TUTORIAL - Spot uv from-illustrator
•
2 likes•1,890 views

This document provides instructions for creating Spot UV files in Adobe Illustrator: 1. Create a new Spot color swatch named "Spot UV" with Black at 100% and CMY at 0% then select elements to apply it to. 2. Copy the selected elements and paste in front to create duplicates above the originals. Change the new selection to the Spot UV swatch. 3. Check the "Overprint Fill" and "Overprint Stroke" attributes if needed, then save as a PDF and use Acrobat's Output Preview to check the separations with "Simulate Overprinting" turned on or off.
Report
Share
Report
Share
Download to read offline

Recommended
Recommended
More Related Content
Similar to TUTORIAL - Spot uv from-illustrator
Similar to TUTORIAL - Spot uv from-illustrator (8)
Photo shop cs5-watercolor-painting-effect-tutorial
Photo shop cs5-watercolor-painting-effect-tutorial
Adobe Illustrator CS5 Part 2 : Vector Graphic Effects
Adobe Illustrator CS5 Part 2 : Vector Graphic Effects
Recently uploaded
Recently uploaded (20)
Software Architecture - Architecture Styles and Patterns-1.pdf
Software Architecture - Architecture Styles and Patterns-1.pdf
Abortion pills in Kuwait 🚚+966505195917 but home delivery available in Kuwait...
Abortion pills in Kuwait 🚚+966505195917 but home delivery available in Kuwait...
ECHOES OF GENIUS - A Tribute to Nari Gandhi's Architectural Legacy. .pdf
ECHOES OF GENIUS - A Tribute to Nari Gandhi's Architectural Legacy. .pdf
Abortion pills in Riyadh +966572737505 <> buy cytotec <> unwanted kit Saudi A...
Abortion pills in Riyadh +966572737505 <> buy cytotec <> unwanted kit Saudi A...
Edward Boginsky's Trailblazing Contributions to Printing
Edward Boginsky's Trailblazing Contributions to Printing
Spring Summer 2026 Inspirations trend book Peclers Paris
Spring Summer 2026 Inspirations trend book Peclers Paris
如何办理(Columbia College毕业证书)纽约市哥伦比亚大学毕业证成绩单本科硕士学位证留信学历认证
如何办理(Columbia College毕业证书)纽约市哥伦比亚大学毕业证成绩单本科硕士学位证留信学历认证
In Saudi Arabia Jeddah (+918761049707)) Buy Abortion Pills For Sale in Riyadh
In Saudi Arabia Jeddah (+918761049707)) Buy Abortion Pills For Sale in Riyadh
Solutions For Social Media App Development (1).pptx
Solutions For Social Media App Development (1).pptx
18+ Young ℂall Girls Vadodara Book Esha 7427069034 Top Class ℂall Girl Serviℂ...
18+ Young ℂall Girls Vadodara Book Esha 7427069034 Top Class ℂall Girl Serviℂ...
TUTORIAL - Spot uv from-illustrator
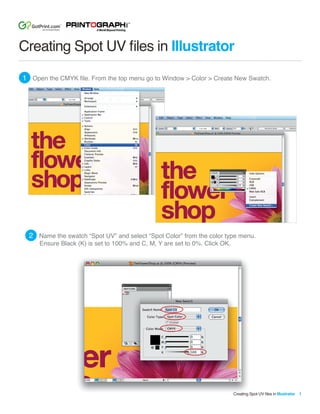
- 1. Your Promotional Experts Creating Spot UV files in Illustrator C = 75 M=0 Y = 100 K = 25 C = 50 M=0 Y = 100 K=0 1 Open the CMYK file. From the top menu go to Window > Color > Create New Swatch. 2 Name the swatch “Spot UV” and select “Spot Color” from the color type menu. Ensure Black (K) is set to 100% and C, M, Y are set to 0%. Click OK. Creating Spot UV files in Illustrator 1
- 2. 3 Select all the elements to which you would like Spot UV applied. From the top menu, go to Edit > Copy then “Paste in Front”. This will create a duplicate of the selection on top of the original. 4 Open color palette and change selection to “Spot UV”. Your Promotional Experts Creating Spot UV files in Illustrator 2
- 3. 5 From the top menu, go to Window > Attributes and check “Overprint Fill”. If there is a stroke, that must be set to “Overprint Stroke” as well. 6 Save as a PDF and open in Adobe Acrobat to check separations using “Output Preview”. Go to Advanced > Print Production > Output Preview and check “Simulate Overprinting”. Preview with spot turned off to show CMYK only. Your Promotional Experts Preview with only spot turned on. Creating Spot UV files in Illustrator 3