
Recommended
More Related Content
Similar to Elektor's Q-Watt Audio Power Amp Delivers Over 200 Watts with Low Distortion
Similar to Elektor's Q-Watt Audio Power Amp Delivers Over 200 Watts with Low Distortion (20)
Recently uploaded
Recently uploaded (20)
Elektor's Q-Watt Audio Power Amp Delivers Over 200 Watts with Low Distortion
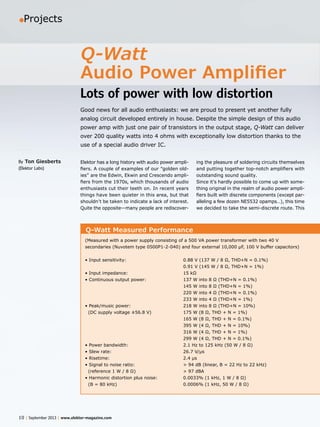
- 1. •Projects 10 | September 2013 | www.elektor-magazine.com Elektor has a long history with audio power ampli- fiers. A couple of examples of our “golden old- ies” are the Edwin, Ekwin and Crescendo ampli- fiers from the 1970s, which thousands of audio enthusiasts cut their teeth on. In recent years things have been quieter in this area, but that shouldn’t be taken to indicate a lack of interest. Quite the opposite—many people are rediscover- ing the pleasure of soldering circuits themselves and putting together top-notch amplifiers with outstanding sound quality. Since it’s hardly possible to come up with some- thing original in the realm of audio power ampli- fiers built with discrete components (except par- alleling a few dozen NE5532 opamps…), this time we decided to take the semi-discrete route. This By Ton Giesberts (Elektor Labs) Good news for all audio enthusiasts: we are proud to present yet another fully analog circuit developed entirely in house. Despite the simple design of this audio power amp with just one pair of transistors in the output stage, Q-Watt can deliver over 200 quality watts into 4 ohms with exceptionally low distortion thanks to the use of a special audio driver IC. Q-Watt Measured Performance (Measured with a power supply consisting of a 500 VA power transformer with two 40 V secondaries (Nuvotem type 0500P1-2-040) and four external 10,000 μF, 100 V buffer capacitors) • Input sensitivity: 0.88 V (137 W / 8 Ω, THD+N = 0.1%) 0.91 V (145 W / 8 Ω, THD+N = 1%) • Input impedance: 15 kΩ • Continuous output power: 137 W into 8 Ω (THD+N = 0.1%) 145 W into 8 Ω (THD+N = 1%) 220 W into 4 Ω (THD+N = 0.1%) 233 W into 4 Ω (THD+N = 1%) • Peak/music power: 218 W into 8 Ω (THD+N = 10%) (DC supply voltage ±56.8 V) 175 W (8 Ω, THD + N = 1%) 165 W (8 Ω, THD + N = 0.1%) 395 W (4 Ω, THD + N = 10%) 316 W (4 Ω, THD + N = 1%) 299 W (4 Ω, THD + N = 0.1%) • Power bandwidth: 2.1 Hz to 125 kHz (50 W / 8 Ω) • Slew rate: 26.7 V/µs • Risetime: 2.4 µs • Signal to noise ratio: > 94 dB (linear, B = 22 Hz to 22 kHz) (reference 1 W / 8 Ω) > 97 dBA • Harmonic distortion plus noise: 0.0033% (1 kHz, 1 W / 8 Ω) (B = 80 kHz) 0.0006% (1 kHz, 50 W / 8 Ω) Q-Watt Audio Power Amplifier Lots of power with low distortion
- 2. Q-Watt Audio Power Amp www.elektor-magazine.com | September 2013 | 11 0.006% (20 kHz, 50 W / 8 Ω) 0.0047% (1 kHz, 1 W / 4 Ω) 0.0009% (1 kHz, 100 W / 4 Ω) 0.009% (20 kHz, 100 W / 4 Ω) • Intermodulation distortion: 0.002% (1 W / 8 Ω) (50 Hz : 7 kHz = 4 : 1) 0.0009% (50 W / 8 Ω) 0.003% (1 W / 4 Ω) 0.0026% (100 W / 4 Ω) • Dynamic IM distortion: 0.0033% (1 W / 8 Ω) ((3.15 kHz square wave) + 0.0022% (50 W / 8 Ω) 15 kHz sine wave:) 0.0045% (1 W / 4 Ω) 0.0027% (100 W / 4 Ω) • Damping factor: 560 (1 kHz / 8 Ω) 311 (20 kHz / 8 Ω) • Efficiency: 70.6% (8 Ω, THD+N = 0.1%) (DC supply) 72.5% (8 Ω, THD+N = 1%) 68.5% (4 Ω, THD+N = 0.1%) 70.5% (4 Ω, THD+N = 1%) • DC protection: +0.55 V / -0.86 V • DC output offset: 0.2 mV (max. 0.6 mV) • Switch-on delay: 6 s
- 3. •Projects 12 | September 2013 | www.elektor-magazine.com Background It all started with the Measurement Filter for Class-D (amplifiers) we published in our July/ August edition in 2011 [1]. We developed this filter at Elektor Labs so that we could measure has the advantage of easy DIY construction, and it results in a very compact design. With a care- ful choice of components, it’s possible to create a power amplifier with outstanding specs and sound quality with this approach. T1 BD 139 T4 MG6330-R T5 MG9410-R T3 MJE15033 P1 470R R10 0R2 R7 220R R6 1k2 5 4 2 10 3 13 14 15 6 IC1 LME49811 T2 MJE15032 R9 100R R8 100R L1 C4 100n C6 100n C7 100n 100V C8 4700u R4 15k R3 390R R2 15k R5 8k2 R1 390R C2 1n +V -V R17 15k R18 15k 0W5 D1 15V +V -V 0W5 D2 15V 1 2 K1 RE1B RE1A LS1 C1 4u7 +15V 100V C12 10u 100V C13 10u 3 2 6 8 1 7 4 IC2 OPA177 C10 2u2 R14 220k R16 10M R15 10M C11 33n R12 3R9 R11 0R2 R29 1k +V T10 D5 1N4148 R28 1k2 R26 820k R25 820k T9 R27 68k 100V C16 10u 5 x 2N5550 16V C15 220u R23 15k T7 T8 R24 1M RE1=RT314048 +15V -15V R30 15k D6 D3 K7 D4 250V C14 1u 0 R19 27k R20 1k2 1N4004 1 2 4 5 6 IC3 4N25 40V 40V 56V 56V T6 T6 ... T10 = R21 470k R22 15k C5 47n R13 3R9 C3 5-57p 1 2 K2 1 2 K3 1 2 K5 1 2 K4 1 2 K6 LS+ LS- 100V C9 4700u 2 x 110656 - 11 Figure 1. Schematic of the Elektor Q-Watt audio power amplifier. Despite the simplicity of the design, the specs of this amplifier are truly excellent.
- 4. Q-Watt Audio Power Amp www.elektor-magazine.com | September 2013 | 13 linear up to several ampères (slightly less with the PNP version), which is a good starting point for a linear output stage. Similar requirements apply to the driver transistors (T2 and T3). The selected types—MJE15032 (NPN) and MJE15033 (PNP)—are suitable for voltages up to 250 V, and here as well the DC gain characteristic is fairly lin- ear. The driver and output transistors have fairly high transition frequencies: 30 MHz for the MJE devices, 60 MHz for the MG6330-R and 35 MHz for the MG9410-R. The quiescent current setting is handled by an ordinary BD139. Audio version When one of our foreign editors saw the design, his first question was whether it could be adapted for use as a ‘normal’ audio amplifier. That would attract a much larger audience than a measure- ment amplifier for high output voltages. The answer was that it was certainly possible, and in fact it wouldn’t require many changes to the original design. Some of the component values would have to be adjusted, and the supply volt- age would have to be reduced. The end result is the schematic diagram shown in Figure 1. With a lower supply voltage (±56 V, provided by a transformer with two 40 VAC secondaries), the power amplifier can deliver a lot of power with just one pair of complementary output transis- tors—more than 300 watts of music power into 4 ohms. In addition to the LME49811 (IC1), the power amplifier consists of four transistors (T2–T5), a quiescent current control network with one tran- sistor (T1), and a few glue components. The negative feedback network R4/R3 is dimen- sioned to provide an input sensitivity of approxi- mately 1 Vrms for a maximum output amplitude of ±55 V with a supply voltage of ±60 V. This input voltage can easily be provided by any modern preamplifier. The resistor values are chosen to ensure that the dissipation of R4 remains just below 0.25 W at maximum output power. The values of resistors R1 and R2 are the same as those of R3 and R4 to maintain the best pos- sible common-mode rejection at the input of the LME49811. The resulting input impedance is approximately 15 kΩ. The bandwidth of the input signal is limited at the low end by capac- itor C1 (with a theoretical corner frequency of 2.2 Hz) and at the high end by C2. In addition to the output voltages of class-D amplifiers up to 70 Vrms. However, we never managed to test the filter with voltages at this level due to the lack of a suitable power amplifier. When there’s a prob- lem, you can always trust Elektor designers to come up with a solution, so they started work- ing on the design of a fully discrete high-volt- age amplifier with 23 high-voltage transistors (MJE340, MJE350, MPSA42 and MPSA92), which was intended to operate from a balanced ±110 V supply. The design turned out to be extremely complicated, and things got a bit out of hand. Although a PCB was designed for an initial pro- totype, we had to ask ourselves whether it was worth spending so much effort just to test a filter. The design specifications for the amplifier were truly impressive. It had to be able to deliver an output signal of 70 Vrms up to 20 kHz with extremely low distortion. The minimum imped- ance of the measurement filter is 1 kΩ, resulting in peak output current requirement of 100 mA (preferably even more). We accordingly decided to look for a simpler alter- native, such as an IC that could deliver such a high output voltage with sufficient power. Our search turned up the LME49811 from Texas Instruments. The title of the datasheet, “Audio Power Amplifier Series—High Fidelity 200 Volt Power Amplifier Input Stage with Shutdown”, sounded very promising. The stated specifications were excellent, but it wasn’t clear to us whether the measured performance figures on the data- sheet were obtained with or without an exter- nal power stage. However, it certainly appeared to be worthwhile to develop an amplifier based on this IC. The right transistors The next step was to select the power transis- tors (T4 and T5) for the power amplifier. One of the key characteristics of power transistors for use in audio amplifiers is a large safe oper- ating area (SOA). We ultimately found a couple of very nice devices at Semelab: the MG6330-R (NPN) and the complementary MG9410-R. These devices can handle more than 600 mA collector current at a collector–emitter voltage of 200 V. This condition occurs when the amplifier is driven to maximum output amplitude with no load. This allows the amplifier to be configured for class-AB operation with a relatively large class-A region. The DC gain of these power transistors is fairly
- 5. •Projects 14 | September 2013 | www.elektor-magazine.com The opamp in the DC correction circuit has its own ±15 V supply voltages tapped off from the main supply rails with the aid of a few resistors and Zener diodes (R17, R18, D1 and D2). The values of R17 and R18 must be adjusted if a lower supply voltage is used. In this connection an additional current of 1.5 mA drawn from the +15 V rail by pin 2 of IC1 must also be taken into account. A Zobel network (R13-C5) is included at the out- put of the amplifier. It ensures that the ampli- fier remains stable with an inductive load or no load. Coil L1 provides additional protection against capacitive loads, and resistor R12 attenuates any oscillations or overshoots. On the PCB, R12 is fitted inside L1 to save space. Two large buffer capacitors (4700 µF each) are also fitted on the circuit board. The selected types have low equivalent series resistance (ESR). The circuit additionally requires an external power transformer, bridge rectifier and four power sup- ply capacitors rated at 10,000 µF, 100 V each. We chose a transformer with two 40-V second- ary windings. For the prototype at Elektor Labs we used a low-cost 500 W transformer, with the result that the output voltage drops a fair amount with a relatively large load. Somewhat higher power output than stated in the specifications would be possible if you use a transformer with better voltage stability. suppressing any HF noise that may be present, this limits the slew rate to prevent the ampli- fier from experiencing problems with excessively steep input signals. Only one capacitor (C3) is needed for the frequency compensation of the IC. To make it easy for users to experiment with the amplifier, we use a trimmer with PTFE (TeflonTM) dielectric for this purpose (Teflon is an excellent choice for audio circuits). The PCB is also suit- able for silver mica capacitors with a lead pitch of 5.9 mm. During testing a trimmer setting of one- third of the rated value (approximately 18 pF) yielded the best measurement results. A feedback loop built around IC2 stabilizes the DC output voltage of the amplifier. It compares the output voltage to the ground reference and corrects it by injecting a very low current into the non-inverting input of the LME49811 (pin 4). The non-inverting input is used for this correction because the impedance at this input is higher than at the inverting input, whose impedance is largely dependent on the value of R3 (which is only 390 Ω). The response time is a few hundred milliseconds. We choose an OPA177 for the con- trol amplifier on account of its outstanding DC specs (maximum bias current 1.8 nA, maximum offset 60 µV). The resulting maximum theoretical offset voltage at the output of the power amplifier is 0.6 mV, which is negligible for the connected loudspeakers. The output offset voltage of our prototype was just 0.2 mV. Supply lines Very high peak currents occur in power amplifiers. To buffer the supply voltage, two electrolytic capacitors with low ESR are mounted on the PCB adjacent to the output transistors, in addition to the external capacitors in the power supply. With an audio amplifier, it is essential that the supply lines to and on the board do not cause magnetic field interference, which can increase distortion by inducing currents in the negative feedback loop and other parts of the amplifier. One way to suppress this undesirable effect is to route the supply lines as close together as possible and to decouple them as close as possible to the output stage. Due to the class AB configuration of this amplifier, only unidirectional currents flow through the supply tracks on the board. Routing the positive and negative supply tracks as close together as possible causes the resulting magnetic field to be nearly sinusoidal, so it causes less distortion. With a double-sided board, these two tracks can be placed on opposite sides of the board exactly aligned to each other. These design considerations are very important for power amplifiers with very low distortion figures. Single-point grounding is also very important in this regard. Here the ground point is located next to C5. The ground lines of the input, negative feedback, Zobel network, loudspeaker output and power supply all meet at this point. The PCB is specifically designed for use as a monaural amplifier (monoblock). For a stereo amplifier you can simply build two of the boards and mount them in an enclosure together with the power supply. You should preferably use two separate power supplies (one for each channel).
- 6. Q-Watt Audio Power Amp www.elektor-magazine.com | September 2013 | 15 conducting and discharge C16 decreases with a decreasing DC voltage at the output. If there is a positive DC offset of more than 0.55 V at the output, T8 will conduct and disengage the relay via T9/T10. Transistor T7 responds similarly if there is a negative DC offset greater than 0.85 V. In addition, both transformer secondary voltages are monitored so that the relay can be disen- gaged immediately when the power transformer is switched off, or a fuse blows. To avoid creating a ground loop, the secondary transformer voltages are monitored using optocoupler IC3, which feeds its output signal to T6 in the protection circuit. Diodes D3 and D4 in combination with capacitor C14 act as a full-wave rectifier for the LED in the optocoupler. The voltage divider R4/R3 is dimen- sioned so that the LED goes dark immediately if either of the transformer voltages drops out. Capacitor C16 in combination with resistors R25 and R26 determines the time delay for engaging the relay after the supply voltage is switched on (approximately 6 seconds). The relay used here has a rated coil voltage of 48 V. It is connected to the 56 V supply rail via a 1 kΩ series resistor (R29). If you have trouble finding a 48 V relay, you can use a 24 V relay instead. In that case R29 must be a 1 W type with a value of 2.2 kΩ. The protection circuit is dimensioned for a supply voltage of ±56 V. If you use a lower supply volt- age, some of the resistor values will have to be Protection We naturally hope that the amplifier will always work properly, but any electronic circuit can fail (especially audio power amplifiers, as we know from experience). Especially at full output power, the temperature of the output transistors can rise sharply (to above 70 °C), which can dramat- ically shorten the lifetime of these semiconduc- tor devices. Our experience is that when tran- sistors fail, they usually fail shorted. If a fuse doesn’t blow somewhere in this case, a hefty DC voltage will be present at the amplifier out- put, which is naturally not the right way to treat your precious loudspeakers. For this reason, DC protection is actually indispensable in any audio power amplifier. After the amplifier is switched on, it takes a few seconds for the DC voltage at the output to sta- bilize. As usual, the loudspeaker is connected to the output through a relay. This relay may close only when the supply voltage for the amplifier is present, and there is no DC voltage at the output of the amplifier. In this design, only the positive supply voltage is monitored by using it as the supply voltage for the protection circuitry built around T6 to T10. If there is no supply voltage, it is simply impossible to energize the relay coil. DC protection is provided by a pair of transistors and a low-pass filter (R23/C15) with a time con- stant of 3.3 s. That may seem like a fairly long time, but the time required for T7 or T8 to start Cooling Adequate cooling must be provided for the driver transistors, output transistors and IC1. For the IC this consists of a piece of 2-mm aluminum sheet metal measuring 2.5 x 8 mm, which is mounted on the IC with a pair of screws and nuts. This heatsink is sufficient to handle the 2 W or so dissipated by the IC with a supply voltage of approximately ±56 V. Choosing the heatsink for the output transistors involves a tradeoff between the size of the heatsink and the estimated average output power of the amplifier. A very large heatsink or forced air cooling would be necessary to handle continuous full output power, but this occurs very rarely in practice. We therefore decided to look for a heatsink that is big enough to handle the full output power for a short while (several minutes). We found a good match in a heatsink from Fischer Elektronik, Germany. It’s not exactly small, but there’s no getting around a low thermal resistance if you want to avoid overheating with high output power. The selected heatsink has a height of 10 cm and a thermal resistance of 0.7 K/W. To give you an idea of what this means, with a regulated supply voltage of ±56.8 V the amplifier can deliver nearly 300 W into a 4 Ω load with 0.1% distortion. With an efficiency of 68.5%, this means that it must dissipate about 137 W. With a continuous sine-wave signal, at full output power the temperature would rise to more than 90 degrees above the ambient temperature. The emitter resistors R10 and R11 (5 W types) would also be on the ragged edge at this point. However, as already mentioned this will never happen in normal use with music signals. By the way, there is virtually no manufacturer of audio amplifiers that dimensions their heatsinks for continuous full power.
- 7. •Projects 16 | September 2013 | www.elektor-magazine.com COMPONENT LIST Resistors (5%, 0.25W, unless otherwise stated) R1,R3 = 390Ω R2,R4,R17,R18,R22,R23,R30 = 15kΩ R5 = 8.2kΩ R6,R20,R28 = 1.2kΩ R7 = 220Ω R8,R9 = 100Ω R10,R11 = 0.2Ω 1% 5W, low inductance (Vishay Dale LVR05R2000FE73) R12,R13 = 3.9Ω 5% 5W R14 = 220kΩ R15,R16 = 10MΩ R19 = 27kΩ R21 = 470kΩ R24 = 1MΩ R25,R26 = 820kΩ R27 = 68kΩ R29 = 1kΩ P1 = 470Ω trimpot, horizontal Capacitors C1 = 4.7μF 63V, MKT (metal/polyester), 5mm or 7.5mm pitch C2 = 1 nF/400 V, MKT (metal/polyester), 5mm or 7.5mm pitch C3 = trimmer 5-57pF 250V, horizontal (Vishay BC- components BFC280908003) C4,C6,C7 = 100nF 100V, 5mm or 7.5mm pitch C5 = 47nF 400V, 5mm or 7.5mm pitch C8,C9 = 4700µF 100V, 10mm pitch, snap-in, 30mm diam. (Panasonic ECOS2AP472DA) C10 = 2.2µF 63V, 5mm or 7.5mm pitch C11 = 33nF 63V, 5mm or 7.5mm pitch C12,C13,C16 = 10µF 100V, 2.5mm pitch, 6.3mm diam. C14 = 1µF 250V, 2.5mm pitch, 6.3mm diam. C15 = 220µF 16V bipolar, 5mm pitch, 10mm diam. Inductor L1 = 450nH: 13 turns 14AWG (1.5 mm) enameled copper wire, 7mm inside diam. Semiconductors D1,D2 = 15V 0.5W zener diode D3,D4 = 1N4004 D5 = 1N4148 D6 = LED, red, 3mm T1 = BD139 T2 = MJE15032 T3 = MJE15033 T4 = MG6330-R T5 = MG9410-R T6–T10 = 2N5550 IC1 = LME49811TB/NOPB IC2 = OPA177GPG4 IC3 = 4N25 Miscellaneous K1 = 2-pin pinheader, 0.1’’ pitch K2–K6 = Faston (blade) plug, PCB mount, 0.2’’ pitch K7 = 3-way PCB screw terminal block, 5mm pitch RE1 = relay, PCB mount, SPCO, 16A, 48V coil, 5.52kΩ (TE Connectivity/Schrack type RT314048) TO-220 isolating washer for T1, T2, T3, Kapton MT film, 0.15mm, 6kV TO-3P isolating washer for T4,T5, Kapton MT film, 0.15mm, 6kV TO-220 3-mm isolating bush for T2,T3 Heatsink, 0.7K/W (e.g. Fischer type SK 47/100 SA) Heatsink for IC1, dim. 25x 80 mm, 2 mm thick aluminum PCB # 110656-1, see www.elektor.com/110656 Power Supply (for one amplifier) Power transformer: sec. 2x40V, 500VA (e.g. Nuvotem 0500P1-2-040 for 230 VAC mains) Bridge rectifier: 200V, 35A (e.g. GBPC3502) (Fairchild) Four 10,000μF, 100V electrolytic capacitors (2 in par- allel on each supply rail) Figure 2. The PCB holds the entire power amplifier, including buffer capacitors and protection circuitry.
- 8. Q-Watt Audio Power Amp www.elektor-magazine.com | September 2013 | 17 the package. Make the second bend at the level of the holes in the PCB. Figure 4 shows what it should look like. The insulator pads for the tran- sistors can be temporarily placed between the transistors and the heatsink to determine the exact position of the second bend. Actually this is not critical unless you use ceramic insulator pads. Secure the transistors firmly to the heat- sink (with the insulator pads in place) before soldering the leads to the board. Next comes IC1. Start by attaching a heatsink plate, consisting of a piece of 2-mm aluminum sheet metal measuring 2.5 x 8 mm, to the IC with a pair of screws and nuts. Mount the heatsink so that it is a bit above the board when the IC is fit- ted, to avoid contact with R1, R4 and R5. Caution: adjusted. This also applies to the resistors in the negative feedback network if you want to main- tain an input sensitivity of around 1 V. Bear in mind that the gain factor of the LME49811 must be at least 20 (26 dB). Construction Figure 2 shows the circuit board layout designed for this amplifier. As promised by the title of this article, everything has been kept nice and compact. Building the board is certainly not difficult, but there are a few points that require attention. Most of the components can be soldered directly on the board, with the exception of T1–T5, IC1 and the supply capacitors C8 and C9. Blade connec- tors (Faston 6.3 x 0.8 mm) are soldered to the PCB for connecting the supply voltage and the loudspeaker. Coil L1 consists of 13 turns of AWG #14 (approx. 1.5 mm) enameled copper wire wound on a 7-mm drill bit. Leave the ends long enough to allow the coil to be mounted a small distance above the board. The coil leads must be bent to point directly away from the middle of the coil. Place resistor R12 inside coil L1 and bend its leads so they line up with the corresponding holes in the PCB. Fit these two components on the board at the same time, and when soldering the leads ensure that the coil is raised a bit above the board surface and the resistor is properly located in the middle of the coil (see Figure 3). Before going any further, you need to know what enclosure you will be using, so that you can deter- mine how to secure the heatsink and the circuit board in the enclosure. The most convenient solution is to attach two aluminum brackets to the heatsink and use them to secure the circuit board. This way you can still perform tasks on the PCB after the transistors have been mounted on the heatsink. The circuit board must be mounted on the heat- sink so that the leads of the transistors are as close as possible to the corresponding pads on the board. Using needle-nose pliers, form the leads of T1–T5 into shallow S shapes so that the leads project slightly and fit into the holes in the PCB without any mechanical stress. Make the first bend as close as possible to the package. Never bend the leads directly; always place a small metal plate against the pins next to the pack- age to prevent the formation of microcracks in Figure 3. Detail of output coil L1 with power resistor R12 fitted co-axially. Figure 4. The leads of all transistors mounted on the heatsink are formed with two bends so they fit precisely in the corresponding holes in the PCB without mechanical stress.
- 9. •Projects 18 | September 2013 | www.elektor-magazine.com 30 mA when the output relay is engaged. Slowly turn P1 to the right (clockwise) until the current increases by 30 mA (60 mA total). This relatively low quiescent current is more than adequate. The quiescent current will rise slightly as the heat- sink temperature increases. However, it will nor- mally remain below 90 mA. At very high output power levels, the junction temperatures of the two output transistors will rise much faster than the temperature of the heatsink, so the quiescent current transistor will not be able to fully track the change. This causes the quiescent current to rise briefly to several hundred milli-amps, but it declines quickly when the temperature drops again. That’s actually a nice extra feature with this amplifier, since the class A range of the power amplifier effectively increases with the output power level. We hope you have a lot of fun building this com- pact power amplifier, and a lot of listening plea- sure afterwards. (110656-I) More details about this power amplifier are available at www.elektor-projects.com/project/110656- simple-audio-power-amplifier.13247.html Internet Reference [1] Measurement Filter for Class D, Elektor July & August 2011, www.elektor.com/100540 the metallic rear surface of the IC is connected to the negative supply voltage. This means that if you do not use insulated mounting hardware, the heatsink will be at the negative supply volt- age. For safety, we recommend using insulating mounting hardware here. Then solder the IC to the PCB. Just enough space for the heatsink has been kept free on the board (see Figure 5). Bend L1 slightly away from the heatsink. The final task is to mount the two large buffer capacitors C8 and C9. That way they don’t get in the way of earlier activities. Q-Watt on test run Before you connect your Q-Watt amplifier directly to the power supply, you have to set the quies- cent current of the output stage. To do this, first connect two 47 Ω, 5 W power resistors in series with the positive and negative supply voltage terminals. This prevents damage to the ampli- fier circuit if something is wrong, such as a short somewhere. The worst that can happen is that the two power resistors go up in smoke. Another option is to use a regulated power supply with current limiting, but most of us don’t have this sort of supply available for ±56 V. Connect an ammeter in series with the positive supply line. Before switching on the supply voltage, turn P1 fully counterclockwise, and remember to con- nect the secondary windings of the transformer to terminal block K7 on the circuit board. After the power is switched on, the current through the positive supply line should be approximately Figure 5. There’s just enough space on the circuit board for the heatsink that has to be mounted on IC1.
- 10. Q-Watt Audio Power Amp www.elektor-magazine.com | September 2013 | 19 Q-Watt Measured Characteristic Curves Test equipment: Audio Precision System Two Cascade Plus 2722 Dual Domain Plot A THD+N at output power levels of 1 W / 8 Ω and 50 W / 8 Ω, B = 80 kHz. The 1 W curve consists primarily of noise (THD+N = 0.0034%). The distortion does not rise above the noise until just before 20 kHz (THD+N = 0.0052%). At 50 W (which is exactly 20 V, so the results can be compared readily to the performance figures on the LME49811 datasheet) the noise floor is much lower relative to the output voltage. Here you can see that the distortion increases earlier at higher frequencies. At 1 W the distortion is still under the noise. The distortion above 10 kHz is nearly the same as the 1 W curve. The curve for 100 W is not shown here because it is virtually the same as the 50 W curve. The distortion is very low at all output power levels until just before the clipping level. Plot B THD+N versus output power (1 kHz / 8 Ω, B = 22 kHz). The measurement bandwidth was reduced here to improve the visibility of the rise in distortion. Here again you can see that the distortion remains very low, while the noise floor drops as the output voltage rises. The clipping point is reached at 127 W, and the distortion rises rapidly above this point. At 137 W the THD+N reaches 0.1%, which is still a usable level for good sound quality. If you really overdrive the amplifier, it can deliver as much as 174 W with 10% distortion. Here it should be noted that with the low-cost power transformer used for the prototype, the supply voltage drops significantly at full output power (at 10% THD it falls to ±51.5 V). Even more output power would be possible with a transformer that provides a more stable supply voltage. Plot C FFT of a 1 kHz signal at 50 W / 8 Ω (20 V rms). The levels of the residual harmonics in the supply voltage and the harmonics of the 1 kHz signal are very low, and in practice they would be inaudible. The third harmonic is at –113 dB, equivalent to just 0.0002%. The THD+N at this power level is 0.0006% (B = 80 kHz). 0.0006 1 0.001 0.002 0.005 0.01 0.02 0.05 0.1 0.2 0.5 % 20 20k 50 100 200 500 1k 2k 5k 10k Hz 110656 - 12 0.0003 10 0.001 0.002 0.005 0.01 0.02 0.05 0.1 0.2 0.5 1 2 5 % 1m 300 2m 5m 10m 20m 50m 100m 200m 500m 1 2 5 110656 - 13 10 20 50 100 W -160 +0 -150 -140 -130 -120 -110 -100 -90 -80 -70 -60 -50 -40 -30 -20 -10 d B r A 10 100k 20 50 100 200 500 1k 2k 5k 10k 20k 50k Hz 110656 - 14 A B C