SlideShare a Scribd company logo
1 of 9
Download to read offline
PLANT TISSUE CULTURE
Background
Plant research often involves growing new plants in a controlled environment.
These may be plants that we have genetically altered in some way or may be
plants of which we need many copies all exactly alike. These things can be
accomplished through tissue culture of small tissue pieces from the plant of
interest. These small pieces may come from a single mother plant or they may
be the result of genetic transformation of single plant cells which are then
encouraged to grow and to ultimately develop into a whole plant. Tissue
culture techniques are often used for commercial production of plants as well
as for plant research.
Tissue culture involves the use of small pieces of plant tissue (explants) which
are cultured in a nutrient medium under sterile conditions. Using the
appropriate growing conditions for each explant type, plants can be induced to
rapidly produce new shoots, and, with the addition of suitable hormones new
roots. These plantlets can also be divided, usually at the shoot stage, to
produce large numbers of new plantlets. The new plants can then be placed in
soil and grown in the normal manner.
Many types of plants are suitable for use in the classroom. Cauliflower, rose
cuttings, African violet leaves and carnation stems will all easily produce clones
(exact genetic copies) through tissue culture. Cauliflower florets in particular
give excellent results since they can be grown into a complete plant in the
basic tissue culture media, without the need for additional growth or root
hormones. Green shoots are generally observable within three weeks, and
roots develop within six weeks.
The most important part of this activity, however, is to maintain as sterile an
environment as possible. Even one fungal spore or bacterial cell that comes
into contact with the growth media will rapidly reproduce and soon completely
overwhelm the small plant piece that you are trying to clone.
Objectives
1. To understand a procedure that is often used to propagate many plants of
the same genetic background.
2. To understand the importance of sterile techniques.
Materials
1 Vial of Murashige Skoog (MS) media. (If you wish to make up your own
growing medium you could use the recipe for the Murashige medium
given at the end of this section.)
1 L sterile distilled water
10 g of agar/L
30 g sucrose/L
1.5 L or 2 L container in which to prepare the growth medium
small amounts of 1M NaOH and 1M HCl to adjust the pH of the media
60 flat bottom culture tubes with closures.
Glass aquarium or box lined with plastic
Plastic sheet to cover the top of the aquarium
Adhesive tape
10% Bleach in a spray bottle
70% alcohol in a spray bottle
Forceps or tweezers
Gloves
Cutting equipment such as a scalpel blade or razor blade
2 bottles of sterile distilled water (purchase at the grocery store)
Pressure cooker
Your chosen plant (cauliflower, rose, African violet or carnation)
paper towel for cutting on or sterile petri dishes if available
Beaker or jar in which to wash the plant material
Detergent-water mixture - 1ml detergent per liter of water
Bleach sterilizing solution - dilute commercial bleach (5-6% sodium
hypochlorite) to a final concentration of 1-2% sodium hypochlorite in
distilled water in a large beaker or jar.
2 or 3 beakers or jars of sterile water
A well-lit area away from direct sunlight or use full-spectrum gro-lights
Hormones such as BAP (benzylaminopurine) and NAA (naphthalene acetic
acid) to stimulate growth and root development,
respectively. (Commercial rooting hormone solutions and powders are
also available from hardware stores.)
Murashige Minimal Organics Medium recipe
(MMOM)
Inorganic salts mg/L
NH4NO3 1,650.00
KNO3 1,900.00
CaCl2 (anhydrous) 332.20
MgSO4 (anhydrous) 180.70
KH2PO4 170.00
Na2EDTA 37.25
FeSO4.7H2O 27.80
H3BO3 6.20
MnSO4.H2O 16.90
ZnSO4.H2O 5.37
KI 0.83
Na2MoO4.2H2O 0.25
CuSO4 (anhydrous) 0.016
CoCl2 (anhydrous) 0.014
Sucrose 30,000.00
i-Inositol 100.00
Thiamine.HCl 0.40
The pH is adjusted to 5.7 using 0.1 M HCl or NaOH.
Procedure
Preparation and sterilization of growing medium (when not provided
pre-poured)
These steps will make 1 L of growth medium which is enough to prepare about
65 growing tubes.
1. Dissolve the MS mixture in about 800 ml of distilled water. Stir the
water continuously while adding the salt mixture. Add 30 g sugar and
stir to dissolve. Adjust pH to 5.8 using 1M NaOH or 1M HCl as necessary
while gently stirring. Add distilled water to make the total volume up to
1 L.
2. Weigh out 10 grams of agar and add it to the MS solution. Heat the
solution gently while stirring until all the agar has dissolved.
3. Pour the still warm medium into the polycarbonate tubes to a depth of
about 4 cm which will use about 15ml of media per tube.
4. Place the tubes (with lids sitting on the tubes but not tightened) in a
pressure cooker and sterilize for 20 minutes. Cool the pressure cooker,
then remove the tubes and tighten the lids. Alternatively the tubes can
be placed in boiling water for 30 minutes, but make sure that none of
the water is able to enter the tubes.
NOTE: If you wish to use plants other than cauliflower you need to prepare two
different media which contain plant hormones necessary to stimulate
development of differentiated tissues. The first one should contain a cytokinin
such as BAP which promotes shoot formation and the second one a rooting
hormone such as NAA or store bought rooting hormone. To do this, prepare the
mixture up until the end of step 2. Keeping the mixture warm so that it does
not solidify, divide it equally into two pre-warmed containers. Each container
can be used to prepare 30 or so tubes as above. The first container should
have BAP added at the rate of 2.0mg/l. The second container should have the
NAA hormone added at the rate of 0.1 mg/L. To do this it is necessary to make
concentrated solutions of both BAP (2.0mg/ml) and NAA (1.0mg/ml) and filter
sterilize them. Add 1ml of the concentrated BAP stock or 100μl of the NAA
concentrated stock to each 1 liter of media that you prepare. If you use
rooting hormone that is purchased from your local hardware or nursery supply
store instead of NAA then just follow the directions before adding to your
media.
Preparation of a sterile transfer chamber and equipment
A classroom transfer chamber can be made from a clean glass aquarium turned
on its side. Scrub the aquarium thoroughly with a 30% bleach solution, making
sure that you wear gloves and do not inhale the fumes. Rinse with sterile
distilled water, turn upside down on a clean counter or paper towels and allow
to dry. Cut holes in a clean plastic sheet to allow arms to reach into the
chamber and reinforce the cut edges with tape if necessary. Tape the clean
plastic sheet over the open side of the aquarium making sure that the arm
holes are located at a convenient height. Plastic sleeves could also be fitted to
these holes if you wish to make it easier to prevent the entry of airborne spores
into the chamber. The finished aquarium chamber can be sterilized by
spraying with 10% chlorox bleach just prior to each use and drying with sterile
paper towel.
Wrap the forceps, scalpels, razor blades, paper towel and gloves (rubber or
surgical) in aluminum foil, seal with tape and sterilize by processing them in a
pressure cooker for twenty minutes. These items can also be sterilized by
placing in an oven at 350o
F for 15 minutes. You can wrap each item separately
or put together a "kit" so that each student will have their own sterile
equipment to use.
Alternatively the forceps and blades can be sterilized by dipping in 10% bleach
and then rinsing in sterile water, or dipping in alcohol and then placing in a
flame, although this is not recommended for use in crowded classrooms. If you
choose to dip in bleach and rinse in sterile water, it is best if fresh solutions
are available for each 3-4 students since the water can easily be contaminated
if care is not used. These liquid containers should only be opened once they
are inside of the sterile chamber.
Plant preparation
Your plant material must first be surface sterilized to remove any bacteria or
fungal spores that are present. We aim to kill all microorganisms, but at the
same time not cause any adverse damage to the plant material.
1. Cauliflower should be cut into small sections of florets about 1 cm
across. If using a rose or other cuttings, cut the shoots into about 5 to 7
cm lengths. Whole African violet leaves can also be used.
2. Wash the prepared plant material in a detergent-water mixture for
about 20 minutes. If trying hairy plant material scrub with a soft brush
(toothbrush). This will help remove fungi etc., and the detergent will
help wet the material and remove air bubbles that may be trapped
between tiny hairs on a plant.
3. Transfer the washed plant material to the sterilizing chlorox
solution. Shake the mixture for 1 minute and then leave to soak for 10-
20 minutes. Carefully pour off the bleach solution using the lid to keep
the plant tissue from coming out and then carefully cap the container.
Note 1: At this point, the tissue is considered sterile. All subsequent rinses
should be done with sterile water, and all manipulations of the tissue
performed with sterile instruments and supplies. Open one container at a time
and never leave the lid off of any container longer than
necessary.
Note 2: Many students will not fully appreciate the importance of carefully
sterilizing explants and so there will be some cultures that become infected
with bacterial or fungal growth. If you do not wish to emphasize this aspect of
the laboratory students can be provided with plant materials that the
instructor has already sterilized prior to use by the class.
Transfer of plant material to tissue culture medium
Use the sterile gloves and equipment for all of these steps.
1. Place the plant material still in the chlorox bleach sterilizing container,
the containers of sterile water, the sterilized forceps and blades, some
sterile paper towel to use as a cutting surface and enough tubes
containing sterile medium into the sterile aquarium. The outside
surfaces of the containers, the capped tubes and the aluminum wrapped
supplies should be briefly sprayed with 70% alcohol before moving them
into the chamber.
2. The gloves can be sprayed with a 70% alcohol solution and hands rubbed
together to spread the alcohol just prior to placing hands into the
chamber. Once students have gloves on and sprayed they must not
touch anything that is outside of the sterile chamber.
3. Carefully open the container with the plant material and pour in enough
sterile water to half fill the container. Replace the lid and gently shake
the container to wash tissue pieces (explants) thoroughly for 2-3 minutes
to remove the bleach. Pour off the water and repeat the washing
process 3 more times.
4. Remove the sterilized plant material from the sterile water, place on
the paper towel or sterile petri dish. Cut the cauliflower into smaller
pieces about 2 to 3 mm across. If using rose cut a piece of stem about 10
mm in length with an attached bud. The African violet leaf can be cut
into small squares about 1-1.5 cm across. Be sure to avoid any tissue
that has been damaged by the bleach, which is apparent by its' pale
color.
5. Take a prepared section of plant material in sterile forceps and place
into the medium in the polycarbonate tube. Cauliflower pieces should
be partly submerged in the medium, flower bud facing up. Rose or
other cuttings should be placed so that the shoots are level with the
medium surface. The African violet leaf pieces should be laid directly
onto the medium surface.
6. Replace the cap tightly on the tube.
Figure 1: The small explant
develops callus which then
produces shoots a few weeks
after being placed into tissue
culture
media
Growing the plants
1. The tubes containing plant sections may be placed in a well-lit area of
the classroom although not in direct sunlight. The shoots will probably
grow more quickly if the explants are placed under fluorescent or grow-
lights to provide at least 12 hours of light per day. The aquarium can be
used as a growth chamber with the lighting about 8-10" overhead. This
will also help maintain a more regular and warm temperature. Ensure
that the temperature does not go over 28o
C. New shoots should develop
within 2 weeks, and should be well advanced in 3 to 4 weeks. Check the
tubes daily and discard any that show signs of infection (before
discarding first sterilize in the pressure cooker or add bleach into the
tube).
2. Roots can appear within 6 weeks on cauliflowers. The roses, African
violet and other cuttings will need to be moved into rooting media for
roots to properly develop. This transfer to the second, rooting media
must be conducted under the same sterile conditions as at the initiation
of the culture. All necessary equipment and the aquarium should be set
up as before and properly sterilized.
3. Working inside the sterile aquarium chamber, remove the cap from the
culture tube. There will usually be several shoots that have arisen from
each explant. These shoots should be carefully separated by gently
removing the whole explant from the media with sterile forceps and
then separating the shoots by gently pulling them apart using two pairs
of forceps. Each shoot should then be placed into a tube of rooting
media and the bottom of the shoot pushed into the media so that good
contact is made. The cap is replaced and the shoots are then allowed to
grow as in step 1 until roots are formed, usually within 2-3 weeks.
Potting the clones
Once roots are well formed the plants are ready to be transferred into soil.
Figure 2: Roots are fully developed prior to moving plants to pots of soil
1. Each plant should be carefully removed from its tube of media and
planted into a small pot containing a clean light potting mix. Gently
wash off all the agar medium prior to planting. The plants will still need
to be protected at this stage since they are not accustomed to the drier
air of the classroom when compared to the moist environment of the
tube of media.
2. Place all of the pots onto a tray and cover lightly with a plastic dome or
tent. Place the plants in an area with 12-16 hours of light (either natural
or artificial) but not direct sunlight.
3. After a week the cover can be gradually removed and the plants
acclimated to stronger light and drier atmospheric conditions.
4. You now have a collection of plants in your classroom that are
genetically exactly the same. You could use these plants to carry out
other experimental tests knowing that one of the main variables in the
experiment has been eliminated. Some of these tests could include
looking at plant responses to low light levels, to drought or to saline soil
conditions. (see activity 7)
Student Activity
1. Tissue culture uses a small piece of tissue from a mother plant to
grow many new copies of the original plant. What is the term used
to refer to this small piece of tissue?
2. What are some of the plants that we might use for tissue culture?
3. Why is tissue culture used for propagation of some plants rather than
just planting seeds?
4. What is a sterile environment?
5. Why is a sterile environment important in tissue culture?
6. How did you or your teacher sterilize the instruments that were used
in this tissue culture activity?
7. Could we sterilize the plant tissue in the same manner? Why or why
not?
8. What happens if you open your sterile plant container when it is not
inside a sterile environment?

More Related Content

Similar to PlantTissueCulture.pdf

Sterility testing products (solids, liquids, ophthalmic and other sterile pro...
Sterility testing products (solids, liquids, ophthalmic and other sterile pro...Sterility testing products (solids, liquids, ophthalmic and other sterile pro...
Sterility testing products (solids, liquids, ophthalmic and other sterile pro...Ms. Pooja Bhandare
 
part6-230110081003-34eff4a5 (1).pdf
part6-230110081003-34eff4a5 (1).pdfpart6-230110081003-34eff4a5 (1).pdf
part6-230110081003-34eff4a5 (1).pdfimshrikant
 
Isolation of microbes.ppt
Isolation of microbes.pptIsolation of microbes.ppt
Isolation of microbes.pptZoyaAli844417
 
organ culture.pptx
organ culture.pptxorgan culture.pptx
organ culture.pptxReemaNaik9
 
Plant tissue culture
Plant tissue culturePlant tissue culture
Plant tissue cultureMegha Shah
 
Spawn production
Spawn productionSpawn production
Spawn productionPankajs1
 
Production technology for bioagents and biofertilizers 2
Production technology for bioagents and biofertilizers 2Production technology for bioagents and biofertilizers 2
Production technology for bioagents and biofertilizers 2BHUMI GAMETI
 
Bacteriology&immunology lab1
Bacteriology&immunology lab1Bacteriology&immunology lab1
Bacteriology&immunology lab1Brian Musalo
 
NGUYENTHINHI-W3.pptx
NGUYENTHINHI-W3.pptxNGUYENTHINHI-W3.pptx
NGUYENTHINHI-W3.pptxMung7
 
Unit 3 revision
Unit 3 revisionUnit 3 revision
Unit 3 revisionjayarajgr
 
Preparation of media & sterilization technique
Preparation of media & sterilization techniquePreparation of media & sterilization technique
Preparation of media & sterilization techniquebenazeer fathima
 
Introduction to Plant Tissue Culture
Introduction to Plant Tissue CultureIntroduction to Plant Tissue Culture
Introduction to Plant Tissue CultureDr Suresh Solleti
 
Bio organic inputs
Bio organic inputsBio organic inputs
Bio organic inputsnikkideronio
 
Microbiological methods
Microbiological methodsMicrobiological methods
Microbiological methodsMaha Gul
 
Microbiological__Methods_media_preparing_mic_492.ppt
Microbiological__Methods_media_preparing_mic_492.pptMicrobiological__Methods_media_preparing_mic_492.ppt
Microbiological__Methods_media_preparing_mic_492.pptirumch8
 
Rhizobium Biofertilizer Mass Production
Rhizobium Biofertilizer Mass ProductionRhizobium Biofertilizer Mass Production
Rhizobium Biofertilizer Mass ProductionDr. Pavan Kundur
 
Notes on Compost Teas
Notes on Compost TeasNotes on Compost Teas
Notes on Compost TeasGardening
 

Similar to PlantTissueCulture.pdf (20)

Sterility testing products (solids, liquids, ophthalmic and other sterile pro...
Sterility testing products (solids, liquids, ophthalmic and other sterile pro...Sterility testing products (solids, liquids, ophthalmic and other sterile pro...
Sterility testing products (solids, liquids, ophthalmic and other sterile pro...
 
part6-230110081003-34eff4a5 (1).pdf
part6-230110081003-34eff4a5 (1).pdfpart6-230110081003-34eff4a5 (1).pdf
part6-230110081003-34eff4a5 (1).pdf
 
Isolation of microbes.ppt
Isolation of microbes.pptIsolation of microbes.ppt
Isolation of microbes.ppt
 
Plant tissue culture
Plant tissue culturePlant tissue culture
Plant tissue culture
 
organ culture.pptx
organ culture.pptxorgan culture.pptx
organ culture.pptx
 
Plant tissue culture
Plant tissue culturePlant tissue culture
Plant tissue culture
 
Spawn production
Spawn productionSpawn production
Spawn production
 
Production technology for bioagents and biofertilizers 2
Production technology for bioagents and biofertilizers 2Production technology for bioagents and biofertilizers 2
Production technology for bioagents and biofertilizers 2
 
Bacteriology&immunology lab1
Bacteriology&immunology lab1Bacteriology&immunology lab1
Bacteriology&immunology lab1
 
NGUYENTHINHI-W3.pptx
NGUYENTHINHI-W3.pptxNGUYENTHINHI-W3.pptx
NGUYENTHINHI-W3.pptx
 
Unit 3 revision
Unit 3 revisionUnit 3 revision
Unit 3 revision
 
Banana Nendran.ppt
Banana Nendran.pptBanana Nendran.ppt
Banana Nendran.ppt
 
Preparation of media & sterilization technique
Preparation of media & sterilization techniquePreparation of media & sterilization technique
Preparation of media & sterilization technique
 
Introduction to Plant Tissue Culture
Introduction to Plant Tissue CultureIntroduction to Plant Tissue Culture
Introduction to Plant Tissue Culture
 
Bio organic inputs
Bio organic inputsBio organic inputs
Bio organic inputs
 
Microbiological methods
Microbiological methodsMicrobiological methods
Microbiological methods
 
Microbiological__Methods_media_preparing_mic_492.ppt
Microbiological__Methods_media_preparing_mic_492.pptMicrobiological__Methods_media_preparing_mic_492.ppt
Microbiological__Methods_media_preparing_mic_492.ppt
 
Culture
CultureCulture
Culture
 
Rhizobium Biofertilizer Mass Production
Rhizobium Biofertilizer Mass ProductionRhizobium Biofertilizer Mass Production
Rhizobium Biofertilizer Mass Production
 
Notes on Compost Teas
Notes on Compost TeasNotes on Compost Teas
Notes on Compost Teas
 

Recently uploaded

Software Engineering Methodologies (overview)
Software Engineering Methodologies (overview)Software Engineering Methodologies (overview)
Software Engineering Methodologies (overview)eniolaolutunde
 
Incoming and Outgoing Shipments in 1 STEP Using Odoo 17
Incoming and Outgoing Shipments in 1 STEP Using Odoo 17Incoming and Outgoing Shipments in 1 STEP Using Odoo 17
Incoming and Outgoing Shipments in 1 STEP Using Odoo 17Celine George
 
ECONOMIC CONTEXT - LONG FORM TV DRAMA - PPT
ECONOMIC CONTEXT - LONG FORM TV DRAMA - PPTECONOMIC CONTEXT - LONG FORM TV DRAMA - PPT
ECONOMIC CONTEXT - LONG FORM TV DRAMA - PPTiammrhaywood
 
MARGINALIZATION (Different learners in Marginalized Group
MARGINALIZATION (Different learners in Marginalized GroupMARGINALIZATION (Different learners in Marginalized Group
MARGINALIZATION (Different learners in Marginalized GroupJonathanParaisoCruz
 
Pharmacognosy Flower 3. Compositae 2023.pdf
Pharmacognosy Flower 3. Compositae 2023.pdfPharmacognosy Flower 3. Compositae 2023.pdf
Pharmacognosy Flower 3. Compositae 2023.pdfMahmoud M. Sallam
 
Presiding Officer Training module 2024 lok sabha elections
Presiding Officer Training module 2024 lok sabha electionsPresiding Officer Training module 2024 lok sabha elections
Presiding Officer Training module 2024 lok sabha electionsanshu789521
 
How to Configure Email Server in Odoo 17
How to Configure Email Server in Odoo 17How to Configure Email Server in Odoo 17
How to Configure Email Server in Odoo 17Celine George
 
Computed Fields and api Depends in the Odoo 17
Computed Fields and api Depends in the Odoo 17Computed Fields and api Depends in the Odoo 17
Computed Fields and api Depends in the Odoo 17Celine George
 
Painted Grey Ware.pptx, PGW Culture of India
Painted Grey Ware.pptx, PGW Culture of IndiaPainted Grey Ware.pptx, PGW Culture of India
Painted Grey Ware.pptx, PGW Culture of IndiaVirag Sontakke
 
18-04-UA_REPORT_MEDIALITERAСY_INDEX-DM_23-1-final-eng.pdf
18-04-UA_REPORT_MEDIALITERAСY_INDEX-DM_23-1-final-eng.pdf18-04-UA_REPORT_MEDIALITERAСY_INDEX-DM_23-1-final-eng.pdf
18-04-UA_REPORT_MEDIALITERAСY_INDEX-DM_23-1-final-eng.pdfssuser54595a
 
Historical philosophical, theoretical, and legal foundations of special and i...
Historical philosophical, theoretical, and legal foundations of special and i...Historical philosophical, theoretical, and legal foundations of special and i...
Historical philosophical, theoretical, and legal foundations of special and i...jaredbarbolino94
 
call girls in Kamla Market (DELHI) 🔝 >༒9953330565🔝 genuine Escort Service 🔝✔️✔️
call girls in Kamla Market (DELHI) 🔝 >༒9953330565🔝 genuine Escort Service 🔝✔️✔️call girls in Kamla Market (DELHI) 🔝 >༒9953330565🔝 genuine Escort Service 🔝✔️✔️
call girls in Kamla Market (DELHI) 🔝 >༒9953330565🔝 genuine Escort Service 🔝✔️✔️9953056974 Low Rate Call Girls In Saket, Delhi NCR
 
EPANDING THE CONTENT OF AN OUTLINE using notes.pptx
EPANDING THE CONTENT OF AN OUTLINE using notes.pptxEPANDING THE CONTENT OF AN OUTLINE using notes.pptx
EPANDING THE CONTENT OF AN OUTLINE using notes.pptxRaymartEstabillo3
 
“Oh GOSH! Reflecting on Hackteria's Collaborative Practices in a Global Do-It...
“Oh GOSH! Reflecting on Hackteria's Collaborative Practices in a Global Do-It...“Oh GOSH! Reflecting on Hackteria's Collaborative Practices in a Global Do-It...
“Oh GOSH! Reflecting on Hackteria's Collaborative Practices in a Global Do-It...Marc Dusseiller Dusjagr
 
Introduction to AI in Higher Education_draft.pptx
Introduction to AI in Higher Education_draft.pptxIntroduction to AI in Higher Education_draft.pptx
Introduction to AI in Higher Education_draft.pptxpboyjonauth
 
How to Make a Pirate ship Primary Education.pptx
How to Make a Pirate ship Primary Education.pptxHow to Make a Pirate ship Primary Education.pptx
How to Make a Pirate ship Primary Education.pptxmanuelaromero2013
 
Enzyme, Pharmaceutical Aids, Miscellaneous Last Part of Chapter no 5th.pdf
Enzyme, Pharmaceutical Aids, Miscellaneous Last Part of Chapter no 5th.pdfEnzyme, Pharmaceutical Aids, Miscellaneous Last Part of Chapter no 5th.pdf
Enzyme, Pharmaceutical Aids, Miscellaneous Last Part of Chapter no 5th.pdfSumit Tiwari
 
Hierarchy of management that covers different levels of management
Hierarchy of management that covers different levels of managementHierarchy of management that covers different levels of management
Hierarchy of management that covers different levels of managementmkooblal
 
ECONOMIC CONTEXT - PAPER 1 Q3: NEWSPAPERS.pptx
ECONOMIC CONTEXT - PAPER 1 Q3: NEWSPAPERS.pptxECONOMIC CONTEXT - PAPER 1 Q3: NEWSPAPERS.pptx
ECONOMIC CONTEXT - PAPER 1 Q3: NEWSPAPERS.pptxiammrhaywood
 
Roles & Responsibilities in Pharmacovigilance
Roles & Responsibilities in PharmacovigilanceRoles & Responsibilities in Pharmacovigilance
Roles & Responsibilities in PharmacovigilanceSamikshaHamane
 

Recently uploaded (20)

Software Engineering Methodologies (overview)
Software Engineering Methodologies (overview)Software Engineering Methodologies (overview)
Software Engineering Methodologies (overview)
 
Incoming and Outgoing Shipments in 1 STEP Using Odoo 17
Incoming and Outgoing Shipments in 1 STEP Using Odoo 17Incoming and Outgoing Shipments in 1 STEP Using Odoo 17
Incoming and Outgoing Shipments in 1 STEP Using Odoo 17
 
ECONOMIC CONTEXT - LONG FORM TV DRAMA - PPT
ECONOMIC CONTEXT - LONG FORM TV DRAMA - PPTECONOMIC CONTEXT - LONG FORM TV DRAMA - PPT
ECONOMIC CONTEXT - LONG FORM TV DRAMA - PPT
 
MARGINALIZATION (Different learners in Marginalized Group
MARGINALIZATION (Different learners in Marginalized GroupMARGINALIZATION (Different learners in Marginalized Group
MARGINALIZATION (Different learners in Marginalized Group
 
Pharmacognosy Flower 3. Compositae 2023.pdf
Pharmacognosy Flower 3. Compositae 2023.pdfPharmacognosy Flower 3. Compositae 2023.pdf
Pharmacognosy Flower 3. Compositae 2023.pdf
 
Presiding Officer Training module 2024 lok sabha elections
Presiding Officer Training module 2024 lok sabha electionsPresiding Officer Training module 2024 lok sabha elections
Presiding Officer Training module 2024 lok sabha elections
 
How to Configure Email Server in Odoo 17
How to Configure Email Server in Odoo 17How to Configure Email Server in Odoo 17
How to Configure Email Server in Odoo 17
 
Computed Fields and api Depends in the Odoo 17
Computed Fields and api Depends in the Odoo 17Computed Fields and api Depends in the Odoo 17
Computed Fields and api Depends in the Odoo 17
 
Painted Grey Ware.pptx, PGW Culture of India
Painted Grey Ware.pptx, PGW Culture of IndiaPainted Grey Ware.pptx, PGW Culture of India
Painted Grey Ware.pptx, PGW Culture of India
 
18-04-UA_REPORT_MEDIALITERAСY_INDEX-DM_23-1-final-eng.pdf
18-04-UA_REPORT_MEDIALITERAСY_INDEX-DM_23-1-final-eng.pdf18-04-UA_REPORT_MEDIALITERAСY_INDEX-DM_23-1-final-eng.pdf
18-04-UA_REPORT_MEDIALITERAСY_INDEX-DM_23-1-final-eng.pdf
 
Historical philosophical, theoretical, and legal foundations of special and i...
Historical philosophical, theoretical, and legal foundations of special and i...Historical philosophical, theoretical, and legal foundations of special and i...
Historical philosophical, theoretical, and legal foundations of special and i...
 
call girls in Kamla Market (DELHI) 🔝 >༒9953330565🔝 genuine Escort Service 🔝✔️✔️
call girls in Kamla Market (DELHI) 🔝 >༒9953330565🔝 genuine Escort Service 🔝✔️✔️call girls in Kamla Market (DELHI) 🔝 >༒9953330565🔝 genuine Escort Service 🔝✔️✔️
call girls in Kamla Market (DELHI) 🔝 >༒9953330565🔝 genuine Escort Service 🔝✔️✔️
 
EPANDING THE CONTENT OF AN OUTLINE using notes.pptx
EPANDING THE CONTENT OF AN OUTLINE using notes.pptxEPANDING THE CONTENT OF AN OUTLINE using notes.pptx
EPANDING THE CONTENT OF AN OUTLINE using notes.pptx
 
“Oh GOSH! Reflecting on Hackteria's Collaborative Practices in a Global Do-It...
“Oh GOSH! Reflecting on Hackteria's Collaborative Practices in a Global Do-It...“Oh GOSH! Reflecting on Hackteria's Collaborative Practices in a Global Do-It...
“Oh GOSH! Reflecting on Hackteria's Collaborative Practices in a Global Do-It...
 
Introduction to AI in Higher Education_draft.pptx
Introduction to AI in Higher Education_draft.pptxIntroduction to AI in Higher Education_draft.pptx
Introduction to AI in Higher Education_draft.pptx
 
How to Make a Pirate ship Primary Education.pptx
How to Make a Pirate ship Primary Education.pptxHow to Make a Pirate ship Primary Education.pptx
How to Make a Pirate ship Primary Education.pptx
 
Enzyme, Pharmaceutical Aids, Miscellaneous Last Part of Chapter no 5th.pdf
Enzyme, Pharmaceutical Aids, Miscellaneous Last Part of Chapter no 5th.pdfEnzyme, Pharmaceutical Aids, Miscellaneous Last Part of Chapter no 5th.pdf
Enzyme, Pharmaceutical Aids, Miscellaneous Last Part of Chapter no 5th.pdf
 
Hierarchy of management that covers different levels of management
Hierarchy of management that covers different levels of managementHierarchy of management that covers different levels of management
Hierarchy of management that covers different levels of management
 
ECONOMIC CONTEXT - PAPER 1 Q3: NEWSPAPERS.pptx
ECONOMIC CONTEXT - PAPER 1 Q3: NEWSPAPERS.pptxECONOMIC CONTEXT - PAPER 1 Q3: NEWSPAPERS.pptx
ECONOMIC CONTEXT - PAPER 1 Q3: NEWSPAPERS.pptx
 
Roles & Responsibilities in Pharmacovigilance
Roles & Responsibilities in PharmacovigilanceRoles & Responsibilities in Pharmacovigilance
Roles & Responsibilities in Pharmacovigilance
 

PlantTissueCulture.pdf

  • 1. PLANT TISSUE CULTURE Background Plant research often involves growing new plants in a controlled environment. These may be plants that we have genetically altered in some way or may be plants of which we need many copies all exactly alike. These things can be accomplished through tissue culture of small tissue pieces from the plant of interest. These small pieces may come from a single mother plant or they may be the result of genetic transformation of single plant cells which are then encouraged to grow and to ultimately develop into a whole plant. Tissue culture techniques are often used for commercial production of plants as well as for plant research. Tissue culture involves the use of small pieces of plant tissue (explants) which are cultured in a nutrient medium under sterile conditions. Using the appropriate growing conditions for each explant type, plants can be induced to rapidly produce new shoots, and, with the addition of suitable hormones new roots. These plantlets can also be divided, usually at the shoot stage, to produce large numbers of new plantlets. The new plants can then be placed in soil and grown in the normal manner. Many types of plants are suitable for use in the classroom. Cauliflower, rose cuttings, African violet leaves and carnation stems will all easily produce clones (exact genetic copies) through tissue culture. Cauliflower florets in particular give excellent results since they can be grown into a complete plant in the basic tissue culture media, without the need for additional growth or root hormones. Green shoots are generally observable within three weeks, and roots develop within six weeks. The most important part of this activity, however, is to maintain as sterile an environment as possible. Even one fungal spore or bacterial cell that comes into contact with the growth media will rapidly reproduce and soon completely overwhelm the small plant piece that you are trying to clone. Objectives 1. To understand a procedure that is often used to propagate many plants of the same genetic background. 2. To understand the importance of sterile techniques.
  • 2. Materials 1 Vial of Murashige Skoog (MS) media. (If you wish to make up your own growing medium you could use the recipe for the Murashige medium given at the end of this section.) 1 L sterile distilled water 10 g of agar/L 30 g sucrose/L 1.5 L or 2 L container in which to prepare the growth medium small amounts of 1M NaOH and 1M HCl to adjust the pH of the media 60 flat bottom culture tubes with closures. Glass aquarium or box lined with plastic Plastic sheet to cover the top of the aquarium Adhesive tape 10% Bleach in a spray bottle 70% alcohol in a spray bottle Forceps or tweezers Gloves Cutting equipment such as a scalpel blade or razor blade 2 bottles of sterile distilled water (purchase at the grocery store) Pressure cooker Your chosen plant (cauliflower, rose, African violet or carnation) paper towel for cutting on or sterile petri dishes if available Beaker or jar in which to wash the plant material Detergent-water mixture - 1ml detergent per liter of water Bleach sterilizing solution - dilute commercial bleach (5-6% sodium hypochlorite) to a final concentration of 1-2% sodium hypochlorite in distilled water in a large beaker or jar. 2 or 3 beakers or jars of sterile water A well-lit area away from direct sunlight or use full-spectrum gro-lights Hormones such as BAP (benzylaminopurine) and NAA (naphthalene acetic acid) to stimulate growth and root development, respectively. (Commercial rooting hormone solutions and powders are also available from hardware stores.)
  • 3. Murashige Minimal Organics Medium recipe (MMOM) Inorganic salts mg/L NH4NO3 1,650.00 KNO3 1,900.00 CaCl2 (anhydrous) 332.20 MgSO4 (anhydrous) 180.70 KH2PO4 170.00 Na2EDTA 37.25 FeSO4.7H2O 27.80 H3BO3 6.20 MnSO4.H2O 16.90 ZnSO4.H2O 5.37 KI 0.83 Na2MoO4.2H2O 0.25 CuSO4 (anhydrous) 0.016 CoCl2 (anhydrous) 0.014 Sucrose 30,000.00 i-Inositol 100.00 Thiamine.HCl 0.40 The pH is adjusted to 5.7 using 0.1 M HCl or NaOH.
  • 4. Procedure Preparation and sterilization of growing medium (when not provided pre-poured) These steps will make 1 L of growth medium which is enough to prepare about 65 growing tubes. 1. Dissolve the MS mixture in about 800 ml of distilled water. Stir the water continuously while adding the salt mixture. Add 30 g sugar and stir to dissolve. Adjust pH to 5.8 using 1M NaOH or 1M HCl as necessary while gently stirring. Add distilled water to make the total volume up to 1 L. 2. Weigh out 10 grams of agar and add it to the MS solution. Heat the solution gently while stirring until all the agar has dissolved. 3. Pour the still warm medium into the polycarbonate tubes to a depth of about 4 cm which will use about 15ml of media per tube. 4. Place the tubes (with lids sitting on the tubes but not tightened) in a pressure cooker and sterilize for 20 minutes. Cool the pressure cooker, then remove the tubes and tighten the lids. Alternatively the tubes can be placed in boiling water for 30 minutes, but make sure that none of the water is able to enter the tubes. NOTE: If you wish to use plants other than cauliflower you need to prepare two different media which contain plant hormones necessary to stimulate development of differentiated tissues. The first one should contain a cytokinin such as BAP which promotes shoot formation and the second one a rooting hormone such as NAA or store bought rooting hormone. To do this, prepare the mixture up until the end of step 2. Keeping the mixture warm so that it does not solidify, divide it equally into two pre-warmed containers. Each container can be used to prepare 30 or so tubes as above. The first container should have BAP added at the rate of 2.0mg/l. The second container should have the NAA hormone added at the rate of 0.1 mg/L. To do this it is necessary to make concentrated solutions of both BAP (2.0mg/ml) and NAA (1.0mg/ml) and filter sterilize them. Add 1ml of the concentrated BAP stock or 100μl of the NAA concentrated stock to each 1 liter of media that you prepare. If you use rooting hormone that is purchased from your local hardware or nursery supply store instead of NAA then just follow the directions before adding to your media. Preparation of a sterile transfer chamber and equipment A classroom transfer chamber can be made from a clean glass aquarium turned on its side. Scrub the aquarium thoroughly with a 30% bleach solution, making
  • 5. sure that you wear gloves and do not inhale the fumes. Rinse with sterile distilled water, turn upside down on a clean counter or paper towels and allow to dry. Cut holes in a clean plastic sheet to allow arms to reach into the chamber and reinforce the cut edges with tape if necessary. Tape the clean plastic sheet over the open side of the aquarium making sure that the arm holes are located at a convenient height. Plastic sleeves could also be fitted to these holes if you wish to make it easier to prevent the entry of airborne spores into the chamber. The finished aquarium chamber can be sterilized by spraying with 10% chlorox bleach just prior to each use and drying with sterile paper towel. Wrap the forceps, scalpels, razor blades, paper towel and gloves (rubber or surgical) in aluminum foil, seal with tape and sterilize by processing them in a pressure cooker for twenty minutes. These items can also be sterilized by placing in an oven at 350o F for 15 minutes. You can wrap each item separately or put together a "kit" so that each student will have their own sterile equipment to use. Alternatively the forceps and blades can be sterilized by dipping in 10% bleach and then rinsing in sterile water, or dipping in alcohol and then placing in a flame, although this is not recommended for use in crowded classrooms. If you choose to dip in bleach and rinse in sterile water, it is best if fresh solutions are available for each 3-4 students since the water can easily be contaminated if care is not used. These liquid containers should only be opened once they are inside of the sterile chamber. Plant preparation Your plant material must first be surface sterilized to remove any bacteria or fungal spores that are present. We aim to kill all microorganisms, but at the same time not cause any adverse damage to the plant material. 1. Cauliflower should be cut into small sections of florets about 1 cm across. If using a rose or other cuttings, cut the shoots into about 5 to 7 cm lengths. Whole African violet leaves can also be used. 2. Wash the prepared plant material in a detergent-water mixture for about 20 minutes. If trying hairy plant material scrub with a soft brush (toothbrush). This will help remove fungi etc., and the detergent will help wet the material and remove air bubbles that may be trapped between tiny hairs on a plant. 3. Transfer the washed plant material to the sterilizing chlorox solution. Shake the mixture for 1 minute and then leave to soak for 10- 20 minutes. Carefully pour off the bleach solution using the lid to keep the plant tissue from coming out and then carefully cap the container.
  • 6. Note 1: At this point, the tissue is considered sterile. All subsequent rinses should be done with sterile water, and all manipulations of the tissue performed with sterile instruments and supplies. Open one container at a time and never leave the lid off of any container longer than necessary. Note 2: Many students will not fully appreciate the importance of carefully sterilizing explants and so there will be some cultures that become infected with bacterial or fungal growth. If you do not wish to emphasize this aspect of the laboratory students can be provided with plant materials that the instructor has already sterilized prior to use by the class. Transfer of plant material to tissue culture medium Use the sterile gloves and equipment for all of these steps. 1. Place the plant material still in the chlorox bleach sterilizing container, the containers of sterile water, the sterilized forceps and blades, some sterile paper towel to use as a cutting surface and enough tubes containing sterile medium into the sterile aquarium. The outside surfaces of the containers, the capped tubes and the aluminum wrapped supplies should be briefly sprayed with 70% alcohol before moving them into the chamber. 2. The gloves can be sprayed with a 70% alcohol solution and hands rubbed together to spread the alcohol just prior to placing hands into the chamber. Once students have gloves on and sprayed they must not touch anything that is outside of the sterile chamber. 3. Carefully open the container with the plant material and pour in enough sterile water to half fill the container. Replace the lid and gently shake the container to wash tissue pieces (explants) thoroughly for 2-3 minutes to remove the bleach. Pour off the water and repeat the washing process 3 more times. 4. Remove the sterilized plant material from the sterile water, place on the paper towel or sterile petri dish. Cut the cauliflower into smaller pieces about 2 to 3 mm across. If using rose cut a piece of stem about 10 mm in length with an attached bud. The African violet leaf can be cut into small squares about 1-1.5 cm across. Be sure to avoid any tissue that has been damaged by the bleach, which is apparent by its' pale color. 5. Take a prepared section of plant material in sterile forceps and place into the medium in the polycarbonate tube. Cauliflower pieces should be partly submerged in the medium, flower bud facing up. Rose or other cuttings should be placed so that the shoots are level with the medium surface. The African violet leaf pieces should be laid directly onto the medium surface.
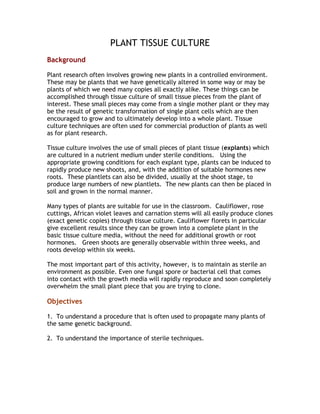
  • 7. 6. Replace the cap tightly on the tube. Figure 1: The small explant develops callus which then produces shoots a few weeks after being placed into tissue culture media Growing the plants 1. The tubes containing plant sections may be placed in a well-lit area of the classroom although not in direct sunlight. The shoots will probably grow more quickly if the explants are placed under fluorescent or grow- lights to provide at least 12 hours of light per day. The aquarium can be used as a growth chamber with the lighting about 8-10" overhead. This will also help maintain a more regular and warm temperature. Ensure that the temperature does not go over 28o C. New shoots should develop within 2 weeks, and should be well advanced in 3 to 4 weeks. Check the tubes daily and discard any that show signs of infection (before discarding first sterilize in the pressure cooker or add bleach into the tube). 2. Roots can appear within 6 weeks on cauliflowers. The roses, African violet and other cuttings will need to be moved into rooting media for roots to properly develop. This transfer to the second, rooting media must be conducted under the same sterile conditions as at the initiation of the culture. All necessary equipment and the aquarium should be set up as before and properly sterilized. 3. Working inside the sterile aquarium chamber, remove the cap from the culture tube. There will usually be several shoots that have arisen from each explant. These shoots should be carefully separated by gently removing the whole explant from the media with sterile forceps and
  • 8. then separating the shoots by gently pulling them apart using two pairs of forceps. Each shoot should then be placed into a tube of rooting media and the bottom of the shoot pushed into the media so that good contact is made. The cap is replaced and the shoots are then allowed to grow as in step 1 until roots are formed, usually within 2-3 weeks. Potting the clones Once roots are well formed the plants are ready to be transferred into soil. Figure 2: Roots are fully developed prior to moving plants to pots of soil 1. Each plant should be carefully removed from its tube of media and planted into a small pot containing a clean light potting mix. Gently wash off all the agar medium prior to planting. The plants will still need to be protected at this stage since they are not accustomed to the drier air of the classroom when compared to the moist environment of the tube of media. 2. Place all of the pots onto a tray and cover lightly with a plastic dome or tent. Place the plants in an area with 12-16 hours of light (either natural or artificial) but not direct sunlight. 3. After a week the cover can be gradually removed and the plants acclimated to stronger light and drier atmospheric conditions. 4. You now have a collection of plants in your classroom that are genetically exactly the same. You could use these plants to carry out other experimental tests knowing that one of the main variables in the experiment has been eliminated. Some of these tests could include looking at plant responses to low light levels, to drought or to saline soil conditions. (see activity 7)
  • 9. Student Activity 1. Tissue culture uses a small piece of tissue from a mother plant to grow many new copies of the original plant. What is the term used to refer to this small piece of tissue? 2. What are some of the plants that we might use for tissue culture? 3. Why is tissue culture used for propagation of some plants rather than just planting seeds? 4. What is a sterile environment? 5. Why is a sterile environment important in tissue culture? 6. How did you or your teacher sterilize the instruments that were used in this tissue culture activity? 7. Could we sterilize the plant tissue in the same manner? Why or why not? 8. What happens if you open your sterile plant container when it is not inside a sterile environment?