Constructng a Cold Frame - for Winter Gardening - A Permaculture Build Project

Constructng a Cold Frame - for Winter Gardening - A Permaculture Build Project ~ 610 Kirby Permaculture ` For more information, Please see websites below: ` Organic Edible Schoolyards & Gardening with Children = http://scribd.com/doc/239851214 ~ ` Double Food Production from your School Garden with Organic Tech = http://scribd.com/doc/239851079 ~ ` Free School Gardening Art Posters = http://scribd.com/doc/239851159 ~ ` Increase Food Production with Companion Planting in your School Garden = http://scribd.com/doc/239851159 ~ ` Healthy Foods Dramatically Improves Student Academic Success = http://scribd.com/doc/239851348 ~ ` City Chickens for your Organic School Garden = http://scribd.com/doc/239850440 ~ ` Huerto Ecológico, Tecnologías Sostenibles, Agricultura Organica http://scribd.com/doc/239850233 ` Simple Square Foot Gardening for Schools - Teacher Guide = http://scribd.com/doc/239851110 ~

Recommended
Recommended
More Related Content
What's hot
What's hot (20)
Similar to Constructng a Cold Frame - for Winter Gardening - A Permaculture Build Project
Similar to Constructng a Cold Frame - for Winter Gardening - A Permaculture Build Project (20)
More from School Vegetable Gardening - Victory Gardens
More from School Vegetable Gardening - Victory Gardens (20)
Recently uploaded
Recently uploaded (20)
Constructng a Cold Frame - for Winter Gardening - A Permaculture Build Project
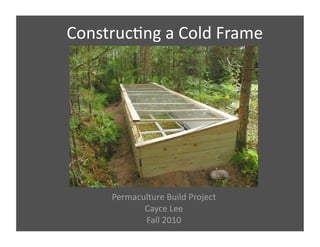
- 1. Construc)ng a Cold Frame Permaculture Build Project Cayce Lee Fall 2010
- 2. • The simplest way to improve growing condi)ons during cold weather is to find, create, or improve warm and sheltered spots. • Building a cold frame is an easy way to grow edibles during the winter, or to start plants from seeds in the spring.
- 3. • A What is a cold frame? cold frame is basically a box with a glass (or plas)c) top and no boIom that sits on the soil. • A cold frame lessens climac)c stress by affec)ng: – Temperature: a single layer of glass can increase the temperature inside the cold frame from between 7-‐20 degrees. – Moisture: Less moisture on the plants means less stress from freezing. – Wind: Provides a windbreak for plants, removing the windchill factor.
- 4. Plants to Grow in a Cold Frame
- 5. Star)ng Seedlings • Cold frames can also serve as a greenhouse for star)ng seedlings. • Seedlings started in a cold frame are hardy because they are not ar)ficially heated. • Watering is also less important because the seedlings are connected to the earth and can’t dry out as quickly as they would in a flat.
- 6. Temperature Control • Keep a thermometer in the frame to monitor heat (on the soil is most accurate) • Vent excess heat out of the top by propping glass up • Aim for 70 degrees in the spring and 60 to 65 degrees in the fall “The ideal is to keep crops growing steadily in this protected environment, but not to overheat them. With cold frames, it is always beIer to err on the cool side and vent the frames excessively rather than to run them too warm. Very cold condi)ons are inevitable as winter arrives, and the so], succulent )ssues of plants that have been grown at too high temperatures will not be as hardy. Once winter arrives the system is basically dormant. Your winter food is not dependent on sunny weather for warmth because it is already grown. Cloudy days with frame temperatures in the 30s and 40s are fine. The cold nights are no problem, since the winter food plants don’t mind freezing. As long as the temperature in the plants gets above freezing every few days so the plants can thaw naturally before you harvest, all will be well.” -‐Eric Coleman
- 7. Project Plan While you can make a cold frame with a level lid, an angled top is best for allowing maximum sunlight. The direc)ons I looked at suggested a depth of 12 inches for the front of the box and 18 inches for the back, so I tried to get close to those measurements with the reclaimed boards I used. The length of the sides were built to match the size of the window I used for my lid.
- 8. Materials and Tools Window for lid Reclaimed wood (2’x4’s) for sides 1”x2” wood for side braces 2 hinges Handle Spray paint to paint handle Tools for cuhng wood (Mitre saw and bandsaw) Power drill and screws Hammer and nails Ruler Pencil
- 9. Step 1 Measure and cut the wood for the sides of your cold frame to match the dimensions of your top (window). Then use your 1”x2”wood to cut braces to connect the boards together. (Angle the top edge of the braces for the back sides to accommodate the slope of the window.)
- 10. Step 2 Nail the wood boards for the front and back sides together using the wooden braces.
- 11. Nail the side boards to the front and back of the box, but only up to the height of the front side. Step 3
- 12. Turn the box on its side with the window connec)ng the back to the front of the box and trace the correct angle to cut the remaining boards for the sides. Step 4 Cut the angled boards and nail to the back side of the box.
- 13. Step 5 Cut and nail more braces with the 1”x2” wood for the sides. Be sure to angle the top edge to match the slope of the sides.
- 14. Step 6 Add triangular corner braces to stabilize structure of box.
- 15. Step 7 Screw hinges on onto the interior side of the window and the back of the box.
- 16. Step 8 Paint (if desired) and screw on the handle.
- 18. Expenses Reclaimed Wood FREE (discarded on side of curb by a neighbor) 1”x 2” Wood FREE (found in my basement) Window FREE (discard from Habitat Restore) Hinges and Handle $7 (from Habitat Restore) Nails and Screws FREE (from my toolbox) Spray paint FREE (le] over from previous project) TOTAL COST $7
- 19. References 1. Coleman, Eliot. The New Organic Grower : A Master's Manual of Tools and Techniques for the Home and Market Gardener. Chelsea, Vt: Chelsea Green, 1989. See chapter 19 “Season Extension” which has informaFon on climate modificaFon by construcFng shelters for plants (i.e. low covers, cold frames, greenhouses, etc.). 2. -‐-‐-‐ The New Organic Grower's Four-‐Season Harvest : How to Harvest Fresh Organic Vegetables from Your Home Garden all Year Long. Post Mills, VT: Chelsea Green Pub., 1992. See chapters 5 and 6 on “The Covered Garden: Cold Frames and Garden Tunnels” and chapter 7 “The Underground Garden: Root Cellars and Indoor HarvesFng.”
- 20. References 3. -‐-‐-‐”A Garden for All Seasons: Gardening on the Back Side of the Calendar.” Mother Earth News, Issue 178, Feb/March 2000. www.fourseasonfarm.com (Barbara Damrosch and Eliot Coleman’s experimental market garden in Harborside, Maine) Easy to read arFcle on growing edibles in winter. 4. Kreiter, Ted. “Garden All Winter Long.” Saturday Evening Post; Jan/Feb 2010, Vol. 282 Issue 1. p.50-‐51, 2p. Easy to follow instrucFons on building a cold frame.