1. 3/10/2014 555 and 556 Timer Circuits
http://electronicsclub.info/555timer.htm 1/10
electronicsclub.info
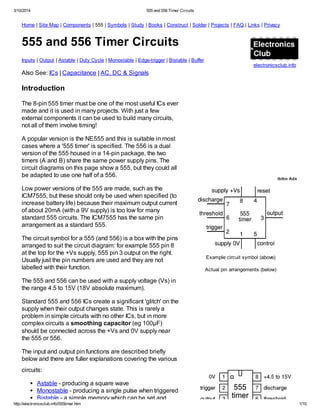
Example circuit symbol (above)
Actual pin arrangements (below)
Home | Site Map | Components | 555 | Symbols | Study | Books | Construct | Solder | Projects | FAQ | Links | Privacy
555 and 556 Timer Circuits
Inputs | Output | Astable | Duty Cycle | Monostable | Edge-trigger | Bistable | Buffer
Also See: ICs | Capacitance | AC, DC & Signals
Introduction
The 8-pin 555 timer must be one of the most useful ICs ever
made and it is used in many projects. With just a few
external components it can be used to build many circuits,
not all of them involve timing!
A popular version is the NE555 and this is suitable in most
cases where a '555 timer' is specified. The 556 is a dual
version of the 555 housed in a 14-pin package, the two
timers (A and B) share the same power supply pins. The
circuit diagrams on this page show a 555, but they could all
be adapted to use one half of a 556.
Low power versions of the 555 are made, such as the
ICM7555, but these should only be used when specified (to
increase battery life) because their maximum output current
of about 20mA (with a 9V supply) is too low for many
standard 555 circuits. The ICM7555 has the same pin
arrangement as a standard 555.
The circuit symbol for a 555 (and 556) is a box with the pins
arranged to suit the circuit diagram: for example 555 pin 8
at the top for the +Vs supply, 555 pin 3 output on the right.
Usually just the pin numbers are used and they are not
labelled with their function.
The 555 and 556 can be used with a supply voltage (Vs) in
the range 4.5 to 15V (18V absolute maximum).
Standard 555 and 556 ICs create a significant 'glitch' on the
supply when their output changes state. This is rarely a
problem in simple circuits with no other ICs, but in more
complex circuits a smoothing capacitor (eg 100µF)
should be connected across the +Vs and 0V supply near
the 555 or 556.
The input and output pin functions are described briefly
below and there are fuller explanations covering the various
circuits:
Astable - producing a square wave
Monostable - producing a single pulse when triggered
Bistable - a simple memory which can be set and
ibibo Ads
2. 3/10/2014 555 and 556 Timer Circuits
http://electronicsclub.info/555timer.htm 2/10
Integrated Circuit 555
Projects
E.A. Parr
Best Price £0.01
or Buy New £4.96
Privacy Information
Electronics Projects
Starter Kit wit...
Mallinson Electric...
Best Price £12.99
or Buy New £12.99
Privacy Information
Bistable - a simple memory which can be set and
reset
Buffer - an inverting buffer (Schmitt trigger)
There is more information about 555 timers and their
circuits on the Electronics in Meccano website.
For detailed information you may wish to download a 555 or
556 datasheet from one of the Datasheet websites.
Inputs of 555/556
Trigger input: when < 1/
3
Vs ('active low') this makes the output high
(+Vs). It monitors the discharging of the timing capacitor in an astable
circuit. It has a high input impedance > 2M .
Threshold input: when > 2/3 Vs ('active high') this makes the output
low (0V)*. It monitors the charging of the timing capacitor in astable and
monostable circuits. It has a high input impedance > 10M .
* providing the trigger input is > 1/3 Vs, otherwise the trigger input will override the
threshold input and hold the output high (+Vs).
Reset input: when less than about 0.7V ('active low') this makes the output low (0V), overriding other
inputs. When not required it should be connected to +Vs. It has an input impedance of about 10k .
Control input: this can be used to adjust the threshold voltage which is set internally to be 2/3 Vs. Usually
this function is not required and the control input is connected to 0V with a 0.01µF capacitor to eliminate
electrical noise. It can be left unconnected if noise is not a problem.
The discharge pin is not an input, but it is listed here for convenience. It is connected to 0V when the timer
output is low and is used to discharge the timing capacitor in astable and monostable circuits.
3. 3/10/2014 555 and 556 Timer Circuits
http://electronicsclub.info/555timer.htm 3/10
output is low and is used to discharge the timing capacitor in astable and monostable circuits.
Output of 555/556
The output of a standard 555 or 556 can sink and source up to 200mA. This
is more than most ICs and it is sufficient to supply many output transducers
directly, including LEDs (with a resistor in series), low current lamps, piezo
transducers, loudspeakers (with a capacitor in series), relay coils (with
diode protection) and some motors (with diode protection). The output
voltage does not quite reach 0V and +Vs, especially if a large current is
flowing.
To switch larger currents you can connect a transistor.
The ability to both sink and source current means that two devices can be
connected to the output so that one is on when the output is low and the
other is on when the output is high. The top diagram shows two LEDs
connected in this way. This arrangement is used in the Level Crossing
project to make the red LEDs flash alternately.
Loudspeakers
A loudspeaker (minimum resistance 64 ) may be connected to the output
of a 555 or 556 astable circuit but a capacitor (about 100µF) must be
connected in series. The output is equivalent to a steady DC of about ½Vs
combined with a square wave AC (audio) signal. The capacitor blocks the
DC, but allows the AC to pass as explained in capacitor coupling.
Piezo transducers may be connected directly to the output and do not
require a capacitor in series.
Relay coils and other inductive loads
Like all ICs, the 555 and 556 must be protected from the brief high voltage
'spike' produced when an inductive load such as a relay coil is switched off.
The standard protection diode must be connected 'backwards' across the
the relay coil as shown in the diagram.
However, the 555 and 556 require an extra diode connected in series with the coil to ensure that a small
'glitch' cannot be fed back into the IC. Without this extra diode monostable circuits may re-trigger
themselves as the coil is switched off! The coil current passes through the extra diode so it must be a
1N4001 or similar rectifier diode capable of passing the current, a signal diode such as a 1N4148 is
usually not suitable.
Top of page | Inputs | Output | Astable | Duty Cycle | Monostable | Edge-trigger | Bistable | Buffer
555/556 Astable
An astable circuit produces a 'square wave', this is a digital
waveform with sharp transitions between low (0V) and high
(+Vs). Note that the durations of the low and high states may
4. 3/10/2014 555 and 556 Timer Circuits
http://electronicsclub.info/555timer.htm 4/10
555 astable output, a square wave
(Tm and Ts may be different)
555 astable circuit
555 astable frequencies
C1 R2 = 10k
R1 = 1k
R2 = 100k
R1 = 10k
R2 = 1M
R1 = 100k
0.001µF 68kHz 6.8kHz 680Hz
0.01µF 6.8kHz 680Hz 68Hz
0.1µF 680Hz 68Hz 6.8Hz
1µF 68Hz 6.8Hz 0.68Hz
10µF 6.8Hz 0.68Hz
(41 per min.)
0.068Hz
(4 per min.)
(+Vs). Note that the durations of the low and high states may
be different. The circuit is called an astable because it is not
stable in any state: the output is continually changing between
'low' and 'high'.
The time period (T) of the square wave is the time for one
complete cycle, but it is usually better to consider frequency
(f) which is the number of cycles per second.
T = 0.7 × (R1 + 2R2) × C1 and f =
1.4
(R1 + 2R2) × C1
T = time period in seconds (s)
f = frequency in hertz (Hz)
R1 = resistance in ohms ( )
R2 = resistance in ohms ( )
C1 = capacitance in farads (F)
The time period can be split into two parts: T = Tm + Ts
Mark time (output high): Tm = 0.7 × (R1 + R2) × C1
Space time (output low): Ts = 0.7 × R2 × C1
Many circuits require Tm and Ts to be almost equal; this is achieved if R2 is much larger than R1.
For a standard astable circuit Tm cannot be less than Ts, but this is not too restricting because the output
can both sink and source current. For example an LED can be made to flash briefly with long gaps by
connecting it (with its resistor) between +Vs and the output. This way the LED is on during Ts, so brief
flashes are achieved with R1 larger than R2, making Ts short and Tm long. If Tm must be less than Ts a
diode can be added to the circuit as explained under duty cycle below.
Choosing R1, R2 and C1
R1 and R2 should be in the range 1k to 1M . It is
best to choose C1 first because capacitors are
available in just a few values.
Choose C1 to suit the frequency range you
require (use the table as a guide).
Choose R2 to give the frequency (f) you require.
Assume that R1 is much smaller than R2 (so that
Tm and Ts are almost equal), then you can use:
R2 =
0.7
f × C1
Choose R1 to be about a tenth of R2 (1k min.)
unless you want the mark time Tm to be significantly longer than the space time Ts.
If you wish to use a variable resistor it is best to make it R2.
If R1 is variable it must have a fixed resistor of at least 1k in series
(this is not required for R2 if it is variable).
Astable operation
5. 3/10/2014 555 and 556 Timer Circuits
http://electronicsclub.info/555timer.htm 5/10
Astable operation
With the output high (+Vs) the
capacitor C1 is charged by current
flowing through R1 and R2. The
threshold and trigger inputs monitor
the capacitor voltage and when it
reaches 2/
3
Vs (threshold voltage) the
output becomes low and the
discharge pin is connected to 0V.
The capacitor now discharges with
current flowing through R2 into the
discharge pin. When the voltage falls to 1/3Vs (trigger voltage) the output becomes high again and the
discharge pin is disconnected, allowing the capacitor to start charging again.
This cycle repeats continuously unless the reset input is connected to 0V which forces the output low while
reset is 0V.
An astable can be used to provide the clock signal for circuits such as counters.
A low frequency astable (< 10Hz) can be used to flash an LED on and off, higher frequency flashes are
too fast to be seen clearly. Driving a loudspeaker or piezo transducer with a low frequency of less than
20Hz will produce a series of 'clicks' (one for each low/high transition) and this can be used to make a
simple metronome.
An audio frequency astable (20Hz to 20kHz) can be used to produce a sound from a loudspeaker or
piezo transducer. The sound is suitable for buzzes and beeps. The natural (resonant) frequency of most
piezo transducers is about 3kHz and this will make them produce a particularly loud sound.
Duty cycle
The duty cycle of an astable circuit is the proportion of the complete
cycle for which the output is high (the mark time). It is usually given as a
percentage.
For a standard 555/556 astable circuit the mark time (Tm) must be
greater than the space time (Ts), so the duty cycle must be at least 50%:
Duty cycle =
Tm
=
R1 + R2
Tm + Ts R1 + 2R2
To achieve a duty cycle of less than 50% a diode can be
added in parallel with R2 as shown in the diagram. This
bypasses R2 during the charging (mark) part of the cycle so
that Tm depends only on R1 and C1:
Tm = 0.7 × R1 × C1 (ignoring 0.7V across diode)
Ts = 0.7 × R2 × C1 (unchanged)
Duty cycle with diode =
Tm
=
R1
Tm + Ts R1 + R2
6. 3/10/2014 555 and 556 Timer Circuits
http://electronicsclub.info/555timer.htm 6/10
555 astable circuit with diode across R2
555 monostable output, a single pulse
555 monostable circuit with manual trigger
Use a signal diode such as 1N4148.
Projects using 555 astable: Flashing LED | Dummy Alarm | Heart-shaped Badge | 'Random' Flasher
Top of page | Inputs | Output | Astable | Duty Cycle | Monostable | Edge-trigger | Bistable | Buffer
555/556 Monostable
A monostable circuit produces a single output pulse
when triggered. It is called a monostable because it is
stable in just one state: 'output low'. The 'output high'
state is temporary.
The duration of the pulse is called the time period (T)
and this is determined by resistor R1 and capacitor C1:
time period, T = 1.1 × R1 × C1
T = time period in seconds (s)
R1 = resistance in ohms ( )
C1 = capacitance in farads (F)
The maximum reliable time period is about 10 minutes.
Why 1.1? The capacitor charges to 2/3 = 67% so it is a bit longer
than the time constant (R1 × C1) which is the time taken to charge
to 63%.
Choose C1 first (there are relatively few values
available).
Choose R1 to give the time period you need. R1
should be in the range 1k to 1M , so use a fixed
resistor of at least 1k in series if R1 is variable.
Beware that electrolytic capacitor values are not
accurate, errors of at least 20% are common.
Beware that electrolytic capacitors leak charge
which substantially increases the time period if you are using a high value resistor - use the formula
as only a very rough guide!
For example the Timer Project should have a maximum time period of 266s (about 4½ minutes), but many electrolytic
capacitors extend this to about 10 minutes!
Monostable operation
The timing period is triggered
(started) when the trigger input (555
pin 2) is less than 1/
3
Vs, this makes
the output high (+Vs) and the
7. 3/10/2014 555 and 556 Timer Circuits
http://electronicsclub.info/555timer.htm 7/10
Power-on reset or
trigger circuit
edge-triggering circuit
the output high (+Vs) and the
capacitor C1 starts to charge through
resistor R1. Once the time period
has started further trigger pulses are
ignored.
The threshold input (555 pin 6)
monitors the voltage across C1 and
when this reaches 2/3 Vs the time
period is over and the output
becomes low. At the same time
discharge (555 pin 7) is connected to 0V, discharging the capacitor ready for the next trigger.
The reset input (555 pin 4) overrides all other inputs and the timing may be cancelled at any time by
connecting reset to 0V, this instantly makes the output low and discharges the capacitor. If the reset
function is not required the reset pin should be connected to +Vs.
Power-on reset or trigger
It may be useful to ensure that a monostable circuit is reset or triggered
automatically when the power supply is connected or switched on. This is achieved
by using a capacitor instead of (or in addition to) a push switch as shown in the
diagram.
The capacitor takes a short time to charge, briefly holding the input close to 0V
when the circuit is switched on. A switch may be connected in parallel with the
capacitor if manual operation is also required.
This arrangement is used for the trigger in the Timer Project.
Edge-triggering
If the trigger input is still less than 1/
3
Vs at the end of the time period the output
will remain high until the trigger is greater than 1/
3
Vs. This situation can occur
if the input signal is from an on-off switch or sensor.
The monostable can be made edge triggered, responding only to changes
of an input signal, by connecting the trigger signal through a capacitor to the
trigger input. The capacitor passes sudden changes (AC) but blocks a
constant (DC) signal. For further information please see the page on
capacitance. The circuit is 'negative edge triggered' because it responds to a
sudden fall in the input signal.
The resistor between the trigger (555 pin 2) and +Vs ensures that the trigger is normally high (+Vs).
Projects using 555 monostable: Adjustable Timer | Electronic 'Lock' | Light-sensitive Alarm
Top of page | Inputs | Output | Astable | Duty Cycle | Monostable | Edge-trigger | Bistable | Buffer
8. 3/10/2014 555 and 556 Timer Circuits
http://electronicsclub.info/555timer.htm 8/10
555 bistable circuit
555 inverting buffer circuit
(a NOT gate)
NOT gate symbol
555/556 Bistable (flip-flop) - a memory circuit
The circuit is called a bistable because it is stable in two
states: output high and output low. It is also known as a
'flip-flop'.
It has two inputs:
Trigger (555 pin 2) makes the output high.
Trigger is 'active low', it functions when < 1/3 Vs.
Reset (555 pin 4) makes the output low.
Reset is 'active low', it resets when < 0.7V.
The power-on reset, power-on trigger and edge-
triggering circuits can all be used as described above for
the monostable.
Projects using 555 bistable: Quiz | Model Railway Signal
Top of page | Inputs | Output | Astable | Duty Cycle | Monostable | Edge-trigger | Bistable | Buffer
555/556 Inverting Buffer (Schmitt trigger) or NOT gate
The buffer circuit's input has a very high impedance (about 1M ) so
it requires only a few µA, but the output can sink or source up to
200mA. This enables a high impedance signal source (such as an
LDR) to switch a low impedance output transducer (such as a
lamp).
It is an inverting buffer or NOT gate because the output logic state
(low/high) is the inverse of the input state:
Input low (< 1/3 Vs) makes output high, +Vs
Input high (> 2/3 Vs) makes output low, 0V
When the input voltage is between 1/
3
and 2/
3
Vs the output remains
in its present state. This intermediate input region is a deadspace
where there is no response, a property called hysteresis, it is like
backlash in a mechanical linkage. This type of circuit is called a
Schmitt trigger.
If high sensitivity is required the hysteresis is a problem, but in many
circuits it is a helpful property. It gives the input a high immunity to
noise because once the circuit output has switched high or low the input must change back by at least
1/3 Vs to make the output switch back.
10. 3/10/2014 555 and 556 Timer Circuits
http://electronicsclub.info/555timer.htm 10/10
Use coupon code
electron10 for 10%
discount off hosting
Home
Downloads
Books
FAQ
Contact
Discounts
Links
Construction
- Breadboard
- Stripboard
- PCB
Soldering
- Tools
- Workbench
- Diodes
- ICs ('Chips')
- CMOS logic ICs
- 74 series ICs
- Lamps
- LEDs
- Relays
- Resistors
- Switches
- Transistors
- Variable Resistors
- Others
- Starter Kit
555 Timer IC
- Circuit Symbols
- Circuit Symbols
- Electricity/Electron
- Series & Parallel
- Voltage & Current
- Meters
- Multimeters
- Resistance
- Ohm's Law
- Power & Energy
- AC & DC Signals
- Oscilloscopes
- Power Supplies
- Transducers
- Voltage Dividers
- Transistor Circuits
- Analgoue & Digital
- Logic Gates
- Capacitance
- Impedance
- Counting
- Quantities & Units
- Traffic Light
- Dice
- Model Lighthouse
- Simple Tester
- Flashing LED
- Electronic 'Lock'
- Adjustable Timer
- Light Alarm
- Xmas Decoration
- Railway Signal
- Level Crossing
- Lead Tester
- 'Random' Flasher
- Heart Badge
- Valentine Heart
More Projects
Kits for Children
Electronics Projects
Starter Kit wit...
Mallinson Electric...
Best Price £12.99
or Buy New £12.99
Privacy Information
Privacy Policy & Cookies
This website does not collect any personal information unless you contact me by email. If you send
me an email your name, email address, and any other personal information you supply will be used
only to respond to your message. Your personal information will never be given to any third party
without your permission.
This website displays affiliate advertisements. If you click on these advertisements the advertiser
will know you came from this site and I may be rewarded if you become their customer. No personal
information is passed to advertisers.
This website uses StatCounter cookies to estimate the number of unique visitors. No personal
information is stored in the cookies. If you would like further information or wish to refuse these
cookies please visit the StatCounter website.
To learn how to delete and control cookies from your browser please visit AboutCookies.org.