
Recommended
More Related Content
What's hot
What's hot (20)
Similar to Shopify
Similar to Shopify (14)
More from My App Editor
Recently uploaded
Recently uploaded (20)
Shopify
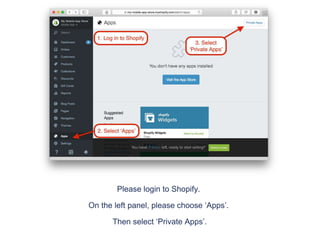
- 1. Please login to Shopify. On the left panel, please choose ‘Apps’. Then select ‘Private Apps’.
- 2. Click on ‘Create a Private App’
- 3. Add in a title for your app and a contact email (valid email address) and then press ‘Save’.
- 4. Now select the app you have created.
- 5. You’ll need to copy the API Key and Password to be able to add it on to the CMS.
- 6. Please login to the CMS. To edit your app, make sure you are on the ‘App’ view of the platform. This is located in the middle of your header bar.
- 7. Go to the ‘features’ tab on the navigation panel to start customising out your content.
- 8. Once the ‘Features’ tab has been selected the app panel will appear with a list of the features that are already applied to your app. On the top right of the panel there is a ‘Manage’ button, click this to access the features menu where you can pick and choose which features you would like on your app.
- 9. Select the ‘Shopify’ feature. 'Add’ the feature and then move it to where you would like it to be placed on your app panel. Press ‘Close' once you’ve finished.
- 10. Select the ‘Shopify’ tab now located on your app panel.
- 11. For a detailed description of what the ‘Shopify’ feature does hover over the question mark button
- 12. Click the customise button to change the name or the icon of your Shopify feature.
- 13. To chose an icon or to upload your own custom icon press the ‘Browse’ button.
- 14. Choose an icon from the list provided, or to upload your own icon press the ‘Upload custom icon’ tab.
- 15. To upload your custom icon drag and drop your 60 x 60 pixel image into the blue area, or press browse to find your icon manually. Press set when you have chosen your icon.
- 16. Press ‘Save’ once you have finished customising your features name and icon.
- 17. Come back to the Shopify tab. Please enter the API Key and Password you copied from Shopify earlier. Enter a Store Name as well. Don’t forget to ‘Save’ changes at the top right of the page.
- 18. Preview App To view your new app feature download the Putti Preview App and navigate to the Shopify tab.