Security service equipment integrated CCTV and burglar fire alarm
•Download as PPTX, PDF•
0 likes•58 views

How to build up security service center easy?With the integrated security equipment, the security monitoring center with more than 10000 users can be built up and managed easy. There is free CMS for security management and security monitoring. From the windows browser, the system can be accesed to remote configure or monitoring. There are local network management PC software to manage local security service systems and internet network PC software to manage all security systems. The secucirty manager can assign the authority and device to identified users.

Recommended
More Related Content
Similar to Security service equipment integrated CCTV and burglar fire alarm
Similar to Security service equipment integrated CCTV and burglar fire alarm (20)
More from Vedard Security Alarm System Store
More from Vedard Security Alarm System Store (20)
Recently uploaded
Recently uploaded (20)
Security service equipment integrated CCTV and burglar fire alarm
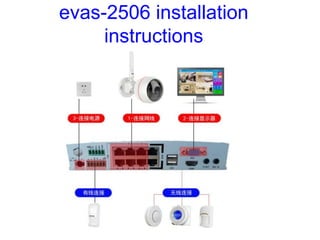
- 2. foreword EAVS-2506 is an alarm video integrated host using H.265 video compression. The host supports 6-way POE high- definition network video access, and supports multiple wired and wireless and bus defense zones. Built-in 2G/4G network module and TCP/IP network module, dual network communication, stable and reliable performance. It has special functions such as high-definition monitoring, intelligent anti-theft, two-way intercom, intelligent home appliances, remote control, and centralized management. It is widely used in residential areas, villas, shops, chain supermarkets, office buildings, enterprises and institutions, etc., to ensure the safety of personal and property in an all- round way.
- 3. Product functions and features 1. communication ways: Supports PSTN, 2G/4G, and TCP/IP network communication modes. 2. System Integration Set video, alarm, smart home in one, one key intelligent management. 3. Connectivity The ONVIF protocol is supported by many major brand network cameras. 4. Centralized management IPC centralized preview, centralized video, video playback, centralized equipment management. 5. Remote control Supports remote control on mobile phones, PCS, ipads, and Internet Explorer. 6. Data concurrency Two independent IP communication networks, data concurrent to both platforms. 7. Multiple functions Two-way intercom, motion detection, POE power supply, routing, and so on.
- 7. Wired Zone Wiring The detector power supply pole is connected to 12V+, and the negative pole is connected to 12V-. The signal line is connected to Z1 and COM, and so on.
- 8. Camera video cable interface Connect the camera video cable to the 8 channels of the host.
- 9. host computer interface When setting up programming, use a VGA cable or HDMI cable to connect to the host terminal, and you can enter the host computer configuration page for configuration.
- 10. External antenna, wired siren, keyboard interface The antenna is connected to the ANT interface, the positive pole of the siren Z is connected to BEL, and the negative pole is connected to GND The keyboard is connected according to the picture
- 11. Network cable interface, USB interface Connect the host network port to the user router with a network cable. USB port can connect mouse and U disk
- 12. telephone line interface The outside line of the telephone is connected to the LINE port, and the telephone is connected to the TEL port.
- 13. Configure page settings After the main unit is powered on and connected to the computer, you can see the picture above
- 14. Configure page settings Main page icon function introduction
- 15. Configure page settings • Main page icon function introduction
- 16. Configure page settings After the host is turned on, click the screen button, and the login page shown above will be displayed. The account admin has no password. direct login
- 17. Configure page settings After logging in, the above page appears, we only need to set system settings, security settings, network settings.
- 18. Configure page settings Including: basic settings, user settings, hard disk settings, default settings, system operation, system maintenance
- 19. Configure page settings In the system settings, the basic settings can set the content on the picture, and the factory default can also be used.
- 21. Configure page settings In the hard disk setting, the new hard disk needs to be formatted before recording
- 23. Configure page settings The system operation force can shut down, restart and upgrade the system.
- 24. Configure page settings In the system maintenance, you can set the date and time for the host to automatically restart.
- 25. Configure page settings Including: remote control setting, zone setting, system setting, telephone alarm, user phone, password, GPRS setting
- 26. ID is the unique code of the wireless device, which can be directly input or obtained wirelessly. This machine supports 8 remote controls at the same time. Username is the user of this remote, can be empty Wireless siren code pairing: Turn on the siren receiver, press and hold the save button on the wireless alarm, and click the wireless siren code pairing on the interface. Hearing the prompt sound means that the learning is successful. When deleting, press the Delete 1 and Delete 2 buttons simultaneously for 1 minute.
- 27. Defense zone number: wireless defense zone 1-32, bus defense zone 33-96, wired defense zone 97-105 Type: Burglar, Delay, Emergency, 24 Hours, Fire, Disabled Defense zone address: the location where the defense zone is installed, it can be empty Siren Tone: When the defense zone alarms, what form will the siren use to alarm, divided into continuous tone, pulse tone and mute Enable: To use this defense zone, tick Enable
- 28. Configure page settings Zone alarm type: refers to the type of alarm that the detector set in the zone can report to the host computer and the alarm center after encountering an alarm. Once the alarm is activated in the defense zone, it will send a report message to the center according to the previously set alarm situation. In addition, once the alarm type of a defense zone is set, no matter what kind of alarm triggers the alarm, it will alarm according to the alarm type set in the defense zone. √ indicates that the host generates an alarm when the alarm is triggered. × means that the host does not generate an alarm when the alarm is triggered, the wireless defense zone is valid by default, and the wired defense zone is disabled The siren sound can be set according to the needs. It is recommended to use different siren sounds for different alarm situations. For example, emergency can be set to mute
- 29. Configure page settings Click the wireless code pairing with the mouse to enter the code pairing interface: when the code pairing is successful, the following interface will appear
- 30. Configure page settings Associated defense zone: In order to prevent false alarms, associate two ringing detectors as needed. When two detectors are triggered within the set time range, the controller will alarm, and only one defense zone will be triggered, and the defense zone will be activated. early warning Note: The Associated Equipment Department recommends the use of door magnetic switch detectors.
- 31. Configure page settings System settings: You can set the delay time of arming and disarming, siren time, and tick the arming and disarming report. Others can be set by themselves as needed.
- 32. Configure page settings Because we use the network transmission here, the alarm center telephone alarm and user telephone can not be set
- 33. Configure page settings Under alarm linkage, select the defense zone and the corresponding camera channel to be set and click save
- 34. Configure page settings Set it as needed, tick it when the timing time is valid
- 35. Configure page settings Remote control/defense zone query: check how many remote controls are connected to the host and the use of defense zones
- 36. Configure page settings System alarm: no need to set if this function is not used
- 37. Configure page settings Electrical switch: Used to control smart home products
- 38. Configure page settings Including: encoding setting, recording setting, PTZ setting, video blocking, color timing setting, rotation training display setting
- 39. Configure page settings The encoding can be set by default, and the format can also be set according to the needs: the code stream 960H is the highest. The picture quality is divided into best, good, good, average, and poor. Frame number 1-25 can be adjusted by itself. The higher the frame rate, the better the picture, the highest bit is 25fps.
- 40. Configure page settings It is necessary to tick the video after the timing is valid. PTZ settings, video occlusion, color timing settings, and rotation training settings are currently not used and no settings are required.
- 41. Configure page settings Including: basic settings, advanced settings, network time synchronization, IP filtering, platform settings
- 42. Configure page settings Tick the following IP address, fill in the IP address according to the customer route, subnet mask: 255.255.255.0 Gateways route addresses for clients. First, enter the WAN port of the customer router with the standby DNS. The mac address and port settings do not need to be set.
- 43. Configure page settings Platform settings: main alarm platform address: 119.147.144.84 Main alarm platform port: 7974 ID: It is the 8-digit number of the mainframe, and the number segment can be freely edited according to the company's issued one, but other people's number segments cannot be used. Password: 12345678 is the password of the host and also the login password of the customer's mobile phone client. It is best to unify it as 12345678.