
Recommended
More Related Content
Similar to Poster Presentation· You are required to present your research.docx
Similar to Poster Presentation· You are required to present your research.docx (20)
More from stilliegeorgiana
More from stilliegeorgiana (20)
Recently uploaded
Recently uploaded (20)
Poster Presentation· You are required to present your research.docx
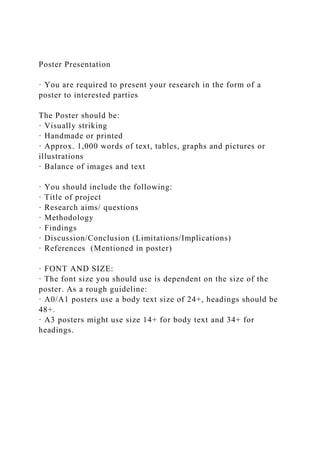
- 1. Poster Presentation · You are required to present your research in the form of a poster to interested parties The Poster should be: · Visually striking · Handmade or printed · Approx. 1,000 words of text, tables, graphs and pictures or illustrations · Balance of images and text · You should include the following: · Title of project · Research aims/ questions · Methodology · Findings · Discussion/Conclusion (Limitations/Implications) · References (Mentioned in poster) · FONT AND SIZE: · The font size you should use is dependent on the size of the poster. As a rough guideline: · A0/A1 posters use a body text size of 24+, headings should be 48+. · A3 posters might use size 14+ for body text and 34+ for headings.
- 2. TIPS ON POSTER: · Analyse Task – academic posters are often based upon larger bodies of work, but the task of creating a poster itself needs to be carefully considered. Questions to be asked might include: · What is the main message you are trying to convey? · What is the purpose of the poster? · Who is your target audience – specialists or a more general audience? · Research – if your poster is based on another piece of work this will already have been done to some extent, but if not you may need to locate relevant sources, read background information and make notes. · Plan content – the purpose of your poster will influence the content and the structure of the content. A typical research poster may include some of the following sections: · Title · Introduction · Methods/Methodology · Results · Discussion · Conclusion · References TEMPLATE Library & Information Services have produced an A3 (more sizes coming soon) poster template that can be customised to suit your needs. It can be a good starting point for creating an academic poster, but it is only a suggested layout; you are encouraged to customise it to suit your needs. The template can be downloaded from the Resources page of the IT Training website: study.cardiffmet.ac.uk/Help/Training/ LAYOUT:
- 3. · Use headings to group text – this makes your poster easier to read and digest. · Format your headings in a consistent way – this creates a sense of unity and helps structure your content visually. · Structure your content in a logical way –content neatly aligned into columns creates a visual narrative for your reader; they will tend to read down then across: · Use white space and margins – plenty of white space makes your poster easier to read and improves the signal-to-noise ratio (the signal is your message, noise is anything that prevents your message from getting through, such as an abundance of text or unnecessary graphical elements). Margins give your text space to breath and can act as delimiters for the different sections of your poster. · Sketch your poster before you begin to design it – a pencil and paper sketch of the poster’s layout may help you when creating the final design. Designing Academic Posters How-To Guide This guide accompanies the Designing Academic Posters training session. It covers the main points of the training session in a step-by-step “How To” manner. The guide covers Best Practice advice for designing effective academic posters and also details how to create posters using PowerPoint.
- 4. All resources used in the training session, including the Cardiff Met poster template, are available on the IT Training website: study.cardiffmet.ac.uk/Help/Training/ A Note on Conventions: · Menus (tabs) and menu options appear in bold italics. E.g. Insert Image means choose the Insert menu then the Image option. · PowerPoint features appear in bold. E.g. “Alignment guides (red dotted lines) will appear when an image is aligned…” · Hints, tips or asides appear within a box. E.g. TIP: Hints, tips and asides will appear in boxes like this! Contents Features of Academic Posters3 Planning Your Poster3 Layout5 Setting the page size5 Using the Cardiff Met template5 Layout Best Practice7 Formatting Text8 Font8 Alignment9 Margins9 Charts10 Inserting a Chart10 Chart Options13 Images13 Finding good images13 Using images15 Colour Scheme16 Printing your poster16 Further Information18Features of Academic Posters Academic posters are used to communicate ideas and research findings in a visually compelling way. They can be used to summarise a research project and serve as an introduction to you and your work.
- 5. A good academic poster will explain the salient points of your research in a clear and concise way. The most important part of the poster is the content. Detailed academic papers or research reports need to be condensed into 300 – 800 words that should be written in a style that suits the target audience, who may not be experts in the field. Whilst the written content is undeniably important, the design of the poster can help to communicate your message effectively. When creating your poster you should be mindful of some features of good academic posters: · Visual – your poster should attract potential readers. Graphics (charts and images) are a great ‘hook’ to draw-in your audience · Clear – text should be easy to read and grouped under appropriate headings. The layout of the poster should create a natural flow that sequences the content logically. · Concise – typically academic posters are between 300 – 800 words. Charts and tables can be used to summarise numerical data. · Self-explanatory – a poster cannot comprehensively explain your research, but it should include enough information that your audience understands the gist of your work. · Evidenced – details of any original research undertaken should be given, as should references to additional sources cited in the poster.Planning Your Poster Before you begin creating your poster, it is a good idea to plan the content and design of the poster. The following steps can be taken when planning your poster: · Analyse Task – academic posters are often based upon larger bodies of work, but the task of creating a poster itself needs to be carefully considered. Questions to be asked might include: · What is the main message you are trying to convey? · What is the purpose of the poster? · Who is your target audience – specialists or a more general audience? · Research – if your poster is based on another piece of work
- 6. this will already have been done to some extent, but if not you may need to locate relevant sources, read background information and make notes. · Plan content – the purpose of your poster will influence the content and the structure of the content. A typical research poster may include some of the following sections: · Title · Introduction · Methods/Methodology · Results · Discussion · Conclusion · References This is not, however, an authoritative structure. Research in the social sciences, for example, may not lend itself to be structured in such a rigid way, as such the headings you use may relate to topics or key terms of your research. · Plan design – how will you layout the sections you have identified? Where will you place your graphics? What colour scheme will you use? Will you incorporate any additional design elements, such as logos? Perhaps the most important consideration when planning the design of your poster is deciding the layout. The next section of this guide focuses on choosing and then implementing a good poster layout. Layout A good layout will make your poster easy to read and should create a natural flow through the content. However, before you begin deciding how your sections will be organised on the page, you first need to set the PowerPoint 2013 slide to an appropriate page size.Setting the page size Academic posters are typically A0 or A1 size, but A3 is also common and is often more convenient to print. 1. From the Design tab choose, Slide Size Custom Slide Size.
- 7. 2. Change the Width and Height settings depending on your required page size. Paper Size Width (cm) Height (cm) A0 118.9 84.1 A1 84.1 59.4 A2 59.4 42 A3 42 29.7 A4 29.7 21 TIP: Setup your page for largest poster you are likely to print. When printing, it is much easier to scale down, than scale up. E.g. if you are going to print an A0 poster and an A4 poster, configure your page to be A0 size. See the Printing Your Poster section for more details. Using the Cardiff Met template Library & Information Services have produced an A3 (more sizes coming soon) poster template that can be customised to suit your needs. It can be a good starting point for creating an academic poster, but it is only a suggested layout; you are encouraged to customise it to suit your needs. The template can be downloaded from the Resources page of the IT Training website: study.cardiffmet.ac.uk/Help/Training/Designing Academic Posters – How-To GuideDesigning Academic Posters – How-To
- 8. Guide © 2019 Cardiff Metropolitan University 8 Click within the title,author and heading text boxes to edit the text Gridlines (View tab Gridlines) can also help align material neatly The width and height of content placeholders can be altered by clicking on the box outline and using the drag handles to adjust. PowerPoint will display alignment guidelines (red dotted lines) when objects on the slide are aligned. Content placeholders can be used to add text or multimedia content, e.g. images and charts Layout Best Practice No matter whether you use the Cardiff Met template or create your own, you should bear in mind the following tips for laying out academic posters: · Use headings to group text – this makes your poster easier to read and digest. · Format your headings in a consistent way – this creates a sense of unity and helps structure your content visually. · Structure your content in a logical way –content neatly aligned into columns creates a visual narrative for your reader; they will tend to read down then across: Arrows have been added to show how a typical reader would read this poster. A good layout, such as this, does not require arrows to indicate narrative · Use white space and margins – plenty of white space makes your poster easier to read and improves the signal-to-noise ratio (the signal is your message, noise is anything that prevents your
- 9. message from getting through, such as an abundance of text or unnecessary graphical elements). Margins give your text space to breath and can act as delimiters for the different sections of your poster. · Sketch your poster before you begin to design it – a pencil and paper sketch of the poster’s layout may help you when creating the final design. Formatting Text It is important that your text is clear and easy to read, you therefore need to choose an appropriate font and font size. Font Serif fonts, such as Times New Romanand Garamond are traditionally used for printed documents, but they can look a bit dated. Modern sans-serif fonts work well on the screen and on paper, good examples are Arial, Calibri and Tahoma. Try to stick to one or two fonts throughout the poster, this creates a sense of cohesion and results in a more professional looking poster. The font size you should use is dependent on the size of the poster. As a rough guideline, A0/A1 posters should use a body text size of 24+, headings should be 48+. A3 posters might use size 14+ for body text and 34+ for headings. Font settings can be found in the Font group on the Home tab:Maintaining a consistent font size By default, PowerPoint will attempt to resize text to fit the placeholder or text box. This is quite useful for slides being displayed on a projector but, in general, body text on a poster should be a consistent size. To disable text resizing: 1. Right-click on the text box or placeholder and choose Format Shape 2. From the Format Shape pane choose: Text Options Textbox (icon) Do not Autofit TIP: The placeholders on the Cardiff Met template are already set to Do not Autofit
- 10. Alignment Body text should be left aligned, or justified, which distributes text evenly between both margins. Justified text can look neater than left aligned text, but can result in distorted character placement if the text box is particularly narrow. Body text should be precisely aligned underneath headings to create a visual connection between the heading and text. PowerPoint will help you align objects by displaying alignment guidelines when objects are aligned neatly: The dotted red alignment guideline indicates that the text box is aligned with the heading Margins Each text box has four margins – left, right, top, and bottom. The top margin can be used to provide an appropriate amount of space between your headings and body text. The left margin should be set to zero to ensure that body text is aligned directly below headings. To change margins: 1. Right-click on the text box and choose Format Shape 2. From the Format Shape pane choose: Text Options Textbox (icon) 3. Adjust the margins as desired: TIP: The left and top margins for textboxes on the Cardiff Met template are already set to appropriate values. Charts Charts can be used to display quantitative data in a visual and engaging way. Charts are generally preferable to data tables as they: · Create interest - they are eye-catching and thus are especially suitable for posters. · Draw “the viewer’s attention to the sense and substance of the data” (Tufte, 2001). · Can show trends and patterns.
- 11. The goal of a good chart is to display data in an efficient, meaningful and unambiguous way (Klass, 2002). This is especially true when using charts on posters; space is limited so it is important that your chart only display meaningful and relevant data. You should also try to avoid clouding your chart with “chart-junk” – graphical elements that add little or nothing to the chart, but do make it more difficult to interpret. This chart includes a lot of chart-junk: large data markers, values for each marker and a “noisy” background Inserting a Chart There are a couple of ways to use charts in PowerPoint; you can insert a new chart and type in the data, or you can copy a chart from Excel. Inserting a new chart 1. (a) Use the Insert Chart icon on the content placeholder OR (b) From the Insert tab choose Chart. TIP: If you are using the Cardiff Met template, it may be better to use the Inserttab as this will allow you to insert a chart alongside some explanatory text. Make sure you have some text in each placeholder first though, otherwise the chart will be inserted into the first available placeholder. 2. Next, choose your chart type: 3. Type in your data. X-axis labels should go in column A, series labels in row 1 and the data sets in columns B, C and D. Extra rows and columns can be added by simply entering data in an adjacent column or row. Pasting from Excel 1. Copy the chart from an Excel spreadsheet. 2. Return to PowerPoint and paste in the chart. 3. Immediately after pasting the chart, a small pop-up menu will appear. Click on it to access paste options:
- 12. 4. The default Paste Option is to Use Destination Theme and Embed Workbook – this will change the colour scheme of the chart to that of your poster. It will also create a copy of the chart and store it within the PowerPoint file (i.e. embed it). This is the safest option as the file no longer requires the spreadsheet to display the chart. It does mean, however, that if you change the data in your spreadsheet, the chart on your poster will not update. Use the Keep Formatting & Link Data option to keep the link between the spreadsheet and PowerPoint file.Chart Options With a chart selected, use the Chart Tools – Design tab to manipulate the design and layout of the chart: Styles affect the appearance of the chart elements. Layout controls the elements that are present on a chart. The Chart Tools – Format tab allows you to further customise chart elements. Images Images, like charts, can be used to draw readers to your poster. They should not, however, be used as decoration; images should be used to illustrate a point or convey complex information visually. Care should be taken when choosing images to use on your poster. Images should be of a high resolution (quality), especially on larger posters where image deficiencies will be obvious. Images other than your own may be subject to copyright. It is important that you clear copyright with the copyright owner, or use images that are licenced for use, such as those available under Creative Commons (creativecommons.org) licences. Image quality can also be degraded when they are manipulated. For example, changing the width of an image, but not the height, will result in a stretched or squished appearance. Image
- 13. quality also decreases if they are enlarged significantly. Finding good images The most efficient way to find good quality images that can be used for free on your poster, is to undertake a Google Image search: 1. Navigate to google.com or use your web browser’s search box. Enter your search term. 2. Click on the Images tab on the results page to display image results. 3. Click on the Search tools button: 4. From here you can apply filters to the search results. As we are interested in high quality images we might apply the Size filter to narrow our results to large images. 5. The Usage Rights filters can restrict search results to images that have been licenced for reuse: TIP: Always confirm if you can use an image. The Usage Rights filter works well, but isn’t perfect Other sources for good quality, free images include: · Creative Commons Search - http://search.creativecommons.org/ · The Cardiff Met Electronic Library: · From the TSR homepage, choose Electronic Library from the Quick Links on the right (or from Study Library Services Electronic Library) · Click on Databases A-Z · Filter by Material Type: Multimedia · Click Go · FreeImages.com - http://www.freeimages.com/ · Foter – foter.com · Open Photo - http://openphoto.net/ Using images Images can be inserted by using the Insert Image icon on a
- 14. content placeholder or the Insertmenu: Once inserted, images can be resized by using the drag handles. Alignment guides (red dotted lines) will appear when an image is aligned with other objects on the slide. TIP: Use the corner drag handles to maintain the aspect ratio of the image, this will prevent stretched and squashed images. Avoid overly enlarging images as this will degrade the quality. When an image is selected the Picture Tools – Format tab appears. This tab allows you to adjust the image, e.g. change the brightness, contrast and colour, or change the picture style. Apply a Picture Style template (border, effects etc.) Adjust image settings, such as brightness and colour saturation Colour Scheme Try to use a consistent colour scheme throughout your poster; choose a few colours that work well together and stick to them throughout your poster. Adobe Color CC [https://color.adobe.com/] can give you a good indication of colours that work well together. To change the colour scheme: Use the Colors menu to change the colour scheme Click the More button next to the gallery of variants on the Design tab Printing your Poster A0 and A1 posters can be printed by both the Llandaff and Cyncoed Print Studios. A3 and A4 posters can be printed on any staff or student printer. Before printing your poster, ensure you proof read it thoroughly. It is also a good idea to print a test copy on A4 paper to get an idea of how it will look when printed. To print an A4 copy: 1. File Print 2. Click the Printer Properties link beneath the name of the printer.
- 15. 3. Change Page Size to A4: TIP: This option scales the page when printing, it does not change the size of the content on the PowerPoint slide. Remember to revert this setting when you are printing the poster properly. Further Information The following resources may be of use when creating your academic poster. · Designing a Poster e-lesson from the University of Leicester: connect.le.ac.uk/posters · Designing an Academic Poster presentation from Adam Read prezi.com/0e1ftr5f7zlz/designing-an-academic-poster/ · Designing conference posters website authored by Colin Purrington colinpurrington.com/tips/academic/posterdesign · Examples of good academic posters hosted on Flickr www.flickr.com/groups/pimpmyposter/ References All example academic posters used in this training session are the copyright of the respective copyright owner. They are used in this training session under the Illustration for Instruction exception of the Copyright, Designs and Patents Act (1988). Acar, U. et. al (2012) Energy Efficient Self Adjusting Computation. Available at: https://flic.kr/p/cb1Ffw. (Accessed 29 October 2014). Handyside R. (2013) Getting the buggers to do their homework. Available at: https://flic.kr/p/ef2oLr (Accessed 29 October 2014). Klass, G. (2002) Creating Good Charts. Available at: http://lilt.ilstu.edu/gmklass/pos138/datadisplay/sections/goodch arts.htm (Accessed 30 October 2014) Mach et. al (2008) A mobile phone application to help track and reduce energy consumption at home. Available at:
- 16. https://flic.kr/p/4FbRuz (Accessed 29 October 2014). Mayer, R and Jones, D. (no date) Asymmetries in phonological development: the case of consonant cluster acquisition in Welsh-English bilingual children. Cardiff: UWIC Press Pranah, N (2012) Flow Interaction Between Multiple Stages Inside a Horizontal Wellbore. Available at: https://flic.kr/p/cTdUk3 (Accessed 29 October 2014) Sveikata, L. (2011) Evaluation of pain, anxiety and depression in patients with chronic alcoholism. Available at: https://flic.kr/p/amo8VJ (Accessed 29 October 2014). Toress, C et. Al (2010) Face recognition with resolution- enhanced stimuli. Available at: https://flic.kr/p/8pvVUL (Accessed 29 October 2014). Tufte, E. (2001) The Visual Display of Quantitative Information. 2nd edn. Cheshire, Connecticut: Graphics Press LLC. Analyse Task Research Plan Content Plan Design © 2016 Cardiff Metropolitan University 7