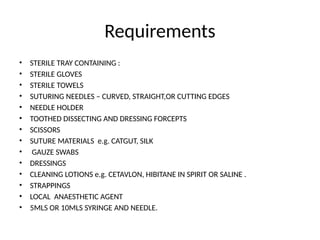
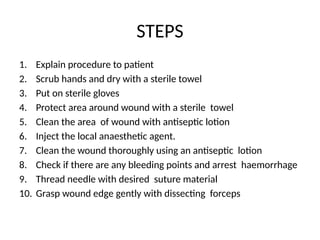
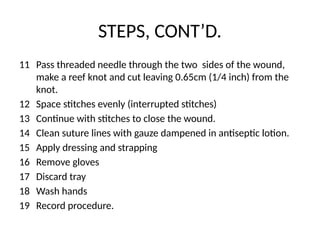
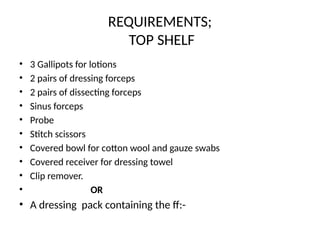
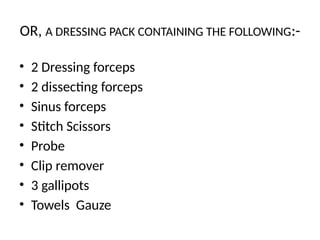
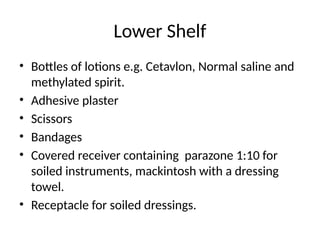
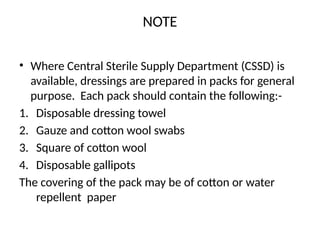
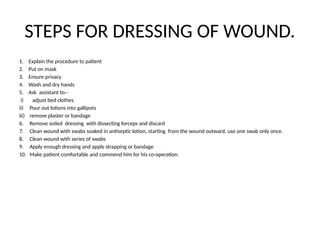
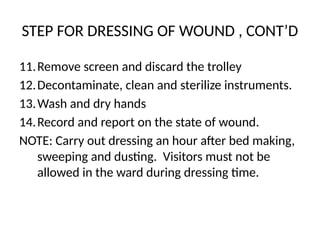
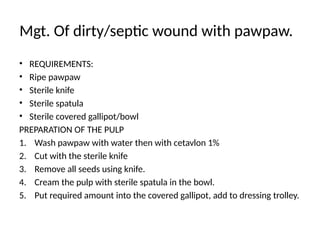
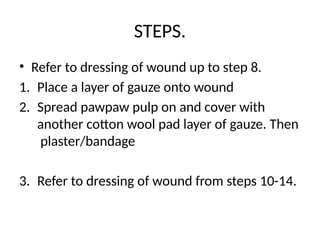
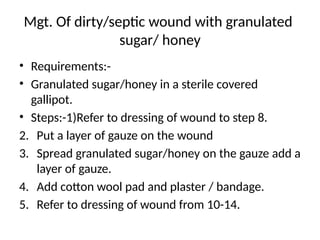
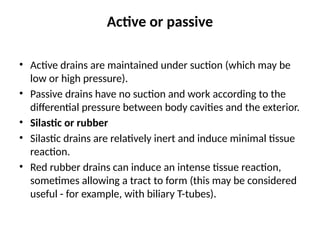
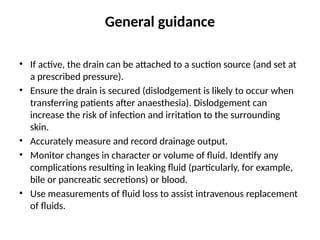
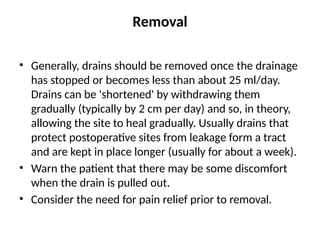
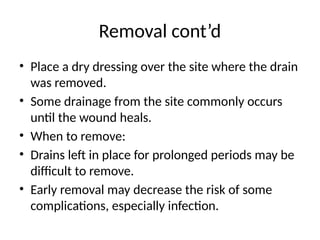
SUTURING OF MINOR WOUNDS
Suturing is using stitch or series of
stitches to close a wound
Requirements
• STERILE TRAY CONTAINING :
• STERILE GLOVES
• STERILE TOWELS
• SUTURING NEEDLES – CURVED, STRAIGHT,OR CUTTING EDGES
• NEEDLE HOLDER
• TOOTHED DISSECTING AND DRESSING FORCEPTS
• SCISSORS
• SUTURE MATERIALS e.g. CATGUT, SILK
• GAUZE SWABS
• DRESSINGS
• CLEANING LOTIONS e.g. CETAVLON, HIBITANE IN SPIRIT OR SALINE .
• STRAPPINGS
• LOCAL ANAESTHETIC AGENT
• 5MLS OR 10MLS SYRINGE AND NEEDLE.
STEPS
1. Explain procedure to patient
2. Scrub hands and dry with a sterile towel
3. Put on sterile gloves
4. Protect area around wound with a sterile towel
5. Clean the area of wound with antiseptic lotion
6. Inject the local anaesthetic agent.
7. Clean the wound thoroughly using an antiseptic lotion
8. Check if there are any bleeding points and arrest haemorrhage
9. Thread needle with desired suture material
10. Grasp wound edge gently with dissecting forceps
STEPS, CONT’D.
11 Pass threaded needle through the two sides of the wound,
make a reef knot and cut leaving 0.65cm (1/4 inch) from the
knot.
12 Space stitches evenly (interrupted stitches)
13 Continue with stitches to close the wound.
14 Clean suture lines with gauze dampened in antiseptic lotion.
15 Apply dressing and strapping
16 Remove gloves
17 Discard tray
18 Wash hands
19 Record procedure.
DRESSING OF WOUNDS
• PREPARATION OF A DRESSING TROLLEY
• THE DRESSING TROLLEY IS PREPARED AS
FOLLOWS:-
1 Put on mask, wash hands thoroughly and
dry.
2 Clean the shelves and rails of the trolley
with soapy water, rinse dry, clean with
disinfectant e.g. hibitane in spirit and dry.
REQUIREMENTS;
TOP SHELF
• 3 Gallipots for lotions
• 2 pairs of dressing forceps
• 2 pairs of dissecting forceps
• Sinus forceps
• Probe
• Stitch scissors
• Covered bowl for cotton wool and gauze swabs
• Covered receiver for dressing towel
• Clip remover.
• OR
• A dressing pack containing the ff:-
OR, A DRESSING PACK CONTAINING THE FOLLOWING:-
• 2 Dressing forceps
• 2 dissecting forceps
• Sinus forceps
• Stitch Scissors
• Probe
• Clip remover
• 3 gallipots
• Towels Gauze
Lower Shelf
• Bottles of lotions e.g. Cetavlon, Normal saline and
methylated spirit.
• Adhesive plaster
• Scissors
• Bandages
• Covered receiver containing parazone 1:10 for
soiled instruments, mackintosh with a dressing
towel.
• Receptacle for soiled dressings.
NOTE
• Where Central Sterile Supply Department (CSSD) is
available, dressings are prepared in packs for general
purpose. Each pack should contain the following:-
1. Disposable dressing towel
2. Gauze and cotton wool swabs
3. Square of cotton wool
4. Disposable gallipots
The covering of the pack may be of cotton or water
repellent paper
STEPS FOR DRESSING OF WOUND.
1. Explain the procedure to patient
2. Put on mask
3. Ensure privacy
4. Wash and dry hands
5. Ask assistant to:-
i) adjust bed clothes
ii) Pour out lotions into gallipots
iii) remove plaster or bandage
6. Remove soiled dressing with dissecting forceps and discard
7. Clean wound with swabs soaked in antiseptic lotion, starting from the wound outward, use one swab only once.
8. Clean wound with series of swabs
9. Apply enough dressing and apply strapping or bandage
10. Make patient comfortable and commend him for his co-operation.
STEP FOR DRESSING OF WOUND , CONT’D
11.Remove screen and discard the trolley
12.Decontaminate, clean and sterilize instruments.
13.Wash and dry hands
14.Record and report on the state of wound.
NOTE: Carry out dressing an hour after bed making,
sweeping and dusting. Visitors must not be
allowed in the ward during dressing time.
Mgt. Of dirty/septic wound with pawpaw.
• REQUIREMENTS:
• Ripe pawpaw
• Sterile knife
• Sterile spatula
• Sterile covered gallipot/bowl
PREPARATION OF THE PULP
1. Wash pawpaw with water then with cetavlon 1%
2. Cut with the sterile knife
3. Remove all seeds using knife.
4. Cream the pulp with sterile spatula in the bowl.
5. Put required amount into the covered gallipot, add to dressing trolley.
STEPS.
• Refer to dressing of wound up to step 8.
1. Place a layer of gauze onto wound
2. Spread pawpaw pulp on and cover with
another cotton wool pad layer of gauze. Then
plaster/bandage
3. Refer to dressing of wound from steps 10-14.
Mgt. Of dirty/septic wound with granulated
sugar/ honey
• Requirements:-
• Granulated sugar/honey in a sterile covered
gallipot.
• Steps:-1)Refer to dressing of wound to step 8.
2. Put a layer of gauze on the wound
3. Spread granulated sugar/honey on the gauze add a
layer of gauze.
4. Add cotton wool pad and plaster / bandage.
5. Refer to dressing of wound from 10-14.
Drains in wounds
Indications
• Surgical drains are used in a wide variety of different
types of surgery. Generally speaking, the intention is to
decompress or drain either fluid or air from the area of
surgery. Examples include: To prevent the
accumulation of fluid (blood, pus and infected fluids).
• To prevent accumulation of air (dead space).
• To characterize fluid (for example, early identification
of anastomotic leakage.
• Specific examples of drains and operations where they
are commonly used include:
Examples of drains cont’d
• Plastic surgery including myocutaneous flap
surgery.
• Breast surgery (to prevent collection of blood
and lymph).
• Orthopaedic procedures (associated with
greater blood loss).
Chest drainage
• Chest surgery (with, for example, the associated risks
of raised intrathoracic pressure and tamponade).
• Infected cysts (to drain pus). Pancreatic surgery (to
drain secretions). Biliary surgery.
• Thyroid surgery (concern over haematoma and
haemorrhage around the airway).
• Neurosurgery (where there is a risk of raised
intracranial pressure). Urinary catheters.Nasogastric
tubes.
Management
• Management is governed by the type,
purpose and location of the drain. It is usual
for the surgeon's preferences and instructions
to be followed. A written protocol can help
staff on the ward with the aftercare of surgical
drains.
Types of surgical drain
• Drains can be: Open or closed
• Open drains (Including corrugated rubber or
plastic sheets) drain fluid on to a gauze pad or
into a stoma bag. They are likely to increase the
risk of infection.
• Closed drains are formed by tubes draining into
a bag or bottle. Examples include chest,
abdominal and orthopaedic drains. Generally,
the risk of infection is reduced.
Active or passive
• Active drains are maintained under suction (which may be
low or high pressure).
• Passive drains have no suction and work according to the
differential pressure between body cavities and the exterior.
• Silastic or rubber
• Silastic drains are relatively inert and induce minimal tissue
reaction.
• Red rubber drains can induce an intense tissue reaction,
sometimes allowing a tract to form (this may be considered
useful - for example, with biliary T-tubes).
General guidance
• If active, the drain can be attached to a suction source (and set at
a prescribed pressure).
• Ensure the drain is secured (dislodgement is likely to occur when
transferring patients after anaesthesia). Dislodgement can
increase the risk of infection and irritation to the surrounding
skin.
• Accurately measure and record drainage output.
• Monitor changes in character or volume of fluid. Identify any
complications resulting in leaking fluid (particularly, for example,
bile or pancreatic secretions) or blood.
• Use measurements of fluid loss to assist intravenous replacement
of fluids.
Removal
• Generally, drains should be removed once the drainage
has stopped or becomes less than about 25 ml/day.
Drains can be 'shortened' by withdrawing them
gradually (typically by 2 cm per day) and so, in theory,
allowing the site to heal gradually. Usually drains that
protect postoperative sites from leakage form a tract
and are kept in place longer (usually for about a week).
• Warn the patient that there may be some discomfort
when the drain is pulled out.
• Consider the need for pain relief prior to removal.
Removal cont’d
• Place a dry dressing over the site where the drain
was removed.
• Some drainage from the site commonly occurs
until the wound heals.
• When to remove:
• Drains left in place for prolonged periods may be
difficult to remove.
• Early removal may decrease the risk of some
complications, especially infection.
CARE OF DRAINAGE TUBE
• Requirement:- same as requirement for dressing of
wound (Refer)
• Add sterile sharp pair of scissors
• Sterile safety pin.
• STEPS:-
1. Refer to dressing of wound to step 8
2. With the gloved hands open the sterile safety pin.
3. Grasp the protruding end of the drainage tube with an
artery forceps and clip into position.
4. Remove any stitch holding the drain in position.
Care of drainage tube, cont,d
5.Gently turn the drain within the wound to loosen it if its a
tubular drain.
6. Using the forceps gently pull the drain out of the wound
for a distance
7. Pass the safety pin through the tube out on the other side
as near the skin surface as possible and close it. Take care
not to injure the patient.
8. Cut the excess tubing off with a sterile pair of scissors or,
swab with cleansing lotion, apply dressing and hold it down
with strips of plaster . Refer to dressing of wound from step
10-14.
Removal of a drainage tube
• Requirement:-
• Same as requirement for dressing of wound.
• STEP:-
1. Refer to care of the drainage tube up to step 5
2. Remove the drain from the wound after swabbing around
it.
3. Swab the wound with cleansing lotion.
4. Dress wound with normal saline and hold it down with
strips of plaster.
5. Refer to dressing of the wound from step 10-14.
Preparation of a patient for incision and
drainage.
• This is cutting and draining of abscess.
• Requirements:-
• Bard Parker Knife handle
• Scalpel blade
• Drainage tube
• Normal saline
• Cleansing lotion e.g. Savlon 1:100
• Sterile cotton wool swabs
• Sterile gauze swabs
• Sterile receiver with
• (a) sponge (b) Dissecting forceps (c) Sinus forceps
• (d) Needle holder (e) Suturing Needles
• Anaesthetic agents , Suturing material, Syringes and needles, Gloves, Face mask
• Protective clothing, Towels to drape the patient, Receiver for used instruments,
• Bandages, Strapping and safety pins
•
STEPS
1. Explain procedure to patient
2. Reassure the patient
3. Prepare the patient for theatre( refer preparation of patient for surgery).
4. Assist doctor during the procedure
5. Continue reassuring the patient if procedure is under local anaesthesia.
6. If under general anaesthesia, refer to post operative management of
patients after surgery.
7. Change the dressing when necessary. ( Refer mgt. Of wounds).
8. Observe the wound for (a) Amount of pus, (b) Any bleeding
9. Record all findings
10. Decontaminate , wash, sterilize and store all equipment used .
11. Wash and dry hands.
REMOVAL OF CLIPS
• Requirements Same as requirement for dressing of wounds(refer). Add clip removing
forceps.
• Steps :- Refer to dressing of wounds up to step 8.
1. Place sterile swabs near the wound
2. Take the clip removing forceps in the right hand and a pair of dissecting forceps in
the left.
3. Steady the clips with dissecting forceps, insert one blade of the clips removers under
the clip in the centre and the other blade on top of it.
4. Ensure the blades are inserted for sufficient distance.
5. Press the blades together, this straightens the clip’s metal, lifting it from the skin on
either side.
6. Lift it on to a swab.
7. Repeat the above to all the clips or as required.
8. Swab the wound with spirit and apply dry dressing. Apply strips of plaster .
9. Refer to dressing of wound from step 10-14

Woumd dressing procedure particular note

  • 1.
    SUTURING OF MINORWOUNDS Suturing is using stitch or series of stitches to close a wound
  • 2.
    Requirements • STERILE TRAYCONTAINING : • STERILE GLOVES • STERILE TOWELS • SUTURING NEEDLES – CURVED, STRAIGHT,OR CUTTING EDGES • NEEDLE HOLDER • TOOTHED DISSECTING AND DRESSING FORCEPTS • SCISSORS • SUTURE MATERIALS e.g. CATGUT, SILK • GAUZE SWABS • DRESSINGS • CLEANING LOTIONS e.g. CETAVLON, HIBITANE IN SPIRIT OR SALINE . • STRAPPINGS • LOCAL ANAESTHETIC AGENT • 5MLS OR 10MLS SYRINGE AND NEEDLE.
  • 3.
    STEPS 1. Explain procedureto patient 2. Scrub hands and dry with a sterile towel 3. Put on sterile gloves 4. Protect area around wound with a sterile towel 5. Clean the area of wound with antiseptic lotion 6. Inject the local anaesthetic agent. 7. Clean the wound thoroughly using an antiseptic lotion 8. Check if there are any bleeding points and arrest haemorrhage 9. Thread needle with desired suture material 10. Grasp wound edge gently with dissecting forceps
  • 4.
    STEPS, CONT’D. 11 Passthreaded needle through the two sides of the wound, make a reef knot and cut leaving 0.65cm (1/4 inch) from the knot. 12 Space stitches evenly (interrupted stitches) 13 Continue with stitches to close the wound. 14 Clean suture lines with gauze dampened in antiseptic lotion. 15 Apply dressing and strapping 16 Remove gloves 17 Discard tray 18 Wash hands 19 Record procedure.
  • 5.
    DRESSING OF WOUNDS •PREPARATION OF A DRESSING TROLLEY • THE DRESSING TROLLEY IS PREPARED AS FOLLOWS:- 1 Put on mask, wash hands thoroughly and dry. 2 Clean the shelves and rails of the trolley with soapy water, rinse dry, clean with disinfectant e.g. hibitane in spirit and dry.
  • 6.
    REQUIREMENTS; TOP SHELF • 3Gallipots for lotions • 2 pairs of dressing forceps • 2 pairs of dissecting forceps • Sinus forceps • Probe • Stitch scissors • Covered bowl for cotton wool and gauze swabs • Covered receiver for dressing towel • Clip remover. • OR • A dressing pack containing the ff:-
  • 7.
    OR, A DRESSINGPACK CONTAINING THE FOLLOWING:- • 2 Dressing forceps • 2 dissecting forceps • Sinus forceps • Stitch Scissors • Probe • Clip remover • 3 gallipots • Towels Gauze
  • 8.
    Lower Shelf • Bottlesof lotions e.g. Cetavlon, Normal saline and methylated spirit. • Adhesive plaster • Scissors • Bandages • Covered receiver containing parazone 1:10 for soiled instruments, mackintosh with a dressing towel. • Receptacle for soiled dressings.
  • 9.
    NOTE • Where CentralSterile Supply Department (CSSD) is available, dressings are prepared in packs for general purpose. Each pack should contain the following:- 1. Disposable dressing towel 2. Gauze and cotton wool swabs 3. Square of cotton wool 4. Disposable gallipots The covering of the pack may be of cotton or water repellent paper
  • 10.
    STEPS FOR DRESSINGOF WOUND. 1. Explain the procedure to patient 2. Put on mask 3. Ensure privacy 4. Wash and dry hands 5. Ask assistant to:- i) adjust bed clothes ii) Pour out lotions into gallipots iii) remove plaster or bandage 6. Remove soiled dressing with dissecting forceps and discard 7. Clean wound with swabs soaked in antiseptic lotion, starting from the wound outward, use one swab only once. 8. Clean wound with series of swabs 9. Apply enough dressing and apply strapping or bandage 10. Make patient comfortable and commend him for his co-operation.
  • 11.
    STEP FOR DRESSINGOF WOUND , CONT’D 11.Remove screen and discard the trolley 12.Decontaminate, clean and sterilize instruments. 13.Wash and dry hands 14.Record and report on the state of wound. NOTE: Carry out dressing an hour after bed making, sweeping and dusting. Visitors must not be allowed in the ward during dressing time.
  • 12.
    Mgt. Of dirty/septicwound with pawpaw. • REQUIREMENTS: • Ripe pawpaw • Sterile knife • Sterile spatula • Sterile covered gallipot/bowl PREPARATION OF THE PULP 1. Wash pawpaw with water then with cetavlon 1% 2. Cut with the sterile knife 3. Remove all seeds using knife. 4. Cream the pulp with sterile spatula in the bowl. 5. Put required amount into the covered gallipot, add to dressing trolley.
  • 13.
    STEPS. • Refer todressing of wound up to step 8. 1. Place a layer of gauze onto wound 2. Spread pawpaw pulp on and cover with another cotton wool pad layer of gauze. Then plaster/bandage 3. Refer to dressing of wound from steps 10-14.
  • 14.
    Mgt. Of dirty/septicwound with granulated sugar/ honey • Requirements:- • Granulated sugar/honey in a sterile covered gallipot. • Steps:-1)Refer to dressing of wound to step 8. 2. Put a layer of gauze on the wound 3. Spread granulated sugar/honey on the gauze add a layer of gauze. 4. Add cotton wool pad and plaster / bandage. 5. Refer to dressing of wound from 10-14.
  • 15.
    Drains in wounds Indications •Surgical drains are used in a wide variety of different types of surgery. Generally speaking, the intention is to decompress or drain either fluid or air from the area of surgery. Examples include: To prevent the accumulation of fluid (blood, pus and infected fluids). • To prevent accumulation of air (dead space). • To characterize fluid (for example, early identification of anastomotic leakage. • Specific examples of drains and operations where they are commonly used include:
  • 16.
    Examples of drainscont’d • Plastic surgery including myocutaneous flap surgery. • Breast surgery (to prevent collection of blood and lymph). • Orthopaedic procedures (associated with greater blood loss).
  • 17.
    Chest drainage • Chestsurgery (with, for example, the associated risks of raised intrathoracic pressure and tamponade). • Infected cysts (to drain pus). Pancreatic surgery (to drain secretions). Biliary surgery. • Thyroid surgery (concern over haematoma and haemorrhage around the airway). • Neurosurgery (where there is a risk of raised intracranial pressure). Urinary catheters.Nasogastric tubes.
  • 18.
    Management • Management isgoverned by the type, purpose and location of the drain. It is usual for the surgeon's preferences and instructions to be followed. A written protocol can help staff on the ward with the aftercare of surgical drains.
  • 19.
    Types of surgicaldrain • Drains can be: Open or closed • Open drains (Including corrugated rubber or plastic sheets) drain fluid on to a gauze pad or into a stoma bag. They are likely to increase the risk of infection. • Closed drains are formed by tubes draining into a bag or bottle. Examples include chest, abdominal and orthopaedic drains. Generally, the risk of infection is reduced.
  • 20.
    Active or passive •Active drains are maintained under suction (which may be low or high pressure). • Passive drains have no suction and work according to the differential pressure between body cavities and the exterior. • Silastic or rubber • Silastic drains are relatively inert and induce minimal tissue reaction. • Red rubber drains can induce an intense tissue reaction, sometimes allowing a tract to form (this may be considered useful - for example, with biliary T-tubes).
  • 21.
    General guidance • Ifactive, the drain can be attached to a suction source (and set at a prescribed pressure). • Ensure the drain is secured (dislodgement is likely to occur when transferring patients after anaesthesia). Dislodgement can increase the risk of infection and irritation to the surrounding skin. • Accurately measure and record drainage output. • Monitor changes in character or volume of fluid. Identify any complications resulting in leaking fluid (particularly, for example, bile or pancreatic secretions) or blood. • Use measurements of fluid loss to assist intravenous replacement of fluids.
  • 22.
    Removal • Generally, drainsshould be removed once the drainage has stopped or becomes less than about 25 ml/day. Drains can be 'shortened' by withdrawing them gradually (typically by 2 cm per day) and so, in theory, allowing the site to heal gradually. Usually drains that protect postoperative sites from leakage form a tract and are kept in place longer (usually for about a week). • Warn the patient that there may be some discomfort when the drain is pulled out. • Consider the need for pain relief prior to removal.
  • 23.
    Removal cont’d • Placea dry dressing over the site where the drain was removed. • Some drainage from the site commonly occurs until the wound heals. • When to remove: • Drains left in place for prolonged periods may be difficult to remove. • Early removal may decrease the risk of some complications, especially infection.
  • 24.
    CARE OF DRAINAGETUBE • Requirement:- same as requirement for dressing of wound (Refer) • Add sterile sharp pair of scissors • Sterile safety pin. • STEPS:- 1. Refer to dressing of wound to step 8 2. With the gloved hands open the sterile safety pin. 3. Grasp the protruding end of the drainage tube with an artery forceps and clip into position. 4. Remove any stitch holding the drain in position.
  • 25.
    Care of drainagetube, cont,d 5.Gently turn the drain within the wound to loosen it if its a tubular drain. 6. Using the forceps gently pull the drain out of the wound for a distance 7. Pass the safety pin through the tube out on the other side as near the skin surface as possible and close it. Take care not to injure the patient. 8. Cut the excess tubing off with a sterile pair of scissors or, swab with cleansing lotion, apply dressing and hold it down with strips of plaster . Refer to dressing of wound from step 10-14.
  • 26.
    Removal of adrainage tube • Requirement:- • Same as requirement for dressing of wound. • STEP:- 1. Refer to care of the drainage tube up to step 5 2. Remove the drain from the wound after swabbing around it. 3. Swab the wound with cleansing lotion. 4. Dress wound with normal saline and hold it down with strips of plaster. 5. Refer to dressing of the wound from step 10-14.
  • 27.
    Preparation of apatient for incision and drainage. • This is cutting and draining of abscess. • Requirements:- • Bard Parker Knife handle • Scalpel blade • Drainage tube • Normal saline • Cleansing lotion e.g. Savlon 1:100 • Sterile cotton wool swabs • Sterile gauze swabs • Sterile receiver with • (a) sponge (b) Dissecting forceps (c) Sinus forceps • (d) Needle holder (e) Suturing Needles • Anaesthetic agents , Suturing material, Syringes and needles, Gloves, Face mask • Protective clothing, Towels to drape the patient, Receiver for used instruments, • Bandages, Strapping and safety pins •
  • 28.
    STEPS 1. Explain procedureto patient 2. Reassure the patient 3. Prepare the patient for theatre( refer preparation of patient for surgery). 4. Assist doctor during the procedure 5. Continue reassuring the patient if procedure is under local anaesthesia. 6. If under general anaesthesia, refer to post operative management of patients after surgery. 7. Change the dressing when necessary. ( Refer mgt. Of wounds). 8. Observe the wound for (a) Amount of pus, (b) Any bleeding 9. Record all findings 10. Decontaminate , wash, sterilize and store all equipment used . 11. Wash and dry hands.
  • 29.
    REMOVAL OF CLIPS •Requirements Same as requirement for dressing of wounds(refer). Add clip removing forceps. • Steps :- Refer to dressing of wounds up to step 8. 1. Place sterile swabs near the wound 2. Take the clip removing forceps in the right hand and a pair of dissecting forceps in the left. 3. Steady the clips with dissecting forceps, insert one blade of the clips removers under the clip in the centre and the other blade on top of it. 4. Ensure the blades are inserted for sufficient distance. 5. Press the blades together, this straightens the clip’s metal, lifting it from the skin on either side. 6. Lift it on to a swab. 7. Repeat the above to all the clips or as required. 8. Swab the wound with spirit and apply dry dressing. Apply strips of plaster . 9. Refer to dressing of wound from step 10-14