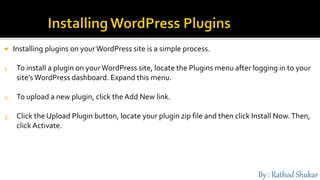
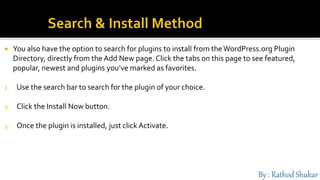
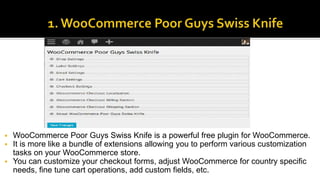
Call Girls in Uttam Nagar Delhi 💯Call Us 🔝8264348440🔝
Wordpress (Theme,Widget,plugins)
1.
2. AWordPress theme is nothing more than a collection of files that work
together to display content to the user.
WordPress itself ships with three of its own default themes.
These are meant to showcase the diversity and potential of themes, while
also enabling the user to customize how their site appears to visitors on the
front-end.
Themes enable users to tap into the power of WordPress to display and
manage their content exactly as desired. As we’ll see, there are themes for
just about every niche and clique imaginable.
3. Users can download themes for blogs, shops, portfolios, magazines, and so
much more. Indeed, themes bring together the power of WordPress with
the creativity of designers, developers, and savvy users.
Once installed and activated, themes may be customized in numerous
ways.
Most of the newer, cutting-edge themes ship with loads of options and
features, enabling users to dial in the perfect theme without touching a line
of code. Other themes, such as starter templates and simple themes, may
include no options So in order to customize things, it may be necessary to
work directly with template files.
4. For build or customize our own themes we must have a knowledge of core
concepts such as PageViews, theTemplate Hierarchy, and theWP Loop….
And the basics of using various coding languages such as CSS, HTML, and
PHP.
5. PageViews play an important role in how WordPress themes operate.
InWordPress, the PageView refers to the type of web page generated by
WordPress.
For example, when viewing a single blog post, you’re looking at a “single
view” or “single-post view”
6.
7. style.css is the theme’s main stylesheet.
It is required for a theme to be recognized byWordPress, and it must always
be included in the theme’s root directory.
Further, style.css must always include a proper file header 1.
The style.css header includes the theme’s name, description, author,
license, and other essential information.
8. In addition to the default theme included with your WordPress installation,
you can also install your ownWordPress theme to change the look and style
of your site.
1. From theWordPress dashboard, expand the Appearance menu in the left-
hand navigation panel. Click theThemes link.
2. Click the Add New button.
3. Click the UploadTheme button, locate your theme zip file and then click
Install Now.Then, click Activate.
9. Search & Install Method
Much like installing plugins, you can search for a theme and install it directly
from yourWordPress dashboard.
1. From the Appearance >Themes page, click on the Add New button.You
can search the FreeTheme Directory right from your WordPress
dashboard. Find a theme you like (you can use the search box or the
feature filter to sort by various options)
2.When you’re looking at a specific theme, you can click on Preview to see
the theme in action. Click around to
10. see different pages and make sure you like what you see. Some things may
be options you can customize, but other tweaks will require editing the
code of the theme.
3. Once you find a theme you like, click ‘Install.’ Once the theme is installed,
just click the Install button. And just like that, your site has a brand new
look.
11. 1.To manage yourWordPress themes, expand the Appearance menu in the
WordPress Dashboard.
2. Here, you’ll see theThemes page. 77
3. The very first theme listed on this page is your Active theme. Here we also
see an option to Customize. If you click this button, you’ll see a preview
window that allows you to make stylistic changes to your site, such as your
Site Identity (SiteTitle,Tagline & Site Icon). From here, you can also make
changes to Menus and the Front Page
12. 4. If you return back to theThemes page, you’ll see a grid list of available
themes in addition to your active theme.These are themes that have been
also installed on yourWordPress site, but aren’t active.
5. If you click the Live Preview link under any theme, you’ll see a preview of
how your site would look with that theme. In the preview, you can navigate
to different pages to see how the theme handles posts, archives and other
page templates.
13. 6. In the left-hand panel of the preview window, you can edit the theme
settings.These settings will differ, depending on what theme features the
theme supports.
7.To accept the new settings and activate the theme all in one step, click the
Save & Activate button at the top of the left-hand panel.
14.
15. Widgets are tools and/or content that you can add, arrange,
and remove from the sidebar of your site.
Widgets make it easy to customize the content of your
sidebar.
16. Widgets are accessed from your Dashboard at Appearance>Widgets.
The available widgets and widget areas are determined by yourTheme.
To use a widget:
1. Drag an available widget from the AvailableWidget area to the desired Sidebar area.
2. Make any modifications/edits.
3. Click Save.
17. Click the Widgets link on the Appearance menu on the Dashboard.
TheWidgets page displays the available widgets like…
18. On the left side of the Widgets page, in the Available Widgets box, is a listing of all
widgets available for yourWord Press blog.
On the right side of the Widgets page are separate boxes for widgets that are
available for the display of different widgets on your blog.
These widget boxes are defined by the theme you’ve chosen to use on your site.
Some themes have only one widget box available; other themes have several.
19. 1. Choose the widget you want to use.
2. Click the widget name.
3. Drag and drop widget in widget area..
4. Give appropriate title.
5. If file is require then select file from pc
6. Arrange your widgets in the order you want them to appear on your
site by clicking a widget and dragging it above or below another
widget.
20. Text
Video
Audio
Calendar
Image
Pages
Categories
Archives
Recent Comment
Recent posts
Search
RSS
Tag Cloud
Custom Menu
Meta
21. TheText widget inWordPress is a little different from the rest of the widgets
on the Widgets page. Add theText widget just as you would any other, using the
steps in the preceding section.
After you have it settled in the sidebar, click the arrow to the right of the widget
title.
A text box drops down to let you type text or HTML code to insert a hyperlink or
include an image file.
22.
23. The RSS widget lets you display content from another blog in your sidebar.
If I wanted to display a list of recent posts from another blog that I have
somewhere else use RSS.
24.
25. WordPress plugins are bits of software that can be uploaded to extend and expand the
functionality of yourWordPress site.
Since WordPress is open source software, these are all third party tools that add-on to what
WordPress can do.They’re easy to download and install. Some are premium (there is a fee to
purchase them) and others are free.
Plugins can do things like improve your search engine optimization, display related posts in
your sidebar, do complete backups of yourWordPress site (BackupBuddy) or create stunning
web forms quickly and easily (Gravity Forms).
You can add just about any functionality to WordPress with plugins.The WordPress Plugin
Directory is a repository of free plugins that have been (somewhat) vetted.There are
currently more than 40,000 plugins in theWordPress directory, so there are a lot of options.
26. As we just mentioned, there are tons ofWordPress plugins available for free download from
the WordPress.org Plugin Directory.
There are also premium or paid WordPress plugins. 66Why would you want to pay for a
plugin? Well, there are several reasons:
▪ While there are thousands of plugins available for free from the plugin directory, paid plugins usually offer a full time
support staff and developers that work on maintaining the security and compatibility of plugins with the latest
version of WordPress, as well as with other themes and plugins.
▪ Most of the time, plugins play nicely with the core of WordPress and with other plugins, but sometimes a plugin’s
code will get in the way of another plugin, causing compatibility issues.With a paid plugin, it’s just nice to know you
have support staff that can help you out if anything goes wrong.
27. Installing plugins on yourWordPress site is a simple process.
1. To install a plugin on yourWordPress site, locate the Plugins menu after logging in to your
site’s WordPress dashboard. Expand this menu.
2. To upload a new plugin, click the Add New link.
3. Click the Upload Plugin button, locate your plugin zip file and then click Install Now.Then,
click Activate.
28. You also have the option to search for plugins to install from the WordPress.org Plugin
Directory, directly from the Add New page. Click the tabs on this page to see featured,
popular, newest and plugins you’ve marked as favorites.
1. Use the search bar to search for the plugin of your choice.
2. Click the Install Now button.
3. Once the plugin is installed, just click Activate.
29. SEO yoast :
The definitive guide to higher rankings forWordPress sites
WordPress is one of the best, if not the best content management systems when it comes to SEO.
That being said, spending time on your WordPress SEO might seem like a waste of time, it most definitely is
not. Optimizing your site to the best practices outlined in this article will help you improve your rankings,
gain more subscribers and have a better website in general.
As we take quite a holistic view on (WordPress) SEO, meaning that we think good SEO should be engrained
in all aspects of your online marketing and PR, this guide covers quite a lot of ground and is, therefore, a long
read. Check out the table of contents below for some quick jumping around.
30. To set up, two steps are needed:
1) Add file uploading fields in your form,
2) Set up your mail settings to attach the uploaded files.The two steps will be explained in
the rest of this post.
31. Like for other types of form fields, Contact Form 7 provides form tags for file uploading fields
(<input type="file"> in HTML): file and file*. file* is a required field and requires the user to
upload a file.
Available options for file and file*
32. Example:
[file your-file filetypes:pdf|txt limit:2mb]
Contact Form 7 applies default restrictions for file type and file size when you do not set
the filetypes: and limit: (file size) options explicitly.
Default acceptable file types (extensions)
are: jpg, jpeg, png, gif, pdf, doc, docx, ppt, pptx, odt, avi, ogg, m4a, mov, mp3, mp4, mpg, wav,
and wmv. Default acceptable file size is 1 MB (1048576 bytes).
33. To attach the uploaded files to the mail, put mail tags corresponding to form tags for file
uploading fields into ‘File attachments’ field as shown below.
34. In this example, the form tag for the file uploading field is:
[file your-file filetypes:pdf]
Therefore, the corresponding mail tag to this is:
[your-file]
35. Contact Form 7 3.5 and higher support local file attachment.You can put local file paths in
the ‘File attachments’ field and those files will be attached to the email as well as uploaded
files.
Put a file path per line. When the path is not an absolute path, it will be treated as a relative
path to wp-content directory.
Example:
[your-file][your-another-file]
/home/you/dir/dir/dir/fantasticpicture.jpg
uploads/2013/08/08/boringguide.pdf
36. WooCommerce is the most popularWordPress eCommerce plugin, and it comes with tons of
extensions.
Among all the paid ones, we’ve hand-picked some of the best free WooCommerce plugins.
There’s an extension in here for just about everyone so have a look and let us know which
one is your favorite.
37. WooCommerce Poor Guys Swiss Knife is a powerful free plugin for WooCommerce.
It is more like a bundle of extensions allowing you to perform various customization
tasks on your WooCommerce store.
You can customize your checkout forms, adjust WooCommerce for country specific
needs, fine tune cart operations, add custom fields, etc.
38. As the name suggests, this plugins adds support for Stripe payment gateway in
WooCommerce. Stripe allows you to accept payments using credit cards on your
WooCommerce store.
39. WP Super Cache is the most popular cache plugin available forWordPress.
Theplugin promises to deliver static files to 99% of your visitors by utilizing mod rewrite,
PHP, or legacy caching.The plugin is very simple to configure.There are seven tabs in the
options page.
WP Super Cache is a static caching plugin forWordPress. It generates html files that are
served directly by Apache without processing comparatively heavy PHP scripts. By using this
plugin you will speed up yourWordPress blog significantly.
40. The plugin walks you through this whole process by displaying notification messages at the
top of the page. If any part of the installation process needs to be completed,W3Total Cache
will advise you of what still needs to be done.
The number of features that W3 Total Cache offers is impressive. There is
very little that the plugin cannot do.
The downside to this is that the number of options can be overwhelming.
Thankfully, the default settings should be ok for most WordPress users,
therefore you do not need to modify any settings.
All major features of W3 Total Cache can be enabled and disabled in the
General Settings page. The General box at the top of the page lets you
enable or disable all caching features at the top of a button.
41. WP Super Cache is the most popular cache plugin available forWordPress.The plugin
promises to deliver static files to 99% of your visitors by utilizing mod rewrite, PHP, or legacy
caching.
The plugin is very simple to configure.There are seven tabs in the options page. All you have
to do is enable caching through the Easy tab and the plugin will begin to cache your pages.
The contents tab will then show you how many pages have been cached and how many have
expired.
42. You can choose what type of caching you use within the advanced settings area. Many settings, such
as compressing files and not caching pages for known users, have a note that these settings are
recommended.
Bizarrely, they are not enabled by default, so you will need to enable them yourself.
43. WP Super Cache offers advanced settings too; however there are less configuration options
thanW3Total Cache.
The plugin allows several plugins to be loaded inWP Super Cache so that they load quicker
than other plugins.This includes Bad Behavior, the Jetpack MobileTheme, andWPTouch. It
also has support for content delivery networks.
All in all, I was impressed with what WP Super Cache can do. It offers a better user
experience thanW3Total Cache, however it still has everything you need.
44. Recently, aWP(wordpress) Beginner reader asked for our help regarding an issue with
images on their website. It all started when the user switched to a new theme, and the
theme displayed thumbnails next to the excerpt of the post.
The problem was that all new images that were uploaded after activating the theme were
looking good, but all the old thumbnails looked ugly and distorted.The user tried to adjust
image sizes in Settings » Media, but it didn’t solve the problem. In this article, we will show
you how to regenerate thumbnails or new image sizes in WordPress.
By default when you upload an image to WordPress, it creates different sizes and saves them
in the uploads folder. Previously,
45. Many WordPress themes take advantage of this feature and define new image sizes, but the problem
is that these new image sizes are only applied on the images you upload after activating the theme.
To solve this problem you need to generate new sizes for all previously uploaded images.This
process is often referred to as regenerating thumbnails.
46. Pressing the regenerate thumbnail button will start generating new image sizes defined by
your theme or in Settings » Media page. It may take a while, depending on how many images
you have on your website.
You can also regenerate image sizes for selected images in Media » Library.
47. Regenerating images sizes does not affect your original upload. It creates additional copies
of images in the newly defined sizes.
It also does not delete previously created image sizes.You can delete the sizes if you are sure
that you haven’t used those sizes anywhere on your website.
48. Use the Advanced Custom Fields plugin to take full control of yourWordPress edit screens &
custom field data.
Add fields on demand. Our field builder allows you to quickly and easily add fields toWP
edit screens with only the click of a few buttons!
Add them anywhere. Fields can be added all overWP including posts, users, taxonomy
terms, media, comments and even custom options pages!
Show them everywhere. Load and display your custom field values in any theme template
file with our hassle free developer friendly functions!
49. Features
Simple & Intuitive
Powerful Functions
Over 30 FieldTypes
Extensive Documentation
Millions of Users
50. Advanced Custom Fields is a WordPress plugin which allows you to add
extra content fields to yourWordPress edit screens.
These extra content fields are more commonly referred to as Custom
Fields and can allow you to build website’s faster and educate your
client’s quicker.
In this guide, you’ll learn how to:
Install the ACF plugin
Create new fields
Create field content
Display fields in your theme
51. Installation :
The Advanced Custom Fields plugin does not come pre installed with WordPress so you
will need to install our plugin before using its awesome features! Luckily for you,
WordPress makes this a very easy process!
If you are familiar with WordPress, simply login to your site and search/install the
Advanced Custom Fields plugin from the plugins page.
52. Method 1: Auto
Log in to yourWP install
From the Administration Panels, click on the Plugin Menu
Under Plugins, click the “Add New” sub menu
Search for “Advanced Custom Fields”
Click the “Install Now” button on the ACF plugin (should be the first one)
After installation, you will find a new menu item “Custom Fields”
53. Method 2: FTP
Download the Advanced Custom Fields plugin
Upload ‘advanced-custom-fields’ to the ‘/wp-content/plugins/’ directory
Activate the plugin through the ‘Plugins’ menu in WordPress
After installation, you will find a new menu item “Custom Fields”