This document provides instructions for using low-cost wireless communication modules with Arduino Uno to transmit data between boards without wires. It details the setup and code for sending and receiving messages using the VirtualWire library, including example sketches for both transmitter and receiver. Various XBee modules are also mentioned for alternative wireless communication solutions.

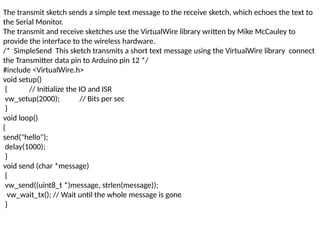
![The receive sketch also uses the VirtualWire library: /* SimpleReceive This
sketch displays text strings received using VirtualWire Connect the Receiver
data pin to Arduino pin 11 */
#include <VirtualWire.h>
byte message[VW_MAX_MESSAGE_LEN]; // a buffer to hold the incoming
messages byte msgLength = VW_MAX_MESSAGE_LEN; // the size of the
message
void setup()
{
Serial.begin(9600); // serial monitor baud rate
Serial.println("Ready"); // Initialize the IO and ISR
vw_setup(2000); // Bits per sec
vw_rx_start(); // Start the receiver
}
void loop()
{
if (vw_get_message(message, &msgLength)) // Non-blocking
{
Serial.print("Got: ");
for (int i = 0; i < msgLength; i++)
{
Serial.write(message[i]);
}
Serial.println();
} }](https://image.slidesharecdn.com/wirelesscommunication-250211094630-b0019393/85/Wireless_Communication-6-320.jpg)