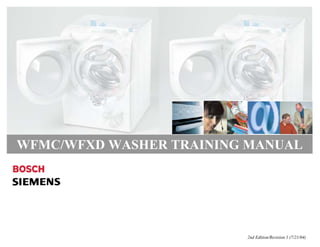
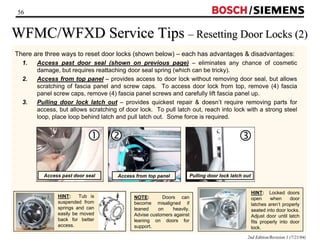
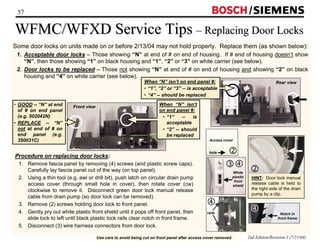
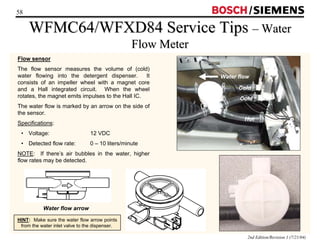
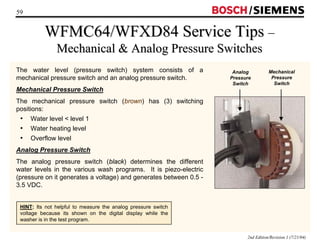
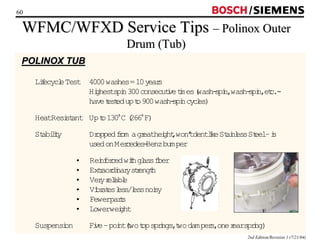
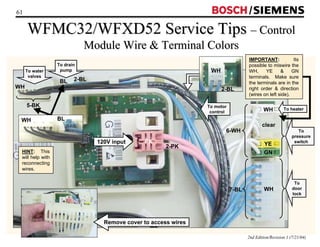
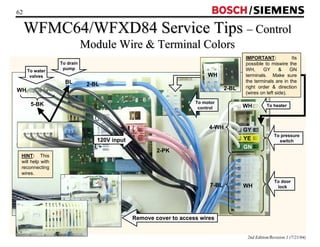
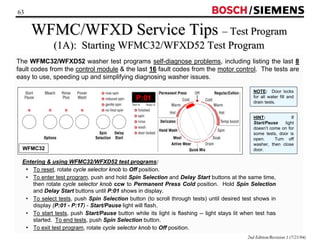
This document provides training information for Bosch front load washers. It includes:
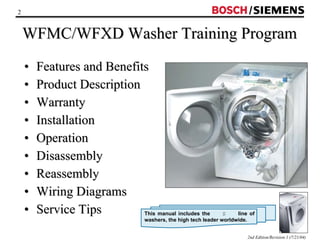
- An overview of the washer training program, which covers features, product description, warranty, installation, operation, disassembly, reassembly, wiring diagrams and service tips.
- Detailed sections on features and benefits, product description, warranty, installation instructions, operating controls for different models, sensors that control the wash cycle, and procedures for cleaning components and removing panels for service.
- The training is intended to educate service technicians on the operation and service of Bosch front load washers. It provides extensive technical details, tips, and a repair process for the washers.
We supply Various Performance, Fatigue Test Machine,
Automotive, Bike, Vehicle Parts Test Facilities
Bearing, Gear, Joint, Coupling, Transmission Test Bench
Dynamometer: for Electric Motor, Engine, Generator Brake Test
Hydraulic Testing Equipments: Pump, Valve, Pipe Test
Shaking Table, Seismic Simulator
Automatic Assembly Line
The Mark 80 Series Temperature Regulator features the advanced sliding gate seat technology pioneered by Jordan Valve. Using the Jordan Valve sliding gate seat technology, the Mark 80 temperature regulators have the signature straight-through flow, short-stroke that is 1/3 of a globe-style valve, quiet operation and tight shutoff. The Jordan Valve Mark 80 has extended temperature ranges and extremely accurate regulation. The proprietary Jorcote seat material is extremely hard (@RC85) with a low coefficient of friction that delivers outstanding performance and long service life.
Jordan Valve’s unique Seal Welded Actuator (SWA), used in conjunction with Jordan’s sliding gate seat, provides exceptional accuracy and long life in a direct operated industrial temperature regulator. The Jordan Valve Mark 80 is the most accurate and durable industrial temperature regulator available in the market today.
This document provides specifications for a Yanmar 4LHA-HTP series marine diesel engine. It is a 4-stroke, turbocharged inline 4-cylinder engine with a displacement of 3.455 liters that produces 118 kW at 3300 rpm. It has a freshwater cooling system and enclosed forced lubrication system. The document also lists optional equipment available and details performance curves showing output, torque, fuel consumption, and propeller performance. Dimensions and specifications for compatible marine gearboxes are also provided.
This document provides product information for Rosemount Analytical pneumatic power positioners. It describes that the positioners are used to accurately control process valves, dampers, and feed mechanisms in response to a demand signal. It lists features such as mounting varieties, characterized positioning with different cam options, air locking, fail safe modes, and manual operators. Specifications are provided for different models with details like size, torque and thrust capabilities, air supply requirements, inputs, performance metrics, and options.
The TeleSensor is an external liquid level transmitter that uses a force balance principle to measure liquid levels in tanks. It has a flange that mounts to the outside of tanks and a diaphragm that senses the hydrostatic pressure from the liquid height. This pressure is converted to a proportional 4-20 mA electrical or pneumatic output signal. It can interface with indicators or controllers to monitor levels remotely. The system is largely unaffected by temperature and immune to drift, making it suitable for applications requiring accurate and reliable level measurement.
Parker Balston is a division of Parker Hannifin, world’s leading diversified manufacturer of motion and control technologies and systems. Balston manufacturers industrial filters and filtration technology, replacement filter elements, compressed air dryers, nitrogen generators, and compressed air microbial detection.
This document provides testing methods and procedures for remanufactured main pumps used in Komatsu construction machines. It contains the following key points:
1. The document outlines the test items, equipment, components, and procedures for evaluating remanufactured HPV95 + 95 pumps. This includes checking for abnormalities, measuring flow rates, and testing pressure control characteristics.
2. The testing is done using a Komatsu hydraulic test stand to simulate the pump operating conditions. Standards are provided to evaluate performance.
3. The document provides details on adjusting the pump to meet flow rate standards, including the adjustment screws used to set maximum and minimum flow. Precision is required when adjusting and measuring components.
Pneumatic Products BAP desiccant dryer purifiers are designed to provide a continuous supply of clean, safe breathing air from your existing compressed air system.
This document provides instructions for testing and adjusting various components of hydraulic excavators, including the PC200-8, PC200LC-8, PC220-8, and PC220LC-8 models. It lists tools needed for tasks like measuring engine speed, intake air pressure, exhaust gas color, valve clearance, compression pressure, and more. Procedures are provided for adjusting components, bleeding air from systems, checking for leaks, and measuring pressures in hydraulic circuits. The document is intended to guide maintenance technicians in properly testing and tuning excavators in the field or shop.
Industrial process control often requires the measurement of liquid inventory volume or mass. If the material is contained within a tank of known shape and dimensions, the volume can be determined accurately by measuring the level of the liquid. Various means are used to determine the liquid level. One of the simplest is the downpipe sensor, sometimes referred to as a "bubbler". King-Gage is manufacturer of industrial downpipe liquid level measuring devices. The slides provide graphic depictions of how the systems function and provide an overview of several product configurations.
opus automazione S.p.A manufactures standard and customized test benches, which satisfy the test specifications requirements of the most important carmakers.
opus has been producing for twenty years test benches for a wide range of products and other kind of test benches for example exhaust gases analysis both diesel and petrol engines.
A standard test benches overview is shown in this catalogue.
Insertion turbine flow meters measure flow of liquid, gas, and
steam by detecting the frequency of rotation of the turbine blades. The frequency of turbine rotation is directly proportional to the flow velocity. Insertion turbine flow meters measure flow by detecting the local velocity within the pipe. The fluid velocity is combined with other parameters to calculate the average pipe velocity and volumetric flow rate.
IRZ artificial lift solutions 1.3 july 2016Ivan Isaev
IRZ is a Russian company that produces oilfield electronic equipment and artificial lift solutions. It has over 20 years of experience, employs 300 people, and produces 8000 downhole sensors and 1000 variable speed drives per year. IRZ seeks to establish partnerships to expand its artificial lift solutions business internationally.
Conflow provides products for dust suppression, fire suppression, pressure measurement, flow measurement, flow control, and filtration for water applications in mining. Their fire suppression products include fire hydrants, which can supply water at 250 liters per minute at 105 bar pressure, and extended water fire barriers that activate at 57°C to prevent the spread of fires. Their dust suppression products control, filter, and spray water to suppress dust and include spray valves, pendulum valves, auto belt sprayers, and other components.
The document provides the procedure for start-up commissioning of the boiler for PLTU 1 Jatim-Pacitan (2×315MW) Project. It includes 10 sections that describe the purpose, scope, preparation, equipment details, tools, prerequisites, organization, commissioning procedure, safety measures, and appendices. The commissioning procedure involves checking conditions, valve testing, interlock testing, drying, boiling, pipe blowing, steam tightness testing, safety valve calibration, normal operation, and shutdown of the 40t/h oil-fired start-up boiler.
Technical Data Fluke Calibration P3000 Series Hydraulic Deadweight TestersPT. Siwali Swantika
Untuk demo request dan pemesanan produk, dapat menghubungi Siwali Jakarta : 021-45850618 / Siwali Surabaya : 031-8421278.
Distributor Fluke Calibration - PT. Siwali Swantika (www.siwali.com)
The document provides details on the scope of work for an EPC contract to design, engineer, procure, construct, erect, commission, and test a 10 MW biomass power plant. The broad scope includes supply and construction of a 48 TPH traveling grate boiler, turbo generator set, air cooled condenser, water treatment systems, piping, electrical systems, instrumentation, civil works, and commissioning. The contractor will also provide 2 years of operation and maintenance spares.
Brooks Instrument manufactures an array of flow, pressure, vacuum and level products for dozens of industries from pharmaceuticals, oil and gas, fuel cell research and chemicals, to medical devices, analytical instrumentation, semiconductor manufacturing.
The QuikSert turbine flow meter is designed for liquid applications requiring accuracy and reliability. It features a stainless steel body with a helical turbine and tungsten carbide shaft and bearings. The "between-the-flange" design eliminates the need for mating flanges, requiring less space and providing easy installation. Fluid passes through flow straighteners and the rotating turbine, with a magnetic pickup generating pulses proportional to flow rate. Optional electronics provide local flow rate monitoring and totalization compatible with various instruments. The meter is available in various sizes with pressure ratings up to 3,705 PSI and an operating temperature range of -150°F to 350°F.
Untuk informasi lebih lanjut dan pemesanan produk, silakan menghubungi kami di Siwali Jakarta : 021-45850618 / Siwali Surabaya : 031-8421264, atau kirim email ke siwali@cbn.net.id. Distributor Fluke Calibration di Indonesia - PT. Siwali Swantika (www.siwali.com)
White paper provides description of function and application of current to pneumatic (I/P) transducers, along with operational diagrams and recommended practices.
Cox Precision metering products by Badger Meter provide flow measurement solutions for the test and measurement market and precision industrial applications.
The EJX910 multivariable transmitter is an all-in-one instrument, integrating the functions of a differential pressure transmitter, pressure gauge, thermometer, and a flow computer for industrial process measurement and control applications.
Overview of the range of turbine meters available from Blancett including sanitary turbine meters for food, beverage and pharmaceuticals. This presentation also explains the operating principle of turbine flow meters.
Ray Beebe has over 50 years of experience in power generation and condition monitoring of steam turbines. He discusses several case studies where condition monitoring helped identify issues in steam turbines. Condition monitoring techniques like vibration analysis, performance analysis of parameters like valve output, stage pressures and enthalpy drop efficiency can help detect problems like blade deposits or damage. The case studies show how condition monitoring helped detect issues and schedule repairs before further degradation occurred. Mr. Beebe emphasizes that condition monitoring data should be used to only open turbines for repair when there are clear technical and economic reasons to do so.
The document describes the basic principles and components of a final control element. It discusses how a process controller's output signal is converted by various components into proportional action on the process. It identifies the typical elements as the control signal, signal conversions, actuator, and final control element. Signal conversions modify the control signal to interface with the actuator. The actuator then translates the converted signal into physical movement of the final control element, which directly influences the process variable. Common types of actuators include pneumatic, hydraulic, electro-pneumatic, and electric motor actuators.
The CX 2000 from Yokogawa is the next generation in process control. It combines recording, control and networking into a single, compact device ready to run on your process or OEM equipment. It delivers "Out of the box, ready to go" real-time and historical process monitoring. CX controls your process using internal PID loops and/or external controllers. One or more CXs link your process to the networked world with built-in Ethernet, web server, e-mail and FTP functions.
This document summarizes the specifications and details of a used Heatpulse 4108 Rapid Thermal Processor. Key details include:
- It is a single wafer, automatic rapid thermal processing system from AG Associates.
- Wafer sizes from 3-8 inches can be processed with temperature capabilities of 400-1100°C.
- It features 2 gas lines, temperature ramping up to 180°C/second, and temperature uniformity of ±10°C.
- The system dimensions are provided and it requires 208V or 400V 3-phase power.
Firmware Functional Tester for Household Washing Machine Controller using Lab...IRJET Journal
This document describes developing an automatic testing software for washing machines using LabVIEW. The software acquires sensor data like rotation speed and temperature and tests the functionality of the washing machine controller via Bluetooth. A National Instruments cRIO controller runs LabVIEW code to control an 8-channel digital I/O module and voltage/current input module for interfacing with sensors like a reflective sensor to monitor rotation speed and a thermocouple for temperature. The software is meant to automatically validate the firmware of washing machine electronic control boards to increase testing capabilities and reliability.
The following example describes the design and application of an electromagnetic flowmeter, BATCHFLUX. This type of flow meter has been specially developed for volumetric filling machines in close co-operation with leading machine manufacturers.
Density Compensation Module for Drexelbrook Universal IV Water Cut MonitorAMETEK STC
Need for density compensation?
Drexelbrook offers a density compensation module (DCM) for its Universal IV in-line water cut monitor (CM). The module automatically compensates for density changes that may occur in the compensation of products and reduces the calibration requirements due to those changes.
Learn more about the density compensation module from Drexelbrook at http://www.drexelbrook.com/Analytical-Products/Universal-IV-CM.aspx
Fuji tu dong hoa catalog frenic-aqua-fuji-dienhathe.orgDien Ha The
Khoa Học - Kỹ Thuật & Giải Trí: http://phongvan.org
Tài Liệu Khoa Học Kỹ Thuật: http://tailieukythuat.info
Thiết bị Điện Công Nghiệp - Điện Hạ Thế: http://dienhathe.vn
Catalog Biến tần Frenic Aqua Fuji-Beeteco.comBeeteco
The document discusses Fuji Electric's FRENIC-AQUA series of inverters. It provides high-performance control of pumps and blowers for water and wastewater applications through energy saving functions and dedicated control features. These inverters contribute to cost reduction by optimizing processes and cutting power consumption for water treatment facilities. The inverters have a slim body design and user-friendly interface to allow independent installation and easy operation and maintenance.
Catalog Frenic-HVAC (Fuji Electric): Biến tần Frenic-HVAC
Beeteco.com là trang mua sắm trực tuyến thiết bị điện - Tự động hóa uy tín tại Việt Nam.
Chuyên cung cấp các thiết bị: Đèn báo nút nhấn, Relay, Timer, Contactor, MCCB ELCB, Biến tần, Van, Thiết bị cảm biến, phụ kiện tủ điện, .... Từ các thương hiệu hàng đầu trên thế giới.
www.beeteco.com @ Công ty TNHH TM KT ASTER
Số 7 Đại Lộ Độc Lập, KCN Sóng Thần 1, P. Dĩ An, Tx. Dĩ An, Bình Dương
www.facebook.com/beeteco
Tel: 0650 3617 012
DĐ: 0904 676 925
The Variable Area Flowmeter is an instrument for measuring the flow of liquids and gases in pipelines. It includes a vertical tube through which the fluid flows whose diameter increases from the bottom to the top and a float which can move vertically in the tube.
As the flow increases this float moves to a higher position until its resistance to the fluid flow is balanced by the float’s buoyed weight in the fluid, a value which is constant and independent of the flowrate.
The position of the float is a measure of the flowrate. The flowrate values can be read on a scale.
The document describes the AutoTreat automated chemical treatment system. It can be installed in less than 2 hours, requires only a standard 110V outlet, and automatically calculates and runs chemical treatment programs. The system benefits include fully automated and flexible chemical treatments that reduce costs and increase production. It has intuitive touchscreen controls and weatherproof components. Setup only involves programming treatment volumes, days, and frequency.
Công ty TNHH Hạo Phương là đối tác phân phối các thiết bị điện công nghiệp của hãng Fuji Electric (Nhật Bản): MCCB, MCB, Contactor, Servo Motor, biến tần, màn hình cảm ứng, PLC...
This document provides an installation, operation and service manual for the Smith Meter Model 210 Digital Electro-Hydraulic Set Stop valve. It describes the basic components and operating principle of the valve, which uses two solenoids to control upstream and downstream pressure to open and close the valve. It provides contact information for technical support and customer service. It also provides tables of contents and sections covering general installation and operation instructions, troubleshooting, maintenance, and related publications.
The Variable Area flowmeter is an instrument for metering the flowrate of liquids and gases in a pipeline. It includes a vertically oriented conical tube, whose diameter is larg- er at the top than at the bottom, through which the fluid flows upward and in which a vertically moving float is positioned.
This document provides installation, operation and safety instructions for a MWHE series washer-extractor. Section 1 covers important safety information, including checking electrical and plumbing connections and verifying proper operation of the door safety interlock. Safe operating environment is also addressed, noting temperature, humidity, ventilation and other factors. Section 2 lists technical specifications and component identification, while subsequent sections cover installation, operation, maintenance, troubleshooting and parts.
This document contains a user manual for automatic control valves that includes the following sections:
- Section 1 provides information on basic valves including their operation, sizing guides for metal valves, details on plastic valves, and installation instructions.
- Section 2 covers automatic control valves in more detail including their design, operating pressures and velocities, media they can control, control options, and hydraulic performance.
- Section 3 includes operating instructions and a troubleshooting guide.
The manual provides technical specifications and guidelines for proper use of different types of automatic control valves for applications like irrigation, sewage, and industrial processes. It explains the valves' components, operation, pressure and flow characteristics.
This document is a user manual for automatic control valves that contains the following sections:
Section 1 discusses basic valves, including how direct-sealing diaphragm valves operate, sizing guides for metal valves, information on plastic valves, and hydraulic properties of water.
Section 2 covers automatic control valves in more detail.
Section 3 provides operating instructions and a troubleshooting guide.
The document provides information on valve types, operating pressures and velocities, media controlled, control media, pressure differentials, pressure losses, cavitation potential, and manual overrides. It also includes sizing tables and discusses hydraulic performance. Plastic valves are introduced as being reliable for corrosive liquids and having advantages like being lightweight
Dosing pump for water treatment
As a senior sourcing expert on water treatment facilities and accessories, our procurement covers a comprehensive range of water treatment facilities and components, mainly including FRP water tanks, membrane housings, membrane elements, cartridges, security filters, metering pumps, etc. These products are widely used in drinking water, commercial water, municipal, medical, food and other fields.
We integrate upstream supply chain products of the water treatment industry. In addition, we work with renowned suppliers and manufacturers. As a result, we can continuously supply high-quality water treatment components and systems for customers across the world to meet the needs of a wide range of applications, thereby optimizing water resources and promoting the sustainable development of the global environment.
If you are looking for water treatment facilities and accessories. Please contact
E-mail: jon@membranehousing.org
Mobile: +86-15633187985 (WhatsApp, WeChat)
The document provides guidance on selecting solenoid valves, noting that it is important to identify parameters like capacity, pressure conditions, media conditions, and discusses choosing valves suitable for open systems with defined pressure or closed circuit systems with undefined pressure, and covers direct-operated and servo-operated valve options.
This document provides an operation manual for the Vortex Flow Meter Model LUGB. It describes the product's general information including its description, operational principle, structure, technical data, and cautions for installation. The document also covers electrical wiring details for the different meter models and programming/setup instructions.
This document provides instructions for using an ultrasonic flow meter. It begins with an outline and contents section describing the manual's organization. It then covers starting measurement with the wall-mounted fixed style ultrasonic flow meter, display and operation including key functions and menu details, transducer installation methods for different types, installation checks, troubleshooting, warranty and service information. The manual aims to guide users on setup, operation and maintenance of the ultrasonic flow meter.
This document contains circuit diagrams for a power circuit and inverter circuit. It provides information on part names, publishing dates ranging from 2008 to 2013, specifications, and component details like capacitors. The diagrams were created by Samsung Electro-Mechanics and reformed on various dates for technical documents on power and inverter circuits.
Este documento proporciona una descripción general de varios análisis de sangre comunes y lo que pueden indicar sobre la salud de una persona. Explica que los análisis de sangre pueden ayudar a diagnosticar problemas de salud antes de que aparezcan los síntomas y confirmar un diagnóstico cuando existen síntomas. Además, ofrece una breve explicación de lo que miden análisis como glucosa, ácido úrico, fosfato, calcio, magnesio, bilirrubina, fosfatasa alcalina y más
El documento describe la importancia de los hongos Reishi y Shiitake en la nutrición y medicina. Contienen betaglucanos que refuerzan el sistema inmune y tienen propiedades anticancerígenas demostradas en estudios. Ambos hongos se han usado en la medicina tradicional oriental durante miles de años y ahora también se estudian en occidente para tratar el cáncer y reducir los efectos secundarios de la quimioterapia.
Cómo entra el mercurio en nuestro cuerpo y dónde se quedag5857p
El documento describe cómo el mercurio de los empastes dentales de amalgama puede entrar en el cuerpo humano y acumularse en varios órganos y tejidos, incluido el cerebro. Explica que el mercurio puede causar una variedad de síntomas neurológicos, psicológicos y físicos, y que dificulta la eliminación de otras toxinas del cuerpo. También discute métodos para diagnosticar la intoxicación por mercurio y desintoxicarse con suplementos naturales como la clorofila y el cilantro.
El documento describe el hipotiroidismo, una condición en la que la glándula tiroides no produce suficiente hormona tiroidea. Las causas más comunes son la enfermedad autoinmune, la cirugía de la tiroides y el tratamiento radiactivo. Los síntomas incluyen fatiga, sensibilidad al frío, estreñimiento y depresión. El diagnóstico se realiza mediante pruebas de sangre que miden los niveles de las hormonas tiroideas TSH y T4. El tratamiento consiste en reemplazar la hormona t
El hipertiroidismo se produce cuando la glándula tiroides es hiperactiva y produce demasiada hormona tiroidea. Los síntomas incluyen nerviosismo, temblor, aumento de sudoración y palpitaciones. Se puede diagnosticar mediante pruebas de sangre que miden los niveles de hormona tiroidea. El tratamiento depende de la causa y la gravedad, e incluye medicamentos, yodo radiactivo o cirugía.
Este documento describe cómo la alimentación puede afectar a las personas con hipotiroidismo o hipertiroidismo. Para el hipotiroidismo se recomienda una dieta baja en calorías, rica en yodo y algas. Para el hipertiroidismo se recomiendan verduras crucíferas y alimentos ricos en litio. Algunos alimentos como el rábano negro y los cereales integrales son beneficiosos para ambas condiciones.
El documento describe las temperaturas recomendadas para planchar diferentes materiales según la norma ISO 3758. Se recomienda una temperatura entre 70-120°C para materiales como acetato, elastano y polipropileno (1 punto dentro del símbolo de plancha), entre 100-160°C para materiales como cupro, poliéster, seda y viscosa (2 puntos), y entre 140-210°C para algodón y lino (3 puntos). También proporciona una fórmula para convertir grados centígrados a Fahrenheit.
Best 20 SEO Techniques To Improve Website Visibility In SERPPixlogix Infotech
Boost your website's visibility with proven SEO techniques! Our latest blog dives into essential strategies to enhance your online presence, increase traffic, and rank higher on search engines. From keyword optimization to quality content creation, learn how to make your site stand out in the crowded digital landscape. Discover actionable tips and expert insights to elevate your SEO game.
GraphSummit Singapore | The Art of the Possible with Graph - Q2 2024Neo4j
Neha Bajwa, Vice President of Product Marketing, Neo4j
Join us as we explore breakthrough innovations enabled by interconnected data and AI. Discover firsthand how organizations use relationships in data to uncover contextual insights and solve our most pressing challenges – from optimizing supply chains, detecting fraud, and improving customer experiences to accelerating drug discoveries.
Cosa hanno in comune un mattoncino Lego e la backdoor XZ?Speck&Tech
ABSTRACT: A prima vista, un mattoncino Lego e la backdoor XZ potrebbero avere in comune il fatto di essere entrambi blocchi di costruzione, o dipendenze di progetti creativi e software. La realtà è che un mattoncino Lego e il caso della backdoor XZ hanno molto di più di tutto ciò in comune.
Partecipate alla presentazione per immergervi in una storia di interoperabilità, standard e formati aperti, per poi discutere del ruolo importante che i contributori hanno in una comunità open source sostenibile.
BIO: Sostenitrice del software libero e dei formati standard e aperti. È stata un membro attivo dei progetti Fedora e openSUSE e ha co-fondato l'Associazione LibreItalia dove è stata coinvolta in diversi eventi, migrazioni e formazione relativi a LibreOffice. In precedenza ha lavorato a migrazioni e corsi di formazione su LibreOffice per diverse amministrazioni pubbliche e privati. Da gennaio 2020 lavora in SUSE come Software Release Engineer per Uyuni e SUSE Manager e quando non segue la sua passione per i computer e per Geeko coltiva la sua curiosità per l'astronomia (da cui deriva il suo nickname deneb_alpha).
Removing Uninteresting Bytes in Software FuzzingAftab Hussain
Imagine a world where software fuzzing, the process of mutating bytes in test seeds to uncover hidden and erroneous program behaviors, becomes faster and more effective. A lot depends on the initial seeds, which can significantly dictate the trajectory of a fuzzing campaign, particularly in terms of how long it takes to uncover interesting behaviour in your code. We introduce DIAR, a technique designed to speedup fuzzing campaigns by pinpointing and eliminating those uninteresting bytes in the seeds. Picture this: instead of wasting valuable resources on meaningless mutations in large, bloated seeds, DIAR removes the unnecessary bytes, streamlining the entire process.
In this work, we equipped AFL, a popular fuzzer, with DIAR and examined two critical Linux libraries -- Libxml's xmllint, a tool for parsing xml documents, and Binutil's readelf, an essential debugging and security analysis command-line tool used to display detailed information about ELF (Executable and Linkable Format). Our preliminary results show that AFL+DIAR does not only discover new paths more quickly but also achieves higher coverage overall. This work thus showcases how starting with lean and optimized seeds can lead to faster, more comprehensive fuzzing campaigns -- and DIAR helps you find such seeds.
- These are slides of the talk given at IEEE International Conference on Software Testing Verification and Validation Workshop, ICSTW 2022.
Essentials of Automations: The Art of Triggers and Actions in FMESafe Software
In this second installment of our Essentials of Automations webinar series, we’ll explore the landscape of triggers and actions, guiding you through the nuances of authoring and adapting workspaces for seamless automations. Gain an understanding of the full spectrum of triggers and actions available in FME, empowering you to enhance your workspaces for efficient automation.
We’ll kick things off by showcasing the most commonly used event-based triggers, introducing you to various automation workflows like manual triggers, schedules, directory watchers, and more. Plus, see how these elements play out in real scenarios.
Whether you’re tweaking your current setup or building from the ground up, this session will arm you with the tools and insights needed to transform your FME usage into a powerhouse of productivity. Join us to discover effective strategies that simplify complex processes, enhancing your productivity and transforming your data management practices with FME. Let’s turn complexity into clarity and make your workspaces work wonders!
UiPath Test Automation using UiPath Test Suite series, part 5DianaGray10
Welcome to UiPath Test Automation using UiPath Test Suite series part 5. In this session, we will cover CI/CD with devops.
Topics covered:
CI/CD with in UiPath
End-to-end overview of CI/CD pipeline with Azure devops
Speaker:
Lyndsey Byblow, Test Suite Sales Engineer @ UiPath, Inc.
In the rapidly evolving landscape of technologies, XML continues to play a vital role in structuring, storing, and transporting data across diverse systems. The recent advancements in artificial intelligence (AI) present new methodologies for enhancing XML development workflows, introducing efficiency, automation, and intelligent capabilities. This presentation will outline the scope and perspective of utilizing AI in XML development. The potential benefits and the possible pitfalls will be highlighted, providing a balanced view of the subject.
We will explore the capabilities of AI in understanding XML markup languages and autonomously creating structured XML content. Additionally, we will examine the capacity of AI to enrich plain text with appropriate XML markup. Practical examples and methodological guidelines will be provided to elucidate how AI can be effectively prompted to interpret and generate accurate XML markup.
Further emphasis will be placed on the role of AI in developing XSLT, or schemas such as XSD and Schematron. We will address the techniques and strategies adopted to create prompts for generating code, explaining code, or refactoring the code, and the results achieved.
The discussion will extend to how AI can be used to transform XML content. In particular, the focus will be on the use of AI XPath extension functions in XSLT, Schematron, Schematron Quick Fixes, or for XML content refactoring.
The presentation aims to deliver a comprehensive overview of AI usage in XML development, providing attendees with the necessary knowledge to make informed decisions. Whether you’re at the early stages of adopting AI or considering integrating it in advanced XML development, this presentation will cover all levels of expertise.
By highlighting the potential advantages and challenges of integrating AI with XML development tools and languages, the presentation seeks to inspire thoughtful conversation around the future of XML development. We’ll not only delve into the technical aspects of AI-powered XML development but also discuss practical implications and possible future directions.
Full-RAG: A modern architecture for hyper-personalizationZilliz
Mike Del Balso, CEO & Co-Founder at Tecton, presents "Full RAG," a novel approach to AI recommendation systems, aiming to push beyond the limitations of traditional models through a deep integration of contextual insights and real-time data, leveraging the Retrieval-Augmented Generation architecture. This talk will outline Full RAG's potential to significantly enhance personalization, address engineering challenges such as data management and model training, and introduce data enrichment with reranking as a key solution. Attendees will gain crucial insights into the importance of hyperpersonalization in AI, the capabilities of Full RAG for advanced personalization, and strategies for managing complex data integrations for deploying cutting-edge AI solutions.
Maruthi Prithivirajan, Head of ASEAN & IN Solution Architecture, Neo4j
Get an inside look at the latest Neo4j innovations that enable relationship-driven intelligence at scale. Learn more about the newest cloud integrations and product enhancements that make Neo4j an essential choice for developers building apps with interconnected data and generative AI.
HCL Notes and Domino License Cost Reduction in the World of DLAUpanagenda
Webinar Recording: https://www.panagenda.com/webinars/hcl-notes-and-domino-license-cost-reduction-in-the-world-of-dlau/
The introduction of DLAU and the CCB & CCX licensing model caused quite a stir in the HCL community. As a Notes and Domino customer, you may have faced challenges with unexpected user counts and license costs. You probably have questions on how this new licensing approach works and how to benefit from it. Most importantly, you likely have budget constraints and want to save money where possible. Don’t worry, we can help with all of this!
We’ll show you how to fix common misconfigurations that cause higher-than-expected user counts, and how to identify accounts which you can deactivate to save money. There are also frequent patterns that can cause unnecessary cost, like using a person document instead of a mail-in for shared mailboxes. We’ll provide examples and solutions for those as well. And naturally we’ll explain the new licensing model.
Join HCL Ambassador Marc Thomas in this webinar with a special guest appearance from Franz Walder. It will give you the tools and know-how to stay on top of what is going on with Domino licensing. You will be able lower your cost through an optimized configuration and keep it low going forward.
These topics will be covered
- Reducing license cost by finding and fixing misconfigurations and superfluous accounts
- How do CCB and CCX licenses really work?
- Understanding the DLAU tool and how to best utilize it
- Tips for common problem areas, like team mailboxes, functional/test users, etc
- Practical examples and best practices to implement right away
For the full video of this presentation, please visit: https://www.edge-ai-vision.com/2024/06/building-and-scaling-ai-applications-with-the-nx-ai-manager-a-presentation-from-network-optix/
Robin van Emden, Senior Director of Data Science at Network Optix, presents the “Building and Scaling AI Applications with the Nx AI Manager,” tutorial at the May 2024 Embedded Vision Summit.
In this presentation, van Emden covers the basics of scaling edge AI solutions using the Nx tool kit. He emphasizes the process of developing AI models and deploying them globally. He also showcases the conversion of AI models and the creation of effective edge AI pipelines, with a focus on pre-processing, model conversion, selecting the appropriate inference engine for the target hardware and post-processing.
van Emden shows how Nx can simplify the developer’s life and facilitate a rapid transition from concept to production-ready applications.He provides valuable insights into developing scalable and efficient edge AI solutions, with a strong focus on practical implementation.
Programming Foundation Models with DSPy - Meetup SlidesZilliz
Prompting language models is hard, while programming language models is easy. In this talk, I will discuss the state-of-the-art framework DSPy for programming foundation models with its powerful optimizers and runtime constraint system.
Dr. Sean Tan, Head of Data Science, Changi Airport Group
Discover how Changi Airport Group (CAG) leverages graph technologies and generative AI to revolutionize their search capabilities. This session delves into the unique search needs of CAG’s diverse passengers and customers, showcasing how graph data structures enhance the accuracy and relevance of AI-generated search results, mitigating the risk of “hallucinations” and improving the overall customer journey.
Communications Mining Series - Zero to Hero - Session 1DianaGray10
This session provides introduction to UiPath Communication Mining, importance and platform overview. You will acquire a good understand of the phases in Communication Mining as we go over the platform with you. Topics covered:
• Communication Mining Overview
• Why is it important?
• How can it help today’s business and the benefits
• Phases in Communication Mining
• Demo on Platform overview
• Q/A
Driving Business Innovation: Latest Generative AI Advancements & Success StorySafe Software
Are you ready to revolutionize how you handle data? Join us for a webinar where we’ll bring you up to speed with the latest advancements in Generative AI technology and discover how leveraging FME with tools from giants like Google Gemini, Amazon, and Microsoft OpenAI can supercharge your workflow efficiency.
During the hour, we’ll take you through:
Guest Speaker Segment with Hannah Barrington: Dive into the world of dynamic real estate marketing with Hannah, the Marketing Manager at Workspace Group. Hear firsthand how their team generates engaging descriptions for thousands of office units by integrating diverse data sources—from PDF floorplans to web pages—using FME transformers, like OpenAIVisionConnector and AnthropicVisionConnector. This use case will show you how GenAI can streamline content creation for marketing across the board.
Ollama Use Case: Learn how Scenario Specialist Dmitri Bagh has utilized Ollama within FME to input data, create custom models, and enhance security protocols. This segment will include demos to illustrate the full capabilities of FME in AI-driven processes.
Custom AI Models: Discover how to leverage FME to build personalized AI models using your data. Whether it’s populating a model with local data for added security or integrating public AI tools, find out how FME facilitates a versatile and secure approach to AI.
We’ll wrap up with a live Q&A session where you can engage with our experts on your specific use cases, and learn more about optimizing your data workflows with AI.
This webinar is ideal for professionals seeking to harness the power of AI within their data management systems while ensuring high levels of customization and security. Whether you're a novice or an expert, gain actionable insights and strategies to elevate your data processes. Join us to see how FME and AI can revolutionize how you work with data!
Driving Business Innovation: Latest Generative AI Advancements & Success Story
Wfmc wfxd washer training_2004
1. BOSCH Front Load Washer
WEBINAR Training
Hosted by Jerry Frear
jerry.frear@marcone.com
MSA Manuels Site www.msaworld.com
2. WFMC/WFXD Washer Training
2nd Edition/Revision 1 (7/21/04)
Program
1
WFMC/WFXD WASHER TRAINING MANUAL
3. 2 /
WFMC/WFXD Washer Training Program
•• Features and Benefits
•• Product Description
•• Warranty
•• Installation
•• Operation
•• Disassembly
•• Reassembly
•• Wiring Diagrams
•• Service Tips This manual includes the Sline of
2nd Edition/Revision 1 (7/21/04)
washers, the high tech leader worldwide.
4. 3 /
2nd Edition/Revision 1 (7/21/04)
Features and Benefits
•• True American sized drum tub
•• Full sized opening (easier loading and unloading)
•• Tilted tub to facilitate door seal draining
•• Very energy efficient - Energy Star rated
•• Stainless steel drum - won’’t rust is gentle to clothes
•• Uses little water
•• 3-Tier water fill for fast equal water fill
•• Direct connection to drain lines
•• 180° door opening
•• Up to 5 rinses
•• Suds sensing - rinses out suds leaving no soap film
•• Unbalanced load sensor - adjusts spin to balance load
•• UL listed (U.S. Canada)
5. 4 /
2nd Edition/Revision 1 (7/21/04)
Extra Features and Benefits ––
WFMC64/WFXD84
•• Continuous cycle notification - digital display
•• Electronic control
•• Accurate water level control independent of water pressure
•• Real time cycle finish (displays actual time of day cycle
stops)
•• Real time delay (enter actual time of day for wash to end)
•• Reduced ironing
•• Interactive language display - choose desired language
(English, French, Spanish)
•• Digital clock (am/pm format)
•• Continuous suds sensing
•• Child lockout
6. Energy
Star rated
5 /
2nd Edition/Revision 1 (7/21/04)
Product Description
Electronic
controls
Adjustable
spin speeds
Safety
door lock
Accessible drain trap
(for servicers only)
•• Electronic controls
•• Large capacity door opening
•• Detergent softener dispenser
•• Regular/Cotton, Permanent Press,
Delicates Hand Wash settings
•• 180º door opening
•• Stainless steel inner drum
•• Durable Polinox outer drum
•• Power Wash (WFMC32/WFXD52),
Bleach, Rinse Plus Reduced Ironing
(WFMC64/WFXD84) buttons
•• Adjustable spin speeds
•• Direct connection to drain lines
•• Guaranteed temperatures
•• UL listed (U.S. Canada)
•• Drain hose cord holder
7. 6 /
Bosch Siemens Washers Limited Lifetime Warranty
Statement of Limited Warranty
The warranties provided by BSH Home Appliances (Bosch“ “Siemens”) in this
Statement of Warranties apply only to Bosch Siemens clothes washers sold to the first
using purchaser by Bosch, Siemens or their authorized dealers, retailers or service centers in
the United States or Canada. The Warranties provided herein are not transferable, and take
place from date of installation or ten business days after delivery date, whichever comes
first.
1 Year Full Limited Warranty
Bosch Siemens will repair or replace, free of charge, any component part that proves
defective under conditions of normal home use, labor and shipping costs included. Warranty
repair service must be performed by an authorized Bosch or Siemens Service Center.
2 Year Limited Warranty
Bosch Siemens will provide replacement parts, free of charge, for any component part
that proves defective under conditions of normal home use, shipping costs included, labor
charges excluded.
For location of nearest repair depot call 1-800-944-2904 from 5:00 AM - 5:00 PM M-F
(Pacific time)
2nd Edition/Revision 1 (7/21/04)
Warranty
8. 7 /
Serial #
label
2nd Edition/Revision 1 (7/21/04)
Warranty –– Serial # Label
The serial # label, located on the front of the washer next to the
door hinge, shows necessary warranty information.
Factory serial # - Can convert
factory serial # to FD # for
warranty use. 1st 2 digits show
factory # (85 = New Bern), 3rd digit
shows year (1 = 2003), 4th 5th
digits show month built (08 =
August). So, serial # starting with
“85308…400126” = washer built
@ New Bern with FD 8308
000126.
• Model # - “WFMC6400UC/01”.
• Serial # - “FD 8308”. To find when the product type
was built, add 20 to the 1st two digits to get the year
(83 + 20 = 103 ◊ product type was built in 2003). The
last two digits show the month (08 = August).
9. 8 /
Installation –– Reprint of Installation Instructions (1)
2nd Edition/Revision 1 (7/21/04)
NOTE: Be sure to follow all national
local codes.
NOTE: Anti-siphon valves allow drain
hoses to be directly connected to drain
lines, unlike many other washers.
10. /
9
Installation –– Reprint of Installation Instructions (2)
2nd Edition/Revision 1 (7/21/04)
HINT: To quickly
remove shipping
(transport) bolts,
use a 13mm
socket wrench.
HINT: To avoid damaging washer, don’t move
it while the feet (leveling legs) are extended.
11. 10 /
Installation –– Reprint of Installation Instructions (3)
2nd Edition/Revision 1 (7/21/04)
HINT: Cold (“C”) hot (“H”)
water connections are clearly
marked on the rear of washers.
TIP: Remove
transport (shipping)
bolts keep them
near the washer (for
HINT: Anti-siphon valves allow drain future shipment).
hoses to be directly connected to drain
lines, unlike many other washers.
HINT: To eliminate possibility of leaking,
don’t overtighten fittings. Teflon tape
can also be used on all threads.
14. WFMC3200UC
2nd Edition/Revision 1 (7/21/04)
13
Operation ––WFMC Controls
Both have Regular/
Cotton, Permanent Press,
Delicates, Hand Wash,
Temperature Boost, Wool,
Active Wear, Rinse Plus
Bleach settings.
WFMC64UC
Cycle Selector
Knob
Digital
Display
Special Wash
Buttons
15. WFXD5200UC
2nd Edition/Revision 1 (7/21/04)
14
Operation ––WFXD Controls
Both have Regular/
Cotton, Permanent Press,
Delicates, Hand Wash,
Temp Plus, Wool Care,
Active Wear, Extra Rinse
Bleach settings.
WFXD8400UC
Cycle Selector
Knob
Digital
Display
Special Wash
Buttons
16. 15 /
2nd Edition/Revision 1 (7/21/04)
Operation –– Sensors (1)
1A. Load Sensor (WFMC32/WFXD52)
At a predefined points during the initial fill, the washer determines if it needs more water using a pressure switch. This is due
to differences in the absorption of the laundry and the size of the loads.
1B. Dynamic Load Sensor (WFMC64/WFXD84)
During the entire fill the washer continually adjusts for the size of the load and determines if more water is needed using an
analog pressure switch and a flow meter.
2. Digital Temperature Sensor (WFMC32/WFXD52 WFMC64/WFXD84)
The thermostat monitors the temperature of the water and controls the length of time the heating element is on, ensuring the
proper temperature for the chosen cycle.
3A. Suds Sensor (WFMC32/WFXD52)
During the beginning of the1st rinse/spin phase, the washer determines if there are excessive suds and automatically adds 2
rinses (if necessary). This is accomplished via the pressure switch and the motor synchronization system.
3B. Continuous Suds Sensor (WFMC64/WFXD84)
Checking the pumping out phase of the main wash, the beginning of the 1st rinse/spin phase and the actual spin speed vs.
the programmed spin speed, the washer determines if there are excessive suds and automatically adds up to 2 rinses (if
necessary). This is accomplished via the pressure switch, analog pressure switch and the motor synchronization system.
4. Unbalanced Load Sensor (WFMC32/WFXD52 WFMC64/WFXD84)
During the final spin cycle the washer monitors the positioning and balance of the load. If the load unbalanced, the washer
stops and adjusts the load up to 15 times and reduces the spin speed to finish the cycle. This is accomplished via the motor
synchronization system.
17. 16 /
2nd Edition/Revision 1 (7/21/04)
Operation –– Sensors (2)
1A/1B. Load Dynamic Load Sensors
Mechanical Pressure Switch - (WFMC32/WFXD52 WFMC64/WFXD84)
measures the water level after the first fill. If the water level is high (like for smaller
loads), the pressure increases and the pressure switch does not provide more water.
Analog Pressure Switch - (WFMC64/WFXD84)
• Precise measuring of actual water level
• Accurate load detection
• Control of the pump - noise reduction
• Time reduction - no pumping when empty
BENEFITS:
• Continuous adjustment of wash times
• Water and energy consumed varies according to load size
Mechanical
Pressure
Switch
Analog
Pressure
Switch
18. 17 /
2nd Edition/Revision 1 (7/21/04)
Operation –– Sensors (3)
1A/1B. Flow Meter
¾ Exact monitoring of water inflow.
¾ Insures exact control of water inlet valves so there’s always the right amount
of water for wash and rinse cycles.
¾ Together with the pressure switch, it continuously adjusts wash time, water
use and energy use in relation to load size.
¾ Works independently of water pressure.
BENEFITS:
• Minimized water consumption
• Exact load detection
• Superior cleaning performance
• An internal water clock monitors water flow via soak compartment.
• Insures exact control of water inlet valves - always right amount of water.
• Independent of water pressure.
19. 18 /
2nd Edition/Revision 1 (7/21/04)
Operation –– Sensors (4)
2. Digital Temperature Sensor
All models are equipped with an electric heater and temperature sensor (NTC) to
deliver guaranteed wash temperatures.
NOTE: Compare with competition
washers which only have heaters in top
of the line models.
Heater
Thermostat (NTC)
20. 19 /
2nd Edition/Revision 1 (7/21/04)
Operation –– Sensors (5)
3A/3B. Suds Continuous Suds Sensors
9 Detection during draining out after main wash
Î immediate additional rinse cancelling of 1st rinse spin
9 Detection during 1st rinse spin
Î immediate interuption of spin
Î insertion of one or two additional rinses
Î reduced agition during additional anti foam rinse
9 Detection during any other rinse spin
Î immediate interuption of spin
Î reduced agitiation in following rinse cycle
9 All subsequent rinse spin cycles are always rechecked
for suds
WFMC64/WFXD84
WFMC64/WFXD84
WFMC32/WFXD52
WFMC64/WFXD84
NOTE: Suds build-up usually occur only when way too
much detergent is used with lightly soiled loads.
21. 20 /
2nd Edition/Revision 1 (7/21/04)
Operation –– Sensors (6)
4. Unbalanced Load Sensor
• Accurate measuring of unbalance by deviation of spin speed and slow down
time of drum
2-step detection
• Infinite adapting of spin speeds
• Compensates reducing of spin speeds by prolonging spinning times
• Attempts to redistribute a load up to 15 times
BENEFITS:
• Noise reduction
• Better machine stability
• Good spinning results with big unbalances
22. 21 /
2nd Edition/Revision 1 (7/21/04)
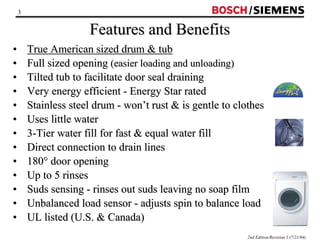
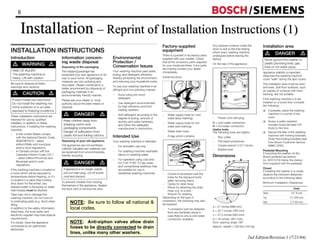
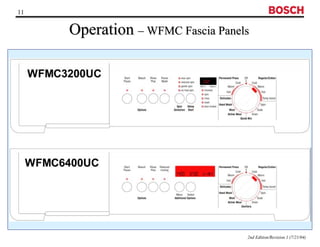
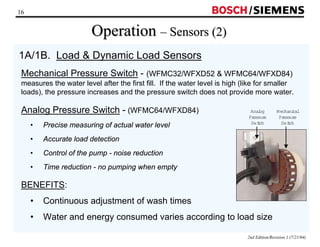
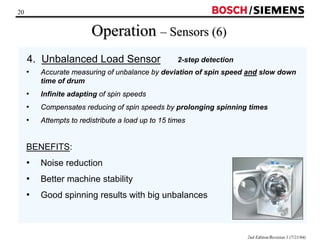
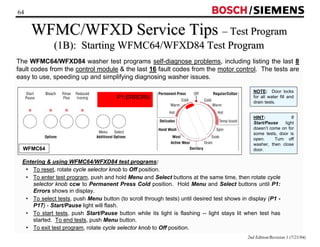
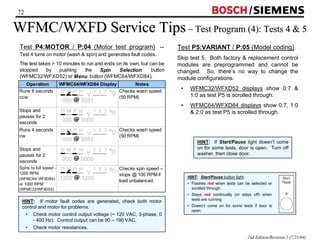
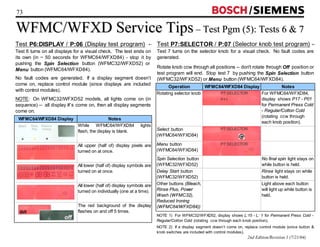
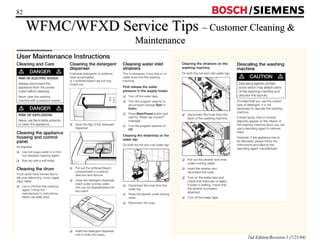
Operation –– Sensors (7)
4. Unbalanced Load Sensor
Spin speed [rpm]
1200
1000
800
600
400
200
0
max. 15 trials
III
IV
I
II
load distribution unbalance Spin speed (rpm) spinning profile
good small 1200 (max.) I
uneven medium 1000 (reduced) II
bad big 800 (low) III
none dangerous no spinning IV
After 4 attempts
After 7 attempts
After 14 attempts
2-step detection
23. 22 /
Operation –– Cleaning Drain Pump Trap
2nd Edition/Revision 1 (7/21/04)
Unlike WFK, WFL WFR washers,
WFMC/WFXD drain pumps are
maintenance-free. So, larger objects
such as coins and paper clips are no
longer collected in the drain pump
trap. The drain pump trap is only
meant to be cleared by servicers.
NOTE: There’s no provision to drain
water manually from drain pumps like
earlier models.
HINT: To remove the drain pump
access cover, insert a pointed object
(or tool) into the hole, push in to
release the latch and rotate the cover
clockwise.
Current production pumps are beige
color – earlier WFMC pumps were black.
CAUTION: After opening drain pump
access cover, take care to not get cut
on front panel opening.
24. 23 /
Operation –– Preventing Water Collecting in Door Seals
Unlike WFK, WFL WFR washers, WFMC/WFXD
washers have tilted tubs and flow through tub paddles to
help prevent water collecting in door seals and to
enhance wash water flowing through clothes.
Paddles direct water toward front of
washer – water drains into paddles from
outside of inner drum, flows toward front
of paddles and exits holes in front of
paddles onto clothing in front of washer.
2nd Edition/Revision 1 (7/21/04)
Directing water away from door seals:
• Drums are tilted to direct water to the back of the drum and
away from the door seal.
• Door glass is shaped to direct water away from the door seal.
• Paddles insure clothing at front of dryer get wet despite tub
being tilted toward the back.
25. 24 /
2nd Edition/Revision 1 (7/21/04)
Operation –– Laundry Deflector
Unlike WFK, WFL WFR washers, WFMC/WFXD washers
have a laundry deflector to prevent small items such as
socks and wash rags from collecting in door seals. Without
laundry deflectors, small clothes items can get jammed in
door seals and apply pressure to bottoms of doors.
Without the laundry
deflector, small clothes
items being jammed in
door seals would only
cause minimal leakage (a
few drops).
26. 25 /
Disassembly –– Fascia (Control) Panel (1)
2nd Edition/Revision 1 (7/21/04)
T-20 screws
To remove fascia panel to access control module dispenser, remove (4) T-20 Torx
front/side screws and lift panel up. Caps over screws can be removed using
fingernails or a sharp knife – take care not to scratch fascia panel or caps.
When reassembling
panels, tuck rear
tabs under top
panel 1st.
Knobs are permanently attached
to panels and cannot be
removed.
27. 26 /
Disassembly –– Fascia (Control) Panel (2)
Control modules can be readily removed from fascia panels, but there’s a knack to it
– must use the procedure below exactly as shown.
Start from left side Pry outer inner tabs together L – R Pry out (3) inner tabs + all outer tabs
2nd Edition/Revision 1 (7/21/04)
HINT: Don’t remove the wire
holders – clip off wire ties
instead. Carry extra wire ties to
reattach wire harnesses. HINT: Don’t force modules out from fascia panels
to avoid breaking plastic parts. If modules don’t
come out easily, the procedure hasn’t been
followed and plastic parts will break.
HINT: The knob does NOT have
to be removed to remove the
control module. The module lifts
off completely from the panel,
knob buttons.
NOTE: Some control modules have been
replaced since fault codes stored in
module or motor control can’t be cleared.
Modules are operating properly and
shouldn’t be replaced to clear fault codes.
28. 27 /
Disassembly –– Top Rear Panels (1)
2nd Edition/Revision 1 (7/21/04)
T-20 screws
Remove top panel screws Remove top panel
Top panel removed
Rear panel removed
Rear
panel
T-20 screws
To remove rear panel to
access drive motor and
rear of drum, remove
(18) T-20 screws.
There’s no need to
remove the top rear
panel (with “H” “C”
stampings).
To remove top panel (for
easier parts access),
remove (3) T-20 screws
and slide panel to rear of
washer.
29. 28 /
Disassembly –– Drum/Front Panel (1)
Remove hinge cover screws Remove hinge screws Remove door seal spring
Remove door latch screws Carefully remove front shield Removing front shield
2nd Edition/Revision 1 (7/21/04)
30. 29 /
Disassembly –– Drum/Front Panel (2)
Front panel tab
2nd Edition/Revision 1 (7/21/04)
T-20 screws
T-20 screws
Remove top front panel screws Remove bottom front panel screws Note front panel mounting tabs
HINT: Removing front panel at this point will make
removing front counterweights easier.
HINT: Front panels are mounted using six (6) plastic tabs
– three (3) on each side. Lift front panels up to remove
them. When reassembling front panels, carefully align tabs
and don’t use excessive force to avoid breaking tabs.
HINT: Most washer screws require T-20 Torx
screwdrivers.
Remove front panel
31. 30 /
Disassembly –– Drum/Front Panel (3)
Remove door latch Note door latch manual release Top counterweight must be removed
2nd Edition/Revision 1 (7/21/04)
13mm screws
Loosen top counterweight screws Slide out top counterweight Note top counterweight bushing slots in tub
32. 31 /
Disassembly –– Drum/Front Panel (4)
2nd Edition/Revision 1 (7/21/04)
13mm screws 13mm screws
Remove right and left front counterweight screws Note counterweight screw bushings in tub
Remove door seal Disconnect main water inlet hose Disconnecting main water inlet hose
35. 34 /
Disassembly –– Drum/Front Panel (7)
2nd Edition/Revision 1 (7/21/04)
Disconnect hoses
NOTE: Old style
dampers shown
(not used in
production)
Disconnect dampers Remove belt from tub
Disconnect motor wires
10mm bolts
NOTE: Old style dampers
shown (not used in production)
Remove drum drive motor Showing drum drive motor mounts
36. 35 /
Disassembly –– Drum/Front Panel (8)
Remove pulley wheel
2nd Edition/Revision 1 (7/21/04)
13mm bolt
Remove tub rear spring
Tub ground wire washer Remove tub washer Remove tub ground wire
37. 36 /
Disassembly –– Drum/Front Panel (9)
Remove
heater
2nd Edition/Revision 1 (7/21/04)
Disconnect locking
heater wires
Disconnect
NTC wires
10mm bolt
Remove
motor control
Disconnect motor
control wire harnesses
Unscrew motor
control screws
38. 37 /
Disassembly –– Drum, Outer Drum (Tub) Dampers (1)
Outer drum (tub)
The tub consists of two durable Polinox plastic shells which are screwed to each other.
To remove outer tub:
1. Disconnect wire harnesses (as needed) – wire ties can be cut off, but clips shouldn’t be cut.
2. Remove front panel, rear panel, fascia panel (with detergent dispenser) and top panel.
3. Remove door seal, top counterweight and both side counterweights.
4. Disconnect dampers from tub and slip belt off of tub.
5. Remove tub through rear of washer.
6. Remove (18) T-25 Torx screws holding front rear tubs together.
2nd Edition/Revision 1 (7/21/04)
NOTE: Rear drum bearings are factory press fit into
rear outer tubs and cannot be removed or serviced.
HINT: When installing outer tub bolts, screw them in by
hand onto the first thread. Do not overtighten or cross-thread
them.
Removing
tub screws
Damper
Removing front of tub
T-25 screws
HINT: Unlike WFL2060 WFR2460 washers, no clips
hold tubs together – no drilling or cutting is needed.
39. 38 /
Disassembly –– Drum, Outer Drum (Tub) Dampers (2)
2nd Edition/Revision 1 (7/21/04)
Lift drum out of tub
Bearing and drum shaft
Showing drum and tub parts
NOTE: Rear drum bearings are
factory press fit into rear outer tubs
and cannot be removed or serviced.
40. 39 /
Disassembly –– Drum Drive Motor
2nd Edition/Revision 1 (7/21/04)
To remove drum drive motors:
• Remove rear panel
• Remove rear tub spring
• Remove drum belt
• Disconnect wire harnesses
• Remove two motor bolts, then pull motor out
toward rear of washer
WARNING: The drum drive motor tub are grounded
through the motor control. Since the tub is plastic and
the motor is isolated from the frame, Its critical the
ground leads from the tub, drive motor motor control
are connected properly.
Drum drive
motor
Rear tub
spring
10mm bolts
41. 40 /
2nd Edition/Revision 1 (7/21/04)
Disassembly –– Drain Pump
To remove drain pumps:
• Remove front panel
• Loosen and remove hoses
• Disconnect green door latch release cord.
• Disconnect wire harness
• Carefully slide pump toward rear of washer,
then lift it out of washer (taking care to not
damage the four rubber feet).
HINT: Drain pumps are mounted on
four rubber feet to dampen vibration
noise. To remove drain pumps,
carefully slide them toward rear of
washers. To install them, carefully
insert all four feet into notches in
washer base, then slide them forward.
Drain
pump
Note four mounting feet
Drain
pump
CAUTION: If opening drain pump
access cover, take care to not get
cut on front panel opening.
Current production pumps are beige
color – earlier WFMC pumps were black.
42. 41 /
Disassembly –– Water Valves RFI Filter
…and that’s all
there is to taking
apart the washers!
2nd Edition/Revision 1 (7/21/04)
Water
valves
HINT: Water valves
are bent and snapped
into place. When
removing valves, take
care not to break off
plastic pieces.
Hot water valve
T-20 screws
Unscrew RFI filter
RFI filter (from rear of dryer)
50. 49 /
WFMC/WFXD Service Tips –– Installing Door Seals
Certain repairs can involve removing or disconnecting the door seal (gasket) for access. To insure proper
washer operation and prevent leaking, door seals must be reinstalled correctly.
2nd Edition/Revision 1 (7/21/04)
To install door seals:
1) Align door seal so notch (for spring) at front is centered
under bottom of door.
2) Carefully push rear of seal over front of tub so seal
properly seats onto tub.
3) Stretch rear spring clamp over seal and insert into
notch at rear of seal.
4) Using small hose clamp, attach dispenser hose to seal.
5) Work front seal lip over front shield flange (so lip
“snaps” in). Tug around entire seal to check if seated.
6) Align clamp spring at door bottom, then insert front
spring clamp into notch of entire left half of door seal
(180º from top to bottom).
7) While pulling right side of spring using needlenosed
pliers, pull clamp into right side seal notch, then
carefully release spring. Hold clamp next to front
shield so clamp won’t pull seal off.
NOTE: Check to make sure seal is
seated after installation so no
leaking will occur.
TIP: Left-handed servicers -- start
the front spring clamp on the right
side and pull the spring to the left.
Inner
spring
def
Dispenser
hose
Make sure seal is
properly seated on
front shield flange
g h
Place spring clamp
over left half of
seal in notch
Keep clamp
spring over notch
at seal bottom
Make sure clamp doesn’t
pull seal off front shield i
Carefully pull spring to
right put clamp into
right side seal notch
Hold clamp
next to
front shield
Center notch in bottom of
seal (for spring) under
bottom of door
ch
51. 50 /
WFMC/WFXD Service Tips –– Reconnecting Harnesses
There have been occasions when wire harnesses have not been reconnected after repairs have
been made, especially for harnesses disconnected to make easier access to repair other parts. Its
important that all wire harnesses are reconnected and checked when any repairs are made.
Examples of wire harnesses that can be left disconnected:
2nd Edition/Revision 1 (7/21/04)
HINT: Write down all harnesses disconnected during repairs,
then check all harnesses after repairs have been made.
HINT: If needed, run test P:3 (P:03) and
visually check all parts are functioning properly.
Motor, including ground wires
Tub ground wire
Heater, including
ground wire NTC
Motor control,
including ground wires
Door latch
Pressure switch Water inlet valves
Drain pump
52. WFMC/WFXD Service Tips –– Drum Drive Motor
2nd Edition/Revision 1 (7/21/04)
51
Unlike previous washers, drum
drive motors are 3-phase are
controlled by separate motor
controls mounted on the base near
the motors (in the right rear of
washers). These controls provide
motor power speed control.
WARNING: The drum drive motor tub are grounded through the motor control.
Since the tub is plastic and the motor is isolated from the frame, Its critical the
ground leads from the tub, drive motor motor control are connected properly.
Motor control (on
left side viewing
rear of washer)
3Φ Motor control
Drum motor
resistances:
Speed sensor
3Φ
connections
Speed tachometer connections
NOTE: Motor is rated @ 120VAC, 3-phase, 850W, 400Hz variable frequency.
/
53. 52 /
WFMC/WFXD Service Tips –– Drain Pump
Drain pumps reliably pump water out from washer
tubs through the drain reservoir and drain hose.
Unlike earlier washers, these pumps are
maintenance free -- access to remove debris is
only meant for servicers.
NOTE: Drain pump motor resistance ranges from
140 – 200 Ω. Its rated @ 120VAC, 60 Hz, 70W.
HINT: Drain pumps have four rubber mounting
feet to dampen vibration noise. Remove pumps
by carefully sliding them toward rear of washers.
Install them by carefully inserting all four feet into
notches in washer base sliding them forward.
2nd Edition/Revision 1 (7/21/04)
HINT: To remove the drain pump access cover,
insert a pointed object (or tool) into the hole, push in
to release the latch and rotate the cover clockwise.
NOTE: There’s no provision for draining
residual water from drain pumps.
Current production pumps
are beige color – earlier
WFMC pumps were black.
CAUTION: After opening drain pump access cover,
take care to not get cut on front panel opening.
54. 53 /
WFMC/WFXD Service Tips –– NTC Heater
HINT: NTC connector is latched
– carefully pry latch with small
blade screwdriver to remove it.
2nd Edition/Revision 1 (7/21/04)
HINT: Heater can be removed
from the back of the tub –
remove rear panel for
access.
10ºC (50ºF): 36 – 44kW
20ºC (68ºF): 22.8 – 27.4kW
30ºC (86ºF): 14.8 – 17.5kW
40ºC (104ºF): 9.8 – 11.5kW
50ºC (122ºF): 6.6 – 7.7kW
60ºC (140ºF): 4.6 – 5.3kW
66ºC (151ºF): 3.73 – 4.29kW
73ºC (163ºF): 2.94 – 3.36kW
NTC 86ºC (187ºF): 1.93 – 2.19kW
55. 54 /
WFMC/WFXD Service Tips –– Door Lock
2nd Edition/Revision 1 (7/21/04)
Door lock manual release
HINT: Can remove fascia panel
Door lock front shield to access door lock.
Door lock terminals
HINT: To remove the access cover to use the door lock
manual release, insert a pointed object (or tool) into the hole,
push in to release the latch and rotate the cover clockwise.
HINT: Door lock manual
release cable is held to
the right side of the
drain pump by a clip.
Simply pull on the cable
to release the door.
Use care to
avoid being
cut on front
panel after
access cover
removed.
Current production drain pumps are beige color – earlier WFMC pumps were black.
56. 55 /
WFMC/WFXD Service Tips –– Resetting Door Locks (1)
Occasionally door locks stay locked when doors are opened while they’re locked, preventing
doors from closing. Please follow these instructions to reset door locks.
Rear
view
Remove front seal spring Move door seal for access Push onto back of door lock until it clicks open
NOTE: Advise customers against
pulling doors open while locked.
2nd Edition/Revision 1 (7/21/04)
HINT: Reach
around back of door
lock (opposite latch
opening) and push
onto back of lock
plate (directly behind
latch) until it clicks.
Push
HINT: If lock
doesn’t release,
pull green manual
door release cord
(down) and push
onto back of lock
a 2nd time.
Pull
Door lock latched Door lock open
57. 56 /
WFMC/WFXD Service Tips –– Resetting Door Locks (2)
There are three ways to reset door locks (shown below) – each has advantages disadvantages:
1. Access past door seal (shown on previous page) – eliminates any chance of cosmetic
e
2nd Edition/Revision 1 (7/21/04)
damage, but requires reattaching door seal spring (which can be tricky).
2. Access from top panel – provides access to door lock without removing door seal, but allows
scratching of fascia panel and screw caps. To access door lock from top, remove (4) fascia
panel screw caps, remove (4) fascia panel screws and carefully lift fascia panel up.
3. Pulling door lock latch out – provides quickest repair doesn’t require removing parts for
access, but allows scratching of door lock. To pull latch out, reach into lock with a strong steel
loop, place loop behind latch and pull latch out. Some force is required.
HINT: Locked doors
open when door
latches aren’t properly
seated into door locks.
Adjust door until latch
fits properly into door
lock.
NOTE: Doors can
become misaligned if
leaned on heavily.
Advise customers against
leaning on doors for
support.
c
Access past door seal
HINT: Tub is
suspended from
springs and can
easily be moved
back for better
access.
d
Access from top panel
Pulling door lock latch out
58. 57 /
WFMC/WFXD Service Tips –– Replacing Door Locks
Some door locks on units made on or before 2/13/04 may not hold properly. Replace them (as shown below):
1. Acceptable door locks – Those showing “N” at end of # on end of housing. If # end of housing doesn’t show
“N”, then those showing “1” on black housing and “1”, “2” or “3” on white carrier (see below).
2. Door locks to be replaced – Those not showing “N” at end of # on end of housing and showing “2” on black
housing and “4” on white carrier (see below).
d
2nd Edition/Revision 1 (7/21/04)
Procedure on replacing door locks:
1. Remove fascia panel by removing (4) screws (and plastic screw caps).
Carefully lay fascia panel out of the way (on top panel).
2. Using a thin tool (e.g. awl or drill bit), push latch on circular drain pump
access cover (through small hole in cover), then rotate cover (cw)
clockwise to remove it. Disconnect green door lock manual release
cable from drain pump (so door lock can be removed).
3. Remove (2) screws holding door lock to front panel.
4. Gently pry out white plastic front shield until it pops off front panel, then
slide lock to left until black plastic lock rails clear notch in front frame.
5. Disconnect (3) wire harness connectors from door lock.
Access cover
hole d
ef
White
plastic
front
shield
Notch in
front frame
f
f
rails
When “N” isn’t
on end panel #:
• “1” -- is
acceptable
• “2” -- should
be replaced
• GOOD -- “N” at end Front view
of # on end panel
(e.g. 502042N)
• REPLACE -- “N”
not at end of # on
end panel (e.g.
350031C)
When “N” isn’t on end panel #: Rear view
• “1”, “2” or “3” -- is acceptable
• “4” -- should be replaced
HINT: Door lock manual
release cable is held to
the right side of the drain
pump by a clip.
Use care to avoid being cut on front panel after access cover removed.
59. /
WFMC64/WFXD84 Service Tips ––Water
Water flow
Cold
Cold
2nd Edition/Revision 1 (7/21/04)
Flow Meter
58
Flow sensor
The flow sensor measures the volume of (cold)
water flowing into the detergent dispenser. It
consists of an impeller wheel with a magnet core
and a Hall integrated circuit. When the wheel
rotates, the magnet emits impulses to the Hall IC.
The water flow is marked by an arrow on the side of
the sensor.
Specifications:
• Voltage: 12 VDC
• Detected flow rate: 0 – 10 liters/minute
NOTE: If there’s air bubbles in the water, higher
flow rates may be detected.
Water flow arrow
HINT: Make sure the water flow arrow points
from the water inlet valve to the dispenser.
Hot
60. 59 /
WFMC64/WFXD84 Service Tips ––
Mechanical Analog Pressure Switches
2nd Edition/Revision 1 (7/21/04)
The water level (pressure switch) system consists of a
mechanical pressure switch and an analog pressure switch.
Mechanical Pressure Switch
The mechanical pressure switch (brown) has (3) switching
positions:
• Water level level 1
• Water heating level
• Overflow level
Analog Pressure Switch
The analog pressure switch (black) determines the different
water levels in the various wash programs. It is piezo-electric
(pressure on it generates a voltage) and generates between 0.5 -
3.5 VDC.
HINT: Its not helpful to measure the analog pressure switch
voltage because its shown on the digital display while the
washer is in the test program.
Mechanical
Pressure
Switch
Analog
Pressure
Switch
61. /
WFMC/WFXD Service Tips –– Polinox Outer
2nd Edition/Revision 1 (7/21/04)
Drum (Tub)
60
POLINOX TUB
Lifecycle Test 4000 washes = 10 years
Highestspin 300 consecutive times (wash-spin,wash-spin,etc. -
have tested up to 900 wash-spin cycles)
HeatResistant Up to 130°C (266°F)
Stability Dropped from a greatheight, won’t dent like Stainless Steel–is
used on Mercedes-Benz bumper
• Reinforced with glass fiber
• Extraordinary strength
• Very reliable
• Vibrates less/ less noisy
• Fewerparts
• Lowerweight
Suspension Five –point (two top springs, two dampers,one rearspring)
62. 61 /
WFMC32/WFXD52 Service Tips –– Control
2nd Edition/Revision 1 (7/21/04)
Module Wire Terminal Colors
120V input
2-PK
To water
valves
5-BK
2-BL
6-WH
7-BL
WH
clear
YE
GN
WH
PK
BL
WH
HINT: This
will help with
reconnecting
wires.
To
pressure
switch
To
door
lock
To motor
control
To drain
pump
IMPORTANT: Its
possible to miswire the
WH, YE GN
terminals. Make sure
the terminals are in the
right order direction
(wires on left side).
2-BL
WH
Remove cover to access wires
WH BL
To heater
63. /
WFMC64/WFXD84 Service Tips –– Control
2nd Edition/Revision 1 (7/21/04)
62
Module Wire Terminal Colors
120V input
2-PK
To water
valves
5-BK
2-BL
4-WH
7-BL
WH
GY
YE
GN
WH
PK
BL
WH
HINT: This
will help with
reconnecting
wires.
To pressure
switch
To door
lock
To motor
control
To drain
pump
Remove cover to access wires
2-BL
WH
IMPORTANT: Its
possible to miswire the
WH, GY GN
terminals. Make sure
the terminals are in the
right order direction
(wires on left side).
To heater
64. 63 /
WFMC/WFXD Service Tips –– Test Program
(1A): Starting WFMC32/WFXD52 Test Program
The WFMC32/WFXD52 washer test programs self-diagnose problems, including listing the last 8
fault codes from the control module the last 16 fault codes from the motor control. The tests are
easy to use, speeding up and simplifying diagnosing washer issues.
NOTE: Door locks
for all water fill and
drain tests.
HINT: If
Start/Pause light
doesn’t come on for
some tests, door is
open. Turn off
washer, then close
door.
Entering using WFMC32/WFXD52 test programs:
• To reset, rotate cycle selector knob to Off position.
• To enter test program, push and hold Spin Selection and Delay Start buttons at the same time,
then rotate cycle selector knob ccw to Permanent Press Cold position. Hold Spin Selection
and Delay Start buttons until P:01 shows in display.
• To select tests, push Spin Selection button (to scroll through tests) until desired test shows in
display (P:01 - P:17) - Start/Pause light will flash.
• To start tests, push Start/Pause button while its light is flashing -- light stays lit when test has
started. To end tests, push Spin Selection button.
• To exit test program, rotate cycle selector knob to Off position.
2nd Edition/Revision 1 (7/21/04)
WFMC32
P:01
65. 64 /
WFMC/WFXD Service Tips –– Test Program
(1B): Starting WFMC64/WFXD84 Test Program
The WFMC64/WFXD84 washer test programs self-diagnose problems, including listing the last 8
fault codes from the control module the last 16 fault codes from the motor control. The tests are
easy to use, speeding up and simplifying diagnosing washer issues.
NOTE: Door locks
for all water fill and
drain tests.
HINT: If
Start/Pause light
doesn’t come on for
some tests, door is
open. Turn off
washer, then close
WFMC64 door.
Entering using WFMC64/WFXD84 test programs:
• To reset, rotate cycle selector knob to Off position.
• To enter test program, push and hold Menu and Select buttons at the same time, then rotate cycle
selector knob ccw to Permanent Press Cold position. Hold Menu and Select buttons until P1:
Errors shows in display.
• To select tests, push Menu button (to scroll through tests) until desired test shows in display (P1 -
P17) - Start/Pause light will flash.
• To start tests, push Start/Pause button while its light is flashing -- light stays lit when test has
started. To end tests, push Menu button.
• To exit test program, rotate cycle selector knob to Off position.
2nd Edition/Revision 1 (7/21/04)
P1:ERRORS
66. 65 /
WFMC/WFXD Service Tips –– Test Program (1C):
2nd Edition/Revision 1 (7/21/04)
Choosing Tests
Understanding WFMC/WFXD test programs:
1. Generating fault codes: Most fault codes are generated by running specific tests.
2. Viewing fault codes: Fault codes are viewed only by running test P1 (WFMC64/WFXD84) / P:01
(WFMC32/WFXD52), not during each test.
3. Procedure: 1st - select test based on expected problems (see below). 2nd - run test. 3rd - go back and run
test P1 (P:01) to see faults. Scroll through each fault and check if it occurred.
HINT: To scroll through tests, push:
• Menu button (WFMC64/WFXD84)
• Spin Selection button (WFMC32/WFXD52)
HINT: To run tests, push Start/Pause button.
To end tests, push:
• Menu button (WFMC64/WFXD84)
• Spin Selection button (WFMC32/WFXD52)
To check motor:
To check door Run test P4 (P:04)
latch: Fault codes
generated during wash
– run test P1 (P:01)
To check motor
control: Run test
P4 (P:04)
To check
fault codes:
Run test P:1
(P01)
To check drain
pump: Run test
P15, P9 (P:09)
To check heater:
Run test P16
To check NTC:
Run test P16
To check water inlet
(pressure switch, flow meter):
Run test P8 (WFMC64/WFXD84
only), P9 (P:09), P11
(WFMC64/WFXD84 only), P13
To check wire
harnesses: Run test
P4 (P:04), P8
(WFMC64/WFXD84 only)
67. 66 /
WFMC/WFXD Service Tips –– Test Program (1D):
2nd Edition/Revision 1 (7/21/04)
Displaying Selected Tests
All washers have displays showing what test has been selected.
WFMC64/WFXD84 Displays
Test # Test
P:03
WFMC32/WFXD52 Displays
WFMC32/
WFXD52 Displays
WFMC64/WFXD84
Displays
Generates
Fault Codes
1 Display fault codes P:01 P1:ERRORS No
2 Safety test (don't run) P:02 P2:SAFETY No
3 Automatic test program P:03 P3:AUTOM No
4 Motor P:04 P4:MOTOR Yes
5 Model coding (variations) - don't run P:05 P5:VARIANT No
6 Displays lights P:06 P6:DISPLAY No
7 Selector knob P:07 P7:SELECTOR No
8 Analog water level sensor Test not available P8:NIVEAU1 Yes
9 Pressure switch P:09 P9:NIVEAU2 Yes
11 Flow meter Test not available P11:FLOW Yes
12 Update control programming (N/A) P:12 P12:UPDATE No
13 Water valve 1 P:13 P13:VALVE1 Yes
14 Buzzer P:14 P14:BUZZER No
15 Pump P:15 P15:PUMP Yes
16 Heater NTC P:16 P16:HEATER Yes
17 Noise (factory test - don't run) P:17 P17:NOISE No
HINT: Skip tests
2, 5, 12 17.
68. 67 /
WFMC/WFXD Service Tips –– Test Program (1E):
2nd Edition/Revision 1 (7/21/04)
WFMC64/WXFD84 Text Displays
WFMC64/WFXD84 washers have full text displays showing which devices are running at each
point during each test. They’re helpful for visually determining whether washers are properly
filling, draining spinning.
Numeral Displayed letter Component/Function
1 D Door
2 M Motor
3 P Pump
4 H Heater
5 V Valve
6 1 Cold water valve (1) - part of dual valve
7 2 Cold water valve (2) - part of dual valve
8 3 Hot water valve (3)
9 N0 No water -- below heating water level
9 NH Heating water level (min. to heat)
9 ND Door water level (reached door)
10 Component actuated
11 …… Component not actuated
12 Clockwise rotation (cw)
12 Counterclockwise rotation (ccw)
0 P
NOTE: “ ” = drum speed (RPM)
“n” = pressure switch reading.
HINT: Using the test program can cut
down repair times eliminate repeat calls
from misdiagnosing problems.
HINT: If Start/Pause light doesn’t come
on for some tests, door is open. Turn off
washer, then close door.
69. 68 /
WFMC/WFXD Service Tips –– Test Program (2A): Fault
Viewing fault codes:
• WFMC32/WFXD52 displays alternate between fault code (e.g. E:01) when fault occurred on in last 8
washes (e.g. C:00) – shows C:00 if fault didn’t occur.
• WFMC64/WFXD84 displays show fault code when fault occurred on in last 8 washes (e.g. 0 - Er:01).
TIP: Washers are designed to give a service history, not
show only latest fault codes. Since fault codes stored in
module or motor control can’t be cleared, don’t expect
fault codes to be reset to “0” when repairs are made.
2nd Edition/Revision 1 (7/21/04)
Code Displays
WFMC32/WFXD52 fault code
displays flash – alternating
between fault code (E:09) and
wash when fault occurred (C:01)
E:09 C:01
WFMC32/WFXD52 Displays
WFMC64/WFXD84 Displays
WFMC64/WFXD84 displays
show fault code (Er:09) and
wash when fault occurred (1)
NOTE: Some control modules have been replaced since
fault codes stored in module or motor control can’t be
cleared. Modules are operating properly and shouldn’t be
replaced to clear fault codes.
70. /
WFMC/WFXD Service Tips –– Test Program (2B):
2nd Edition/Revision 1 (7/21/04)
Module Fault Codes (Test 1)
69
Last 8 fault codes are
Test P1:ERRORS / P:01 (Viewing control module fault codes) -- Start end test P1 stored displayed!
(WFMC64/WFXD84) / (P:01) (WFMC32/WFXD52) by pushing Start/Pause button. Scroll through list of fault
codes by pushing Spin Selection (WFMC32/WFXD52) or Menu (WFMC64/WFXD84) buttons.
• WFMC32/WFXD52 displays alternate between fault code (e.g. E:01) when fault occurred on in last 8
washes (e.g. C:00) – shows C:00 if fault didn’t occur.
• WFMC64/WFXD84 displays show fault code when fault occurred on in last 8 washes (e.g. 0 - Er:01).
HINT: # of faults reads “0”
for faults which didn’t occur.
Look at # of faults, not error
#, to see if faults occurred --
scroll thru all faults to check
if any occurred.
WFMC32/
WFXD52 Displays
WFMC64/
WFXD84 Displays Test # Problem Possible Cause(s)
E:01 Er:01 washing Door open Door lock not engaged
Er:02 washing Door lock doesn't unlock Jammed lock or bad wire harness
E:03 Er:03 washing Door lock doesn't lock Jammed lock or bad wire harness
E:04 Er:04 washing Door control broken Faulty Triac/control module or oversudsing
(washer locks, thinking it has overfilled)
E:05 Er:05 P:16 NTC open-circuited Faulty NTC or bad wire harness
E:06 Er:06 P:16 NTC shorted Faulty NTC or bad wire harness
E:07 Er:07 P:16 Unexpected heating (heater on at wrong time) Faulty heater or stuck heater relay
E:08 Er:08 P:16 Heater doesn't shut off Faulty heater or stuck heater relay
E:09 Er:09 P:4 Communication lost to motor Faulty wire harness
----- Er:10 P:11 Flow meter gives wrong values Faulty flow meter or wire harness
----- Er:11 P:8/9/13 No water flow (within 6 minutes) Faulty inlet valve, wire harness, hose
E:12 Er:12 P:8/9/13 Water supply time exceeded Faulty inlet valve, wire harness, hose
E:13 Er:13 P:15 Drain pump time exceeded Faulty drain pump, wire harness, hose
E:14 Er:14 P:9 Overflow level exceeded Faulty/blocked pump, hose, inlet valve
----- Er:15 P:8 Pressure sensor gives failure voltage level Faulty pressure sensor, wire harness
----- Er:16 P:8 Can't calibrate pressure sensor Faulty pressure sensor, wire harness
E:20 Er:20 P:4 Spinning aborted due to unbalanced load Unbalanced load or faulty wire harness
E:21 Er:21 Excessive foam Wrong or too much detergent used
E:22 Er:22 washing Frequency synchronization failed Faulty control module
E:24 Er:24 P:4 Motor power relay failed Faulty control module
NOTE: Fault codes stored in module can’t be cleared .
71. 70 /
WFMC/WFXD Service Tips –– Test Program (2C): Motor
2nd Edition/Revision 1 (7/21/04)
Control Fault Codes (Test 1)
Test P1:ERRORS / P:01 (Viewing motor control fault codes) -- Start end test P1 by
pushing Start/Pause button. Scroll through list of (18) fault codes by pushing Spin Selection
(WFMC32/WFXD52) or Menu (WFMC64/WFXD84) buttons.
• WFMC32/WFXD52 displays alternates between fault code (e.g. d:01) when fault occurred on in
last 16 washes (e.g. C:00) – shows C:00 if fault didn’t occur.
• WFMC64/WFXD84 displays shows fault code when fault occurred on in last 16 washes (e.g. 0
- dr:01).
Last 16 fault codes are
stored displayed!
HINT: # of faults reads “0” for
faults which didn’t occur. Look at
# of faults, not error #, to see if
faults occurred -- scroll thru all
faults to check if any occurred.
WFMC32/WFXD52
Displays
WFMC64/WFXD84
Displays Test # Problem Possible Cause(s)
d:01 dr:01 P:04 Motor control short circuited. Faulty motor control.
d:02 dr:02 P:04 Motor control interruption. Faulty motor control.
d:03 dr:03 P:04 Damaged motor control temperature sensor. Faulty temperature sensor.
d:06 dr:06 P:04 NTC relay failure. NTC too hot or relay stuck closed.
d:07 dr:07 P:04 Motor control (inverter) failed or motor shorted. Faulty motor control or motor.
d:08 dr:08 P:04 Motor speed sensor failed. Faulty speed sensor or wire harness.
d:09 dr:09 P:04 Voltage too high. Faulty motor control.
d:10 dr:10 P:04 Power limiter switch off. Motor overloaded or binding.
d:11 dr:11 P:04 Voltage too low. Faulty motor control.
d:12 dr:12 P:04 Motor control high current switch off. Motor overloaded or binding.
d:13 dr:13 P:04 Motor control high temperature switch off. Motor overloaded or binding.
d:14 dr:14 P:04 Motor control high temperature warning. Motor overloaded or binding.
d:15 dr:15 P:04 Power limiter warning. Motor overloaded or binding.
d:16 dr:16 P:04 Motor high temperature switch off. Motor overloaded or binding.
d:17 dr:17 P:04 Motor high temperature warning. Motor overloaded or binding.
d:18 dr:18 P:04 Peak voltage too high. Faulty motor control.
NOTE: Fault codes stored in motor control can’t be cleared .
72. 71 /
WFMC/WFXD Service Tips –– Test Program (3): Tests 2 3
D M P H V 1 2 3 NH
t23 0051
NOTE: “ ” = actual
drum speed (RPM)
2nd Edition/Revision 1 (7/21/04)
Test P2:SAFETY / P:02 (Safety test program) --
Skip this European test. Test ends on its own - stop it by pushing the Spin
Selection button (WFMC32/WFXD52) or Menu button (WFMC64/WFXD84).
Operation WFMC64/WFXD84 Display Notes
Starts filling
(valve 2 - cold)
Starts heating (30
seconds)
HINT: Do not use
this test as it applies
to European models
requiring VDE
safety testing.
D M P H V 1 2 3 NH
n 075
D M P H V 1 2 3 NH
n 075
Operation WFMC64/WFXD84 Display Notes
Starts ccw
rotation
Filling valve 1 only
Starts cw rotation Filling valve 1 only
Starts 3rd fill
(valve 3 - hot)
Stops rotation
Starts draining
Drum starts
spinning
Rotation ccw. Water
level reaches N0.
Drum spins at full
speed (~ 1200
RPM)
Doesn't have to hit
1200 RPM exactly
Drum slows
down
Test stops
D M P H V 1 2 3 NH
t23 0051
D M P H V 1 2 3 NH
t23 0000
D M P H V 1 2 3 NH
t23 0000
D M P H V 1 2 3 N0
t23 0072
D M P H V 1 2 3 N0
t23 1154
D M P H V 1 2 3 N0
t23 0066
D M P H V 1 2 3 N0
t23 0000
NOTE: ‘“n” = pressure switch (analog sensor) reading.
Test P3:AUTOM / P:03 (Automatic test program) --
Test 3 turns on motor (wash spin), heater, drain pump and water
valves separately for a visual check. No fault codes are generated.
Test 3 ends on its own - stop it by pushing the Spin Selection button
(WFMC32/WFXD52) or Menu button (WFMC64/WFXD84).
Operation WFMC64/WFXD84 Display Notes
Starts filling
(valve 2 - cold)
Water starts at N0
level (no water)
Fills up to NH
level
Filling using valve 2 -
cold
Starts heating Stops valve 2 filling
Starts 2nd fill
(valves 1 2 -
cold)
Keeps heating
D M P H V 1 2 3 N0
t23 0000
D M P H V 1 2 3 NH
t23 0000
D M P H V 1 2 3 NH
t23 0000
D M P H V 1 2 3 NH
t23 0000
NOTE: “t” = temperature
measured on NTC (can vary).
NOTE: WFMC32/WFXD52 displays don’t show any change during
test – it stays on P:03. Only light lit is Door locked light.
73. 72 /
WFMC/WXFD Service Tips –– Test Program (4): Tests 4 5
Test P5:VARIANT / P:05 (Model coding)
Skip test 5. Both factory replacement control
modules are preprogrammed and cannot be
changed. So, there’s no way to change the
module configurations.
• WFMC32/WFXD52 displays show 0:7
1:0 as test P5 is scrolled through.
• WFMC64/WFXD84 displays show 0:7, 1:0
2:0 as test P5 is scrolled through.
HINT: If Start/Pause light doesn’t come
on for some tests, door is open. Turn off
washer, then close door.
HINT: Start/Pause button light:
• Flashes red when tests can be selected or
scrolled through.
• Stays red continually (or stays off) when
tests are running.
• Doesn’t come on for some tests if door is
open.
2nd Edition/Revision 1 (7/21/04)
Test P4:MOTOR / P:04 (Motor test program) --
Test 4 turns on motor (wash spin) and generates fault codes.
The test takes 10 minutes to run and ends on its own, but can be
stopped by pushing the Spin Selection button
(WFMC32/WFXD52) or Menu button (WFMC64/WFXD84).
Operation WFMC64/WFXD84 Display Notes
Runs 6 seconds
ccw
Checks wash speed
(50 RPM)
Stops and
pauses for 2
seconds
Runs 4 seconds
cw
Checks wash speed
(50 RPM)
Stops and
pauses for 2
seconds
Spins to full speed --
1200 RPM
(WFMC64/ WFXD84)
or 1000 RPM
(WFMC32/WFXD52)
Checks spin speed --
stops @ 100 RPM if
load unbalanced.
D M P H V 1 2 3 N0
050 0051
D M P H V 1 2 3 N0
000 0000
D M P H V 1 2 3 N0
050 0051
D M P H V 1 2 3 N0
000 0000
D M P H V 1 2 3 N0
1200 1200
HINT: If motor fault codes are generated, check both motor
control and motor for problems.
• Check motor control output voltage (~ 120 VAC, 3-phase, 0
- 400 Hz). Control output can be 90 – 190 VAC.
• Check motor resistances.
74. 73 /
WFMC/WFXD Service Tips –– Test Pgm (5): Tests 6 7
Test P7:SELECTOR / P:07 (Selector knob test program) --
Test 7 turns on the selector knob for a visual check. No fault codes are
generated.
Rotate knob ccw through all positions -- don't rotate through Off position or
test program will end. Stop test 7 by pushing the Spin Selection button
(WFMC32/WFXD52) or Menu button (WFMC64/WFXD84).
Operation WFMC64/WFXD84 Display Notes
Rotating selector knob For WFMC64/WFXD84,
display shows P17 - P01
for Permanent Press Cold
- Regular/Cotton Cold
(rotating ccw through
each knob position).
P7:SELECTOR
P11
P7:SELECTOR
P7:SELECTOR
2nd Edition/Revision 1 (7/21/04)
Select button
(WFMC64/WFXD84)
Menu button
(WFMC64/WFXD84)
Spin Selection button
(WFMC32/WFXD52)
No final spin light stays on
while button is held.
Delay Start button
(WFMC32/WFXD52)
Rinse light stays on while
button is held.
Other buttons (Bleach,
Rinse Plus, Power
Wash (WFMC32),
Reduced Ironing
(WFMC64/WFXD84))
Light above each button
will light up while button is
held.
NOTE 1) For WFMC32/WFXD52, display shows L:15 - L: 1 for Permanent Press Cold -
Regular/Cotton Cold (rotating ccw through each knob position).
NOTE 2) If a display segment doesn’t come on, replace control module (since button
knob switches are included with control modules).
Test P6:DISPLAY / P:06 (Display test program) --
Test 6 turns on all displays for a visual check. The test ends on
its own (in ~ 50 seconds for WFMC64/WFXD84) - stop it by
pushing the Spin Selection button (WFMC32/WFXD52) or
Menu button (WFMC64/WFXD84).
No fault codes are generated. If a display segment doesn’t
come on, replace control module (since displays are included
with control modules).
NOTE: On WFMC32/WFXD52 models, all lights come on (in
sequence) -- all display #’s come on, then all display segments
come on.
WFMC64/WFXD84 Display
Notes
While WFMC64/WFXD84 lights
flash, the display is blank.
All upper (half of) display pixels are
turned on at once.
All lower (half of) display symbols are
turned on at once.
All lower (half of) display symbols are
turned on individually (one at a time).
The red background of the display
flashes on and off 5 times.
on
off
75. 74 /
WFMC/WFXD Service Tips –– Test Pgm (6): Tests 8 9
Test P9:NIVEAU2 / P:09 (Mechanical pressure
switch test program) -- The test turns on the mechanical
pressure switch and generates fault codes. Stop it by pushing the
Spin Selection button (WFMC32/WFXD52) or Menu button
(WFMC64/WFXD84).
Operation WFMC64/WFXD84 Display Notes
2nd Edition/Revision 1 (7/21/04)
Changes as
water level
changes
Changes as
water level
changes
When n075 has been
reached, volume
display jumps to U15.
D M P H V 1 2 3 N0
U00 n000
D M P H V 1 2 3 NH
U03 n075
D M P H V 1 2 3 NH
U15 n075
Water volume measured
by flow meter
Value of mechanical
pressure switch
Test P8:NIVEAU1 (Analog pressure switch test
program) -- The test turns on the analog pressure switch
(WFMC64/WFXD84 only) and generates fault codes. The test
can be stopped by pushing the Menu button.
Operation WFMC64/WFXD84 Display Notes
Changes as
water level
changes
Calibrates analog
sensor
Changes as
water level
changes
Pauses for 10
seconds
Changes as
water level
changes
D M P H V 1 2 3 N0
I00 n000
D M P H V 1 2 3 NH
I65 n075
D M P H V 1 2 3 ND
I65 n139
Value of analog
pressure switch
Offset of analog
pressure switch
HINT: Water level symbols change as follows:
• WFMC64/WFXD84 -- from N0 (below heating level) to NH (heating level) to ND (door locked level).
• WFMC32/WFXD52 -- from 63 (below heating level) to 88 (heating level) to 177 (door locked level).
HINT: If Start/Pause light
doesn’t come on for some
tests, door is open. Turn off
washer, then close door.
76. 75 /
WFMC/WFXD Service Tips –– Test Pgm (7): Tests 11 - 13
Test P13:VALVE1 / P:13 (Water inlet valves test
program) -- The test turns on all 3 water inlet valves and
generates fault codes.
It stops when n20 level is reached (max. 10 minutes). Stop it by
pushing the Spin Selection button (WFMC32/WFXD52) or
Menu button (WFMC64/WFXD84).
2nd Edition/Revision 1 (7/21/04)
Test P11:FLOW (Flow meter test program) -- The
test turns on the flow meter (WFMC64/WFXD84 only) and
generates fault codes. The test has ended when U05 has
displayed ( 1 minute) and can be stopped by pushing the Menu
button.
Operation WFMC64/WFXD84 Display Notes
Changes as
water level
changes
Test P12: UPDATE / P:12 (Update programming) --
This test cannot be used presently. If selected, it can only be
exited by turning the washer off using the selector knob.
HINT: On WFMC32/WFXD52, each valve is checked automatically. On
WFMC64/WFXD84, push Start/Pause button to check each valve:
• At start of test, valve 1 (cold) is tested.
• Push Start/Pause button again to check valve 2 (cold).
• Push Start/Pause button again to check valves 1 + 2 (dual cold).
• Push Start/Pause button again to check valve 3 (hot).
• Pushing Start/Pause button again checks valve 1 again.
HINT: Water level symbols change as follows (e.g. test P13): • Push Menu button to exit test.
• WFMC64/WFXD84 -- from N0 (below heating level) to NH
(heating level) to ND (door locked level).
• WFMC32/WFXD52 -- from 63 (below heating level) to 88
(heating level) to 177 (door locked level).
Run test P1 to check
fault code -- if Er:13,
check water inlet
valve.
Changes as
water level
changes
Run test P1 to check
fault code -- if Er:12,
check flow meter for
errors.
D M P H V 1 2 3 N0
U00 F….
D M P H V 1 2 3 N0
U05 F….
Flow rate measured by
flow meter in liters/minute
Water volume measured
by flow meter
Operation WFMC64/WFXD84 Display Notes
Test runs valves
in sequence: 1,
2, 1 + 2 3.
Analog pressure
sensor reading
increases after valves
shut off.
D M P H V 1 2 3 ND
U22 n253
Flow rate measured by
flow meter in liters/minute
Value of analog
pressure switch
NOTE: On WFMC32/WFXD52, displays alternates from “P:13” to
“63”, “88” or “177”, depending on water level (below or at heating
level).
HINT: Test runs until max. water level reached or is stopped by pressing
Menu button. To save time with Test P13, press Menu to stop test when
HINT: If Start/Pause light doesn’t come on for some tests, door is all valves have been checked. Run Test P15 to drain washer if needed.
open. Turn off washer, then close door.
77. 76 /
WFMC/WFXD Service Tips –– Test Pgm (8): Tests 14 - 17
Test P16:HEATER / P:16 (Heater NTC test
program) -- The test turns on the heater NTC and generates
fault codes. The test runs for ~ 30 minutes and can be stopped by
pushing the Spin Selection button (WFMC32/WFXD52) or
Menu button (WFMC64/WFXD84).
Operation WFMC64/WFXD84 Display Notes
2nd Edition/Revision 1 (7/21/04)
Changes as
water level
changes
During heating,
temperature display
rises to t86 max.
(86ºC/187ºF)
D M P H V 1 2 3 NH
t20
D M P H V 1 2 3 NH
t22
Water temperature
in ºC
Test P14:BUZZER / P:14 (Buzzer test program) --
Buzzer sounds when test is run.
Test P15:PUMP / P:15 (Drain pump test program) -
- The test turns on the drain pump and generates fault codes. The
test runs for ~ 30 minutes and can be stopped by pushing the
Spin Selection button (WFMC32/WFXD52) or Menu button
(WFMC64/WFXD84).
Operation WFMC64/WFXD84 Display Notes
Filling (to door
locked level) and
draining
Can save time by
filling then running
Drain cycle to check
for water draining.
D M P H V 1 2 3 N0
n000
Value of analog
pressure switch
HINT: To save time with Test T16, press Menu to stop testing after the
temperature has gone up several degrees, confirming the washer is
heating OK.
HINT: Water level symbols change as follows (e.g. test P15):
• WFMC64/WFXD84 -- from N0 (below heating level) to NH
(heating level) to ND (door locked level).
• WFMC32/WFXD52 -- from 63 (below heating level) to 88
(heating level) to 177 (door locked level).
NOTE: On Test T16, the water level rises until NH, which is the heating
water level.
HINT: Start/Pause button light:
• Flashes red when tests can be selected or
scrolled through.
• Stays red continually (or stays off) when
tests are running.
• Doesn’t come on for some tests if door is
open.
P17:NOISE / P:17 (Factory noise test program) --
Not relevant to customer service – do not use. This test is similar
to automatic test P3, except no heating is done and nothing is
shown on displays. This test merely turns on certain parts so the
factory can measure noise.
78. 77 /
WFMC/WFXD Service Tips –– Troubleshooting (1)
2nd Edition/Revision 1 (7/21/04)
Symptom Problem Solution
Washer won’t start. ‰ Electricity is disconnected
or has been turned off.
‰ Cycle selector knob or
control module has failed.
‰ Make sure washer is connected to an appropriate 120V, 60 Hz
circuit (according to local codes). Turn on electricity.
‰ Control module has onboard cycle selector knob. Check
voltage output to water inlet valves and drum motor (when
they’re energized). If no voltage, replace faulty control module.
Washer won’t fill. ‰ Water supply turned off.
‰ Water inlet hose filters
(strainers) blocked.
‰ Water pressure too low.
‰ Control module has
failed.
‰ Water inlet valve(s) has
failed.
‰ Turn on water supply.
‰ Check water inlet hose filters. Clean if dirty. Replace filters if
damaged.
‰ Check incoming water pressure.
‰ Check voltage output to water inlet valves (when they’re
energized). If no voltage, replace faulty control module.
‰ Measure resistance of water inlet valves (~ 2.7 – 4.5 kΩ).
Replace inlet valve(s), if faulty.
Washer won’t drain. ‰ Drain pump or pump
motor protector has
failed.
‰ Control module has
failed.
‰ Disconnect drain pump and measure resistance at connector
(~ 140 – 200 Ω). Replace drain pump if faulty.
‰ Check voltage output to drain pump when it’s energized. If no
voltage, replace faulty control module.
HINT: The washer test program diagnoses
problems quickly and thoroughly where resistance
measurements usually aren’t needed.
WARNING! Unplug washer
before starting any repairs.
79. 78 /
WFMC/WFXD Service Tips –– Troubleshooting (2)
2nd Edition/Revision 1 (7/21/04)
Symptom Problem Solution
Drum won’t rotate. ‰ Drum rear bearing
has failed.
‰ Motor control has
failed.
‰ Drum drive motor
has failed.
‰ Check how drum rotates. If drum wobbles or won’t move,
replace outer tub (containing faulty rear bearings).
‰ c Check voltage at motor connectors when motor is energized.
If low or no voltage, replace faulty motor control. d If voltage ~
120V, check motor resistance (when washer de-energized). If
motor is OK, replace faulty motor control.
‰ Check voltage at motor connectors when motor is energized. If
~ 120V, check motor resistance (when washer de-energized). If
motor faulty, replace faulty drum motor.
Washer won’t heat. ‰ Heater has failed.
‰ NTC has failed.
‰ Heater is covered
with scale.
‰ Voltage too low.
‰ Control module
has failed.
‰ Disconnect heater and measure resistance at terminals (~ 13.7 –
15.2 Ω). Replace heater if faulty.
‰ Disconnect NTC and measure resistance at terminals (~ 22.8 –
27.4 k Ω @ 20ºC (68ºF)). Replace NTC if faulty.
‰ If possible, remove clean heater. If not, replace it.
‰ Have an electrician check the house wiring and the wiring to the
washer to make sure it is 120 volts.
‰ Check voltage output to drain pump when it’s energized. If no
voltage, replace faulty control module.
WARNING! Unplug washer
before starting any repairs.
HINT: The washer test program diagnoses
problems quickly and thoroughly where resistance
measurements usually aren’t needed.
80. 79 /
WFMC/WFXD Service Tips –– Troubleshooting (3)
2nd Edition/Revision 1 (7/21/04)
Symptom Problem Solution
Washer overheats. ‰ Control module has
failed.
‰ NTC failed.
‰ Check voltage to heater. If voltage is present when heater
shouldn’t be on, replace faulty control module.
‰ Disconnect NTC and measure resistance at terminals (~ 22.8 –
27.4 kΩ @ 20ºC (68ºF)). Replace NTC if faulty.
Door won’t lock. ‰ Door isn’t closed
properly.
‰ Door latch is broken.
‰ Door lock has failed.
‰ Close door securely. If door won’t latch, check door latch and
door hinge alignment.
‰ Replace broken door latch.
‰ Measure resistance of door lock mechanism (~ 159 - 211 Ω).
Replace faulty door lock mechanism.
WARNING! Unplug washer
before starting any repairs.
HINT: The washer test program diagnoses
problems quickly and thoroughly where resistance
measurements usually aren’t needed.
81. 80 /
WFMC/WFXD Service Tips –– Troubleshooting
of Minor Faults 1 (Customer Self-Help)
2nd Edition/Revision 1 (7/21/04)
82. 81 /
WFMC/WFXD Service Tips –– Troubleshooting
of Minor Faults 2 (Customer Self-Help)
2nd Edition/Revision 1 (7/21/04)
84. 83 /
WFMC/WFXD Service Tips –– Oversudsing Suds Lock
If washers time out and shut off without an end of cycle signal
(and without going through the spin cycle), the washer has
experienced suds lock, a possible occurrence with all front
loader washers (regardless of manufacturer).
TIP: Because front loader washers wash the
same amount of clothes more efficiently with
much less water than top loader washers, high
efficiency (HE) detergent specially formulated
for front loader washers is needed. Have
customers follow detergent directions and not
expect to see suds.
TIP: Powdered detergent works better than
liquid detergents (due to more surfactants in
liquid detergents).
2nd Edition/Revision 1 (7/21/04)
• Suds lock: Suds lock comes from suds (airy foam)
interfering with water level sensors (pressure switches).
Electronic controls are fooled into thinking water hasn’t been
removed fully, so washers won’t go into spin cycles. Drain
pumps can also get air locks in them.
• Cause: Suds lock oversudsing come from using too
much detergent, using the wrong kind of detergent (not HE) or
overloading washers (trapping suds in clothes).
• Solution: Where oversudsing has occurred, have the
washer cleaned out every 6 months by running it without
clothing using a hot water wash (with cold water rinse) ½
gallon of white vinegar. When suds have overflowed, run a
cold water rinse using 1 gallon of white vinegar. NOTE: Don’t
use vinegar routinely to avoid possible damage to washer
parts.
• Customer education: Educate customer on type (HE)
and amount of detergent to use. To remove suds from clothes,
have customer rewash clothes with liquid fabric softener, ½
recommended amount of detergent a cold water rinse.
NOTE: Where possible, handle such calls
over the phone without making service calls.
TIP: Fault code E:04/Er:04 can occur during oversudsing if
pressure switch locks door, thinking washer has overfilled.