Download as PDF, PPTX

![Safety Information and Introduction
En-3
Precautions
1. Recording Copyright—Unless it’s for personal
use only, recording copyrighted material is illegal
without the permission of the copyright holder.
2. AC Fuse—The AC fuse inside the unit is not user-
serviceable. If you cannot turn on the unit, contact
your Onkyo dealer.
3. Care—Occasionally you should dust the unit all
over with a soft cloth. For stubborn stains, use a
soft cloth dampened with a weak solution of mild
detergent and water. Dry the unit immediately
afterwards with a clean cloth. Don’t use abrasive
cloths, thinners, alcohol, or other chemical
solvents, because they may damage the finish or
remove the panel lettering.
4. Power
WARNING
BEFORE PLUGGING IN THE UNIT FOR THE
FIRST TIME, READ THE FOLLOWING SECTION
CAREFULLY.
AC outlet voltages vary from country to country.
Make sure that the voltage in your area meets the
voltage requirements printed on the unit’s rear
panel (e.g., AC 230 V, 50 Hz or AC 120 V, 60 Hz).
The power cord plug is used to disconnect this
unit from the AC power source. Make sure that
the plug is readily operable (easily accessible) at
all times.
For models with [POWER] button, or with both
[POWER] and [ON/STANDBY] buttons:
Pressing the [POWER] button to select OFF
mode does not fully disconnect from the mains. If
you do not intend to use the unit for an extended
period, remove the power cord from the AC outlet.
For models with [ON/STANDBY] button only:
Pressing the [ON/STANDBY] button to select
Standby mode does not fully disconnect from the
mains. If you do not intend to use the unit for an
extended period, remove the power cord from the
AC outlet.
5. Preventing Hearing Loss
Caution
Excessive sound pressure from earphones and
headphones can cause hearing loss.
6. Batteries and Heat Exposure
Warning
Batteries (battery pack or batteries installed) shall
not be exposed to excessive heat as sunshine,
fire or the like.
7. Never Touch this Unit with Wet Hands—Never
handle this unit or its power cord while your hands
are wet or damp. If water or any other liquid gets
inside this unit, have it checked by your Onkyo
dealer.
8. Handling Notes
• If you need to transport this unit, use the original
packaging to pack it how it was when you
originally bought it.
• Do not leave rubber or plastic items on this unit
for a long time, because they may leave marks
on the case.
• This unit’s top and rear panels may get warm
after prolonged use. This is normal.
• If you do not use this unit for a long time, it may
not work properly the next time you turn it on, so
be sure to use it occasionally.
For U.S. and Canadian models
FCC CAUTION
Changes or modifications not expressly approved by
the party responsible for compliance could void the
user’s authority to operate the equipment.
Note:
This equipment has been tested and found to comply
with the limits for a Class B digital device, pursuant to
part 15 of the FCC Rules. These limits are designed
to provide reasonable protection against harmful
interference in a residential installation. This
equipment generates, uses and can radiate radio
frequency energy and, if not installed and used in
accordance with the instructions, may cause harmful
interference to radio communications. However, there
is no guarantee that interference will not occur in a
particular installation. If this equipment does cause
harmful interference to radio or television reception,
which can be determined by turning the equipment off
and on, the user is encouraged to try to correct the
interference by one or more of the following
measures:
–Reorient or relocate the receiving antenna.
–Increase the separation between the equipment
and receiver.
–Connect the equipment into an outlet on a circuit
different from that to which the receiver is
connected.
–Consult the dealer or an experienced radio/TV
technician for help.
This device complies with Industry Canada licence-
exempt RSS standard(s). Operation is subject to the
following two conditions: (1) this device may not
cause interference, and (2) this device must accept
any interference, including interference that may
cause undesired operation of the device.
Le présent appareil est conforme aux CNR d’Industrie
Canada applicables aux appareils radio exempts de
licence. L’exploitation est autorisée aux deux
conditions suivantes : (1) l’appareil ne doit pas
produire de brouillage, et (2) l’utilisateur de l’appareil
doit accepter tout brouillage radioélectrique subi,
même si le brouillage est susceptible d’en
compromettre le fonctionnement.
This transmitter must not be co-located or operated in
conjunction with any other antenna or transmitter.](https://image.slidesharecdn.com/tx-nr727english-140522105640-phpapp01/85/Tx-nr727-english-3-320.jpg)


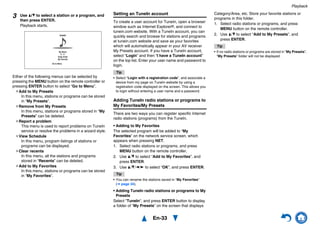
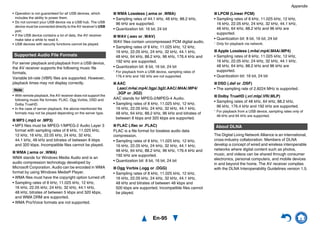
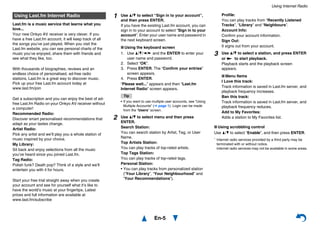
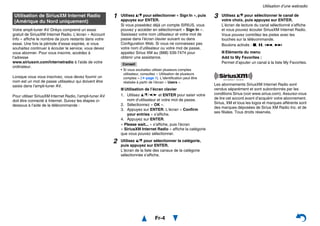
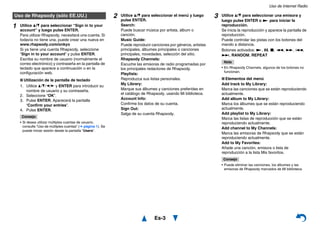
![Playback
En-40
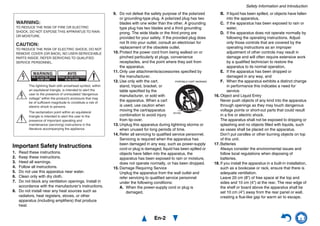
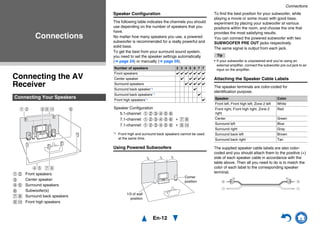
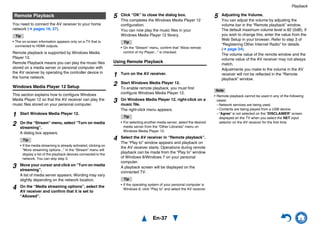
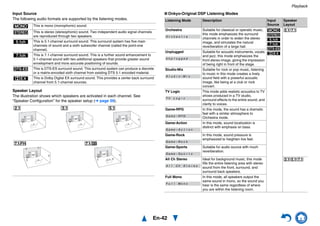
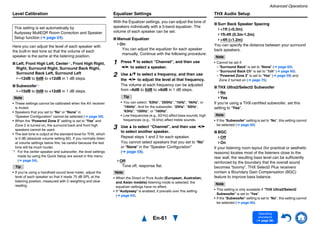
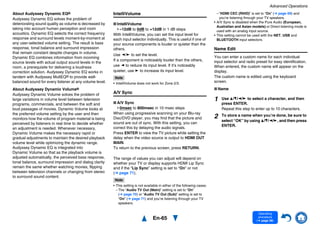
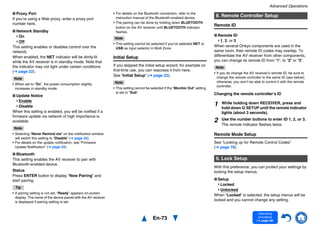
■ Listening to Traffic News (TP)
You can search for stations that broadcast traffic
news.
RDS program types (PTY)
You can listen to the audio of one input source while
watching the video of another. This function takes
advantage of the fact that when an audio-only input
source (PHONO, TV/CD, PC, TUNER) is selected,
the video input source remains unchanged. The
following procedure shows how to listen to a CD
player’s audio source connected to TV/CD IN while
watching a Blu-ray Disc/DVD player’s video source
connected to BD/DVD.
Tip
• To use an input selector as audio-exclusive, you must
assign all video inputs to “- - - - -” (➔ page 58).
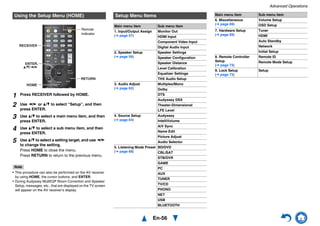
1 Press RT/PTY/TP three times.
If the current radio station is broadcasting TP
(Traffic Program), “[TP]” will appear on the AV
receiver’s display. If “TP” without square brackets
appears, this means that the station is not
broadcasting TP.
2 To locate a station that is broadcasting TP,
press ENTER.
The AV receiver searches until it finds a station
that’s broadcasting TP.
If no stations are found, the message “Not
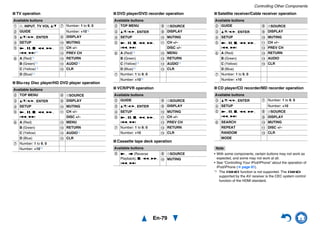
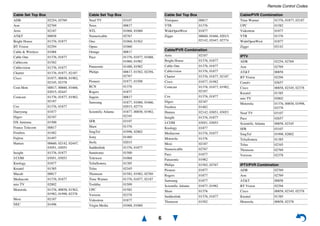
Found” appears.
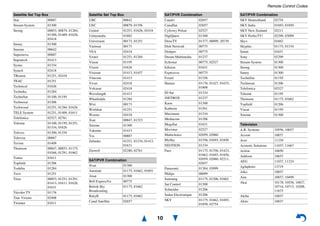
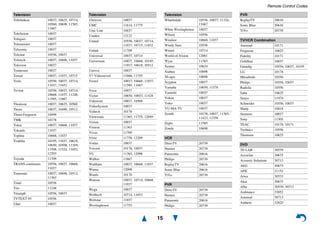
Type Display
None None
News reports News
Current affairs Affairs
Information Info
Sport Sport
Education Educate
Drama Drama
Culture Culture
Science and technology Science
Varied Varied
Pop music Pop M
Rock music Rock M
Middle of the road music Easy M
Light classics Light M
Serious classics Classics
Other music Other M
Weather Weather
Finance Finance
Children’s programmes Children
Social affairs Social
Religion Religion
Phone in Phone In
Travel Travel
Leisure Leisure
Jazz music Jazz
Country music Country
National music Nation M
Oldies music Oldies
Folk music Folk M
Documentary Document
Alarm test TEST
Alarm Alarm!
Playing Audio and Video from Separate
Sources
1 Press BD/DVD.
2 Press TV/CD.
The audio output changes to the CD source, but
the video of previously-selected BD/DVD is
retained.
3 Start playback on your Blu-ray Disc/DVD and
CD players.
You can now enjoy watching your Blu-ray
Disc/DVD with the sound of your CD player.](https://image.slidesharecdn.com/tx-nr727english-140522105640-phpapp01/85/Tx-nr727-english-40-320.jpg)


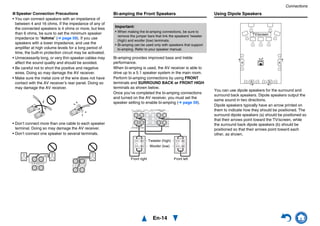
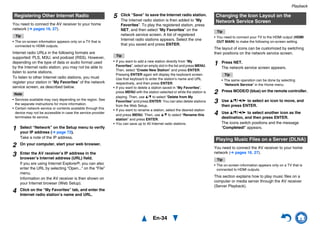
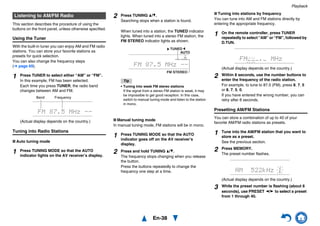
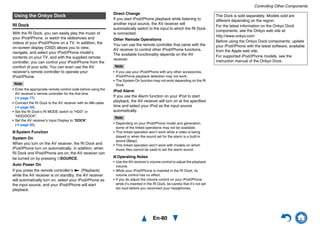
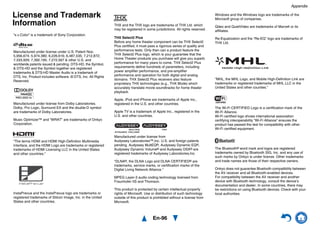
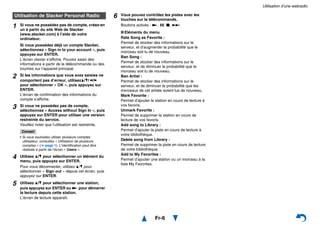
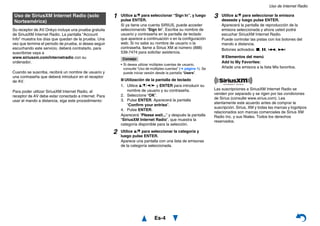
![Advanced Operations
En-66
Operating
procedure
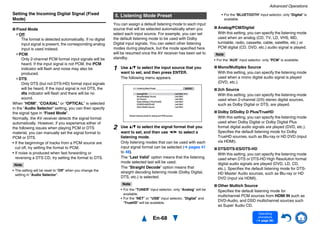
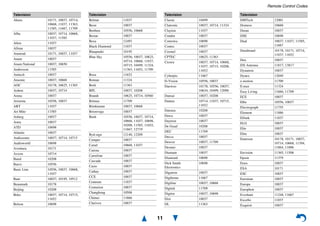
(➔ page 56)
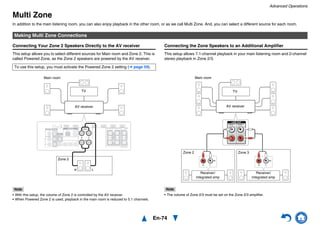
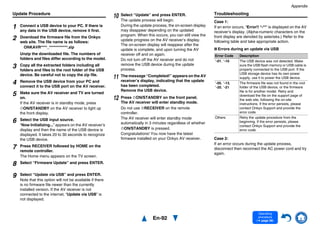
a Toggles between lower and upper case
characters.*1
b Moves the cursor left or right in the Name input
area.
c Moves the cursor backward and deletes one
character.*2
d Enters a space character.
e Confirms your entry.
Tip
• To name a radio preset, use TUNER to select AM or FM,
and then select the preset (➔ page 38).
• To restore a name to its default, erase all characters with
CLR, select “OK” and then press ENTER.
*1 This can also be performed by using +10 on the remote
controller.
*2 Press CLR on the remote controller to delete all the
characters you have input.
Note
• This setting cannot be used for the NET, USB and
BLUETOOTH input selectors.
Picture Adjust
Using Picture Adjust, you can adjust the picture
quality and reduce any noise appearing on the
screen.
Press ENTER to view the TV picture while setting
when the video source is output to HDMI OUT MAIN.
To return to the previous screen, press RETURN.
■ Wide Mode*1*6
This setting determines the aspect ratio.
4:3:
Full:
Zoom:
Wide Zoom:
Auto:
According to the input signals and monitor
output setting, the AV receiver automatically
selects the “4:3”, “Full”, “Zoom” or “Wide Zoom”
mode. See “Monitor Out” for details on the
monitor output setting (➔ page 57).
■ Picture Mode*1
Custom:
All settings can be performed manually.
Cinema:
Select when the picture source is a movie or
alike.
Game:
Select when the video source is a game
console.
Standard:
Does not adjust picture quality (changes
resolution).
Bypass:
Does not adjust picture quality (does not change
resolution).
With “Picture Mode”, you can change the following
settings to be suitable for the movie or game screen
by one operation: “Game Mode”, “Film Mode”, “Edge
Enhancement”, “Noise Reduction”, “Brightness”,
“Contrast”, “Hue”, “Saturation” or “Color
Temperature”.
■ Game Mode*2*3*4
Off
On
If video signal delay occurs during playback on a video
component (i.e., game console), select the
corresponding input source and set the “Game Mode”
setting to “On”. The delay will decrease but in return
the picture quality will become poor.
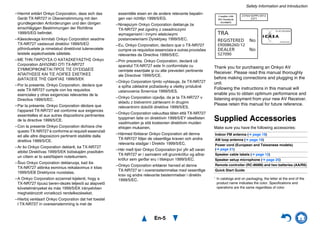
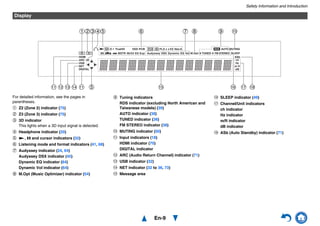
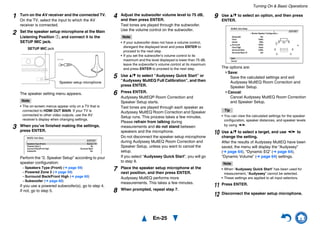
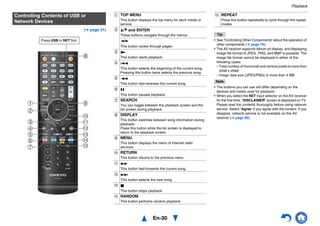
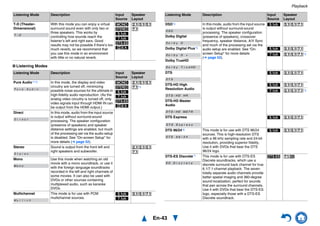
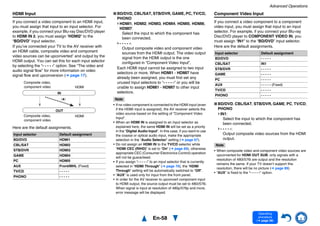
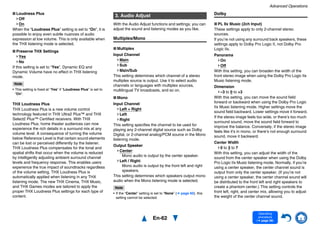
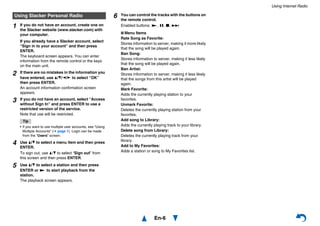
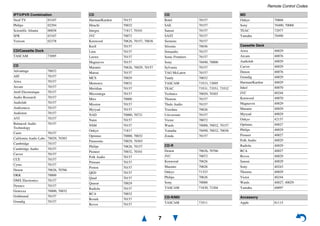
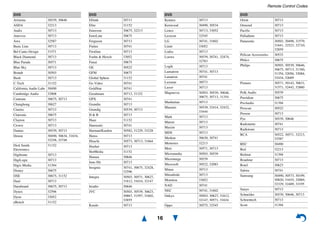
BD/DVD4 - 4. Name Edit
Name
+10 CLR
a b c d e f g h i j k l m
n o p q r s t u v w x y z
1 2 3 4 5 6 7 8 9 0 – ^
Space
Back SpaceShift OK
, . / ; : @ [ ]
Shift All Erase
A B C D E F G H I J K L M
N O P Q R S T U V W X Y Z
+? ` { }< >
! ˝ # $ % & ’ )( _ = |˜
Shift All Erase+10 CLR
Space
Back SpaceShift OK
a eb dc
Name input area
*1 *2](https://image.slidesharecdn.com/tx-nr727english-140522105640-phpapp01/85/Tx-nr727-english-66-320.jpg)


![Appendix
En-89
DISCLAIMER
Through this device you are able to link to other services or websites which are not under the
control of any company which has designed, manufactured or distributed/have distributed this
device, and its affiliates (collectively, “Company”). We have no control over the nature, content
and availability of those services. The inclusion of any links does not necessarily imply a
recommendation or endorse the views expressed within them.
All information, content and services available through this device belong to third parties and
are protected by copyright, patent, trademark and/or other intellectual property laws of
applicable countries. The information, content and services provided through this device are
for your personal, noncommercial use only. Any information, content or services may not be
used in any manner other than previously approved by the appropriate content owner or
service provider.
You may not modify, copy, republish, translate, exploit, create derivative works, upload, post,
transmit, sell or distribute in any manner any information, content or services available
through this device, unless expressly permitted by the appropriate copyright, patent,
trademark and/or other intellectual property owner, including, without limitation, content owner
or service provider.
THE CONTENT AND SERVICES AVAILABLE THROUGH THIS DEVICE ARE PROVIDED
“AS IS”. COMPANY DOES NOT WARRANT INFORMATION, CONTENT OR SERVICES SO
PROVIDED, EITHER EXPRESSLY OR IMPLIEDLY, FOR ANY PURPOSE.
COMPANY EXPRESSLY DISCLAIMS ANY WARRANTIES, EXPRESS OR IMPLIED,
INCLUDING BUT NOT LIMITED TO, WARRANTIES OF TITLE, NON-INFRINGEMENT,
MERCHANTABILITY OR FITNESS FOR A PARTICULAR PURPOSE.
Company makes no representation or warranty of any kind, express or implied, about the
completeness, accuracy, validity, legality, reliability, suitability or availability with respect to
the information, content or services available through this device. Company shall not be liable,
whether in contract or tort, including negligence and strict liability, for any direct, indirect,
special, incidental or consequential damages or any other damages arising out of, or in
connection with, any information contained in, or as a result of the use of any content or
service by you or any third party, even if Company has been advised of the possibility of such
damages, nor shall Company be liable for any third party claims against users of this device
or any third party.
In no event shall Company be responsible nor liable for, without limiting the generality of the
foregoing, any interruption or suspension of any information, content or service available
through this device. Company is neither responsible nor liable for customer service related to
the information, content and services available through this device.
Any question or request for service relating to the information, content or services should be
made directly to the appropriate content owners and services providers.
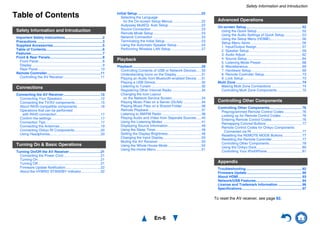
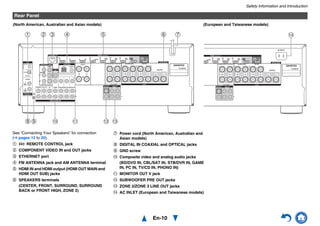
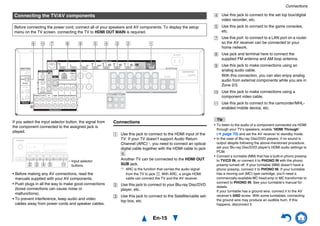
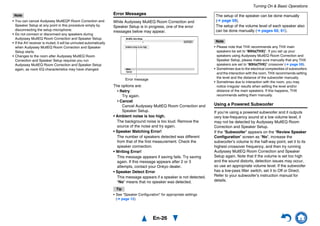
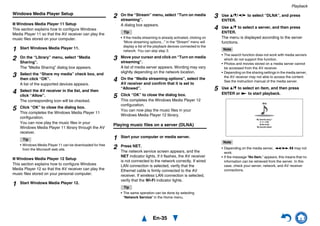
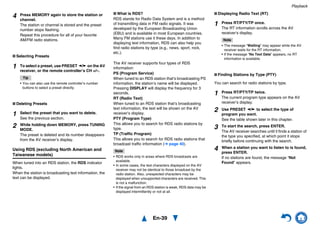
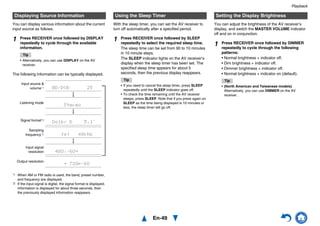
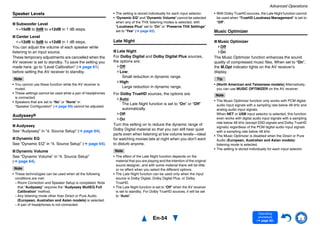
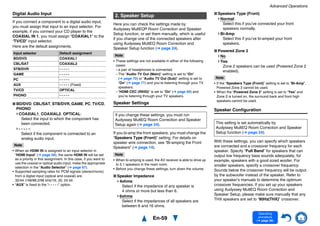
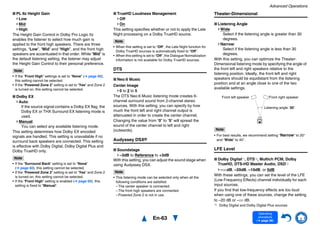
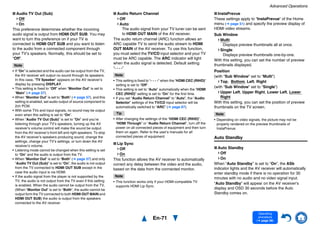
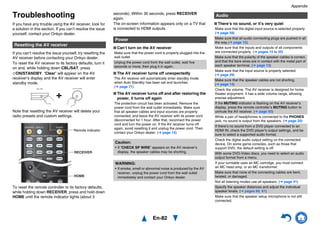
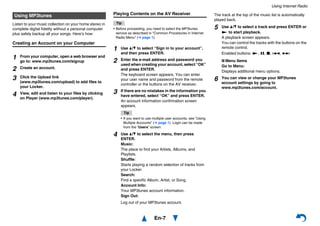
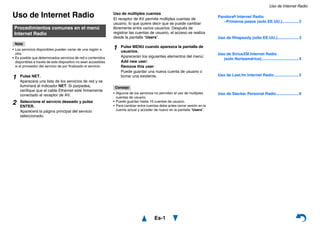
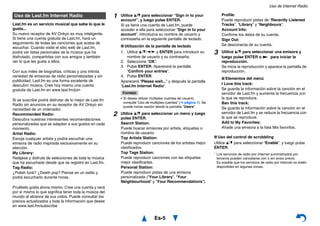
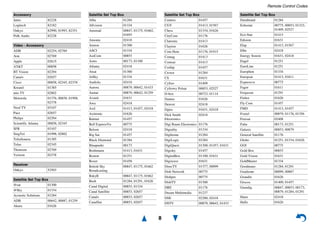
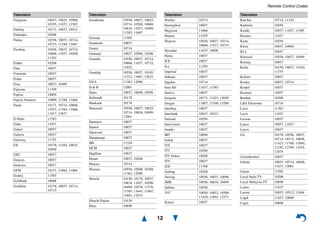
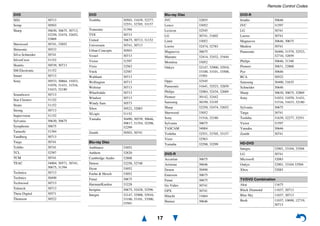
The following tables show how video signals at different resolutions are output by
the AV receiver.
✔: Output available
s
*1 Supported resolutions: [3840 × 2160 30 Hz], [3840 × 2160 25 Hz], [3840 × 2160 24 Hz],
[4096 × 2160 24 Hz]
*2 The AV receiver is compatible with HDMI IN 1 to HDMI IN 4. However, the number of the
player that outputs video signal at 4K resolution or the same level at the same time may
be up to three.
*3 Supported resolutions for HDMI OUT SUB.
Video Resolution Chart
HDMI
4K*1 1080p/24 1080p 1080i 720p 480p/576p 480i/576i
HDMI 4K*2 ✔*3
1080p/24 ✔ ✔*3
1080p ✔ ✔*3
1080i ✔ ✔ ✔*3 ✔
720p ✔ ✔ ✔ ✔*3
480p/576p ✔ ✔ ✔ ✔ ✔*3
480i/576i ✔ ✔ ✔ ✔ ✔ ✔*3
Component 1080p
1080i
720p
480p/576p
480i/576i ✔ ✔ ✔ ✔ ✔ ✔*3
Composite 480i/576i ✔ ✔ ✔ ✔ ✔ ✔*3
Component Composite
1080p 1080i 720p 480p/576p 480i/576i 480i/576i
HDMI 4K*2
1080p/24
1080p
1080i
720p
480p/576p
480i/576i
Component 1080p ✔
1080i ✔
720p ✔
480p/576p ✔
480i/576i ✔
Composite 480i/576i ✔
Output
Input
Output
Input](https://image.slidesharecdn.com/tx-nr727english-140522105640-phpapp01/85/Tx-nr727-english-89-320.jpg)


![Remote Control Codes
1
Remote Control Codes
/
1 While holding down the REMOTE MODE button to which you want to assign a
code, press and hold down [DISPLAY] (about 3 seconds).
The REMOTE MODE button/Remote indicator lights.
On Integra products, button names are capitalized. For example, “Remote Mode”
button and “Display” button.
Notes:
• Remote control codes cannot be entered for [RECEIVER] and the multi zone button.
• Only TV remote control codes can be entered for [TV].
• Except for [RECEIVER], [TV], and the multi zone button, remote control codes from any
category can be assigned for the REMOTE MODE buttons. However, these buttons also work
as input selector buttons, so choose a REMOTE MODE button that corresponds with the input
to which you connect your component. For example, if you connect your CD player to the CD
input, choose [TV/CD] when entering its remote control code.
2 Within 30 seconds, use the number buttons to enter the 5-digit remote control
code.
The REMOTE MODE button/Remote indicator flashes twice.
If the remote control code is not entered successfully, the REMOTE MODE
button/Remote indicator will flash once slowly.
Notes:
• The flashing element of the remote controller will differ according to your AV receiver’s model.
• The remote controller is preconfigured with remote controller presets of different components.
By entering a code from the Remote Control Code list, you can activate the relevant preset for
that component.
• When there are multiple codes related to one manufacturer, try and enter them one-by-one until
it matches your component.
• Depending on the model and year of your component, compatibility is not guaranteed.
• With some models, the remote controller may not not work or its compatibility may be limited
to part of the component’s functionality.
• Besides, it is not possible to add new codes to the existing remote controller presets.
• Though the provided remote control codes are correct at the time of printing, they are subject to
change by the manufacturer.](https://image.slidesharecdn.com/tx-nr727english-140522105640-phpapp01/85/Tx-nr727-english-125-320.jpg)
![Remote Control Codes
2
Codes de télécommande Códigos de control remoto
1 Tout en maintenant enfoncé le bouton REMOTE MODE auquel vous souhaitez
associer un code, pressez et maintenez enfoncé le bouton [DISPLAY] (pendant
environ 3 secondes).
Le bouton REMOTE MODE/le témoin Remote s’allume.
Les noms de boutons sont en manjuscules sur les produits Integra. Par exemple, le
bouton « Remote Mode » et le bouton « Display ».
Remarques :
• Les codes de télécommande ne peuvent pas être entrés pour [RECEIVER] et le bouton multi
zone.
• Seul les code de télécommande de téléviseurs peuvent être entrés pour [TV].
• À l’exception de [RECEIVER], [TV] et du bouton multi zone, vous pouvez affecter des codes
de télécommande de n’importe quelle catégorie pour les boutons REMOTE MODE. Cependant,
ces boutons font également office de bouton de sélecteur d’entrée : par conséquent, choisissez
un bouton REMOTE MODE correspondant à l’entrée à laquelle vous souhaitez raccorder votre
appareil. Par exemple, si vous raccordez votre lecteur CD à l’entrée CD, choisissez [TV/CD]
lorsque vous saisissez le code de télécommande.
2 Vous disposez de 30 secondes pour saisir le code de télécommande à cinq chiffres
à l’aide des boutons numérotés.
Le bouton REMOTE MODE/le témoin Remote clignote deux fois.
Si le code de télécommande n’a pas été saisi correctement le bouton REMOTE
MODE/l’indicateur Remote ne clignote qu’une seule fois.
Remarques :
• L’élément clignotant de la télécommande différera selon le modèle de votre ampli-tuner AV.
• La télécommande est préconfigurée avec des préréglages de télécommande de différents
appareils. En entrant un code de la liste des codes de télécommandes, vous pouvez activer le
préréglage approprié pour cet appreil.
• Quand il y a de multiples codes liés à un fabricant, essayez-les et entrez-les un par un jusqu’à ce
que cela corresponde à votre appareil.
• Selon le modèle et l’année de votre appareil, la compatibilité n’est pas garantie.
• Avec certains modèles, la télécommande peut ne pas fonctionner ou sa compatibilité peut être
limitée à une partie de la fonctionnalité de l’appareil.
• En outre, il n’est pas possible d’ajouter de nouveaux codes aux préréglages de télécommande
existants.
• Bien que les codes de télécommande fournis soient corrects au moment de l’impression de la
liste, ils sont susceptibles d’être modifiés par le fabricant.
1 Manteniendo pulsado el botón REMOTE MODE para el cual desea introducir un
código, pulse y mantenga presionado el botón [DISPLAY] (aproximadamente 3
segundos).
Se iluminará el botón REMOTE MODE/indicador Remote.
En los productos Integra, los nombres de los botones aparecen con mayúsculas. Por
ejemplo, el botón “Remote Mode” y el botón “Display”.
Notas:
• No podrán introducirse códigos de mando a distancia para [RECEIVER] y el botón multizona.
• Únicamente podrán introducirse códigos de mando a distancia de televisor para el botón [TV].
• Con la excepción de [RECEIVER], [TV] y el botón multizona, se pueden asignar códigos de
mando a distancia de cualquier categoría a los botones de REMOTE MODE. No obstante, estos
botones también pueden funcionar como botones de selector de entrada; por tanto, seleccione
un botón REMOTE MODE que se corresponda con la entrada a la cual está conectado el
componente. Por ejemplo, si conecta un reproductor de CD a la entrada de CD, seleccione
[TV/CD] cuando introduzca su código de mando a distancia.
2 Antes de que transcurran 30 segundos, utilice los botones numéricos para
introducir el código de mando a distancia de 5 dígitos.
El botón REMOTE MODE/indicador Remote parpadeará dos veces.
Si el código de mando a distancia no se introduce correctamente, el botón REMOTE
MODE/indicador Remote parpadeará una vez despacio.
Notas:
• El parpadeo del mando distancia será distinto según el modelo de receptor de AV.
• El mando a distancia está preconfigurado con los ajustes predeterminados de los distintos
componentes. Al introducir un código de la lista de códigos del mando a distancia se puede
activar el ajuste predeterminado de ese componente.
• Cuando hay múltiples códigos relacionados con un fabricante, pruebe a introducirlos uno a uno
hasta que coincida con su componente.
• Dependiendo del modelo y el año de su componente, la compatibilidad no está garantizada.
• Con algunos modelos, es posible que el mando a distancia no funcione o que su compatibilidad
esté limitada a una parte de las funciones del componente.
• Además, no es posible añadir nuevos códigos a los ajustes predeterminados existentes del
mando a distancia.
• Los códigos de mando a distancia suministrados son correctos en el momento de la impresión,
pero el fabricante puede realizar cambios.](https://image.slidesharecdn.com/tx-nr727english-140522105640-phpapp01/85/Tx-nr727-english-126-320.jpg)
![Remote Control Codes
3
Codici del telecomando Fernbedienungscodes
1 Tenendo premuto il tasto REMOTE MODE al quale si desidera assegnare il
codice, premere e tenere premuto [DISPLAY] (per circa 3 secondi).
Il tasto REMOTE MODE/l'indicatore Remote si accende.
Sui prodotti Integra, i nomi dei tasti sono scritti con l'iniziale maiuscola. Ad esempio,
tasto “Remote Mode” e tasto “Display”.
Note:
• I codici di controllo del telecomando non possono essere inseriti per [RECEIVER] e i tasti multi
zona.
• Per [TV] è possibile immettere solo codici telecomando del televisore.
• Tranne che per [RECEIVER], [TV], e per il tasto multi zona, è possibile assegnare codici di
controllo di ogni categoria per i tasti REMOTE MODE. Tuttavia, tali tasti fungono anche da
tasti del selettore d'ingresso, quindi scegliere un tasto REMOTE MODE che corrisponda
all'ingresso al quale viene collegato il dispositivo. Per esempio, se si collega il lettore CD
all'ingresso CD, scegliere il [TV/CD] quando si immette il relativo codice telecomando.
2 Entro 30 secondi utilizzare i tasti numerici per inserire il codice telecomando a 5
cifre.
Il tasto REMOTE MODE/l'indicatore Remote lampeggia due volte.
Se il codice telecomando non viene inserito correttamente, il tasto REMOTE
MODE/l'indicatore Remote lampeggia lentamente una volta.
Note:
• L'elemento lampeggiante del telecomando varia a seconda del modello del ricevitore AV.
• Il telecomando è preconfigurato con preselezioni per diversi apparecchi. Inserendo un codice
dall'elenco dei codici telecomando, è possibile attivare la relativa preselezione per tale
apparecchio.
• Se sono presenti più codici relativi allo stesso produttore, provare a inserirli uno a uno finché
non si arrivi al codice corrispondente dell'apparecchio.
• A seconda del modello e dell'anno dell'apparecchio, la compatibilità non è garantita.
• Con alcuni modelli, il telecomando può non funzionare o la sua compatibilità può essere limitata
a una parte della funzionalità dell'apparecchio.
• Inoltre, non è possibile aggiungere nuovi codici alle preselezioni esistenti del telecomando.
• I codici telecomando specificati sono validi alla data della stampa del presente documento, ma
sono soggetti a variazioni da parte del produttore.
1 Halten Sie die REMOTE MODE-Taste gedruckt, fur die Sie den Code eingeben
mochten, und drucken Sie (ca. 3 Sekunden lang) die [DISPLAY]-Taste.
Die REMOTE MODE-Taste/Remote-Anzeige leuchtet.
Bei den Integra-Produkten werden die Namen der Tasten groß geschrieben. Zum
Beispiel „Remote Mode“ (Fernbedienungsmodus)-Taste und „Display“-Taste.
Hinweise:
• Der Fernbedienungscode kann nicht [RECEIVER] und der Multi-Zonen-Taste zugeordnet
werden.
• Der Taste [TV] können nur Fernbedienungscodes für einen Fernseher zugeordnet werden.
• Abgesehen von [RECEIVER], [TV] und der Multi-Zone-Taste, können die
Fernbedienungscodes jeder Kategorie den REMOTE MODE-Tasten zugewiesen werden.
Allerdings dienen diese Tasten auch als Quellenwahltasten. Wählen Sie also nach Möglichkeit
eine REMOTE MODE-Taste, die dem Eingang zugeordnet ist, an den Sie die betreffende Quelle
angeschlossen haben. Wenn Sie z.B. einen CD-Player an den CD-Eingang anschließen, sollten
Sie [TV/CD] wenn Sie den Fernbedienungscode eingeben.
2 Geben Sie mit den Zifferntasten innerhalb von 30 Sekunden den 5-stelligen
Herstellercode ein.
Die REMOTE MODE-Taste/Remote-Anzeige blinkt zwei Mal.
Wenn der Fernbedienungscode nicht ordnungsgemäß eingegeben wurde, blinkt die
REMOTE MODE-Taste/Remote-Anzeige einmal langsam.
Hinweise:
• Das blinkende Element auf der Fernbedienung unterscheidet sich je nach AV-Receiver-Modell.
• Die Fernbedienung ist mit den Voreinstellungen der Fernbedienung der verschiedenen
Komponenten vorkonfiguriert. Indem ein Code aus der Liste der Fernbedienungscodes
eingegeben wird, können Sie die entsprechende Voreinstellung für die Komponente aktivieren.
• Wenn es mehrere Codes gibt, die sich auf einen Hersteller beziehen, versuchen Sie sie einzeln
einzugeben, bis einer mit Ihrer Komponente übereinstimmt.
• Dies hängt vom Modell und Herstellungsjahr Ihrer Komponente ab und die Kompatibilität ist
nicht garantiert.
• Es kann sein, dass bei einigen Modellen die Fernbedienung nicht funktioniert oder ihre
Kompatibilität sich auf nur auf Teile der Funktionalität der Komponente beschränkt.
• Abgesehen davon ist es nicht möglich, den bestehenden Voreinstellungen der Fernbedienung
neue Codes hinzuzufügen.
• Obwohl die angegebenen Fernbedienungscodes dem Stand bei Drucklegung entsprechen, sind
Änderungen durch den Hersteller vorbehalten.](https://image.slidesharecdn.com/tx-nr727english-140522105640-phpapp01/85/Tx-nr727-english-127-320.jpg)
![Remote Control Codes
4
Afstandsbedieningscodes Fjärrstyrningskoder
1 Houd terwijl u de REMOTE MODE toets ingedrukt houdt waarvoor u een code
wilt toewijzen de [DISPLAY] toets ingedrukt (ongeveer 3 seconden).
De toets REMOTE MODE (afstandsbedieningsmodus) / Het indicatielampje
afstandsbediening gaat branden.
Op producten van Integra staan de namen van de toetesn in hoofdletters. Bijvoorbeeld,
de toetsen “Remote Mode” en “Display”.
Opmerkingen:
• Er kunnen geen afstandsbedieningscodes worden ingevoerd voor [RECEIVER] en de multi
zone-toets.
• Alleen TV afstandsbedieningscodes kunnen worden ingevoerd voor [TV].
• Behalve voor [RECEIVER], [TV] en de multi zone-toets, kunnen afstandsbedieningscodes
vanuit elke categorie worden toegewezen aan de REMOTE MODE toetsen. Deze toetsen
werken overigens ook als ingangsselectortoetsen, kies dus een REMOTE MODE toets die
overeenkomt met de ingang waarop u uw component wilt aansluiten. Kies indien u bijvoorbeeld
uw CD-speler aansluit op de CD-ingang de [TV/CD] toets bij het invoeren van de
afstandsbedieningscode.
2 Gebruik binnen 30 seconden de cijfertoetsen om de 5-cijferige
afstandsbedieningscode in te voeren.
De toets REMOTE MODE (afstandsbedieningsmodus) / Het indicatielampje
afstandsbediening knippert tweemaal.
Indien de afstandsbedieningscode niet met succes wordt ingevoerd, zal de toets
REMOTE MODE/Remote-indicator eenmaal traag knipperen.
Opmerkingen:
• Het knippergedeelte van de afstandsbediening zal verschillen ten opzichte van het model van
uw AV-receiver.
• De afstandsbediening is voorgeprogrammeerd met voorkeuzetoetsen van verschillende
componenten. Door het invullen van een code uit de afstandsbediening codelijst kunt u de
voorkeuzetoets voor die component activeren.
• Wanneer er meerdere codes gerelateerd zijn aan één fabrikant, probeer deze dan een voor een
totdat de juiste code overeenkomt met uw component.
• Afhankelijk van het model en het bouwjaar van uw component is de compatibiliteit niet
gegarandeerd.
• Bij sommige modellen werkt de afstandsbediening mogelijk niet of is de compatibiliteit ervan
beperkt tot een deel van de functionaliteit van de component.
• Daarnaast is het niet mogelijk om nieuwe codes aan de bestaande voorkeuzetoetsen van de
afstandsbediening toe te voegen.
• Hoewel de gegeven afstandsbedieningscodes correct zijn op het moment van afdrukken, kunnen
deze door de fabrikant gewijzigd worden.
1 Håll ned knappen för det REMOTE MODE som du vill tilldela en kod samtidigt
som du trycker och håller ned [DISPLAY] (i cirka 3 sekunder).
REMOTE MODE-knapp/Fjärrindikatorlampa.
På Integra-produkter, är knappnamnens begynnelsebokstav en versal. Till exempel,
”Fjärrläge”-knapp och ”Display”-knapp.
Anmärkningar:
• Fjärrkontrollkoder kan inte anges för knapparna [RECEIVER] och flerzonsknappen.
• Endast fjärrkontrollkoder för tv kan anges för [TV].
• Förutom [RECEIVER], [TV] och flerzonsknappen, kan fjärrkontrollkoder för vilken som helst
kategori tilldelas för knapparna REMOTE MODE. Dessa knappar fungerar dock även som
ingångväljarknappar, så använd en knapp för REMOTE MODE som motsvarar ingången som
du ansluter utrustningen till. Till exempel, om du ansluter din CD-spelare till CD-ingången ska
du välja [TV/CD] när du anger dess fjärrkontrollkod.
2 Använd sifferknapparna för att ange den femsiffriga koden inom 30 sekunder.
REMOTE MODE-knapp/Fjärrindikatorlampa blinkar två gånger.
Om fjärrkontrollkoden inte ställdes in, blinkar REMOTE MODE-
knappen/fjärrindikatorn långsamt en gång.
Anmärkningar:
• Det blinkande elementet på fjärrkontrollen skiljer sig åt beroende på din modell av AV-receiver.
• Fjärrkontrollen har förkonfigurerats med förvalda kanaler på fjärrkontrollen för olika
komponenter. Genom att ange en kod från fjärrkontrollkodlistan, kan du aktivera relevanta
förvalda kanaler för den utrustningen.
• När det finns flera olika koder för en tillverkare ska du försöka att ange dem en och en tills de
stämmer överens med din utrustning.
• Beroende på utrustningens modell och årgång, går det inte att garantera kompatibilitet.
• På vissa modeller kan det hända att fjärrkontrollen inte fungerar eller så kan dess kompatibilitet
vara begränsad till en del av utrustningens funktion.
• Dessutom går det inte att lägga till nya koder till fjärrkontrollens existerande förvalda kanaler.
• Även om erhållna fjärrkontrollkoder är korrekta vid tryckningen, kan de ändras av tillverkaren.](https://image.slidesharecdn.com/tx-nr727english-140522105640-phpapp01/85/Tx-nr727-english-128-320.jpg)
![Remote Control Codes
5
遙控代碼 遥控代码
1 在按住想指定編碼的 REMOTE MODE (遙控模式)按鈕時,同時按住
[DISPLAY] (顯示)(約 3 秒)。
REMOTE MODE (遙控模式)按鈕 / 遙控指示燈亮起。
在 Integra 系列產品上,按鈕名稱為大寫。例如,「Remote Mode」(遙控模式)
按鈕和 「Display」(顯示)按鈕。
注意:
• [RECEIER] (接收機)和多區域按鈕不能輸入遙控編碼。
• 您只能為 [TV] (電視)輸入電視遙控編碼。
• 除 [RECEIVER] (接收機)、[TV] (電視)和多區域按鈕外,您可針對 REMOTE MODE
(遙控模式)按鈕指定任何類別的遙控編碼。但是,這些按鈕仍可用作為輸入選擇器按
鈕,因此,請選擇與您設備所連接輸入接口對應的 REMOTE MODE 按鈕。例如,如果
要將 CD 播放機連接到 CD 輸入源上,則需在輸入遙控編碼時選擇 [TV/CD]。
2 在 30 秒內,使用數字按鈕輸入 5 位數的遙控編碼。
REMOTE MODE (遙控模式)按鈕 / 遙控指示燈閃爍兩次。
如果無法成功輸入遙控編碼,REMOTE MODE (遙控模式)按鈕 / 遙控指示燈
會慢慢地閃爍一次。
注意:
• 視您的 AV 接收機型號而定,遙控器的閃爍元件會有不同。
• 遙控器已預先設定有不同設備的遙控器預設值。透過輸入遙控編碼清單中的編碼,您
可啟用該設備的相關預設值。
• 當有多個編碼與單一製造商相關時,請嘗試一個接著一個輸入,直到與您的設備對應
為止。
• 視設備的型號和年份而定,並不保證與本公司產品相容。
• 在某些型號上,遙控器可能無法作用,或是其相容性限於部份設備功能。
• 除此之外,您無法新增編碼至現有的遙控器預設值。
• 雖然所提供之遙控編碼在本文件列印時為正確,製造商仍可能會對其作出修改。
1 按住想指定编码的 REMOTE MODE (遥控模式)按钮的同时,按住 [DISPLAY
(显示)] (大约 3 秒钟)。
REMOTE MODE (遥控模式)按钮 / 遥控指示灯亮起。
Integra 产品上的按钮名称单词首字母大写。例如,“Remote Mode (遥控模
式)”按钮和 “Display (显示)”按钮。
注意:
• [RECEIVER (接收机)] 和多区域按钮不能输入遥控编码。
• 只能为 [TV (电视)] 输入电视遥控编码。
• 除 [RECEIVER (接收机)]、[TV (电视)] 和多区域按钮外,不能为 REMOTE MODE (遥
控模式)按钮指定任何类别的遥控编码。 但是,这些按钮仍可用作输入选择器按钮,因
此,选择与设备所要连接的输入端对应的 REMOTE MODE(遥控模式) 按钮。 例如,如果
要将 CD 播放机连接到 CD 输入端,应在输入遥控编码时选择 [TV/CD (电视 /CD)]。
2 在 30 秒内,使用数字按钮输入 5 位数的遥控编码。
REMOTE MODE (遥控模式)按钮 / 遥控指示灯闪烁两次。
如果不能顺利输入遥控编码,REMOTE MODE (遥控模式)按钮 / 遥控指示灯会
缓慢闪烁一次。
注意:
• 根据 AV 接收机产品类型的不同,遥控器闪烁元素将会不同。
• 遥控器采用不同设备的遥控器预设进行预配置。通过从遥控器编码列表输入编码,便
可激活相应设备的相关预设。
• 单个制造商关联多个编码时,请尝试逐个输入,直至符合当前设备。
• 根据设备的产品类型和年份的不同,无法保证兼容性。
• 对于某些产品类型,遥控器可能无法工作或其兼容性可能受到部分设备功能性的限制。
• 此外,可能无法将新的编码追加到现有的遥控器预设。
• 尽管付印时所提供的遥控编码是正确的,但制造商会随时更改。](https://image.slidesharecdn.com/tx-nr727english-140522105640-phpapp01/85/Tx-nr727-english-129-320.jpg)


This document contains safety instructions and introduction information for an AV receiver. It outlines important safety precautions including warnings about electric shock, proper ventilation, and battery disposal. The document also provides instructions on cleaning, transporting, and operating the unit properly to avoid damage. Regulatory compliance information is included at the end.


