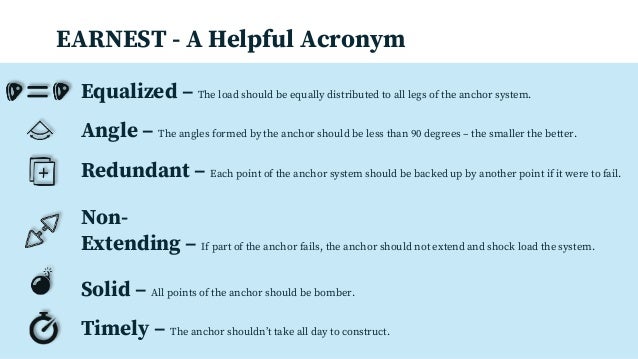
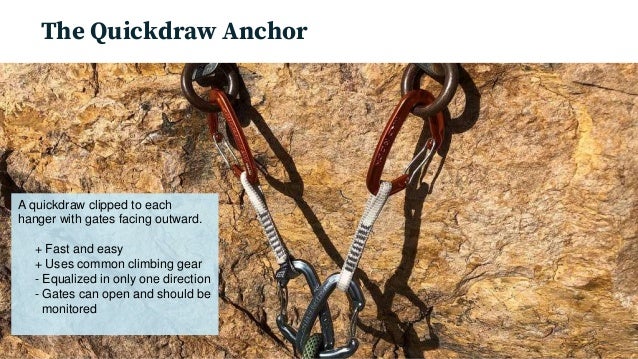
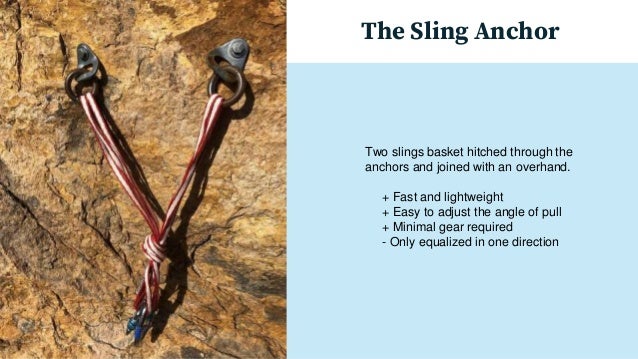
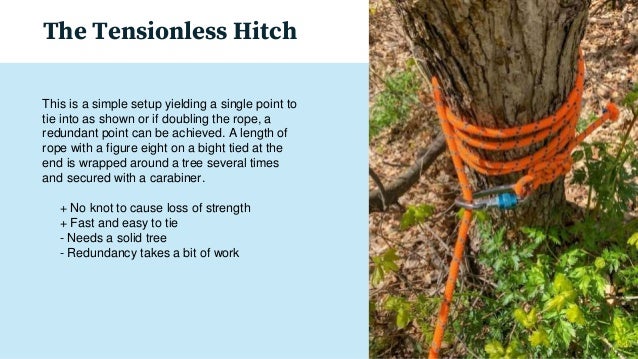
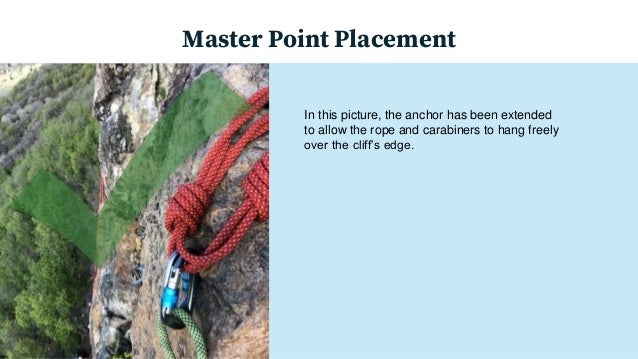
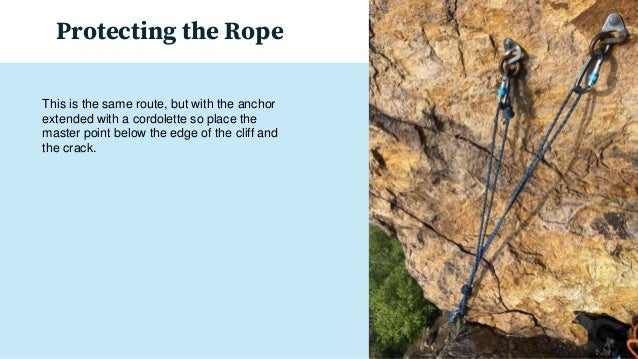
TOP-ROPE
ANCHORS
LEARN TO BUILD SOLID, SECURE, AND SMART ANCHORS
ADVENTURE SCHOOL
Solid
Anchors must be
solidly constructed
with redundancy,
equalization, and
limited extensibility.
Secure
Anchors must be
attached to
immovable and
strong objects such
as trees larger than 6”
or refrigerator size (or
larger) rocks. Multiple
objects is better than
one.
Speedy
You’re on the wall to
climb, not to build
anchors. Whatever
you build shouldn’t
take all day.
Principles of Top-rope Anchors
EARNEST - A Helpful Acronym
Redundant – Each point of the anchor system should be backed up by another point if it were to fail.
Angle – The angles formed by the anchor should be less than 90 degrees – the smaller the better.
Equalized – The load should be equally distributed to all legs of the anchor system.
Non-
Extending – If part of the anchor fails, the anchor should not extend and shock load the system.
Timely – The anchor shouldn’t take all day to construct.
Solid – All points of the anchor should be bomber.
The Quickdraw Anchor
A quickdraw clipped to each
hanger with gates facing outward.
+ Fast and easy
+ Uses common climbing gear
- Equalized in only one direction
- Gates can open and should be
monitored
The Quad Anchor
A cordolette folded twice and tied with
two overhand knots.
+ Fast and easy if tied in advance
+ Equalized across a broad angle
+ Secure, redundant, and reliable
- Bulkier than other options
The Sling Anchor
Two slings basket hitched through the
anchors and joined with an overhand.
+ Fast and lightweight
+ Easy to adjust the angle of pull
+ Minimal gear required
- Only equalized in one direction
The Wrap 2 Pull 1
A doubled length of webbing is wrapped
around a tree 2 times and tied with a water
knot. The knot is pulled against the tree and 1
loop is pulled out from under the knotted loop
to form the master point.
+ Strong and reliable
+ Equalized across a wide angle of pull
- Needs a long piece of webbing
- More difficult to tie than other options
- Not fast to adjust the length
The Tensionless Hitch
This is a simple setup yielding a single point to
tie into as shown or if doubling the rope, a
redundant point can be achieved. A length of
rope with a figure eight on a bight tied at the
end is wrapped around a tree several times
and secured with a carabiner.
+ No knot to cause loss of strength
+ Fast and easy to tie
- Needs a solid tree
- Redundancy takes a bit of work
Master Point Placement
Once you get your anchor method figured out,
you need to pay attention to the position of the
master point. It should not look like the picture
on the left with the rope dragging on the rock
and the carabiners leveraged into the rock.
You’ll need to adjust the anchor length until
the rope and carabiners are free.
Master Point Placement
In this picture, the anchor has been extended
to allow the rope and carabiners to hang freely
over the cliff’s edge.
Protecting the Rope
You also need to pay attention to where the
rope will rub as you climb. A sharp edge can
cut through a rope in a hurry.
Even without a sharp edge, rope drag can
make climbing and belaying much more
difficult and will wear your rope out
prematurely.
Protecting the Rope
Here, the rope bag is being used to minimize
rope drag and prevent the rope from being
caught in the crack.
Protecting the Rope
This is the same route, but with the anchor
extended with a cordolette so place the
master point below the edge of the cliff and
the crack.
To learn more about top-rope climbing and many
other adventure activities visit us at:
MYADVENTURESCHOOL.COM
Wherever you climb, keep
it safe and smart.

Top rope anchors

  • 1.
    TOP-ROPE ANCHORS LEARN TO BUILDSOLID, SECURE, AND SMART ANCHORS ADVENTURE SCHOOL
  • 2.
    Solid Anchors must be solidlyconstructed with redundancy, equalization, and limited extensibility. Secure Anchors must be attached to immovable and strong objects such as trees larger than 6” or refrigerator size (or larger) rocks. Multiple objects is better than one. Speedy You’re on the wall to climb, not to build anchors. Whatever you build shouldn’t take all day. Principles of Top-rope Anchors
  • 3.
    EARNEST - AHelpful Acronym Redundant – Each point of the anchor system should be backed up by another point if it were to fail. Angle – The angles formed by the anchor should be less than 90 degrees – the smaller the better. Equalized – The load should be equally distributed to all legs of the anchor system. Non- Extending – If part of the anchor fails, the anchor should not extend and shock load the system. Timely – The anchor shouldn’t take all day to construct. Solid – All points of the anchor should be bomber.
  • 4.
    The Quickdraw Anchor Aquickdraw clipped to each hanger with gates facing outward. + Fast and easy + Uses common climbing gear - Equalized in only one direction - Gates can open and should be monitored
  • 5.
    The Quad Anchor Acordolette folded twice and tied with two overhand knots. + Fast and easy if tied in advance + Equalized across a broad angle + Secure, redundant, and reliable - Bulkier than other options
  • 6.
    The Sling Anchor Twoslings basket hitched through the anchors and joined with an overhand. + Fast and lightweight + Easy to adjust the angle of pull + Minimal gear required - Only equalized in one direction
  • 7.
    The Wrap 2Pull 1 A doubled length of webbing is wrapped around a tree 2 times and tied with a water knot. The knot is pulled against the tree and 1 loop is pulled out from under the knotted loop to form the master point. + Strong and reliable + Equalized across a wide angle of pull - Needs a long piece of webbing - More difficult to tie than other options - Not fast to adjust the length
  • 8.
    The Tensionless Hitch Thisis a simple setup yielding a single point to tie into as shown or if doubling the rope, a redundant point can be achieved. A length of rope with a figure eight on a bight tied at the end is wrapped around a tree several times and secured with a carabiner. + No knot to cause loss of strength + Fast and easy to tie - Needs a solid tree - Redundancy takes a bit of work
  • 9.
    Master Point Placement Onceyou get your anchor method figured out, you need to pay attention to the position of the master point. It should not look like the picture on the left with the rope dragging on the rock and the carabiners leveraged into the rock. You’ll need to adjust the anchor length until the rope and carabiners are free.
  • 10.
    Master Point Placement Inthis picture, the anchor has been extended to allow the rope and carabiners to hang freely over the cliff’s edge.
  • 11.
    Protecting the Rope Youalso need to pay attention to where the rope will rub as you climb. A sharp edge can cut through a rope in a hurry. Even without a sharp edge, rope drag can make climbing and belaying much more difficult and will wear your rope out prematurely.
  • 12.
    Protecting the Rope Here,the rope bag is being used to minimize rope drag and prevent the rope from being caught in the crack.
  • 13.
    Protecting the Rope Thisis the same route, but with the anchor extended with a cordolette so place the master point below the edge of the cliff and the crack.
  • 14.
    To learn moreabout top-rope climbing and many other adventure activities visit us at: MYADVENTURESCHOOL.COM Wherever you climb, keep it safe and smart.