Downloaded 17 times


![Introduction to React 19
Complex JavaScript in JSX
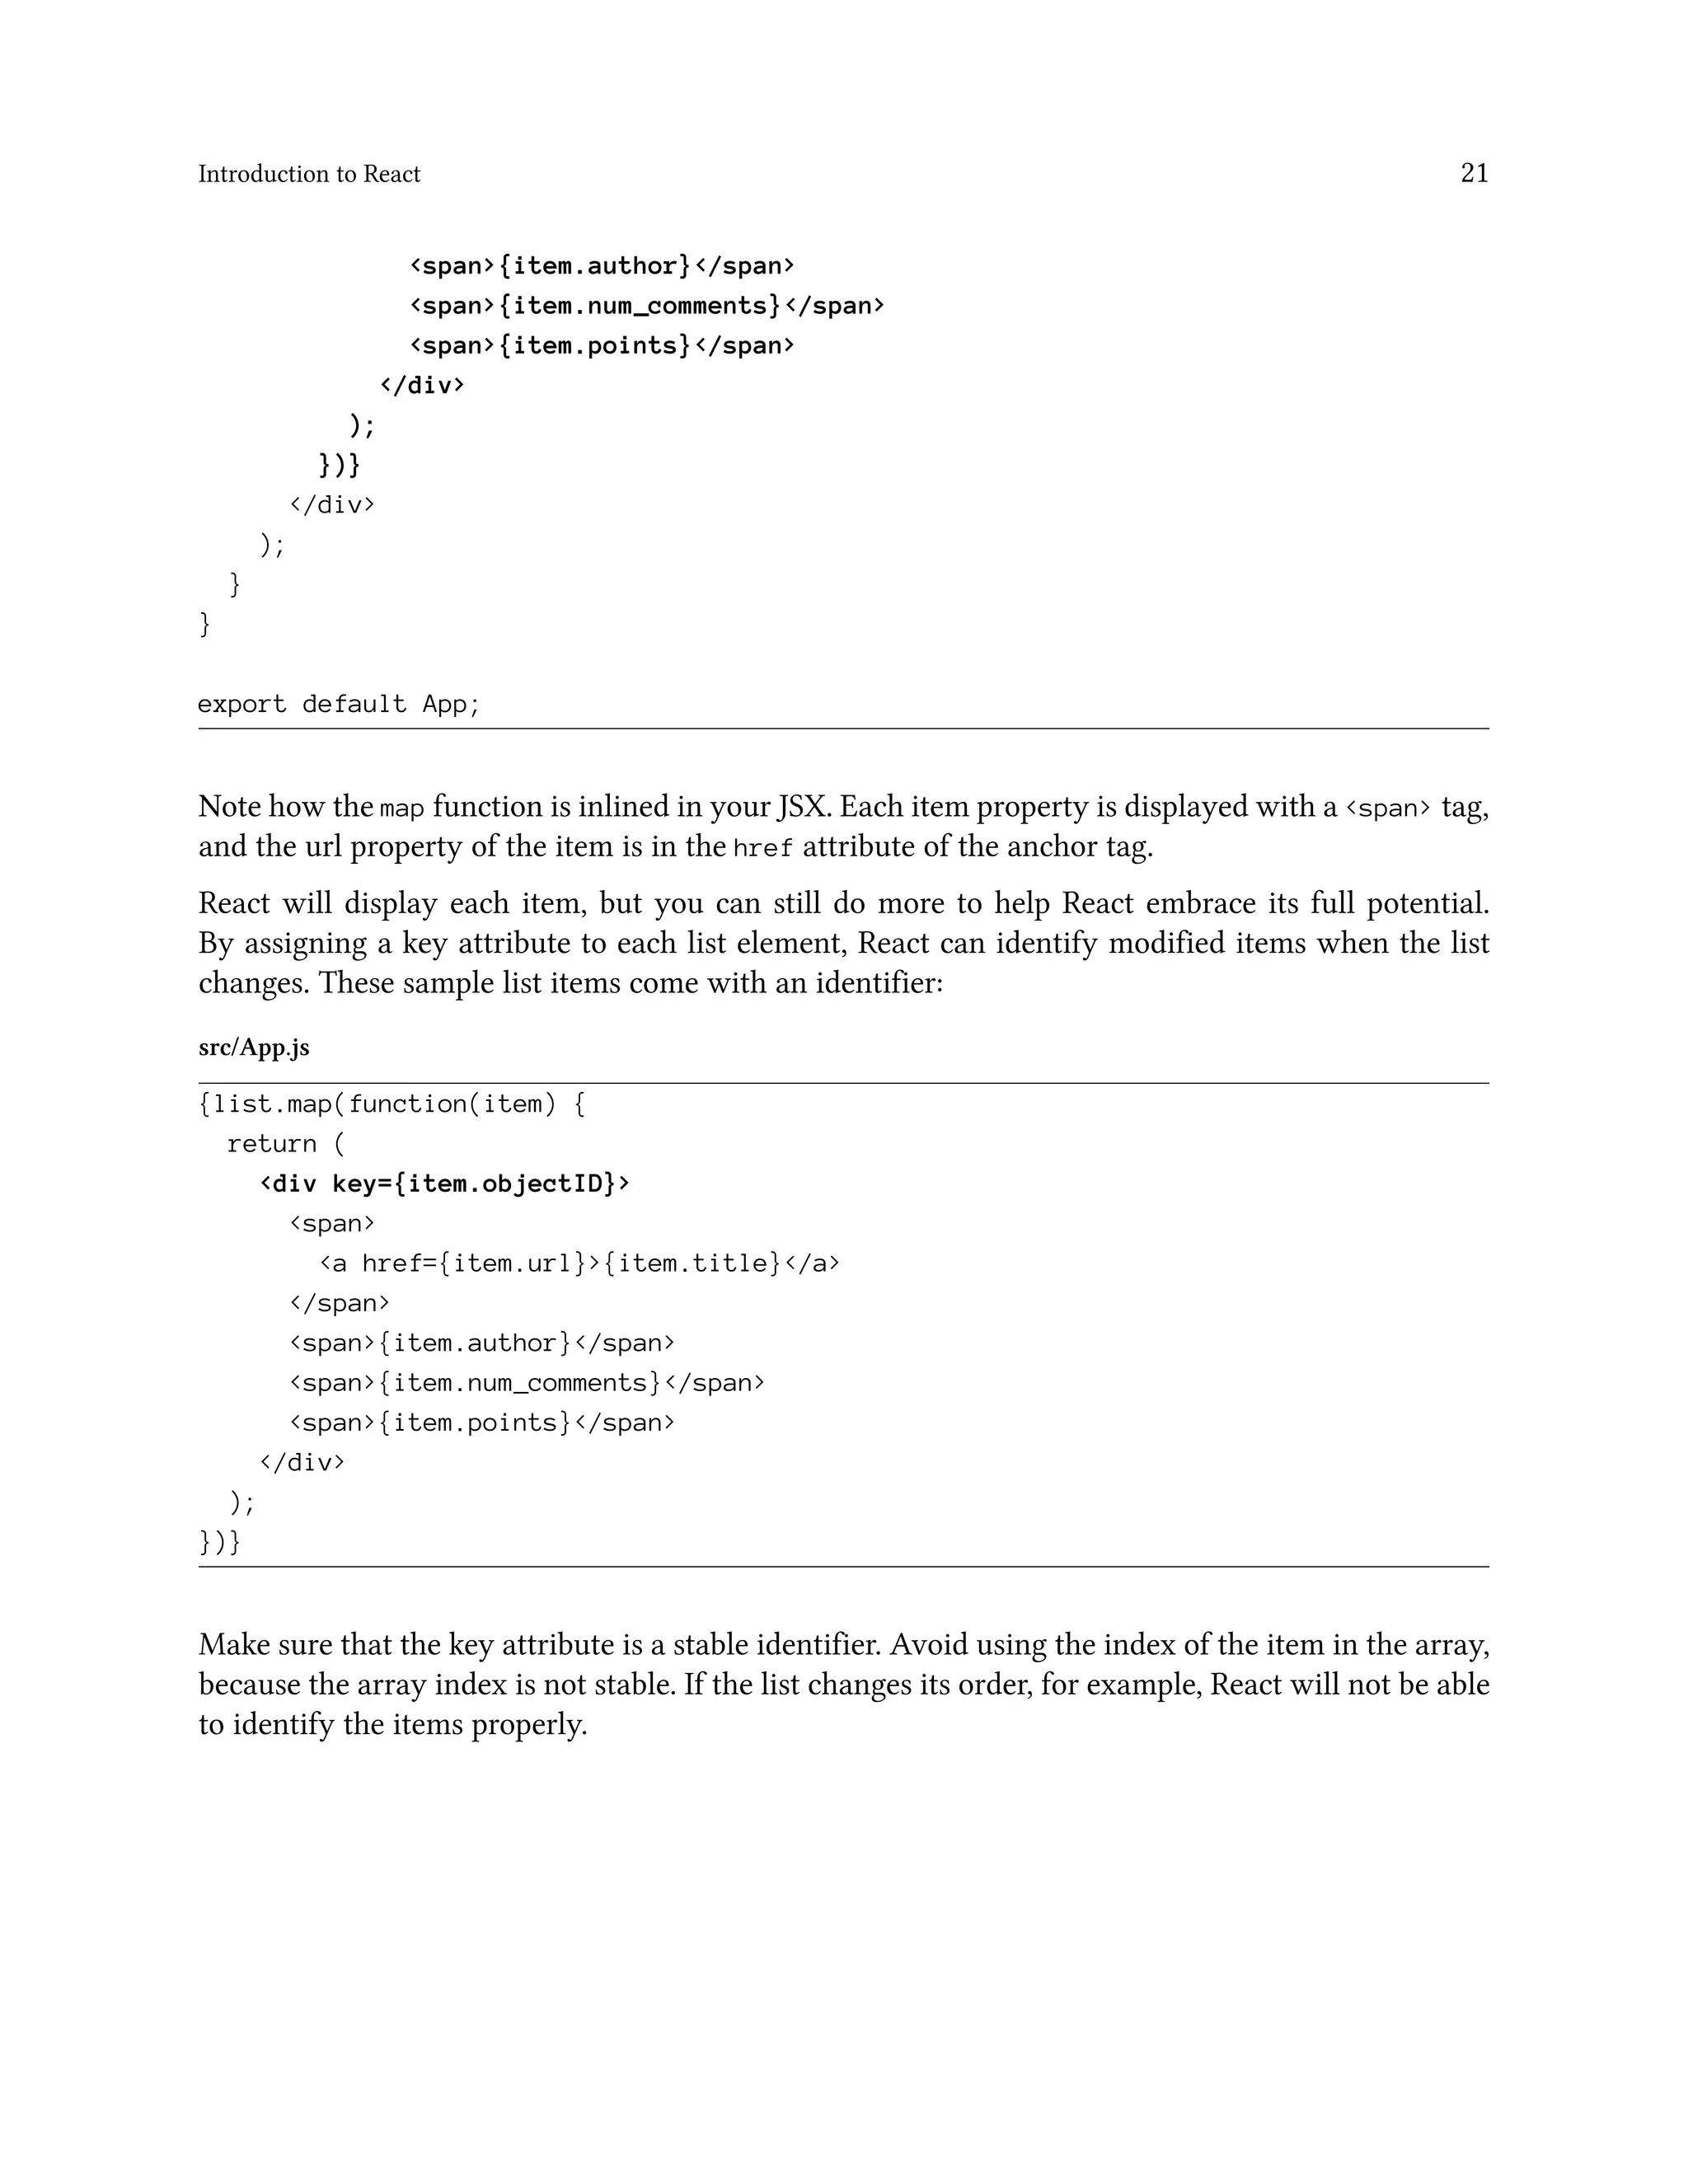
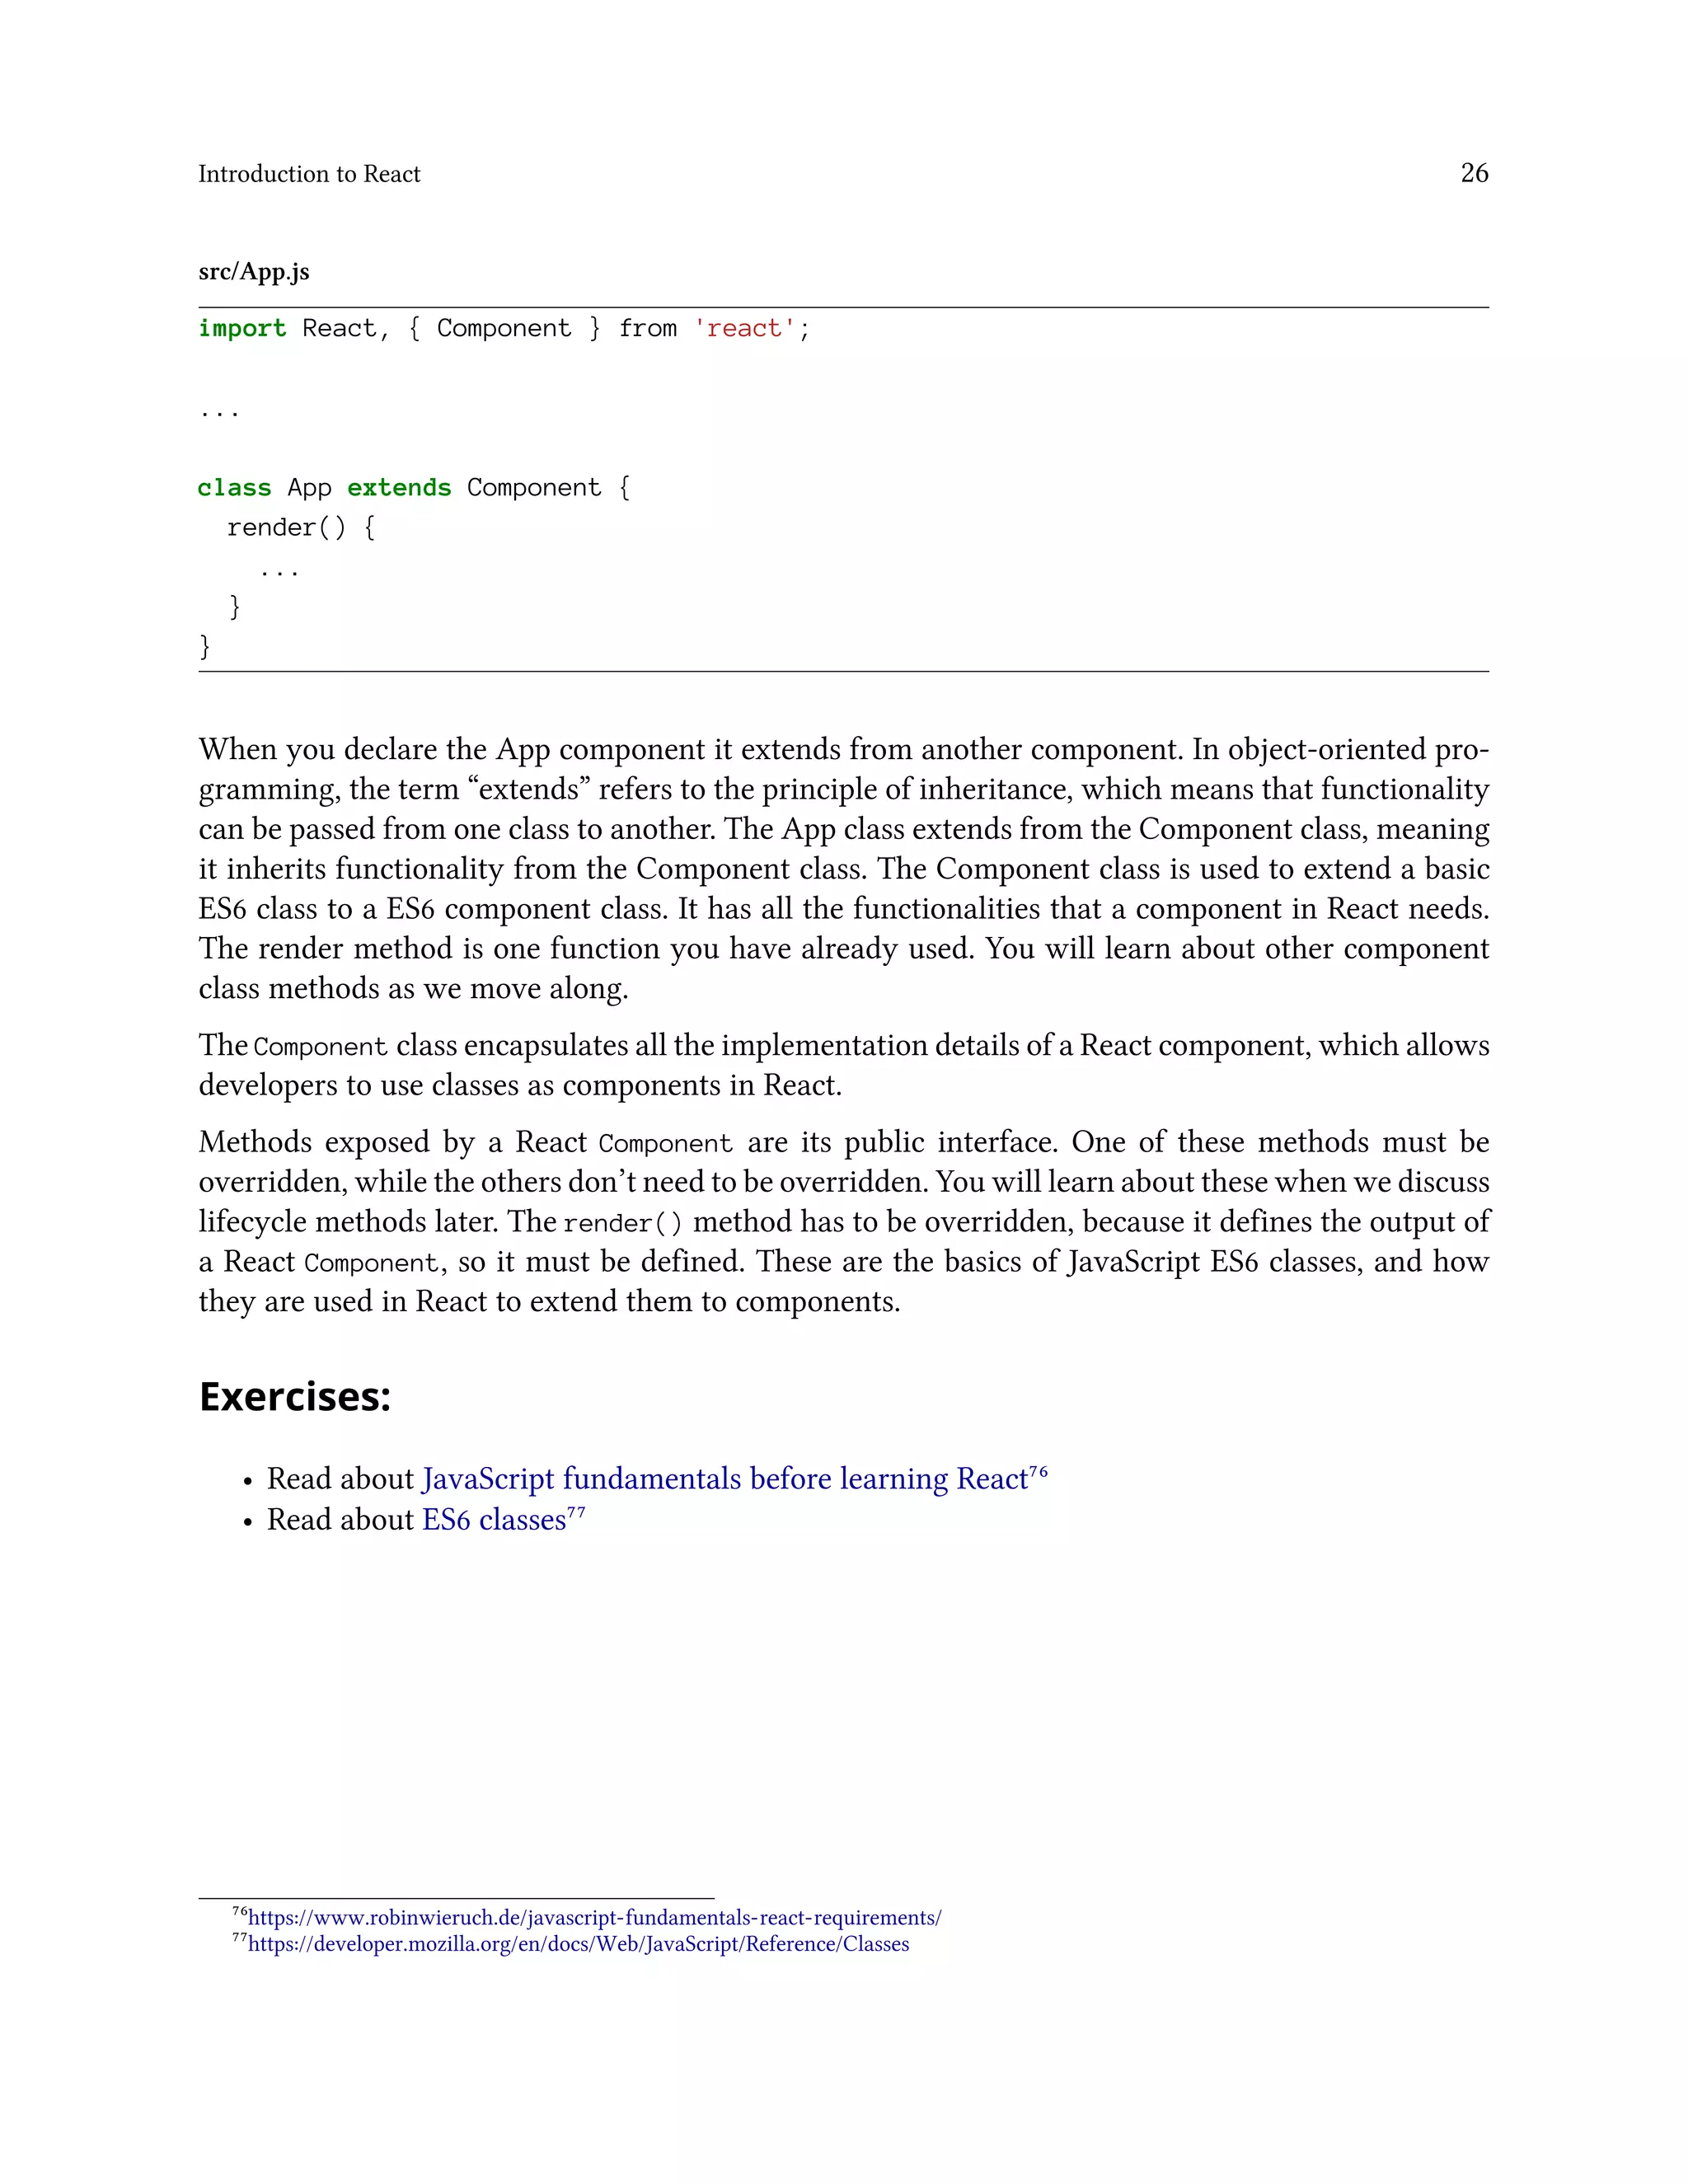
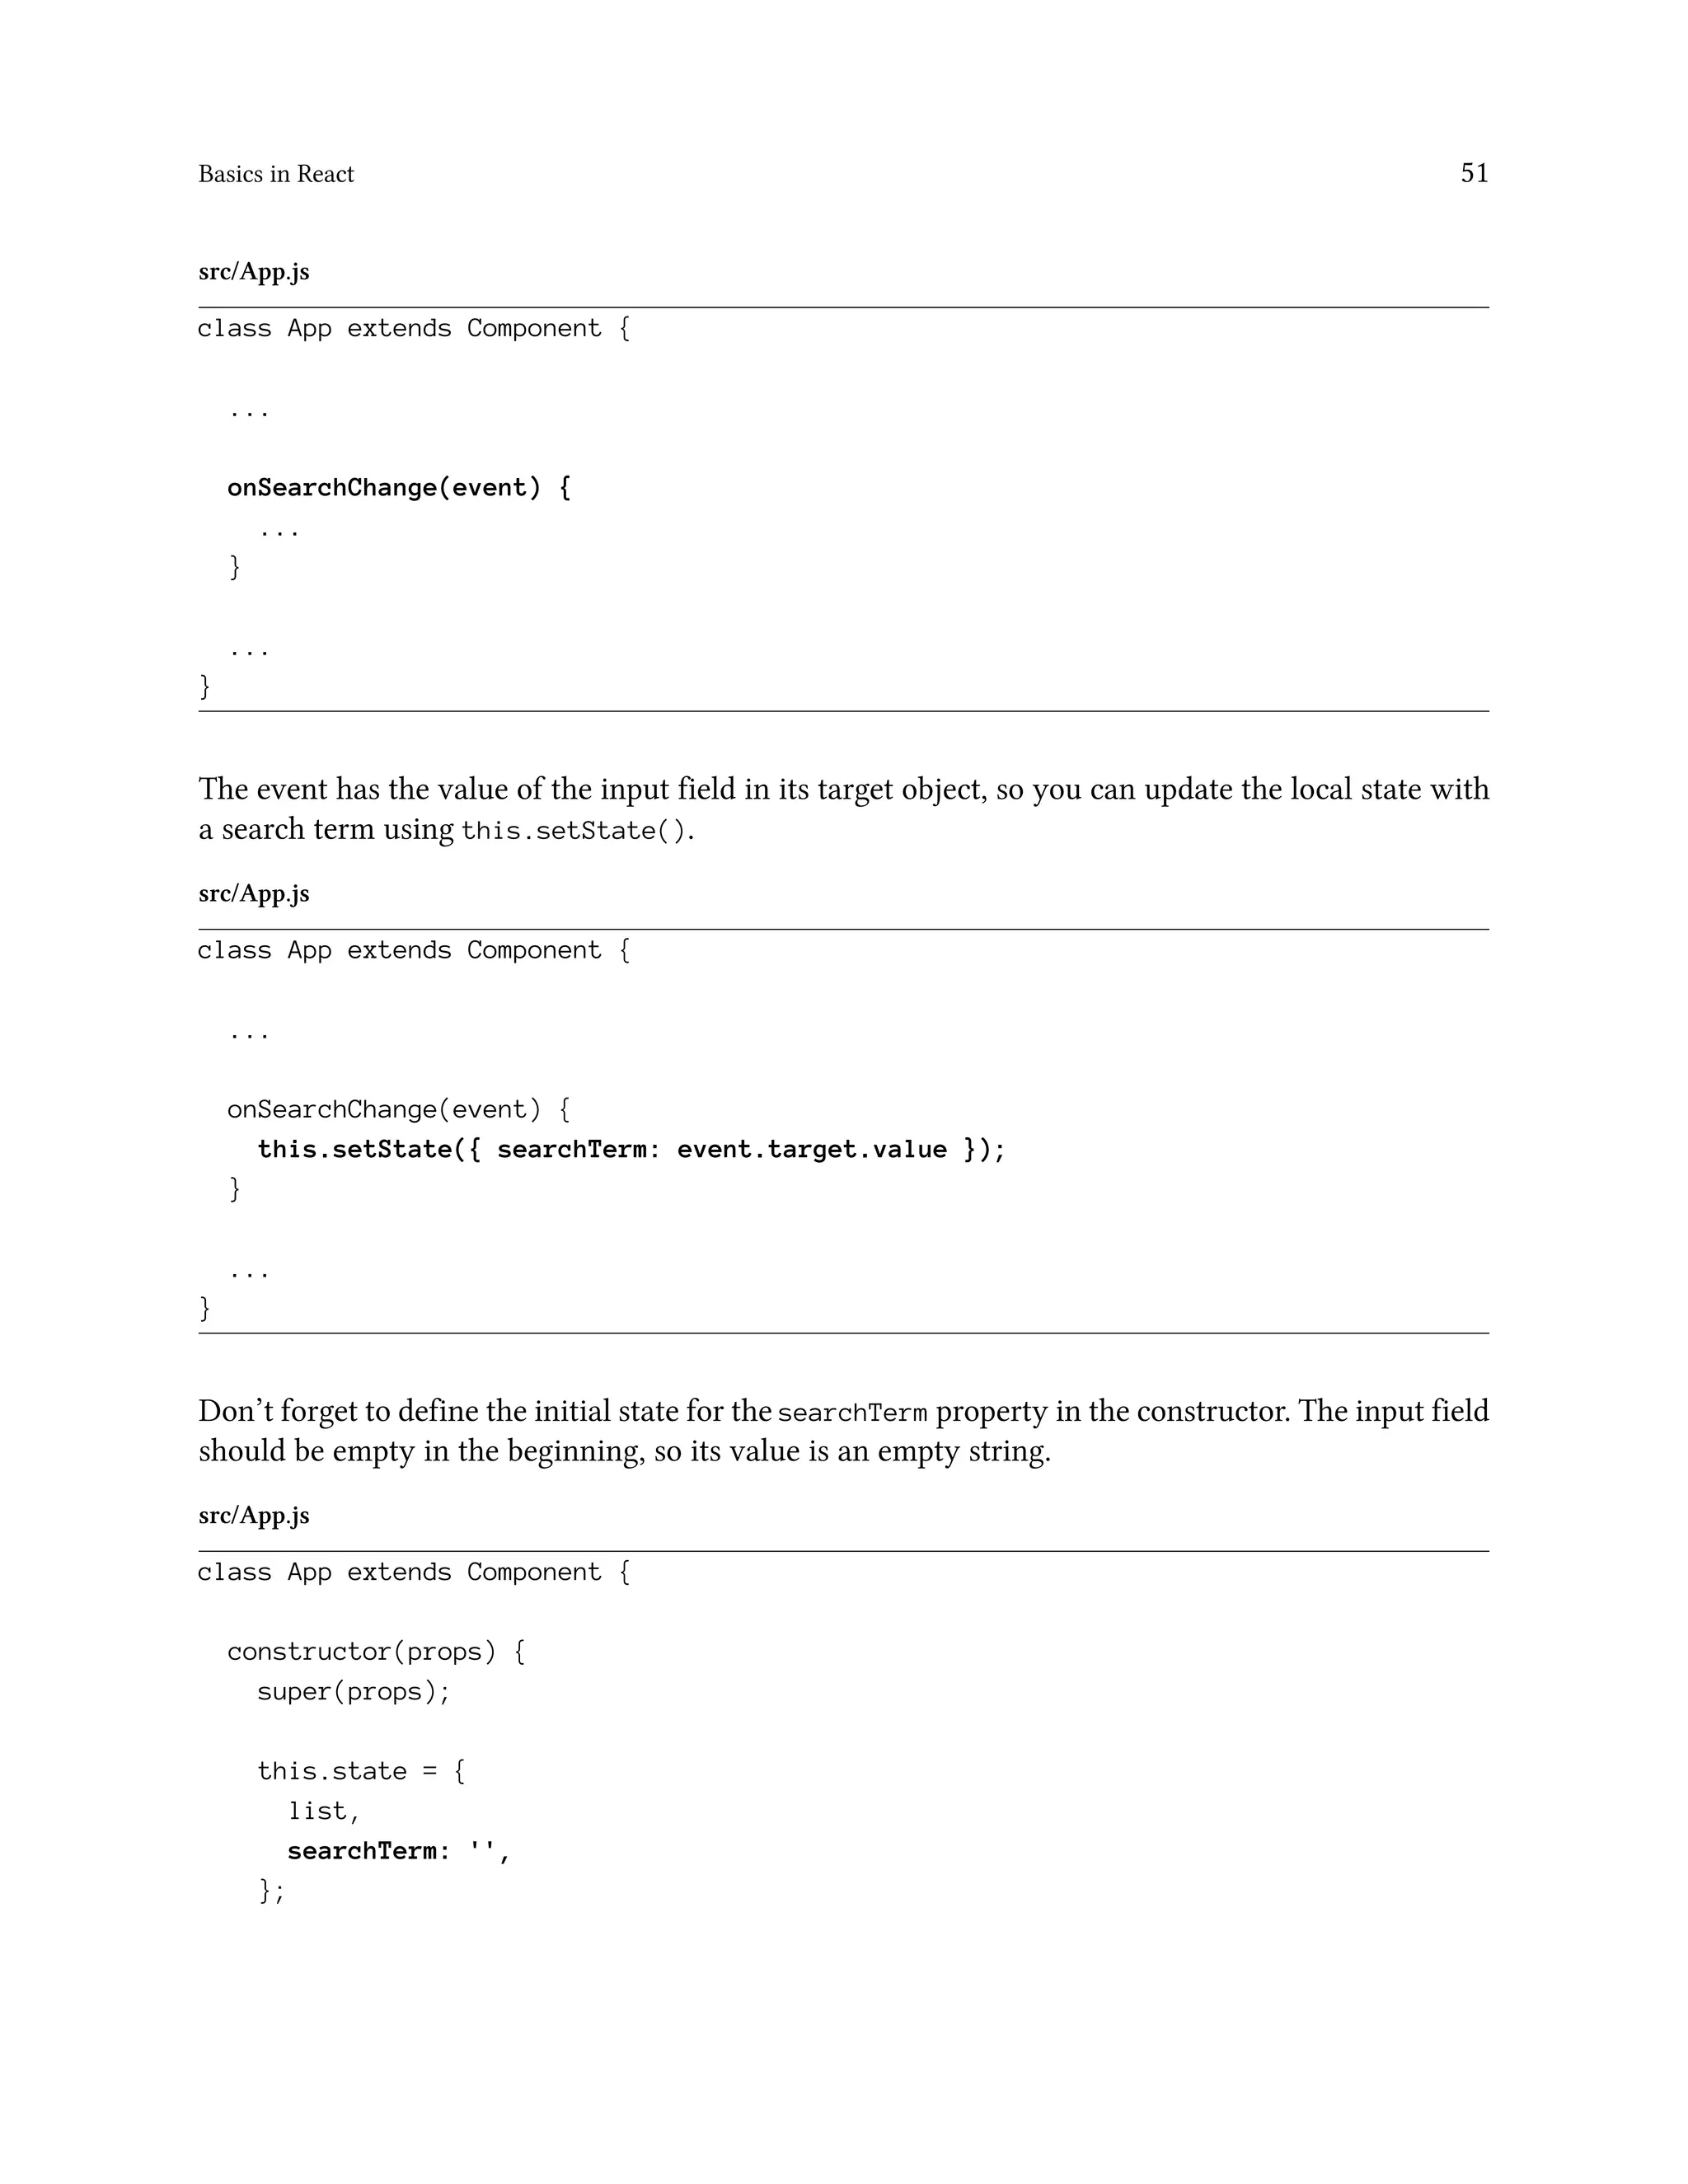
So far, you have rendered a few primitive variables in your JSX. Now, we will render a list of items.
The list will contain sample data in the beginning, but later we will learn how to fetch the data from
an external API.
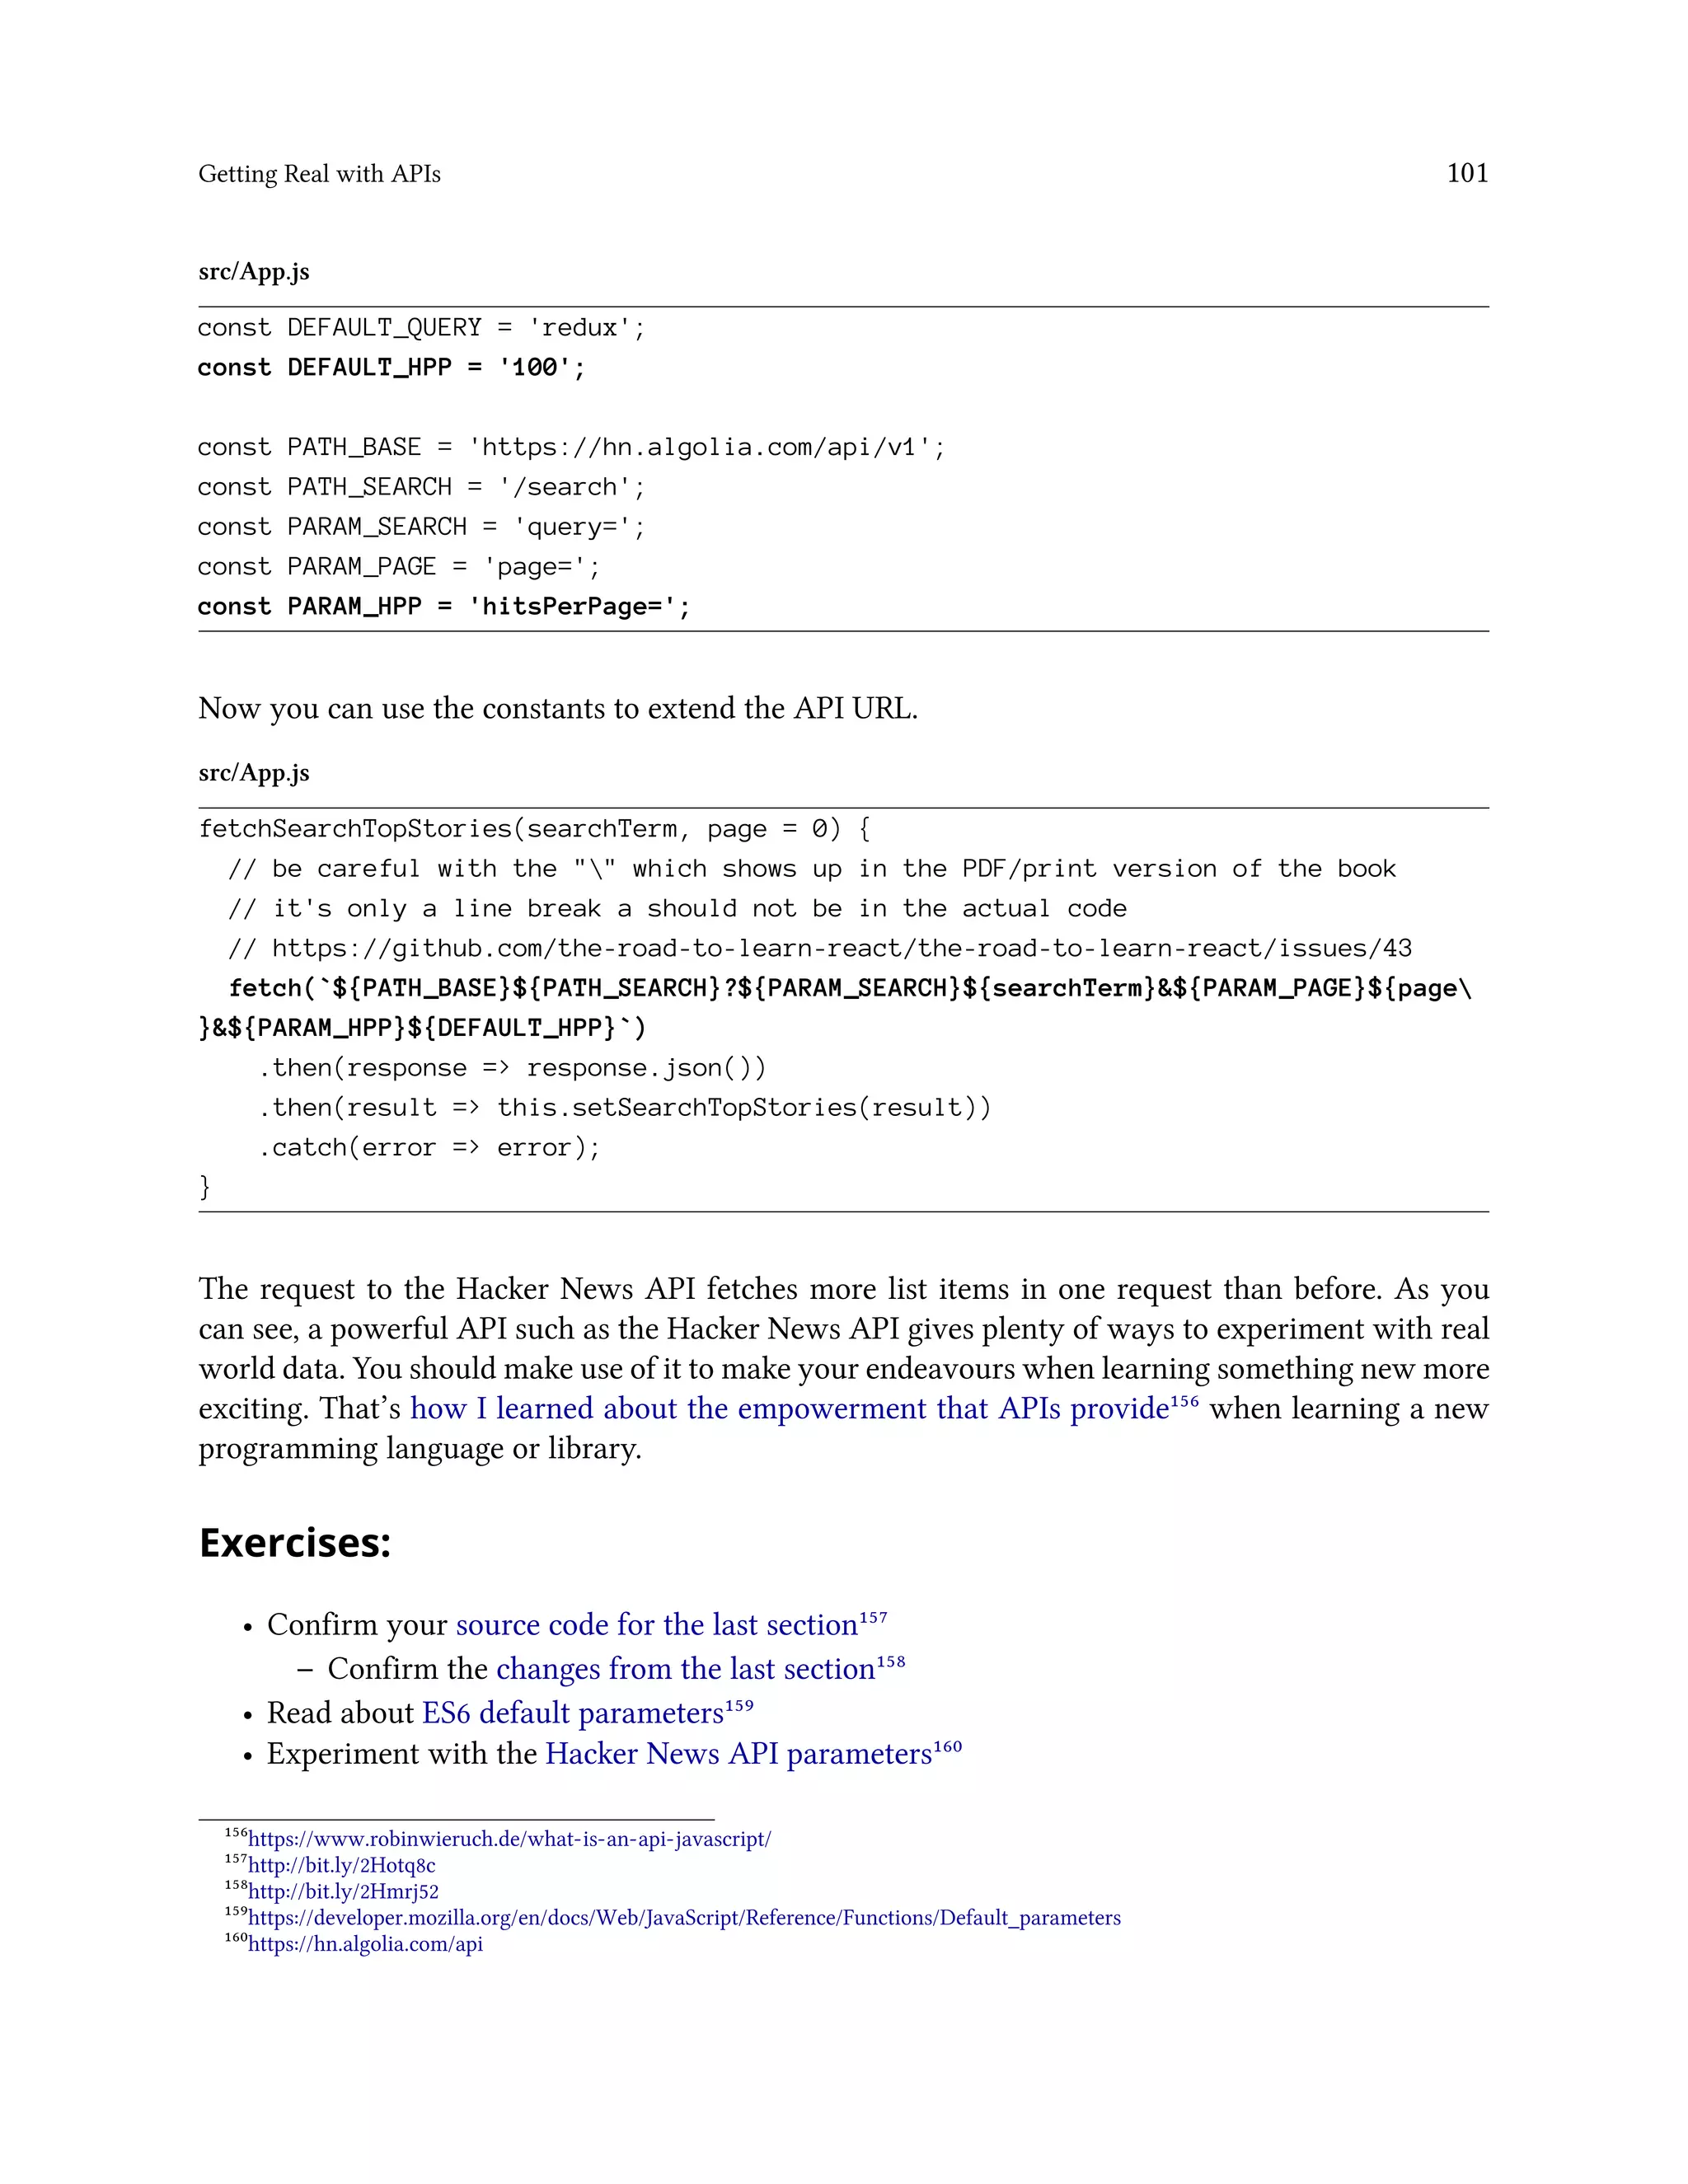
First you have to define the list of items:
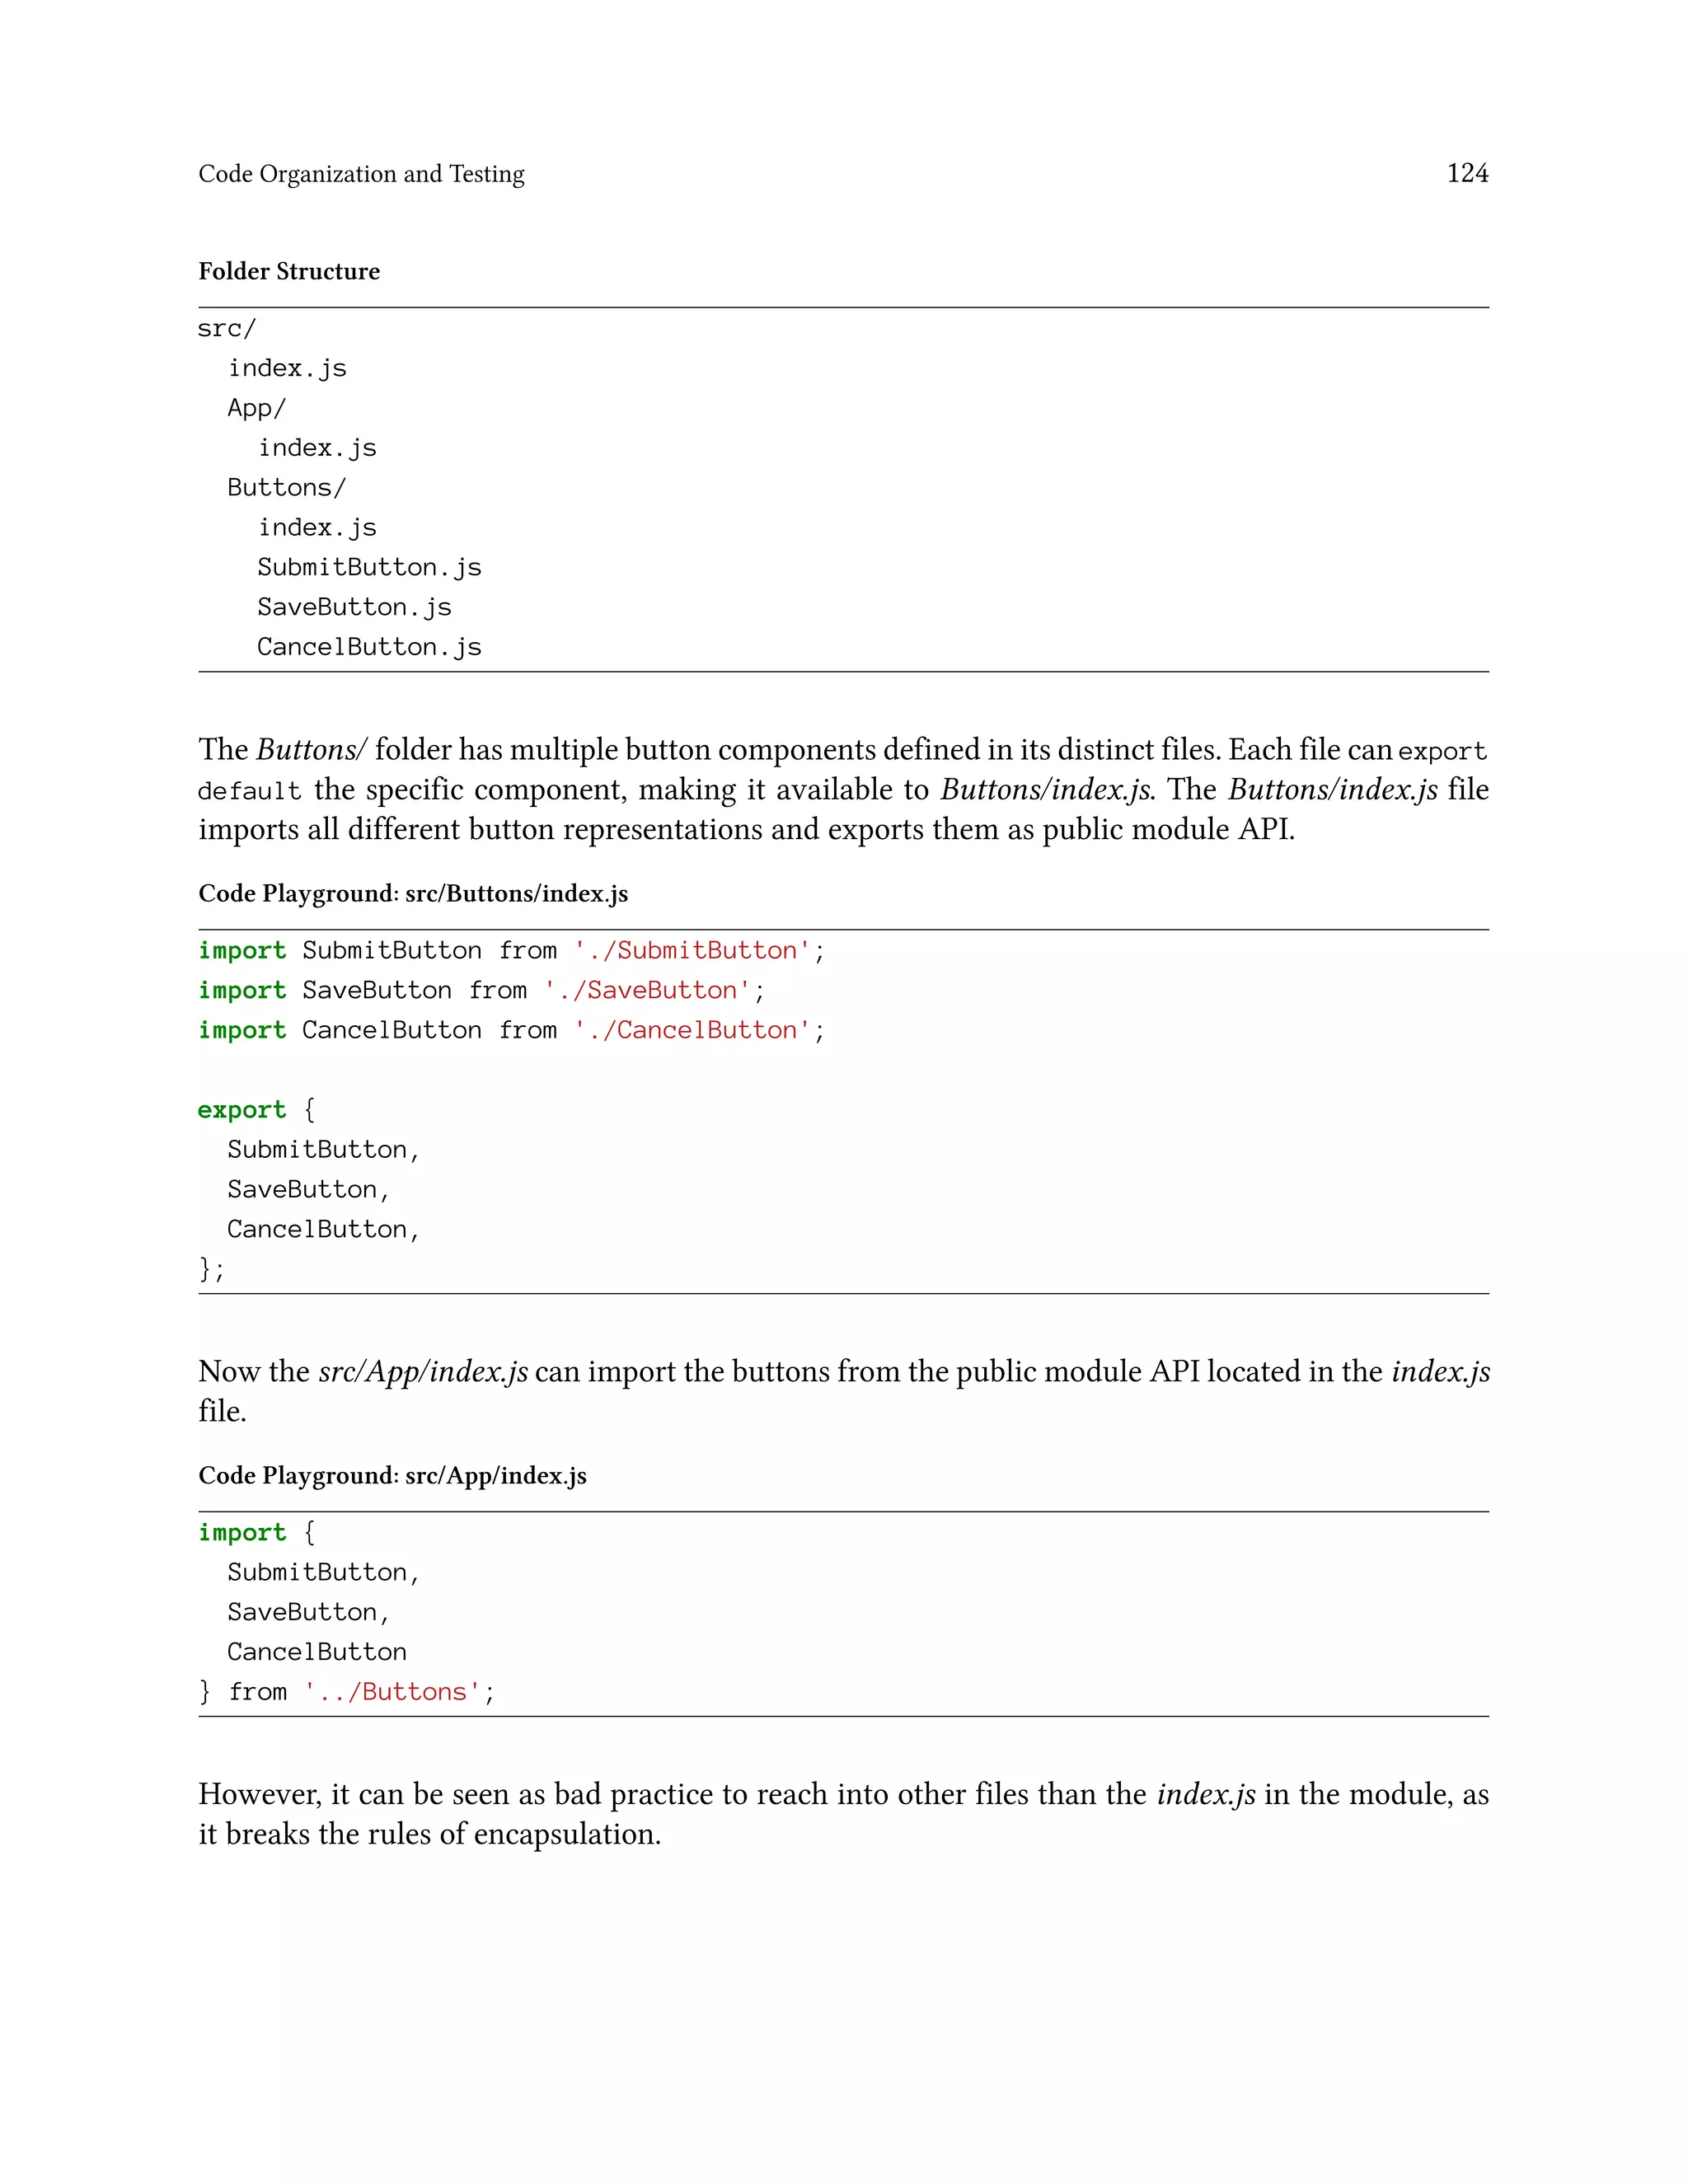
src/App.js
import React, { Component } from 'react';
import './App.css';
const list = [
{
title: 'React',
url: 'https://reactjs.org/',
author: 'Jordan Walke',
num_comments: 3,
points: 4,
objectID: 0,
},
{
title: 'Redux',
url: 'https://redux.js.org/',
author: 'Dan Abramov, Andrew Clark',
num_comments: 2,
points: 5,
objectID: 1,
},
];
class App extends Component {
...
}
The sample data represents information we will fetch from an API later on. Items in this list each
have a title, a url, and an author, as well an identifier, points (which indicate how popular an article
is), and a count of comments.
Now you can use the built-in JavaScript map functionality⁶⁷ in JSX, which iterates over a list of
items to display them according to specific attributes. Again, we use curly braces to encapsulate the
JavaScript expression in JSX:
⁶⁷https://developer.mozilla.org/en-US/docs/Web/JavaScript/Reference/Global_Objects/Array/map](https://image.slidesharecdn.com/the-road-to-learn-react-190414064122/75/The-road-to-learn-react-34-2048.jpg)
![Introduction to React 20
src/App.js
class App extends Component {
render() {
return (
<div className="App">
{list.map(function(item) {
return <div>{item.title}</div>;
})}
</div>
);
}
}
export default App;
Using JavaScript alongside HTML in JSX is very powerful. For a different task you may have used
map to convert one list of items to another. This time, we used map to convert a list of items to HTML
elements.
Code Playground
const array = [1, 4, 9, 16];
// pass a function to map
const newArray = array.map(function (x) { return x * 2; });
console.log(newArray);
// expected output: Array [2, 8, 18, 32]
So far, only the title is displayed for each item. Let’s experiment with more of the item’s properties:
src/App.js
class App extends Component {
render() {
return (
<div className="App">
{list.map(function(item) {
return (
<div>
<span>
<a href={item.url}>{item.title}</a>
</span>](https://image.slidesharecdn.com/the-road-to-learn-react-190414064122/75/The-road-to-learn-react-35-2048.jpg)


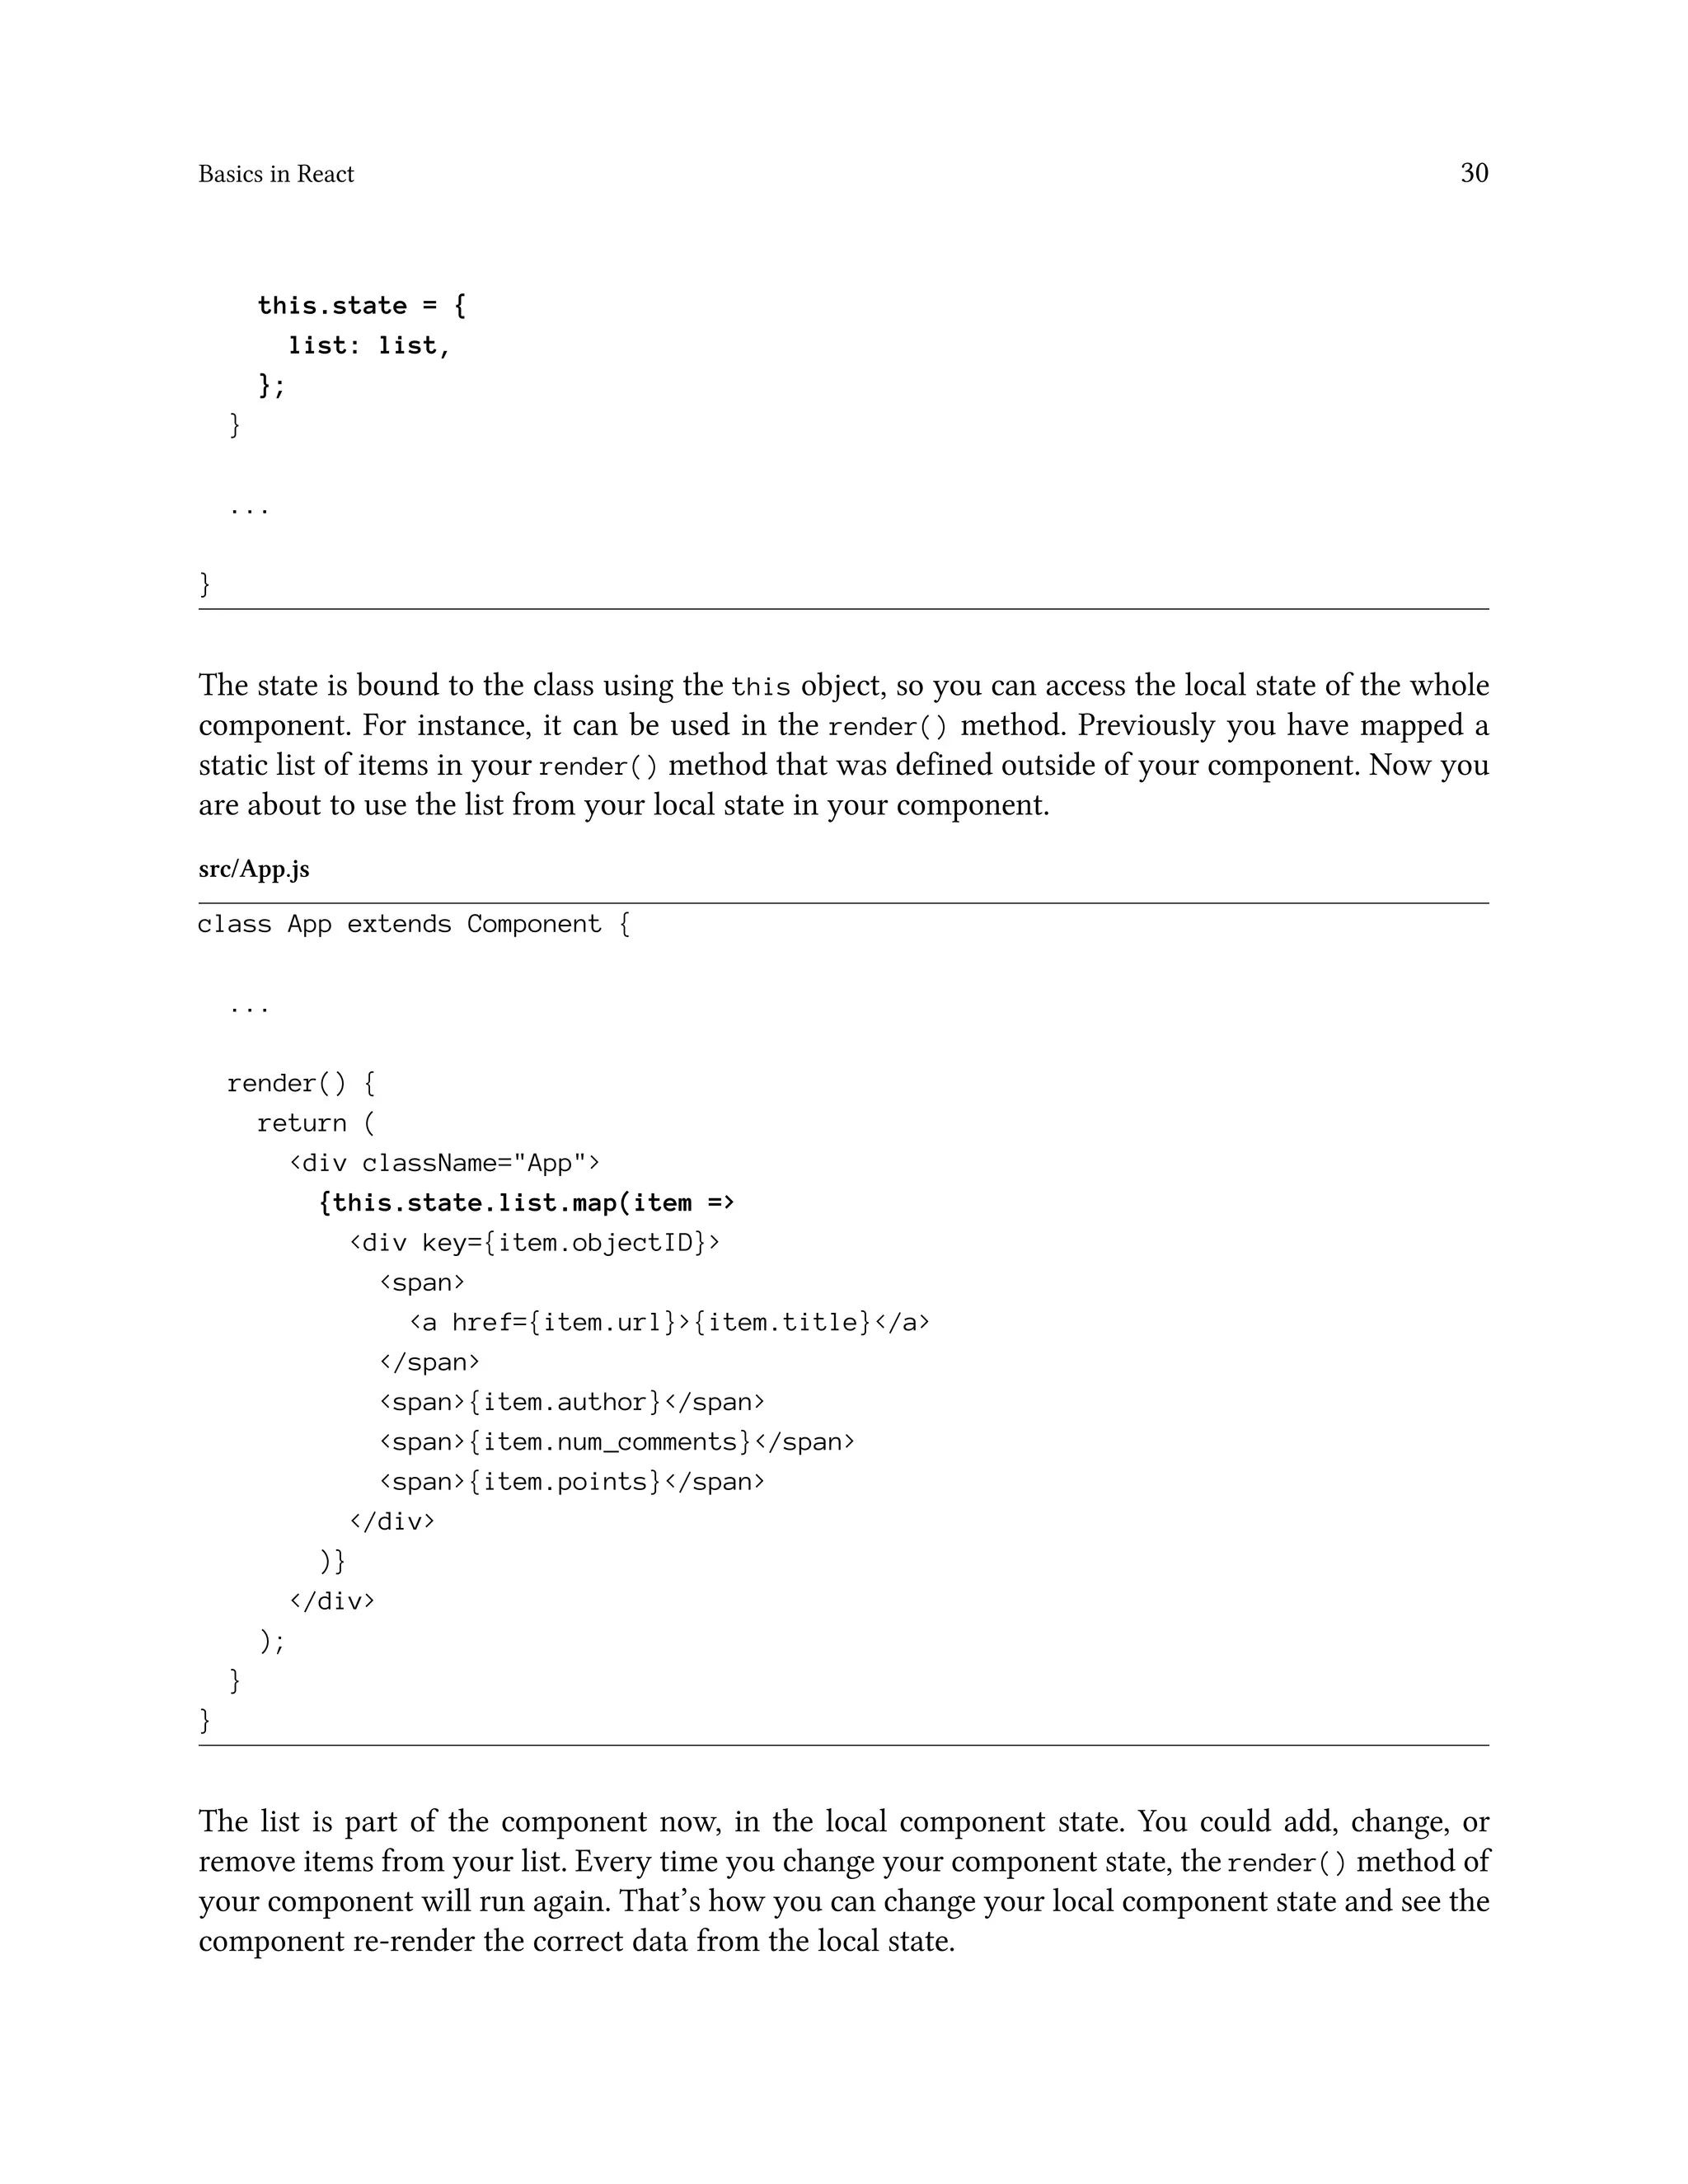
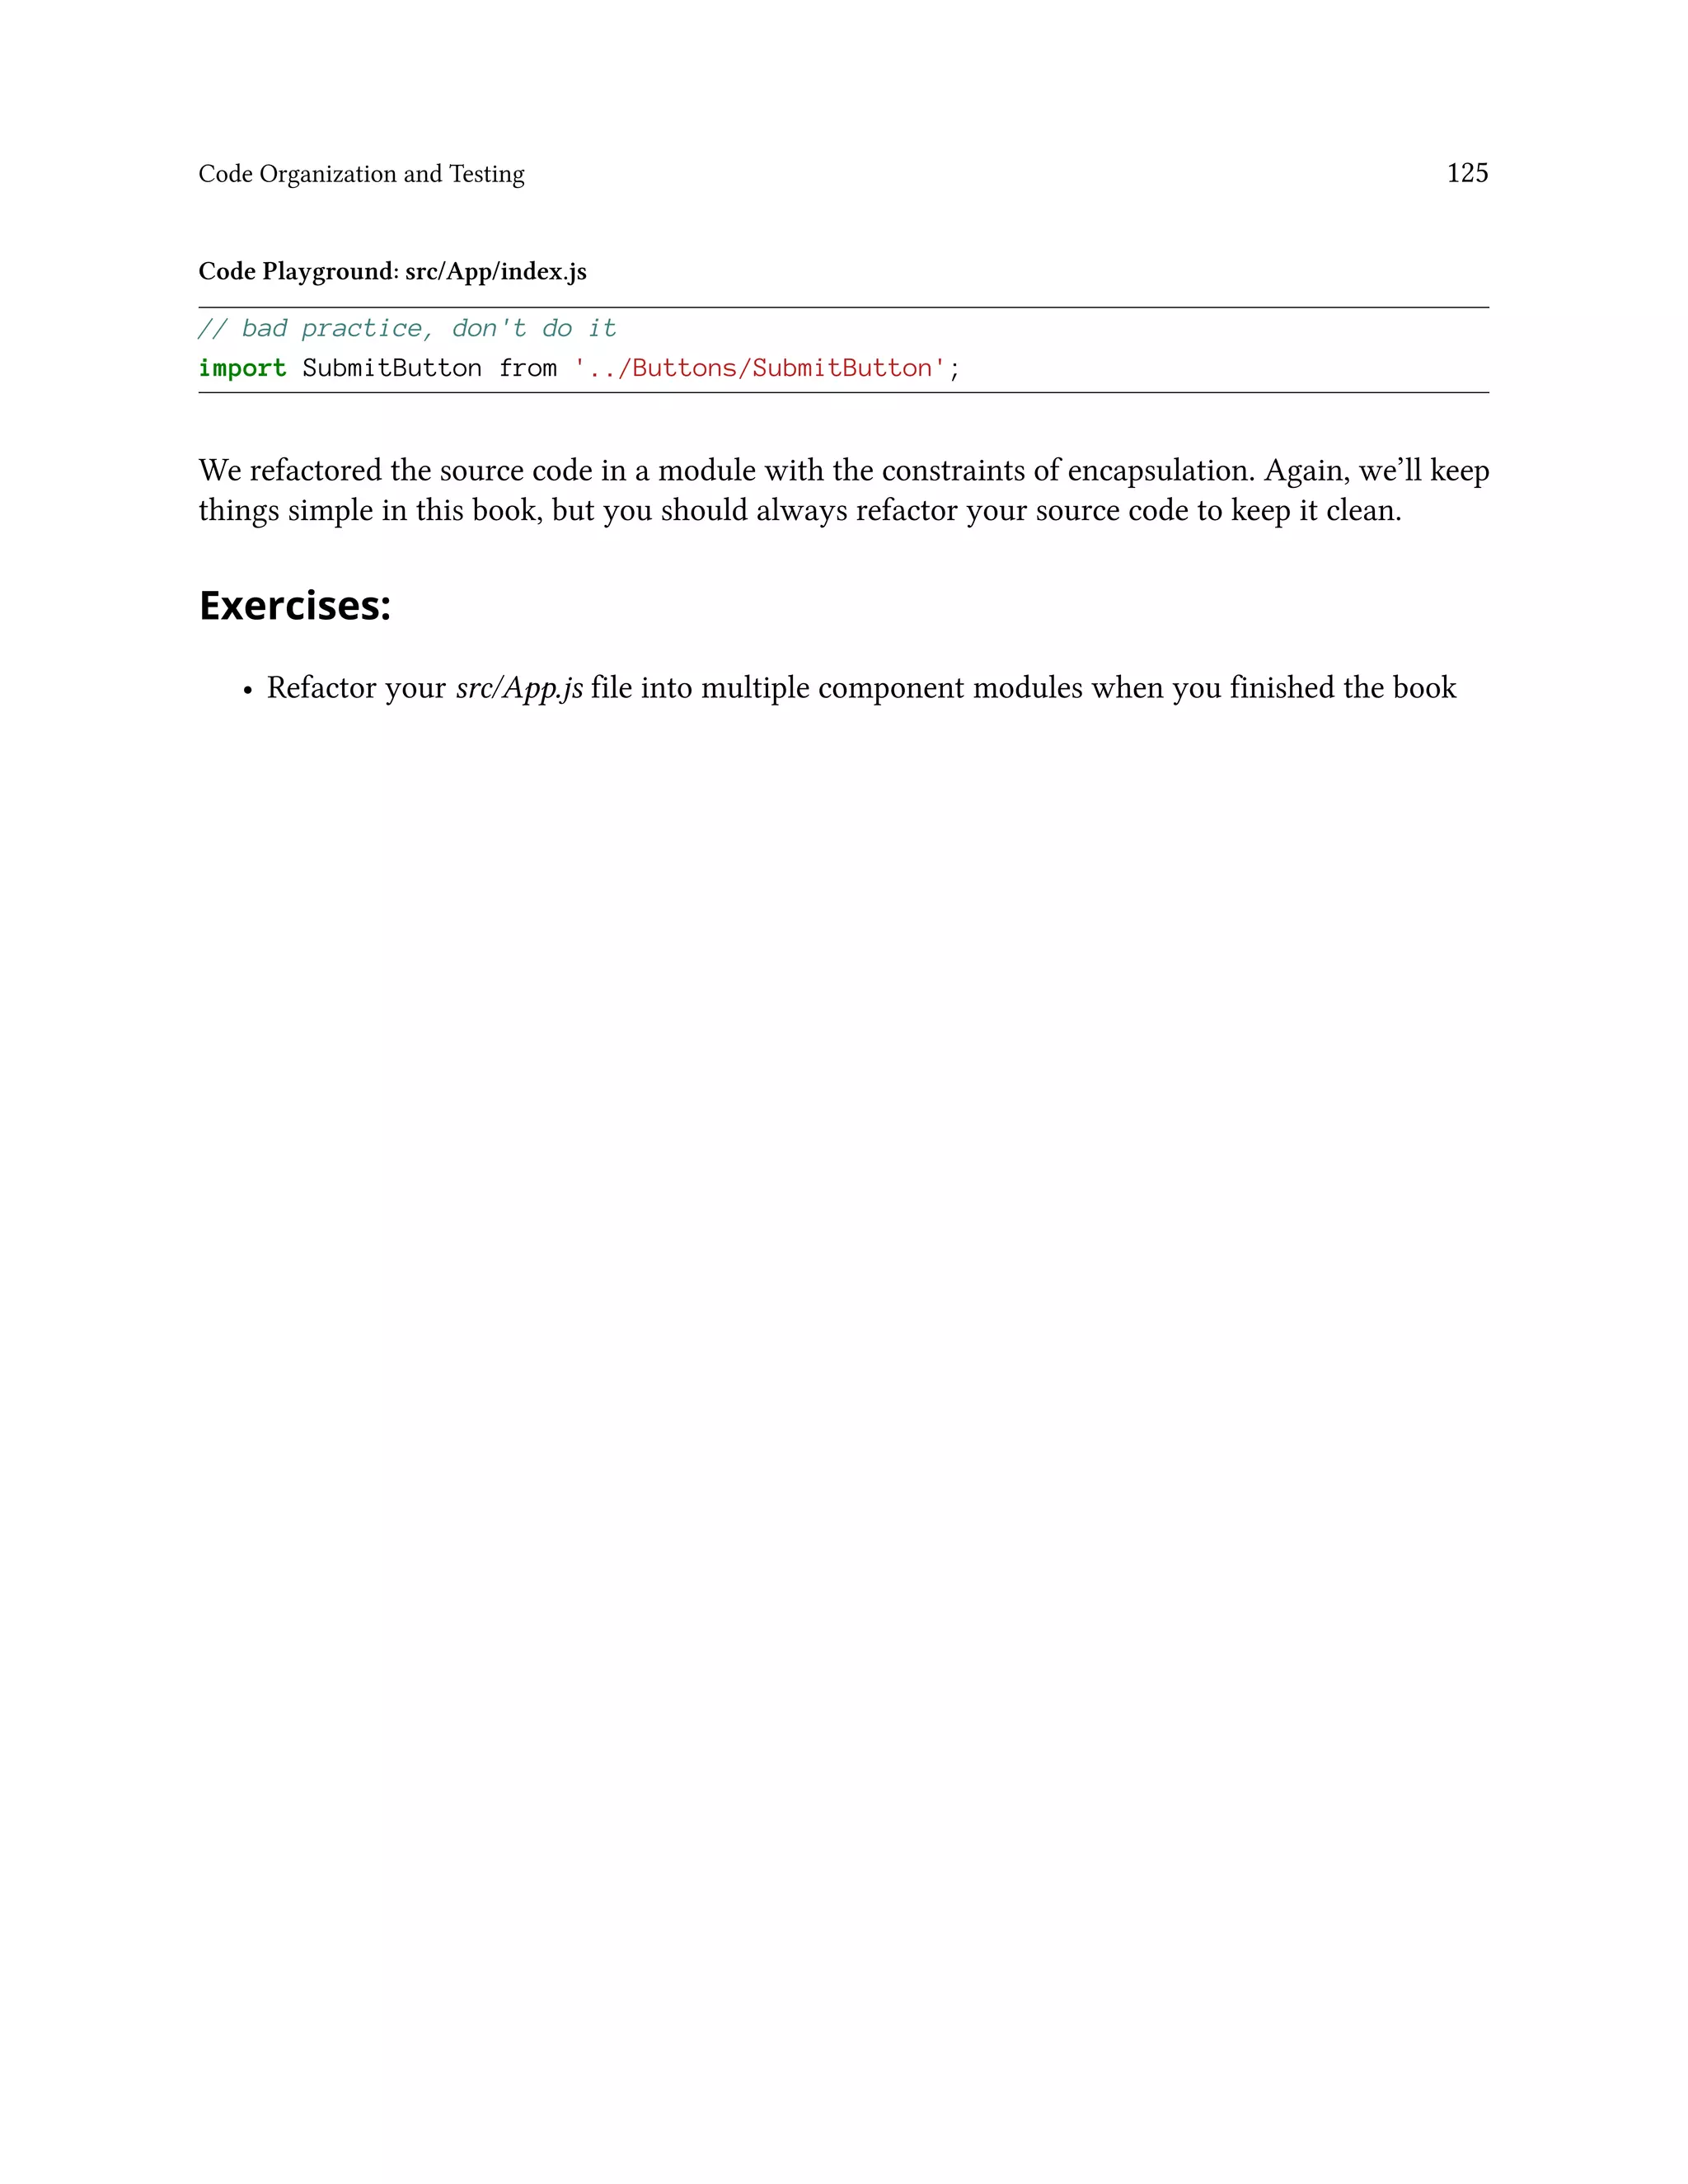
![Basics in React 29
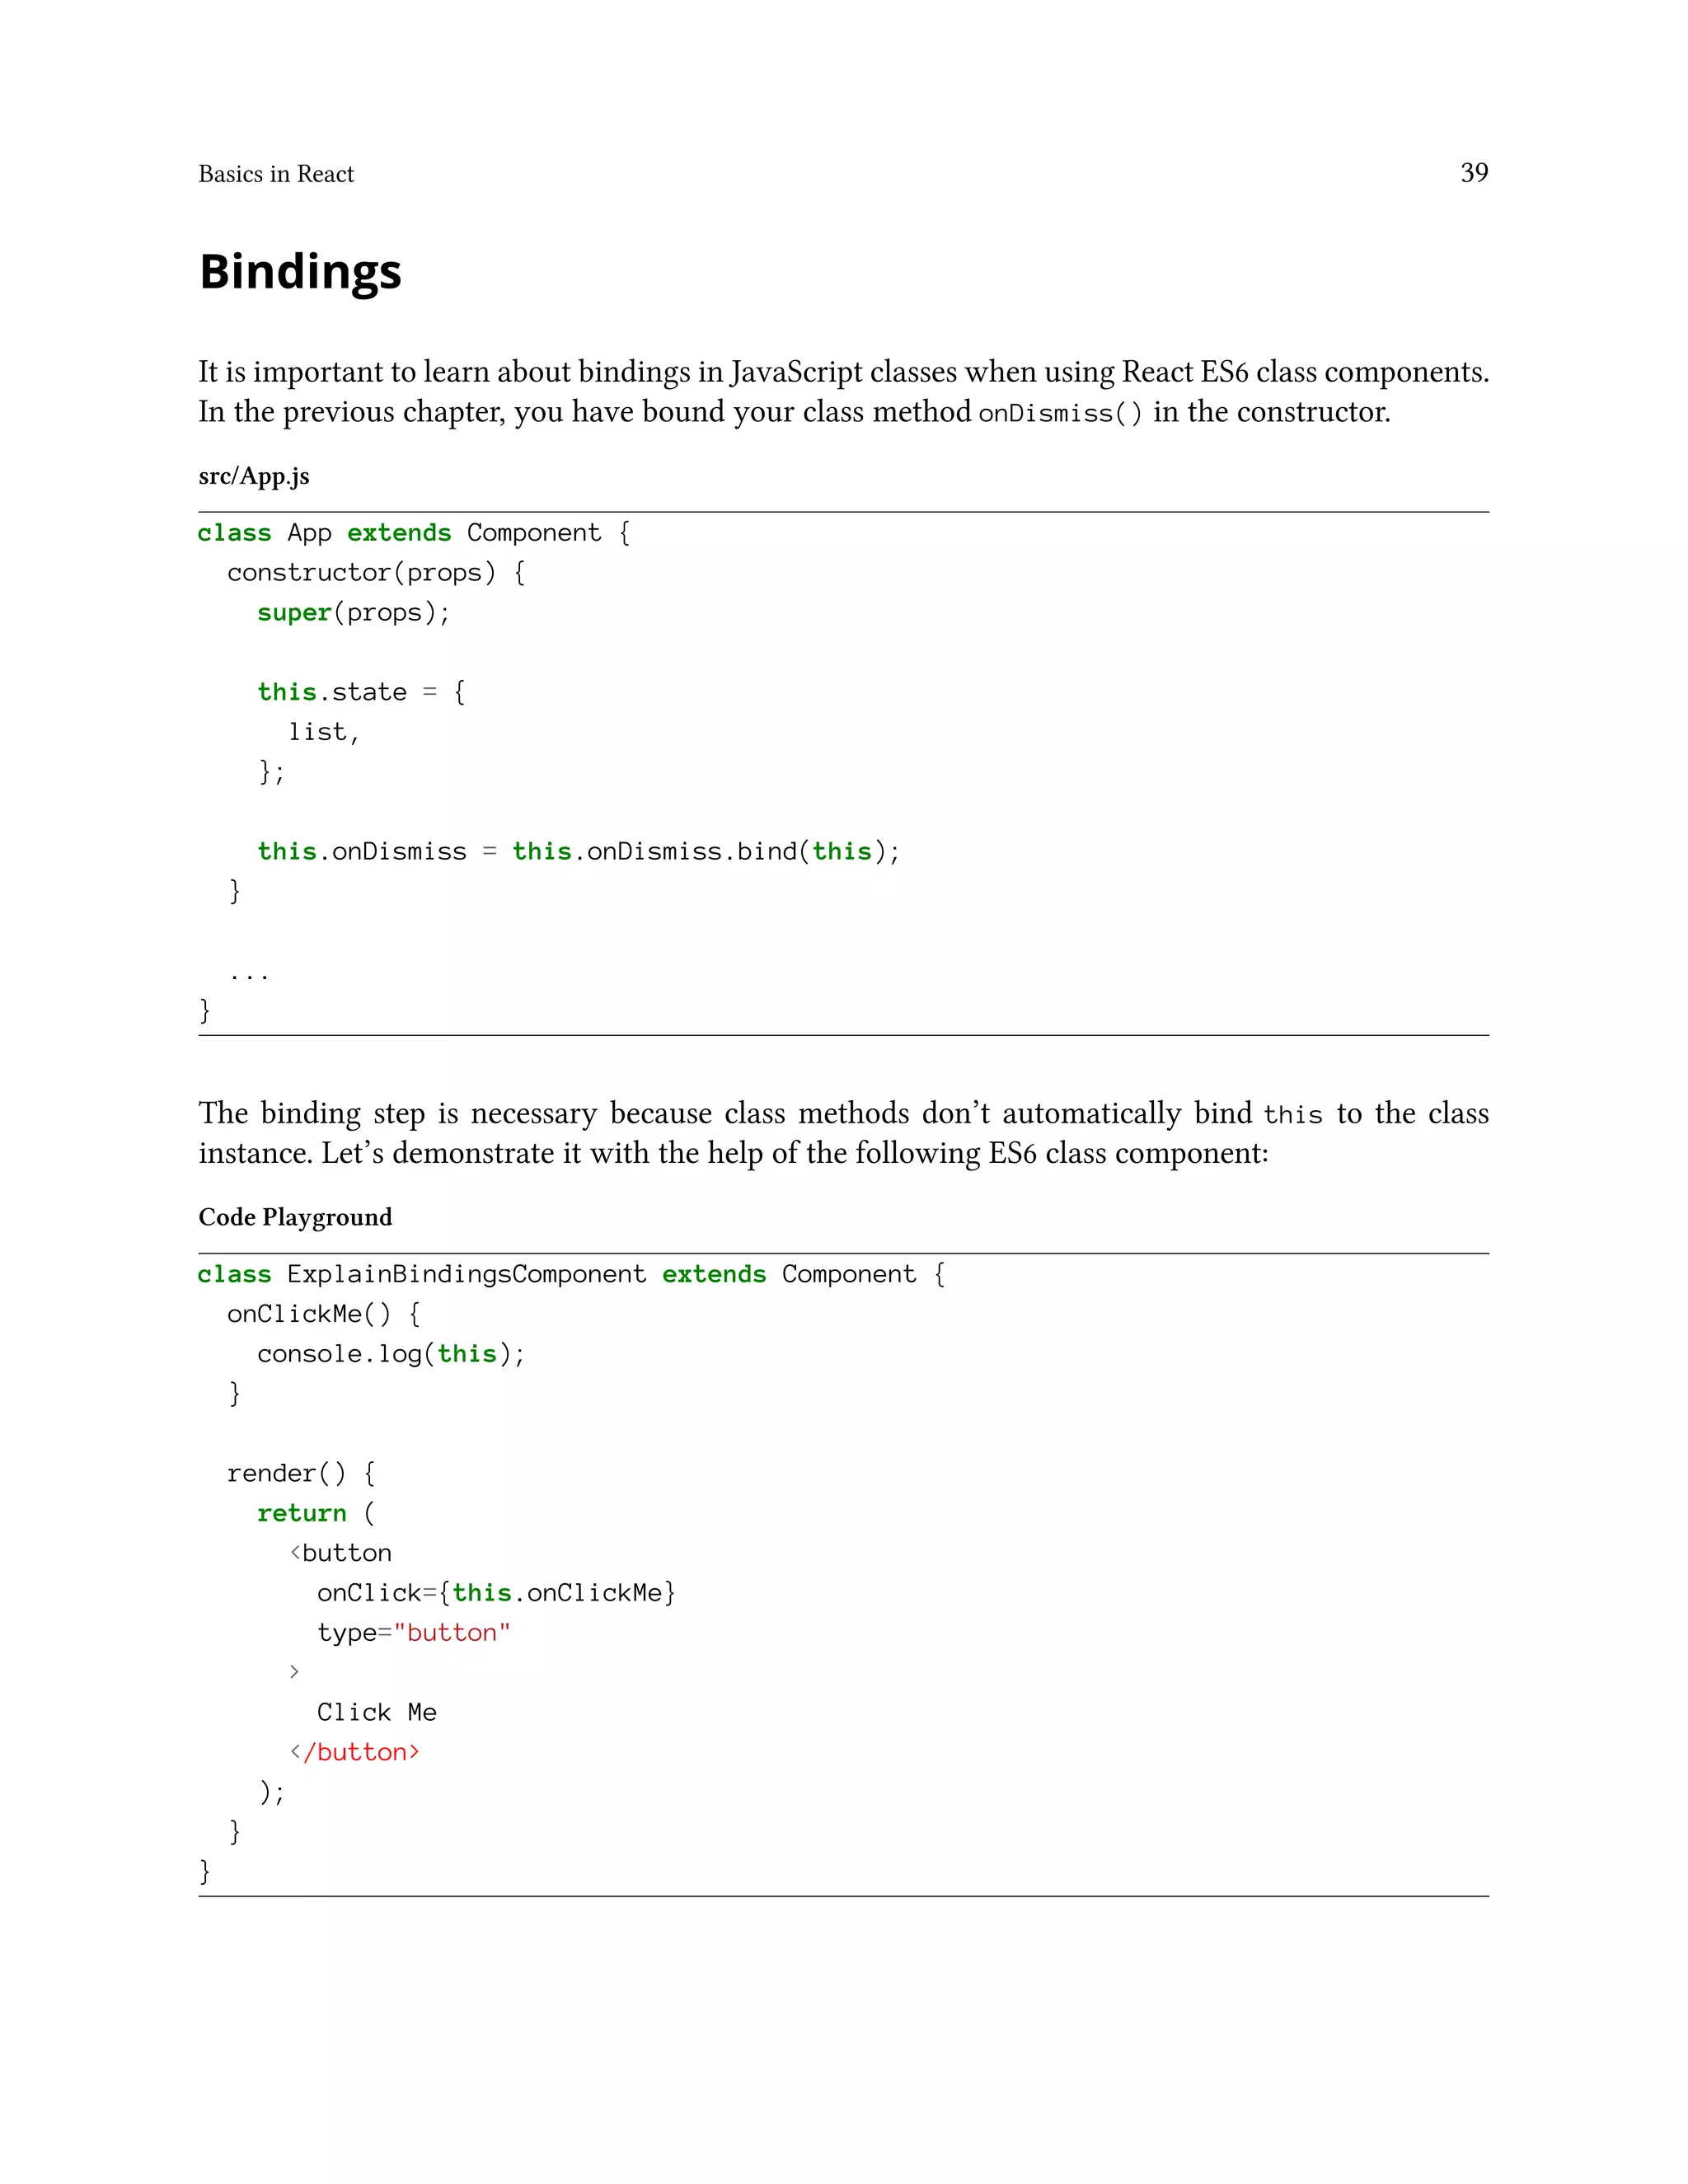
Local Component State
Local component state, also known as internal component state, allows you to save, modify, and
delete properties stored in your component. The ES6 class component then uses a constructor to
initialize local component state. The constructor is called only once, when the component initializes:
Let’s introduce a class constructor.
src/App.js
class App extends Component {
constructor(props) {
super(props);
}
...
}
The App component is a subclass of Component, so the extends Component is in the App component
declaration.
It is mandatory to call super(props);. It sets this.props in your constructor in case you want
to access them there. They would be undefined when accessing this.props in your constructor
otherwise. In this case, the initial state of the component should be the sample list of items:
src/App.js
const list = [
{
title: 'React',
url: 'https://reactjs.org/',
author: 'Jordan Walke',
num_comments: 3,
points: 4,
objectID: 0,
},
...
];
class App extends Component {
constructor(props) {
super(props);](https://image.slidesharecdn.com/the-road-to-learn-react-190414064122/75/The-road-to-learn-react-44-2048.jpg)
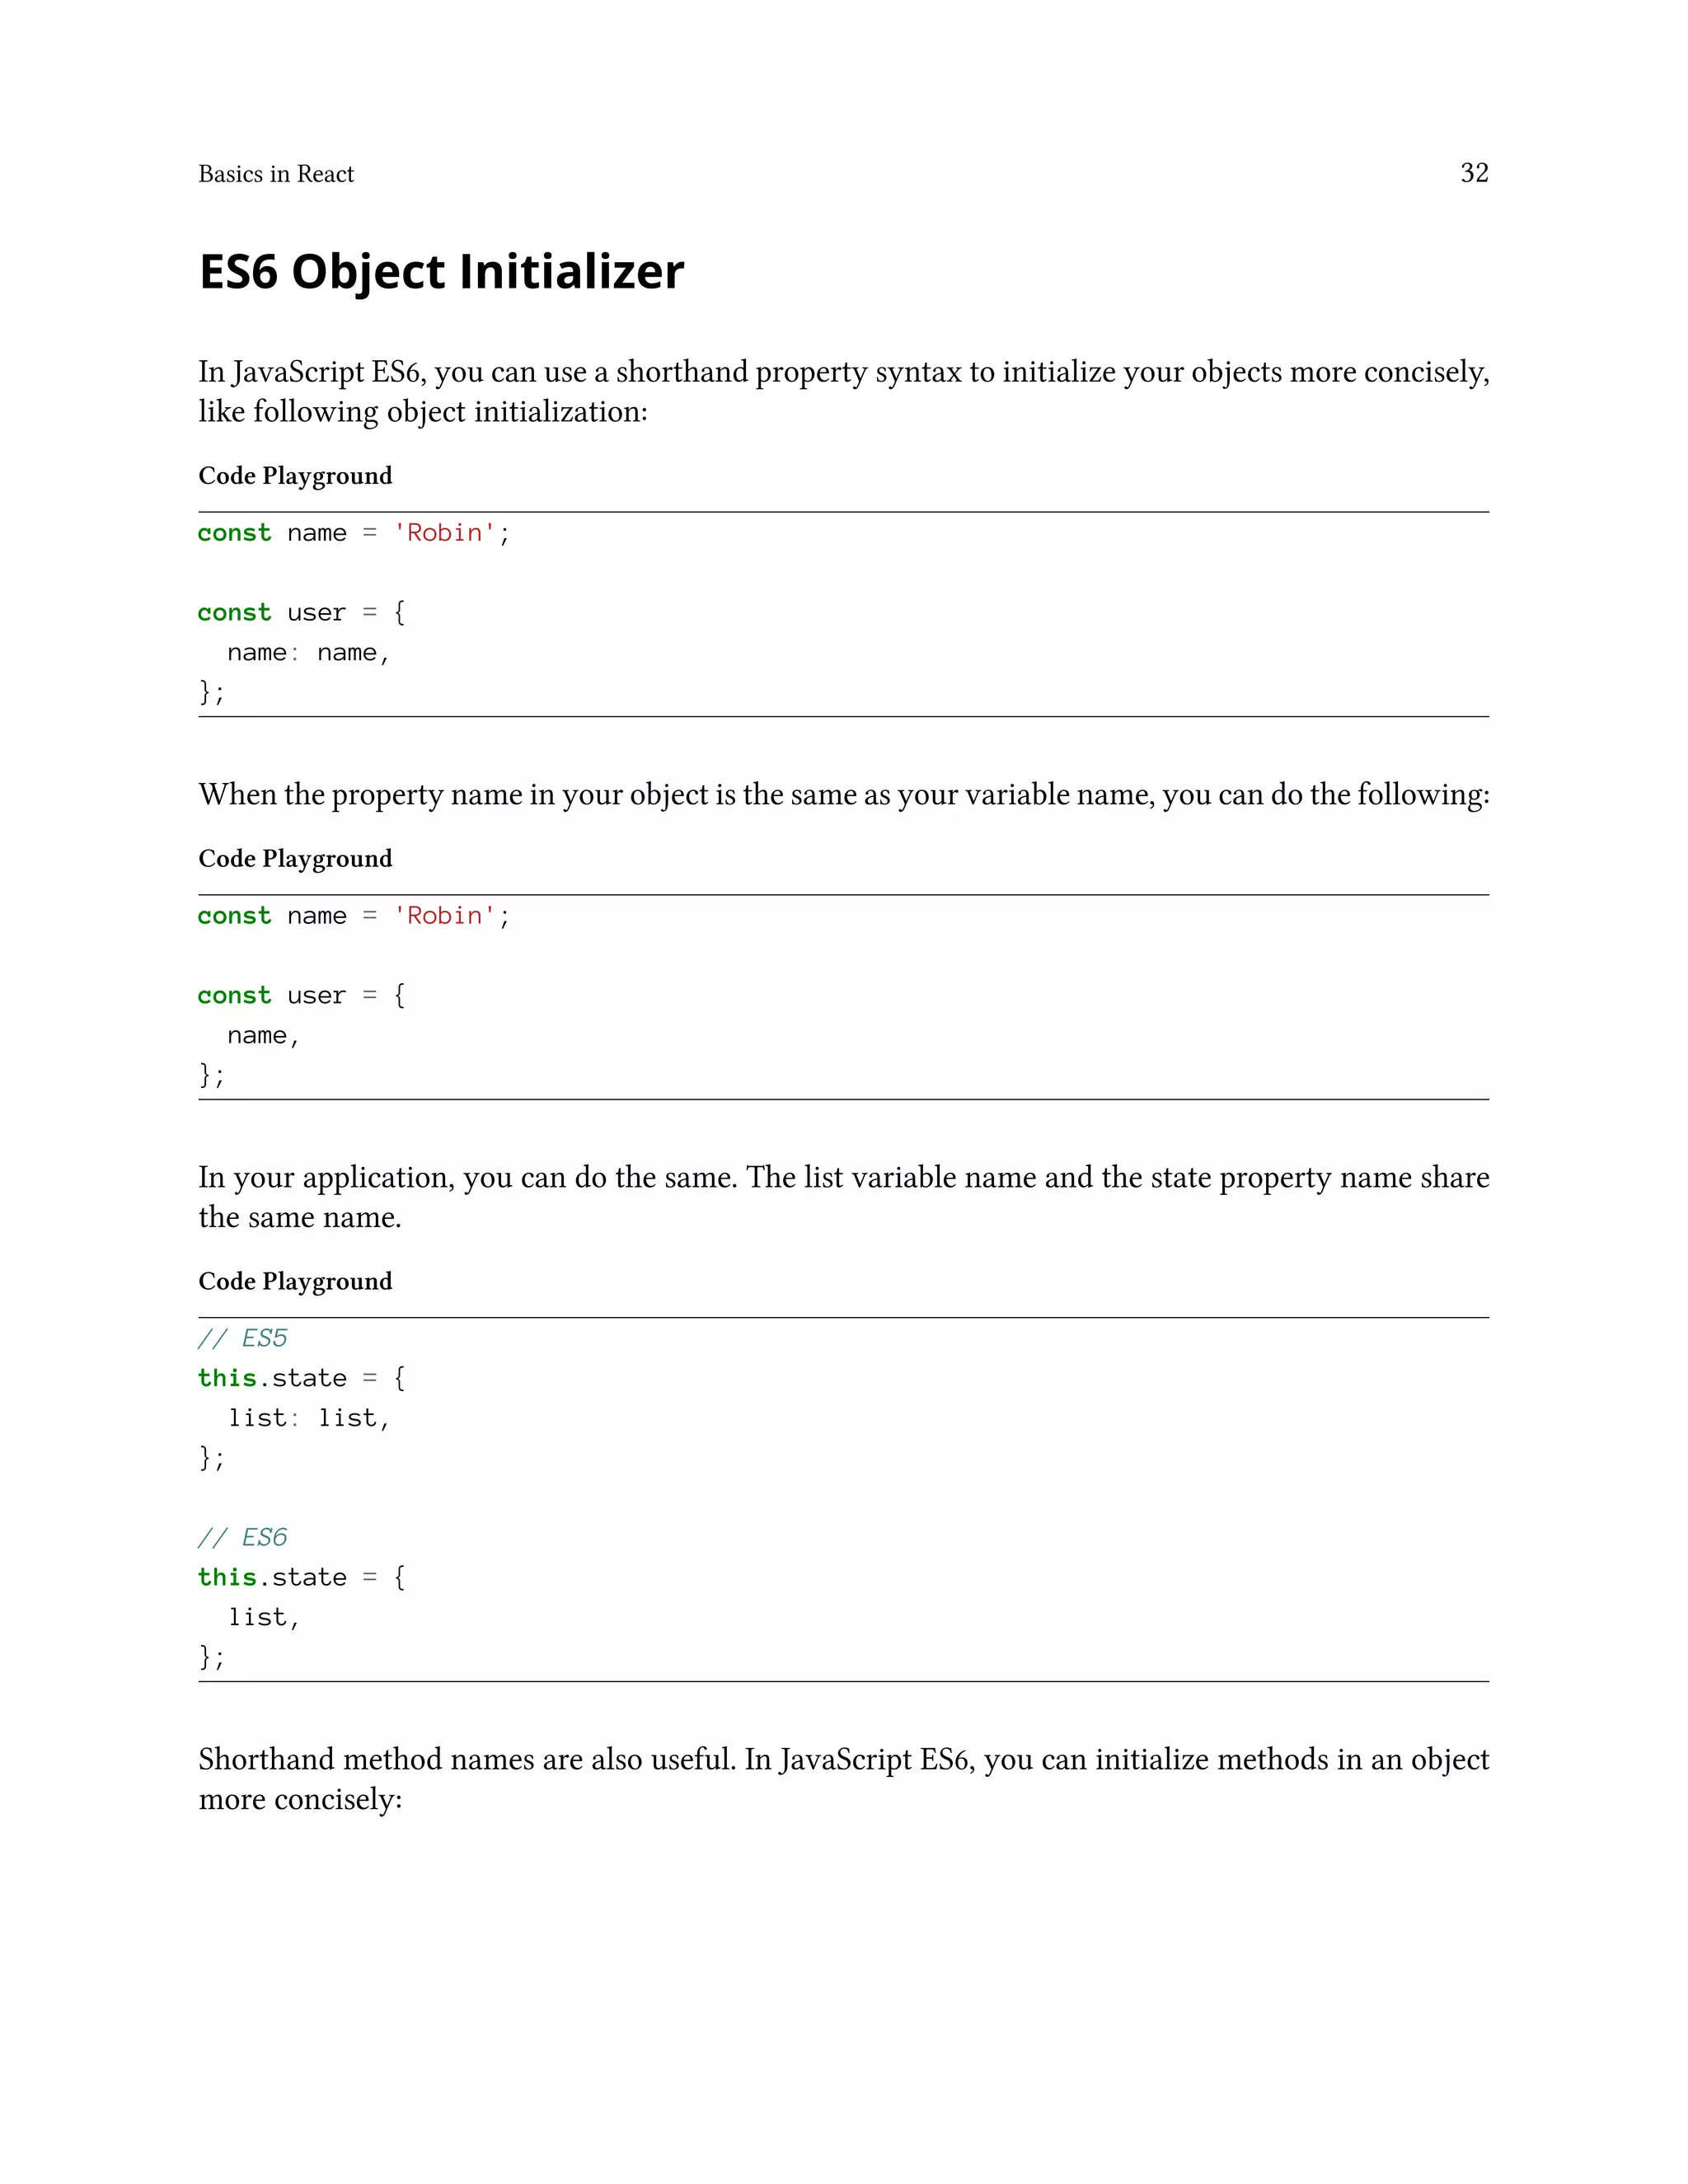
![Basics in React 33
Code Playground
// ES5
var userService = {
getUserName: function (user) {
return user.firstname + ' ' + user.lastname;
},
};
// ES6
const userService = {
getUserName(user) {
return user.firstname + ' ' + user.lastname;
},
};
Finally, you are allowed to use computed property names in JavaScript ES6:
Code Playground
// ES5
var user = {
name: 'Robin',
};
// ES6
const key = 'name';
const user = {
[key]: 'Robin',
};
Later, you will be able to use computed property names to allocate values by key in an object
dynamically, a handy way to generate lookup tables in JavaScript.
Exercises:
• Confirm your source code for the last section⁸²
– Confirm the changes from the last section⁸³
• Experiment with ES6 object initializer
• Read about ES6 object initializer⁸⁴
⁸²http://bit.ly/2H9Ewif
⁸³http://bit.ly/2HadAyX
⁸⁴https://developer.mozilla.org/en/docs/Web/JavaScript/Reference/Operators/Object_initializer](https://image.slidesharecdn.com/the-road-to-learn-react-190414064122/75/The-road-to-learn-react-48-2048.jpg)

![Basics in React 36
src/App.js
class App extends Component {
constructor(props) {
super(props);
this.state = {
list,
};
this.onDismiss = this.onDismiss.bind(this);
}
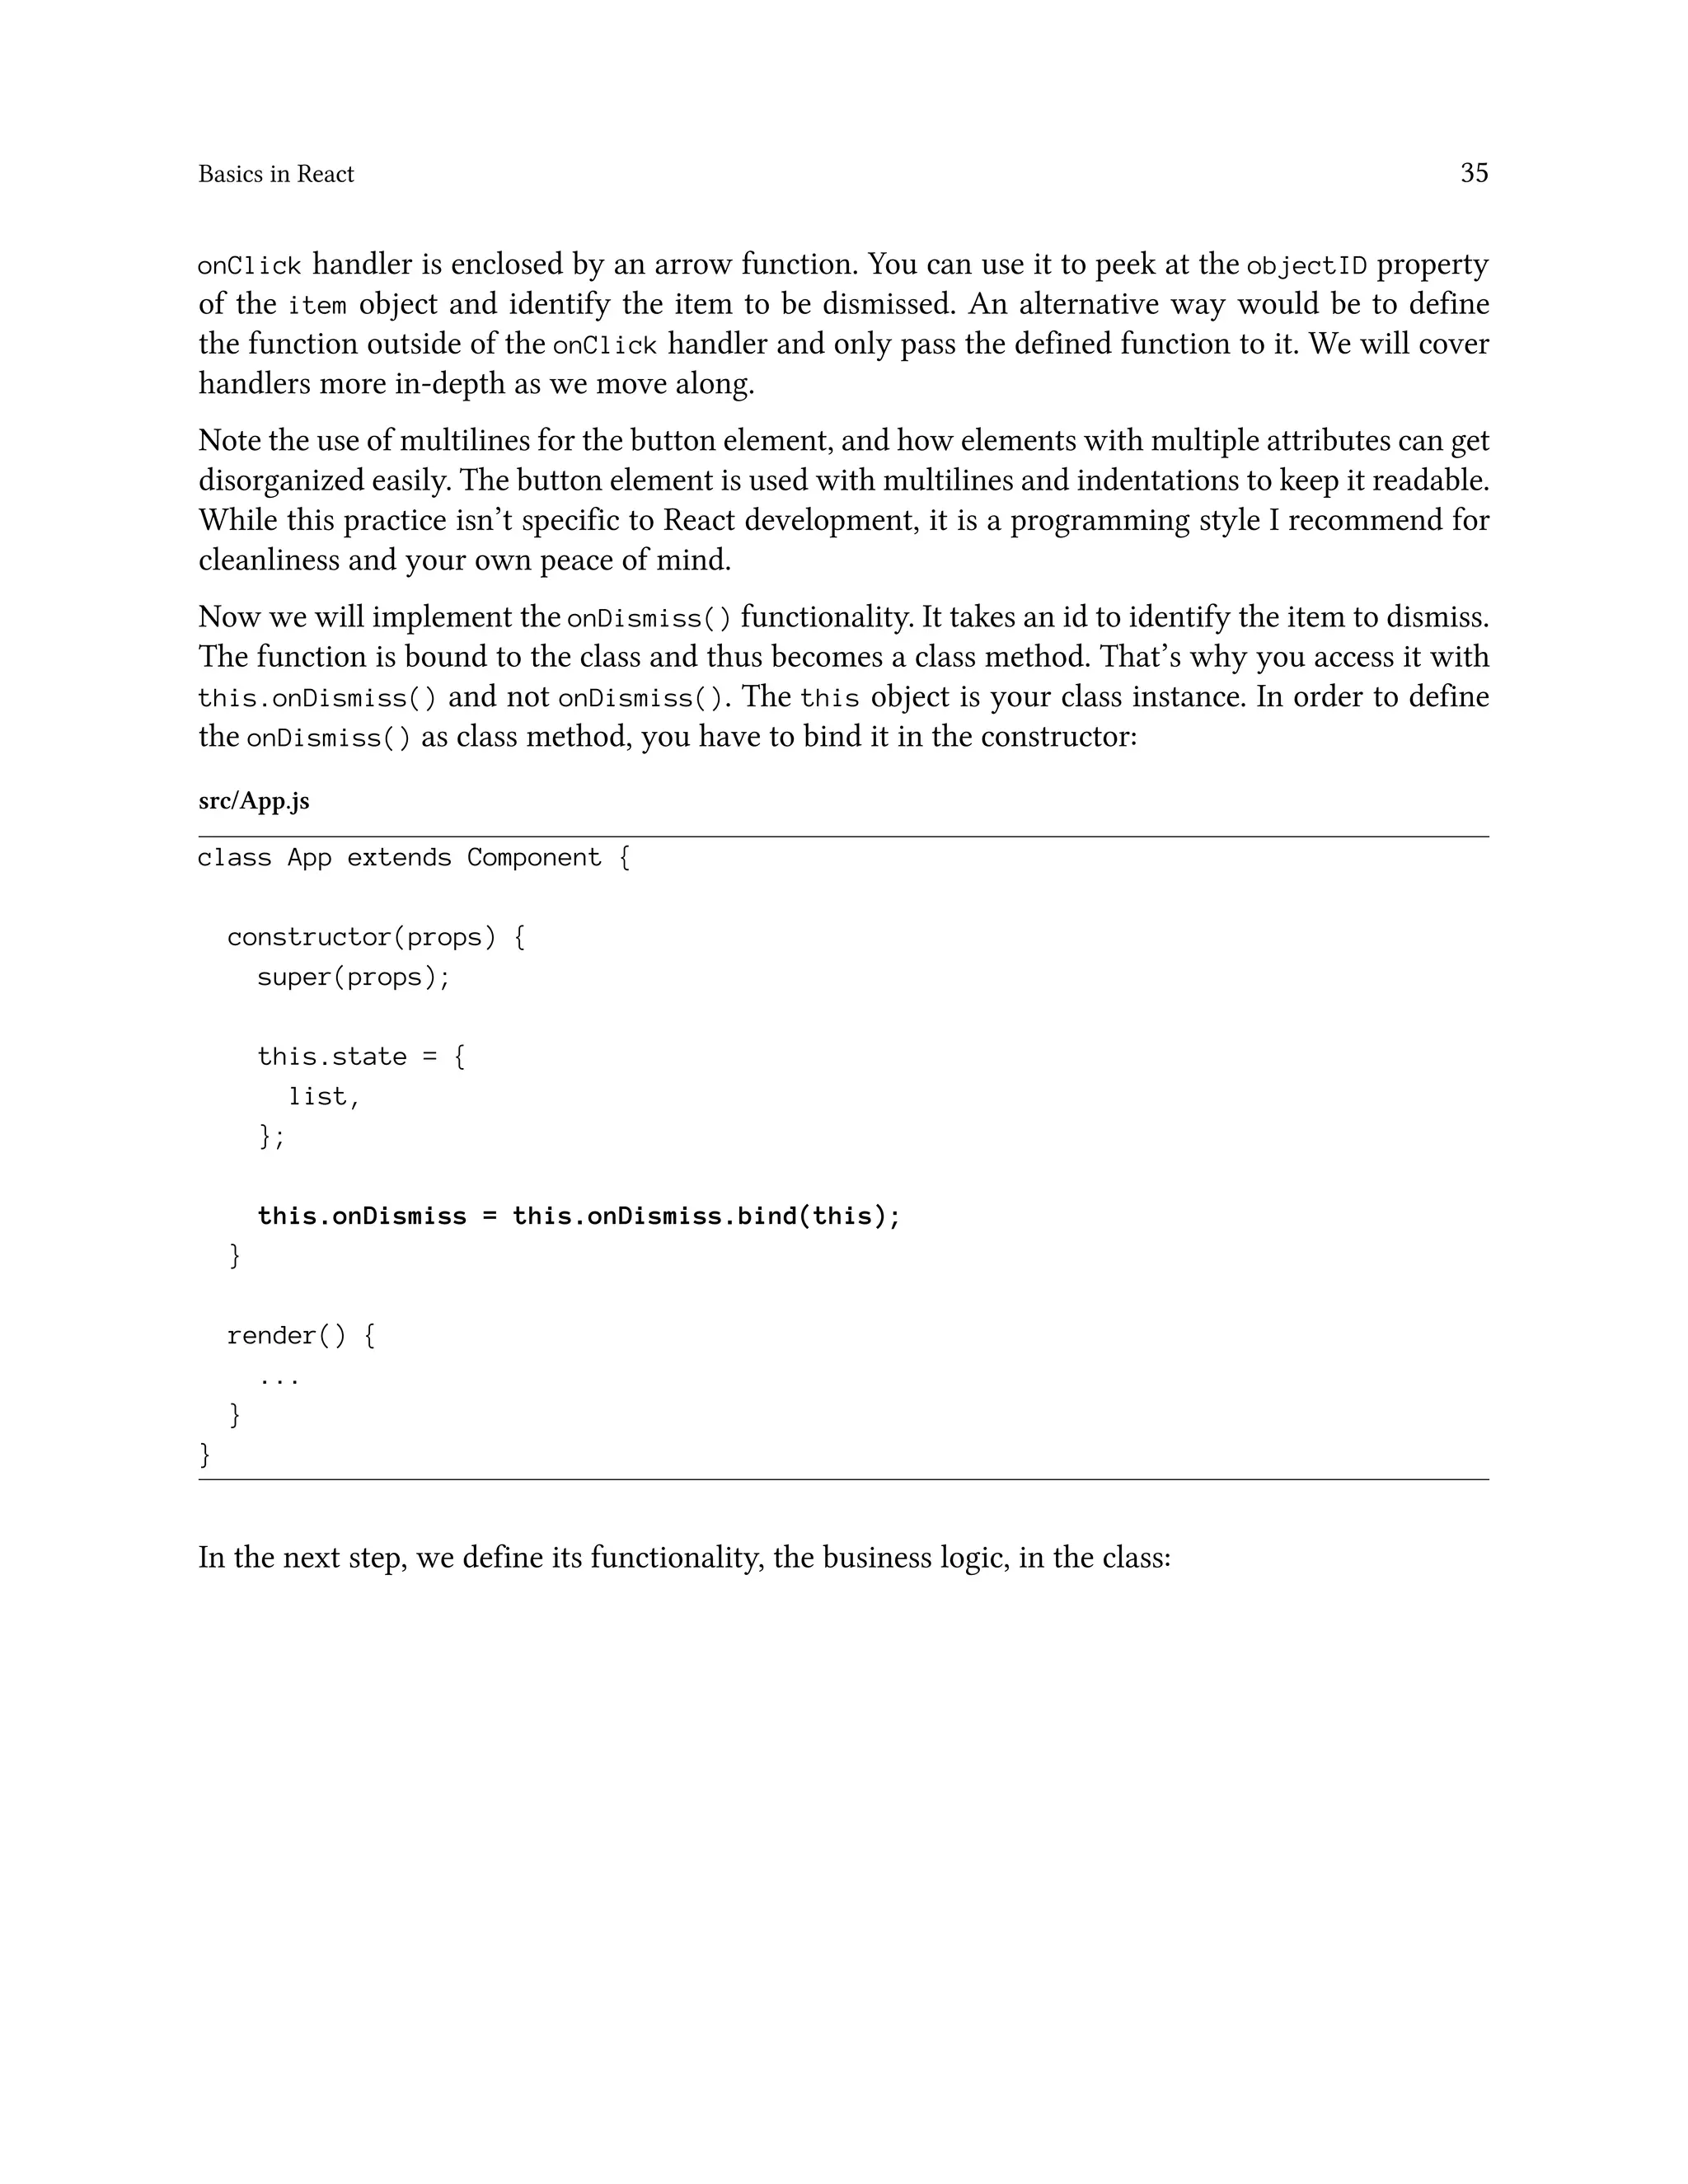
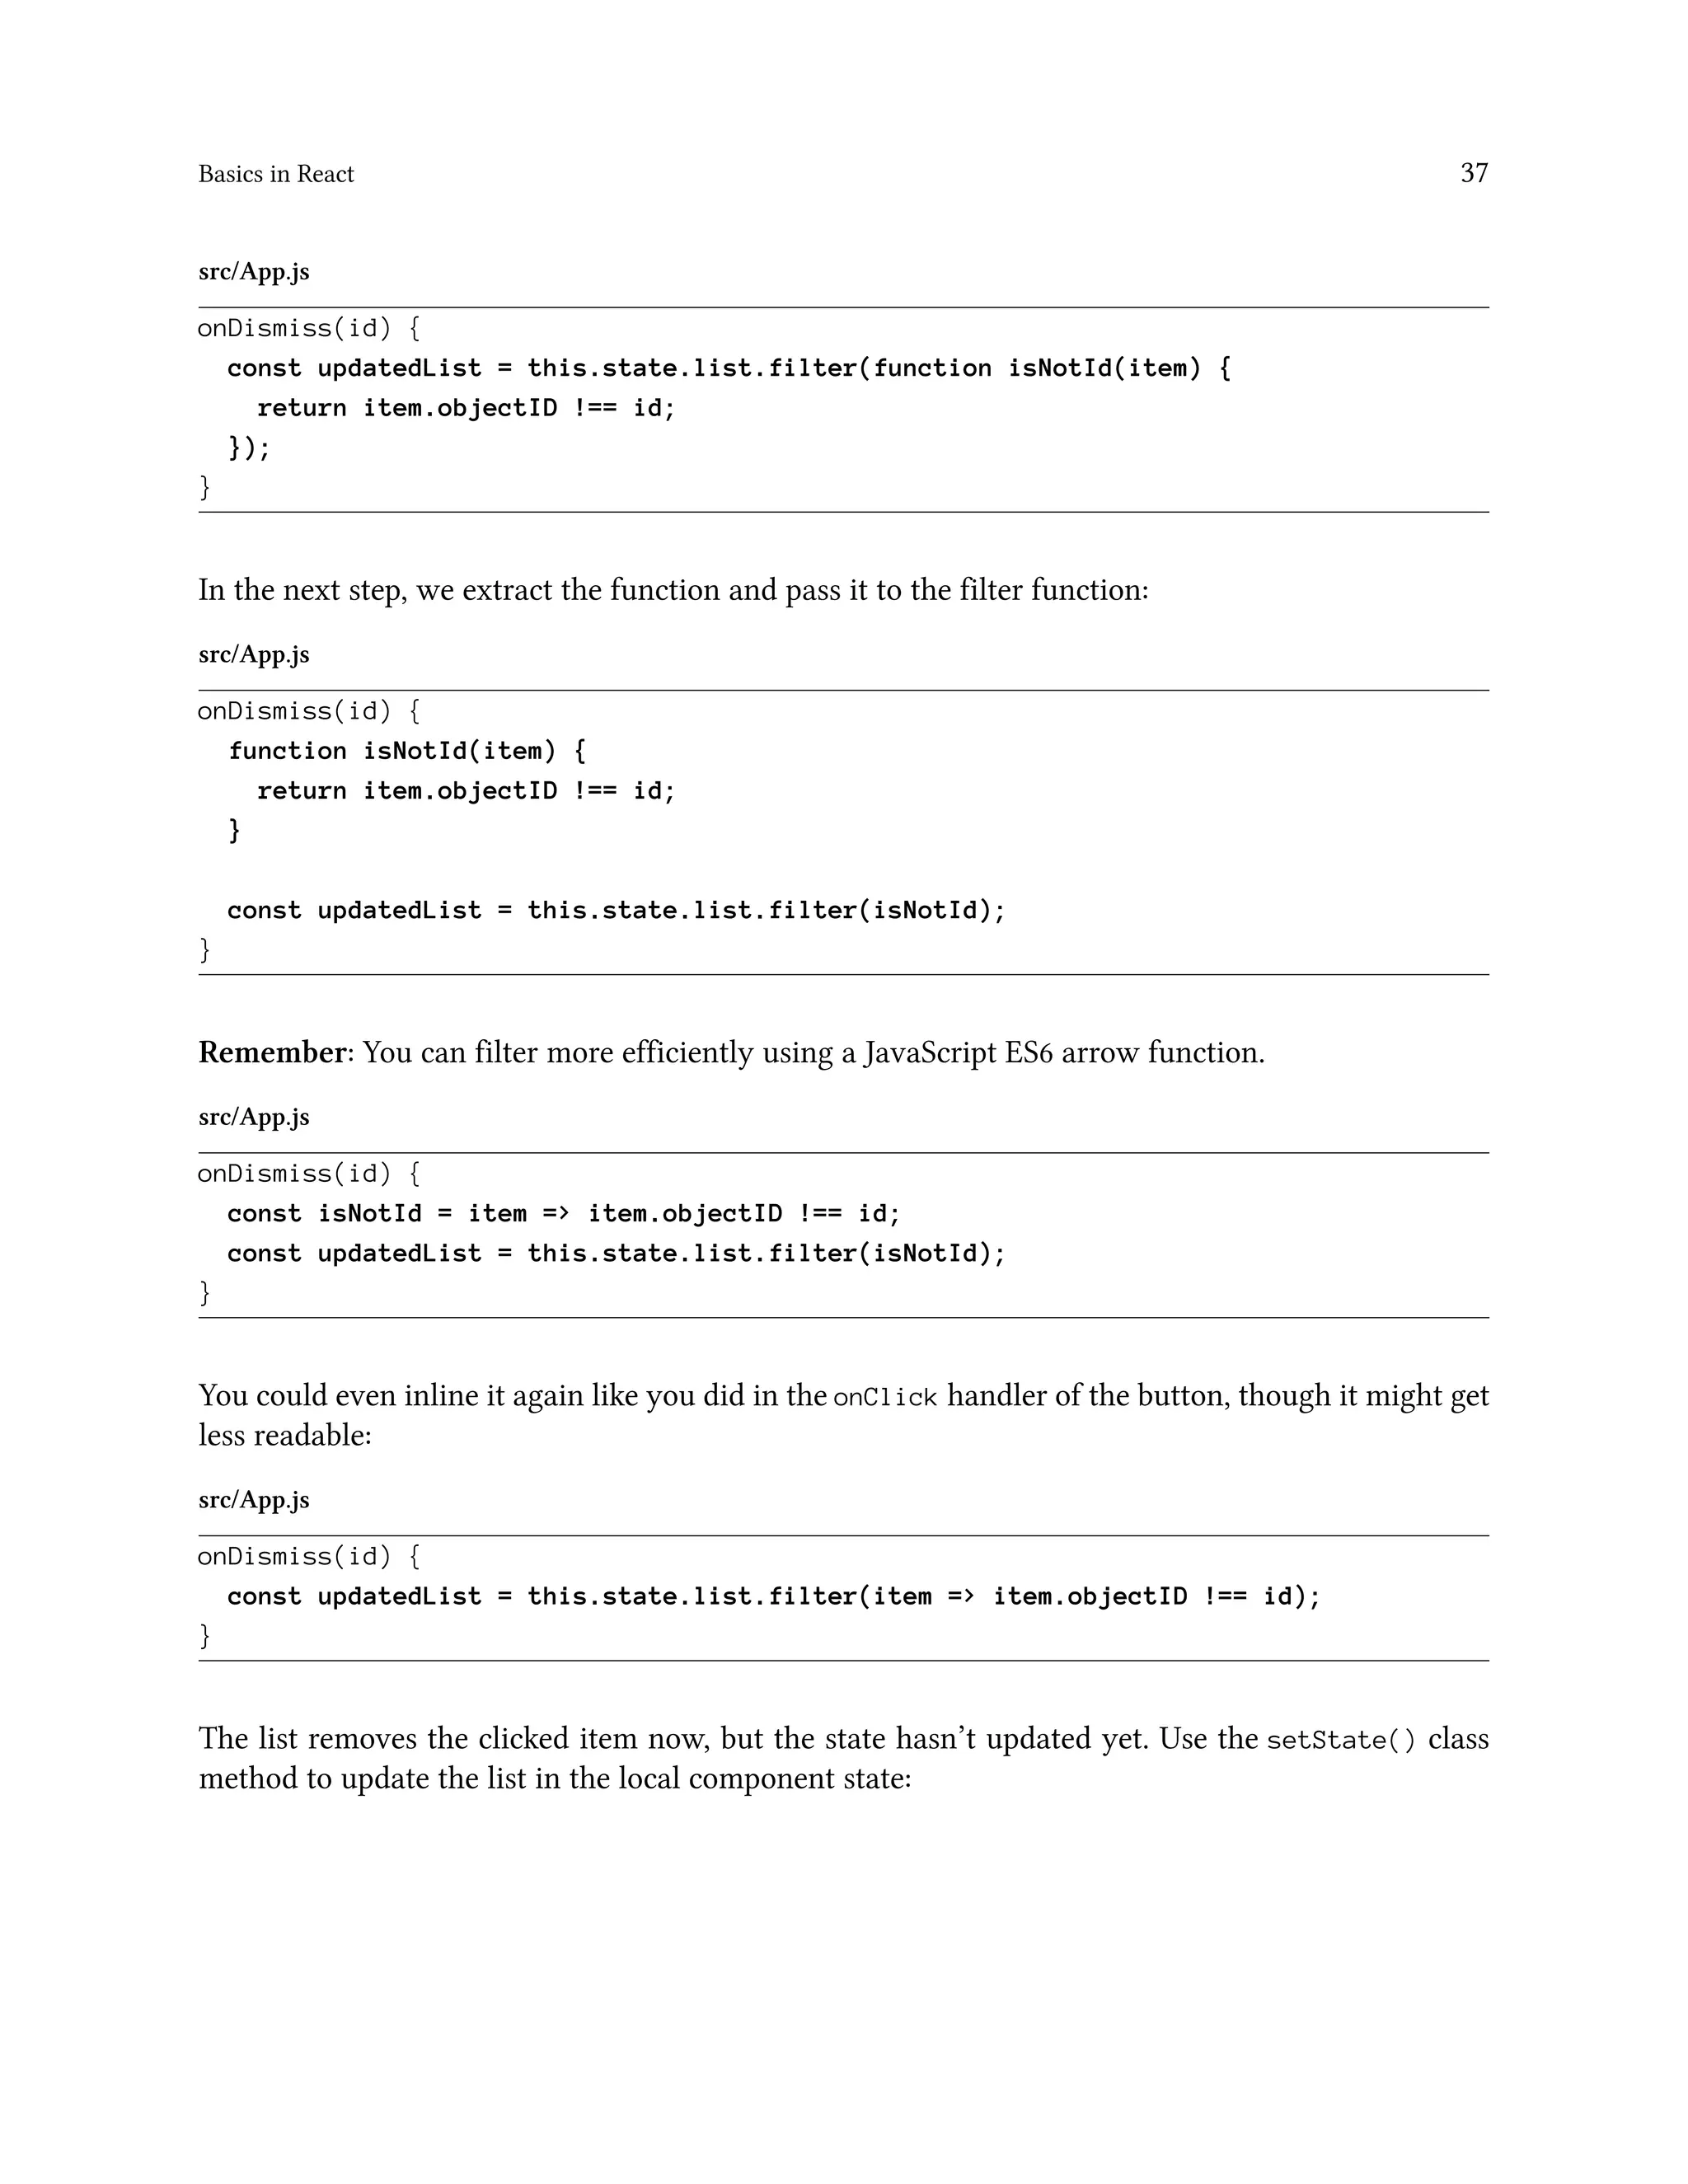
onDismiss(id) {
...
}
render() {
...
}
}
Now we can define what happens inside a class method. Remember, the objective is to remove the
item identified by the id from the list and store an updated list to the local state. The updated list
will be used in the re-running render() method to display it, where the removed item should no
longer appear.
You can remove an item from a list using JavaScript’s built-in filter⁸⁵ functionality, which takes a
function as input. The function has access to each value in the list because it iterates over each item,
so you can evaluate them based on certain conditions.
Code Playground
const words = ['spray', 'limit', 'elite', 'exuberant', 'destruction', 'present'];
const filteredWords = words.filter(function (word) { return word.length > 6; });
console.log(filteredWords);
// expected output: Array ["exuberant", "destruction", "present"]
The function returns a new list instead of mutating the old one, and it supports the React convention
of using immutable data structures.
⁸⁵https://developer.mozilla.org/en-US/docs/Web/JavaScript/Reference/Global_Objects/Array/filter](https://image.slidesharecdn.com/the-road-to-learn-react-190414064122/75/The-road-to-learn-react-51-2048.jpg)


![Basics in React 57
Code Playground
const users = ['Robin', 'Andrew', 'Dan'];
const [
userOne,
userTwo,
userThree
] = users;
console.log(userOne, userTwo, userThree);
// output: Robin Andrew Dan
Note that the local state object in the App component can get destructured the same way. You can
shorten the filter and map line of code.
src/App.js
render() {
const { searchTerm, list } = this.state;
return (
<div className="App">
...
{list.filter(isSearched(searchTerm)).map(item =>
...
)}
</div>
);
You can do it the ES5 or ES6 way:
Code Playground
// ES5
var searchTerm = this.state.searchTerm;
var list = this.state.list;
// ES6
const { searchTerm, list } = this.state;
But since the book uses JavaScript ES6 most of the time, you should stick to it.](https://image.slidesharecdn.com/the-road-to-learn-react-190414064122/75/The-road-to-learn-react-72-2048.jpg)


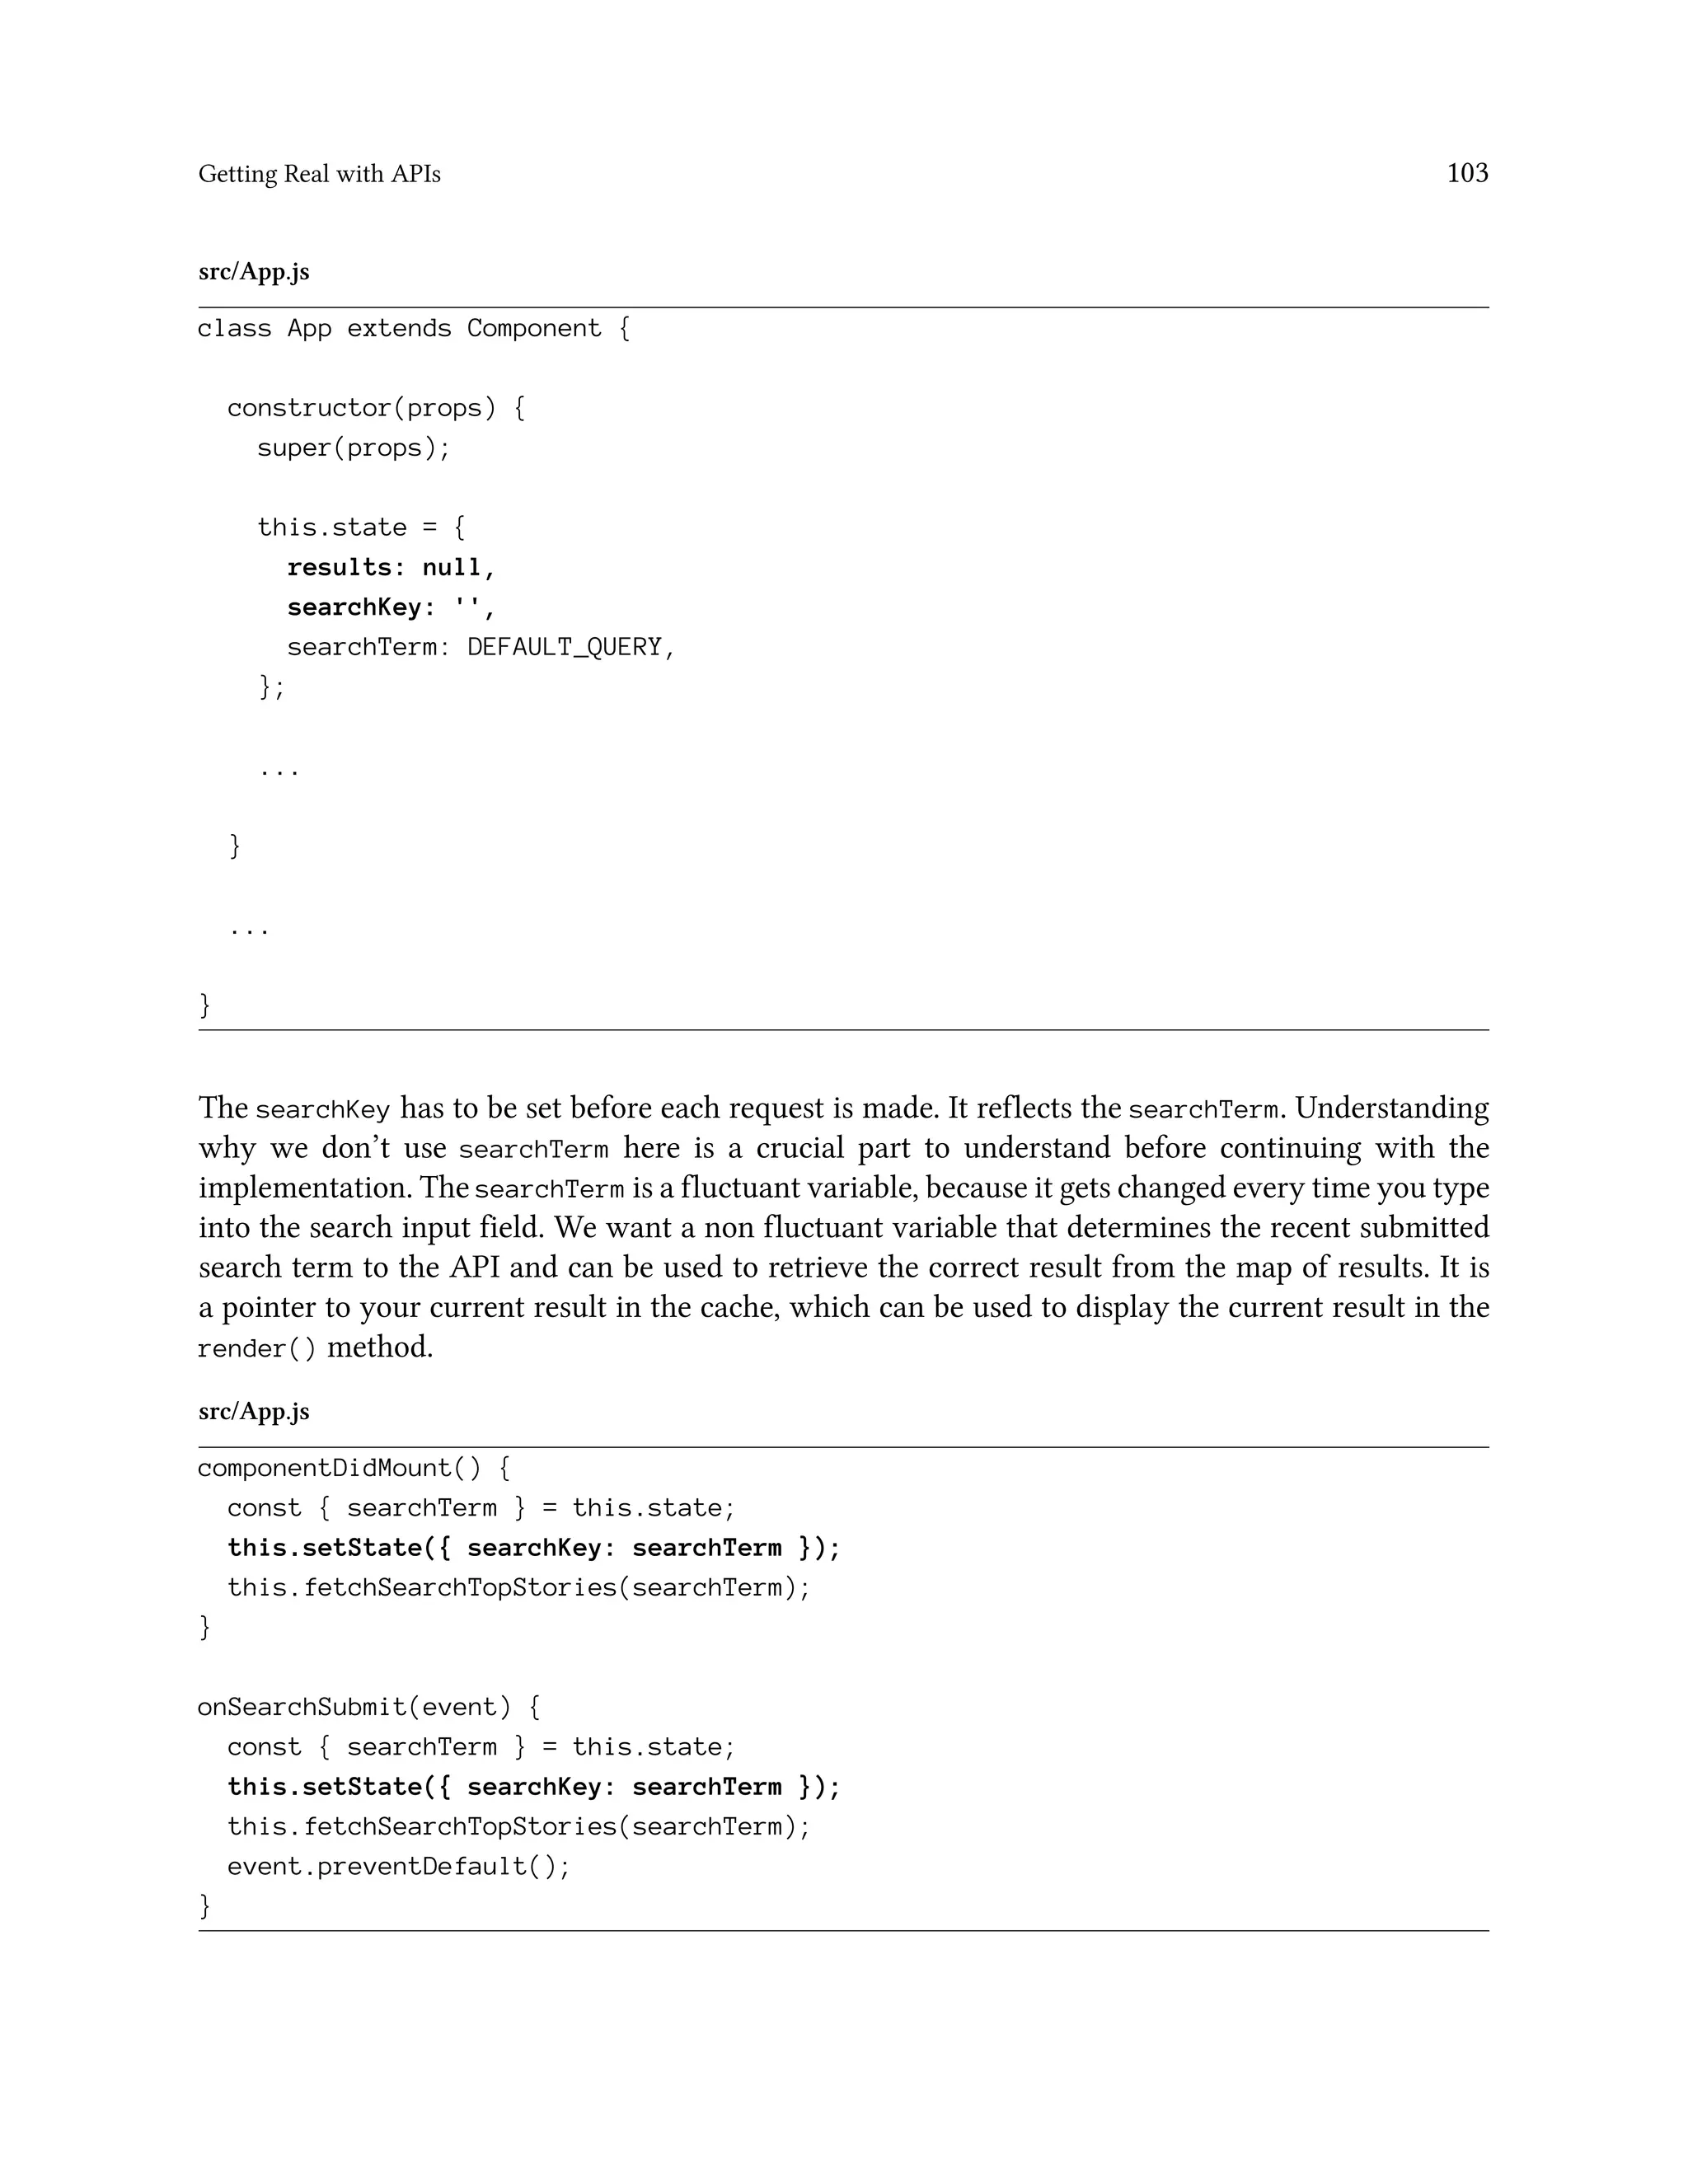
![Getting Real with APIs 88
src/App.js
onDismiss(id) {
const isNotId = item => item.objectID !== id;
const updatedHits = this.state.result.hits.filter(isNotId);
this.setState({
result: Object.assign({}, this.state.result, { hits: updatedHits })
});
}
That’s one solution, but there is a simpler way in JavaScript ES6, called the spread operator. The
spread operator is shown with three dots: ... When it is used, every value from an array or object
gets copied to another array or object.
We’ll examine the ES6 array spread operator even though you don’t need it yet:
Code Playground
const userList = ['Robin', 'Andrew', 'Dan'];
const additionalUser = 'Jordan';
const allUsers = [ ...userList, additionalUser ];
console.log(allUsers);
// output: ['Robin', 'Andrew', 'Dan', 'Jordan']
The allUsers variable is a completely new array. The other variables userList and additionalUser
stay the same. You can even merge two arrays into a new array.
Code Playground
const oldUsers = ['Robin', 'Andrew'];
const newUsers = ['Dan', 'Jordan'];
const allUsers = [ ...oldUsers, ...newUsers ];
console.log(allUsers);
// output: ['Robin', 'Andrew', 'Dan', 'Jordan']
Now let’s have a look at the object spread operator, which is not JavaScript ES6. It is part of a
proposal for a next JavaScript version¹⁴⁰ that is already being used by the React community, which
is why create-react-app incorporated the feature in the configuration. The object spread operator
works just like the JavaScript ES6 array spread operator, except with objects. Each key value pair is
copied into a new object:
¹⁴⁰https://github.com/sebmarkbage/ecmascript-rest-spread](https://image.slidesharecdn.com/the-road-to-learn-react-190414064122/75/The-road-to-learn-react-103-2048.jpg)


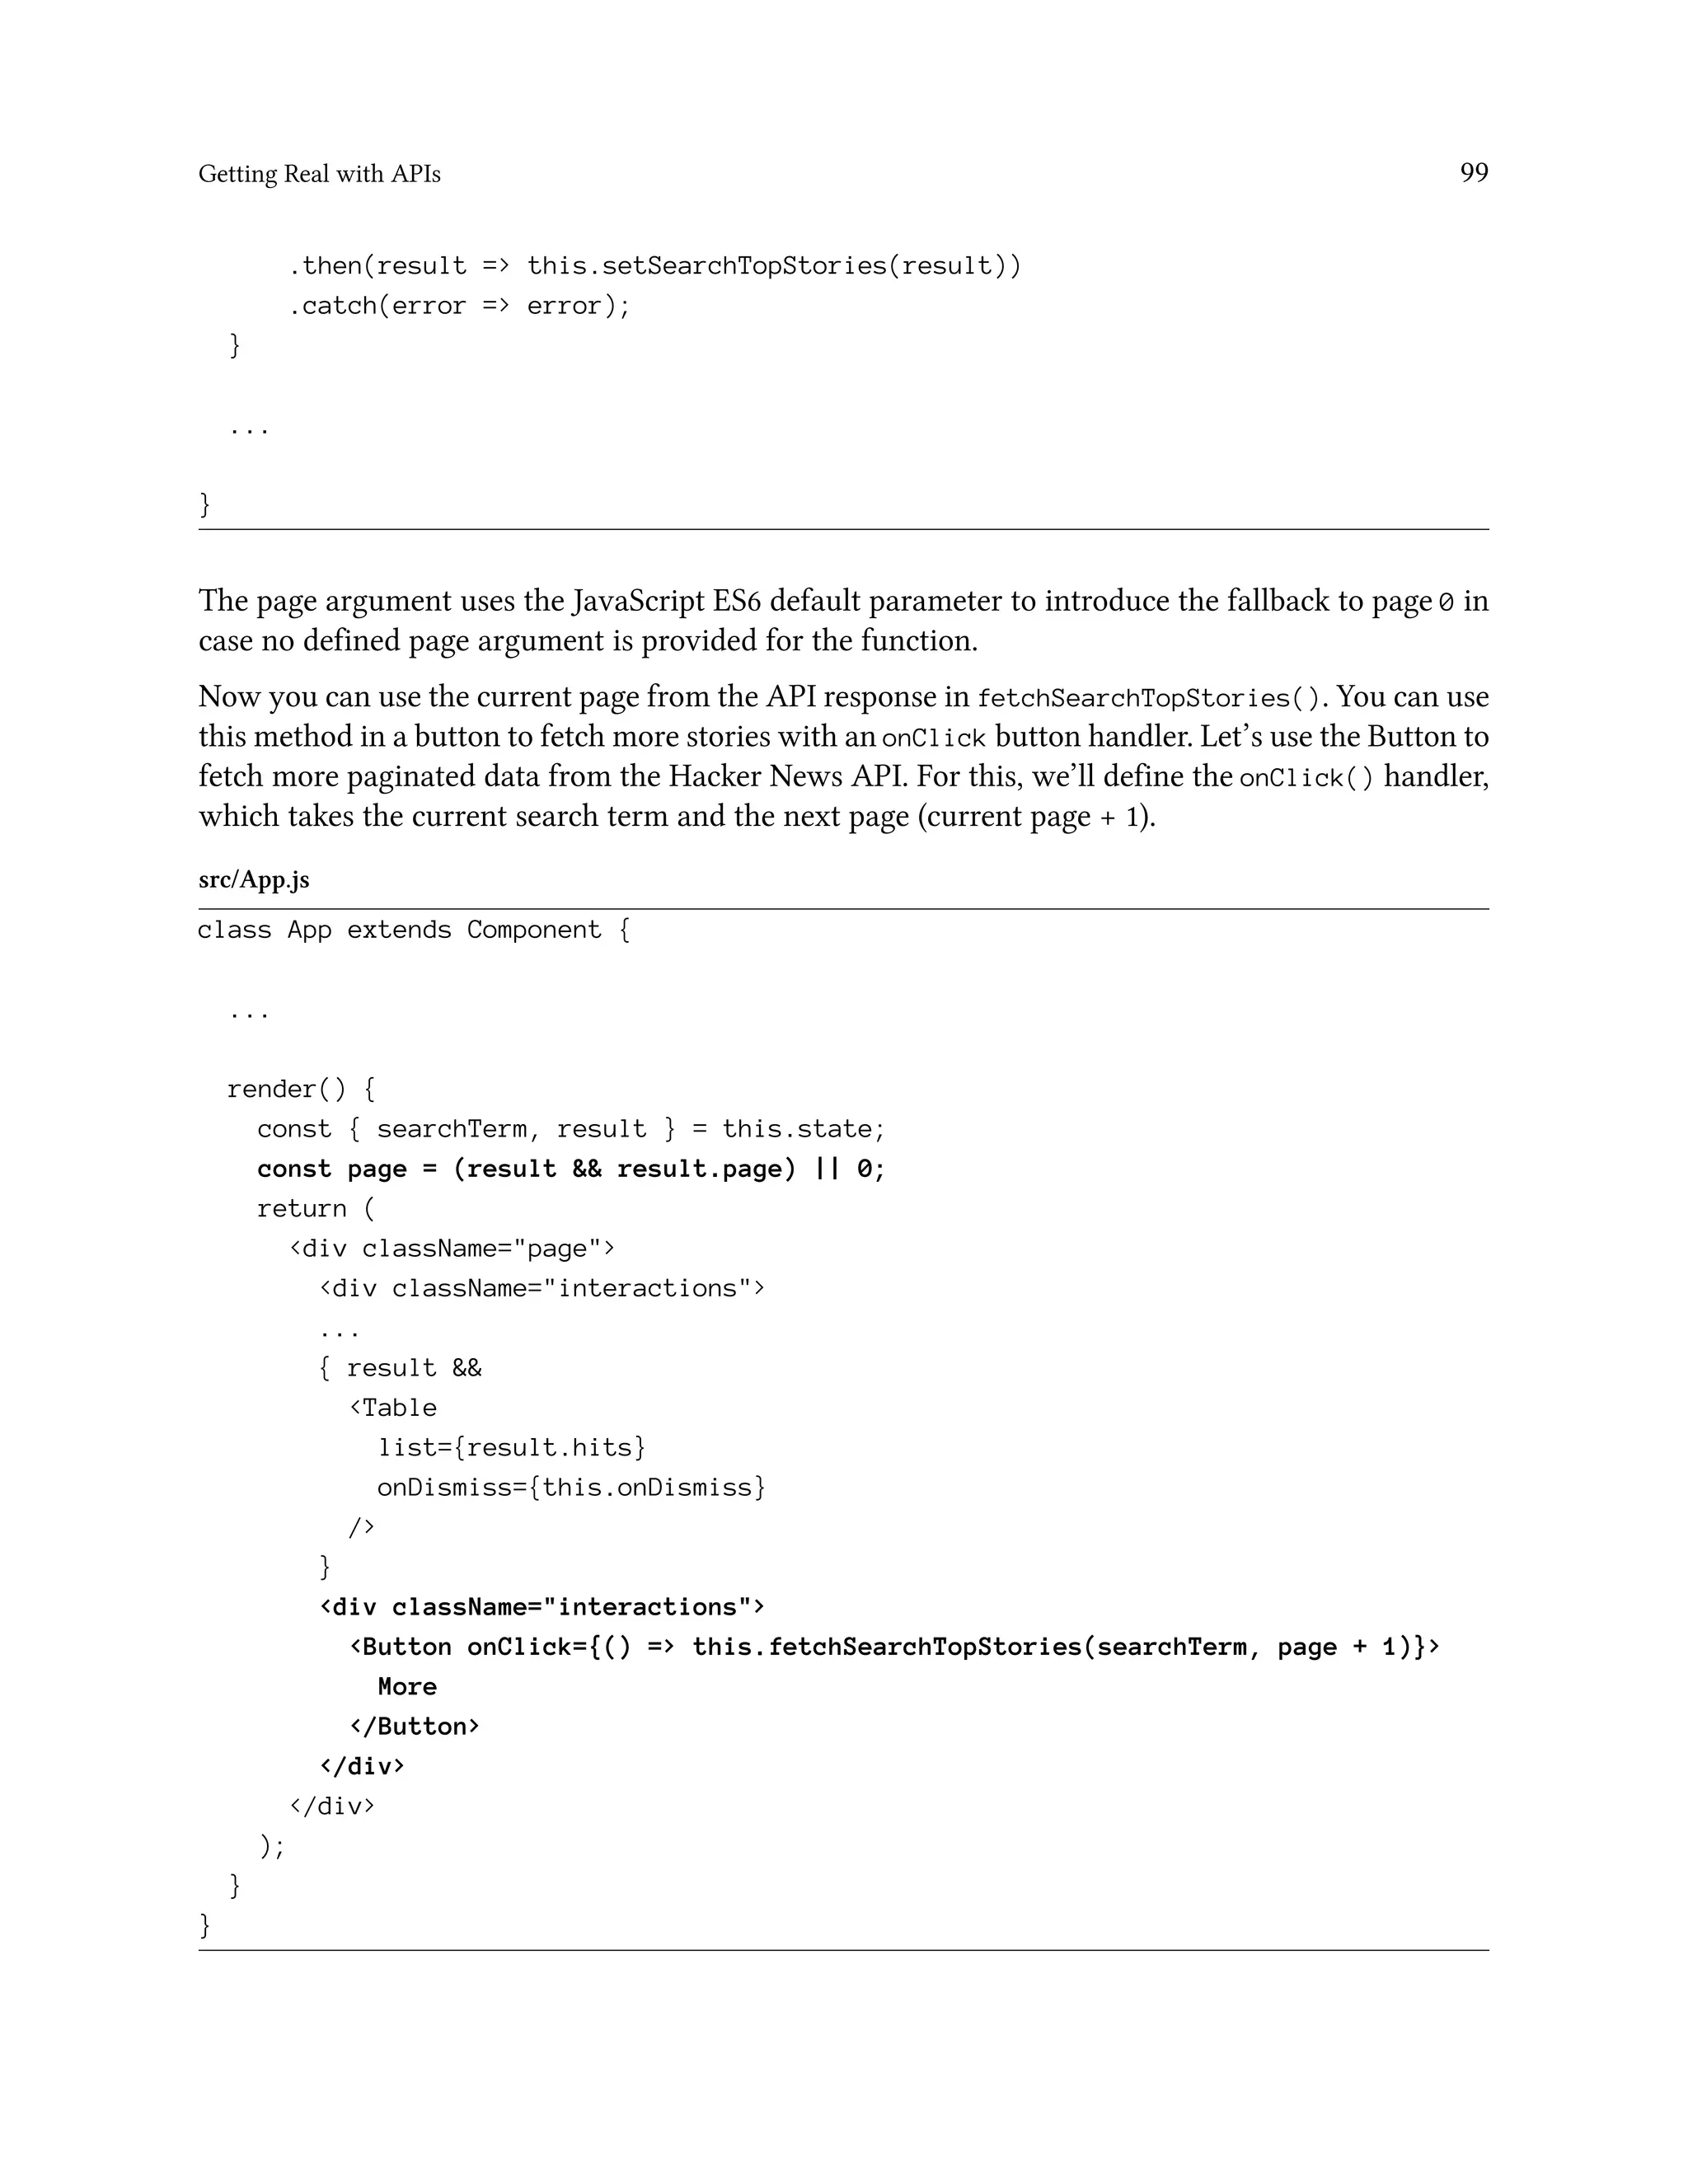
![Getting Real with APIs 100
In your render() method, make sure to default to page 0 when there is no result. Remember, the
render() method is called before the data is fetched asynchronously in the componentDidMount()
lifecycle method.
There is still one step missing, because fetching the next page of data will override your previous
page of data. We want to concatenate the old and new list of hits from the local state and new result
object, so we’ll adjust its functionality to add new data rather than override it.
src/App.js
setSearchTopStories(result) {
const { hits, page } = result;
const oldHits = page !== 0
? this.state.result.hits
: [];
const updatedHits = [
...oldHits,
...hits
];
this.setState({
result: { hits: updatedHits, page }
});
}
A couple things happen in the setSearchTopStories() method now. First, you get the hits and page
from the result.
Second, you have to check if there are already old hits. When the page is 0, it is a new search request
from componentDidMount() or onSearchSubmit(). The hits are empty. But when you click the “More”
button to fetch paginated data the page isn’t 0. The old hits are already stored in your state and thus
can be used.
Third, you don’t want to override the old hits. You can merge old and new hits from the recent API
request, which can be done with a JavaScript ES6 array spread operator.
Fourth, you set the merged hits and page in the local component state.
Now we’ll make one last adjustment. When you try the “More” button it only fetches a few list
items. The API URL can be extended to fetch more list items with each request, so we add even
more composable path constants:](https://image.slidesharecdn.com/the-road-to-learn-react-190414064122/75/The-road-to-learn-react-115-2048.jpg)
![Getting Real with APIs 102
Client Cache
Each search submit makes a request to the Hacker News API. You might search for “redux”, followed
by “react” and eventually “redux” again. In total it makes 3 requests. But you searched for “redux”
twice and both times it took a whole asynchronous roundtrip to fetch the data. In a client-sided
cache, you would store each result. When a request to the API is made, it checks if a result is already
there and uses the cache if it is. Otherwise an API request is made to fetch the data.
To have a client cache for each result, you have to store multiple results rather than one result
in your local component state. The results object will be a map with the search term as key and the
result as value. Each result from the API will be saved by the search term (key).
At the moment, your result in the local state looks like this:
Code Playground
result: {
hits: [ ... ],
page: 2,
}
Imagine you have made two API requests. One for the search term “redux” and another one for
“react”. The results object should look like the following:
Code Playground
results: {
redux: {
hits: [ ... ],
page: 2,
},
react: {
hits: [ ... ],
page: 1,
},
...
}
Let’s implement a client-side cache with React setState(). First, rename the result object to
results in the initial component state. Second, define a temporary searchKey to store each result.](https://image.slidesharecdn.com/the-road-to-learn-react-190414064122/75/The-road-to-learn-react-117-2048.jpg)
![Getting Real with APIs 104
Now we will change where the result is stored to the local component state. It should store each
result by searchKey.
src/App.js
class App extends Component {
...
setSearchTopStories(result) {
const { hits, page } = result;
const { searchKey, results } = this.state;
const oldHits = results && results[searchKey]
? results[searchKey].hits
: [];
const updatedHits = [
...oldHits,
...hits
];
this.setState({
results: {
...results,
[searchKey]: { hits: updatedHits, page }
}
});
}
...
}
The searchKey will be used as the key to save the updated hits and page in a results map.
First, you have to retrieve the searchKey from the component state. Remember that the searchKey
gets set on componentDidMount() and onSearchSubmit().
Second, the old hits have to get merged with the new hits as before. But this time the old hits get
retrieved from the results map with the searchKey as key.
Third, a new result can be set in the results map in the state. Let’s examine the results object in
setState().](https://image.slidesharecdn.com/the-road-to-learn-react-190414064122/75/The-road-to-learn-react-119-2048.jpg)
![Getting Real with APIs 105
src/App.js
results: {
...results,
[searchKey]: { hits: updatedHits, page }
}
The bottom part makes sure to store the updated result by searchKey in the results map. The value
is an object with a hits and page property. The searchKey is the search term. You already learned
the [searchKey]: ... syntax. It is an ES6 computed property name. It helps you allocate values
dynamically in an object.
The upper part needs to spread all other results by searchKey in the state using the object spread
operator. Otherwise, you would lose all results that you have stored before.
Now you store all results by search term. That’s the first step to enable your cache. In the next
step, you can retrieve the result depending on the non fluctuant searchKey from your map of
results. That’s why you had to introduce the searchKey in the first place as non fluctuant variable.
Otherwise, the retrieval would be broken when you would use the fluctuant searchTerm to retrieve
the current result, because this value might change when we use the Search component.
src/App.js
class App extends Component {
...
render() {
const {
searchTerm,
results,
searchKey
} = this.state;
const page = (
results &&
results[searchKey] &&
results[searchKey].page
) || 0;
const list = (
results &&
results[searchKey] &&
results[searchKey].hits
) || [];](https://image.slidesharecdn.com/the-road-to-learn-react-190414064122/75/The-road-to-learn-react-120-2048.jpg)
![Getting Real with APIs 106
return (
<div className="page">
<div className="interactions">
...
</div>
<Table
list={list}
onDismiss={this.onDismiss}
/>
<div className="interactions">
<Button onClick={() => this.fetchSearchTopStories(searchKey, page + 1)}>
More
</Button>
</div>
</div>
);
}
}
Since you default to an empty list when there is no result by searchKey, you can spare the conditional
rendering for the Table component. Additionally, we need to pass the searchKey rather than the
searchTerm to the “More” button. Otherwise, your paginated fetch depends on the searchTerm value
which is fluctuant. Moreover make sure to keep the fluctuant searchTerm property for the input field
in the Search component.
The search functionality should store all results from the Hacker News API now.
Now, we can see the onDismiss() method needs improvement, as it still deals with the result object.
We want it deal with multiple results:
src/App.js
onDismiss(id) {
const { searchKey, results } = this.state;
const { hits, page } = results[searchKey];
const isNotId = item => item.objectID !== id;
const updatedHits = hits.filter(isNotId);
this.setState({
results: {
...results,
[searchKey]: { hits: updatedHits, page }
}](https://image.slidesharecdn.com/the-road-to-learn-react-190414064122/75/The-road-to-learn-react-121-2048.jpg)
![Getting Real with APIs 107
});
}
Check to make sure the “Dismiss” button is working again.
Note that nothing will stop the application from sending an API request on each search submit.
Though there might be already a result, there is no check that prevents the request, so the cache
functionality is not complete yet. It caches the results, but it doesn’t make use of them. The last step
is to prevent the API request when a result is available in the cache:
src/App.js
class App extends Component {
constructor(props) {
...
this.needsToSearchTopStories = this.needsToSearchTopStories.bind(this);
this.setSearchTopStories = this.setSearchTopStories.bind(this);
this.fetchSearchTopStories = this.fetchSearchTopStories.bind(this);
this.onSearchChange = this.onSearchChange.bind(this);
this.onSearchSubmit = this.onSearchSubmit.bind(this);
this.onDismiss = this.onDismiss.bind(this);
}
needsToSearchTopStories(searchTerm) {
return !this.state.results[searchTerm];
}
...
onSearchSubmit(event) {
const { searchTerm } = this.state;
this.setState({ searchKey: searchTerm });
if (this.needsToSearchTopStories(searchTerm)) {
this.fetchSearchTopStories(searchTerm);
}
event.preventDefault();
}
...](https://image.slidesharecdn.com/the-road-to-learn-react-190414064122/75/The-road-to-learn-react-122-2048.jpg)


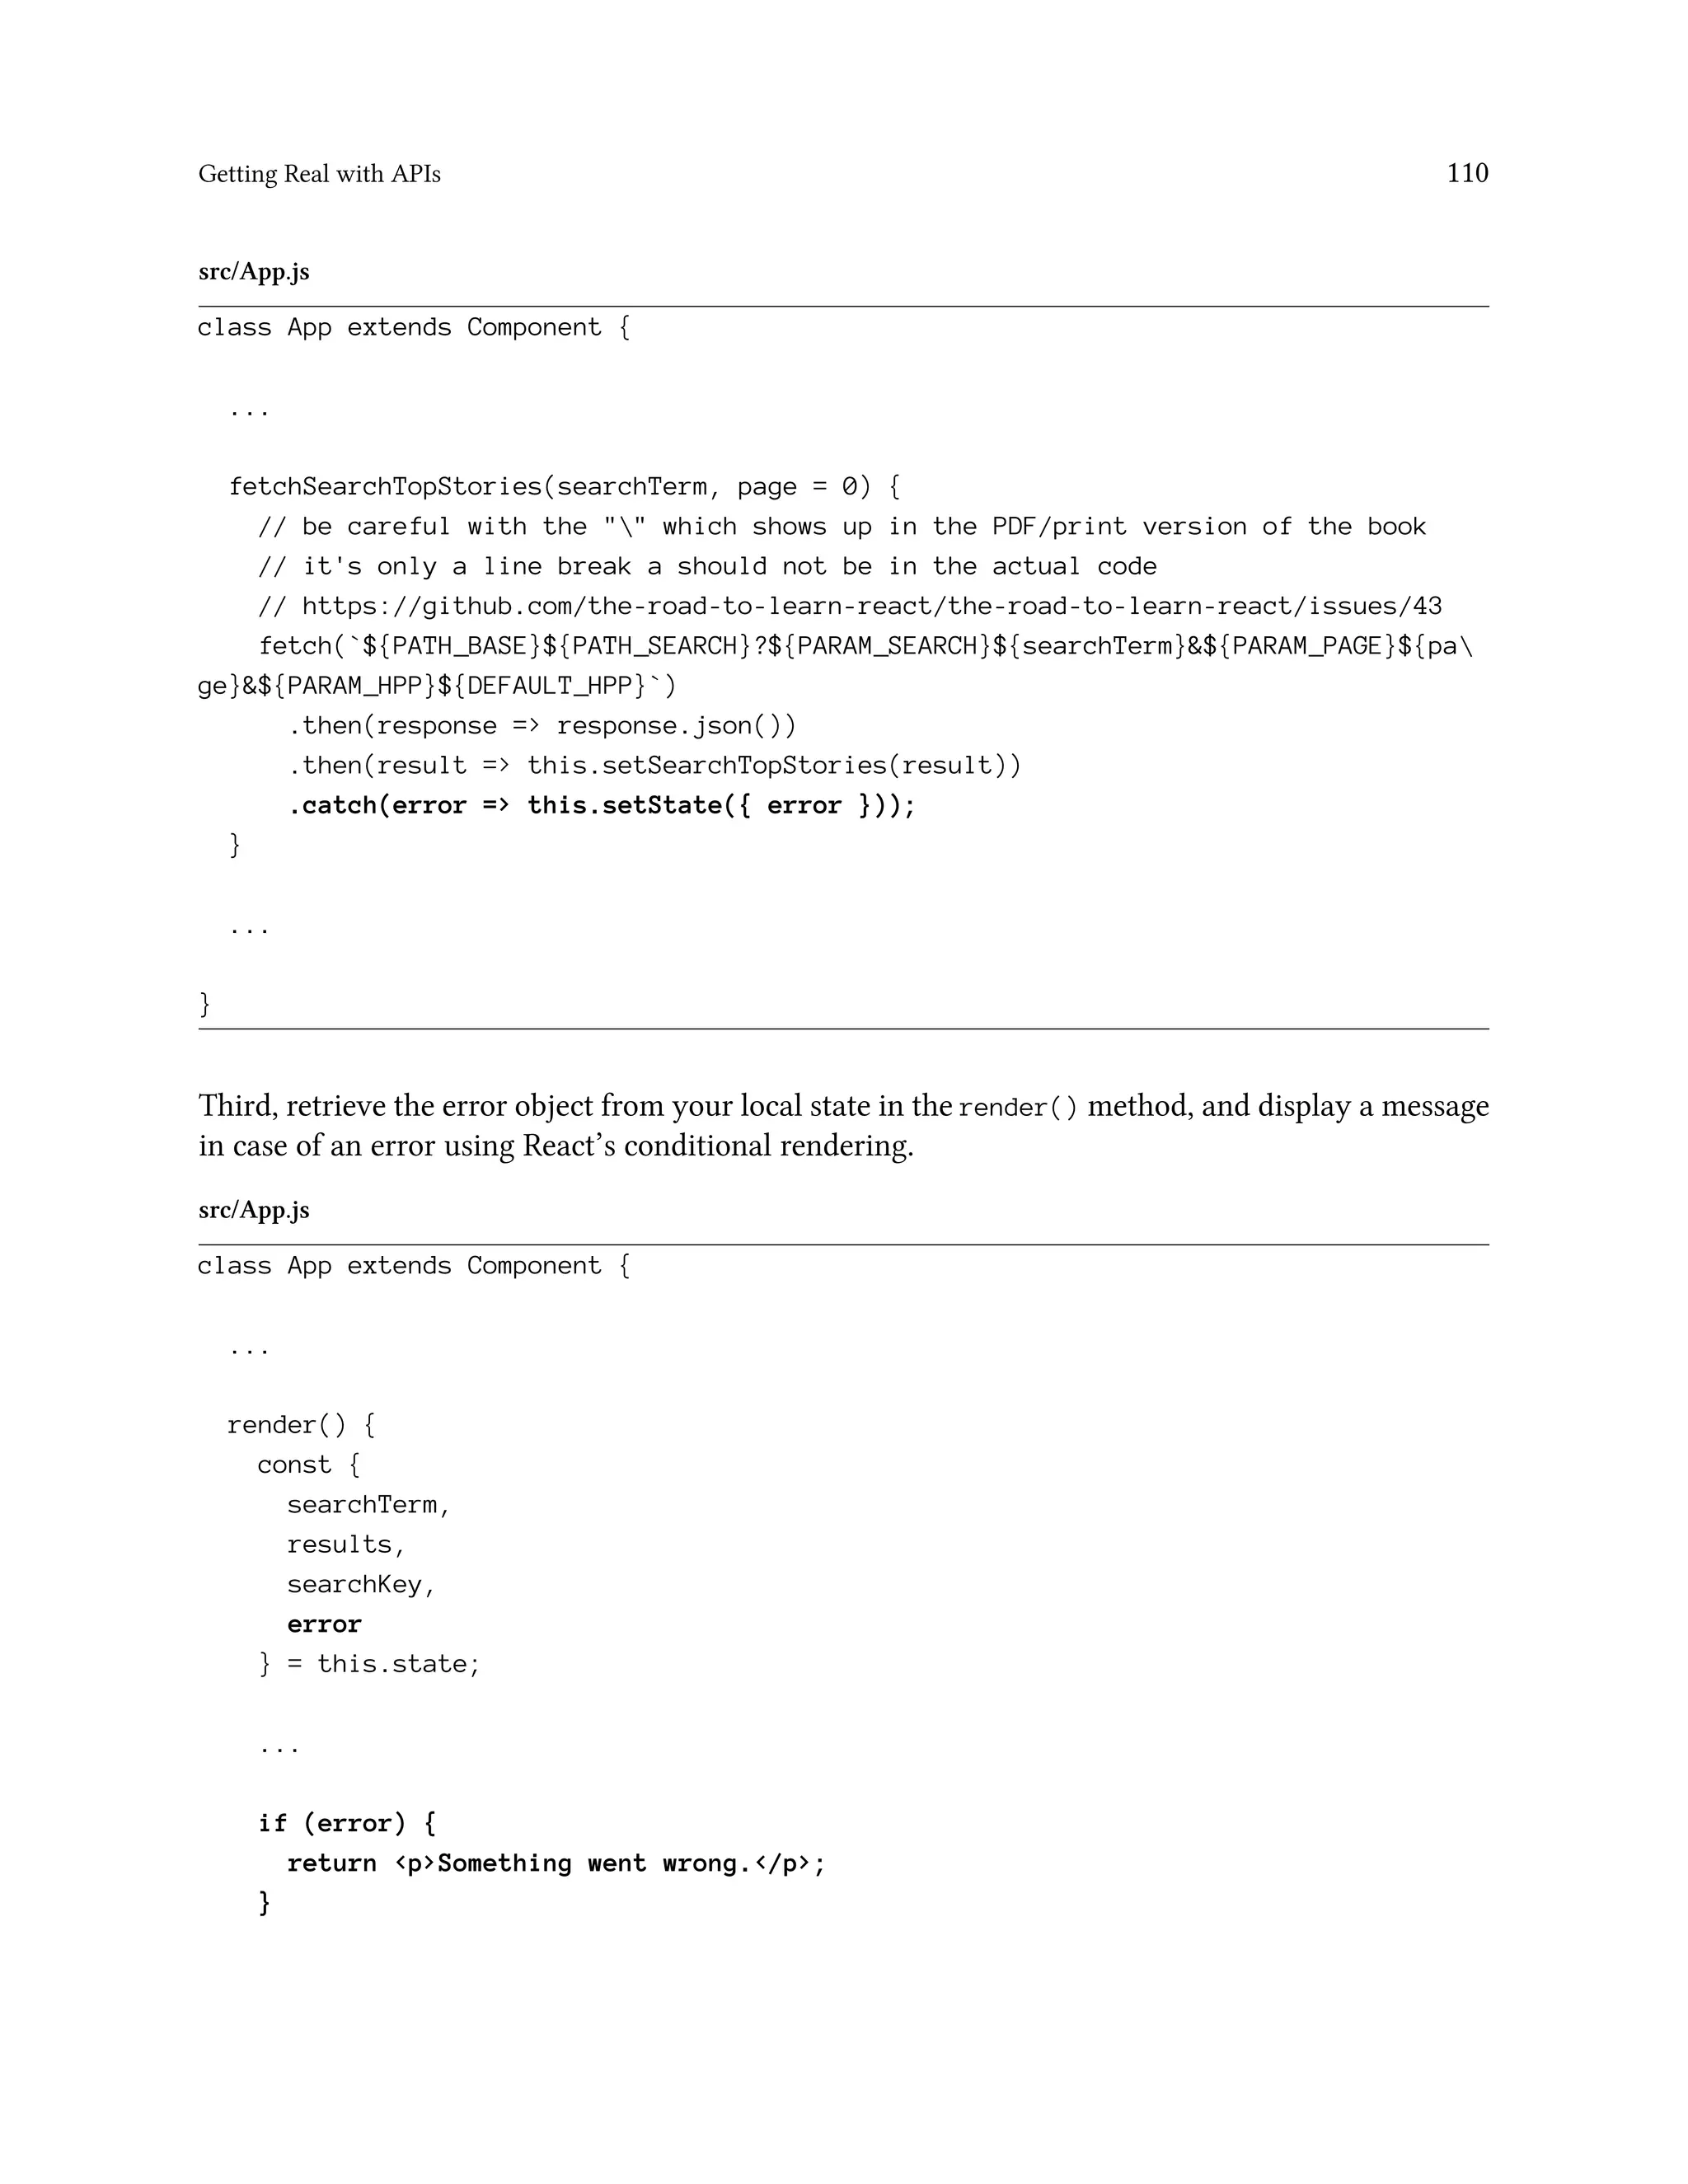
![Getting Real with APIs 111
return (
<div className="page">
...
</div>
);
}
}
If you want to test that your error handling is working, change the API URL to something non-
existent to force an error.
src/App.js
const PATH_BASE = 'https://hn.mydomain.com/api/v1';
Now you should see an error message instead of your application. It’s up to you where you want
to place the conditional rendering for the error message. In this case, the app is overridden by the
error message, but that wouldn’t be the best user experience. The remaining application would still
be visible so the user knows it’s still running:
src/App.js
class App extends Component {
...
render() {
const {
searchTerm,
results,
searchKey,
error
} = this.state;
const page = (
results &&
results[searchKey] &&
results[searchKey].page
) || 0;
const list = (
results &&
results[searchKey] &&
results[searchKey].hits](https://image.slidesharecdn.com/the-road-to-learn-react-190414064122/75/The-road-to-learn-react-126-2048.jpg)
![Getting Real with APIs 112
) || [];
return (
<div className="page">
<div className="interactions">
...
</div>
{ error
? <div className="interactions">
<p>Something went wrong.</p>
</div>
: <Table
list={list}
onDismiss={this.onDismiss}
/>
}
...
</div>
);
}
}
Remember to revert the URL for the API to the existent one:
src/App.js
const PATH_BASE = 'https://hn.algolia.com/api/v1';
The application now has error handling in case the API request fails.
Exercises:
• Confirm your source code for the last section¹⁶¹
– Confirm the changes from the last section¹⁶²
• Read about React’s Error Handling for Components¹⁶³
¹⁶¹http://bit.ly/2HoLAGY
¹⁶²http://bit.ly/2HquJnd
¹⁶³https://reactjs.org/blog/2017/07/26/error-handling-in-react-16.html](https://image.slidesharecdn.com/the-road-to-learn-react-190414064122/75/The-road-to-learn-react-127-2048.jpg)


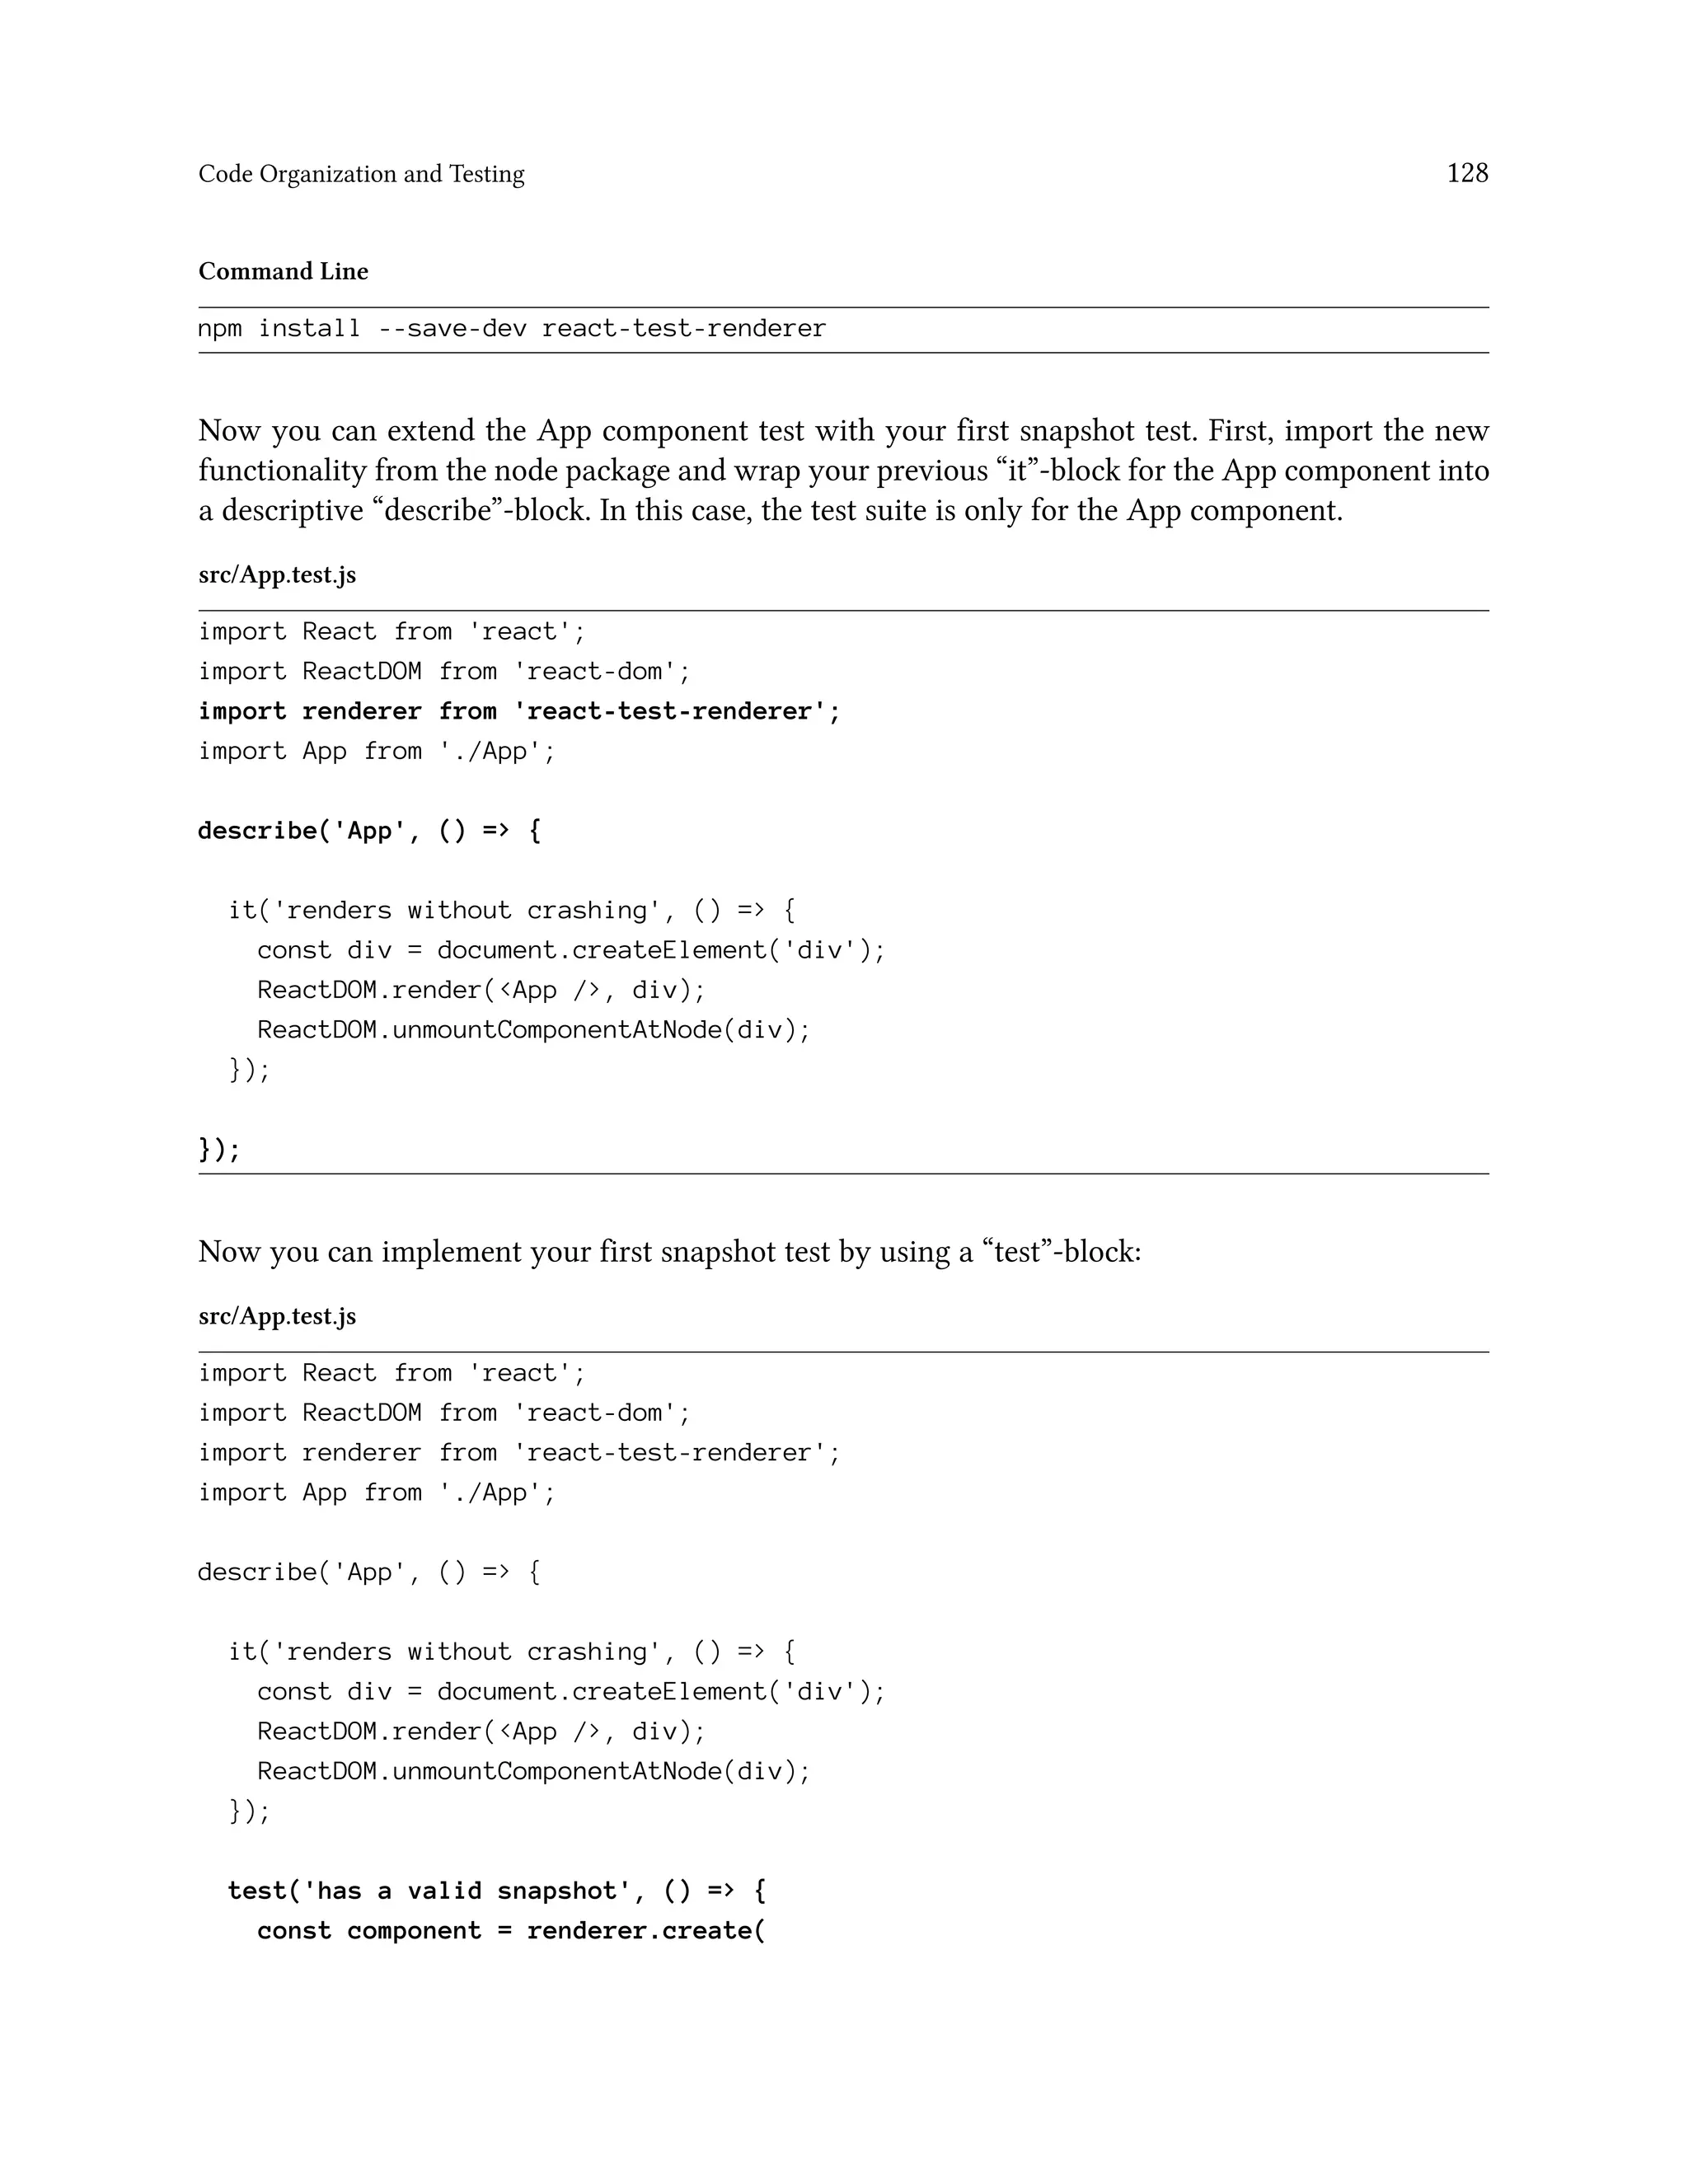
![Code Organization and Testing 131
src/App.test.js
...
import App, { Search, Button, Table } from './App';
...
describe('Table', () => {
const props = {
list: [
{ title: '1', author: '1', num_comments: 1, points: 2, objectID: 'y' },
{ title: '2', author: '2', num_comments: 1, points: 2, objectID: 'z' },
],
};
it('renders without crashing', () => {
const div = document.createElement('div');
ReactDOM.render(<Table { ...props } />, div);
});
test('has a valid snapshot', () => {
const component = renderer.create(
<Table { ...props } />
);
const tree = component.toJSON();
expect(tree).toMatchSnapshot();
});
});
Snapshot tests usually stay pretty basic. You only want to make sure the component doesn’t change
its output. Once it does, you have to decide if you accept the changes, otherwise you have to fix the
component.
Exercises:
• Confirm your source code for the last section¹⁷⁴
– Confirm the changes from the last section¹⁷⁵
• See how a snapshot test fails once you change your component’s return value in the render()
method
¹⁷⁴http://bit.ly/2H9GkI3
¹⁷⁵http://bit.ly/2Ha22f6](https://image.slidesharecdn.com/the-road-to-learn-react-190414064122/75/The-road-to-learn-react-146-2048.jpg)

![Code Organization and Testing 134
{ title: '2', author: '2', num_comments: 1, points: 2, objectID: 'z' },
],
};
...
it('shows two items in list', () => {
const element = shallow(
<Table { ...props } />
);
expect(element.find('.table-row').length).toBe(2);
});
});
Shallow renders the component without its child components, so you can dedicate the test to one
component.
Enzyme has three rendering mechanisms in its API. You already know shallow(), but there is also
mount() and render(). Both instantiate instances of the parent component and all child components.
mount() gives you access to the component lifecycle methods. These are the rules of them as to when
to use each mechanism:
• Always begin with a shallow test
• If componentDidMount() or componentDidUpdate() should be tested, use mount()
• If you want to test component lifecycle and children behavior, use mount()
• If you want to test a component’s children rendering with less overhead than mount() and you
are not interested in lifecycle methods, use render()
Continue to unit test your components, but be sure to keep the tests simple and maintainable.
Otherwise you will have to refactor them once you change your components. This is one of the
main reasons Facebook introduced snapshot tests with Jest.
Exercises:
• Confirm your source code for the last section¹⁷⁸
– Confirm the changes from the last section¹⁷⁹
• Write a unit test with Enzyme for your Button component
• Keep your unit tests up to date during the following chapters
¹⁷⁸http://bit.ly/2HaT2Gl
¹⁷⁹http://bit.ly/2H842oa](https://image.slidesharecdn.com/the-road-to-learn-react-190414064122/75/The-road-to-learn-react-149-2048.jpg)


![Advanced React Components 148
src/App.js
class App extends Component {
...
setSearchTopStories(result) {
...
this.setState({
results: {
...results,
[searchKey]: { hits: updatedHits, page }
},
isLoading: false
});
}
fetchSearchTopStories(searchTerm, page = 0) {
this.setState({ isLoading: true });
axios(`${PATH_BASE}${PATH_SEARCH}?${PARAM_SEARCH}${searchTerm}&${PARAM_PAGE}${pa
ge}&${PARAM_HPP}${DEFAULT_HPP}`)
.then(result => this.setSearchTopStories(result.data))
.catch(error => this.setState({ error }));
}
...
}
In the last step, we used the Loading component in the App component. A conditional rendering
based on the loading state will decide whether to show a Loading component or the Button
component. The latter is the button to fetch more data.](https://image.slidesharecdn.com/the-road-to-learn-react-190414064122/75/The-road-to-learn-react-163-2048.jpg)

![Advanced React Components 154
Command Line
- <button
- className=""
- onClick={[Function]}
- type="button"
- >
- More
- </button>
+ <div>
+ Loading ...
+ </div>
You can either fix the component now, when you think there is something wrong about it, or can
accept the new snapshot of it. Because you introduced the Loading component in this chapter, you
can accept the altered snapshot test on the command line in the interactive test.
Higher-order components are an advanced pattern in React. They have multiple purposes: improved
reusability of components, greater abstraction, composability of components, and manipulations of
props, state and view. I encourage you to read gentle introduction to higher-order components²⁰¹. It
gives you another approach to learn them, shows you an elegant way to use them in a functional
programming way, and solves the problem of conditional rendering with higher-order components.
Exercises:
• Confirm your source code for the last section²⁰²
– Confirm the changes from the last section²⁰³
• Read a gentle introduction to higher-order components²⁰⁴
• Experiment with the HOC you have created
• Think about a use case where another HOC would make sense
– Implement the HOC, if there is a use case
²⁰¹https://www.robinwieruch.de/gentle-introduction-higher-order-components/
²⁰²http://bit.ly/2HkoP7c
²⁰³http://bit.ly/2Ho9uT9
²⁰⁴https://www.robinwieruch.de/gentle-introduction-higher-order-components/](https://image.slidesharecdn.com/the-road-to-learn-react-190414064122/75/The-road-to-learn-react-169-2048.jpg)
.map(item =>
<div key={item.objectID} className="table-row">
...
</div>
)}
</div>
In theory, the list should get sorted by one of the functions. But the default sort is set to NONE, so
nothing is sorted yet, as nothing executes the onSort() method to change the sortKey. We extend
the Table with a row of column headers that use Sort components in columns to sort each column:
src/App.js
const Table = ({
list,
sortKey,
onSort,
onDismiss
}) =>
<div className="table">
<div className="table-header">
<span style={{ width: '40%' }}>
<Sort
sortKey={'TITLE'}
onSort={onSort}
>
Title
</Sort>
</span>
<span style={{ width: '30%' }}>
<Sort
sortKey={'AUTHOR'}
onSort={onSort}
>
Author](https://image.slidesharecdn.com/the-road-to-learn-react-190414064122/75/The-road-to-learn-react-173-2048.jpg)
.map(item =>
...
)}
</div>
Each Sort component gets a specific sortKey and the general onSort() function. Internally, it calls
the method with the sortKey to set the specific key.
src/App.js
const Sort = ({ sortKey, onSort, children }) =>
<Button onClick={() => onSort(sortKey)}>
{children}
</Button>
As you can see, the Sort component reuses your common Button component. On a button click, each
individual passed sortKey is set by the onSort() method, so the list is sorted when column headers
are selected.
Now we’ll improve the look of the button in the column header. Let’s give it a proper className:](https://image.slidesharecdn.com/the-road-to-learn-react-190414064122/75/The-road-to-learn-react-174-2048.jpg)
;
const reverseSortedList = isSortReverse
? sortedList.reverse()
: sortedList;
return(
<div className="table">
<div className="table-header">
...
</div>
{reverseSortedList.map(item =>
...
)}
</div>
);
}
Finally, we want to give the user visual feedback to distinguish which column is actively sorted. Each
Sort component has its specific sortKey already, which can be used to identify the activated sort.
We pass the sortKey from the internal component state as active sort key to your Sort component:
src/App.js
const Table = ({
list,
sortKey,
isSortReverse,
onSort,
onDismiss
}) => {
const sortedList = SORTS[sortKey](list);
const reverseSortedList = isSortReverse
? sortedList.reverse()
: sortedList;](https://image.slidesharecdn.com/the-road-to-learn-react-190414064122/75/The-road-to-learn-react-177-2048.jpg)

![Advanced React Components 164
{reverseSortedList.map(item =>
...
)}
</div>
);
}
Now the user will know whether sort is active based on the sortKey and activeSortKey . Give your
Sort component an extra className attribute, in case it is sorted, to give visual feedback:
src/App.js
const Sort = ({
sortKey,
activeSortKey,
onSort,
children
}) => {
const sortClass = ['button-inline'];
if (sortKey === activeSortKey) {
sortClass.push('button-active');
}
return (
<Button
onClick={() => onSort(sortKey)}
className={sortClass.join(' ')}
>
{children}
</Button>
);
}
We can define sortClass more efficiently using a library called classnames, which is installed using
npm:
Command Line
npm install classnames
After installation, we import it on top of the src/App.js file.](https://image.slidesharecdn.com/the-road-to-learn-react-190414064122/75/The-road-to-learn-react-179-2048.jpg)
![Advanced React Components 166
src/App.test.js
...
describe('Table', () => {
const props = {
list: [
{ title: '1', author: '1', num_comments: 1, points: 2, objectID: 'y' },
{ title: '2', author: '2', num_comments: 1, points: 2, objectID: 'z' },
],
sortKey: 'TITLE',
isSortReverse: false,
};
...
});
We may need to accept the failing snapshot tests again for the Table component, because we provided
extended props for it. The advanced sort interaction is finally complete.
Exercises:
• Confirm your source code for the last section²⁰⁶
– Confirm the changes from the last section²⁰⁷
• Use a library like Font Awesome²⁰⁸ to indicate the (reverse) sort. It could be an arrow up or
arrow down icon next to each Sort header
• Read about the classnames library²⁰⁹
²⁰⁶http://bit.ly/2HteRAe
²⁰⁷http://bit.ly/2HnYFAh
²⁰⁸https://fontawesome.com/
²⁰⁹https://github.com/JedWatson/classnames](https://image.slidesharecdn.com/the-road-to-learn-react-190414064122/75/The-road-to-learn-react-181-2048.jpg)


;
const reverseSortedList = isSortReverse
? sortedList.reverse()
: sortedList;
return(
...
);
}
Your Table component as an ES6 class component:](https://image.slidesharecdn.com/the-road-to-learn-react-190414064122/75/The-road-to-learn-react-184-2048.jpg)
;
const reverseSortedList = isSortReverse
? sortedList.reverse()
: sortedList;
return (
...
);
}
}
Since you want to deal with state and methods in your component, you have to add a constructor
and initial state.
src/App.js
class Table extends Component {
constructor(props) {
super(props);
this.state = {};
}
render() {
...
}
}
Now you can move state and class methods with the sort functionality from your App component
down to your Table component.](https://image.slidesharecdn.com/the-road-to-learn-react-190414064122/75/The-road-to-learn-react-185-2048.jpg)
;
const reverseSortedList = isSortReverse
? sortedList.reverse()
: sortedList;
return(
<div className="table">
<div className="table-header">
<span style={{ width: '40%' }}>
<Sort
sortKey={'TITLE'}
onSort={this.onSort}
activeSortKey={sortKey}
>
Title
</Sort>
</span>
<span style={{ width: '30%' }}>
<Sort
sortKey={'AUTHOR'}
onSort={this.onSort}](https://image.slidesharecdn.com/the-road-to-learn-react-190414064122/75/The-road-to-learn-react-188-2048.jpg)

![State Management in React 177
Code Playground
this.setState((prevState, props) => {
const { oneCount } = prevState;
const { anotherCount } = props;
return { count: oneCount + anotherCount };
});
In our code, the setSearchTopStories() method relies on the previous state, and this is a good
example to use a function over an object in setState(). Right now, it looks like the following code:
src/App.js
setSearchTopStories(result) {
const { hits, page } = result;
const { searchKey, results } = this.state;
const oldHits = results && results[searchKey]
? results[searchKey].hits
: [];
const updatedHits = [
...oldHits,
...hits
];
this.setState({
results: {
...results,
[searchKey]: { hits: updatedHits, page }
},
isLoading: false
});
}
Here, we extracted values from the state, but updated the state depending on the previous state
asynchronously. Now we’ll use the functional approach to prevent bugs from a stale state:](https://image.slidesharecdn.com/the-road-to-learn-react-190414064122/75/The-road-to-learn-react-192-2048.jpg)
![State Management in React 178
src/App.js
setSearchTopStories(result) {
const { hits, page } = result;
this.setState(prevState => {
...
});
}
We can move the whole block we implemented into the function by directing it to operate on the
prevState instead of the this.state.
src/App.js
setSearchTopStories(result) {
const { hits, page } = result;
this.setState(prevState => {
const { searchKey, results } = prevState;
const oldHits = results && results[searchKey]
? results[searchKey].hits
: [];
const updatedHits = [
...oldHits,
...hits
];
return {
results: {
...results,
[searchKey]: { hits: updatedHits, page }
},
isLoading: false
};
});
}
That will fix the issue with a stale state, but there is still one more improvement. Since it is a function,
you can extract the function for improved readability. One more advantage to use a function over
an object is that function can live outside of the component. We still have to use a higher-order
function to pass the result to it since we want to update the state based on the fetched result from
the API.](https://image.slidesharecdn.com/the-road-to-learn-react-190414064122/75/The-road-to-learn-react-193-2048.jpg)
![State Management in React 179
src/App.js
setSearchTopStories(result) {
const { hits, page } = result;
this.setState(updateSearchTopStoriesState(hits, page));
}
The updateSearchTopStoriesState() function has to return a function. It is a higher-order function
that can be defined outside the App component. Note how the function signature changes slightly
now.
src/App.js
const updateSearchTopStoriesState = (hits, page) => (prevState) => {
const { searchKey, results } = prevState;
const oldHits = results && results[searchKey]
? results[searchKey].hits
: [];
const updatedHits = [
...oldHits,
...hits
];
return {
results: {
...results,
[searchKey]: { hits: updatedHits, page }
},
isLoading: false
};
};
class App extends Component {
...
}
The function instead of object approach in setState() fixes potential bugs, while increasing the
readability and maintainability of your code. Further, it becomes testable outside of the App
component. I advise exporting and testing it as practice.](https://image.slidesharecdn.com/the-road-to-learn-react-190414064122/75/The-road-to-learn-react-194-2048.jpg)


This document is the contents page for the book "The Road to learn React" by Robin Wieruch. It outlines the chapters included in the book, which cover topics like the basics of React, components, styling, APIs, testing, debugging and more. The book is intended to teach readers the fundamentals of React in a practical way without complex tooling by building a real-world application from start to finish.