
Recommended
More Related Content
Similar to TERRARIUM GUIDE 2- TLE Horticultural crop production.pdf
Similar to TERRARIUM GUIDE 2- TLE Horticultural crop production.pdf (20)
More from FeDelgado3
More from FeDelgado3 (6)
Recently uploaded
Recently uploaded (20)
TERRARIUM GUIDE 2- TLE Horticultural crop production.pdf
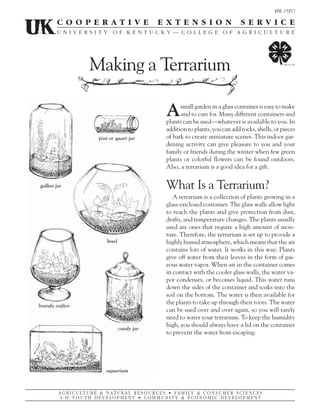
- 1. Asmall garden in a glass container is easy to make and to care for. Many different containers and plants can be used—whatever is available to you. In addition to plants, you can add rocks, shells, or pieces of bark to create miniature scenes. This indoor gar- dening activity can give pleasure to you and your family or friends during the winter when few green plants or colorful flowers can be found outdoors. Also, a terrarium is a good idea for a gift. What Is a Terrarium? A terrarium is a collection of plants growing in a glass-enclosed container. The glass walls allow light to reach the plants and give protection from dust, drafts, and temperature changes. The plants usually used are ones that require a high amount of mois- ture. Therefore, the terrarium is set up to provide a highly humid atmosphere, which means that the air contains lots of water. It works in this way: Plants give off water from their leaves in the form of gas- eous water vapor. When air in the container comes in contact with the cooler glass walls, the water va- por condenses, or becomes liquid. This water runs down the sides of the container and soaks into the soil on the bottom. The water is then available for the plants to take up through their roots. The water can be used over and over again, so you will rarely need to water your terrarium. To keep the humidity high, you should always have a lid on the container to prevent the water from escaping. 4BE-15PO Making a Terrarium
- 2. 2 You Will Need You will need containers, soil, fertilizer (optional), drainage material, charcoal, and plants. There are also many options for accessories for your terrarium. Containers You will need a glass container clear enough to see through. Cloudy or tinted glass reduces the amount of light the plant receives. Any size con- tainer will do, depending on the number of plants you are using. The container should have a remov- able cover to control moisture. A piece of glass or plastic can be used if your container does not have a lid. Some possible containers are shown on Page 1. Soil Enough soil is needed to make a 1½-inch to 2-inch layer in the bottom of the container. The soil should be porous to allow good drainage. It should be slightly moist for planting. Here are pos- sible potting mixtures: • Wood soil if available or mix. • Equal parts of garden soil, sand, and peat moss. • Prepackaged garden soil mixture from the local garden center. Fertilizer (Optional) Soil should not be too fertile so the plants will not outgrow the container. One level teaspoon of 5-10-5 fertilizer can be mixed with each 2 quarts of soil. Drainage Material Gravel is needed to prevent soil from becoming too wet. Charcoal Crushed charcoal will keep your terrarium from having a bad smell. Plants Woodland plants and houseplants may be used but not in the same terrarium. Use small plants that grow slowly. Plants should fill the container but not crowd it. If possible, collect plants from a nearby woods or see what a local greenhouse or garden cen- ter has to offer. When removing plants from the woods, do not mutilate the area. Only take plants that are plentiful in the area. Never completely strip an area of any plant. Line the container with wood moss, and add some of the suggested plants listed below: House Plants English Ivy Small Ferns Philodendron Begonias (small-leaved) African Violets Woodland Plants Reindeer Lichen Small Ferns Mosses Pipsisewa Rattlesnake Plantain Partridgeberry British Soldier Ground Cedar Accessories (Optional) Rocks Bark Fungi Small Figurines Shells
- 3. 3 What to Do 1. Wash and polish the container and its top. 2. Line the lower quarter of the container with wood moss. Put the green side next to the glass. This will hide the soil. 3. On top of the moss, place a few pieces of char- coal and ½ inch to 1 inch of gravel as shown. 4. Add soil until it is slightly above the moss. 5. Decide how to place the plants. If the terrarium is to be viewed from all sides, place taller plants in the middle and lower ones around the out- side. If it is to have a front and back, place taller plants in the back and smaller ones toward the front so that all plants can be seen well. 6. Scoop out soil to make holes for the plants. Set the plants in position, and press the soil gently around the roots. 7. Clean the soil from the plant leaves. 8. Add accessories, if you are using them. 9. Sprinkle soil lightly with water. 10. Cover the container, but place the lid so there is a small opening for air to get in. 11. Place the container in bright light but not in direct sun. A northeast or north window is best. Direct sun will make the air inside the terrarium too hot, and the plants will die. 12. Water the terrarium only if the soil seems dry. Usually only a few teaspoonsful of water once a month are needed. 13. Rotate the terrarium occasionally to give a bal- anced form to the plants. 14. If the sides of the container become foggy, remove the lid until they clear. 15. Remove dead leaves and overgrown plants. Suggested Activities 1. Choose a small container, possibly a pint or quart jar, to hold one to two plants. Follow the above instructions. Add at least one interesting rock or other accessory. 2. Make a large terrarium as a group activity. Each individual could add a different plant. 3. Chooseanytypeofcontainerandplaceplantsin it in a suitable manner. 4. Advanced Activity. Make a bottle garden. This takes some skill to plant, and some special equipmentisneeded.Thepro- cedure is the same as above. Make a paper funnel for pouring gravel and soil into the bottle. Tape a stick or pencil to a plastic spoon andforktoreachintothe bottle to move the soil and to put the plants in place. See the illustra- tions.
- 4. Educational programs of the Kentucky Cooperative Extension Service serve all people regardless of race, color, age, sex, religion, disability, or national origin. Issued in furtherance of Cooperative Extension work, Acts of May 8 and June 30, 1914, in cooperation with the U.S. Department of Agriculture, M. Scott Smith, Director of Cooperative Extension Service, University of Kentucky College of Agriculture, Lexington, and Kentucky State University, Frankfort. Copyright © 2003 for materials developed by the University of Kentucky Cooperative Extension Service. This publication may be reproduced in portions or its entirety for educational or nonprofit purposes only. Permitted users shall give credit to the author(s) and include this copyright notice. Publications are also available on the World Wide Web at www.ca.uky.edu. Issued 12-74. Project Suggestions 1. Completeoneormoreofthesuggestedactivities. 2. Take pictures or make drawings of your project work. 3. Take a trip to the woods, a garden center, or a greenhouse. Locate five or more plants that could be used in a terrarium. Learn to identify them. Look up information about each one. 4. Do a demonstration or exhibit your terrarium. 5. Fill in the project record sheet. (4BE-15RO). References Allgrove, Arthur Easmes. Terrariums and How They Grow. Shuttleworth, Floyd Stephen, and Herbert Zim. Non-floweringPlants,AGoldenNatureGuide.1967. Originally prepared by Madge Balden Adams, former special assignment writer for Horticulture. Contact: William M. Fountain, Department of Horticulture