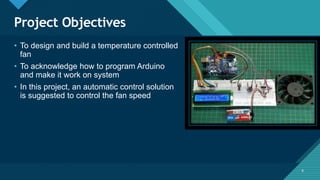
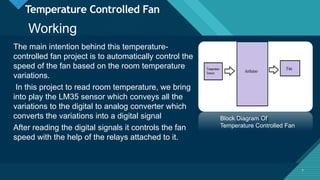
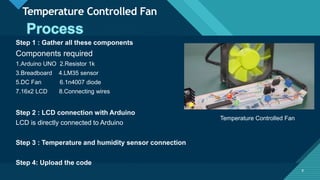
Click to edit Master title style
1
Temperature
Controlled Fan
Mini Project
On Embedded System
SUBMITTED TO:
Mr. Alok Kumar
Asst. Prof. ECE
Department
SUBMITTED BY :
UTKARSH PAL
2100270310157
ECE-3
Click to edit Master title style
2
Introduction
Components Required
2
Bibliography
Online Simulation Working
Advantages
Click to edit Master title style
3
What is Embedded System?
Embedded System is a
system composed of
hardware, application
software and real time
operating system. It can
be small independent
system or large
combinational system.
3
Click to edit Master title style
4
Components
Arduino LM 35
Sensor
DC Fan LCD
Display
Resistor
4
Click to edit Master title style
5
What is Arduino?
Arduino is an open-source platform used
for building electronics projects. Arduino
consists of both a physical
programmable circuit board (often
referred to as a microcontroller) and a
piece of software, or IDE (Integrated
Development Environment) that runs on
your computer, used to write and upload
computer code to the physical board.
5
Click to edit Master title style
6
Project Objectives
6
• To design and build a temperature controlled
fan
• To acknowledge how to program Arduino
and make it work on system
• In this project, an automatic control solution
is suggested to control the fan speed
Click to edit Master title style
7
Temperature Controlled Fan
The main intention behind this temperature-
controlled fan project is to automatically control the
speed of the fan based on the room temperature
variations.
In this project to read room temperature, we bring
into play the LM35 sensor which conveys all the
variations to the digital to analog converter which
converts the variations into a digital signal
After reading the digital signals it controls the fan
speed with the help of the relays attached to it.
7
Block Diagram Of
Temperature Controlled Fan
Working
Click to edit Master title style
8
Temperature Controlled Fan
Step 1 : Gather all these components
Components required
1.Arduino UNO 2.Resistor 1k
3.Breadboard 4.LM35 sensor
5.DC Fan 6.1n4007 diode
7.16x2 LCD 8.Connecting wires
Step 2 : LCD connection with Arduino
LCD is directly connected to Arduino
Step 3 : Temperature and humidity sensor connection
Step 4: Upload the code
8
Temperature Controlled Fan
Click to edit Master title style
9
Proteus simulation
9
Click to edit Master title style
10
Arduino Code for Simulation
10
Click to edit Master title style
11
Advantages
1) No control adjustments
With automated fan control, you no longer need to disrupt your
to disrupt your workflow to adjust the speed and direction of your
direction of your fans. Automating the fan speed saves time and
saves time and maintains a consistently comfortable
comfortable environment.
2) Optimized fan performance
Identifying the best speed to operate your fans can be difficult,
especially during the spring and fall seasons when the
temperatures frequently fluctuate. The automation software
calculates all of this for you and perfectly optimizes your fans’
performance for the current climate.
3) Savings on heating and cooling
If you pair your fans with air conditioning, the cooling effect created
by the fans will enable you to set your thermostat higher while
maintaining the same level of comfort.
11
Click to edit Master title style
12
The applications of the temperature-controlled fan
include where the consumption of power has to be
controlled such as firms, institutes, organizations, home
appliances, in computers to cool the processor.
12
Real Life Applications
This project can be used in Industry Furthermore, this
project can be enhanced by interfacing with air
conditioners
This will help in saving energy/electricity.
Click to edit Master title style
13
Future Developments
We can monitor more parameters like humidity
and light. At the same time control them.
We can send this data to a remote location using
mobile or internet
We can draw graphs of variations in these
parameters using computer
Click to edit Master title style
14
Bibliography
14
https://robu.in/temperature-controlled-fan-using-arduino-step-by-step-
guide-with-code/
https://www.electronicshub.org/temperature-controlled-dc-fan-using-
microcontroller/
https://www.elprocus.com/temperature-controlled-dc-fan-using-
microcontroller/
Click to edit Master title style
15
Thank You

Temperature Controlled Fan.pptx

  • 1.
    Click to editMaster title style 1 Temperature Controlled Fan Mini Project On Embedded System SUBMITTED TO: Mr. Alok Kumar Asst. Prof. ECE Department SUBMITTED BY : UTKARSH PAL 2100270310157 ECE-3
  • 2.
    Click to editMaster title style 2 Introduction Components Required 2 Bibliography Online Simulation Working Advantages
  • 3.
    Click to editMaster title style 3 What is Embedded System? Embedded System is a system composed of hardware, application software and real time operating system. It can be small independent system or large combinational system. 3
  • 4.
    Click to editMaster title style 4 Components Arduino LM 35 Sensor DC Fan LCD Display Resistor 4
  • 5.
    Click to editMaster title style 5 What is Arduino? Arduino is an open-source platform used for building electronics projects. Arduino consists of both a physical programmable circuit board (often referred to as a microcontroller) and a piece of software, or IDE (Integrated Development Environment) that runs on your computer, used to write and upload computer code to the physical board. 5
  • 6.
    Click to editMaster title style 6 Project Objectives 6 • To design and build a temperature controlled fan • To acknowledge how to program Arduino and make it work on system • In this project, an automatic control solution is suggested to control the fan speed
  • 7.
    Click to editMaster title style 7 Temperature Controlled Fan The main intention behind this temperature- controlled fan project is to automatically control the speed of the fan based on the room temperature variations. In this project to read room temperature, we bring into play the LM35 sensor which conveys all the variations to the digital to analog converter which converts the variations into a digital signal After reading the digital signals it controls the fan speed with the help of the relays attached to it. 7 Block Diagram Of Temperature Controlled Fan Working
  • 8.
    Click to editMaster title style 8 Temperature Controlled Fan Step 1 : Gather all these components Components required 1.Arduino UNO 2.Resistor 1k 3.Breadboard 4.LM35 sensor 5.DC Fan 6.1n4007 diode 7.16x2 LCD 8.Connecting wires Step 2 : LCD connection with Arduino LCD is directly connected to Arduino Step 3 : Temperature and humidity sensor connection Step 4: Upload the code 8 Temperature Controlled Fan
  • 9.
    Click to editMaster title style 9 Proteus simulation 9
  • 10.
    Click to editMaster title style 10 Arduino Code for Simulation 10
  • 11.
    Click to editMaster title style 11 Advantages 1) No control adjustments With automated fan control, you no longer need to disrupt your to disrupt your workflow to adjust the speed and direction of your direction of your fans. Automating the fan speed saves time and saves time and maintains a consistently comfortable comfortable environment. 2) Optimized fan performance Identifying the best speed to operate your fans can be difficult, especially during the spring and fall seasons when the temperatures frequently fluctuate. The automation software calculates all of this for you and perfectly optimizes your fans’ performance for the current climate. 3) Savings on heating and cooling If you pair your fans with air conditioning, the cooling effect created by the fans will enable you to set your thermostat higher while maintaining the same level of comfort. 11
  • 12.
    Click to editMaster title style 12 The applications of the temperature-controlled fan include where the consumption of power has to be controlled such as firms, institutes, organizations, home appliances, in computers to cool the processor. 12 Real Life Applications This project can be used in Industry Furthermore, this project can be enhanced by interfacing with air conditioners This will help in saving energy/electricity.
  • 13.
    Click to editMaster title style 13 Future Developments We can monitor more parameters like humidity and light. At the same time control them. We can send this data to a remote location using mobile or internet We can draw graphs of variations in these parameters using computer
  • 14.
    Click to editMaster title style 14 Bibliography 14 https://robu.in/temperature-controlled-fan-using-arduino-step-by-step- guide-with-code/ https://www.electronicshub.org/temperature-controlled-dc-fan-using- microcontroller/ https://www.elprocus.com/temperature-controlled-dc-fan-using- microcontroller/
  • 15.
    Click to editMaster title style 15 Thank You