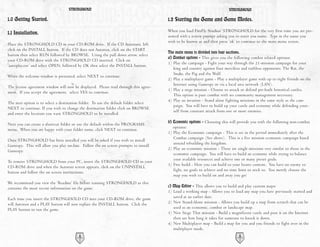
As soon as the King had marched his army into the barbarian homeland,
the inevitable rumors of a plot to seize the throne began to spread.
A few seasons into the war, the capture of the King was reported from
abroad sparking disorder among the peasantry. Sure enough, the enemy grabbed
this opportunity to invade and after several bloody engagements the splintered
country became locked in civil war.
When the initial onslaught had finished, your father attempted to
negotiate a treaty, arranging a meeting at the stronghold of Duc Beauregard.
Along the way there was an ambush and your father along with several
other lords were brutally hacked down by a band of unknown raiders.
With no treaty signed, the enemy continued their assault forcing county
after county to yield until the country was lost.
Bruised and exhausted, you have been beaten back to a forest on an
overlooked peninsula where it is rumored a small band of bedraggled troops are
hiding.
Although you believe there is little hope, maybe from this refuge you can at
least avenge your father's death.
STRONGHOLD                                                                                                                STRONGHOLD

Table of Contents                                                                                                         6.2 The Barracks . . . . . . . . . . . . . . . . . . . . . . . . . . . . . . . . . . . . . . . . . . . . . . . .30
1.0 Getting Started . . . . . . . . . . . . . . . . . . . . . . . . . . . . . . . . . . . . . . . . . . . . . . .4        6.3 Available Units . . . . . . . . . . . . . . . . . . . . . . . . . . . . . . . . . . . . . . . . . . . . . .31
1.1 Installation . . . . . . . . . . . . . . . . . . . . . . . . . . . . . . . . . . . . . . . . . . . . . . . . . .4     7.0 Issuing Military Commands . . . . . . . . . . . . . . . . . . . . . . . . . . . . . . . . . . . .32
1.2 Starting the Game and Game Modes . . . . . . . . . . . . . . . . . . . . . . . . . . . . . .5                         7.1 Gathering your Forces . . . . . . . . . . . . . . . . . . . . . . . . . . . . . . . . . . . . . . . . .32
1.3 Game Options . . . . . . . . . . . . . . . . . . . . . . . . . . . . . . . . . . . . . . . . . . . . . . .6           7.2 Marching Orders . . . . . . . . . . . . . . . . . . . . . . . . . . . . . . . . . . . . . . . . . . . . .33
1.4 Game Overview . . . . . . . . . . . . . . . . . . . . . . . . . . . . . . . . . . . . . . . . . . . . . . .7          7.3 Unit Stances . . . . . . . . . . . . . . . . . . . . . . . . . . . . . . . . . . . . . . . . . . . . . . . .34
1.5 About the Manual . . . . . . . . . . . . . . . . . . . . . . . . . . . . . . . . . . . . . . . . . . . . .7           7.4 Military Commands . . . . . . . . . . . . . . . . . . . . . . . . . . . . . . . . . . . . . . . . . .35
1.6 Winning and Losing . . . . . . . . . . . . . . . . . . . . . . . . . . . . . . . . . . . . . . . . . . .8             7.5 Map Bookmarks . . . . . . . . . . . . . . . . . . . . . . . . . . . . . . . . . . . . . . . . . . . . .37
1.7 Playing a Multi-player Game . . . . . . . . . . . . . . . . . . . . . . . . . . . . . . . . . . . . .8                8.0 Defending your People . . . . . . . . . . . . . . . . . . . . . . . . . . . . . . . . . . . . . . . .37
1.8 Map Editor Overview . . . . . . . . . . . . . . . . . . . . . . . . . . . . . . . . . . . . . . . . .11               8.1 The Gatehouse . . . . . . . . . . . . . . . . . . . . . . . . . . . . . . . . . . . . . . . . . . . . . .37
2.0 Game Basics . . . . . . . . . . . . . . . . . . . . . . . . . . . . . . . . . . . . . . . . . . . . . . . .12         8.2 Building Walls . . . . . . . . . . . . . . . . . . . . . . . . . . . . . . . . . . . . . . . . . . . . . . .37
2.1 Main Screen Overview and Navigating the Map . . . . . . . . . . . . . . . . . . . . .12                               8.3 Turrets and Towers . . . . . . . . . . . . . . . . . . . . . . . . . . . . . . . . . . . . . . . . . . .38
2.2 Camera Interface . . . . . . . . . . . . . . . . . . . . . . . . . . . . . . . . . . . . . . . . . . . . .13          8.4 Placing Stairs . . . . . . . . . . . . . . . . . . . . . . . . . . . . . . . . . . . . . . . . . . . . . . .38
2.3 Placing your Keep . . . . . . . . . . . . . . . . . . . . . . . . . . . . . . . . . . . . . . . . . . . .14           8.5 Traps . . . . . . . . . . . . . . . . . . . . . . . . . . . . . . . . . . . . . . . . . . . . . . . . . . . . . .38
2.4 Population Growth . . . . . . . . . . . . . . . . . . . . . . . . . . . . . . . . . . . . . . . . . . .15             8.6 Moat Digging . . . . . . . . . . . . . . . . . . . . . . . . . . . . . . . . . . . . . . . . . . . . . . .39
2.5 Rationing and the Granary . . . . . . . . . . . . . . . . . . . . . . . . . . . . . . . . . . . . .15                 8.7 Mounted Siege Equipment . . . . . . . . . . . . . . . . . . . . . . . . . . . . . . . . . . . . .39
2.6 Setting Taxes . . . . . . . . . . . . . . . . . . . . . . . . . . . . . . . . . . . . . . . . . . . . . . .16         8.8 Boiling Oil . . . . . . . . . . . . . . . . . . . . . . . . . . . . . . . . . . . . . . . . . . . . . . . . .39
2.7 Popularity in Brief . . . . . . . . . . . . . . . . . . . . . . . . . . . . . . . . . . . . . . . . . . .16           9.0 Siege Warfare . . . . . . . . . . . . . . . . . . . . . . . . . . . . . . . . . . . . . . . . . . . . . . .40
2.8 Gathering Food and Resources . . . . . . . . . . . . . . . . . . . . . . . . . . . . . . . . . .17                    9.1 Siege Equipment Overview . . . . . . . . . . . . . . . . . . . . . . . . . . . . . . . . . . . . .40
2.9 Increasing your Population . . . . . . . . . . . . . . . . . . . . . . . . . . . . . . . . . . . . .18                9.2 Portable Shields . . . . . . . . . . . . . . . . . . . . . . . . . . . . . . . . . . . . . . . . . . . . . .40
3.0 Influencing your Popularity . . . . . . . . . . . . . . . . . . . . . . . . . . . . . . . . . . . .19                 9.3 Battering Rams . . . . . . . . . . . . . . . . . . . . . . . . . . . . . . . . . . . . . . . . . . . . . .41
3.1 Food . . . . . . . . . . . . . . . . . . . . . . . . . . . . . . . . . . . . . . . . . . . . . . . . . . . . . .19    9.4 Siege Towers . . . . . . . . . . . . . . . . . . . . . . . . . . . . . . . . . . . . . . . . . . . . . . . .41
3.2 Tax . . . . . . . . . . . . . . . . . . . . . . . . . . . . . . . . . . . . . . . . . . . . . . . . . . . . . . .20   9.5 Catapults . . . . . . . . . . . . . . . . . . . . . . . . . . . . . . . . . . . . . . . . . . . . . . . . . . .41
3.3 Crowding . . . . . . . . . . . . . . . . . . . . . . . . . . . . . . . . . . . . . . . . . . . . . . . . . .21        9.6 Trebuchets . . . . . . . . . . . . . . . . . . . . . . . . . . . . . . . . . . . . . . . . . . . . . . . . . .41
3.4 Fairs and Other Events . . . . . . . . . . . . . . . . . . . . . . . . . . . . . . . . . . . . . . . .21              9.7 Digging Tunnels . . . . . . . . . . . . . . . . . . . . . . . . . . . . . . . . . . . . . . . . . . . . .42
3.5 Religion . . . . . . . . . . . . . . . . . . . . . . . . . . . . . . . . . . . . . . . . . . . . . . . . . . .21      9.8 Filling in Moats . . . . . . . . . . . . . . . . . . . . . . . . . . . . . . . . . . . . . . . . . . . . .42
3.6 Working Inns . . . . . . . . . . . . . . . . . . . . . . . . . . . . . . . . . . . . . . . . . . . . . . .22          10.0 Reference Section . . . . . . . . . . . . . . . . . . . . . . . . . . . . . . . . . . . . . . . . . . .43
3.7 Fear Factor . . . . . . . . . . . . . . . . . . . . . . . . . . . . . . . . . . . . . . . . . . . . . . . . .23       10.1 Non-military Characters . . . . . . . . . . . . . . . . . . . . . . . . . . . . . . . . . . . . . .43
4.0 Food and Resources . . . . . . . . . . . . . . . . . . . . . . . . . . . . . . . . . . . . . . . . . .24              10.2 Food Flow Chart . . . . . . . . . . . . . . . . . . . . . . . . . . . . . . . . . . . . . . . . . . . .47
4.1 The Stockpile . . . . . . . . . . . . . . . . . . . . . . . . . . . . . . . . . . . . . . . . . . . . . . .24         10.3 Resource Flow Chart . . . . . . . . . . . . . . . . . . . . . . . . . . . . . . . . . . . . . . . . .47
4.2 Resources . . . . . . . . . . . . . . . . . . . . . . . . . . . . . . . . . . . . . . . . . . . . . . . . . .25       10.4 Buildings Table . . . . . . . . . . . . . . . . . . . . . . . . . . . . . . . . . . . . . . . . . . . . .48
4.3 The Granary . . . . . . . . . . . . . . . . . . . . . . . . . . . . . . . . . . . . . . . . . . . . . . . .26         10.5 Unit Table . . . . . . . . . . . . . . . . . . . . . . . . . . . . . . . . . . . . . . . . . . . . . . . . .58
4.4 Food Types . . . . . . . . . . . . . . . . . . . . . . . . . . . . . . . . . . . . . . . . . . . . . . . . .27        10.6 Unit Cost Table . . . . . . . . . . . . . . . . . . . . . . . . . . . . . . . . . . . . . . . . . . . .59
5.0 Money . . . . . . . . . . . . . . . . . . . . . . . . . . . . . . . . . . . . . . . . . . . . . . . . . . . .28       10.7 Keyboard Commands . . . . . . . . . . . . . . . . . . . . . . . . . . . . . . . . . . . . . . . . .60
5.1 Tax Rate . . . . . . . . . . . . . . . . . . . . . . . . . . . . . . . . . . . . . . . . . . . . . . . . . . .28      11.0 Additions to the Manual . . . . . . . . . . . . . . . . . . . . . . . . . . . . . . . . . . . . . .62
5.2 The Marketplace . . . . . . . . . . . . . . . . . . . . . . . . . . . . . . . . . . . . . . . . . . . . .29           11.1 Game Additions and Revisions . . . . . . . . . . . . . . . . . . . . . . . . . . . . . . . . .62
6.0 Military Forces . . . . . . . . . . . . . . . . . . . . . . . . . . . . . . . . . . . . . . . . . . . . . .30         11.2 Additional Multi-player Information . . . . . . . . . . . . . . . . . . . . . . . . . . . . .63
6.1 Military Goods and the Armory . . . . . . . . . . . . . . . . . . . . . . . . . . . . . . . . .30                     11.3 Electronic Registration . . . . . . . . . . . . . . . . . . . . . . . . . . . . . . . . . . . . . . .67


                                                             2                                                                                                                        3
STRONGHOLD                                                                             STRONGHOLD

1.0 Getting Started.                                                                  1.2 Starting the Game and Game Modes.
                                                                                      When you load FireFly Studios’ STRONGHOLD for the very first time you are pre-
1.1 Installation.
                                                                                      sented with a screen prompt asking you to enter you name. Type in the name you
                                                                                      wish to be known as and then press ‘ok’ to continue to the main menu screen.
Place the STRONGHOLD CD in your CD-ROM drive. If the CD Autoruns, left
click on the INSTALL button. If the CD does not Autorun, click on the START
                                                                                      The main menu is divided into four sections.
button then select RUN followed by BROWSE. Using the pull down arrow, select
                                                                                      a) Combat options - This gives you the following combat related options:
your CD-ROM drive with the STRONGHOLD CD inserted. Click on
                                                                                      1) Play the campaign - Fight your way through the 21-mission campaign for your
‘autoplay.exe’ and select OPEN, followed by OK then select the INSTALL button.
                                                                                         king and country against four merciless and ruthless opponents: The Rat, the
                                                                                         Snake, the Pig and the Wolf.
When the welcome window is presented, select NEXT to continue.
                                                                                      2) Play a multiplayer game - Play a multiplayer game with up to eight friends on the
                                                                                         Internet using Gamespy or via a local area network (LAN).
The license agreement window will now be displayed. Please read through this agree-
                                                                                      3) Play a siege mission - Choose to attack or defend pre-built historical castles.
ment. If you accept the agreement, select YES to continue.
                                                                                         This option is pure combat with no community management necessary.
                                                                                      4) Play an invasion - Stand alone fighting missions in the same style as the cam-
The next option is to select a destination folder. To use the default folder select
                                                                                         paign. You will have to build up your castle and economy while defending your-
NEXT to continue. If you wish to change the destination folder click on BROWSE
                                                                                         self from constant attack from one or more enemies.
and enter the location you want STRONGHOLD to be installed.
                                                                                      b) Economic options - Choosing this will provide you with the following non-combat
Next you can create a shortcut folder or use the default within the PROGRAMS
                                                                                         options:
menu. When you are happy with your folder name, click NEXT to continue.
                                                                                      1) Play the Economic campaign - This is set in the period immediately after the
                                                                                         Combat campaign (See above). This is a five mission economic campaign based
Once STRONGHOLD has been installed you will be asked if you wish to install
                                                                                         around rebuilding the kingdom.
Gamespy. This will allow you play on-line. Follow the on screen prompts to install
                                                                                      2) Play an economic mission - These are single missions very similar to those in the
Gamespy.
                                                                                         economic campaign. You will have to build an economy while trying to balance
                                                                                         your available resources and achieve one or many preset goals.
To remove STRONGHOLD from your PC, insert the STRONGHOLD CD in your
                                                                                      3) Free build - Here you can build to your hearts content. You have no enemy to
CD-ROM drive and when the Autorun screen appears, click on the UNINSTALL
                                                                                         fight, no goals to achieve and no time limit to stick to. You merely choose the
button and follow the on screen instructions.
                                                                                         map you wish to build on and away you go!
We recommend you view the ‘Readme’ file before running STRONGHOLD as this
contains the most recent information on the game.                                     c) Map Editor - This allows you to build and play custom maps:
                                                                                      1) Load a working map - Allows you to load any map you have previously started and
Each time you insert the STRONGHOLD CD into your CD-ROM drive, the game                  saved at an earlier date.
will Autorun and a PLAY button will now replace the INSTALL button. Click the         2) New Stand-Alone mission - Allows you build up a map from scratch that can be
PLAY button to run the game.                                                             used as an economic, combat or landscape map.
                                                                                      3) New Siege That mission - Build a magnificent castle and post it on the Internet
                                                                                         then see how long it takes for someone to knock it down.
                                                                                      4) New Multiplayer map - Build a map for you and you friends to fight over in the
                                                                                         multiplayer mode.
                                         4                                                                                      5
STRONGHOLD                                                                             STRONGHOLD

d) Load a save game - Load a game that you saved on a previous occasion. You can       1.4 Game Overview.
also access this from within the main game using the options menu.
                                                                                       STRONGHOLD is a castle simulator, it will teach you to design, manage and
1.3 Game Options.                                                                      defend your own medieval castle. Starting in the middle of the eleventh century, with
                                                                                       little more than wooden palisades and hills to defend yourself with, you will learn
    The game options panel can be accessed by selecting the key icon to the left of    how to build up a castle and rule its citizens. As time goes on, your castles will get
    the mini-map within the game.                                                      bigger and more sophisticated until, by the end of the campaign, you will have all the
                                                                                       knowledge you need with which to create the ultimate castle.

Save: This allows you to save your game using a file name of your choice.              You must start your initial settlement from scratch then move forward to defend that
                                                                                       which you have built. Each new settlement will need a balanced infrastructure with a
Load: From here you can load a previously saved game.                                  steady income, a healthy stock of food and resources as well as a happy population.

Options: This allows you to change the following elements of the game:                 As you progress through the game your defenses will become steadily more advanced.
                                                                                       In the early stages you will only have enough resources at your disposal to build a
        Game Play Options: This lets you change the game speed and turn the in-        simple stockade. Eventually you will have techniques with which to construct a virtu-
        game help on or off.                                                           ally impenetrable fortress.

        Video Options: This allows you to change the resolution of the game as well    There are many challenges ahead of you on the road to victory. Each territory has a
        as how fast the map scrolls.                                                   unique set of economic conditions and you will face many bloody siege engagements
                                                                                       before this chapter in history draws to a close.
        Sound Options: From here you can turn the sound on or off and adjust the
        volume levels for the music, sound effects and speech.                         Only with careful castle planning and the cunning use of military tactics will you be
                                                                                       able to ensure the safety of the kingdom. Your STRONGHOLD awaits you, good
Help: This takes you to the contents page of the in-game help facility.                luck and God speed my liege!

Quit Mission: This option quits the current mission and takes you back to the begin-   1.5 About the Manual.
ning screen.
                                                                                       This vast tome may appear a little daunting at first but luckily there is no need to
Exit STRONGHOLD - This closes STRONGHOLD and returns you back to the                   read all of it to begin playing. You may find it useful to go through the in-game
operating system.                                                                      tutorial first by selecting the tutorial shield from the start screen. Alternatively,
                                                                                       chapter 2 quick start/game basics will introduce you to all of the main concepts.
Resume Game: Selecting this returns you to the game.                                   Once you know the basics you can read through the sections you want more informa-
                                                                                       tion on.

                                                                                       'Notes' will appear now and again to give you more information on the last topic dis-
                                                                                       cussed.

                                                                                       Note: You do not have to read these bits if you don't want to, as they are only here to
                                                                                             answer frequently asked questions on the last topic.
                                           6                                                                                      7
STRONGHOLD                                                                                   STRONGHOLD

'Tips' will also appear throughout to give you information relating to game dynamics            Note: You can autorun Gamespy Arcade from within the Stronghold multiplayer
such as shortcut keys or other alternative ways of doing things.                                      Service Provider screen in which case Stronghold will exit and Gamespy Arcade
                                                                                                      will start, re-launching Stronghold once you have chosen your opposition.
Tip: It is quicker to skip these sections to start with as they are only here to suggest
     different ways of doing something you have just learned about.                             b) Setting up a local connection
                                                                                                Clicking on Multiplayer in the Combat Options screen brings you to the Service
There are also 'Hints' which suggest possible game play strategies.                             Provider screen. Here you will see the list of available connection methods installed
                                                                                                on your machine. Click on your preferred method and follow the on screen instruc-
Hint: Don't read hints if you prefer to figure things out on your own.
                                                                                                tions to connect. One player will host the game and the remaining players can join
                                                                                                the game set up by the host.
1.6 Winning and Losing.
                                                                                                After you have connected to a multi-player game you will arrive in the multiplayer
Each mission within STRONGHOLD has a unique set of objectives. To view the                      options screen. If you have joined a game you should signal you are ready to start
objectives you have yet to complete, select the ‘Briefing’ button to the left of the
                                                                                                the game by clicking on the ready icon. You can then tell the host which type of
mini-map.
                                                                                                game you would like to play by using the chat window, but you cannot set any of the
                                                                                                game parameters as only the host has control over these.

                                                                                                Players Connected - Here you can see a list of connected players along with their
                                                                                                ready status. All players must be set to ready before the game is launched. You can
                                                                                                also set your team number here. By default each player plays separately but you can
                                                                                                ally together by clicking on your team number to match that of another player. Being
                                                                                                in an alliance with another player means that your troops will not attack each other
                                                                                                and you will win the game if the victory conditions are met jointly.

You will see the mission briefing text for the current scenario. All of the completed           If you are hosting the game you can now change any of the default game type options
objectives will have a dagger through them. If the objective of the mission is to eliminate     below:
all the enemy units, then you will also see a timeline. This indicates the time until the
last invasion arrives on the map. When all objectives have been met, you win and the vic-       Starting keep - In a multiplayer game each player starts with a pre-placed keep. This
tory screen is displayed. If the lord is killed, you lose and the defeat screen is displayed.   option allows the host to change the type of keep each player starts with. Changing
                                                                                                this will also change the level of buildings, troops and starting goods available. The
                                                                                                simple Saxon Hall provides an early medieval game with few resource and troops
1.7 Playing a Multi-player Game.                                                                types available. The most advanced is the Stronghold, which gives you access to all
                                                                                                late medieval troops and technology.
You can start a stronghold multiplayer game either via Gamespy Arcade(tm) matchmaking
service or by setting up a local connection.                                                    Gold - This allows you to set the initial gold each player begins the game with.
a) Looking for a game on Gamespy Arcade(tm)
Launch Gamespy Arcade and move to the Stronghold lobby. Here you can find other
players to compete against. Once all the players are ready the host will launch the game
and you will be sent into the Stronghold multi-player options screen.

                                              8                                                                                            9
STRONGHOLD                                                                                STRONGHOLD

Popularity - This option sets the starting popularity rating.                              1.8 Map Editor Overview.
Trade - From here you can turn the options to trade on or off for the ‘Resources’,         After selecting the ‘Map Editor’ button, you will be presented with four additional
‘Food’ and ‘Weapons’ categories.                                                           options.

Win Conditions - This allows you to change the way in which the game is won. E.g.          Load a Map - This option allows you to load and edit a previously saved map.
killing the enemies lords or achieving an economic goal.
                                                                                           New Stand-Alone Map - From here you can create a new siege, invasion, economic or
Starting Goods - This lets you set the initial food, resources and weapons each player     landscape map complete with it's own map and scenario. The 'To Map' button will
begins the game with. The available goods will differ depending upon the keep type         take you to the map-editing screen and the 'Edit Scenario' button will let you change
you have selected.                                                                         the various events and conditions for the mission. Follow the step-by-step instruc-
                                                                                           tions to select the map size and game type you wish to create.
Starting Troops - This changes the amount of troops that each player starts with. If
you want a longer build up before the first battle then set this to 'none'. If you pre-    Note: The game type you select, determines where the map will appear in the game.
fer jumping straight into the action, change this setting to 'many'.                             For example choosing to create an invasion map will make the map show up
                                                                                                 under the ‘Combat Invasion’ category.
Chat Window - You can send messages to the other connected players from here by
typing a message and then pressing return.                                                 New Siege That Mission - This part of stronghold allows you test your castle building
                                                                                           expertise against that of other would be challengers to your crown! Everybody starts
Map Selection - The maps available will differ depending upon your keep setting and        with the same resources and builds a castle using a fixed amount of stone and troops.
the number of players joining. Maps can be selected from the bottom right window.          Attackers then have a set amount of points to choose the make up of their attacking
You will see an overview of the selected map appear in the top right window and a          force in an attempt to siege your stronghold and kill your lord. Your castle can then
short description of the map below it.                                                     be judged by how well it survived or how easily it fell.

When every player is ready and you are happy with the game settings, the game can be       New Multi-Player Map - From here you can create a map for you and your friends to
launched by pressing the ‘Launch’ button.                                                  fight over. When you enter the map editing screen there are extra options for placing
                                                                                           the players starting keeps and structures. The number of keeps you place on the map
In Game Chat                                                                               dictates the maximum number of players that can use the map and the type of keep
During the course of a multiplayer game you can send messages to other players by          you place will set the 'Starting Keep' type (see section 1.7 on multiplayer games).
bringing up the chat entry panel. You do this by pressing the Space bar. Before you
start entering your message you need to decide who to send your message to. The            Once in the map editor you will have at your disposal an array of landscape editing
default is to everyone, but if you wish to send a message to a specific player, pressing   tools and a custom scenario builder to enable you to create the most beautiful map
the number keys will select an individual player as the recipient. Once you have typed     or the ultimate mission.
your message, press ‘Enter’ to send it. If you want to cancel the message press the
‘Escape’ key.                                                                              You may share these missions for the purposes of game play but may not sell or make
                                                                                           other commercial uses of the missions. Firefly Studios Ltd. reserves all other rights
For any updates to the Stronghold multiplayer game, please refer to the ‘Readme’ file.     to the editors and files.


                                           10                                                                                        11
STRONGHOLD                                                                            STRONGHOLD

2.0 Game Basics.                                                                        2.2 Camera Interface.
This section will take you through all of the main features within Stronghold. If you   When you press and hold the right mouse button on the main display you will see
rarely play computer games, it is recommended that you go through the in-game           the four camera interface icons appear.
tutorial by selecting the tutorial shield. If you play computer games regularly, then
scan this chapter to familiarize yourself with the basics.

2.1 Main Screen Overview and Navigating the Map.

After starting a new game the screen will look something like this:
                                                                                                  To Rotate the Map:
                                                                                                  Move the mouse pointer upwards onto the rotate icon, it will highlight
                                                                                                  and the map will rotate ninety degrees. The map will continue to rotate if
                                                                                                  you leave your mouse over the rotate icon and won't stop until you release
                                                                                                  the right mouse button.

                                                                                                  To Zoom:
                                                                                                  Holding down the right mouse button and moving the mouse pointer over
                                                                                                  the zoom icon, will zoom out your view, allowing you to see more of the
                                                                                                  map. Repeating the process will zoom back in again.

                                                                                                  To see behind things:
                                                                                                  Moving the mouse pointer downwards onto the flatten icon will pull the
                                                                                                  landscape, trees, walls and some buildings down to the same level.
                                                                                                  Releasing the button will make the landscape spring back up.

                                                                                                  Hint: This feature will prove very useful later on when you want to peek
                                                                                                       behind walls!

                                                                                                  To hide the Management Panel:
                                                                                                  Moving the mouse pointer over the icon to the left hides the management
                                                                                                  panel and makes the game go full screen. To bring the management panel
To scroll around the map, push the mouse pointer to the edge of the screen. As you
                                                                                                  back up, repeat the process.
scroll around, the overhead mini-map will move with you.
                                                                                                  Tip: You can also use the tab key to hide the management panel.
Tip: You can also use the cursor keys to scroll around the map.
     Another way to get to a specific location is by left clicking on
     the overhead mini-map in the bottom right of the screen.


                                           12                                                                                    13
STRONGHOLD                                                                              STRONGHOLD

2.3 Placing your Keep.                                                                  2.4 Population Growth.
You must place your starting keep and a granary on the map before any other build-      In addition to the keep and the stockpile you will see a campfire. Moving the mouse
ings become available. To construct a building, select it from the building selection   pointer over it will reveal the population growth indicator.
scroll at the bottom of the screen then left click on the main display when you are
happy with it's position.                                                                                          The more popular you are, the faster it will fill and the
                                                                                                                   quicker your population will grow. Every time the indica-
                                                                                                                   tor makes one full rotation, a peasant will arrive and stand
                                                                                                                   by the campfire until work becomes available. If the halo
                                                                                                                   turns red it means that you are unpopular. The halo will
                                                                                                                   then show how quickly people are leaving your castle.


                                                                                        2.5 Rationing and the Granary.
                                                                                                                 When you build a granary the food in your starting goods
                                                                                                                 will be transferred to it. Left clicking on the granary will
                                                                                                                 bring up the granary panel.
Note: If you happen to place a structure over an area of inaccessible ground, part of
     the cursor will turn red warning you that you cannot build there.
                                                                                                                 Note: Left clicking on any building or person will bring up a
                                                                                                                        screen giving you more information on them. Right
Once the keep is placed a lot of things will start happening. One of the first things
                                                                                                                        clicking after placing a building will clear the building
you'll see is you starting resources being transferred from your starting goods onto
                                                                                                                        cursor and give you back the standard mouse cursor.
your stockpile.


                                                                                        This panel lets you see your food details and allows you to make changes to your
                                                                                        rationing. On the right of this panel there are five plates with varying amounts of
                                                                                        food on them, which symbolize the different ration settings from 'no rations' up to
These resources are now available for you to use in construction.
                                                                                        'double rations'. Reducing you rations below the default of 'full rations' will have a
                                                                                        negative effect on your popularity, whereas increasing them will have a positive effect.
                                                                                        You will see the rate of consumption by watching the speed of the bar in the granary
                                                                                        panel or by looking at the units of food disappear from your granary.


                                           14                                                                                      15
STRONGHOLD                                                                              STRONGHOLD

2.6 Setting Taxes.                                                                                  If your scribe stops smiling and your popularity rating starts being dis-
                                                                                                    played in red, you will begin to lose workers. Your popularity will be
Left clicking on your keep will bring up the tax panel, which lets you view your tax                displayed in red if it is below 50 and displayed in green if it is 50 or
details and change your tax rate. You can set your taxes to anything from a generous                higher.
bribe all the way up to a downright cruel tax by moving the slide bar left or right.
Increasing your tax rate above the default setting of 'no taxes' will have a negative
effect on your popularity and reducing taxes to hand out bribe money will have a        Tip: Listen for announcements from your advisor. He will let you know if you are
positive effect.                                                                             running into any problems.

2.7 Popularity in Brief.                                                                2.8 Gathering Food and Resources.

             The scribe holding up an open book allows you to see critical informa-     Running along the bottom left of the screen you will notice six shields.
             tion at a glance.

             The expression on his face reflects your popularity and he will also let
             you know what he thinks about some of your actions!


Left clicking on the report book will bring up the reports panel.                       These are the building category buttons, which change the type of buildings displayed
                                                                                        on the building selection scroll above them. Moving your mouse pointer over these
                                                                                        shields will highlight them and bring up a brief description of the button above the
                                                                                        building selection scroll.

                                                                                        Tip: If you can't work out the function of any of the icons in the game, move your
                                                                                             mouse pointer over the icon and it's description will appear.
Left clicking on the ‘Popularity’ button will show all information regarding your
popularity.                                                                             The most basic resource in the game is wood, as it is required in the construction of
                                                                                        almost every building. Left clicking on the shield with the picture of a hammer will
                                                                                        select the ‘Industry Buildings’ category.

                                                                                        When you place a woodcutter's hut on the map a peasant will turn into a woodcutter
                                                                                        and get to work cutting down trees.

At the bottom of the panel, after the words 'In the coming month' you will see the
overall effects of your actions on castle popularity for the coming month. Making
changes to your tax rate and rationing are the two main ways of manipulating your
popularity. Ensure your popularity rating remains above 50, otherwise people will
begin leaving your castle.

                                          16                                                                                      17
STRONGHOLD                                                                               STRONGHOLD

A quick and easy way to gain food early on is by hunting deer by building hunter's      3.0 Influencing your Popularity.
huts found in the ‘Farm Buildings’ category.
                                                                                        This chapter will take you through each of the factors, which govern your popularity.
                                                                                        These are listed for you when you open the popularity panel from the report menu.


Once the meat is prepared they will place it in your granary, swelling your food                          To the left of each is a face. A green smiling face means that you
stocks. You should always be aiming to balance the rate at which you consume food                         will have a positive effect for that factor. A yellow face shows that
with the rate at which it is being put into your granary.                               there is no effect and the red sad face represents a negative effect. When added
                                                                                        together the sum of these reflect either a bonus or penalty to your overall popularity.
      Undo - If you change your mind when placing a structure, left click on the        This number is shown after the words 'In the coming month'. There are a total of
      ‘Undo’ button to the left of the mini-map and you're last action will be can-     seven ways to effect popularity with the two main factors being food and tax.
      celled. All of the resources will be recovered.

      Delete - To remove a structure from your settlement, left click on the ‘Delete’
                                                                                        3.1 Food.
      button to the left of the mini-map then select the structure you wish to
                                                                                        Changing your rationing is one of the quickest ways to influence your popularity.
      remove. Half of the resources spent in construction will be recovered.
                                                                                        Both the number of food types eaten and your ration setting affect your food bonus
                                                                                        or penalty. These separate influences can be seen in the granary panel.
2.9 Increasing your Population.

                 To increase your available housing, build more hovels found in the
                 ‘Town Buildings’ category.

                 Your available housing will increase by eight and your settlement
                 will continue to grow, but so of course will the mouths to feed.       Your people will be happier with you if you supply them with more than 1 type of
                                                                                        food. Less than full rations hurts your popularity, while increasing your rations
Recap:
                                                                                        boosts it. The bonuses and penalties from food types eaten and rationing are as fol-
• Use the camera interface and mini-map to help you find a suitable location            lows:
  for your settlement.
• The keep and granary must be placed before any other buildings become                 Food Types Eaten          Bonus to Popularity       Rations Bonus to Popularity
  available.
• Popularity is your key game variable.                                                                                                                       -
• Changing your tax rate and rationing will influence your popularity.                          1                           0               None              8
                                                                                                                           +                                  -
• Make sure you start gathering wood and food early on.                                         2                           1               Half              4
• Build more housing to increase your population, keeping an eye on your food                   3                          +
                                                                                                                            2               Full              0
  supply and popularity as you expand.                                                                                     +                                  +
                                                                                                4                           3               Extra              4
                                                                                                                                                              +
                                                                                                                                            Double             8
                                          18                                                                                       19
STRONGHOLD                                                                                             STRONGHOLD

3.2 Tax.                                                                                                     3.3 Crowding.
The people of Stronghold do not enjoy paying taxes so any positive tax rate you set                                         Your keep provides you with some starter housing for your people,
will have a negative effect on your popularity.                                                                             after which you need to place houses to increase your maximum popu-
                                                                                                                            lation level. Each house provides shelter for another 8 people.
                                                                                                                            Crowding will occur when your population exceeds your available
                                                                                                                            housing. The population indicator will turn red if you have an over-
                                                                                                                            crowding problem.

                                                                                                                            Overcrowding may occur if a house is deleted or destroyed by the
                                                                                                                            enemy. To remedy overcrowding, simply build more housing.
When you have sufficient gold in your treasury you may decide to give your peasants
a handout in the form of bribe money each month.
                                                                                                             3.4 Fairs and Other Events.
                                                                                                             Occasionally, during the course of the game, traveling fairs will pay surprise visits to
                                                                                                             your castle and provide entertainment. Whilst they are in town you will gain a tem-
                                                                                                             porary bonus to popularity.


Doing this will have a positive effect on your popularity.

Hint: You will find bribery proves useful when you are running low on food. Change
           your rations to half then hand out bribe money to offset the worst of the
           penalty until you find a way of restoring your granary stock.                                     Other events such as the marriage of your lord will also occur, bringing temporary
                                                                                                             changes to your current popularity. These are added bonuses that you have no con-
The table below shows the popularity bonuses and penalties that you will receive                             trol over.
from the various tax settings.
Generous       Large    Small   No Taxes    Low         Average   High    Mean    Extortionate   Downright   3.5 Religion.
 Bribe         Bribe    Bribe              Taxes         Taxes    Taxes   Taxes     Taxes          Cruel
                                                                                                   Taxes
                                                                                                             When a religious building is placed, priests will arrive and begin blessing your people.
  +7         +5         +3        +1        -2            -4       -6      -8         -12        -16


Note: Attempting to give out bribe money when your treasury is empty will not have
           any effect on popularity.


                                                   20                                                                                                   21
STRONGHOLD                                                                                STRONGHOLD

By opening the religion panel from the advisors report menu, you can see the per-          3.7 Fear Factor.
centage of people who have been blessed as well as the bonus you are receiving to
popularity.                                                                                Fear factor lets you know how people see you, as either cruel and ruthless or easy
                                                                                           going and forgiving. Your fear factor determines how productive your workers are.
                                                                                           Placing good things around your castle will make you seem easy going and increase
                                                                                           your popularity, but at the same time will reduce your workers efficiency.
                                                                                           Constructing some gardens in the castle for example will make everyone happy, but
                                                                                           you will find that they tend to loiter about at the gardens after delivering their
                                                                                           goods, instead of heading straight back to work.
The blessing given by the priest wears off after a short while, at which point that per-
son must be blessed again. Covering the religious needs of the community, therefore,               To see these structures left click on the ‘Good Things’ button in the 'Town
is a continual process. The higher the percentage of blessed people, the higher the                Buildings' category.
bonus you will receive to your popularity.

As your castle population grows the percentage of your people blessed will start to
fall, thus lowering your bonus. To rectify this you will need to place extra religious
buildings. Be warned however as your community grows, people will start demanding
ever more impressive (and expensive) religious structures and failure to provide these
buildings will result in a popularity drop.

The religious buildings available can be seen in the town buildings category.
                                                                                           On the other hand, you may wish to appear more cruel and ruthless. You can
3.6 Working Inns.                                                                          increase work efficiency by placing bad structures around your castle. This will
                                                                                           unsurprisingly have a negative effect on your popularity. Placing a few gallows for
A working inn is one with a supply of ale and an innkeeper. The innkeeper will col-        example may not be the most popular of decisions, but it has the effect of encourag-
lect ale from the stockpile and deliver it to the inn automatically. Once ale is avail-    ing people to work that extra bit harder. They will even start to deliver extra goods
able at an inn, your people will start to drink it. The rate at which ale is drunk         when they make deliveries to the stockpile, granary or armory.
depends on your population. The more people you have the faster it will be con-
sumed. To check to see if an inn is working, select it and look at it's panel.                     To see these structures, left click on the ‘Bad Things’ button in the 'Town
                                                                                                   Buildings' category.


This panel shows how many barrels and flagons of ale the inn has in stock. For each
working inn, (i.e. one that still has ale) you will gain a bonus of plus 1 to your popu-
larity. Ale is drunk from each inn at the same rate regardless of its location. Inns are
in the 'Food Processing Buildings' category.


                                           22                                                                                        23
STRONGHOLD                                                                                  STRONGHOLD

4.0 Food and Resources.                                                                      Hint: It is a good idea to leave some space around you stockpile in case you need to
                                                                                                   expand it later in the game.
This section will take you through how to manage your food and resources. In
Stronghold, there are three types of goods available:                                        4.2 Resources.
· Food                                                                                       In total, there are eight resource types, which are stored in your stockpile. Some are
· Resources                                                                                  raw materials and others are processed.
· Weaponry
                                                                                                     Wheat: This grows on your wheat farms and is at the start of the most pro-
Note: For information on weaponry, see section 6.1.                                                  ductive food chain in Stronghold. Wheat is required to make flour.

              Upon starting a new game you will see a cart travel across the top of the              Flour: This is produced at the mill and requires wheat. Flour is required to
              screen. This signals the arrival of your starting goods.                               bake bread.

                                                                                                     Hops: These grow on your hop farms. If you want to brew ale, you will first
Your starting goods are displayed in the top left of the main display, until you pro-                need to grow hops.
vide space for them by building a stockpile, granary or armory.
                                                                                                     Ale: This is produced at the brewery and requires a supply of hops. When
4.1 The Stockpile.                                                                                   ale is finally distributed through your inns, you will gain a bonus to your
                                                                                                     popularity.
All of the resources you gather or produce will be placed on the stockpile. Each
stockpile square can hold up to four resource types.                                                 Stone: The quarries that extract this from the ground must be placed on the
                                                                                                     white boulders. Stone is required for building most of the castle defensive
                                                                                                     structures.

                                                                                                     Iron: The mines, which extract this, must be placed on the reddish colored
                                                                                                     rocks found on the tops of hills. You will need iron to craft the more
                                                                                                     advanced weapon and armor types.
You can gauge the approximate amounts of resources you have by simply looking at
the stockpile. To see the exact amount of each resource left click on the stockpile.                 Wood: This is gathered by woodcutters and is used in the construction of
                                                                                                     most buildings. It can also be used to craft basic weapon types.
Tip: You can also use the ‘Stores’ button from the advisors report menu to get to the
    same panel.                                                                                      Pitch: You will find this bubbling up through marshes. Once you have
                                                                                                     placed a pitch rig on some oil in the marsh, pitch diggers will extract pitch.
                                                                                                     Pitch is used for boiling oil and pitch ditches.


When you run out of space, extra stockpile squares can be added to your original stock-
pile. Any additional stockpile squares must be placed adjacent to your original stockpile.
                                            24                                                                                         25
STRONGHOLD                                                                                STRONGHOLD

4.3 The Granary.                                                                          To find out exactly how many units of each food type you have in stock, left click on
                                                                                          the ‘Food Report’ button on the granary panel.
The granary is where all of your food is stored. Left clicking on your granary will
allow you to set the amount of food that is distributed to your population. This is       Tip: You can also get to this panel by selecting food from the scribes report menu.
referred to as your ration level.


The green bar in the top left is the food consumption indicator. Each time the indi-      From here you can see which foods you are running low on. To increase your food
cator fills with green, one unit of food is consumed from the granary. The larger         storage capacity, additional granaries can be placed adjacent to your existing granary.
your population and the higher you set your ration level, the quicker your granary
stocks will deplete.                                                                      4.4 Food Types.
The three numbers underneath this show the units of food remaining in the granary,        There are four types of food available in Stronghold, all of which are stored in the
how long this food will last and the number of food types your people are eating.         granary. Each food type has it's own benefits and drawbacks.

On the right of this panel, there are five plates with varying amounts of food on                 Meat: Hunters will gather this for you when a hunters hut is placed. This
them, which symbolize the different ration settings from 'no rations' up to 'double               is quick to get working and can generate quite a bit of food, however, animal
rations'. Reducing you rations below the default of 'full rations' will have a negative           migration and over hunting can make meat an unreliable food source.
effect on your popularity, whereas, increasing them will have a positive effect.
                                                                                                  Apples: These are grown in your orchards, which must be placed on low-
If you hold your mouse pointer over the granary, the roof of the granary will be                  lying land. These are quick to get working, but require a large area of land
removed so you can see inside. Looking at the granary should give you a rough idea                for each orchard. Apple production usually proves to be more reliable than
of how much and what types of food you have stored.                                               meat, but produces a little less food.

                                                                                                  Cheese: This is produced in your dairy farms. Dairy farming is slow to get
                                                                                                  going. Only when three cows have been raised will your dairy farmer begin
                                                                                                  milking them to produce cheese. Once running, however, dairy farming is
                                                                                                  more efficient than apple farming or hunting. If you are producing leather
                                                                                                  armor cheese production will suffer as tanners take the cows.

                                                                                                  Bread: This is made in the bakery and requires a supply of flour, which in
                                                                                                  turn requires a supply of wheat. The food chain leading up to bread requires
                                                                                                  more time and resources to set-up, but when your wheat farms, mills and
                                                                                                  bakeries are all in place, it proves the most efficient food source in the game.
                                                                                                  As with apple farming, wheat farms must be placed on low-lying land so at
                                                                                                  times you may need to think carefully about how to maximize this limited
                                                                                                  space.
                                           26                                                                                        27
STRONGHOLD                                                                                STRONGHOLD

Tip: A working mill will support multiple bakers. For baking to become really cost        5.2 The Marketplace.
    effective, you will want to get several bakers working.
                                                                                          The marketplace allows you to buy and sell goods. Left clicking on the marketplace
5.0 Money.                                                                                will bring up the trade panel.

This section will show you how to effectively manage your finances. Maintaining a
healthy treasury will help you deal with emergencies.

5.1 Tax Rate.
Left click on your keep to bring up the tax panel.                                        The ‘Scale’ icon on the right will bring up a price list of all available goods. This
                                                                                          panel shows the buying and selling price for each good that the trader has available.


The slider bar allows you to raise taxes or bribe your people.

Note: Section 3.2 deals with how your tax rate influences your popularity.                Note: Some goods may not be available to trade depending upon where you are in the
                                                                                               game.
If you have plenty of gold in your treasury you may decide to move your tax rate
down to a point where you actually pay your peasants bribes to encourage them to          The first three icons will take you to the trade panel for food, resources or military
stay. This will provide you with a popularity bonus.                                      goods.


On the other hand you may decide to move your tax rate up to raise money. Raising
taxes will have a negative effect on your popularity. The highest tax rate that can be    From here, click on the good you wish to trade then select the ‘Buy or Sell’ button.
set is a 'Downright Cruel' tax where you take every penny your peasants earn, this will
have a devastating effect on your popularity and should be used only for brief peri-      Note: Markets only deal in bulk so you must purchase or sell batches of five goods at
ods.                                                                                           a time.


Go to the Treasury report to see details of the castles current financial situation.
                                           28                                                                                        29
STRONGHOLD                                                                                  STRONGHOLD

6.0 Military Forces.                                                                       and walk to the barracks. Troops are not considered part of your workforce so do
                                                                                           not require additional housing. The gold paid for them is used to buy their food
This section will take you through everything you need to know about raising an            while in your service, therefore, they do not receive rations from the granary.
army.

6.1 Military Goods and the Armory.                                                         6.3 Available Units.

There are eight types of weapon in Stronghold. These are stored in the armory. To          There are eight troop types available for hire in the barracks and an additional three
see how many weapons and suits of armor you have, left click on the armory.                special units who are trained in your guilds.
                                                                                                         Archers: These are your standard long-range troops. Their lack of
Weaponry         Made by         Required Resources                                                      armor makes them one of the quickest units in the game but in hand-to-
Bow              Fletcher        2 Wood                                                                  hand combat, archers are virtually useless. They have a long firing range
Crossbow         Fletcher        3 Wood                                                                  and are very effective against units that don't wear metal armor.
Spear            Poleturner      1 Wood                                                                  Crossbowmen: These units are slow to move and reload and have a
Pike             Poleturner      2 Wood                                                                  shorter range then Archers. They are, however, very accurate and their
Mace             Blacksmith      1 Iron                                                                  deadly bolts can easily penetrate metal armor.
Swords           Blacksmith      1 Iron                                                                  Spearmen: These are the first melee troops you have access to and the
Leather Armor    Tanner          One cow provides enough leather for three suits                         cheapest to produce. Having no armor makes them quicker than most
Metal Armor      Armorer         1 Iron                                                                  troops and they prove useful for pushing ladders off of walls and digging
                                                                                                         moats. They are also one of the few units able to use ladders to scale walls.
6.2 The Barracks.                                                                                        Pikemen: Their heavy pike and metal armor make Pikemen slow to
                                                                                                         move, but also make them the ultimate defensive unit. They are able to
                                                                                                         take a lot of damage and are ideal for blocking access to areas of the castle.
This is where you hire and train your troops. Selecting this building will bring up
the barracks panel.                                                                                      Macemen: These thuggish brutes are quick and deal out a lot of dam-
                                                                                                         age, making them ideal assault troops. They are not heavily armored,
                                                                                                         however, and are very susceptible to missile fire. Like spearmen they can
                                                                                                         use ladders to scale castle walls.
                                                                                                         Swordsmen: These are your elite foot soldiers. Their heavy armor
                                                                                                         makes them the slowest unit in the game but when they reach their tar-
To find out which weapons are required to build a military unit, move your mouse                         get they prove devastating. They have both great offensive and defensive
pointer over each of the troop types and the required goods will become highlighted                      capabilities.
at the bottom of the panel. The amount of gold needed will also be shown at the top                      Knights: The ultimate trained solider, Knights are both fast and deadly
of the panel.                                                                                            in combat. They are also especially useful for surprise attacks, sallying
                                                                                                         forth from the castle to destroy siege equipment. Each knight needs a
                                                                                                         horse bred for him in your stables.
                                                                                                         Tunnelers: These special units can burrow beneath the foundations of
                                                                                                         enemy walls and turrets, causing them to collapse. They are trained (for
                                                                                                         a cost in gold) at the tunneler's guild.
If you have peasants available, as well as the correct military goods and gold, left
clicking on a troop type will hire and train it. Your troops will appear at the campfire
                                           30                                                                                           31
STRONGHOLD                                                                             STRONGHOLD

              Laddermen: If you can't bring a wall down then these units will allow        Army Interface Panel:
              you to go over the top. Laddermen are cheap to produce but are very
              vulnerable, so they need to be deployed quickly.                             When units are selected you will see the army interface panel appear at the bottom of
                                                                                           the screen with the units command box on the left and the unit information panel on
              Engineers: These are perhaps the most versatile and useful unit in the       the right. The unit information panel shows you the type and amount of units cur-
              game. They are required to build and man all of your siege equipment,        rently selected and allows you to select and deselect specific unit types. Left clicking
              in and out of the castle. These units are trained in the engineer's guild.   on a unit type from this panel will select only that unit type whereas right clicking
                                                                                           will remove that unit type from the current selection.
              Black Monks: These are mysterious individuals to say the least. Now
              and again they will appear and share their knowledge with you and help
              you fight.


7.0 Issuing Military Commands.                                                             Grouping units:

This chapter takes you through the commands you can issue to your military units.          Grouping units allows you to form a group of units that you can command at the
                                                                                           same time.
Note: Units in this chapter refer to military units only.
                                                                                           1) To form a group of units, first make a selection.
                                                                                           2) Next hold down the ‘Ctrl’ key and press a number on the keyboard to assign to
7.1 Gathering your Forces.                                                                    the group.
                                                                                           3)Once a group has been assigned a number, pressing that number on the keyboard
                                    Selecting units:                                         will select it. For example, pressing the number 1 on the keyboard will select
                                                                                             group 1. Pressing the same number again will take you to the groups current posi-
                                    You can select a single unit by left clicking on it.     tion on the map.
                                    To select a group of units, press and hold the left
                                    mouse button then drag the pointer to create a box
                                    around them. When you release the mouse button,
                                                                                           7.2 Marching Orders.
                                    all of the units that were within the box will now
                                    become selected.                                                         When you have a unit selected, your pointer will change to the move-
                                                                                                             ment cursor. The green pointer means that you can move to a specific
                                                                                                             spot while the red cross means the area is inaccessible.

Additional options for selecting units:                                                    Moving units to the tops of walls and towers:

Units can be added or removed from a selection by holding down the ‘Shift’ key then                 To position troops on top of your walls and defensive structures select a
left clicking on them. Multiple units can be added to a selection by holding down                   unit then when the fortify mouse cursor appears, left click to send units to
the ‘Shift’ key and dragging a box around them. Double clicking on a unit will select               that destination.
all of that unit type visible on the screen.
                                                                                           Note: If the red cross appears it is likely to mean that there are no stairs leading up
                                                                                                 to the top of your building or wall.
                                              32                                                                                        33
STRONGHOLD                                                                                 STRONGHOLD

Patrolling:                                                                                 7.4 Military Commands.
         You can also set units to patrol between two points. Move the unit to where        Attacking the enemy:
         you want their patrol to start, select the ‘Patrol’ button then left click where
         you wish the patrol to end. The unit will patrol back and forth between the               To attack the enemy, select a unit then click on the enemy you wish to attack
         two positions.                                                                            when you see the attack pointer appear.

Setting up advanced patrols:                                                                       In addition to your standard attack some units have an extra attack option
                                                                                                   accessed by using the ‘Special Attack’ button in the bottom left of the unit
1) Select a unit then the ‘Patrol’ button.                                                         control box. This button will change depending upon the unit selected. With
2) While holding down the ‘Shift’ key, left click to place additional patrol markers               range units selected this button will become the 'Attack Here' button.
   (you can place up to 10).
3) When you are happy with the patrol markers, press the right mouse button to                     Selecting this button will allow you to designate an attack radius. You will
   finish.                                                                                         see a circle of dots appear to show the area the unit will attack. This type of
4) Units will patrol in the order you have placed the markers.                                     attack is very useful for attacking units behind castle walls.

       Note: If a group of selected units are on the move you can prevent them from               When an engineer with a pot of boiling oil is selected this button will appear
              going further by clicking the ‘Stop’ button.                                        as the ‘Pour Oil’ button.

                                                                                                   After the ‘Pour Oil’ button has been selected a circle will appear above the
                                                                                                   engineers head to show the direction that the oil will be poured. Beware, this
7.3 Unit Stances.                                                                                  control allows you to pour oil anywhere on the map, even at ground level
                                                                                                   which will almost certainly leave the engineer standing in his own oil!
                The top three buttons in the command box change the way your units
                behave in combat.                                                                  Moving the mouse changes the pour direction and left clicking pours the oil.
                                                                                                   After the oil has been poured your engineer will automatically run back to the
Stand Ground - Units set to stand ground will not move from their posts unless                     oil smelter to replenish his oil then return to his designated post.
ordered to do otherwise. They will defend themselves when attacked and if they are a
missile unit, will fire when enemy units come into range.

Defensive Stance - Units set to a defensive stance will move a short distance from
their post to engage any enemy units that come close to their position. Once there
are no more enemy units to engage, they will return to their original position.

Aggressive Stance - Units set to an aggressive stance will look a long way to engage
or chase down enemy units. When the enemy is defeated your units will look for
another potential target before returning to their original position. Units in an
aggressive stance will also respond actively to missile attacks.


                                           34                                                                                         35
STRONGHOLD                                                                                 STRONGHOLD

Another method of pouring the oil is to select the engineer and then simply use the         7.5 Map Bookmarks.
target cursor to direct his aim. This is a quicker approach when in the heat of battle.
                                                                                            Areas on the map can be book marked by holding down the ‘Ctrl’ and ‘Alt’ keys then
      With a tunnel digger selected this button will appear as the ‘Dig Here’ button.       pressing a number. To quickly return to this position later hold down the ‘Alt’ key
      After this button is selected and the left mouse button is pressed on the map,        and press the number. For example, to bookmark your quarry area, scroll over to
      the tunnel digger will begin his decent then dig his way to the nearest poten-        your quarry. Now, while holding down the ‘Ctrl’ and ‘Alt’ keys, press the number 1
      tial target.                                                                          on your keyboard. Later, to quickly return to the quarry area, hold down the ‘Alt’ key
                                                                                            and press the number 1 on the keyboard. Additionally, pressing the ‘H’ key will cen-
Note: Section 9.7 covers tunnel digging in more detail.                                     ter you on your keep. Pressing the ‘S’ key will center you on the signpost where
                                                                                            enemy units appear.
As well as these special attacks, some units have additional commands. When engi-
neers are selected you will see a ‘Build’ button appear in the unit control box.
Selecting this will bring up a list of available siege engines to build.
                                                                                            8.0 Defending your People.
                                                                                            This section will take you through the various ways you can defend that which you
Note: See section 9.1 for more information on building siege equipment.
                                                                                            have built.
      Catapults and trebuchets also have a ‘Launch Cow’ button available on certain
      missions as long as you have a supply of diseased cattle to fire (shown by the        8.1 The Gatehouse.
      number on the icon).
                                                                                            This should be one of your first considerations when piecing together your defenses,
      To retire a unit, select it then click on the ‘Disband’ button in the units control   because once your walls are built your workers will need a gatehouse to get in and out
      box. The unit will turn back into a peasant and go to the campfire until work         of the castle. To build one, first select the ‘Castle Buildings’ category then click on
      is assigned.                                                                          the ‘Gatehouse’ button. Left click on the gatehouse of your choice then select the
                                                                                            appropriate orientation before placing it.
Note: If the campfire is inaccessible the peasants will vanish from the map.
                                                                                            8.2 Building Walls.
Attacking units with your Lord:
                                                                                                     Walls are selected from the castle buildings category. When the desired wall
Your Lord can be used to target and attack enemy units, but cannot be ordered to                     is selected, press and hold the left mouse button on the main display then
move to a specific destination. If there are enemy units on the map, the lord will                   slowly drag the mouse. If you have enough wood or stone in your stockpile,
return to the safety of the keep, unless you order him to attack.                                    the wall will appear in front of you. The wall will finally be placed only
                                                                                                     when the button is released.

                                                                                            Tip: Walls can be built to any thickness, with thicker walls taking much longer to
                                                                                                 bash through than thinner ones.

                                                                                            Crenulated walls can be added to the front of your standard walls to give added pro-
                                                                                            tection. Wooden walls are cheaper to build than stonewalls, but are much easier to
                                                                                            knock down and do not allow soldiers to stand on them.


                                           36                                                                                         37
STRONGHOLD                                                                                    STRONGHOLD

Note: When dragging to create walls, if any piece of the wall is not in a valid building                    The second trap is the pitch ditch. This is an area or trench of oil
      location, the whole wall will turn red.                                                               extracted from the marsh that ignites into a deadly inferno when
                                                                                                            you fire a burning arrow into it. To light the pitch you will need an
8.3 Turrets and Towers.                                                                                     archer with a brazier close by to ignite the pitch. Target him at the
                                                                                                            pitch and he will fire a burning arrow into it.
                                    These can be found in the defense section of the
                                    castle buildings panel. They are impervious to lad-
                                    der attacks and can withstand much more damage         8.6 Moat Digging.
                                    than walls.
                                                                                                           This is a mucky job, but provides an excellent defense. To dig one
                                                                                                           you first need to layout a plan for where you want a moat to be dug.
They also give your missile units further firing range and provide all units with a
                                                                                                           You do this by selecting 'Dig' from the castle buildings category then
defensive advantage against enemy missile troops.
                                                                                                           left clicking on the map. If you are unhappy with the plan, select the
                                                                                                           'Don't Dig' button then left click to correct it. When you are happy
Turrets are cheap to build, but only have room for a small number of military units,                       with the plan, select some units then move your cursor over the plan
don't support siege equipment and can be collapsed by tunneling attacks.                   area. When the cursor turns into a shovel, left click and the units will move to that
                                                                                           position then start digging out the moat. If you want to fill in a moat (your own or
Towers are more expensive, but have space for more military units, can be used to          your enemies!) just select some troops and click on the moat.
mount defensive siege equipment and are immune to tunneling attacks.
                                                                                           Tip: Some of your units will dig more enthusiastically than others and some will
Troops get into towers via the walls. You must build a wall adjacent to a tower to              refuse to dig altogether.
create a door for troops to use then provide stair access up onto that wall (See
                                                                                           A drawbridge can be attached to stone gatehouses. This allows your people across
below).                                                                                    the moat but can also be raised in times of siege to delay the enemy.

8.4 Placing Stairs.                                                                        8.7 Mounted Siege Equipment.
In order to allow troops to have access to the tops of walls and gatehouses, there                Castle siege machines such as ballista and mangonels can be placed on top of
must be stairs connected to them. Stairs are built in the same way as walls but must              towers to protect your castle. Engineers must man these siege machines after
be attached to either your standard walls or the side of your gatehouse. To build                  they are built. Mangonels throw out a spray of rocks and are devastating
them, select stairs and move your mouse pointer next to a section of wall. Now press               against infantry, but are quite inaccurate. Ballista are more accurate, shoot-
and hold the left mouse button on the main display then slowly drag the mouse. You                 ing a single bolt at a time and are very effective against enemy siege engines.
will see an outline of stairs appear. When you happy with the placement, release the
left mouse button to build them.                                                           8.8 Boiling Oil.
8.5 Traps.                                                                                                 Boiling oil is an awesome defense against besieging units. To equip an engineer
                                                                                                           with a pot of boiling oil you must assign him to boiling oil duty. First select an
There are two types of traps available in Stronghold. The first one is the killing pit,                    engineer and move your cursor over the oil smelter. When the cursor turns into
which is a covered pit with sharpened stakes at the bottom. Killing pits are visible                       a down arrow, left click and the engineer will be assigned to boiling oil duty.
and harmless to your people but invisible to the enemy who fall to their deaths inside                     The first engineer assigned has the job of keeping the smelter filled with pitch
them.                                                                                                      and filling up the boiling oil pots of other engineers.


                                           38                                                                                            39
                                                                                                                                         39
STRONGHOLD                                                                               STRONGHOLD

Subsequent engineers assigned to the smelter will receive pots of boiling oil, which       9.3 Battering Rams.
they can now use against attackers!
                                                                                                    Battering Rams are slow, but can take a lot of damage and prove a superi-
To pour the oil, select an engineer then press the ‘Pour Oil’ button. Move your cur-                or weapon for bringing down gatehouses. They are also effective against
sor over an enemy unit or area of ground that you want to pour the oil on then left                 castle walls and towers, when they manage to reach them. Each ram
click.                                                                                              requires 4 siege engineers to man it before it will become operational.

9.0 Siege Warfare.                                                                         9.4 Siege Towers.
This chapter will help you to master the art of getting into someone else's castle!                 When in position, these gigantic mobile constructs will give all your
                                                                                                    troops quick access to the top of enemy walls. To use a siege tower,
9.1 Siege Equipment Overview.                                                                       select it and move it adjacent to an enemy wall. Once it is close enough,
                                                                                                    the tower will dock and a gangplank will drop onto the enemies' wall.
                       In order to get your siege engines up and running, you need                  Once the gangplank is in place, units will be able to climb up through the
                       engineers to build and man them. With an engineer selected,                  siege tower onto enemy walls. Each siege tower requires 4 siege engineers
                       click on the ‘Siege Equipment’ button to see a list of machines              to man it before it will become operational.
                       that are available to build.
                                                                                           9.5 Catapults.
Select the piece of siege equipment you wish to build then left click on the map and                These siege machines allow you to demolish enemy structures from a dis-
a siege tent will appear. Selecting this tent will give you an idea of how long the                 tance. Catapults are mobile, fairly accurate, have a medium range and do a
equipment will take to build.                                                                       medium amount of damage. They fire with a low trajectory so they are
                                                                                                    good for precision attacks, to take out enemy structures. Catapults can
Hint: Siege tents are easy to demolish and the engineers inside are vulnerable until the            also fire diseased cattle into an enemy castle to spread the plague. To do
     equipment is finished. Ensure you protect them well.                                           this select the ‘Fire Cow’ button from the catapult menu then select a tar-
                                                                                                    get. Each catapult requires 2 siege engineers to man it before it will
All siege engines need to be manned. To do this, select a group of engineers then                   become operational.
move your cursor over the piece of siege equipment you wish to man. When the cur-
sor turns into a down arrow, left click and the engineers will move to the equipment
and man it. Depending on the type of siege equipment, a different amount of engi-
                                                                                           9.6 Trebuchets.
neers are needed to man them before they become operational.
                                                                                                    Trebuchets are awesome siege machines for knocking down castle struc-
                                                                                                    tures. Trebuchets are huge machines and once built, stay in a fixed posi-
9.2 Portable Shields.                                                                               tion. They lack the accuracy of catapults but have a very long range and
                                                                                                    do a large amount of damage when they hit enemy structures. Trebuchets
                                These are good for protecting your infantry from vol-               fire with a high arc, so they are ideal for firing over castle walls. As with
                                leys of arrows and crossbow bolts, but are very weak                catapults you can fire diseased cattle into enemy castles to spread disease.
                                against infantry attacks. Each shield requires 1 siege              Each trebuchet requires 3 siege engineers to man it before it becomes
                                engineer to man it before it will become operational.               operational.


                                           40                                                                                       41
STRONGHOLD                                                                               STRONGHOLD

9.7 Digging Tunnels.                                                                     10.0 Reference Section.
           Another way to bring the opposition to their knees is by digging tunnels.     This chapter gives you additional information, which you may find useful in your
           Tunnelers dig under defensive structures then collapse their tunnel,          conquest.
           demolishing the foundations above. To do this, select a tunneler then
           click on the ‘Dig’ button. Choose an area close to the castle as there is a   10.1 Non-military Characters:
           maximum distance the tunnel can extend before it collapses in on itself.
           Once underground, the Tunneler will make his way towards the nearest                  Lord: His Lordship is the most important character in the game. He is an
           wall, turret or gatehouse and set fire to the pit props holding up the tun-           absolutely deadly fighter as well as the master of all he surveys. Should he
           nel, causing it to collapse. This will damage or destroy the structure                fall in combat the game will be lost.
           above the tunnel. It is impossible for tunnel diggers to dig under moats
           or towers although they can attack the smaller turrets.                               Lady: Although she has the good of the castle at heart, she can come across
                                                                                                 as a little bossy. She used to live in a luxurious manor house with her father
9.8 Filling in Moats.                                                                            and now complains profusely about the squalid conditions she is forced to
                                                                                                 live in.
Military units can be ordered to fill in the enemies' moats. To do this select a group
of units then click on the moat when you see the shovel pointer appear. They will                Jester: The jester runs around your castle teasing people whilst doing acro-
walk to the moat and start filling it in.                                                        batics so has a very short life expectancy.

                                                                                                 Woodcutters: They cut down trees, are very vain and enjoy showing off their
                                                                                                 bulging muscles to passers by.

                                                                                                 Hunters: Hunters kill deer for food, taking the meat to your granary. They
                                                                                                 are rough and ready folks who have a strong appreciation for fine ale.


                                                                                                 Farmers: These lowly citizens tend to your various crops. They enjoy grum-
                                                                                                 bling about their poor treatment and have a bitter dislike for town folk.

                                                                                                 Peasants: They spend their days sitting around the fire and hoping to be
                                                                                                 given work.

                                                                                                 Children: These little scamps run around causing mischief all day. You will
                                                                                                 occasionally see them playing classic games such as catch and patty cake.

                                                                                                 Mothers and Babies: They appear when a hovel is placed. The mother is
                                                                                                 responsible for keeping the baby happy and making the house neat and tidy
                                                                                                 whereas the baby cries and makes a mess. They will be seen running to their
                                                                                                 hovel when enemies appear at the castle.

                                          42                                                                                      43
STRONGHOLD                                                                        STRONGHOLD

Stone Masons: They work in the quarry cutting and carving stone. Some            Armorer: He crafts metal armor for your soldiers. The armorer is a military
say they have their own mysterious society where masons indulge in a sacred      veteran and a well-respected figure in the castle, always ready with a new tale
ritual known as trouser leg rolling.                                             to tell the children.

Iron Miners: They work long hours underground, smelting and delivering           Blacksmith: He forges your swords and maces. The blacksmith is usually a
iron. Iron miners are cold-hearted individuals with a bleak outlook on life      quiet and reserved gentleman. Unfortunately he has a rather short fuse and
and it can prove difficult to break through their hardened exteriors.            has a tendency to burst into fits of rage without notice.

Pitch Diggers: These people extract pitch from the surrounding marshland.        Poleturner: He turns spears and pikes for your troops. The poleturner
Unfortunately, working in this environment has had an adverse effect on          spends his days contemplating the meaning behind a spinning piece of wood
their sense of smell so pitch workers have an even more acute personal           and comes across as a subdued introvert, but is in fact the wisest character in
hygiene problem than your average medieval citizen.                              the game.

Mill Boys: These young lads rush wheat to your mill, hastily grind it up,        Tanner: She is a strong willed woman and has no problem dispatching your
then quickly deliver the flour. Mill boys seem to have an endless supply of      cows, then sewing them into attractive leather garments for your soldiers to
energy.                                                                          wear. The tanner has an abrasive manner about her, which is coupled with an
                                                                                 exceptionally dominant personality.
Drover: He takes stone from the quarry pile, loads it onto his ox then, deliv-
ers the stone to your main stockpile. The drover is a big softy at heart,        Priests: They spread joy by carrying out blessings and weddings. Due to
spending most of his spare time at rhyme and verse.                              their strict order, medieval priests are not allowed a sense of humor.

Baker: He bakes bread to help feed your people. The baker comes across as        Healer: He clears up any clouds of disease, which float around your castle.
a happy and sensitive gentleman. He is also at the center of much village        The healer spends a lot of time walking in the woods to gather his herbs and
gossip.                                                                          sometimes disappears for days on end.

Brewer: She brews the ale for your inns. The brewer has a problem focusing       Market Trader: He will arrive when a market place is built. The trader is a
and walking straight. She regularly tastes what she brews and gets into trou-    quick talking fellow who holds himself confidently. He is always ready to
ble for shouting slurred insults at strangers in the street.                     negotiate the fairest and best possible deal for himself.

Innkeeper: He distributes ale among your workers. The innkeeper is a jolly       Juggler: He comes to your castle with the traveling fair to entertain your
red-faced gent who has his thumb on the pulse of the nation and knows            people. The juggler is a skittish character that finds it impossible to sit still
about all the latest fads.                                                       for two minutes and has a fear of commitment.

Drunkard: These wobbly individuals will appear when your inns are up and         Fire-eater: The fire-eater is also part of the traveling fair and really knows
running. You will see them staggering around in zigzag patterns only stop-       how to captivate the audience with his collection of cunning stunts. He no
ping to drink some more ale.                                                     longer has any body hair due to an unfortunate incident over a brazier.

Fletcher: He crafts bows and crossbows for your troops. The fletcher regu-
larly invites people around for tea so he can tell them all about his bad leg.

                                  44                                                                                45
STRONGHOLD                                           STRONGHOLD

                  10.2 Food Flow Chart:
Appendix Charts
                   Hunters Hut               Meat


                   Dairy Farm                Cheese

                   Orchard                   Apples


                   Wheat Farm                Wheat           Mill          Flour     Bakery   Bread    Granary

                   Hops Farm                 Hops            Brewery           Ale    Inn


                  10.3 Resource Flow Chart:

                   Quarry         Stone

                   Dairy Farm     Animal       Tanners                 Leather
                                   Hide        Workshop                 Armor

                                                                         Maces
                                                Blacksmith
                                                                         Swords
                   Iron Mine       Iron
                                                Armorer                Metal
                                                                       Armor


                                                                         Bows
                                                  Fletcher
                    Woodcutters                                         Crossbows
                                     Wood
                       Hut
                                                    Poleturner
                                                                         Spears

                                                                           Pikes
                       Pitch                                                                  Armory
                                     Pitch       Oil Smelter
                      Dugout


        46                                                       47
STRONGHOLD                                                                  STRONGHOLD

10.4 Buildings Table.                                                      10.4 Buildings Table.

              BUILDING   CATEGORY        RESOURCE   WORKERS    PRODUCES/                 BUILDING    CATEGORY        RESOURCE   WORKERS    PRODUCES/
                                           COST     REQUIRED    ALLOWS                                                 COST     REQUIRED    ALLOWS

               SAXON     CASTLE           FREE        N/A      GRANARY                     MAIN      CASTLE          20 STONE     N/A      ACCESS
                HALL                                                                       GATE


              WOODEN     CASTLE           FREE        N/A      GRANARY                    DRAW-      CASTLE          10 WOOD      N/A      ACCESS
               KEEP                                                                       BRIDGE                     10 STONE


               STONE     CASTLE           FREE        N/A      GRANARY                   WOODEN      CASTLE          10 WOOD      N/A       ADDED
                KEEP                                                                     PLATFORM                                          DEFENSE


             FORTRESS    CASTLE           FREE        N/A      GRANARY                   PERIMETER   CASTLE          10 STONE     N/A       ADDED
                                                                                          TURRET                                           DEFENSE


              STRONG-    CASTLE           FREE        N/A      GRANARY                   DEFENSE     CASTLE          15 STONE     N/A       ADDED
               HOLD                                                                      TURRET                                            DEFENSE


              WOODEN     CASTLE          10 WOOD      N/A      WORK                      SQUARE      CASTLE          35 STONE     N/A       ADDED
               GATE                                            ACCESS                    TOWER                                             DEFENSE


               INNER     CASTLE          10 STONE     N/A      WORK                      ROUND       CASTLE          40 STONE     N/A       ADDED
                GATE                                           ACCESS                    TOWER                                             DEFENSE


                                    48                                                                          49
STRONGHOLD                                                                       STRONGHOLD

10.4 Buildings Table.                                                             10.4 Buildings Table.

               BUILDING   CATEGORY        RESOURCE    WORKERS         PRODUCES/                 BUILDING   CATEGORY        RESOURCE   WORKERS     PRODUCES/
                                            COST      REQUIRED         ALLOWS                                                COST     REQUIRED     ALLOWS

              ARMORY      CASTLE          10 WOOD        N/A          WEAPON                     SIEGE     CASTLE            N/A       1 OR         BUILD
                                                                      & ARMOR                    TENT                                  MORE         SIEGE
                                                                      STORAGE                                                         ENGINEERS   EQUIPMENT


             WOODEN       CASTLE          15 WOOD        N/A          TROOPS                     STABLE    CASTLE          20 WOOD      N/A       HORSES
             BARRACKS                                                                                                      400 GOLD


              STONE       CASTLE          15 STONE       N/A          TROOPS                   TUNNELER    CASTLE          10 WOOD      N/A       TUNNELERS
             BARRACKS                                                                            GUILD                     100 GOLD


              ENGINEER    CASTLE          10 WOOD        N/A          LADDER-                   APPLE       FARM           5 WOOD        1         APPLES
                GUILD                     100 GOLD                     MEN &                   ORCHARD
                                                                      ENGINEER

              KILLING     CASTLE          6 WOOD         N/A           ADDED                     DAIRY      FARM           10 WOOD       1         CHEESE
                PIT                                                   DEFENSE                   FARMER


                OIL       CASTLE           10 IRON    1 ENGINEER TO   POTS OF                    HOPS       FARM           15 WOOD       1         HOPS
                                                      MAN SMELTER.
              SMELTER                     100 GOLD      ADDITIONAL    BOILING                   FARMER
                                                      ENGINEERS TO
                                                     CARRY THE POTS
                                                                        OIL

               PITCH      CASTLE          1 PITCH        N/A           ADDED                   HUNTER-      FARM           5 WOOD        1          MEAT
               DITCH                                                  DEFENSE                   POST


              WAR DOG     CASTLE          50 GOLD        N/A           KILLER
              KENNEL                                                   DOGS


                                     50                                                                               51
STRONGHOLD                                                                 STRONGHOLD

10.4 Buildings Table.                                                       10.4 Buildings Table.

               BUILDING   CATEGORY        RESOURCE   WORKERS    PRODUCES/                 BUILDING   CATEGORY        RESOURCE   WORKERS    PRODUCES/
                                            COST     REQUIRED    ALLOWS                                                COST     REQUIRED    ALLOWS

              WHEAT        FARM           15 WOOD       1        WHEAT                      IRON     INDUSTRY        20 WOOD       2         IRON
              FARMER                                                                        MINE


               BAKERY      FOOD           10 WOOD       1        BREAD                    MARKET     INDUSTRY        15 WOOD      N/A      TRADING
                          PROCESS-
                            ING

              BREWER       FOOD           10 WOOD       1         ALE                    OX TETHER   INDUSTRY        2 WOOD        1        STONE
                          PROCESS-                                                                                                         DELIVERIES
                            ING

              GRANERY      FOOD           10 WOOD      N/A       FOOD                      PITCH     INDUSTRY        20 WOOD       1        PITCH
                          PROCESS-                              STORAGE                     RIG
                            ING

                 INN       FOOD           50 WOOD       1         ALE                     QUARRY     INDUSTRY        15 WOOD       3        STONE
                          PROCESS-        25 GOLD               DISTRIBU-
                            ING                                   TION

              WINDMILL     FOOD           20 WOOD       3        FLOUR                     STOCK     INDUSTRY          N/A        N/A      RESOURCE
                          PROCESS-                                                          PILE                                            STORAGE
                            ING


                                     52                                                                         53
STRONGHOLD                                                                    STRONGHOLD

10.4 Buildings Table.                                                          10.4 Buildings Table.

               BUILDING   CATEGORY        RESOURCE   WORKERS    PRODUCES/                    BUILDING   CATEGORY   RESOURCE   WORKERS    PRODUCES/
                                            COST     REQUIRED    ALLOWS                                              COST     REQUIRED    ALLOWS

                WOOD      INDUSTRY        3 WOOD        1         WOOD                      CATHEDRAL    TOWN      40 STONE     N/A         PRIEST
                                                                                                                                         (NEEDED AT
               CUTTER                                                                                              500 GOLD
                                                                                                                                          VERY HIGH
                                                                                                                                         POPULATIONS)


                                          10 WOOD       1        DISEASE                       WELL      TOWN      50 GOLD      N/A       INCREASE
              APOTHE-      TOWN
                                          50 GOLD                PREVEN-                                                                 POPULARITY
                CARY
                                                                  TION

                                                                 8 ADDI-
               HOVEL       TOWN           6 WOOD       N/A                                    GARDEN     TOWN      30 GOLD      N/A       INCREASE
                                                                 TIONAL                                                                  POPULARITY
                                                                HOUSING
                                                                 SPACES
                                                                 8 ADDI-
               HOVEL       TOWN             N/A        N/A                                   MAYPOLE     TOWN      30 GOLD      N/A       INCREASE
                                                                 TIONAL                                                                  POPULARITY
                                                                HOUSING
                                                                 SPACES
                                                                 8 ADDI-
               HOVEL       TOWN             N/A        N/A                                   DANCING     TOWN      30 GOLD      N/A       INCREASE
                                                                 TIONAL
                                                                HOUSING                        BEAR                                      POPULARITY

                                                                 SPACES
               CHAPEL      TOWN           10 STONE     N/A        PRIEST                      STATUES    TOWN      30 GOLD      N/A       INCREASE
                                          250 GOLD                                                                                       POPULARITY


              CHURCH       TOWN           20 STONE     N/A        PRIEST                     SHRINES     TOWN      30 GOLD      N/A       INCREASE
                                          350 GOLD              (NEEDED AT
                                                                                                                                         POPULARITY
                                                                  HIGHER
                                                                POPULATIONS)

                                                                                              PONDS      TOWN      30 GOLD      N/A
                                                                                                                                          INCREASE
                                                                                                                                         POPULARITY


                                                                                             GALLOWS     TOWN      30 GOLD      N/A
                                                                                                                                          HIGHER
                                                                                                                                           WORK
                                                                                                                                         EFFICIENCY
                                     54
STRONGHOLD                                                                   STRONGHOLD

10.4 Buildings Table.                                                        10.4 Buildings Table.

              BUILDING    CATEGORY        RESOURCE   WORKERS    PRODUCES/                   BUILDING   CATEGORY        RESOURCE   WORKERS    PRODUCES/
                                            COST     REQUIRED    ALLOWS                                                  COST     REQUIRED    ALLOWS

               STOCKS      TOWN           30 GOLD      N/A       HIGHER                    ARMORER     WEAPONS         20 WOOD       1        METAL
                                                                  WORK                                                 100 GOLD               ARMOR
                                                                EFFICIENCY

             DUNGEONS      TOWN           30 GOLD      N/A       HIGHER                      BLACK-    WEAPONS         20 WOOD       1       MACES &
                                                                  WORK                       SMITH                     200 GOLD              SWORDS
                                                                EFFICIENCY

             STRETCHING    TOWN           30 GOLD      N/A       HIGHER                    FLETCHER    WEAPONS         20 WOOD       1        BOWS &
                RACK                                              WORK                                                 100 GOLD               CROSS-
                                                                EFFICIENCY                                                                     BOWS

               CESSPIT     TOWN           30 GOLD      N/A       HIGHER                      POLE      WEAPONS         10 WOOD       1       SPEARS &
                                                                  WORK                      TURNER                     100 GOLD                PIKES
                                                                EFFICIENCY

              BURNING      TOWN           30 GOLD      N/A       HIGHER                     TANNER     WEAPONS         10 WOOD       1       LEATHER
               STAKE                                              WORK                                                 100 GOLD               ARMOR
                                                                EFFICIENCY

             CHOPPING      TOWN           30 GOLD      N/A       HIGHER                    SIGNPOST     MISC.            N/A        N/A      Shows where
              BLOCK                                               WORK                                                                       enemy attacks
                                                                EFFICIENCY                                                                       from

               GIBBITT     TOWN           30 GOLD      N/A       HIGHER                      RUINS      MISC.            N/A        N/A
                                                                  WORK                                                                           N/A
                                                                EFFICIENCY

              DUNKING      TOWN           30 GOLD       0        HIGHER                     TUNNEL                       N/A        N/A       BEGIN-
                                                                 WORK                                   MISC.
               STOOL                                                                       ENTRANCE                                          NING OF
                                                                EFFICIENCY                                                                   TUNNEL


                                     56                                                                           57
STRONGHOLD                                                                      STRONGHOLD
10.5 UNIT TABLE                                                      10.5 UNIT TABLE

          UNIT    ATTACK    DEFENSE      SPEED    WEAPON    ARMOR                   UNIT          ATTACK     DEFENSE     SPEED    WEAPON   ARMOR
                  RATING    RATING                                                                RATING     RATING

         ARCHER    LOW        LOW        FAST      BOW       N/A                   KNIGHT         VERY        HIGH       VERY     SWORD    METAL &
                                                                                                  HIGH                   FAST              HORSE


         CROSS-    LOW      MEDIUM      AVERAGE   CROSS-   LEATHER                 TUNNEL-       MEDIUM       LOW       AVERAGE    N/A       N/A
        BOWMEN                                     BOW                               ER


         SPEAR-   MEDIUM      LOW        FAST     SPEAR      N/A                   LADDER-         N/A        VERY       FAST      N/A       N/A
          MEN                                                                        MEN                      LOW


        PIKEMEN   MEDIUM     VERY       AVERAGE    PIKE    METAL                    ENGI-          N/A        VERY      AVERAGE    N/A       N/A
                             HIGH                                                   NEER                      LOW


         MACE-     HIGH     MEDIUM       FAST     MACE     LEATHER                  BLACK        MEDIUM     MEDIUM       FAST      N/A       N/A
         MEN                                                                        MONK


        SWORDS-    VERY      HIGH        SLOW     SWORD    METAL
          MEN      HIGH                                              10.6 UNIT COST TABLE
                                                                         UNIT          COST (GOLD)
                                                                        ARCHER               12
                                                                       SPEARMEN              8
                                                                       MACEMEN               20
                                                                      CROSSBOWMEN            20
                                                                        PIKEMEN              20
                                                                      SWORDSMEN              40
                                                                        KNIGHT               40
                                                                       TUNNELER              30
                                                                       ENGINEER              30
                                                                       LADDERMEN             4


                               58                                                                              59
STRONGHOLD                        STRONGHOLD
10.7 KEYBOARD COMMANDS           10.7 KEYBOARD COMMANDS


                         60                               61
STRONGHOLD                                                                               STRONGHOLD

11.0 Additions to the Manual                                                                Mark', which appears in the corner of the mini-map.
                                                                                          • Creating troops within the barracks (section 6.2 in the manual) now costs gold.
This section provides additional information and revisions added following the first        Hovering the mouse over the troop will display the costs at the top of the barracks
printing on the Stronghold manual.                                                          screen. See Section 6 of the Readme file for a table displaying the costs.

For additional information, refer to the Readme file. Links to the Readme file can be     • The Inns (section 3.6 in the manual) 'Ale Coverage' within the game is dependant
found on the Autorun menu and under the game’s listing in the Program List.                 on the population count. The higher the population the less 'Ale Coverage' Inns
                                                                                            will have. This means more Inns need to be built to have the same effect on your
                                                                                            popularity.
11.1 Game Additions and Revisions                                                         • Within a multi-player game, any player can commandeer empty siege equipment.
                                                                                          • We recommend experienced game players play the game on the 'Hard' or 'Very
• The 'Fear Factor' (section 3.7) system for using good and bad things has changed.         Hard' difficultly levels.
  As your population grows, you will need to build more good or bad things to
                                                                                          • The campfire (section 2.4) can only hold 24 people. Once that limit is reached
  maintain your 'Fear Factor'.
                                                                                            you will need to create jobs for the people around the campfire before more people
  Good things have a positive effect on your troops, giving them a better attack-rat-
                                                                                            will come to the castle.
  ing dependant on your ‘Fear Factor’ level. You can see this bonus by clicking on
  the scribe's book, then on the 'Army' button. Bad things will give troops a penalty.
  The maximum bonus and penalty ranges from +25% to -25%. When you select a               11.2 Additional Multi-player Information
  unit (whilst playing as either a good or bad lord), green or red dots will appear
  above the unit's health bar, indicating their bonus. Red dots indicate a penalty,       There are two main ways to get connected. If you know whom you are going to be
  while green dots indicate a bonus. Each dot represents a 5% adjustment in the           playing, use Stronghold's built in connection services. If you want to find a game to
  units attack-rating.                                                                    join on the Internet, use GameSpy's matchmaking service, GameSpy Arcade.
• Trebuchets and catapults require rocks to fire. You can get additional rocks by         Connecting using Stronghold
  exchanging ten stone (if you have them in your stockpile) for twenty rocks.
                                                                                          On the Multiplayer 'Service Provider' screen you are presented with at least four con-
• Setting Engineers to a 'Defensive' or 'Aggressive' stance allows your engineers to      nection types. The four main types of connection are:
  dump oil automatically. The 'Aggressive' stance will cause the engineers to dump
                                                                                          1. IPX
  the oil if any enemy is nearby, while the 'Defensive' stance requires three or more
                                                                                          2. Internet TCP/IP
  enemies to be nearby.
                                                                                          3. Modem Connection
• Archers that are set to a 'Defensive' or 'Aggressive' stance will stop and attack       4. Serial Connection
  enemy units when on route to a destination. Archers set to a 'Stand Ground'
                                                                                          In all these types of connection, one player must be a 'Host' and the rest must join
  stance will try and continue to a destination, even if they are being attacked.
                                                                                          into the host's game.
• You are now able to view how well you scored, when you win a game in single play-
  er mode. A multi-player scoring system has also been implemented.                       Note: These Network protocols are computer dependent and should be set up proper-
                                                                                                ly before attempting to begin a multi-player session. If you have difficulty set-
• Occasionally, fires will occur and set buildings and trees alight. A building that is         ting up these protocols, please contact your network administrator or computer
  alight will send out sparks and if any other buildings are nearby, they will also             manufacturer. Our technical support staff will be unable to assist you with
  catch fire. You can combat the spread of fire by building a well.                             these issues.
• To display where an event has occurred on the map, click on the 'Exclamation
                                           62                                                                                       63
STRONGHOLD                                                                               STRONGHOLD

1. IPX                                                                                     When playing Stronghold using GameSpy Arcade, games are limited to 4 players.
This is mainly used on LAN's. No in-game configuration is required.                        To play Stronghold using GameSpy Arcade, run GameSpy Arcade directly without
                                                                                           running Stronghold or run Stronghold then select the 'GameSpy Arcade' button from
2. Internet TCP/IP                                                                         the multi-player start screen.
Use this if you wish to play on the Internet or on a LAN. If you are using TCP/IP
                                                                                           Once in GameSpy Arcade, go to the Stronghold section and create a game, if you
on a LAN, then no one needs to supply an IP address. If you are using the Internet,
                                                                                           wish to be a 'Host', or look for available games and join one of them. When everyone
then the ‘Host’ must inform the other players of his IP address (shown on host's
                                                                                           is ready, launch the game. GameSpy Arcade will minimize and Stronghold will launch
screen). The host must then start his game and the others must enter the host's IP
                                                                                           itself.
address and click on 'Join'.
                                                                                           If you are the ‘Host’, you will be taken to the multi-player ‘Waiting Room’ screen
This is probably the best way for two people to play head to head (presuming both
                                                                                           (further details below) otherwise the game will wait until it has made a connection to
people have Internet connections). One player is the 'Host' and should supply the
                                                                                           the ‘Host’ before taking you to the ‘Waiting Room’.
other player with his IP address and the other player should enter the IP address
before joining the host's game.

3. Modem Connection (2 Player Only)                                                        The Waiting Room - Choosing Your Game
First, select your modem from the list of available modems on your computer. Then,         On this screen when playing as the ‘Host’, you can select the map and game settings
if you are hosting the game, just click on 'Host'. The other player must enter the         you wish to play with. Once you are ready, you must select the 'Ready' button and
phone number of the ‘Host’ and click on 'Join' and the modem will call the host's          then wait for the ‘Host’ to launch the game. The ‘Host’ can 'Eject' any player he
computer.                                                                                  doesn't want in the game by clicking the 'X' button next to the player's name he wish-
                                                                                           es to eject.
4. Serial Connection (2 Player Only)
                                                                                           The ‘Host’ can also put people into teams of two by clicking on the number below
Both players will be asked for their serial connection information. Normally you will
                                                                                           'Team'. People with the same number are on the same team. During the game, play-
be asked for the 'COM port' of the serial port. The other settings should normally
                                                                                           ers can join and leave teams by holding 'Alt' and clicking on the troops of the player
be left on their default values.
                                                                                           he wishes to join to or leave. If you are trying to join another player, the other player
If you are joining a game, after clicking on 'Join' you will be presented with a list of   will be told that you wish to ally with him and if he holds 'Alt' and clicks on one of
sessions. Normally, only one will be shown (unless you are playing on a LAN with           your troops, you will both be placed on the same team. To leave a team, hold 'Alt'
more than one game of Stronghold being played). Select the session that you wish           and click on one of your ally's troops and you will be separated.
to join and you will be taken to the 'Waiting Room'.
                                                                                           The ‘Host’ can also select the map he wishes to play. Some of the maps may be
It is best if the 'Host' is the person with the fastest computer, as well as the fastest   'grayed out', which means that either you have too many players to play that map or
and most reliable net connection, because if there are any game-play connection prob-      one of the players doesn't have that map.
lems, it is the ‘Host’ that has to fix this. During a game, if the 'Host' loses connec-
                                                                                           There are two types of multi-player games. In the most common type, the victor is
tion to the game, another player becomes the ‘Host’.
                                                                                           the last person left alive. The other type of game is 'King of the Hill'. In this type
                                                                                           of game, the players can win by either killing the other lords as normal, or by occupy-
                                                                                           ing the keep at the center of the map until his timer reaches zero. The first person
Connecting Using GameSpy Arcade.                                                           to reach zero wins.
(Only brief instructions for GameSpy Arcade are supplied here. Please refer to             If the ‘Host’ clicks on 'Connection Options' he will have the option to set the game
GameSpy Arcade's own instructions for further details.)                                    speed. The default is 40, making this lower will slow the game down, but it may
                                            64                                                                                        65
STRONGHOLD                                                                               STRONGHOLD
make it more reliable if you are having connection problems. Setting the game speed       menu and press 'Quit Mission'. He will then be asked to 'Quit Game' which means he
higher will result in a faster game, but you may experience more connection problems.     will leave the game, or he can select 'End this Game' which will ask the other players
Unlike in the single player mode, you can't change this setting during the game.          if they wish to end the game. If all the players agree then the game will end and
                                                                                          everyone will be returned to the ‘Waiting Room’.
The other option is ‘Autosave’. It is recommended that you have this set to 10 min-
utes. This means that every 10 minutes the game is automatically saved. This is           Once the game is finished, the players are presented with a ranking screen. This
especially useful if you are experiencing connection problems, because it allows you      screen details the achievements of the players during the game. The winner of the
to resume the game at a recent point. If you don't experience any connection prob-        game is at the top of the list. He received one crown for winning. Other crowns are
lems then you can turn this setting off.                                                  awarded for how well the players have played. Stars are awarded for each opposing
                                                                                          lord that the player has killed.
When everyone is ready, the ‘Host’ should click on 'Launch' and the game will begin.


During the Game                                                                           11.3 Electronic Registration
During the game it is possible to chat with other players using the chat panel, which
is activated by pressing the ‘Enter’ key. On the chat panel you can select which play-    Be sure to register your copy of Stronghold. To register your game, simply click on
ers you wish to chat with and you can also send them pre-defined 'Insults' by clicking    the 'Register' button on the Autorun menu. This link will take you to our electronic
on the 1-20 buttons. If any players are in teams, the colors of the teams are shown       registration site. Simply follow the on-screen prompts to register your copy of
in the top-left corner of the name buttons.                                               Stronghold.

Some machines may suffer from connection problems during the game. This is most           If the Autorun feature is not enabled on your system, you can access the electronic
likely to happen when people are playing on the Internet using modems. There are          registration site through the Program List. Simply click on the ‘Start’ button on the
two main problems that may to occur.                                                      Taskbar and select ‘Programs’. Move your cursor to the ‘Firefly Studios’ listing in the
                                                                                          Program List that appears, and then highlight the ‘Stronghold’ folder. Click on the
Firstly, if a player's connection becomes very slow, or they lose their connection        ‘Register Stronghold’ option and follow the on-screen prompts to register your game.
entirely, the other players will be presented with a panel with the option to eject the
player with the problem. If the player's connection hasn't recovered within 60 sec-       Note: To use these registration links, you must have an active TCP/IP Internet con-
onds they will automatically be ejected or the ‘Host’ can click ‘Eject’ at anytime to           nection or Internet access via a Local Area Network (LAN). If your Internet
remove that player from the game. If the player's connection recovers, then the panel           Service Provider (ISP) doesn't use Window's dial-up networking, such as
will automatically be removed from the screen and the game will continue normally.              America Online (AOL), you will need to manually connect to the Internet
                                                                                                before using these links.
The other connection problem is when the game on each person's computer gets out
of sync with the ‘Host’. This is more likely to happen on the Internet using
modems, but it can occur with other types of connections. If the games lose sync, a
panel will be displayed with a time bar showing how long it will take to re-sync the
game.
If the ‘Host’ thinks it will take too long, he can click 'Cancel Game' which will end
the game for all players. Once the game is re-synced it should continue as normal.
During re-syncing it is still possible to use the chat feature by pressing the "Enter'
key.
If at any point a player wishes to leave the game, he should bring up the options
                                           66                                                                                       67
STRONGHOLD    STRONGHOLD


NOTES:        NOTES:
STRONGHOLD


NOTES:

Stronghold manual

  • 1.
    As soon asthe King had marched his army into the barbarian homeland, the inevitable rumors of a plot to seize the throne began to spread. A few seasons into the war, the capture of the King was reported from abroad sparking disorder among the peasantry. Sure enough, the enemy grabbed this opportunity to invade and after several bloody engagements the splintered country became locked in civil war. When the initial onslaught had finished, your father attempted to negotiate a treaty, arranging a meeting at the stronghold of Duc Beauregard. Along the way there was an ambush and your father along with several other lords were brutally hacked down by a band of unknown raiders. With no treaty signed, the enemy continued their assault forcing county after county to yield until the country was lost. Bruised and exhausted, you have been beaten back to a forest on an overlooked peninsula where it is rumored a small band of bedraggled troops are hiding. Although you believe there is little hope, maybe from this refuge you can at least avenge your father's death.
  • 2.
    STRONGHOLD STRONGHOLD Table of Contents 6.2 The Barracks . . . . . . . . . . . . . . . . . . . . . . . . . . . . . . . . . . . . . . . . . . . . . . . .30 1.0 Getting Started . . . . . . . . . . . . . . . . . . . . . . . . . . . . . . . . . . . . . . . . . . . . . . .4 6.3 Available Units . . . . . . . . . . . . . . . . . . . . . . . . . . . . . . . . . . . . . . . . . . . . . .31 1.1 Installation . . . . . . . . . . . . . . . . . . . . . . . . . . . . . . . . . . . . . . . . . . . . . . . . . .4 7.0 Issuing Military Commands . . . . . . . . . . . . . . . . . . . . . . . . . . . . . . . . . . . .32 1.2 Starting the Game and Game Modes . . . . . . . . . . . . . . . . . . . . . . . . . . . . . .5 7.1 Gathering your Forces . . . . . . . . . . . . . . . . . . . . . . . . . . . . . . . . . . . . . . . . .32 1.3 Game Options . . . . . . . . . . . . . . . . . . . . . . . . . . . . . . . . . . . . . . . . . . . . . . .6 7.2 Marching Orders . . . . . . . . . . . . . . . . . . . . . . . . . . . . . . . . . . . . . . . . . . . . .33 1.4 Game Overview . . . . . . . . . . . . . . . . . . . . . . . . . . . . . . . . . . . . . . . . . . . . . . .7 7.3 Unit Stances . . . . . . . . . . . . . . . . . . . . . . . . . . . . . . . . . . . . . . . . . . . . . . . .34 1.5 About the Manual . . . . . . . . . . . . . . . . . . . . . . . . . . . . . . . . . . . . . . . . . . . . .7 7.4 Military Commands . . . . . . . . . . . . . . . . . . . . . . . . . . . . . . . . . . . . . . . . . .35 1.6 Winning and Losing . . . . . . . . . . . . . . . . . . . . . . . . . . . . . . . . . . . . . . . . . . .8 7.5 Map Bookmarks . . . . . . . . . . . . . . . . . . . . . . . . . . . . . . . . . . . . . . . . . . . . .37 1.7 Playing a Multi-player Game . . . . . . . . . . . . . . . . . . . . . . . . . . . . . . . . . . . . .8 8.0 Defending your People . . . . . . . . . . . . . . . . . . . . . . . . . . . . . . . . . . . . . . . .37 1.8 Map Editor Overview . . . . . . . . . . . . . . . . . . . . . . . . . . . . . . . . . . . . . . . . .11 8.1 The Gatehouse . . . . . . . . . . . . . . . . . . . . . . . . . . . . . . . . . . . . . . . . . . . . . .37 2.0 Game Basics . . . . . . . . . . . . . . . . . . . . . . . . . . . . . . . . . . . . . . . . . . . . . . . .12 8.2 Building Walls . . . . . . . . . . . . . . . . . . . . . . . . . . . . . . . . . . . . . . . . . . . . . . .37 2.1 Main Screen Overview and Navigating the Map . . . . . . . . . . . . . . . . . . . . .12 8.3 Turrets and Towers . . . . . . . . . . . . . . . . . . . . . . . . . . . . . . . . . . . . . . . . . . .38 2.2 Camera Interface . . . . . . . . . . . . . . . . . . . . . . . . . . . . . . . . . . . . . . . . . . . . .13 8.4 Placing Stairs . . . . . . . . . . . . . . . . . . . . . . . . . . . . . . . . . . . . . . . . . . . . . . .38 2.3 Placing your Keep . . . . . . . . . . . . . . . . . . . . . . . . . . . . . . . . . . . . . . . . . . . .14 8.5 Traps . . . . . . . . . . . . . . . . . . . . . . . . . . . . . . . . . . . . . . . . . . . . . . . . . . . . . .38 2.4 Population Growth . . . . . . . . . . . . . . . . . . . . . . . . . . . . . . . . . . . . . . . . . . .15 8.6 Moat Digging . . . . . . . . . . . . . . . . . . . . . . . . . . . . . . . . . . . . . . . . . . . . . . .39 2.5 Rationing and the Granary . . . . . . . . . . . . . . . . . . . . . . . . . . . . . . . . . . . . .15 8.7 Mounted Siege Equipment . . . . . . . . . . . . . . . . . . . . . . . . . . . . . . . . . . . . .39 2.6 Setting Taxes . . . . . . . . . . . . . . . . . . . . . . . . . . . . . . . . . . . . . . . . . . . . . . .16 8.8 Boiling Oil . . . . . . . . . . . . . . . . . . . . . . . . . . . . . . . . . . . . . . . . . . . . . . . . .39 2.7 Popularity in Brief . . . . . . . . . . . . . . . . . . . . . . . . . . . . . . . . . . . . . . . . . . .16 9.0 Siege Warfare . . . . . . . . . . . . . . . . . . . . . . . . . . . . . . . . . . . . . . . . . . . . . . .40 2.8 Gathering Food and Resources . . . . . . . . . . . . . . . . . . . . . . . . . . . . . . . . . .17 9.1 Siege Equipment Overview . . . . . . . . . . . . . . . . . . . . . . . . . . . . . . . . . . . . .40 2.9 Increasing your Population . . . . . . . . . . . . . . . . . . . . . . . . . . . . . . . . . . . . .18 9.2 Portable Shields . . . . . . . . . . . . . . . . . . . . . . . . . . . . . . . . . . . . . . . . . . . . . .40 3.0 Influencing your Popularity . . . . . . . . . . . . . . . . . . . . . . . . . . . . . . . . . . . .19 9.3 Battering Rams . . . . . . . . . . . . . . . . . . . . . . . . . . . . . . . . . . . . . . . . . . . . . .41 3.1 Food . . . . . . . . . . . . . . . . . . . . . . . . . . . . . . . . . . . . . . . . . . . . . . . . . . . . . .19 9.4 Siege Towers . . . . . . . . . . . . . . . . . . . . . . . . . . . . . . . . . . . . . . . . . . . . . . . .41 3.2 Tax . . . . . . . . . . . . . . . . . . . . . . . . . . . . . . . . . . . . . . . . . . . . . . . . . . . . . . .20 9.5 Catapults . . . . . . . . . . . . . . . . . . . . . . . . . . . . . . . . . . . . . . . . . . . . . . . . . . .41 3.3 Crowding . . . . . . . . . . . . . . . . . . . . . . . . . . . . . . . . . . . . . . . . . . . . . . . . . .21 9.6 Trebuchets . . . . . . . . . . . . . . . . . . . . . . . . . . . . . . . . . . . . . . . . . . . . . . . . . .41 3.4 Fairs and Other Events . . . . . . . . . . . . . . . . . . . . . . . . . . . . . . . . . . . . . . . .21 9.7 Digging Tunnels . . . . . . . . . . . . . . . . . . . . . . . . . . . . . . . . . . . . . . . . . . . . .42 3.5 Religion . . . . . . . . . . . . . . . . . . . . . . . . . . . . . . . . . . . . . . . . . . . . . . . . . . .21 9.8 Filling in Moats . . . . . . . . . . . . . . . . . . . . . . . . . . . . . . . . . . . . . . . . . . . . .42 3.6 Working Inns . . . . . . . . . . . . . . . . . . . . . . . . . . . . . . . . . . . . . . . . . . . . . . .22 10.0 Reference Section . . . . . . . . . . . . . . . . . . . . . . . . . . . . . . . . . . . . . . . . . . .43 3.7 Fear Factor . . . . . . . . . . . . . . . . . . . . . . . . . . . . . . . . . . . . . . . . . . . . . . . . .23 10.1 Non-military Characters . . . . . . . . . . . . . . . . . . . . . . . . . . . . . . . . . . . . . .43 4.0 Food and Resources . . . . . . . . . . . . . . . . . . . . . . . . . . . . . . . . . . . . . . . . . .24 10.2 Food Flow Chart . . . . . . . . . . . . . . . . . . . . . . . . . . . . . . . . . . . . . . . . . . . .47 4.1 The Stockpile . . . . . . . . . . . . . . . . . . . . . . . . . . . . . . . . . . . . . . . . . . . . . . .24 10.3 Resource Flow Chart . . . . . . . . . . . . . . . . . . . . . . . . . . . . . . . . . . . . . . . . .47 4.2 Resources . . . . . . . . . . . . . . . . . . . . . . . . . . . . . . . . . . . . . . . . . . . . . . . . . .25 10.4 Buildings Table . . . . . . . . . . . . . . . . . . . . . . . . . . . . . . . . . . . . . . . . . . . . .48 4.3 The Granary . . . . . . . . . . . . . . . . . . . . . . . . . . . . . . . . . . . . . . . . . . . . . . . .26 10.5 Unit Table . . . . . . . . . . . . . . . . . . . . . . . . . . . . . . . . . . . . . . . . . . . . . . . . .58 4.4 Food Types . . . . . . . . . . . . . . . . . . . . . . . . . . . . . . . . . . . . . . . . . . . . . . . . .27 10.6 Unit Cost Table . . . . . . . . . . . . . . . . . . . . . . . . . . . . . . . . . . . . . . . . . . . .59 5.0 Money . . . . . . . . . . . . . . . . . . . . . . . . . . . . . . . . . . . . . . . . . . . . . . . . . . . .28 10.7 Keyboard Commands . . . . . . . . . . . . . . . . . . . . . . . . . . . . . . . . . . . . . . . . .60 5.1 Tax Rate . . . . . . . . . . . . . . . . . . . . . . . . . . . . . . . . . . . . . . . . . . . . . . . . . . .28 11.0 Additions to the Manual . . . . . . . . . . . . . . . . . . . . . . . . . . . . . . . . . . . . . .62 5.2 The Marketplace . . . . . . . . . . . . . . . . . . . . . . . . . . . . . . . . . . . . . . . . . . . . .29 11.1 Game Additions and Revisions . . . . . . . . . . . . . . . . . . . . . . . . . . . . . . . . .62 6.0 Military Forces . . . . . . . . . . . . . . . . . . . . . . . . . . . . . . . . . . . . . . . . . . . . . .30 11.2 Additional Multi-player Information . . . . . . . . . . . . . . . . . . . . . . . . . . . . .63 6.1 Military Goods and the Armory . . . . . . . . . . . . . . . . . . . . . . . . . . . . . . . . .30 11.3 Electronic Registration . . . . . . . . . . . . . . . . . . . . . . . . . . . . . . . . . . . . . . .67 2 3
  • 3.
    STRONGHOLD STRONGHOLD 1.0 Getting Started. 1.2 Starting the Game and Game Modes. When you load FireFly Studios’ STRONGHOLD for the very first time you are pre- 1.1 Installation. sented with a screen prompt asking you to enter you name. Type in the name you wish to be known as and then press ‘ok’ to continue to the main menu screen. Place the STRONGHOLD CD in your CD-ROM drive. If the CD Autoruns, left click on the INSTALL button. If the CD does not Autorun, click on the START The main menu is divided into four sections. button then select RUN followed by BROWSE. Using the pull down arrow, select a) Combat options - This gives you the following combat related options: your CD-ROM drive with the STRONGHOLD CD inserted. Click on 1) Play the campaign - Fight your way through the 21-mission campaign for your ‘autoplay.exe’ and select OPEN, followed by OK then select the INSTALL button. king and country against four merciless and ruthless opponents: The Rat, the Snake, the Pig and the Wolf. When the welcome window is presented, select NEXT to continue. 2) Play a multiplayer game - Play a multiplayer game with up to eight friends on the Internet using Gamespy or via a local area network (LAN). The license agreement window will now be displayed. Please read through this agree- 3) Play a siege mission - Choose to attack or defend pre-built historical castles. ment. If you accept the agreement, select YES to continue. This option is pure combat with no community management necessary. 4) Play an invasion - Stand alone fighting missions in the same style as the cam- The next option is to select a destination folder. To use the default folder select paign. You will have to build up your castle and economy while defending your- NEXT to continue. If you wish to change the destination folder click on BROWSE self from constant attack from one or more enemies. and enter the location you want STRONGHOLD to be installed. b) Economic options - Choosing this will provide you with the following non-combat Next you can create a shortcut folder or use the default within the PROGRAMS options: menu. When you are happy with your folder name, click NEXT to continue. 1) Play the Economic campaign - This is set in the period immediately after the Combat campaign (See above). This is a five mission economic campaign based Once STRONGHOLD has been installed you will be asked if you wish to install around rebuilding the kingdom. Gamespy. This will allow you play on-line. Follow the on screen prompts to install 2) Play an economic mission - These are single missions very similar to those in the Gamespy. economic campaign. You will have to build an economy while trying to balance your available resources and achieve one or many preset goals. To remove STRONGHOLD from your PC, insert the STRONGHOLD CD in your 3) Free build - Here you can build to your hearts content. You have no enemy to CD-ROM drive and when the Autorun screen appears, click on the UNINSTALL fight, no goals to achieve and no time limit to stick to. You merely choose the button and follow the on screen instructions. map you wish to build on and away you go! We recommend you view the ‘Readme’ file before running STRONGHOLD as this contains the most recent information on the game. c) Map Editor - This allows you to build and play custom maps: 1) Load a working map - Allows you to load any map you have previously started and Each time you insert the STRONGHOLD CD into your CD-ROM drive, the game saved at an earlier date. will Autorun and a PLAY button will now replace the INSTALL button. Click the 2) New Stand-Alone mission - Allows you build up a map from scratch that can be PLAY button to run the game. used as an economic, combat or landscape map. 3) New Siege That mission - Build a magnificent castle and post it on the Internet then see how long it takes for someone to knock it down. 4) New Multiplayer map - Build a map for you and you friends to fight over in the multiplayer mode. 4 5
  • 4.
    STRONGHOLD STRONGHOLD d) Load a save game - Load a game that you saved on a previous occasion. You can 1.4 Game Overview. also access this from within the main game using the options menu. STRONGHOLD is a castle simulator, it will teach you to design, manage and 1.3 Game Options. defend your own medieval castle. Starting in the middle of the eleventh century, with little more than wooden palisades and hills to defend yourself with, you will learn The game options panel can be accessed by selecting the key icon to the left of how to build up a castle and rule its citizens. As time goes on, your castles will get the mini-map within the game. bigger and more sophisticated until, by the end of the campaign, you will have all the knowledge you need with which to create the ultimate castle. Save: This allows you to save your game using a file name of your choice. You must start your initial settlement from scratch then move forward to defend that which you have built. Each new settlement will need a balanced infrastructure with a Load: From here you can load a previously saved game. steady income, a healthy stock of food and resources as well as a happy population. Options: This allows you to change the following elements of the game: As you progress through the game your defenses will become steadily more advanced. In the early stages you will only have enough resources at your disposal to build a Game Play Options: This lets you change the game speed and turn the in- simple stockade. Eventually you will have techniques with which to construct a virtu- game help on or off. ally impenetrable fortress. Video Options: This allows you to change the resolution of the game as well There are many challenges ahead of you on the road to victory. Each territory has a as how fast the map scrolls. unique set of economic conditions and you will face many bloody siege engagements before this chapter in history draws to a close. Sound Options: From here you can turn the sound on or off and adjust the volume levels for the music, sound effects and speech. Only with careful castle planning and the cunning use of military tactics will you be able to ensure the safety of the kingdom. Your STRONGHOLD awaits you, good Help: This takes you to the contents page of the in-game help facility. luck and God speed my liege! Quit Mission: This option quits the current mission and takes you back to the begin- 1.5 About the Manual. ning screen. This vast tome may appear a little daunting at first but luckily there is no need to Exit STRONGHOLD - This closes STRONGHOLD and returns you back to the read all of it to begin playing. You may find it useful to go through the in-game operating system. tutorial first by selecting the tutorial shield from the start screen. Alternatively, chapter 2 quick start/game basics will introduce you to all of the main concepts. Resume Game: Selecting this returns you to the game. Once you know the basics you can read through the sections you want more informa- tion on. 'Notes' will appear now and again to give you more information on the last topic dis- cussed. Note: You do not have to read these bits if you don't want to, as they are only here to answer frequently asked questions on the last topic. 6 7
  • 5.
    STRONGHOLD STRONGHOLD 'Tips' will also appear throughout to give you information relating to game dynamics Note: You can autorun Gamespy Arcade from within the Stronghold multiplayer such as shortcut keys or other alternative ways of doing things. Service Provider screen in which case Stronghold will exit and Gamespy Arcade will start, re-launching Stronghold once you have chosen your opposition. Tip: It is quicker to skip these sections to start with as they are only here to suggest different ways of doing something you have just learned about. b) Setting up a local connection Clicking on Multiplayer in the Combat Options screen brings you to the Service There are also 'Hints' which suggest possible game play strategies. Provider screen. Here you will see the list of available connection methods installed on your machine. Click on your preferred method and follow the on screen instruc- Hint: Don't read hints if you prefer to figure things out on your own. tions to connect. One player will host the game and the remaining players can join the game set up by the host. 1.6 Winning and Losing. After you have connected to a multi-player game you will arrive in the multiplayer Each mission within STRONGHOLD has a unique set of objectives. To view the options screen. If you have joined a game you should signal you are ready to start objectives you have yet to complete, select the ‘Briefing’ button to the left of the the game by clicking on the ready icon. You can then tell the host which type of mini-map. game you would like to play by using the chat window, but you cannot set any of the game parameters as only the host has control over these. Players Connected - Here you can see a list of connected players along with their ready status. All players must be set to ready before the game is launched. You can also set your team number here. By default each player plays separately but you can ally together by clicking on your team number to match that of another player. Being in an alliance with another player means that your troops will not attack each other and you will win the game if the victory conditions are met jointly. You will see the mission briefing text for the current scenario. All of the completed If you are hosting the game you can now change any of the default game type options objectives will have a dagger through them. If the objective of the mission is to eliminate below: all the enemy units, then you will also see a timeline. This indicates the time until the last invasion arrives on the map. When all objectives have been met, you win and the vic- Starting keep - In a multiplayer game each player starts with a pre-placed keep. This tory screen is displayed. If the lord is killed, you lose and the defeat screen is displayed. option allows the host to change the type of keep each player starts with. Changing this will also change the level of buildings, troops and starting goods available. The simple Saxon Hall provides an early medieval game with few resource and troops 1.7 Playing a Multi-player Game. types available. The most advanced is the Stronghold, which gives you access to all late medieval troops and technology. You can start a stronghold multiplayer game either via Gamespy Arcade(tm) matchmaking service or by setting up a local connection. Gold - This allows you to set the initial gold each player begins the game with. a) Looking for a game on Gamespy Arcade(tm) Launch Gamespy Arcade and move to the Stronghold lobby. Here you can find other players to compete against. Once all the players are ready the host will launch the game and you will be sent into the Stronghold multi-player options screen. 8 9
  • 6.
    STRONGHOLD STRONGHOLD Popularity - This option sets the starting popularity rating. 1.8 Map Editor Overview. Trade - From here you can turn the options to trade on or off for the ‘Resources’, After selecting the ‘Map Editor’ button, you will be presented with four additional ‘Food’ and ‘Weapons’ categories. options. Win Conditions - This allows you to change the way in which the game is won. E.g. Load a Map - This option allows you to load and edit a previously saved map. killing the enemies lords or achieving an economic goal. New Stand-Alone Map - From here you can create a new siege, invasion, economic or Starting Goods - This lets you set the initial food, resources and weapons each player landscape map complete with it's own map and scenario. The 'To Map' button will begins the game with. The available goods will differ depending upon the keep type take you to the map-editing screen and the 'Edit Scenario' button will let you change you have selected. the various events and conditions for the mission. Follow the step-by-step instruc- tions to select the map size and game type you wish to create. Starting Troops - This changes the amount of troops that each player starts with. If you want a longer build up before the first battle then set this to 'none'. If you pre- Note: The game type you select, determines where the map will appear in the game. fer jumping straight into the action, change this setting to 'many'. For example choosing to create an invasion map will make the map show up under the ‘Combat Invasion’ category. Chat Window - You can send messages to the other connected players from here by typing a message and then pressing return. New Siege That Mission - This part of stronghold allows you test your castle building expertise against that of other would be challengers to your crown! Everybody starts Map Selection - The maps available will differ depending upon your keep setting and with the same resources and builds a castle using a fixed amount of stone and troops. the number of players joining. Maps can be selected from the bottom right window. Attackers then have a set amount of points to choose the make up of their attacking You will see an overview of the selected map appear in the top right window and a force in an attempt to siege your stronghold and kill your lord. Your castle can then short description of the map below it. be judged by how well it survived or how easily it fell. When every player is ready and you are happy with the game settings, the game can be New Multi-Player Map - From here you can create a map for you and your friends to launched by pressing the ‘Launch’ button. fight over. When you enter the map editing screen there are extra options for placing the players starting keeps and structures. The number of keeps you place on the map In Game Chat dictates the maximum number of players that can use the map and the type of keep During the course of a multiplayer game you can send messages to other players by you place will set the 'Starting Keep' type (see section 1.7 on multiplayer games). bringing up the chat entry panel. You do this by pressing the Space bar. Before you start entering your message you need to decide who to send your message to. The Once in the map editor you will have at your disposal an array of landscape editing default is to everyone, but if you wish to send a message to a specific player, pressing tools and a custom scenario builder to enable you to create the most beautiful map the number keys will select an individual player as the recipient. Once you have typed or the ultimate mission. your message, press ‘Enter’ to send it. If you want to cancel the message press the ‘Escape’ key. You may share these missions for the purposes of game play but may not sell or make other commercial uses of the missions. Firefly Studios Ltd. reserves all other rights For any updates to the Stronghold multiplayer game, please refer to the ‘Readme’ file. to the editors and files. 10 11
  • 7.
    STRONGHOLD STRONGHOLD 2.0 Game Basics. 2.2 Camera Interface. This section will take you through all of the main features within Stronghold. If you When you press and hold the right mouse button on the main display you will see rarely play computer games, it is recommended that you go through the in-game the four camera interface icons appear. tutorial by selecting the tutorial shield. If you play computer games regularly, then scan this chapter to familiarize yourself with the basics. 2.1 Main Screen Overview and Navigating the Map. After starting a new game the screen will look something like this: To Rotate the Map: Move the mouse pointer upwards onto the rotate icon, it will highlight and the map will rotate ninety degrees. The map will continue to rotate if you leave your mouse over the rotate icon and won't stop until you release the right mouse button. To Zoom: Holding down the right mouse button and moving the mouse pointer over the zoom icon, will zoom out your view, allowing you to see more of the map. Repeating the process will zoom back in again. To see behind things: Moving the mouse pointer downwards onto the flatten icon will pull the landscape, trees, walls and some buildings down to the same level. Releasing the button will make the landscape spring back up. Hint: This feature will prove very useful later on when you want to peek behind walls! To hide the Management Panel: Moving the mouse pointer over the icon to the left hides the management panel and makes the game go full screen. To bring the management panel To scroll around the map, push the mouse pointer to the edge of the screen. As you back up, repeat the process. scroll around, the overhead mini-map will move with you. Tip: You can also use the tab key to hide the management panel. Tip: You can also use the cursor keys to scroll around the map. Another way to get to a specific location is by left clicking on the overhead mini-map in the bottom right of the screen. 12 13
  • 8.
    STRONGHOLD STRONGHOLD 2.3 Placing your Keep. 2.4 Population Growth. You must place your starting keep and a granary on the map before any other build- In addition to the keep and the stockpile you will see a campfire. Moving the mouse ings become available. To construct a building, select it from the building selection pointer over it will reveal the population growth indicator. scroll at the bottom of the screen then left click on the main display when you are happy with it's position. The more popular you are, the faster it will fill and the quicker your population will grow. Every time the indica- tor makes one full rotation, a peasant will arrive and stand by the campfire until work becomes available. If the halo turns red it means that you are unpopular. The halo will then show how quickly people are leaving your castle. 2.5 Rationing and the Granary. When you build a granary the food in your starting goods will be transferred to it. Left clicking on the granary will bring up the granary panel. Note: If you happen to place a structure over an area of inaccessible ground, part of the cursor will turn red warning you that you cannot build there. Note: Left clicking on any building or person will bring up a screen giving you more information on them. Right Once the keep is placed a lot of things will start happening. One of the first things clicking after placing a building will clear the building you'll see is you starting resources being transferred from your starting goods onto cursor and give you back the standard mouse cursor. your stockpile. This panel lets you see your food details and allows you to make changes to your rationing. On the right of this panel there are five plates with varying amounts of food on them, which symbolize the different ration settings from 'no rations' up to These resources are now available for you to use in construction. 'double rations'. Reducing you rations below the default of 'full rations' will have a negative effect on your popularity, whereas increasing them will have a positive effect. You will see the rate of consumption by watching the speed of the bar in the granary panel or by looking at the units of food disappear from your granary. 14 15
  • 9.
    STRONGHOLD STRONGHOLD 2.6 Setting Taxes. If your scribe stops smiling and your popularity rating starts being dis- played in red, you will begin to lose workers. Your popularity will be Left clicking on your keep will bring up the tax panel, which lets you view your tax displayed in red if it is below 50 and displayed in green if it is 50 or details and change your tax rate. You can set your taxes to anything from a generous higher. bribe all the way up to a downright cruel tax by moving the slide bar left or right. Increasing your tax rate above the default setting of 'no taxes' will have a negative effect on your popularity and reducing taxes to hand out bribe money will have a Tip: Listen for announcements from your advisor. He will let you know if you are positive effect. running into any problems. 2.7 Popularity in Brief. 2.8 Gathering Food and Resources. The scribe holding up an open book allows you to see critical informa- Running along the bottom left of the screen you will notice six shields. tion at a glance. The expression on his face reflects your popularity and he will also let you know what he thinks about some of your actions! Left clicking on the report book will bring up the reports panel. These are the building category buttons, which change the type of buildings displayed on the building selection scroll above them. Moving your mouse pointer over these shields will highlight them and bring up a brief description of the button above the building selection scroll. Tip: If you can't work out the function of any of the icons in the game, move your mouse pointer over the icon and it's description will appear. Left clicking on the ‘Popularity’ button will show all information regarding your popularity. The most basic resource in the game is wood, as it is required in the construction of almost every building. Left clicking on the shield with the picture of a hammer will select the ‘Industry Buildings’ category. When you place a woodcutter's hut on the map a peasant will turn into a woodcutter and get to work cutting down trees. At the bottom of the panel, after the words 'In the coming month' you will see the overall effects of your actions on castle popularity for the coming month. Making changes to your tax rate and rationing are the two main ways of manipulating your popularity. Ensure your popularity rating remains above 50, otherwise people will begin leaving your castle. 16 17
  • 10.
    STRONGHOLD STRONGHOLD A quick and easy way to gain food early on is by hunting deer by building hunter's 3.0 Influencing your Popularity. huts found in the ‘Farm Buildings’ category. This chapter will take you through each of the factors, which govern your popularity. These are listed for you when you open the popularity panel from the report menu. Once the meat is prepared they will place it in your granary, swelling your food To the left of each is a face. A green smiling face means that you stocks. You should always be aiming to balance the rate at which you consume food will have a positive effect for that factor. A yellow face shows that with the rate at which it is being put into your granary. there is no effect and the red sad face represents a negative effect. When added together the sum of these reflect either a bonus or penalty to your overall popularity. Undo - If you change your mind when placing a structure, left click on the This number is shown after the words 'In the coming month'. There are a total of ‘Undo’ button to the left of the mini-map and you're last action will be can- seven ways to effect popularity with the two main factors being food and tax. celled. All of the resources will be recovered. Delete - To remove a structure from your settlement, left click on the ‘Delete’ 3.1 Food. button to the left of the mini-map then select the structure you wish to Changing your rationing is one of the quickest ways to influence your popularity. remove. Half of the resources spent in construction will be recovered. Both the number of food types eaten and your ration setting affect your food bonus or penalty. These separate influences can be seen in the granary panel. 2.9 Increasing your Population. To increase your available housing, build more hovels found in the ‘Town Buildings’ category. Your available housing will increase by eight and your settlement will continue to grow, but so of course will the mouths to feed. Your people will be happier with you if you supply them with more than 1 type of food. Less than full rations hurts your popularity, while increasing your rations Recap: boosts it. The bonuses and penalties from food types eaten and rationing are as fol- • Use the camera interface and mini-map to help you find a suitable location lows: for your settlement. • The keep and granary must be placed before any other buildings become Food Types Eaten Bonus to Popularity Rations Bonus to Popularity available. • Popularity is your key game variable. - • Changing your tax rate and rationing will influence your popularity. 1 0 None 8 + - • Make sure you start gathering wood and food early on. 2 1 Half 4 • Build more housing to increase your population, keeping an eye on your food 3 + 2 Full 0 supply and popularity as you expand. + + 4 3 Extra 4 + Double 8 18 19
  • 11.
    STRONGHOLD STRONGHOLD 3.2 Tax. 3.3 Crowding. The people of Stronghold do not enjoy paying taxes so any positive tax rate you set Your keep provides you with some starter housing for your people, will have a negative effect on your popularity. after which you need to place houses to increase your maximum popu- lation level. Each house provides shelter for another 8 people. Crowding will occur when your population exceeds your available housing. The population indicator will turn red if you have an over- crowding problem. Overcrowding may occur if a house is deleted or destroyed by the enemy. To remedy overcrowding, simply build more housing. When you have sufficient gold in your treasury you may decide to give your peasants a handout in the form of bribe money each month. 3.4 Fairs and Other Events. Occasionally, during the course of the game, traveling fairs will pay surprise visits to your castle and provide entertainment. Whilst they are in town you will gain a tem- porary bonus to popularity. Doing this will have a positive effect on your popularity. Hint: You will find bribery proves useful when you are running low on food. Change your rations to half then hand out bribe money to offset the worst of the penalty until you find a way of restoring your granary stock. Other events such as the marriage of your lord will also occur, bringing temporary changes to your current popularity. These are added bonuses that you have no con- The table below shows the popularity bonuses and penalties that you will receive trol over. from the various tax settings. Generous Large Small No Taxes Low Average High Mean Extortionate Downright 3.5 Religion. Bribe Bribe Bribe Taxes Taxes Taxes Taxes Taxes Cruel Taxes When a religious building is placed, priests will arrive and begin blessing your people. +7 +5 +3 +1 -2 -4 -6 -8 -12 -16 Note: Attempting to give out bribe money when your treasury is empty will not have any effect on popularity. 20 21
  • 12.
    STRONGHOLD STRONGHOLD By opening the religion panel from the advisors report menu, you can see the per- 3.7 Fear Factor. centage of people who have been blessed as well as the bonus you are receiving to popularity. Fear factor lets you know how people see you, as either cruel and ruthless or easy going and forgiving. Your fear factor determines how productive your workers are. Placing good things around your castle will make you seem easy going and increase your popularity, but at the same time will reduce your workers efficiency. Constructing some gardens in the castle for example will make everyone happy, but you will find that they tend to loiter about at the gardens after delivering their goods, instead of heading straight back to work. The blessing given by the priest wears off after a short while, at which point that per- son must be blessed again. Covering the religious needs of the community, therefore, To see these structures left click on the ‘Good Things’ button in the 'Town is a continual process. The higher the percentage of blessed people, the higher the Buildings' category. bonus you will receive to your popularity. As your castle population grows the percentage of your people blessed will start to fall, thus lowering your bonus. To rectify this you will need to place extra religious buildings. Be warned however as your community grows, people will start demanding ever more impressive (and expensive) religious structures and failure to provide these buildings will result in a popularity drop. The religious buildings available can be seen in the town buildings category. On the other hand, you may wish to appear more cruel and ruthless. You can 3.6 Working Inns. increase work efficiency by placing bad structures around your castle. This will unsurprisingly have a negative effect on your popularity. Placing a few gallows for A working inn is one with a supply of ale and an innkeeper. The innkeeper will col- example may not be the most popular of decisions, but it has the effect of encourag- lect ale from the stockpile and deliver it to the inn automatically. Once ale is avail- ing people to work that extra bit harder. They will even start to deliver extra goods able at an inn, your people will start to drink it. The rate at which ale is drunk when they make deliveries to the stockpile, granary or armory. depends on your population. The more people you have the faster it will be con- sumed. To check to see if an inn is working, select it and look at it's panel. To see these structures, left click on the ‘Bad Things’ button in the 'Town Buildings' category. This panel shows how many barrels and flagons of ale the inn has in stock. For each working inn, (i.e. one that still has ale) you will gain a bonus of plus 1 to your popu- larity. Ale is drunk from each inn at the same rate regardless of its location. Inns are in the 'Food Processing Buildings' category. 22 23
  • 13.
    STRONGHOLD STRONGHOLD 4.0 Food and Resources. Hint: It is a good idea to leave some space around you stockpile in case you need to expand it later in the game. This section will take you through how to manage your food and resources. In Stronghold, there are three types of goods available: 4.2 Resources. · Food In total, there are eight resource types, which are stored in your stockpile. Some are · Resources raw materials and others are processed. · Weaponry Wheat: This grows on your wheat farms and is at the start of the most pro- Note: For information on weaponry, see section 6.1. ductive food chain in Stronghold. Wheat is required to make flour. Upon starting a new game you will see a cart travel across the top of the Flour: This is produced at the mill and requires wheat. Flour is required to screen. This signals the arrival of your starting goods. bake bread. Hops: These grow on your hop farms. If you want to brew ale, you will first Your starting goods are displayed in the top left of the main display, until you pro- need to grow hops. vide space for them by building a stockpile, granary or armory. Ale: This is produced at the brewery and requires a supply of hops. When 4.1 The Stockpile. ale is finally distributed through your inns, you will gain a bonus to your popularity. All of the resources you gather or produce will be placed on the stockpile. Each stockpile square can hold up to four resource types. Stone: The quarries that extract this from the ground must be placed on the white boulders. Stone is required for building most of the castle defensive structures. Iron: The mines, which extract this, must be placed on the reddish colored rocks found on the tops of hills. You will need iron to craft the more advanced weapon and armor types. You can gauge the approximate amounts of resources you have by simply looking at the stockpile. To see the exact amount of each resource left click on the stockpile. Wood: This is gathered by woodcutters and is used in the construction of most buildings. It can also be used to craft basic weapon types. Tip: You can also use the ‘Stores’ button from the advisors report menu to get to the same panel. Pitch: You will find this bubbling up through marshes. Once you have placed a pitch rig on some oil in the marsh, pitch diggers will extract pitch. Pitch is used for boiling oil and pitch ditches. When you run out of space, extra stockpile squares can be added to your original stock- pile. Any additional stockpile squares must be placed adjacent to your original stockpile. 24 25
  • 14.
    STRONGHOLD STRONGHOLD 4.3 The Granary. To find out exactly how many units of each food type you have in stock, left click on the ‘Food Report’ button on the granary panel. The granary is where all of your food is stored. Left clicking on your granary will allow you to set the amount of food that is distributed to your population. This is Tip: You can also get to this panel by selecting food from the scribes report menu. referred to as your ration level. The green bar in the top left is the food consumption indicator. Each time the indi- From here you can see which foods you are running low on. To increase your food cator fills with green, one unit of food is consumed from the granary. The larger storage capacity, additional granaries can be placed adjacent to your existing granary. your population and the higher you set your ration level, the quicker your granary stocks will deplete. 4.4 Food Types. The three numbers underneath this show the units of food remaining in the granary, There are four types of food available in Stronghold, all of which are stored in the how long this food will last and the number of food types your people are eating. granary. Each food type has it's own benefits and drawbacks. On the right of this panel, there are five plates with varying amounts of food on Meat: Hunters will gather this for you when a hunters hut is placed. This them, which symbolize the different ration settings from 'no rations' up to 'double is quick to get working and can generate quite a bit of food, however, animal rations'. Reducing you rations below the default of 'full rations' will have a negative migration and over hunting can make meat an unreliable food source. effect on your popularity, whereas, increasing them will have a positive effect. Apples: These are grown in your orchards, which must be placed on low- If you hold your mouse pointer over the granary, the roof of the granary will be lying land. These are quick to get working, but require a large area of land removed so you can see inside. Looking at the granary should give you a rough idea for each orchard. Apple production usually proves to be more reliable than of how much and what types of food you have stored. meat, but produces a little less food. Cheese: This is produced in your dairy farms. Dairy farming is slow to get going. Only when three cows have been raised will your dairy farmer begin milking them to produce cheese. Once running, however, dairy farming is more efficient than apple farming or hunting. If you are producing leather armor cheese production will suffer as tanners take the cows. Bread: This is made in the bakery and requires a supply of flour, which in turn requires a supply of wheat. The food chain leading up to bread requires more time and resources to set-up, but when your wheat farms, mills and bakeries are all in place, it proves the most efficient food source in the game. As with apple farming, wheat farms must be placed on low-lying land so at times you may need to think carefully about how to maximize this limited space. 26 27
  • 15.
    STRONGHOLD STRONGHOLD Tip: A working mill will support multiple bakers. For baking to become really cost 5.2 The Marketplace. effective, you will want to get several bakers working. The marketplace allows you to buy and sell goods. Left clicking on the marketplace 5.0 Money. will bring up the trade panel. This section will show you how to effectively manage your finances. Maintaining a healthy treasury will help you deal with emergencies. 5.1 Tax Rate. Left click on your keep to bring up the tax panel. The ‘Scale’ icon on the right will bring up a price list of all available goods. This panel shows the buying and selling price for each good that the trader has available. The slider bar allows you to raise taxes or bribe your people. Note: Section 3.2 deals with how your tax rate influences your popularity. Note: Some goods may not be available to trade depending upon where you are in the game. If you have plenty of gold in your treasury you may decide to move your tax rate down to a point where you actually pay your peasants bribes to encourage them to The first three icons will take you to the trade panel for food, resources or military stay. This will provide you with a popularity bonus. goods. On the other hand you may decide to move your tax rate up to raise money. Raising taxes will have a negative effect on your popularity. The highest tax rate that can be From here, click on the good you wish to trade then select the ‘Buy or Sell’ button. set is a 'Downright Cruel' tax where you take every penny your peasants earn, this will have a devastating effect on your popularity and should be used only for brief peri- Note: Markets only deal in bulk so you must purchase or sell batches of five goods at ods. a time. Go to the Treasury report to see details of the castles current financial situation. 28 29
  • 16.
    STRONGHOLD STRONGHOLD 6.0 Military Forces. and walk to the barracks. Troops are not considered part of your workforce so do not require additional housing. The gold paid for them is used to buy their food This section will take you through everything you need to know about raising an while in your service, therefore, they do not receive rations from the granary. army. 6.1 Military Goods and the Armory. 6.3 Available Units. There are eight types of weapon in Stronghold. These are stored in the armory. To There are eight troop types available for hire in the barracks and an additional three see how many weapons and suits of armor you have, left click on the armory. special units who are trained in your guilds. Archers: These are your standard long-range troops. Their lack of Weaponry Made by Required Resources armor makes them one of the quickest units in the game but in hand-to- Bow Fletcher 2 Wood hand combat, archers are virtually useless. They have a long firing range Crossbow Fletcher 3 Wood and are very effective against units that don't wear metal armor. Spear Poleturner 1 Wood Crossbowmen: These units are slow to move and reload and have a Pike Poleturner 2 Wood shorter range then Archers. They are, however, very accurate and their Mace Blacksmith 1 Iron deadly bolts can easily penetrate metal armor. Swords Blacksmith 1 Iron Spearmen: These are the first melee troops you have access to and the Leather Armor Tanner One cow provides enough leather for three suits cheapest to produce. Having no armor makes them quicker than most Metal Armor Armorer 1 Iron troops and they prove useful for pushing ladders off of walls and digging moats. They are also one of the few units able to use ladders to scale walls. 6.2 The Barracks. Pikemen: Their heavy pike and metal armor make Pikemen slow to move, but also make them the ultimate defensive unit. They are able to take a lot of damage and are ideal for blocking access to areas of the castle. This is where you hire and train your troops. Selecting this building will bring up the barracks panel. Macemen: These thuggish brutes are quick and deal out a lot of dam- age, making them ideal assault troops. They are not heavily armored, however, and are very susceptible to missile fire. Like spearmen they can use ladders to scale castle walls. Swordsmen: These are your elite foot soldiers. Their heavy armor makes them the slowest unit in the game but when they reach their tar- To find out which weapons are required to build a military unit, move your mouse get they prove devastating. They have both great offensive and defensive pointer over each of the troop types and the required goods will become highlighted capabilities. at the bottom of the panel. The amount of gold needed will also be shown at the top Knights: The ultimate trained solider, Knights are both fast and deadly of the panel. in combat. They are also especially useful for surprise attacks, sallying forth from the castle to destroy siege equipment. Each knight needs a horse bred for him in your stables. Tunnelers: These special units can burrow beneath the foundations of enemy walls and turrets, causing them to collapse. They are trained (for a cost in gold) at the tunneler's guild. If you have peasants available, as well as the correct military goods and gold, left clicking on a troop type will hire and train it. Your troops will appear at the campfire 30 31
  • 17.
    STRONGHOLD STRONGHOLD Laddermen: If you can't bring a wall down then these units will allow Army Interface Panel: you to go over the top. Laddermen are cheap to produce but are very vulnerable, so they need to be deployed quickly. When units are selected you will see the army interface panel appear at the bottom of the screen with the units command box on the left and the unit information panel on Engineers: These are perhaps the most versatile and useful unit in the the right. The unit information panel shows you the type and amount of units cur- game. They are required to build and man all of your siege equipment, rently selected and allows you to select and deselect specific unit types. Left clicking in and out of the castle. These units are trained in the engineer's guild. on a unit type from this panel will select only that unit type whereas right clicking will remove that unit type from the current selection. Black Monks: These are mysterious individuals to say the least. Now and again they will appear and share their knowledge with you and help you fight. 7.0 Issuing Military Commands. Grouping units: This chapter takes you through the commands you can issue to your military units. Grouping units allows you to form a group of units that you can command at the same time. Note: Units in this chapter refer to military units only. 1) To form a group of units, first make a selection. 2) Next hold down the ‘Ctrl’ key and press a number on the keyboard to assign to 7.1 Gathering your Forces. the group. 3)Once a group has been assigned a number, pressing that number on the keyboard Selecting units: will select it. For example, pressing the number 1 on the keyboard will select group 1. Pressing the same number again will take you to the groups current posi- You can select a single unit by left clicking on it. tion on the map. To select a group of units, press and hold the left mouse button then drag the pointer to create a box around them. When you release the mouse button, 7.2 Marching Orders. all of the units that were within the box will now become selected. When you have a unit selected, your pointer will change to the move- ment cursor. The green pointer means that you can move to a specific spot while the red cross means the area is inaccessible. Additional options for selecting units: Moving units to the tops of walls and towers: Units can be added or removed from a selection by holding down the ‘Shift’ key then To position troops on top of your walls and defensive structures select a left clicking on them. Multiple units can be added to a selection by holding down unit then when the fortify mouse cursor appears, left click to send units to the ‘Shift’ key and dragging a box around them. Double clicking on a unit will select that destination. all of that unit type visible on the screen. Note: If the red cross appears it is likely to mean that there are no stairs leading up to the top of your building or wall. 32 33
  • 18.
    STRONGHOLD STRONGHOLD Patrolling: 7.4 Military Commands. You can also set units to patrol between two points. Move the unit to where Attacking the enemy: you want their patrol to start, select the ‘Patrol’ button then left click where you wish the patrol to end. The unit will patrol back and forth between the To attack the enemy, select a unit then click on the enemy you wish to attack two positions. when you see the attack pointer appear. Setting up advanced patrols: In addition to your standard attack some units have an extra attack option accessed by using the ‘Special Attack’ button in the bottom left of the unit 1) Select a unit then the ‘Patrol’ button. control box. This button will change depending upon the unit selected. With 2) While holding down the ‘Shift’ key, left click to place additional patrol markers range units selected this button will become the 'Attack Here' button. (you can place up to 10). 3) When you are happy with the patrol markers, press the right mouse button to Selecting this button will allow you to designate an attack radius. You will finish. see a circle of dots appear to show the area the unit will attack. This type of 4) Units will patrol in the order you have placed the markers. attack is very useful for attacking units behind castle walls. Note: If a group of selected units are on the move you can prevent them from When an engineer with a pot of boiling oil is selected this button will appear going further by clicking the ‘Stop’ button. as the ‘Pour Oil’ button. After the ‘Pour Oil’ button has been selected a circle will appear above the engineers head to show the direction that the oil will be poured. Beware, this 7.3 Unit Stances. control allows you to pour oil anywhere on the map, even at ground level which will almost certainly leave the engineer standing in his own oil! The top three buttons in the command box change the way your units behave in combat. Moving the mouse changes the pour direction and left clicking pours the oil. After the oil has been poured your engineer will automatically run back to the Stand Ground - Units set to stand ground will not move from their posts unless oil smelter to replenish his oil then return to his designated post. ordered to do otherwise. They will defend themselves when attacked and if they are a missile unit, will fire when enemy units come into range. Defensive Stance - Units set to a defensive stance will move a short distance from their post to engage any enemy units that come close to their position. Once there are no more enemy units to engage, they will return to their original position. Aggressive Stance - Units set to an aggressive stance will look a long way to engage or chase down enemy units. When the enemy is defeated your units will look for another potential target before returning to their original position. Units in an aggressive stance will also respond actively to missile attacks. 34 35
  • 19.
    STRONGHOLD STRONGHOLD Another method of pouring the oil is to select the engineer and then simply use the 7.5 Map Bookmarks. target cursor to direct his aim. This is a quicker approach when in the heat of battle. Areas on the map can be book marked by holding down the ‘Ctrl’ and ‘Alt’ keys then With a tunnel digger selected this button will appear as the ‘Dig Here’ button. pressing a number. To quickly return to this position later hold down the ‘Alt’ key After this button is selected and the left mouse button is pressed on the map, and press the number. For example, to bookmark your quarry area, scroll over to the tunnel digger will begin his decent then dig his way to the nearest poten- your quarry. Now, while holding down the ‘Ctrl’ and ‘Alt’ keys, press the number 1 tial target. on your keyboard. Later, to quickly return to the quarry area, hold down the ‘Alt’ key and press the number 1 on the keyboard. Additionally, pressing the ‘H’ key will cen- Note: Section 9.7 covers tunnel digging in more detail. ter you on your keep. Pressing the ‘S’ key will center you on the signpost where enemy units appear. As well as these special attacks, some units have additional commands. When engi- neers are selected you will see a ‘Build’ button appear in the unit control box. Selecting this will bring up a list of available siege engines to build. 8.0 Defending your People. This section will take you through the various ways you can defend that which you Note: See section 9.1 for more information on building siege equipment. have built. Catapults and trebuchets also have a ‘Launch Cow’ button available on certain missions as long as you have a supply of diseased cattle to fire (shown by the 8.1 The Gatehouse. number on the icon). This should be one of your first considerations when piecing together your defenses, To retire a unit, select it then click on the ‘Disband’ button in the units control because once your walls are built your workers will need a gatehouse to get in and out box. The unit will turn back into a peasant and go to the campfire until work of the castle. To build one, first select the ‘Castle Buildings’ category then click on is assigned. the ‘Gatehouse’ button. Left click on the gatehouse of your choice then select the appropriate orientation before placing it. Note: If the campfire is inaccessible the peasants will vanish from the map. 8.2 Building Walls. Attacking units with your Lord: Walls are selected from the castle buildings category. When the desired wall Your Lord can be used to target and attack enemy units, but cannot be ordered to is selected, press and hold the left mouse button on the main display then move to a specific destination. If there are enemy units on the map, the lord will slowly drag the mouse. If you have enough wood or stone in your stockpile, return to the safety of the keep, unless you order him to attack. the wall will appear in front of you. The wall will finally be placed only when the button is released. Tip: Walls can be built to any thickness, with thicker walls taking much longer to bash through than thinner ones. Crenulated walls can be added to the front of your standard walls to give added pro- tection. Wooden walls are cheaper to build than stonewalls, but are much easier to knock down and do not allow soldiers to stand on them. 36 37
  • 20.
    STRONGHOLD STRONGHOLD Note: When dragging to create walls, if any piece of the wall is not in a valid building The second trap is the pitch ditch. This is an area or trench of oil location, the whole wall will turn red. extracted from the marsh that ignites into a deadly inferno when you fire a burning arrow into it. To light the pitch you will need an 8.3 Turrets and Towers. archer with a brazier close by to ignite the pitch. Target him at the pitch and he will fire a burning arrow into it. These can be found in the defense section of the castle buildings panel. They are impervious to lad- der attacks and can withstand much more damage 8.6 Moat Digging. than walls. This is a mucky job, but provides an excellent defense. To dig one you first need to layout a plan for where you want a moat to be dug. They also give your missile units further firing range and provide all units with a You do this by selecting 'Dig' from the castle buildings category then defensive advantage against enemy missile troops. left clicking on the map. If you are unhappy with the plan, select the 'Don't Dig' button then left click to correct it. When you are happy Turrets are cheap to build, but only have room for a small number of military units, with the plan, select some units then move your cursor over the plan don't support siege equipment and can be collapsed by tunneling attacks. area. When the cursor turns into a shovel, left click and the units will move to that position then start digging out the moat. If you want to fill in a moat (your own or Towers are more expensive, but have space for more military units, can be used to your enemies!) just select some troops and click on the moat. mount defensive siege equipment and are immune to tunneling attacks. Tip: Some of your units will dig more enthusiastically than others and some will Troops get into towers via the walls. You must build a wall adjacent to a tower to refuse to dig altogether. create a door for troops to use then provide stair access up onto that wall (See A drawbridge can be attached to stone gatehouses. This allows your people across below). the moat but can also be raised in times of siege to delay the enemy. 8.4 Placing Stairs. 8.7 Mounted Siege Equipment. In order to allow troops to have access to the tops of walls and gatehouses, there Castle siege machines such as ballista and mangonels can be placed on top of must be stairs connected to them. Stairs are built in the same way as walls but must towers to protect your castle. Engineers must man these siege machines after be attached to either your standard walls or the side of your gatehouse. To build they are built. Mangonels throw out a spray of rocks and are devastating them, select stairs and move your mouse pointer next to a section of wall. Now press against infantry, but are quite inaccurate. Ballista are more accurate, shoot- and hold the left mouse button on the main display then slowly drag the mouse. You ing a single bolt at a time and are very effective against enemy siege engines. will see an outline of stairs appear. When you happy with the placement, release the left mouse button to build them. 8.8 Boiling Oil. 8.5 Traps. Boiling oil is an awesome defense against besieging units. To equip an engineer with a pot of boiling oil you must assign him to boiling oil duty. First select an There are two types of traps available in Stronghold. The first one is the killing pit, engineer and move your cursor over the oil smelter. When the cursor turns into which is a covered pit with sharpened stakes at the bottom. Killing pits are visible a down arrow, left click and the engineer will be assigned to boiling oil duty. and harmless to your people but invisible to the enemy who fall to their deaths inside The first engineer assigned has the job of keeping the smelter filled with pitch them. and filling up the boiling oil pots of other engineers. 38 39 39
  • 21.
    STRONGHOLD STRONGHOLD Subsequent engineers assigned to the smelter will receive pots of boiling oil, which 9.3 Battering Rams. they can now use against attackers! Battering Rams are slow, but can take a lot of damage and prove a superi- To pour the oil, select an engineer then press the ‘Pour Oil’ button. Move your cur- or weapon for bringing down gatehouses. They are also effective against sor over an enemy unit or area of ground that you want to pour the oil on then left castle walls and towers, when they manage to reach them. Each ram click. requires 4 siege engineers to man it before it will become operational. 9.0 Siege Warfare. 9.4 Siege Towers. This chapter will help you to master the art of getting into someone else's castle! When in position, these gigantic mobile constructs will give all your troops quick access to the top of enemy walls. To use a siege tower, 9.1 Siege Equipment Overview. select it and move it adjacent to an enemy wall. Once it is close enough, the tower will dock and a gangplank will drop onto the enemies' wall. In order to get your siege engines up and running, you need Once the gangplank is in place, units will be able to climb up through the engineers to build and man them. With an engineer selected, siege tower onto enemy walls. Each siege tower requires 4 siege engineers click on the ‘Siege Equipment’ button to see a list of machines to man it before it will become operational. that are available to build. 9.5 Catapults. Select the piece of siege equipment you wish to build then left click on the map and These siege machines allow you to demolish enemy structures from a dis- a siege tent will appear. Selecting this tent will give you an idea of how long the tance. Catapults are mobile, fairly accurate, have a medium range and do a equipment will take to build. medium amount of damage. They fire with a low trajectory so they are good for precision attacks, to take out enemy structures. Catapults can Hint: Siege tents are easy to demolish and the engineers inside are vulnerable until the also fire diseased cattle into an enemy castle to spread the plague. To do equipment is finished. Ensure you protect them well. this select the ‘Fire Cow’ button from the catapult menu then select a tar- get. Each catapult requires 2 siege engineers to man it before it will All siege engines need to be manned. To do this, select a group of engineers then become operational. move your cursor over the piece of siege equipment you wish to man. When the cur- sor turns into a down arrow, left click and the engineers will move to the equipment and man it. Depending on the type of siege equipment, a different amount of engi- 9.6 Trebuchets. neers are needed to man them before they become operational. Trebuchets are awesome siege machines for knocking down castle struc- tures. Trebuchets are huge machines and once built, stay in a fixed posi- 9.2 Portable Shields. tion. They lack the accuracy of catapults but have a very long range and do a large amount of damage when they hit enemy structures. Trebuchets These are good for protecting your infantry from vol- fire with a high arc, so they are ideal for firing over castle walls. As with leys of arrows and crossbow bolts, but are very weak catapults you can fire diseased cattle into enemy castles to spread disease. against infantry attacks. Each shield requires 1 siege Each trebuchet requires 3 siege engineers to man it before it becomes engineer to man it before it will become operational. operational. 40 41
  • 22.
    STRONGHOLD STRONGHOLD 9.7 Digging Tunnels. 10.0 Reference Section. Another way to bring the opposition to their knees is by digging tunnels. This chapter gives you additional information, which you may find useful in your Tunnelers dig under defensive structures then collapse their tunnel, conquest. demolishing the foundations above. To do this, select a tunneler then click on the ‘Dig’ button. Choose an area close to the castle as there is a 10.1 Non-military Characters: maximum distance the tunnel can extend before it collapses in on itself. Once underground, the Tunneler will make his way towards the nearest Lord: His Lordship is the most important character in the game. He is an wall, turret or gatehouse and set fire to the pit props holding up the tun- absolutely deadly fighter as well as the master of all he surveys. Should he nel, causing it to collapse. This will damage or destroy the structure fall in combat the game will be lost. above the tunnel. It is impossible for tunnel diggers to dig under moats or towers although they can attack the smaller turrets. Lady: Although she has the good of the castle at heart, she can come across as a little bossy. She used to live in a luxurious manor house with her father 9.8 Filling in Moats. and now complains profusely about the squalid conditions she is forced to live in. Military units can be ordered to fill in the enemies' moats. To do this select a group of units then click on the moat when you see the shovel pointer appear. They will Jester: The jester runs around your castle teasing people whilst doing acro- walk to the moat and start filling it in. batics so has a very short life expectancy. Woodcutters: They cut down trees, are very vain and enjoy showing off their bulging muscles to passers by. Hunters: Hunters kill deer for food, taking the meat to your granary. They are rough and ready folks who have a strong appreciation for fine ale. Farmers: These lowly citizens tend to your various crops. They enjoy grum- bling about their poor treatment and have a bitter dislike for town folk. Peasants: They spend their days sitting around the fire and hoping to be given work. Children: These little scamps run around causing mischief all day. You will occasionally see them playing classic games such as catch and patty cake. Mothers and Babies: They appear when a hovel is placed. The mother is responsible for keeping the baby happy and making the house neat and tidy whereas the baby cries and makes a mess. They will be seen running to their hovel when enemies appear at the castle. 42 43
  • 23.
    STRONGHOLD STRONGHOLD Stone Masons: They work in the quarry cutting and carving stone. Some Armorer: He crafts metal armor for your soldiers. The armorer is a military say they have their own mysterious society where masons indulge in a sacred veteran and a well-respected figure in the castle, always ready with a new tale ritual known as trouser leg rolling. to tell the children. Iron Miners: They work long hours underground, smelting and delivering Blacksmith: He forges your swords and maces. The blacksmith is usually a iron. Iron miners are cold-hearted individuals with a bleak outlook on life quiet and reserved gentleman. Unfortunately he has a rather short fuse and and it can prove difficult to break through their hardened exteriors. has a tendency to burst into fits of rage without notice. Pitch Diggers: These people extract pitch from the surrounding marshland. Poleturner: He turns spears and pikes for your troops. The poleturner Unfortunately, working in this environment has had an adverse effect on spends his days contemplating the meaning behind a spinning piece of wood their sense of smell so pitch workers have an even more acute personal and comes across as a subdued introvert, but is in fact the wisest character in hygiene problem than your average medieval citizen. the game. Mill Boys: These young lads rush wheat to your mill, hastily grind it up, Tanner: She is a strong willed woman and has no problem dispatching your then quickly deliver the flour. Mill boys seem to have an endless supply of cows, then sewing them into attractive leather garments for your soldiers to energy. wear. The tanner has an abrasive manner about her, which is coupled with an exceptionally dominant personality. Drover: He takes stone from the quarry pile, loads it onto his ox then, deliv- ers the stone to your main stockpile. The drover is a big softy at heart, Priests: They spread joy by carrying out blessings and weddings. Due to spending most of his spare time at rhyme and verse. their strict order, medieval priests are not allowed a sense of humor. Baker: He bakes bread to help feed your people. The baker comes across as Healer: He clears up any clouds of disease, which float around your castle. a happy and sensitive gentleman. He is also at the center of much village The healer spends a lot of time walking in the woods to gather his herbs and gossip. sometimes disappears for days on end. Brewer: She brews the ale for your inns. The brewer has a problem focusing Market Trader: He will arrive when a market place is built. The trader is a and walking straight. She regularly tastes what she brews and gets into trou- quick talking fellow who holds himself confidently. He is always ready to ble for shouting slurred insults at strangers in the street. negotiate the fairest and best possible deal for himself. Innkeeper: He distributes ale among your workers. The innkeeper is a jolly Juggler: He comes to your castle with the traveling fair to entertain your red-faced gent who has his thumb on the pulse of the nation and knows people. The juggler is a skittish character that finds it impossible to sit still about all the latest fads. for two minutes and has a fear of commitment. Drunkard: These wobbly individuals will appear when your inns are up and Fire-eater: The fire-eater is also part of the traveling fair and really knows running. You will see them staggering around in zigzag patterns only stop- how to captivate the audience with his collection of cunning stunts. He no ping to drink some more ale. longer has any body hair due to an unfortunate incident over a brazier. Fletcher: He crafts bows and crossbows for your troops. The fletcher regu- larly invites people around for tea so he can tell them all about his bad leg. 44 45
  • 24.
    STRONGHOLD STRONGHOLD 10.2 Food Flow Chart: Appendix Charts Hunters Hut Meat Dairy Farm Cheese Orchard Apples Wheat Farm Wheat Mill Flour Bakery Bread Granary Hops Farm Hops Brewery Ale Inn 10.3 Resource Flow Chart: Quarry Stone Dairy Farm Animal Tanners Leather Hide Workshop Armor Maces Blacksmith Swords Iron Mine Iron Armorer Metal Armor Bows Fletcher Woodcutters Crossbows Wood Hut Poleturner Spears Pikes Pitch Armory Pitch Oil Smelter Dugout 46 47
  • 25.
    STRONGHOLD STRONGHOLD 10.4 Buildings Table. 10.4 Buildings Table. BUILDING CATEGORY RESOURCE WORKERS PRODUCES/ BUILDING CATEGORY RESOURCE WORKERS PRODUCES/ COST REQUIRED ALLOWS COST REQUIRED ALLOWS SAXON CASTLE FREE N/A GRANARY MAIN CASTLE 20 STONE N/A ACCESS HALL GATE WOODEN CASTLE FREE N/A GRANARY DRAW- CASTLE 10 WOOD N/A ACCESS KEEP BRIDGE 10 STONE STONE CASTLE FREE N/A GRANARY WOODEN CASTLE 10 WOOD N/A ADDED KEEP PLATFORM DEFENSE FORTRESS CASTLE FREE N/A GRANARY PERIMETER CASTLE 10 STONE N/A ADDED TURRET DEFENSE STRONG- CASTLE FREE N/A GRANARY DEFENSE CASTLE 15 STONE N/A ADDED HOLD TURRET DEFENSE WOODEN CASTLE 10 WOOD N/A WORK SQUARE CASTLE 35 STONE N/A ADDED GATE ACCESS TOWER DEFENSE INNER CASTLE 10 STONE N/A WORK ROUND CASTLE 40 STONE N/A ADDED GATE ACCESS TOWER DEFENSE 48 49
  • 26.
    STRONGHOLD STRONGHOLD 10.4 Buildings Table. 10.4 Buildings Table. BUILDING CATEGORY RESOURCE WORKERS PRODUCES/ BUILDING CATEGORY RESOURCE WORKERS PRODUCES/ COST REQUIRED ALLOWS COST REQUIRED ALLOWS ARMORY CASTLE 10 WOOD N/A WEAPON SIEGE CASTLE N/A 1 OR BUILD & ARMOR TENT MORE SIEGE STORAGE ENGINEERS EQUIPMENT WOODEN CASTLE 15 WOOD N/A TROOPS STABLE CASTLE 20 WOOD N/A HORSES BARRACKS 400 GOLD STONE CASTLE 15 STONE N/A TROOPS TUNNELER CASTLE 10 WOOD N/A TUNNELERS BARRACKS GUILD 100 GOLD ENGINEER CASTLE 10 WOOD N/A LADDER- APPLE FARM 5 WOOD 1 APPLES GUILD 100 GOLD MEN & ORCHARD ENGINEER KILLING CASTLE 6 WOOD N/A ADDED DAIRY FARM 10 WOOD 1 CHEESE PIT DEFENSE FARMER OIL CASTLE 10 IRON 1 ENGINEER TO POTS OF HOPS FARM 15 WOOD 1 HOPS MAN SMELTER. SMELTER 100 GOLD ADDITIONAL BOILING FARMER ENGINEERS TO CARRY THE POTS OIL PITCH CASTLE 1 PITCH N/A ADDED HUNTER- FARM 5 WOOD 1 MEAT DITCH DEFENSE POST WAR DOG CASTLE 50 GOLD N/A KILLER KENNEL DOGS 50 51
  • 27.
    STRONGHOLD STRONGHOLD 10.4 Buildings Table. 10.4 Buildings Table. BUILDING CATEGORY RESOURCE WORKERS PRODUCES/ BUILDING CATEGORY RESOURCE WORKERS PRODUCES/ COST REQUIRED ALLOWS COST REQUIRED ALLOWS WHEAT FARM 15 WOOD 1 WHEAT IRON INDUSTRY 20 WOOD 2 IRON FARMER MINE BAKERY FOOD 10 WOOD 1 BREAD MARKET INDUSTRY 15 WOOD N/A TRADING PROCESS- ING BREWER FOOD 10 WOOD 1 ALE OX TETHER INDUSTRY 2 WOOD 1 STONE PROCESS- DELIVERIES ING GRANERY FOOD 10 WOOD N/A FOOD PITCH INDUSTRY 20 WOOD 1 PITCH PROCESS- STORAGE RIG ING INN FOOD 50 WOOD 1 ALE QUARRY INDUSTRY 15 WOOD 3 STONE PROCESS- 25 GOLD DISTRIBU- ING TION WINDMILL FOOD 20 WOOD 3 FLOUR STOCK INDUSTRY N/A N/A RESOURCE PROCESS- PILE STORAGE ING 52 53
  • 28.
    STRONGHOLD STRONGHOLD 10.4 Buildings Table. 10.4 Buildings Table. BUILDING CATEGORY RESOURCE WORKERS PRODUCES/ BUILDING CATEGORY RESOURCE WORKERS PRODUCES/ COST REQUIRED ALLOWS COST REQUIRED ALLOWS WOOD INDUSTRY 3 WOOD 1 WOOD CATHEDRAL TOWN 40 STONE N/A PRIEST (NEEDED AT CUTTER 500 GOLD VERY HIGH POPULATIONS) 10 WOOD 1 DISEASE WELL TOWN 50 GOLD N/A INCREASE APOTHE- TOWN 50 GOLD PREVEN- POPULARITY CARY TION 8 ADDI- HOVEL TOWN 6 WOOD N/A GARDEN TOWN 30 GOLD N/A INCREASE TIONAL POPULARITY HOUSING SPACES 8 ADDI- HOVEL TOWN N/A N/A MAYPOLE TOWN 30 GOLD N/A INCREASE TIONAL POPULARITY HOUSING SPACES 8 ADDI- HOVEL TOWN N/A N/A DANCING TOWN 30 GOLD N/A INCREASE TIONAL HOUSING BEAR POPULARITY SPACES CHAPEL TOWN 10 STONE N/A PRIEST STATUES TOWN 30 GOLD N/A INCREASE 250 GOLD POPULARITY CHURCH TOWN 20 STONE N/A PRIEST SHRINES TOWN 30 GOLD N/A INCREASE 350 GOLD (NEEDED AT POPULARITY HIGHER POPULATIONS) PONDS TOWN 30 GOLD N/A INCREASE POPULARITY GALLOWS TOWN 30 GOLD N/A HIGHER WORK EFFICIENCY 54
  • 29.
    STRONGHOLD STRONGHOLD 10.4 Buildings Table. 10.4 Buildings Table. BUILDING CATEGORY RESOURCE WORKERS PRODUCES/ BUILDING CATEGORY RESOURCE WORKERS PRODUCES/ COST REQUIRED ALLOWS COST REQUIRED ALLOWS STOCKS TOWN 30 GOLD N/A HIGHER ARMORER WEAPONS 20 WOOD 1 METAL WORK 100 GOLD ARMOR EFFICIENCY DUNGEONS TOWN 30 GOLD N/A HIGHER BLACK- WEAPONS 20 WOOD 1 MACES & WORK SMITH 200 GOLD SWORDS EFFICIENCY STRETCHING TOWN 30 GOLD N/A HIGHER FLETCHER WEAPONS 20 WOOD 1 BOWS & RACK WORK 100 GOLD CROSS- EFFICIENCY BOWS CESSPIT TOWN 30 GOLD N/A HIGHER POLE WEAPONS 10 WOOD 1 SPEARS & WORK TURNER 100 GOLD PIKES EFFICIENCY BURNING TOWN 30 GOLD N/A HIGHER TANNER WEAPONS 10 WOOD 1 LEATHER STAKE WORK 100 GOLD ARMOR EFFICIENCY CHOPPING TOWN 30 GOLD N/A HIGHER SIGNPOST MISC. N/A N/A Shows where BLOCK WORK enemy attacks EFFICIENCY from GIBBITT TOWN 30 GOLD N/A HIGHER RUINS MISC. N/A N/A WORK N/A EFFICIENCY DUNKING TOWN 30 GOLD 0 HIGHER TUNNEL N/A N/A BEGIN- WORK MISC. STOOL ENTRANCE NING OF EFFICIENCY TUNNEL 56 57
  • 30.
    STRONGHOLD STRONGHOLD 10.5 UNIT TABLE 10.5 UNIT TABLE UNIT ATTACK DEFENSE SPEED WEAPON ARMOR UNIT ATTACK DEFENSE SPEED WEAPON ARMOR RATING RATING RATING RATING ARCHER LOW LOW FAST BOW N/A KNIGHT VERY HIGH VERY SWORD METAL & HIGH FAST HORSE CROSS- LOW MEDIUM AVERAGE CROSS- LEATHER TUNNEL- MEDIUM LOW AVERAGE N/A N/A BOWMEN BOW ER SPEAR- MEDIUM LOW FAST SPEAR N/A LADDER- N/A VERY FAST N/A N/A MEN MEN LOW PIKEMEN MEDIUM VERY AVERAGE PIKE METAL ENGI- N/A VERY AVERAGE N/A N/A HIGH NEER LOW MACE- HIGH MEDIUM FAST MACE LEATHER BLACK MEDIUM MEDIUM FAST N/A N/A MEN MONK SWORDS- VERY HIGH SLOW SWORD METAL MEN HIGH 10.6 UNIT COST TABLE UNIT COST (GOLD) ARCHER 12 SPEARMEN 8 MACEMEN 20 CROSSBOWMEN 20 PIKEMEN 20 SWORDSMEN 40 KNIGHT 40 TUNNELER 30 ENGINEER 30 LADDERMEN 4 58 59
  • 31.
    STRONGHOLD STRONGHOLD 10.7 KEYBOARD COMMANDS 10.7 KEYBOARD COMMANDS 60 61
  • 32.
    STRONGHOLD STRONGHOLD 11.0 Additions to the Manual Mark', which appears in the corner of the mini-map. • Creating troops within the barracks (section 6.2 in the manual) now costs gold. This section provides additional information and revisions added following the first Hovering the mouse over the troop will display the costs at the top of the barracks printing on the Stronghold manual. screen. See Section 6 of the Readme file for a table displaying the costs. For additional information, refer to the Readme file. Links to the Readme file can be • The Inns (section 3.6 in the manual) 'Ale Coverage' within the game is dependant found on the Autorun menu and under the game’s listing in the Program List. on the population count. The higher the population the less 'Ale Coverage' Inns will have. This means more Inns need to be built to have the same effect on your popularity. 11.1 Game Additions and Revisions • Within a multi-player game, any player can commandeer empty siege equipment. • We recommend experienced game players play the game on the 'Hard' or 'Very • The 'Fear Factor' (section 3.7) system for using good and bad things has changed. Hard' difficultly levels. As your population grows, you will need to build more good or bad things to • The campfire (section 2.4) can only hold 24 people. Once that limit is reached maintain your 'Fear Factor'. you will need to create jobs for the people around the campfire before more people Good things have a positive effect on your troops, giving them a better attack-rat- will come to the castle. ing dependant on your ‘Fear Factor’ level. You can see this bonus by clicking on the scribe's book, then on the 'Army' button. Bad things will give troops a penalty. The maximum bonus and penalty ranges from +25% to -25%. When you select a 11.2 Additional Multi-player Information unit (whilst playing as either a good or bad lord), green or red dots will appear above the unit's health bar, indicating their bonus. Red dots indicate a penalty, There are two main ways to get connected. If you know whom you are going to be while green dots indicate a bonus. Each dot represents a 5% adjustment in the playing, use Stronghold's built in connection services. If you want to find a game to units attack-rating. join on the Internet, use GameSpy's matchmaking service, GameSpy Arcade. • Trebuchets and catapults require rocks to fire. You can get additional rocks by Connecting using Stronghold exchanging ten stone (if you have them in your stockpile) for twenty rocks. On the Multiplayer 'Service Provider' screen you are presented with at least four con- • Setting Engineers to a 'Defensive' or 'Aggressive' stance allows your engineers to nection types. The four main types of connection are: dump oil automatically. The 'Aggressive' stance will cause the engineers to dump 1. IPX the oil if any enemy is nearby, while the 'Defensive' stance requires three or more 2. Internet TCP/IP enemies to be nearby. 3. Modem Connection • Archers that are set to a 'Defensive' or 'Aggressive' stance will stop and attack 4. Serial Connection enemy units when on route to a destination. Archers set to a 'Stand Ground' In all these types of connection, one player must be a 'Host' and the rest must join stance will try and continue to a destination, even if they are being attacked. into the host's game. • You are now able to view how well you scored, when you win a game in single play- er mode. A multi-player scoring system has also been implemented. Note: These Network protocols are computer dependent and should be set up proper- ly before attempting to begin a multi-player session. If you have difficulty set- • Occasionally, fires will occur and set buildings and trees alight. A building that is ting up these protocols, please contact your network administrator or computer alight will send out sparks and if any other buildings are nearby, they will also manufacturer. Our technical support staff will be unable to assist you with catch fire. You can combat the spread of fire by building a well. these issues. • To display where an event has occurred on the map, click on the 'Exclamation 62 63
  • 33.
    STRONGHOLD STRONGHOLD 1. IPX When playing Stronghold using GameSpy Arcade, games are limited to 4 players. This is mainly used on LAN's. No in-game configuration is required. To play Stronghold using GameSpy Arcade, run GameSpy Arcade directly without running Stronghold or run Stronghold then select the 'GameSpy Arcade' button from 2. Internet TCP/IP the multi-player start screen. Use this if you wish to play on the Internet or on a LAN. If you are using TCP/IP Once in GameSpy Arcade, go to the Stronghold section and create a game, if you on a LAN, then no one needs to supply an IP address. If you are using the Internet, wish to be a 'Host', or look for available games and join one of them. When everyone then the ‘Host’ must inform the other players of his IP address (shown on host's is ready, launch the game. GameSpy Arcade will minimize and Stronghold will launch screen). The host must then start his game and the others must enter the host's IP itself. address and click on 'Join'. If you are the ‘Host’, you will be taken to the multi-player ‘Waiting Room’ screen This is probably the best way for two people to play head to head (presuming both (further details below) otherwise the game will wait until it has made a connection to people have Internet connections). One player is the 'Host' and should supply the the ‘Host’ before taking you to the ‘Waiting Room’. other player with his IP address and the other player should enter the IP address before joining the host's game. 3. Modem Connection (2 Player Only) The Waiting Room - Choosing Your Game First, select your modem from the list of available modems on your computer. Then, On this screen when playing as the ‘Host’, you can select the map and game settings if you are hosting the game, just click on 'Host'. The other player must enter the you wish to play with. Once you are ready, you must select the 'Ready' button and phone number of the ‘Host’ and click on 'Join' and the modem will call the host's then wait for the ‘Host’ to launch the game. The ‘Host’ can 'Eject' any player he computer. doesn't want in the game by clicking the 'X' button next to the player's name he wish- es to eject. 4. Serial Connection (2 Player Only) The ‘Host’ can also put people into teams of two by clicking on the number below Both players will be asked for their serial connection information. Normally you will 'Team'. People with the same number are on the same team. During the game, play- be asked for the 'COM port' of the serial port. The other settings should normally ers can join and leave teams by holding 'Alt' and clicking on the troops of the player be left on their default values. he wishes to join to or leave. If you are trying to join another player, the other player If you are joining a game, after clicking on 'Join' you will be presented with a list of will be told that you wish to ally with him and if he holds 'Alt' and clicks on one of sessions. Normally, only one will be shown (unless you are playing on a LAN with your troops, you will both be placed on the same team. To leave a team, hold 'Alt' more than one game of Stronghold being played). Select the session that you wish and click on one of your ally's troops and you will be separated. to join and you will be taken to the 'Waiting Room'. The ‘Host’ can also select the map he wishes to play. Some of the maps may be It is best if the 'Host' is the person with the fastest computer, as well as the fastest 'grayed out', which means that either you have too many players to play that map or and most reliable net connection, because if there are any game-play connection prob- one of the players doesn't have that map. lems, it is the ‘Host’ that has to fix this. During a game, if the 'Host' loses connec- There are two types of multi-player games. In the most common type, the victor is tion to the game, another player becomes the ‘Host’. the last person left alive. The other type of game is 'King of the Hill'. In this type of game, the players can win by either killing the other lords as normal, or by occupy- ing the keep at the center of the map until his timer reaches zero. The first person Connecting Using GameSpy Arcade. to reach zero wins. (Only brief instructions for GameSpy Arcade are supplied here. Please refer to If the ‘Host’ clicks on 'Connection Options' he will have the option to set the game GameSpy Arcade's own instructions for further details.) speed. The default is 40, making this lower will slow the game down, but it may 64 65
  • 34.
    STRONGHOLD STRONGHOLD make it more reliable if you are having connection problems. Setting the game speed menu and press 'Quit Mission'. He will then be asked to 'Quit Game' which means he higher will result in a faster game, but you may experience more connection problems. will leave the game, or he can select 'End this Game' which will ask the other players Unlike in the single player mode, you can't change this setting during the game. if they wish to end the game. If all the players agree then the game will end and everyone will be returned to the ‘Waiting Room’. The other option is ‘Autosave’. It is recommended that you have this set to 10 min- utes. This means that every 10 minutes the game is automatically saved. This is Once the game is finished, the players are presented with a ranking screen. This especially useful if you are experiencing connection problems, because it allows you screen details the achievements of the players during the game. The winner of the to resume the game at a recent point. If you don't experience any connection prob- game is at the top of the list. He received one crown for winning. Other crowns are lems then you can turn this setting off. awarded for how well the players have played. Stars are awarded for each opposing lord that the player has killed. When everyone is ready, the ‘Host’ should click on 'Launch' and the game will begin. During the Game 11.3 Electronic Registration During the game it is possible to chat with other players using the chat panel, which is activated by pressing the ‘Enter’ key. On the chat panel you can select which play- Be sure to register your copy of Stronghold. To register your game, simply click on ers you wish to chat with and you can also send them pre-defined 'Insults' by clicking the 'Register' button on the Autorun menu. This link will take you to our electronic on the 1-20 buttons. If any players are in teams, the colors of the teams are shown registration site. Simply follow the on-screen prompts to register your copy of in the top-left corner of the name buttons. Stronghold. Some machines may suffer from connection problems during the game. This is most If the Autorun feature is not enabled on your system, you can access the electronic likely to happen when people are playing on the Internet using modems. There are registration site through the Program List. Simply click on the ‘Start’ button on the two main problems that may to occur. Taskbar and select ‘Programs’. Move your cursor to the ‘Firefly Studios’ listing in the Program List that appears, and then highlight the ‘Stronghold’ folder. Click on the Firstly, if a player's connection becomes very slow, or they lose their connection ‘Register Stronghold’ option and follow the on-screen prompts to register your game. entirely, the other players will be presented with a panel with the option to eject the player with the problem. If the player's connection hasn't recovered within 60 sec- Note: To use these registration links, you must have an active TCP/IP Internet con- onds they will automatically be ejected or the ‘Host’ can click ‘Eject’ at anytime to nection or Internet access via a Local Area Network (LAN). If your Internet remove that player from the game. If the player's connection recovers, then the panel Service Provider (ISP) doesn't use Window's dial-up networking, such as will automatically be removed from the screen and the game will continue normally. America Online (AOL), you will need to manually connect to the Internet before using these links. The other connection problem is when the game on each person's computer gets out of sync with the ‘Host’. This is more likely to happen on the Internet using modems, but it can occur with other types of connections. If the games lose sync, a panel will be displayed with a time bar showing how long it will take to re-sync the game. If the ‘Host’ thinks it will take too long, he can click 'Cancel Game' which will end the game for all players. Once the game is re-synced it should continue as normal. During re-syncing it is still possible to use the chat feature by pressing the "Enter' key. If at any point a player wishes to leave the game, he should bring up the options 66 67
  • 35.
    STRONGHOLD STRONGHOLD NOTES: NOTES:
  • 36.