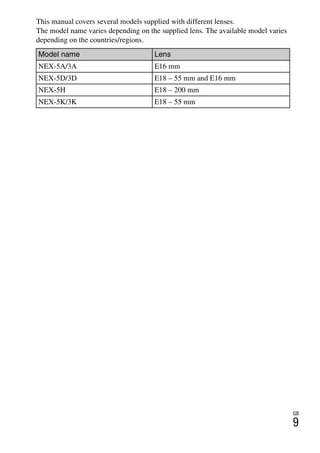
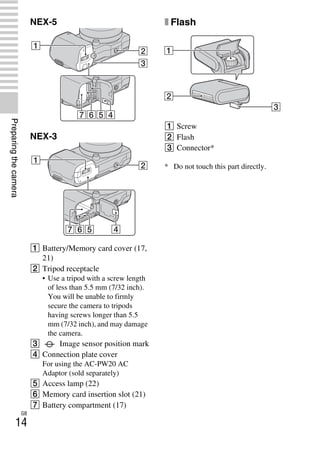
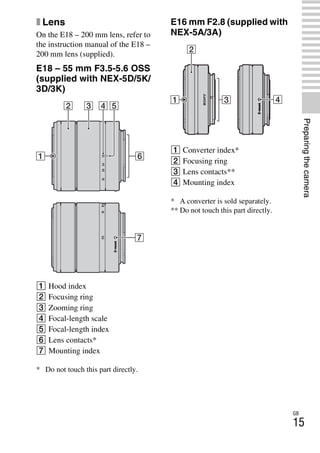
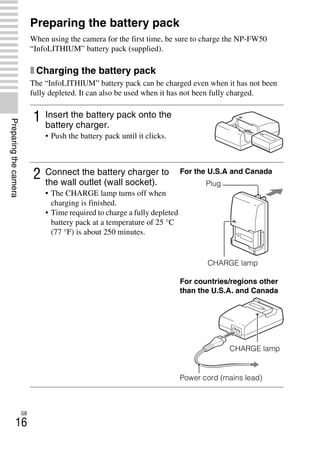
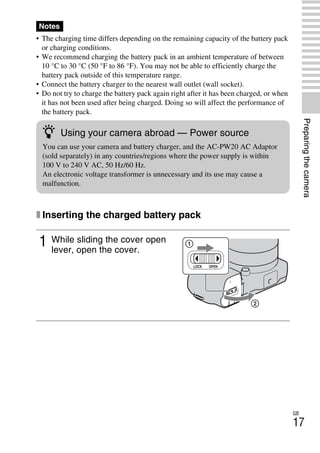
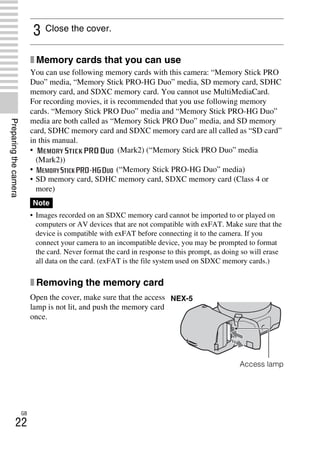
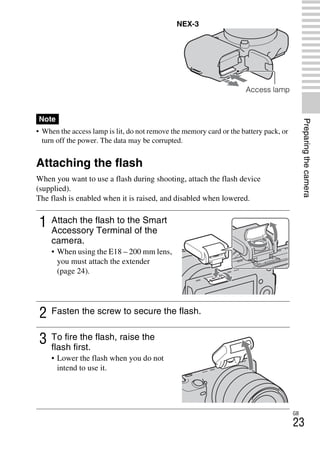
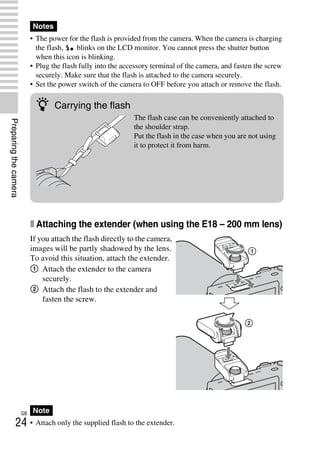
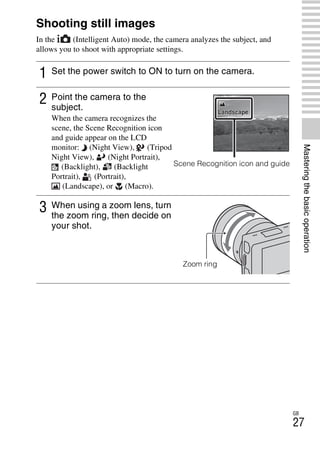
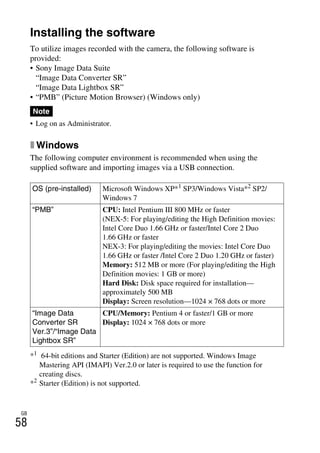
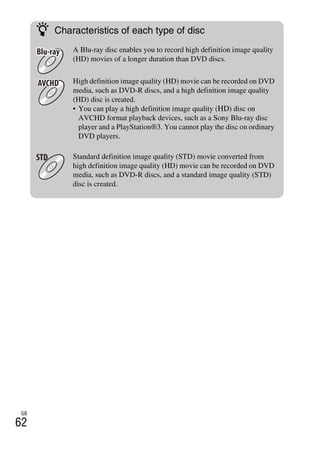
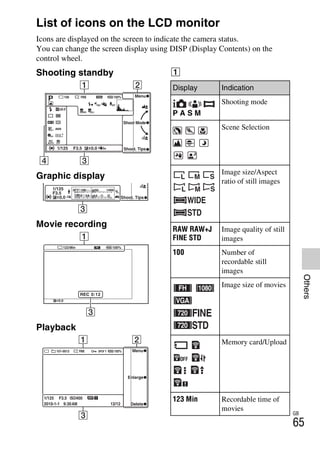
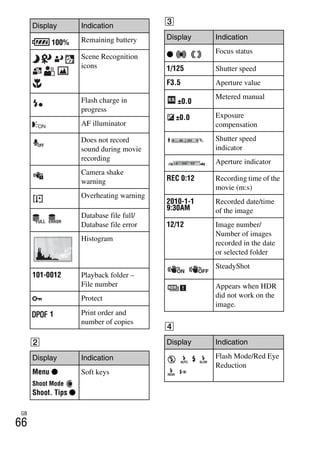
This document is an instruction manual for Sony NEX interchangeable lens digital cameras. It provides information on preparing the camera such as checking accessories, identifying parts, inserting memory cards, and attaching lenses. It also covers basic camera operation including shooting, playback, deleting images, and menus. Additional sections provide details on specific camera functions and importing images to a computer.


![NEX-3/NEX-5
4-183-856-14(1)
F:CX75000_Paper_Revision3GB41838561414183856141NEX5U201GB-
NEX5U2030PRE.fm
master: Right
GB
25
Preparingthecamera
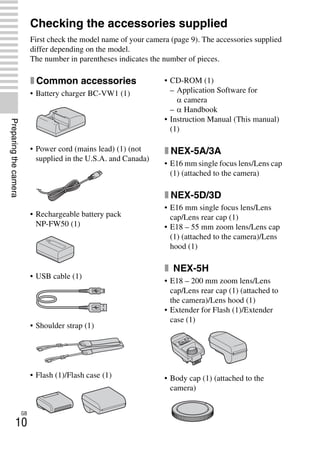
Turning on the camera and setting up the
date
When you turn on the camera for the first time, the screen to set date and time
appears.
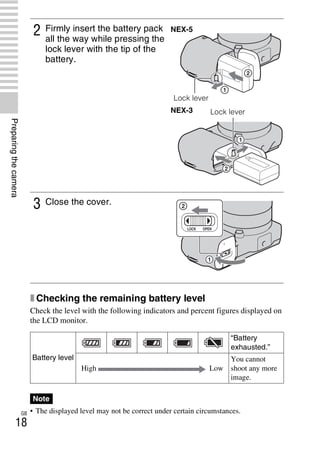
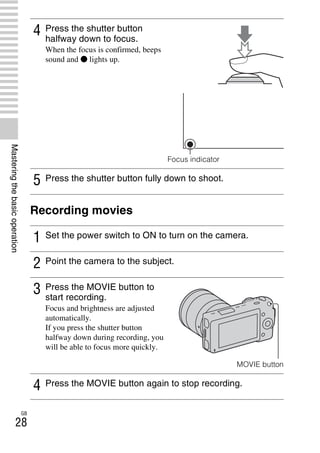
1 Set the power switch to ON to
turn on the camera.
The screen to set date and time
appears.
• To turn off the camera, set the
power switch to OFF.
2 Press the center of the control
wheel to confirm [OK].
3 Select your area by pressing
the right or left of the control
wheel and press the center.
4 Press the left or right of the
control wheel to select each
item, and press the top or
bottom, or turn it to select the
numeric value.
Daylight Svg.: Turns on or off the
daytime saving time setting.
Date Format: Selects the format to
display date.
• Midnight is indicated as 12:00 AM,
and noon as 12:00 PM.](https://image.slidesharecdn.com/sonynex5manual-150806094040-lva1-app6892/85/Sony-nex5manual-25-320.jpg)
![NEX-3/NEX-5
4-183-856-14(1)
F:CX75000_Paper_Revision3GB41838561414183856141NEX5U201GB-
NEX5U2030PRE.fm
master: Left
GB
26
Preparingthecamera
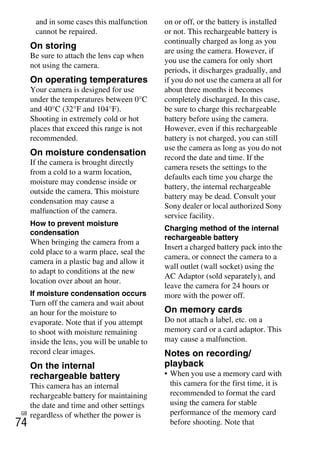
• You cannot superimpose the date on images on this camera. Using “PMB” stored
on the CD-ROM (supplied), you can save or print images with date. Refer to
“PMB Help” for more details (page 60).
x Resetting the date and time/Checking the current
clock setting
Press [Menu], then select [Setup] t [Date/Time Setup] (page 32, 54).
x Maintaining the date and time setting
This camera has an internal rechargeable battery for maintaining the date and
time and other settings regardless of whether the power is on or off, or the
battery is installed or not. For details, see page 74.
5 Repeat step 4 to set other items, then press the center of
the control wheel.
Note](https://image.slidesharecdn.com/sonynex5manual-150806094040-lva1-app6892/85/Sony-nex5manual-26-320.jpg)
![NEX-3/NEX-5
4-183-856-14(1)
F:CX75000_Paper_Revision3GB41838561414183856141NEX5U201GB-
NEX5U2040BAS.fm
master: Right
GB
29
Masteringthebasicoperation
• The sound of the camera and the lens in operation might be recorded while
recording a movie. You can disable the sound recording by selecting [Menu] t
[Setup] t [Movie Audio Rec] t [Off] (page 32, 54).
• The angle of view of movies is narrower than that of still images. After you press
the MOVIE button, the camera shows the actual range to be recorded by
displaying an empty frame on the screen.
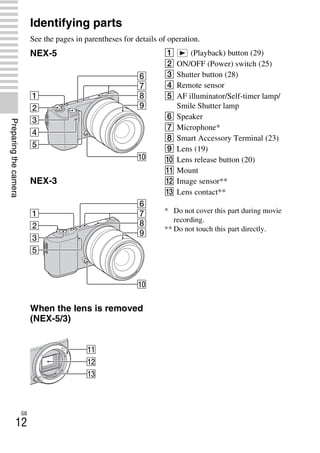
Playing back images
x Selecting the image
Turn the control wheel.
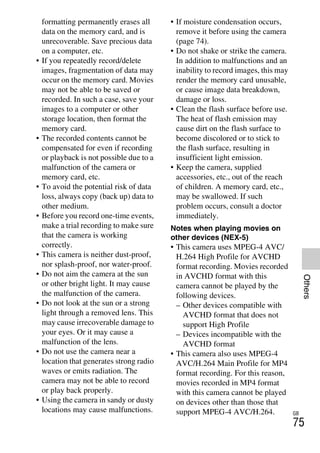
x Playing back movies
Notes
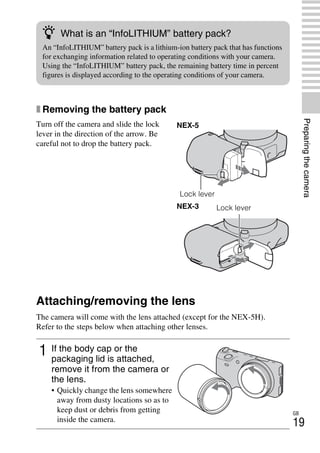
1 Press the (playback)
button.
The last recorded image is displayed
on the LCD monitor.
A still image is displayed in the
default setting.
(playback) button
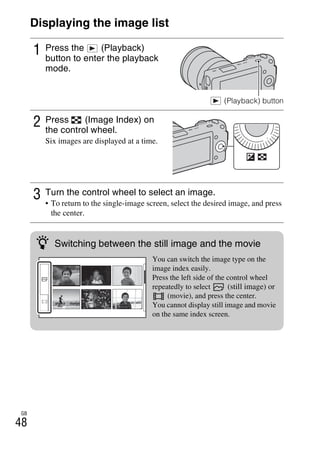
1 Press (Image Index) on
the control wheel in playback
mode.
Six images are displayed.](https://image.slidesharecdn.com/sonynex5manual-150806094040-lva1-app6892/85/Sony-nex5manual-29-320.jpg)
![NEX-3/NEX-5
4-183-856-14(1)
F:CX75000_Paper_Revision3GB41838561414183856141NEX5U201GB-
NEX5U2040BAS.fm
master: Left
GB
30
Masteringthebasicoperation
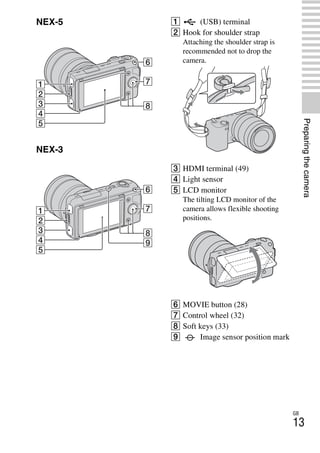
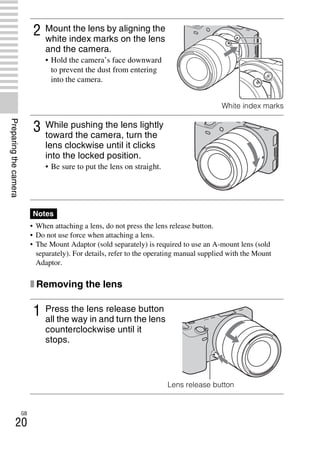
Deleting images
You can delete the image that is currently displayed.
2 Press the left side of the
control wheel repeatedly to
select (movie), and press
the center.
To return to still image playback,
select (still image) (page 48).
3 Turn the control wheel to select the desired movie, and
press the center.
During movie playback Control wheel operation
To pause/resume Press the center.
To fast-forward Press the right, or turn it right.
To fast-rewind Press the left, or turn it left.
To slow-forward (NEX-5 only) Turn it right during pause.
To slow-reverse (NEX-5 only) Turn it left during pause.
To adjust sound volume Press the bottom t top/bottom.
1 Display the desired image,
and press [Delete].
[Delete]](https://image.slidesharecdn.com/sonynex5manual-150806094040-lva1-app6892/85/Sony-nex5manual-30-320.jpg)
![NEX-3/NEX-5
4-183-856-14(1)
F:CX75000_Paper_Revision3GB41838561414183856141NEX5U201GB-
NEX5U2040BAS.fm
master: Right
GB
31
Masteringthebasicoperation
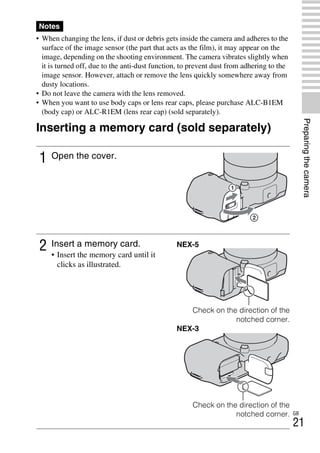
2 Press the center of the control
wheel to confirm [OK].
Press [Cancel] to quit the operation.
[OK]
[Cancel]
z To delete several images
Select [Menu] t [Playback] t [Delete] to select and delete specific images at
the same time.](https://image.slidesharecdn.com/sonynex5manual-150806094040-lva1-app6892/85/Sony-nex5manual-31-320.jpg)
![NEX-3/NEX-5
4-183-856-14(1)
F:CX75000_Paper_Revision3GB41838561414183856141NEX5U201GB-
NEX5U2040BAS.fm
master: Right
GB
33
Masteringthebasicoperation
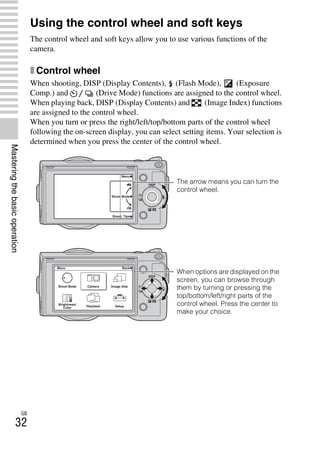
x Soft keys
The soft keys have different roles, depending on the context.
The assigned role (function) of each soft key is shown on the screen.
To use the function shown at the upper right corner of the screen, press soft
key A. To use the function shown at the lower right corner of the screen, press
soft key B. To use the function shown at the center, press the center of the
control wheel (soft key C).
In this handbook, the soft keys are indicated by the icon or the function shown
on the screen.
In this case, soft key A
works as the [Menu] button,
and soft key B as the
[Shoot. Tips] button. Soft
key C works as the [Shoot
Mode] button.
A
B
C](https://image.slidesharecdn.com/sonynex5manual-150806094040-lva1-app6892/85/Sony-nex5manual-33-320.jpg)
![NEX-3/NEX-5
4-183-856-14(1)
F:CX75000_Paper_Revision3GB41838561414183856141NEX5U201GB-
NEX5U2040BAS.fm
master: Left
GB
34
Masteringthebasicoperation
Using the guide function of the camera
The camera provides various “Help Guides” which explain the functions, and
“Shooting Tips” which introduce tips for better shooting. Use these guides to
make better use of the camera.
x Help Guides
The camera displays the Help Guide to explain the selected function, when
you change the setting, etc.
You can hide the Help Guides by selecting [Menu] t [Setup] t [Help Guide
Display] t [Off].
x Shooting tips
The camera displays the shooting tips in accordance with the shooting mode
selected.
1 When [Shoot. Tips] is displayed at the right bottom corner of the screen,
press the button at the right bottom (page 33).
A shooting tip in accordance with the current subject appears
automatically.
2 Press the left or right of the control wheel and search for the desired
shooting tip.
• Turn the control wheel to scroll the text up and down.
[Shoot. Tips]
z To access all shooting tips
You can search through all shooting tips from the menu.
1[Menu] t [Camera] t [Shooting Tip List].
2Search for the desired shooting tips.](https://image.slidesharecdn.com/sonynex5manual-150806094040-lva1-app6892/85/Sony-nex5manual-34-320.jpg)
![NEX-3/NEX-5
4-183-856-14(1)
F:CX75000_Paper_Revision3GB41838561414183856141NEX5U201GB-
NEX5U2050REC.fm
master: Right
GB
35
Usingtherecordingfunctions
Using the recording functions
Defocusing the background easily
(Background Defocus Control)
In the [Intelligent Auto] mode, you can defocus the background easily to make
the subject stand out.
• The defocusing effect may not be noticeable, depending on the distance from the
subject or the lens used.
1 Press [Menu], then select
[Shoot Mode] t
(Intelligent Auto).
[Menu]
2 Press the center of the control
wheel.
The Background Defocus screen
appears.
Control wheel
3 Defocus the background by
turning the control wheel.
: Turn up to focus
: Turn down to defocus
Press [Back] to restore the original
status.
Note
z For a better result of Background Defocus
• Move closer to the subject.
• Lengthen the distance between the subject and the background.](https://image.slidesharecdn.com/sonynex5manual-150806094040-lva1-app6892/85/Sony-nex5manual-35-320.jpg)
![NEX-3/NEX-5
4-183-856-14(1)
F:CX75000_Paper_Revision3GB41838561414183856141NEX5U201GB-
NEX5U2050REC.fm
master: Right
GB
37
Usingtherecordingfunctions
Adjusting the brightness of still images
(Exposure compensation)
You can adjust the exposure in 1/3 EV steps in a range of –2.0 EV to +2.0 EV.
Using the self-timer
1 Press (Exposure Comp.)
on the control wheel.
2 Turn the control wheel to select the desired value, and
press the center.
When the image is too bright, set [Exposure Comp.] toward –.
When the image is too dark, set [Exposure Comp.] toward +.
1 Press (Drive Mode) on
the control wheel.
2 Turn the control wheel to select (Self-timer).
3 Press [Option], then turn the control wheel to select the
desired mode and press the center.
(Self-timer: 10 Sec): Sets the 10-second delay self-timer. Use this
when you want to include yourself in the picture.
To cancel the timer, press again.
When you press the shutter button, the self-timer lamp flashes and beeps
until the shutter operates.
(Self-timer: 2 Sec): Sets the 2-second delay self-timer. You can
prevent blur caused by camera shake that occurs when the shutter button
is pressed.](https://image.slidesharecdn.com/sonynex5manual-150806094040-lva1-app6892/85/Sony-nex5manual-37-320.jpg)
![NEX-3/NEX-5
4-183-856-14(1)
F:CX75000_Paper_Revision3GB41838561414183856141NEX5U201GB-
NEX5U2050REC.fm
master: Right
GB
39
Usingtherecordingfunctions
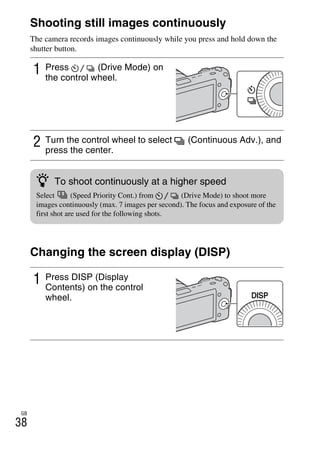
Shooting with various drive mode
2 Press DISP repeatedly to select the desired mode.
During shooting
Disp. Basic Info: Shows basic shooting information. Graphically shows
the shutter speed and aperture value, except for when [Shoot Mode] is set
to [Intelligent Auto] or [Sweep Panorama].
Display Info.: Shows recording information.
No Disp. Info.: Does not show recording information.
During playback
Display Info.: Shows recording information.
Histogram: Displays the luminance distribution graphically, in addition
to recording information.
No Disp. Info.: Does not show recording information.
1 Press [Menu].
[Menu]
2 Use the control wheel to select [Shoot Mode] t desired
mode, and press the center.
(Intelligent Auto): The camera evaluates the subject and makes the
proper settings.
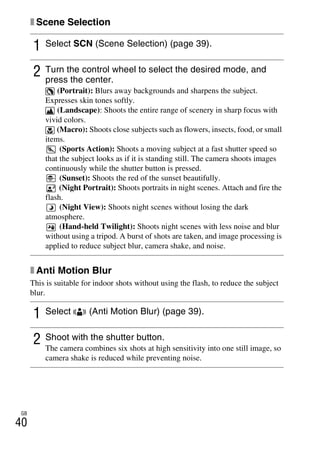
SCN (Scene Selection): Shoots with preset settings according to the
subject or condition.
(Anti Motion Blur): Reduces the camera shake when shooting a
slightly dark indoor scene or a telephoto.
(Sweep Panorama): Shoots with panoramic size.
M (Manual Exposure): Adjusts the aperture and shutter speed.
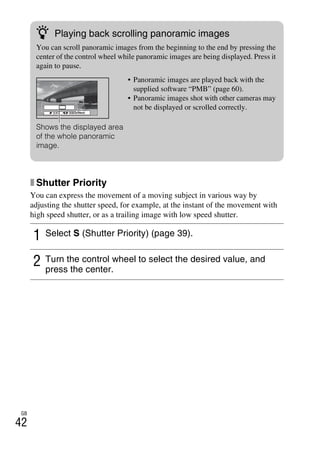
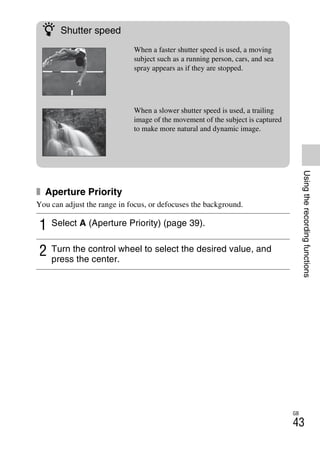
S (Shutter Priority): Adjusts the shutter speed to express the movement
of the subject.
A (Aperture Priority): Adjusts the range in focus, or defocuses the
background.
P (Program Auto): Automatic shooting that allows you to customize
settings, except for the exposure (aperture and shutter speed).](https://image.slidesharecdn.com/sonynex5manual-150806094040-lva1-app6892/85/Sony-nex5manual-39-320.jpg)
![NEX-3/NEX-5
4-183-856-14(1)
F:CX75000_Paper_Revision3GB41838561414183856141NEX5U201GB-
NEX5U2050REC.fm
master: Right
GB
41
Usingtherecordingfunctions
x Sweep Panorama
While you pan the camera, the camera shoots several images and composes
them into one panoramic image.
• The camera continues shooting during [Sweep Panorama] recording, and the
shutter keeps clicking until the end of the shooting.
1 Select (Sweep Panorama) (page 39).
2 Point the camera at the edge
of the subject, then press the
shutter button fully down.
This part will not be taken.
3 Pan the camera to the end,
following the guidance on the
LCD monitor.
Guidance bar
Note](https://image.slidesharecdn.com/sonynex5manual-150806094040-lva1-app6892/85/Sony-nex5manual-41-320.jpg)
![NEX-3/NEX-5
4-183-856-14(1)
F:CX75000_Paper_Revision3GB41838561414183856141NEX5U201GB-
NEX5U2050REC.fm
master: Left
GB
44
Selecting the image size
The image size determines the size of the image file that is recorded when you
take an image.
The larger the image size, the more detail will be reproduced when the image
is printed on large format paper. The smaller the image size, the more images
can be recorded.
In the case of movies, the larger the image size, the higher the image quality.
Still
1 Press [Menu].
[Menu]
2 Use the control wheel to select [Image Size] t [Image
Size], and press the center.
3 Turn the control wheel to select the desired mode, and
press the center.
When [Aspect Ratio] is 3:2 Usage guidelines
(L: 14M) 4592 × 3056 pixels For prints up to A3+ size
(M: 7.4M) 3344 × 2224 pixels For prints up to A4 size
(S: 3.5M) 2288 × 1520 pixels For prints L/2L size
When [Aspect Ratio] is 16:9 Usage guidelines
(L: 12M) 4592 × 2576 pixels For viewing on a high-definition TV
(M: 6.3M) 3344 × 1872 pixels
(S: 2.9M) 2288 × 1280 pixels](https://image.slidesharecdn.com/sonynex5manual-150806094040-lva1-app6892/85/Sony-nex5manual-44-320.jpg)
![NEX-3/NEX-5
4-183-856-14(1)
F:CX75000_Paper_Revision3GB41838561414183856141NEX5U201GB-
NEX5U2050REC.fm
master: Right
GB
45
Usingtherecordingfunctions
Panorama
The image size varies depending on the shooting direction (page 51).
Movie
NEX-5
NEX-3
• When you print still images recorded with 16:9 aspect ratio, and panoramic
images, both edges may be cut off.
(Standard) Shoots images using standard size.
Vertical: 2160 × 3872
Horizontal: 8192 × 1856
(Wide) Shoots images using wide size.
Vertical: 2160 × 5536
Horizontal: 12416 × 1856
[AVCHD] mode Average
bit-rate
Usage guidelines
1920 × 1080 17 Mbps Records with the highest image quality
for viewing on a high-definition TV.
[MP4] mode Average
bit-rate
Usage guidelines
1440 × 1080 12 Mbps Records with high image quality for
viewing on a high-definition TV.
VGA (640 × 480) 3 Mbps Records in the suitable size for WEB
uploads.
Image size Average
bit-rate
Usage guidelines
1280 × 720
(Fine)
9 Mbps Records with high image quality for
viewing on a high-definition TV.
1280 × 720
(Standard)
6 Mbps
VGA (640 × 480) 3 Mbps Records in the suitable size for WEB
uploads.
Note](https://image.slidesharecdn.com/sonynex5manual-150806094040-lva1-app6892/85/Sony-nex5manual-45-320.jpg)
![NEX-3/NEX-5
4-183-856-14(1)
F:CX75000_Paper_Revision3GB41838561414183856141NEX5U201GB-
NEX5U2050REC.fm
master: Left
GB
46
Focusing on the face (Face Detection)
The camera detects the faces of your subjects and adjusts the focus on the face.
You can select the priority face to be focused on.
1 Press [Menu].
[Menu]
2 Use the control wheel to select [Camera] t [Face
Detection], and press the center.
3 Turn the control wheel to select the desired mode, and
press the center.
(Off): Does not use Face Detection function.
(Auto): Selects the face the camera is to automatically focus on.
(Child Priority): Detects and shoots with priority on child’s face.
(Adult Priority): Detects and shoots with priority on adult’s face.
z Capturing a smiling face (Smile Shutter)
If you use the Smile Shutter function, the camera
detects a smile and releases the shutter
automatically.
Select [Menu] t [Camera] t [Smile Shutter]
t [On], then point the camera at the subject and
wait for him/her to smile.
You can also shoot by pressing the shutter button
yourself.](https://image.slidesharecdn.com/sonynex5manual-150806094040-lva1-app6892/85/Sony-nex5manual-46-320.jpg)
![NEX-3/NEX-5
4-183-856-14(1)
F:CX75000_Paper_Revision3GB41838561414183856141NEX5U201GB-
NEX5U2060PLY.fm
master: Right
GB
47
Usingtheplaybackfunctions
Using the playback functions
Enlarging the playback image (Enlarge
Image)
1 Press the (Playback)
button to enter the playback
mode.
(Playback) button
2 Display the image you want to
enlarge, then press [Enlarge]
(the center of the control
wheel).
Control wheel
3 Turn the control wheel to adjust the scaling.
4 Press the top/bottom/right/left of the control wheel to select
the portion you want to enlarge.
• To cancel the operation, press [Exit].](https://image.slidesharecdn.com/sonynex5manual-150806094040-lva1-app6892/85/Sony-nex5manual-47-320.jpg)
![NEX-3/NEX-5
4-183-856-14(1)
F:CX75000_Paper_Revision3GB41838561414183856141NEX5U201GB-
NEX5U2070CHK.fm
master: Left
GB
50
Checking the functions available
Menu list
When you press [Menu], six menu items; [Shoot Mode], [Camera], [Image
Size], [Brightness/Color], [Playback], and [Setup], appear on the screen.
You can set various functions in each item. Items that cannot be set in the
context are displayed in gray.
x Shoot Mode
Allows you to select a shooting mode, such as exposure mode, panoramic,
Scene Selection.
Intelligent Auto The camera evaluates the subject and makes the
proper settings.
Scene Selection Shoots with preset settings according to the subject or
condition.
(Portrait/Landscape/Macro/Sports Action/Sunset/
Night Portrait/Night View/Hand-held Twilight)
Anti Motion Blur Reduces the camera shake when shooting a slightly
dark indoor scene or a telephoto.
Sweep Panorama Shoots with panoramic size.
Manual Exposure Adjusts the aperture and shutter speed.
Shutter Priority Adjusts the shutter speed to express the movement of
the subject.
Aperture Priority Adjusts the range in focus, or defocuses the
background.
Program Auto Automatic shooting that allows you to customize
settings, except for the exposure (shutter speed and
aperture).](https://image.slidesharecdn.com/sonynex5manual-150806094040-lva1-app6892/85/Sony-nex5manual-50-320.jpg)


![NEX-3/NEX-5
4-183-856-14(1)
F:CX75000_Paper_Revision3GB41838561414183856141NEX5U201GB-
NEX5U2070CHK.fm
master: Right
GB
55
Checkingthefunctionsavailable
* Appears when an Eye-Fi card (sold separately) is inserted in the camera. Do not
use an Eye-Fi card inserted in the camera on an airplane. If there is an Eye-Fi
card inserted in the camera, set [Upload Settings] to [Off].
Display Color Selects the color of the LCD monitor.
(Black/White/Blue/Pink)
Wide Image Selects a method to display wide images.
(Full Screen/Normal)
Playback Display Selects the method used to play back portrait images.
(Auto Rotate/Manual Rotate)
CTRL FOR HDMI Sets whether or not to operate the camera with an
HDMI-compliant TV’s Remote Control.
(On/Off)
USB Connection Selects the method used for a USB connection.
(Mass Storage/PTP)
Cleaning Mode Allows you to clean the image sensor.
Version Displays the version of the camera and the lens.
Demo Mode Sets whether or not to display the demonstration with
movies.
(On/Off)
Reset Default Resets the camera to the factory-settings.
Memory Card Tool
Format Formats the memory card.
File Number Selects the method used for assigning file numbers to
images.
(Series/Reset)
Folder Name Selects the folder name format.
(Standard Form/Date Form)
Select Shoot. Folder Selects the recording folder.
New Folder Creates a new folder.
Recover Image DB Repairs the image database file of movies when
inconsistencies are found.
Display Card Space Displays the remaining recording time of movies and
the recordable number of still images on the memory
card.
Eye-Fi Setup*
Upload Settings Sets the upload function of the camera when an
Eye-Fi card is used.
(On/Off)](https://image.slidesharecdn.com/sonynex5manual-150806094040-lva1-app6892/85/Sony-nex5manual-55-320.jpg)
![NEX-3/NEX-5
4-183-856-14(1)
F:CX75000_Paper_Revision3GB41838561414183856141NEX5U201GB-
NEX5U2070CHK.fm
master: Right
GB
57
Checkingthefunctionsavailable
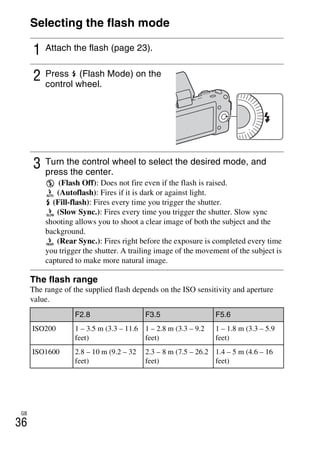
Flash modes available
The flash modes you can select depend on the shooting mode and functions
selected.
In the table below, indicates the function available. – indicates the function
not available.
The flash modes you cannot select are displayed in gray on the screen.
• The flash modes may be limited also by conditions other than the shooting mode.
• Even if you select a workable flash mode, the flash does not fire unless it is raised.
• [Autoflash] can be selected when [Shoot Mode] is set to [Intelligent Auto] or
certain [Scene Selection] modes only.
Shoot Mode Off Autoflash Fill-flash Slow Sync. Rear Sync.
Intelligent Auto – – –
Sweep Panorama – – – –
Anti Motion Blur – – – –
Scene
Selection
– –
– – –
– –
– – –
– – –
– – – –
– – – –
– – – –
Program Auto – –
Aperture Priority – –
Shutter Priority – –
Manual Exposure – –
Notes](https://image.slidesharecdn.com/sonynex5manual-150806094040-lva1-app6892/85/Sony-nex5manual-57-320.jpg)
![NEX-3/NEX-5
4-183-856-14(1)
F:CX75000_Paper_Revision3GB41838561414183856141NEX5U201GB-
NEX5U2080SOF.fm
master: Right
GB
59
Importingimagestothecomputer
• If “PMB” has already been installed on the computer, and the version number of
the previously installed “PMB” is lower than that of the “PMB” on the CD-ROM
(supplied), install “PMB” also from the CD-ROM (supplied).
x Macintosh
The following computer environment is recommended when using the
supplied software and importing images via a USB connection.
1 Turn on your computer, and
insert the CD-ROM (supplied)
into the CD-ROM drive.
The installation menu screen appears.
2 Click [Install].
• Make sure that both “Sony Image Data Suite” and “PMB” are checked
and follow the instructions on the screen.
• Connect the camera to the computer during the procedure following the
instructions on the screen.
• When the restarting confirmation message appears, restart the computer
following the instructions on the screen.
• DirectX may be installed depending on the system environment of your
computer.
3 Remove the CD-ROM after the installation is complete.
The software is installed and shortcut icons appear on the desktop.
Note
OS (pre-installed) USB Connection: Mac OS X (v10.3 to v10.6)
“Image Data Converter SR Ver.3”/“Image Data
Lightbox SR”: Mac OS X v10.4/Mac OS X v10.5/
Mac OS X v10.6 (Snow Leopard)
“Image Data
Converter SR
Ver.3”/“Image Data
Lightbox SR”
CPU: Power PC G4/G5 series (1.0 GHz or faster is
recommended)/Intel Core Solo/Core Duo/Core 2 Duo or
faster
Memory: 1 GB or more is recommended.
Display: 1024 × 768 dots or more](https://image.slidesharecdn.com/sonynex5manual-150806094040-lva1-app6892/85/Sony-nex5manual-59-320.jpg)
![GB
60
What you can do with the supplied software
x “PMB”
With “PMB” you can do the following, etc.:
• Import images shot with the camera and display them on the computer.
• Organize images on the computer on a calendar by shooting date to view
them.
• Print or save still images with the date.
For details on “PMB,” refer to “PMB Help”.
To start Help, click (PMB Help) displayed on the desktop after
installation. Or, from the start menu, click [Start] t [All Programs] t
[PMB] t [PMB Help].
The support information for the “PMB” (English only):
http://www.sony.co.jp/pmb-se/
• “PMB” is not compatible with Macintosh computers.
x “Image Data Converter SR”/“Image Data Lightbox
SR”
With “Image Data Converter SR,” you can edit images recorded in RAW
format with various corrections, such as tone curve, and sharpness.
With “Image Data Lightbox SR,” you can display and compare RAW/JPEG
images recorded with this camera.
1 Turn on your Macintosh computer, and insert the CD-ROM
(supplied) into the CD-ROM drive.
2 Double-click the CD-ROM icon.
3 Copy the [IDS_INST.pkg] file in the [MAC] folder to the
hard disk icon.
4 Double-click the [IDS_INST.pkg] file in the copy-to folder.
• Follow the instructions on the screen to complete the installation.
Note](https://image.slidesharecdn.com/sonynex5manual-150806094040-lva1-app6892/85/Sony-nex5manual-60-320.jpg)
![NEX-3/NEX-5
4-183-856-14(1)
F:CX75000_Paper_Revision3GB41838561414183856141NEX5U201GB-
NEX5U2080SOF.fm
master: Right
GB
61
Importingimagestothecomputer
For details on “Image Data Converter SR” and “Image Data Lightbox SR,”
refer to Help.
To start Help, click [Start] t [All Programs] t [Sony Image Data Suite] t
[Help] t [Image Data Converter SR Ver.3] or [Image Data Lightbox SR].
The support information for the “Sony Image Data Suite” (English only):
http://www.sony.co.jp/ids-se/
Creating a movie disc (NEX-5)
You can create a disc from AVCHD format movies recorded on the camera.
Select the method that best suits your disc player. Use “PMB” to import
AVCHD format movies to a computer. See “PMB Help” for details on
creating a disc using “PMB.”
• If you use a Sony DVDirect (DVD Writer), you can transfer data by inserting a
memory card into the memory card slot of the DVD writer, or connecting your
camera to the DVD writer with a USB cable.
• When you use Sony DVDirect (DVD writer), make sure that the version of DVD
writer’s firmware is the latest.
For details, refer to the following URL:
http://sony.storagesupport.com/
Player Method Disc type
Blu-ray disc playback
devices
(Blu-ray disc player,
PlayStation®3, etc.)
Create a Blu-ray disc of movies and
photos imported to a computer using
“PMB.”
AVCHD format playback
devices
(Sony Blu-ray disc player,
PlayStation®3, etc.)
Create an AVCHD format disc of
movies and photos imported to a
computer using “PMB.”
Creating an AVCHD format disc with
a DVD writer/recorder other than
DVDirect Express.
Ordinary DVD playback
devices
(DVD player, DVD
playable computer, etc.)
Create a standard definition image
quality (STD) disc of movies and
photos imported to a computer using
“PMB.”
Notes](https://image.slidesharecdn.com/sonynex5manual-150806094040-lva1-app6892/85/Sony-nex5manual-61-320.jpg)
![NEX-3/NEX-5
4-183-856-14(1)
F:CX75000_Paper_Revision3GB41838561414183856141NEX5U201GB-
NEX5U2090OTH.fm
master: Right
GB
63
Others
Others
Checking the number of recordable images
• When “0” (the number of recordable images) flashes in yellow, the memory card
is full. Replace the memory card with another one, or delete images in the current
memory card (page 30).
• When “NO CARD” (the number of recordable images) flashes in yellow, it means
no memory card has been inserted. Insert a memory card.
x Number of still images and time of movies that can be
recorded on a memory card
Still images
The table shows the approximate number of still images that can be recorded
on a memory card formatted with this camera. The values are defined using
Sony standard memory cards for testing. The values may vary depending on
the shooting conditions.
Image size: L 14M
Aspect ratio: 3:2*
(Units: images)
* When [Aspect Ratio] is set to [16:9], you can record more images than the
numbers shown in the table above (except for [RAW]).
Once you insert a memory card into the
camera and set the power switch to ON,
the number of images that can be
recorded (should you continue to shoot
using the current settings) is displayed
on the LCD monitor.
Notes
Capacity
Quality
2GB 4GB 8GB 16GB 32GB
Standard 433 875 1778 3626 7172
Fine 305 618 1258 2569 5083
RAW & JPEG 84 176 362 745 1478
RAW 122 251 514 1054 2089](https://image.slidesharecdn.com/sonynex5manual-150806094040-lva1-app6892/85/Sony-nex5manual-63-320.jpg)
![NEX-3/NEX-5
4-183-856-14(1)
F:CX75000_Paper_Revision3GB41838561414183856141NEX5U201GB-
NEX5U2090OTH.fm
master: Left
GB
64
Movies
The table below shows the approximate recording times available. These are
the total times for all movie files. Continuous recording is possible for
approximately 29 minutes per recording. For MP4, the maximum size of a
movie file is about 2 GB.
(Units: hour:minute:second)
* NEX-5
** NEX-3
x Number of still images that can be recorded using a
battery pack
The approximate number of images that can be recorded is 330 images when
you use the camera with the battery pack (supplied) at full capacity.
Note that the actual numbers may be less depending on the conditions of use.
• The number is calculated with a battery pack at full capacity and in the following
situation:
– At an ambient temperature of 25°C (77°F).
– [Quality] is set to [Fine].
– [Autofocus Mode] is set to [Single-shot AF].
– Shooting once every 30 seconds.
– The flash strobes once every two times.
– The power turns on and off once every ten times.
– Using the battery pack that is charged for an hour after the CHARGE lamp goes
out.
– Using Sony “Memory Stick PRO Duo” media (sold separately).
• The measurement method is based on the CIPA standard.
(CIPA: Camera & Imaging Products Association)
Capacity
File format
(Image size)
2GB 4GB 8GB 16GB 32GB
AVCHD (1920×1080)* 0:14:00 0:28:30 0:58:10 1:58:50 3:55:20
MP4 (1440×1080)* 0:20:40 0:41:40 1:24:40 2:52:30 5:41:00
MP4 (1280×720 (Fine))** 0:27:00 0:54:30 1:50:30 3:45:10 7:25:10](https://image.slidesharecdn.com/sonynex5manual-150806094040-lva1-app6892/85/Sony-nex5manual-64-320.jpg)
![NEX-3/NEX-5
4-183-856-14(1)
F:CX75000_Paper_Revision3GB41838561414183856141NEX5U201GB-
NEX5U2090OTH.fm
master: Left
GB
68
Learning more about the camera
(α Handbook)
“α Handbook,” which explains how to use the camera in detail, is included on
the CD-ROM (supplied). Refer to it for in-depth instructions on the many
functions of the camera.
x For Windows users
x For Macintosh users
1 Turn on your computer, and insert the CD-ROM (supplied)
into the CD-ROM drive.
2 Click [Handbook].
3 Click [Install].
4 Start “α Handbook” from the shortcut on the desktop.
1 Turn on your computer, and insert the CD-ROM (supplied)
into the CD-ROM drive.
2 Select the [Handbook] folder and copy “Handbook.pdf”
stored in the [GB] folder to your computer.
3 After copying is complete, double-click “Handbook.pdf.”](https://image.slidesharecdn.com/sonynex5manual-150806094040-lva1-app6892/85/Sony-nex5manual-68-320.jpg)
![NEX-3/NEX-5
4-183-856-14(1)
F:CX75000_Paper_Revision3GB41838561414183856141NEX5U201GB-
NEX5U2090OTH.fm
master: Right
GB
71
Others
• You are shooting in manual focus mode. Set [AF/MF Select] to [Autofocus].
• Ambient light is insufficient.
• The subject may require special focusing. Use the [Flexible Spot] or manual
focus function.
The flash does not work.
• Raise the flash (page 23).
• The flash is not attached correctly. Reattach the flash (page 23).
• You cannot use a flash with the following shooting mode:
– [Bracket: Cont.]
– [Sweep Panorama]
– [Night View] and [Hand-held Twilight] in [Scene Selection]
– [Anti Motion Blur]
– Movie recording
Fuzzy white circular spots appear on images shot using the flash.
• Particles (dust, pollen, etc.) in the air reflected the flash light and appeared on
the image. This is not a malfunction.
The flash takes too long to recharge.
• The flash has been fired in succession in a short period. When the flash has
been fired in succession, the recharging process may take longer than usual
to avoid overheating of the flash.
The image taken with the flash is too dark.
• If the subject is beyond the flash range (the distance that the flash can reach),
the pictures will be dark because the flash light does not reach the subject. If
the ISO is changed, the flash range also changes with it.
The date and time are recorded incorrectly.
• Set the correct date and time (page 25).
• The area selected with [Area Setting] is different from the actual area. Set
the actual area by selecting [Menu] t [Setup] t [Area Setting].
The aperture value and/or shutter speed flashes when you press
the shutter button halfway down.
• Since the subject is too bright or too dark, it is beyond the available range of
the camera. Adjust the setting again.](https://image.slidesharecdn.com/sonynex5manual-150806094040-lva1-app6892/85/Sony-nex5manual-71-320.jpg)
![NEX-3/NEX-5
4-183-856-14(1)
F:CX75000_Paper_Revision3GB41838561414183856141NEX5U201GB-
NEX5U2090OTH.fm
master: Left
GB
72
The image is whitish (Flare).
Blurring of light appears on the image (Ghosting).
• The picture was taken under a strong light source, and excessive light has
entered the lens. When using the zoom lens, attach a lens hood.
The corners of the picture are too dark.
• If any filter or hood is used, take it off and try shooting again. Depending on
the thickness of the filter and improper attachment of the hood, the filter or
the hood may partially appear on the image. The optical properties of some
lenses may cause the periphery of the image to appear too dark (insufficient
light).
The eyes of the subject come out red.
• Activate the Red Eye Reduction function.
• Get close to the subject, and shoot the subject within the flash range
(page 36) using the flash.
Dots appear and remain on the LCD monitor.
• This is not a malfunction. These dots are not recorded (page 73).
The image is blurred.
• The picture was taken in a dark location without the flash, resulting in
camera shake. The use of a tripod or the flash is recommended (page 23).
[Hand-held Twilight] in [Scene Selection] (page 40) and [Anti Motion Blur]
(page 40) are also effective in reducing blur.
The exposure value is flashing on the LCD monitor.
• The subject is too bright or too dark for the metering range of the camera.
Images cannot be played back.
• The folder/file name has been changed on your computer.
• When an image file has been processed by a computer or when the image file
was recorded using a model other than that of your camera, playback on your
camera is not guaranteed.
• The camera is in USB mode. Delete the USB connection.
Viewing images](https://image.slidesharecdn.com/sonynex5manual-150806094040-lva1-app6892/85/Sony-nex5manual-72-320.jpg)
![NEX-3/NEX-5
4-183-856-14(1)
F:CX75000_Paper_Revision3GB41838561414183856141NEX5U201GB-
NEX5U2090OTH.fm
master: Left_2 column
GB
76
• Discs recorded with HD (high
definition) image quality can be
played back only on AVCHD
format-compatible devices.
DVD-based players or recorders
cannot play back HD image quality
discs, as they are incompatible
with the AVCHD format. Also,
DVD-based players or recorders
may fail to eject HD image quality
discs.
Warning on copyright
Television programs, films,
videotapes, and other materials may
be copyrighted. Unauthorized
recording of such materials may be
contrary to the provisions of the
copyright laws.
The pictures used in this
manual
The photographs used as examples
of pictures in this manual are
reproduced images, and are not
actual images shot using this
camera.
On the data specifications
described in this manual
The data on performance and
specifications is defined under the
following conditions, except as
described in this manual: at an
ordinary ambient temperature of
25ºC (77°F), and using a battery
pack that is charged for an hour after
the CHARGE lamp goes out.
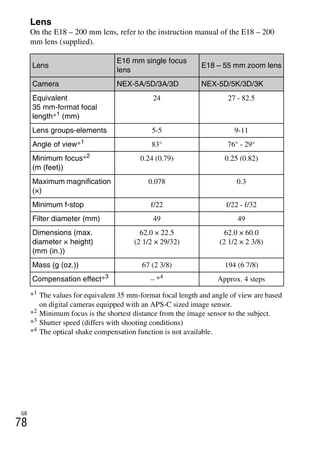
Specifications
Camera
[System]
Camera type: Interchangeable lens
digital camera
Lens: E-mount lens
[Image sensor]
Image sensor: 23.4 × 15.6 mm (APS-C
format) CMOS image sensor
Total pixel number of image sensor:
Approx. 14 600 000 pixels
Effective pixel number of camera:
Approx. 14 200 000 pixels
[Anti-dust]
System: Charge protection coating on
Low-Pass Filter and
electromagnetic vibration
mechanism
[Auto focus system]
System: Contrast detection system
Sensitivity range: 0 EV to 20 EV (at
ISO 100 equivalent, with F2.8 lens)
[Exposure control]
Metering method: 49-segment
metering by the image sensor
Metering range: 0 EV to 20 EV (at ISO
100 equivalent, with F2.8 lens)
ISO sensitivity (Recommended
exposure index): Auto, ISO 200 to
12800
Exposure compensation: ±2.0 EV (1/3
EV step)
[Shutter]
Type: Electronically-controlled,
vertical-traverse, focal-plane type
Speed range: 1/4000 second to 30
seconds, BULB, (1/3 EV step)
Flash sync speed: 1/160 second](https://image.slidesharecdn.com/sonynex5manual-150806094040-lva1-app6892/85/Sony-nex5manual-76-320.jpg)
![NEX-3/NEX-5
4-183-856-14(1)
F:CX75000_Paper_Revision3GB41838561414183856141NEX5U201GB-
NEX5U2090OTH.fm
master: Right_2 column
GB
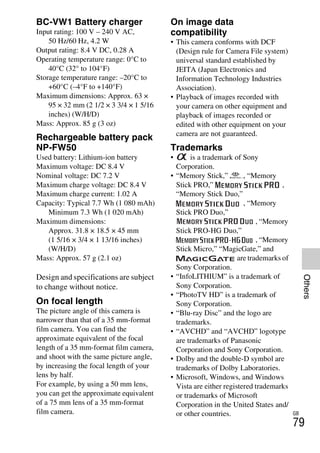
77
Others
[Recording media]
“Memory Stick PRO Duo” media,
SD card
[LCD monitor]
LCD panel: 7.5 cm (3.0 type) TFT
drive
Total number of dots: 921 600 (640 × 3
(RGB) × 480) dots
[Input/output terminals]
USB: miniB
HDMI: HDMI type C minijack
[Power]
Used battery pack: Rechargeable
battery pack NP-FW50
[Others]
Exif Print: Compatible
PRINT Image Matching III:
Compatible
Dimensions:
NEX-5:
Approx. 110.8 × 58.8 × 38.2 mm
(4 3/8 × 2 3/8 × 1 9/16 inches)
(W/H/D, excluding protrusions)
NEX-3:
Approx. 117.2 × 62.6 × 33.4 mm
(4 5/8 × 2 1/2 × 1 3/8 inches)
(W/H/D, excluding protrusions)
Mass:
NEX-5:
Approx. 287 g (10.1 oz)
(including battery and “Memory
Stick PRO Duo” media)
Approx. 229 g (8.1 oz)
(camera only)
NEX-3:
Approx. 297 g (10.5 oz)
(including battery and “Memory
Stick PRO Duo” media)
Approx. 239 g (8.4 oz)
(camera only)
Operating temperature: 0°C to 40°C
(32°F to 104°F)
File format:
Still image: JPEG (DCF Ver. 2.0,
Exif Ver. 2.3, MPF Baseline)
compliant, DPOF compatible
NEX-5:
Movie (AVCHD format):
AVCHD Ver. 1.0 compliant
Video: MPEG-4 AVC/H.264
Audio: Dolby Digital 2ch,
equipped with Dolby Digital
Stereo Creator
• Manufactured under license
from Dolby Laboratories.
Movie (MP4 format):
Video: MPEG-4 AVC/H.264
Audio: MPEG-4 AAC-LC 2ch
NEX-3:
Movie: MPEG-4 Visual
USB communication: Hi-Speed USB
(USB 2.0 compliant)
Flash
Flash guide number: GN 7 (in meters at
ISO 100)
Recycling time: Approx. 4 seconds
Flash coverage: Covering 16 mm lens
(focal length that the lens indicates)
Flash compensation: ±2.0 EV (1/3 EV
step)
Dimensions:
Approx. 35.9 × 23.8 × 42.7 mm
(1 7/16 × 15/16 × 1 11/16 inches)
(W/H/D, excluding protrusions)
Mass: Approx. 20.4 g (0.8 oz)](https://image.slidesharecdn.com/sonynex5manual-150806094040-lva1-app6892/85/Sony-nex5manual-77-320.jpg)