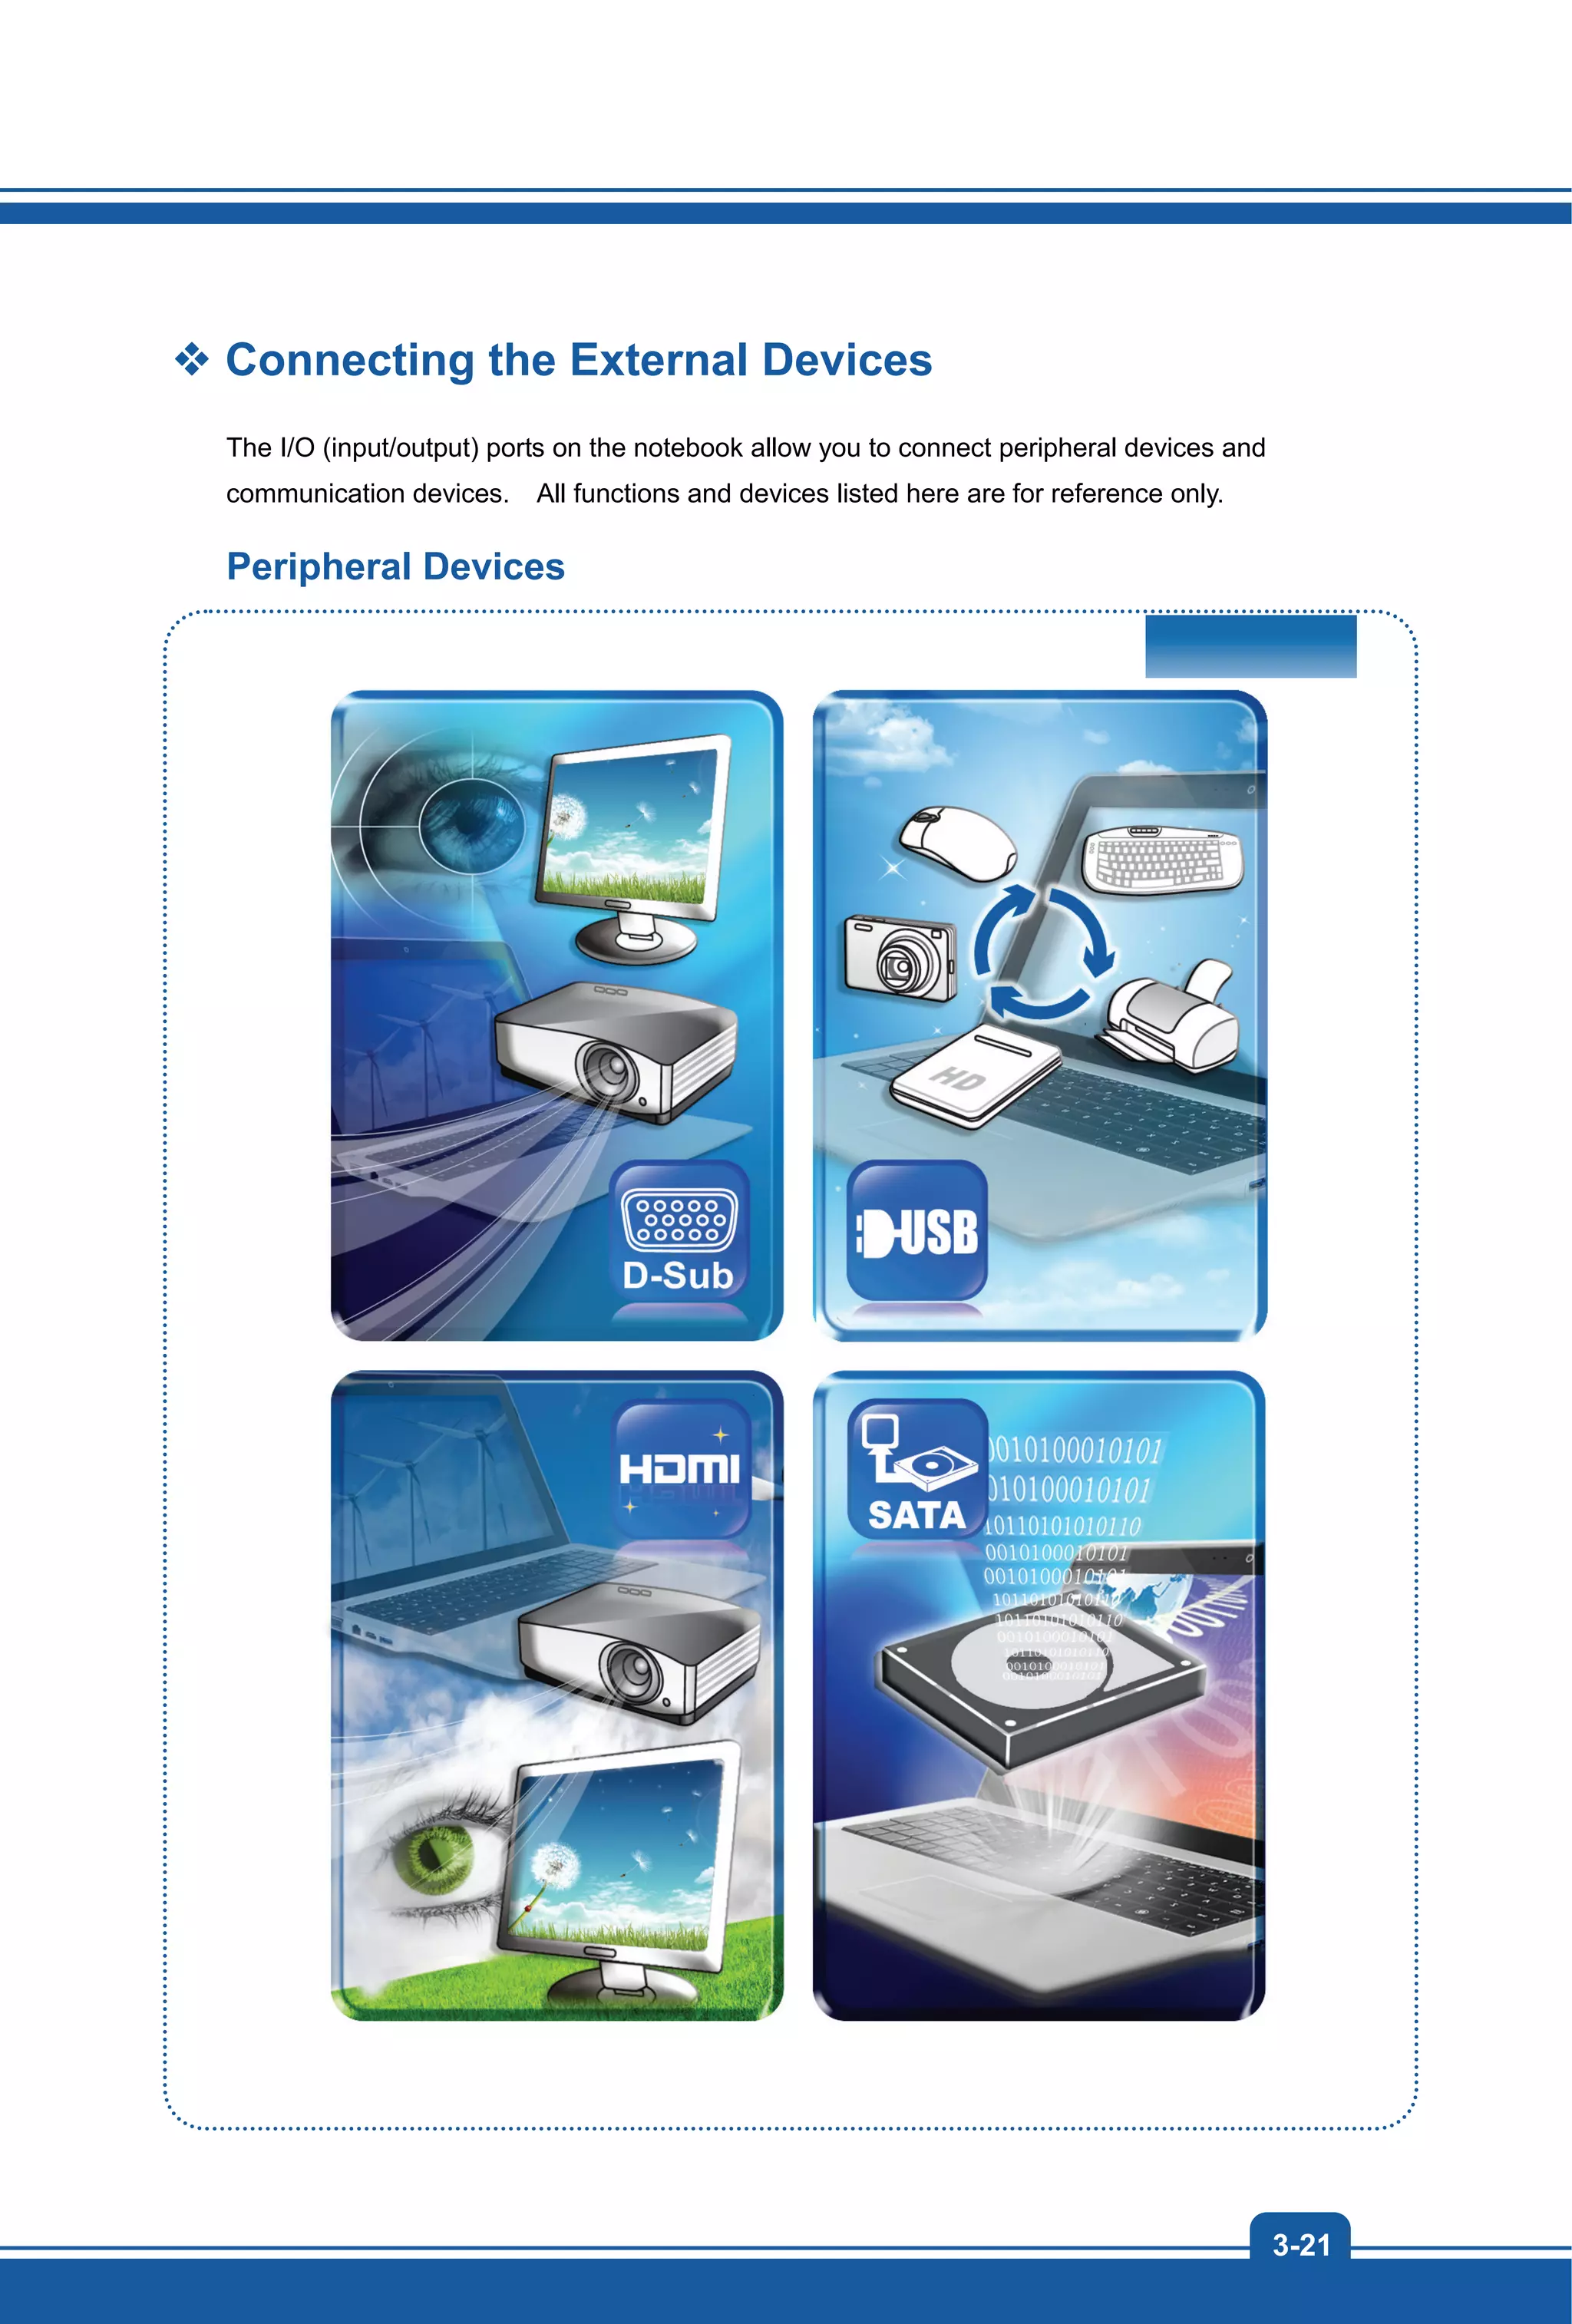
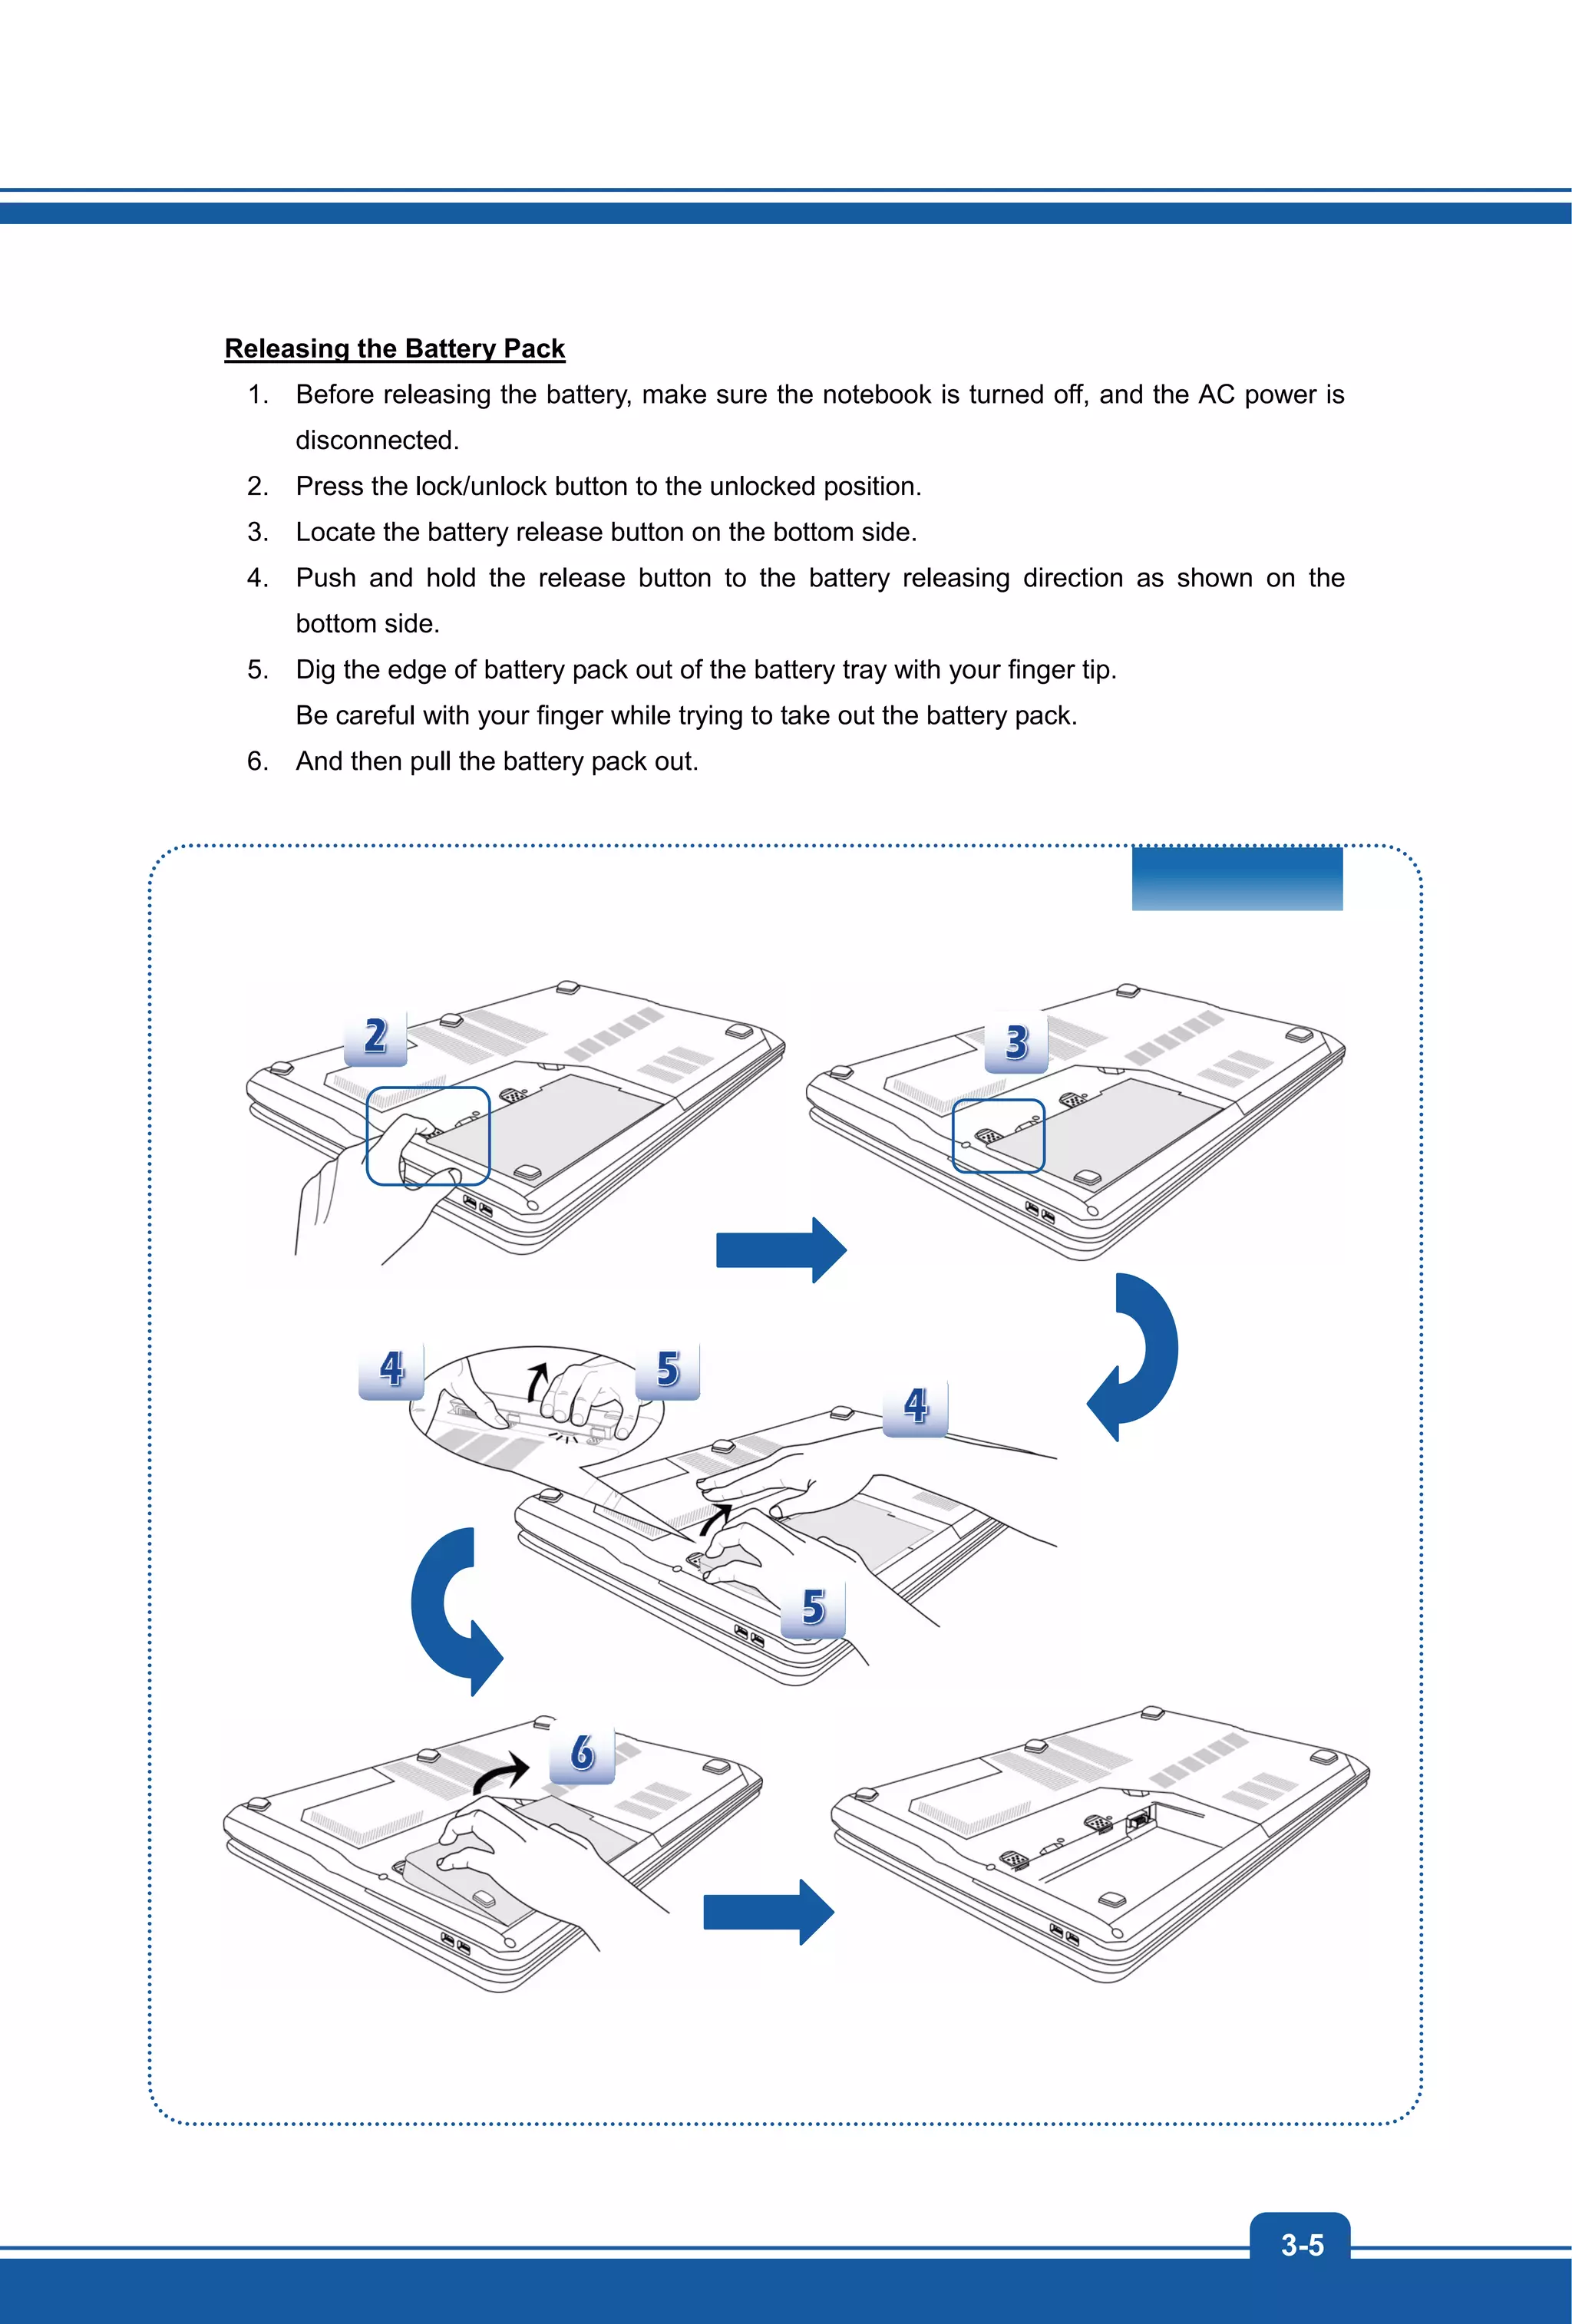
This document provides an overview of a notebook computer, including its key features and specifications. It describes the notebook's top-open view such as the webcam, speakers, power button, and keyboard. The document also outlines the notebook's front side view with status LEDs for Bluetooth and wireless LAN. Additional sections cover the right, left, rear and bottom side views as well as specifications. Safety instructions and regulatory information are also included.


![Introductions
2-4
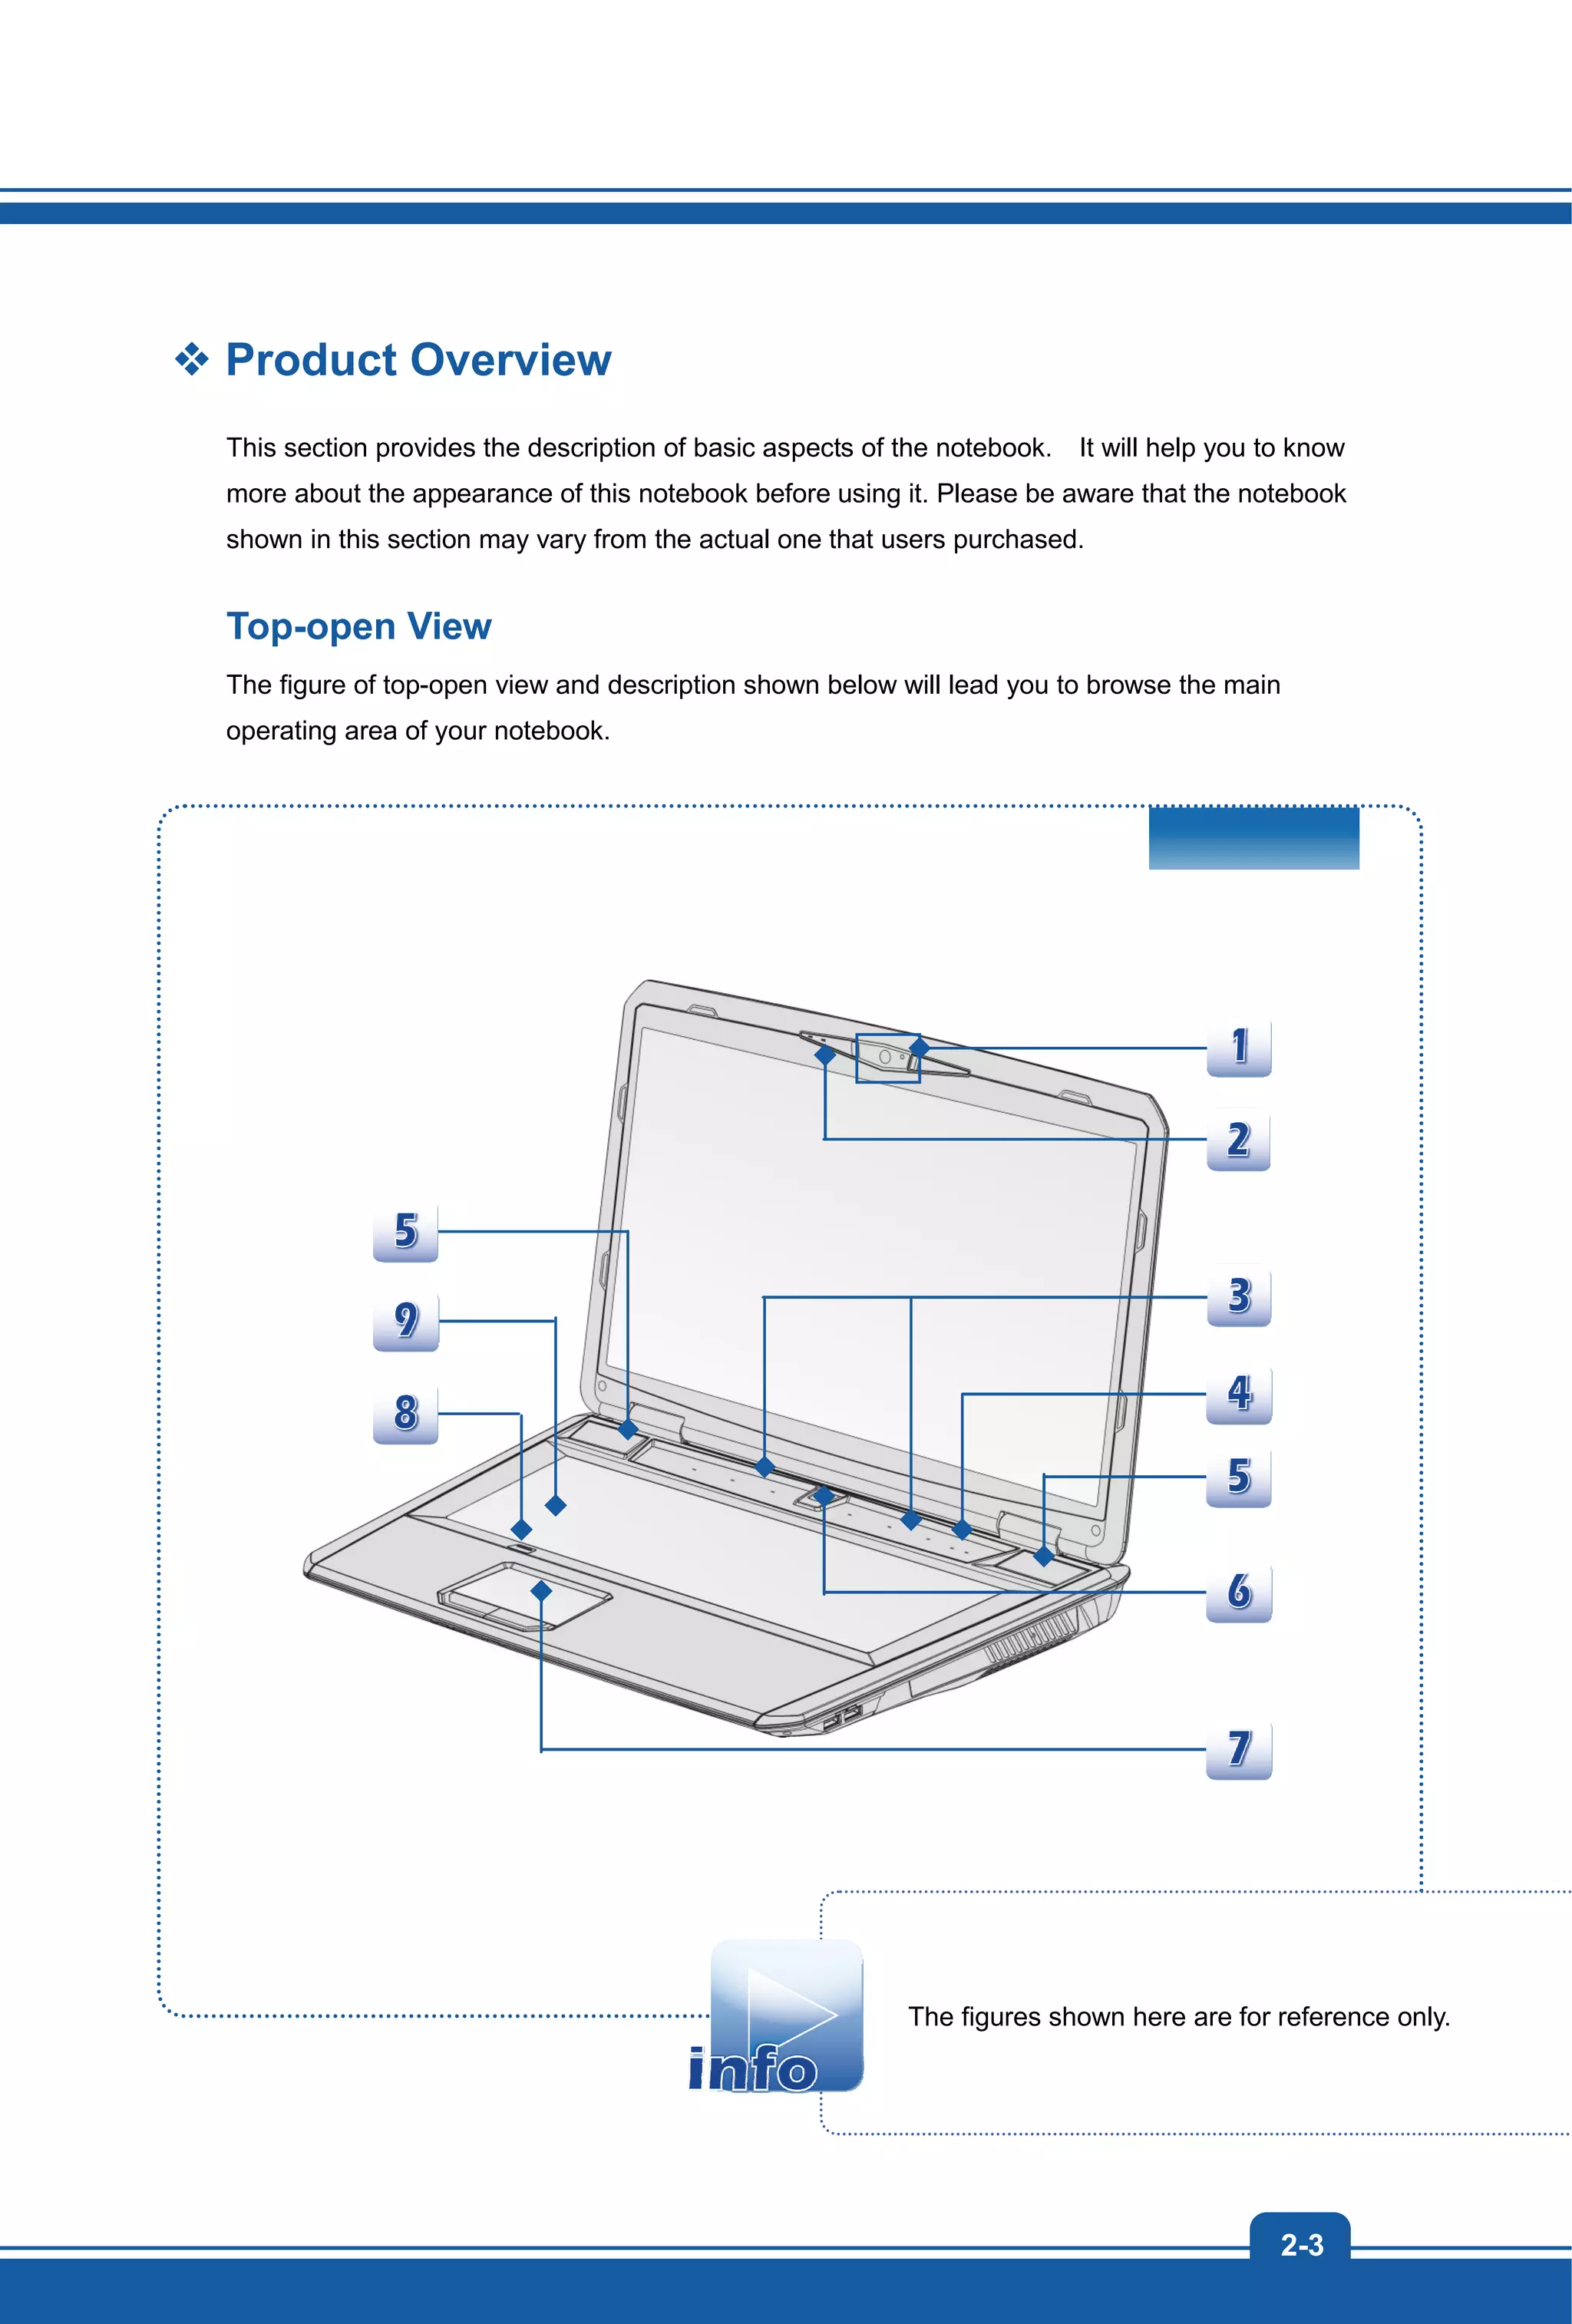
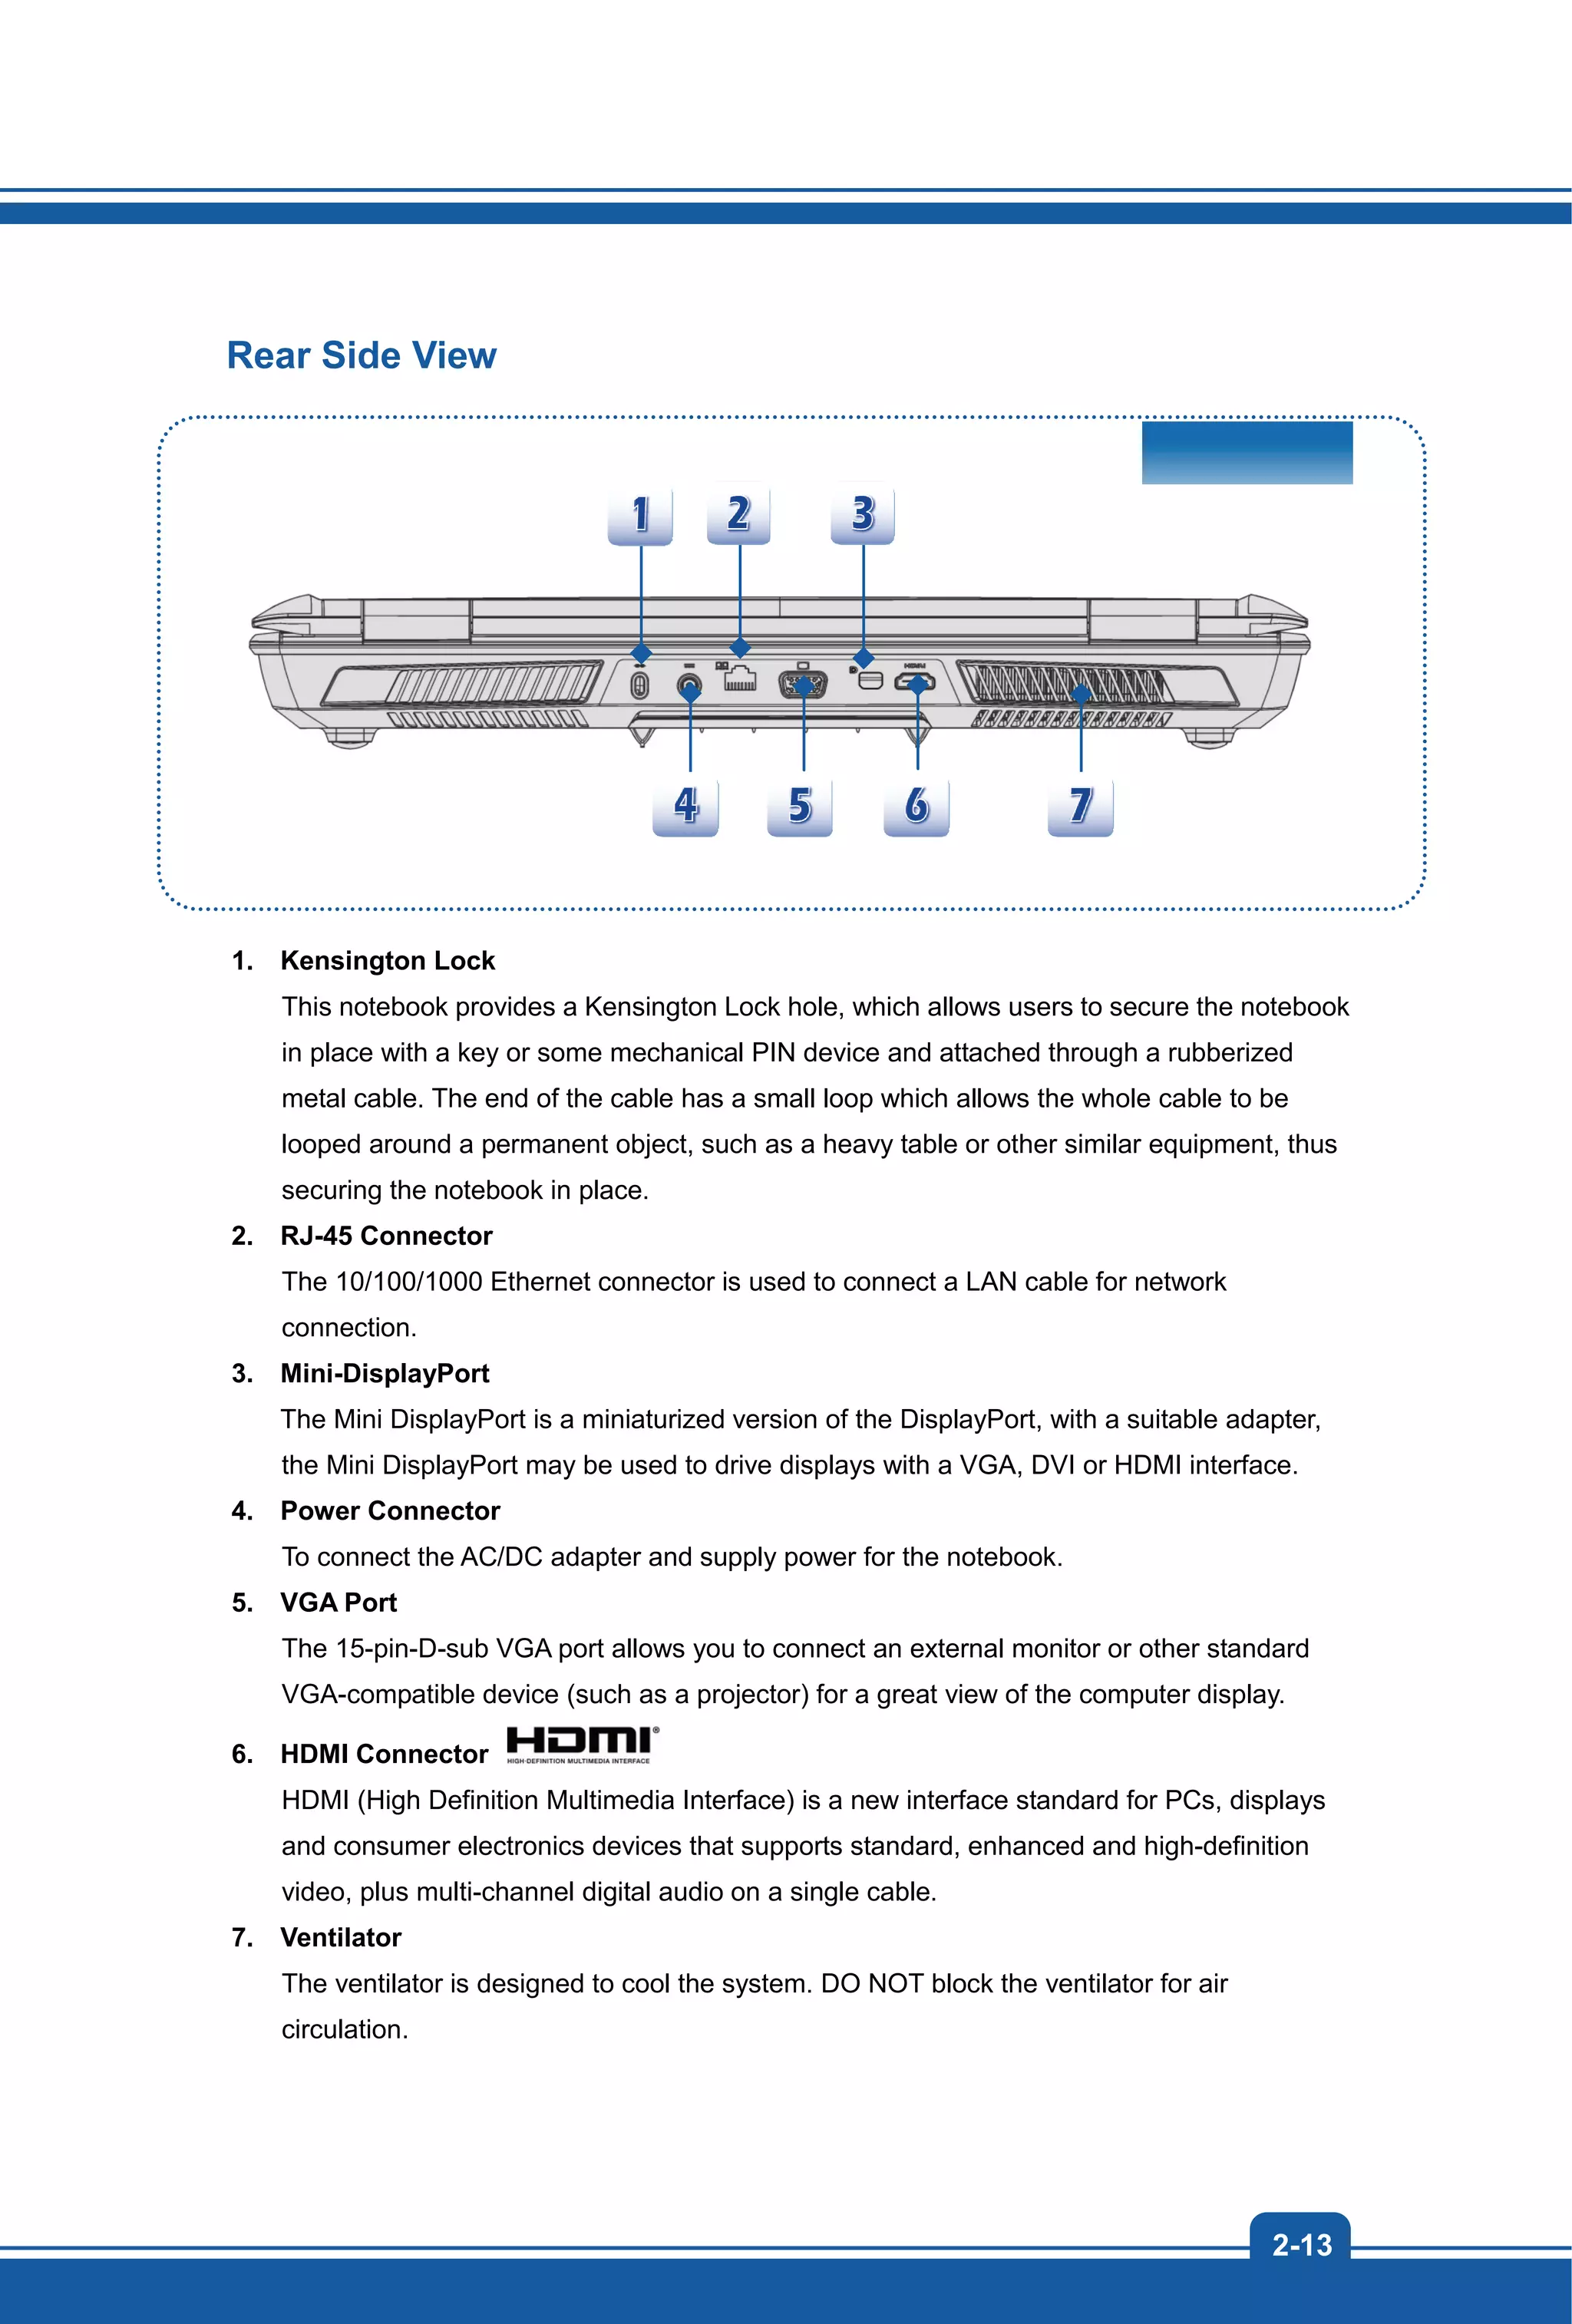
1. Webcam
This built-in Webcam can be used for picture taking, video recoding or conferencing,
and any other interactive applications.
Webcam LED indicator, next to the webcam, glows orange when webcam function is
activated; LED goes out when this function is turned off.
2. Internal Microphone
This is the built-in microphone and its function is the same with microphone.
3. Quick Launch Buttons
Press the quick launch buttons to activate the specific applications or tools. The following
Quick Launch Buttons will only be functional in the Operating System with the SCM
application installed. Find the SCM application in the all-in-one disk that comes with the
package for easy and convenient operation. It is strongly recommended to install the
SCM application.
Media Player
Use this button to activate the Media Player function which
enhances the playback quality from your display device
and sound system.
Cooler Boost
Use this button to increase the fan speed to cool down the
overall temperature of the notebook.
Keyboard LED
Backlit Switch
Use this button to switch ON or OFF the colorful flash
keyboard LEDs which are mounted beneath the keyboard.
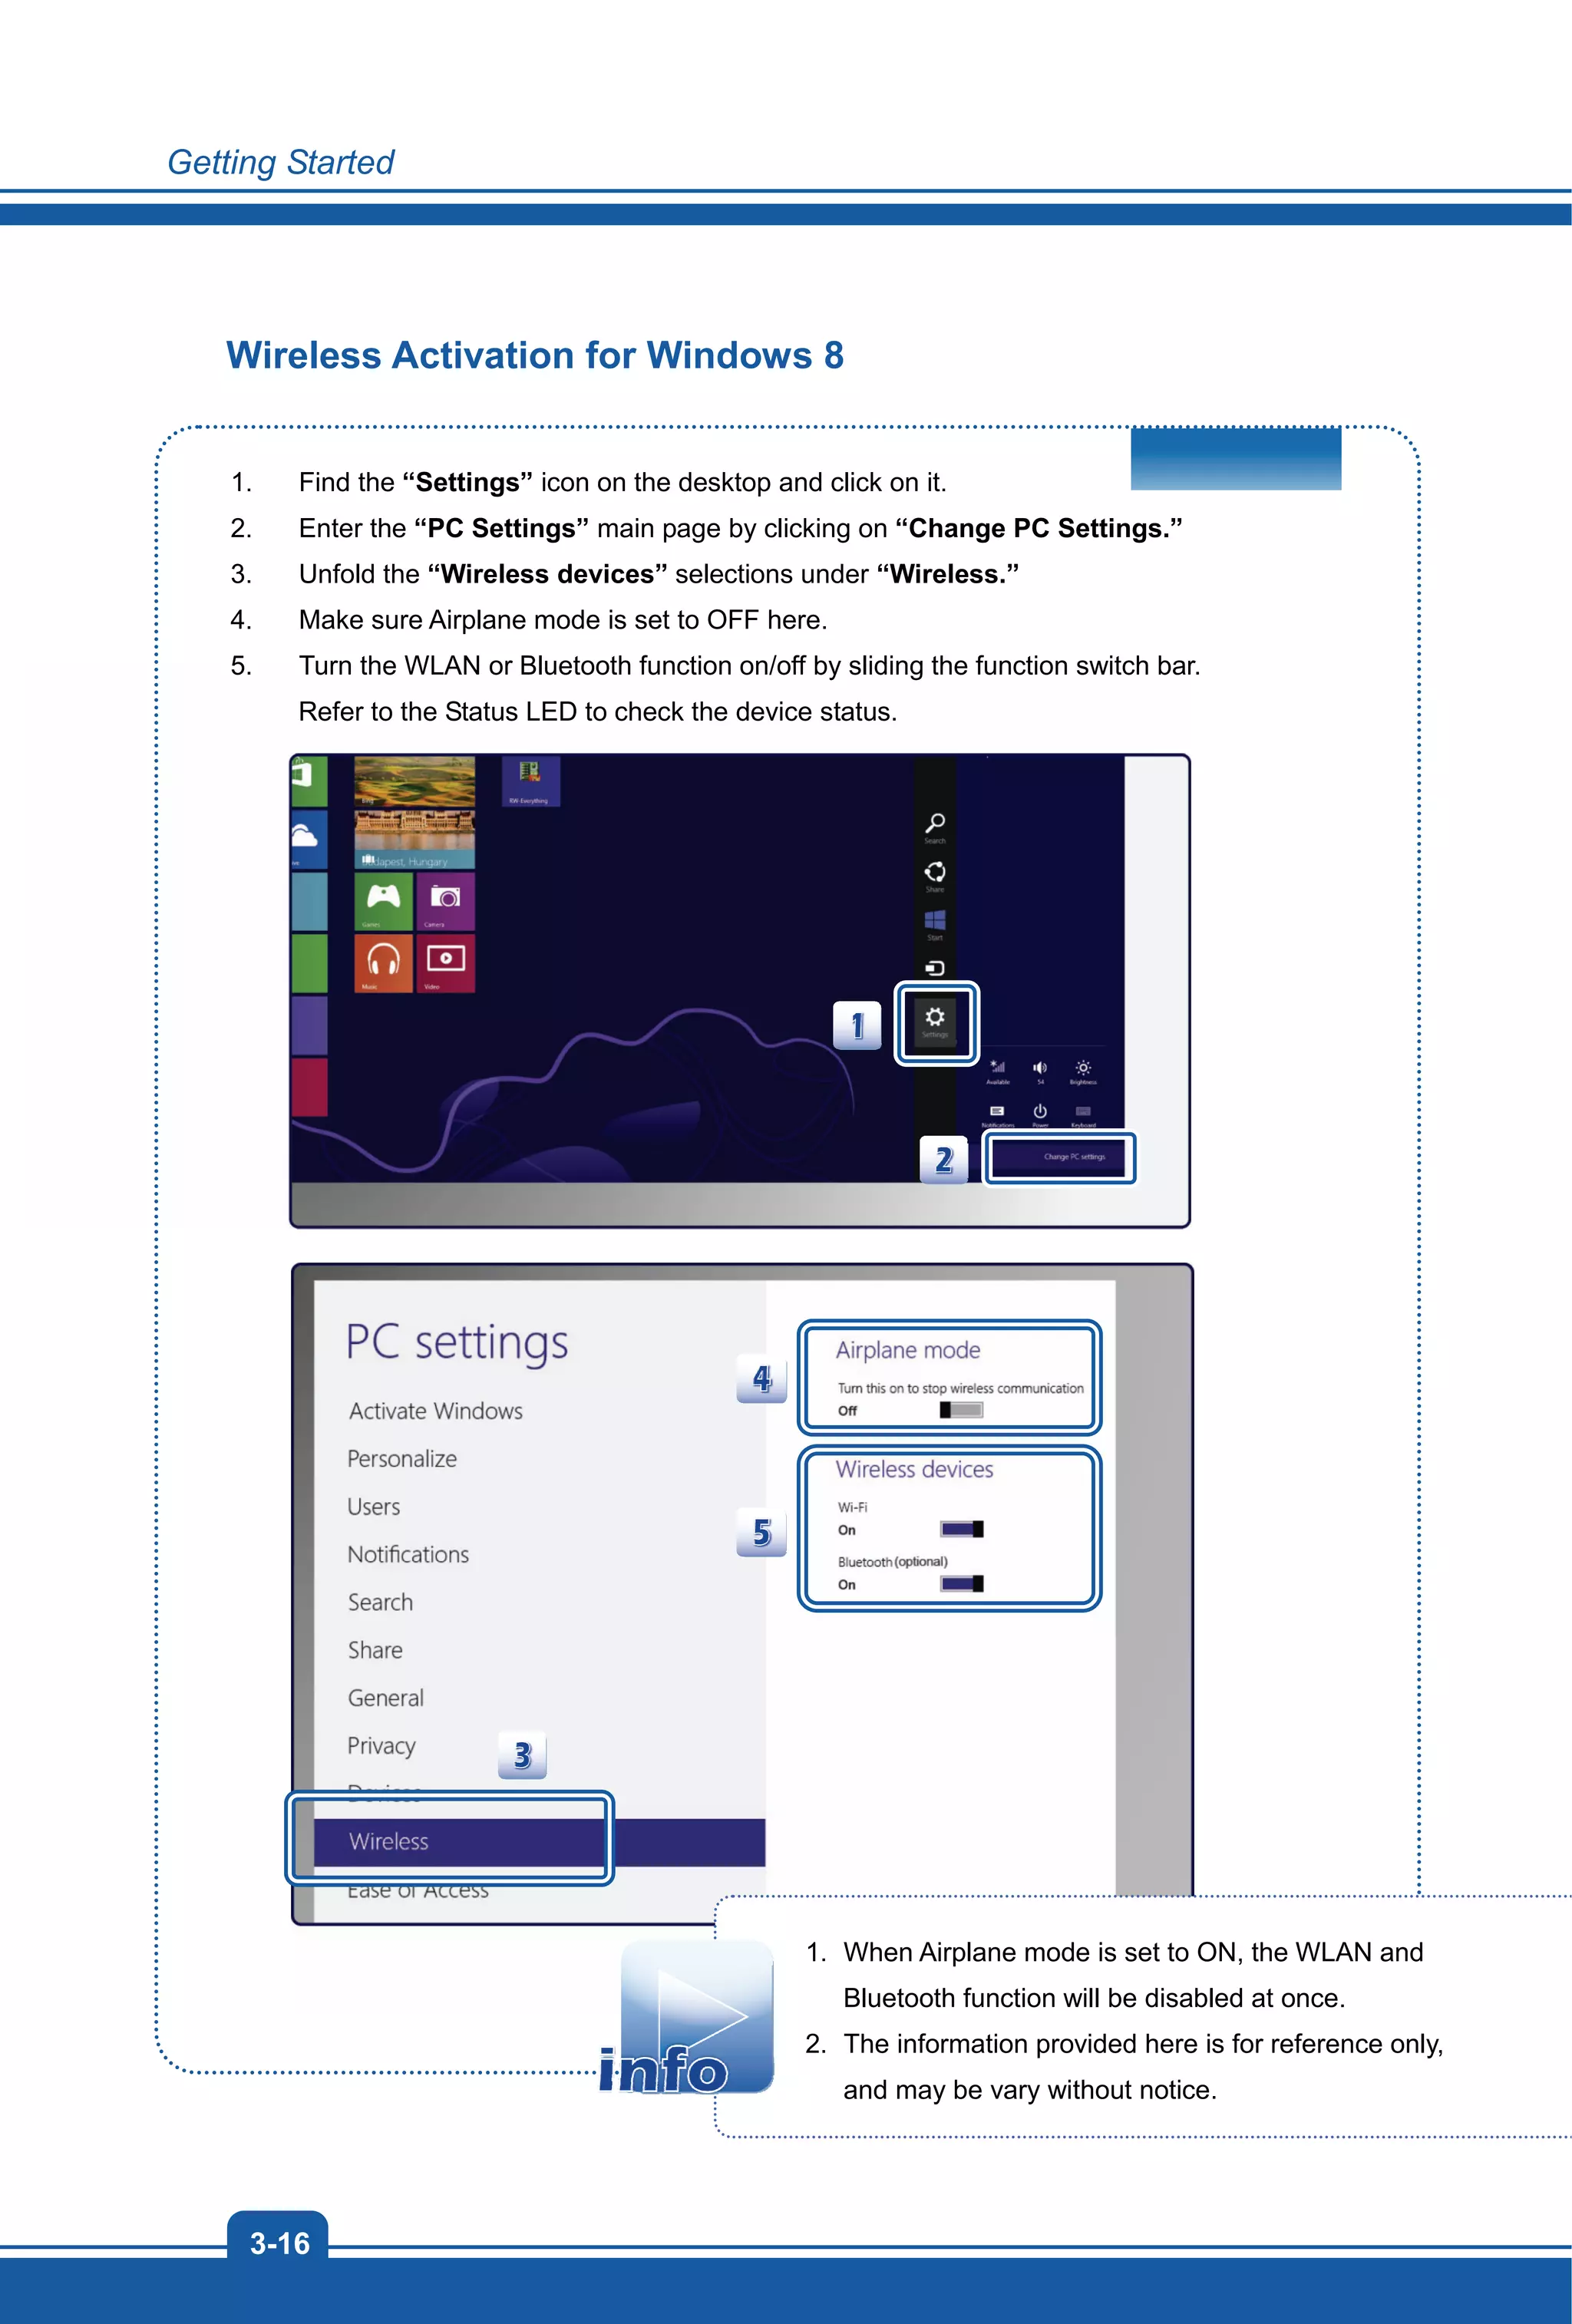
Airplane mode
Use this button to turn Airplane mode on or off.
For flight safety consideration, it is always recommended to
turn Airplane Mode on when you are in flight.
Refer to the Airplane mode switch icon under [Start/
Settings/ Change PC Settings/ Wireless/ Airplane
mode] on the desktop to check the device status.
To enable the WLAN or Bluetooth function, please refer to
the instructions provided in “Wireless Activation for
Windows 8.” in chapter 3.](https://image.slidesharecdn.com/01ms1763wsv1-161116095912/75/MSI-WT70-Workstation-User-Manual-PDF-Download-User-Guide-14-2048.jpg)
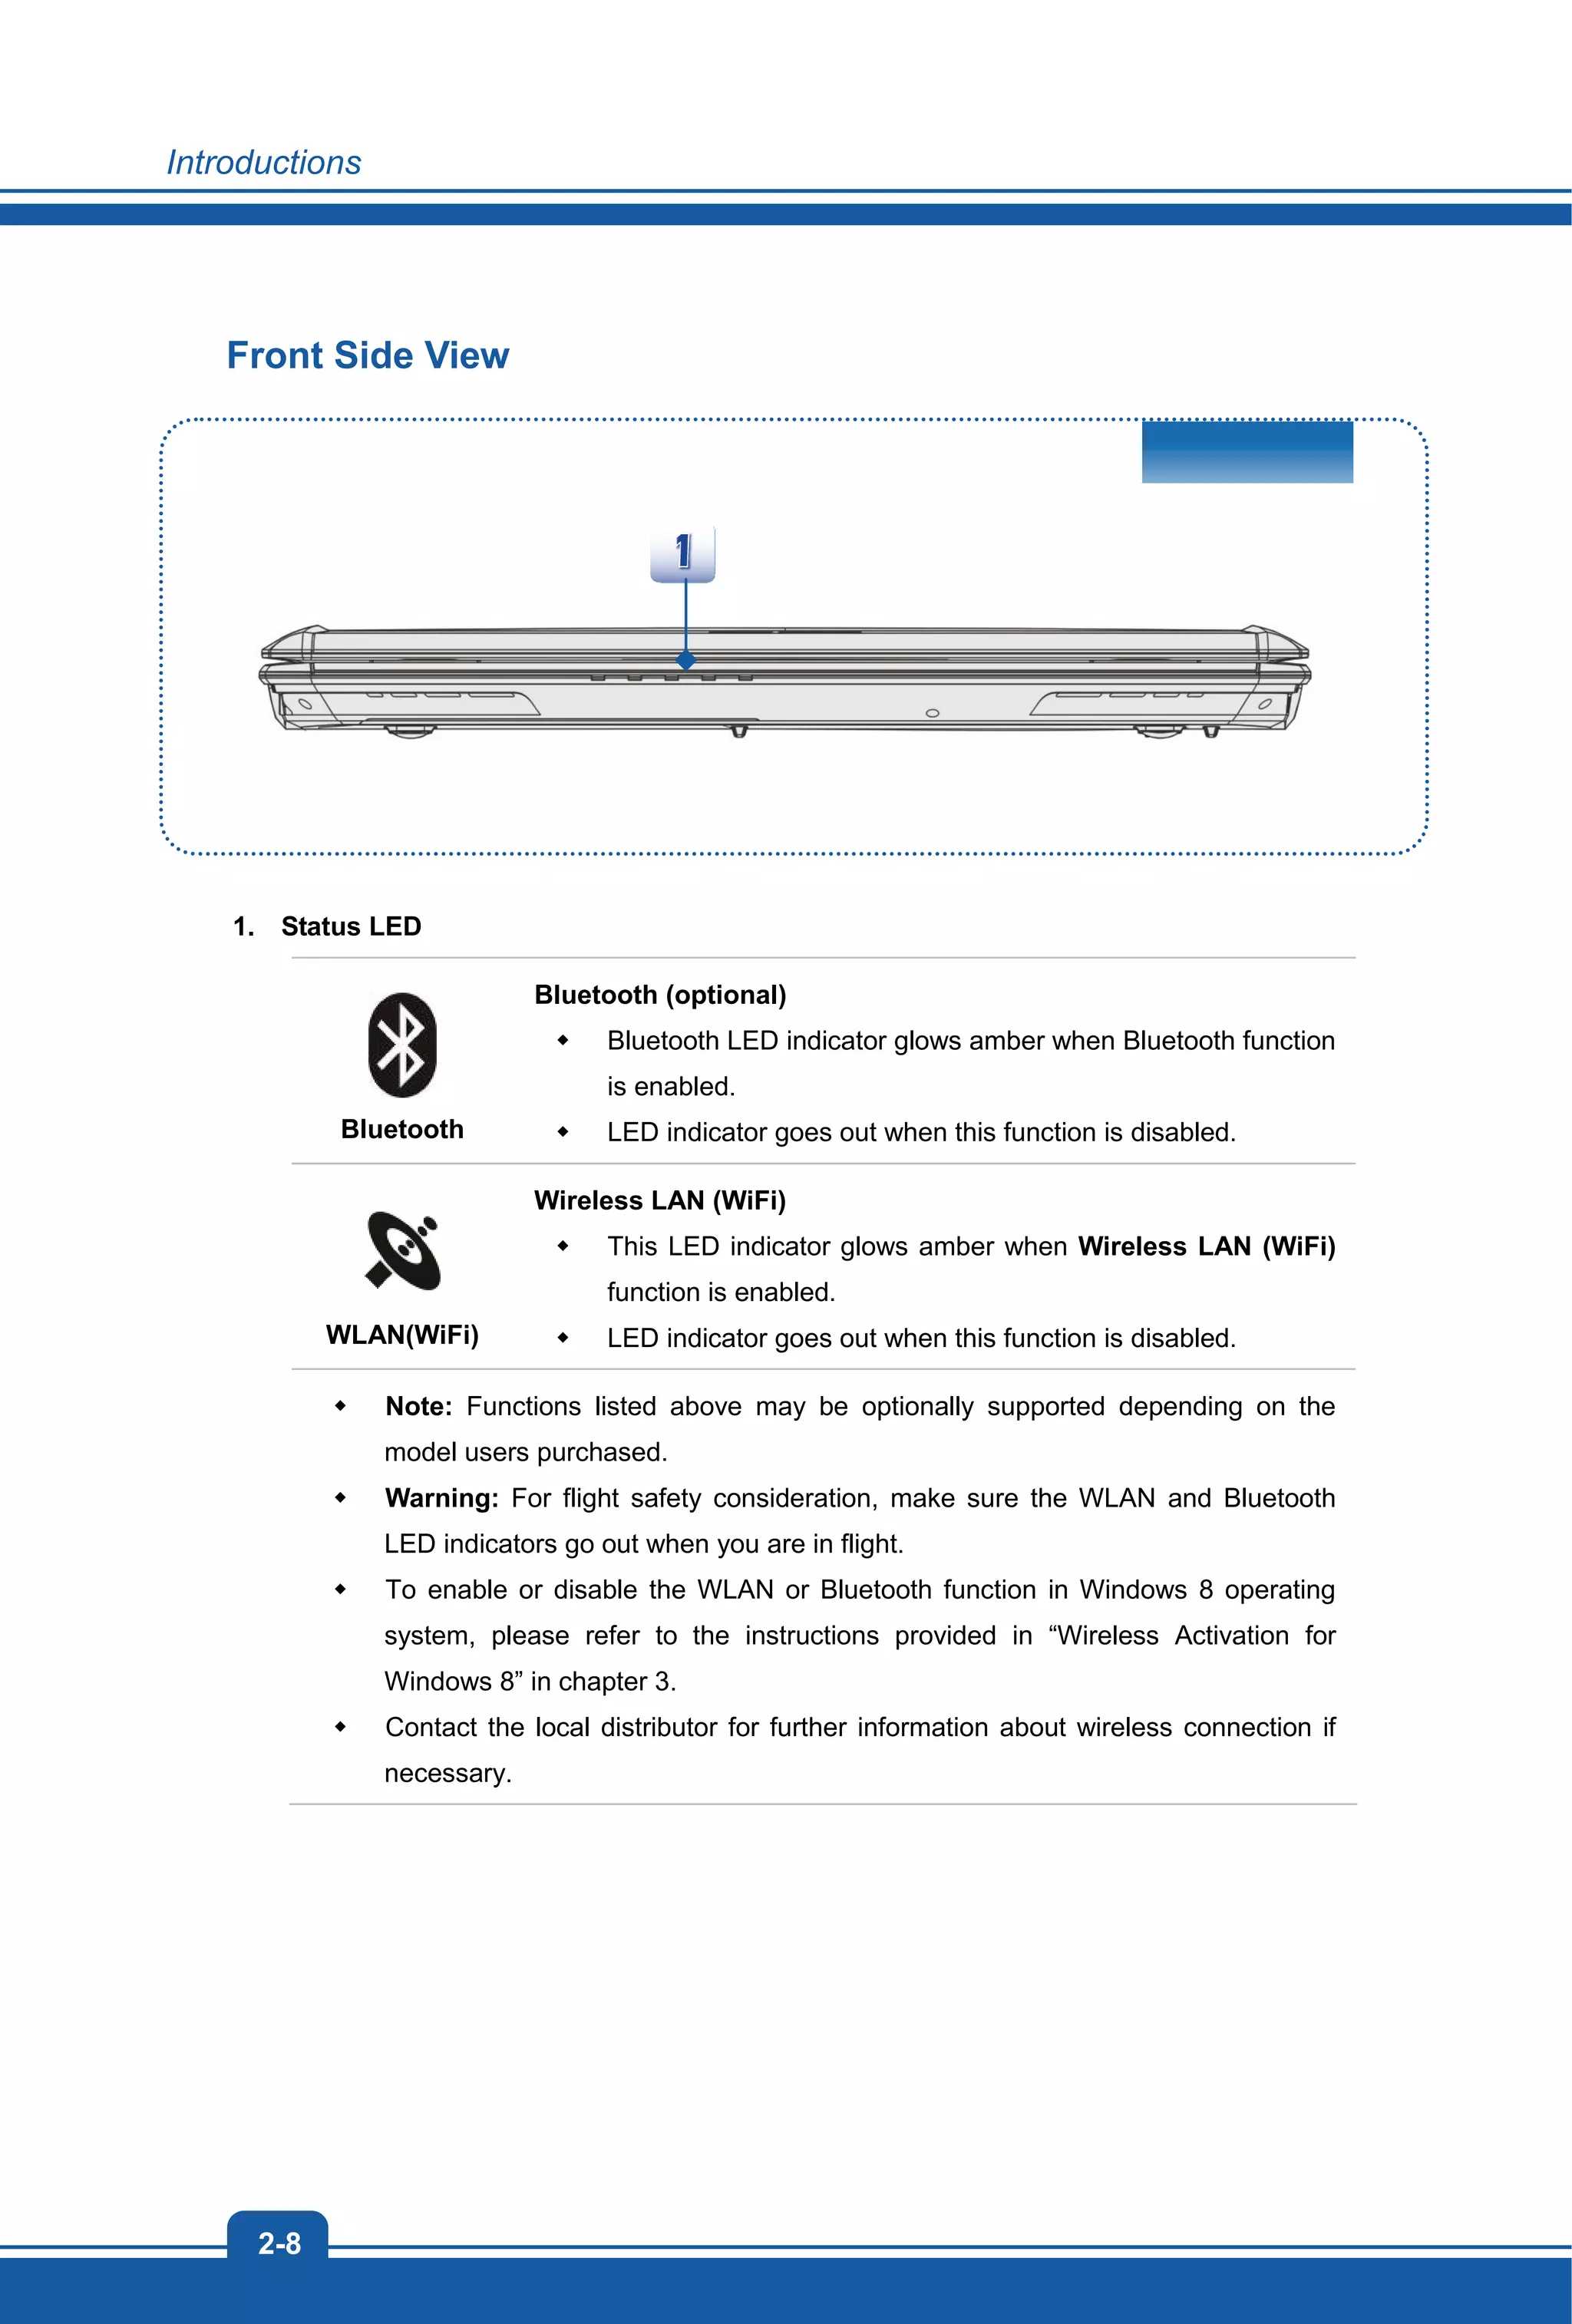
![Introductions
2-6
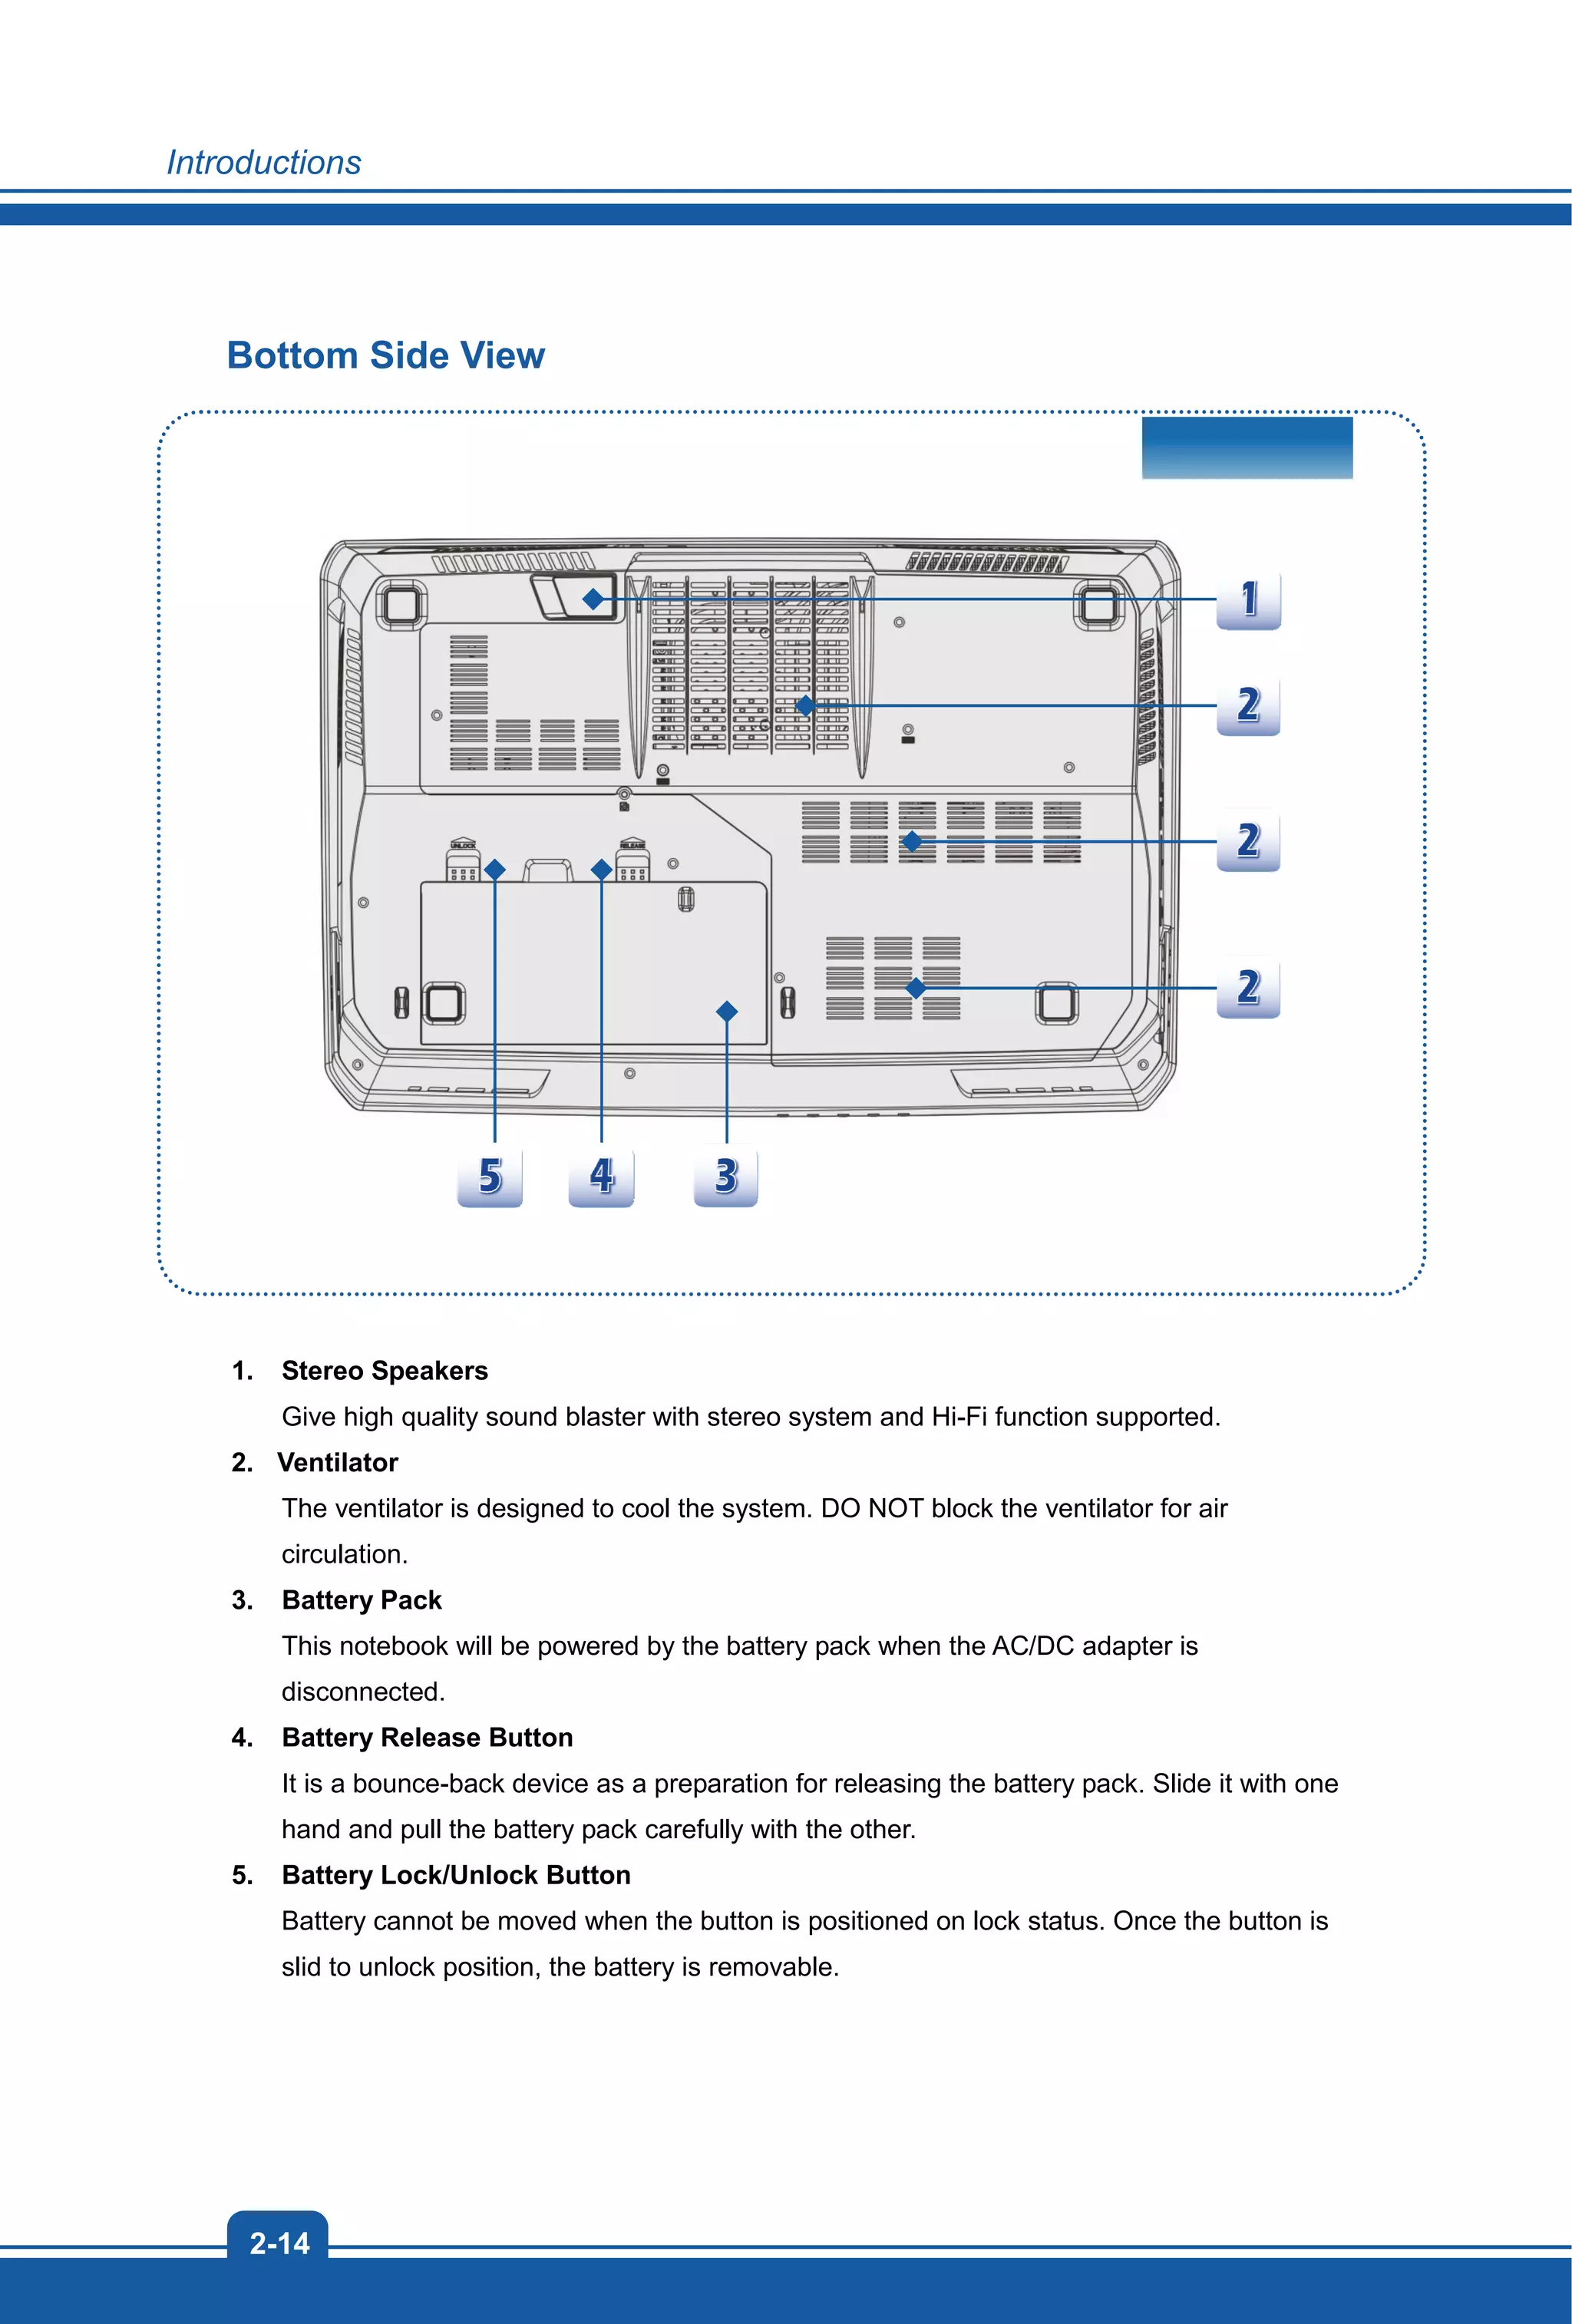
8. Touchpad Switch
Press this button to enable or disable the touchpad function. The touchpad indicator, if
equipped, glows when the touchpad function is disabled.
9. Keyboard
The built-in keyboard provides all the functions of a full-sized keyboard.
Quick Launch [Fn] Buttons
Use the [Fn] buttons on the keyboard to activate the specific applications or tools.
With the help of these quick launch buttons, users will be able to do work more efficiently.
+
User Defined
or
Windows Search
(optional)
Press and hold the Fn button, and then press the F4 button
to launch the User Defined application.
Or, press and hold the Fn button, and then press the F4
button to launch the Windows Search function.
+
ECO Engine
(Power Saving)
Press and hold the Fn button, and then press the F5 button
repeatedly to switch among various power saving modes
provided by ECO Engine, or to turn this function off
recurrently.
+
Webcam
Press and hold the Fn button, and then press the F6 button
to turn the Webcam function on. Press again to turn it off.
+
Airplane mode
Press and hold the Fn button, and then press the F10
button repeatedly to turn Airplane mode on or off
recurrently.
For flight safety consideration, it is always recommended to
turn Airplane Mode on when you are in flight.
Refer to the Airplane mode switch icon under [Start/
Settings/ Change PC Settings/ Wireless/ Airplane
mode] on the desktop to check the device status.
To enable the WLAN or Bluetooth function, please refer to
the instructions provided in “Wireless Activation for
Windows 8.”](https://image.slidesharecdn.com/01ms1763wsv1-161116095912/75/MSI-WT70-Workstation-User-Manual-PDF-Download-User-Guide-16-2048.jpg)
![2-7
General [Fn] Keys
+
Increase keyboard LEDs' RGB saturation level.
+
Decrease keyboard LEDs' RGB saturation level.](https://image.slidesharecdn.com/01ms1763wsv1-161116095912/75/MSI-WT70-Workstation-User-Manual-PDF-Download-User-Guide-17-2048.jpg)


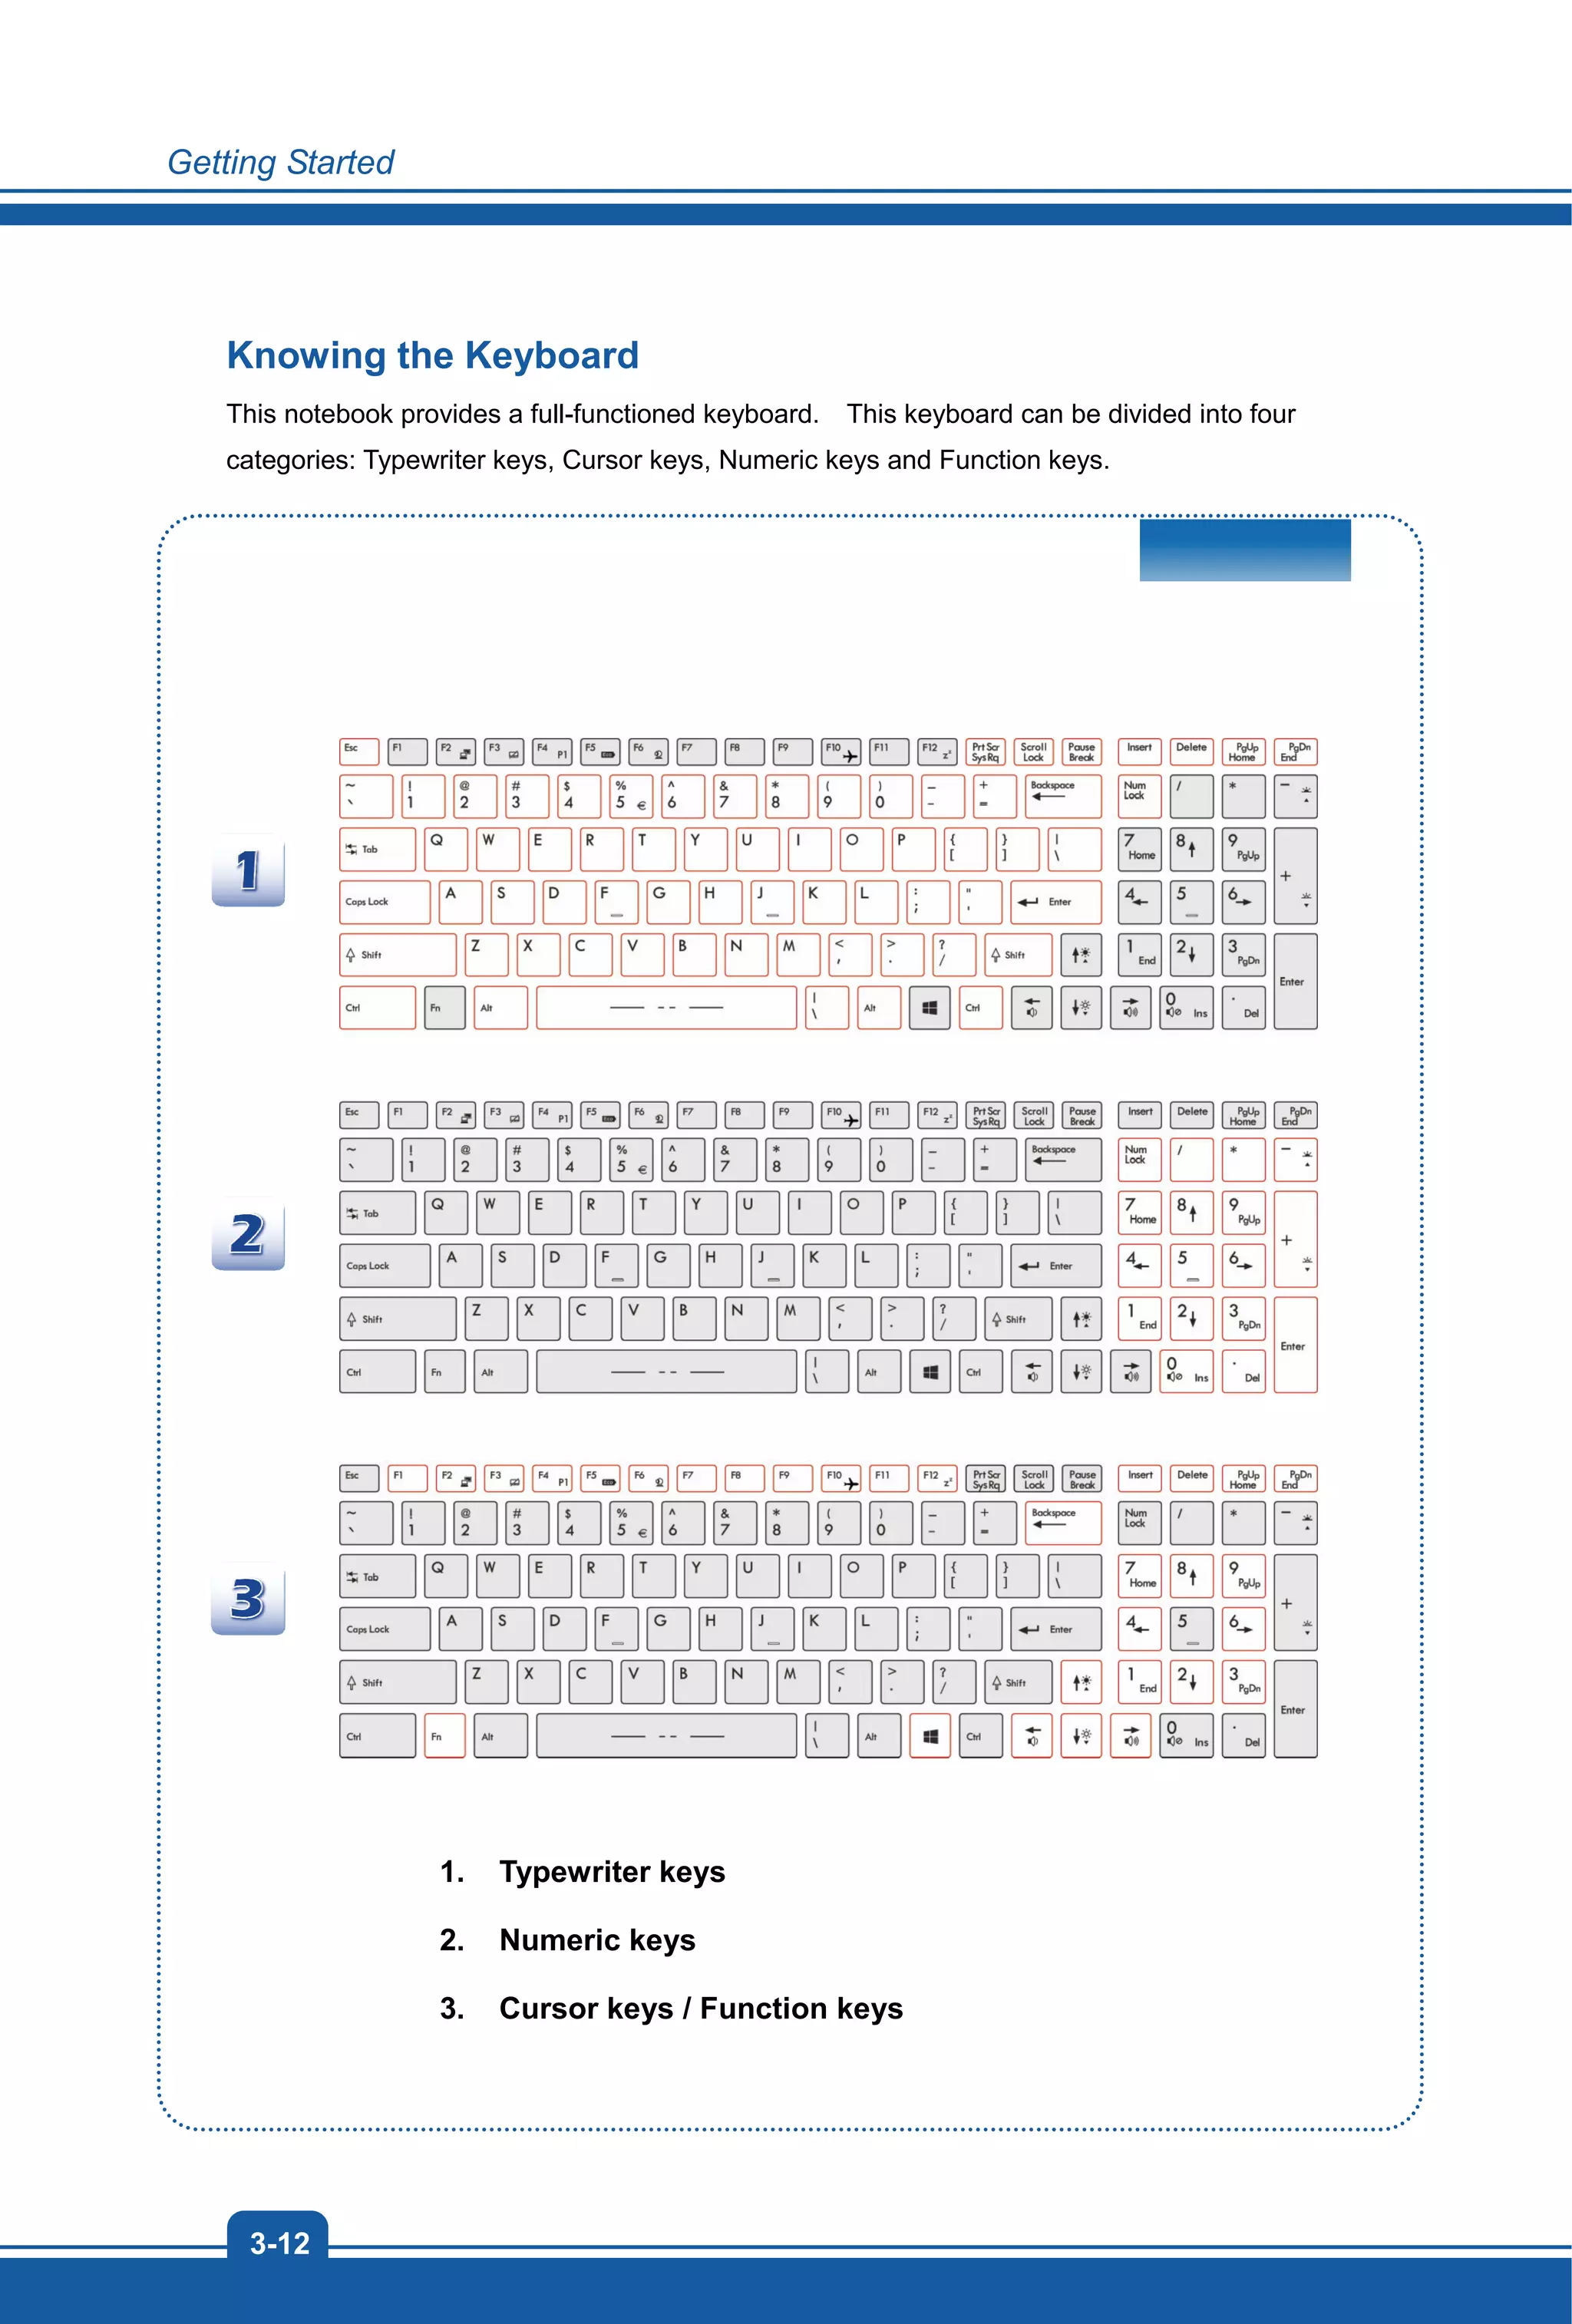
![3-13
Typewriter Keys
In addition to providing the major function of the keyboard, these typewrite keys also
provide several keys for special purposes, such as [Ctrl,] [Alt,] and [Esc] key.
When the lock keys are pressed, the corresponding LEDs will light up to indicate their
status:
1. Num Lock: Press this key to toggle the Num Lock on and off. When this
function is activated, you can use the numeric keys that are embedded in the
typewriter keys.
2. Caps Lock: Press this key to toggle the Caps Lock on and off. When this
function is activated, the letters you type are kept in uppercase.
3. Scroll Lock: Press this key to toggle the Scroll Lock on and off. This function is
defined by individual programs, and is usually used under DOS.
Numeric Keys
Find the numeric keys among the keyboard, and activate the Num Lock function to use these
numeric keys to enter numbers and calculations.
Cursor Keys
The four cursor (arrow) keys and [Home], [PgUp], [PgDn], [End] keys are used to control the
cursor movement.
The [Backspace] key, [Ins] and [Del] keys at upper right corner are use for editing purpose.
Function Keys
Windows Keys
You can find the Windows Logo key ( ) on the keyboard which is used to perform
Windows-specific functions, such as opening the Start menu and launching the shortcut
menu. For more information of the two keys, please refer to your Windows manual or
online help.
General [Fn] Keys
+
Switch the display output mode between the LCD, external monitor
and both.
+
Enable or disable the touchpad function.](https://image.slidesharecdn.com/01ms1763wsv1-161116095912/75/MSI-WT70-Workstation-User-Manual-PDF-Download-User-Guide-41-2048.jpg)
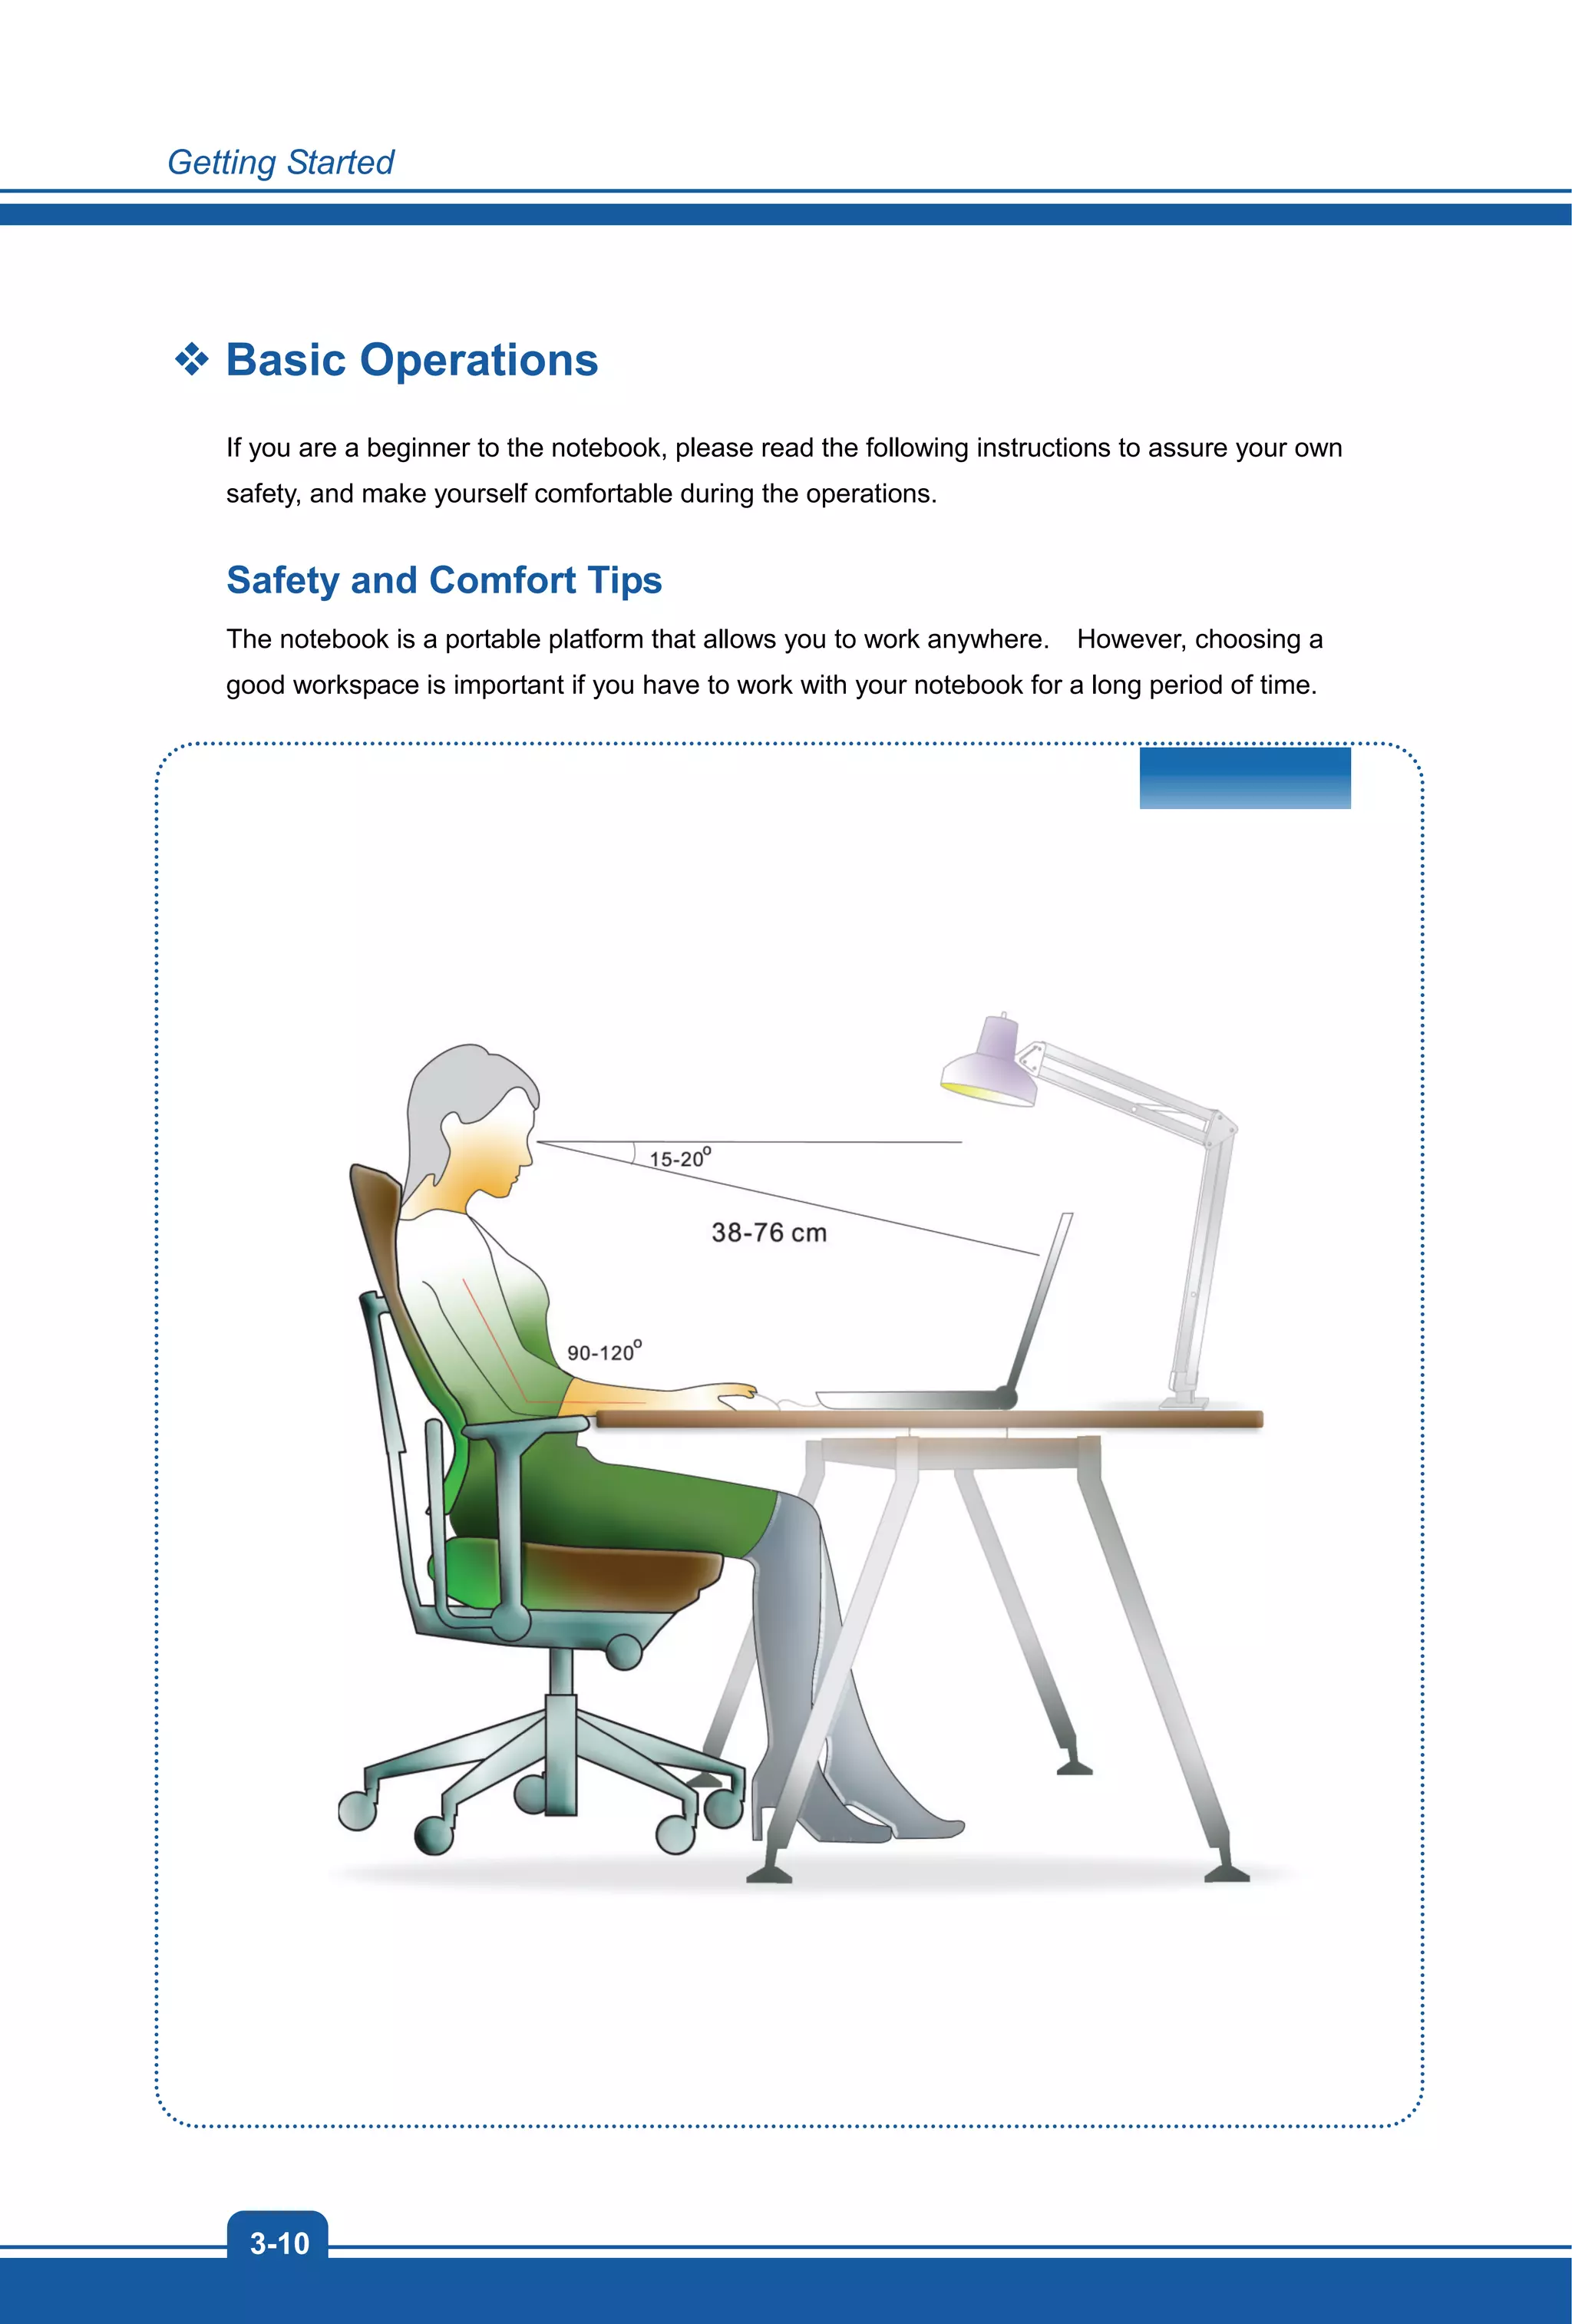
![Getting Started
3-14
+
Decrease the LCD brightness.
+
Increase the LCD brightness.
+
Decrease the built-in speaker’s volume.
+
Increase the built-in speaker’s volume.
+
Disable the computer’s audio function.
+
Force the computer into sleep state (depending on the system
configuration).
+
Increase the Keyboard LED brightness.
+
Decrease the Keyboard LED brightness.
Quick Launch [Fn] Keys
Use the [Fn] buttons on the keyboard to activate the specific applications or tools.
With the help of these quick launch buttons, users will be able to do work more efficiently.
+
User Defined
or
Windows Search
(optional)
Press and hold the Fn button, and then press the F4
button to launch the User Defined application.
Or, press and hold the Fn button, and then press the
F4 button to launch the Windows Search function.
+
ECO Engine
(Power Saving)
Press and hold the Fn button, and then press the F5
button repeatedly to switch among various power
saving modes provided by ECO Engine, or to turn this
function off recurrently.](https://image.slidesharecdn.com/01ms1763wsv1-161116095912/75/MSI-WT70-Workstation-User-Manual-PDF-Download-User-Guide-42-2048.jpg)
![3-15
+
Webcam
Press and hold the Fn button, and then press the F6
button to turn the Webcam function on. Press again to
turn it off.
+
Airplane mode
Press and hold the Fn button, and then press the F10
button repeatedly to turn Airplane mode on or off
recurrently.
For flight safety consideration, it is always
recommended to turn Airplane Mode on when you are
in flight.
Refer to the Airplane mode switch icon under [Start/
Settings/ Change PC Settings/ Wireless/ Airplane
mode] on the desktop to check the device status.](https://image.slidesharecdn.com/01ms1763wsv1-161116095912/75/MSI-WT70-Workstation-User-Manual-PDF-Download-User-Guide-43-2048.jpg)