SlideShare a Scribd company logo
1. pre-requisites
lets target our installation in /u03 mount & make sure mount should have 'oracle'
permission:
Note: /media/sf_SOA_softwares, mount should have oracle permission, if not please
work out as shown
Place required software in /media/sf_SOA_softwares
Note: location is dynamic with provided specifications
Software Movement
Move all software to /u03/app/stage/SOA12c, as we will install from this location
Please create the directory structures if needed, setup .bash_profile
$ vi .bash_profile
execute .bash_profile to apply settings and validate bash_profile to check if
setting s are applied
2. Installation
#sudo su oracle, root install 'java development kit'
rpm -Uvh /u03/app/stage/SOA12c/jdk-7u55-linux-x64.rpm
Unzip the infrastructure file from its respective location
SOA12c]$ unzip V44416-01.zip
Archive: V44416-01.zip
inflating: fmw_12.1.3.0.0_infrastructure.jar
SOA12c]$ java -jar fmw_12.1.3.0.0_infrastructure.jar
Extracting
files...........................................................................................................................................
Starting Oracle Universal Installer
Checking if CPU speed is above 300 MHz. Actual 2593.956 MHz Passed
Checking monitor: must be configured to display at least 256 colors. Actual
16777216 Passed
Checking swap space: must be greater than 512 MB. Actual 4128764 MB Passed
Checking if this platform requires a 64-bit JVM. Actual 64 Passed (64-bit not
required)
Checking temp space: must be greater than 300 MB. Actual 4347 MB Passed
Preparing to launch the Oracle Universal Installer from /tmp/OraInstall2015-09-
13_03-48-05PM
After validation Oracle Universal
installation will be kicked-off
Provide inventory location as
below
'/u03/app/oracle/inventory'
Welcome Screen
Click NEXT
Provide the desired oracle home
location:
'/u03/app/oracle/product/12.1.3/
fmw'
Then click NEXT
Select fusion middleware
infrastructure then click on NEXT
Installation will validate java
version & OS certification, once it
is successful then click NEXT
Basically this screen will ask you to
sign up for any alerts from oracle.
which we may not need at this
scenario
Click NEXT
So for the same reason we would
un check the box then click on
NEXT
we will encounter with a warning
message when you uncheck the
box. so, we shouldn't worry.
click on 'YES'.. & go ahead
click on NEXT..
Here.. in this slide we can go-
through the summary of the
installation which happens in next
slide & also it provides us an
option to save response file for
future purposes
Click on INSTALL
This screen displays the progress of
installation & which should reach
100% without any errors to
proceed further
Click on NEXT
An successful installation can be
seen in this screen
Click on FINISH
3. SOA Installation
Now, as we installed infrastructure let's go ahead with SOA installation
Our first step would be to unzip V44420-01.zip file under '/u03/app/stage/SOA12c'
oracle@soabpm-vm SOA12c]$ ls -lrt
total 4616348
-rwxrwxrwx 1 root root 122656363 Mar 21 2014 jdk-7u55-linux-x64.rpm
-rwxr-xr-x 1 oracle g660 1601986193 Jun 19 2014 fmw_12.1.3.0.0_infrastructure.jar
-rwxrwx--- 1 root vboxsf 1400565940 Sep 13 14:29 V44420-01.zip
-rwxrwx--- 1 root vboxsf 1601912610 Sep 13 15:38 V44416-01.zip
[oracle@soabpm-vm SOA12c]$ unzip V44420-01.zip
Archive: V44420-01.zip
inflating: fmw_12.1.3.0.0_soa.jar
oracle@soabpm-vm SOA12c]$ java -jar fmw_12.1.3.0.0_soa.jar
provide above syntax to start Oracle Universal Installer which should help us to
complete SOA installation
oracle@soabpm-vm SOA12c]$ java -jar fmw_12.1.3.0.0_soa.jar
Launcher log file is /tmp/OraInstall2015-09-13_08-39-05PM/launcher2015-09-13_08-
39-05PM.log.
Extracting files..................................................................................................
Starting Oracle Universal Installer
Checking if CPU speed is above 300 MHz. Actual 2593.956 MHz Passed
Checking monitor: must be configured to display at least 256 colors. Actual
16777216 Passed
Checking swap space: must be greater than 512 MB. Actual 4128764 MB Passed
Checking if this platform requires a 64-bit JVM. Actual 64 Passed (64-bit not
required)
Checking temp space: must be greater than 300 MB. Actual 4550 MB Passed
Preparing to launch the Oracle Universal Installer from /tmp/OraInstall2015-09-
13_08-39-05PM
Please provide installation inventory
location ' /u03/app/oracle/inventory'
Then it will kick-off SOA12c & Business
Process Management
Click on OK
Welcome screen
Click NEXT
Provide the oracle home location
'/u03/app/oracle/product/12.1.3/fmw'
Click on view to see what all features will
be installed
Click NEXT
Select SOA suite radio button to proceed
further with installation
Then click NEXT
In this screen we can see the pre-
requisites OS certificate and java
version were validated to proceed
further
Then click NEXT
We can see few critical details about
locations, disk space & features which
will be installed
Note - you can save response file
Then click on INSTALL
This window should be 100% completed
for an successful installation of SOA suite,
also one can able to see how installation
is in going on by click on view messages
Then click on NEXT
We completed SOA installation !!
Click on FINISH
4. Repository Create Utility Installation
Note:
before we move ahead with RCU, please make sure DB is up & running along with
listener, unless which it will turn as showstopper
Get into RCU location then...
cd /u03/app/oracle/product/12.1.3/fmw/oracle_common/bin/
When "./rcu" is given an Oracle universal installer will be displayed for further
process
[oracle@chef1 ~]$ cd /u03/app/oracle/product/12.1.3/fmw/oracle_common/bin/
[oracle@chef1 bin]$ ls -lrt
total 112
-rwxr-x--- 1 oracle g660 3472 Dec 30 2013 copyBinary.sh
-rwxr-x--- 1 oracle g660 4475 Dec 30 2013 pasteBinary.sh
-rwxr-x--- 1 oracle g660 3422 Dec 30 2013 obfuscatePassword.sh
-rwxr-x--- 1 oracle g660 3225 Dec 30 2013 extractMovePlan.sh
-rwxr-x--- 1 oracle g660 4440 Dec 30 2013 copyConfig.sh
-rwxr-x--- 1 oracle g660 4402 Jan 7 2014 pasteConfig.sh
-rwxr-x--- 1 oracle g660 12876 Feb 5 2014 rcu
-rwxr-x--- 1 oracle g660 8463 Feb 17 2014 rcu.bat
-rw-r----- 1 oracle g660 709 Feb 26 2014 owlcs.ohs_conf.xml
-rwxr-x--- 1 oracle g660 2081 Apr 3 2014 rcuJDBCEngine.bat
-rwxr-x--- 1 oracle g660 2446 Apr 3 2014 rcuJDBCEngine
-rwxr-x--- 1 oracle g660 2328 May 12 2014 orapki.bat
-rwxr-x--- 1 oracle g660 4601 May 12 2014 orapki
-rwxr-x--- 1 oracle g660 1957 May 12 2014 mkstore.bat
-rwxr-x--- 1 oracle g660 3718 May 12 2014 mkstore
-rwxr-x--- 1 oracle g660 2119 May 12 2014 libovdconfig.sh
-rwxr-x--- 1 oracle g660 2101 May 12 2014 libovdconfig.bat
-rwxr-x--- 1 oracle g660 2119 May 12 2014 libovdadapterconfig.sh
-rwxr-x--- 1 oracle g660 2101 May 12 2014 libovdadapterconfig.bat
[oracle@chef1 bin]$ ./rcu
Welcome screen !
Enter the database details same as
screen print given..
Note: DB details are respective to ENV
Then click on NEXT
Here RCU will look for few global
requisites and below warning is
because I used XE edition of database
(pl. ignore)
Click OK on rcu will proceed to check
requisites
Select the components required to
complete RCU installation, you can find
selection of components in next screen
print
Click on NEXT
Please select the components checked
in the screen print
Click on NEXT
Here all services will be verified.. you
can read those services in screen print
Click OK then click NEXT
Click NEXT
Provide the password for all the
schemas which were created just
above
Then click NEXT
Here are the default table spaces for
the components selected
Click on NEXT
If RCU require more tablespaces then
they would be created automatically..
so you can click on OK
As mentioned earlier, few new
tablespaces are created
Click on OK
It is a summary window, it display
about database details & few other
details. please check the screen print
for more information
Click on CREATE
Repository system load is in progress..
You need not click on anything but it will
take you another window once load is
completed successfully
We successfully completed RCU !!!
Now we have RCU in place, so we need to validate if all components are
successfully registered in database.. to find out those... use below command in
database
SQL> select comp_name, version from schema_version_registry;
Beside screen should be your output, if all went well !
SQL> select comp_name, version from schema_version_registry;
COMP_NAME
--------------------------------------------------------------------------------
VERSION
------------------------------
Oracle Enterprise Scheduler
12.1.3.0.0
Audit Service
12.1.3.0.0
Audit Service
12.1.3.0.0
COMP_NAME
--------------------------------------------------------------------------------
VERSION
------------------------------
Audit Service Append
12.1.3.0.0
Audit Service Append
12.1.3.0.0
Audit Service Viewer
12.1.3.0.0
COMP_NAME
--------------------------------------------------------------------------------
VERSION
------------------------------
Audit Service Viewer
12.1.3.0.0
Metadata Services
12.1.3.0.0
Metadata Services
12.1.3.0.0
COMP_NAME
--------------------------------------------------------------------------------
VERSION
------------------------------
Oracle Platform Security Services
12.1.3.0.0
Oracle Platform Security Services
12.1.3.0.0
SOA Infrastructure Services
12.1.3.0.0
COMP_NAME
--------------------------------------------------------------------------------
VERSION
------------------------------
Service Table
12.1.3.0.0
Service Table
12.1.2.0.0
User Messaging Service
12.1.3.0.0
COMP_NAME
--------------------------------------------------------------------------------
VERSION
------------------------------
5. DOMAIN Creation
Oracle recommends that you set the umask to 027 on your system prior to
installation. This ensures that file permissions will be set properly during installation.
~]$ umask 027
Now to kick-off domain creation, need to change directory
~]$ cd /u03/app/oracle/product/12.1.3/fmw/oracle_common/common/bin
[oracle@chef1 bin]$ ls -lrt
total 100
-rwxr-x--- 1 oracle g660 494 Jun 18 2013 getproperty.sh
-rwxr-x--- 1 oracle g660 2960 Jul 17 2013 wlst.sh
-rwxr-x--- 1 oracle g660 2756 Jul 17 2013 unpack.sh
-rwxr-x--- 1 oracle g660 954 Jul 17 2013 prepareCustomProvider.sh
-rwxr-x--- 1 oracle g660 3216 Jul 17 2013 pack.sh
-rwxr-x--- 1 oracle g660 3070 Jul 17 2013 config.sh
-rwxr-x--- 1 oracle g660 2801 Sep 25 2013 clonedunpack.sh
-rwxr-x--- 1 oracle g660 3010 Oct 1 2013 wlst_new.sh
-rwxr-x--- 1 oracle g660 3140 Feb 10 2014 reconfig.sh
-rwxr-x--- 1 oracle g660 2684 Feb 11 2014 config_builder.sh
-rwxr-x--- 1 oracle g660 825 Feb 24 2014 qs_config.sh
-rwxr-x--- 1 oracle g660 148 May 7 2014 setWlstEnv.sh
-rwxr-x--- 1 oracle g660 115 May 7 2014 setWlstEnv.cmd
-rwxr-x--- 1 oracle g660 1918 May 7 2014 setNMProps.sh
-rwxr-x--- 1 oracle g660 2087 May 7 2014 setNMProps.cmd
-rwxr-x--- 1 oracle g660 101 May 7 2014 nm.required.properties
-rwxr-x--- 1 oracle g660 1437 May 21 2014 printJarVersions.sh
-rwxr-x--- 1 oracle g660 633 Sep 13 20:12 setHomeDirs.sh
-rwxr-x--- 1 oracle g660 25235 Sep 13 20:12 commEnv.sh
[oracle@chef1 bin]$
$ ./config.sh
Mentioned screen will be invoked to
create a new domain
Click on NEXT
Select the templates which are required
for further installation (you can find out
required templates information in next
screen print)
Now.. please check the boxes shown in
screen print and click on NEXT
Provide the application location
/u03/app/oracle/config/applications/so
a12c_domain1
Click on NEXT
create username & password for
WebLogic server
Click on NEXT
Please select the ENV & check the
correct java version
Then click NEXT
Now let's cross check if all the Database
details are correct before we process
RCU
So, when clicked on "get RCU
configuration" one should see successful
test results
Then click on NEXT
Provide all the DB details to validate the
connections
Click on NEXT
It will check the component schemas &
their connections
Click on NEXT
Provide your hostname at listen address
and admin server name
Click on NEXT
Create NODE MANAGER credentials
Click on NEXT
Provide the managed server name
along with listen address
Then click on NEXT
Provide the cluster name if applicable
Click on NEXT
Move all servers under clusters from left
to right
Click on NEXT
If you planned for coherence then
provide details
Click. on NEXT
Select UNIX machine tab & provide
name and node manager listen address
Click on NEXT
Assign servers to machines which we
configured above
From left to right
Click on NEXT
You can go-thru the configuration
summary then click on create button
Then configuration will progress & will
reach to 100%
Click on NEXT
So, if all the process and installation goes well... we will see URLS like screen print
Start weblogic & nodemanager servers
[oracle@wls12c-node1 oracle]$ nohup $DOMAIN_HOME/bin/startNodeManager.sh
>/dev/null 2>&1 &
#Starting Administration Console (WLS0_ADM managed server):
[oracle@wls12c-node1 oracle]$ nohup $DOMAIN_HOME/bin/startWebLogic.sh
>/dev/null 2>&1 &
If node manager & WebLogic servers starts up successfully, you can use URL to login
into WebLogic portal
We done with setup!!!

More Related Content

What's hot

Oracle R12.1 Full & Tips Installation on Windows Server 2008 64/32 bit
Oracle R12.1 Full & Tips Installation on Windows Server 2008 64/32 bitOracle R12.1 Full & Tips Installation on Windows Server 2008 64/32 bit
Oracle R12.1 Full & Tips Installation on Windows Server 2008 64/32 bit
Mohammed Raouf
 
Weblogic12 c installation guide
Weblogic12 c installation guideWeblogic12 c installation guide
Weblogic12 c installation guide
Chinni Rajavardhan Reddy
 
12c on RHEL7
12c on RHEL712c on RHEL7
12c on RHEL7
Osama Mustafa
 
OID Install and Config
OID Install and ConfigOID Install and Config
OID Install and Config
Vigilant Technologies
 
Pluggable database tutorial
Pluggable database tutorialPluggable database tutorial
Pluggable database tutorial
Osama Mustafa
 
Oracle EBS R12.1.3_Installation_linux(64bit)_Pan_Tian
Oracle EBS R12.1.3_Installation_linux(64bit)_Pan_TianOracle EBS R12.1.3_Installation_linux(64bit)_Pan_Tian
Oracle EBS R12.1.3_Installation_linux(64bit)_Pan_Tian
Pan Tian
 
Uponor Exadata e-Business Suite Migration Case Study
Uponor Exadata e-Business Suite Migration Case StudyUponor Exadata e-Business Suite Migration Case Study
Uponor Exadata e-Business Suite Migration Case Study
Simo Vilmunen
 
在Oel5上安装配置oracle gird control 10.2.0.5
在Oel5上安装配置oracle gird control 10.2.0.5在Oel5上安装配置oracle gird control 10.2.0.5
在Oel5上安装配置oracle gird control 10.2.0.5maclean liu
 
SOA OSB suite cluster installation
SOA OSB suite cluster installationSOA OSB suite cluster installation
SOA OSB suite cluster installation
Rakesh Gujjarlapudi
 
E business suite r12.2 changes for database administrators
E business suite r12.2 changes for database administratorsE business suite r12.2 changes for database administrators
E business suite r12.2 changes for database administrators
Srinivasa Pavan Marti
 
Oracle Cloud Compute - EBS 12.2.5 Vision Demo - Technical Discussion
Oracle Cloud Compute - EBS 12.2.5 Vision Demo - Technical DiscussionOracle Cloud Compute - EBS 12.2.5 Vision Demo - Technical Discussion
Oracle Cloud Compute - EBS 12.2.5 Vision Demo - Technical Discussion
Joshua Johnson, MIS
 
Oracle E-Business Suite R12.2.6 on Database 12c: Install, Patch and Administer
Oracle E-Business Suite R12.2.6 on Database 12c: Install, Patch and AdministerOracle E-Business Suite R12.2.6 on Database 12c: Install, Patch and Administer
Oracle E-Business Suite R12.2.6 on Database 12c: Install, Patch and Administer
Andrejs Karpovs
 
Upgrade Oracle Database to 12c
Upgrade Oracle Database to 12c Upgrade Oracle Database to 12c
Upgrade Oracle Database to 12c
Osama Mustafa
 
Microsoft exchange-server-2013-installation
Microsoft exchange-server-2013-installationMicrosoft exchange-server-2013-installation
Microsoft exchange-server-2013-installation
takdirlovely09
 
Installing oracle timesten database On Linux
Installing oracle timesten database On Linux Installing oracle timesten database On Linux
Installing oracle timesten database On Linux
Osama Mustafa
 
Oracle to MySQL DatabaseLink
Oracle to MySQL DatabaseLinkOracle to MySQL DatabaseLink
Oracle to MySQL DatabaseLink
Osama Mustafa
 
Doors quality analyzer deployment guide
Doors quality analyzer deployment guideDoors quality analyzer deployment guide
Doors quality analyzer deployment guide
ReuseCompany
 
Sql training
Sql trainingSql training
Sql training
premrings
 

What's hot (20)

Oracle R12.1 Full & Tips Installation on Windows Server 2008 64/32 bit
Oracle R12.1 Full & Tips Installation on Windows Server 2008 64/32 bitOracle R12.1 Full & Tips Installation on Windows Server 2008 64/32 bit
Oracle R12.1 Full & Tips Installation on Windows Server 2008 64/32 bit
 
Weblogic12 c installation guide
Weblogic12 c installation guideWeblogic12 c installation guide
Weblogic12 c installation guide
 
Oam install & config
Oam install & configOam install & config
Oam install & config
 
12c on RHEL7
12c on RHEL712c on RHEL7
12c on RHEL7
 
Ad installation
Ad installationAd installation
Ad installation
 
OID Install and Config
OID Install and ConfigOID Install and Config
OID Install and Config
 
Pluggable database tutorial
Pluggable database tutorialPluggable database tutorial
Pluggable database tutorial
 
Oracle EBS R12.1.3_Installation_linux(64bit)_Pan_Tian
Oracle EBS R12.1.3_Installation_linux(64bit)_Pan_TianOracle EBS R12.1.3_Installation_linux(64bit)_Pan_Tian
Oracle EBS R12.1.3_Installation_linux(64bit)_Pan_Tian
 
Uponor Exadata e-Business Suite Migration Case Study
Uponor Exadata e-Business Suite Migration Case StudyUponor Exadata e-Business Suite Migration Case Study
Uponor Exadata e-Business Suite Migration Case Study
 
在Oel5上安装配置oracle gird control 10.2.0.5
在Oel5上安装配置oracle gird control 10.2.0.5在Oel5上安装配置oracle gird control 10.2.0.5
在Oel5上安装配置oracle gird control 10.2.0.5
 
SOA OSB suite cluster installation
SOA OSB suite cluster installationSOA OSB suite cluster installation
SOA OSB suite cluster installation
 
E business suite r12.2 changes for database administrators
E business suite r12.2 changes for database administratorsE business suite r12.2 changes for database administrators
E business suite r12.2 changes for database administrators
 
Oracle Cloud Compute - EBS 12.2.5 Vision Demo - Technical Discussion
Oracle Cloud Compute - EBS 12.2.5 Vision Demo - Technical DiscussionOracle Cloud Compute - EBS 12.2.5 Vision Demo - Technical Discussion
Oracle Cloud Compute - EBS 12.2.5 Vision Demo - Technical Discussion
 
Oracle E-Business Suite R12.2.6 on Database 12c: Install, Patch and Administer
Oracle E-Business Suite R12.2.6 on Database 12c: Install, Patch and AdministerOracle E-Business Suite R12.2.6 on Database 12c: Install, Patch and Administer
Oracle E-Business Suite R12.2.6 on Database 12c: Install, Patch and Administer
 
Upgrade Oracle Database to 12c
Upgrade Oracle Database to 12c Upgrade Oracle Database to 12c
Upgrade Oracle Database to 12c
 
Microsoft exchange-server-2013-installation
Microsoft exchange-server-2013-installationMicrosoft exchange-server-2013-installation
Microsoft exchange-server-2013-installation
 
Installing oracle timesten database On Linux
Installing oracle timesten database On Linux Installing oracle timesten database On Linux
Installing oracle timesten database On Linux
 
Oracle to MySQL DatabaseLink
Oracle to MySQL DatabaseLinkOracle to MySQL DatabaseLink
Oracle to MySQL DatabaseLink
 
Doors quality analyzer deployment guide
Doors quality analyzer deployment guideDoors quality analyzer deployment guide
Doors quality analyzer deployment guide
 
Sql training
Sql trainingSql training
Sql training
 

Similar to Soa bpm standalone_installation

Oracle forms and reports 11g installation on linux
Oracle forms and reports 11g installation on linuxOracle forms and reports 11g installation on linux
Oracle forms and reports 11g installation on linux
Venu Palakolanu
 
Oracle vm-installation
Oracle vm-installationOracle vm-installation
Oracle vm-installation
Ravi Kumar Lanke
 
Discoverer 11.1.1.7 web logic (10.3.6) & ebs r12 12.1.3) implementation guide...
Discoverer 11.1.1.7 web logic (10.3.6) & ebs r12 12.1.3) implementation guide...Discoverer 11.1.1.7 web logic (10.3.6) & ebs r12 12.1.3) implementation guide...
Discoverer 11.1.1.7 web logic (10.3.6) & ebs r12 12.1.3) implementation guide...
ginniapps
 
OAM Install & Config
OAM Install & ConfigOAM Install & Config
OAM Install & Config
Vigilant Technologies
 
Oracle 12cR2 Installation On Linux With ASM
Oracle 12cR2 Installation On Linux With ASMOracle 12cR2 Installation On Linux With ASM
Oracle 12cR2 Installation On Linux With ASM
Arun Sharma
 
12c installation
12c installation12c installation
12c installation
Osama Mustafa
 
Oracle Enterprise Manager Cloud Control 13c13.3 Installation On Oracle Linux-7
Oracle Enterprise Manager Cloud Control 13c13.3 Installation On Oracle Linux-7Oracle Enterprise Manager Cloud Control 13c13.3 Installation On Oracle Linux-7
Oracle Enterprise Manager Cloud Control 13c13.3 Installation On Oracle Linux-7
Arun Sharma
 
How to install oracle ops center 12c
How to install oracle ops center 12cHow to install oracle ops center 12c
How to install oracle ops center 12c
Muqthiyar Pasha
 
How To Install OpenFire in CentOS 7
How To Install OpenFire in CentOS 7How To Install OpenFire in CentOS 7
How To Install OpenFire in CentOS 7
VCP Muthukrishna
 
Swift configurator installation-manual
Swift configurator installation-manualSwift configurator installation-manual
Swift configurator installation-manualPramod Sharma
 
SOA Fusion Middleware installation
SOA Fusion Middleware installationSOA Fusion Middleware installation
SOA Fusion Middleware installation
Monowar Mukul
 
Deploy agent in em12c
Deploy agent in em12cDeploy agent in em12c
Deploy agent in em12c
Osama Mustafa
 
Installing oracle database 11g on windows 7
Installing oracle database 11g on windows 7Installing oracle database 11g on windows 7
Installing oracle database 11g on windows 7
Ravi Kumar Lanke
 
Instalar PENTAHO 5 en CentOS 6
Instalar PENTAHO 5 en CentOS 6Instalar PENTAHO 5 en CentOS 6
Instalar PENTAHO 5 en CentOS 6
Moisés Elías Araya
 
Oracle ODI & Oracle SOA installation
Oracle ODI & Oracle SOA  installationOracle ODI & Oracle SOA  installation
Oracle ODI & Oracle SOA installation
Osama Mustafa
 
New sap installation post installation
New sap  installation   post installationNew sap  installation   post installation
New sap installation post installationdkeerthan
 
Quick-Start Guide: Deploying Your Cloudian HyperStore Hybrid Storage Service
Quick-Start Guide: Deploying Your Cloudian HyperStore Hybrid Storage ServiceQuick-Start Guide: Deploying Your Cloudian HyperStore Hybrid Storage Service
Quick-Start Guide: Deploying Your Cloudian HyperStore Hybrid Storage Service
Cloudian
 
Field installation guide-v3_1
Field installation guide-v3_1Field installation guide-v3_1
Field installation guide-v3_1
Ganesh Joshi Regmi
 

Similar to Soa bpm standalone_installation (20)

Oracle forms and reports 11g installation on linux
Oracle forms and reports 11g installation on linuxOracle forms and reports 11g installation on linux
Oracle forms and reports 11g installation on linux
 
Oracle vm-installation
Oracle vm-installationOracle vm-installation
Oracle vm-installation
 
Discoverer 11.1.1.7 web logic (10.3.6) & ebs r12 12.1.3) implementation guide...
Discoverer 11.1.1.7 web logic (10.3.6) & ebs r12 12.1.3) implementation guide...Discoverer 11.1.1.7 web logic (10.3.6) & ebs r12 12.1.3) implementation guide...
Discoverer 11.1.1.7 web logic (10.3.6) & ebs r12 12.1.3) implementation guide...
 
OAM Install & Config
OAM Install & ConfigOAM Install & Config
OAM Install & Config
 
Oracle 12cR2 Installation On Linux With ASM
Oracle 12cR2 Installation On Linux With ASMOracle 12cR2 Installation On Linux With ASM
Oracle 12cR2 Installation On Linux With ASM
 
12c installation
12c installation12c installation
12c installation
 
Oracle Enterprise Manager Cloud Control 13c13.3 Installation On Oracle Linux-7
Oracle Enterprise Manager Cloud Control 13c13.3 Installation On Oracle Linux-7Oracle Enterprise Manager Cloud Control 13c13.3 Installation On Oracle Linux-7
Oracle Enterprise Manager Cloud Control 13c13.3 Installation On Oracle Linux-7
 
How to install oracle ops center 12c
How to install oracle ops center 12cHow to install oracle ops center 12c
How to install oracle ops center 12c
 
How To Install OpenFire in CentOS 7
How To Install OpenFire in CentOS 7How To Install OpenFire in CentOS 7
How To Install OpenFire in CentOS 7
 
Swift configurator installation-manual
Swift configurator installation-manualSwift configurator installation-manual
Swift configurator installation-manual
 
Oracle WebLogic
Oracle WebLogicOracle WebLogic
Oracle WebLogic
 
SOA Fusion Middleware installation
SOA Fusion Middleware installationSOA Fusion Middleware installation
SOA Fusion Middleware installation
 
Deploy agent in em12c
Deploy agent in em12cDeploy agent in em12c
Deploy agent in em12c
 
Installing oracle database 11g on windows 7
Installing oracle database 11g on windows 7Installing oracle database 11g on windows 7
Installing oracle database 11g on windows 7
 
Instalar PENTAHO 5 en CentOS 6
Instalar PENTAHO 5 en CentOS 6Instalar PENTAHO 5 en CentOS 6
Instalar PENTAHO 5 en CentOS 6
 
Oracle ODI & Oracle SOA installation
Oracle ODI & Oracle SOA  installationOracle ODI & Oracle SOA  installation
Oracle ODI & Oracle SOA installation
 
New sap installation post installation
New sap  installation   post installationNew sap  installation   post installation
New sap installation post installation
 
Quick-Start Guide: Deploying Your Cloudian HyperStore Hybrid Storage Service
Quick-Start Guide: Deploying Your Cloudian HyperStore Hybrid Storage ServiceQuick-Start Guide: Deploying Your Cloudian HyperStore Hybrid Storage Service
Quick-Start Guide: Deploying Your Cloudian HyperStore Hybrid Storage Service
 
Network Manual
Network ManualNetwork Manual
Network Manual
 
Field installation guide-v3_1
Field installation guide-v3_1Field installation guide-v3_1
Field installation guide-v3_1
 

Recently uploaded

Multiple Your Crypto Portfolio with the Innovative Features of Advanced Crypt...
Multiple Your Crypto Portfolio with the Innovative Features of Advanced Crypt...Multiple Your Crypto Portfolio with the Innovative Features of Advanced Crypt...
Multiple Your Crypto Portfolio with the Innovative Features of Advanced Crypt...
Hivelance Technology
 
Why React Native as a Strategic Advantage for Startup Innovation.pdf
Why React Native as a Strategic Advantage for Startup Innovation.pdfWhy React Native as a Strategic Advantage for Startup Innovation.pdf
Why React Native as a Strategic Advantage for Startup Innovation.pdf
ayushiqss
 
Into the Box 2024 - Keynote Day 2 Slides.pdf
Into the Box 2024 - Keynote Day 2 Slides.pdfInto the Box 2024 - Keynote Day 2 Slides.pdf
Into the Box 2024 - Keynote Day 2 Slides.pdf
Ortus Solutions, Corp
 
Developing Distributed High-performance Computing Capabilities of an Open Sci...
Developing Distributed High-performance Computing Capabilities of an Open Sci...Developing Distributed High-performance Computing Capabilities of an Open Sci...
Developing Distributed High-performance Computing Capabilities of an Open Sci...
Globus
 
Using IESVE for Room Loads Analysis - Australia & New Zealand
Using IESVE for Room Loads Analysis - Australia & New ZealandUsing IESVE for Room Loads Analysis - Australia & New Zealand
Using IESVE for Room Loads Analysis - Australia & New Zealand
IES VE
 
Cyaniclab : Software Development Agency Portfolio.pdf
Cyaniclab : Software Development Agency Portfolio.pdfCyaniclab : Software Development Agency Portfolio.pdf
Cyaniclab : Software Development Agency Portfolio.pdf
Cyanic lab
 
Large Language Models and the End of Programming
Large Language Models and the End of ProgrammingLarge Language Models and the End of Programming
Large Language Models and the End of Programming
Matt Welsh
 
Innovating Inference - Remote Triggering of Large Language Models on HPC Clus...
Innovating Inference - Remote Triggering of Large Language Models on HPC Clus...Innovating Inference - Remote Triggering of Large Language Models on HPC Clus...
Innovating Inference - Remote Triggering of Large Language Models on HPC Clus...
Globus
 
Vitthal Shirke Microservices Resume Montevideo
Vitthal Shirke Microservices Resume MontevideoVitthal Shirke Microservices Resume Montevideo
Vitthal Shirke Microservices Resume Montevideo
Vitthal Shirke
 
Paketo Buildpacks : la meilleure façon de construire des images OCI? DevopsDa...
Paketo Buildpacks : la meilleure façon de construire des images OCI? DevopsDa...Paketo Buildpacks : la meilleure façon de construire des images OCI? DevopsDa...
Paketo Buildpacks : la meilleure façon de construire des images OCI? DevopsDa...
Anthony Dahanne
 
OpenFOAM solver for Helmholtz equation, helmholtzFoam / helmholtzBubbleFoam
OpenFOAM solver for Helmholtz equation, helmholtzFoam / helmholtzBubbleFoamOpenFOAM solver for Helmholtz equation, helmholtzFoam / helmholtzBubbleFoam
OpenFOAM solver for Helmholtz equation, helmholtzFoam / helmholtzBubbleFoam
takuyayamamoto1800
 
Field Employee Tracking System| MiTrack App| Best Employee Tracking Solution|...
Field Employee Tracking System| MiTrack App| Best Employee Tracking Solution|...Field Employee Tracking System| MiTrack App| Best Employee Tracking Solution|...
Field Employee Tracking System| MiTrack App| Best Employee Tracking Solution|...
informapgpstrackings
 
Software Testing Exam imp Ques Notes.pdf
Software Testing Exam imp Ques Notes.pdfSoftware Testing Exam imp Ques Notes.pdf
Software Testing Exam imp Ques Notes.pdf
MayankTawar1
 
A Comprehensive Look at Generative AI in Retail App Testing.pdf
A Comprehensive Look at Generative AI in Retail App Testing.pdfA Comprehensive Look at Generative AI in Retail App Testing.pdf
A Comprehensive Look at Generative AI in Retail App Testing.pdf
kalichargn70th171
 
Providing Globus Services to Users of JASMIN for Environmental Data Analysis
Providing Globus Services to Users of JASMIN for Environmental Data AnalysisProviding Globus Services to Users of JASMIN for Environmental Data Analysis
Providing Globus Services to Users of JASMIN for Environmental Data Analysis
Globus
 
Beyond Event Sourcing - Embracing CRUD for Wix Platform - Java.IL
Beyond Event Sourcing - Embracing CRUD for Wix Platform - Java.ILBeyond Event Sourcing - Embracing CRUD for Wix Platform - Java.IL
Beyond Event Sourcing - Embracing CRUD for Wix Platform - Java.IL
Natan Silnitsky
 
GlobusWorld 2024 Opening Keynote session
GlobusWorld 2024 Opening Keynote sessionGlobusWorld 2024 Opening Keynote session
GlobusWorld 2024 Opening Keynote session
Globus
 
top nidhi software solution freedownload
top nidhi software solution freedownloadtop nidhi software solution freedownload
top nidhi software solution freedownload
vrstrong314
 
Enhancing Research Orchestration Capabilities at ORNL.pdf
Enhancing Research Orchestration Capabilities at ORNL.pdfEnhancing Research Orchestration Capabilities at ORNL.pdf
Enhancing Research Orchestration Capabilities at ORNL.pdf
Globus
 
Dominate Social Media with TubeTrivia AI’s Addictive Quiz Videos.pdf
Dominate Social Media with TubeTrivia AI’s Addictive Quiz Videos.pdfDominate Social Media with TubeTrivia AI’s Addictive Quiz Videos.pdf
Dominate Social Media with TubeTrivia AI’s Addictive Quiz Videos.pdf
AMB-Review
 

Recently uploaded (20)

Multiple Your Crypto Portfolio with the Innovative Features of Advanced Crypt...
Multiple Your Crypto Portfolio with the Innovative Features of Advanced Crypt...Multiple Your Crypto Portfolio with the Innovative Features of Advanced Crypt...
Multiple Your Crypto Portfolio with the Innovative Features of Advanced Crypt...
 
Why React Native as a Strategic Advantage for Startup Innovation.pdf
Why React Native as a Strategic Advantage for Startup Innovation.pdfWhy React Native as a Strategic Advantage for Startup Innovation.pdf
Why React Native as a Strategic Advantage for Startup Innovation.pdf
 
Into the Box 2024 - Keynote Day 2 Slides.pdf
Into the Box 2024 - Keynote Day 2 Slides.pdfInto the Box 2024 - Keynote Day 2 Slides.pdf
Into the Box 2024 - Keynote Day 2 Slides.pdf
 
Developing Distributed High-performance Computing Capabilities of an Open Sci...
Developing Distributed High-performance Computing Capabilities of an Open Sci...Developing Distributed High-performance Computing Capabilities of an Open Sci...
Developing Distributed High-performance Computing Capabilities of an Open Sci...
 
Using IESVE for Room Loads Analysis - Australia & New Zealand
Using IESVE for Room Loads Analysis - Australia & New ZealandUsing IESVE for Room Loads Analysis - Australia & New Zealand
Using IESVE for Room Loads Analysis - Australia & New Zealand
 
Cyaniclab : Software Development Agency Portfolio.pdf
Cyaniclab : Software Development Agency Portfolio.pdfCyaniclab : Software Development Agency Portfolio.pdf
Cyaniclab : Software Development Agency Portfolio.pdf
 
Large Language Models and the End of Programming
Large Language Models and the End of ProgrammingLarge Language Models and the End of Programming
Large Language Models and the End of Programming
 
Innovating Inference - Remote Triggering of Large Language Models on HPC Clus...
Innovating Inference - Remote Triggering of Large Language Models on HPC Clus...Innovating Inference - Remote Triggering of Large Language Models on HPC Clus...
Innovating Inference - Remote Triggering of Large Language Models on HPC Clus...
 
Vitthal Shirke Microservices Resume Montevideo
Vitthal Shirke Microservices Resume MontevideoVitthal Shirke Microservices Resume Montevideo
Vitthal Shirke Microservices Resume Montevideo
 
Paketo Buildpacks : la meilleure façon de construire des images OCI? DevopsDa...
Paketo Buildpacks : la meilleure façon de construire des images OCI? DevopsDa...Paketo Buildpacks : la meilleure façon de construire des images OCI? DevopsDa...
Paketo Buildpacks : la meilleure façon de construire des images OCI? DevopsDa...
 
OpenFOAM solver for Helmholtz equation, helmholtzFoam / helmholtzBubbleFoam
OpenFOAM solver for Helmholtz equation, helmholtzFoam / helmholtzBubbleFoamOpenFOAM solver for Helmholtz equation, helmholtzFoam / helmholtzBubbleFoam
OpenFOAM solver for Helmholtz equation, helmholtzFoam / helmholtzBubbleFoam
 
Field Employee Tracking System| MiTrack App| Best Employee Tracking Solution|...
Field Employee Tracking System| MiTrack App| Best Employee Tracking Solution|...Field Employee Tracking System| MiTrack App| Best Employee Tracking Solution|...
Field Employee Tracking System| MiTrack App| Best Employee Tracking Solution|...
 
Software Testing Exam imp Ques Notes.pdf
Software Testing Exam imp Ques Notes.pdfSoftware Testing Exam imp Ques Notes.pdf
Software Testing Exam imp Ques Notes.pdf
 
A Comprehensive Look at Generative AI in Retail App Testing.pdf
A Comprehensive Look at Generative AI in Retail App Testing.pdfA Comprehensive Look at Generative AI in Retail App Testing.pdf
A Comprehensive Look at Generative AI in Retail App Testing.pdf
 
Providing Globus Services to Users of JASMIN for Environmental Data Analysis
Providing Globus Services to Users of JASMIN for Environmental Data AnalysisProviding Globus Services to Users of JASMIN for Environmental Data Analysis
Providing Globus Services to Users of JASMIN for Environmental Data Analysis
 
Beyond Event Sourcing - Embracing CRUD for Wix Platform - Java.IL
Beyond Event Sourcing - Embracing CRUD for Wix Platform - Java.ILBeyond Event Sourcing - Embracing CRUD for Wix Platform - Java.IL
Beyond Event Sourcing - Embracing CRUD for Wix Platform - Java.IL
 
GlobusWorld 2024 Opening Keynote session
GlobusWorld 2024 Opening Keynote sessionGlobusWorld 2024 Opening Keynote session
GlobusWorld 2024 Opening Keynote session
 
top nidhi software solution freedownload
top nidhi software solution freedownloadtop nidhi software solution freedownload
top nidhi software solution freedownload
 
Enhancing Research Orchestration Capabilities at ORNL.pdf
Enhancing Research Orchestration Capabilities at ORNL.pdfEnhancing Research Orchestration Capabilities at ORNL.pdf
Enhancing Research Orchestration Capabilities at ORNL.pdf
 
Dominate Social Media with TubeTrivia AI’s Addictive Quiz Videos.pdf
Dominate Social Media with TubeTrivia AI’s Addictive Quiz Videos.pdfDominate Social Media with TubeTrivia AI’s Addictive Quiz Videos.pdf
Dominate Social Media with TubeTrivia AI’s Addictive Quiz Videos.pdf
 

Soa bpm standalone_installation

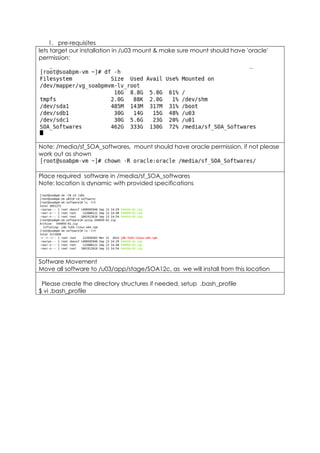
  • 1. 1. pre-requisites lets target our installation in /u03 mount & make sure mount should have 'oracle' permission: Note: /media/sf_SOA_softwares, mount should have oracle permission, if not please work out as shown Place required software in /media/sf_SOA_softwares Note: location is dynamic with provided specifications Software Movement Move all software to /u03/app/stage/SOA12c, as we will install from this location Please create the directory structures if needed, setup .bash_profile $ vi .bash_profile
  • 2. execute .bash_profile to apply settings and validate bash_profile to check if setting s are applied 2. Installation #sudo su oracle, root install 'java development kit' rpm -Uvh /u03/app/stage/SOA12c/jdk-7u55-linux-x64.rpm Unzip the infrastructure file from its respective location SOA12c]$ unzip V44416-01.zip Archive: V44416-01.zip inflating: fmw_12.1.3.0.0_infrastructure.jar SOA12c]$ java -jar fmw_12.1.3.0.0_infrastructure.jar Extracting files........................................................................................................................................... Starting Oracle Universal Installer Checking if CPU speed is above 300 MHz. Actual 2593.956 MHz Passed Checking monitor: must be configured to display at least 256 colors. Actual
  • 3. 16777216 Passed Checking swap space: must be greater than 512 MB. Actual 4128764 MB Passed Checking if this platform requires a 64-bit JVM. Actual 64 Passed (64-bit not required) Checking temp space: must be greater than 300 MB. Actual 4347 MB Passed Preparing to launch the Oracle Universal Installer from /tmp/OraInstall2015-09- 13_03-48-05PM After validation Oracle Universal installation will be kicked-off Provide inventory location as below '/u03/app/oracle/inventory' Welcome Screen Click NEXT Provide the desired oracle home location: '/u03/app/oracle/product/12.1.3/ fmw' Then click NEXT
  • 4. Select fusion middleware infrastructure then click on NEXT Installation will validate java version & OS certification, once it is successful then click NEXT Basically this screen will ask you to sign up for any alerts from oracle. which we may not need at this scenario Click NEXT
  • 5. So for the same reason we would un check the box then click on NEXT we will encounter with a warning message when you uncheck the box. so, we shouldn't worry. click on 'YES'.. & go ahead click on NEXT.. Here.. in this slide we can go- through the summary of the installation which happens in next slide & also it provides us an option to save response file for future purposes Click on INSTALL
  • 6. This screen displays the progress of installation & which should reach 100% without any errors to proceed further Click on NEXT An successful installation can be seen in this screen Click on FINISH 3. SOA Installation Now, as we installed infrastructure let's go ahead with SOA installation Our first step would be to unzip V44420-01.zip file under '/u03/app/stage/SOA12c' oracle@soabpm-vm SOA12c]$ ls -lrt total 4616348 -rwxrwxrwx 1 root root 122656363 Mar 21 2014 jdk-7u55-linux-x64.rpm -rwxr-xr-x 1 oracle g660 1601986193 Jun 19 2014 fmw_12.1.3.0.0_infrastructure.jar -rwxrwx--- 1 root vboxsf 1400565940 Sep 13 14:29 V44420-01.zip -rwxrwx--- 1 root vboxsf 1601912610 Sep 13 15:38 V44416-01.zip [oracle@soabpm-vm SOA12c]$ unzip V44420-01.zip Archive: V44420-01.zip inflating: fmw_12.1.3.0.0_soa.jar oracle@soabpm-vm SOA12c]$ java -jar fmw_12.1.3.0.0_soa.jar provide above syntax to start Oracle Universal Installer which should help us to complete SOA installation oracle@soabpm-vm SOA12c]$ java -jar fmw_12.1.3.0.0_soa.jar Launcher log file is /tmp/OraInstall2015-09-13_08-39-05PM/launcher2015-09-13_08- 39-05PM.log. Extracting files.................................................................................................. Starting Oracle Universal Installer
  • 7. Checking if CPU speed is above 300 MHz. Actual 2593.956 MHz Passed Checking monitor: must be configured to display at least 256 colors. Actual 16777216 Passed Checking swap space: must be greater than 512 MB. Actual 4128764 MB Passed Checking if this platform requires a 64-bit JVM. Actual 64 Passed (64-bit not required) Checking temp space: must be greater than 300 MB. Actual 4550 MB Passed Preparing to launch the Oracle Universal Installer from /tmp/OraInstall2015-09- 13_08-39-05PM Please provide installation inventory location ' /u03/app/oracle/inventory' Then it will kick-off SOA12c & Business Process Management Click on OK Welcome screen Click NEXT Provide the oracle home location '/u03/app/oracle/product/12.1.3/fmw' Click on view to see what all features will be installed Click NEXT
  • 8. Select SOA suite radio button to proceed further with installation Then click NEXT In this screen we can see the pre- requisites OS certificate and java version were validated to proceed further Then click NEXT We can see few critical details about locations, disk space & features which will be installed Note - you can save response file Then click on INSTALL
  • 9. This window should be 100% completed for an successful installation of SOA suite, also one can able to see how installation is in going on by click on view messages Then click on NEXT We completed SOA installation !! Click on FINISH 4. Repository Create Utility Installation Note: before we move ahead with RCU, please make sure DB is up & running along with listener, unless which it will turn as showstopper Get into RCU location then... cd /u03/app/oracle/product/12.1.3/fmw/oracle_common/bin/ When "./rcu" is given an Oracle universal installer will be displayed for further process [oracle@chef1 ~]$ cd /u03/app/oracle/product/12.1.3/fmw/oracle_common/bin/ [oracle@chef1 bin]$ ls -lrt total 112 -rwxr-x--- 1 oracle g660 3472 Dec 30 2013 copyBinary.sh -rwxr-x--- 1 oracle g660 4475 Dec 30 2013 pasteBinary.sh -rwxr-x--- 1 oracle g660 3422 Dec 30 2013 obfuscatePassword.sh -rwxr-x--- 1 oracle g660 3225 Dec 30 2013 extractMovePlan.sh -rwxr-x--- 1 oracle g660 4440 Dec 30 2013 copyConfig.sh -rwxr-x--- 1 oracle g660 4402 Jan 7 2014 pasteConfig.sh -rwxr-x--- 1 oracle g660 12876 Feb 5 2014 rcu -rwxr-x--- 1 oracle g660 8463 Feb 17 2014 rcu.bat -rw-r----- 1 oracle g660 709 Feb 26 2014 owlcs.ohs_conf.xml -rwxr-x--- 1 oracle g660 2081 Apr 3 2014 rcuJDBCEngine.bat -rwxr-x--- 1 oracle g660 2446 Apr 3 2014 rcuJDBCEngine -rwxr-x--- 1 oracle g660 2328 May 12 2014 orapki.bat
  • 10. -rwxr-x--- 1 oracle g660 4601 May 12 2014 orapki -rwxr-x--- 1 oracle g660 1957 May 12 2014 mkstore.bat -rwxr-x--- 1 oracle g660 3718 May 12 2014 mkstore -rwxr-x--- 1 oracle g660 2119 May 12 2014 libovdconfig.sh -rwxr-x--- 1 oracle g660 2101 May 12 2014 libovdconfig.bat -rwxr-x--- 1 oracle g660 2119 May 12 2014 libovdadapterconfig.sh -rwxr-x--- 1 oracle g660 2101 May 12 2014 libovdadapterconfig.bat [oracle@chef1 bin]$ ./rcu Welcome screen ! Enter the database details same as screen print given.. Note: DB details are respective to ENV Then click on NEXT Here RCU will look for few global requisites and below warning is because I used XE edition of database (pl. ignore) Click OK on rcu will proceed to check requisites
  • 11. Select the components required to complete RCU installation, you can find selection of components in next screen print Click on NEXT Please select the components checked in the screen print Click on NEXT Here all services will be verified.. you can read those services in screen print Click OK then click NEXT Click NEXT
  • 12. Provide the password for all the schemas which were created just above Then click NEXT Here are the default table spaces for the components selected Click on NEXT If RCU require more tablespaces then they would be created automatically.. so you can click on OK As mentioned earlier, few new tablespaces are created Click on OK
  • 13. It is a summary window, it display about database details & few other details. please check the screen print for more information Click on CREATE Repository system load is in progress.. You need not click on anything but it will take you another window once load is completed successfully We successfully completed RCU !!! Now we have RCU in place, so we need to validate if all components are successfully registered in database.. to find out those... use below command in database SQL> select comp_name, version from schema_version_registry; Beside screen should be your output, if all went well ! SQL> select comp_name, version from schema_version_registry; COMP_NAME -------------------------------------------------------------------------------- VERSION ------------------------------ Oracle Enterprise Scheduler
  • 14. 12.1.3.0.0 Audit Service 12.1.3.0.0 Audit Service 12.1.3.0.0 COMP_NAME -------------------------------------------------------------------------------- VERSION ------------------------------ Audit Service Append 12.1.3.0.0 Audit Service Append 12.1.3.0.0 Audit Service Viewer 12.1.3.0.0 COMP_NAME -------------------------------------------------------------------------------- VERSION ------------------------------ Audit Service Viewer 12.1.3.0.0 Metadata Services 12.1.3.0.0 Metadata Services 12.1.3.0.0 COMP_NAME -------------------------------------------------------------------------------- VERSION ------------------------------ Oracle Platform Security Services 12.1.3.0.0 Oracle Platform Security Services 12.1.3.0.0 SOA Infrastructure Services 12.1.3.0.0
  • 15. COMP_NAME -------------------------------------------------------------------------------- VERSION ------------------------------ Service Table 12.1.3.0.0 Service Table 12.1.2.0.0 User Messaging Service 12.1.3.0.0 COMP_NAME -------------------------------------------------------------------------------- VERSION ------------------------------ 5. DOMAIN Creation Oracle recommends that you set the umask to 027 on your system prior to installation. This ensures that file permissions will be set properly during installation. ~]$ umask 027 Now to kick-off domain creation, need to change directory ~]$ cd /u03/app/oracle/product/12.1.3/fmw/oracle_common/common/bin [oracle@chef1 bin]$ ls -lrt total 100 -rwxr-x--- 1 oracle g660 494 Jun 18 2013 getproperty.sh -rwxr-x--- 1 oracle g660 2960 Jul 17 2013 wlst.sh -rwxr-x--- 1 oracle g660 2756 Jul 17 2013 unpack.sh -rwxr-x--- 1 oracle g660 954 Jul 17 2013 prepareCustomProvider.sh -rwxr-x--- 1 oracle g660 3216 Jul 17 2013 pack.sh -rwxr-x--- 1 oracle g660 3070 Jul 17 2013 config.sh -rwxr-x--- 1 oracle g660 2801 Sep 25 2013 clonedunpack.sh -rwxr-x--- 1 oracle g660 3010 Oct 1 2013 wlst_new.sh -rwxr-x--- 1 oracle g660 3140 Feb 10 2014 reconfig.sh -rwxr-x--- 1 oracle g660 2684 Feb 11 2014 config_builder.sh -rwxr-x--- 1 oracle g660 825 Feb 24 2014 qs_config.sh -rwxr-x--- 1 oracle g660 148 May 7 2014 setWlstEnv.sh -rwxr-x--- 1 oracle g660 115 May 7 2014 setWlstEnv.cmd -rwxr-x--- 1 oracle g660 1918 May 7 2014 setNMProps.sh -rwxr-x--- 1 oracle g660 2087 May 7 2014 setNMProps.cmd -rwxr-x--- 1 oracle g660 101 May 7 2014 nm.required.properties -rwxr-x--- 1 oracle g660 1437 May 21 2014 printJarVersions.sh -rwxr-x--- 1 oracle g660 633 Sep 13 20:12 setHomeDirs.sh -rwxr-x--- 1 oracle g660 25235 Sep 13 20:12 commEnv.sh [oracle@chef1 bin]$
  • 16. $ ./config.sh Mentioned screen will be invoked to create a new domain Click on NEXT Select the templates which are required for further installation (you can find out required templates information in next screen print) Now.. please check the boxes shown in screen print and click on NEXT Provide the application location /u03/app/oracle/config/applications/so a12c_domain1 Click on NEXT
  • 17. create username & password for WebLogic server Click on NEXT Please select the ENV & check the correct java version Then click NEXT Now let's cross check if all the Database details are correct before we process RCU So, when clicked on "get RCU configuration" one should see successful test results Then click on NEXT
  • 18. Provide all the DB details to validate the connections Click on NEXT It will check the component schemas & their connections Click on NEXT Provide your hostname at listen address and admin server name Click on NEXT Create NODE MANAGER credentials Click on NEXT
  • 19. Provide the managed server name along with listen address Then click on NEXT Provide the cluster name if applicable Click on NEXT Move all servers under clusters from left to right Click on NEXT If you planned for coherence then provide details Click. on NEXT
  • 20. Select UNIX machine tab & provide name and node manager listen address Click on NEXT Assign servers to machines which we configured above From left to right Click on NEXT You can go-thru the configuration summary then click on create button Then configuration will progress & will reach to 100% Click on NEXT
  • 21. So, if all the process and installation goes well... we will see URLS like screen print Start weblogic & nodemanager servers [oracle@wls12c-node1 oracle]$ nohup $DOMAIN_HOME/bin/startNodeManager.sh >/dev/null 2>&1 & #Starting Administration Console (WLS0_ADM managed server): [oracle@wls12c-node1 oracle]$ nohup $DOMAIN_HOME/bin/startWebLogic.sh >/dev/null 2>&1 & If node manager & WebLogic servers starts up successfully, you can use URL to login
  • 22. into WebLogic portal We done with setup!!!