This document provides operating instructions for the RDJ10RF/SET wireless programmable temperature controller. The controller consists of a RDJ10RF wireless controller and RCR10/433 receiver. It allows the user to set both temperature setpoints and time programs to automatically switch between comfort and energy saving modes. The controller has an ergonomic knob to adjust temperature and buttons to program the on/off times, comfort/energy saving temperatures, and view the current temperature and operating mode.
Plan--Study/Check-Act (PDSA/PDCA) merupakan salah satu modetode paling sederhana untuk mengatasi masalah dalam penerapan suatu program, layanan, atau proses baru di bidang kesehatan. Mempelajari bagaimana PDSA bekerja dapat memberikan kita pandangan bagaimana mengatasi masalah-masalah tersebut.
Anole hot runner temperature control systems in China use high intelligent, smart meter & a computer chip as hot runner mould temperature controller and have multiple digital filter to provide the PID algorithm & realize accurate temperature control of the Hot Runner.
Hướng dẫn sử dụng máy đo khí CO2, nhiệt độ, độ ẩm Extech CO200Tenmars Việt Nam
Hướng dẫn sử dụng máy đo khí CO2, nhiệt độ, độ ẩm Extech CO200
http://extech.vn/vi/products/ph%C3%A2n-t%C3%ADch--ki%E1%BB%83m-tra-kh%C3%AD
http://extech.vn/vi/products/ph%C3%A2n-t%C3%ADch--ki%E1%BB%83m-tra-kh%C3%AD/extech-co200---m%C3%A1y-%C4%91o-l%C6%B0%E1%BB%A3ng-kh%C3%AD-co2-nhi%E1%BB%87t-%C4%91%E1%BB%99-%C4%91%E1%BB%99-%E1%BA%A9m
This HT1209 is a low cost yet highly functional thermostat controller. With this module you can intelligently control power to most types of electrical devices based on the temperature sensed by the included high accuracy NTC temperature sensor probe. 3 tactile switches allow for setting of various parameters including on & off trigger temperatures. The on board relay can switch up to a maximum of 240VAC at 5A or 14V DC at 10A. The actual temperature is displayed in degrees Centigrade with 3-digit 7-segment display. The relay On/Off state indicates by on board LED indicator.
Programming the schedule
1. Slide the RUN/program switch to .
2. The Switch-point indicator is 1 (1) and the Light indicator ( ) is
on, indicating your settings are for the first switch-point and
will turn the lights on.
NOTE: Odd numbered switch-points always turn the lights on,
and even numbered switch-points always turn the lights off.
3. Repeatedly press the 1…7 button until the Day indicator
points to the days you want your first switch-point to take
place. For example, if you want the first switch-point to take
place only on Tuesdays, press the 1…7 button twice so the
indicator (▲) points to 2 (2=Tuesday).
4. Repeatedly press the h button to set the hour. Make sure the
displayed AM/PM indicator is correct. To rapidly advance the
displayed hour, press and hold the h button.
5. Repeatedly press the m button to set the minute. To rapidly
advance the displayed minute, press and hold the h button.
6. When ready to proceed to the next switch-point, press the
button once. The Switch-point indicator changes to 2 (2) and
the Light indicator ( ) is off.
7. Repeat steps 3 through 6 for each switch-point. You can
program as few as 1 and as many as 16 switch-points. The
maximum number of switch-points for any single day is 8.
8. When your programming is complete, slide the RUN/program
switch to RUN.
Changing or deleting a switch-point
1. Slide the RUN/program switch to .
2. Press the button until the Switch-point indicator is displayed
for the switch-point you want to change.
■ To change the days and time, use the 1…7, h, and m
buttons.
■ To delete the switch-point, simultaneously press and hold
the and buttons until the display flashes 0:00.
3. When your changes are complete, slide the RUN/program
switch to RUN.
Reviewing the schedule
1. Slide the RUN/program switch to .
2. Repeatedly press the button. With each press, the Switch-
point indicator will increase, and the days and time for each
switch-point will be shown.
3. When your review is complete, slide the RUN/program switch
to RUN.
Hướng dẫn sử dụng máy đo nhiệt độ Testo 610
https://testostore.vn/danh-muc/do-nhiet-do-do-am/
https://testostore.vn/san-pham/may-do-nhiet-do-testo-610/
State of ICS and IoT Cyber Threat Landscape Report 2024 previewPrayukth K V
The IoT and OT threat landscape report has been prepared by the Threat Research Team at Sectrio using data from Sectrio, cyber threat intelligence farming facilities spread across over 85 cities around the world. In addition, Sectrio also runs AI-based advanced threat and payload engagement facilities that serve as sinks to attract and engage sophisticated threat actors, and newer malware including new variants and latent threats that are at an earlier stage of development.
The latest edition of the OT/ICS and IoT security Threat Landscape Report 2024 also covers:
State of global ICS asset and network exposure
Sectoral targets and attacks as well as the cost of ransom
Global APT activity, AI usage, actor and tactic profiles, and implications
Rise in volumes of AI-powered cyberattacks
Major cyber events in 2024
Malware and malicious payload trends
Cyberattack types and targets
Vulnerability exploit attempts on CVEs
Attacks on counties – USA
Expansion of bot farms – how, where, and why
In-depth analysis of the cyber threat landscape across North America, South America, Europe, APAC, and the Middle East
Why are attacks on smart factories rising?
Cyber risk predictions
Axis of attacks – Europe
Systemic attacks in the Middle East
Download the full report from here:
https://sectrio.com/resources/ot-threat-landscape-reports/sectrio-releases-ot-ics-and-iot-security-threat-landscape-report-2024/
DevOps and Testing slides at DASA ConnectKari Kakkonen
My and Rik Marselis slides at 30.5.2024 DASA Connect conference. We discuss about what is testing, then what is agile testing and finally what is Testing in DevOps. Finally we had lovely workshop with the participants trying to find out different ways to think about quality and testing in different parts of the DevOps infinity loop.
Essentials of Automations: The Art of Triggers and Actions in FMESafe Software
In this second installment of our Essentials of Automations webinar series, we’ll explore the landscape of triggers and actions, guiding you through the nuances of authoring and adapting workspaces for seamless automations. Gain an understanding of the full spectrum of triggers and actions available in FME, empowering you to enhance your workspaces for efficient automation.
We’ll kick things off by showcasing the most commonly used event-based triggers, introducing you to various automation workflows like manual triggers, schedules, directory watchers, and more. Plus, see how these elements play out in real scenarios.
Whether you’re tweaking your current setup or building from the ground up, this session will arm you with the tools and insights needed to transform your FME usage into a powerhouse of productivity. Join us to discover effective strategies that simplify complex processes, enhancing your productivity and transforming your data management practices with FME. Let’s turn complexity into clarity and make your workspaces work wonders!
Threats to mobile devices are more prevalent and increasing in scope and complexity. Users of mobile devices desire to take full advantage of the features
available on those devices, but many of the features provide convenience and capability but sacrifice security. This best practices guide outlines steps the users can take to better protect personal devices and information.
Dr. Sean Tan, Head of Data Science, Changi Airport Group
Discover how Changi Airport Group (CAG) leverages graph technologies and generative AI to revolutionize their search capabilities. This session delves into the unique search needs of CAG’s diverse passengers and customers, showcasing how graph data structures enhance the accuracy and relevance of AI-generated search results, mitigating the risk of “hallucinations” and improving the overall customer journey.
GraphRAG is All You need? LLM & Knowledge GraphGuy Korland
Guy Korland, CEO and Co-founder of FalkorDB, will review two articles on the integration of language models with knowledge graphs.
1. Unifying Large Language Models and Knowledge Graphs: A Roadmap.
https://arxiv.org/abs/2306.08302
2. Microsoft Research's GraphRAG paper and a review paper on various uses of knowledge graphs:
https://www.microsoft.com/en-us/research/blog/graphrag-unlocking-llm-discovery-on-narrative-private-data/
Observability Concepts EVERY Developer Should Know -- DeveloperWeek Europe.pdfPaige Cruz
Monitoring and observability aren’t traditionally found in software curriculums and many of us cobble this knowledge together from whatever vendor or ecosystem we were first introduced to and whatever is a part of your current company’s observability stack.
While the dev and ops silo continues to crumble….many organizations still relegate monitoring & observability as the purview of ops, infra and SRE teams. This is a mistake - achieving a highly observable system requires collaboration up and down the stack.
I, a former op, would like to extend an invitation to all application developers to join the observability party will share these foundational concepts to build on:
Removing Uninteresting Bytes in Software FuzzingAftab Hussain
Imagine a world where software fuzzing, the process of mutating bytes in test seeds to uncover hidden and erroneous program behaviors, becomes faster and more effective. A lot depends on the initial seeds, which can significantly dictate the trajectory of a fuzzing campaign, particularly in terms of how long it takes to uncover interesting behaviour in your code. We introduce DIAR, a technique designed to speedup fuzzing campaigns by pinpointing and eliminating those uninteresting bytes in the seeds. Picture this: instead of wasting valuable resources on meaningless mutations in large, bloated seeds, DIAR removes the unnecessary bytes, streamlining the entire process.
In this work, we equipped AFL, a popular fuzzer, with DIAR and examined two critical Linux libraries -- Libxml's xmllint, a tool for parsing xml documents, and Binutil's readelf, an essential debugging and security analysis command-line tool used to display detailed information about ELF (Executable and Linkable Format). Our preliminary results show that AFL+DIAR does not only discover new paths more quickly but also achieves higher coverage overall. This work thus showcases how starting with lean and optimized seeds can lead to faster, more comprehensive fuzzing campaigns -- and DIAR helps you find such seeds.
- These are slides of the talk given at IEEE International Conference on Software Testing Verification and Validation Workshop, ICSTW 2022.
Sudheer Mechineni, Head of Application Frameworks, Standard Chartered Bank
Discover how Standard Chartered Bank harnessed the power of Neo4j to transform complex data access challenges into a dynamic, scalable graph database solution. This keynote will cover their journey from initial adoption to deploying a fully automated, enterprise-grade causal cluster, highlighting key strategies for modelling organisational changes and ensuring robust disaster recovery. Learn how these innovations have not only enhanced Standard Chartered Bank’s data infrastructure but also positioned them as pioneers in the banking sector’s adoption of graph technology.
LF Energy Webinar: Electrical Grid Modelling and Simulation Through PowSyBl -...DanBrown980551
Do you want to learn how to model and simulate an electrical network from scratch in under an hour?
Then welcome to this PowSyBl workshop, hosted by Rte, the French Transmission System Operator (TSO)!
During the webinar, you will discover the PowSyBl ecosystem as well as handle and study an electrical network through an interactive Python notebook.
PowSyBl is an open source project hosted by LF Energy, which offers a comprehensive set of features for electrical grid modelling and simulation. Among other advanced features, PowSyBl provides:
- A fully editable and extendable library for grid component modelling;
- Visualization tools to display your network;
- Grid simulation tools, such as power flows, security analyses (with or without remedial actions) and sensitivity analyses;
The framework is mostly written in Java, with a Python binding so that Python developers can access PowSyBl functionalities as well.
What you will learn during the webinar:
- For beginners: discover PowSyBl's functionalities through a quick general presentation and the notebook, without needing any expert coding skills;
- For advanced developers: master the skills to efficiently apply PowSyBl functionalities to your real-world scenarios.
UiPath Test Automation using UiPath Test Suite series, part 4DianaGray10
Welcome to UiPath Test Automation using UiPath Test Suite series part 4. In this session, we will cover Test Manager overview along with SAP heatmap.
The UiPath Test Manager overview with SAP heatmap webinar offers a concise yet comprehensive exploration of the role of a Test Manager within SAP environments, coupled with the utilization of heatmaps for effective testing strategies.
Participants will gain insights into the responsibilities, challenges, and best practices associated with test management in SAP projects. Additionally, the webinar delves into the significance of heatmaps as a visual aid for identifying testing priorities, areas of risk, and resource allocation within SAP landscapes. Through this session, attendees can expect to enhance their understanding of test management principles while learning practical approaches to optimize testing processes in SAP environments using heatmap visualization techniques
What will you get from this session?
1. Insights into SAP testing best practices
2. Heatmap utilization for testing
3. Optimization of testing processes
4. Demo
Topics covered:
Execution from the test manager
Orchestrator execution result
Defect reporting
SAP heatmap example with demo
Speaker:
Deepak Rai, Automation Practice Lead, Boundaryless Group and UiPath MVP
Epistemic Interaction - tuning interfaces to provide information for AI supportAlan Dix
Paper presented at SYNERGY workshop at AVI 2024, Genoa, Italy. 3rd June 2024
https://alandix.com/academic/papers/synergy2024-epistemic/
As machine learning integrates deeper into human-computer interactions, the concept of epistemic interaction emerges, aiming to refine these interactions to enhance system adaptability. This approach encourages minor, intentional adjustments in user behaviour to enrich the data available for system learning. This paper introduces epistemic interaction within the context of human-system communication, illustrating how deliberate interaction design can improve system understanding and adaptation. Through concrete examples, we demonstrate the potential of epistemic interaction to significantly advance human-computer interaction by leveraging intuitive human communication strategies to inform system design and functionality, offering a novel pathway for enriching user-system engagements.
Epistemic Interaction - tuning interfaces to provide information for AI support
Siemens room stat instructions
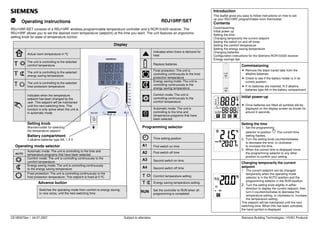
1. CE1B3072en / 04.07.2007 Subject to alteration Siemens Building Technologies / HVAC Products
Operating instructions RDJ10RF/SET
RDJ10RF/SET consists of a RDJ10RF wireless programmable temperature controller and a RCR10/433 receiver. The
RDJ10RF allows you to set the desired room temperature (setpoint) at the time you want. The unit features an ergonomic
setting knob for ease of temperature control.
Display
Actual room temperature in ºC
Indicates when there is demand for
heat
The unit is controlling to the selected
comfort temperature Replace batteries
The unit is controlling to the selected
energy saving temperature
Frost protection: The unit is
controlling continuously to the frost
protection temperature
The unit is controlling to the selected
frost protection temperature
Energy saving mode: The unit is
controlling continuously to the
energy saving temperature
Comfort mode: The unit is
controlling continuously to the
comfort temperature
Indicates when the temperature
setpoint has been changed by the
user. This setpoint will be maintained
until the next switching time. This
function is only active when the unit is
in automatic mode.
Automatic mode: The unit is
controlling to the time and
temperature programs that have
been selected
Setting knob
Warmer/colder for selecting
the temperature setpoint
Programming selector
Battery compartment
2 alkaline batteries type AA, 1.5 V Time setting position
Operating mode selector A1 First switch on time
Automatic mode: The unit is controlling to the time and
temperature programs that have been selected
A2 First switch off time
Comfort mode: The unit is controlling continuously to the
comfort temperature
A3 Second switch on time
Energy saving mode: The unit is controlling continuously
to the energy saving temperature A4 Second switch off time
Frost protection: The unit is controlling continuously to the
frost protection temperature. This setpoint is fixed at 5 ºC Comfort temperature setting
Advance button Energy saving temperature setting
Switches the operating mode from comfort to energy saving,
or vice versa, until the next switching time RUN Set the controller to RUN when all
programming is completed
Introduction
This leaflet gives you easy to follow instructions on how to set-
up your RDJ10RF programmable room thermostat.
Contents
Commissioning
Initial power up
Setting the time
Changing temporarily the current setpoint
Setting the switch on and off times
Setting the comfort temperature
Setting the energy saving temperature
Changing batteries
Configuration instructions for the Siemens RCR10/433 receiver
Energy savings tips
Commissioning
• Remove the black transit tabs from the
alkaline batteries.
• Check to see if the battery holder is in its
correct position.
• If no batteries are inserted, fit 2 alkaline
batteries type AA in the battery compartment.
Initial power-up
• Once batteries are fitted all symbols will be
displayed on the display screen as shown for
around 2 seconds.
Setting the time
1. Set the programming
selector to position The current time
setting flashes.
2. Turn the setting knob counterclockwise
to decrease the time, or clockwise
to increase the time.
3. When the correct time is displayed move
the programming selector to any other
position to confirm your setting.
Changing temporarily the current
setpoint
1. The current setpoint can be changed
temporarily when the operating mode
selector is in the AUTO position and the
programming selector in the RUN position.
2. Turn the setting knob slightly in either
direction to display the current setpoint, then
turn it counterclockwise to decrease the
temperature setting, or clockwise to increase
the temperature setting.
This setpoint will be maintained until the next
switching time. When this has been activated,
the hand symbol is displayed.
2. CE1B3072en / 04.07.2007 Subject to alteration Siemens Building Technologies / HVAC Products
Setting the first switch on time
1. Set the programming selector to position A1. The setting for the first switch on
time flashes.
2. Turn the setting knob counterclockwise to decrease the time, or clockwise to
increase the time.
3. When the required switch on time is displayed, move the programming selector
to any other position to confirm your setting.
Setting the first switch off time
1. Set the programming selector to position A2. The setting for the first switch off
time flashes.
2. Turn the setting knob counterclockwise to decrease the time, or clockwise to
increase the time.
3. When the required switch off time is displayed, move the programming selector
to any other position to confirm your setting.
Setting the second switch on time
1. Set the programming selector to position A3. The setting for the second switch
on time flashes.
2. Turn the setting knob counterclockwise to decrease the time, or clockwise to
increase the time.
3. When the required switch on time is displayed, move the programming selector
to any other position to confirm your setting.
Setting the second switch off time
1. Set the programming selector to position A4. The setting for the second switch
off time flashes.
2. Turn the setting knob counterclockwise to decrease the time, or clockwise to
increase the time.
3. When the required switch off time is displayed, move the programming selector
to any other position to confirm your setting.
NOTE
The switch on and off times are interrelated. When trying to set a switching
time to a time after the subsequent switching time, the latter time will
automatically be pushed forward (or backward).
Setting the comfort temperature
1. Set the programming selector to position .
2. The setting for the current comfort temperature flashes.
3. Turn the setting knob counterclockwise to decrease the temperature setting, or
clockwise to increase the temperature setting.
4. When the required comfort temperature is displayed, move the programming
selector to any other position to confirm your setting.
Setting the energy saving temperature
1. Set the programming selector to position The setting for the current
energy saving temperature flashes.
2. Turn the setting knob counterclockwise to decrease the temperature setting,
or clockwise to increase the temperature setting.
3. When the required energy saving temperature is displayed, move the
programming selector to any other position to confirm your setting.
Changing
the batteries
1. Get 2 new alkaline batteries type AA, 1.5 V.
2. Within 1 minute: Remove the battery holder, then the batteries, insert the new
batteries and replace the battery holder.
Make certain the old batteries are disposed of properly, in compliance with
environmental requirements.
Front View Receiver
LED Signal Indicator LED Relay Indicator
Orange LED indicates relay is on.
When the LED flashes green
there is a good signal.
When the LED flashes red there
is no signal. SET Button
Pressing this button puts the receiver into
learn mode for learning a transmitter.
RESET Button
Pressing this button will erase all
transmitter codes.
Rear View Room Unit
Learn Button TEST Button
Release learn telegram Used to test transmission.
Configuration instructions for the Siemens RCR10/433 receiver
1. Press and release the SET button. This puts the receiver into learn mode.
2. Press and release the LEARN button on the back of the transmitter.
3. A good signal is indicated by a green flashing LED. No signal is indicated by a red flashing LED.
4. To test the transmission, press the TEST button on the transmitter. This will switch the relay on in
the receiver irrespective of temperature. The RF TEST symbol appears on the thermostat display.
5. An orange LED indicates that the relay is on.
Energy saving tips without sacrificing comfort
● Never allow room temperatures to exceed 21˚C.
● Air out rooms for short periods of time only, but properly, with the windows wide open.
NOTE: Pressing the RESET button will erase all ID codes in the receiver.
The set-up procedure has to be repeated to regain communication.