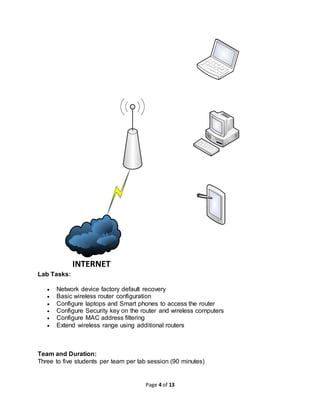
SlideShare a Scribd company logo
School of Engineering Technology and Applied Science
Department of Information and Communication Engineering
Technology
Computer Systems and Network
Friday, April 24, 2015
Workshop on Setting up a Wireless/WiFi Network
Instructor: Ali Nezhad
Page 2 of 13
Computer Systems and Networks Programs
Centennial College
 Computer and Communication Networks Bachelor Degree (CCN)
 Computer Systems Technology – Networking (CSTyN)
 Computer Systems Technician – Networking (CSTN)
 Computer Repair And Maintenance Certificate (CRAM)
What makes CentennialDifferent…?
 Accredited Programs
o Canadian Technology Accreditation Board (CCTT/CTAB)
 Co-op
 Hands-on
 State-of-the-Art Labs
 Full Spectrum of Programs
Program Coordinator:
Dr. Ali Al-Rubaie
(416) 289-5000 ext. 3434
aalrubaie@centennialcollege.ca
Page 3 of 13
Objectives:
Learn how to create/set up a wireless network at home/school so that you can use your
desktop/laptop/smart phone to access the Internet remotely and securely.
Network Topology
We find Wireless/WiFi networks everywhere; at schools, hospitals, Tim Hortons and
homes. To build a WiFi network, all that we need is a Wireless Router/Access Point
(AP), which is normally connected to the Internet through one of the Internet Service
Providers like Bell or Rogers. To be able to connect to the Wireless Router, user
devices, like PC, laptop, tablet PC and Smart phones, should be equipped with a
wireless/WiFi interface. The topology of this network is shown below:
Page 4 of 13
INTERNET
Lab Tasks:
 Network device factory default recovery
 Basic wireless router configuration
 Configure laptops and Smart phones to access the router
 Configure Security key on the router and wireless computers
 Configure MAC address filtering
 Extend wireless range using additional routers
Team and Duration:
Three to five students per team per lab session (90 minutes)
Page 5 of 13
Introduction to Computer Addressing:
1. MAC (Medium Access Control) Address
 Physical or Hardware Address
 Each purchased PC, laptop, tablet PC or Smart Phone has its own
Unique and Permanent MAC address
 Has Local Significance only; can be used to communicate only with
other users in the same local network.
For example, each Centennial student has a unique student no. which is
recognized only inside Centennial and does not have any meaning for
your Family Doctor, your bank or Canada revenue agency.
2. IP (Internet Protocol) Address
 Logical, or Software, Address
 A Unique and Temporal Address assigned to your device when you join
a network like School network, Tim Hortons network, network at home,
…etc. It will be taken away from you when you leave the School, Tim
Hortons or Home.
 Has Global Significance; can be used to communicate with any user on
the Internet.
For Example, the SIN is Unique and has a Significance on the National
level; it is recognized all over Canada, not only in the School, the Family
Doctor office or your bank branch.
Lab Procedure:
A. Basic Wireless Setup
1. Connect the PC to any of the four Ethernet ports at the back panel of the Wireless Router Linksys
WRT120N router (as shown in the figure below) using one Ethernet (UTP) cable. The Laptop and
Smart Phone will be used to join the Wireless network
Page 6 of 13
Wireless Laptop/Smart Phone Linksys WRT120N Wired PC
2. Power on wireless router Linksys WRT120N, press the Reset button for over 2 seconds. Then,
your wireless router will have factory default settings. The default password is recovered (default
password: admin, no username)
3. After connecting your PC to any of wireless router’s four ports, check if your PC has retrieved IP
address from the router by the following steps:
a. Click Windows Start button, then key in “cmd” command in “Search programs and files”
field. You will see the following Window:
b. In the command line, key in “ipconfig” command to verify your IP address. Do you have
192.168.1.X IP address in the command output (X is a value in the range 101 to 140)? If
yes, move on to the next step. If not, repeat step 1 and check again.
4. Start your PC’s Browser (IE, Firefox, or Chrome), key in 192.168.1.1 in the Brower’s Web link
field.
Page 7 of 13
5. You will see Linksys WRT120N authentication page. Key in password as admin, leave username
blank.
6. Now, you should be able to see Linksys WRT120N graphic interface as show below.
Congratulations, you can now configure the router for your own wireless network establishment.
7. Click “Wireless” option on the left top field. You can now see the following interface.
Page 8 of 13
Check "Manual" in "Configuration View", then you will see:
Key in a new name in Network Name (SSID) field, list the name here: __________(for example,
funnet, each group should have a different name).
Make sure that the option “SSID Broadcast” is set to Enabled and then click "Save Settings".
Note: In the last part of this workshop, every two groups will be paired and perform an
experiment jointly. It is recommended that if one group names their network funnet the peer group
name theirs funnet-extender.
B. Check the Wireless Connection
8. Now, let’s work on the Laptop and learn how to join the wireless network that you just set:
a. Click the wireless network icon, shown below, at the bottom-right corner of the screen
and read available networks.
Page 9 of 13
b. Select your network with the wireless network name you set in step 4 (SSID name), if you
do not find it then click Refresh Network List. Click Connect and You are Connected!
Note how the Wireless Network icon had been changed to indicate that you are
connected.
9. Now, let’s work on the Smart Phone (Samsung) and learn how to join the wireless network that
you just set:
a. Select the Setting group then select Wi-Fi, you will see a list of available WiFi networks.
b. Select your network with the wireless network name you set in step 4 (SSID name), click
Connect. You are Connected!
C. Test Internet connectivity.
At home or in the office, you would have an Internet connection through your ISP (Internet Service
Provider). In the college, we are not allowed to connect your router to the college network for security
reasons. Instead, we will use a local server to emulate the Internet.
Your instructor has already prepared the setup in a way that you can connect to the server
plustwo.setasicet.int by plugging the uplink port of your router into one of the yellow ports behind the
monitors on your desk.
Now, you should be able to connect to the server by starting a browser on your cell phone or the
laptop and typing the server name plustwo.setasicet.int.
D. How about Security?
You may have noticed that at this time anyone can connect to the WiFi network configured in
the previous steps. No password or security constraints have been configured. You definitely do
not want your network to be available to unauthorized users like neighbors or hackers; they will
share your Internet bandwidth which will downgrade the Internet connection speed and could
also be a security and privacy concern.
Page 10 of 13
In the following steps, you will learn how to define some security constraints and configure a
secure WiFi network.
10. Click "Wireless Security", you will note that Security is disabled by default. Pull down “Security
Mode”:
There are different Security modes listed there and we will select "WPA Personal" in this lab.
After selecting this mode, you may get the following message:
Click OK.
Key in Passphrase (8-63 characters long): ___________, this is a Password or Access Key that you will
have to provide in order to connect to the WiFi network. For example, you may use myPass123 as a
passphrase.
Click "Save Settings"
Check the Connection:
11. Now, let’s work on the Laptop and learn how to join the secure wireless network that you just set:
a. First, you will notice that your laptop had been disconnected automatically from the network
after configuring the Security mode and Passphrase.
Page 11 of 13
b. Click the network connection icon at the bottom-right corner of the screen and view available
networks.
c. Click on the wireless network with the name you set in step 4 (SSID name), click Connect.
d. You will be asked to provide the Password that you defined in step 10. Type the Password
and You are Connected
12. Now, let’s work on the Samsung Smart Phone and learn how to join the secure wireless network
that you just set:
a. As with the Laptop configuration above, you will notice that your Smart Phone had been
disconnected automatically from the network after configuring the Security mode and
Passphrase.
b. Select the Setting group then select Wi-Fi, you will see a list of available WiFi networks.
c. Select your network. You will be asked to provide a Password. Type in the Password
that you configured in step 10 and You are Connected!
E. One More Step in Building a Secure Network – MAC Filtering
As we mentioned in the Introduction, each PC/Laptop/Smart Phone has a unique MAC address that no
other device can have. So, to make your network more secure, you can define which device has the right
to connect to your network using its MAC address as the device ID. That way, the router will allow ONLY
devices with those MAC addresses and block all other devices.
13. Click "Wireless MAC filter", you will see the following:
14. Click "Enabled" option, you can select either the devices you want to block or those you want to
permit. In most cases we use the later. Check "Permit"
15. You can add the MAC addresses manually. The MAC addresses can be found as follows
a. For Laptop, go to START  Run  cmd ok. Then, type ipconfig/all, scroll to the
Page 12 of 13
Ethernet Adapter Wireless Network Connection and find there the Physical Address
which is the MAC address.
What is your Laptop MAC Address? _______________________________
b. For Smart Phone, go to Settings  Wi-Fi  Advanced and you will find the MAC address
there.
What is your Smart Phone MAC Address? _______________________________
16. Since the Laptop and Smart Phone had been already connected to the Wireless Router, the
Router is aware of their MAC addresses. Click "Wireless Client List" and you will get the devices
MAC addresses. Compare these addresses with the MAC addresses you wrote down above,
they should be exactly the same.
17. Let’s select to save only the Laptop (dell) MAC address by clicking on the corresponding box in
the list, click on Add and then Save Settings.
a. Is the laptop still connected?
b. How about the Smart Phone
F. Range Extension
The coverage area of a wireless router or access point depends on a number of factors such as its
supported standard (.11 a/b/g/n/ac), its antennas and in particular its location. Wireless signals can be
weakened by distance and objects like walls and other obstacles. Even the type of materials used in walls
is important. Therefore, in any wireless network there may be dark spots where the signal levels are low
which means the connection will be either unusable or at least the transmission rate will be low.
To improve the situation a secondary wireless device may be used. There are many names to describe
such a device which may mean slightly different things. Some of these names are signal booster (a.k.a
range extender), router, repeater, bridge or an access point.
An economical solution may exist if you have a second wireless router which may not be in use at the
moment such as an older model which you retired after buying your new unit. This is possible by
connecting the second router in one of several possible configurations to the first router.
Although the two routers may be connected wirelessly (which may be desirable), for the sake of simplicity,
in this lab we will connect them using an Ethernet cable. For a wireless configuration, the firmware of the
second router (if even amongst the supported models; at this time it seems that our WRT120n routers are
not supported.) must usually be upgraded using software such as DD-WRT, Tomato or OpenWRT.
The following figure depicts the scenario for the next experiment. In this setup, the second router will also
work as an actual router not just a wireless access point or a repeater.
Page 13 of 13
18. Team up with the group sitting next to you. If one group has the funnet network, the other group will
own the funnet-extender.
19. Disconnect the Internet port of the funnet-extender router from the ISP (yellow jack behind the
monitor) and connect it to one of the LAN ports of the funnet using a straight through cable.
20. In order to simulate a realistic situation, you may wrap the funnet router in some aluminum foil. In
that case, its signal should be considerably weakened so that your devices may not be able to
successfully connect to the server using that router anymore (you may need to clear your browser
cache). Now, try connecting your devices to funnet-extender and try loading the same server web
page or pinging it again. Were you successful?
21. Free practice and document for future reference.
Family Room Basement
ISP
funnetfunnet-extender
Internet
Port
Internet
Port
LAN
Port

More Related Content

Similar to Setting up a WiFi Network v3

Maxis Fibre Internet FTTH Self Help Guide
Maxis Fibre Internet FTTH Self Help GuideMaxis Fibre Internet FTTH Self Help Guide
Maxis Fibre Internet FTTH Self Help Guide
Maxis Fibre
 
Home Network Instructions
Home Network InstructionsHome Network Instructions
Home Network Instructions
jruiz1986
 
Manual repetidor wi fi
Manual repetidor wi fiManual repetidor wi fi
Manual repetidor wi fi
Patrícia Nascimento
 
Laptop to mobile y5
Laptop to mobile y5Laptop to mobile y5
Laptop to mobile y5
Pavithra Kattem
 
Network Troubleshooting
Network TroubleshootingNetwork Troubleshooting
Network Troubleshooting
Joy Sarker
 
CSS Module 8 - Configuring the Wireless Access Point
CSS Module 8 - Configuring the Wireless Access PointCSS Module 8 - Configuring the Wireless Access Point
CSS Module 8 - Configuring the Wireless Access Point
kenjifritz
 
Technical Report
Technical ReportTechnical Report
Technical Report
stuartsearles
 
Vo ip guide
Vo ip guideVo ip guide
Vo ip guide
ACP
 
2.1.1.5 Packet Tracer - Create a Simple Network Using Packet Tracer (3).pdf
2.1.1.5 Packet Tracer - Create a Simple  Network Using Packet Tracer (3).pdf2.1.1.5 Packet Tracer - Create a Simple  Network Using Packet Tracer (3).pdf
2.1.1.5 Packet Tracer - Create a Simple Network Using Packet Tracer (3).pdf
HaseebAli795005
 
Get Your Windows 8 Device Connected with the Right Wi.pdf
Get Your Windows 8 Device Connected with the Right Wi.pdfGet Your Windows 8 Device Connected with the Right Wi.pdf
Get Your Windows 8 Device Connected with the Right Wi.pdf
Get Up To Dated
 
Cscu module 07 securing network connections
Cscu module 07 securing network connectionsCscu module 07 securing network connections
Cscu module 07 securing network connections
Alireza Ghahrood
 
Wireless security
Wireless securityWireless security
Wireless security
Nguyen Minh Thu
 
Wifi Training
Wifi TrainingWifi Training
Wifi Training
rosedale
 
Linksys router troubleshooting
Linksys router troubleshootingLinksys router troubleshooting
Linksys router setup
Linksys router setupLinksys router setup
Adslconfiguration 100407000953-phpapp01
Adslconfiguration 100407000953-phpapp01Adslconfiguration 100407000953-phpapp01
Adslconfiguration 100407000953-phpapp01
sasdasdadasd
 
How to setup a wireless network router
How to setup a wireless network routerHow to setup a wireless network router
How to setup a wireless network router
Anthonysshareslide
 
Qig di 604
Qig di 604Qig di 604
Qig di 604
Gilberto Batista
 
Wndr4000 igpm 08_nov2010
Wndr4000 igpm 08_nov2010Wndr4000 igpm 08_nov2010
Wndr4000 igpm 08_nov2010
Sant2009
 
Pace IT - Client Networking (Part 2)
Pace IT - Client Networking (Part 2)Pace IT - Client Networking (Part 2)
Pace IT - Client Networking (Part 2)
Pace IT at Edmonds Community College
 

Similar to Setting up a WiFi Network v3 (20)

Maxis Fibre Internet FTTH Self Help Guide
Maxis Fibre Internet FTTH Self Help GuideMaxis Fibre Internet FTTH Self Help Guide
Maxis Fibre Internet FTTH Self Help Guide
 
Home Network Instructions
Home Network InstructionsHome Network Instructions
Home Network Instructions
 
Manual repetidor wi fi
Manual repetidor wi fiManual repetidor wi fi
Manual repetidor wi fi
 
Laptop to mobile y5
Laptop to mobile y5Laptop to mobile y5
Laptop to mobile y5
 
Network Troubleshooting
Network TroubleshootingNetwork Troubleshooting
Network Troubleshooting
 
CSS Module 8 - Configuring the Wireless Access Point
CSS Module 8 - Configuring the Wireless Access PointCSS Module 8 - Configuring the Wireless Access Point
CSS Module 8 - Configuring the Wireless Access Point
 
Technical Report
Technical ReportTechnical Report
Technical Report
 
Vo ip guide
Vo ip guideVo ip guide
Vo ip guide
 
2.1.1.5 Packet Tracer - Create a Simple Network Using Packet Tracer (3).pdf
2.1.1.5 Packet Tracer - Create a Simple  Network Using Packet Tracer (3).pdf2.1.1.5 Packet Tracer - Create a Simple  Network Using Packet Tracer (3).pdf
2.1.1.5 Packet Tracer - Create a Simple Network Using Packet Tracer (3).pdf
 
Get Your Windows 8 Device Connected with the Right Wi.pdf
Get Your Windows 8 Device Connected with the Right Wi.pdfGet Your Windows 8 Device Connected with the Right Wi.pdf
Get Your Windows 8 Device Connected with the Right Wi.pdf
 
Cscu module 07 securing network connections
Cscu module 07 securing network connectionsCscu module 07 securing network connections
Cscu module 07 securing network connections
 
Wireless security
Wireless securityWireless security
Wireless security
 
Wifi Training
Wifi TrainingWifi Training
Wifi Training
 
Linksys router troubleshooting
Linksys router troubleshootingLinksys router troubleshooting
Linksys router troubleshooting
 
Linksys router setup
Linksys router setupLinksys router setup
Linksys router setup
 
Adslconfiguration 100407000953-phpapp01
Adslconfiguration 100407000953-phpapp01Adslconfiguration 100407000953-phpapp01
Adslconfiguration 100407000953-phpapp01
 
How to setup a wireless network router
How to setup a wireless network routerHow to setup a wireless network router
How to setup a wireless network router
 
Qig di 604
Qig di 604Qig di 604
Qig di 604
 
Wndr4000 igpm 08_nov2010
Wndr4000 igpm 08_nov2010Wndr4000 igpm 08_nov2010
Wndr4000 igpm 08_nov2010
 
Pace IT - Client Networking (Part 2)
Pace IT - Client Networking (Part 2)Pace IT - Client Networking (Part 2)
Pace IT - Client Networking (Part 2)
 

More from Ali Nezhad

Network programming using python
Network programming using pythonNetwork programming using python
Network programming using python
Ali Nezhad
 
Internet of things
Internet of thingsInternet of things
Internet of things
Ali Nezhad
 
converged Networks
converged Networksconverged Networks
converged Networks
Ali Nezhad
 
cnet311 q-bank
cnet311 q-bankcnet311 q-bank
cnet311 q-bank
Ali Nezhad
 
IP Addressing and subnetting
IP Addressing and subnettingIP Addressing and subnetting
IP Addressing and subnetting
Ali Nezhad
 
adhoc network workshop
adhoc network workshopadhoc network workshop
adhoc network workshop
Ali Nezhad
 

More from Ali Nezhad (6)

Network programming using python
Network programming using pythonNetwork programming using python
Network programming using python
 
Internet of things
Internet of thingsInternet of things
Internet of things
 
converged Networks
converged Networksconverged Networks
converged Networks
 
cnet311 q-bank
cnet311 q-bankcnet311 q-bank
cnet311 q-bank
 
IP Addressing and subnetting
IP Addressing and subnettingIP Addressing and subnetting
IP Addressing and subnetting
 
adhoc network workshop
adhoc network workshopadhoc network workshop
adhoc network workshop
 

Setting up a WiFi Network v3

  • 1. School of Engineering Technology and Applied Science Department of Information and Communication Engineering Technology Computer Systems and Network Friday, April 24, 2015 Workshop on Setting up a Wireless/WiFi Network Instructor: Ali Nezhad
  • 2. Page 2 of 13 Computer Systems and Networks Programs Centennial College  Computer and Communication Networks Bachelor Degree (CCN)  Computer Systems Technology – Networking (CSTyN)  Computer Systems Technician – Networking (CSTN)  Computer Repair And Maintenance Certificate (CRAM) What makes CentennialDifferent…?  Accredited Programs o Canadian Technology Accreditation Board (CCTT/CTAB)  Co-op  Hands-on  State-of-the-Art Labs  Full Spectrum of Programs Program Coordinator: Dr. Ali Al-Rubaie (416) 289-5000 ext. 3434 aalrubaie@centennialcollege.ca
  • 3. Page 3 of 13 Objectives: Learn how to create/set up a wireless network at home/school so that you can use your desktop/laptop/smart phone to access the Internet remotely and securely. Network Topology We find Wireless/WiFi networks everywhere; at schools, hospitals, Tim Hortons and homes. To build a WiFi network, all that we need is a Wireless Router/Access Point (AP), which is normally connected to the Internet through one of the Internet Service Providers like Bell or Rogers. To be able to connect to the Wireless Router, user devices, like PC, laptop, tablet PC and Smart phones, should be equipped with a wireless/WiFi interface. The topology of this network is shown below:
  • 4. Page 4 of 13 INTERNET Lab Tasks:  Network device factory default recovery  Basic wireless router configuration  Configure laptops and Smart phones to access the router  Configure Security key on the router and wireless computers  Configure MAC address filtering  Extend wireless range using additional routers Team and Duration: Three to five students per team per lab session (90 minutes)
  • 5. Page 5 of 13 Introduction to Computer Addressing: 1. MAC (Medium Access Control) Address  Physical or Hardware Address  Each purchased PC, laptop, tablet PC or Smart Phone has its own Unique and Permanent MAC address  Has Local Significance only; can be used to communicate only with other users in the same local network. For example, each Centennial student has a unique student no. which is recognized only inside Centennial and does not have any meaning for your Family Doctor, your bank or Canada revenue agency. 2. IP (Internet Protocol) Address  Logical, or Software, Address  A Unique and Temporal Address assigned to your device when you join a network like School network, Tim Hortons network, network at home, …etc. It will be taken away from you when you leave the School, Tim Hortons or Home.  Has Global Significance; can be used to communicate with any user on the Internet. For Example, the SIN is Unique and has a Significance on the National level; it is recognized all over Canada, not only in the School, the Family Doctor office or your bank branch. Lab Procedure: A. Basic Wireless Setup 1. Connect the PC to any of the four Ethernet ports at the back panel of the Wireless Router Linksys WRT120N router (as shown in the figure below) using one Ethernet (UTP) cable. The Laptop and Smart Phone will be used to join the Wireless network
  • 6. Page 6 of 13 Wireless Laptop/Smart Phone Linksys WRT120N Wired PC 2. Power on wireless router Linksys WRT120N, press the Reset button for over 2 seconds. Then, your wireless router will have factory default settings. The default password is recovered (default password: admin, no username) 3. After connecting your PC to any of wireless router’s four ports, check if your PC has retrieved IP address from the router by the following steps: a. Click Windows Start button, then key in “cmd” command in “Search programs and files” field. You will see the following Window: b. In the command line, key in “ipconfig” command to verify your IP address. Do you have 192.168.1.X IP address in the command output (X is a value in the range 101 to 140)? If yes, move on to the next step. If not, repeat step 1 and check again. 4. Start your PC’s Browser (IE, Firefox, or Chrome), key in 192.168.1.1 in the Brower’s Web link field.
  • 7. Page 7 of 13 5. You will see Linksys WRT120N authentication page. Key in password as admin, leave username blank. 6. Now, you should be able to see Linksys WRT120N graphic interface as show below. Congratulations, you can now configure the router for your own wireless network establishment. 7. Click “Wireless” option on the left top field. You can now see the following interface.
  • 8. Page 8 of 13 Check "Manual" in "Configuration View", then you will see: Key in a new name in Network Name (SSID) field, list the name here: __________(for example, funnet, each group should have a different name). Make sure that the option “SSID Broadcast” is set to Enabled and then click "Save Settings". Note: In the last part of this workshop, every two groups will be paired and perform an experiment jointly. It is recommended that if one group names their network funnet the peer group name theirs funnet-extender. B. Check the Wireless Connection 8. Now, let’s work on the Laptop and learn how to join the wireless network that you just set: a. Click the wireless network icon, shown below, at the bottom-right corner of the screen and read available networks.
  • 9. Page 9 of 13 b. Select your network with the wireless network name you set in step 4 (SSID name), if you do not find it then click Refresh Network List. Click Connect and You are Connected! Note how the Wireless Network icon had been changed to indicate that you are connected. 9. Now, let’s work on the Smart Phone (Samsung) and learn how to join the wireless network that you just set: a. Select the Setting group then select Wi-Fi, you will see a list of available WiFi networks. b. Select your network with the wireless network name you set in step 4 (SSID name), click Connect. You are Connected! C. Test Internet connectivity. At home or in the office, you would have an Internet connection through your ISP (Internet Service Provider). In the college, we are not allowed to connect your router to the college network for security reasons. Instead, we will use a local server to emulate the Internet. Your instructor has already prepared the setup in a way that you can connect to the server plustwo.setasicet.int by plugging the uplink port of your router into one of the yellow ports behind the monitors on your desk. Now, you should be able to connect to the server by starting a browser on your cell phone or the laptop and typing the server name plustwo.setasicet.int. D. How about Security? You may have noticed that at this time anyone can connect to the WiFi network configured in the previous steps. No password or security constraints have been configured. You definitely do not want your network to be available to unauthorized users like neighbors or hackers; they will share your Internet bandwidth which will downgrade the Internet connection speed and could also be a security and privacy concern.
  • 10. Page 10 of 13 In the following steps, you will learn how to define some security constraints and configure a secure WiFi network. 10. Click "Wireless Security", you will note that Security is disabled by default. Pull down “Security Mode”: There are different Security modes listed there and we will select "WPA Personal" in this lab. After selecting this mode, you may get the following message: Click OK. Key in Passphrase (8-63 characters long): ___________, this is a Password or Access Key that you will have to provide in order to connect to the WiFi network. For example, you may use myPass123 as a passphrase. Click "Save Settings" Check the Connection: 11. Now, let’s work on the Laptop and learn how to join the secure wireless network that you just set: a. First, you will notice that your laptop had been disconnected automatically from the network after configuring the Security mode and Passphrase.
  • 11. Page 11 of 13 b. Click the network connection icon at the bottom-right corner of the screen and view available networks. c. Click on the wireless network with the name you set in step 4 (SSID name), click Connect. d. You will be asked to provide the Password that you defined in step 10. Type the Password and You are Connected 12. Now, let’s work on the Samsung Smart Phone and learn how to join the secure wireless network that you just set: a. As with the Laptop configuration above, you will notice that your Smart Phone had been disconnected automatically from the network after configuring the Security mode and Passphrase. b. Select the Setting group then select Wi-Fi, you will see a list of available WiFi networks. c. Select your network. You will be asked to provide a Password. Type in the Password that you configured in step 10 and You are Connected! E. One More Step in Building a Secure Network – MAC Filtering As we mentioned in the Introduction, each PC/Laptop/Smart Phone has a unique MAC address that no other device can have. So, to make your network more secure, you can define which device has the right to connect to your network using its MAC address as the device ID. That way, the router will allow ONLY devices with those MAC addresses and block all other devices. 13. Click "Wireless MAC filter", you will see the following: 14. Click "Enabled" option, you can select either the devices you want to block or those you want to permit. In most cases we use the later. Check "Permit" 15. You can add the MAC addresses manually. The MAC addresses can be found as follows a. For Laptop, go to START  Run  cmd ok. Then, type ipconfig/all, scroll to the
  • 12. Page 12 of 13 Ethernet Adapter Wireless Network Connection and find there the Physical Address which is the MAC address. What is your Laptop MAC Address? _______________________________ b. For Smart Phone, go to Settings  Wi-Fi  Advanced and you will find the MAC address there. What is your Smart Phone MAC Address? _______________________________ 16. Since the Laptop and Smart Phone had been already connected to the Wireless Router, the Router is aware of their MAC addresses. Click "Wireless Client List" and you will get the devices MAC addresses. Compare these addresses with the MAC addresses you wrote down above, they should be exactly the same. 17. Let’s select to save only the Laptop (dell) MAC address by clicking on the corresponding box in the list, click on Add and then Save Settings. a. Is the laptop still connected? b. How about the Smart Phone F. Range Extension The coverage area of a wireless router or access point depends on a number of factors such as its supported standard (.11 a/b/g/n/ac), its antennas and in particular its location. Wireless signals can be weakened by distance and objects like walls and other obstacles. Even the type of materials used in walls is important. Therefore, in any wireless network there may be dark spots where the signal levels are low which means the connection will be either unusable or at least the transmission rate will be low. To improve the situation a secondary wireless device may be used. There are many names to describe such a device which may mean slightly different things. Some of these names are signal booster (a.k.a range extender), router, repeater, bridge or an access point. An economical solution may exist if you have a second wireless router which may not be in use at the moment such as an older model which you retired after buying your new unit. This is possible by connecting the second router in one of several possible configurations to the first router. Although the two routers may be connected wirelessly (which may be desirable), for the sake of simplicity, in this lab we will connect them using an Ethernet cable. For a wireless configuration, the firmware of the second router (if even amongst the supported models; at this time it seems that our WRT120n routers are not supported.) must usually be upgraded using software such as DD-WRT, Tomato or OpenWRT. The following figure depicts the scenario for the next experiment. In this setup, the second router will also work as an actual router not just a wireless access point or a repeater.
  • 13. Page 13 of 13 18. Team up with the group sitting next to you. If one group has the funnet network, the other group will own the funnet-extender. 19. Disconnect the Internet port of the funnet-extender router from the ISP (yellow jack behind the monitor) and connect it to one of the LAN ports of the funnet using a straight through cable. 20. In order to simulate a realistic situation, you may wrap the funnet router in some aluminum foil. In that case, its signal should be considerably weakened so that your devices may not be able to successfully connect to the server using that router anymore (you may need to clear your browser cache). Now, try connecting your devices to funnet-extender and try loading the same server web page or pinging it again. Were you successful? 21. Free practice and document for future reference. Family Room Basement ISP funnetfunnet-extender Internet Port Internet Port LAN Port