
Recommended
More Related Content
What's hot
What's hot (19)
Viewers also liked
Viewers also liked (11)
Similar to Essential SAS Tips
Similar to Essential SAS Tips (20)
Recently uploaded
Recently uploaded (20)
Essential SAS Tips
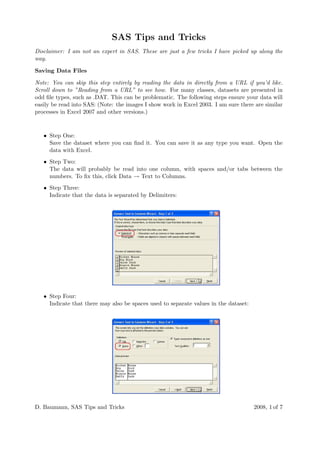
- 1. SAS Tips and Tricks Disclaimer: I am not an expert in SAS. These are just a few tricks I have picked up along the way. Saving Data Files Note: You can skip this step entirely by reading the data in directly from a URL if you’d like. Scroll down to ”Reading from a URL” to see how. For many classes, datasets are presented in odd file types, such as .DAT. This can be problematic. The following steps ensure your data will easily be read into SAS: (Note: the images I show work in Excel 2003. I am sure there are similar processes in Excel 2007 and other versions.) • Step One: Save the dataset where you can find it. You can save it as any type you want. Open the data with Excel. • Step Two: The data will probably be read into one column, with spaces and/or tabs between the numbers. To fix this, click Data → Text to Columns. • Step Three: Indicate that the data is separated by Delimiters: • Step Four: Indicate that there may also be spaces used to separate values in the dataset: D. Baumann, SAS Tips and Tricks 2008, 1 of 7
- 2. • Step Five: Save the Excel file in any format you prefer. I suggest comma-delimited, or .csv. To determine exactly where the file was saved (the full file extension), browse to the file. Once there, right-click and select Properties: The window that appears shows the Location of the saved file: In the following tips and tricks, I simplify this to ’yourfileextension.’ Instead, substitute your full file location and file name such as: C:Documents and SettingsdbaumannDesktopCH01PR19.csv Reading Data into SAS D. Baumann, SAS Tips and Tricks 2008, 2 of 7
- 3. I have always found reading data into SAS to be the hardest part about using SAS. There are essentially three ways to read data into SAS: importing the data, reading the data from a file, and using cards/datalines. 1. Using ’proc import’ This is the point-and-click way to get files into SAS. Below are step-by-step instructions for importing data. At the end, I have included the SAS code which performs the same steps. This set of instructions assumes you have variable names in the first row of your datafile. • Step One: Click File → Import Data • Step Two: Choose which type of file you are importing. See the ’Data Cleaning’ section above for tips. Click ’Next.’ D. Baumann, SAS Tips and Tricks 2008, 3 of 7
- 4. • Step Three: Browse to the file you want to import (or type in the full extension – see ’Data Clean- ing’ for tips). Click ”Next.’ • Step Four: Indicate ’Library’ and ’Member.’ I leave the ’Library’ set to the default ’WORK,’ and name ’Member’ whatever I want to name my dataset. Click ’Next.’ D. Baumann, SAS Tips and Tricks 2008, 4 of 7
- 5. • Step Five: Create SAS Statements. I generally just skip this step. I will include the code which SAS would output below. Click ’Finish.’ The data is now saved in SAS. To take a look at the data, type: proc print data=yourdataname; run; The SAS code that will perform these same steps automatically looks like: proc import datafile=’yourfileextension’ out=test dbms=’Identifier’ replace; run; Replace ’Identifier’ in the code above with one of the following: Type Identifier .csv CSV .txt TAB other DLM 2. Using the ’infile’ command The second method for reading data into SAS is likely the most common. The difficulty most people have with this method is dealing with various delimited files. Let’s assume you named your data ’test’ and you have the full extension for your file (see above). (This can be extended to more than just two variables as well.) The general framework is as follows: data test; infile ’yourfileextension’; input variable1 variable2; proc print data=test; run; The difficulty with most data sets is the delimiter, or the way the file indicates the end of one number and the beginning of another. In most class datasets, this delimiter is a tab. Other common delimiters are spaces and commas. In SAS, the ’data’ step, as above, sets the default delimiter to be a space. D. Baumann, SAS Tips and Tricks 2008, 5 of 7
- 6. To work with a tab delimited file, we need to specify the delimiter. This is done with the dlm command right after your infile file extension: infile ’yourfileextension’ dlm=’09’x; Other common delimiters are as follows: Delimiter Code Tab dlm=’09’x Comma dlm=’,’ Pipe dlm=’|’ 3. Using ’cards’ or ’datalines’ This is probably the easiest method to use for small datasets. Its usefulness decreases with large datasets because all of the data is written directly into the SAS Editor. I prefer to use cards, because I’ve found it can handle class datasets better. The typical code is: data test; input variable1 variable2 variable3 $ ; cards; Insert your data here ; proc print data=test; run; I have included the dollar sign ($) after variable3 which indicates a text variable. Notice that there is a semicolon on the line after the data. When entered correctly, the data will be highlighted in yellow. Most often, for classes, datasets will be formatted nicely, in clean columns for each variable: Variable 1 Variable 2 Variable 3 59 3.46 C 62 4.56 D 94 4.64 B ... ... ... However, sometimes the data isn’t formatted so nicely: 59 3.46 C 62 4.56 D 94 4.64 B ... To account for this, you can add ’@@’ to the end of your input line as follows: input variable1 variable2 variable3 $ @@; This takes groups of numbers together (based on how many variables you have), and con- siders them to be a single observation. You only need to add ’@@,’ no matter how many variables you have in your data. D. Baumann, SAS Tips and Tricks 2008, 6 of 7
- 7. Reading from a URL There is not a lot different between this method and the ’infile’ command above. However, this can save the step of saving the data. The code looks like: filename mydata url ’http://www.yourwebsite.com/datafile.txt’; data a1; infile mydata; input Variable1 Variable2 Variable3; proc print data=a1; run; The text right after ’filename’ in the first line defines the dataset name. ’url’ indicates that the data is on a website which is defined in the ’http:// ... ’ step. Then, the ’infile’ command uses that dataset as the source. The same additional options that were found in the ’infile’ section still apply here. D. Baumann, SAS Tips and Tricks 2008, 7 of 7