Install Metal Face Seal with SAP PartsTM Guide
•
0 likes•172 views

This document provides guidelines for installing mechanical face seals. Key points include: 1. The seal housing and components must be cleaned using an approved solvent like SAP Parts Seal-O-Fix Spray to remove particles. 2. When handling seals, care should be taken not to damage the polished metal faces and O-rings. 3. A dedicated installation tool is used to correctly position the O-ring on the seal ramp and guide the seal into the housing groove, applying gentle pressure.

Recommended
Recommended
More Related Content
What's hot
What's hot (14)
Similar to Install Metal Face Seal with SAP PartsTM Guide
Similar to Install Metal Face Seal with SAP PartsTM Guide (20)
More from sapparts
More from sapparts (20)
Recently uploaded
Recently uploaded (20)
Install Metal Face Seal with SAP PartsTM Guide
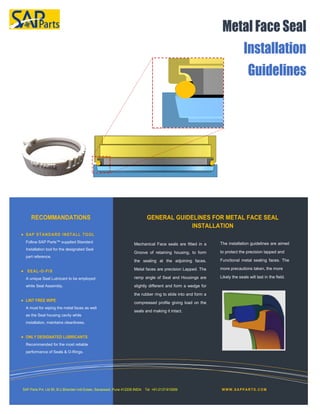
- 1. Follow SAP Parts™ supplied Standard Installation tool for the designated Seal part reference. A unique Seal Lubricant to be employed white Seal Assembly. A must for wiping the metal faces as well as the Seal housing cavity while installation, maintains cleanliness. Recommended for the most reliable performance of Seals & O-Rings. Mechanical Face seals are fitted in a Groove of retaining housing, to form the sealing at the adjoining faces. Metal faces are precision Lapped. The ramp angle of Seal and Housings are slightly different and form a wedge for the rubber ring to slide into and form a compressed profile giving load on the seals and making it intact. The installation guidelines are aimed to protect the precision lapped and Functional metal sealing faces. The more precautions taken, the more Likely the seals will last in the field.
- 2. Seal Housing Preparation: The housing components which contact the rubber O-Rings must be free from foreign particles, like dust, lints etc. before installing the seal. This should be done using lint free wipe and a non-petroleum based solvent especially SAP Parts™ Seal-O-Fix Spray. Also following other approved assembly lubricants may be used following to manufacturer specified seafty guidelines for respective lubricant. Other Approved Assembly Lubricants: • Denaturated alchohol or Isopropyl Alcohol* / Houghto-Grind 60 CT/ Quaker® Solvo Clean 68- RAH (*) All applicable safety and disposal guidelines for flammable liquids must be followed. Note: Do not use Stanosol or any other liquid that leaves an oil film and /or does not evaporate quickly. Metal Face Seal Handling Care: After unpacking from the Box, handle the seals with great care. Do not allow the Polished Metal faces placed inverted on ground or metal surface where they can get damaged during handling. Clear the Oil film on the metal face Seals with a clean wipe. Remove any foreign material from the rubber torics, the Seal ramps and the lips of both seal rings. Important Check: Place the rubber O-Rings on the metal seal ring at the bottom of the seal ring ramp and against the, retaining lip. Steps by Step Seal Installation Guidelines 1. Arrange Right Duo cone Seal, Installation Tool, Seal-O-Fix Spray, Mallet, Lint Free Cloth, etc. as shown below before starting actual seal installation in the housing cavity. 2. Check you are using appropriate tool part number, and design provided by SAP Parts™ for the Seal. Note: – Each seal has different Tool. Check Seal face, O-Ring & housings are clean and free from any mechanical damage, dent etc. 3. Apply Seal-O-Fix on Seal face and clean the Seal using Lint Free Wipe. Ensure the seal face be thoroughly cleaned and no fine particles of dust should remain on it. Employ the spray on the O-Ring circumference, this gives sufficient lubrication for Seal to fit in the cavity of Housing.Do never use Ethanol, Oil or Grease for lubricating the O-Ring. 4. Put the O-Ring on the Seal Ramp and check it is properly placed on the metal ring ramp. Check there is no skewing or twisting of O-Ring, and Hold the O- Ring on the Seal Ramp and engage the Lip of the tool between the gap of O-Ring and seal face inside the circular guide way groove of the Tool. 5. Bring the edges of tool bracket close to each other and hold the seal firmly in the clamp formed. This makes the Seal Guided in the Install Tool. 1. Metal Face Seal 2. Rubber O-Ring 3. Seal Housing 4. Install Tool A typical Mechanical Face Seal installation tool looks like as shown in the image below. Made out of advanced 3-D printing technology, it consists of a circular bracket type polyamide ring with clamping arrangement and lock that holds the seal with O- Ring in the special groove made at the face of tool ring and pushes the O–ring in the housing groove. There are many other versions of designated Seal Installation Tools developed by SAP Parts™ out of special polymers including PTFE, ABS,PU materials using 3 D – Printing and other advance manufacturing technologies , based on the size and seal application requirements. These are the customized tooling solutions provided by SAP Parts™. 2 1 3 4 Check the O-Rings remain straight on the rim and not squeezed or twisted as it may lead to improper installation of the Mechanical seal. SAP Parts - Seal-O-Fix A unique Solution for Seal Installation and Cleaning the Housings. While applying always follow all the safety practices for handling volatile solvents. Do not use any other oil that leaves oil film or do not evaporate. Ensure Parting Line on the O- Ring should be parallel with Seal face.
- 3. SAP PARTS PVT.LTD. 85, B.U.Bhandari Indl.Estate, Sanaswadi, Pune – 412208 INDIA www.sapparts.com ©2018 Installation of Seal inside the Housing Groove: 1. For installation of Seal, arrange a cleaned Seal & cleaned ,wiped housing.Put the Seal on the Housing. 2. Hold the O– Ring in the Fixture and form the tool guide assembly as explained above. 3. Hold the Seal and O-Ring Firmly and see O-Ring is not twisted. Locate the seal & tool on groove opening. 4. Press the fixture with even load on the O- Ring, and experience the O–Ring insertion jerk, inside the housing. Small Rings can be manually fixed, for big rings apply even and gentle pressure around the rim of guide plate using wooden mallet. 5. Below is the correct Final Seal Assembly. Check the Assembly height “H” as shown below at 4 diagonaly opposite positions. The variation should not be more than the specified limit of respective seal assembly. CAUTION The Rubber O-Ring can twist if it is not wet all around during installation or if there are burs and fins on the retaining ramp of housing. Twist , misalignments , and bulges of O—ring will result in seal failure . If Seal is not installed correctly , remove it from housing and repeat the process.Never use Rubber O– Rings with Blow holes/ damages. Never allow Sealing surface be dirty, it should be cleaned well before Assembly. Never try hammering on sealing surface and never use sharp tools to locate O-Rings. DOS Clean the Sealing Surface thoroughly before installation. Use SAP Parts™ Seal – O-Fix Spray or approved lubricants. Carefully check for Sealing edge is free from dust, dirt, hair etc. Always use Only Lint free Wipes/Cloths, Never use tissue Paper or cotton waste. While completing the final assembly of the unit, make sure that both seals are in correct housings together. High impact can scratch or break the seal components. IMPORTANT INSTRUCTIONS Metal Face Seals are precision components made of special cast iron, being very brittle due care must be taken to avoid impacts. Following care to be taken: Do not open the original packaging as long seal assembly preperations are made ready. Be careful to protect the hands as sharp edges may ingure the users, hence use glooves. Protect rubber rings form dust contamination. Ensure the seal housing cavity bore is rounded as sharp edges may cut O- Rings. Protect the functional edge of installation tool from excessive wear and fall down. Put the tool in designated box or holder. Clean the tool it with IPA in regular intervals to maintain the life. H