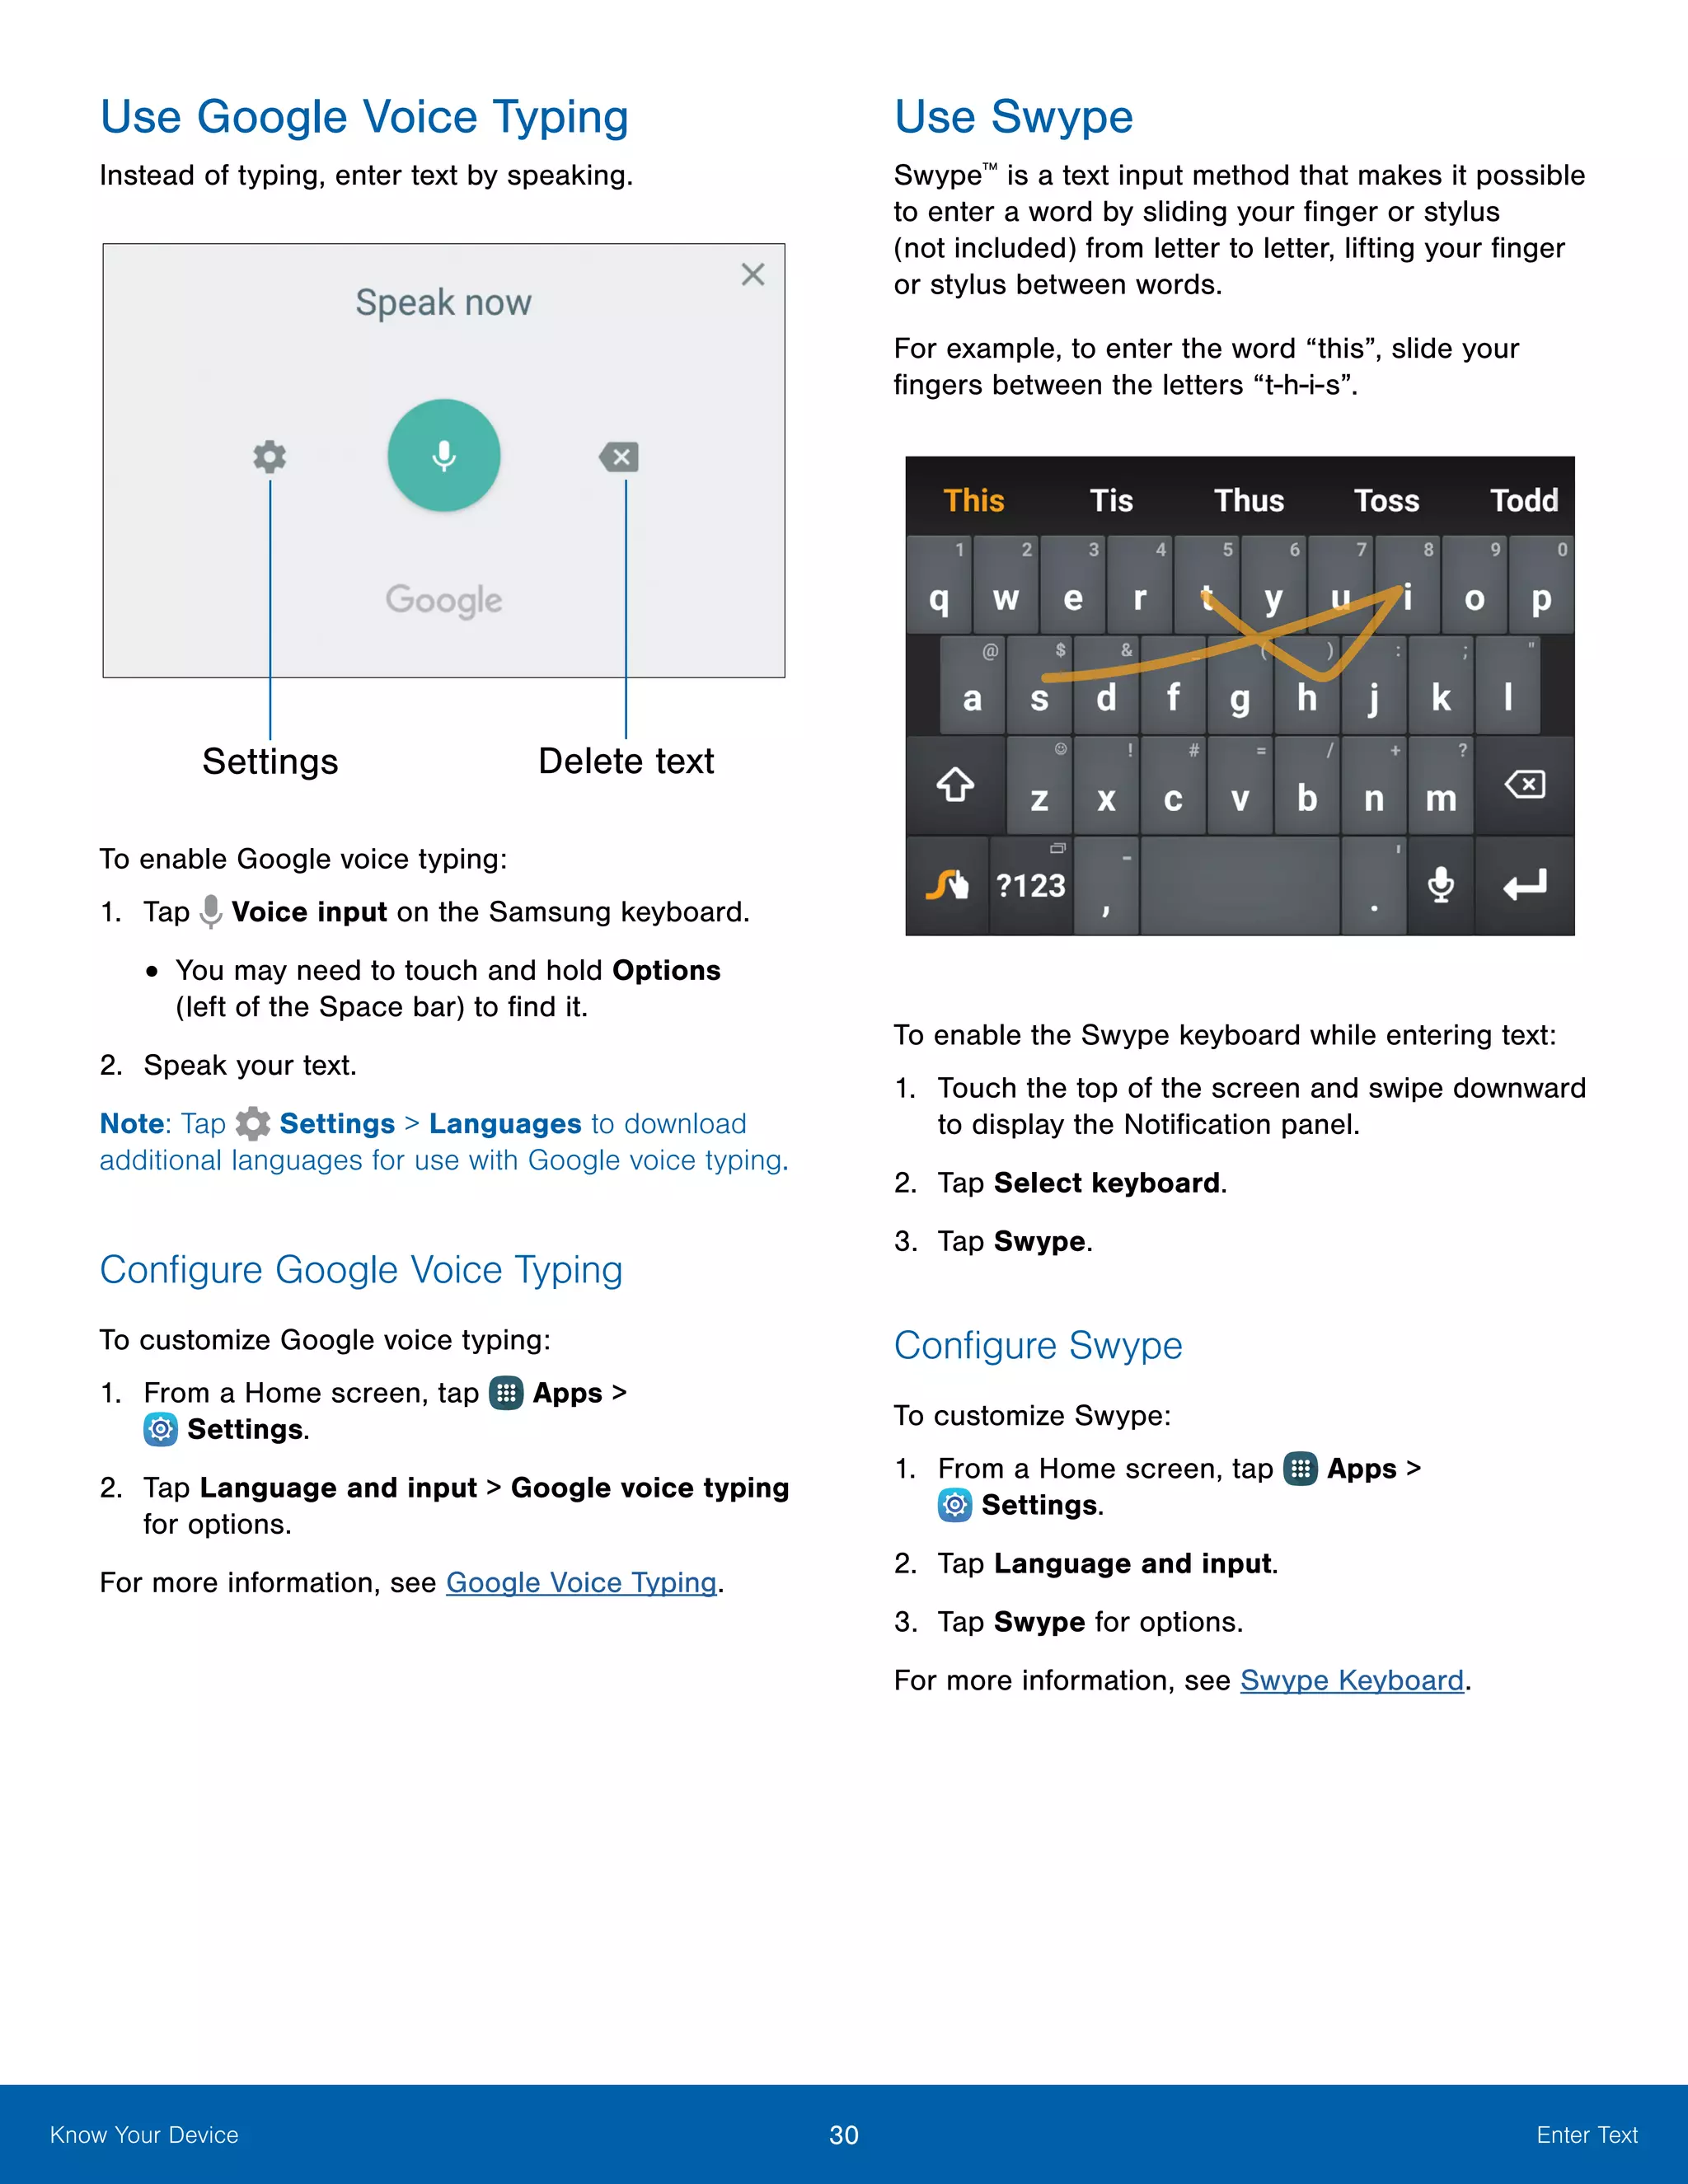
S M A R T P H O N E
User Manual
Please read this manual before operating your device
and keep it for future reference.
i Legal Notices
WARNING! This product contains chemicals known to
the State of California to cause cancer, birth defects,
or other reproductive harm. For more information,
please call 1-800-SAMSUNG (726-7864).
Intellectual Property
All Intellectual Property, as defined below, owned
by or which is otherwise the property of Samsung
or its respective suppliers relating to the SAMSUNG
Phone, including but not limited to, accessories,
parts, or software relating there to (the “Phone
System”), is proprietary to Samsung and protected
under federal laws, state laws, and international
treaty provisions. Intellectual Property includes,
but is not limited to, inventions (patentable or
unpatentable), patents, trade secrets, copyrights,
software, computer programs, and related
documentation and other works of authorship. You
may not infringe or otherwise violate the rights
secured by the Intellectual Property. Moreover,
you agree that you will not (and will not attempt
to) modify, prepare derivative works of, reverse
engineer, decompile, disassemble, or otherwise
attempt to create source code from the software.
No title to or ownership in the Intellectual Property
is transferred to you. All applicable rights of the
Intellectual Property shall remain with SAMSUNG
and its suppliers.
Open Source Software
Some software components of this product
incorporate source code covered under GNU
General Public License (GPL), GNU Lesser
General Public License (LGPL), OpenSSL License,
BSD License and other open source licenses.
To obtain the source code covered under the
open source licenses, please visit:
opensource.samsung.com
Disclaimer of Warranties;
Exclusion of Liability
EXCEPT AS SET FORTH IN THE EXPRESS
WARRANTY CONTAINED ON THE WARRANTY
PAGE ENCLOSED WITH THE PRODUCT, THE
PURCHASER TAKES THE PRODUCT “AS IS”, AND
SAMSUNG MAKES NO EXPRESS OR IMPLIED
WARRANTY OF ANY KIND WHATSOEVER WITH
RESPECT TO THE PRODUCT, INCLUDING BUT
NOT LIMITED TO THE MERCHANTABILITY OF THE
PRODUCT OR ITS FITNESS FOR ANY PARTICULAR
PURPOSE OR USE; THE DESIGN, CONDITION OR
QUALITY OF THE PRODUCT; THE PERFORMANCE
OF THE PRODUCT; THE WORKMANSHIP OF THE
PRODUCT OR THE COMPONENTS CONTAINED
THEREIN; OR COMPLIANCE OF THE PRODUCT
WITH THE REQUIREMENTS OF ANY LAW, RULE,
SPECIFICATION OR CONTRACT PERTAINING
THERETO. NOTHING CONTAINED IN THE
INSTRUCTION MANUAL SHALL BE CONSTRUED
TO CREATE AN EXPRESS OR IMPLIED WARRANTY
OF ANY KIND WHATSOEVER WITH RESPECT TO
THE PRODUCT. IN ADDITION, SAMSUNG SHALL
NOT BE LIABLE FOR ANY DAMAGES OF ANY KIND
RESULTING FROM THE PURCHASE OR USE OF
THE PRODUCT OR ARISING FROM THE BREACH
OF THE EXPRESS WARRANTY, INCLUDING
INCIDENTAL, SPECIAL OR CONSEQUENTIAL
DAMAGES, OR LOSS OF ANTICIPATED PROFITS
OR BENEFITS.
Modification of Software
SAMSUNG IS NOT LIABLE FOR PERFORMANCE
ISSUES OR INCOMPATIBILITIES CAUSED BY
YOUR EDITING OF REGISTRY SETTINGS, OR
YOUR MODIFICATION OF OPERATING SYSTEM
SOFTWARE.
USING CUSTOM OPERATING SYSTEM SOFTWARE
MAY CAUSE YOUR DEVICE AND APPLICATIONS
TO WORK IMPROPERLY. YOUR CARRIER MAY
NOT PERMIT USERS TO DOWNLOAD CERTAIN
SOFTWARE, SUCH AS CUSTOM OS.
USC_N915R4_EN_UM_TN_PC4_053116_FINAL
Legal Notices
ii Legal Notices
Samsung KNOX
Samsung KNOX™
is Samsung’s security platform
and is a mark for a Samsung device tested for
security with enterprise use in mind. Additional
licensing fee may be required. For more information
about KNOX, please refer to: samsung.com/us/knox
[041516]
Samsung Electronics America
(SEA), Inc.
Address:
85 Challenger Road
Ridgefield Park,
New Jersey 07660
Phone:
1-800-SAMSUNG (726-7864)
Internet Address:
samsung.com
©2016 Samsung Electronics America, Inc.
Samsung, Samsung Galaxy, Multi Window, S Pen,
S Health, S Voice, and Samsung Milk Music are all
trademarks of Samsung Electronics Co., Ltd.
Other marks are the property of their respective
owners.
Note: Screen images are simulated. Appearance of
device may vary.
Do you have questions about your
Samsung Mobile Device?
For 24 hour information and assistance, we offer
a new FAQ/ARS System (Automated Response
System) at: samsung.com/us/support
The actual available capacity of the internal memory
is less than the specified capacity because the
operating system and default applications occupy
part of the memory. The available capacity may
change when you upgrade the device.
Legal Information
Important legal information can be accessed in
writing on the mobile device or at samsung.com
READ THIS INFORMATION BEFORE USING YOUR
MOBILE DEVICE.
Samsung Limited Warranty - This product is
covered under the applicable Samsung Limited
Warranty INCLUDING ITS DISPUTE RESOLUTION
PROCEDURE and your right to opt out of
arbitration within 30 calendar days of the first
consumer purchase. You may opt out by either
sending an email to optout@sea.samsung.com
with the subject line “Arbitration Opt-Out” or by
calling 1-800-SAMSUNG (726-7864). For more
detailed procedures, please refer to the “Dispute
Resolution Procedures and Arbitration and Opt-Out”
section of the Limited Warranty.
Full written terms and detailed information about
the warranty and obtaining service are available
on the device at: Settings > About device >
Legal information > Samsung legal or you may
access the online version of the Health/Safety and
Warranty guide for your device at:
English
samsung.com/us/Legal/Phone-HSGuide
Spanish
samsung.com/us/Legal/Phone-HSGuide-SP
The online version of the End User License
Agreement (EULA) for your device can be found
online at:
samsung.com/us/Legal/SamsungLegal-EULA4
iii Table of Contents
Getting Started..............................................................1
Front View............................................................................2
Back View............................................................................3
Assemble Your Device................................................4
Set Up Your Device.......................................................7
Set Up Accounts on Your Device.........................8
Know Your Device......................................................9
Home Screen..................................................................10
Status Bar..........................................................................13
Edge Screen....................................................................14
Navigation, Motions, and Gestures...................17
Notification Panel..........................................................19
Multi Window...................................................................21
S Pen....................................................................................24
Air Command..................................................................26
Enter Text...........................................................................29
Emergency Mode.........................................................31
Calling...................................................................................32
Phone Screen..................................................................33
Make and Answer Calls............................................35
Speed Dial.........................................................................38
Emergency Calls...........................................................39
Set Up and Access Voicemail..............................40
Applications....................................................................41
Apps List............................................................................42
Google Apps...................................................................45
U.S. Cellular Apps........................................................47
Additional Apps..............................................................48
Calculator...........................................................................49
Calendar.............................................................................50
Camera and Video.......................................................52
Clock.....................................................................................55
Contacts..............................................................................57
Email.....................................................................................61
Galaxy Apps....................................................................63
Gallery..................................................................................64
Internet.................................................................................66
Messages..........................................................................68
Music Player.....................................................................70
My Files...............................................................................72
S Health..............................................................................73
S Note..................................................................................75
S Voice................................................................................77
Scrapbook.........................................................................78
Video Player.....................................................................79
Voice Recorder...............................................................81
Settings...............................................................................82
How to Use Settings...................................................83
Wi-Fi.......................................................................................84
Bluetooth............................................................................86
Tethering and Wi-Fi Hotspot...................................88
Airplane Mode................................................................90
Data Usage.......................................................................91
Location..............................................................................92
NFC and Sharing..........................................................94
More Networks...............................................................96
Sounds and Notifications.........................................98
Display and Wallpaper........................................... 102
Lock Screen.................................................................. 105
Multi Window Settings............................................ 106
Notification Panel Settings................................... 107
Table of Contents
iv Table of Contents
S Pen Settings............................................................. 108
Motions and Gestures............................................ 109
Edge Screen Settings............................................. 110
Accounts.......................................................................... 111
Cloud................................................................................. 112
Backup and Reset.................................................... 113
Easy Mode..................................................................... 114
Accessibility................................................................... 115
Private Mode................................................................. 117
Finger Scanner............................................................ 118
Language and Input Settings............................. 120
Date and Time............................................................. 122
Safety Assistance...................................................... 123
Accessories................................................................... 124
Battery............................................................................... 125
Storage............................................................................. 126
Security............................................................................ 128
Help.................................................................................... 130
About Device................................................................ 131
Application Manager................................................ 132
Default Applications................................................. 133
Application Settings................................................. 134
Getting Started
Learn about your mobile
device hardware, assembly
procedures, and how to
get started using your new
device.
2 Front ViewGetting Started
Recent
Power key
Front camera
Back
Status light
Earpiece
Volume key
Home key/Finger scanner
Proximity sensors
Edge screen
•	Proximity sensors: Detect the presence of
objects near the device.
•	Power key: Press and hold to turn the device on
or off, restart it, or for quick access to Airplane
and Emergency modes. Press to lock or wake up
the screen.
•	Front camera: Take self-portraits and record
videos of yourself.
•	Edge screen: Provides quick access to frequently
used apps, alerts, notifications, and device
functionality all with the swipe of a thumb.
•	Back: Return to the previous screen, or to close a
dialog box, menu, or keyboard. Touch and hold for
Multi window™
.
•	Home key/Finger scanner: Return to the Home
screen. Activate the Fingerprint security feature.
•	Recent: Tap to display recent apps, or touch and
hold for Home screen options.
•	Volume key: Press to adjust the volume of your
device’s sounds and audio.
•	Status light: Display a light when the battery is
charging or fully charged, when a notification
arrives, or when recording voice.
•	Earpiece: Listen to a call.
Front View
3 Back ViewGetting Started
USB charger/
Accessory port
Microphone
Rear camera
Infrared transmitter
Microphone
Heart rate sensorFlash
Speaker
S Pen
Headset jack
Microphone
•	Headset jack: Connect an optional headset
(not included).
•	Rear camera: Take pictures and record videos.
•	Heart rate sensor: Measure your heart rate using
your fingertip when using the S Health™
app. For
more information, see S Health.
•	Microphone: Record audio and detect voice
commands.
•	USB charger/Accessory port: Connect the
USB charger (included), and other optional
accessories (not included).
•	S Pen: Access a variety of powerful functions on
your device with this versatile stylus.
•	Speaker: Play music and other sounds.
•	Flash: Illuminate subjects in low-light
environments when taking a photo or recording
video.
•	Infrared transmitter: Controls external devices
using infrared light.
Back View
4 Assemble Your DeviceGetting Started
This section helps you to
assemble your device.
Remove the Back Cover
1.	 Remove the back cover using the slot on the top
of your phone.
2.	 Lift the cover up from the phone.
Warning: Do not bend or twist the back cover
excessively. Doing so may damage the cover.
Install the SIM Card
When you subscribe to a cellular network, you are
provided with a plug-in SIM card. During activation,
your SIM card is loaded with your subscription
details, such as your Personal Identification Number
(PIN), available optional services, and other
features.
Warning: Please be careful when handling the SIM
card to avoid damaging it. Keep all SIM cards out of
reach of small children.
►► Carefully slide the SIM card into the SIM card
slot until the card locks into place.
•	Make sure that the card’s gold contacts face
down into the device and that the card is
positioned as shown.
Caution: If the SIM card is not inserted correctly, the
device cannot detect it. Reorient the SIM card and
place it back into the slot if it is not detected.
Assemble Your Device
5 Assemble Your DeviceGetting Started
Install a Memory Card
You can install an optional microSD™
or
microSDHC™
memory card (not included) to add
more memory space to your device.
Note: A memory card can be installed at any time; it
is not necessary to install it prior to using the device.
►► With the gold contacts facing down, carefully
slide the memory card into the slot, pushing
gently until it clicks into place.
Caution: If the memory card is not inserted correctly,
the device cannot detect it. Reorient the memory card
and place it back into the slot if it is not detected.
Install the Battery
To install the battery:
1.	 Insert the battery into the opening on the back of
the device, making sure the connectors align.
2.	 Gently press down to secure the battery.
Replace the Back Cover
To replace the back cover:
1.	 Place the battery cover onto the back of the
phone and press down.
2.	 Press along the edge of the back cover until you
have a secure seal.
6 Assemble Your DeviceGetting Started
Charge the Battery
Your device is powered by a rechargeable, standard
Li-Ion battery. A USB charger (charging head and
USB cable) is included with the device for charging
the battery from any standard outlet.
The battery comes partially charged. A fully
discharged battery requires up to four hours of
charge time. You can use the device while charging.
Note: It is recommended you fully charge the battery
before using your device for the first time.
Note: For fastest charging times, use the Samsung
Adaptive Fast Charger that came with your device.
This charger provides faster charging only when
connected to devices that support Adaptive Fast
Charging.
Caution: Use only charging devices and batteries
approved by Samsung. Samsung accessories are
designed for your device to maximize battery life.
Using other accessories may invalidate your warranty
and may cause damage.
1.	 Insert the USB cable into the USB charger/
Accessory port.
2.	 Connect the USB cable to the charging head,
and then plug the charging head into a standard
outlet.
3.	 Unplug the charging head from the outlet and
remove the USB cable from the device when
charging is complete.
Caution: Failure to unplug the wall charger before you
remove the battery, can cause damage to the device.
When to Charge the Battery
When the battery is low and only a few minutes of
operation remain, the device sounds a warning tone
at regular intervals.
In this condition, your device conserves its
remaining battery power by dimming the screen.
When the battery level becomes too low, the device
automatically turns off.
For a quick check of your battery level:
►► View the battery charge indicator located in the
top right corner of your device’s display. A solid
color (   ) indicates a full charge.
You can also choose to display a percentage
value. Viewing a percentage value can provide
a better idea of the remaining charge on
the battery. For more information, see Battery.
7 Set Up Your DeviceGetting Started
Turn Your Device On or Off
The instructions below explain how to turn your
device on or off.
Turn the Device On
To turn the device on:
►► Press and hold the Power key until the device
vibrates and turns on.
Turn the Device Off
To turn the device off:
1.	 Press and hold the Power key until the
Device options menu is displayed.
2.	 Tap Power off, and confirm if prompted.
Reset the Device
If your device stops responding to taps or finger
gestures and you are unable to turn it off, you can
reset your device.
►► Press and hold the Power key and the
Volume down key at the same time for
more than seven seconds.
Initial Set Up
The first time you turn your device on, a Welcome
screen is displayed. It guides you through the basics
of setting up your device.
Follow the prompts to choose a default language,
connect to a Wi-Fi®
network, set up accounts,
choose location services, learn about your device’s
features, and more.
Secure Your Device
Use your device’s screen lock features to secure
your device.
Lock the Device
By default, the device locks automatically when the
screen times out.
To lock the device:
►► Press the Power key.
Unlock the Device
The default Screen lock on your device is Swipe.
Note: To choose a more secure screen lock,
see Set a Screen Lock.
To unlock the device:
►► Press the Power key or Home key, and then
drag your finger across the screen.
Set Up Your Device
8 Set Up Accounts on Your DeviceGetting Started
Samsung Account
Create a Samsung account for access to Samsung
content and apps on your device. When you turn on
your device for the first time, set up your existing
Samsung account or create a new Samsung
account.
– or –
To create a new Samsung account or set up your
Samsung account on your device at any time,
use Accounts settings. For more information,
see Accounts.
1.	 From a Home screen, tap Apps >
 Settings > Accounts.
2.	 Tap Add account > Samsung account.
Google Account
Your new device uses your Google™
Account to
fully utilize its Android™
features, including Gmail™
,
Google Hangouts™
, and the Google Play™
store.
When you turn on your device for the first time, set
up your existing Google Account or create a new
Google Account.
– or –
To create a new Google Account or set up your
Google Account on your device at any time,
use Accounts settings. For more information,
see Accounts.
1.	 From a Home screen, tap Apps >
 Settings > Accounts.
2.	 Tap Add account > Google.
Set Up Accounts on Your Device
Know Your Device
Learn some of the key
features of your mobile
device, including the screens
and icons, as well as how to
navigate the device and enter
text using the keyboard.
Warning: Please note that a touch screen
responds best to a light touch from the pad
of your finger or a capacitive stylus. Using
excessive force or a metallic object when
pressing on the touch screen may damage the
tempered glass surface and void the warranty.
10 Home ScreenKnow Your Device
Home Screen
The Home screen is the starting point for using your device.
Status iconsNotification icons
Home screen indicator
Status bar
Widget
Apps list
App shortcuts
App folder
Edge screen
Phone
•	Status icons: Displays information about the
device, such as the network signal strength,
battery level, and the time.
•	Edge screen: Display area along the
edge of your phone. For more information,
see Edge Screen Settings.
•	App shortcuts: Launches your favorite
applications.
•	App folder: Groups multiple apps into a folder.
•	Apps list: Allows quick access to all of your
applications.
•	Home screen indicator: Indicates which
Home screen is currently visible.
•	Phone: Shortcut to the phone keypad and related
functions.
•	Widget: Runs as a simple application extension
(not a shortcut) on a Home screen.
•	Status bar: Displays device status icons (right)
and notification icons (left).
•	Notification icons: Displays new messages and
emails, available software updates, and more.
11 Home ScreenKnow Your Device
Customize your Home screen
by adding application shortcuts,
widgets, folders, and using
wallpapers.
To access Home screen manager:
►► From a Home screen, pinch the screen.
– or –
Touch and hold an empty space on the screen.
Manage Home Screens
Your device comes with multiple Home screens
to hold app shortcuts and widgets. You can add,
remove, change the order of screens, as well as
choose a different main Home screen.
1.	 From a Home screen, pinch the screen.
2.	 Use these options to manage screens:
•	Add a screen: Swipe to the end of the
screens, and then tap Add.
•	Remove a screen: Touch and hold a screen,
and then drag it to Remove.
•	Set a screen as the main Home screen: Tap
Main Home screen at the top of a screen.
This screen is displayed when you press the
Home key.
•	Change the order of screens: Touch
and hold a screen, and then drag it to a
new position.
•	Flipboard Briefing: Swipe to the left of the
screens to find the Flipboard Briefing screen.
•	Home screen settings: Tap an option to
customize:
-- Transition effect: Select a transition to use
when swiping between screens.
-- Flipboard Briefing: Tap the checkbox to
enable or disable this feature.
Wallpapers
Change the look of the Home and Lock screens
with wallpaper. You can display a favorite picture or
choose from preloaded wallpapers.
1.	 From a Home screen, pinch the screen.
2.	 Tap Wallpapers to customize.
For more information, see Wallpaper.
To access Wallpaper settings:
►► From a Home screen, tap Apps >  Settings
> Display and wallpaper.
Widgets
Widgets are simple application extensions that
run on a Home screen. There are many kinds
of widgets, including links to a specific contact,
Internet bookmarks, Gmail and email accounts, and
many others.
Add a Widget to a Home Screen
You can add a widget to a Home screen.
1.	 From a Home screen, pinch the screen.
2.	 Tap Widgets.
3.	 Touch and hold a widget, drag it to a
Home screen, and release it.
Remove a Widget
You can remove a widget that you added to a Home
screen.
1.	 From a Home screen, touch and hold a widget to
release it.
2.	 Drag the widget to Remove and release it.
Note: Removing a widget does not delete the widget,
it just removes the widget from the Home screen.
12 Home ScreenKnow Your Device
App Shortcuts
You can use app shortcuts to launch an app from
any Home screen.
Add a Shortcut to a Home Screen
You can add a shortcut to a Home screen.
1.	 From a Home screen, tap Apps.
2.	 Touch and hold an app shortcut, drag it to a
Home screen, and then release it.
Remove a Shortcut
You can remove a shortcut that you added to a
Home screen.
1.	 Touch and hold an app shortcut to release it.
2.	 Drag the app shortcut to Remove and
release it.
Note: Removing a shortcut does not delete the app, it
just removes the shortcut from the Home screen.
Folders
Place folders on a Home screen to organize items.
Create a Folder
You can create an app folder on a Home screen.
1.	 From a Home screen, touch and hold an app
shortcut and drag it onto Create folder.
2.	 Release the app shortcut to create the folder.
•	Enter folder name: Enter a name for the
folder.
•	 Palette: Change the color.
•	 Add application: Place more apps in the
folder. Tap apps to select them, and then
tap Done.
3.	 Tap anywhere outside of the folder to close it.
•	To add more apps, touch and hold an app
shortcut and drag it to the folder.
Remove a Folder from a Home Screen
You can remove a folder that you added to a Home
screen.
1.	 Touch and hold the folder until it detaches.
2.	 Drag the folder to Remove and release it.
13 Status BarKnow Your Device
The Status bar at the top of the
Home screen provides device
information (such as network
status, battery charge, and time)
on the right side and notification
alerts on the left.
Status Icons
Battery full: Battery is fully charged.
Battery low: Battery is low.
Battery charging: Battery is charging.
Vibrate mode: Vibrate mode is enabled.
Mute mode: Mute mode is enabled.
4G LTE active: The device is connected
to a 4G LTE wireless network.
Signal strength: Cellular network signal
strength.
Network not available: No wireless
network is available.
Wi-Fi active: Wi‑Fi is active.
Wi-Fi available: A Wi-Fi network is
available.
Notification Icons
Missed call: A call has been missed.
Call in progress: A call is in progress.
Call on hold: A call is on hold.
New email: New email has arrived.
New Gmail: New Gmail has arrived.
New voicemail: New voicemail message
has been received.
New message: New text or multimedia
message has arrived.
File download in progress: Download of
a file or app is in progress.
File upload in progress: File is being
uploaded or sent.
GPS active: Location service (GPS) is
active and acquiring a signal.
App updates available: App updates are
available from the Google Play store.
App updates complete: App installation
or updates are complete.
Status Bar
14 Edge ScreenKnow Your Device
The Edge screen provides
a variety of useful tools for
notifications, information feeds,
and timekeeping.
Basic Gestures
The Edge screen responds to basic gestures as
follows:
•	Swipe right or left to switch between panels.
•	Swipe down to view the Quick Tools.
•	Swipe up to access settings (only when the
screen is unlocked).
Customize App Shortcuts
You can choose the apps you want to display in the
Edge screen.
►► On the Edge screen, tap the  Favorite Apps
icon to edit the apps that appear on the tray:
•	To remove an app from the Edge screen, drag
it off of the tray.
•	To add an app to the Edge screen, drag it to
the tray.
•	To relocate an app, drag it to a new location.
Quick Tools
You can quickly use preset tools on your
Edge screen without disrupting your activity on the
main screen.
1.	 Swipe down from the top of the Edge screen.
2.	 Select from the following tools:
•	 Ruler: Use your Edge screen as a ruler.
Tap cm to change from centimeters to inches.
•	 Stopwatch: Count down with the
Edge screen. Tap Start to begin the
countdown. Tap Stop to end the time, or Lap
to keep the record and immediately start a
new record.
•	 Timer: Use your Edge screen as a timer.
Tap the plus and minus signs to set the length
of time. Tap Start to begin the timer.
•	 Flashlight: Use your camera flash as a
flashlight. Tap on to use the flashlight. Tap off
when you are done.
•	 Voice recorder: User your Edge screen
as a voice recorder. Use the Record,
Cancel, Stop, and Pause options to edit your
recording. Recordings are saved to the Audio
file.
3.	 Swipe up from the bottom of the screen to close
the quick tools.
Edge Screen
15 Edge ScreenKnow Your Device
Edge Screen Settings
Configure the Edge screen panels to provide
convenient functions that are the most useful to you.
►► From a Home screen, tap Apps >
 Settings > Edge screen.
– or –
Swipe upward on the Edge screen, and then tap
 Settings.
Manage Panels
1.	 Swipe upward on the Edge screen and then tap
Settings.
2.	 Tap Manage panels.
3.	 Check the box above the widgets you want to
add to your Edge screen. Tap Download to
add more panels.
4.	 To uninstall a downloaded panel, tap
 More options > Uninstall.
5.	 To change the order of panels, tap
 More options > Reorder.
•	Touch and hold, then drag panels to change
the order. When finished, tap Reorder.
Add Wallpaper to the Edge Screen
1.	 Swipe upward on the Edge screen, and then tap
Settings.
2.	 Tap Express me > Create new for the
following options:
•	Tap Images to choose an image from the
Gallery.
•	Tap Handwriting to use the S Pen and draw
an image or message.
•	Tap Text to type a message on your wallpaper.
•	Tap Effect to add an effect to the wallpaper.
– or –
Tap More options > Import to import images.
Information Stream
The Information stream feature displays feeds that
you select on the Edge screen.
To view the Information stream:
►► When the main screen is turned off, quickly
swipe your finger along the Edge screen in
one direction, and then back in the opposite
direction.
To configure the Information stream:
1.	 Swipe upward on the Edge screen, and then tap
Settings.
2.	 Tap Information stream.
3.	 Tap On/Off to activate the Information stream
feature.
4.	 Tap the checkbox on each feed that you want to
appear on the Edge screen.
5.	 To edit a feed, tap Settings (if available).
Note: To activate available feeds, go to the
Manage panels section. For more information,
see Manage Panels.
Configure Night Clock
Night clock turns your device into a clock when
the screen is turned off. To use this feature, set a
daily start and end time (up to 12 hours), and turn
Night clock on.
1.	 Swipe upward on the Edge screen, and then tap
Settings.
2.	 Tap Night clock.
3.	 Tap On/Off to activate Night clock.
4.	 Drag Start to set the daily start time.
5.	 Drag End to set the daily end time.
16 Edge ScreenKnow Your Device
Change Edge Screen Text
1.	 Swipe upward on the Edge screen and then tap
Settings.
2.	 Tap Edge screen text.
3.	 Type the text you want to appear on the
Edge screen.
4.	 Tap OK to save.
Change Edge Screen Timeout
You can change how long the Edge screen appears
before it times out.
1.	 Swipe upward on the Edge screen and then tap
Settings.
2.	 Tap Edge screen timeout.
3.	 Tap a time interval to select it.
Show Notifications on the Edge Screen
Notifications received on your phone can be set to
appear on the Edge screen.
1.	 Swipe upward on the Edge screen and then tap
Settings.
2.	 Tap Notifications to enable or disable this
feature. A checkmark indicates that notifications
will appear on the Edge screen.
Change Where the Edge Screen
Appears
You can choose to have the Edge screen appear
on the left side of the screen instead of the curved
edge on the right.
1.	 Swipe upward on the Edge screen, and then tap
Settings.
2.	 Tap Use Edge screen on left.
3.	 Tap the On/Off to enable this feature.
17 Navigation, Motions, and GesturesKnow Your Device
Learn the basics for how to
navigate through your device.
Touchscreen Navigation
Use the following motions and gestures on your
touchscreen to navigate the device.
Tap
Lightly tap items to select or launch them.
•	Tap the keyboard to enter characters or text.
•	Tap an item to select it.
•	Tap an app shortcut to launch the application.
Touch and Hold
Touch and hold items on the screen to activate
them.
•	Touch and hold a widget on a Home screen to
move it.
•	Touch and hold a field to display a pop-up menu
of options.
Swipe
Lightly drag your finger vertically or horizontally
across the screen.
•	Swipe the screen to unlock the device.
•	Swipe the screen to scroll through the
Home screens or menu options.
Drag
Touch and hold an item, and then move it to a new
location.
•	Drag an app shortcut to add it to a Home screen.
•	Drag a widget to place it in a new location on a
Home screen.
Pinch and Spread
Pinch the screen using your thumb and forefinger or
spread by moving your fingers apart.
•	Pinch the screen to zoom out while viewing a
picture or a web page.
•	Spread your fingers on the screen to zoom in
while viewing a picture or a web page.
Motions and Gestures
Control your device by making specific gestures
with your hand above the device’s screen.
For details, see Motions and Gestures.
To access the Motions and Gestures settings:
►► From a Home screen, tap Apps >
 Settings > Motions and gestures.
Navigation, Motions, and Gestures
18 Navigation, Motions, and GesturesKnow Your Device
Common Options
The device uses basic command options to perform
common actions.
•	  More options: Tap to view more menu options
for a screen. This often allows you to select items
to delete or share.
•	Delete: Tap to select items to delete.
•	Share: Tap to select items to share, and then
choose a sharing method.
•	Edit: Tap to customize the screen.
•	On/Off button: Tap to turn the option on ( ON ) or
off ( ).
•	 Checkbox: Tap to enable or select. When
enabled, a checkmark is displayed. You can
often tap a checkbox at the top of the screen to
select all.
•	 Menu: Tap to view available options for the
field.
19 Notification PanelKnow Your Device
Notification icons on the Status bar display calendar events, device
status, and more. For details, open the Notification panel.
Quick settings
Screen brightness
View all
Settings
Clear notifications
Notification card
Quick connectS Finder
•	Settings: Display the Settings screen.
•	View all: See all available Quick settings.
•	Quick connect: Search for nearby devices to
connect with quickly and easily.
•	Clear notifications: Clear all notifications.
•	Notification card: View details about a
notification.
•	S Finder: Search your device for apps, contacts,
messages, email, files, settings, and more.
•	Screen brightness: Adjust screen brightness.
•	Quick settings: Quickly enable or disable a
feature.
Notification Panel
20 Notification PanelKnow Your Device
View the Notification Panel
1.	 Swipe down on the Status bar to display the
Notification panel.
2.	 Scroll down the list to see notification details.
•	Tap an item to open it.
•	To clear a single notification, drag the
notification left or right. Tap Clear to clear all
notifications.
3.	 To close the Notification panel, swipe upward
from the bottom of the screen or tap  Back.
Quick Settings
In addition to notifications, the Notification panel
also provides quick access to device functions such
as Wi-Fi, allowing you to quickly turn them on or off.
To view additional Quick settings:
►► Swipe left or right across the visible icons.
– or –
►► Tap  View all.
Notification Panel Settings
To customize the Notification panel, see
Notification Panel Settings.
S Finder
Search your device for apps, contacts, messages,
email, files, settings, and more.
1.	 Swipe down on the Status bar to display the
Notification panel.
2.	 Tap S Finder.
3.	 Tap the Search bar and type what you are
searching for.
•	You can narrow the search by tapping Filter
and using preset search options. Items that
match your search appears below.
4.	 Tap items to open them.
Quick Connect
Search for nearby devices automatically to connect
to them quickly and easily.
1.	 Drag the Status bar down to display the
Notification panel.
2.	 Tap Quick connect. Your device automatically
scans for compatible devices.
•	You may be asked to set device visibility. Tap
Always visible or Only when Quick connect
turned on.
•	Tap Refresh to manually scan.
3.	 Tap a device from a list and follow the prompts.
Customize Your Quick Connect
1.	 Swipe down on the Status bar to display the
Notification panel.
2.	 Tap Quick connect.
3.	 Tap More > Set device visibility, and choose
an option.
21 Multi WindowKnow Your Device
Multitask by using multiple applications at the same time.
Window controls
Multi window tray
Tray controls
Activate Multi Window
Apps that support Multi window display together on
a split screen. You can switch between the apps,
adjust the size of their display on the screen, and
copy information from one app to the other.
Note: Multi window is not available for all apps.
1.	 From a Home screen, tap Apps >
 Settings > Multi window.
2.	 Tap On/Off to activate.
3.	 Tap an option to activate it:
•	Open in split screen view: Automatically view
content in Multi window when you open files
from My Files or Video player, or attachments
from email.
•	Pop-up view shortcut: Swipe down diagonally
from the corner of a window to put it in pop-up
view.
Note: You can also activate Multi window from the
Notification panel.
Multi Window
22 Multi WindowKnow Your Device
Use Multi Window
After enabling Multi window, you can use it to run
multiple apps at the same time.
Note: Only apps located on the Multi window tray can
be used together. Additional Multi window apps are
available from the Google Play store.
The apps display together on a split screen. You
can switch between the apps, adjust the size of their
display on the screen, and copy information from
one app to the other.
►► Touch and hold Back to display the
Multi window tray, and then drag apps to the
windows.
You can also launch recently used apps directly into
Multi window view:
1.	 Tap Recent.
•	Recently used apps that support Multi window
have a Multi window icon in their title bar.
2.	 Tap Multi window in the title bar to launch an
application in split screen view.
•	Other recently used apps that support
Multi window display below the launched app.
3.	 Tap an app icon to add it to the split screen view.
Note: Only applications that support Multi window
have the Multi window icon.
Window Controls
Select an app window, and then tap
 Window controls in the middle of the
window border.
Control Buttons
Switch windows: Switch locations between
Multi window apps.
Drag and drop content: Move items
between the app windows. Drag an item to
share from one window to another. Not all
applications support this feature.
Minimize window: Collapse the selected
window.
Maximize window: Open the selected app
window in full screen view.
Close app: Close the selected window.
23 Multi WindowKnow Your Device
Customize Multi Window
You can customize Multi window to suit your
preferences.
Create a Window Group
If you use certain apps together in Multi window
often, you can create a window group to quickly
display the two apps in Multi window.
The window group is stored in the Multi window tray,
so you can choose it any time to display the two
apps.
1.	 Touch and hold Back to display the tray, and
then drag apps to the windows.
2.	 Scroll to the bottom of the Multi window tray, and
then tap Tray controls > Create.
Change the Order of Apps in the
Multi Window Tray
1.	 Touch and hold Back to display the
Multi window tray.
2.	 Touch and hold an app, drag it to a new position
in the tray, and then drop it.
Choose Apps to Display in the
Multi Window Tray
You can choose the apps you want to display in the
Multi window tray.
1.	 Touch and hold Back to display the
Multi window tray.
2.	 Tap Tray controls > Edit for options:
•	To remove an app from the tray, tap and drag it
off of the tray and place it in the storage area.
•	To add an app to the tray, tap and drag it from
the storage area to the tray.
•	To relocate an app, tap and drag it to a new
location.
Multi Window Settings
To customize Multi window:
►► From a Home screen, tap Apps >
 Settings > Multi window.
For more information, see Multi Window Settings.
24 S PenKnow Your Device
S Pen
The S Pen is a stylus that assists
you in performing different
functions.
S Pen tip
S Pen
button
Remove S Pen
The S Pen stores inside your device for convenient
access.
►► Slide the S Pen from your device using the notch
on the end of the S Pen.
Caution: When you insert the S Pen into the slot,
insert the S Pen’s tip first. Failure to do so can cause
the S Pen to become stuck. Forcefully detaching the
S Pen from the slot may cause damage to the S Pen
and your device.
Air View
Hover the S Pen over the screen to preview content,
or view information about an item on the screen.
For example:
•	Hover over an email in a list to preview the
message before opening it.
•	Hover over a photo album to preview the contents
or see a picture enlarged.
•	Hover over the timeline during video playback to
preview and navigate to specific scenes.
•	Hover over an icon or screen button to view the
item’s name or description.
Note: The preview function is only available when the
S Pen’s onscreen pointer is a solid color.
25 S PenKnow Your Device
Direct Pen Input
When filling out a form field in an app (like Name or
Number in Contacts), you can open a Handwriting
window to allow you to write an entry with the S Pen
rather than type.
To use the Handwriting window:
1.	 When filling out a form field, hover the S Pen over
the field until the Handwriting icon appears.
2.	 Tap Handwriting. The Handwriting window
appears.
3.	 Use the space provided in the window to write
an entry by hand using the S Pen. While writing,
your entries will be converted into text.
•	To edit the converted text, use the Space,
Delete, and Enter icons. To change the
position of the cursor, drag the pointer below
the cursor to the desired position for editing.
•	In Messages, tap Drawing mode to draw an
image and attach it to your message.
4.	 When finished, tap Done.
Configure S Pen Settings
To configure S Pen settings, including options for
sounds and for tracking S Pen when it is not stored
in your device:
►► From a Home screen, tap Apps >
 Settings.
Replace the S Pen Tip
You can replace the tip of the S Pen.
To replace the tip:
1.	 Use tweezers to pull out the S Pen tip.
2.	 Insert the new pen tip on the top of the S Pen
and press until it clicks in place.
26 Air CommandKnow Your Device
Air command allows you to
quickly activate frequently‑used
applications or perform actions.
To launch the Air command menu:
►► Remove the S Pen from the S Pen slot.
– or –
Hold the S Pen near the screen so that the
pointer appears, and then press the S Pen
button once.
– or –
Tap Air command.
►► To use Air Command, tap an option:
•	Action memo: Launch an Action memo and
link it to actions. Action memos are saved in
the S Note app.
•	Smart select: Draw around an area of the
screen to collect it in the Scrapbook app.
•	Screen write: Capture screenshots and write
or draw on them.
•	S Note: Tap to open the S Note app. For more
information, see S Note.
•	Add shortcuts: Add up to three apps and
functions to the Air command menu.
•	 Settings: Customize your Air command by
adding apps and functions, and changing how
it appears.
Action Memo
An Action memo is a special type of note that can
turn your written text into actions on your device.
For example, if someone tells you the name of a
restaurant, you can launch a new memo, write the
name of the restaurant, and then have the memo
locate it on a map.
Note: While active, an Action memo stays on the
screen for as long as you are using it, even if you
press the Home key. You must tap Save in order to
close the memo.
Air Command
27 Air CommandKnow Your Device
Create an Action Memo
To create an Action memo:
1.	 Tap Air command >  Action memo.
– or –
Press and hold the S Pen button and tap the
screen two times with the pen.
2.	 Write your action memo, these editing tools are
available:
•	List: Tap to view all Action memos saved in
the S Note app.
•	Pen: Tap to change the pen color.
•	Eraser: Use the pen to erase part of the
memo, or tap Clear all to erase all content.
3.	 Tap  Share, and then choose a sharing
method to share the action memo.
4.	 Tap More for additional options:
•	Link to action: Turn written text into actions.
•	Minimize: Minimize the action memo by
making a small thumbnail on the main Home
screen.
•	Pin to Home screen: Pin the Action memo to
the Home screen.
•	Set reminder: Set a time to remind you about
the action memo.
•	Edit as S Note file: Open the action memo in
the S Note app.
•	Change background color: Change the color
of the action memo.
•	Discard: Close the current Action memo
without saving it.
5.	 When you are finished, tap Save.
Note: Action memos are saved in the  S Note app.
Link an Action Memo
Turn text into actions. For example, you can write a
phone number, and then save it to Contacts.
To link a memo to an action:
1.	 Tap Air command >  Action memo.
2.	 Write on the memo.
3.	 Tap More > Link to action and select an action
to perform.
4.	 Draw around the content you want to use for
the action. The selected content is boxed and
highlighted.
5.	 On the menu bar that appears, tap the action you
want to take. Options include Phone, Contacts,
Messages, Email, Internet, and More.
Screen Off Memo
You can write quick memos without turning your
device on.
Note: The screen off memo setting must be enabled.
For more information, see S Pen Settings.
To create a screen off memo:
1.	 Detach the S Pen while the screen is off.
2.	 Write on the screen.
•	Tap Save to save your memo to the S Note
app.
•	Tap Delete to discard the memo.
28 Air CommandKnow Your Device
Smart Select
The Smart select feature provides a capture tool to
select content on a screen. You can then add it to
your Scrapbook app or share it with your contacts.
To launch the Smart select tool:
1.	 Tap Air command >  Smart select.
2.	 Tap a shape at the top of the screen, and then
drag a box with the S Pen to select content. The
following options appear:
•	Write: Add notes to the screen using the
S Pen.
•	Share: Choose a sharing method to share
your content.
•	Save in Scrapbook: Save the content in the
Scrapbook app.
•	Save in Gallery: Save the content to the
Gallery app.
Screen Write
Screen write allows you to capture a screen shot
and then write notes on the screen shot.
To use Screen Write:
1.	 Tap Air command >  Screen write.
2.	 The current screen is captured, and a pen tool
appears. The following editing tools are provided:
•	Pen: Draw on the screen shot. Press the Pen
icon a second time to change the pen tip, size,
color, and to save presets.
•	Eraser: Erase the writing or drawings on the
screen shot. Tap the Eraser icon a second
time to change the size of the eraser area and
to see the Erase all option.
•	Undo: Tap to undo the last action.
•	Redo: Tap to redo the last action that
was undone.
3.	 When you are finished writing, tap an option:
•	Share: Choose a sharing method to share
your content.
•	Save in Scrapbook: Save the content in the
Scrapbook app.
•	Save in Gallery: Save the content to the
Gallery app.
S Note App
Create notes and edit Action memos.
To access S Note:
1.	 Tap Air command > S Note.
– or –
2.	 From a Home screen, tap Apps >  S Note.
For more information, see S Note.
Add Shortcuts
You can add shortcuts to apps and functions to the
Air Command menu.
To use Add shortcuts:
1.	 Tap Air command >  Add shortcuts.
2.	 Swipe across the screens, and tap the apps
or functions you would like to add to the
Air command menu.
•	To delete an app shortcut tap  Remove.
3.	 Tap Back to save your selection.
29 Enter TextKnow Your Device
Text can be entered using a
keyboard or by speaking.
Use the Samsung Keyboard
Enter text using a QWERTY keyboard.
Options
Predictive text
Special Keys
Symbol: Tap to insert symbols.
Touch and hold Options for the following:
Voice input: Enter text using Google
Voice™
typing.
Handwriting: Use your handwriting to enter
text.
Clipboard: Access the clipboard.
Keyboard settings: Access keyboard
settings.
Special Keys
Emoticon: Insert an emoticon at the cursor
position.
Keyboard layout: Change the layout of the
keyboard.
Note: Available options depend on the app in use.
Not all options are available for all apps.
Predictive Text
Predictive text suggests words that match your text
entries, and can automatically complete common
words. Predictive text can learn your personal
writing style from your contacts, messages, email,
and social networking sites — improving the accuracy
of predicting text entries.
Configure the Samsung Keyboard
To customize the Samsung keyboard:
1.	 From a Home screen, tap Apps >
 Settings.
2.	 Tap Language and input > Samsung keyboard
for options.
For more information, see Samsung Keyboard.
Enter Text
30 Enter TextKnow Your Device
Use Google Voice Typing
Instead of typing, enter text by speaking.
Settings Delete text
To enable Google voice typing:
1.	 Tap Voice input on the Samsung keyboard.
•	You may need to touch and hold Options
(left of the Space bar) to find it.
2.	 Speak your text.
Note: Tap Settings > Languages to download
additional languages for use with Google voice typing.
Configure Google Voice Typing
To customize Google voice typing:
1.	 From a Home screen, tap Apps >
 Settings.
2.	 Tap Language and input > Google voice typing
for options.
For more information, see Google Voice Typing.
Use Swype
Swype™
is a text input method that makes it possible
to enter a word by sliding your finger or stylus
(not included) from letter to letter, lifting your finger
or stylus between words.
For example, to enter the word “this”, slide your
fingers between the letters “t-h-i-s”.
To enable the Swype keyboard while entering text:
1.	 Touch the top of the screen and swipe downward
to display the Notification panel.
2.	 Tap Select keyboard.
3.	 Tap Swype.
Configure Swype
To customize Swype:
1.	 From a Home screen, tap Apps >
 Settings.
2.	 Tap Language and input.
3.	 Tap Swype for options.
For more information, see Swype Keyboard.
31 Emergency ModeKnow Your Device
Emergency mode conserves
your device’s remaining power
when you are in an emergency
situation.
Emergency mode saves battery power by:
•	Changing the color of the screen to grayscale.
•	Restricting application usage to only essential
applications and those you select.
•	Turning off Mobile data when the screen is off.
•	Turning off connectivity features such as Wi‑Fi and
Bluetooth®
.
Note: When Emergency mode is turned off, the
Location settings may stay the same as they were in
Emergency mode.
Activate Emergency Mode
To activate Emergency mode:
1.	 Press and hold the Power key to display the
Device options window.
2.	 Tap Emergency mode.
•	When accessing for the first time, read the
Terms and conditions. If you accept them,
tap the Checkbox, and then tap Agree.
Confirm when prompted.
3.	 Tap Turn on.
Turn Off Emergency Mode
►► From the Emergency mode Home screen, tap 
 More options > Turn off Emergency mode.
Use Emergency Mode
While in Emergency mode, your device conserves
power. The following apps and features are available
on the Home screen:
•	Flashlight: Use the device’s flash as a steady
source of light.
•	Emergency alarm: Sound an audible siren.
•	Share my location: Send your location
information to your emergency contacts.
•	Phone: Launch the call screen.
•	Internet: Launch the Web browser.
•	 Add: Add other available apps.
-- Facebook: Launch Facebook™
.
-- Maps: Launch Google Maps™
.
•	 Battery charge: Display estimated battery
charge remaining.
•	Estimated max. standby time: Display estimated
standby time that can be reached based on
current battery charge and usage.
•	Emergency call: Dial the emergency telephone
number (for example, 911). This kind of call can
be made even without activated cellular service.
•	 More options:
-- Turn off Emergency mode: Disable Emergency
mode and return to standard mode.
-- Remove: Choose apps to remove from the
screen.
-- Manage emergency contacts: Add emergency
contacts if none have been set in Safety
Assistance.
-- Settings: Configure the available settings. Only
a limited number of settings are enabled in
Emergency mode.
Emergency Mode
Make telephone calls
using a variety of calling
features and services.
Calling
33 Phone ScreenCalling
Phone Screen
•	More options: Access Speed dial and Call
settings.
•	Delete: After entering a number using the keypad,
if you make a mistake, tap to erase a single
character or touch and hold to erase the entire
string of numbers.
•	Call: Make a call.
•	Voicemail: Set up and check your
voicemail. For more information, see
Set Up and Access Voicemail.
•	Keypad: Dial the number that you want to call.
•	Tabs: Display a log of all dialed, received,
and missed calls. Display contacts marked as
favorites. Display your contacts and select a
contact to call.
Use the Phone screen to access the dialer keypad, recent calls,
favorites, and contacts.
Tabs
Keypad
Voicemail
Call
Delete
More options
34 Phone ScreenCalling
Access Phone
There are a couple of ways to access Phone.
►► From a Home screen, tap  Phone.
– or –
From a Home screen, tap Apps > Phone.
Display Your Phone Number
Your phone number can be found in Settings.
►► From a Home screen, tap Apps >
 Settings > About device > Status.
•	Your phone number is displayed in the
My phone number field.
Call Settings
There are also a couple of ways to access the
Call settings menu.
►► From a Home screen, tap Phone >
 More options > Settings > Call.
– or –
From a Home screen, tap Apps >
 Settings > Application Settings > Call.
35 Make and Answer CallsCalling
Make and Answer Calls
Learn how to make or answer
a call. Explore features and
functionality associated with
making or answering a call.
Make a Call
You can make a call from a Home screen.
1.	 From a Home screen, tap  Phone.
2.	 Enter a number on the keypad and tap
 Dial.
•	Tap Keypad if the keypad is not displayed.
Dial a Number from Your Contacts List
You can quickly dial a phone number from your
Contacts list.
1.	 From a Home screen, tap Apps >
 Contacts.
– or –
From a Home screen, tap  Phone > Contacts.
2.	 Swipe your finger across a contact to the right to
call the contact.
Dial a Recent Number
All incoming, outgoing, and missed calls are
recorded in the Call log. If the number or caller is
listed in your contacts list, the associated name is
also displayed.
1.	 From a Home screen, tap Phone.
2.	 Tap Recent. A list of recent calls is displayed.
3.	 Tap a contact, and then tap Call.
Answer a Call
When a call is received, the phone rings and the
caller’s phone number or name is displayed, if it is
stored in the Contacts list.
►► At the incoming call screen:
•	Drag Answer to the right to answer the
call.
•	Drag Reject to the left to reject the call
and send it to your voicemail.
•	Drag Reject call with message upward and
select a message.
If you are using an app, a pop-up screen is
displayed for the incoming call.
►► On the incoming call pop-up screen:
•	Tap Answer to answer the call.
•	Tap Reject to reject the call and send it to
your voicemail.
•	Tap Reject call with message and select a
message.
•	Tap Expand to exit the app and view the
main incoming call screen.
End a Call
To finish your call:
►► Tap  End when you are ready to end your call.
36 Make and Answer CallsCalling
Multitask While on a Call
If you exit the call screen and return to a
Home screen, your active call is indicated by
 Call on the Status bar.
This lets you continue with your current call and do
something else, such as access the contacts list,
view a recent email, or locate a picture.
To return to the call screen:
►► Drag the Status bar down to display the
Notification panel, and then tap Call notification.
To end a call from any application:
►► Drag the Status bar down to display the
Notification panel, and then tap End call.
Options During a Call
Your phone provides several options that you can
use during a call.
Adjust the Call Volume
►► Press the Volume keys to increase or decrease
the volume.
– or –
Tap  More options > Extra volume to quickly
add more volume to the incoming audio.
Listen with the Speaker or
Bluetooth Headset
Listen to the call using the speaker or through a
Bluetooth™
headset (not included).
►► Tap Speaker to hear the caller using the
speaker.
– or –
Tap Bluetooth to hear the caller using a
Bluetooth headset.
Place a New Call While on a Call
If your service plan supports this feature, you can
make another call while a call is in progress.
1.	 From the active call, tap Add call to dial the
second call.
2.	 Dial the new number and tap Dial. When
the call is answered:
•	Tap Swap to switch between the two
calls.
•	Tap Merge to hear both callers at once
(multi-conferencing).
Call Waiting
If your service plan supports this feature, you can
answer an incoming call while you have a call in
progress. You are notified of an incoming call by a
call waiting tone.
To answer a new call while you have a call in
progress:
1.	 Drag Answer in any direction to answer the
new call.
2.	 Tap an option:
•	Put [caller] on hold to place the previous
caller on hold while you answer the new
incoming call.
•	Merge with [caller] to add the new caller to
the current call.
•	End call with [caller] to end the previous call
and answer the new call.
3.	 Tap the previous On hold number entry and
select Swap to switch between the two
calls. This places the new caller on hold and
activates the previous call.
37 Make and Answer CallsCalling
Call Log
The numbers of the calls you have dialed, received,
or missed are stored in the Call log.
1.	 From a Home screen, tap Phone.
2.	 Tap Recent. A list of recent calls is displayed.
If the caller is in your Contacts list, the caller’s
name is displayed.
Save a Recent Call to Your Contacts List
Use recent call information to create a contact or
update your Contacts list.
1.	 From a Home screen, tap Phone > Recent.
2.	 Tap the call that contains the information that you
want to save to your Contacts list.
3.	 Tap Create contact.
– or –
If you want to replace the number for an existing
contact, tap Update existing.
Delete a Call from the Call Log
To delete Call log entries:
1.	 From a Home screen, tap Phone > Recent.
2.	 Touch and hold the call you want to delete from
the Call log.
3.	 Tap Delete.
Block a Number
By adding a caller to your Block list, future calls
from this number are sent directly to your voicemail,
and messages are not received.
1.	 From a Home screen, tap Phone > Recent.
2.	 Tap the caller you want to add to the Block list.
3.	 Tap  More options > Add to auto reject list.
38 Speed DialCalling
Speed Dial
You can assign a shortcut
number to a contact for speed
dialing their default number.
Create a Speed Dial
You can assign 100 speed dial numbers.
1.	 From a Home screen, tap Phone.
•	Tap Keypad if the keypad is not displayed.
2.	 Tap  More options > Speed dial. The Speed
dial screen displays the numbers 1 through 100.
Number 1 is reserved for Voicemail.
3.	 Tap an unassigned number ( Add contact).
4.	 Tap a contact to assign to the number.
•	The selected contact is displayed in the
Speed dial number box.
Use Speed Dial to Make a Call
You can make a call using Speed dial.
1.	 From a Home screen, tap Phone.
•	Tap Keypad if the keypad is not displayed.
2.	 Touch and hold the Speed dial number.
•	If the Speed dial number is more than one
digit long, enter the first digits, and then hold
the last digit.
Remove a Speed Dial Number
Assignment
You can remove an assigned Speed dial number.
1.	 From a Home screen, tap Phone.
2.	 Tap  More options > Speed dial.
3.	 Find the contact to remove from Speed dial.
4.	 Tap Remove.
39 Emergency CallsCalling
Emergency Calls
You can dial the emergency
telephone number in your
region regardless of the phone’s
cellular service status.
Make an Emergency Call
You can dial the emergency telephone number
from your phone whether or not cellular service has
been activated. If your phone is not activated, you
can only make an emergency call.
1.	 From a Home screen, tap Phone.
2.	 Enter the emergency telephone number (911 in
North America) and tap Dial.
3.	 Complete your call. During this type of call, you
have access to most in-call features.
Call Emergency Services from a
Locked Screen
The emergency telephone number can be dialed
even if the phone is locked, allowing anyone to use
your phone to call for help in an emergency. When
accessed from a locked screen, only the emergency
calling feature is accessible to the caller. The rest of
the phone remains secured.
Swipe Lock Screen
If the Lock screen is set to Swipe, you can access
the call screen in a couple of ways.
1.	 Drag Phone upward to open the call screen.
- or -
Swipe across the screen to unlock it, and then
tap Phone.
2.	 Enter the emergency telephone number (911 in
North America) and tap Dial.
3.	 Complete your call. During this type of call, you
have access to most in-call features.
Secure Lock Screens
You can make calls even if your phone has a secure
lock screen.
1.	 Drag Phone upward to open the call screen.
2.	 Tap Emergency call to display the Emergency
dialer.
3.	 Enter the emergency telephone number (911 in
North America) and tap Dial.
4.	 Complete your call. During this type of call, you
have access to most in-call features.
40 Set Up and Access VoicemailCalling
Set Up and Access Voicemail
Set up and configure your
voicemail.
Set Up Your Voicemail
You can access your voicemail from a Home screen.
1.	 From the Home screen, tap  Phone >
 Voicemail.
2.	 Follow the tutorial to create a password, record a
greeting, and record your name.
Note: These steps may be different depending on
your network.
Access Your Voicemail
You can access your voicemail from a Home screen.
1.	 From the Home screen, tap  Phone >
 Voicemail.
•	You may be prompted to enter a password.
2.	 Follow the voice prompts from the voicemail
center.
Access Your Voicemail from
Another Phone
You can access your voicemail from another phone.
1.	 From another phone, dial your wireless phone
number. Wait until you hear your voicemail
greeting.
2.	 Press the asterisk or star (*) key on the phone
you are using.
3.	 Enter your password and you are connected to
your voicemail.
Applications
Learn how to change the
way apps are displayed,
organize apps into folders,
and uninstall or disable
apps.
42 Apps ListCalling
The Apps list displays all
preloaded apps and apps that
you downloaded. You can
uninstall, disable, or hide apps
from view.
Shortcuts to apps can be placed on any of the
Home screens. For more information, see
Add a Shortcut to a Home Screen.
Access Apps
You can access and launch all applications from the
Apps list.
1.	 From a Home screen, tap Apps.
2.	 Tap an app’s shortcut to launch it.
•	To return to the main Home screen, press the
Home key.
Download and Install New Apps
Find new apps to download and install on your
device.
•	 Play Store: Download new apps
from the Google Play store. Visit
play.google.com/store/apps to learn more.
•	 Galaxy Apps: View and download
Samsung apps that are optimized
for use with Galaxy devices. Visit
samsung.com/levant/apps/mobile/galaxyapps
to learn more.
Uninstall or Disable Apps
You can uninstall or disable apps you download and
install.
•	Preloaded apps cannot be uninstalled.
•	Apps that are disabled are turned off and hidden
from view.
To uninstall or disable an app:
1.	 From a Home screen, tap Apps.
2.	 Tap More options > Uninstall/disable apps.
Apps that can be uninstalled show
 Uninstall/disable on their icon.
3.	 Tap Uninstall/disable and follow the prompts
to either uninstall or disable the app.
To enable apps after disabling them:
1.	 From a Home screen, tap Apps >
 Settings > Application manager.
2.	 Tap All apps > Disabled, and then tap the
app you want to enable.
3.	 Tap Enable. The app is displayed again in the
Apps list.
For more information, see Application Manager.
Apps List
43 Apps ListCalling
Organize Your Apps
App shortcuts can be listed alphabetically or in your
own custom order.
To change the order apps are listed:
1.	 From a Home screen, tap Apps.
2.	 Tap More options > Sort by.
3.	 Tap an option:
•	Custom: Allows you to touch and hold on
apps to move them from screen to screen.
•	Alphabetical order: Apps are arranged in a
grid, in A-Z order.
Use Folders to Organize Apps
You can organize Apps in a folder on an Apps list
screen.
1.	 From a Home screen, tap Apps.
2.	 Tap More options > Create folder.
•	Enter folder name: Name the folder.
•	 Palette: Change the folder color.
•	 Add application: Place more apps in the
folder. Tap apps to select them, and then
tap Done.
3.	 Tap anywhere outside of the folder to close it.
To launch apps in a folder:
►► Tap a folder, and then tap an app shortcut to
launch it.
To delete a folder:
1.	 From a Home screen, tap Apps.
2.	 Tap More options > Remove folder.
3.	 Select the folder to delete and tap Done. Confirm
if prompted.
Add a Folder to a Home Screen
To add a folder to a Home screen:
1.	 From a Home screen, tap Apps.
2.	 Touch and hold a folder, drag it to a
Home screen, and then release it.
Hide or Show Apps
Hide Apps from View
You can hide (rather than uninstall or disable) any
apps you do not want to see on the Apps screen.
1.	 From a Home screen, tap Apps.
2.	 Tap More options > Hide apps.
3.	 Tap apps to hide, and then tap Done.
Show Hidden Apps
You can unhide apps you have hidden and put them
back on the Apps screen.
1.	 From a Home screen, tap Apps.
2.	 Tap More options > Show hidden apps.
3.	 Tap apps to unhide, and then tap Done.
44 Apps ListCalling
Apps Screen Options
1.	 From a Home screen, tap Apps.
2.	 Tap More options for these options:
•	Edit: Touch and hold an app icon, and then
drag it to:
-- Create page: Add a new page to the Apps
list and move the app icon there.
-- Create folder: Create a new folder.
-- App info: View information about this app.
-- Uninstall: Uninstall the app. Preloaded apps
cannot be uninstalled.
•	Create folder: Create a new folder to hold the
app icon.
•	Remove folder: Delete a folder.
•	Sort by: Configure the Apps screen.
•	Downloaded apps: Display only downloaded
apps.
•	Uninstall/disable apps: Uninstall an app that
you downloaded to your device, or disable
a preloaded app (preloaded apps cannot
be uninstalled). Tap Uninstall/disable to
remove or disable the selected app.
•	Hide apps: Hide apps from the Apps screen.
•	Show disabled apps: Display disabled apps.
•	Show hidden apps: Display hidden apps.
•	Help: View information about your device.
45 Google AppsCalling
Enjoy these apps from Google.
Note: Certain apps require a Google Account.
Visit google.com to learn more.
Chrome
Browse the Internet and bring your open
tabs, bookmarks and address bar data
from your computer to your mobile device.
Visit google.com/chrome/mobile to learn
more about Chrome™
.
Drive
Open, view, rename, and share your
Google Docs™
and files.
Visit drive.google.com to learn more about
Google Drive™
.
Gmail
Send and receive email with Gmail,
Google’s web-based email service.
Visit gmail.com to learn more.
Google
Search not only the Internet, but also the
apps and contents of your device.
Google Now
Works in the background to collect
information you regularly look up and
organize it into convenient cards that
appear when you need them.
Visit google.com/landing/now to learn
more.
Note: When Google Now™
is enabled, you
can access it by tapping Google.
Google+
Chat with friends and family, post photos,
and see what others are sharing.
Visit google.com/mobile/+ to learn more
about Google+™
.
Hangouts
Meet friends and family online, share
photos, host video calls, and send SMS
and Hangouts messages.
Visit hangouts.google.com to learn more.
Google Apps
46 Google AppsCalling
Maps
Find your current location and get
directions and other location-based
information.
Visit google.com/maps to learn more.
Note: You must enable location services
to use Google Maps. For more information,
see Location Services.
Photos
Automatically backs up your photos and
videos to your Google Account.
Visit photos.google.com to learn more
about Google Photos™
.
Play Books
Find millions of free e-books and
hundreds of thousands more to buy in the
eBookstore.
Visit play.google.com/store/books to learn
more.
Play Games
Discover hundreds of games for
download and purchase through the
Google Play store.
Visit play.google.com/store/apps to learn
more.
Play Movies & TV
Watch movies and TV shows purchased
from Google Play. You can stream them
instantly or download them for viewing
when you are not connected to the
Internet. You can also view videos saved
on your device.
Visit play.google.com/store/movies to
learn more.
Play Music
Play music and audio files on your device.
Visit play.google.com/music to learn more.
Play Newsstand
Subscribe to your favorite magazines to
read on your device at your leisure.
Visit play.google.com/store/newsstand to
learn more.
Play Store
Find new apps, movies and TV shows,
music, books, magazines, and games in
Google Play store.
Visit play.google.com/store to learn more.
Voice Search
Use voice commands to search the web
with Google.
YouTube
View and upload YouTube™
videos right
from your device.
Visit youtube.com to learn more.
47 U.S. Cellular AppsCalling
U.S. Cellular Apps
Enjoy these apps from
U.S. Cellular.
Note: Certain apps require a data plan or paid
subscription. Visit uscellular.com to learn more
or contact your service provider for additional
information.
City ID
See the city and state of incoming calls
with this enhanced caller ID feature.
City ID provides over 20,000 cities in
North America, giving you an important
tool to help identify unknown callers
and more effectively manage your
communications.
Mobile Data Security
Keep your data safe and secure if your
device is lost or stolen.
Mobile Hotspot
Configure your device as a mobile
hotspot.
For more information, see
Configure Mobile Hotspot Settings.
Tone Room Deluxe
Access the latest and hottest content from
your favorite artists for ringtones and ring
back tones.
Your Navigator Deluxe
Obtain turn-by-turn driving directions
(including voice guided turn-by-turn
directions) with GPS accuracy. Search for
any destination (including gas stations,
ATMs, restaurants, and more). View
detailed maps of any location.
48 Additional AppsCalling
There are additional apps,
including several Samsung apps,
preloaded on your device.
Amazon
Shop at amazon.com™
from your device.
Visit amazon.com to learn more.
Dropbox
Save and share files with others using the
Dropbox cloud storage. When you save
files to Dropbox, your device automatically
syncs with the web server and any other
computers that have Dropbox installed.
Visit dropbox.com to learn more.
Evernote
Create, synchronize, and share multimedia
notes. You can add tags to the notes, or
sort the notes into a notebook so that you
can manage your ideas efficiently.
Facebook
Keep up with friends and family with the
Facebook app. Share updates, photos,
and videos, as well as text, chat, and play
games.
Flipboard
Access your personalized magazines.
Hancom Office 2014
View, edit, and create Hancom™
Office
Hanword (*.hwp) and Hanshow (*.show)
documents.
Peel Smart Remote
Control select Wi-Fi-enabled Samsung
TV models using your Samsung Galaxy
device. Now you can control all of
your TV’s settings, such as on and off
functions, channel navigation, and volume
control from the same Samsung device
you already know.
PEN.UP
Share photos, comment on other
creations, or just browse through the
pages for something to add to your
personal collection.
Samsung Milk Music
Stream music with Samsung Milk Music™,
a radio service that offers a simple way to
find the music that is right for you. With a
library of over 13 million songs and 200+
stations, the interactive dial makes it easy
to skim through stations to find the perfect
soundtrack for the moment.
Samsung+
Get live help, discover new features, and
unlock promotions for your Samsung
device.
Smart Manager
Access your Battery, RAM, Storage, and
Device security information.
Additional Apps
49 CalculatorCalling
The Calculator provides basic
and advanced arithmetic
functions.
Basic Operation
You can use your calculator to perform basic
operations.
1.	 From a Home screen, tap Apps >
 Calculator.
2.	 Enter the first number using the numeric keys.
3.	 Tap the appropriate arithmetic function key.
4.	 Enter the next number.
5.	 Tap Equals to view the result.
6.	 Tap Clear to clear the results.
Additional Functions
You can perform additional functions on your
calculator.
To clear the calculator history:
•	Tap > Clear history.
To copy all or part of the calculation to the
clipboard:
•	Touch and hold an entry in the display field, and
then tap Copy.
Scientific Calculator
The Calculator app also provides advanced
arithmetic functions, such as sin, cos, and tan.
To use the Scientific calculator:
1.	 If Screen rotation is disabled, enable Screen
rotation.
2.	 Turn the device to landscape.
Note: Screen rotation is found in the Quick settings
on the Notification panel. For more information, see
Quick Settings.
Calculator
50 CalendarCalling
Calendar
Manage your events and tasks.
Calendar View
To choose a calendar view:
1.	 From a Home screen, tap Apps >
 Calendar.
2.	 Tap Menu, and then tap one of the following:
•	Year: Display all twelve months of this year.
Swipe across the screen to display another
year.
•	Month: Display the current month. Swipe
across the screen to display another month.
Events and tasks are also displayed.
•	Month and agenda: Display the current month
along with all events and tasks at the bottom
of the screen. Swipe across the screen to
display another month.
•	Week: Display the current week. Swipe across
the screen to display another week.
•	Day: Display today’s schedule by hour. Swipe
across the screen to display another day.
•	Agenda: Display all tasks.
3.	 Tap Today to return to the current date.
Create an Event or Task
You can use your Calendar to create events.
1.	 From a Home screen, tap Apps >
 Calendar.
2.	 Tap Add and use one of the following
methods:
•	Add event: Enter an event with an optional
repeat setting.
•	Add task: Enter a task with an optional priority
setting.
3.	 Enter details for the event or task, and then tap
Save. Confirm if prompted.
Share an Event
You can share events you create from your
Calendar.
1.	 From a Home screen, tap Apps >
 Calendar.
2.	 Tap an event to view it.
3.	 Tap Share via, choose a sharing method, and
follow the prompts.
51 CalendarCalling
Delete an Event or Task
You can delete events or tasks you create from your
Calendar.
1.	 From a Home screen, tap Apps >
 Calendar.
2.	 Tap an event or task to view it.
3.	 Tap Delete. Confirm if prompted.
To delete multiple events or tasks
1.	 From a Home screen, tap Apps >
 Calendar.
2.	 Tap  More options > Delete.
3.	 Tap events or tasks to select them.
4.	 Tap Done. Confirm if prompted.
Calendar Settings
These settings allow you to modify settings
associated with using the Calendar.
1.	 From a Home screen, tap Apps >
 Calendar.
2.	 Tap More options > Settings.
3.	 Tap an option and follow the prompts.
52 Camera and VideoCalling
Take pictures and record videos with the Camera app.
Switch cameras
Shortcuts
Record video
Take a picture
Shooting mode
Gallery
Settings
•	Record video: Record a video.
•	Take a picture: Take a picture.
•	Shooting mode: Change the shooting mode.
•	Gallery: Open the Gallery to view photos and
videos.
•	Switch cameras: Switch between the rear and
front cameras.
•	Settings: Configure other camera settings.
•	Shortcuts: Display up to two camera setting
shortcuts on the viewfinder.
Camera and Video
53 Camera and VideoCalling
Take Pictures
Take pictures with your device’s front or rear
camera, or combine shots with Dual mode.
Note: Prior to using the camera, remove the plastic
protective covering from the camera lens.
1.	 From a Home screen, tap Apps >  Camera.
2.	 Using the display screen as a viewfinder,
compose your shot by aiming the camera at the
subject. While composing your picture, use the
available options or these gestures:
•	Touch the screen with two fingers and pinch
or spread them on the screen to zoom in
or out.
•	Tap the screen to focus on the area you
touched.
3.	 Tap Take a picture to take the picture.
Note: You can also press the Volume key up or
down to take a picture. This is the default action of the
Volume key while the camera is active. You can also
set the Volume key to act as the video record key or
as a zoom key.
Shooting Mode
Several visual effects are available. Some modes are
not available when taking self-portraits.
1.	 From a Home screen, tap Apps >  Camera.
2.	 Tap MODE  Mode, and then scroll up or down the
screen at the right side of the screen.
Rear Camera
•	Auto: Allow the camera to evaluate the
surroundings and determine the ideal mode
for the picture.
•	Rear-cam selfie: Set the rear camera to
automatically detect and focus on your face
when you take self-portrait pictures using the
rear camera.
•	Selective focus: Make objects stand out from
the background. They must be within 1.5 feet
from you, and at least 3 times this distance
from the background.
•	Panorama: Create a linear image by taking
pictures in either a horizontal or vertical
direction.
•	Slow motion: Record videos at a high frame
rate for viewing in slow motion. You can play a
specific section of each video in slow motion
after recording it.
•	Fast motion: Record videos for viewing in
fast motion. You can play a specific section of
each video in fast motion after recording.
•	Manage modes: Select which shooting modes
to display when you tap Mode.
•	Download: Download additional shooting
modes from the Galaxy Apps store.
Front Camera
•	Selfie: Tap the screen, or place your finger
over the heart rate sensor to take selfies.
•	Wide selfie: Take wide-angle selfie shots to fit
more people into your pictures.
•	Download: Download additional shooting
modes from the Galaxy Apps store.
54 Camera and VideoCalling
Camera Settings
1.	 From a Home screen, tap Apps >  Camera.
2.	 Tap Settings. Available options vary
depending on the camera/recording mode used.
•	Picture size: Select a resolution. Use higher
resolution for higher quality. Higher resolution
pictures take up more memory.
•	Effects: Add special graphical effects.
•	Timer: Take time-delayed pictures or videos.
•	Flash: Activate or deactivate the flash
(rear camera only).
•	Interval shot: Select the best picture from a
series of continuous shots (front camera only).
3.	 Tap Menu to display the following additional
options.
Rear Camera Only
•	ISO: Select an ISO value. This controls
camera light sensitivity. It is measured in
film-camera equivalents. Low values are for
stationary or brightly-lit objects. Higher values
are for fast-moving or poorly-lit objects.
•	White balance: Select an appropriate white
balance, so images have a true-to-life color
range. The settings are designed for specific
lighting situations. These settings are similar to
the heat range for white-balance exposure in
professional cameras.
•	Metering modes: Select a metering
method. This determines how light values
are calculated. Center-weighted measures
background light in the center of the scene.
Spot measures the light value at a specific
location. Matrix averages the entire scene.
•	HDR (rich tone): Save the picture in HDR
(rich tone) only.
•	Video stabilization: Activate anti-shake.
Anti‑shake helps to keep the focus steady
when the camera is moving.
Front Camera Only
•	Beauty face: Take a picture with lightened
faces for gentler images.
•	Save as flipped: Automatically save images as
flipped in the Gallery.
Both Cameras
•	Exposure value: Change the exposure value.
This determines how much light the camera’s
sensor receives. For low light situations, use a
higher exposure.
•	Tap to take pics: Tap the image on the
preview screen to take pictures.
•	Video size: Select a resolution. Use higher
resolution for higher quality. Higher resolution
videos take up more memory.
•	Location tags: Attach a GPS location tag to
the picture.
•	Storage location: Select the memory location
for storage.
•	Grid lines: Display viewfinder grid lines to help
composition when selecting subjects.
•	Voice control: Set the camera to take pictures
with voice commands.
•	The Volume key: Use the Volume key as the
camera key, the record key, or as a zoom key.
•	Review pictures: Set to show pictures or
videos after taking them.
•	Manage shortcuts: Touch and hold, then drag
items to add them to the shortcuts menu.
•	Reset settings: Reset the camera settings.
55 ClockCalling
The Clock app offers features for
keeping track of time and setting
alarms.
1.	 From a Home screen, tap Apps > Clock.
2.	 Tap a tab to use a feature:
•	Alarm: Set an alarm to ring at a specific time.
•	World clock: View the time of day or night in
other parts of the world. World clock displays
time in hundreds of different cities, within all
24 time zones around the world.
•	Stopwatch: Measure intervals of time.
•	Timer: Use a timer to count down to an event
based on a preset time length (hours, minutes,
and seconds).
Alarm
Set an alarm to ring at a specific time.
Create an Alarm
Create an alarm event. You can set one-time or
recurring alarms, and choose options for how to be
notified.
1.	 From a Home screen, tap Apps > Clock.
2.	 Tap Create alarm to configure:
•	Time: Choose a time for the alarm.
•	Repeat: Choose when to repeat the alarm.
•	Alarm type: Choose whether the alarm uses
sound, vibration, or vibration and sound to
alert you.
•	Alarm tone: Choose a sound to play for the
alarm.
•	 Volume: Drag the slider to set the volume
of the alarm.
•	Snooze: Allow snoozing. Set interval and
repeat values for the alarm while snoozing.
•	Smart alarm: When on, the alarm will start
playing a tone at a low volume at an interval
before the alarm time, and slowly increase in
volume. Choose a time interval and a tone to
use with smart alarm. This option is available
when you have chosen an alarm type that
includes sound.
•	Name: Enter a name for the alarm.
3.	 Tap Done to save the alarm.
Delete an Alarm
You can delete an alarm that you created.
1.	 From a Home screen, tap Apps > Clock.
2.	 Touch and hold an alarm, and then tap
 Delete.
Clock
56 ClockCalling
World Clock
The World clock lets you keep track of the current
time in multiple cities around the globe.
To list a city on the main World clock screen:
1.	 From a Home screen, tap Apps > Clock.
2.	 Tap World clock.
3.	 Tap the Search field, and enter the name of a
city. Tap the city to view it on the globe.
4.	 Tap Add city to add the city to your world
clock.
5.	 Repeat to add more cities.
Tip: Tap Search cities and use the keyboard to find a
city. Tap an entry to add the city to your list.
To remove a city from the World clock list:
1.	 From a Home screen, tap Apps > Clock.
2.	 Tap World clock.
3.	 Tap List view.
4.	 Touch and hold a city you want to remove from
the list until it is selected.
5.	 Tap  Delete.
Stopwatch
The Stopwatch lets you time events down to a
hundredth of a second.
1.	 From a Home screen, tap Apps > Clock.
2.	 Tap Stopwatch and use the following options:
•	Start: Begin timing.
•	Stop: Stop timing.
•	Lap: Keep track of lap times.
•	Resume: Continue timing after stopping the
clock.
•	Reset: Reset the Stopwatch to zero.
Timer
The Timer provides a countdown timer for up to
99 hours, 59 minutes, and 59 seconds.
1.	 From a Home screen, tap Apps > Clock.
2.	 Tap Timer.
3.	 Use the keypad and tap Hours, Minutes, and
Seconds to set the length of the Timer. The
following options are available:
•	Start: Begin the Timer.
•	Stop: Stop the Timer.
•	Resume: Resume the timer after stopping it.
•	Reset: Reset the Timer.
57 ContactsCalling
Store and manage your contacts
with the Contacts app, which
can be synchronized with a
variety of your existing personal
accounts, including Google,
Email, Facebook, and your
Samsung account.
For more information on connecting with and
managing your accounts through your device,
see Accounts.
Manage Contacts
Access your list of contacts by using the Contacts
app. To access your Contacts list:
►► From a Home screen, tap Apps >
 Contacts.
Find a Contact
You can search for a contact or swipe the list to find
one by name.
1.	 From a Home screen, tap Apps >
 Contacts.
2.	 Tap the Search field, and then enter characters
to find contacts that match.
– or –
Tap a letter on the side of the list to jump directly
to that letter in the alphabetical list. You can also
slide your finger across the alphabetical list to
select a letter with better precision.
Add a Contact
Use the following procedure to add a new contact.
1.	 From a Home screen, tap Apps >
 Contacts.
2.	 Tap Create contact, and then tap contact
fields to enter information.
•	Choose a storage account for the contact. You
can store the contact on the device, or sync it
with an account.
•	Tap Contact photo to assign a picture to
the new contact.
•	Enter a name, phone number, email address,
and assign the contact to a group.
-- Tap  Add to enter additional entries.
-- Tap  Remove to remove an entry.
-- Tap  More for additional fields.
-- Tap Label to the right of an entry to
choose a label for the field (for example,
Home or Work).
3.	 Tap Add another field to add additional contact
information.
4.	 Tap Save.
Contacts
58 ContactsCalling
Edit a Contact
When editing a contact, you can tap a field and
change or delete the information, or you can add
more fields to the contact’s list of information.
1.	 From a Home screen, tap Apps >
 Contacts.
2.	 Tap the contact to display it, and then tap
 Edit.
3.	 Tap any of the fields to add, change, or delete
information.
4.	 Tap Save.
Share a Name Card
When you share a name card, the contact’s
information is sent as a vCard file (.vcf) or text file.
You can share a vCard using Bluetooth or Wi-Fi
Direct, attach it to a message, or save it to a storage
location.
1.	 From a Home screen, tap Apps >
 Contacts.
2.	 Tap a contact to display it, and then tap
 More options > Share name card.
3.	 Choose whether to send the contact as a vCard
file (.vcf) or text file.
4.	 Choose a sharing method and follow
the prompts.
Link Contacts
When you have contacts from various sources, such
as Gmail or Facebook, you may have multiple similar
entries for a single contact. Contacts lets you link
multiple entries into a single contact.
1.	 From a Home screen, tap Apps >
 Contacts.
2.	 Tap the contact to display it.
3.	 Tap  More options > Link contacts.
4.	 Tap contacts to choose them.
5.	 Tap Done.
Unlink Contacts
You can unlink a contact that you previously linked.
1.	 From a Home screen, tap Apps >
 Contacts.
2.	 Tap the contact to display it.
3.	 Tap  More options > Unlink contacts.
4.	 Tap Separate beside contacts to unlink them
from the main contact.
Delete Contacts
You can delete a single contact or choose multiple
contacts to delete.
1.	 From a Home screen, tap Apps >
 Contacts.
2.	 Touch and hold a contact to select it. You can
also tap other contacts or tap the selected
checkbox at the top of the screen to select all
contacts.
3.	 Tap Delete, and then confirm if prompted.
Favorites
When you mark contacts as favorites, they are
easily accessible from other apps. Favorites display
together on the Favorites tab in Contacts.
Mark Contacts as Favorites
You can mark contacts as Favorites.
1.	 From a Home screen, tap Apps >
 Contacts.
2.	 Tap a contact to display it, and then tap
 Add to Favorites (the star brightens ).
Remove Contacts from Favorites
You can remove contacts from Favorites.
1.	 From a Home screen, tap Apps >
 Contacts.
2.	 Tap a contact to display it, and then tap
 Remove from Favorites (the star dims ).
59 ContactsCalling
Create a Shortcut to a Favorite
You can create a shortcut to a favorite on the home
screen, to access their information directly from the
home screen.
1.	 From a Home screen, tap Apps >
 Contacts.
2.	 Tap the Favorites tab, and then touch and hold
on a contact to select it.
3.	 Tap  More options > Add shortcut to
Home screen. The new shortcut displays in an
empty area of the home screen.
Groups
You can use groups to organize your contacts. Your
device comes with preloaded groups, and you can
create your own. You might create a group for your
family, for coworkers, or a team. Groups make it
easy to find contacts, and you can send messages
to the members of a group.
Create a Group
You can create your own contact groups.
1.	 From a Home screen, tap Apps >
 Contacts.
2.	 Tap Groups, and then tap Create group.
3.	 Tap fields to enter information about the group:
•	Create group in [location]: Tap to choose
where to save the group. You can save it to a
specific account, to the device memory, or to
all accounts.
•	Group name: Enter a name for the new group.
•	Group ringtone: Choose a ringtone specific to
members of this group.
•	Group message tone: Choose a tone specific
to members of this group.
•	Group vibration pattern: Choose a vibration
pattern specific to members of this group.
4.	 Tap Add member and select contact(s) to add to
the new group, and then tap Done.
5.	 Tap Save.
Rename a Group
You can rename a contact group.
1.	 From a Home screen, tap Apps >
 Contacts.
2.	 Tap Groups, and then tap a group.
3.	 Tap  More options > Edit group and enter a
new name.
4.	 Tap Save.
Add Contacts to a Group
You can add contacts to a group.
1.	 From a Home screen, tap Apps >
 Contacts.
2.	 Tap Groups, and then tap a group.
3.	 Tap Add member, and then tap the contact(s)
you want to add.
4.	 Tap Done.
Send a Message to a Group
You can send a text message to members of a
group.
1.	 From a Home screen, tap Apps >
 Contacts.
2.	 Tap Groups, and then tap a group.
3.	 Tap  More options > Send message or email.
4.	 Tap Message.
5.	 Type your message and tap Send.
60 ContactsCalling
Send an Email to a Group
You can send an email to members of a group.
1.	 From a Home screen, tap Apps >
 Contacts.
2.	 Tap Groups, and then tap a group.
3.	 Tap  More options > Send message or email.
4.	 Tap Email.
5.	 Tap contacts to select them, or tap the
 Checkbox, and then tap Done. Only group
members that have email addresses in their
records are shown.
6.	 Choose an account and follow the prompts.
Delete a Group
Preset groups cannot be deleted.
1.	 From a Home screen, tap Apps >
 Contacts.
2.	 Tap Groups.
3.	 Tap  More options > Delete group.
4.	 Tap one or more groups to select, and then tap
Delete.
5.	 Tap Group only to delete the just the group,
or tap Group and members to delete both the
group and its members.
Contact Settings
These settings allow you to modify settings
associated with using the Contacts app.
1.	 From a Home screen, tap Apps >
 Contacts > Contacts tab.
2.	 Tap  More options > Settings > Contacts.
3.	 Tap an option and follow the prompts.
61 EmailCalling
Email
Use the Email app to view and
manage all your email accounts
in one app.
To access Email:
►► From a Home screen, tap Apps > Email.
Configure Email Accounts
You can configure Email for most accounts in just a
few steps.
1.	 From a Home screen, tap Apps > Email.
2.	 Follow the prompts to set up your email account.
To add an email account:
1.	 From a Home screen, tap Apps > Email.
2.	 Tap More options > Settings >
Manage accounts.
3.	 Tap Add account.
4.	 Enter your email address and password.
The device communicates with the appropriate
server to set up your account and synchronize your
email. When complete, your email is displayed in the
Inbox for the account.
Note: To configure email account settings at
any time, tap  More options > Settings. Tap
Manage accounts. Tap the email account to display
its settings.
Refresh Your Email Account
Refresh your account to update your email
accounts.
1.	 From a Home screen, tap Apps > Email.
2.	 In the Application bar, tap Refresh.
View Multiple Email Accounts
You can view email you receive for multiple accounts
on the Combined inbox screen or you can view
email accounts individually.
1.	 From a Home screen, tap Apps > Email.
2.	 Tap Menu at the top left of the screen to view
the current account mailbox.
3.	 Tap the account name to view:
•	Combined view: View all email in a combined
inbox.
•	[Account name]: View email for only one
email account.
Manage Your Inbox
There are several tools available from the Inbox
screen.
1.	 From a Home screen, tap Apps > Email.
•	Tap a message to read and reply or forward it.
•	Tap Search to search for key words in your
email inbox.
•	Tap More options for additional message
options.
62 EmailCalling
Create and Send an Email
This section describes how to create and send an
email using the Email app.
1.	 From a Home screen, tap Apps > Email >
Compose.
2.	 Tap the To field to manually add an email
address or tap Add recipient to select a
recipient from Contacts or Groups.
•	If manually entering recipients, enter additional
recipients by separating each entry with a
semicolon (;). More recipients can be added at
any time before the message is sent.
•	If adding a recipient from your Contacts, tap
the contact to place a checkmark, and then
tap Done. The contact is displayed in the
recipients field.
•	Tap More to add Cc and Bcc fields.
3.	 Tap the Subject and Message fields to enter
text.
•	Tap Attach to add Files, Images, Audio,
and more to your email.
•	Tap  More options for additional email
options.
4.	 Review your message and tap Send.
Remove Email Accounts
To remove an Email account:
1.	 From a Home screen, tap Apps > Email.
2.	 Tap More options > Settings >
Manage accounts.
3.	 Tap  More options > Select.
4.	 Tap one or more accounts to delete, and then
tap Remove. Confirm if prompted.
Email Settings
These settings allow you to modify settings
associated with using the Email app.
1.	 From a Home screen, tap Apps > Email.
2.	 Tap  More options > Settings.
3.	 Under General settings, tap an option, and then
follow the prompts.
4.	 Tap Manage accounts, and then tap an account
to configure specific settings for only that
account.
63 Galaxy AppsCalling
Samsung Galaxy Apps provides
a quick and easy way to find and
download free premium apps
that are compatible with your
Galaxy device.
To access the Samsung Galaxy Apps website:
►► From a Home screen, tap Apps >
 Galaxy Apps.
Galaxy Essentials
Galaxy Essentials is a collection of specially chosen
apps available through Samsung Apps.
From Galaxy Essentials, you can access and
download a collection of premium content, free of
charge.
To access Galaxy Essentials:
1.	 Swipe across the Home screens and locate
and tap the Galaxy Essentials widget.
2.	 Follow the prompts to download
Galaxy Essentials apps.
Note: A Samsung account is required to purchase
and download apps.
Galaxy Apps
64 GalleryCalling
View, edit, and manage pictures
and videos.
Note: Some functions described in this section are
only available if there are images or videos in the
Gallery.
View Images and Videos
Launching Gallery displays available folders. When
another app, such as Email, saves an image, a
Download folder is automatically created to contain
the image. Likewise, capturing a screenshot
automatically creates a Screenshots folder.
1.	 From a Home screen, tap Apps >  Gallery.
2.	 Tap Menu in the upper left corner, and then
tap an option to choose the way items are
displayed.
•	In Album view, you can create albums to
organize your images. On the menu, tap
Albums, and then tap  More options >
Create album.
3.	 Depending on the view mode selected, either tap
an image or video to view it, or first tap an album
or folder and then tap an image or video.
•	When viewing an image or video, you can
swipe left or right to view the next or previous
image or video.
Zoom In or Out
Use one of the following methods to zoom in or out
on an image:
•	Double-tap anywhere on the screen to zoom in or
zoom out.
•	Spread two fingers apart on any place to zoom in.
Pinch the screen to zoom out.
Play Videos
You can play videos stored on your device.
1.	 From a Home screen, tap Apps >  Gallery.
2.	 Tap a folder or category to open it.
3.	 Tap a video to view it.
4.	 Tap Play to play the video.
Trim Segments of a Video
You can trim segments of a video.
1.	 Select a video, and then tap Trim.
2.	 Use the sliders at the bottom of the screen
to trim the video. Move the left bracket to the
desired starting point, and then move the right
bracket to the desired ending point.
3.	 Tap Done to save the video. Modify the
File name, and then tap OK to confirm the
changes.
Gallery
65 GalleryCalling
Edit Images
You can edit images stored on your device.
►► While viewing an image, tap  More options:
•	Edit: Use basic tools to edit your picture.
•	More info: View image details.
•	Write on image: Write directly on the image.
•	Rotate left: Rotate the photo
counter‑clockwise.
•	Rotate right: Rotate the photo clockwise.
•	Crop: Resize the frame to crop the image.
•	Rename: Rename the file.
•	Slideshow: Start a slideshow with the images
and videos in the current folder.
•	Add tag: Add a tag to your image.
•	Studio: Edit your picture with advanced tools.
•	Set as: Set the image as wallpaper or as a
contact’s photo.
•	Print: Print the image through a USB or
Wi‑Fi connection. Some printers may not be
compatible with the device.
•	Settings: Change the Gallery settings.
Share Images and Videos
You can share images and videos from your Gallery.
1.	 From a Home screen, tap Apps >  Gallery.
2.	 Tap a folder to open it.
3.	 In a folder, tap  More options > Select, select
images and videos, and then tap Share via
to send them to others or share them with social
network services.
– or –
While viewing a single image or video, tap
 Share via to send it to others or share it with
social network services.
Delete Images and Videos
You can delete images and videos stored on your
device.
1.	 From a Home screen, tap Apps >  Gallery.
2.	 Tap a folder to open it.
3.	 In a folder, tap More options > Delete, select
images and videos, and then tap Done.
– or –
When viewing a single image, tap  Delete.
Gallery Settings
These settings allow you to modify settings
associated with using your Gallery.
1.	 From a Home screen, tap Apps >  Gallery.
2.	 Tap More options > Settings.
3.	 Tap an option and follow the prompts.
4.	 Tap More options > Add account to
add a Samsung, Dropbox, Google, or
Facebook account.
66 InternetCalling
Access the Internet with a
fully‑featured web browser.
Access the Internet
►► From a Home screen, tap Apps >  Internet.
Command Keys
The following command keys are available:
•	 Back or Back: Return to the previous page.
•	 Forward: Go forward to a recent page.
•	 Home: Display your Internet Home screen.
•	  Bookmarks: Manage bookmarked pages,
saved pages, and history.
►► Tabs: Manage open tabs. The number on
the icon indicates the number of tabs that are
currently open.
•	 Refresh: Reload or reload the current
web page.
View a Web Site
To view a web site:
►► Tap the address field, enter the web address,
and then tap Go on the keyboard.
To share, save, or print the current web page:
►► Tap More.
To zoom in or out:
►► Tap the screen twice or pinch the screen to
zoom out. Stretch the screen to zoom in.
Browser Tabs
Use tabs to view multiple web pages at the
same time.
To open a new tab:
►► Tap Tabs > New tab.
To close a tab:
1.	 Tap Tabs.
2.	 Tap Close by the tabs you want to close.
Bookmarks
The Bookmarks page stores Bookmarks,
Saved pages, and History.
Save and Open Bookmarks
Bookmarking a web page saves the web address so
that you can access it quickly.
To bookmark the current web page:
1.	 Tap  Bookmarks > Bookmarks > Add.
2.	 Type a title for the bookmark and tap Save.
To open a bookmarked web page:
1.	 Tap  Bookmarks > Bookmarks.
2.	 Tap a bookmark entry.
Internet
67 InternetCalling
Saved Pages
Saving a web page stores the web page content on
your device so that you can access it offline.
To save the current web page:
►► Tap More > Save web page.
To view saved web pages:
1.	 Tap  Bookmarks > Saved pages.
2.	 Tap a saved page to open it in the browser.
View History
To view a list of recently visited web pages:
►► Tap  Bookmarks > History.
Share Pages
To share a web page address with others:
►► Tap  More options > Share, and follow the
prompts.
Secret Mode
Pages viewed in Secret mode are not listed in your
browser history or search history, and leave no
traces (such as cookies) on your device. Secret
tabs are a darker shade than the normal tab
windows.
Note: Any downloaded files remain on your device
after you close the secret tab.
To enable Secret mode:
1.	 From a Home screen, tap Apps >  Internet.
2.	 Tap Tabs.
3.	 Tap Turn on secret.
4.	 Tap Create password to protect your
Secret mode data with a password.
– or –
Tap Do not use password.
To turn off Secret mode:
1.	 From a Home screen, tap Apps >  Internet.
2.	 Tap Tabs.
3.	 Tap Turn off secret.
Internet Settings
These settings allow you to modify settings
associated with using the Internet app.
1.	 From a Home screen, tap Apps >  Internet.
2.	 Tap More > Settings.
3.	 Tap an option and follow the prompts.
68 MessagesCalling
Learn how to send and receive
different messages using the
Samsung Messages app on your
device.
Types of Messages
The Samsung Messages app provides the following
message types:
•	Text Messages (SMS)
•	Multimedia Messages (MMS)
The Short Message Service (SMS) lets you send
and receive text messages to and from other mobile
phones or email addresses. To use this feature, you
may need to subscribe to your service provider’s
message service.
The Multimedia Messaging Service (MMS) lets you
send and receive multimedia messages (such as
picture, video, and audio messages) to and from
other mobile phones or email addresses. To use this
feature, you may need to subscribe to your service
provider’s multimedia message service.
Messaging icons are displayed at the top of the
screen and indicate when messages are received
and their type.
Create and Send Messages
This section describes how to create and send a
message using the Messages app.
1.	 From a Home screen, tap Messages.
2.	 Tap  Compose.
3.	 Tap the Enter recipients field to manually enter
a recipient or tap Add recipient to select a
recipient from your Contacts. You can also select
the recipient based on Groups, Favorites, or
Logs.
•	If adding a recipient from your Contacts,
tap the contact to place a checkmark, and
then tap Done. The contact is placed in the
recipients field.
•	Enter additional recipients by separating each
entry with a semicolon (;) and then using the
previous procedure. More recipients can be
added at any time before the message is sent.
•	For the Group option, you can select up to ten
members in the group.
4.	 Tap the Enter message field to enter a message.
•	 Attach: Add images, audio, and more to
your message.
•	 Add emoticon: Choose an available
emoticon from the list and then add it into your
message at the cursor location.
5.	 Review the message and tap Send.
Note: If you exit a message before you send it, the
message is automatically saved as a draft.
Messages
69 MessagesCalling
View New Messages
When you receive a new message,
 New message appears on the Status bar.
To view the message:
►► Open the Notification panel and tap the
message. For more information, see
Notification Panel.
– or –
From a Home screen, tap Apps >
 Messages, and then tap the new message to
view it.
•	To play a multimedia message attachment
(audio or video), tap Play.
•	To scroll through the list of messages, swipe
up or down the page.
Delete Messages
To delete messages, follow these steps:
1.	 From a Home screen, tap Apps >
 Messages.
2.	 Tap More options > Select.
3.	 Tap each message you want to delete or tap the
selected checkbox at the top of the screen to
select all messages.
4.	 Tap  Delete and confirm if prompted.
Message Search
You can search through your messages by using the
Message Search feature.
1.	 From a Home screen, tap Apps >
 Messages.
2.	 Tap Search.
3.	 Enter a word or phrase to search for, and then
tap Search on the keyboard.
Messages Settings
Configure the settings for text messages,
multimedia messages, push messages, and more.
►► From a Home screen, tap Apps >
 Messages >  More options > Settings.
Emergency Alerts
This device is designed to receive wireless
emergency alerts from the Commercial Mobile
Alerting System (CMAS), which may also be known
as the Personal Localized Alerting Network (PLAN).
For more information, please contact your wireless
provider.
Emergency alerts allows customers to receive
geographically-targeted messages. Alert messages
notify customers of imminent threats to their safety
within their area. There is no charge for receiving an
Emergency alert message.
There are three types of Emergency alerts:
•	Alerts issued by the President
•	Alerts involving imminent threats to safety of life
(extreme and severe)
•	AMBER alerts (missing child alert)
Users may choose not to receive Imminent alerts
(extreme and severe) and AMBER alerts.
Note: Alerts issued by the President cannot be
disabled.
To disable Imminent and AMBER alerts, follow the
instructions below:
1.	 From a Home screen, tap Apps >
 Messages.
2.	 Tap More options > Settings >
Emergency alerts.
3.	 Tap Emergency alerts.
•	All alerts are enabled (checkmark showing) by
default.
4.	 Tap an alert option to disable it.
70 Music PlayerCalling
Listen to your favorite songs with the Music player. Navigate through
your music library, play songs, and create customized playlists.
Adjust volume
More options
Change player
Sound quality and
effects
Repeat
Song length
Playback controls
Time elapsed
Shuffle
Favorite
Playback position
Volume
•	Volume: Tap to adjust the volume.
•	More options: View more options.
•	Adjust volume: Control the volume level.
•	Sound quality and effects: Customize options to
adjust sound effects.
•	Repeat: Control playback.
•	Song length: View the total length of the current
song.
•	Playback controls: Fast-forward or rewind, play
or pause the current song, add the song to a
playlist, and view current playlist.
•	Time elapsed: View the time elapsed for the
current song.
•	Shuffle: Shuffle songs in the current playlist.
•	Playback position: Skip to another part of the
current song.
•	Favorite: Tag this song as a favorite.
•	Change player: Play the song on a connected
device.
Music Player
71 Music PlayerCalling
Listen to Music
1.	 From a Home screen, tap Apps >  Music.
2.	 Tap a library category at the top of the screen to
view your music files.
3.	 Swipe through the list of songs and tap an entry
to begin playback.
4.	 While playing music, use these controls:
•	Tap Pause to pause playback. To start
playback again, tap Play.
•	Tap Rewind to move to the previous
song. Tap Fast-forward to move to the
next song.
•	Tap the repeat button to control playback.
Choose Repeat off to play all songs once.
Choose Repeat all to repeat all songs.
Choose Repeat 1 to repeat the current
song.
•	Tap the shuffle button to control the order
songs are played. Choose Shuffle off to
play songs in the order they appear in the
list. Choose  Shuffle on to play songs in
random order.
•	Tap Favorite to mark a song as a favorite.
Whenever a song is a favorite, the star is gold.
Favorite songs are included in the Favorites
playlist.
•	Tap Volume to set the volume. You can
also set volume by pressing the Volume key
on the side of the phone.
Note: When you close the Music screen, playback
continues in the background, allowing you to listen to
music while using other features of your phone. When
music is playing in the background, you can access
playback controls from the Notification panel.
72 My FilesCalling
Access files stored on your
device, including images, videos,
music, and sound clips.
To view files in My Files:
1.	 From a Home screen, tap Apps >
 My Files.
2.	 Tap a category to view the relevant files or
folders.
3.	 Tap a file or folder to open it.
File Groups
Files stored in the device are organized into the
following groups:
•	Recent files: View recently saved files.
•	Images: View image files.
•	Videos: View video files.
•	Audio: View audio files.
•	Documents: View document files.
•	Downloaded apps: View downloaded apps.
•	Download history: View all apps and files that
have been downloaded to the device.
•	Shortcuts: Contains shortcuts to files or folders
that you have added. This option only appears if
you have added shortcuts to the My Files main
screen.
•	Local storage: View folders and files in their
storage locations.
-- Device storage: View folders and files located
on the device.
-- SD card: View folders and files located on the
memory card (if installed).
•	Cloud storage: Contains shortcuts to FTP servers
or other cloud storage locations that you have
added. This option only appears if you have
added shortcuts to the My Files main screen.
My Files Options
Use My File options to search, edit, clear file history,
and more.
►► From a Home screen, tap Apps >
 My Files. The following options are available:
•	 Search: Search for a file or folder.
•	 Storage usage: View memory information
for your device and memory card (if installed).
•	Tap More options for these options:
-- Add shortcut: Add a shortcut on the My
Files main screen to any folder.
-- Settings: Change the settings for viewing
files.
My Files
73 S HealthCalling
Use S Health to plan, track, and
manage your health goals and
activities, including exercise,
sleep, and meals.
Caution: The information gathered from this device,
S Health, or related software is not intended for use in
the diagnosis of disease or other conditions, or in the
cure, mitigation, treatment or prevention of disease.
The accuracy of the information and data provided
by this device and its related software, including
heart rate readings, may be affected by factors
such as environmental conditions, skin condition,
specific activity performed while using/wearing the
device, settings of the device, user configuration/
user-provided information, placement of the sensor
on the body, and other end-user interactions. For
more information on proper wear and use, see
samsung.com/us/heartratesensor
1.	 From a Home screen, tap Apps >
 S Health.
2.	 Read and accept the terms and conditions.
3.	 Set up your health profile and goals.
Before You Start Exercising
This app can be used to monitor your exercise.
While moderate physical activity, such as brisk
walking, is safe for most people, health experts
suggest that you talk with your doctor before you
start an exercise program, particularly if you have
any of the following conditions:
•	Heart disease;
•	Asthma or lung disease;
•	Diabetes, or liver or kidney disease;
•	Arthritis.
You should also check with your doctor if you have
symptoms suggestive of heart, lung, or other serious
disease, such as:
•	Pain or discomfort in your chest, neck, jaw, or
arms during physical activity;
•	Dizziness or loss of consciousness;
•	Shortness of breath with mild exertion or at rest,
or when lying down or going to bed;
•	Ankle swelling, especially at night;
•	A heart murmur or a rapid or pronounced
heartbeat;
•	Muscle pain when walking upstairs or up a hill that
goes away when you rest.
Finally, the American College of Sports Medicine
recommends that you see your doctor before
engaging in vigorous exercise if two or more of the
following apply:
•	You are a man older than age 45 or a woman
older than age 55;
•	You have a family history of heart disease before
age 55;
•	You smoke or quit smoking in the past six months;
•	You have not exercised for three months or more;
•	You are overweight or obese;
•	You have high blood pressure or high cholesterol;
•	You have impaired glucose tolerance, also called
prediabetes.
S Health
74 S HealthCalling
When in Doubt — Check It Out
If you are unsure of your health status, have several
health problems, or are pregnant, you should speak
with your doctor before starting a new exercise
program. Working with your doctor ahead of time is
a good way to plan an exercise program that is right
and safe for you. Consider it the first step on your
path to physical fitness.
75 S NoteCalling
The S Note app helps you
create, edit, and manage all the
notes on your device.
Sign in to your Samsung
account to access your notes in
S Note from any device.
With S Note, create content by typing, writing,
drawing, and even recording voice, video, or taking
pictures. Templates are provided to make content
creation easy and help keep things organized.
Create a Note
To create a note with S Note:
1.	 From a Home screen, tap Apps >  S Note.
2.	 Tap the Create new note.
3.	 Use the S Pen to create content.
•	Tap More > Background settings to add
templates, change the background color, and
add images.
4.	 Tap Save.
Note Tools
When creating or editing a note in S Note, some
helpful modes and tools are provided.
Note: To use your finger to write and draw on S Notes,
tap More > Settings > S Pen only mode to disable
this restriction.
•	Save: Name and save the note.
•	Pen: Write or draw freehand with the S Pen. Tap
the Pen icon once to change the Pen settings.
-- Tap Favorite pens to save pen settings at
the bottom of the screen.
•	Eraser: Erase content from the note. Tap once to
select the eraser. Tap again to change the Eraser
settings.
•	Text: Type text using the keyboard. Tap once to
select Text mode.
•	Undo: Undo the last action.
•	Redo: Redo the last action.
•	More options: View more options for the note.
S Note
76 S NoteCalling
Edit a Note
To edit an S Note:
1.	 From a Home screen, tap Apps >  S Note.
2.	 Tap a note to view it.
3.	 Tap Edit mode to edit the note.
Note: Action memos behave differently from other
notes. When you tap on an Action memo to view it,
you can edit the memo immediately.
View Action Memos
You can view S Notes and Action memos together,
or you can narrow your view to Action memos.
To view Action memos in S Note:
►► Tap the drop-down menu and tap Action memos.
•	Tap Search to search for action memos.
•	Tap More for additional options:
-- Share: Select action memos to share.
-- Edit: Select memos to delete, export, or
save as an S Note.
-- Filter by background color: Sort action
memos by background color.
-- Settings: Customize S Note settings.
-- Help: View help topics on how to use
S Note.
77 S VoiceCalling
S Voice
Speak commands to perform
operations on your device, and
to speak criteria for searches
and other operations.
Access S Voice
You can access S Voice from the Apps list.
1.	 From a Home screen, tap Apps >  S Voice.
2.	 Speak a command.
3.	 Tap Microphone if the device does not hear
you, or to give it another command.
Tip: Tap More options for example commands and
to view a tutorial.
S Voice Settings
These settings allow you to modify settings
associated with using the S Voice app.
1.	 From a Home screen, tap Apps >  S Voice.
2.	 Tap More options > Settings.
3.	 Tap an option and follow the prompts.
78 ScrapbookCalling
The Scrapbook app provides
a place for you to manage the
multimedia content you capture
with the S Pen tools.
Scrapbook provides storage and organization tools
for content you capture while using your mobile
device.
With the S Pen tools, you can capture articles,
images, and even videos and music. You can then
add a title, text, a handwritten memo, or content
tags. When you capture content online, the web link
is saved with the content.
Edit the Scrapbook
Categories and content files in the Scrapbook can
be edited. To open the Scrapbook:
►► From a Home screen, tap Apps >
 Scrapbook.
You can edit both Categories and the content files
within them.
To edit a file:
1.	 Tap the drop-down menu in the top left corner.
2.	 Select either the category or tag that contains
the file to edit.
3.	 Tap the file to edit.
4.	 Tap Edit to change the Title, Text, Memo, or Tags
as desired.
5.	 When finished, tap Save.
To edit categories:
1.	 From a Home screen, tap Apps >
 Scrapbook.
2.	 Tap More options > Manage categories.
•	Tap Create category to create a new
category.
•	To delete a category, tap Edit, select the
category, and tap Delete.
3.	 When you are finished tap Back.
Scrapbook
79 Video PlayerCalling
Play and manage videos stored on your device.
File name
Pause/Play
Rewind
More
options
Screen ratio
Fast-forwardChange player
Playback
position
•	Rewind: Restart the video, skip to a previous
video or rewind the video.
•	Pause or Play: Pause or play the current video.
•	Fast-forward: Skip to the next video or
fast‑forward through the current video.
•	More options: View more options.
•	File name: View the name of the video file.
•	Screen ratio: Change the screen ratio.
•	Change player: Play the video on a nearby
device.
•	Playback position: Skip to another part of the
video.
Video Player
80 Video PlayerCalling
Access the Video Player
1.	 From a Home screen, tap Apps > Video.
2.	 Scroll through the videos stored on your device.
After a few seconds, each video thumbnail
begins playing a preview of the clip.
3.	 Tap a video to view it.
Use Pop‑Up Play
Multitask with Pop-up player by transforming your
video player into a pop-up window. The video will
continue to play, and the pop-up window can be
resized or moved anywhere on the screen.
1.	 From a Home screen, tap Apps > Video.
2.	 Tap a video to view it.
3.	 Tap More options > Pop-up player to continue
playing the video in a floating window.
•	Drag the window to any location on the
screen.
•	Use two fingers to pinch or spread to resize
the floating window.
Change the Video Screen Size
You can change the size of the video during video
playback.
1.	 From a Home screen, tap Apps > Video.
2.	 Tap a video to view it.
3.	 Tap the screen ratio icon to cycle through the
screen size options:
•	 Full-screen in ratio view: The video
is enlarged as much as possible without
becoming distorted.
•	 Full-screen view: The entire screen is
used, which may cause some minor distortion.
•	 Original size view: The video will be
played in its original size.
•	 Stretch to fit: The video is enlarged to fit
the screen without becoming distorted.
81 Voice RecorderCalling
Voice Recorder
Record voice memos and notes.
Create a Voice Recording
To create a voice recording:
►► From a Home screen, tap  Apps >
 Voice Recorder.
•	Tap  More options > Settings >
Recording quality to adjust the recording
quality.
•	Tap Select mode to choose the appropriate
recording mode:
-- Normal: This recording mode picks up any
sounds detected by the microphones.
-- Interview: The top and bottom microphones
are used for two-directional recording. The
top and bottom of the device pick up equal
amounts of sound. Microphones can be
muted during playback.
-- Meeting: The microphones are sensitive
to sound from all directions and can
distinguish up to eight sources of sound.
Sound sources can be muted during
playback.
-- Voice memo: Voice input is converted to
text on screen. The maximum recording time
is five minutes.
The following additional controls are available:
•	 Block calls: Block incoming calls while
recording.
•	 Record: Record an audio file.
•	 Stop: Stop recording. The file is
automatically saved.
•	 Pause: Pause the recording of an
audio file.
•	 Cancel: Cancel the recording of an audio
file.
•	 Bookmark: Add a bookmark to this
location in the recording.
Manage Recordings
Once you have recorded and saved at least one
recording, the following options are available:
1.	 From a Home screen, tap  Apps >
 Voice Recorder.
2.	 Tap Recordings.
3.	 Tap a recording to play it back.
4.	 Tap Search to search for a recording.
5.	 Tap  More options:
•	Select: Select recordings. Once selected, the
following options are available:
-- Share: Share recording files.
-- Delete: Delete voice recordings.
-- More options: Choose Change category,
Rename, Set as, Write to Voice Label, or
view Details.
•	Sort by: Sort the list of recordings.
•	Filter by category: Filter entries by category.
•	Edit categories: Add or edit categories.
•	Settings: Configure Voice Recorder.
Configure your device’s
connections and settings,
add accounts, and customize
the Home screens, apps, and
features.
Settings
83 How to Use SettingsSettings
How to Use Settings
Access Settings
There are a couple of ways to access your device
settings.
►► From a Home screen, tap Apps >
 Settings.
– or –
Drag down from the Status bar to display the
Notification panel, and then tap  Settings.
Search for Settings
If you are not sure exactly where to find a certain
setting, you can use the Search feature.
1.	 From a Home screen, tap Apps >
 Settings.
2.	 Tap Search.
•	Enter a word or words in the Search field. As
you type, settings that match are displayed on
the screen.
•	Tap an entry to go to that setting.
Customize Quick Settings
Quick settings are the settings that you are most
likely to frequently use. When you first access the
Settings menu, the Quick settings are set to a
default list of settings.
To edit the Quick settings list:
1.	 From a Home screen, tap Apps >
 Settings.
2.	 Tap More options > Edit quick settings.
•	Choose additional settings to display in your
Quick settings menu. Settings that are already
in the Quick settings menu are checked.
•	Uncheck a setting to remove it from the
Quick settings list.
3.	 Tap Done to save your new Quick settings menu.
Change How Settings Are Listed
Settings can be listed in a list view or a tab view.
1.	 From a Home screen, tap Apps >
 Settings.
2.	 Tap More options > View as.
3.	 Select a different view.
84 Wi-FiSettings
Wi-Fi is a term used for certain
types of Wireless Local Area
Networks (WLAN). Wi-Fi
communication requires access
to a wireless Access Point (AP).
Turn Wi‑Fi On or Off
Turning Wi-Fi on makes your device able to discover
and connect to compatible in-range wireless APs.
1.	 From a Home screen, tap Apps >
 Settings.
2.	 Tap Wi-Fi, and then tap On/Off to turn Wi-Fi on
or off.
Wi-Fi Status Indicators
Status bar icons indicate your current Wi-Fi
connection status:
•	When Wi-Fi is connected, active, and
communicating with a wireless Access Point,
 Wi-Fi active is displayed in the Status bar.
•	If a Wi-Fi access point is available, but your
device is not connected to it, Wi-Fi available
is displayed. It may also display if there is a
communication issue with the target wireless
Access Point.
Wi‑Fi Networks
To scan for a Wi-Fi network and connect to it:
1.	 From a Home screen, tap Apps >
 Settings.
2.	 Tap Wi-Fi, and then tap On/Off to turn Wi-Fi on.
•	When Wi-Fi is turned on, your device
automatically scans for available networks and
displays them.
3.	 Tap the network you want to connect to.
•	When you select an open network, you are
automatically connected to the network.
Otherwise, enter a password to connect.
Manually Connect to a Wi‑Fi Network
You can connect your device to a Wi-Fi network
manually.
1.	 From a Home screen, tap Apps >
 Settings.
2.	 Tap Wi-Fi, and then tap On/Off to turn Wi-Fi on.
3.	 Tap Add Wi-Fi network.
4.	 Enter information about the Wi-Fi network:
•	Network SSID: Enter the name of the Wi-Fi
network.
•	Security: Select a security option and enter
your password.
•	Show advanced options: Add advanced
options such as IP settings and Proxy settings.
5.	 Tap Connect to store the new information and
connect to your target wireless Access Point.
Wi-Fi
85 Wi-FiSettings
Wi-Fi Options
The Wi-Fi settings menu allows you to set up many
of your device’s advanced Wi-Fi services.
1.	 From a Home screen, tap Apps >
 Settings.
2.	 Tap Wi-Fi, and then tap On/Off to turn Wi-Fi on.
3.	 Tap More options for options:
•	Scan: Start another scan for nearby Wi-Fi
networks.
•	Wi-Fi Direct: Configure a Wi-Fi Direct
connection with a nearby device.
•	Advanced:
-- Network notification: Receive notifications
when open networks in range are detected.
-- Sort by: Sort Wi-Fi networks alphabetically
or by signal strength.
-- Keep Wi-Fi on during sleep: Specify when
to disconnect from Wi-Fi.
-- Smart network switch: Connect
automatically to a mobile network
connection when the Wi-Fi connection is
unstable.
-- Install certificates: Install authentication
certificates.
-- MAC address: View your device’s
MAC address, which is required when
connecting to some secured networks
(not configurable).
-- IP address: View your device’s IP address
(not configurable).
•	WPS push button: Set up a connection to a
WPS (Wi-Fi Protected Setup) router or other
equipment.
•	WPS PIN entry: View the PIN used by your
device to set up a PIN-secured connection
to a Wi-Fi router or other equipment
(not configurable).
•	Share Wi-Fi profile: Share Wi-Fi profiles you
have created with others.
•	Help: Learn about setting up and using Wi-Fi
networks, and other settings.
Wi-Fi Direct
Wi-Fi Direct allows direct device-to-device
connections using Wi-Fi, without having to connect
to a Wi-Fi network.
1.	 From a Home screen, tap Apps >
 Settings.
2.	 Tap Wi-Fi, and then tap On/Off to turn Wi-Fi on.
•	Wi-Fi must be on to configure settings.
3.	 Tap More options > Wi-Fi Direct. Your device
automatically scans for nearby Wi-Fi Direct
devices.
– or –
Tap Scan to start scanning.
4.	 Select a device, and then follow the prompts to
complete the connection.
Wi-Fi Direct Status Indicator
Status bar icons indicate your current Wi-Fi Direct
connection status:
•	When your device is connected to another device
using Wi-Fi Direct, Wi-Fi Direct is displayed in
the Status bar.
86 BluetoothSettings
Bluetooth
Bluetooth is a short-range
communications technology that
connects your device wirelessly
to a number of Bluetooth
devices, such as headsets
and hands-free car Bluetooth
systems, and Bluetooth-enabled
computers, printers, and wireless
devices.
Note: The Bluetooth communication range is
approximately 30 feet.
Turn Bluetooth On or Off
Use the settings menu to turn your device’s
Bluetooth on or off.
1.	 From a Home screen, tap Apps >
 Settings.
2.	 Tap Bluetooth, and then tap On/Off to turn
Bluetooth on or off.
Bluetooth Status Indicator
Status bar icons indicate your current Bluetooth
connection status:
•	When Bluetooth is turned on, Bluetooth is
displayed in the Status bar.
Scan for Bluetooth Devices
When you want to pair with another Bluetooth
device, you can scan for nearby devices that
are visible.
1.	 From a Home screen, tap Apps >
 Settings.
2.	 Tap Bluetooth, and then tap On/Off to turn on
Bluetooth.
•	When Bluetooth is first turned on, it scans for
nearby Bluetooth devices and displays them.
•	To manually perform a new scan, tap Scan.
Making Your Device Visible to
Other Bluetooth Devices
When you make your device visible, other Bluetooth
devices can find it in a scan and initiate pairing. You
can choose the length of time your device remains
visible.
1.	 From a Home screen, tap Apps >
 Settings.
2.	 Tap Bluetooth, and then tap On/Off to turn on
Bluetooth.
3.	 Tap the Checkbox under My device to make
your device visible to nearby devices.
4.	 Tap Bluetooth > More options >
Visibility timeout.
5.	 Select a time period for your device to remain
visible after you turn on visibility.
87 BluetoothSettings
Review Files Received Through
Bluetooth
When you receive files from another device through
Bluetooth, you can access them from Bluetooth
settings.
1.	 From a Home screen, tap Apps >
 Settings.
2.	 Tap Bluetooth > More options >
Received files.
Change Your Device’s Name
Change the name others use when pairing with your
device through Bluetooth.
1.	 From a Home screen, tap Apps >
 Settings.
2.	 Tap Bluetooth > More options >
Rename device.
3.	 Tap the current device name to edit it.
4.	 When finished, tap OK.
Pair Bluetooth Devices
The Bluetooth pairing process allows you to
establish trusted connections between your device
and another Bluetooth device.
Pairing between two Bluetooth devices is a
one‑time process. Once a pairing is created, the
devices continue to recognize their partnership and
exchange information without having to re-enter a
passcode.
1.	 From a Home screen, tap Apps >
 Settings.
2.	 Tap Bluetooth, and then tap On/Off to turn on
Bluetooth.
•	Make sure that the target device is
discoverable, so that your device can find it.
Refer to the instructions that came with the
device to find out how to set it to discoverable
mode.
3.	 Tap Scan. Your device starts scanning for
Bluetooth devices within range.
4.	 Tap the name of the target device when you see
it displayed in the Bluetooth devices section.
•	Your device automatically tries to pair with the
target device. If automatic pairing fails, enter
the passcode supplied with the target device.
Note: Due to different specifications and features
of other Bluetooth-compatible devices, display and
operations may be different, and functions such as
transfer or exchange may not be possible with all
Bluetooth compatible devices.
Rename a Paired Device
Once you have paired your device to another
device, you can rename the paired device to make it
easier to recognize.
1.	 From a Home screen, tap Apps >
 Settings.
2.	 Tap Bluetooth, and then tap On/Off to turn on
Bluetooth.
3.	 Tap  Settings next to the previously paired
device, and then tap Rename.
4.	 Enter a new name, and tap OK.
Delete a Paired Device (Unpair)
When you unpair from a Bluetooth device, the two
devices no longer recognize each other. To connect
again, you have to pair the devices.
1.	 From a Home screen, tap Apps >
 Settings.
2.	 Tap Bluetooth, and then tap On/Off to turn on
Bluetooth.
3.	 Tap  Settings next to the paired device, and
then tap Unpair to delete the paired device.
88 Tethering and Wi-Fi HotspotSettings
Tethering and Wi-Fi Hotspot
Use Mobile hotspot and
tethering to share your device’s
Internet connection with other
devices.
Enable Mobile Hotspot
Activate Mobile hotspot to allow other devices to use
your device’s Internet connection.
Note: You must have a tethering plan on your service
account in order to use Mobile hotspot.
Warning: Mobile hotspot consumes battery power
and uses data service.
Warning: By default, your device’s Mobile hotspot has
no security applied, and any device can connect.
1.	 From a Home screen, tap Apps >
 Settings.
2.	 Tap Tethering and Wi-Fi hotspot >
Mobile hotspot.
3.	 Tap On/Off to turn Mobile hotspot on or off.
Connect a Device to Your
Mobile Hotspot
Use the other device’s Wi-Fi control to connect to
your device’s Mobile hotspot.
1.	 From a Home screen, tap Apps >
 Settings.
2.	 Tap Tethering and Wi-Fi hotspot >
Mobile hotspot.
3.	 Tap On/Off to turn on Mobile hotspot.
4.	 Activate Wi-Fi on the target device.
5.	 Scan for Wi-Fi hotspots and select the target
device from the list.
6.	 Enter your device’s Mobile hotspot password on
the target device.
•	By default, the password is your device’s
phone number.
Allowed Devices List
Control whether devices connect to your Mobile
hotspot with the Allowed devices list. After you add
devices to the list, they can scan for your device and
connect using your device’s Mobile hotspot name
and password.
Note: Using your device as a Mobile hotspot
consumes battery power and uses data service. While
Mobile hotspot is active, your device’s applications
use the Mobile hotspot data service. Roaming while
using your device as a Mobile hotspot incurs extra
data charges.
1.	 From a Home screen, tap Apps >
 Settings.
2.	 Tap Tethering and Wi-Fi hotspot >
Mobile hotspot.
3.	 Tap On/Off to turn on Mobile hotspot.
4.	 Tap More options > Allowed devices, and
then tap Add to enter the other device’s
Device name and MAC address.
5.	 Tap OK to add the device.
89 Tethering and Wi-Fi HotspotSettings
Change the Mobile Hotspot
Password
You can change your Mobile hotspot password.
1.	 From a Home screen, tap Apps >
 Settings.
2.	 Tap Tethering and Wi-Fi hotspot >
Mobile hotspot.
3.	 Tap On/Off to turn on Mobile hotspot.
4.	 Tap More options > Configure hotspot.
5.	 Tap the Security field and select WPA2 PSK and
enter a new password.
Configure Mobile Hotspot
Settings
Manage your Mobile hotspot security and
connecting settings.
1.	 From a Home screen, tap Apps >
 Settings.
2.	 Tap Tethering and Wi-Fi hotspot >
Mobile hotspot.
3.	 Tap More options > Configure hotspot for the
following settings:
•	Network SSID: View and change the name of
your Mobile hotspot.
•	Broadcast network name (SSID): Enable
to make your Mobile hotspot visible to other
Wi-Fi devices during a scan. When disabled,
other devices can still connect to your Mobile
hotspot, but have to set up the connection
manually with your Network SSID and
Password.
•	Security: Choose the security level for your
Mobile hotspot.
•	Password: If you choose a security level
that uses a password, enter the password. A
default password is displayed on the Mobile
hotspot screen.
•	Show password: Display your password
instead of masking it.
•	Show advanced options: Access advanced
options, including Broadcast channel, and
to specify the channel your device uses for
Mobile hotspot and maximum connections.
Timeout Settings
Automatically turn off Mobile hotspot if there are no
connected devices.
1.	 From a Home screen, tap Apps >
 Settings.
2.	 Tap Tethering and Wi-Fi hotspot >
Mobile hotspot.
3.	 Tap More options > Timeout settings, and
then select and interval.
Tethering Your Device
You can use USB or Bluetooth tethering to share
your device’s Internet connection with a computer.
1.	 From a Home screen, tap Apps >
 Settings.
2.	 Tap Tethering and Wi-Fi hotspot, and choose a
tethering method:
•	USB tethering: Connect the computer to the
device using the USB cable, and then tap
USB tethering to turn tethering on.
•	Bluetooth tethering: Use Bluetooth to pair
your device with the computer. For more
information, see Bluetooth.
90 Airplane ModeSettings
Airplane mode disconnects your
device from all networks and
turns off connectivity features,
such as phone calls and Wi-Fi.
While in Airplane mode, you
can use other features such as
playing music, watching videos,
and other offline applications.
Enable Airplane Mode
To enable or disable Airplane mode:
1.	 From a Home screen, tap Apps >
 Settings.
2.	 Tap Airplane mode, and then tap On/Off to
enable or disable the option.
Note: You can also control Airplane mode from
the Device options menu. Press and hold the
Power key, and then tap Airplane mode.
Airplane Mode
91 Data UsageSettings
Data Usage
Monitor how your data is
being used, and set limits and
restrictions to conserve it.
Note: Your service provider may account for data
usage differently.
1.	 From a Home screen, tap Apps >
 Settings.
2.	 Tap Data usage for options:
•	Mobile data: Enable mobile data.
•	Set mobile data limit: Your mobile data
connection is turned off when the specified
limit is reached.
•	Data usage cycle: Tap the drop-down menu,
and then choose a time period for data usage.
Data usage for the period is displayed on the
graph, along with usage by application at the
bottom of the screen.
3.	 Tap More options for the following options:
•	Restrict background data: Restrict some
apps and services from working unless you
are connected to a Wi-Fi network.
•	Show/Hide Wi-Fi usage: Display or hide a
Wi‑Fi tab that shows Wi-Fi usage.
•	Mobile hotspot: Select Wi-Fi networks that are
mobile hotspots. You can restrict apps from
using these networks, and you can configure
apps to warn you before using these networks
for large downloads.
•	Mobile networks: Control your device’s
access to networks and mobile data service.
For more information, see Mobile Networks.
92 LocationSettings
Location
Some apps, such as Google
Maps, may require one or more
location services be turned on
for full functionality.
Locating Method
Before using any features that require location
assistance, you must enable your device’s location
services.
1.	 From a Home screen, tap Apps >
 Settings.
2.	 Tap Location.
3.	 Tap On/Off to turn on Location services.
4.	 Tap Mode to select how your location is
determined:
•	High accuracy: Uses GPS, Wi-Fi, and mobile
networks.
•	Power saving: Uses Wi-Fi and mobile
networks (no GPS).
•	GPS only: Uses GPS only.
5.	 Tap Improve accuracy to use other connections
for determining your location:
•	Wi-Fi scanning: Allow apps and services to
scan for Wi-Fi networks automatically, even
when Wi-Fi is turned off.
•	Bluetooth scanning: Allow apps to scan for
and connect to nearby devices automatically
through Bluetooth, even when Bluetooth is
turned off.
Recent Location Requests
Apps that have requested your location are listed
under Recent location requests.
1.	 From a Home screen, tap Apps >
 Settings.
2.	 Tap Location.
3.	 Tap On/Off to turn on Location services.
4.	 Tap an entry under Recent location requests to
view the app’s settings.
Location Services
Google Location History™
stores and uses your
device’s most recent location data. Google apps,
such as Google Maps, can use this data to improve
your search results based on places that you have
visited.
1.	 From a Home screen, tap Apps >
 Settings.
2.	 Tap Location.
3.	 Tap On/Off to turn on Location services.
4.	 Tap Google Location History and sign in to your
Google Account for more options.
93 LocationSettings
My Places
You can save your favorite locations for use with
services that require location information. This
information can improve your search results and
other location-related activities.
1.	 From a Home screen, tap Apps >
 Settings.
2.	 Tap Location.
3.	 Tap On/Off to turn on Location services.
4.	 Tap My places.
•	Tap a category (Home, Work, Car, School,
or Gym) to add a location.
•	Tap Add to add more categories.
•	To delete a custom category, tap
 More options > Select, tap the category
to delete, and tap Delete. Confirm if
prompted.
Note: Home, Work, Car, School, and Gym cannot
be deleted.
94 NFC and SharingSettings
NFC and Sharing
NFC (Near Field Communication)
allows data exchange when you
touch your device with another
compatible device. This is used
for features like Android Beam.
Enable NFC
Activate NFC to allow your device to exchange data
with other NFC devices.
1.	 From a Home screen, tap Apps >
 Settings.
2.	 Tap NFC and sharing > NFC.
3.	 Tap On/Off to turn on NFC.
Android Beam
When Android Beam is activated, you can beam app
content to another NFC-capable device by holding
the devices close together. You can beam browser
pages, YouTube videos, contacts, and more.
1.	 From a Home screen, tap Apps >
 Settings.
2.	 Tap NFC and sharing > NFC.
3.	 Tap On/Off to turn on NFC.
4.	 Tap Android Beam, and then tap On/Off to turn
on Android Beam.
5.	 Touch the back of your device with another
NFC‑capable device to transfer content.
S Beam
When S Beam is activated, you can beam files to
another NFC-capable device by holding the devices
close together.
You can beam images and videos from your Gallery,
music files from your Music app, and more.
1.	 From a Home screen, tap Apps >
 Settings.
2.	 Tap NFC and sharing > NFC.
3.	 Tap On/Off to turn on NFC.
4.	 Tap S Beam, and then tap On/Off to turn on
S Beam.
5.	 Touch the back of your device with another
NFC‑capable device to transfer content.
Tap and Pay
Tap and pay allows you to select the default
payment application you want to use for making
purchases on your device.
1.	 From a Home screen, tap Apps >
 Settings.
2.	 Tap NFC and sharing > NFC.
3.	 Tap On/Off to turn on NFC.
4.	 Tap Tap and pay.
5.	 Choose the app that you want as your default.
95 NFC and SharingSettings
Nearby Devices
Share your media files with nearby devices through
Wi‑Fi, Wi‑Fi Direct, or Mobile Hotspot.
Warning: If file sharing is enabled, other devices can
access your data. Use this option with care.
To enable Nearby devices:
1.	 From a Home screen, tap Apps >
 Settings.
2.	 Tap NFC and sharing > Nearby devices.
3.	 Tap On/Off to enable Nearby devices.
4.	 Set the following options:
•	Content to share: Select the content to share.
Choices are: Videos, Photos, and Music.
•	Allowed devices: Indicate the devices
accessible to your device.
•	Denied devices: Indicate devices not allowed
access to your device.
•	Download to: Allow downloading of data
to your device or optional memory card
(not included).
•	Receive files from other devices: Warn if a
device attempts to upload data to your device.
5.	 Tap More options > Rename device to
rename your phone.
Printing
Print images and documents to Samsung printers
and other compatible printers (not included).
To set up a printer:
1.	 From a Home screen, tap Apps >
 Settings.
2.	 Tap NFC and sharing > Printing.
3.	 Tap a print service and follow the prompts.
Note: Tap Download plug-in to install additional
print service drivers.
Screen Mirroring
Share your device’s screen with another device.
To enable Screen Mirroring:
1.	 From a Home screen, tap Apps >
 Settings.
2.	 Tap NFC and sharing > Screen Mirroring.
•	Available devices are listed.
3.	 Tap Scan to find more devices.
4.	 Tap a device and follow the prompts to connect.
MirrorLink
Mirror your device’s display on your car’s
entertainment and information screen using a
USB connection.
Note: To use this feature, your car system must
support MirrorLink.
To turn on MirrorLink:
1.	 Connect your device to your car’s system using
the USB cable.
2.	 On your device’s Home screen, tap Apps >
 Settings.
3.	 Tap NFC and sharing > MirrorLink.
4.	 Tap Connect to vehicle via USB and follow the
prompts.
5.	 Tap More > MirrorLink device ID to view the
MirrorLink ID for your device.
96 More NetworksSettings
More Networks
The More networks settings
allow you to configure a variety
of connectivity settings for your
device.
Nearby Device Scanning
Scan for nearby devices to connect to and set them
up easily. You receive a notification when there are
available devices to connect to.
Note: This function uses Bluetooth Low Energy
scanning even if Bluetooth is turned off on your
device.
To enable nearby device scanning:
1.	 From a Home screen, tap Apps >
 Settings.
2.	 Tap More networks > Nearby device scanning.
3.	 Tap On/Off to enable the feature.
4.	 Tap an available device and follow the prompts.
Download Booster
Download booster improves download speed by
using both Wi-Fi and 4G LTE networks at the same
time when downloading files over 30 MB in size.
Note: Download booster uses mobile data services.
To turn on Download booster:
1.	 From a Home screen, tap Apps >
 Settings.
2.	 Tap More networks > Download booster.
3.	 Tap On/Off to enable Download booster.
Mobile Networks
Control your device’s access to networks and
mobile data service.
1.	 From a Home screen, tap Apps >
 Settings.
2.	 Tap More networks > Mobile networks for
options:
•	Mobile data: Allow your device to connect to a
mobile data network.
•	Data roaming: Allow your device to connect
to data services while roaming. Significantly
higher charges may result.
•	System select: Choose the mobile network
system. Please contact your mobile service
provider for details before changing this
setting.
•	Access Point Names: Choose or add APNs.
•	Network mode: Choose the network type to
use (LTE / CDMA or CDMA).
•	Network operators: Choose available and
preferred networks.
97 More NetworksSettings
Virtual Private Networks (VPN)
Set up and manage your Virtual Private Networks
(VPNs).
Note: You must set a secured screen lock
before setting up a VPN. For more information,
see Set a Screen Lock.
Add a VPN
Use the VPN settings menu to add a VPN
connection to your device.
1.	 From a Home screen, tap Apps >
 Settings.
2.	 Tap More networks > VPN.
3.	 Tap Add and follow the prompts to set up
your VPN.
Connect to a VPN
To connect to a VPN:
1.	 From a Home screen, tap Apps >
 Settings.
2.	 Tap More networks > VPN.
3.	 Tap the VPN, enter your log in information, and
tap Connect.
Disconnect from a VPN
To disconnect from a VPN:
1.	 From a Home screen, tap Apps >
 Settings.
2.	 Tap More networks > VPN.
3.	 Tap the VPN, and tap Disconnect.
Edit or Delete a VPN
Once you have set up a VPN connection, you can
edit or delete the connection.
1.	 From a Home screen, tap Apps >
 Settings.
2.	 Tap More networks > VPN.
3.	 Tap  Settings next to the VPN that you want to
edit or delete.
4.	 Edit the VPN and tap Save.
– or –
Tap Delete to delete the VPN.
98 Sounds and NotificationsSettings
Configure the sounds and
vibrations used to indicate
notifications, screen touches,
and other interactions.
Adjust the Volume
Set the system volume level and default volume for
call ringtones, notifications, and other audio.
Note: You can also set Ringtone volume from a Home
screen by pressing the Volume key.
1.	 From a Home screen, tap Apps >
 Settings.
2.	 Tap Sounds and notifications.
3.	 Under Sound, drag the sliders to set the default
volume for:
•	Ringtone
•	Media
•	Notifications
•	System
Change the Sound Mode
You can switch between sound modes while
preserving the individual sound settings you have
made.
1.	 From a Home screen, tap Apps >
 Settings.
2.	 Tap Sounds and notifications > Sound mode,
and then choose a mode:
•	Sound: Use the sounds, vibrations, and
volume levels you have chosen in Sound
settings for notifications and alerts.
•	Vibrate: Vibrate for notifications and alerts.
This uses the Vibration intensity you choose in
Sound settings.
•	Mute: Mute all sounds and notifications.
Vibration Intensity
Set the amount of vibration for incoming calls,
notifications, and haptic feedback.
1.	 From a Home screen, tap Apps >
 Settings.
2.	 Tap Sounds and notifications > Vibration
intensity.
3.	 Drag the sliders to set the various vibration
intensities.
Sounds and Notifications
99 Sounds and NotificationsSettings
Vibrate When Ringing
Your device can vibrate in addition to ringing when
you receive a call.
1.	 From a Home screen, tap Apps >
 Settings.
2.	 Tap Sounds and notifications > Vibrate when
ringing to enable this option.
Select a Default Ringtone
Choose from preset ringtones or add your own.
1.	 From a Home screen, tap Apps >
 Settings.
2.	 Tap Sounds and notifications > Ringtones.
3.	 Tap a ringtone to hear a preview and select it.
– or –
Tap Add to use a use an audio file as a ringtone.
Select a Default Vibration Pattern
Choose from preset vibration patterns.
1.	 From a Home screen, tap Apps >
 Settings.
2.	 Tap Sounds and notifications > Vibrations.
3.	 Tap a pattern to preview it and select it.
Select a Notification Ringtone
Choose a sound for notifications, such as for new
messages and event reminders.
1.	 From a Home screen, tap Apps >
 Settings.
2.	 Tap Sounds and notifications > Notification
ringtone.
3.	 Tap a sound to preview it, and then tap OK to set
it as your default notification sound.
Configure Other Sounds
Play tones when you tap the screen to make
selections.
1.	 From a Home screen, tap Apps >
 Settings.
2.	 Tap Sounds and notifications > Other sounds
for the following options:
•	Dialing keypad tone: Tap to play a tone when
the dialing keypad is tapped.
•	Screen lock sound: Tap to play a sound when
you unlock the screen.
•	Charging sound: Play a sound when a
charger is connected.
•	Touch sounds: Play tones when you touch or
tap the screen to make selections.
•	Haptic feedback: Tap to set the device
to vibrate when you tap the Back key or
Recent apps key, and for certain screen
interactions.
•	Emergency tone: Set the emergency tone to
Alert, Vibrate, or Silent.
•	Sound when tapped: Tap to enable auditory
feedback when you tap a key.
•	Vibrate when tapped: Tap to enable the
device to vibrate when you tap a key.
100 Sounds and NotificationsSettings
Sound Quality and Effects
You can enable sound effects when connected to a
headset.
Note: Sound effects are only available when
headphones or a compatible Bluetooth headset
(not included) is connected.
Choose from advanced sound options to customize
your audio experience.
1.	 From a Home screen, tap Apps >
 Settings.
2.	 Tap Sounds and notifications > Sound quality
and effects.
3.	 Tap Adapt sound and follow the prompts to
customize your sound settings.
4.	 Tap On/Off to enable each option:
•	UHQ upscaler: Enhance the sound resolution
of music and videos for a clearer listening
experience.
•	SoundAlive+: Recreate the effects of rich
surround sound.
•	Tube Amp Pro: Simulate the soft timbre of a
tube amplifier.
Do Not Disturb
This setting allows you to block all notifications
and alerts. The options below determine what
notifications can make sounds, and during what time
periods you want to enter this mode.
To activate Do not disturb mode:
1.	 From a Home screen, tap Apps >
 Settings.
2.	 Tap Sounds and notifications > Do not disturb.
3.	 Tap Turn on now to enable this option.
Scheduling
This option allows you to turn Do not disturb mode
on or off automatically at scheduled times.
Note: Scheduling is not available if Do not disturb
mode has been turned on manually.
1.	 From a Home screen, tap Apps >
 Settings.
2.	 Tap Sounds and notifications > Do not disturb.
3.	 Tap Turn on as scheduled, and set the Days,
Start time, and End time.
Allow Exceptions
This option lets you customize which notifications
are allowed while your device is in Do not disturb
mode.
1.	 From a Home screen, tap Apps >
 Settings.
2.	 Tap Sounds and notifications > Do not disturb.
3.	 Tap Allow exceptions, and tap one of the
following options:
•	No exceptions
•	Alarms only
•	Custom
Lock Screen Notifications
To define how notifications should be displayed on
your phone’s lock screen:
1.	 From a Home screen, tap Apps >
 Settings.
2.	 Tap Sounds and notifications > Notifications
on lock screen and select an option:
•	Show content
•	Hide content
•	Do not show notifications
101 Sounds and NotificationsSettings
Application Notifications
To set whether application notifications are
displayed:
1.	 From a Home screen, tap Apps >
 Settings.
2.	 Tap Sounds and notifications >
Application notifications.
3.	 Swipe through the alphabetical list of apps and
tap an app.
4.	 Tap On/Off to block all notifications from this
app or to show priority notifications for the
selected app.
Notification Access
To see which applications can read notifications:
1.	 From a Home screen, tap Apps >
 Settings.
2.	 Tap Sounds and notifications > Notification
access.
3.	 Tap On/Off to enable or disable access to
notifications.
102 Display and WallpaperSettings
Configure your display’s
brightness, screen timeout delay,
and other display settings.
Adjust the Screen Brightness
Adjust the screen brightness to suit your
surroundings or personal preference. You may also
want to adjust screen brightness to conserve battery
power.
1.	 From a Home screen, tap Apps >
 Settings.
2.	 Tap Display and wallpaper > Brightness for
options:
•	Tap Automatic brightness to allow the device
to adjust brightness automatically.
•	Drag the Brightness level to set a custom
brightness level.
Note: You can also control Brightness from the
Notification panel.
Wallpaper
Change the look of the Home and Lock screens
with wallpaper. You can display a favorite picture or
choose from preloaded wallpapers.
To change wallpaper:
1.	 From a Home screen, tap Apps >
 Settings.
2.	 Tap Display and wallpaper > Wallpaper.
3.	 Tap Home screen, Lock screen, or Home
and lock screen.
4.	 Tap an image to preview it, and then tap
Set as wallpaper.
•	Tap From Gallery for additional wallpapers.
Change the Font Style and Size
You can set the font style and size for all text that is
displayed on the screen.
1.	 From a Home screen, tap Apps >
 Settings.
2.	 Tap Display and wallpaper > Font to choose a
font style and size.
•	Tap Font style to change the font.
-- Tap Download to find new fonts online.
•	Tap Font size and tap a font size.
One-Handed Operation
Change the screen layout to accommodate
operating your device with one hand.
1.	 From a Home screen, tap Apps >
 Settings.
2.	 Tap Display and wallpaper > One-handed
operation.
3.	 Tap On/Off to enable or disable the following:
•	Reduce screen size: Press the Home key
three times in quick succession to reduce the
size of the display.
•	One-handed input: Adjust the size and
position of the keyboard and other input
methods for easier input with one hand.
•	Side key panel: Have the hardkeys and other
selected functions appear as buttons at the
side of the screen.
Display and Wallpaper
103 Display and WallpaperSettings
Screen Rotation
Use the front camera to rotate the screen based on
the orientation of your face.
1.	 From a Home screen, tap Apps >
 Settings.
2.	 Tap Display and wallpaper > Screen rotation to
turn the feature on.
Enable Smart Stay
The screen does not time out as long as you are
facing the front camera.
1.	 From a Home screen, tap Apps >
 Settings.
2.	 Tap Display and wallpaper > Smart stay to turn
the feature on.
Set the Screen Timeout
Turn the screen off after a set amount of time.
1.	 From a Home screen, tap Apps >
 Settings.
2.	 Tap Display and wallpaper > Screen timeout,
and then choose a time period.
Select a Screen Mode
Choose a screen mode to match your type of
viewing.
1.	 From a Home screen, tap Apps >
 Settings.
2.	 Tap Display and wallpaper > Screen mode and
choose a screen mode.
•	Tap Adaptive display if you want your device
to automatically optimize the display to match
the type of image displayed and other criteria,
such as battery level.
– or –
Choose a specific type of screen mode based
on what you are viewing.
Auto Adjust the Screen Tone
Your device analyzes the images displayed on the
screen and automatically adjusts the brightness to
conserve battery power.
1.	 From a Home screen, tap Apps >
 Settings.
2.	 Tap Display and wallpaper > Auto adjust
screen tone to turn the feature on.
Daydream
The Daydream setting controls what is displayed
on the screen when the device is docked (dock
not included) or while charging. You can choose to
display colors or display photos.
1.	 From a Home screen, tap Apps >
 Settings.
2.	 Tap Display and wallpaper > Daydream.
3.	 Tap On/Off to enable Daydream.
4.	 Configure options:
•	Colors: Tap the selector to display a changing
screen of colors.
•	Flipboard: Display pictures from Flipboard.
Tap Settings for options.
•	Google Photos: Display pictures from your
Google Photos account. Tap Settings for
options.
•	Photo table: Display pictures in a photo table.
Tap Settings for options.
•	Photo frame: Display pictures in a photo
frame. Tap Settings for options.
5.	 Tap More options for additional options:
•	Preview: See a demonstration of Daydream.
•	Select when to daydream: Select when your
device can go into Daydream mode.
104 Display and WallpaperSettings
LED Indicator
Light up the LED indicator when charging, voice
recording, or receiving notifications.
1.	 From a Home screen, tap Apps >
 Settings.
2.	 Tap Display and wallpaper.
3.	 Tap LED indicator to turn the feature on or off.
Touch Key Light Duration
Set the length of time Recent and  Back
remain lit after you tap them.
1.	 From a Home screen, tap Apps >
 Settings.
2.	 Tap Display and wallpaper.
3.	 Tap Touch key light duration to choose a
timeout period.
Increase Touch Sensitivity
Increase the sensitivity of the touch screen to
improve results when wearing gloves.
1.	 From a Home screen, tap Apps >
 Settings.
2.	 Tap Display and wallpaper.
3.	 Tap Increase touch sensitivity to turn the
feature on.
105 Lock ScreenSettings
Secure your device and protect
your data with Lock Screen
settings.
Set a Screen Lock
It is recommended that you secure your device
using a Screen lock.
1.	 From a Home screen, tap Apps >
 Settings.
2.	 Tap Lock Screen > Screen lock to select a
screen lock and level of security:
•	Swipe: Swipe the screen to unlock it. This
option provides no security.
•	Pattern: Create a pattern that you draw on
the screen to unlock your device. This option
provides medium security.
•	PIN: Select a PIN to use for unlocking the
screen. This option provides medium to high
security.
•	Password: Create a password for unlocking
the screen. This option provides high security.
•	Fingerprint: Use fingerprint recognition
to unlock the screen. This option provides
medium to high security.
•	None: Never use a Lock screen.
3.	 Select your notification preferences, if you
choose a secured lock screen option:
•	Show content
•	Hide content
•	Do not show notifications
4.	 Choose a screen lock option:
All Screen Locks
•	Show information: Display information on the
Lock screen.
•	Camera shortcut: Display a camera shortcut
on your Lock screen.
•	Action memo on lock screen: Double tap the
lock screen while pressing the pen button to
open Action memo.
Swipe Only
•	Phone shortcut: Check the box to display a
phone shortcut on your Lock screen.
•	Unlock effect: Set the visual effect used when
unlocking the screen.
Pattern Only
•	Pattern type: Select a pattern type.
•	Make pattern visible: Display the pattern as
your draw it.
•	Vibration feedback: Vibrate when the unlock
pattern is entered incorrectly.
Pattern, PIN, Password, and Fingerprint
•	Lock automatically: Set a time-out for lock
screen.
•	Lock instantly with power key: Lock the
screen by pressing the Power key.
Lock Screen
106 Multi Window SettingsSettings
Multi Window Settings
Turn on the Multi window feature.
For more information, see Multi Window.
1.	 From a Home screen, tap Apps >
 Settings > Multi window.
2.	 Tap On/Off to enable. The following options are
available:
•	Open in split screen view: Automatically
view content in multi window when you open
files from My Files or Video, or attachments
from email. The applications must support
Multi window.
•	Pop-up view shortcut: Swipe down diagonally
from the corner of a window to put it in pop-up
view.
Note: These features only work on apps that support
Multi window functionality.
107 Notification Panel SettingsSettings
Notification Panel Settings
Customize which Quick setting
buttons are displayed on the
Notification panel.
You can also customize which
apps are displayed on the
Recommended applications
menu on the Notification panel
when you perform certain
actions, such as plugging in
earphones.
►► From a Home screen, tap Apps >
 Settings > Notification panel.
– or –
From the Notification panel, tap View all >
 Edit.
To customize which quick setting buttons are
displayed at the top of the Notification panel:
►► Touch and drag buttons between the
Active buttons and Available buttons trays to
reorder them.
To use the default layout:
►► Tap Reset.
108 S Pen SettingsSettings
Configure options and settings
for the S Pen.
Air Command
The Air command menu provides quick access to
S Pen applications from any screen. The settings
page allows you to either enable or disable the Air
Command menu.
To enable or disable the Air Command menu:
1.	 From a Home screen, tap Apps >
 Settings.
2.	 Tap S Pen > Air command for these options:
•	Shortcuts: Add shortcuts to the Air command
menu.
•	Floating icon: Tap On/Off to minimize the Air
command menu into a floating icon.
Air View
Preview information, extend text, or enlarge pictures
by hovering your finger over the screen.
1.	 From a Home screen, tap Apps >
 Settings.
2.	 Tap S Pen > Air view.
3.	 Tap On/Off to turn the feature on.
4.	 Configure options for Air view.
Other S Pen Settings
To configure settings for the S Pen:
1.	 From a Home screen, tap Apps >
 Settings.
2.	 Tap S Pen to configure the following settings:
•	Direct pen input: Turn the Direct pen input
feature on. This feature allows you to switch
from the keyboard to the S Pen when filling in
form fields.
•	Pointer: Turn the pointer on. The pointer
appears on the screen when the tip of the
S Pen is hovering close enough. Holding the
pointer over some features can reveal what an
item is or what it does.
•	Detachment options: Launch Air command or
create a new Action memo when you remove
the S Pen.
•	Screen off memo: Create action memos by
detaching the S Pen while the screen is off
and writing on the screen.
•	S Pen alerts: Tap the check box to set your
device to sound an alert and show a pop-up if
you forget to attach the S Pen and walk away
from it with your device.
•	S Pen power saver: Choose to turn off pen
detection when the S Pen is attached to
extend battery life.
•	S Pen sound: Tap the check box to enable
sounds when writing with the S Pen.
•	S Pen vibration: Activate vibration feedback
when writing with the S Pen.
For more information, see S Pen.
S Pen Settings
109 Motions and GesturesSettings
Control certain device actions
by moving your hand over the
screen.
1.	 From a Home screen, tap Apps >
 Settings.
2.	 Tap Motions and gestures.
3.	 Tap On/Off to enable each of the following:
•	Direct call: Call the contact whose call log,
message, or contact details are currently on
the screen by bringing the device close to
your ear.
•	Smart alert: Set your device to vibrate when
you pick it up, which notifies you about missed
calls and messages.
•	Mute: Mute incoming calls and alarms by
turning the device over or by covering the
screen with your hand.
•	Palm swipe to capture: Create a copy of the
current screen by swiping the side of your
hand across the screen. The screenshot is
saved to the clipboard and to the Screenshots
folder in the Gallery app.
Motions and Gestures
110 Edge Screen SettingsSettings
Manage the panels that display
on the Edge screen, including
your own custom panels, and set
up night mode.
To access Edge screen settings:
►► From a Home screen, tap Apps >
 Settings > Edge screen.
– or –
Swipe upward on the Edge screen, and then tap
Settings.
The following options are available:
•	Manage panels: Check the panels that you
want to display on the Edge screen.
•	Express me: Tap Create new to create a
new Edge screen panel.
•	Information stream: Select which notifications
are shown on the Information stream panel,
and set the screen timeout.
•	Night clock: Set up a clock that displays
when the phone screen is off. Night mode is
available for a maximum of 12 hours.
•	Edge screen text: Type a personal message
to display on the Edge screen.
•	Edge screen timeout: Set the Edge screen
timeout setting, which is only applied while
the Edge screen is on, unless the Night clock
is shown.
•	Notifications: Tap to show notifications on the
Edge screen.
•	Use Edge screen on left: Rotate the
main screen 180° so that you can use the
Edge screen on the left. Screen rotation must
be turned on to use this function.
For more information, tap Help, or see
Edge Screen Settings.
Edge Screen Settings
111 AccountsSettings
Accounts
Set up and manage accounts,
including your Google Account,
Samsung account, email, and
social networking accounts.
Depending on the account, you
can choose to synchronize your
calendar, contacts, and other
types of content.
Add an Account
You can add and manage all your email, social
networking, and picture and video sharing accounts.
1.	 From a Home screen, tap Apps >
 Settings.
2.	 Tap Accounts > Add account.
3.	 Tap one of the account types.
4.	 Follow the prompts to enter your credentials and
set up the account.
Synchronize Accounts
You can synchronize your calendar, contacts, and
other types of accounts.
1.	 From a Home screen, tap Apps >
 Settings.
2.	 Tap Accounts > [Account type].
3.	 Tap an account to view the sync settings for that
account.
4.	 Tap individual data items to sync.
5.	 Tap More options > Sync all or Sync now to
synchronize the account.
Note: Sync options and the location of the sync
command differ depending on the account type.
Account Settings
Each account has its own set of settings. In addition,
you can configure common settings for all accounts
of the same type.
Note: Account settings and available features vary
between account types and service providers. Contact
your service provider for more information on your
account’s settings.
1.	 From a Home screen, tap Apps >
 Settings.
2.	 Tap Accounts > [Account type].
3.	 Tap an account to configure that account’s sync
settings.
4.	 Tap other available options for the account type.
Remove an Account
You can remove accounts from your device.
1.	 From a Home screen, tap Apps >
 Settings.
2.	 Tap Accounts > [Account type].
3.	 Tap the account, and then tap More options >
Remove account. Confirm if prompted.
112 CloudSettings
Back up your personal data
using your Samsung Account or
Dropbox.
Using Your Samsung Account
To sync and back up content to your Samsung
account:
1.	 From a Home screen, tap Apps >
 Settings.
2.	 Tap Cloud.
3.	 If you have not signed in to your Samsung
Account, tap Add Samsung account.
– or –
Tap your Samsung account to manage your sync
settings and backup options.
4.	 Tap to view the following Samsung account
information:
•	Backup: Manage your back up and restore
options.
•	Restore: Retrieve data from your Samsung
account.
Using Your Dropbox Account
For more information about Dropbox,
visit dropbox.com.
1.	 From a Home screen, tap Apps >
 Settings.
2.	 Tap Cloud.
3.	 If you have not signed in to your Dropbox
account, tap Link Dropbox account.
– or –
Tap your Dropbox account to manage your sync
settings and backup options.
4.	 Follow the prompts to set up and use Dropbox.
Cloud
113 Backup and ResetSettings
Backup and Reset
Back up your data to Google
servers. You can also reset your
device to its factory defaults.
Backup and Restore
Enable backup of your information to Google
servers.
1.	 From a Home screen, tap Apps >
 Settings.
2.	 Tap Backup and reset for options:
•	Back up my data: Enable back up of
application data, Wi-Fi passwords, and other
settings to Google servers.
•	Backup account: Select a Google Account to
be used as your backup account.
•	Automatic restore: Enable automatic
restoration of settings from Google servers.
When enabled, backed-up settings are
restored when you reinstall an application.
Reset Network Settings
You can reset Wi-Fi, Mobile data, and Bluetooth
settings with Reset network settings.
1.	 From a Home screen, tap Apps >
 Settings.
2.	 Tap Backup and reset > Reset network
settings.
3.	 Tap Reset settings, and confirm when prompted.
Factory Data Reset
Return your device to its factory defaults, erasing all
data from your device.
Warning: This action permanently erases ALL data
from the device, including Google or other account
settings, system and application data and settings,
downloaded applications, as well as your music,
photos, videos, and other files. Any data stored on an
external SD card is not affected.
To reset your device:
1.	 From a Home screen, tap Apps >
 Settings.
2.	 Tap Backup and reset > Factory data reset.
3.	 Tap Reset device and follow the prompts to
perform the reset.
114 Easy ModeSettings
Switch between the default
screen layout and a simpler
layout. The Easy Mode layout
has larger text and icons, making
for a more straightforward visual
experience.
To enable Easy Mode:
1.	 From a Home screen, tap Apps >
 Settings.
2.	 Tap Easy mode, and then tap Easy mode to
choose this feature.
•	When Easy mode is enabled, you can swipe
down the page and select which apps you
want to appear on the Home screens.
3.	 Tap the checkbox next to the apps you want to
add or remove.
4.	 Tap Done to save your settings.
To disable Easy mode:
1.	 Swipe through the Home screens and tap
 Easy settings
2.	 Tap Easy mode > Standard mode.
3.	 Tap Done to confirm.
Easy Mode
115 AccessibilitySettings
Accessibility
Accessibility services are special
features that make using the
device easier for those with
certain physical disabilities.
Note: You can download additional accessibility
applications from the Google Play store.
1.	 From a Home screen, tap Apps >
 Settings.
2.	 Tap Accessibility for options:
Vision
•	Switch access: Use this option to control your
device using configurable key combinations.
Tap On/Off to turn the feature on. Tap
Settings for more options.
•	TalkBack: Speak feedback aloud to help blind
and low-vision users. Tap On/Off to turn the
feature on. Tap Settings for more options.
-- TalkBack can collect all of the text you
enter, except passwords, including personal
data and credit card numbers. It may also
log your user interface interactions with the
device.
•	Dark screen: Keep the screen turned off at all
times for privacy. TalkBack must be enabled in
order to configure this option.
•	Rapid key input: Release your finger to enter
selection instead of double tapping. TalkBack
must be enabled in order to configure this
option.
•	Speak passwords: Read the characters aloud
as you enter your passwords. TalkBack must
be enabled in order to configure this option.
•	Font size: Set the font size.
•	High contrast fonts: Adjust the color and
outline of fonts to increase the contrast with
the background.
•	Magnification gestures: Use exaggerated
gestures such as triple-tapping, double
pinching, and dragging two fingers across
the screen.
•	Hover zoom: Magnify content by hovering the
S Pen over it.
•	Notification reminder: Play a beep when a
notification for a call, message, and more, has
been missed.
•	Negative colors: Reverse the display of
screen colors from white text on a black
background to black text on a white
background.
•	Color adjustment: Adjust the color of the
screen if you are color blind or have difficulty
reading the display because of the screen
color. Tap Color adjustment for options.
•	Accessibility shortcut: Quickly enable
accessibility features in two quick steps. Tap
On/Off to turn the feature on.
•	Text-to-speech options: Set your preferred
TTS engine and options. For more information,
see Text-To-Speech Options.
Hearing
•	Flash notification: Set your camera light to
blink whenever you receive a notification.
•	Turn off all sounds: Turn off all notifications
and audio for privacy.
•	Hearing aids: Improve the sound quality of
your device for use with hearing aids.
•	Samsung subtitles (CC): Use Samsung
subtitles with multimedia files when available.
•	Google subtitles (CC): Use Google subtitles
with multimedia files when available.
•	Sound balance: Use the slider to set the left
and right balance when using a stereo device.
116 AccessibilitySettings
•	Mono audio: Switch audio from stereo to
mono for use with one earphone.
•	Sound detectors: Receive alerts when the
phone detects a doorbell or a crying baby.
Dexterity and interaction
•	Assistant menu: Improve the device
accessibility for users with reduced dexterity.
•	Air wake up: Wake up your device by waving
your hand over the sensor.
•	Press and hold delay: Select a time interval
for this tap action.
•	Interaction control: Block areas of the
screen from touch interaction. Disable
Auto rotate screen and hard key functions.
Only show application notifications in the
Notification panel and the Status bar.
More settings
•	Direct access: Open your accessibility
settings by pressing the Home key quickly
three times in succession.
•	Answering and ending calls: Choose
shortcuts for answering and ending calls.
•	Single tap mode: Dismiss or snooze alarms,
calendar events, and timer alerts, and answer
or reject incoming calls with a single tap.
•	Manage accessibility: Export your
accessibility settings and share them with
another device.
Services
Additional accessibility apps may be downloaded
from the Google Play store. Certain accessibility
services you install may be configured here.
117 Private ModeSettings
Private Mode
Hide personal content from
being accessed by anyone else
using your device.
Private mode is only available for
certain applications.
Note: A secure screen lock (Pattern, PIN, Password,
or Fingerprint) is required to use Private Mode.
Set Up Private Mode
1.	 From a Home screen, tap Apps >
 Settings.
2.	 Tap Private mode.
3.	 Follow the prompts to learn about and set up
Private mode.
118 Finger ScannerSettings
Finger Scanner
Use fingerprint recognition as an
alternative to entering passwords
in certain apps.
You can also use your fingerprint
to verify your identity when
logging in to your Samsung
account.
Note: Fingerprint recognition uses the unique
characteristics of each fingerprint to enhance the
security of your device. The likelihood of the fingerprint
sensor confusing even small areas of two different
fingerprints is very low. But in rare cases, the
sensor may recognize a fingerprint that is similar
to a registered fingerprint.
Register a Fingerprint
You can register up to 3 fingerprints. A password is
also set up as an alternative to your fingerprint.
1.	 From a Home screen, tap Apps >
 Settings.
2.	 Tap Finger scanner > Fingerprint manager.
•	Swipe your finger over the Home key to
register your first fingerprint or to continue to
the next screen.
Add a Fingerprint
If no fingerprints are registered, the manager
automatically opens the Register fingerprint
screen. Otherwise:
►► Tap Add and follow the instructions to
register a fingerprint and password.
Rename a Fingerprint
To rename a fingerprint:
►► Touch and hold the fingerprint, and then tap
 Edit.
Delete a Fingerprint
To delete a fingerprint:
►► Touch and hold the fingerprint, and then tap
 Delete.
Change Backup Password
To change the backup password for a fingerprint:
1.	 From a Home screen, tap Apps >
 Settings.
2.	 Tap Finger scanner > Change backup
password.
3.	 Scan your fingerprint.
4.	 Enter a new backup password.
119 Finger ScannerSettings
Fingerprint Verification
Fingerprint verification can be used for other
accounts accessed from your device.
1.	 From a Home screen, tap Apps >
 Settings.
2.	 Tap Finger scanner for options.
•	Screen lock: Change your Screen lock
and access Screen lock settings. For more
information, see Set a Screen Lock.
•	Web sign-in: Access your online accounts
using your fingerprint.
•	Verify Samsung account: Verify your identity
using your fingerprint when logging in to your
Samsung account.
•	Pay with PayPal: Link your PayPal account to
your device to make faster and more secure
PayPal payments using any of your registered
fingerprints.
120 Language and Input SettingsSettings
Language and Input Settings
Configure your device’s
language and input settings.
Language
You can select a default language for your device’s
menus and keyboards.
1.	 From a Home screen, tap Apps >
 Settings.
2.	 Tap Language and input > Language.
3.	 Select a language from the list.
Default Keyboard
You can select a default keyboard or input method.
1.	 From a Home screen, tap Apps >
 Settings.
2.	 Tap Language and input > Default.
3.	 Select a keyboard.
Note: Additional keyboards can be downloaded from
the Google Play store.
Samsung Keyboard
Configure options for using the Samsung keyboard.
1.	 From a Home screen, tap Apps >
 Settings.
2.	 Tap Language and input.
3.	 Tap Samsung keyboard for options:
•	English(US): Set the keyboard type to
Qwerty keyboard or 3x4 keyboard.
•	Select input languages: Choose which
languages are available on the keyboard. To
switch between languages, slide the Space
bar sideways.
•	Predictive text: Predictive text suggests
words that match your text entries, and can
automatically complete common words.
Predictive text can learn your personal writing
style from your contacts, messages, Gmail,
and social networking sites — improving its
accuracy of predicting your text entries.
•	Additional keyboard settings provide
assistance with capitalization, punctuation,
and much more.
Swype Keyboard
Configure options for using the Swype keyboard.
1.	 From a Home screen, tap Apps >
 Settings.
2.	 Tap Language and input.
3.	 Tap Swype for options:
•	Settings: Configure basic options.
•	Themes: Change the keyboard layout.
•	My words: Manage your personal dictionary,
new word updates, as well as how Swype can
learn from your writing style in various apps.
•	Languages: Set the current language.
Additional languages can be downloaded.
•	Gestures: Learn about using Swype gestures.
•	Help: View information on using Swype.
121 Language and Input SettingsSettings
Google Voice Typing
Speak rather than type your text entries using
Google voice typing.
1.	 From a Home screen, tap Apps >
 Settings.
2.	 Tap Language and input.
3.	 Tap Google voice typing for options:
•	Languages: Select languages for Google
voice typing.
•	“Ok Google” detection: Tap to launch
a Google search whenever you say “OK
Google”.
•	Hands-free: Allow requests with the device
locked.
•	Speech output: Select options for spoken
feedback.
•	Offline speech recognition: Download and
install speech recognition engines, allowing
you to use voice input while not connected to
the network.
•	Block offensive words: Hide recognized
offensive voice results.
•	Bluetooth headset: Use audio input from a
Bluetooth headset (not included), if one is
connected.
Handwriting Recognition
Language
Handwriting can be recognized in S Note and
Action memo. Use this option to select a language
that is used by the device to recognize your
handwriting.
1.	 From a Home screen, tap Apps >
 Settings.
2.	 Tap Language and input.
3.	 Under Handwriting recognition, tap Language.
4.	 Tap More languages to select a new language.
Text-To-Speech Options
Configure your Text-to-Speech (TTS) options.
TTS is used for various accessibility features,
such as TalkBack. For more information, see
Accessibility.
1.	 From a Home screen, tap Apps >
 Settings.
2.	 Tap Language and input > Text-to-speech
options for options:
•	Preferred TTS engine: Choose either the
Samsung or Google Text‑to‑speech engine.
Tap Settings next to each TTS engine for
options.
•	Speech rate: Set the speed at which the text
is spoken.
•	Listen to an example: Play a sample of
speech synthesis (available if voice data is
installed).
•	Default language status: Display the default
language in use.
Read New Notifications Aloud
Set the device to read new notifications aloud for
incoming calls, messages, and emails, as well as
caller or sender information.
1.	 From a Home screen, tap Apps >
 Settings.
2.	 Tap Language and input > Read notifications
aloud.
3.	 Tap the checkbox to enable each option.
Pointer Speed
Configure pointer speed for an optional mouse or
trackpad (not included).
1.	 From a Home screen, tap Apps >
 Settings.
2.	 Tap Language and input > Pointer speed.
3.	 Drag the slider to the right to go faster or to the
left to go slower.
4.	 Tap OK to save your setting.
122 Date and TimeSettings
By default, your device receives
date and time information from
the wireless network.
When you are outside network
coverage, you may want to
set date and time information
manually using the date and time
settings.
1.	 From a Home screen, tap Apps >
 Settings.
2.	 Tap Date and time. The following options are
available:
•	Automatic date and time: Receive date and
time updates from the wireless network.
•	Set date: Enter the current date (only available
when Automatic date and time is disabled).
•	Set time: Enter the current time (only available
when Automatic date and time is disabled).
•	Automatic time zone: Receive the time zone
from the wireless network.
•	Select time zone: Choose your local time
zone (only available when Automatic time zone
is disabled).
•	Use 24-hour format: Set the format for
displaying time.
Date and Time
123 Safety AssistanceSettings
Safety Assistance
Receive real-time information
about emergencies and severe
weather conditions.
You can also enable Emergency
mode: a power-conserving mode
that restricts certain apps and
functions while allowing access
to Messages, Contacts, and
emergency calls.
Emergency Mode
Use Emergency mode to conserve battery
power during emergencies. Power-hungry apps
and functions are disable, but you are still able
to send messages, use Contacts, and make
emergency calls.
1.	 From a Home screen, tap Apps >
 Settings.
2.	 Tap Safety assistance > Emergency mode.
3.	 Tap On/Off to turn the feature on.
Geo News
Receive information about weather, environmental
situations, and geological information for your
location during emergencies.
1.	 From a Home screen, tap Apps >
 Settings.
2.	 Tap Safety assistance > Geo News.
3.	 Tap On/Off to turn the feature on.
•	Geo News notification pop-ups: Receive
pop‑up alerts.
Send Help Messages
Send a quick alert to your primary contacts when
you are in an emergency situation.
To enable this feature:
1.	 From a Home screen, tap Apps >
 Settings.
2.	 Tap Safety assistance > Send help messages.
3.	 Tap On/Off to turn the feature on and configure
the following options:
•	Send pictures: Send photos taken with the
front and back cameras to your emergency
contacts.
•	Send sound recording: Send a short audio
message to your emergency contacts.
To send a help message:
►► Press the Power key quickly three times.
Manage Primary Contacts
Select contacts or create new ones to be your
emergency contacts. These contacts automatically
receive your help message.
1.	 From a Home screen, tap Apps >
 Settings.
2.	 Tap Safety assistance > Manage primary
contacts.
3.	 Tap Create primary contact and choose one of
the following options:
•	Create contact: Enter a name and phone
number for a new emergency contact.
•	Select from contacts: Designate a contact to
be an emergency contact.
124 AccessoriesSettings
Configure options when
using HDMI audio devices
(not included).
1.	 From a Home screen, tap Apps >
 Settings.
2.	 Tap Accessories for options.
•	Audio output: Select a sound output format
to use when connecting your device to HDMI
devices (not included). Some devices may not
support the surround sound setting.
Accessories
125 BatterySettings
View how battery power is used
for device activities.
1.	 From a Home screen, tap Apps >
 Settings.
2.	 Tap Battery for options:
•	Battery usage: View battery usage since the
battery was last fully charged.
-- Usage since last fully charged: View a
chart of past usage and estimated time
remaining.
-- More options: Tap Optimize battery
usage to select apps to optimize their
individual battery usage. Tap Refresh to
update the listing.
•	Power saving mode: Save battery power by
limiting your device’s performance, limiting
vibration feedback, and restricting location
services and most background data.
•	Ultra power saving mode: Save battery
power by using a minimal Home screen layout
and limiting the number of usable apps.
•	Detail: View details on apps that have an
abnormal amount of battery usage.
•	Percentage on status bar: Display the battery
charge percentage next to the battery icon on
the Status bar.
•	Fast cable charging: Charge the battery more
quickly.
Battery
126 StorageSettings
Storage
View the device memory and
usage. Mount, unmount, or
format an optional memory card
(not included).
Device Memory
View and manage the memory used by the device.
1.	 From a Home screen, tap Apps >
 Settings.
2.	 Tap Storage.
•	Device storage used out of the total space
available is displayed.
3.	 Tap Internal storage for the following:
•	Total space: The total space in your device’s
memory.
•	Available space: The amount of storage
space currently available.
•	System memory: The minimum amount of
storage space required to run the system.
•	Used space: The amount of storage space
currently being used.
•	Other: The space used by app data,
downloaded files, and Android system files.
•	Cached data: The amount of data currently
cached.
4.	 Tap Explore to launch My Files to view content
stored on your device.
To increase available memory:
1.	 From a Home screen, tap Apps >
 Settings.
2.	 Tap Storage > Internal storage.
3.	 Tap Cached data to clear cached data for all
apps.
4.	 Tap Delete to confirm.
Memory Card (SD Card)
Once a memory card (not included) has been
installed in your device, the card memory is
displayed as Total space and Available space.
Note: The SD card menu only appears when an
optional memory card is installed.
Note: To improve performance and reliability with
high-definition video recording and playback, it is
recommended you use a memory card (SD card) that
is both rated as at least a Class 10 and provides a
high read speed.
Install a Memory Card
You can use a microSD or microSDHC card
(not included) to add more memory space to your
device.
For more information, see Install a Memory Card.
127 StorageSettings
Mount a Memory Card
When you install an optional memory card, it is
automatically mounted (connected to the device)
and prepared for use. However, should you unmount
the card without removing it from the device, you
have to mount it before it can be accessed.
1.	 From a Home screen, tap Apps >
 Settings.
2.	 Tap Storage > SD card > Mount.
Unmount a Memory Card
To prevent damage to information stored on the
memory card, always unmount the card before
removing it from the device.
Unmounting an SD card may stop some applications
from functioning until you mount the SD card again.
1.	 From a Home screen, tap Apps >
 Settings.
2.	 Tap Storage > SD card > Unmount.
Remove a Memory Card
Warning: To prevent damage to information stored on
the memory card, unmount the card before removing
it from the device.
1.	 From a Home screen, tap Apps >
 Settings.
2.	 Tap Storage > SD card > Unmount.
3.	 Remove the back cover. For more information,
see Remove the Back Cover.
4.	 Slide the card out carefully.
5.	 Replace the back cover. For more information,
see Replace the Back Cover.
Format a Memory Card
Warning: When formatting an SD card, you should
back up your music and photo files that are stored on
the card because formatting the SD card deletes all
the stored data.
1.	 From a Home screen, tap Apps >
 Settings.
2.	 Tap Storage > SD card > Format and follow the
prompts.
128 SecuritySettings
Secure your device and protect
your data with Security settings.
Device Administration
Manage your device administrators and application
installation privileges.
1.	 From a Home screen, tap Apps >
 Settings.
2.	 Tap Security for options:
•	Device administrators: Add or remove device
administrators.
•	Unknown sources: Enable installation of
non‑Google Play applications.
Warning: Enabling installation of third-party
applications can cause your device and personal data
to be more vulnerable to attacks by unknown sources.
Encryption
Require a numeric PIN or password to decrypt your
device each time you power it on or encrypt the
data on a memory card (not included) each time it is
connected.
1.	 From a Home screen, tap Apps >
 Settings.
2.	 Tap Security for options:
•	Protect encrypted data: Encrypt all data on
your device.
•	Encrypt external SD card: Encrypt data on a
memory card (not included).
Note: Make sure your battery is charged more than
80 percent. Encryption takes an hour or more.
Find My Mobile
Protect your device from loss or theft allowing your
device to be locked, tracked, and for your data to be
deleted remotely.
►► To access your device remotely,
visit findmymobile.samsung.com.
Note: You must sign up for a Samsung account and
enable Google location service to use Find My Mobile.
1.	 From a Home screen, tap Apps >
 Settings.
2.	 Tap Security.
3.	 Under Find my mobile, the following options are
available:
•	Remote controls: Lock and erase your data
remotely if your device is lost or stolen.
•	Go to website: Launch the Find My Mobile
website.
•	Reactivation lock: Use your Samsung
account to stop anyone from reactivating your
device without your permission.
Passwords
Display password characters briefly as you type
them.
1.	 From a Home screen, tap Apps >
 Settings.
2.	 Tap Security > Make passwords visible to turn
the feature on.
Security
129 SecuritySettings
Security Update Service
Automatically receive security updates.
1.	 From a Home screen, tap Apps >
 Settings.
2.	 Tap Security for options:
•	Security policy updates: Automatically or
manually check for security policy updates.
-- Automatic updates can also be limited to
only when your device is connected to a
Wi‑Fi network.
•	Send security reports: Use Wi-FI to send
security reports to Samsung for threat
analysis.
Credential Storage
Manage your security certificates. If a certificate
authority (CA) certificate gets compromised or
for some other reason you do not trust it, you can
disable or remove it.
1.	 From a Home screen, tap Apps >
 Settings.
2.	 Tap Security for options:
•	Storage type: Select a storage location for
credential contents.
•	Trusted credentials: Display certificates in
your device’s ROM and other certificates you
have installed.
•	Install from device storage: Install a new
certificate from storage.
•	Clear credentials: Erase the credential
contents from the device and reset the
password.
Advanced Security
Protect your device with these advanced security
options.
1.	 From a Home screen, tap Apps >
 Settings.
2.	 Tap Security for options:
•	Trust agents: Perform selected actions when
trusted devices are connected.
-- To view Trust agents, set up a secured
screen lock (Password, PIN, Pattern, or
Fingerprints). For more information, see
Set a Screen Lock.
•	Pin windows: Pin a specific app on your
device screen. Follow the prompts.
•	Usage data access: View the applications that
can access your device’s usage history.
•	Smart Lock: Set your device to stay unlocked
when you have trusted devices connected or
when it’s in a trusted place.
-- To view Smart Lock, set up a secured
screen lock (Password, PIN, Pattern, or
Fingerprints). For more information, see
Set a Screen Lock.
•	Do not disturb permission: View which apps
have permission to change the Do not disturb
settings.
130 HelpSettings
View tips and guidelines for
using your device.
1.	 From a Home screen, tap Apps >
 Settings.
2.	 Tap Help for information about:
•	New features
•	Getting started
•	Applications
•	Settings
Help
131 About DeviceSettings
About Device
View information about your
device, including current status,
legal information, hardware and
software versions, and more.
1.	 From a Home screen, tap Apps >
 Settings.
2.	 Tap About device, and then tap items for more
details:
•	Download updates manually: Check for and
install available software updates.
•	Scheduled software updates: Set a time to
automatically check for and install software
updates.
•	Status: View the status of the battery, network,
and other information about your device.
•	Legal information: View legal notices
and other legal information, including your
embedded Samsung legal information.
•	Report diagnostic info: Consent to send
diagnostic and usage data about your device
to Samsung.
•	Device name: View and change your device’s
name.
•	Additional device information includes the
Model number, Android version, Build number,
and more.
132 Application ManagerSettings
Application Manager
You can download and install
new applications on your device.
Use Application manager
settings to manage your
downloaded and preloaded
applications.
Warning: Because this device can be configured
with system software not provided by or supported
by Google or any other company, you operate this
software at your own risk.
Application Manager Options
If you have disabled apps, you can choose whether
to display them.
1.	 From a Home screen, tap Apps >
 Settings.
2.	 Tap Application manager.
3.	 If you have disabled applications:
•	Tap All apps at the top left of the screen.
•	Tap All apps, Enabled, or Disabled.
4.	 Tap More options for the following options:
•	Show/Hide system apps: Show or hide
system (background) apps.
•	App permissions: Control which apps have
permissions to use certain features of your
device.
•	Apps that can appear on top: Choose apps
that can run on top of other running apps.
•	Change system settings: Select which apps
can change system endings.
•	Reset app preferences: Reset options that
have been changed. Existing app data is not
deleted.
Manage Apps
You can view and update information about an
application, including memory usage, default
settings, and permissions.
1.	 From a Home screen, tap Apps >
 Settings.
2.	 Tap Application manager.
3.	 Tap an application to view and update
information about the application. The following
options are displayed:
•	Uninstall/Disable: Uninstall or disable the
application. Preloaded apps can only be
disabled.
•	Force stop: Stop an app that is misbehaving.
Restart your device if stopping an app,
process, or service causes your device to stop
working correctly.
•	Storage: Manage the app’s storage usage.
•	Data usage: View mobile data usage.
•	Permissions: View permissions granted to the
app for access to your device’s information.
•	Notifications: Configure notifications from
the app.
•	Set as default: Set the app as a default for a
certain category of apps.
•	Battery: View battery usage since the last full
charge.
•	Memory: View memory usage.
Note: Options may vary by application.
133 Default ApplicationsSettings
If you have multiple applications
of the same type, such as email
apps, you can select one app to
be the default.
You can also use a simpler
Home screen that provides
an easier user experience for
first‑time smartphone users.
1.	 From a Home screen, tap Apps >
 Settings.
2.	 Tap Default applications.
3.	 Tap the following to choose default apps:
•	Browser app: Choose a default browser app.
•	Calling app: Choose a default calling app.
•	Messaging app: Choose a default messaging
(text and multimedia) app.
•	Set as default: Choose default apps for other
functions.
•	Home: Choose a Home screen type.
•	Device assistance app: Choose an app that
provides assistance for using your device.
Default Applications
134 Application SettingsSettings
Shortcuts to the settings for
various apps are available in one
convenient location.
1.	 From a Home screen, tap Apps >
 Settings.
2.	 Tap Application settings.
3.	 Tap one of the following to display the settings
for the selected app:
•	Calendar
•	Call
•	Contacts
•	Email
•	Gallery
•	Internet
•	Messages
•	S Voice
•	Google
Application Settings

Samsung Galaxy Note Edge Manual / User Guide

  • 1.
    S M AR T P H O N E User Manual Please read this manual before operating your device and keep it for future reference.
  • 2.
    i Legal Notices WARNING!This product contains chemicals known to the State of California to cause cancer, birth defects, or other reproductive harm. For more information, please call 1-800-SAMSUNG (726-7864). Intellectual Property All Intellectual Property, as defined below, owned by or which is otherwise the property of Samsung or its respective suppliers relating to the SAMSUNG Phone, including but not limited to, accessories, parts, or software relating there to (the “Phone System”), is proprietary to Samsung and protected under federal laws, state laws, and international treaty provisions. Intellectual Property includes, but is not limited to, inventions (patentable or unpatentable), patents, trade secrets, copyrights, software, computer programs, and related documentation and other works of authorship. You may not infringe or otherwise violate the rights secured by the Intellectual Property. Moreover, you agree that you will not (and will not attempt to) modify, prepare derivative works of, reverse engineer, decompile, disassemble, or otherwise attempt to create source code from the software. No title to or ownership in the Intellectual Property is transferred to you. All applicable rights of the Intellectual Property shall remain with SAMSUNG and its suppliers. Open Source Software Some software components of this product incorporate source code covered under GNU General Public License (GPL), GNU Lesser General Public License (LGPL), OpenSSL License, BSD License and other open source licenses. To obtain the source code covered under the open source licenses, please visit: opensource.samsung.com Disclaimer of Warranties; Exclusion of Liability EXCEPT AS SET FORTH IN THE EXPRESS WARRANTY CONTAINED ON THE WARRANTY PAGE ENCLOSED WITH THE PRODUCT, THE PURCHASER TAKES THE PRODUCT “AS IS”, AND SAMSUNG MAKES NO EXPRESS OR IMPLIED WARRANTY OF ANY KIND WHATSOEVER WITH RESPECT TO THE PRODUCT, INCLUDING BUT NOT LIMITED TO THE MERCHANTABILITY OF THE PRODUCT OR ITS FITNESS FOR ANY PARTICULAR PURPOSE OR USE; THE DESIGN, CONDITION OR QUALITY OF THE PRODUCT; THE PERFORMANCE OF THE PRODUCT; THE WORKMANSHIP OF THE PRODUCT OR THE COMPONENTS CONTAINED THEREIN; OR COMPLIANCE OF THE PRODUCT WITH THE REQUIREMENTS OF ANY LAW, RULE, SPECIFICATION OR CONTRACT PERTAINING THERETO. NOTHING CONTAINED IN THE INSTRUCTION MANUAL SHALL BE CONSTRUED TO CREATE AN EXPRESS OR IMPLIED WARRANTY OF ANY KIND WHATSOEVER WITH RESPECT TO THE PRODUCT. IN ADDITION, SAMSUNG SHALL NOT BE LIABLE FOR ANY DAMAGES OF ANY KIND RESULTING FROM THE PURCHASE OR USE OF THE PRODUCT OR ARISING FROM THE BREACH OF THE EXPRESS WARRANTY, INCLUDING INCIDENTAL, SPECIAL OR CONSEQUENTIAL DAMAGES, OR LOSS OF ANTICIPATED PROFITS OR BENEFITS. Modification of Software SAMSUNG IS NOT LIABLE FOR PERFORMANCE ISSUES OR INCOMPATIBILITIES CAUSED BY YOUR EDITING OF REGISTRY SETTINGS, OR YOUR MODIFICATION OF OPERATING SYSTEM SOFTWARE. USING CUSTOM OPERATING SYSTEM SOFTWARE MAY CAUSE YOUR DEVICE AND APPLICATIONS TO WORK IMPROPERLY. YOUR CARRIER MAY NOT PERMIT USERS TO DOWNLOAD CERTAIN SOFTWARE, SUCH AS CUSTOM OS. USC_N915R4_EN_UM_TN_PC4_053116_FINAL Legal Notices
  • 3.
    ii Legal Notices SamsungKNOX Samsung KNOX™ is Samsung’s security platform and is a mark for a Samsung device tested for security with enterprise use in mind. Additional licensing fee may be required. For more information about KNOX, please refer to: samsung.com/us/knox [041516] Samsung Electronics America (SEA), Inc. Address: 85 Challenger Road Ridgefield Park, New Jersey 07660 Phone: 1-800-SAMSUNG (726-7864) Internet Address: samsung.com ©2016 Samsung Electronics America, Inc. Samsung, Samsung Galaxy, Multi Window, S Pen, S Health, S Voice, and Samsung Milk Music are all trademarks of Samsung Electronics Co., Ltd. Other marks are the property of their respective owners. Note: Screen images are simulated. Appearance of device may vary. Do you have questions about your Samsung Mobile Device? For 24 hour information and assistance, we offer a new FAQ/ARS System (Automated Response System) at: samsung.com/us/support The actual available capacity of the internal memory is less than the specified capacity because the operating system and default applications occupy part of the memory. The available capacity may change when you upgrade the device. Legal Information Important legal information can be accessed in writing on the mobile device or at samsung.com READ THIS INFORMATION BEFORE USING YOUR MOBILE DEVICE. Samsung Limited Warranty - This product is covered under the applicable Samsung Limited Warranty INCLUDING ITS DISPUTE RESOLUTION PROCEDURE and your right to opt out of arbitration within 30 calendar days of the first consumer purchase. You may opt out by either sending an email to optout@sea.samsung.com with the subject line “Arbitration Opt-Out” or by calling 1-800-SAMSUNG (726-7864). For more detailed procedures, please refer to the “Dispute Resolution Procedures and Arbitration and Opt-Out” section of the Limited Warranty. Full written terms and detailed information about the warranty and obtaining service are available on the device at: Settings > About device > Legal information > Samsung legal or you may access the online version of the Health/Safety and Warranty guide for your device at: English samsung.com/us/Legal/Phone-HSGuide Spanish samsung.com/us/Legal/Phone-HSGuide-SP The online version of the End User License Agreement (EULA) for your device can be found online at: samsung.com/us/Legal/SamsungLegal-EULA4
  • 4.
    iii Table ofContents Getting Started..............................................................1 Front View............................................................................2 Back View............................................................................3 Assemble Your Device................................................4 Set Up Your Device.......................................................7 Set Up Accounts on Your Device.........................8 Know Your Device......................................................9 Home Screen..................................................................10 Status Bar..........................................................................13 Edge Screen....................................................................14 Navigation, Motions, and Gestures...................17 Notification Panel..........................................................19 Multi Window...................................................................21 S Pen....................................................................................24 Air Command..................................................................26 Enter Text...........................................................................29 Emergency Mode.........................................................31 Calling...................................................................................32 Phone Screen..................................................................33 Make and Answer Calls............................................35 Speed Dial.........................................................................38 Emergency Calls...........................................................39 Set Up and Access Voicemail..............................40 Applications....................................................................41 Apps List............................................................................42 Google Apps...................................................................45 U.S. Cellular Apps........................................................47 Additional Apps..............................................................48 Calculator...........................................................................49 Calendar.............................................................................50 Camera and Video.......................................................52 Clock.....................................................................................55 Contacts..............................................................................57 Email.....................................................................................61 Galaxy Apps....................................................................63 Gallery..................................................................................64 Internet.................................................................................66 Messages..........................................................................68 Music Player.....................................................................70 My Files...............................................................................72 S Health..............................................................................73 S Note..................................................................................75 S Voice................................................................................77 Scrapbook.........................................................................78 Video Player.....................................................................79 Voice Recorder...............................................................81 Settings...............................................................................82 How to Use Settings...................................................83 Wi-Fi.......................................................................................84 Bluetooth............................................................................86 Tethering and Wi-Fi Hotspot...................................88 Airplane Mode................................................................90 Data Usage.......................................................................91 Location..............................................................................92 NFC and Sharing..........................................................94 More Networks...............................................................96 Sounds and Notifications.........................................98 Display and Wallpaper........................................... 102 Lock Screen.................................................................. 105 Multi Window Settings............................................ 106 Notification Panel Settings................................... 107 Table of Contents
  • 5.
    iv Table ofContents S Pen Settings............................................................. 108 Motions and Gestures............................................ 109 Edge Screen Settings............................................. 110 Accounts.......................................................................... 111 Cloud................................................................................. 112 Backup and Reset.................................................... 113 Easy Mode..................................................................... 114 Accessibility................................................................... 115 Private Mode................................................................. 117 Finger Scanner............................................................ 118 Language and Input Settings............................. 120 Date and Time............................................................. 122 Safety Assistance...................................................... 123 Accessories................................................................... 124 Battery............................................................................... 125 Storage............................................................................. 126 Security............................................................................ 128 Help.................................................................................... 130 About Device................................................................ 131 Application Manager................................................ 132 Default Applications................................................. 133 Application Settings................................................. 134
  • 6.
    Getting Started Learn aboutyour mobile device hardware, assembly procedures, and how to get started using your new device.
  • 7.
    2 Front ViewGettingStarted Recent Power key Front camera Back Status light Earpiece Volume key Home key/Finger scanner Proximity sensors Edge screen • Proximity sensors: Detect the presence of objects near the device. • Power key: Press and hold to turn the device on or off, restart it, or for quick access to Airplane and Emergency modes. Press to lock or wake up the screen. • Front camera: Take self-portraits and record videos of yourself. • Edge screen: Provides quick access to frequently used apps, alerts, notifications, and device functionality all with the swipe of a thumb. • Back: Return to the previous screen, or to close a dialog box, menu, or keyboard. Touch and hold for Multi window™ . • Home key/Finger scanner: Return to the Home screen. Activate the Fingerprint security feature. • Recent: Tap to display recent apps, or touch and hold for Home screen options. • Volume key: Press to adjust the volume of your device’s sounds and audio. • Status light: Display a light when the battery is charging or fully charged, when a notification arrives, or when recording voice. • Earpiece: Listen to a call. Front View
  • 8.
    3 Back ViewGettingStarted USB charger/ Accessory port Microphone Rear camera Infrared transmitter Microphone Heart rate sensorFlash Speaker S Pen Headset jack Microphone • Headset jack: Connect an optional headset (not included). • Rear camera: Take pictures and record videos. • Heart rate sensor: Measure your heart rate using your fingertip when using the S Health™ app. For more information, see S Health. • Microphone: Record audio and detect voice commands. • USB charger/Accessory port: Connect the USB charger (included), and other optional accessories (not included). • S Pen: Access a variety of powerful functions on your device with this versatile stylus. • Speaker: Play music and other sounds. • Flash: Illuminate subjects in low-light environments when taking a photo or recording video. • Infrared transmitter: Controls external devices using infrared light. Back View
  • 9.
    4 Assemble YourDeviceGetting Started This section helps you to assemble your device. Remove the Back Cover 1. Remove the back cover using the slot on the top of your phone. 2. Lift the cover up from the phone. Warning: Do not bend or twist the back cover excessively. Doing so may damage the cover. Install the SIM Card When you subscribe to a cellular network, you are provided with a plug-in SIM card. During activation, your SIM card is loaded with your subscription details, such as your Personal Identification Number (PIN), available optional services, and other features. Warning: Please be careful when handling the SIM card to avoid damaging it. Keep all SIM cards out of reach of small children. ►► Carefully slide the SIM card into the SIM card slot until the card locks into place. • Make sure that the card’s gold contacts face down into the device and that the card is positioned as shown. Caution: If the SIM card is not inserted correctly, the device cannot detect it. Reorient the SIM card and place it back into the slot if it is not detected. Assemble Your Device
  • 10.
    5 Assemble YourDeviceGetting Started Install a Memory Card You can install an optional microSD™ or microSDHC™ memory card (not included) to add more memory space to your device. Note: A memory card can be installed at any time; it is not necessary to install it prior to using the device. ►► With the gold contacts facing down, carefully slide the memory card into the slot, pushing gently until it clicks into place. Caution: If the memory card is not inserted correctly, the device cannot detect it. Reorient the memory card and place it back into the slot if it is not detected. Install the Battery To install the battery: 1. Insert the battery into the opening on the back of the device, making sure the connectors align. 2. Gently press down to secure the battery. Replace the Back Cover To replace the back cover: 1. Place the battery cover onto the back of the phone and press down. 2. Press along the edge of the back cover until you have a secure seal.
  • 11.
    6 Assemble YourDeviceGetting Started Charge the Battery Your device is powered by a rechargeable, standard Li-Ion battery. A USB charger (charging head and USB cable) is included with the device for charging the battery from any standard outlet. The battery comes partially charged. A fully discharged battery requires up to four hours of charge time. You can use the device while charging. Note: It is recommended you fully charge the battery before using your device for the first time. Note: For fastest charging times, use the Samsung Adaptive Fast Charger that came with your device. This charger provides faster charging only when connected to devices that support Adaptive Fast Charging. Caution: Use only charging devices and batteries approved by Samsung. Samsung accessories are designed for your device to maximize battery life. Using other accessories may invalidate your warranty and may cause damage. 1. Insert the USB cable into the USB charger/ Accessory port. 2. Connect the USB cable to the charging head, and then plug the charging head into a standard outlet. 3. Unplug the charging head from the outlet and remove the USB cable from the device when charging is complete. Caution: Failure to unplug the wall charger before you remove the battery, can cause damage to the device. When to Charge the Battery When the battery is low and only a few minutes of operation remain, the device sounds a warning tone at regular intervals. In this condition, your device conserves its remaining battery power by dimming the screen. When the battery level becomes too low, the device automatically turns off. For a quick check of your battery level: ►► View the battery charge indicator located in the top right corner of your device’s display. A solid color (   ) indicates a full charge. You can also choose to display a percentage value. Viewing a percentage value can provide a better idea of the remaining charge on the battery. For more information, see Battery.
  • 12.
    7 Set UpYour DeviceGetting Started Turn Your Device On or Off The instructions below explain how to turn your device on or off. Turn the Device On To turn the device on: ►► Press and hold the Power key until the device vibrates and turns on. Turn the Device Off To turn the device off: 1. Press and hold the Power key until the Device options menu is displayed. 2. Tap Power off, and confirm if prompted. Reset the Device If your device stops responding to taps or finger gestures and you are unable to turn it off, you can reset your device. ►► Press and hold the Power key and the Volume down key at the same time for more than seven seconds. Initial Set Up The first time you turn your device on, a Welcome screen is displayed. It guides you through the basics of setting up your device. Follow the prompts to choose a default language, connect to a Wi-Fi® network, set up accounts, choose location services, learn about your device’s features, and more. Secure Your Device Use your device’s screen lock features to secure your device. Lock the Device By default, the device locks automatically when the screen times out. To lock the device: ►► Press the Power key. Unlock the Device The default Screen lock on your device is Swipe. Note: To choose a more secure screen lock, see Set a Screen Lock. To unlock the device: ►► Press the Power key or Home key, and then drag your finger across the screen. Set Up Your Device
  • 13.
    8 Set UpAccounts on Your DeviceGetting Started Samsung Account Create a Samsung account for access to Samsung content and apps on your device. When you turn on your device for the first time, set up your existing Samsung account or create a new Samsung account. – or – To create a new Samsung account or set up your Samsung account on your device at any time, use Accounts settings. For more information, see Accounts. 1. From a Home screen, tap Apps >  Settings > Accounts. 2. Tap Add account > Samsung account. Google Account Your new device uses your Google™ Account to fully utilize its Android™ features, including Gmail™ , Google Hangouts™ , and the Google Play™ store. When you turn on your device for the first time, set up your existing Google Account or create a new Google Account. – or – To create a new Google Account or set up your Google Account on your device at any time, use Accounts settings. For more information, see Accounts. 1. From a Home screen, tap Apps >  Settings > Accounts. 2. Tap Add account > Google. Set Up Accounts on Your Device
  • 14.
    Know Your Device Learnsome of the key features of your mobile device, including the screens and icons, as well as how to navigate the device and enter text using the keyboard. Warning: Please note that a touch screen responds best to a light touch from the pad of your finger or a capacitive stylus. Using excessive force or a metallic object when pressing on the touch screen may damage the tempered glass surface and void the warranty.
  • 15.
    10 Home ScreenKnowYour Device Home Screen The Home screen is the starting point for using your device. Status iconsNotification icons Home screen indicator Status bar Widget Apps list App shortcuts App folder Edge screen Phone • Status icons: Displays information about the device, such as the network signal strength, battery level, and the time. • Edge screen: Display area along the edge of your phone. For more information, see Edge Screen Settings. • App shortcuts: Launches your favorite applications. • App folder: Groups multiple apps into a folder. • Apps list: Allows quick access to all of your applications. • Home screen indicator: Indicates which Home screen is currently visible. • Phone: Shortcut to the phone keypad and related functions. • Widget: Runs as a simple application extension (not a shortcut) on a Home screen. • Status bar: Displays device status icons (right) and notification icons (left). • Notification icons: Displays new messages and emails, available software updates, and more.
  • 16.
    11 Home ScreenKnowYour Device Customize your Home screen by adding application shortcuts, widgets, folders, and using wallpapers. To access Home screen manager: ►► From a Home screen, pinch the screen. – or – Touch and hold an empty space on the screen. Manage Home Screens Your device comes with multiple Home screens to hold app shortcuts and widgets. You can add, remove, change the order of screens, as well as choose a different main Home screen. 1. From a Home screen, pinch the screen. 2. Use these options to manage screens: • Add a screen: Swipe to the end of the screens, and then tap Add. • Remove a screen: Touch and hold a screen, and then drag it to Remove. • Set a screen as the main Home screen: Tap Main Home screen at the top of a screen. This screen is displayed when you press the Home key. • Change the order of screens: Touch and hold a screen, and then drag it to a new position. • Flipboard Briefing: Swipe to the left of the screens to find the Flipboard Briefing screen. • Home screen settings: Tap an option to customize: -- Transition effect: Select a transition to use when swiping between screens. -- Flipboard Briefing: Tap the checkbox to enable or disable this feature. Wallpapers Change the look of the Home and Lock screens with wallpaper. You can display a favorite picture or choose from preloaded wallpapers. 1. From a Home screen, pinch the screen. 2. Tap Wallpapers to customize. For more information, see Wallpaper. To access Wallpaper settings: ►► From a Home screen, tap Apps >  Settings > Display and wallpaper. Widgets Widgets are simple application extensions that run on a Home screen. There are many kinds of widgets, including links to a specific contact, Internet bookmarks, Gmail and email accounts, and many others. Add a Widget to a Home Screen You can add a widget to a Home screen. 1. From a Home screen, pinch the screen. 2. Tap Widgets. 3. Touch and hold a widget, drag it to a Home screen, and release it. Remove a Widget You can remove a widget that you added to a Home screen. 1. From a Home screen, touch and hold a widget to release it. 2. Drag the widget to Remove and release it. Note: Removing a widget does not delete the widget, it just removes the widget from the Home screen.
  • 17.
    12 Home ScreenKnowYour Device App Shortcuts You can use app shortcuts to launch an app from any Home screen. Add a Shortcut to a Home Screen You can add a shortcut to a Home screen. 1. From a Home screen, tap Apps. 2. Touch and hold an app shortcut, drag it to a Home screen, and then release it. Remove a Shortcut You can remove a shortcut that you added to a Home screen. 1. Touch and hold an app shortcut to release it. 2. Drag the app shortcut to Remove and release it. Note: Removing a shortcut does not delete the app, it just removes the shortcut from the Home screen. Folders Place folders on a Home screen to organize items. Create a Folder You can create an app folder on a Home screen. 1. From a Home screen, touch and hold an app shortcut and drag it onto Create folder. 2. Release the app shortcut to create the folder. • Enter folder name: Enter a name for the folder. • Palette: Change the color. • Add application: Place more apps in the folder. Tap apps to select them, and then tap Done. 3. Tap anywhere outside of the folder to close it. • To add more apps, touch and hold an app shortcut and drag it to the folder. Remove a Folder from a Home Screen You can remove a folder that you added to a Home screen. 1. Touch and hold the folder until it detaches. 2. Drag the folder to Remove and release it.
  • 18.
    13 Status BarKnowYour Device The Status bar at the top of the Home screen provides device information (such as network status, battery charge, and time) on the right side and notification alerts on the left. Status Icons Battery full: Battery is fully charged. Battery low: Battery is low. Battery charging: Battery is charging. Vibrate mode: Vibrate mode is enabled. Mute mode: Mute mode is enabled. 4G LTE active: The device is connected to a 4G LTE wireless network. Signal strength: Cellular network signal strength. Network not available: No wireless network is available. Wi-Fi active: Wi‑Fi is active. Wi-Fi available: A Wi-Fi network is available. Notification Icons Missed call: A call has been missed. Call in progress: A call is in progress. Call on hold: A call is on hold. New email: New email has arrived. New Gmail: New Gmail has arrived. New voicemail: New voicemail message has been received. New message: New text or multimedia message has arrived. File download in progress: Download of a file or app is in progress. File upload in progress: File is being uploaded or sent. GPS active: Location service (GPS) is active and acquiring a signal. App updates available: App updates are available from the Google Play store. App updates complete: App installation or updates are complete. Status Bar
  • 19.
    14 Edge ScreenKnow YourDevice The Edge screen provides a variety of useful tools for notifications, information feeds, and timekeeping. Basic Gestures The Edge screen responds to basic gestures as follows: • Swipe right or left to switch between panels. • Swipe down to view the Quick Tools. • Swipe up to access settings (only when the screen is unlocked). Customize App Shortcuts You can choose the apps you want to display in the Edge screen. ►► On the Edge screen, tap the  Favorite Apps icon to edit the apps that appear on the tray: • To remove an app from the Edge screen, drag it off of the tray. • To add an app to the Edge screen, drag it to the tray. • To relocate an app, drag it to a new location. Quick Tools You can quickly use preset tools on your Edge screen without disrupting your activity on the main screen. 1. Swipe down from the top of the Edge screen. 2. Select from the following tools: • Ruler: Use your Edge screen as a ruler. Tap cm to change from centimeters to inches. • Stopwatch: Count down with the Edge screen. Tap Start to begin the countdown. Tap Stop to end the time, or Lap to keep the record and immediately start a new record. • Timer: Use your Edge screen as a timer. Tap the plus and minus signs to set the length of time. Tap Start to begin the timer. • Flashlight: Use your camera flash as a flashlight. Tap on to use the flashlight. Tap off when you are done. • Voice recorder: User your Edge screen as a voice recorder. Use the Record, Cancel, Stop, and Pause options to edit your recording. Recordings are saved to the Audio file. 3. Swipe up from the bottom of the screen to close the quick tools. Edge Screen
  • 20.
    15 Edge ScreenKnow YourDevice Edge Screen Settings Configure the Edge screen panels to provide convenient functions that are the most useful to you. ►► From a Home screen, tap Apps >  Settings > Edge screen. – or – Swipe upward on the Edge screen, and then tap  Settings. Manage Panels 1. Swipe upward on the Edge screen and then tap Settings. 2. Tap Manage panels. 3. Check the box above the widgets you want to add to your Edge screen. Tap Download to add more panels. 4. To uninstall a downloaded panel, tap  More options > Uninstall. 5. To change the order of panels, tap  More options > Reorder. • Touch and hold, then drag panels to change the order. When finished, tap Reorder. Add Wallpaper to the Edge Screen 1. Swipe upward on the Edge screen, and then tap Settings. 2. Tap Express me > Create new for the following options: • Tap Images to choose an image from the Gallery. • Tap Handwriting to use the S Pen and draw an image or message. • Tap Text to type a message on your wallpaper. • Tap Effect to add an effect to the wallpaper. – or – Tap More options > Import to import images. Information Stream The Information stream feature displays feeds that you select on the Edge screen. To view the Information stream: ►► When the main screen is turned off, quickly swipe your finger along the Edge screen in one direction, and then back in the opposite direction. To configure the Information stream: 1. Swipe upward on the Edge screen, and then tap Settings. 2. Tap Information stream. 3. Tap On/Off to activate the Information stream feature. 4. Tap the checkbox on each feed that you want to appear on the Edge screen. 5. To edit a feed, tap Settings (if available). Note: To activate available feeds, go to the Manage panels section. For more information, see Manage Panels. Configure Night Clock Night clock turns your device into a clock when the screen is turned off. To use this feature, set a daily start and end time (up to 12 hours), and turn Night clock on. 1. Swipe upward on the Edge screen, and then tap Settings. 2. Tap Night clock. 3. Tap On/Off to activate Night clock. 4. Drag Start to set the daily start time. 5. Drag End to set the daily end time.
  • 21.
    16 Edge ScreenKnow YourDevice Change Edge Screen Text 1. Swipe upward on the Edge screen and then tap Settings. 2. Tap Edge screen text. 3. Type the text you want to appear on the Edge screen. 4. Tap OK to save. Change Edge Screen Timeout You can change how long the Edge screen appears before it times out. 1. Swipe upward on the Edge screen and then tap Settings. 2. Tap Edge screen timeout. 3. Tap a time interval to select it. Show Notifications on the Edge Screen Notifications received on your phone can be set to appear on the Edge screen. 1. Swipe upward on the Edge screen and then tap Settings. 2. Tap Notifications to enable or disable this feature. A checkmark indicates that notifications will appear on the Edge screen. Change Where the Edge Screen Appears You can choose to have the Edge screen appear on the left side of the screen instead of the curved edge on the right. 1. Swipe upward on the Edge screen, and then tap Settings. 2. Tap Use Edge screen on left. 3. Tap the On/Off to enable this feature.
  • 22.
    17 Navigation, Motions,and GesturesKnow Your Device Learn the basics for how to navigate through your device. Touchscreen Navigation Use the following motions and gestures on your touchscreen to navigate the device. Tap Lightly tap items to select or launch them. • Tap the keyboard to enter characters or text. • Tap an item to select it. • Tap an app shortcut to launch the application. Touch and Hold Touch and hold items on the screen to activate them. • Touch and hold a widget on a Home screen to move it. • Touch and hold a field to display a pop-up menu of options. Swipe Lightly drag your finger vertically or horizontally across the screen. • Swipe the screen to unlock the device. • Swipe the screen to scroll through the Home screens or menu options. Drag Touch and hold an item, and then move it to a new location. • Drag an app shortcut to add it to a Home screen. • Drag a widget to place it in a new location on a Home screen. Pinch and Spread Pinch the screen using your thumb and forefinger or spread by moving your fingers apart. • Pinch the screen to zoom out while viewing a picture or a web page. • Spread your fingers on the screen to zoom in while viewing a picture or a web page. Motions and Gestures Control your device by making specific gestures with your hand above the device’s screen. For details, see Motions and Gestures. To access the Motions and Gestures settings: ►► From a Home screen, tap Apps >  Settings > Motions and gestures. Navigation, Motions, and Gestures
  • 23.
    18 Navigation, Motions,and GesturesKnow Your Device Common Options The device uses basic command options to perform common actions. •  More options: Tap to view more menu options for a screen. This often allows you to select items to delete or share. • Delete: Tap to select items to delete. • Share: Tap to select items to share, and then choose a sharing method. • Edit: Tap to customize the screen. • On/Off button: Tap to turn the option on ( ON ) or off ( ). • Checkbox: Tap to enable or select. When enabled, a checkmark is displayed. You can often tap a checkbox at the top of the screen to select all. • Menu: Tap to view available options for the field.
  • 24.
    19 Notification PanelKnow YourDevice Notification icons on the Status bar display calendar events, device status, and more. For details, open the Notification panel. Quick settings Screen brightness View all Settings Clear notifications Notification card Quick connectS Finder • Settings: Display the Settings screen. • View all: See all available Quick settings. • Quick connect: Search for nearby devices to connect with quickly and easily. • Clear notifications: Clear all notifications. • Notification card: View details about a notification. • S Finder: Search your device for apps, contacts, messages, email, files, settings, and more. • Screen brightness: Adjust screen brightness. • Quick settings: Quickly enable or disable a feature. Notification Panel
  • 25.
    20 Notification PanelKnow YourDevice View the Notification Panel 1. Swipe down on the Status bar to display the Notification panel. 2. Scroll down the list to see notification details. • Tap an item to open it. • To clear a single notification, drag the notification left or right. Tap Clear to clear all notifications. 3. To close the Notification panel, swipe upward from the bottom of the screen or tap  Back. Quick Settings In addition to notifications, the Notification panel also provides quick access to device functions such as Wi-Fi, allowing you to quickly turn them on or off. To view additional Quick settings: ►► Swipe left or right across the visible icons. – or – ►► Tap  View all. Notification Panel Settings To customize the Notification panel, see Notification Panel Settings. S Finder Search your device for apps, contacts, messages, email, files, settings, and more. 1. Swipe down on the Status bar to display the Notification panel. 2. Tap S Finder. 3. Tap the Search bar and type what you are searching for. • You can narrow the search by tapping Filter and using preset search options. Items that match your search appears below. 4. Tap items to open them. Quick Connect Search for nearby devices automatically to connect to them quickly and easily. 1. Drag the Status bar down to display the Notification panel. 2. Tap Quick connect. Your device automatically scans for compatible devices. • You may be asked to set device visibility. Tap Always visible or Only when Quick connect turned on. • Tap Refresh to manually scan. 3. Tap a device from a list and follow the prompts. Customize Your Quick Connect 1. Swipe down on the Status bar to display the Notification panel. 2. Tap Quick connect. 3. Tap More > Set device visibility, and choose an option.
  • 26.
    21 Multi WindowKnowYour Device Multitask by using multiple applications at the same time. Window controls Multi window tray Tray controls Activate Multi Window Apps that support Multi window display together on a split screen. You can switch between the apps, adjust the size of their display on the screen, and copy information from one app to the other. Note: Multi window is not available for all apps. 1. From a Home screen, tap Apps >  Settings > Multi window. 2. Tap On/Off to activate. 3. Tap an option to activate it: • Open in split screen view: Automatically view content in Multi window when you open files from My Files or Video player, or attachments from email. • Pop-up view shortcut: Swipe down diagonally from the corner of a window to put it in pop-up view. Note: You can also activate Multi window from the Notification panel. Multi Window
  • 27.
    22 Multi WindowKnowYour Device Use Multi Window After enabling Multi window, you can use it to run multiple apps at the same time. Note: Only apps located on the Multi window tray can be used together. Additional Multi window apps are available from the Google Play store. The apps display together on a split screen. You can switch between the apps, adjust the size of their display on the screen, and copy information from one app to the other. ►► Touch and hold Back to display the Multi window tray, and then drag apps to the windows. You can also launch recently used apps directly into Multi window view: 1. Tap Recent. • Recently used apps that support Multi window have a Multi window icon in their title bar. 2. Tap Multi window in the title bar to launch an application in split screen view. • Other recently used apps that support Multi window display below the launched app. 3. Tap an app icon to add it to the split screen view. Note: Only applications that support Multi window have the Multi window icon. Window Controls Select an app window, and then tap  Window controls in the middle of the window border. Control Buttons Switch windows: Switch locations between Multi window apps. Drag and drop content: Move items between the app windows. Drag an item to share from one window to another. Not all applications support this feature. Minimize window: Collapse the selected window. Maximize window: Open the selected app window in full screen view. Close app: Close the selected window.
  • 28.
    23 Multi WindowKnowYour Device Customize Multi Window You can customize Multi window to suit your preferences. Create a Window Group If you use certain apps together in Multi window often, you can create a window group to quickly display the two apps in Multi window. The window group is stored in the Multi window tray, so you can choose it any time to display the two apps. 1. Touch and hold Back to display the tray, and then drag apps to the windows. 2. Scroll to the bottom of the Multi window tray, and then tap Tray controls > Create. Change the Order of Apps in the Multi Window Tray 1. Touch and hold Back to display the Multi window tray. 2. Touch and hold an app, drag it to a new position in the tray, and then drop it. Choose Apps to Display in the Multi Window Tray You can choose the apps you want to display in the Multi window tray. 1. Touch and hold Back to display the Multi window tray. 2. Tap Tray controls > Edit for options: • To remove an app from the tray, tap and drag it off of the tray and place it in the storage area. • To add an app to the tray, tap and drag it from the storage area to the tray. • To relocate an app, tap and drag it to a new location. Multi Window Settings To customize Multi window: ►► From a Home screen, tap Apps >  Settings > Multi window. For more information, see Multi Window Settings.
  • 29.
    24 S PenKnowYour Device S Pen The S Pen is a stylus that assists you in performing different functions. S Pen tip S Pen button Remove S Pen The S Pen stores inside your device for convenient access. ►► Slide the S Pen from your device using the notch on the end of the S Pen. Caution: When you insert the S Pen into the slot, insert the S Pen’s tip first. Failure to do so can cause the S Pen to become stuck. Forcefully detaching the S Pen from the slot may cause damage to the S Pen and your device. Air View Hover the S Pen over the screen to preview content, or view information about an item on the screen. For example: • Hover over an email in a list to preview the message before opening it. • Hover over a photo album to preview the contents or see a picture enlarged. • Hover over the timeline during video playback to preview and navigate to specific scenes. • Hover over an icon or screen button to view the item’s name or description. Note: The preview function is only available when the S Pen’s onscreen pointer is a solid color.
  • 30.
    25 S PenKnowYour Device Direct Pen Input When filling out a form field in an app (like Name or Number in Contacts), you can open a Handwriting window to allow you to write an entry with the S Pen rather than type. To use the Handwriting window: 1. When filling out a form field, hover the S Pen over the field until the Handwriting icon appears. 2. Tap Handwriting. The Handwriting window appears. 3. Use the space provided in the window to write an entry by hand using the S Pen. While writing, your entries will be converted into text. • To edit the converted text, use the Space, Delete, and Enter icons. To change the position of the cursor, drag the pointer below the cursor to the desired position for editing. • In Messages, tap Drawing mode to draw an image and attach it to your message. 4. When finished, tap Done. Configure S Pen Settings To configure S Pen settings, including options for sounds and for tracking S Pen when it is not stored in your device: ►► From a Home screen, tap Apps >  Settings. Replace the S Pen Tip You can replace the tip of the S Pen. To replace the tip: 1. Use tweezers to pull out the S Pen tip. 2. Insert the new pen tip on the top of the S Pen and press until it clicks in place.
  • 31.
    26 Air CommandKnowYour Device Air command allows you to quickly activate frequently‑used applications or perform actions. To launch the Air command menu: ►► Remove the S Pen from the S Pen slot. – or – Hold the S Pen near the screen so that the pointer appears, and then press the S Pen button once. – or – Tap Air command. ►► To use Air Command, tap an option: • Action memo: Launch an Action memo and link it to actions. Action memos are saved in the S Note app. • Smart select: Draw around an area of the screen to collect it in the Scrapbook app. • Screen write: Capture screenshots and write or draw on them. • S Note: Tap to open the S Note app. For more information, see S Note. • Add shortcuts: Add up to three apps and functions to the Air command menu. • Settings: Customize your Air command by adding apps and functions, and changing how it appears. Action Memo An Action memo is a special type of note that can turn your written text into actions on your device. For example, if someone tells you the name of a restaurant, you can launch a new memo, write the name of the restaurant, and then have the memo locate it on a map. Note: While active, an Action memo stays on the screen for as long as you are using it, even if you press the Home key. You must tap Save in order to close the memo. Air Command
  • 32.
    27 Air CommandKnowYour Device Create an Action Memo To create an Action memo: 1. Tap Air command >  Action memo. – or – Press and hold the S Pen button and tap the screen two times with the pen. 2. Write your action memo, these editing tools are available: • List: Tap to view all Action memos saved in the S Note app. • Pen: Tap to change the pen color. • Eraser: Use the pen to erase part of the memo, or tap Clear all to erase all content. 3. Tap  Share, and then choose a sharing method to share the action memo. 4. Tap More for additional options: • Link to action: Turn written text into actions. • Minimize: Minimize the action memo by making a small thumbnail on the main Home screen. • Pin to Home screen: Pin the Action memo to the Home screen. • Set reminder: Set a time to remind you about the action memo. • Edit as S Note file: Open the action memo in the S Note app. • Change background color: Change the color of the action memo. • Discard: Close the current Action memo without saving it. 5. When you are finished, tap Save. Note: Action memos are saved in the  S Note app. Link an Action Memo Turn text into actions. For example, you can write a phone number, and then save it to Contacts. To link a memo to an action: 1. Tap Air command >  Action memo. 2. Write on the memo. 3. Tap More > Link to action and select an action to perform. 4. Draw around the content you want to use for the action. The selected content is boxed and highlighted. 5. On the menu bar that appears, tap the action you want to take. Options include Phone, Contacts, Messages, Email, Internet, and More. Screen Off Memo You can write quick memos without turning your device on. Note: The screen off memo setting must be enabled. For more information, see S Pen Settings. To create a screen off memo: 1. Detach the S Pen while the screen is off. 2. Write on the screen. • Tap Save to save your memo to the S Note app. • Tap Delete to discard the memo.
  • 33.
    28 Air CommandKnowYour Device Smart Select The Smart select feature provides a capture tool to select content on a screen. You can then add it to your Scrapbook app or share it with your contacts. To launch the Smart select tool: 1. Tap Air command >  Smart select. 2. Tap a shape at the top of the screen, and then drag a box with the S Pen to select content. The following options appear: • Write: Add notes to the screen using the S Pen. • Share: Choose a sharing method to share your content. • Save in Scrapbook: Save the content in the Scrapbook app. • Save in Gallery: Save the content to the Gallery app. Screen Write Screen write allows you to capture a screen shot and then write notes on the screen shot. To use Screen Write: 1. Tap Air command >  Screen write. 2. The current screen is captured, and a pen tool appears. The following editing tools are provided: • Pen: Draw on the screen shot. Press the Pen icon a second time to change the pen tip, size, color, and to save presets. • Eraser: Erase the writing or drawings on the screen shot. Tap the Eraser icon a second time to change the size of the eraser area and to see the Erase all option. • Undo: Tap to undo the last action. • Redo: Tap to redo the last action that was undone. 3. When you are finished writing, tap an option: • Share: Choose a sharing method to share your content. • Save in Scrapbook: Save the content in the Scrapbook app. • Save in Gallery: Save the content to the Gallery app. S Note App Create notes and edit Action memos. To access S Note: 1. Tap Air command > S Note. – or – 2. From a Home screen, tap Apps >  S Note. For more information, see S Note. Add Shortcuts You can add shortcuts to apps and functions to the Air Command menu. To use Add shortcuts: 1. Tap Air command >  Add shortcuts. 2. Swipe across the screens, and tap the apps or functions you would like to add to the Air command menu. • To delete an app shortcut tap  Remove. 3. Tap Back to save your selection.
  • 34.
    29 Enter TextKnowYour Device Text can be entered using a keyboard or by speaking. Use the Samsung Keyboard Enter text using a QWERTY keyboard. Options Predictive text Special Keys Symbol: Tap to insert symbols. Touch and hold Options for the following: Voice input: Enter text using Google Voice™ typing. Handwriting: Use your handwriting to enter text. Clipboard: Access the clipboard. Keyboard settings: Access keyboard settings. Special Keys Emoticon: Insert an emoticon at the cursor position. Keyboard layout: Change the layout of the keyboard. Note: Available options depend on the app in use. Not all options are available for all apps. Predictive Text Predictive text suggests words that match your text entries, and can automatically complete common words. Predictive text can learn your personal writing style from your contacts, messages, email, and social networking sites — improving the accuracy of predicting text entries. Configure the Samsung Keyboard To customize the Samsung keyboard: 1. From a Home screen, tap Apps >  Settings. 2. Tap Language and input > Samsung keyboard for options. For more information, see Samsung Keyboard. Enter Text
  • 35.
    30 Enter TextKnowYour Device Use Google Voice Typing Instead of typing, enter text by speaking. Settings Delete text To enable Google voice typing: 1. Tap Voice input on the Samsung keyboard. • You may need to touch and hold Options (left of the Space bar) to find it. 2. Speak your text. Note: Tap Settings > Languages to download additional languages for use with Google voice typing. Configure Google Voice Typing To customize Google voice typing: 1. From a Home screen, tap Apps >  Settings. 2. Tap Language and input > Google voice typing for options. For more information, see Google Voice Typing. Use Swype Swype™ is a text input method that makes it possible to enter a word by sliding your finger or stylus (not included) from letter to letter, lifting your finger or stylus between words. For example, to enter the word “this”, slide your fingers between the letters “t-h-i-s”. To enable the Swype keyboard while entering text: 1. Touch the top of the screen and swipe downward to display the Notification panel. 2. Tap Select keyboard. 3. Tap Swype. Configure Swype To customize Swype: 1. From a Home screen, tap Apps >  Settings. 2. Tap Language and input. 3. Tap Swype for options. For more information, see Swype Keyboard.
  • 36.
    31 Emergency ModeKnowYour Device Emergency mode conserves your device’s remaining power when you are in an emergency situation. Emergency mode saves battery power by: • Changing the color of the screen to grayscale. • Restricting application usage to only essential applications and those you select. • Turning off Mobile data when the screen is off. • Turning off connectivity features such as Wi‑Fi and Bluetooth® . Note: When Emergency mode is turned off, the Location settings may stay the same as they were in Emergency mode. Activate Emergency Mode To activate Emergency mode: 1. Press and hold the Power key to display the Device options window. 2. Tap Emergency mode. • When accessing for the first time, read the Terms and conditions. If you accept them, tap the Checkbox, and then tap Agree. Confirm when prompted. 3. Tap Turn on. Turn Off Emergency Mode ►► From the Emergency mode Home screen, tap   More options > Turn off Emergency mode. Use Emergency Mode While in Emergency mode, your device conserves power. The following apps and features are available on the Home screen: • Flashlight: Use the device’s flash as a steady source of light. • Emergency alarm: Sound an audible siren. • Share my location: Send your location information to your emergency contacts. • Phone: Launch the call screen. • Internet: Launch the Web browser. • Add: Add other available apps. -- Facebook: Launch Facebook™ . -- Maps: Launch Google Maps™ . • Battery charge: Display estimated battery charge remaining. • Estimated max. standby time: Display estimated standby time that can be reached based on current battery charge and usage. • Emergency call: Dial the emergency telephone number (for example, 911). This kind of call can be made even without activated cellular service. • More options: -- Turn off Emergency mode: Disable Emergency mode and return to standard mode. -- Remove: Choose apps to remove from the screen. -- Manage emergency contacts: Add emergency contacts if none have been set in Safety Assistance. -- Settings: Configure the available settings. Only a limited number of settings are enabled in Emergency mode. Emergency Mode
  • 37.
    Make telephone calls usinga variety of calling features and services. Calling
  • 38.
    33 Phone ScreenCalling PhoneScreen • More options: Access Speed dial and Call settings. • Delete: After entering a number using the keypad, if you make a mistake, tap to erase a single character or touch and hold to erase the entire string of numbers. • Call: Make a call. • Voicemail: Set up and check your voicemail. For more information, see Set Up and Access Voicemail. • Keypad: Dial the number that you want to call. • Tabs: Display a log of all dialed, received, and missed calls. Display contacts marked as favorites. Display your contacts and select a contact to call. Use the Phone screen to access the dialer keypad, recent calls, favorites, and contacts. Tabs Keypad Voicemail Call Delete More options
  • 39.
    34 Phone ScreenCalling AccessPhone There are a couple of ways to access Phone. ►► From a Home screen, tap  Phone. – or – From a Home screen, tap Apps > Phone. Display Your Phone Number Your phone number can be found in Settings. ►► From a Home screen, tap Apps >  Settings > About device > Status. • Your phone number is displayed in the My phone number field. Call Settings There are also a couple of ways to access the Call settings menu. ►► From a Home screen, tap Phone >  More options > Settings > Call. – or – From a Home screen, tap Apps >  Settings > Application Settings > Call.
  • 40.
    35 Make andAnswer CallsCalling Make and Answer Calls Learn how to make or answer a call. Explore features and functionality associated with making or answering a call. Make a Call You can make a call from a Home screen. 1. From a Home screen, tap  Phone. 2. Enter a number on the keypad and tap  Dial. • Tap Keypad if the keypad is not displayed. Dial a Number from Your Contacts List You can quickly dial a phone number from your Contacts list. 1. From a Home screen, tap Apps >  Contacts. – or – From a Home screen, tap  Phone > Contacts. 2. Swipe your finger across a contact to the right to call the contact. Dial a Recent Number All incoming, outgoing, and missed calls are recorded in the Call log. If the number or caller is listed in your contacts list, the associated name is also displayed. 1. From a Home screen, tap Phone. 2. Tap Recent. A list of recent calls is displayed. 3. Tap a contact, and then tap Call. Answer a Call When a call is received, the phone rings and the caller’s phone number or name is displayed, if it is stored in the Contacts list. ►► At the incoming call screen: • Drag Answer to the right to answer the call. • Drag Reject to the left to reject the call and send it to your voicemail. • Drag Reject call with message upward and select a message. If you are using an app, a pop-up screen is displayed for the incoming call. ►► On the incoming call pop-up screen: • Tap Answer to answer the call. • Tap Reject to reject the call and send it to your voicemail. • Tap Reject call with message and select a message. • Tap Expand to exit the app and view the main incoming call screen. End a Call To finish your call: ►► Tap  End when you are ready to end your call.
  • 41.
    36 Make andAnswer CallsCalling Multitask While on a Call If you exit the call screen and return to a Home screen, your active call is indicated by  Call on the Status bar. This lets you continue with your current call and do something else, such as access the contacts list, view a recent email, or locate a picture. To return to the call screen: ►► Drag the Status bar down to display the Notification panel, and then tap Call notification. To end a call from any application: ►► Drag the Status bar down to display the Notification panel, and then tap End call. Options During a Call Your phone provides several options that you can use during a call. Adjust the Call Volume ►► Press the Volume keys to increase or decrease the volume. – or – Tap  More options > Extra volume to quickly add more volume to the incoming audio. Listen with the Speaker or Bluetooth Headset Listen to the call using the speaker or through a Bluetooth™ headset (not included). ►► Tap Speaker to hear the caller using the speaker. – or – Tap Bluetooth to hear the caller using a Bluetooth headset. Place a New Call While on a Call If your service plan supports this feature, you can make another call while a call is in progress. 1. From the active call, tap Add call to dial the second call. 2. Dial the new number and tap Dial. When the call is answered: • Tap Swap to switch between the two calls. • Tap Merge to hear both callers at once (multi-conferencing). Call Waiting If your service plan supports this feature, you can answer an incoming call while you have a call in progress. You are notified of an incoming call by a call waiting tone. To answer a new call while you have a call in progress: 1. Drag Answer in any direction to answer the new call. 2. Tap an option: • Put [caller] on hold to place the previous caller on hold while you answer the new incoming call. • Merge with [caller] to add the new caller to the current call. • End call with [caller] to end the previous call and answer the new call. 3. Tap the previous On hold number entry and select Swap to switch between the two calls. This places the new caller on hold and activates the previous call.
  • 42.
    37 Make andAnswer CallsCalling Call Log The numbers of the calls you have dialed, received, or missed are stored in the Call log. 1. From a Home screen, tap Phone. 2. Tap Recent. A list of recent calls is displayed. If the caller is in your Contacts list, the caller’s name is displayed. Save a Recent Call to Your Contacts List Use recent call information to create a contact or update your Contacts list. 1. From a Home screen, tap Phone > Recent. 2. Tap the call that contains the information that you want to save to your Contacts list. 3. Tap Create contact. – or – If you want to replace the number for an existing contact, tap Update existing. Delete a Call from the Call Log To delete Call log entries: 1. From a Home screen, tap Phone > Recent. 2. Touch and hold the call you want to delete from the Call log. 3. Tap Delete. Block a Number By adding a caller to your Block list, future calls from this number are sent directly to your voicemail, and messages are not received. 1. From a Home screen, tap Phone > Recent. 2. Tap the caller you want to add to the Block list. 3. Tap  More options > Add to auto reject list.
  • 43.
    38 Speed DialCalling SpeedDial You can assign a shortcut number to a contact for speed dialing their default number. Create a Speed Dial You can assign 100 speed dial numbers. 1. From a Home screen, tap Phone. • Tap Keypad if the keypad is not displayed. 2. Tap  More options > Speed dial. The Speed dial screen displays the numbers 1 through 100. Number 1 is reserved for Voicemail. 3. Tap an unassigned number ( Add contact). 4. Tap a contact to assign to the number. • The selected contact is displayed in the Speed dial number box. Use Speed Dial to Make a Call You can make a call using Speed dial. 1. From a Home screen, tap Phone. • Tap Keypad if the keypad is not displayed. 2. Touch and hold the Speed dial number. • If the Speed dial number is more than one digit long, enter the first digits, and then hold the last digit. Remove a Speed Dial Number Assignment You can remove an assigned Speed dial number. 1. From a Home screen, tap Phone. 2. Tap  More options > Speed dial. 3. Find the contact to remove from Speed dial. 4. Tap Remove.
  • 44.
    39 Emergency CallsCalling EmergencyCalls You can dial the emergency telephone number in your region regardless of the phone’s cellular service status. Make an Emergency Call You can dial the emergency telephone number from your phone whether or not cellular service has been activated. If your phone is not activated, you can only make an emergency call. 1. From a Home screen, tap Phone. 2. Enter the emergency telephone number (911 in North America) and tap Dial. 3. Complete your call. During this type of call, you have access to most in-call features. Call Emergency Services from a Locked Screen The emergency telephone number can be dialed even if the phone is locked, allowing anyone to use your phone to call for help in an emergency. When accessed from a locked screen, only the emergency calling feature is accessible to the caller. The rest of the phone remains secured. Swipe Lock Screen If the Lock screen is set to Swipe, you can access the call screen in a couple of ways. 1. Drag Phone upward to open the call screen. - or - Swipe across the screen to unlock it, and then tap Phone. 2. Enter the emergency telephone number (911 in North America) and tap Dial. 3. Complete your call. During this type of call, you have access to most in-call features. Secure Lock Screens You can make calls even if your phone has a secure lock screen. 1. Drag Phone upward to open the call screen. 2. Tap Emergency call to display the Emergency dialer. 3. Enter the emergency telephone number (911 in North America) and tap Dial. 4. Complete your call. During this type of call, you have access to most in-call features.
  • 45.
    40 Set Upand Access VoicemailCalling Set Up and Access Voicemail Set up and configure your voicemail. Set Up Your Voicemail You can access your voicemail from a Home screen. 1. From the Home screen, tap  Phone >  Voicemail. 2. Follow the tutorial to create a password, record a greeting, and record your name. Note: These steps may be different depending on your network. Access Your Voicemail You can access your voicemail from a Home screen. 1. From the Home screen, tap  Phone >  Voicemail. • You may be prompted to enter a password. 2. Follow the voice prompts from the voicemail center. Access Your Voicemail from Another Phone You can access your voicemail from another phone. 1. From another phone, dial your wireless phone number. Wait until you hear your voicemail greeting. 2. Press the asterisk or star (*) key on the phone you are using. 3. Enter your password and you are connected to your voicemail.
  • 46.
    Applications Learn how tochange the way apps are displayed, organize apps into folders, and uninstall or disable apps.
  • 47.
    42 Apps ListCalling TheApps list displays all preloaded apps and apps that you downloaded. You can uninstall, disable, or hide apps from view. Shortcuts to apps can be placed on any of the Home screens. For more information, see Add a Shortcut to a Home Screen. Access Apps You can access and launch all applications from the Apps list. 1. From a Home screen, tap Apps. 2. Tap an app’s shortcut to launch it. • To return to the main Home screen, press the Home key. Download and Install New Apps Find new apps to download and install on your device. • Play Store: Download new apps from the Google Play store. Visit play.google.com/store/apps to learn more. • Galaxy Apps: View and download Samsung apps that are optimized for use with Galaxy devices. Visit samsung.com/levant/apps/mobile/galaxyapps to learn more. Uninstall or Disable Apps You can uninstall or disable apps you download and install. • Preloaded apps cannot be uninstalled. • Apps that are disabled are turned off and hidden from view. To uninstall or disable an app: 1. From a Home screen, tap Apps. 2. Tap More options > Uninstall/disable apps. Apps that can be uninstalled show  Uninstall/disable on their icon. 3. Tap Uninstall/disable and follow the prompts to either uninstall or disable the app. To enable apps after disabling them: 1. From a Home screen, tap Apps >  Settings > Application manager. 2. Tap All apps > Disabled, and then tap the app you want to enable. 3. Tap Enable. The app is displayed again in the Apps list. For more information, see Application Manager. Apps List
  • 48.
    43 Apps ListCalling OrganizeYour Apps App shortcuts can be listed alphabetically or in your own custom order. To change the order apps are listed: 1. From a Home screen, tap Apps. 2. Tap More options > Sort by. 3. Tap an option: • Custom: Allows you to touch and hold on apps to move them from screen to screen. • Alphabetical order: Apps are arranged in a grid, in A-Z order. Use Folders to Organize Apps You can organize Apps in a folder on an Apps list screen. 1. From a Home screen, tap Apps. 2. Tap More options > Create folder. • Enter folder name: Name the folder. • Palette: Change the folder color. • Add application: Place more apps in the folder. Tap apps to select them, and then tap Done. 3. Tap anywhere outside of the folder to close it. To launch apps in a folder: ►► Tap a folder, and then tap an app shortcut to launch it. To delete a folder: 1. From a Home screen, tap Apps. 2. Tap More options > Remove folder. 3. Select the folder to delete and tap Done. Confirm if prompted. Add a Folder to a Home Screen To add a folder to a Home screen: 1. From a Home screen, tap Apps. 2. Touch and hold a folder, drag it to a Home screen, and then release it. Hide or Show Apps Hide Apps from View You can hide (rather than uninstall or disable) any apps you do not want to see on the Apps screen. 1. From a Home screen, tap Apps. 2. Tap More options > Hide apps. 3. Tap apps to hide, and then tap Done. Show Hidden Apps You can unhide apps you have hidden and put them back on the Apps screen. 1. From a Home screen, tap Apps. 2. Tap More options > Show hidden apps. 3. Tap apps to unhide, and then tap Done.
  • 49.
    44 Apps ListCalling AppsScreen Options 1. From a Home screen, tap Apps. 2. Tap More options for these options: • Edit: Touch and hold an app icon, and then drag it to: -- Create page: Add a new page to the Apps list and move the app icon there. -- Create folder: Create a new folder. -- App info: View information about this app. -- Uninstall: Uninstall the app. Preloaded apps cannot be uninstalled. • Create folder: Create a new folder to hold the app icon. • Remove folder: Delete a folder. • Sort by: Configure the Apps screen. • Downloaded apps: Display only downloaded apps. • Uninstall/disable apps: Uninstall an app that you downloaded to your device, or disable a preloaded app (preloaded apps cannot be uninstalled). Tap Uninstall/disable to remove or disable the selected app. • Hide apps: Hide apps from the Apps screen. • Show disabled apps: Display disabled apps. • Show hidden apps: Display hidden apps. • Help: View information about your device.
  • 50.
    45 Google AppsCalling Enjoythese apps from Google. Note: Certain apps require a Google Account. Visit google.com to learn more. Chrome Browse the Internet and bring your open tabs, bookmarks and address bar data from your computer to your mobile device. Visit google.com/chrome/mobile to learn more about Chrome™ . Drive Open, view, rename, and share your Google Docs™ and files. Visit drive.google.com to learn more about Google Drive™ . Gmail Send and receive email with Gmail, Google’s web-based email service. Visit gmail.com to learn more. Google Search not only the Internet, but also the apps and contents of your device. Google Now Works in the background to collect information you regularly look up and organize it into convenient cards that appear when you need them. Visit google.com/landing/now to learn more. Note: When Google Now™ is enabled, you can access it by tapping Google. Google+ Chat with friends and family, post photos, and see what others are sharing. Visit google.com/mobile/+ to learn more about Google+™ . Hangouts Meet friends and family online, share photos, host video calls, and send SMS and Hangouts messages. Visit hangouts.google.com to learn more. Google Apps
  • 51.
    46 Google AppsCalling Maps Findyour current location and get directions and other location-based information. Visit google.com/maps to learn more. Note: You must enable location services to use Google Maps. For more information, see Location Services. Photos Automatically backs up your photos and videos to your Google Account. Visit photos.google.com to learn more about Google Photos™ . Play Books Find millions of free e-books and hundreds of thousands more to buy in the eBookstore. Visit play.google.com/store/books to learn more. Play Games Discover hundreds of games for download and purchase through the Google Play store. Visit play.google.com/store/apps to learn more. Play Movies & TV Watch movies and TV shows purchased from Google Play. You can stream them instantly or download them for viewing when you are not connected to the Internet. You can also view videos saved on your device. Visit play.google.com/store/movies to learn more. Play Music Play music and audio files on your device. Visit play.google.com/music to learn more. Play Newsstand Subscribe to your favorite magazines to read on your device at your leisure. Visit play.google.com/store/newsstand to learn more. Play Store Find new apps, movies and TV shows, music, books, magazines, and games in Google Play store. Visit play.google.com/store to learn more. Voice Search Use voice commands to search the web with Google. YouTube View and upload YouTube™ videos right from your device. Visit youtube.com to learn more.
  • 52.
    47 U.S. CellularAppsCalling U.S. Cellular Apps Enjoy these apps from U.S. Cellular. Note: Certain apps require a data plan or paid subscription. Visit uscellular.com to learn more or contact your service provider for additional information. City ID See the city and state of incoming calls with this enhanced caller ID feature. City ID provides over 20,000 cities in North America, giving you an important tool to help identify unknown callers and more effectively manage your communications. Mobile Data Security Keep your data safe and secure if your device is lost or stolen. Mobile Hotspot Configure your device as a mobile hotspot. For more information, see Configure Mobile Hotspot Settings. Tone Room Deluxe Access the latest and hottest content from your favorite artists for ringtones and ring back tones. Your Navigator Deluxe Obtain turn-by-turn driving directions (including voice guided turn-by-turn directions) with GPS accuracy. Search for any destination (including gas stations, ATMs, restaurants, and more). View detailed maps of any location.
  • 53.
    48 Additional AppsCalling Thereare additional apps, including several Samsung apps, preloaded on your device. Amazon Shop at amazon.com™ from your device. Visit amazon.com to learn more. Dropbox Save and share files with others using the Dropbox cloud storage. When you save files to Dropbox, your device automatically syncs with the web server and any other computers that have Dropbox installed. Visit dropbox.com to learn more. Evernote Create, synchronize, and share multimedia notes. You can add tags to the notes, or sort the notes into a notebook so that you can manage your ideas efficiently. Facebook Keep up with friends and family with the Facebook app. Share updates, photos, and videos, as well as text, chat, and play games. Flipboard Access your personalized magazines. Hancom Office 2014 View, edit, and create Hancom™ Office Hanword (*.hwp) and Hanshow (*.show) documents. Peel Smart Remote Control select Wi-Fi-enabled Samsung TV models using your Samsung Galaxy device. Now you can control all of your TV’s settings, such as on and off functions, channel navigation, and volume control from the same Samsung device you already know. PEN.UP Share photos, comment on other creations, or just browse through the pages for something to add to your personal collection. Samsung Milk Music Stream music with Samsung Milk Music™, a radio service that offers a simple way to find the music that is right for you. With a library of over 13 million songs and 200+ stations, the interactive dial makes it easy to skim through stations to find the perfect soundtrack for the moment. Samsung+ Get live help, discover new features, and unlock promotions for your Samsung device. Smart Manager Access your Battery, RAM, Storage, and Device security information. Additional Apps
  • 54.
    49 CalculatorCalling The Calculatorprovides basic and advanced arithmetic functions. Basic Operation You can use your calculator to perform basic operations. 1. From a Home screen, tap Apps >  Calculator. 2. Enter the first number using the numeric keys. 3. Tap the appropriate arithmetic function key. 4. Enter the next number. 5. Tap Equals to view the result. 6. Tap Clear to clear the results. Additional Functions You can perform additional functions on your calculator. To clear the calculator history: • Tap > Clear history. To copy all or part of the calculation to the clipboard: • Touch and hold an entry in the display field, and then tap Copy. Scientific Calculator The Calculator app also provides advanced arithmetic functions, such as sin, cos, and tan. To use the Scientific calculator: 1. If Screen rotation is disabled, enable Screen rotation. 2. Turn the device to landscape. Note: Screen rotation is found in the Quick settings on the Notification panel. For more information, see Quick Settings. Calculator
  • 55.
    50 CalendarCalling Calendar Manage yourevents and tasks. Calendar View To choose a calendar view: 1. From a Home screen, tap Apps >  Calendar. 2. Tap Menu, and then tap one of the following: • Year: Display all twelve months of this year. Swipe across the screen to display another year. • Month: Display the current month. Swipe across the screen to display another month. Events and tasks are also displayed. • Month and agenda: Display the current month along with all events and tasks at the bottom of the screen. Swipe across the screen to display another month. • Week: Display the current week. Swipe across the screen to display another week. • Day: Display today’s schedule by hour. Swipe across the screen to display another day. • Agenda: Display all tasks. 3. Tap Today to return to the current date. Create an Event or Task You can use your Calendar to create events. 1. From a Home screen, tap Apps >  Calendar. 2. Tap Add and use one of the following methods: • Add event: Enter an event with an optional repeat setting. • Add task: Enter a task with an optional priority setting. 3. Enter details for the event or task, and then tap Save. Confirm if prompted. Share an Event You can share events you create from your Calendar. 1. From a Home screen, tap Apps >  Calendar. 2. Tap an event to view it. 3. Tap Share via, choose a sharing method, and follow the prompts.
  • 56.
    51 CalendarCalling Delete anEvent or Task You can delete events or tasks you create from your Calendar. 1. From a Home screen, tap Apps >  Calendar. 2. Tap an event or task to view it. 3. Tap Delete. Confirm if prompted. To delete multiple events or tasks 1. From a Home screen, tap Apps >  Calendar. 2. Tap  More options > Delete. 3. Tap events or tasks to select them. 4. Tap Done. Confirm if prompted. Calendar Settings These settings allow you to modify settings associated with using the Calendar. 1. From a Home screen, tap Apps >  Calendar. 2. Tap More options > Settings. 3. Tap an option and follow the prompts.
  • 57.
    52 Camera andVideoCalling Take pictures and record videos with the Camera app. Switch cameras Shortcuts Record video Take a picture Shooting mode Gallery Settings • Record video: Record a video. • Take a picture: Take a picture. • Shooting mode: Change the shooting mode. • Gallery: Open the Gallery to view photos and videos. • Switch cameras: Switch between the rear and front cameras. • Settings: Configure other camera settings. • Shortcuts: Display up to two camera setting shortcuts on the viewfinder. Camera and Video
  • 58.
    53 Camera andVideoCalling Take Pictures Take pictures with your device’s front or rear camera, or combine shots with Dual mode. Note: Prior to using the camera, remove the plastic protective covering from the camera lens. 1. From a Home screen, tap Apps >  Camera. 2. Using the display screen as a viewfinder, compose your shot by aiming the camera at the subject. While composing your picture, use the available options or these gestures: • Touch the screen with two fingers and pinch or spread them on the screen to zoom in or out. • Tap the screen to focus on the area you touched. 3. Tap Take a picture to take the picture. Note: You can also press the Volume key up or down to take a picture. This is the default action of the Volume key while the camera is active. You can also set the Volume key to act as the video record key or as a zoom key. Shooting Mode Several visual effects are available. Some modes are not available when taking self-portraits. 1. From a Home screen, tap Apps >  Camera. 2. Tap MODE  Mode, and then scroll up or down the screen at the right side of the screen. Rear Camera • Auto: Allow the camera to evaluate the surroundings and determine the ideal mode for the picture. • Rear-cam selfie: Set the rear camera to automatically detect and focus on your face when you take self-portrait pictures using the rear camera. • Selective focus: Make objects stand out from the background. They must be within 1.5 feet from you, and at least 3 times this distance from the background. • Panorama: Create a linear image by taking pictures in either a horizontal or vertical direction. • Slow motion: Record videos at a high frame rate for viewing in slow motion. You can play a specific section of each video in slow motion after recording it. • Fast motion: Record videos for viewing in fast motion. You can play a specific section of each video in fast motion after recording. • Manage modes: Select which shooting modes to display when you tap Mode. • Download: Download additional shooting modes from the Galaxy Apps store. Front Camera • Selfie: Tap the screen, or place your finger over the heart rate sensor to take selfies. • Wide selfie: Take wide-angle selfie shots to fit more people into your pictures. • Download: Download additional shooting modes from the Galaxy Apps store.
  • 59.
    54 Camera andVideoCalling Camera Settings 1. From a Home screen, tap Apps >  Camera. 2. Tap Settings. Available options vary depending on the camera/recording mode used. • Picture size: Select a resolution. Use higher resolution for higher quality. Higher resolution pictures take up more memory. • Effects: Add special graphical effects. • Timer: Take time-delayed pictures or videos. • Flash: Activate or deactivate the flash (rear camera only). • Interval shot: Select the best picture from a series of continuous shots (front camera only). 3. Tap Menu to display the following additional options. Rear Camera Only • ISO: Select an ISO value. This controls camera light sensitivity. It is measured in film-camera equivalents. Low values are for stationary or brightly-lit objects. Higher values are for fast-moving or poorly-lit objects. • White balance: Select an appropriate white balance, so images have a true-to-life color range. The settings are designed for specific lighting situations. These settings are similar to the heat range for white-balance exposure in professional cameras. • Metering modes: Select a metering method. This determines how light values are calculated. Center-weighted measures background light in the center of the scene. Spot measures the light value at a specific location. Matrix averages the entire scene. • HDR (rich tone): Save the picture in HDR (rich tone) only. • Video stabilization: Activate anti-shake. Anti‑shake helps to keep the focus steady when the camera is moving. Front Camera Only • Beauty face: Take a picture with lightened faces for gentler images. • Save as flipped: Automatically save images as flipped in the Gallery. Both Cameras • Exposure value: Change the exposure value. This determines how much light the camera’s sensor receives. For low light situations, use a higher exposure. • Tap to take pics: Tap the image on the preview screen to take pictures. • Video size: Select a resolution. Use higher resolution for higher quality. Higher resolution videos take up more memory. • Location tags: Attach a GPS location tag to the picture. • Storage location: Select the memory location for storage. • Grid lines: Display viewfinder grid lines to help composition when selecting subjects. • Voice control: Set the camera to take pictures with voice commands. • The Volume key: Use the Volume key as the camera key, the record key, or as a zoom key. • Review pictures: Set to show pictures or videos after taking them. • Manage shortcuts: Touch and hold, then drag items to add them to the shortcuts menu. • Reset settings: Reset the camera settings.
  • 60.
    55 ClockCalling The Clockapp offers features for keeping track of time and setting alarms. 1. From a Home screen, tap Apps > Clock. 2. Tap a tab to use a feature: • Alarm: Set an alarm to ring at a specific time. • World clock: View the time of day or night in other parts of the world. World clock displays time in hundreds of different cities, within all 24 time zones around the world. • Stopwatch: Measure intervals of time. • Timer: Use a timer to count down to an event based on a preset time length (hours, minutes, and seconds). Alarm Set an alarm to ring at a specific time. Create an Alarm Create an alarm event. You can set one-time or recurring alarms, and choose options for how to be notified. 1. From a Home screen, tap Apps > Clock. 2. Tap Create alarm to configure: • Time: Choose a time for the alarm. • Repeat: Choose when to repeat the alarm. • Alarm type: Choose whether the alarm uses sound, vibration, or vibration and sound to alert you. • Alarm tone: Choose a sound to play for the alarm. • Volume: Drag the slider to set the volume of the alarm. • Snooze: Allow snoozing. Set interval and repeat values for the alarm while snoozing. • Smart alarm: When on, the alarm will start playing a tone at a low volume at an interval before the alarm time, and slowly increase in volume. Choose a time interval and a tone to use with smart alarm. This option is available when you have chosen an alarm type that includes sound. • Name: Enter a name for the alarm. 3. Tap Done to save the alarm. Delete an Alarm You can delete an alarm that you created. 1. From a Home screen, tap Apps > Clock. 2. Touch and hold an alarm, and then tap  Delete. Clock
  • 61.
    56 ClockCalling World Clock TheWorld clock lets you keep track of the current time in multiple cities around the globe. To list a city on the main World clock screen: 1. From a Home screen, tap Apps > Clock. 2. Tap World clock. 3. Tap the Search field, and enter the name of a city. Tap the city to view it on the globe. 4. Tap Add city to add the city to your world clock. 5. Repeat to add more cities. Tip: Tap Search cities and use the keyboard to find a city. Tap an entry to add the city to your list. To remove a city from the World clock list: 1. From a Home screen, tap Apps > Clock. 2. Tap World clock. 3. Tap List view. 4. Touch and hold a city you want to remove from the list until it is selected. 5. Tap  Delete. Stopwatch The Stopwatch lets you time events down to a hundredth of a second. 1. From a Home screen, tap Apps > Clock. 2. Tap Stopwatch and use the following options: • Start: Begin timing. • Stop: Stop timing. • Lap: Keep track of lap times. • Resume: Continue timing after stopping the clock. • Reset: Reset the Stopwatch to zero. Timer The Timer provides a countdown timer for up to 99 hours, 59 minutes, and 59 seconds. 1. From a Home screen, tap Apps > Clock. 2. Tap Timer. 3. Use the keypad and tap Hours, Minutes, and Seconds to set the length of the Timer. The following options are available: • Start: Begin the Timer. • Stop: Stop the Timer. • Resume: Resume the timer after stopping it. • Reset: Reset the Timer.
  • 62.
    57 ContactsCalling Store andmanage your contacts with the Contacts app, which can be synchronized with a variety of your existing personal accounts, including Google, Email, Facebook, and your Samsung account. For more information on connecting with and managing your accounts through your device, see Accounts. Manage Contacts Access your list of contacts by using the Contacts app. To access your Contacts list: ►► From a Home screen, tap Apps >  Contacts. Find a Contact You can search for a contact or swipe the list to find one by name. 1. From a Home screen, tap Apps >  Contacts. 2. Tap the Search field, and then enter characters to find contacts that match. – or – Tap a letter on the side of the list to jump directly to that letter in the alphabetical list. You can also slide your finger across the alphabetical list to select a letter with better precision. Add a Contact Use the following procedure to add a new contact. 1. From a Home screen, tap Apps >  Contacts. 2. Tap Create contact, and then tap contact fields to enter information. • Choose a storage account for the contact. You can store the contact on the device, or sync it with an account. • Tap Contact photo to assign a picture to the new contact. • Enter a name, phone number, email address, and assign the contact to a group. -- Tap  Add to enter additional entries. -- Tap  Remove to remove an entry. -- Tap  More for additional fields. -- Tap Label to the right of an entry to choose a label for the field (for example, Home or Work). 3. Tap Add another field to add additional contact information. 4. Tap Save. Contacts
  • 63.
    58 ContactsCalling Edit aContact When editing a contact, you can tap a field and change or delete the information, or you can add more fields to the contact’s list of information. 1. From a Home screen, tap Apps >  Contacts. 2. Tap the contact to display it, and then tap  Edit. 3. Tap any of the fields to add, change, or delete information. 4. Tap Save. Share a Name Card When you share a name card, the contact’s information is sent as a vCard file (.vcf) or text file. You can share a vCard using Bluetooth or Wi-Fi Direct, attach it to a message, or save it to a storage location. 1. From a Home screen, tap Apps >  Contacts. 2. Tap a contact to display it, and then tap  More options > Share name card. 3. Choose whether to send the contact as a vCard file (.vcf) or text file. 4. Choose a sharing method and follow the prompts. Link Contacts When you have contacts from various sources, such as Gmail or Facebook, you may have multiple similar entries for a single contact. Contacts lets you link multiple entries into a single contact. 1. From a Home screen, tap Apps >  Contacts. 2. Tap the contact to display it. 3. Tap  More options > Link contacts. 4. Tap contacts to choose them. 5. Tap Done. Unlink Contacts You can unlink a contact that you previously linked. 1. From a Home screen, tap Apps >  Contacts. 2. Tap the contact to display it. 3. Tap  More options > Unlink contacts. 4. Tap Separate beside contacts to unlink them from the main contact. Delete Contacts You can delete a single contact or choose multiple contacts to delete. 1. From a Home screen, tap Apps >  Contacts. 2. Touch and hold a contact to select it. You can also tap other contacts or tap the selected checkbox at the top of the screen to select all contacts. 3. Tap Delete, and then confirm if prompted. Favorites When you mark contacts as favorites, they are easily accessible from other apps. Favorites display together on the Favorites tab in Contacts. Mark Contacts as Favorites You can mark contacts as Favorites. 1. From a Home screen, tap Apps >  Contacts. 2. Tap a contact to display it, and then tap  Add to Favorites (the star brightens ). Remove Contacts from Favorites You can remove contacts from Favorites. 1. From a Home screen, tap Apps >  Contacts. 2. Tap a contact to display it, and then tap  Remove from Favorites (the star dims ).
  • 64.
    59 ContactsCalling Create aShortcut to a Favorite You can create a shortcut to a favorite on the home screen, to access their information directly from the home screen. 1. From a Home screen, tap Apps >  Contacts. 2. Tap the Favorites tab, and then touch and hold on a contact to select it. 3. Tap  More options > Add shortcut to Home screen. The new shortcut displays in an empty area of the home screen. Groups You can use groups to organize your contacts. Your device comes with preloaded groups, and you can create your own. You might create a group for your family, for coworkers, or a team. Groups make it easy to find contacts, and you can send messages to the members of a group. Create a Group You can create your own contact groups. 1. From a Home screen, tap Apps >  Contacts. 2. Tap Groups, and then tap Create group. 3. Tap fields to enter information about the group: • Create group in [location]: Tap to choose where to save the group. You can save it to a specific account, to the device memory, or to all accounts. • Group name: Enter a name for the new group. • Group ringtone: Choose a ringtone specific to members of this group. • Group message tone: Choose a tone specific to members of this group. • Group vibration pattern: Choose a vibration pattern specific to members of this group. 4. Tap Add member and select contact(s) to add to the new group, and then tap Done. 5. Tap Save. Rename a Group You can rename a contact group. 1. From a Home screen, tap Apps >  Contacts. 2. Tap Groups, and then tap a group. 3. Tap  More options > Edit group and enter a new name. 4. Tap Save. Add Contacts to a Group You can add contacts to a group. 1. From a Home screen, tap Apps >  Contacts. 2. Tap Groups, and then tap a group. 3. Tap Add member, and then tap the contact(s) you want to add. 4. Tap Done. Send a Message to a Group You can send a text message to members of a group. 1. From a Home screen, tap Apps >  Contacts. 2. Tap Groups, and then tap a group. 3. Tap  More options > Send message or email. 4. Tap Message. 5. Type your message and tap Send.
  • 65.
    60 ContactsCalling Send anEmail to a Group You can send an email to members of a group. 1. From a Home screen, tap Apps >  Contacts. 2. Tap Groups, and then tap a group. 3. Tap  More options > Send message or email. 4. Tap Email. 5. Tap contacts to select them, or tap the  Checkbox, and then tap Done. Only group members that have email addresses in their records are shown. 6. Choose an account and follow the prompts. Delete a Group Preset groups cannot be deleted. 1. From a Home screen, tap Apps >  Contacts. 2. Tap Groups. 3. Tap  More options > Delete group. 4. Tap one or more groups to select, and then tap Delete. 5. Tap Group only to delete the just the group, or tap Group and members to delete both the group and its members. Contact Settings These settings allow you to modify settings associated with using the Contacts app. 1. From a Home screen, tap Apps >  Contacts > Contacts tab. 2. Tap  More options > Settings > Contacts. 3. Tap an option and follow the prompts.
  • 66.
    61 EmailCalling Email Use theEmail app to view and manage all your email accounts in one app. To access Email: ►► From a Home screen, tap Apps > Email. Configure Email Accounts You can configure Email for most accounts in just a few steps. 1. From a Home screen, tap Apps > Email. 2. Follow the prompts to set up your email account. To add an email account: 1. From a Home screen, tap Apps > Email. 2. Tap More options > Settings > Manage accounts. 3. Tap Add account. 4. Enter your email address and password. The device communicates with the appropriate server to set up your account and synchronize your email. When complete, your email is displayed in the Inbox for the account. Note: To configure email account settings at any time, tap  More options > Settings. Tap Manage accounts. Tap the email account to display its settings. Refresh Your Email Account Refresh your account to update your email accounts. 1. From a Home screen, tap Apps > Email. 2. In the Application bar, tap Refresh. View Multiple Email Accounts You can view email you receive for multiple accounts on the Combined inbox screen or you can view email accounts individually. 1. From a Home screen, tap Apps > Email. 2. Tap Menu at the top left of the screen to view the current account mailbox. 3. Tap the account name to view: • Combined view: View all email in a combined inbox. • [Account name]: View email for only one email account. Manage Your Inbox There are several tools available from the Inbox screen. 1. From a Home screen, tap Apps > Email. • Tap a message to read and reply or forward it. • Tap Search to search for key words in your email inbox. • Tap More options for additional message options.
  • 67.
    62 EmailCalling Create andSend an Email This section describes how to create and send an email using the Email app. 1. From a Home screen, tap Apps > Email > Compose. 2. Tap the To field to manually add an email address or tap Add recipient to select a recipient from Contacts or Groups. • If manually entering recipients, enter additional recipients by separating each entry with a semicolon (;). More recipients can be added at any time before the message is sent. • If adding a recipient from your Contacts, tap the contact to place a checkmark, and then tap Done. The contact is displayed in the recipients field. • Tap More to add Cc and Bcc fields. 3. Tap the Subject and Message fields to enter text. • Tap Attach to add Files, Images, Audio, and more to your email. • Tap  More options for additional email options. 4. Review your message and tap Send. Remove Email Accounts To remove an Email account: 1. From a Home screen, tap Apps > Email. 2. Tap More options > Settings > Manage accounts. 3. Tap  More options > Select. 4. Tap one or more accounts to delete, and then tap Remove. Confirm if prompted. Email Settings These settings allow you to modify settings associated with using the Email app. 1. From a Home screen, tap Apps > Email. 2. Tap  More options > Settings. 3. Under General settings, tap an option, and then follow the prompts. 4. Tap Manage accounts, and then tap an account to configure specific settings for only that account.
  • 68.
    63 Galaxy AppsCalling SamsungGalaxy Apps provides a quick and easy way to find and download free premium apps that are compatible with your Galaxy device. To access the Samsung Galaxy Apps website: ►► From a Home screen, tap Apps >  Galaxy Apps. Galaxy Essentials Galaxy Essentials is a collection of specially chosen apps available through Samsung Apps. From Galaxy Essentials, you can access and download a collection of premium content, free of charge. To access Galaxy Essentials: 1. Swipe across the Home screens and locate and tap the Galaxy Essentials widget. 2. Follow the prompts to download Galaxy Essentials apps. Note: A Samsung account is required to purchase and download apps. Galaxy Apps
  • 69.
    64 GalleryCalling View, edit,and manage pictures and videos. Note: Some functions described in this section are only available if there are images or videos in the Gallery. View Images and Videos Launching Gallery displays available folders. When another app, such as Email, saves an image, a Download folder is automatically created to contain the image. Likewise, capturing a screenshot automatically creates a Screenshots folder. 1. From a Home screen, tap Apps >  Gallery. 2. Tap Menu in the upper left corner, and then tap an option to choose the way items are displayed. • In Album view, you can create albums to organize your images. On the menu, tap Albums, and then tap  More options > Create album. 3. Depending on the view mode selected, either tap an image or video to view it, or first tap an album or folder and then tap an image or video. • When viewing an image or video, you can swipe left or right to view the next or previous image or video. Zoom In or Out Use one of the following methods to zoom in or out on an image: • Double-tap anywhere on the screen to zoom in or zoom out. • Spread two fingers apart on any place to zoom in. Pinch the screen to zoom out. Play Videos You can play videos stored on your device. 1. From a Home screen, tap Apps >  Gallery. 2. Tap a folder or category to open it. 3. Tap a video to view it. 4. Tap Play to play the video. Trim Segments of a Video You can trim segments of a video. 1. Select a video, and then tap Trim. 2. Use the sliders at the bottom of the screen to trim the video. Move the left bracket to the desired starting point, and then move the right bracket to the desired ending point. 3. Tap Done to save the video. Modify the File name, and then tap OK to confirm the changes. Gallery
  • 70.
    65 GalleryCalling Edit Images Youcan edit images stored on your device. ►► While viewing an image, tap  More options: • Edit: Use basic tools to edit your picture. • More info: View image details. • Write on image: Write directly on the image. • Rotate left: Rotate the photo counter‑clockwise. • Rotate right: Rotate the photo clockwise. • Crop: Resize the frame to crop the image. • Rename: Rename the file. • Slideshow: Start a slideshow with the images and videos in the current folder. • Add tag: Add a tag to your image. • Studio: Edit your picture with advanced tools. • Set as: Set the image as wallpaper or as a contact’s photo. • Print: Print the image through a USB or Wi‑Fi connection. Some printers may not be compatible with the device. • Settings: Change the Gallery settings. Share Images and Videos You can share images and videos from your Gallery. 1. From a Home screen, tap Apps >  Gallery. 2. Tap a folder to open it. 3. In a folder, tap  More options > Select, select images and videos, and then tap Share via to send them to others or share them with social network services. – or – While viewing a single image or video, tap  Share via to send it to others or share it with social network services. Delete Images and Videos You can delete images and videos stored on your device. 1. From a Home screen, tap Apps >  Gallery. 2. Tap a folder to open it. 3. In a folder, tap More options > Delete, select images and videos, and then tap Done. – or – When viewing a single image, tap  Delete. Gallery Settings These settings allow you to modify settings associated with using your Gallery. 1. From a Home screen, tap Apps >  Gallery. 2. Tap More options > Settings. 3. Tap an option and follow the prompts. 4. Tap More options > Add account to add a Samsung, Dropbox, Google, or Facebook account.
  • 71.
    66 InternetCalling Access theInternet with a fully‑featured web browser. Access the Internet ►► From a Home screen, tap Apps >  Internet. Command Keys The following command keys are available: • Back or Back: Return to the previous page. • Forward: Go forward to a recent page. • Home: Display your Internet Home screen. •  Bookmarks: Manage bookmarked pages, saved pages, and history. ►► Tabs: Manage open tabs. The number on the icon indicates the number of tabs that are currently open. • Refresh: Reload or reload the current web page. View a Web Site To view a web site: ►► Tap the address field, enter the web address, and then tap Go on the keyboard. To share, save, or print the current web page: ►► Tap More. To zoom in or out: ►► Tap the screen twice or pinch the screen to zoom out. Stretch the screen to zoom in. Browser Tabs Use tabs to view multiple web pages at the same time. To open a new tab: ►► Tap Tabs > New tab. To close a tab: 1. Tap Tabs. 2. Tap Close by the tabs you want to close. Bookmarks The Bookmarks page stores Bookmarks, Saved pages, and History. Save and Open Bookmarks Bookmarking a web page saves the web address so that you can access it quickly. To bookmark the current web page: 1. Tap  Bookmarks > Bookmarks > Add. 2. Type a title for the bookmark and tap Save. To open a bookmarked web page: 1. Tap  Bookmarks > Bookmarks. 2. Tap a bookmark entry. Internet
  • 72.
    67 InternetCalling Saved Pages Savinga web page stores the web page content on your device so that you can access it offline. To save the current web page: ►► Tap More > Save web page. To view saved web pages: 1. Tap  Bookmarks > Saved pages. 2. Tap a saved page to open it in the browser. View History To view a list of recently visited web pages: ►► Tap  Bookmarks > History. Share Pages To share a web page address with others: ►► Tap  More options > Share, and follow the prompts. Secret Mode Pages viewed in Secret mode are not listed in your browser history or search history, and leave no traces (such as cookies) on your device. Secret tabs are a darker shade than the normal tab windows. Note: Any downloaded files remain on your device after you close the secret tab. To enable Secret mode: 1. From a Home screen, tap Apps >  Internet. 2. Tap Tabs. 3. Tap Turn on secret. 4. Tap Create password to protect your Secret mode data with a password. – or – Tap Do not use password. To turn off Secret mode: 1. From a Home screen, tap Apps >  Internet. 2. Tap Tabs. 3. Tap Turn off secret. Internet Settings These settings allow you to modify settings associated with using the Internet app. 1. From a Home screen, tap Apps >  Internet. 2. Tap More > Settings. 3. Tap an option and follow the prompts.
  • 73.
    68 MessagesCalling Learn howto send and receive different messages using the Samsung Messages app on your device. Types of Messages The Samsung Messages app provides the following message types: • Text Messages (SMS) • Multimedia Messages (MMS) The Short Message Service (SMS) lets you send and receive text messages to and from other mobile phones or email addresses. To use this feature, you may need to subscribe to your service provider’s message service. The Multimedia Messaging Service (MMS) lets you send and receive multimedia messages (such as picture, video, and audio messages) to and from other mobile phones or email addresses. To use this feature, you may need to subscribe to your service provider’s multimedia message service. Messaging icons are displayed at the top of the screen and indicate when messages are received and their type. Create and Send Messages This section describes how to create and send a message using the Messages app. 1. From a Home screen, tap Messages. 2. Tap  Compose. 3. Tap the Enter recipients field to manually enter a recipient or tap Add recipient to select a recipient from your Contacts. You can also select the recipient based on Groups, Favorites, or Logs. • If adding a recipient from your Contacts, tap the contact to place a checkmark, and then tap Done. The contact is placed in the recipients field. • Enter additional recipients by separating each entry with a semicolon (;) and then using the previous procedure. More recipients can be added at any time before the message is sent. • For the Group option, you can select up to ten members in the group. 4. Tap the Enter message field to enter a message. • Attach: Add images, audio, and more to your message. • Add emoticon: Choose an available emoticon from the list and then add it into your message at the cursor location. 5. Review the message and tap Send. Note: If you exit a message before you send it, the message is automatically saved as a draft. Messages
  • 74.
    69 MessagesCalling View NewMessages When you receive a new message,  New message appears on the Status bar. To view the message: ►► Open the Notification panel and tap the message. For more information, see Notification Panel. – or – From a Home screen, tap Apps >  Messages, and then tap the new message to view it. • To play a multimedia message attachment (audio or video), tap Play. • To scroll through the list of messages, swipe up or down the page. Delete Messages To delete messages, follow these steps: 1. From a Home screen, tap Apps >  Messages. 2. Tap More options > Select. 3. Tap each message you want to delete or tap the selected checkbox at the top of the screen to select all messages. 4. Tap  Delete and confirm if prompted. Message Search You can search through your messages by using the Message Search feature. 1. From a Home screen, tap Apps >  Messages. 2. Tap Search. 3. Enter a word or phrase to search for, and then tap Search on the keyboard. Messages Settings Configure the settings for text messages, multimedia messages, push messages, and more. ►► From a Home screen, tap Apps >  Messages >  More options > Settings. Emergency Alerts This device is designed to receive wireless emergency alerts from the Commercial Mobile Alerting System (CMAS), which may also be known as the Personal Localized Alerting Network (PLAN). For more information, please contact your wireless provider. Emergency alerts allows customers to receive geographically-targeted messages. Alert messages notify customers of imminent threats to their safety within their area. There is no charge for receiving an Emergency alert message. There are three types of Emergency alerts: • Alerts issued by the President • Alerts involving imminent threats to safety of life (extreme and severe) • AMBER alerts (missing child alert) Users may choose not to receive Imminent alerts (extreme and severe) and AMBER alerts. Note: Alerts issued by the President cannot be disabled. To disable Imminent and AMBER alerts, follow the instructions below: 1. From a Home screen, tap Apps >  Messages. 2. Tap More options > Settings > Emergency alerts. 3. Tap Emergency alerts. • All alerts are enabled (checkmark showing) by default. 4. Tap an alert option to disable it.
  • 75.
    70 Music PlayerCalling Listento your favorite songs with the Music player. Navigate through your music library, play songs, and create customized playlists. Adjust volume More options Change player Sound quality and effects Repeat Song length Playback controls Time elapsed Shuffle Favorite Playback position Volume • Volume: Tap to adjust the volume. • More options: View more options. • Adjust volume: Control the volume level. • Sound quality and effects: Customize options to adjust sound effects. • Repeat: Control playback. • Song length: View the total length of the current song. • Playback controls: Fast-forward or rewind, play or pause the current song, add the song to a playlist, and view current playlist. • Time elapsed: View the time elapsed for the current song. • Shuffle: Shuffle songs in the current playlist. • Playback position: Skip to another part of the current song. • Favorite: Tag this song as a favorite. • Change player: Play the song on a connected device. Music Player
  • 76.
    71 Music PlayerCalling Listento Music 1. From a Home screen, tap Apps >  Music. 2. Tap a library category at the top of the screen to view your music files. 3. Swipe through the list of songs and tap an entry to begin playback. 4. While playing music, use these controls: • Tap Pause to pause playback. To start playback again, tap Play. • Tap Rewind to move to the previous song. Tap Fast-forward to move to the next song. • Tap the repeat button to control playback. Choose Repeat off to play all songs once. Choose Repeat all to repeat all songs. Choose Repeat 1 to repeat the current song. • Tap the shuffle button to control the order songs are played. Choose Shuffle off to play songs in the order they appear in the list. Choose  Shuffle on to play songs in random order. • Tap Favorite to mark a song as a favorite. Whenever a song is a favorite, the star is gold. Favorite songs are included in the Favorites playlist. • Tap Volume to set the volume. You can also set volume by pressing the Volume key on the side of the phone. Note: When you close the Music screen, playback continues in the background, allowing you to listen to music while using other features of your phone. When music is playing in the background, you can access playback controls from the Notification panel.
  • 77.
    72 My FilesCalling Access filesstored on your device, including images, videos, music, and sound clips. To view files in My Files: 1. From a Home screen, tap Apps >  My Files. 2. Tap a category to view the relevant files or folders. 3. Tap a file or folder to open it. File Groups Files stored in the device are organized into the following groups: • Recent files: View recently saved files. • Images: View image files. • Videos: View video files. • Audio: View audio files. • Documents: View document files. • Downloaded apps: View downloaded apps. • Download history: View all apps and files that have been downloaded to the device. • Shortcuts: Contains shortcuts to files or folders that you have added. This option only appears if you have added shortcuts to the My Files main screen. • Local storage: View folders and files in their storage locations. -- Device storage: View folders and files located on the device. -- SD card: View folders and files located on the memory card (if installed). • Cloud storage: Contains shortcuts to FTP servers or other cloud storage locations that you have added. This option only appears if you have added shortcuts to the My Files main screen. My Files Options Use My File options to search, edit, clear file history, and more. ►► From a Home screen, tap Apps >  My Files. The following options are available: • Search: Search for a file or folder. • Storage usage: View memory information for your device and memory card (if installed). • Tap More options for these options: -- Add shortcut: Add a shortcut on the My Files main screen to any folder. -- Settings: Change the settings for viewing files. My Files
  • 78.
    73 S HealthCalling UseS Health to plan, track, and manage your health goals and activities, including exercise, sleep, and meals. Caution: The information gathered from this device, S Health, or related software is not intended for use in the diagnosis of disease or other conditions, or in the cure, mitigation, treatment or prevention of disease. The accuracy of the information and data provided by this device and its related software, including heart rate readings, may be affected by factors such as environmental conditions, skin condition, specific activity performed while using/wearing the device, settings of the device, user configuration/ user-provided information, placement of the sensor on the body, and other end-user interactions. For more information on proper wear and use, see samsung.com/us/heartratesensor 1. From a Home screen, tap Apps >  S Health. 2. Read and accept the terms and conditions. 3. Set up your health profile and goals. Before You Start Exercising This app can be used to monitor your exercise. While moderate physical activity, such as brisk walking, is safe for most people, health experts suggest that you talk with your doctor before you start an exercise program, particularly if you have any of the following conditions: • Heart disease; • Asthma or lung disease; • Diabetes, or liver or kidney disease; • Arthritis. You should also check with your doctor if you have symptoms suggestive of heart, lung, or other serious disease, such as: • Pain or discomfort in your chest, neck, jaw, or arms during physical activity; • Dizziness or loss of consciousness; • Shortness of breath with mild exertion or at rest, or when lying down or going to bed; • Ankle swelling, especially at night; • A heart murmur or a rapid or pronounced heartbeat; • Muscle pain when walking upstairs or up a hill that goes away when you rest. Finally, the American College of Sports Medicine recommends that you see your doctor before engaging in vigorous exercise if two or more of the following apply: • You are a man older than age 45 or a woman older than age 55; • You have a family history of heart disease before age 55; • You smoke or quit smoking in the past six months; • You have not exercised for three months or more; • You are overweight or obese; • You have high blood pressure or high cholesterol; • You have impaired glucose tolerance, also called prediabetes. S Health
  • 79.
    74 S HealthCalling Whenin Doubt — Check It Out If you are unsure of your health status, have several health problems, or are pregnant, you should speak with your doctor before starting a new exercise program. Working with your doctor ahead of time is a good way to plan an exercise program that is right and safe for you. Consider it the first step on your path to physical fitness.
  • 80.
    75 S NoteCalling TheS Note app helps you create, edit, and manage all the notes on your device. Sign in to your Samsung account to access your notes in S Note from any device. With S Note, create content by typing, writing, drawing, and even recording voice, video, or taking pictures. Templates are provided to make content creation easy and help keep things organized. Create a Note To create a note with S Note: 1. From a Home screen, tap Apps >  S Note. 2. Tap the Create new note. 3. Use the S Pen to create content. • Tap More > Background settings to add templates, change the background color, and add images. 4. Tap Save. Note Tools When creating or editing a note in S Note, some helpful modes and tools are provided. Note: To use your finger to write and draw on S Notes, tap More > Settings > S Pen only mode to disable this restriction. • Save: Name and save the note. • Pen: Write or draw freehand with the S Pen. Tap the Pen icon once to change the Pen settings. -- Tap Favorite pens to save pen settings at the bottom of the screen. • Eraser: Erase content from the note. Tap once to select the eraser. Tap again to change the Eraser settings. • Text: Type text using the keyboard. Tap once to select Text mode. • Undo: Undo the last action. • Redo: Redo the last action. • More options: View more options for the note. S Note
  • 81.
    76 S NoteCalling Edita Note To edit an S Note: 1. From a Home screen, tap Apps >  S Note. 2. Tap a note to view it. 3. Tap Edit mode to edit the note. Note: Action memos behave differently from other notes. When you tap on an Action memo to view it, you can edit the memo immediately. View Action Memos You can view S Notes and Action memos together, or you can narrow your view to Action memos. To view Action memos in S Note: ►► Tap the drop-down menu and tap Action memos. • Tap Search to search for action memos. • Tap More for additional options: -- Share: Select action memos to share. -- Edit: Select memos to delete, export, or save as an S Note. -- Filter by background color: Sort action memos by background color. -- Settings: Customize S Note settings. -- Help: View help topics on how to use S Note.
  • 82.
    77 S VoiceCalling SVoice Speak commands to perform operations on your device, and to speak criteria for searches and other operations. Access S Voice You can access S Voice from the Apps list. 1. From a Home screen, tap Apps >  S Voice. 2. Speak a command. 3. Tap Microphone if the device does not hear you, or to give it another command. Tip: Tap More options for example commands and to view a tutorial. S Voice Settings These settings allow you to modify settings associated with using the S Voice app. 1. From a Home screen, tap Apps >  S Voice. 2. Tap More options > Settings. 3. Tap an option and follow the prompts.
  • 83.
    78 ScrapbookCalling The Scrapbookapp provides a place for you to manage the multimedia content you capture with the S Pen tools. Scrapbook provides storage and organization tools for content you capture while using your mobile device. With the S Pen tools, you can capture articles, images, and even videos and music. You can then add a title, text, a handwritten memo, or content tags. When you capture content online, the web link is saved with the content. Edit the Scrapbook Categories and content files in the Scrapbook can be edited. To open the Scrapbook: ►► From a Home screen, tap Apps >  Scrapbook. You can edit both Categories and the content files within them. To edit a file: 1. Tap the drop-down menu in the top left corner. 2. Select either the category or tag that contains the file to edit. 3. Tap the file to edit. 4. Tap Edit to change the Title, Text, Memo, or Tags as desired. 5. When finished, tap Save. To edit categories: 1. From a Home screen, tap Apps >  Scrapbook. 2. Tap More options > Manage categories. • Tap Create category to create a new category. • To delete a category, tap Edit, select the category, and tap Delete. 3. When you are finished tap Back. Scrapbook
  • 84.
    79 Video PlayerCalling Playand manage videos stored on your device. File name Pause/Play Rewind More options Screen ratio Fast-forwardChange player Playback position • Rewind: Restart the video, skip to a previous video or rewind the video. • Pause or Play: Pause or play the current video. • Fast-forward: Skip to the next video or fast‑forward through the current video. • More options: View more options. • File name: View the name of the video file. • Screen ratio: Change the screen ratio. • Change player: Play the video on a nearby device. • Playback position: Skip to another part of the video. Video Player
  • 85.
    80 Video PlayerCalling Accessthe Video Player 1. From a Home screen, tap Apps > Video. 2. Scroll through the videos stored on your device. After a few seconds, each video thumbnail begins playing a preview of the clip. 3. Tap a video to view it. Use Pop‑Up Play Multitask with Pop-up player by transforming your video player into a pop-up window. The video will continue to play, and the pop-up window can be resized or moved anywhere on the screen. 1. From a Home screen, tap Apps > Video. 2. Tap a video to view it. 3. Tap More options > Pop-up player to continue playing the video in a floating window. • Drag the window to any location on the screen. • Use two fingers to pinch or spread to resize the floating window. Change the Video Screen Size You can change the size of the video during video playback. 1. From a Home screen, tap Apps > Video. 2. Tap a video to view it. 3. Tap the screen ratio icon to cycle through the screen size options: • Full-screen in ratio view: The video is enlarged as much as possible without becoming distorted. • Full-screen view: The entire screen is used, which may cause some minor distortion. • Original size view: The video will be played in its original size. • Stretch to fit: The video is enlarged to fit the screen without becoming distorted.
  • 86.
    81 Voice RecorderCalling VoiceRecorder Record voice memos and notes. Create a Voice Recording To create a voice recording: ►► From a Home screen, tap  Apps >  Voice Recorder. • Tap  More options > Settings > Recording quality to adjust the recording quality. • Tap Select mode to choose the appropriate recording mode: -- Normal: This recording mode picks up any sounds detected by the microphones. -- Interview: The top and bottom microphones are used for two-directional recording. The top and bottom of the device pick up equal amounts of sound. Microphones can be muted during playback. -- Meeting: The microphones are sensitive to sound from all directions and can distinguish up to eight sources of sound. Sound sources can be muted during playback. -- Voice memo: Voice input is converted to text on screen. The maximum recording time is five minutes. The following additional controls are available: • Block calls: Block incoming calls while recording. • Record: Record an audio file. • Stop: Stop recording. The file is automatically saved. • Pause: Pause the recording of an audio file. • Cancel: Cancel the recording of an audio file. • Bookmark: Add a bookmark to this location in the recording. Manage Recordings Once you have recorded and saved at least one recording, the following options are available: 1. From a Home screen, tap  Apps >  Voice Recorder. 2. Tap Recordings. 3. Tap a recording to play it back. 4. Tap Search to search for a recording. 5. Tap  More options: • Select: Select recordings. Once selected, the following options are available: -- Share: Share recording files. -- Delete: Delete voice recordings. -- More options: Choose Change category, Rename, Set as, Write to Voice Label, or view Details. • Sort by: Sort the list of recordings. • Filter by category: Filter entries by category. • Edit categories: Add or edit categories. • Settings: Configure Voice Recorder.
  • 87.
    Configure your device’s connectionsand settings, add accounts, and customize the Home screens, apps, and features. Settings
  • 88.
    83 How toUse SettingsSettings How to Use Settings Access Settings There are a couple of ways to access your device settings. ►► From a Home screen, tap Apps >  Settings. – or – Drag down from the Status bar to display the Notification panel, and then tap  Settings. Search for Settings If you are not sure exactly where to find a certain setting, you can use the Search feature. 1. From a Home screen, tap Apps >  Settings. 2. Tap Search. • Enter a word or words in the Search field. As you type, settings that match are displayed on the screen. • Tap an entry to go to that setting. Customize Quick Settings Quick settings are the settings that you are most likely to frequently use. When you first access the Settings menu, the Quick settings are set to a default list of settings. To edit the Quick settings list: 1. From a Home screen, tap Apps >  Settings. 2. Tap More options > Edit quick settings. • Choose additional settings to display in your Quick settings menu. Settings that are already in the Quick settings menu are checked. • Uncheck a setting to remove it from the Quick settings list. 3. Tap Done to save your new Quick settings menu. Change How Settings Are Listed Settings can be listed in a list view or a tab view. 1. From a Home screen, tap Apps >  Settings. 2. Tap More options > View as. 3. Select a different view.
  • 89.
    84 Wi-FiSettings Wi-Fi isa term used for certain types of Wireless Local Area Networks (WLAN). Wi-Fi communication requires access to a wireless Access Point (AP). Turn Wi‑Fi On or Off Turning Wi-Fi on makes your device able to discover and connect to compatible in-range wireless APs. 1. From a Home screen, tap Apps >  Settings. 2. Tap Wi-Fi, and then tap On/Off to turn Wi-Fi on or off. Wi-Fi Status Indicators Status bar icons indicate your current Wi-Fi connection status: • When Wi-Fi is connected, active, and communicating with a wireless Access Point,  Wi-Fi active is displayed in the Status bar. • If a Wi-Fi access point is available, but your device is not connected to it, Wi-Fi available is displayed. It may also display if there is a communication issue with the target wireless Access Point. Wi‑Fi Networks To scan for a Wi-Fi network and connect to it: 1. From a Home screen, tap Apps >  Settings. 2. Tap Wi-Fi, and then tap On/Off to turn Wi-Fi on. • When Wi-Fi is turned on, your device automatically scans for available networks and displays them. 3. Tap the network you want to connect to. • When you select an open network, you are automatically connected to the network. Otherwise, enter a password to connect. Manually Connect to a Wi‑Fi Network You can connect your device to a Wi-Fi network manually. 1. From a Home screen, tap Apps >  Settings. 2. Tap Wi-Fi, and then tap On/Off to turn Wi-Fi on. 3. Tap Add Wi-Fi network. 4. Enter information about the Wi-Fi network: • Network SSID: Enter the name of the Wi-Fi network. • Security: Select a security option and enter your password. • Show advanced options: Add advanced options such as IP settings and Proxy settings. 5. Tap Connect to store the new information and connect to your target wireless Access Point. Wi-Fi
  • 90.
    85 Wi-FiSettings Wi-Fi Options TheWi-Fi settings menu allows you to set up many of your device’s advanced Wi-Fi services. 1. From a Home screen, tap Apps >  Settings. 2. Tap Wi-Fi, and then tap On/Off to turn Wi-Fi on. 3. Tap More options for options: • Scan: Start another scan for nearby Wi-Fi networks. • Wi-Fi Direct: Configure a Wi-Fi Direct connection with a nearby device. • Advanced: -- Network notification: Receive notifications when open networks in range are detected. -- Sort by: Sort Wi-Fi networks alphabetically or by signal strength. -- Keep Wi-Fi on during sleep: Specify when to disconnect from Wi-Fi. -- Smart network switch: Connect automatically to a mobile network connection when the Wi-Fi connection is unstable. -- Install certificates: Install authentication certificates. -- MAC address: View your device’s MAC address, which is required when connecting to some secured networks (not configurable). -- IP address: View your device’s IP address (not configurable). • WPS push button: Set up a connection to a WPS (Wi-Fi Protected Setup) router or other equipment. • WPS PIN entry: View the PIN used by your device to set up a PIN-secured connection to a Wi-Fi router or other equipment (not configurable). • Share Wi-Fi profile: Share Wi-Fi profiles you have created with others. • Help: Learn about setting up and using Wi-Fi networks, and other settings. Wi-Fi Direct Wi-Fi Direct allows direct device-to-device connections using Wi-Fi, without having to connect to a Wi-Fi network. 1. From a Home screen, tap Apps >  Settings. 2. Tap Wi-Fi, and then tap On/Off to turn Wi-Fi on. • Wi-Fi must be on to configure settings. 3. Tap More options > Wi-Fi Direct. Your device automatically scans for nearby Wi-Fi Direct devices. – or – Tap Scan to start scanning. 4. Select a device, and then follow the prompts to complete the connection. Wi-Fi Direct Status Indicator Status bar icons indicate your current Wi-Fi Direct connection status: • When your device is connected to another device using Wi-Fi Direct, Wi-Fi Direct is displayed in the Status bar.
  • 91.
    86 BluetoothSettings Bluetooth Bluetooth isa short-range communications technology that connects your device wirelessly to a number of Bluetooth devices, such as headsets and hands-free car Bluetooth systems, and Bluetooth-enabled computers, printers, and wireless devices. Note: The Bluetooth communication range is approximately 30 feet. Turn Bluetooth On or Off Use the settings menu to turn your device’s Bluetooth on or off. 1. From a Home screen, tap Apps >  Settings. 2. Tap Bluetooth, and then tap On/Off to turn Bluetooth on or off. Bluetooth Status Indicator Status bar icons indicate your current Bluetooth connection status: • When Bluetooth is turned on, Bluetooth is displayed in the Status bar. Scan for Bluetooth Devices When you want to pair with another Bluetooth device, you can scan for nearby devices that are visible. 1. From a Home screen, tap Apps >  Settings. 2. Tap Bluetooth, and then tap On/Off to turn on Bluetooth. • When Bluetooth is first turned on, it scans for nearby Bluetooth devices and displays them. • To manually perform a new scan, tap Scan. Making Your Device Visible to Other Bluetooth Devices When you make your device visible, other Bluetooth devices can find it in a scan and initiate pairing. You can choose the length of time your device remains visible. 1. From a Home screen, tap Apps >  Settings. 2. Tap Bluetooth, and then tap On/Off to turn on Bluetooth. 3. Tap the Checkbox under My device to make your device visible to nearby devices. 4. Tap Bluetooth > More options > Visibility timeout. 5. Select a time period for your device to remain visible after you turn on visibility.
  • 92.
    87 BluetoothSettings Review FilesReceived Through Bluetooth When you receive files from another device through Bluetooth, you can access them from Bluetooth settings. 1. From a Home screen, tap Apps >  Settings. 2. Tap Bluetooth > More options > Received files. Change Your Device’s Name Change the name others use when pairing with your device through Bluetooth. 1. From a Home screen, tap Apps >  Settings. 2. Tap Bluetooth > More options > Rename device. 3. Tap the current device name to edit it. 4. When finished, tap OK. Pair Bluetooth Devices The Bluetooth pairing process allows you to establish trusted connections between your device and another Bluetooth device. Pairing between two Bluetooth devices is a one‑time process. Once a pairing is created, the devices continue to recognize their partnership and exchange information without having to re-enter a passcode. 1. From a Home screen, tap Apps >  Settings. 2. Tap Bluetooth, and then tap On/Off to turn on Bluetooth. • Make sure that the target device is discoverable, so that your device can find it. Refer to the instructions that came with the device to find out how to set it to discoverable mode. 3. Tap Scan. Your device starts scanning for Bluetooth devices within range. 4. Tap the name of the target device when you see it displayed in the Bluetooth devices section. • Your device automatically tries to pair with the target device. If automatic pairing fails, enter the passcode supplied with the target device. Note: Due to different specifications and features of other Bluetooth-compatible devices, display and operations may be different, and functions such as transfer or exchange may not be possible with all Bluetooth compatible devices. Rename a Paired Device Once you have paired your device to another device, you can rename the paired device to make it easier to recognize. 1. From a Home screen, tap Apps >  Settings. 2. Tap Bluetooth, and then tap On/Off to turn on Bluetooth. 3. Tap  Settings next to the previously paired device, and then tap Rename. 4. Enter a new name, and tap OK. Delete a Paired Device (Unpair) When you unpair from a Bluetooth device, the two devices no longer recognize each other. To connect again, you have to pair the devices. 1. From a Home screen, tap Apps >  Settings. 2. Tap Bluetooth, and then tap On/Off to turn on Bluetooth. 3. Tap  Settings next to the paired device, and then tap Unpair to delete the paired device.
  • 93.
    88 Tethering andWi-Fi HotspotSettings Tethering and Wi-Fi Hotspot Use Mobile hotspot and tethering to share your device’s Internet connection with other devices. Enable Mobile Hotspot Activate Mobile hotspot to allow other devices to use your device’s Internet connection. Note: You must have a tethering plan on your service account in order to use Mobile hotspot. Warning: Mobile hotspot consumes battery power and uses data service. Warning: By default, your device’s Mobile hotspot has no security applied, and any device can connect. 1. From a Home screen, tap Apps >  Settings. 2. Tap Tethering and Wi-Fi hotspot > Mobile hotspot. 3. Tap On/Off to turn Mobile hotspot on or off. Connect a Device to Your Mobile Hotspot Use the other device’s Wi-Fi control to connect to your device’s Mobile hotspot. 1. From a Home screen, tap Apps >  Settings. 2. Tap Tethering and Wi-Fi hotspot > Mobile hotspot. 3. Tap On/Off to turn on Mobile hotspot. 4. Activate Wi-Fi on the target device. 5. Scan for Wi-Fi hotspots and select the target device from the list. 6. Enter your device’s Mobile hotspot password on the target device. • By default, the password is your device’s phone number. Allowed Devices List Control whether devices connect to your Mobile hotspot with the Allowed devices list. After you add devices to the list, they can scan for your device and connect using your device’s Mobile hotspot name and password. Note: Using your device as a Mobile hotspot consumes battery power and uses data service. While Mobile hotspot is active, your device’s applications use the Mobile hotspot data service. Roaming while using your device as a Mobile hotspot incurs extra data charges. 1. From a Home screen, tap Apps >  Settings. 2. Tap Tethering and Wi-Fi hotspot > Mobile hotspot. 3. Tap On/Off to turn on Mobile hotspot. 4. Tap More options > Allowed devices, and then tap Add to enter the other device’s Device name and MAC address. 5. Tap OK to add the device.
  • 94.
    89 Tethering andWi-Fi HotspotSettings Change the Mobile Hotspot Password You can change your Mobile hotspot password. 1. From a Home screen, tap Apps >  Settings. 2. Tap Tethering and Wi-Fi hotspot > Mobile hotspot. 3. Tap On/Off to turn on Mobile hotspot. 4. Tap More options > Configure hotspot. 5. Tap the Security field and select WPA2 PSK and enter a new password. Configure Mobile Hotspot Settings Manage your Mobile hotspot security and connecting settings. 1. From a Home screen, tap Apps >  Settings. 2. Tap Tethering and Wi-Fi hotspot > Mobile hotspot. 3. Tap More options > Configure hotspot for the following settings: • Network SSID: View and change the name of your Mobile hotspot. • Broadcast network name (SSID): Enable to make your Mobile hotspot visible to other Wi-Fi devices during a scan. When disabled, other devices can still connect to your Mobile hotspot, but have to set up the connection manually with your Network SSID and Password. • Security: Choose the security level for your Mobile hotspot. • Password: If you choose a security level that uses a password, enter the password. A default password is displayed on the Mobile hotspot screen. • Show password: Display your password instead of masking it. • Show advanced options: Access advanced options, including Broadcast channel, and to specify the channel your device uses for Mobile hotspot and maximum connections. Timeout Settings Automatically turn off Mobile hotspot if there are no connected devices. 1. From a Home screen, tap Apps >  Settings. 2. Tap Tethering and Wi-Fi hotspot > Mobile hotspot. 3. Tap More options > Timeout settings, and then select and interval. Tethering Your Device You can use USB or Bluetooth tethering to share your device’s Internet connection with a computer. 1. From a Home screen, tap Apps >  Settings. 2. Tap Tethering and Wi-Fi hotspot, and choose a tethering method: • USB tethering: Connect the computer to the device using the USB cable, and then tap USB tethering to turn tethering on. • Bluetooth tethering: Use Bluetooth to pair your device with the computer. For more information, see Bluetooth.
  • 95.
    90 Airplane ModeSettings Airplanemode disconnects your device from all networks and turns off connectivity features, such as phone calls and Wi-Fi. While in Airplane mode, you can use other features such as playing music, watching videos, and other offline applications. Enable Airplane Mode To enable or disable Airplane mode: 1. From a Home screen, tap Apps >  Settings. 2. Tap Airplane mode, and then tap On/Off to enable or disable the option. Note: You can also control Airplane mode from the Device options menu. Press and hold the Power key, and then tap Airplane mode. Airplane Mode
  • 96.
    91 Data UsageSettings DataUsage Monitor how your data is being used, and set limits and restrictions to conserve it. Note: Your service provider may account for data usage differently. 1. From a Home screen, tap Apps >  Settings. 2. Tap Data usage for options: • Mobile data: Enable mobile data. • Set mobile data limit: Your mobile data connection is turned off when the specified limit is reached. • Data usage cycle: Tap the drop-down menu, and then choose a time period for data usage. Data usage for the period is displayed on the graph, along with usage by application at the bottom of the screen. 3. Tap More options for the following options: • Restrict background data: Restrict some apps and services from working unless you are connected to a Wi-Fi network. • Show/Hide Wi-Fi usage: Display or hide a Wi‑Fi tab that shows Wi-Fi usage. • Mobile hotspot: Select Wi-Fi networks that are mobile hotspots. You can restrict apps from using these networks, and you can configure apps to warn you before using these networks for large downloads. • Mobile networks: Control your device’s access to networks and mobile data service. For more information, see Mobile Networks.
  • 97.
    92 LocationSettings Location Some apps,such as Google Maps, may require one or more location services be turned on for full functionality. Locating Method Before using any features that require location assistance, you must enable your device’s location services. 1. From a Home screen, tap Apps >  Settings. 2. Tap Location. 3. Tap On/Off to turn on Location services. 4. Tap Mode to select how your location is determined: • High accuracy: Uses GPS, Wi-Fi, and mobile networks. • Power saving: Uses Wi-Fi and mobile networks (no GPS). • GPS only: Uses GPS only. 5. Tap Improve accuracy to use other connections for determining your location: • Wi-Fi scanning: Allow apps and services to scan for Wi-Fi networks automatically, even when Wi-Fi is turned off. • Bluetooth scanning: Allow apps to scan for and connect to nearby devices automatically through Bluetooth, even when Bluetooth is turned off. Recent Location Requests Apps that have requested your location are listed under Recent location requests. 1. From a Home screen, tap Apps >  Settings. 2. Tap Location. 3. Tap On/Off to turn on Location services. 4. Tap an entry under Recent location requests to view the app’s settings. Location Services Google Location History™ stores and uses your device’s most recent location data. Google apps, such as Google Maps, can use this data to improve your search results based on places that you have visited. 1. From a Home screen, tap Apps >  Settings. 2. Tap Location. 3. Tap On/Off to turn on Location services. 4. Tap Google Location History and sign in to your Google Account for more options.
  • 98.
    93 LocationSettings My Places Youcan save your favorite locations for use with services that require location information. This information can improve your search results and other location-related activities. 1. From a Home screen, tap Apps >  Settings. 2. Tap Location. 3. Tap On/Off to turn on Location services. 4. Tap My places. • Tap a category (Home, Work, Car, School, or Gym) to add a location. • Tap Add to add more categories. • To delete a custom category, tap  More options > Select, tap the category to delete, and tap Delete. Confirm if prompted. Note: Home, Work, Car, School, and Gym cannot be deleted.
  • 99.
    94 NFC andSharingSettings NFC and Sharing NFC (Near Field Communication) allows data exchange when you touch your device with another compatible device. This is used for features like Android Beam. Enable NFC Activate NFC to allow your device to exchange data with other NFC devices. 1. From a Home screen, tap Apps >  Settings. 2. Tap NFC and sharing > NFC. 3. Tap On/Off to turn on NFC. Android Beam When Android Beam is activated, you can beam app content to another NFC-capable device by holding the devices close together. You can beam browser pages, YouTube videos, contacts, and more. 1. From a Home screen, tap Apps >  Settings. 2. Tap NFC and sharing > NFC. 3. Tap On/Off to turn on NFC. 4. Tap Android Beam, and then tap On/Off to turn on Android Beam. 5. Touch the back of your device with another NFC‑capable device to transfer content. S Beam When S Beam is activated, you can beam files to another NFC-capable device by holding the devices close together. You can beam images and videos from your Gallery, music files from your Music app, and more. 1. From a Home screen, tap Apps >  Settings. 2. Tap NFC and sharing > NFC. 3. Tap On/Off to turn on NFC. 4. Tap S Beam, and then tap On/Off to turn on S Beam. 5. Touch the back of your device with another NFC‑capable device to transfer content. Tap and Pay Tap and pay allows you to select the default payment application you want to use for making purchases on your device. 1. From a Home screen, tap Apps >  Settings. 2. Tap NFC and sharing > NFC. 3. Tap On/Off to turn on NFC. 4. Tap Tap and pay. 5. Choose the app that you want as your default.
  • 100.
    95 NFC andSharingSettings Nearby Devices Share your media files with nearby devices through Wi‑Fi, Wi‑Fi Direct, or Mobile Hotspot. Warning: If file sharing is enabled, other devices can access your data. Use this option with care. To enable Nearby devices: 1. From a Home screen, tap Apps >  Settings. 2. Tap NFC and sharing > Nearby devices. 3. Tap On/Off to enable Nearby devices. 4. Set the following options: • Content to share: Select the content to share. Choices are: Videos, Photos, and Music. • Allowed devices: Indicate the devices accessible to your device. • Denied devices: Indicate devices not allowed access to your device. • Download to: Allow downloading of data to your device or optional memory card (not included). • Receive files from other devices: Warn if a device attempts to upload data to your device. 5. Tap More options > Rename device to rename your phone. Printing Print images and documents to Samsung printers and other compatible printers (not included). To set up a printer: 1. From a Home screen, tap Apps >  Settings. 2. Tap NFC and sharing > Printing. 3. Tap a print service and follow the prompts. Note: Tap Download plug-in to install additional print service drivers. Screen Mirroring Share your device’s screen with another device. To enable Screen Mirroring: 1. From a Home screen, tap Apps >  Settings. 2. Tap NFC and sharing > Screen Mirroring. • Available devices are listed. 3. Tap Scan to find more devices. 4. Tap a device and follow the prompts to connect. MirrorLink Mirror your device’s display on your car’s entertainment and information screen using a USB connection. Note: To use this feature, your car system must support MirrorLink. To turn on MirrorLink: 1. Connect your device to your car’s system using the USB cable. 2. On your device’s Home screen, tap Apps >  Settings. 3. Tap NFC and sharing > MirrorLink. 4. Tap Connect to vehicle via USB and follow the prompts. 5. Tap More > MirrorLink device ID to view the MirrorLink ID for your device.
  • 101.
    96 More NetworksSettings MoreNetworks The More networks settings allow you to configure a variety of connectivity settings for your device. Nearby Device Scanning Scan for nearby devices to connect to and set them up easily. You receive a notification when there are available devices to connect to. Note: This function uses Bluetooth Low Energy scanning even if Bluetooth is turned off on your device. To enable nearby device scanning: 1. From a Home screen, tap Apps >  Settings. 2. Tap More networks > Nearby device scanning. 3. Tap On/Off to enable the feature. 4. Tap an available device and follow the prompts. Download Booster Download booster improves download speed by using both Wi-Fi and 4G LTE networks at the same time when downloading files over 30 MB in size. Note: Download booster uses mobile data services. To turn on Download booster: 1. From a Home screen, tap Apps >  Settings. 2. Tap More networks > Download booster. 3. Tap On/Off to enable Download booster. Mobile Networks Control your device’s access to networks and mobile data service. 1. From a Home screen, tap Apps >  Settings. 2. Tap More networks > Mobile networks for options: • Mobile data: Allow your device to connect to a mobile data network. • Data roaming: Allow your device to connect to data services while roaming. Significantly higher charges may result. • System select: Choose the mobile network system. Please contact your mobile service provider for details before changing this setting. • Access Point Names: Choose or add APNs. • Network mode: Choose the network type to use (LTE / CDMA or CDMA). • Network operators: Choose available and preferred networks.
  • 102.
    97 More NetworksSettings VirtualPrivate Networks (VPN) Set up and manage your Virtual Private Networks (VPNs). Note: You must set a secured screen lock before setting up a VPN. For more information, see Set a Screen Lock. Add a VPN Use the VPN settings menu to add a VPN connection to your device. 1. From a Home screen, tap Apps >  Settings. 2. Tap More networks > VPN. 3. Tap Add and follow the prompts to set up your VPN. Connect to a VPN To connect to a VPN: 1. From a Home screen, tap Apps >  Settings. 2. Tap More networks > VPN. 3. Tap the VPN, enter your log in information, and tap Connect. Disconnect from a VPN To disconnect from a VPN: 1. From a Home screen, tap Apps >  Settings. 2. Tap More networks > VPN. 3. Tap the VPN, and tap Disconnect. Edit or Delete a VPN Once you have set up a VPN connection, you can edit or delete the connection. 1. From a Home screen, tap Apps >  Settings. 2. Tap More networks > VPN. 3. Tap  Settings next to the VPN that you want to edit or delete. 4. Edit the VPN and tap Save. – or – Tap Delete to delete the VPN.
  • 103.
    98 Sounds andNotificationsSettings Configure the sounds and vibrations used to indicate notifications, screen touches, and other interactions. Adjust the Volume Set the system volume level and default volume for call ringtones, notifications, and other audio. Note: You can also set Ringtone volume from a Home screen by pressing the Volume key. 1. From a Home screen, tap Apps >  Settings. 2. Tap Sounds and notifications. 3. Under Sound, drag the sliders to set the default volume for: • Ringtone • Media • Notifications • System Change the Sound Mode You can switch between sound modes while preserving the individual sound settings you have made. 1. From a Home screen, tap Apps >  Settings. 2. Tap Sounds and notifications > Sound mode, and then choose a mode: • Sound: Use the sounds, vibrations, and volume levels you have chosen in Sound settings for notifications and alerts. • Vibrate: Vibrate for notifications and alerts. This uses the Vibration intensity you choose in Sound settings. • Mute: Mute all sounds and notifications. Vibration Intensity Set the amount of vibration for incoming calls, notifications, and haptic feedback. 1. From a Home screen, tap Apps >  Settings. 2. Tap Sounds and notifications > Vibration intensity. 3. Drag the sliders to set the various vibration intensities. Sounds and Notifications
  • 104.
    99 Sounds andNotificationsSettings Vibrate When Ringing Your device can vibrate in addition to ringing when you receive a call. 1. From a Home screen, tap Apps >  Settings. 2. Tap Sounds and notifications > Vibrate when ringing to enable this option. Select a Default Ringtone Choose from preset ringtones or add your own. 1. From a Home screen, tap Apps >  Settings. 2. Tap Sounds and notifications > Ringtones. 3. Tap a ringtone to hear a preview and select it. – or – Tap Add to use a use an audio file as a ringtone. Select a Default Vibration Pattern Choose from preset vibration patterns. 1. From a Home screen, tap Apps >  Settings. 2. Tap Sounds and notifications > Vibrations. 3. Tap a pattern to preview it and select it. Select a Notification Ringtone Choose a sound for notifications, such as for new messages and event reminders. 1. From a Home screen, tap Apps >  Settings. 2. Tap Sounds and notifications > Notification ringtone. 3. Tap a sound to preview it, and then tap OK to set it as your default notification sound. Configure Other Sounds Play tones when you tap the screen to make selections. 1. From a Home screen, tap Apps >  Settings. 2. Tap Sounds and notifications > Other sounds for the following options: • Dialing keypad tone: Tap to play a tone when the dialing keypad is tapped. • Screen lock sound: Tap to play a sound when you unlock the screen. • Charging sound: Play a sound when a charger is connected. • Touch sounds: Play tones when you touch or tap the screen to make selections. • Haptic feedback: Tap to set the device to vibrate when you tap the Back key or Recent apps key, and for certain screen interactions. • Emergency tone: Set the emergency tone to Alert, Vibrate, or Silent. • Sound when tapped: Tap to enable auditory feedback when you tap a key. • Vibrate when tapped: Tap to enable the device to vibrate when you tap a key.
  • 105.
    100 Sounds andNotificationsSettings Sound Quality and Effects You can enable sound effects when connected to a headset. Note: Sound effects are only available when headphones or a compatible Bluetooth headset (not included) is connected. Choose from advanced sound options to customize your audio experience. 1. From a Home screen, tap Apps >  Settings. 2. Tap Sounds and notifications > Sound quality and effects. 3. Tap Adapt sound and follow the prompts to customize your sound settings. 4. Tap On/Off to enable each option: • UHQ upscaler: Enhance the sound resolution of music and videos for a clearer listening experience. • SoundAlive+: Recreate the effects of rich surround sound. • Tube Amp Pro: Simulate the soft timbre of a tube amplifier. Do Not Disturb This setting allows you to block all notifications and alerts. The options below determine what notifications can make sounds, and during what time periods you want to enter this mode. To activate Do not disturb mode: 1. From a Home screen, tap Apps >  Settings. 2. Tap Sounds and notifications > Do not disturb. 3. Tap Turn on now to enable this option. Scheduling This option allows you to turn Do not disturb mode on or off automatically at scheduled times. Note: Scheduling is not available if Do not disturb mode has been turned on manually. 1. From a Home screen, tap Apps >  Settings. 2. Tap Sounds and notifications > Do not disturb. 3. Tap Turn on as scheduled, and set the Days, Start time, and End time. Allow Exceptions This option lets you customize which notifications are allowed while your device is in Do not disturb mode. 1. From a Home screen, tap Apps >  Settings. 2. Tap Sounds and notifications > Do not disturb. 3. Tap Allow exceptions, and tap one of the following options: • No exceptions • Alarms only • Custom Lock Screen Notifications To define how notifications should be displayed on your phone’s lock screen: 1. From a Home screen, tap Apps >  Settings. 2. Tap Sounds and notifications > Notifications on lock screen and select an option: • Show content • Hide content • Do not show notifications
  • 106.
    101 Sounds andNotificationsSettings Application Notifications To set whether application notifications are displayed: 1. From a Home screen, tap Apps >  Settings. 2. Tap Sounds and notifications > Application notifications. 3. Swipe through the alphabetical list of apps and tap an app. 4. Tap On/Off to block all notifications from this app or to show priority notifications for the selected app. Notification Access To see which applications can read notifications: 1. From a Home screen, tap Apps >  Settings. 2. Tap Sounds and notifications > Notification access. 3. Tap On/Off to enable or disable access to notifications.
  • 107.
    102 Display andWallpaperSettings Configure your display’s brightness, screen timeout delay, and other display settings. Adjust the Screen Brightness Adjust the screen brightness to suit your surroundings or personal preference. You may also want to adjust screen brightness to conserve battery power. 1. From a Home screen, tap Apps >  Settings. 2. Tap Display and wallpaper > Brightness for options: • Tap Automatic brightness to allow the device to adjust brightness automatically. • Drag the Brightness level to set a custom brightness level. Note: You can also control Brightness from the Notification panel. Wallpaper Change the look of the Home and Lock screens with wallpaper. You can display a favorite picture or choose from preloaded wallpapers. To change wallpaper: 1. From a Home screen, tap Apps >  Settings. 2. Tap Display and wallpaper > Wallpaper. 3. Tap Home screen, Lock screen, or Home and lock screen. 4. Tap an image to preview it, and then tap Set as wallpaper. • Tap From Gallery for additional wallpapers. Change the Font Style and Size You can set the font style and size for all text that is displayed on the screen. 1. From a Home screen, tap Apps >  Settings. 2. Tap Display and wallpaper > Font to choose a font style and size. • Tap Font style to change the font. -- Tap Download to find new fonts online. • Tap Font size and tap a font size. One-Handed Operation Change the screen layout to accommodate operating your device with one hand. 1. From a Home screen, tap Apps >  Settings. 2. Tap Display and wallpaper > One-handed operation. 3. Tap On/Off to enable or disable the following: • Reduce screen size: Press the Home key three times in quick succession to reduce the size of the display. • One-handed input: Adjust the size and position of the keyboard and other input methods for easier input with one hand. • Side key panel: Have the hardkeys and other selected functions appear as buttons at the side of the screen. Display and Wallpaper
  • 108.
    103 Display andWallpaperSettings Screen Rotation Use the front camera to rotate the screen based on the orientation of your face. 1. From a Home screen, tap Apps >  Settings. 2. Tap Display and wallpaper > Screen rotation to turn the feature on. Enable Smart Stay The screen does not time out as long as you are facing the front camera. 1. From a Home screen, tap Apps >  Settings. 2. Tap Display and wallpaper > Smart stay to turn the feature on. Set the Screen Timeout Turn the screen off after a set amount of time. 1. From a Home screen, tap Apps >  Settings. 2. Tap Display and wallpaper > Screen timeout, and then choose a time period. Select a Screen Mode Choose a screen mode to match your type of viewing. 1. From a Home screen, tap Apps >  Settings. 2. Tap Display and wallpaper > Screen mode and choose a screen mode. • Tap Adaptive display if you want your device to automatically optimize the display to match the type of image displayed and other criteria, such as battery level. – or – Choose a specific type of screen mode based on what you are viewing. Auto Adjust the Screen Tone Your device analyzes the images displayed on the screen and automatically adjusts the brightness to conserve battery power. 1. From a Home screen, tap Apps >  Settings. 2. Tap Display and wallpaper > Auto adjust screen tone to turn the feature on. Daydream The Daydream setting controls what is displayed on the screen when the device is docked (dock not included) or while charging. You can choose to display colors or display photos. 1. From a Home screen, tap Apps >  Settings. 2. Tap Display and wallpaper > Daydream. 3. Tap On/Off to enable Daydream. 4. Configure options: • Colors: Tap the selector to display a changing screen of colors. • Flipboard: Display pictures from Flipboard. Tap Settings for options. • Google Photos: Display pictures from your Google Photos account. Tap Settings for options. • Photo table: Display pictures in a photo table. Tap Settings for options. • Photo frame: Display pictures in a photo frame. Tap Settings for options. 5. Tap More options for additional options: • Preview: See a demonstration of Daydream. • Select when to daydream: Select when your device can go into Daydream mode.
  • 109.
    104 Display andWallpaperSettings LED Indicator Light up the LED indicator when charging, voice recording, or receiving notifications. 1. From a Home screen, tap Apps >  Settings. 2. Tap Display and wallpaper. 3. Tap LED indicator to turn the feature on or off. Touch Key Light Duration Set the length of time Recent and  Back remain lit after you tap them. 1. From a Home screen, tap Apps >  Settings. 2. Tap Display and wallpaper. 3. Tap Touch key light duration to choose a timeout period. Increase Touch Sensitivity Increase the sensitivity of the touch screen to improve results when wearing gloves. 1. From a Home screen, tap Apps >  Settings. 2. Tap Display and wallpaper. 3. Tap Increase touch sensitivity to turn the feature on.
  • 110.
    105 Lock ScreenSettings Secureyour device and protect your data with Lock Screen settings. Set a Screen Lock It is recommended that you secure your device using a Screen lock. 1. From a Home screen, tap Apps >  Settings. 2. Tap Lock Screen > Screen lock to select a screen lock and level of security: • Swipe: Swipe the screen to unlock it. This option provides no security. • Pattern: Create a pattern that you draw on the screen to unlock your device. This option provides medium security. • PIN: Select a PIN to use for unlocking the screen. This option provides medium to high security. • Password: Create a password for unlocking the screen. This option provides high security. • Fingerprint: Use fingerprint recognition to unlock the screen. This option provides medium to high security. • None: Never use a Lock screen. 3. Select your notification preferences, if you choose a secured lock screen option: • Show content • Hide content • Do not show notifications 4. Choose a screen lock option: All Screen Locks • Show information: Display information on the Lock screen. • Camera shortcut: Display a camera shortcut on your Lock screen. • Action memo on lock screen: Double tap the lock screen while pressing the pen button to open Action memo. Swipe Only • Phone shortcut: Check the box to display a phone shortcut on your Lock screen. • Unlock effect: Set the visual effect used when unlocking the screen. Pattern Only • Pattern type: Select a pattern type. • Make pattern visible: Display the pattern as your draw it. • Vibration feedback: Vibrate when the unlock pattern is entered incorrectly. Pattern, PIN, Password, and Fingerprint • Lock automatically: Set a time-out for lock screen. • Lock instantly with power key: Lock the screen by pressing the Power key. Lock Screen
  • 111.
    106 Multi WindowSettingsSettings Multi Window Settings Turn on the Multi window feature. For more information, see Multi Window. 1. From a Home screen, tap Apps >  Settings > Multi window. 2. Tap On/Off to enable. The following options are available: • Open in split screen view: Automatically view content in multi window when you open files from My Files or Video, or attachments from email. The applications must support Multi window. • Pop-up view shortcut: Swipe down diagonally from the corner of a window to put it in pop-up view. Note: These features only work on apps that support Multi window functionality.
  • 112.
    107 Notification Panel SettingsSettings Notification Panel Settings Customize whichQuick setting buttons are displayed on the Notification panel. You can also customize which apps are displayed on the Recommended applications menu on the Notification panel when you perform certain actions, such as plugging in earphones. ►► From a Home screen, tap Apps >  Settings > Notification panel. – or – From the Notification panel, tap View all >  Edit. To customize which quick setting buttons are displayed at the top of the Notification panel: ►► Touch and drag buttons between the Active buttons and Available buttons trays to reorder them. To use the default layout: ►► Tap Reset.
  • 113.
    108 S PenSettingsSettings Configure options and settings for the S Pen. Air Command The Air command menu provides quick access to S Pen applications from any screen. The settings page allows you to either enable or disable the Air Command menu. To enable or disable the Air Command menu: 1. From a Home screen, tap Apps >  Settings. 2. Tap S Pen > Air command for these options: • Shortcuts: Add shortcuts to the Air command menu. • Floating icon: Tap On/Off to minimize the Air command menu into a floating icon. Air View Preview information, extend text, or enlarge pictures by hovering your finger over the screen. 1. From a Home screen, tap Apps >  Settings. 2. Tap S Pen > Air view. 3. Tap On/Off to turn the feature on. 4. Configure options for Air view. Other S Pen Settings To configure settings for the S Pen: 1. From a Home screen, tap Apps >  Settings. 2. Tap S Pen to configure the following settings: • Direct pen input: Turn the Direct pen input feature on. This feature allows you to switch from the keyboard to the S Pen when filling in form fields. • Pointer: Turn the pointer on. The pointer appears on the screen when the tip of the S Pen is hovering close enough. Holding the pointer over some features can reveal what an item is or what it does. • Detachment options: Launch Air command or create a new Action memo when you remove the S Pen. • Screen off memo: Create action memos by detaching the S Pen while the screen is off and writing on the screen. • S Pen alerts: Tap the check box to set your device to sound an alert and show a pop-up if you forget to attach the S Pen and walk away from it with your device. • S Pen power saver: Choose to turn off pen detection when the S Pen is attached to extend battery life. • S Pen sound: Tap the check box to enable sounds when writing with the S Pen. • S Pen vibration: Activate vibration feedback when writing with the S Pen. For more information, see S Pen. S Pen Settings
  • 114.
    109 Motions andGesturesSettings Control certain device actions by moving your hand over the screen. 1. From a Home screen, tap Apps >  Settings. 2. Tap Motions and gestures. 3. Tap On/Off to enable each of the following: • Direct call: Call the contact whose call log, message, or contact details are currently on the screen by bringing the device close to your ear. • Smart alert: Set your device to vibrate when you pick it up, which notifies you about missed calls and messages. • Mute: Mute incoming calls and alarms by turning the device over or by covering the screen with your hand. • Palm swipe to capture: Create a copy of the current screen by swiping the side of your hand across the screen. The screenshot is saved to the clipboard and to the Screenshots folder in the Gallery app. Motions and Gestures
  • 115.
    110 Edge ScreenSettingsSettings Manage the panels that display on the Edge screen, including your own custom panels, and set up night mode. To access Edge screen settings: ►► From a Home screen, tap Apps >  Settings > Edge screen. – or – Swipe upward on the Edge screen, and then tap Settings. The following options are available: • Manage panels: Check the panels that you want to display on the Edge screen. • Express me: Tap Create new to create a new Edge screen panel. • Information stream: Select which notifications are shown on the Information stream panel, and set the screen timeout. • Night clock: Set up a clock that displays when the phone screen is off. Night mode is available for a maximum of 12 hours. • Edge screen text: Type a personal message to display on the Edge screen. • Edge screen timeout: Set the Edge screen timeout setting, which is only applied while the Edge screen is on, unless the Night clock is shown. • Notifications: Tap to show notifications on the Edge screen. • Use Edge screen on left: Rotate the main screen 180° so that you can use the Edge screen on the left. Screen rotation must be turned on to use this function. For more information, tap Help, or see Edge Screen Settings. Edge Screen Settings
  • 116.
    111 AccountsSettings Accounts Set upand manage accounts, including your Google Account, Samsung account, email, and social networking accounts. Depending on the account, you can choose to synchronize your calendar, contacts, and other types of content. Add an Account You can add and manage all your email, social networking, and picture and video sharing accounts. 1. From a Home screen, tap Apps >  Settings. 2. Tap Accounts > Add account. 3. Tap one of the account types. 4. Follow the prompts to enter your credentials and set up the account. Synchronize Accounts You can synchronize your calendar, contacts, and other types of accounts. 1. From a Home screen, tap Apps >  Settings. 2. Tap Accounts > [Account type]. 3. Tap an account to view the sync settings for that account. 4. Tap individual data items to sync. 5. Tap More options > Sync all or Sync now to synchronize the account. Note: Sync options and the location of the sync command differ depending on the account type. Account Settings Each account has its own set of settings. In addition, you can configure common settings for all accounts of the same type. Note: Account settings and available features vary between account types and service providers. Contact your service provider for more information on your account’s settings. 1. From a Home screen, tap Apps >  Settings. 2. Tap Accounts > [Account type]. 3. Tap an account to configure that account’s sync settings. 4. Tap other available options for the account type. Remove an Account You can remove accounts from your device. 1. From a Home screen, tap Apps >  Settings. 2. Tap Accounts > [Account type]. 3. Tap the account, and then tap More options > Remove account. Confirm if prompted.
  • 117.
    112 CloudSettings Back upyour personal data using your Samsung Account or Dropbox. Using Your Samsung Account To sync and back up content to your Samsung account: 1. From a Home screen, tap Apps >  Settings. 2. Tap Cloud. 3. If you have not signed in to your Samsung Account, tap Add Samsung account. – or – Tap your Samsung account to manage your sync settings and backup options. 4. Tap to view the following Samsung account information: • Backup: Manage your back up and restore options. • Restore: Retrieve data from your Samsung account. Using Your Dropbox Account For more information about Dropbox, visit dropbox.com. 1. From a Home screen, tap Apps >  Settings. 2. Tap Cloud. 3. If you have not signed in to your Dropbox account, tap Link Dropbox account. – or – Tap your Dropbox account to manage your sync settings and backup options. 4. Follow the prompts to set up and use Dropbox. Cloud
  • 118.
    113 Backup andResetSettings Backup and Reset Back up your data to Google servers. You can also reset your device to its factory defaults. Backup and Restore Enable backup of your information to Google servers. 1. From a Home screen, tap Apps >  Settings. 2. Tap Backup and reset for options: • Back up my data: Enable back up of application data, Wi-Fi passwords, and other settings to Google servers. • Backup account: Select a Google Account to be used as your backup account. • Automatic restore: Enable automatic restoration of settings from Google servers. When enabled, backed-up settings are restored when you reinstall an application. Reset Network Settings You can reset Wi-Fi, Mobile data, and Bluetooth settings with Reset network settings. 1. From a Home screen, tap Apps >  Settings. 2. Tap Backup and reset > Reset network settings. 3. Tap Reset settings, and confirm when prompted. Factory Data Reset Return your device to its factory defaults, erasing all data from your device. Warning: This action permanently erases ALL data from the device, including Google or other account settings, system and application data and settings, downloaded applications, as well as your music, photos, videos, and other files. Any data stored on an external SD card is not affected. To reset your device: 1. From a Home screen, tap Apps >  Settings. 2. Tap Backup and reset > Factory data reset. 3. Tap Reset device and follow the prompts to perform the reset.
  • 119.
    114 Easy ModeSettings Switchbetween the default screen layout and a simpler layout. The Easy Mode layout has larger text and icons, making for a more straightforward visual experience. To enable Easy Mode: 1. From a Home screen, tap Apps >  Settings. 2. Tap Easy mode, and then tap Easy mode to choose this feature. • When Easy mode is enabled, you can swipe down the page and select which apps you want to appear on the Home screens. 3. Tap the checkbox next to the apps you want to add or remove. 4. Tap Done to save your settings. To disable Easy mode: 1. Swipe through the Home screens and tap  Easy settings 2. Tap Easy mode > Standard mode. 3. Tap Done to confirm. Easy Mode
  • 120.
    115 AccessibilitySettings Accessibility Accessibility servicesare special features that make using the device easier for those with certain physical disabilities. Note: You can download additional accessibility applications from the Google Play store. 1. From a Home screen, tap Apps >  Settings. 2. Tap Accessibility for options: Vision • Switch access: Use this option to control your device using configurable key combinations. Tap On/Off to turn the feature on. Tap Settings for more options. • TalkBack: Speak feedback aloud to help blind and low-vision users. Tap On/Off to turn the feature on. Tap Settings for more options. -- TalkBack can collect all of the text you enter, except passwords, including personal data and credit card numbers. It may also log your user interface interactions with the device. • Dark screen: Keep the screen turned off at all times for privacy. TalkBack must be enabled in order to configure this option. • Rapid key input: Release your finger to enter selection instead of double tapping. TalkBack must be enabled in order to configure this option. • Speak passwords: Read the characters aloud as you enter your passwords. TalkBack must be enabled in order to configure this option. • Font size: Set the font size. • High contrast fonts: Adjust the color and outline of fonts to increase the contrast with the background. • Magnification gestures: Use exaggerated gestures such as triple-tapping, double pinching, and dragging two fingers across the screen. • Hover zoom: Magnify content by hovering the S Pen over it. • Notification reminder: Play a beep when a notification for a call, message, and more, has been missed. • Negative colors: Reverse the display of screen colors from white text on a black background to black text on a white background. • Color adjustment: Adjust the color of the screen if you are color blind or have difficulty reading the display because of the screen color. Tap Color adjustment for options. • Accessibility shortcut: Quickly enable accessibility features in two quick steps. Tap On/Off to turn the feature on. • Text-to-speech options: Set your preferred TTS engine and options. For more information, see Text-To-Speech Options. Hearing • Flash notification: Set your camera light to blink whenever you receive a notification. • Turn off all sounds: Turn off all notifications and audio for privacy. • Hearing aids: Improve the sound quality of your device for use with hearing aids. • Samsung subtitles (CC): Use Samsung subtitles with multimedia files when available. • Google subtitles (CC): Use Google subtitles with multimedia files when available. • Sound balance: Use the slider to set the left and right balance when using a stereo device.
  • 121.
    116 AccessibilitySettings • Mono audio:Switch audio from stereo to mono for use with one earphone. • Sound detectors: Receive alerts when the phone detects a doorbell or a crying baby. Dexterity and interaction • Assistant menu: Improve the device accessibility for users with reduced dexterity. • Air wake up: Wake up your device by waving your hand over the sensor. • Press and hold delay: Select a time interval for this tap action. • Interaction control: Block areas of the screen from touch interaction. Disable Auto rotate screen and hard key functions. Only show application notifications in the Notification panel and the Status bar. More settings • Direct access: Open your accessibility settings by pressing the Home key quickly three times in succession. • Answering and ending calls: Choose shortcuts for answering and ending calls. • Single tap mode: Dismiss or snooze alarms, calendar events, and timer alerts, and answer or reject incoming calls with a single tap. • Manage accessibility: Export your accessibility settings and share them with another device. Services Additional accessibility apps may be downloaded from the Google Play store. Certain accessibility services you install may be configured here.
  • 122.
    117 Private ModeSettings PrivateMode Hide personal content from being accessed by anyone else using your device. Private mode is only available for certain applications. Note: A secure screen lock (Pattern, PIN, Password, or Fingerprint) is required to use Private Mode. Set Up Private Mode 1. From a Home screen, tap Apps >  Settings. 2. Tap Private mode. 3. Follow the prompts to learn about and set up Private mode.
  • 123.
    118 Finger ScannerSettings FingerScanner Use fingerprint recognition as an alternative to entering passwords in certain apps. You can also use your fingerprint to verify your identity when logging in to your Samsung account. Note: Fingerprint recognition uses the unique characteristics of each fingerprint to enhance the security of your device. The likelihood of the fingerprint sensor confusing even small areas of two different fingerprints is very low. But in rare cases, the sensor may recognize a fingerprint that is similar to a registered fingerprint. Register a Fingerprint You can register up to 3 fingerprints. A password is also set up as an alternative to your fingerprint. 1. From a Home screen, tap Apps >  Settings. 2. Tap Finger scanner > Fingerprint manager. • Swipe your finger over the Home key to register your first fingerprint or to continue to the next screen. Add a Fingerprint If no fingerprints are registered, the manager automatically opens the Register fingerprint screen. Otherwise: ►► Tap Add and follow the instructions to register a fingerprint and password. Rename a Fingerprint To rename a fingerprint: ►► Touch and hold the fingerprint, and then tap  Edit. Delete a Fingerprint To delete a fingerprint: ►► Touch and hold the fingerprint, and then tap  Delete. Change Backup Password To change the backup password for a fingerprint: 1. From a Home screen, tap Apps >  Settings. 2. Tap Finger scanner > Change backup password. 3. Scan your fingerprint. 4. Enter a new backup password.
  • 124.
    119 Finger ScannerSettings FingerprintVerification Fingerprint verification can be used for other accounts accessed from your device. 1. From a Home screen, tap Apps >  Settings. 2. Tap Finger scanner for options. • Screen lock: Change your Screen lock and access Screen lock settings. For more information, see Set a Screen Lock. • Web sign-in: Access your online accounts using your fingerprint. • Verify Samsung account: Verify your identity using your fingerprint when logging in to your Samsung account. • Pay with PayPal: Link your PayPal account to your device to make faster and more secure PayPal payments using any of your registered fingerprints.
  • 125.
    120 Language andInput SettingsSettings Language and Input Settings Configure your device’s language and input settings. Language You can select a default language for your device’s menus and keyboards. 1. From a Home screen, tap Apps >  Settings. 2. Tap Language and input > Language. 3. Select a language from the list. Default Keyboard You can select a default keyboard or input method. 1. From a Home screen, tap Apps >  Settings. 2. Tap Language and input > Default. 3. Select a keyboard. Note: Additional keyboards can be downloaded from the Google Play store. Samsung Keyboard Configure options for using the Samsung keyboard. 1. From a Home screen, tap Apps >  Settings. 2. Tap Language and input. 3. Tap Samsung keyboard for options: • English(US): Set the keyboard type to Qwerty keyboard or 3x4 keyboard. • Select input languages: Choose which languages are available on the keyboard. To switch between languages, slide the Space bar sideways. • Predictive text: Predictive text suggests words that match your text entries, and can automatically complete common words. Predictive text can learn your personal writing style from your contacts, messages, Gmail, and social networking sites — improving its accuracy of predicting your text entries. • Additional keyboard settings provide assistance with capitalization, punctuation, and much more. Swype Keyboard Configure options for using the Swype keyboard. 1. From a Home screen, tap Apps >  Settings. 2. Tap Language and input. 3. Tap Swype for options: • Settings: Configure basic options. • Themes: Change the keyboard layout. • My words: Manage your personal dictionary, new word updates, as well as how Swype can learn from your writing style in various apps. • Languages: Set the current language. Additional languages can be downloaded. • Gestures: Learn about using Swype gestures. • Help: View information on using Swype.
  • 126.
    121 Language andInput SettingsSettings Google Voice Typing Speak rather than type your text entries using Google voice typing. 1. From a Home screen, tap Apps >  Settings. 2. Tap Language and input. 3. Tap Google voice typing for options: • Languages: Select languages for Google voice typing. • “Ok Google” detection: Tap to launch a Google search whenever you say “OK Google”. • Hands-free: Allow requests with the device locked. • Speech output: Select options for spoken feedback. • Offline speech recognition: Download and install speech recognition engines, allowing you to use voice input while not connected to the network. • Block offensive words: Hide recognized offensive voice results. • Bluetooth headset: Use audio input from a Bluetooth headset (not included), if one is connected. Handwriting Recognition Language Handwriting can be recognized in S Note and Action memo. Use this option to select a language that is used by the device to recognize your handwriting. 1. From a Home screen, tap Apps >  Settings. 2. Tap Language and input. 3. Under Handwriting recognition, tap Language. 4. Tap More languages to select a new language. Text-To-Speech Options Configure your Text-to-Speech (TTS) options. TTS is used for various accessibility features, such as TalkBack. For more information, see Accessibility. 1. From a Home screen, tap Apps >  Settings. 2. Tap Language and input > Text-to-speech options for options: • Preferred TTS engine: Choose either the Samsung or Google Text‑to‑speech engine. Tap Settings next to each TTS engine for options. • Speech rate: Set the speed at which the text is spoken. • Listen to an example: Play a sample of speech synthesis (available if voice data is installed). • Default language status: Display the default language in use. Read New Notifications Aloud Set the device to read new notifications aloud for incoming calls, messages, and emails, as well as caller or sender information. 1. From a Home screen, tap Apps >  Settings. 2. Tap Language and input > Read notifications aloud. 3. Tap the checkbox to enable each option. Pointer Speed Configure pointer speed for an optional mouse or trackpad (not included). 1. From a Home screen, tap Apps >  Settings. 2. Tap Language and input > Pointer speed. 3. Drag the slider to the right to go faster or to the left to go slower. 4. Tap OK to save your setting.
  • 127.
    122 Date andTimeSettings By default, your device receives date and time information from the wireless network. When you are outside network coverage, you may want to set date and time information manually using the date and time settings. 1. From a Home screen, tap Apps >  Settings. 2. Tap Date and time. The following options are available: • Automatic date and time: Receive date and time updates from the wireless network. • Set date: Enter the current date (only available when Automatic date and time is disabled). • Set time: Enter the current time (only available when Automatic date and time is disabled). • Automatic time zone: Receive the time zone from the wireless network. • Select time zone: Choose your local time zone (only available when Automatic time zone is disabled). • Use 24-hour format: Set the format for displaying time. Date and Time
  • 128.
    123 Safety AssistanceSettings SafetyAssistance Receive real-time information about emergencies and severe weather conditions. You can also enable Emergency mode: a power-conserving mode that restricts certain apps and functions while allowing access to Messages, Contacts, and emergency calls. Emergency Mode Use Emergency mode to conserve battery power during emergencies. Power-hungry apps and functions are disable, but you are still able to send messages, use Contacts, and make emergency calls. 1. From a Home screen, tap Apps >  Settings. 2. Tap Safety assistance > Emergency mode. 3. Tap On/Off to turn the feature on. Geo News Receive information about weather, environmental situations, and geological information for your location during emergencies. 1. From a Home screen, tap Apps >  Settings. 2. Tap Safety assistance > Geo News. 3. Tap On/Off to turn the feature on. • Geo News notification pop-ups: Receive pop‑up alerts. Send Help Messages Send a quick alert to your primary contacts when you are in an emergency situation. To enable this feature: 1. From a Home screen, tap Apps >  Settings. 2. Tap Safety assistance > Send help messages. 3. Tap On/Off to turn the feature on and configure the following options: • Send pictures: Send photos taken with the front and back cameras to your emergency contacts. • Send sound recording: Send a short audio message to your emergency contacts. To send a help message: ►► Press the Power key quickly three times. Manage Primary Contacts Select contacts or create new ones to be your emergency contacts. These contacts automatically receive your help message. 1. From a Home screen, tap Apps >  Settings. 2. Tap Safety assistance > Manage primary contacts. 3. Tap Create primary contact and choose one of the following options: • Create contact: Enter a name and phone number for a new emergency contact. • Select from contacts: Designate a contact to be an emergency contact.
  • 129.
    124 AccessoriesSettings Configure optionswhen using HDMI audio devices (not included). 1. From a Home screen, tap Apps >  Settings. 2. Tap Accessories for options. • Audio output: Select a sound output format to use when connecting your device to HDMI devices (not included). Some devices may not support the surround sound setting. Accessories
  • 130.
    125 BatterySettings View howbattery power is used for device activities. 1. From a Home screen, tap Apps >  Settings. 2. Tap Battery for options: • Battery usage: View battery usage since the battery was last fully charged. -- Usage since last fully charged: View a chart of past usage and estimated time remaining. -- More options: Tap Optimize battery usage to select apps to optimize their individual battery usage. Tap Refresh to update the listing. • Power saving mode: Save battery power by limiting your device’s performance, limiting vibration feedback, and restricting location services and most background data. • Ultra power saving mode: Save battery power by using a minimal Home screen layout and limiting the number of usable apps. • Detail: View details on apps that have an abnormal amount of battery usage. • Percentage on status bar: Display the battery charge percentage next to the battery icon on the Status bar. • Fast cable charging: Charge the battery more quickly. Battery
  • 131.
    126 StorageSettings Storage View thedevice memory and usage. Mount, unmount, or format an optional memory card (not included). Device Memory View and manage the memory used by the device. 1. From a Home screen, tap Apps >  Settings. 2. Tap Storage. • Device storage used out of the total space available is displayed. 3. Tap Internal storage for the following: • Total space: The total space in your device’s memory. • Available space: The amount of storage space currently available. • System memory: The minimum amount of storage space required to run the system. • Used space: The amount of storage space currently being used. • Other: The space used by app data, downloaded files, and Android system files. • Cached data: The amount of data currently cached. 4. Tap Explore to launch My Files to view content stored on your device. To increase available memory: 1. From a Home screen, tap Apps >  Settings. 2. Tap Storage > Internal storage. 3. Tap Cached data to clear cached data for all apps. 4. Tap Delete to confirm. Memory Card (SD Card) Once a memory card (not included) has been installed in your device, the card memory is displayed as Total space and Available space. Note: The SD card menu only appears when an optional memory card is installed. Note: To improve performance and reliability with high-definition video recording and playback, it is recommended you use a memory card (SD card) that is both rated as at least a Class 10 and provides a high read speed. Install a Memory Card You can use a microSD or microSDHC card (not included) to add more memory space to your device. For more information, see Install a Memory Card.
  • 132.
    127 StorageSettings Mount aMemory Card When you install an optional memory card, it is automatically mounted (connected to the device) and prepared for use. However, should you unmount the card without removing it from the device, you have to mount it before it can be accessed. 1. From a Home screen, tap Apps >  Settings. 2. Tap Storage > SD card > Mount. Unmount a Memory Card To prevent damage to information stored on the memory card, always unmount the card before removing it from the device. Unmounting an SD card may stop some applications from functioning until you mount the SD card again. 1. From a Home screen, tap Apps >  Settings. 2. Tap Storage > SD card > Unmount. Remove a Memory Card Warning: To prevent damage to information stored on the memory card, unmount the card before removing it from the device. 1. From a Home screen, tap Apps >  Settings. 2. Tap Storage > SD card > Unmount. 3. Remove the back cover. For more information, see Remove the Back Cover. 4. Slide the card out carefully. 5. Replace the back cover. For more information, see Replace the Back Cover. Format a Memory Card Warning: When formatting an SD card, you should back up your music and photo files that are stored on the card because formatting the SD card deletes all the stored data. 1. From a Home screen, tap Apps >  Settings. 2. Tap Storage > SD card > Format and follow the prompts.
  • 133.
    128 SecuritySettings Secure yourdevice and protect your data with Security settings. Device Administration Manage your device administrators and application installation privileges. 1. From a Home screen, tap Apps >  Settings. 2. Tap Security for options: • Device administrators: Add or remove device administrators. • Unknown sources: Enable installation of non‑Google Play applications. Warning: Enabling installation of third-party applications can cause your device and personal data to be more vulnerable to attacks by unknown sources. Encryption Require a numeric PIN or password to decrypt your device each time you power it on or encrypt the data on a memory card (not included) each time it is connected. 1. From a Home screen, tap Apps >  Settings. 2. Tap Security for options: • Protect encrypted data: Encrypt all data on your device. • Encrypt external SD card: Encrypt data on a memory card (not included). Note: Make sure your battery is charged more than 80 percent. Encryption takes an hour or more. Find My Mobile Protect your device from loss or theft allowing your device to be locked, tracked, and for your data to be deleted remotely. ►► To access your device remotely, visit findmymobile.samsung.com. Note: You must sign up for a Samsung account and enable Google location service to use Find My Mobile. 1. From a Home screen, tap Apps >  Settings. 2. Tap Security. 3. Under Find my mobile, the following options are available: • Remote controls: Lock and erase your data remotely if your device is lost or stolen. • Go to website: Launch the Find My Mobile website. • Reactivation lock: Use your Samsung account to stop anyone from reactivating your device without your permission. Passwords Display password characters briefly as you type them. 1. From a Home screen, tap Apps >  Settings. 2. Tap Security > Make passwords visible to turn the feature on. Security
  • 134.
    129 SecuritySettings Security UpdateService Automatically receive security updates. 1. From a Home screen, tap Apps >  Settings. 2. Tap Security for options: • Security policy updates: Automatically or manually check for security policy updates. -- Automatic updates can also be limited to only when your device is connected to a Wi‑Fi network. • Send security reports: Use Wi-FI to send security reports to Samsung for threat analysis. Credential Storage Manage your security certificates. If a certificate authority (CA) certificate gets compromised or for some other reason you do not trust it, you can disable or remove it. 1. From a Home screen, tap Apps >  Settings. 2. Tap Security for options: • Storage type: Select a storage location for credential contents. • Trusted credentials: Display certificates in your device’s ROM and other certificates you have installed. • Install from device storage: Install a new certificate from storage. • Clear credentials: Erase the credential contents from the device and reset the password. Advanced Security Protect your device with these advanced security options. 1. From a Home screen, tap Apps >  Settings. 2. Tap Security for options: • Trust agents: Perform selected actions when trusted devices are connected. -- To view Trust agents, set up a secured screen lock (Password, PIN, Pattern, or Fingerprints). For more information, see Set a Screen Lock. • Pin windows: Pin a specific app on your device screen. Follow the prompts. • Usage data access: View the applications that can access your device’s usage history. • Smart Lock: Set your device to stay unlocked when you have trusted devices connected or when it’s in a trusted place. -- To view Smart Lock, set up a secured screen lock (Password, PIN, Pattern, or Fingerprints). For more information, see Set a Screen Lock. • Do not disturb permission: View which apps have permission to change the Do not disturb settings.
  • 135.
    130 HelpSettings View tipsand guidelines for using your device. 1. From a Home screen, tap Apps >  Settings. 2. Tap Help for information about: • New features • Getting started • Applications • Settings Help
  • 136.
    131 About DeviceSettings AboutDevice View information about your device, including current status, legal information, hardware and software versions, and more. 1. From a Home screen, tap Apps >  Settings. 2. Tap About device, and then tap items for more details: • Download updates manually: Check for and install available software updates. • Scheduled software updates: Set a time to automatically check for and install software updates. • Status: View the status of the battery, network, and other information about your device. • Legal information: View legal notices and other legal information, including your embedded Samsung legal information. • Report diagnostic info: Consent to send diagnostic and usage data about your device to Samsung. • Device name: View and change your device’s name. • Additional device information includes the Model number, Android version, Build number, and more.
  • 137.
    132 Application ManagerSettings ApplicationManager You can download and install new applications on your device. Use Application manager settings to manage your downloaded and preloaded applications. Warning: Because this device can be configured with system software not provided by or supported by Google or any other company, you operate this software at your own risk. Application Manager Options If you have disabled apps, you can choose whether to display them. 1. From a Home screen, tap Apps >  Settings. 2. Tap Application manager. 3. If you have disabled applications: • Tap All apps at the top left of the screen. • Tap All apps, Enabled, or Disabled. 4. Tap More options for the following options: • Show/Hide system apps: Show or hide system (background) apps. • App permissions: Control which apps have permissions to use certain features of your device. • Apps that can appear on top: Choose apps that can run on top of other running apps. • Change system settings: Select which apps can change system endings. • Reset app preferences: Reset options that have been changed. Existing app data is not deleted. Manage Apps You can view and update information about an application, including memory usage, default settings, and permissions. 1. From a Home screen, tap Apps >  Settings. 2. Tap Application manager. 3. Tap an application to view and update information about the application. The following options are displayed: • Uninstall/Disable: Uninstall or disable the application. Preloaded apps can only be disabled. • Force stop: Stop an app that is misbehaving. Restart your device if stopping an app, process, or service causes your device to stop working correctly. • Storage: Manage the app’s storage usage. • Data usage: View mobile data usage. • Permissions: View permissions granted to the app for access to your device’s information. • Notifications: Configure notifications from the app. • Set as default: Set the app as a default for a certain category of apps. • Battery: View battery usage since the last full charge. • Memory: View memory usage. Note: Options may vary by application.
  • 138.
    133 Default ApplicationsSettings Ifyou have multiple applications of the same type, such as email apps, you can select one app to be the default. You can also use a simpler Home screen that provides an easier user experience for first‑time smartphone users. 1. From a Home screen, tap Apps >  Settings. 2. Tap Default applications. 3. Tap the following to choose default apps: • Browser app: Choose a default browser app. • Calling app: Choose a default calling app. • Messaging app: Choose a default messaging (text and multimedia) app. • Set as default: Choose default apps for other functions. • Home: Choose a Home screen type. • Device assistance app: Choose an app that provides assistance for using your device. Default Applications
  • 139.
    134 Application SettingsSettings Shortcutsto the settings for various apps are available in one convenient location. 1. From a Home screen, tap Apps >  Settings. 2. Tap Application settings. 3. Tap one of the following to display the settings for the selected app: • Calendar • Call • Contacts • Email • Gallery • Internet • Messages • S Voice • Google Application Settings