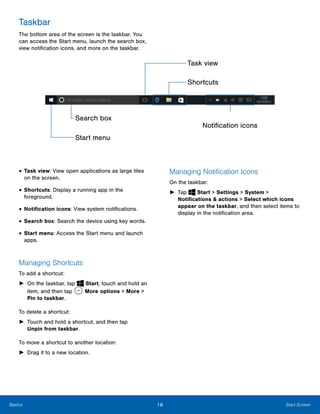
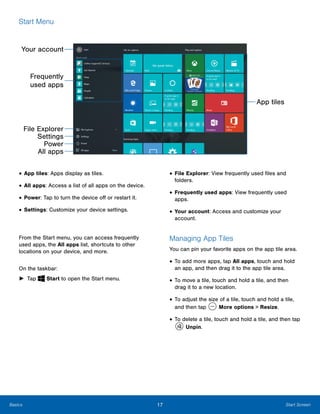
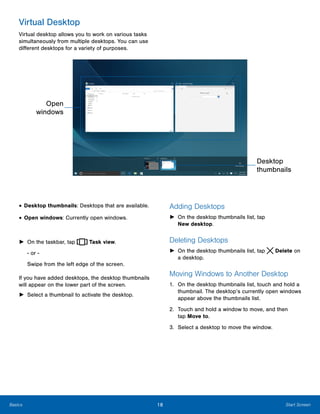
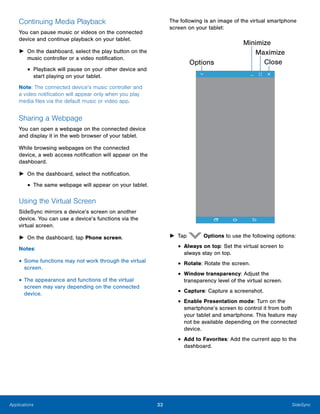
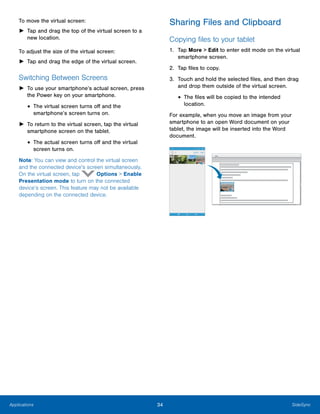
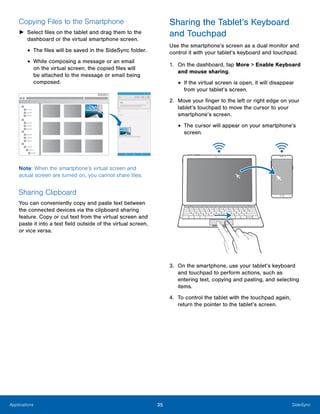
SlideShare a Scribd company logo
T A B L E T 

User Manual

Please read this manual before operating your device
and keep it for future reference.
iLegal Notices
Legal Notices

WARNING! This product contains chemicals known to
the State of California to cause cancer, birth defects,
or other reproductive harm. For more information,
please call 1-800-SAMSUNG (726-7864).
Intellectual Property
All Intellectual Property, as defined below,
owned by or which is otherwise the property of
Samsung or its respective suppliers relating to the
SAMSUNG mobile device, including but not limited
to, accessories, parts, or software relating thereto
(the “mobile device”), is proprietary to Samsung
and protected under federal laws, state laws, and
international treaty provisions. Intellectual Property
includes, but is not limited to, inventions (patentable
or unpatentable), patents, trade secrets, copyrights,
software, computer programs, and related
documentation and other works of authorship. You
may not infringe or otherwise violate the rights
secured by the Intellectual Property. Moreover,
you agree that you will not (and will not attempt
to) modify, prepare derivative works of, reverse
engineer, decompile, disassemble, or otherwise
attempt to create source code from the software.
No title to or ownership in the Intellectual Property
is transferred to you. All applicable rights of the
Intellectual Property shall remain with SAMSUNG
and its suppliers.
Open Source Software
Some software components of this product
incorporate source code covered under GNU
General Public License (GPL), GNU Lesser
General Public License (LGPL), OpenSSL
License, BSD License and other open source
licenses. To obtain the source code covered
under the open source licenses, please visit:
opensource.samsung.com
Disclaimer of Warranties;
Exclusion of Liability
EXCEPT AS SET FORTH IN THE EXPRESS
WARRANTY CONTAINED ON THE WARRANTY
PAGE ENCLOSED WITH THE PRODUCT, THE
PURCHASER TAKES THE PRODUCT “AS IS”, AND
SAMSUNG MAKES NO EXPRESS OR IMPLIED
WARRANTY OF ANY KIND WHATSOEVER WITH
RESPECT TO THE PRODUCT, INCLUDING BUT
NOT LIMITED TO THE MERCHANTABILITY OF THE
PRODUCT OR ITS FITNESS FOR ANY PARTICULAR
PURPOSE OR USE; THE DESIGN, CONDITION OR
QUALITY OF THE PRODUCT; THE PERFORMANCE
OF THE PRODUCT; THE WORKMANSHIP OF THE
PRODUCT OR THE COMPONENTS CONTAINED
THEREIN; OR COMPLIANCE OF THE PRODUCT
WITH THE REQUIREMENTS OF ANY LAW, RULE,
SPECIFICATION OR CONTRACT PERTAINING
THERETO. NOTHING CONTAINED IN THE
INSTRUCTION MANUAL SHALL BE CONSTRUED
TO CREATE AN EXPRESS OR IMPLIED WARRANTY
OF ANY KIND WHATSOEVER WITH RESPECT TO
THE PRODUCT. IN ADDITION, SAMSUNG SHALL
NOT BE LIABLE FOR ANY DAMAGES OF ANY KIND
RESULTING FROM THE PURCHASE OR USE OF
THE PRODUCT OR ARISING FROM THE BREACH
OF THE EXPRESS WARRANTY, INCLUDING
INCIDENTAL, SPECIAL OR CONSEQUENTIAL
DAMAGES, OR LOSS OF ANTICIPATED PROFITS
OR BENEFITS.
Modification of Software
SAMSUNG IS NOT LIABLE FOR PERFORMANCE
ISSUES OR INCOMPATIBILITIES CAUSED BY
YOUR EDITING OF REGISTRY SETTINGS, OR
YOUR MODIFICATION OF OPERATING SYSTEM
SOFTWARE.
USING CUSTOM OPERATING SYSTEM SOFTWARE
MAY CAUSE YOUR DEVICE AND APPLICATIONS
TO WORK IMPROPERLY. YOUR CARRIER MAY
NOT PERMIT USERS TO DOWNLOAD CERTAIN
SOFTWARE, SUCH AS CUSTOM OS.
WIF_W700_EN_UM_TN_A20_030416_FINAL
iiLegal Notices
Samsung Electronics America
(SEA), Inc.
Address:

85 Challenger Road 

Ridgefield Park, 

New Jersey 07660

Phone:

1-800-SAMSUNG (726-7864)

Internet Address:
samsung.com
©2016 Samsung Electronics America, Inc.
Samsung, Samsung Galaxy, are all trademarks of
Samsung Electronics Co., Ltd.
Note: Screen images are simulated. Appearance of
device may vary.
Do you have questions about your
Samsung Mobile Device?
For 24 hour information and assistance, we offer
a new FAQ/ARS System (Automated Response
System) at: samsung.com/us/support
The actual available capacity of the internal memory
is less than the specified capacity because the
operating system and default applications occupy
part of the memory. The available capacity may
change when you upgrade the device.
Nuance®
, VSuite™
, T9®
Text Input, and the Nuance
logo are trademarks or registered trademarks of
Nuance Communications, Inc., or its affiliates in the
United States and/or other countries.
The Bluetooth®
word mark, figure mark (stylized
“B Design”), and combination mark (Bluetooth word
mark and “B Design”) are registered trademarks and
are wholly owned by the Bluetooth SIG.
Wi-Fi is a registered trademark of the
Wireless Fidelity Alliance, Inc.
Microsoft is a registered trademark of the
Microsoft Corporation.
Legal Information
Important legal information can be accessed in
writing on the mobile device or at samsung.com
READ THIS INFORMATION BEFORE USING YOUR
MOBILE DEVICE.
Samsung Limited Warranty - This product is
covered under the applicable Samsung Limited
Warranty INCLUDING ITS DISPUTE RESOLUTION
PROCEDURE and your right to opt out of
arbitration within 30 calendar days of the first
consumer purchase. You may opt out by either
sending an email to optout@sea.samsung.com
with the subject line “Arbitration Opt-Out” or by
calling 1-800-SAMSUNG (726-7864). For more
detailed procedures, please refer to the “Dispute
Resolution Procedures and Arbitration and Opt-Out”
section of the Limited Warranty.
Full written terms and detailed information about
the warranty and obtaining service are available on
the device at: Settings > Extras > Galaxy Settings
> Legal information > Samsung legal or you may
access the online version of the Health and Safety,
Warranty, and End User License Agreement for your
device at:
English
samsung.com/us/Legal/Tablet-HSGuide
Spanish
samsung.com/us/Legal/Tablet-HSGuide-SP
The online version of the End User License
Agreement (EULA) for your device can be found
online at:
samsung.com/us/Legal/SamsungLegal-EULA4
iiiTable of Contents
Table of Contents

Basics....................................................................................1

Read Me First...................................................................2

Package Contents.........................................................3

Device Layout...................................................................4

Battery...................................................................................7

Turning the Device On and Off.............................9

Keyboard Cover............................................................10

Touchscreen....................................................................13

Start Screen.....................................................................15

Lock Screen....................................................................20

Action Center..................................................................21

Search Box.......................................................................22

Entering Text ...................................................................23

Opening Apps................................................................25

Split Screen View.........................................................26

Device and Data Management...........................27

Applications...................................................................28

Installing or Uninstalling Apps.............................29

Scrap Box.........................................................................30

SideSync ...........................................................................31

Samsung Update.........................................................36

Samsung Recovery....................................................37

Online Support (S Services).................................38

Settings..............................................................................39

Introduction......................................................................40

System................................................................................41

Devices...............................................................................42

Network and Internet.................................................43

Personalization ..............................................................44

Accounts............................................................................45

Time and Language...................................................46

Ease of Access.............................................................47

Privacy ................................................................................48

Update and Security..................................................49

Extras...................................................................................50

Appendix...........................................................................51

Troubleshooting.............................................................52

Windows Recovery Function................................55

Removing the Battery ...............................................56
Basics
Learn about your mobile
device hardware, assembly
procedures, and how to
get started using your
new device.
2 Read Me FirstBasics
Read Me First

Please read this manual before
using the device to ensure safe
and proper use.
• Descriptions are based on the device’s default
settings.
• Some content may differ from your device
depending on the region, service provider, model
specifications, or device’s software.
• Content (high quality content) that requires
high CPU and RAM usage will affect the overall
performance of the device. Apps related to the
content may not work properly depending on the
device’s specifications and the environment that it
is used in.
• Samsung is not liable for performance issues
caused by apps supplied by providers other than
Samsung.
• Samsung is not liable for performance issues or
incompatibilities caused by edited registry settings
or modified operating system software. Attempting
to customize the operating system may cause the
device or apps to work improperly.
• Software, sound sources, wallpapers, images, and
other media provided with this device are licensed
for limited use. Extracting and using these
materials for commercial or other purposes is an
infringement of copyright laws. Users are entirely
responsible for illegal use of media.
• Default apps that come with the device are subject
to updates and may no longer be supported
without prior notice. If you have questions about
an app provided with the device, contact a
Samsung Service Center. For user-installed apps,
contact service providers.
• Modifying the device’s operating system or
installing softwares from unofficial sources may
result in device malfunctions and data corruption
or loss. These actions are violations of your
Samsung license agreement and will void your
warranty.
Warnings, Cautions, and Notes
Warning: Situations that could cause injury to yourself
or others.
Caution: Situations that could cause damage to your
device or other equipment.
Note: Notes, usage tips, or additional information.
3 Package ContentsBasics
Package Contents

Check the product box for the following items:
• Device
• Keyboard Cover
• Quick start guide
• USB charger/travel adapter
Notes:
• The items supplied with the device and any
available accessories may vary depending on the
region or service provider.
• The supplied items are designed only for this device
and may not be compatible with other devices.
• Appearances and specifications are subject to
change without prior notice.
• You can purchase additional accessories from
your local Samsung retailer. Make sure they are
compatible with the device before purchase.
• Use only Samsung-approved accessories.
Using unapproved accessories may cause the
performance problems and malfunctions that are
not covered by the warranty.
• Availability of all accessories is subject to change
depending entirely on manufacturing companies.
For more information about available accessories,
visit samsung.com.
4 Device LayoutBasics
Device Layout

Front View

Volume key
Power key
Front camera
Touchscreen
Keyboard dock port
• Microphone: Record audio and detects voice
commands.
• Light sensor: Adjust display based on ambient
lighting.
• Speaker: Plays music and other sounds.
• USB charger/Accessory port: Connect the
Charger/USB cable (included), and other optional
accessories (not included).
• Headset jack: Connect an optional headset
(not included).
• Keyboard dock port: Connect to the Keyboard
Cover.
Microphone
Light sensor
Microphone
Speaker
USB charger/

Accessory port

Headset jack
• Touchscreen: Touch to navigate the device and
perform various actions.
• Front camera: Take self-portraits and record
videos of yourself.
• Power key: Press and hold to turn the device on
or off. Press to lock or wake up the screen.
• Volume key: Adjust the volume of your device’s
sounds.
5 Device LayoutBasics
Back View

Rear camera
Start key
Speaker
• Start key: Open the Start menu.
• Speaker: Plays music and other sounds.
• Rear camera: Take pictures and record videos.
Notes:
• Using a Samsung-approved screen protector is
recommended. Unapproved screen protectors may
cause the sensors to malfunction.
• Do not allow water to contact the touchscreen. The
touchscreen may malfunction in humid conditions or
when exposed to water.
6 Device LayoutBasics
Keyboard Cover

Stand
Connector
Keyboard
Touchpad
• Keyboard: Enter text with a full QWERTY
keyboard.
• Touchpad: Control the onscreen cursor.
• Connector: Connect the Keyboard cover to the
device.
• Stand: Fold to create a stand for the device.
7 BatteryBasics
Battery

Charging the Battery
Charge the battery before using it for the first time
or when it has been unused for extended periods.
Important: Use only Samsung-approved chargers,
batteries, and cables. Samsung accessories are
designed to maximize battery life. Using other
accessories may invalidate your warranty and may
cause damage.
1.	 Connect the USB cable to the USB power
adapter, and then plug the end of the USB cable
into the USB charger/Accessory port.
Caution: Connecting the charger improperly may
cause serious damage to the device. Any damage
caused by misuse is not covered by the warranty.
2.	 Plug the USB power adapter into an electric
socket.
3.	 After fully charging, disconnect the device from
the charger. First unplug the charger from the
device, and then unplug it from the electric
socket.
Note: Failure to unplug the wall charger before you
remove the battery can cause damage to the device.
Viewing the Remaining Charging Time
► While charging, on the taskbar, tap Start >
Settings > System > Battery saver.
Note: The actual charging time may vary depending
on the status of your device and the charging
conditions. The remaining charging time may not
display when you charge the device in very cold or
very hot conditions.
Reducing the Battery Consumption
Your device provides various options that help you
conserve battery power.
• When you are not using the device, switch to
sleep mode by pressing the Power key.
• Activate battery saver mode.
• Close unnecessary apps.
• Deactivate the Bluetooth feature when not in use.
• Deactivate the Wi-Fi feature when not in use.
• Deactivate auto-syncing of apps.
• Decrease the backlight time.
• Decrease the screen brightness.
8 BatteryBasics
Battery Charging Tips and
Precautions
• When the battery power is low, the battery icon
appears empty.
• If the battery is completely discharged, the
device cannot be turned on immediately when the
charger is connected. Allow a depleted battery
to charge for a few minutes before turning on the
device.
• If you use multiple apps at once, network apps,
or apps that need a connection to another device,
the battery will drain quickly. To avoid losing
power during a data transfer, always use these
apps after fully charging the battery.
• Using a power source other than the USB power
adapter, such as a computer, may result in a
slower charging speed due to a lower electric
current.
• The device can be used while it is charging, but it
may take longer to fully charge the battery.
• If the device receives an unstable power supply
while charging, the touchscreen may not function.
If this happens, unplug the charger from the
device.
• While charging, the device and the charger may
heat up. This is normal and should not affect the
device’s lifespan or performance. If the battery
gets hotter than usual, the charger may stop
charging.
• If the device is not charging properly, take the
device and the charger to a Samsung Service
Center.
Battery Saver
Save the battery power by limiting the device’s
functions.
► On the taskbar, tap Start > Settings >
System > Battery saver, and then tap the switch
under Battery saver is currently to activate it.
• To automatically activate battery saver mode
when the remaining battery power reaches the
preset level, tap Battery saver settings and
select an option.
9 Turning the Device On and OffBasics
Turning the Device On and Off

When you turn on your device for the first time or
after performing a data reset, follow the prompts to
set up your device.
Note: Before turning on your device for the first time,
you must connect the device to a power supply.
To turn on the device:
►	 Press and hold the Power key for a few seconds
to turn on the device.
To turn off the device:
► Tap Start > Power > Shut down. In Tablet
mode, tap Power > Shut down.
- or ­
Press and hold the Power key until the locked
screen appears, and then drag the locked
screen downwards.
Note: Follow all posted warnings and directions
from authorized personnel in areas where the use of
wireless devices is restricted, such as airplanes and
hospitals.
Restarting the Device
To restart the device:
► Tap Start > Power > Restart. In Tablet
mode, tap Power > Restart.
If your device is frozen and unresponsive:
1.	 Press and hold the Power key for more than
10 seconds until the device turns off.
2. Press and hold the Power key again to restart it.
10 Keyboard CoverBasics
Keyboard Cover
Introduction
Connecting the device to the Keyboard Cover allows
you to use a traditional keyboard and touchpad. The
touchpad has two click buttons so you can use the
touchpad like a mouse. You can also stand your
device upright using the stand on the Keyboard
Cover.
When you close the Keyboard Cover, your device
will enter sleep mode. When you open the cover
and set the device in position using the stand, the
touchscreen will turn on.
To change the settings:
1.	 Touch and hold Start, tap Control Panel
> Hardware and Sound > Power Options >
Choose what closing the lid does.
2. Configure the When I close the lid: settings.
Important: The device contains magnets. The
American Heart Association (US) and the Medicines
and Healthcare Products Regulatory Agency (UK)
both warn that magnets can affect the operation of
implanted pacemakers, cardioverters, defibrillators,
insulin pumps or other electro medical devices
(collectively, “Medical Device”) within the range of
15 cm (6 inches). If you are a user of any of these
Medical Devices, DO NOT USE THIS DEVICE UNLESS
YOU HAVE CONSULTED WITH YOUR PHYSICIAN.
Caution: Do not store your device near magnetic
fields. Magnetic stripe cards, including credit cards,
phone cards, passbooks, and boarding passes, may
be damaged by magnetic fields.
Connecting the Keyboard Cover
1.	 Connect the keyboard dock port at the bottom
of the device to the connector on the Keyboard
Cover.
2.	 Attach the stand to the device, and then set the
device in position.
2
1
Note: Use care when connecting and removing the
tablet from the keyboard case.
Hot Keys
Use hot keys to easily access features and change
settings, such as brightness and volume.
►	 To use hot keys, simultaneously press and hold
the Fn key and press a hot key.
If you lock the Fn key, you can use hot keys without
pressing the Fn key.
►	 To lock the Fn key, tap the Fn Lock key.
Basics
F1

F2

F3

F4

F5

F6

F7

F8

F9

F10

F11

F12

Ctrl
Key/Icon Function
Launch Settings.
Adjust the brightness of the display.
Switch between the LCD and an
external display when an external
display is connected to the device.
Lock the touchpad.
Mute or unmute the audio.
Adjust the volume.
Open the search box. If Cortana is
supported, Cortana will be activated.
Open the task view screen.
Enter full screen mode. This function
may not be available depending on
the app.
Activate or deactivate Airplane mode.
Perform the right-click function.
Touchpad
Use the touchpad to move the cursor or select
items. The left and right buttons of the touchpad
function the same as the left and right buttons of a
mouse.
Note: Use only your fingers on the touchpad.
Basic Touchpad Functions
Moving
To move the cursor, move your finger on the
touchpad.
Clicking
Tap the touchpad or press the left-click button.
or
Double-Clicking
Double-tap the touchpad or press the left-click
button twice.
or
11 Keyboard Cover
12 Keyboard CoverBasics
Right-Clicking
Press the right-click button to perform the right-click
function.
Dragging
To move an item, select and drag it to the target
position while pressing and holding the left-click
button.
Additional Functions
Swiping
To scroll up, down, left, or right to a desired location,
swipe with two fingers on the touchpad.
or
Spreading and Pinching
Spread two fingers apart on a webpage, map, or
image to zoom in a part. Pinch to zoom out.
or
Configuring Touchpad Gestures
Configure touchpad gestures to use the touchpad
more efficiently.
1. Tap Start > Settings > Devices > 

Mouse & touchpad.

2. Configure the settings under Touchpad.
Locking the Touchpad
►	 Press and hold the Fn key, and then press the
F5 key to lock the touchpad.
13 TouchscreenBasics
Touchscreen

Important:
• Do not allow the touchscreen to come into
contact with other electrical devices. Electrostatic
discharges can cause the touchscreen to
malfunction.
• To avoid damaging the touchscreen, do not tap it
with anything sharp or apply excessive pressure
to it with your fingertips.
Note:
• The device may not recognize touch inputs close
to the edges of the screen, which are outside of
the touch input area.
• Leaving the touchscreen idle for extended periods
may result in afterimages (screen burn-in) or
ghosting. Turn off the touchscreen when you do
not use the device.
• It is recommended to use fingers when you use
the touchscreen.
Tap
To open an app, to select a menu item, to press an
onscreen button, or to enter a character using the
keyboard on the screen, tap it with your finger.
Touch and Hold
Touch and hold an item or the screen for more than
2 seconds to access available options.
Drag
To move an item, touch and hold it and drag it to the
target position.
14 TouchscreenBasics
Double-Tap Spread and Pinch
Double-tap on a webpage or image to zoom in.
Double-tap again to return.
Spread two fingers apart on a webpage, map, or
image to zoom in a part. Pinch to zoom out.
or
Swipe
Swipe to the left or right on the screen to scroll
left or right. Swipe upwards or downwards to scroll
through a webpage or a list of items.
15 Start ScreenBasics
Start Screen

The Start screen is the starting point for accessing all of the
device’s features.
Start menu Taskbar
• Taskbar: Access system controls and
notifications.
• Start menu: Access the Start menu and
launch apps.
Moving and Removing an Item
To move an item:
►	 Touch and hold an item on the Start screen, and
then drag it to a new location.
To remove an item:
►	 Touch and hold the item, and then tap Unpin
from taskbar.
16 Start ScreenBasics
 
 
Taskbar
The bottom area of the screen is the taskbar. You
can access the Start menu, launch the search box,
view notification icons, and more on the taskbar.
Task view

Shortcuts

Search box
Notification icons
Start menu
• Task view: View open applications as large tiles
on the screen.
• Shortcuts: Display a running app in the
foreground.
• Notification icons: View system notifications.
• Search box: Search the device using key words.
• Start menu: Access the Start menu and launch
apps.
Managing Shortcuts
To add a shortcut:
► On the taskbar, tap Start, touch and hold an
item, and then tap More options > More >
Pin to taskbar.
To delete a shortcut:
►	 Touch and hold a shortcut, and then tap
Unpin from taskbar.
To move a shortcut to another location:
►	 Drag it to a new location.
Managing Notification Icons
On the taskbar:
► Tap Start > Settings > System >
Notifications & actions > Select which icons
appear on the taskbar, and then select items to
display in the notification area.
17 Start ScreenBasics
Start Menu

Your account
Frequently
used apps
File Explorer

Settings

Power

All apps

• App tiles: Apps display as tiles.
• All apps: Access a list of all apps on the device.
• Power: Tap to turn the device off or restart it.
• Settings: Customize your device settings.
From the Start menu, you can access frequently
used apps, the All apps list, shortcuts to other
locations on your device, and more.
On the taskbar:
► Tap Start to open the Start menu.
App tiles
• File Explorer: View frequently used files and
folders.
• Frequently used apps: View frequently used
apps.
• Your account: Access and customize your
account.
Managing App Tiles
You can pin your favorite apps on the app tile area.
• To add more apps, tap All apps, touch and hold
an app, and then drag it to the app tile area.
• To move a tile, touch and hold a tile, and then
drag it to a new location.
• To adjust the size of a tile, touch and hold a tile,
and then tap More options > Resize.
• To delete a tile, touch and hold a tile, and then tap
Unpin.
18 Start ScreenBasics
 
Virtual Desktop
Virtual desktop allows you to work on various tasks
simultaneously from multiple desktops. You can use
different desktops for a variety of purposes.
Open
windows
Desktop
thumbnails
• Desktop thumbnails: Desktops that are available.
• Open windows: Currently open windows.
► On the taskbar, tap Task view. 

- or ­
Swipe from the left edge of the screen.

If you have added desktops, the desktop thumbnails
will appear on the lower part of the screen.
► Select a thumbnail to activate the desktop.
Adding Desktops
►	 On the desktop thumbnails list, tap
New desktop.
Deleting Desktops
► On the desktop thumbnails list, tap Delete on
a desktop.
Moving Windows to Another Desktop
1.	 On the desktop thumbnails list, touch and hold a
thumbnail. The desktop’s currently open windows
appear above the thumbnails list.
2.	 Touch and hold a window to move, and then
tap Move to.
3. Select a desktop to move the window.
19 Start ScreenBasics
 
Switching to Tablet Mode
You can switch between PC mode and tablet mode.
In Tablet mode, the full Start menu screen will be the
Start screen. Switching to tablet mode makes the
device more touch-friendly.
To switch to tablet mode, on the taskbar:
► Tap Action center > Tablet mode.
- or ­
Swipe from the right edge of the screen 

towards the center of the screen, and then 

tap Tablet mode.

To return to PC mode:
► Tap Tablet mode again.
20 Lock ScreenBasics
Lock Screen

Pressing the Power key turns off the screen and
locks it. Also, the screen turns off and automatically
locks if the device is not used for a specified period.
►	 To unlock the screen, press the Power key and
drag the locked screen upwards.
You can change the way that you lock the screen
to prevent others from accessing your personal
information.
► On the taskbar, tap Start > Settings >
Accounts > Sign-in options, and then select
a screen lock method. The device requires an
unlock code whenever unlocking it.
Notes:
• If the unlock code is forgotten, take the device to
a Samsung Service Center to reset it.
• You must add a password before you can use the
other lock methods.
Password
Create your Microsoft account password.
►	 Tap Add, and enter a password, enter the
password again to verify it, and then enter a
password hint.
PIN
A PIN consists of numbers only.
►	 Tap Add, and enter a password, enter the
password again to verify it, and then enter a
password hint.
Picture Password
A picture password consists of circles, straight lines,
and taps.
►	 Tap Add, and select an image and draw on the
image to create gestures.
Pattern Log-In
To unlock the screen using a pattern, on the
taskbar:
1. Tap Start > Settings > Extras > Galaxy
Settings > Pattern Log-in, and then tap On/Off
to activate it.
2.	 Draw a pattern by connecting four dots or more,
and then draw the pattern again to verify it.
21 Action CenterBasics
Action Center

Using the Action Center
You can view new notifications from Windows and
apps, and use quick action buttons. Quick action
buttons allow you to easily adjust frequently used
settings, such as activating Wi-Fi.
►	 To open the Action center panel, on the taskbar,
tap Action center.
- or -
Swipe from the right edge of the screen.
You can use the following functions on the Action
center panel.
Clear
Notifications
Quick action
buttons
• Clear: Clear all notifications.
• Notifications: Tap a notification and perform
various actions.
• Quick action buttons: Access common settings
quickly from the Action center.
Using Quick Action Buttons
Tap quick action buttons to activate certain features.
To view more detailed settings:
►	 Touch and hold a button, and then tap Go to
settings.
To change the top four buttons:
► On the taskbar, tap Start > Settings >
System > Notifications & actions, and then
change quick actions under Choose your quick
actions.
22 Search BoxBasics
Search Box

Search for a wide variety of content on the device or
web with a keyword.
►	 Tap the search box on the taskbar and enter a
keyword in the search field.
• To search for files, apps, settings, and more on
your device and your OneDrive, tap My stuff.
• To search for apps, images, topics and more
in the Internet, tap Web.
Basics
 
Entering Text

Using the Onscreen Keyboard
In tablet mode, the onscreen keyboard appears
automatically when you enter text to send emails,
create notes, and more.
►	 To use the onscreen keyboard in PC mode, on
the taskbar, tap Keyboard.
Note: Text entry is not supported in some languages.
To enter text, you must change the input language to
one of the supported languages.
Icon Function
Floating keyboard: Switch to the floating
keyboard.
Close: Close the keyboard.
Return: Break to the next line.
Keyboard options: Change the input
language or the keyboard layout, or add
input languages.
Arrows: Move the cursor.
Emoticons: Enter emoticons.
Numbers and Punctuations: Enter
numbers and punctuation marks.
&123
Shift: Enter uppercase. For all caps, tap it
twice.
Delete: Delete a preceding character.
Changing the Input Language
► Tap Keyboard > Language preferences >
Add a language, and then select a language to
add.
• When you add languages, you can select other
input languages by tapping Keyboard.
Additional Keyboard Functions
► Tap Keyboard to use various functions.
Standard: Switch to the standard
keyboard.
•
Floating/Split: Switch to the floating or
split keyboard. You can move the keyboard to
another location by dragging the keyboard.
•
Handwriting: Switch to handwriting mode.•
Note: This feature may not be available depending on
the region or service provider.
23	 Entering Text
24 Entering TextBasics
Copying and Pasting
1.	 Drag your finger across text to select it.
2.	 Touch and hold the text to display the options.
3.	 Tap Copy or Cut. The selected text is copied to
the clipboard.
4.	 Touch and hold where the text is to be inserted
and tap Paste.
Using the Keyboard Cover
When your device is in PC mode and connected
to the Keyboard Cover, you can enter text using
the traditional keyboard. For more information, see
Keyboard Cover.
25 Opening AppsBasics
Opening Apps

To open an app:
► On the taskbar, tap Start > All apps, and
then select an app icon to open it.
- or ­
To open an app from the task view screen, on
the taskbar, tap Task view, and then select
a window.
To close an app:
► Tap Close at the top of the app window to
close it.
26 Split Screen ViewBasics
Split Screen View

In tablet mode, you can open two windows at the
same time in the split screen view by selecting
windows from the task view screen.
Note: Some apps may not support this feature.
Adjusting the Window Size
Drag the handle between the app windows left or
right to adjust the size of the windows.
1. On the taskbar, tap Task view to view 

currently open apps. 

- or -

Swipe from the left edge of the screen.

2.	 Touch and hold an app and select Snap left or
Snap right.
3. Select another app to launch.
27 Device and Data ManagementBasics
Device and Data Management

Transferring Data Between
Devices
Move audio, video, image, or other types of files
between your tablet and a mobile device.
Caution: Do not disconnect the USB cable from the
device when you are transferring files. Doing so may
cause data loss or device damage.
Note: The devices may not connect properly if they
are connected via a USB hub. Directly connect
devices via your device’s USB charger/Accessory
port.
1.	 Connect a mobile device to your tablet using the
USB cable.
2.	 Transfer files between your tablet and the
connected device.
Updating the Device
Keep your device up to date by downloading
and installing updates, such as service packs
and patches, for the operating system and other
Microsoft apps.
The device is set to download and install updates
automatically.
To check for available updates manually:
► On the taskbar, tap Start > Settings >
Update & security > Windows Update > Check
for updates.
Samsung Update
Install and update Samsung apps, drivers, and more
on the device easily.
► On the taskbar, tap Start > All apps > 

Samsung > Samsung Update. 

• For more information, see Samsung Update.
Backing Up and Restoring Data
Keep your personal information, app data, and
settings safe on your device. You can back up your
sensitive information using Samsung Recovery. For
more information, see Samsung Recovery.
Performing a Data Reset
Delete all settings and data on the device. Before
performing a factory data reset, ensure you back
up all important data stored on the device. For more
information, see Backing Up the Current System and
Restoring to Factory Default.
Applications

Learn how to change the way
apps display, use apps, and
uninstall or disable apps.
29 Installing or Uninstalling AppsApplications
 
Installing or Uninstalling Apps

Store
Purchase and download apps.
► On the taskbar, tap Store.
- or -
On the taskbar, tap Start > Store.
Notes:
• This app may not be available depending on the
region or service provider.
• You can install apps provided by Samsung via
Samsung Update.
• For service requests for apps provided by
third-party providers, contact the provider.
If you contact a Samsung Service Center,
troubleshooting actions in response to service
requests may have limitations depending on
the app.
Installing Apps
Browse apps by category or tap the search field to
search for a keyword.
► Select an app to view information about it.
• To download free apps, tap Free.
• To purchase and download apps where
charges apply, tap the price and follow the
prompts.
• To change the auto update settings, tap
Your account > Settings, and then tap
the Update apps automatically switch to
activate or deactivate it.
Uninstalling Apps
Note: Some apps cannot be uninstalled.
1. On the taskbar, tap Store > All apps.
2. Touch and hold an app, and then tap Uninstall.
• Some apps will automatically move to the
Uninstall or change a program screen.
• Touch and hold an app, tap Uninstall or
Uninstall/Change, and then follow the
prompts to uninstall the app.
3. Tap Uninstall.
30 Scrap BoxApplications
Scrap Box

Capture a screenshot while using the device. You
can share or edit captured images, view them as a
slideshow, and more.
Capturing Screenshots
1.	 When there is content you want to capture,
on the taskbar, tap Start > All apps > 

Scrap Box.

2. Tap Capture.
3. Drag a Circle to resize the selection, and
then tap Done.
• To auto fit the frame around the content you
want, tap Auto-fit.
• To exit the selection, tap Cancel.
4. Use tools to edit the image and tap Save to
save it.
Managing Captured Images
On the Scrap Box screen, you can share images,
upload them to OneDrive, or delete them.
1. Tap List to view a list of the images you
have saved.
2. Tap images, and then use the following options:
Share: Share the images with others.•
Upload: Upload the images to OneDrive.•
Delete: Delete the images.•
31 SideSyncApplications
SideSync

Introduction
SideSync allows you to easily share your screen
and data between Samsung Android smartphone
and tablet. After you connect your devices, a virtual
screen will appear on your tablet. You can check
notifications, such as messages, from the dashboard
or in pop-up windows.
Before You Start
The SideSync app must be installed on both devices
that you want to connect.
• If SideSync is not installed, use one of the
following methods to download and install it:
- To download and install SideSync on your
Samsung Android tablet or smartphone, search
for SideSync in Galaxy Apps or Play Store. If
your device does not support SideSync, you
may not be able to find the app.
- To download and install SideSync on your
device, visit www.samsung.com/sidesync. On
the webpage, you can also find the information
about SideSync system requirements.
• To connect your smartphone and tablet, they must
support Wi-Fi Direct.
• To wirelessly connect your smartphone and tablet,
they must be connected to the same wireless
access point.
32 SideSyncApplications
 
Connecting to Smartphones
Connecting to a Smartphone via
Wi-Fi Direct
1.	 Launch SideSync on both your tablet and
smartphone.
2.	 Tap Start on both devices.
• Both devices will scan each other and 

connect.

3.	 On your tablet, select your smartphone from the
detected devices list.
4.	 On the smartphone, accept the connection
request.
• The dashboard will appear on your tablet.
Connecting Devices Automatically
If two devices have been previously connected, you
can set them to reconnect automatically.
1.	 On the dashboard, tap SideSync > More >
Settings > Automatically Stat & Connect.
2.	 Tap Automatically connect to the device which
has been connected before to activate the auto
connection feature.
Using the Dashboard
Launch frequently used apps or view notifications
from your smartphone.
When you tap a notification, the related app or
program will launch. The following is an image of the
smartphone’s dashboard on your tablet.
Options

Virtual
smartphone
Minimize
Close
AddActions

• Options: Access additional options.
• Minimize: Minimize the dashboard.
• Close: Close the dashboard.
• Add: Add more apps.
• Actions: Tap a notification and perform various
actions.
• Virtual smartphone: Turn on the virtual
smartphone screen.
You can rearrange or delete apps when you touch
and hold an app icon.
33 SideSyncApplications
Continuing Media Playback
You can pause music or videos on the connected
device and continue playback on your tablet.
►	 On the dashboard, select the play button on the
music controller or a video notification.
• Playback will pause on your other device and
start playing on your tablet.
Note: The connected device’s music controller and
a video notification will appear only when you play
media files via the default music or video app.
Sharing a Webpage
You can open a webpage on the connected device
and display it in the web browser of your tablet.
While browsing webpages on the connected
device, a web access notification will appear on the
dashboard.
►	 On the dashboard, select the notification.
• The same webpage will appear on your tablet.
Using the Virtual Screen
SideSync mirrors a device’s screen on another
device. You can use a device’s functions via the
virtual screen.
►	 On the dashboard, tap Phone screen.
Notes:
• Some functions may not work through the virtual
screen.
• The appearance and functions of the virtual
screen may vary depending on the connected
device.
The following is an image of the virtual smartphone
screen on your tablet:
Minimize
Maximize
CloseOptions
► Tap Options to use the following options:
• Always on top: Set the virtual screen to
always stay on top.
• Rotate: Rotate the screen.
• Window transparency: Adjust the
transparency level of the virtual screen.
• Capture: Capture a screenshot.
• Enable Presentation mode: Turn on the
smartphone’s screen to control it from both
your tablet and smartphone. This feature may
not be available depending on the connected
device.
• Add to Favorites: Add the current app to the
dashboard.
34 SideSyncApplications
To move the virtual screen:
►	 Tap and drag the top of the virtual screen to a
new location.
To adjust the size of the virtual screen:
► Tap and drag the edge of the virtual screen.
Switching Between Screens
►	 To use your smartphone’s actual screen, press
the Power key on your smartphone.
• The virtual screen turns off and the 

smartphone’s screen turns on.

►	 To return to the virtual screen, tap the virtual
smartphone screen on the tablet.
• The actual screen turns off and the virtual
screen turns on.
Note: You can view and control the virtual screen
and the connected device’s screen simultaneously.
On the virtual screen, tap Options > Enable
Presentation mode to turn on the connected
device’s screen. This feature may not be available
depending on the connected device.
Sharing Files and Clipboard
Copying files to your tablet
1.	 Tap More > Edit to enter edit mode on the virtual
smartphone screen.
2.	 Tap files to copy.
3.	 Touch and hold the selected files, and then drag
and drop them outside of the virtual screen.
• The files will be copied to the intended 

location.

For example, when you move an image from your
smartphone to an open Word document on your
tablet, the image will be inserted into the Word
document.
35 SideSyncApplications
Copying Files to the Smartphone
►	 Select files on the tablet and drag them to the
dashboard or the virtual smartphone screen.
• The files will be saved in the SideSync folder.
• While composing a message or an email
on the virtual screen, the copied files will
be attached to the message or email being
composed.
Note: When the smartphone’s virtual screen and
actual screen are turned on, you cannot share files.
Sharing Clipboard
You can conveniently copy and paste text between
the connected devices via the clipboard sharing
feature. Copy or cut text from the virtual screen and
paste it into a text field outside of the virtual screen,
or vice versa.
Sharing the Tablet’s Keyboard
and Touchpad
Use the smartphone’s screen as a dual monitor and
control it with your tablet’s keyboard and touchpad.
1.	 On the dashboard, tap More > Enable Keyboard
and mouse sharing.
• If the virtual screen is open, it will disappear
from your tablet’s screen.
2.	 Move your finger to the left or right edge on your
tablet’s touchpad to move the cursor to your
smartphone’s screen.
• The cursor will appear on your smartphone’s
screen.
3.	 On the smartphone, use your tablet’s keyboard
and touchpad to perform actions, such as
entering text, copying and pasting, and selecting
items.
4.	 To control the tablet with the touchpad again,
return the pointer to the tablet’s screen.
36 Samsung UpdateApplications
Samsung Update

Install and update Samsung apps, drivers, and more
on the device.
1. On the taskbar, tap Start > All apps > 

Samsung > Samsung Update.

2.	 Tap Find Model to find your device.
- or ­
Tap the Search field at the top of the screen and
enter your model name.
3.	 Tap your model name and tap your device’s
OS version.
4. Select items to update and tap Save.
37 Samsung RecoveryApplications
Samsung Recovery

Introduction
Back up your data and settings, and restore your
device to a previously backed up point or to the
factory default.
Note:
•	 To use this app, you must sign in to the device
with an administrator account, or enter the
administrator’s password.
•	 When you restore your device, it will erase the
data or apps saved after the selected backup
point. Ensure you back up important data
regularly.
Backing Up the Current System
Back up important data to an external storage
device regularly to prevent restore.
1. Connect an external storage device.
2. On the taskbar, tap Start > All apps > 

Samsung > Samsung Recovery.

3. Tap Backup Management > New backup.
4.	 Enter backup information and select the external
storage device.
5. Tap Recover.
6. When the backup start window appears, tap OK.
7.	 When the backup complete window appears,
tap OK.
• When the backup is finished, the backup
image will appear on the backup management
screen.
Restoring the System
Restoring to Factory Default
Restore the device to its factory default settings.
Before performing a factory data reset, ensure you
back up all important data stored on the device.
► On the taskbar, tap Start > All apps
> Samsung > Samsung Recovery >
Factory image > Recover > Recover > OK.
Restoring to a Backup Point
Select a backup point saved on an external storage
device to restore the device to that point.
1.	 Connect the external storage device to your
device.
2. On the taskbar, tap Start > All apps > 

Samsung > Samsung Recovery.

3.	 Tap Backup Management, select a backup
image, and then tap Recover.
4. Tap Recover.
38 Online Support (S Services)Applications
Online Support (S Services)

This service allows you to chat with a technical
engineer via the Internet and resolve problems on
your device remotely.
This service may be limited after the expiration date.
1. On the taskbar, tap Start > All apps > 

Samsung > Online Support (S Service).

2. Tap Online Support.
3. Enter a question and tap Request.
Settings
Configure your device’s
connections and settings,
add accounts, and customize
Home screens, apps, and
features.
40 IntroductionSettings
Introduction

Customize settings for functions
and apps. You can make your
device more personalized by
configuring various setting
options.
► On the taskbar, tap Start > Settings.
• To search for settings by entering keywords,
tap the Search field at the top of the screen.
41 SystemSettings
System

Change the system settings.
► On the Settings screen, tap System:
• Display: Change the display settings, such as
the font size and the brightness of the display.
• Notifications & actions: Select Quick action
buttons to display on the action center panel
and change the notification settings.
• Apps & features: View and manage apps and
features on the device.
• Multitasking: Change settings for multitasking.
• Tablet mode: Switch to tablet mode and
change the related settings.
• Battery saver: View battery power information
and change the power saving options.
• Power & sleep: Set the device’s backlight
timer. You can also set the Wi-Fi settings for
when the device is in sleep mode.
• Storage: View memory information for your
device and select where new apps and data
are saved by default.
- The actual available capacity of the internal
memory is less than the specified capacity
because the operating system and default
apps occupy part of the memory. The
available capacity may change when you
update the device.
• Offline maps: Download maps to search for
places and get directions offline and change
settings for offline maps.
• Default apps: Select a default setting for using
apps.
• About: Access device information and change
the device name or other settings.
42 DevicesSettings
Devices

Change settings related to your
connected devices.
► On the Settings screen, tap Devices:
• Printers & scanners: Change setting to 

connect printers and scanners.

• Connected devices: Add devices and change
settings for metered connections.
• Bluetooth: Activate or deactivate the Bluetooth
feature. You can search for other Bluetooth
devices and pair with them.
- Samsung is not responsible for the loss,
interception, or misuse of data sent or
received via Bluetooth.
- Always ensure that you share and receive
data with devices that are trusted and
properly secured. If there are obstacles
between the devices, the operating distance
may be reduced.
- Some devices, especially those that are not
tested or approved by the Bluetooth SIG,
may be incompatible with your device.
- Do not use the Bluetooth feature for illegal
purposes (for example, pirating copies of
files or illegally tapping communications for
commercial purposes).
- Samsung is not responsible for the
repercussion of illegal use of the Bluetooth
feature.
• Mouse & touchpad: Change the mouse and
touchpad settings.
• Typing: Change the onscreen keyboard 

settings.

• AutoPlay: Activate or deactivate the AutoPlay
feature and change related settings.
• USB: Set the device to notify you if there are
issues when connecting to USB devices.
43 Network and InternetSettings
Network and Internet

Change the network and Internet
settings.
► On the Settings screen, tap Network & Internet:
• Wi-Fi: Activate the Wi-Fi feature to connect to a
Wi-Fi network and change the related settings.
- Turn off Wi-Fi to save the battery when not
in use.
• Airplane mode: Activate or deactivate Airplane
mode. This disables all wireless functions on
your device. You can use only non-network
services.
Important: Make sure the device is turned off
during takeoff and landing. After takeoff, you can
use the device in Airplane mode if allowed by
aircraft personnel.
• Data usage: Keep track of your data usage
amount.
• VPN: Set up and connect to virtual private
networks (VPNs).
• Dial-up: Configure the dial-up settings.
• Proxy: Configure the proxy settings.
44 PersonalizationSettings
Personalization

Change the display settings,
such as a wallpaper, color, and
theme.
► On the Settings screen, tap Personalization:
• Background: Change the wallpaper and
related settings.
• Colors: Change the colors of the taskbar,
items on the Start menu, and more.
• Lock screen: Change the locked screen
wallpaper and select items to show on the
locked screen.
• Themes: Select a theme to apply and change
related settings.
• Start: Change the settings related to the
Start menu.
45 AccountsSettings
Accounts

Change the account settings.
► On the Settings screen, tap Accounts:
• Your email and accounts: Add your Microsoft
account and manage your other accounts.
• Sign-in options: Change the device sign-in
options. You can select a screen lock method
to prevent others from accessing your
personal information.
• Work access: Add a work or school account
to access to your organization’s resources,
such as apps and network.
• Family & other users: Add additional
accounts for your family members or other
users to use the device with their own
personalized settings.
• Sync your settings: Change settings to sync
your settings with other devices using your
Microsoft account.
46 Time and LanguageSettings
Time and Language

Change settings to control how
the device displays the time and
date, and select your country or
region.
Note: If the battery remains fully discharged or is
removed from the device, the time and date resets.
► On the Settings screen, tap Time & language:
• Date & time: Change the time and date
settings.
• Region & language: Set your country or
region, and add your display languages.
• Speech: Change the settings for the 

text-to-speech feature.
47 Ease of AccessSettings
Ease of Access

Change settings to improve the
device’s accessibility.
► On the Settings screen, tap Ease of Access:
• Narrator: Activate the screen reader and
change the related settings. When you activate
this feature, the device reads aloud all the
elements on the screen, such as text and
buttons.
• Magnifier: Activate a magnifier and change the
related settings. When you activate this feature
you can zoom in on the screen to view a larger
version of the content.
• High contrast: Apply high contrast themes to
the display to improve screen visibility.
• Closed captions: Change the caption 

settings.

• Keyboard: Change the onscreen keyboard
settings.
• Mouse: Change the pointer and mouse 

settings.

• Other options: Change the additional 

accessibility settings.
48 PrivacySettings
Privacy

Change the privacy settings.
► On the Settings screen, tap Privacy:
• General: Change the general privacy settings.
• Location: Change settings for location 

information permissions.

• Camera: Activate or deactivate the camera
feature. Select apps to allow them to use the
camera feature.
• Microphone: Activate or deactivate the
microphones. Select apps to allow them to use
the microphones.
• Speech, inking, & typing: Set the device to
collect personal information, such as contacts
and recent calendar events. You can also
manage your cloud settings.
• Account info: Set apps to access and use
your account information.
• Contacts: Select apps to allow them to access
your contacts.
• Calendar: Activate or deactivate the calendar
app. Select apps to allow them to access the
calendar app.
• Call history: Select apps to allow them to
access your call logs.
• Email: Activate or deactivate the email app.
Select apps to allow them to access the email
app and send emails.
• Messaging: Activate or deactivate the
messaging app. Select apps to allow them
to access the messaging app and send
messages.
• Radios: Change the settings to allow apps to
use radios, such as Bluetooth.
• Other devices: Change the settings for
external devices, such as wireless devices or
hardware.
• Feedback & diagnostics: Set the frequency
of Windows feedback and select an option to
send the device’s diagnostic and usage data
to Microsoft.
• Background apps: Select apps to run in the
background.
49 Update and SecuritySettings
Update and Security

Change the Windows update,
data backup, and device security
settings.
► On the Settings screen, tap Update & security:
• Windows Update: Check for available updates
and update Windows to the latest version.
• Windows Defender: Activate the Windows
Defender feature to scan for malware. You can
also set the device to send security problems
to Microsoft automatically.
• Backup: Backup your files using the File
History feature.
• Recovery: Reset the device or restart it using
the advanced start-up feature.
• Activation: View the Windows activation
information. You can change your Windows
product key.
• Find My Device: Activate or deactivate
the Find My Device feature to help locate
the device when lost or stolen. Access the
Microsoft webpage to track your device’s last
known location and control the device.
• For developers: Change the development
settings.
50 ExtrasSettings
Extras

Change additional settings
provided by Samsung.
►	 On the Settings screen, tap Extras >
Galaxy Settings:
• Battery Life Extender: Set the maximum
battery charge level to extend the battery life.
• AMOLED: Change the screen mode and the
screen brightness timer.
• Pattern Log-in: Set a pattern to use it as your
screen lock method.
• Legal information: View legal information for
your device.
- Samsung legal: View the Samsung legal
information.
-	Open source license: View the open
source license announcement.
• About device: Access device information.
Appendix
52 TroubleshootingAppendix
Troubleshooting

Before contacting a Samsung Service Center,
please attempt the following solutions. Some
situations may not apply to your device.
When you turn on your device or while
you are using the device, it prompts you
to enter one of the following codes:
• Enter your screen lock Password, PIN, Picture
password, or Pattern log in to unlock the screen.
Your device displays network or service
error messages.
• When you are in areas with weak signals or
poor reception, you may lose reception. Move to
another area and try again. While moving, error
messages may appear repeatedly.
• You cannot access some options without a
subscription. For more information, contact your
service provider.
Your device does not turn on.
• When the battery is completely discharged, your
device will not turn on. Fully charge the battery
before turning on the device.
The touchscreen responds slowly or
improperly.
• If you attach a screen protector or optional
accessories to the touchscreen, the touchscreen
may not function properly.
• If you are wearing gloves, if your hands are not
clean while touching the touchscreen, or if you tap
the screen with sharp objects or your fingertips,
the touchscreen may malfunction.
• The touchscreen may malfunction in humid
conditions or when exposed to water.
• Restart your device to clear any temporary
software bugs.
• Ensure that your device software is updated to the
latest version.
• If the touchscreen is scratched or damaged, visit a
Samsung Service Center.
Your device freezes or has fatal errors.
Try the following solutions. If the problem is still not
resolved, contact a Samsung Service Center.
• Restarting the device: If your device freezes or
hangs, you may need to close apps or turn off the
device and turn it on again.
• Forcing restart: If your device is frozen and
unresponsive, press and hold the Power key for
more than 10 seconds until the device turns off.
Then, press and hold the Power key again to
restart it.
- Resetting the device: If the methods above do
not solve your problem, perform a factory data
reset.
To perform a factory data reset:
• On the taskbar, tap Start > All apps >
Samsung > Samsung Recovery > Factory
image > Recover > Recover > Ok. Before
performing the factory data reset, remember
to make backup copies of all important data
stored in the device.
53 TroubleshootingAppendix
The Internet is often disconnected.
• Ensure that you are not blocking the device’s
internal antenna.
• When you are in areas with weak signals or poor
reception, you may lose reception. You may have
connectivity problems due to issues with the
service provider’s base station. Move to another
area and try again.
• When using the device while moving, wireless
network services may be disabled due to issues
with the service provider’s network.
The battery icon is empty.
• Your battery is low. Charge the battery.
The battery does not charge properly (for
Samsung-approved chargers).
• Ensure that the charger is connected properly.
• Visit a Samsung Service Center and have the
battery replaced.
The battery depletes faster than when
first purchased.
• When you expose the device or the battery to very
cold or very hot temperatures, the useful charge
may be reduced.
• Battery consumption increases when you use
messaging features or some apps, such as games
or the Internet.
• The battery is consumable and the useful charge
will get shorter over time.
Your device is hot to the touch.
• When you use apps that require more power or
use apps on your device for an extended period
of time, your device may feel hot to the touch.
This is normal and should not affect your device’s
lifespan or performance.
• If the device becomes too hot, do not use the
device or apps for a while. If the device continues
to overheat, contact a Samsung Service Center.
Photo quality is poorer than the preview.
• The quality of your photos may vary, depending on
the surroundings and the photography techniques
you use.
• If you take photos in dark areas, at night, or
indoors, image noise may occur or images may be
out of focus.
Error messages appear when opening
multimedia files.
If you receive error messages or multimedia files do
not play when you open them on your device, try the
following:
• Free some memory by transferring files to an
external storage device or deleting files from your
device.
• Ensure that the music file is not Digital Rights
Management (DRM)-protected. If the file is
DRM-protected, ensure that you have the
appropriate license or key to play the file.
• Ensure that the file formats are supported by the
device. If a file format is not supported, such as
DivX or AC3, install an app that supports it. To
confirm the file formats that your device supports,
visit www.samsung.com.
• Your device supports photos and videos captured
with the device. Photos and videos captured by
other devices may not work properly.
• Your device supports multimedia files that are
authorized by your network service provider or
providers of additional services. Some content
circulated on the Internet, such as ringtones,
videos, or wallpapers, may not work properly.
54 TroubleshootingAppendix
Another Bluetooth device is not located.
• Ensure that the Bluetooth wireless feature is
activated on your device.
• Ensure that the Bluetooth wireless feature is
activated on the device you wish to connect to.
• Ensure that your device and the other Bluetooth
device are within the maximum Bluetooth range
(10 meters).
If the tips above do not solve the problem, contact a
Samsung Service Center.
Your device cannot find your current
location.
• GPS signals may be obstructed in some locations,
such as indoors. Set the device to use Wi-Fi or
a mobile network to find your current location in
these situations.
Data stored in the device has been lost.
• Always make backup copies of all important
data stored in the device. Otherwise, you cannot
restore data if it is corrupted or lost. Samsung is
not responsible for the loss of data stored on the
device.
The touchscreen does not turn on when
you open the Keyboard Cover.
• Ensure that your device connects to the Keyboard
Cover, and the device is in correct position
using the stand of the Keyboard Cover. For more
information, see Keyboard Cover.
A small gap appears around the outside
of the device case.
• This gap is a necessary manufacturing feature
and some minor rocking or vibration of parts may
occur.
• Over time, friction between parts may cause this
gap to expand slightly.
55 Windows Recovery FunctionAppendix
Windows Recovery Function

If the Samsung Recovery app is
not supported, reinstall Windows
using the Windows recovery
function.
Important: Reinstalling Windows will erase all apps
and data on the device. Back up important apps and
data to an external storage device before reinstalling
Windows.
Note: After Windows is reinstalled, you can install the
required Samsung apps. On the taskbar, tap Start
> All apps > Samsung > Samsung Update.
1. On the taskbar, tap Start > Settings > 

Update & security > Recovery.

2. Tap Get started.
3. Tap Keep my files or Remove everything.
56 Removing the BatteryAppendix
Removing the Battery

The internal battery should not
be removed by any party other
than samsung-authorized service
centers.
Removing the battery and
accessing the internal
components can damage the
device and void the warranty.
• For your safety, you must not attempt to remove
the battery. If the battery is not properly removed,
it may lead to damage to the battery and device,
cause personal injury, and/or result in the device
being unsafe.
• Samsung does not accept liability for any damage
or loss (whether in contract or tort, including
negligence) which may arise from failure to
precisely follow these warnings and instructions,
other than death or personal injury caused by
Samsung’s negligence.

More Related Content

What's hot

Samsung Galaxy Tab A 8.0" (SM-T350NZWAXAR) user manual PDF / User Guide
  Samsung Galaxy Tab A 8.0" (SM-T350NZWAXAR) user manual PDF / User Guide  Samsung Galaxy Tab A 8.0" (SM-T350NZWAXAR) user manual PDF / User Guide
Samsung Galaxy Tab A 8.0" (SM-T350NZWAXAR) user manual PDF / User Guide
manualsheet
 
Samsung Galaxy J3 User Manual
Samsung Galaxy J3 User ManualSamsung Galaxy J3 User Manual
Samsung Galaxy J3 User Manual
Sarah Williams
 
Samsung Galaxy Sol Manual / User Guide
Samsung Galaxy Sol Manual / User GuideSamsung Galaxy Sol Manual / User Guide
Samsung Galaxy Sol Manual / User Guide
manualsheet
 
Samsung Galaxy Note Edge Manual / User Guide
Samsung Galaxy Note Edge Manual / User GuideSamsung Galaxy Note Edge Manual / User Guide
Samsung Galaxy Note Edge Manual / User Guide
manualsheet
 
Samsung Galaxy Amp Prime Manual / User Guide
Samsung Galaxy Amp Prime Manual / User GuideSamsung Galaxy Amp Prime Manual / User Guide
Samsung Galaxy Amp Prime Manual / User Guide
manualsheet
 
Galaxy Note 5 Manual in English
Galaxy Note 5 Manual in EnglishGalaxy Note 5 Manual in English
Galaxy Note 5 Manual in English
Robert Isaac Kreitzer
 
Samsung Galaxy Alpha Manual / User Guide
Samsung Galaxy Alpha Manual / User GuideSamsung Galaxy Alpha Manual / User Guide
Samsung Galaxy Alpha Manual / User Guide
manualsheet
 
Samsung Galaxy View 18.4" (SM-T677VZKBVZW) User Guide PDF download (English...
  Samsung Galaxy View 18.4" (SM-T677VZKBVZW) User Guide PDF download (English...  Samsung Galaxy View 18.4" (SM-T677VZKBVZW) User Guide PDF download (English...
Samsung Galaxy View 18.4" (SM-T677VZKBVZW) User Guide PDF download (English...
manualsheet
 
samsung s4
samsung s4samsung s4
samsung s4
Prefect Emeritus
 
Samsung Galaxy View Manual / User Guide
Samsung Galaxy View Manual / User GuideSamsung Galaxy View Manual / User Guide
Samsung Galaxy View Manual / User Guide
manualsheet
 
Samsung Galaxy Note 5 Manual / User Guide
Samsung Galaxy Note 5 Manual / User GuideSamsung Galaxy Note 5 Manual / User Guide
Samsung Galaxy Note 5 Manual / User Guide
manualsheet
 
Samsung Galaxy Note 5 Duos User Guide (English)
Samsung Galaxy Note 5 Duos User Guide (English)Samsung Galaxy Note 5 Duos User Guide (English)
Samsung Galaxy Note 5 Duos User Guide (English)
manualsheet
 
8324572 samsung-schu740-manual
8324572 samsung-schu740-manual8324572 samsung-schu740-manual
8324572 samsung-schu740-manual
arunsahani
 
Samsung Galaxy S7 active manual / user guide
Samsung Galaxy S7 active manual / user guideSamsung Galaxy S7 active manual / user guide
Samsung Galaxy S7 active manual / user guide
manualsheet
 
Samsung Galaxy S7 edge Manual / User Guide
Samsung Galaxy S7 edge Manual / User GuideSamsung Galaxy S7 edge Manual / User Guide
Samsung Galaxy S7 edge Manual / User Guide
manualsheet
 
Samsung mobile device health and safety and warranty guide
Samsung mobile device health and safety and warranty guide Samsung mobile device health and safety and warranty guide
Samsung mobile device health and safety and warranty guide
Saima Ashiq
 
Samsung Galaxy S7 Manual / User Guide
Samsung Galaxy S7 Manual / User GuideSamsung Galaxy S7 Manual / User Guide
Samsung Galaxy S7 Manual / User Guide
manualsheet
 
데이타맥스프린터 Datamax H-Class 열전사감열 RFID 산업용 바코드프린터 매뉴얼
데이타맥스프린터 Datamax H-Class 열전사감열 RFID 산업용 바코드프린터 매뉴얼데이타맥스프린터 Datamax H-Class 열전사감열 RFID 산업용 바코드프린터 매뉴얼
데이타맥스프린터 Datamax H-Class 열전사감열 RFID 산업용 바코드프린터 매뉴얼
HION IT
 
LG G Flex D950 AT&T User Manual
LG G Flex D950 AT&T User Manual LG G Flex D950 AT&T User Manual
LG G Flex D950 AT&T User Manual
nomorebugs
 

What's hot (19)

Samsung Galaxy Tab A 8.0" (SM-T350NZWAXAR) user manual PDF / User Guide
  Samsung Galaxy Tab A 8.0" (SM-T350NZWAXAR) user manual PDF / User Guide  Samsung Galaxy Tab A 8.0" (SM-T350NZWAXAR) user manual PDF / User Guide
Samsung Galaxy Tab A 8.0" (SM-T350NZWAXAR) user manual PDF / User Guide
 
Samsung Galaxy J3 User Manual
Samsung Galaxy J3 User ManualSamsung Galaxy J3 User Manual
Samsung Galaxy J3 User Manual
 
Samsung Galaxy Sol Manual / User Guide
Samsung Galaxy Sol Manual / User GuideSamsung Galaxy Sol Manual / User Guide
Samsung Galaxy Sol Manual / User Guide
 
Samsung Galaxy Note Edge Manual / User Guide
Samsung Galaxy Note Edge Manual / User GuideSamsung Galaxy Note Edge Manual / User Guide
Samsung Galaxy Note Edge Manual / User Guide
 
Samsung Galaxy Amp Prime Manual / User Guide
Samsung Galaxy Amp Prime Manual / User GuideSamsung Galaxy Amp Prime Manual / User Guide
Samsung Galaxy Amp Prime Manual / User Guide
 
Galaxy Note 5 Manual in English
Galaxy Note 5 Manual in EnglishGalaxy Note 5 Manual in English
Galaxy Note 5 Manual in English
 
Samsung Galaxy Alpha Manual / User Guide
Samsung Galaxy Alpha Manual / User GuideSamsung Galaxy Alpha Manual / User Guide
Samsung Galaxy Alpha Manual / User Guide
 
Samsung Galaxy View 18.4" (SM-T677VZKBVZW) User Guide PDF download (English...
  Samsung Galaxy View 18.4" (SM-T677VZKBVZW) User Guide PDF download (English...  Samsung Galaxy View 18.4" (SM-T677VZKBVZW) User Guide PDF download (English...
Samsung Galaxy View 18.4" (SM-T677VZKBVZW) User Guide PDF download (English...
 
samsung s4
samsung s4samsung s4
samsung s4
 
Samsung Galaxy View Manual / User Guide
Samsung Galaxy View Manual / User GuideSamsung Galaxy View Manual / User Guide
Samsung Galaxy View Manual / User Guide
 
Samsung Galaxy Note 5 Manual / User Guide
Samsung Galaxy Note 5 Manual / User GuideSamsung Galaxy Note 5 Manual / User Guide
Samsung Galaxy Note 5 Manual / User Guide
 
Samsung Galaxy Note 5 Duos User Guide (English)
Samsung Galaxy Note 5 Duos User Guide (English)Samsung Galaxy Note 5 Duos User Guide (English)
Samsung Galaxy Note 5 Duos User Guide (English)
 
8324572 samsung-schu740-manual
8324572 samsung-schu740-manual8324572 samsung-schu740-manual
8324572 samsung-schu740-manual
 
Samsung Galaxy S7 active manual / user guide
Samsung Galaxy S7 active manual / user guideSamsung Galaxy S7 active manual / user guide
Samsung Galaxy S7 active manual / user guide
 
Samsung Galaxy S7 edge Manual / User Guide
Samsung Galaxy S7 edge Manual / User GuideSamsung Galaxy S7 edge Manual / User Guide
Samsung Galaxy S7 edge Manual / User Guide
 
Samsung mobile device health and safety and warranty guide
Samsung mobile device health and safety and warranty guide Samsung mobile device health and safety and warranty guide
Samsung mobile device health and safety and warranty guide
 
Samsung Galaxy S7 Manual / User Guide
Samsung Galaxy S7 Manual / User GuideSamsung Galaxy S7 Manual / User Guide
Samsung Galaxy S7 Manual / User Guide
 
데이타맥스프린터 Datamax H-Class 열전사감열 RFID 산업용 바코드프린터 매뉴얼
데이타맥스프린터 Datamax H-Class 열전사감열 RFID 산업용 바코드프린터 매뉴얼데이타맥스프린터 Datamax H-Class 열전사감열 RFID 산업용 바코드프린터 매뉴얼
데이타맥스프린터 Datamax H-Class 열전사감열 RFID 산업용 바코드프린터 매뉴얼
 
LG G Flex D950 AT&T User Manual
LG G Flex D950 AT&T User Manual LG G Flex D950 AT&T User Manual
LG G Flex D950 AT&T User Manual
 

Similar to Samsung Galaxy TabPro S Manual / User Guide

Samsung Galaxy View 18.4 Manual / User Guide
Samsung Galaxy View 18.4 Manual / User GuideSamsung Galaxy View 18.4 Manual / User Guide
Samsung Galaxy View 18.4 Manual / User Guide
manualsheet
 
Samsung Gear S3 SM-R770- SM-760- Final User Manual
Samsung Gear S3 SM-R770- SM-760- Final User ManualSamsung Gear S3 SM-R770- SM-760- Final User Manual
Samsung Gear S3 SM-R770- SM-760- Final User Manual
TizenExperts
 
Samsung Gear S2 Manual Tizen Smart Watch
Samsung Gear S2 Manual Tizen Smart WatchSamsung Gear S2 Manual Tizen Smart Watch
Samsung Gear S2 Manual Tizen Smart Watch
Saima Ashiq
 
Samsung Gear S2 Manual / User Guide
Samsung Gear S2 Manual / User GuideSamsung Gear S2 Manual / User Guide
Samsung Gear S2 Manual / User Guide
manualsheet
 
Samsung Galaxy S II Skyrocket i727 Unlocked GSM Phone
Samsung Galaxy S II Skyrocket i727 Unlocked GSM PhoneSamsung Galaxy S II Skyrocket i727 Unlocked GSM Phone
Samsung Galaxy S II Skyrocket i727 Unlocked GSM Phone
Cellhut
 
Multisim User Manual
Multisim User ManualMultisim User Manual
Multisim User Manual
guestfc76b6
 
License
LicenseLicense
License
Alan Martinez
 
License
LicenseLicense
License
LicenseLicense
License
Blady Mamani
 
Multisim Instruction Manual - Electric circuits
Multisim Instruction Manual - Electric circuitsMultisim Instruction Manual - Electric circuits
Multisim Instruction Manual - Electric circuits
vimala elumalai
 
Digia ii-dvr
Digia ii-dvrDigia ii-dvr
Digia ii-dvr
MATEO ROSAS MORENO
 
Samsung Galaxy S2 (GT-I9100) User Guide
Samsung Galaxy S2 (GT-I9100) User GuideSamsung Galaxy S2 (GT-I9100) User Guide
Samsung Galaxy S2 (GT-I9100) User Guide
rosselli00
 
Lan explorer guide
Lan explorer guideLan explorer guide
Lan explorer guide
Fredy Ricse
 
Storage commander v5 manual
Storage commander v5 manualStorage commander v5 manual
Storage commander v5 manual
Kevin Kerr
 
Storage manager
Storage managerStorage manager
Storage manager
tmmueller
 

Similar to Samsung Galaxy TabPro S Manual / User Guide (15)

Samsung Galaxy View 18.4 Manual / User Guide
Samsung Galaxy View 18.4 Manual / User GuideSamsung Galaxy View 18.4 Manual / User Guide
Samsung Galaxy View 18.4 Manual / User Guide
 
Samsung Gear S3 SM-R770- SM-760- Final User Manual
Samsung Gear S3 SM-R770- SM-760- Final User ManualSamsung Gear S3 SM-R770- SM-760- Final User Manual
Samsung Gear S3 SM-R770- SM-760- Final User Manual
 
Samsung Gear S2 Manual Tizen Smart Watch
Samsung Gear S2 Manual Tizen Smart WatchSamsung Gear S2 Manual Tizen Smart Watch
Samsung Gear S2 Manual Tizen Smart Watch
 
Samsung Gear S2 Manual / User Guide
Samsung Gear S2 Manual / User GuideSamsung Gear S2 Manual / User Guide
Samsung Gear S2 Manual / User Guide
 
Samsung Galaxy S II Skyrocket i727 Unlocked GSM Phone
Samsung Galaxy S II Skyrocket i727 Unlocked GSM PhoneSamsung Galaxy S II Skyrocket i727 Unlocked GSM Phone
Samsung Galaxy S II Skyrocket i727 Unlocked GSM Phone
 
Multisim User Manual
Multisim User ManualMultisim User Manual
Multisim User Manual
 
License
LicenseLicense
License
 
License
LicenseLicense
License
 
License
LicenseLicense
License
 
Multisim Instruction Manual - Electric circuits
Multisim Instruction Manual - Electric circuitsMultisim Instruction Manual - Electric circuits
Multisim Instruction Manual - Electric circuits
 
Digia ii-dvr
Digia ii-dvrDigia ii-dvr
Digia ii-dvr
 
Samsung Galaxy S2 (GT-I9100) User Guide
Samsung Galaxy S2 (GT-I9100) User GuideSamsung Galaxy S2 (GT-I9100) User Guide
Samsung Galaxy S2 (GT-I9100) User Guide
 
Lan explorer guide
Lan explorer guideLan explorer guide
Lan explorer guide
 
Storage commander v5 manual
Storage commander v5 manualStorage commander v5 manual
Storage commander v5 manual
 
Storage manager
Storage managerStorage manager
Storage manager
 

Samsung Galaxy TabPro S Manual / User Guide

  • 1. T A B L E T User Manual Please read this manual before operating your device and keep it for future reference.
  • 2. iLegal Notices Legal Notices WARNING! This product contains chemicals known to the State of California to cause cancer, birth defects, or other reproductive harm. For more information, please call 1-800-SAMSUNG (726-7864). Intellectual Property All Intellectual Property, as defined below, owned by or which is otherwise the property of Samsung or its respective suppliers relating to the SAMSUNG mobile device, including but not limited to, accessories, parts, or software relating thereto (the “mobile device”), is proprietary to Samsung and protected under federal laws, state laws, and international treaty provisions. Intellectual Property includes, but is not limited to, inventions (patentable or unpatentable), patents, trade secrets, copyrights, software, computer programs, and related documentation and other works of authorship. You may not infringe or otherwise violate the rights secured by the Intellectual Property. Moreover, you agree that you will not (and will not attempt to) modify, prepare derivative works of, reverse engineer, decompile, disassemble, or otherwise attempt to create source code from the software. No title to or ownership in the Intellectual Property is transferred to you. All applicable rights of the Intellectual Property shall remain with SAMSUNG and its suppliers. Open Source Software Some software components of this product incorporate source code covered under GNU General Public License (GPL), GNU Lesser General Public License (LGPL), OpenSSL License, BSD License and other open source licenses. To obtain the source code covered under the open source licenses, please visit: opensource.samsung.com Disclaimer of Warranties; Exclusion of Liability EXCEPT AS SET FORTH IN THE EXPRESS WARRANTY CONTAINED ON THE WARRANTY PAGE ENCLOSED WITH THE PRODUCT, THE PURCHASER TAKES THE PRODUCT “AS IS”, AND SAMSUNG MAKES NO EXPRESS OR IMPLIED WARRANTY OF ANY KIND WHATSOEVER WITH RESPECT TO THE PRODUCT, INCLUDING BUT NOT LIMITED TO THE MERCHANTABILITY OF THE PRODUCT OR ITS FITNESS FOR ANY PARTICULAR PURPOSE OR USE; THE DESIGN, CONDITION OR QUALITY OF THE PRODUCT; THE PERFORMANCE OF THE PRODUCT; THE WORKMANSHIP OF THE PRODUCT OR THE COMPONENTS CONTAINED THEREIN; OR COMPLIANCE OF THE PRODUCT WITH THE REQUIREMENTS OF ANY LAW, RULE, SPECIFICATION OR CONTRACT PERTAINING THERETO. NOTHING CONTAINED IN THE INSTRUCTION MANUAL SHALL BE CONSTRUED TO CREATE AN EXPRESS OR IMPLIED WARRANTY OF ANY KIND WHATSOEVER WITH RESPECT TO THE PRODUCT. IN ADDITION, SAMSUNG SHALL NOT BE LIABLE FOR ANY DAMAGES OF ANY KIND RESULTING FROM THE PURCHASE OR USE OF THE PRODUCT OR ARISING FROM THE BREACH OF THE EXPRESS WARRANTY, INCLUDING INCIDENTAL, SPECIAL OR CONSEQUENTIAL DAMAGES, OR LOSS OF ANTICIPATED PROFITS OR BENEFITS. Modification of Software SAMSUNG IS NOT LIABLE FOR PERFORMANCE ISSUES OR INCOMPATIBILITIES CAUSED BY YOUR EDITING OF REGISTRY SETTINGS, OR YOUR MODIFICATION OF OPERATING SYSTEM SOFTWARE. USING CUSTOM OPERATING SYSTEM SOFTWARE MAY CAUSE YOUR DEVICE AND APPLICATIONS TO WORK IMPROPERLY. YOUR CARRIER MAY NOT PERMIT USERS TO DOWNLOAD CERTAIN SOFTWARE, SUCH AS CUSTOM OS. WIF_W700_EN_UM_TN_A20_030416_FINAL
  • 3. iiLegal Notices Samsung Electronics America (SEA), Inc. Address: 85 Challenger Road Ridgefield Park, New Jersey 07660 Phone: 1-800-SAMSUNG (726-7864) Internet Address: samsung.com ©2016 Samsung Electronics America, Inc. Samsung, Samsung Galaxy, are all trademarks of Samsung Electronics Co., Ltd. Note: Screen images are simulated. Appearance of device may vary. Do you have questions about your Samsung Mobile Device? For 24 hour information and assistance, we offer a new FAQ/ARS System (Automated Response System) at: samsung.com/us/support The actual available capacity of the internal memory is less than the specified capacity because the operating system and default applications occupy part of the memory. The available capacity may change when you upgrade the device. Nuance® , VSuite™ , T9® Text Input, and the Nuance logo are trademarks or registered trademarks of Nuance Communications, Inc., or its affiliates in the United States and/or other countries. The Bluetooth® word mark, figure mark (stylized “B Design”), and combination mark (Bluetooth word mark and “B Design”) are registered trademarks and are wholly owned by the Bluetooth SIG. Wi-Fi is a registered trademark of the Wireless Fidelity Alliance, Inc. Microsoft is a registered trademark of the Microsoft Corporation. Legal Information Important legal information can be accessed in writing on the mobile device or at samsung.com READ THIS INFORMATION BEFORE USING YOUR MOBILE DEVICE. Samsung Limited Warranty - This product is covered under the applicable Samsung Limited Warranty INCLUDING ITS DISPUTE RESOLUTION PROCEDURE and your right to opt out of arbitration within 30 calendar days of the first consumer purchase. You may opt out by either sending an email to optout@sea.samsung.com with the subject line “Arbitration Opt-Out” or by calling 1-800-SAMSUNG (726-7864). For more detailed procedures, please refer to the “Dispute Resolution Procedures and Arbitration and Opt-Out” section of the Limited Warranty. Full written terms and detailed information about the warranty and obtaining service are available on the device at: Settings > Extras > Galaxy Settings > Legal information > Samsung legal or you may access the online version of the Health and Safety, Warranty, and End User License Agreement for your device at: English samsung.com/us/Legal/Tablet-HSGuide Spanish samsung.com/us/Legal/Tablet-HSGuide-SP The online version of the End User License Agreement (EULA) for your device can be found online at: samsung.com/us/Legal/SamsungLegal-EULA4
  • 4. iiiTable of Contents Table of Contents Basics....................................................................................1 Read Me First...................................................................2 Package Contents.........................................................3 Device Layout...................................................................4 Battery...................................................................................7 Turning the Device On and Off.............................9 Keyboard Cover............................................................10 Touchscreen....................................................................13 Start Screen.....................................................................15 Lock Screen....................................................................20 Action Center..................................................................21 Search Box.......................................................................22 Entering Text ...................................................................23 Opening Apps................................................................25 Split Screen View.........................................................26 Device and Data Management...........................27 Applications...................................................................28 Installing or Uninstalling Apps.............................29 Scrap Box.........................................................................30 SideSync ...........................................................................31 Samsung Update.........................................................36 Samsung Recovery....................................................37 Online Support (S Services).................................38 Settings..............................................................................39 Introduction......................................................................40 System................................................................................41 Devices...............................................................................42 Network and Internet.................................................43 Personalization ..............................................................44 Accounts............................................................................45 Time and Language...................................................46 Ease of Access.............................................................47 Privacy ................................................................................48 Update and Security..................................................49 Extras...................................................................................50 Appendix...........................................................................51 Troubleshooting.............................................................52 Windows Recovery Function................................55 Removing the Battery ...............................................56
  • 5. Basics Learn about your mobile device hardware, assembly procedures, and how to get started using your new device.
  • 6. 2 Read Me FirstBasics Read Me First Please read this manual before using the device to ensure safe and proper use. • Descriptions are based on the device’s default settings. • Some content may differ from your device depending on the region, service provider, model specifications, or device’s software. • Content (high quality content) that requires high CPU and RAM usage will affect the overall performance of the device. Apps related to the content may not work properly depending on the device’s specifications and the environment that it is used in. • Samsung is not liable for performance issues caused by apps supplied by providers other than Samsung. • Samsung is not liable for performance issues or incompatibilities caused by edited registry settings or modified operating system software. Attempting to customize the operating system may cause the device or apps to work improperly. • Software, sound sources, wallpapers, images, and other media provided with this device are licensed for limited use. Extracting and using these materials for commercial or other purposes is an infringement of copyright laws. Users are entirely responsible for illegal use of media. • Default apps that come with the device are subject to updates and may no longer be supported without prior notice. If you have questions about an app provided with the device, contact a Samsung Service Center. For user-installed apps, contact service providers. • Modifying the device’s operating system or installing softwares from unofficial sources may result in device malfunctions and data corruption or loss. These actions are violations of your Samsung license agreement and will void your warranty. Warnings, Cautions, and Notes Warning: Situations that could cause injury to yourself or others. Caution: Situations that could cause damage to your device or other equipment. Note: Notes, usage tips, or additional information.
  • 7. 3 Package ContentsBasics Package Contents Check the product box for the following items: • Device • Keyboard Cover • Quick start guide • USB charger/travel adapter Notes: • The items supplied with the device and any available accessories may vary depending on the region or service provider. • The supplied items are designed only for this device and may not be compatible with other devices. • Appearances and specifications are subject to change without prior notice. • You can purchase additional accessories from your local Samsung retailer. Make sure they are compatible with the device before purchase. • Use only Samsung-approved accessories. Using unapproved accessories may cause the performance problems and malfunctions that are not covered by the warranty. • Availability of all accessories is subject to change depending entirely on manufacturing companies. For more information about available accessories, visit samsung.com.
  • 8. 4 Device LayoutBasics Device Layout Front View Volume key Power key Front camera Touchscreen Keyboard dock port • Microphone: Record audio and detects voice commands. • Light sensor: Adjust display based on ambient lighting. • Speaker: Plays music and other sounds. • USB charger/Accessory port: Connect the Charger/USB cable (included), and other optional accessories (not included). • Headset jack: Connect an optional headset (not included). • Keyboard dock port: Connect to the Keyboard Cover. Microphone Light sensor Microphone Speaker USB charger/ Accessory port Headset jack • Touchscreen: Touch to navigate the device and perform various actions. • Front camera: Take self-portraits and record videos of yourself. • Power key: Press and hold to turn the device on or off. Press to lock or wake up the screen. • Volume key: Adjust the volume of your device’s sounds.
  • 9. 5 Device LayoutBasics Back View Rear camera Start key Speaker • Start key: Open the Start menu. • Speaker: Plays music and other sounds. • Rear camera: Take pictures and record videos. Notes: • Using a Samsung-approved screen protector is recommended. Unapproved screen protectors may cause the sensors to malfunction. • Do not allow water to contact the touchscreen. The touchscreen may malfunction in humid conditions or when exposed to water.
  • 10. 6 Device LayoutBasics Keyboard Cover Stand Connector Keyboard Touchpad • Keyboard: Enter text with a full QWERTY keyboard. • Touchpad: Control the onscreen cursor. • Connector: Connect the Keyboard cover to the device. • Stand: Fold to create a stand for the device.
  • 11. 7 BatteryBasics Battery Charging the Battery Charge the battery before using it for the first time or when it has been unused for extended periods. Important: Use only Samsung-approved chargers, batteries, and cables. Samsung accessories are designed to maximize battery life. Using other accessories may invalidate your warranty and may cause damage. 1. Connect the USB cable to the USB power adapter, and then plug the end of the USB cable into the USB charger/Accessory port. Caution: Connecting the charger improperly may cause serious damage to the device. Any damage caused by misuse is not covered by the warranty. 2. Plug the USB power adapter into an electric socket. 3. After fully charging, disconnect the device from the charger. First unplug the charger from the device, and then unplug it from the electric socket. Note: Failure to unplug the wall charger before you remove the battery can cause damage to the device. Viewing the Remaining Charging Time ► While charging, on the taskbar, tap Start > Settings > System > Battery saver. Note: The actual charging time may vary depending on the status of your device and the charging conditions. The remaining charging time may not display when you charge the device in very cold or very hot conditions. Reducing the Battery Consumption Your device provides various options that help you conserve battery power. • When you are not using the device, switch to sleep mode by pressing the Power key. • Activate battery saver mode. • Close unnecessary apps. • Deactivate the Bluetooth feature when not in use. • Deactivate the Wi-Fi feature when not in use. • Deactivate auto-syncing of apps. • Decrease the backlight time. • Decrease the screen brightness.
  • 12. 8 BatteryBasics Battery Charging Tips and Precautions • When the battery power is low, the battery icon appears empty. • If the battery is completely discharged, the device cannot be turned on immediately when the charger is connected. Allow a depleted battery to charge for a few minutes before turning on the device. • If you use multiple apps at once, network apps, or apps that need a connection to another device, the battery will drain quickly. To avoid losing power during a data transfer, always use these apps after fully charging the battery. • Using a power source other than the USB power adapter, such as a computer, may result in a slower charging speed due to a lower electric current. • The device can be used while it is charging, but it may take longer to fully charge the battery. • If the device receives an unstable power supply while charging, the touchscreen may not function. If this happens, unplug the charger from the device. • While charging, the device and the charger may heat up. This is normal and should not affect the device’s lifespan or performance. If the battery gets hotter than usual, the charger may stop charging. • If the device is not charging properly, take the device and the charger to a Samsung Service Center. Battery Saver Save the battery power by limiting the device’s functions. ► On the taskbar, tap Start > Settings > System > Battery saver, and then tap the switch under Battery saver is currently to activate it. • To automatically activate battery saver mode when the remaining battery power reaches the preset level, tap Battery saver settings and select an option.
  • 13. 9 Turning the Device On and OffBasics Turning the Device On and Off When you turn on your device for the first time or after performing a data reset, follow the prompts to set up your device. Note: Before turning on your device for the first time, you must connect the device to a power supply. To turn on the device: ► Press and hold the Power key for a few seconds to turn on the device. To turn off the device: ► Tap Start > Power > Shut down. In Tablet mode, tap Power > Shut down. - or ­ Press and hold the Power key until the locked screen appears, and then drag the locked screen downwards. Note: Follow all posted warnings and directions from authorized personnel in areas where the use of wireless devices is restricted, such as airplanes and hospitals. Restarting the Device To restart the device: ► Tap Start > Power > Restart. In Tablet mode, tap Power > Restart. If your device is frozen and unresponsive: 1. Press and hold the Power key for more than 10 seconds until the device turns off. 2. Press and hold the Power key again to restart it.
  • 14. 10 Keyboard CoverBasics Keyboard Cover Introduction Connecting the device to the Keyboard Cover allows you to use a traditional keyboard and touchpad. The touchpad has two click buttons so you can use the touchpad like a mouse. You can also stand your device upright using the stand on the Keyboard Cover. When you close the Keyboard Cover, your device will enter sleep mode. When you open the cover and set the device in position using the stand, the touchscreen will turn on. To change the settings: 1. Touch and hold Start, tap Control Panel > Hardware and Sound > Power Options > Choose what closing the lid does. 2. Configure the When I close the lid: settings. Important: The device contains magnets. The American Heart Association (US) and the Medicines and Healthcare Products Regulatory Agency (UK) both warn that magnets can affect the operation of implanted pacemakers, cardioverters, defibrillators, insulin pumps or other electro medical devices (collectively, “Medical Device”) within the range of 15 cm (6 inches). If you are a user of any of these Medical Devices, DO NOT USE THIS DEVICE UNLESS YOU HAVE CONSULTED WITH YOUR PHYSICIAN. Caution: Do not store your device near magnetic fields. Magnetic stripe cards, including credit cards, phone cards, passbooks, and boarding passes, may be damaged by magnetic fields. Connecting the Keyboard Cover 1. Connect the keyboard dock port at the bottom of the device to the connector on the Keyboard Cover. 2. Attach the stand to the device, and then set the device in position. 2 1 Note: Use care when connecting and removing the tablet from the keyboard case. Hot Keys Use hot keys to easily access features and change settings, such as brightness and volume. ► To use hot keys, simultaneously press and hold the Fn key and press a hot key. If you lock the Fn key, you can use hot keys without pressing the Fn key. ► To lock the Fn key, tap the Fn Lock key.
  • 15. Basics F1 F2 F3 F4 F5 F6 F7 F8 F9 F10 F11 F12 Ctrl Key/Icon Function Launch Settings. Adjust the brightness of the display. Switch between the LCD and an external display when an external display is connected to the device. Lock the touchpad. Mute or unmute the audio. Adjust the volume. Open the search box. If Cortana is supported, Cortana will be activated. Open the task view screen. Enter full screen mode. This function may not be available depending on the app. Activate or deactivate Airplane mode. Perform the right-click function. Touchpad Use the touchpad to move the cursor or select items. The left and right buttons of the touchpad function the same as the left and right buttons of a mouse. Note: Use only your fingers on the touchpad. Basic Touchpad Functions Moving To move the cursor, move your finger on the touchpad. Clicking Tap the touchpad or press the left-click button. or Double-Clicking Double-tap the touchpad or press the left-click button twice. or 11 Keyboard Cover
  • 16. 12 Keyboard CoverBasics Right-Clicking Press the right-click button to perform the right-click function. Dragging To move an item, select and drag it to the target position while pressing and holding the left-click button. Additional Functions Swiping To scroll up, down, left, or right to a desired location, swipe with two fingers on the touchpad. or Spreading and Pinching Spread two fingers apart on a webpage, map, or image to zoom in a part. Pinch to zoom out. or Configuring Touchpad Gestures Configure touchpad gestures to use the touchpad more efficiently. 1. Tap Start > Settings > Devices > Mouse & touchpad. 2. Configure the settings under Touchpad. Locking the Touchpad ► Press and hold the Fn key, and then press the F5 key to lock the touchpad.
  • 17. 13 TouchscreenBasics Touchscreen Important: • Do not allow the touchscreen to come into contact with other electrical devices. Electrostatic discharges can cause the touchscreen to malfunction. • To avoid damaging the touchscreen, do not tap it with anything sharp or apply excessive pressure to it with your fingertips. Note: • The device may not recognize touch inputs close to the edges of the screen, which are outside of the touch input area. • Leaving the touchscreen idle for extended periods may result in afterimages (screen burn-in) or ghosting. Turn off the touchscreen when you do not use the device. • It is recommended to use fingers when you use the touchscreen. Tap To open an app, to select a menu item, to press an onscreen button, or to enter a character using the keyboard on the screen, tap it with your finger. Touch and Hold Touch and hold an item or the screen for more than 2 seconds to access available options. Drag To move an item, touch and hold it and drag it to the target position.
  • 18. 14 TouchscreenBasics Double-Tap Spread and Pinch Double-tap on a webpage or image to zoom in. Double-tap again to return. Spread two fingers apart on a webpage, map, or image to zoom in a part. Pinch to zoom out. or Swipe Swipe to the left or right on the screen to scroll left or right. Swipe upwards or downwards to scroll through a webpage or a list of items.
  • 19. 15 Start ScreenBasics Start Screen The Start screen is the starting point for accessing all of the device’s features. Start menu Taskbar • Taskbar: Access system controls and notifications. • Start menu: Access the Start menu and launch apps. Moving and Removing an Item To move an item: ► Touch and hold an item on the Start screen, and then drag it to a new location. To remove an item: ► Touch and hold the item, and then tap Unpin from taskbar.
  • 20. 16 Start ScreenBasics     Taskbar The bottom area of the screen is the taskbar. You can access the Start menu, launch the search box, view notification icons, and more on the taskbar. Task view Shortcuts Search box Notification icons Start menu • Task view: View open applications as large tiles on the screen. • Shortcuts: Display a running app in the foreground. • Notification icons: View system notifications. • Search box: Search the device using key words. • Start menu: Access the Start menu and launch apps. Managing Shortcuts To add a shortcut: ► On the taskbar, tap Start, touch and hold an item, and then tap More options > More > Pin to taskbar. To delete a shortcut: ► Touch and hold a shortcut, and then tap Unpin from taskbar. To move a shortcut to another location: ► Drag it to a new location. Managing Notification Icons On the taskbar: ► Tap Start > Settings > System > Notifications & actions > Select which icons appear on the taskbar, and then select items to display in the notification area.
  • 21. 17 Start ScreenBasics Start Menu Your account Frequently used apps File Explorer Settings Power All apps • App tiles: Apps display as tiles. • All apps: Access a list of all apps on the device. • Power: Tap to turn the device off or restart it. • Settings: Customize your device settings. From the Start menu, you can access frequently used apps, the All apps list, shortcuts to other locations on your device, and more. On the taskbar: ► Tap Start to open the Start menu. App tiles • File Explorer: View frequently used files and folders. • Frequently used apps: View frequently used apps. • Your account: Access and customize your account. Managing App Tiles You can pin your favorite apps on the app tile area. • To add more apps, tap All apps, touch and hold an app, and then drag it to the app tile area. • To move a tile, touch and hold a tile, and then drag it to a new location. • To adjust the size of a tile, touch and hold a tile, and then tap More options > Resize. • To delete a tile, touch and hold a tile, and then tap Unpin.
  • 22. 18 Start ScreenBasics   Virtual Desktop Virtual desktop allows you to work on various tasks simultaneously from multiple desktops. You can use different desktops for a variety of purposes. Open windows Desktop thumbnails • Desktop thumbnails: Desktops that are available. • Open windows: Currently open windows. ► On the taskbar, tap Task view. - or ­ Swipe from the left edge of the screen. If you have added desktops, the desktop thumbnails will appear on the lower part of the screen. ► Select a thumbnail to activate the desktop. Adding Desktops ► On the desktop thumbnails list, tap New desktop. Deleting Desktops ► On the desktop thumbnails list, tap Delete on a desktop. Moving Windows to Another Desktop 1. On the desktop thumbnails list, touch and hold a thumbnail. The desktop’s currently open windows appear above the thumbnails list. 2. Touch and hold a window to move, and then tap Move to. 3. Select a desktop to move the window.
  • 23. 19 Start ScreenBasics   Switching to Tablet Mode You can switch between PC mode and tablet mode. In Tablet mode, the full Start menu screen will be the Start screen. Switching to tablet mode makes the device more touch-friendly. To switch to tablet mode, on the taskbar: ► Tap Action center > Tablet mode. - or ­ Swipe from the right edge of the screen towards the center of the screen, and then tap Tablet mode. To return to PC mode: ► Tap Tablet mode again.
  • 24. 20 Lock ScreenBasics Lock Screen Pressing the Power key turns off the screen and locks it. Also, the screen turns off and automatically locks if the device is not used for a specified period. ► To unlock the screen, press the Power key and drag the locked screen upwards. You can change the way that you lock the screen to prevent others from accessing your personal information. ► On the taskbar, tap Start > Settings > Accounts > Sign-in options, and then select a screen lock method. The device requires an unlock code whenever unlocking it. Notes: • If the unlock code is forgotten, take the device to a Samsung Service Center to reset it. • You must add a password before you can use the other lock methods. Password Create your Microsoft account password. ► Tap Add, and enter a password, enter the password again to verify it, and then enter a password hint. PIN A PIN consists of numbers only. ► Tap Add, and enter a password, enter the password again to verify it, and then enter a password hint. Picture Password A picture password consists of circles, straight lines, and taps. ► Tap Add, and select an image and draw on the image to create gestures. Pattern Log-In To unlock the screen using a pattern, on the taskbar: 1. Tap Start > Settings > Extras > Galaxy Settings > Pattern Log-in, and then tap On/Off to activate it. 2. Draw a pattern by connecting four dots or more, and then draw the pattern again to verify it.
  • 25. 21 Action CenterBasics Action Center Using the Action Center You can view new notifications from Windows and apps, and use quick action buttons. Quick action buttons allow you to easily adjust frequently used settings, such as activating Wi-Fi. ► To open the Action center panel, on the taskbar, tap Action center. - or - Swipe from the right edge of the screen. You can use the following functions on the Action center panel. Clear Notifications Quick action buttons • Clear: Clear all notifications. • Notifications: Tap a notification and perform various actions. • Quick action buttons: Access common settings quickly from the Action center. Using Quick Action Buttons Tap quick action buttons to activate certain features. To view more detailed settings: ► Touch and hold a button, and then tap Go to settings. To change the top four buttons: ► On the taskbar, tap Start > Settings > System > Notifications & actions, and then change quick actions under Choose your quick actions.
  • 26. 22 Search BoxBasics Search Box Search for a wide variety of content on the device or web with a keyword. ► Tap the search box on the taskbar and enter a keyword in the search field. • To search for files, apps, settings, and more on your device and your OneDrive, tap My stuff. • To search for apps, images, topics and more in the Internet, tap Web.
  • 27. Basics   Entering Text Using the Onscreen Keyboard In tablet mode, the onscreen keyboard appears automatically when you enter text to send emails, create notes, and more. ► To use the onscreen keyboard in PC mode, on the taskbar, tap Keyboard. Note: Text entry is not supported in some languages. To enter text, you must change the input language to one of the supported languages. Icon Function Floating keyboard: Switch to the floating keyboard. Close: Close the keyboard. Return: Break to the next line. Keyboard options: Change the input language or the keyboard layout, or add input languages. Arrows: Move the cursor. Emoticons: Enter emoticons. Numbers and Punctuations: Enter numbers and punctuation marks. &123 Shift: Enter uppercase. For all caps, tap it twice. Delete: Delete a preceding character. Changing the Input Language ► Tap Keyboard > Language preferences > Add a language, and then select a language to add. • When you add languages, you can select other input languages by tapping Keyboard. Additional Keyboard Functions ► Tap Keyboard to use various functions. Standard: Switch to the standard keyboard. • Floating/Split: Switch to the floating or split keyboard. You can move the keyboard to another location by dragging the keyboard. • Handwriting: Switch to handwriting mode.• Note: This feature may not be available depending on the region or service provider. 23 Entering Text
  • 28. 24 Entering TextBasics Copying and Pasting 1. Drag your finger across text to select it. 2. Touch and hold the text to display the options. 3. Tap Copy or Cut. The selected text is copied to the clipboard. 4. Touch and hold where the text is to be inserted and tap Paste. Using the Keyboard Cover When your device is in PC mode and connected to the Keyboard Cover, you can enter text using the traditional keyboard. For more information, see Keyboard Cover.
  • 29. 25 Opening AppsBasics Opening Apps To open an app: ► On the taskbar, tap Start > All apps, and then select an app icon to open it. - or ­ To open an app from the task view screen, on the taskbar, tap Task view, and then select a window. To close an app: ► Tap Close at the top of the app window to close it.
  • 30. 26 Split Screen ViewBasics Split Screen View In tablet mode, you can open two windows at the same time in the split screen view by selecting windows from the task view screen. Note: Some apps may not support this feature. Adjusting the Window Size Drag the handle between the app windows left or right to adjust the size of the windows. 1. On the taskbar, tap Task view to view currently open apps. - or - Swipe from the left edge of the screen. 2. Touch and hold an app and select Snap left or Snap right. 3. Select another app to launch.
  • 31. 27 Device and Data ManagementBasics Device and Data Management Transferring Data Between Devices Move audio, video, image, or other types of files between your tablet and a mobile device. Caution: Do not disconnect the USB cable from the device when you are transferring files. Doing so may cause data loss or device damage. Note: The devices may not connect properly if they are connected via a USB hub. Directly connect devices via your device’s USB charger/Accessory port. 1. Connect a mobile device to your tablet using the USB cable. 2. Transfer files between your tablet and the connected device. Updating the Device Keep your device up to date by downloading and installing updates, such as service packs and patches, for the operating system and other Microsoft apps. The device is set to download and install updates automatically. To check for available updates manually: ► On the taskbar, tap Start > Settings > Update & security > Windows Update > Check for updates. Samsung Update Install and update Samsung apps, drivers, and more on the device easily. ► On the taskbar, tap Start > All apps > Samsung > Samsung Update. • For more information, see Samsung Update. Backing Up and Restoring Data Keep your personal information, app data, and settings safe on your device. You can back up your sensitive information using Samsung Recovery. For more information, see Samsung Recovery. Performing a Data Reset Delete all settings and data on the device. Before performing a factory data reset, ensure you back up all important data stored on the device. For more information, see Backing Up the Current System and Restoring to Factory Default.
  • 32. Applications Learn how to change the way apps display, use apps, and uninstall or disable apps.
  • 33. 29 Installing or Uninstalling AppsApplications   Installing or Uninstalling Apps Store Purchase and download apps. ► On the taskbar, tap Store. - or - On the taskbar, tap Start > Store. Notes: • This app may not be available depending on the region or service provider. • You can install apps provided by Samsung via Samsung Update. • For service requests for apps provided by third-party providers, contact the provider. If you contact a Samsung Service Center, troubleshooting actions in response to service requests may have limitations depending on the app. Installing Apps Browse apps by category or tap the search field to search for a keyword. ► Select an app to view information about it. • To download free apps, tap Free. • To purchase and download apps where charges apply, tap the price and follow the prompts. • To change the auto update settings, tap Your account > Settings, and then tap the Update apps automatically switch to activate or deactivate it. Uninstalling Apps Note: Some apps cannot be uninstalled. 1. On the taskbar, tap Store > All apps. 2. Touch and hold an app, and then tap Uninstall. • Some apps will automatically move to the Uninstall or change a program screen. • Touch and hold an app, tap Uninstall or Uninstall/Change, and then follow the prompts to uninstall the app. 3. Tap Uninstall.
  • 34. 30 Scrap BoxApplications Scrap Box Capture a screenshot while using the device. You can share or edit captured images, view them as a slideshow, and more. Capturing Screenshots 1. When there is content you want to capture, on the taskbar, tap Start > All apps > Scrap Box. 2. Tap Capture. 3. Drag a Circle to resize the selection, and then tap Done. • To auto fit the frame around the content you want, tap Auto-fit. • To exit the selection, tap Cancel. 4. Use tools to edit the image and tap Save to save it. Managing Captured Images On the Scrap Box screen, you can share images, upload them to OneDrive, or delete them. 1. Tap List to view a list of the images you have saved. 2. Tap images, and then use the following options: Share: Share the images with others.• Upload: Upload the images to OneDrive.• Delete: Delete the images.•
  • 35. 31 SideSyncApplications SideSync Introduction SideSync allows you to easily share your screen and data between Samsung Android smartphone and tablet. After you connect your devices, a virtual screen will appear on your tablet. You can check notifications, such as messages, from the dashboard or in pop-up windows. Before You Start The SideSync app must be installed on both devices that you want to connect. • If SideSync is not installed, use one of the following methods to download and install it: - To download and install SideSync on your Samsung Android tablet or smartphone, search for SideSync in Galaxy Apps or Play Store. If your device does not support SideSync, you may not be able to find the app. - To download and install SideSync on your device, visit www.samsung.com/sidesync. On the webpage, you can also find the information about SideSync system requirements. • To connect your smartphone and tablet, they must support Wi-Fi Direct. • To wirelessly connect your smartphone and tablet, they must be connected to the same wireless access point.
  • 36. 32 SideSyncApplications   Connecting to Smartphones Connecting to a Smartphone via Wi-Fi Direct 1. Launch SideSync on both your tablet and smartphone. 2. Tap Start on both devices. • Both devices will scan each other and connect. 3. On your tablet, select your smartphone from the detected devices list. 4. On the smartphone, accept the connection request. • The dashboard will appear on your tablet. Connecting Devices Automatically If two devices have been previously connected, you can set them to reconnect automatically. 1. On the dashboard, tap SideSync > More > Settings > Automatically Stat & Connect. 2. Tap Automatically connect to the device which has been connected before to activate the auto connection feature. Using the Dashboard Launch frequently used apps or view notifications from your smartphone. When you tap a notification, the related app or program will launch. The following is an image of the smartphone’s dashboard on your tablet. Options Virtual smartphone Minimize Close AddActions • Options: Access additional options. • Minimize: Minimize the dashboard. • Close: Close the dashboard. • Add: Add more apps. • Actions: Tap a notification and perform various actions. • Virtual smartphone: Turn on the virtual smartphone screen. You can rearrange or delete apps when you touch and hold an app icon.
  • 37. 33 SideSyncApplications Continuing Media Playback You can pause music or videos on the connected device and continue playback on your tablet. ► On the dashboard, select the play button on the music controller or a video notification. • Playback will pause on your other device and start playing on your tablet. Note: The connected device’s music controller and a video notification will appear only when you play media files via the default music or video app. Sharing a Webpage You can open a webpage on the connected device and display it in the web browser of your tablet. While browsing webpages on the connected device, a web access notification will appear on the dashboard. ► On the dashboard, select the notification. • The same webpage will appear on your tablet. Using the Virtual Screen SideSync mirrors a device’s screen on another device. You can use a device’s functions via the virtual screen. ► On the dashboard, tap Phone screen. Notes: • Some functions may not work through the virtual screen. • The appearance and functions of the virtual screen may vary depending on the connected device. The following is an image of the virtual smartphone screen on your tablet: Minimize Maximize CloseOptions ► Tap Options to use the following options: • Always on top: Set the virtual screen to always stay on top. • Rotate: Rotate the screen. • Window transparency: Adjust the transparency level of the virtual screen. • Capture: Capture a screenshot. • Enable Presentation mode: Turn on the smartphone’s screen to control it from both your tablet and smartphone. This feature may not be available depending on the connected device. • Add to Favorites: Add the current app to the dashboard.
  • 38. 34 SideSyncApplications To move the virtual screen: ► Tap and drag the top of the virtual screen to a new location. To adjust the size of the virtual screen: ► Tap and drag the edge of the virtual screen. Switching Between Screens ► To use your smartphone’s actual screen, press the Power key on your smartphone. • The virtual screen turns off and the smartphone’s screen turns on. ► To return to the virtual screen, tap the virtual smartphone screen on the tablet. • The actual screen turns off and the virtual screen turns on. Note: You can view and control the virtual screen and the connected device’s screen simultaneously. On the virtual screen, tap Options > Enable Presentation mode to turn on the connected device’s screen. This feature may not be available depending on the connected device. Sharing Files and Clipboard Copying files to your tablet 1. Tap More > Edit to enter edit mode on the virtual smartphone screen. 2. Tap files to copy. 3. Touch and hold the selected files, and then drag and drop them outside of the virtual screen. • The files will be copied to the intended location. For example, when you move an image from your smartphone to an open Word document on your tablet, the image will be inserted into the Word document.
  • 39. 35 SideSyncApplications Copying Files to the Smartphone ► Select files on the tablet and drag them to the dashboard or the virtual smartphone screen. • The files will be saved in the SideSync folder. • While composing a message or an email on the virtual screen, the copied files will be attached to the message or email being composed. Note: When the smartphone’s virtual screen and actual screen are turned on, you cannot share files. Sharing Clipboard You can conveniently copy and paste text between the connected devices via the clipboard sharing feature. Copy or cut text from the virtual screen and paste it into a text field outside of the virtual screen, or vice versa. Sharing the Tablet’s Keyboard and Touchpad Use the smartphone’s screen as a dual monitor and control it with your tablet’s keyboard and touchpad. 1. On the dashboard, tap More > Enable Keyboard and mouse sharing. • If the virtual screen is open, it will disappear from your tablet’s screen. 2. Move your finger to the left or right edge on your tablet’s touchpad to move the cursor to your smartphone’s screen. • The cursor will appear on your smartphone’s screen. 3. On the smartphone, use your tablet’s keyboard and touchpad to perform actions, such as entering text, copying and pasting, and selecting items. 4. To control the tablet with the touchpad again, return the pointer to the tablet’s screen.
  • 40. 36 Samsung UpdateApplications Samsung Update Install and update Samsung apps, drivers, and more on the device. 1. On the taskbar, tap Start > All apps > Samsung > Samsung Update. 2. Tap Find Model to find your device. - or ­ Tap the Search field at the top of the screen and enter your model name. 3. Tap your model name and tap your device’s OS version. 4. Select items to update and tap Save.
  • 41. 37 Samsung RecoveryApplications Samsung Recovery Introduction Back up your data and settings, and restore your device to a previously backed up point or to the factory default. Note: • To use this app, you must sign in to the device with an administrator account, or enter the administrator’s password. • When you restore your device, it will erase the data or apps saved after the selected backup point. Ensure you back up important data regularly. Backing Up the Current System Back up important data to an external storage device regularly to prevent restore. 1. Connect an external storage device. 2. On the taskbar, tap Start > All apps > Samsung > Samsung Recovery. 3. Tap Backup Management > New backup. 4. Enter backup information and select the external storage device. 5. Tap Recover. 6. When the backup start window appears, tap OK. 7. When the backup complete window appears, tap OK. • When the backup is finished, the backup image will appear on the backup management screen. Restoring the System Restoring to Factory Default Restore the device to its factory default settings. Before performing a factory data reset, ensure you back up all important data stored on the device. ► On the taskbar, tap Start > All apps > Samsung > Samsung Recovery > Factory image > Recover > Recover > OK. Restoring to a Backup Point Select a backup point saved on an external storage device to restore the device to that point. 1. Connect the external storage device to your device. 2. On the taskbar, tap Start > All apps > Samsung > Samsung Recovery. 3. Tap Backup Management, select a backup image, and then tap Recover. 4. Tap Recover.
  • 42. 38 Online Support (S Services)Applications Online Support (S Services) This service allows you to chat with a technical engineer via the Internet and resolve problems on your device remotely. This service may be limited after the expiration date. 1. On the taskbar, tap Start > All apps > Samsung > Online Support (S Service). 2. Tap Online Support. 3. Enter a question and tap Request.
  • 43. Settings Configure your device’s connections and settings, add accounts, and customize Home screens, apps, and features.
  • 44. 40 IntroductionSettings Introduction Customize settings for functions and apps. You can make your device more personalized by configuring various setting options. ► On the taskbar, tap Start > Settings. • To search for settings by entering keywords, tap the Search field at the top of the screen.
  • 45. 41 SystemSettings System Change the system settings. ► On the Settings screen, tap System: • Display: Change the display settings, such as the font size and the brightness of the display. • Notifications & actions: Select Quick action buttons to display on the action center panel and change the notification settings. • Apps & features: View and manage apps and features on the device. • Multitasking: Change settings for multitasking. • Tablet mode: Switch to tablet mode and change the related settings. • Battery saver: View battery power information and change the power saving options. • Power & sleep: Set the device’s backlight timer. You can also set the Wi-Fi settings for when the device is in sleep mode. • Storage: View memory information for your device and select where new apps and data are saved by default. - The actual available capacity of the internal memory is less than the specified capacity because the operating system and default apps occupy part of the memory. The available capacity may change when you update the device. • Offline maps: Download maps to search for places and get directions offline and change settings for offline maps. • Default apps: Select a default setting for using apps. • About: Access device information and change the device name or other settings.
  • 46. 42 DevicesSettings Devices Change settings related to your connected devices. ► On the Settings screen, tap Devices: • Printers & scanners: Change setting to connect printers and scanners. • Connected devices: Add devices and change settings for metered connections. • Bluetooth: Activate or deactivate the Bluetooth feature. You can search for other Bluetooth devices and pair with them. - Samsung is not responsible for the loss, interception, or misuse of data sent or received via Bluetooth. - Always ensure that you share and receive data with devices that are trusted and properly secured. If there are obstacles between the devices, the operating distance may be reduced. - Some devices, especially those that are not tested or approved by the Bluetooth SIG, may be incompatible with your device. - Do not use the Bluetooth feature for illegal purposes (for example, pirating copies of files or illegally tapping communications for commercial purposes). - Samsung is not responsible for the repercussion of illegal use of the Bluetooth feature. • Mouse & touchpad: Change the mouse and touchpad settings. • Typing: Change the onscreen keyboard settings. • AutoPlay: Activate or deactivate the AutoPlay feature and change related settings. • USB: Set the device to notify you if there are issues when connecting to USB devices.
  • 47. 43 Network and InternetSettings Network and Internet Change the network and Internet settings. ► On the Settings screen, tap Network & Internet: • Wi-Fi: Activate the Wi-Fi feature to connect to a Wi-Fi network and change the related settings. - Turn off Wi-Fi to save the battery when not in use. • Airplane mode: Activate or deactivate Airplane mode. This disables all wireless functions on your device. You can use only non-network services. Important: Make sure the device is turned off during takeoff and landing. After takeoff, you can use the device in Airplane mode if allowed by aircraft personnel. • Data usage: Keep track of your data usage amount. • VPN: Set up and connect to virtual private networks (VPNs). • Dial-up: Configure the dial-up settings. • Proxy: Configure the proxy settings.
  • 48. 44 PersonalizationSettings Personalization Change the display settings, such as a wallpaper, color, and theme. ► On the Settings screen, tap Personalization: • Background: Change the wallpaper and related settings. • Colors: Change the colors of the taskbar, items on the Start menu, and more. • Lock screen: Change the locked screen wallpaper and select items to show on the locked screen. • Themes: Select a theme to apply and change related settings. • Start: Change the settings related to the Start menu.
  • 49. 45 AccountsSettings Accounts Change the account settings. ► On the Settings screen, tap Accounts: • Your email and accounts: Add your Microsoft account and manage your other accounts. • Sign-in options: Change the device sign-in options. You can select a screen lock method to prevent others from accessing your personal information. • Work access: Add a work or school account to access to your organization’s resources, such as apps and network. • Family & other users: Add additional accounts for your family members or other users to use the device with their own personalized settings. • Sync your settings: Change settings to sync your settings with other devices using your Microsoft account.
  • 50. 46 Time and LanguageSettings Time and Language Change settings to control how the device displays the time and date, and select your country or region. Note: If the battery remains fully discharged or is removed from the device, the time and date resets. ► On the Settings screen, tap Time & language: • Date & time: Change the time and date settings. • Region & language: Set your country or region, and add your display languages. • Speech: Change the settings for the text-to-speech feature.
  • 51. 47 Ease of AccessSettings Ease of Access Change settings to improve the device’s accessibility. ► On the Settings screen, tap Ease of Access: • Narrator: Activate the screen reader and change the related settings. When you activate this feature, the device reads aloud all the elements on the screen, such as text and buttons. • Magnifier: Activate a magnifier and change the related settings. When you activate this feature you can zoom in on the screen to view a larger version of the content. • High contrast: Apply high contrast themes to the display to improve screen visibility. • Closed captions: Change the caption settings. • Keyboard: Change the onscreen keyboard settings. • Mouse: Change the pointer and mouse settings. • Other options: Change the additional accessibility settings.
  • 52. 48 PrivacySettings Privacy Change the privacy settings. ► On the Settings screen, tap Privacy: • General: Change the general privacy settings. • Location: Change settings for location information permissions. • Camera: Activate or deactivate the camera feature. Select apps to allow them to use the camera feature. • Microphone: Activate or deactivate the microphones. Select apps to allow them to use the microphones. • Speech, inking, & typing: Set the device to collect personal information, such as contacts and recent calendar events. You can also manage your cloud settings. • Account info: Set apps to access and use your account information. • Contacts: Select apps to allow them to access your contacts. • Calendar: Activate or deactivate the calendar app. Select apps to allow them to access the calendar app. • Call history: Select apps to allow them to access your call logs. • Email: Activate or deactivate the email app. Select apps to allow them to access the email app and send emails. • Messaging: Activate or deactivate the messaging app. Select apps to allow them to access the messaging app and send messages. • Radios: Change the settings to allow apps to use radios, such as Bluetooth. • Other devices: Change the settings for external devices, such as wireless devices or hardware. • Feedback & diagnostics: Set the frequency of Windows feedback and select an option to send the device’s diagnostic and usage data to Microsoft. • Background apps: Select apps to run in the background.
  • 53. 49 Update and SecuritySettings Update and Security Change the Windows update, data backup, and device security settings. ► On the Settings screen, tap Update & security: • Windows Update: Check for available updates and update Windows to the latest version. • Windows Defender: Activate the Windows Defender feature to scan for malware. You can also set the device to send security problems to Microsoft automatically. • Backup: Backup your files using the File History feature. • Recovery: Reset the device or restart it using the advanced start-up feature. • Activation: View the Windows activation information. You can change your Windows product key. • Find My Device: Activate or deactivate the Find My Device feature to help locate the device when lost or stolen. Access the Microsoft webpage to track your device’s last known location and control the device. • For developers: Change the development settings.
  • 54. 50 ExtrasSettings Extras Change additional settings provided by Samsung. ► On the Settings screen, tap Extras > Galaxy Settings: • Battery Life Extender: Set the maximum battery charge level to extend the battery life. • AMOLED: Change the screen mode and the screen brightness timer. • Pattern Log-in: Set a pattern to use it as your screen lock method. • Legal information: View legal information for your device. - Samsung legal: View the Samsung legal information. - Open source license: View the open source license announcement. • About device: Access device information.
  • 56. 52 TroubleshootingAppendix Troubleshooting Before contacting a Samsung Service Center, please attempt the following solutions. Some situations may not apply to your device. When you turn on your device or while you are using the device, it prompts you to enter one of the following codes: • Enter your screen lock Password, PIN, Picture password, or Pattern log in to unlock the screen. Your device displays network or service error messages. • When you are in areas with weak signals or poor reception, you may lose reception. Move to another area and try again. While moving, error messages may appear repeatedly. • You cannot access some options without a subscription. For more information, contact your service provider. Your device does not turn on. • When the battery is completely discharged, your device will not turn on. Fully charge the battery before turning on the device. The touchscreen responds slowly or improperly. • If you attach a screen protector or optional accessories to the touchscreen, the touchscreen may not function properly. • If you are wearing gloves, if your hands are not clean while touching the touchscreen, or if you tap the screen with sharp objects or your fingertips, the touchscreen may malfunction. • The touchscreen may malfunction in humid conditions or when exposed to water. • Restart your device to clear any temporary software bugs. • Ensure that your device software is updated to the latest version. • If the touchscreen is scratched or damaged, visit a Samsung Service Center. Your device freezes or has fatal errors. Try the following solutions. If the problem is still not resolved, contact a Samsung Service Center. • Restarting the device: If your device freezes or hangs, you may need to close apps or turn off the device and turn it on again. • Forcing restart: If your device is frozen and unresponsive, press and hold the Power key for more than 10 seconds until the device turns off. Then, press and hold the Power key again to restart it. - Resetting the device: If the methods above do not solve your problem, perform a factory data reset. To perform a factory data reset: • On the taskbar, tap Start > All apps > Samsung > Samsung Recovery > Factory image > Recover > Recover > Ok. Before performing the factory data reset, remember to make backup copies of all important data stored in the device.
  • 57. 53 TroubleshootingAppendix The Internet is often disconnected. • Ensure that you are not blocking the device’s internal antenna. • When you are in areas with weak signals or poor reception, you may lose reception. You may have connectivity problems due to issues with the service provider’s base station. Move to another area and try again. • When using the device while moving, wireless network services may be disabled due to issues with the service provider’s network. The battery icon is empty. • Your battery is low. Charge the battery. The battery does not charge properly (for Samsung-approved chargers). • Ensure that the charger is connected properly. • Visit a Samsung Service Center and have the battery replaced. The battery depletes faster than when first purchased. • When you expose the device or the battery to very cold or very hot temperatures, the useful charge may be reduced. • Battery consumption increases when you use messaging features or some apps, such as games or the Internet. • The battery is consumable and the useful charge will get shorter over time. Your device is hot to the touch. • When you use apps that require more power or use apps on your device for an extended period of time, your device may feel hot to the touch. This is normal and should not affect your device’s lifespan or performance. • If the device becomes too hot, do not use the device or apps for a while. If the device continues to overheat, contact a Samsung Service Center. Photo quality is poorer than the preview. • The quality of your photos may vary, depending on the surroundings and the photography techniques you use. • If you take photos in dark areas, at night, or indoors, image noise may occur or images may be out of focus. Error messages appear when opening multimedia files. If you receive error messages or multimedia files do not play when you open them on your device, try the following: • Free some memory by transferring files to an external storage device or deleting files from your device. • Ensure that the music file is not Digital Rights Management (DRM)-protected. If the file is DRM-protected, ensure that you have the appropriate license or key to play the file. • Ensure that the file formats are supported by the device. If a file format is not supported, such as DivX or AC3, install an app that supports it. To confirm the file formats that your device supports, visit www.samsung.com. • Your device supports photos and videos captured with the device. Photos and videos captured by other devices may not work properly. • Your device supports multimedia files that are authorized by your network service provider or providers of additional services. Some content circulated on the Internet, such as ringtones, videos, or wallpapers, may not work properly.
  • 58. 54 TroubleshootingAppendix Another Bluetooth device is not located. • Ensure that the Bluetooth wireless feature is activated on your device. • Ensure that the Bluetooth wireless feature is activated on the device you wish to connect to. • Ensure that your device and the other Bluetooth device are within the maximum Bluetooth range (10 meters). If the tips above do not solve the problem, contact a Samsung Service Center. Your device cannot find your current location. • GPS signals may be obstructed in some locations, such as indoors. Set the device to use Wi-Fi or a mobile network to find your current location in these situations. Data stored in the device has been lost. • Always make backup copies of all important data stored in the device. Otherwise, you cannot restore data if it is corrupted or lost. Samsung is not responsible for the loss of data stored on the device. The touchscreen does not turn on when you open the Keyboard Cover. • Ensure that your device connects to the Keyboard Cover, and the device is in correct position using the stand of the Keyboard Cover. For more information, see Keyboard Cover. A small gap appears around the outside of the device case. • This gap is a necessary manufacturing feature and some minor rocking or vibration of parts may occur. • Over time, friction between parts may cause this gap to expand slightly.
  • 59. 55 Windows Recovery FunctionAppendix Windows Recovery Function If the Samsung Recovery app is not supported, reinstall Windows using the Windows recovery function. Important: Reinstalling Windows will erase all apps and data on the device. Back up important apps and data to an external storage device before reinstalling Windows. Note: After Windows is reinstalled, you can install the required Samsung apps. On the taskbar, tap Start > All apps > Samsung > Samsung Update. 1. On the taskbar, tap Start > Settings > Update & security > Recovery. 2. Tap Get started. 3. Tap Keep my files or Remove everything.
  • 60. 56 Removing the BatteryAppendix Removing the Battery The internal battery should not be removed by any party other than samsung-authorized service centers. Removing the battery and accessing the internal components can damage the device and void the warranty. • For your safety, you must not attempt to remove the battery. If the battery is not properly removed, it may lead to damage to the battery and device, cause personal injury, and/or result in the device being unsafe. • Samsung does not accept liability for any damage or loss (whether in contract or tort, including negligence) which may arise from failure to precisely follow these warnings and instructions, other than death or personal injury caused by Samsung’s negligence.