Downloaded 20 times


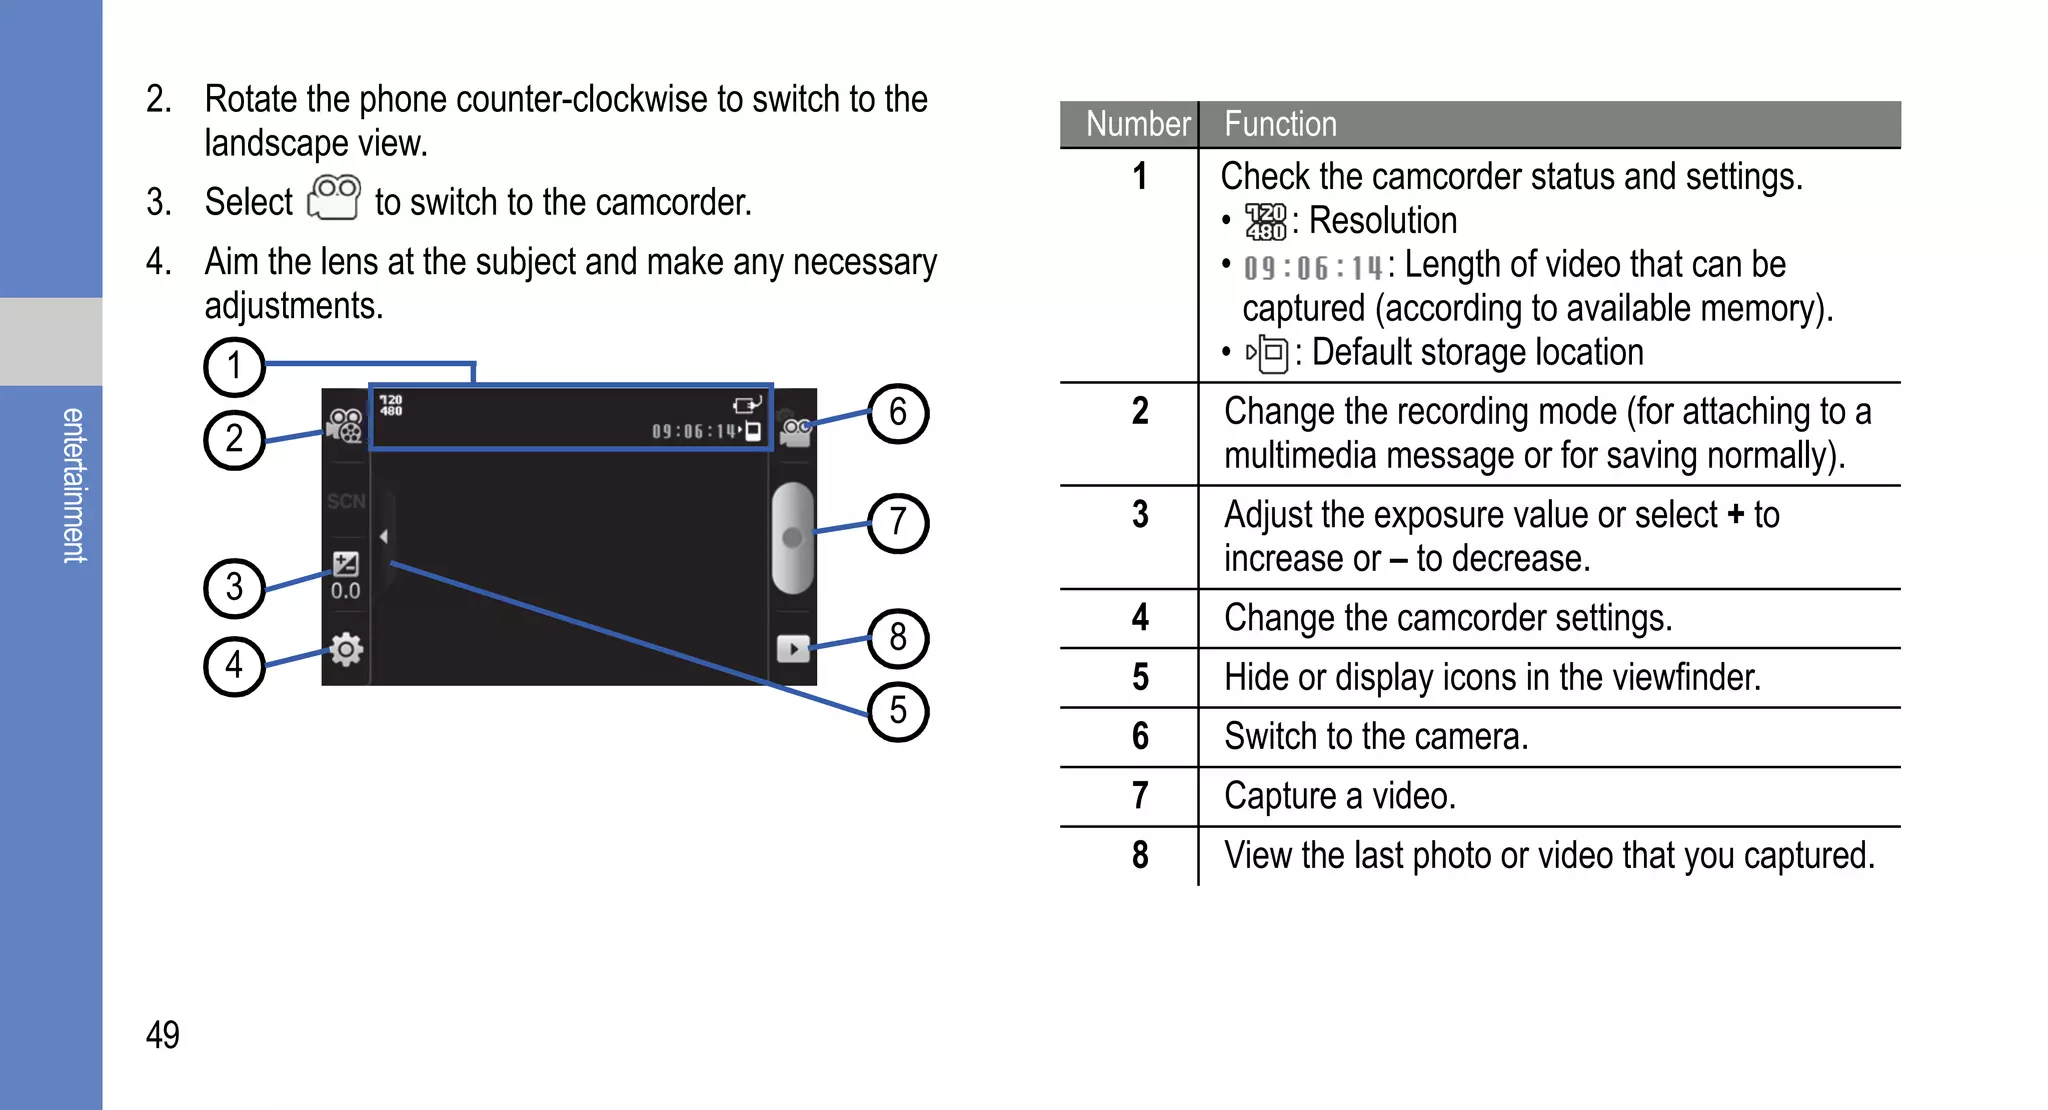
![[] Square brackets: Device keys. For example:
[ ] (represents the Power key).
using this manual
2](https://image.slidesharecdn.com/galaxys-130104164348-phpapp01/75/Samsung-Galaxy-S-User-Manual-13-2048.jpg)


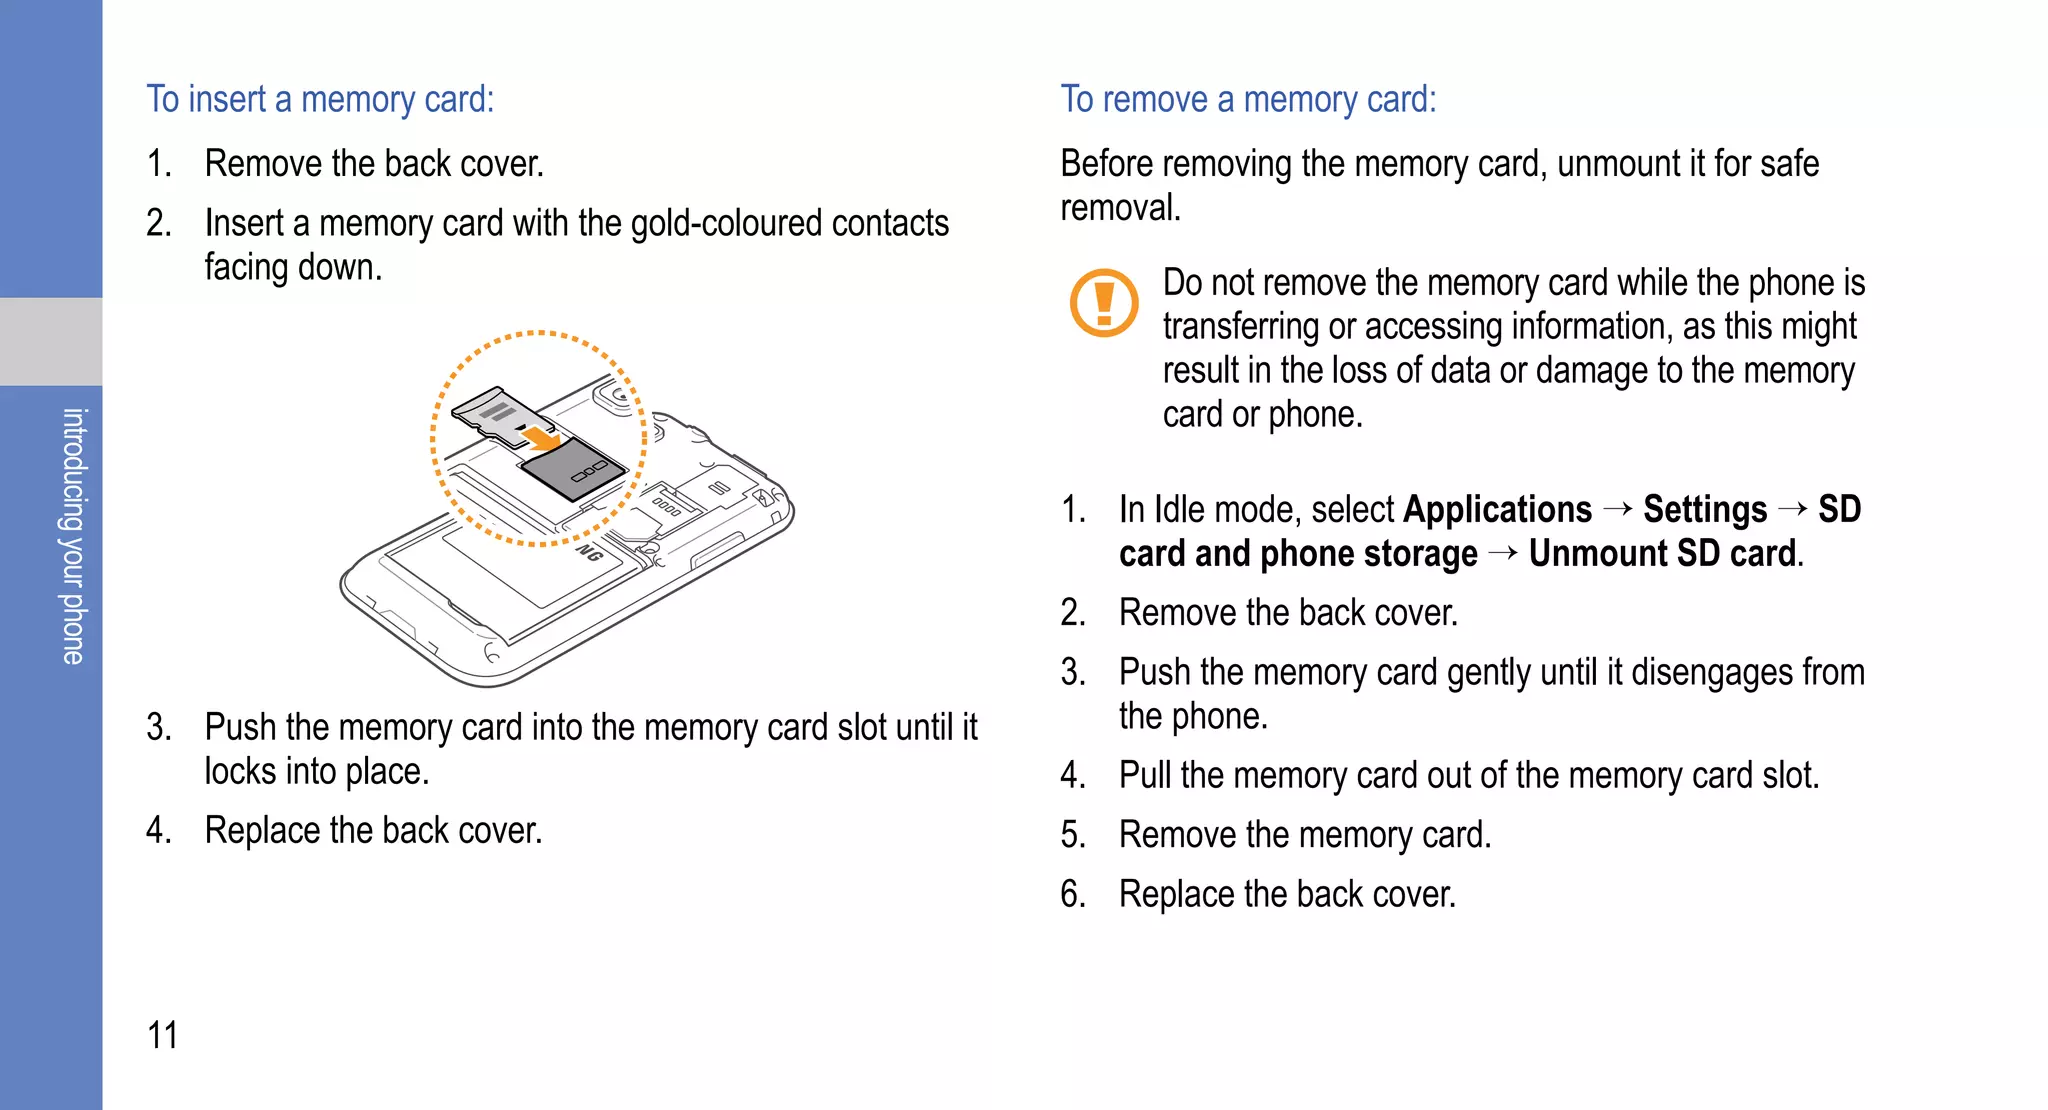
![details, such as your personal identification number (PIN) 3. Insert the SIM card.
and optional services.
To install the SIM card and battery:
1. If the phone is on, press and hold [ ] and select
Power Off to turn it off.
2. Remove the back cover.
introducing your phone
• Place the SIM card in the phone with the gold-
coloured contacts facing down.
• If you do not insert a SIM card, you can only use
your phone’s non-network services and some
menus.
• Do not insert a memory card into the SIM card slot.
Be careful not to damage your fingernails when you
remove the back cover.
7](https://image.slidesharecdn.com/galaxys-130104164348-phpapp01/75/Samsung-Galaxy-S-User-Manual-18-2048.jpg)


![Turn Your Phone On and Off
getting started To turn your phone on, press and hold [ ]. Your phone will
automatically connect to the network. When you turn on
with your phone
your phone for the first time, tap the Android image on the
screen and follow the on-screen instructions to set up your
phone for its first use.
You might be charged for the data connection
because the connection to the Google web server is
always active by default.
To turn your phone off:
1. Press and hold [ ].
2. Select Power off.
• Follow all posted warnings and directions when in
area where the use of wireless devices is restricted,
such as aeroplanes and hospitals.
13](https://image.slidesharecdn.com/galaxys-130104164348-phpapp01/75/Samsung-Galaxy-S-User-Manual-24-2048.jpg)
![• To only use your phone’s non-network services, • For optimal use of the touch screen, remove the
switch to Flight mode. Press and hold [ ] and screen protection film before using your phone.
select Flight mode. • Your touch screen has a layer that detects small
electrical charges emitted by the human body. For
Use the Touch Screen best performance, tap the touch screen with your
fingertip.
Your phone’s touch screen lets you easily select items or
perform functions. To control the touch screen:
getting started with your phone
• To avoid scratching the touch screen, do not use • Tap: Tap once with your finger to select or launch a
sharp tools. menu, option, or application.
• Do not allow the touch screen to come into contact • Tap and hold: Tap an item and hold it for more than 2
with other electrical devices. Electrostatic seconds to open a pop-up option list.
discharges can cause it to malfunction. • Scroll: Tap and drag your finger up, down, left, or right to
• Do not allow the touch screen to come into contact move to items on the list.
with water. The touch screen might malfunction in • Drag and drop: Tap and hold your finger on an item and
humid conditions or when exposed to water. then drag your finger to move the item.
14](https://image.slidesharecdn.com/galaxys-130104164348-phpapp01/75/Samsung-Galaxy-S-User-Manual-25-2048.jpg)
![• Double-tap: Tap twice quickly with your finger to zoom in Get to Know the Idle Screen
or out while viewing photos or web pages.
When your phone turns on or is in Idle mode, the Idle screen
• Your phone turns off the touch screen when you do is displayed. From this screen, you can access various
not use the phone for a specified amount of time. To features and status information.
turn on the touch screen, press [ ] or [ ]. The Idle screen has 7 panels. Scroll left or right to a panel
• You can also adjust the backlight time. In Idle mode, on the Idle screen. You can also select a dot on the top of
select Applications → Settings → Sound and the screen to move to the corresponding panel of the Idle
getting started with your phone
display → Screen timeout. screen.
To lock or unlock the touch screen and keys: Add items to the Idle screen:
You can lock the touch screen and keys to prevent any You can customize the Idle screen by adding shortcuts to
unwanted phone operations. applications or items in applications, widgets, or folders.
• To lock, press [ ]. To add items to the Idle screen:
• To unlock, turn on the touch screen by pressing [ ] or 1. Press [ ] → Add.
[ ], and then flick the grey window with your finger.
2. Select the item category and then select an item:
• Samsung Widgets: Add Samsung widgets to the
Idle screen.
15](https://image.slidesharecdn.com/galaxys-130104164348-phpapp01/75/Samsung-Galaxy-S-User-Manual-26-2048.jpg)
![• Wi-Fi: Activate or deactivate the WLAN connection Access Applications
feature. ► p. 77
• Bluetooth: Activate or deactivate the Bluetooth wireless To access your phone’s applications:
connection feature. ► p. 75 1. In Idle mode, select Applications to access the
• GPS: Activate or deactivate GPS mode. application list.
• Vibration: Activate or deactivate Vibration mode. 2. Scroll left or right to display the application screens.
You can also select a dot at the top of the screen to
getting started with your phone
Add or remove panels from the Idle screen move to the corresponding main menu screen.
You can add or remove panels from the Idle screen to 3. Select an application.
organise widgets according to your preferences and needs.
• When you use applications provided by Google,
1. In Idle mode, press [ ] → Edit. you must have a Google account. If you do not
2. Select to remove a panel or to add new panels. have a Google account, you will need to create one.
3. Press [ ] → Save. • You can add a shortcut to an application by tapping
and holding an application icon in the application
list. You can then move the icon on the Idle screen
as needed.
17](https://image.slidesharecdn.com/galaxys-130104164348-phpapp01/75/Samsung-Galaxy-S-User-Manual-28-2048.jpg)
![4. Press [ ] to return to the previous screen or press screen. You can also move commonly used applications
[ ] to return to the Idle screen. next to Home.
Your phone has a built-in motion sensor that detects 4. Press [ ] → Save.
its orientation. While using some features, if you To access recent applications:
rotate the phone the interface automatically switches
to landscape view. To set the interface to retain the 1. Press and hold [ ] to open a list of applications that
portrait orientation when the phon is rotated, select you have recently accessed.
getting started with your phone
Settings → Sound and display → Orientation . 2. Select the application that you want to access.
To organize applications: Customize Your Phone
You can reorganise the applications in the application list by Get more from your phone by customizing it to suit your
changing their order or by grouping them into categories to needs.
suit your needs.
To set the current date and time:
1. In the application list, press [ ] → Edit.
1. In Idle mode, select Applications → Settings → Date
2. Tap and hold an application. and time.
3. Drag the application icon to a new location. 2. Set the date and time and change other options as
You can move an application icon to another main menu needed.
18](https://image.slidesharecdn.com/galaxys-130104164348-phpapp01/75/Samsung-Galaxy-S-User-Manual-29-2048.jpg)
![To turn the touch tone on or off: 2. Select a ringtone in the list and select OK.
• In Idle mode, select Applications → Settings → Sound To activate animation for switching windows:
& display → Audible selection.
• In Idle mode, select Applications → Settings → Sound
To adjust the volume of the ringtones: & display → Animation → Some Animations or All
Animations.
• In the Idle mode, press the Volume key up or down to
adjust the ringtone volume. To select wallpaper for the Idle screen:
getting started with your phone
To switch to or from Silent mode: 1. In the Idle mode, press [ ] → Wallpaper and select
an option.
To mute or unmute your phone, do one of the following:
2. Select an image.
• In the Idle mode, select Phone → Keypad and tap and
hold #. 3. Select Save or Set wallpaper.
• In Idle mode, press and hold [ ] and select Silent
mode.
To change your ringtone:
1. In Idle mode, select Applications → Settings →
Sound & display → Voice call ringtone or Video call
ringtone.
19](https://image.slidesharecdn.com/galaxys-130104164348-phpapp01/75/Samsung-Galaxy-S-User-Manual-30-2048.jpg)


![2. Pause on the second character for a moment and then Number Function
drag your finger to the next character. 2 Switch between Symbol mode and ABC/Number
3. Continue until you have finished the word. mode.
4. Release the finger on the last character. The word is 3 Delete characters.
inserted into the text input field. 4 Insert a space.
5. Repeat steps 1-4 to complete your text.
Tap and hold each key to enter additional characters. • To hide the Swype keyboard, press [ ].
getting started with your phone
6. You can also use the following keys: • To view the Help information about using the Swype
keyboard, tap and hold .
Using the Samsung keypad
1 3 To enter text using the Samsung keypad:
2 4 1. Select and select a text input method.
You can select one of key input methods (QWERTY or
Number Function traditional keypad) or the handwriting input methods.
1 Change case. 2. Enter text by selecting alphanumeric keys or by writing
on the touch screen.
23](https://image.slidesharecdn.com/galaxys-130104164348-phpapp01/75/Samsung-Galaxy-S-User-Manual-34-2048.jpg)

![Android Market 4. Select Install (for free items) or Buy.
• If you select Install, select OK to download the item
Android Market provides you with an easy way to shop for immediately.
games and mobile applications. Based on the Android
• If you select Buy, you need to enter your credit card
platform, your phone’s functionality can be extended by
information. Follow the on-screen instructions.
installing additional applications.
To uninstall applications:
• This feature might not be available in your region.
1. In the Android Market home screen, press [ ]→
getting started with your phone
• Your phone will save user files from downloaded
applications to the internal moviNANDTM memory. Downloads.
To save the files in the memory card, connect your 2. Select the item that you want to delete.
phone to a PC and copy them from moviNAND to 3. Select Uninstall → OK.
the memory card.
To install applications:
1. In Idle mode, select Applications → Market.
2. Select Accept in the terms and conditions page.
3. Select an item category and then select an item.
25](https://image.slidesharecdn.com/galaxys-130104164348-phpapp01/75/Samsung-Galaxy-S-User-Manual-36-2048.jpg)
![Download Files from the Web To view the download history:
When you download files or web applications from the web, 1. In Idle mode, select Applications → Internet.
your phone stores them in a memory card. 2. Press [ ] → More → Downloads.
Files that you download from the web can include 3. To clear the download history list, press [ ] → Clear
viruses that will damage your phone. To lessen your list.
risk, only download from sources that you trust. To cancel downloading, press [ ] → Cancel all
downloads.
getting started with your phone
Some media files include Digital Rights Management
to protect copyrights. This protection might prevent
you from downloading, copying, modifying, or Synchronize Data
transferring some files. You can synchronize data (Google messages, calendar, and
contacts) with the Google web server and back up or restore
To download files from the web: your data.
1. In Idle mode, select Applications → Internet. When the synchronization is complete, your phone stays
2. Search for a file or application and download it. connected to the web. If any change is made on the web,
To install applications downloaded from websites other than the updated information will appear on your phone and
Android Market, you must select Settings → Applications automatically will begin synchronization, and vice-versa.
→ Unknown sources.
26](https://image.slidesharecdn.com/galaxys-130104164348-phpapp01/75/Samsung-Galaxy-S-User-Manual-37-2048.jpg)
![• This feature might not be available in your region. (Google Mail, Calendar, and Contacts), the updated
• To synchronize with the Google web server, you information will appear on your phone, and vice-versa.
must have a Google account. If you do not have a 1. In Idle mode, select Applications → Settings →
Google account, sign up for a Google account by Accounts and sync.
selecting Create on the first setup screen.
2. Select Auto-sync.
To set up a server account: 3. Select the applications that you want to synchronise.
To exclude applications from automatic synchronisation,
getting started with your phone
1. In Idle mode, select Applications → Settings →
clear the checkbox next to the application that you do not
Accounts and sync.
want to synchronise.
2. Select Add account and select an account type.
To synchronise data manually:
3. Follow the on-screen instructions to complete the
account setup. 1. In Idle mode, select Applications → Settings →
For online community services, such as Facebook or Accounts and sync.
MySpace, enter your user name and password and 2. Select an account.
select Log in. 3. Press [ ] → Sync now. Your phone will start
To activate automatic sync: synchronising the data you have selected for
synchronisation.
If you add or edit data in any of the applications on the web
27](https://image.slidesharecdn.com/galaxys-130104164348-phpapp01/75/Samsung-Galaxy-S-User-Manual-38-2048.jpg)


![• Activate the speakerphone: Select Speaker. • Connect the current caller to the caller placed on
hold: Press [ ] → Transfer. You will be disconnected
In noisy environments, you might have difficulty from the call.
hearing some calls while using the speakerphone. For
better audio performance, use the normal phone
Use options during a video call
mode.
You can use the following options while a video call is in
• Turn off the microphone: Select Mute so that the caller progress:
communication
cannot hear you. • Activate the speakerphone: Select Speaker.
• Use a Bluetooth headset: Select Headset to use a • Turn off the microphone: Select Mute so that the caller
Bluetooth headset to listen and talk to the caller. cannot hear you.
• Open the phonebook: Press [ ] → Contacts. • Hide your image from the caller, press [ ] → Hide
• Add a memo: Press [ ] → Memo. me.
• Switch between two calls: Select Swap. • Select an alternate image: Press [ ] → Outgoing
• Make a multiparty call (conference call): Make or image.
answer a second call and select Merge when connected • Open the dialling screen: Press [ ] → Dialpad.
to the second party. Repeat to add more parties. You • Use a Bluetooth headset: Press [ ] → Switch to
must subscribe to the multiparty call service to use this headset to listen and talk to the other party using a
feature. Bluetooth headset.
31](https://image.slidesharecdn.com/galaxys-130104164348-phpapp01/75/Samsung-Galaxy-S-User-Manual-42-2048.jpg)
![• Switch between the front and rear camera lens: Press 2. Select the missed call.
[ ] → Switch camera.
• Customise video call settings: Press [ ]→ Use additional features
Settings and then select an option (Preset image, You can use various other call-related features, such as
Show me, and Use call fail options). auto rejection, call diverting, or call barring.
• Use the other party's image: Tap and hold the other
To set auto rejection and set up the reject list:
party's image. You can capture an image of the screen or
record the video call. You can use auto rejection to automatically reject calls from
communication
• Use your image: Tap and hold your image. You can specific numbers.
adjust the brightness, zoom in or out on the image using 1. In Idle mode, select Applications → Settings → Call
the rear camera lens, or apply the blur effect to your settings → All calls → Auto reject.
image using the front camera lens.
2. Select Enable auto reject to activate auto rejection.
View and dial missed calls 3. Select Auto reject list.
Your phone will display calls you have missed. 4. Press [ ] → Create.
To dial the number of a missed call: 5. Enter a number to reject and select Save.
6. To add more numbers, repeat steps 4-5.
1. Open the shortcut panel.
32](https://image.slidesharecdn.com/galaxys-130104164348-phpapp01/75/Samsung-Galaxy-S-User-Manual-43-2048.jpg)

![1. In Idle mode, select Applications → Settings → Call 3. Select a log to view its details.
settings → Voice call → Call waiting.
From the detail view, you can dial the number, send a
2. Your setting will be sent to the network. message to the number or add the number to the
This feature is only available for voice calls. phonebook or reject list.
Text and Multimedia Messages
To view call logs:
communication
You can create an send text (SMS), multimedia (MMS), or
You can view logs of your calls and filter them by their types. email messages, and view or manage messages that you
have sent or received. For instructions on entering text, see
1. In Idle mode, select Phone → Call log.
p. 22.
2. Press [ ] → View by and select an option for sorting
the call logs. You might incur additional charges for sending and
receiving messages while outside your home service
From the call logs, you can make a call or send a area. For details, contact your service provider.
message directly to a contact by quickly flicking the
contact to the left or right To send a text message:
1. In Idle mode, select Messaging → New message.
2. Select Contacts.
34](https://image.slidesharecdn.com/galaxys-130104164348-phpapp01/75/Samsung-Galaxy-S-User-Manual-45-2048.jpg)
![You can enter a number manually or select one from a When you enter an email address, the phone will
recent recipient or contact group by selecting another convert the message into a multimedia message.
button. 4. Select Type to compose and enter your message text.
3. Select the checkboxes next to the contacts and select To insert emoticons, press [ ] → Insert smiley.
Add.
5. Press [ ] → Attach, select an option, and then add
4. Select Type to compose and enter your message text. an item.
To insert emoticons, press [ ] → Insert smiley. 6. Press [ ] → Add subject and add a subject for the
communication
5. Select Send to send the message. message.
To send a multimedia message: 7. Select Send to send the message.
1. In Idle mode, select Messaging → New message. To view text or multimedia messages:
2. Select Contacts. 1. In Idle mode, select Messaging.
You can enter a number manually or select one from a Your messages are grouped into message threads by
recent recipient or contact group by selecting another contact.
button. 2. Select a contact.
3. Select the checkboxes next to the required contacts and 3. Select a text or multimedia message in the message
select Add. thread.
35](https://image.slidesharecdn.com/galaxys-130104164348-phpapp01/75/Samsung-Galaxy-S-User-Manual-46-2048.jpg)
![4. For a multimedia message, select to view the Google Mail™
attachment.
You can retrieve new email messages from Google MailTM
Listen to voicemail messages to your Inbox. When you access this application, the Inbox
screen appears. The total number of unread messages
If you have set missed calls to be diverted to voicemail, displays in the title bar and the unread messages display in
callers can leave a voice message when you do not answer bold. If you have labelled a message, its label appears in a
incoming calls. coloured rectangle on the message.
communication
To access your voicemail inbox and listen to voicemail This feature might not be available in your region.
messages:
1. In Idle mode, select Phone → Keypad, and tap and
hold 1. To send an email message:
2. Follow the instructions on the voicemail server. 1. In Idle mode, select Applications → Google Mail.
You must save the voicemail server number before 2. Press [ ] → Compose.
accessing the server. Your service provider can give
3. Enter a name or address in the recipient field.
you the number.
4. Enter a subject and message.
36](https://image.slidesharecdn.com/galaxys-130104164348-phpapp01/75/Samsung-Galaxy-S-User-Manual-47-2048.jpg)
![5. To attach an image file, press [ ] → Attach an select • Older: View an older message.
a file.
6. Select Send to send the message. Organize email by labels
To view email messages: You can organize your email by labelling your messages or
adding stars to mark important messages. You can then sort
1. In Idle mode, select Applications → Google Mail. messages by label filter.
2. Select an email message. To add a label to a message:
communication
In the message view, use the following options:
1. In the Inbox screen, touch and hold a message.
• Reply: Reply to the message. 2. Select Change labels.
• Reply to all: Reply to the message including all
3. Select a label to add and select OK.
recipients.
• Forward: Forward the message to other recipients. To add a star to a message:
• Preview: Select Preview next to the attachment item to 1. In the Inbox screen, touch and hold a message.
view the attachment. 2. Select Add star. The star icon next to the message is
• Download: Save the attachment on your phone. activated.
• Archive: Archive the message.
• Delete: Delete the message.
37](https://image.slidesharecdn.com/galaxys-130104164348-phpapp01/75/Samsung-Galaxy-S-User-Manual-48-2048.jpg)
![To filter messages: created more than two accounts, you can switch between
email accounts. Press [ ] → Accounts and select the
1. In the Inbox screen, press [ ] → View labels.
one from which you want to retrieve the messages.
2. Select the label of the messages that you want to view.
To send an email message:
Email 1. In Idle mode, select Applications → Email and then
select an email account.
You can send or view email messages using your personal
2. Press [ ] → Compose.
communication
or company email account.
3. Select Contacts.
To set up an email account:
You can enter an email address manually or select one
1. In Idle mode, select Applications → Email. from the recent recipients or groups by selecting
2. Enter your email address and password. another button.
3. Select Next (for general email accounts, such as 4. Select the Cc/Bcc field to add more recipients.
Google Mail and Yahoo) or Manual setup (for other 5. Select the subject field to enter a subject.
company email accounts). 6. Select the text input field to enter your email text.
4. Follow the on-screen instructions. 7. Select Attach and attach a file.
When you have finished setting up the email account, the You can select an image, video, or sound clip.
email messages are downloaded to your phone. If you have
38](https://image.slidesharecdn.com/galaxys-130104164348-phpapp01/75/Samsung-Galaxy-S-User-Manual-49-2048.jpg)
![8. Select Send to send the message. • Delete: Delete the message.
If you are offline or outside your service area, the • Reply all: Reply to the message including all recipients.
message will be held in the message thread list until • Open: View an attachment.
you are online and in your service area. • Save: Save the attachment on your phone.
• [ ] → Forward: Forward the message to other
To view email messages: recipients.
When you open an email account, you can view previously
communication
retrieved emails offline or connect to the email server to Google Talk™
view new messages. After you retrieve email messages,
you can view them offline. You can send instant messages to your friends or family
using Google TalkTM.
1. In Idle mode, select Applications → Email and then
select an email account. To add friends to your Friends list:
2. Press [ ] → Refresh to update the message list. 1. In Idle mode, select Applications → Talk
3. Select an email message. The friend list shows all of your Google Talk contacts at
a glance.
In the message view, use the following options:
2. Press [ ] → Add friend.
• Reply: Reply to the message.
39](https://image.slidesharecdn.com/galaxys-130104164348-phpapp01/75/Samsung-Galaxy-S-User-Manual-50-2048.jpg)
![3. Enter the email address of the friend and select Send Social Hub
invitation.
You can access Social HubTM, the integrated
When your friend accepts the invitation, they are added to
communication application for email, messages, instant
your friend list.
messages, contacts, or calendar information. Visit http://
To start a chat: socialhub.samsungmobile.com for more details.
1. In Idle mode, select Applications → Talk To access Social Hub:
2. Select a friend from the Friends list. The chat screen
communication
1. In Idle mode, select Applications → Social Hub.
opens.
2. Check and use the contents delivered from the Social
3. Enter your message and select Send. Hub.
To insert emoticons, press [ ] → More → Insert
smiley.
4. To switch between active chats, press [ ] → Switch
chats.
5. To end the chat, press [ ] → End chat.
40](https://image.slidesharecdn.com/galaxys-130104164348-phpapp01/75/Samsung-Galaxy-S-User-Manual-51-2048.jpg)


![8. Select to switch back to album view.
• WOW HD™ significantly improves the playback
quality of audio, delivering a dynamic 3D To create a playlist:
entertainment experience with deep, rich bass and
1. In Idle mode, select Applications → Music Player.
high frequency clarity for crisp detail.
2. Select Playlists.
To access the album list: 3. Press [ ] → Create.
1. In Idle mode, select Applications → Music Player. 4. Enter a title for the new playlist and select Save.
entertainment
2. Rotate the phone counter-clockwise to switch to the 5. Select Add music.
landscape view. The display switches to the album view.
6. Select the files that you want to include and select Add.
3. Scroll left or right to an album. During playback, you can add files to a playlist by pressing
4. Select the album image to begin playback. [ ] → Add to playlist.
5. Select or to pause or resume the current To add songs to the quick list:
playback.
You can add songs to the quick list and save them as a
6. Select to switch to circle view. playlist. During playback, press [ ] → Add to quick list
7. Drag around the circle to select a track. to add the current song to the quick list.
To switch to another category, select All and then select
a category.
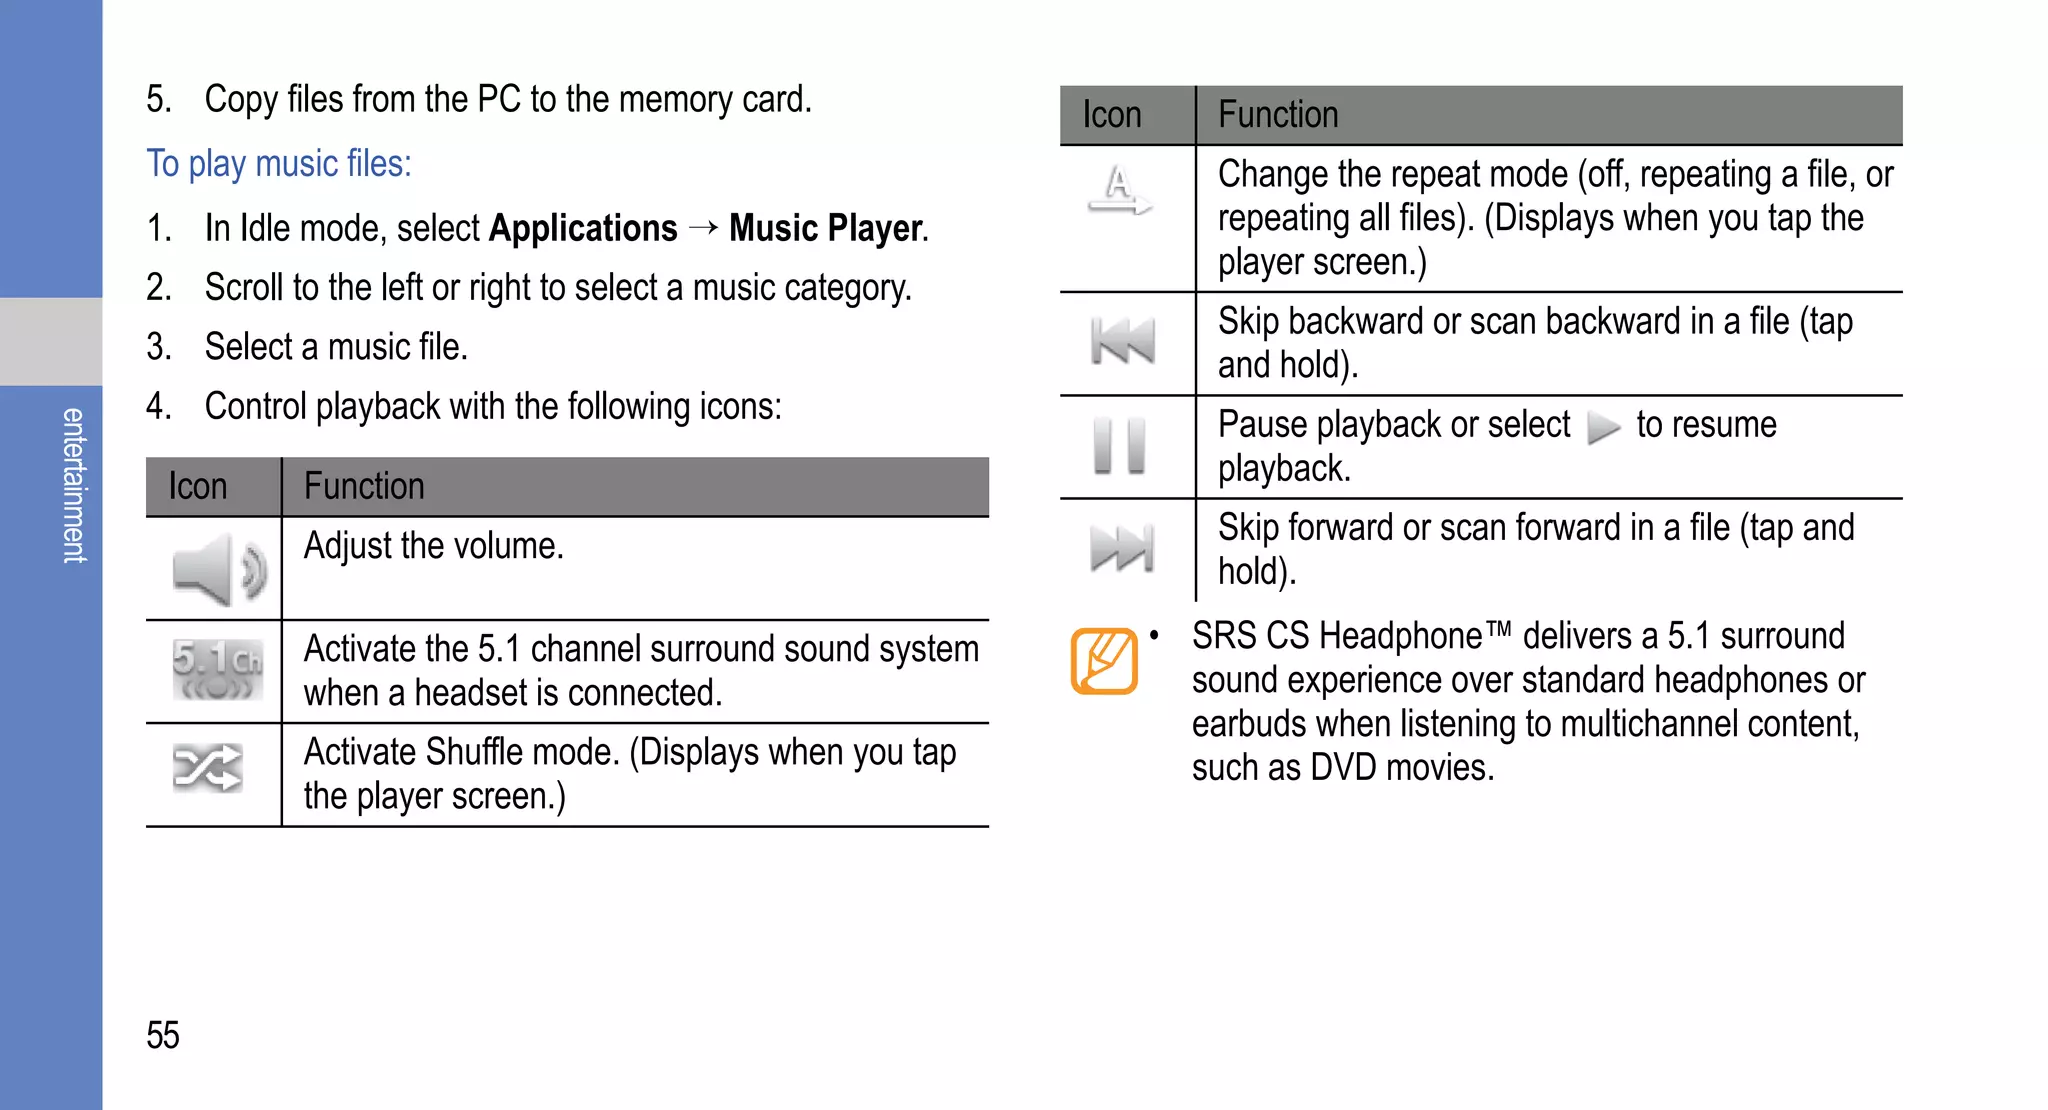
56](https://image.slidesharecdn.com/galaxys-130104164348-phpapp01/75/Samsung-Galaxy-S-User-Manual-67-2048.jpg)
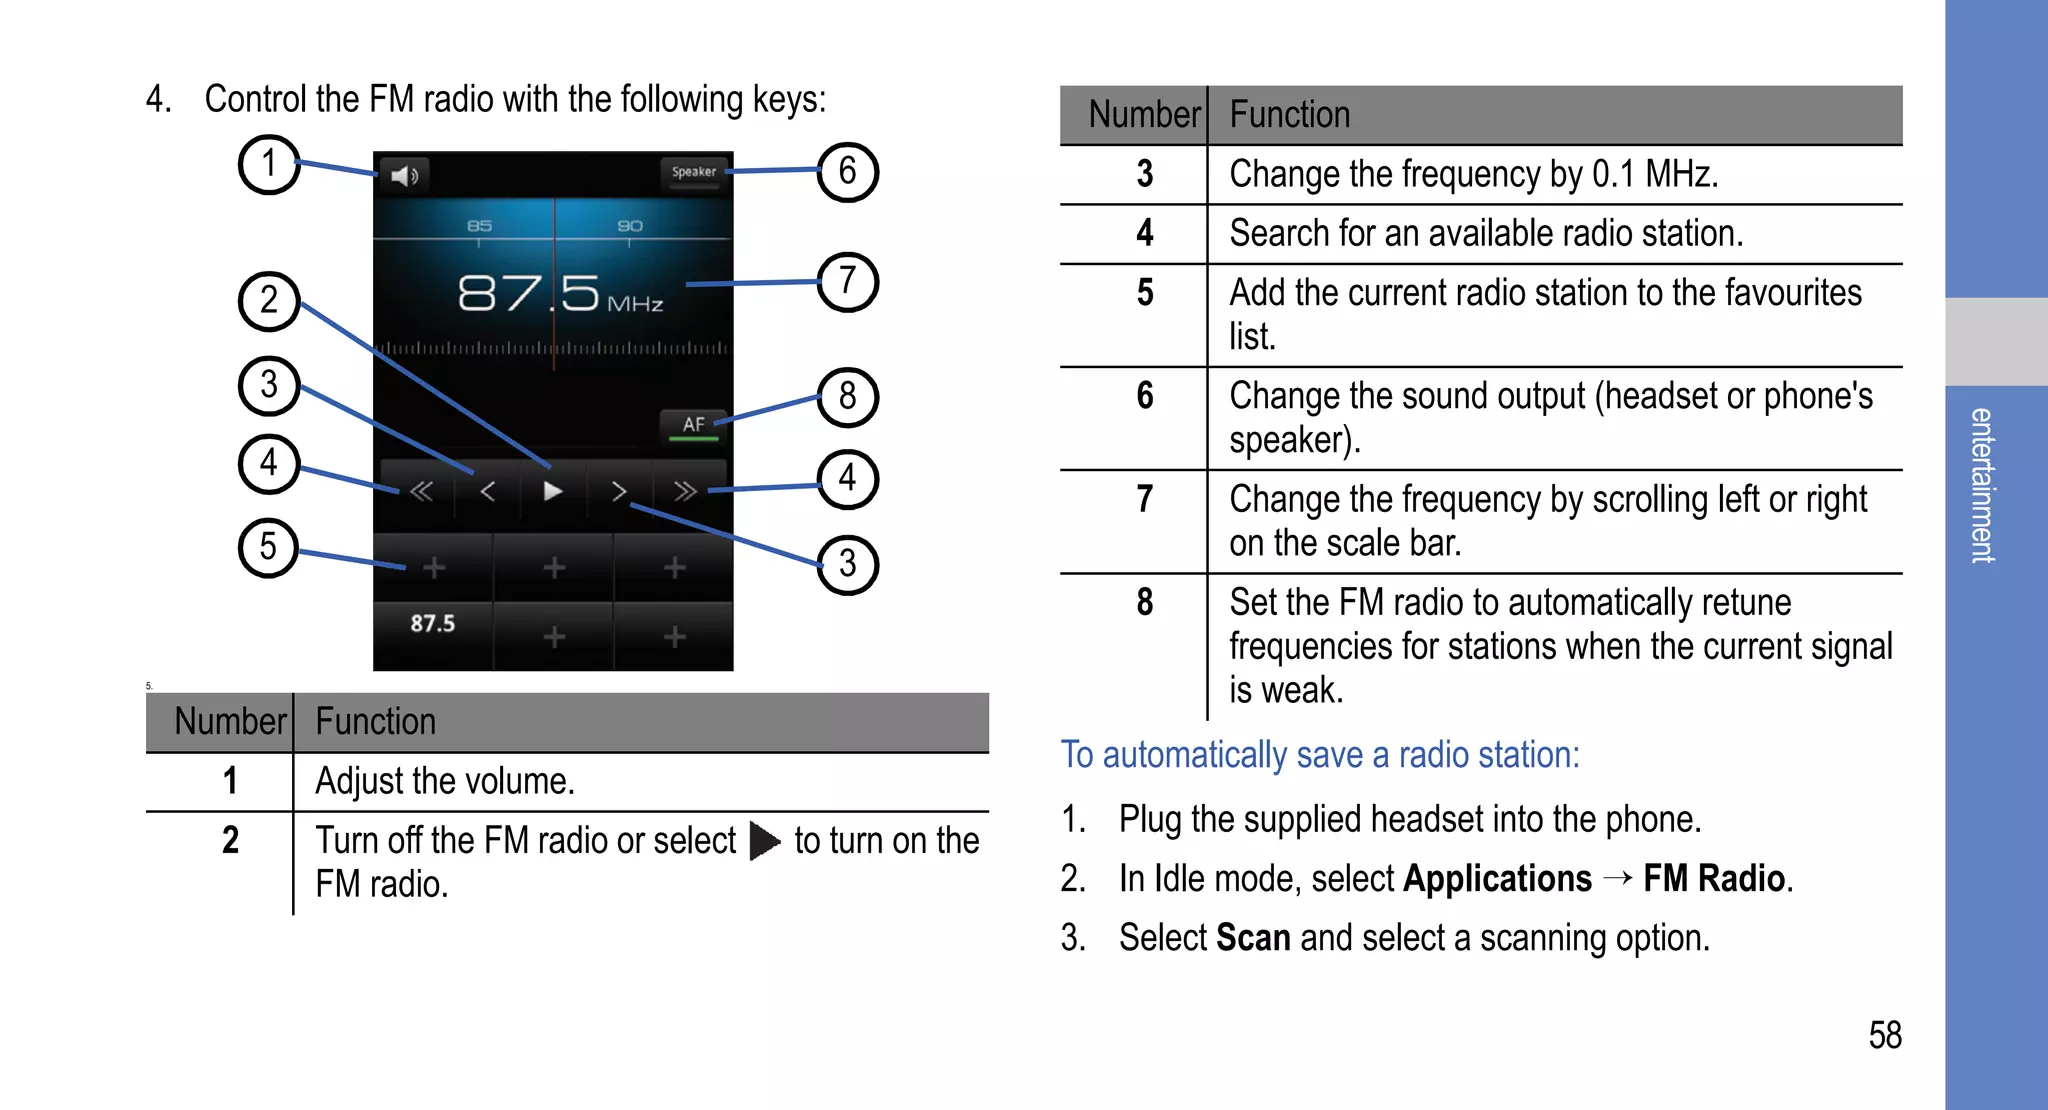
![To go to the quick list, from the music player main screen, FM Radio
select Playlists → Quick list. To save the quick list as a
playlist, press [ ] → Save as playlist. You can listen to music and news on the FM radio. To listen
to the FM radio, you must connect the supplied headset,
To customise music player settings: which serves as the radio antenna.
1. In Idle mode, select Applications → Music Player. To listen to the FM radio:
2. Press [ ] → More → Settings, or press [ ]→ 1. Plug the supplied headset into the phone.
Settings.
entertainment
2. In Idle mode, select Applications → FM Radio.
3. Adjust the following settings to customise your music
player: 3. Select to turn on the FM radio.
The FM radio automatically scans for and saves the
Option Function available stations.
Equalizer Select a default equaliser type. The first time you turn on the FM radio, you are
prompted to start automatic tuning.
Effect Select a sound effect.
Music menu Select music categories to display on the
music library screen.
Visualization Display an animated visualization during
playback.
57](https://image.slidesharecdn.com/galaxys-130104164348-phpapp01/75/Samsung-Galaxy-S-User-Manual-68-2048.jpg)
![The FM radio automatically scans and saves available 3. Adjust the following settings to customise your FM
stations. radio:
4. Select a radio station in the station list and press [ ] Option Function
to return to the FM radio screen. Region Select your region.
To add a radio station to the favourites list: Background Set whether or not to run the FM radio in
1. Plug the supplied headset into the phone. playing the background while using other
applications. If this feature is on, you can
entertainment
2. In Idle mode, select Applications → FM Radio. control the FM radio from the shortcuts
3. Select to turn on the FM radio. panel.
4. Scroll to a radio station. Show Set whether or not to show the station ID
5. Select + to add to the favourites list. Station ID on the FM radio screen. Station IDs are
available only from radio stations that
To customise the FM radio settings: provide this information.
1. In Idle mode, select Applications → FM Radio. Alternative Set whether or not the FM radio attempts
2. Press [ ] → Settings. frequency to retune a radio station when the signal is
weak.
FM auto off Set the FM radio to automatically turn off
after a specified amount of time.
59](https://image.slidesharecdn.com/galaxys-130104164348-phpapp01/75/Samsung-Galaxy-S-User-Manual-70-2048.jpg)


![3. Select Add to Contacts → Create contact. 3. Select a contact’s name.
4. Select a memory location. Once you have found a contact, you can:
5. Enter contact information. • Call the contact by selecting Call or Video call.
6. Select Save to add the contact to memory. • Send a message by selecting Send Message.
To import or export contacts: • Edit the contact information by pressing [ ]→
Edit.
1. In Idle mode, select Contacts.
personal information
2. Press [ ] → More → Import/Export. To set a speed dial number:
3. Select an option to import or export. 1. In Idle mode, select Contacts.
4. For importing contacts, select an importing option. 2. Press [ ] → Speed dial.
To find a contact: 3. Select a location number and then select a contact.
1. In Idle mode, select Contacts. You can quickly dial this number by touching and
2. Scroll up or down in the contact list. holding the location number in the dialing screen.
To create your namecard:
1. In Idle mode, select Contacts.
62](https://image.slidesharecdn.com/galaxys-130104164348-phpapp01/75/Samsung-Galaxy-S-User-Manual-73-2048.jpg)
![2. Press [ ] → My profile. To create a group of contacts:
3. Enter your details. By creating groups of contacts, you can manage multiple
4. Select Save. contacts and send messages or email to an entire group.
Start by creating a group.
You can send your namecard by attaching it to a
1. In Idle mode, select Contacts → Groups.
message or email or by transferring it using
Bluetooth. 2. Press [ ] → Create.
personal information
3. Enter a name and select a ringtone for the group.
To retrieve contacts from your community accounts: 4. Select Save.
You can view the list of community website accounts and To copy contacts:
select an account to add a contact from the website to your
phone contacts. 1. In Idle mode, select Contacts.
1. In Idle mode, select Contacts. 2. Select a contact.
2. Press [ ] → Get friends. 3. Press [ ] and select a copy option (from the phone to
the SIM card or vice-versa).
3. Select an account.
63](https://image.slidesharecdn.com/galaxys-130104164348-phpapp01/75/Samsung-Galaxy-S-User-Manual-74-2048.jpg)
![To view the communication log: To create an event:
You can view the communication log of calls, messages, 1. In Idle mode, select Applications → Calendar.
email or SNS threads. 2. Press [ ] → Create.
1. In Idle mode, select Contacts → History. 3. Enter the details of the event as required.
2. Select the item that you want to view. 4. Select Save.
To view social network activities: To change the calendar view:
personal information
You can view the recent activities of contacts in social 1. In Idle mode, select Applications → Calendar.
network services, such as Facebook, MySpace, and Twitter.
2. Select a view mode at the top of the calendar.
1. In Idle mode, select Contacts → Activities.
To view events of a specific date:
2. Select the item that you want to view.
1. In Idle mode, select Applications → Calendar.
Calendar 2. Select a date on the calendar. In the month view, days
with scheduled events are indicated by a small triangle.
You can create and manage daily, weekly, or monthly To move to a specific day by entering a date manually,
events, and set alarms to remind yourself of important press [ ] → Go to, enter the date by selecting +
events. or -, and select Set.
64](https://image.slidesharecdn.com/galaxys-130104164348-phpapp01/75/Samsung-Galaxy-S-User-Manual-75-2048.jpg)
![To select today's date, press [ ] → Today. Memo
3. Select an event to view its details. You can record important information to save and view later.
You can send the event to others by pressing [ ] To create a memo:
→ Send via and select an option.
1. In Idle mode, select Applications → Memo.
To stop an event alarm: 2. Select Create memo or press [ ] → Create.
3. Enter your memo text.
personal information
If you set an alarm for a calendar event, the event alarm
icon will appear at the specified time. 4. Select a colour to change the background colour.
1. Open the shortcuts panel from the top of the screen. 5. Select Save.
2. Select a reminder to view more details about the event. To view memos:
3. To snooze or dismiss the reminder, select Snooze all or 1. In Idle mode, select Applications → Memo.
Dismiss all.
2. Select a memo to view its details.
You can send the memo to others by tapping and
holding the memo and selecting an option.
65](https://image.slidesharecdn.com/galaxys-130104164348-phpapp01/75/Samsung-Galaxy-S-User-Manual-76-2048.jpg)


![You can also select to open a list of saved • [ ] → More → Add bookmark: Bookmark the
bookmarks, frequently visited pages, and recent internet current web page.
history. • [ ] → More → Find on page: Search for text on the
While browsing web pages, you can use the following web page.
options: • [ ] → More → Select text: Select text on the web
• Zoom in or out: Double-tap the screen. You can also page. Highlight the text with your finger. The highlighted
use the two finger zoom. Place two fingers on the screen text is copied to the clipboard and you can paste it
anywhere.
web
and slowly pinch or spread them apart to zoom in or out.
• [ ] → New window: Open a new window. • [ ] → More → Page info: View the web page
details.
• [ ] → Brightness Setting: Adjust the brightness of
the screen. This feature might be unavailable in your • [ ] → More → Share page: Send the web address
region. (URL) of the web page to others.
• [ ] → Windows: View the currently active windows. • [ ] → More → Downloads: View the download
You can open multiple pages and switch back and forth history.
between them. • [ ] → More → Settings: Customise the browser
• [ ] → Refresh: Reload the current web page. settings.
• [ ] → Forward: Go to the next page in history. • [ ] → Add RSS feeds: Add an RSS feed. You can
read RSS feeds using Google Reader.
68](https://image.slidesharecdn.com/galaxys-130104164348-phpapp01/75/Samsung-Galaxy-S-User-Manual-79-2048.jpg)
![To bookmark your favourite web pages: • Share link: Send the web address (URL) of the web
page to others.
1. In Idle mode, select Applications → Internet.
• Copy link URL: Copy the web address (URL) of the web
2. Select → Bookmarks. page.
3. Select Add. To bookmark the web page you were • Delete bookmark: Delete the bookmark.
viewing, press [ ] → Bookmark last-viewed page.
• Set as homepage: Use the web page as the homepage
4. Enter a page title and a web address (URL). in the browser.
web
5. Select OK. To add an RSS feed address:
In the bookmark list, tap and hold a bookmark and use the
1. In Idle mode, select Applications → Internet.
following options:
2. Move to a web page that has an RSS feed.
• Open: Opens the web page.
3. Press [ ] → More → Add RSS feeds.
• Open in new window: Open the web page in a new
window. 4. Select the RSS feed that you want to add.
• Edit bookmark: Edit the bookmark details. 5. Select OK to open Google Reader and view the RSS
• Add shortcut to Home: Add the bookmark shortcut to feed.
the Idle screen. To access frequently visited pages or the recent history:
1. In Idle mode, select Applications → Internet.
69](https://image.slidesharecdn.com/galaxys-130104164348-phpapp01/75/Samsung-Galaxy-S-User-Manual-80-2048.jpg)
![To change the map view: • Enter the address.
1. In Idle mode, select Applications → Maps. • Enter the category of the business.
• Select an address you have visited from the list.
To search the map:
4. Select .
1. In Idle mode, select Applications → Maps.
To get directions to a specific destination:
2. Drag your finger to scroll through the map.
1. In Idle mode, select Applications → Maps.
3. To zoom in or out, tap the screen and then select or
web
. 2. Press [ ] → Directions.
To find your location: 3. Enter the addresses of the starting location and the
ending location.
1. In Idle mode, select Applications → Maps. To enter an address from your contact list or to point to a
2. Press [ ] → My Location. location on the map, select → My Location,
Contacts, or Point on map.
To search for a specific location:
4. Select a travel method (car, bus, or walk) and select Go.
1. In Idle mode, select Applications → Maps.
5. Select a travel route to view the details of your trip (if
2. Press [ ] → Search. necessary).
3. Use one of the following methods: 6. Select Show on map.
71](https://image.slidesharecdn.com/galaxys-130104164348-phpapp01/75/Samsung-Galaxy-S-User-Manual-82-2048.jpg)
![7. When you are finished, press [ ] → More → Clear YouTube™
Map.
YouTube is a free online video streaming service. You can
To share your location using Google LatitudeTM: view and share videos using YouTube.
You can share your location with your friends and view your
This feature might not be available in your region.
friend’s locations using Google LatitudeTM.
1. In Idle mode, select Applications → Maps.
web
2. Press [ ] → Join Latitude. To watch videos on YouTube:
3. Press [ ] → Add friends and select an option. 1. In Idle mode, select Applications → YouTube.
4. Select the friends that you want to add or enter an email 2. Select a video from the list.
address and select Add friends → Yes.
3. Rotate the phone counter-clockwise to switch to the
When your friend accepts your invitation, you can share
landscape view.
locations.
You can view the marks that indicate the locations of your
friends by pressing [ ] → See map.
72](https://image.slidesharecdn.com/galaxys-130104164348-phpapp01/75/Samsung-Galaxy-S-User-Manual-83-2048.jpg)
![4. Control playback using the following keys: To share videos on YouTube:
1. In Idle mode, select Applications → YouTube.
2. Touch and hold a video.
3. Select Share and select an option.
To upload videos to YouTube:
1 3
1. In Idle mode, select Applications → YouTube.
web
2 4 2. Press [ ] → Upload and select a video. Skip to step
8.
Number Function If you want to upload new videos, select to turn on
1 Scan backward in file. the camera.
2 Move to a point in the file by dragging the bar. 3. Rotate the phone counter-clockwise to switch to the
landscape view.
3 Scan forward in a file.
4 Pause playback or select to resume 4. Aim the lens at the subject and make any adjustments.
playback. 5. Select to start recording.
6. Select to stop recording.
73](https://image.slidesharecdn.com/galaxys-130104164348-phpapp01/75/Samsung-Galaxy-S-User-Manual-84-2048.jpg)


![• Some phones, especially those that are not tested OK. Alternatively, select Accept to match the PIN
or approved by Bluetooth SIG, might not be between your phone and the phone.
compatible with your phone. When the owner of the other phone enters the same
PIN or accepts the connection, pairing is complete. If
To turn on the Bluetooth wireless feature: the pairing is successful, the phone will automatically
search for available services.
1. In Idle mode, select Applications → Settings →
Wireless and network → Bluetooth settings. The Some phones, especially headsets or hands-free car
connectivity
preset homepage opens. kits, might have a fixed Bluetooth PIN, such as 0000.
2. Select Bluetooth to turn on the Bluetooth wireless If the other phone has a PIN, you must enter it.
feature.
To send data using the Bluetooth wireless feature:
To find and pair with other Bluetooth-enabled phones:
1. Select a file or item, such as a contact, calendar event,
1. In Idle mode, select Applications → Settings → memo, or media file, from an appropriate application or
Wireless and network → Bluetooth settings → Scan from My Files.
devices.
2. Press [ ] → Share, Send via, or Send namecard
2. Select a device. via → Bluetooth.
3. Enter a PIN for the Bluetooth wireless feature or the 3. Search for and pair with a Bluetooth-enabled phone.
other phone’s Bluetooth PIN, if it has one, and select
76](https://image.slidesharecdn.com/galaxys-130104164348-phpapp01/75/Samsung-Galaxy-S-User-Manual-87-2048.jpg)


![Clock
tools You can set and control alarms for important events and set
various world clocks. You can also use the stopwatch and
count-down timer.
To set a new alarm:
1. In Idle mode, select Applications → Clock → Alarm.
2. Select Create Alarm or press [ ] → Create.
3. Set the alarm details.
Select Set as daily briefing to activate the Daily
briefing immediately after you stop an alarm.
4. When you are finished, select Save.
If you set Smart alarm, your phone will play a
natural sound and display the alarm screen until the
set alarm goes off.
85](https://image.slidesharecdn.com/galaxys-130104164348-phpapp01/75/Samsung-Galaxy-S-User-Manual-96-2048.jpg)
![To stop an alarm: To select a city in the world map view, select .
When an alarm sounds: 4. To add more world clocks, repeat steps 2 and 3.
• Tap and hold Stop to stop the alarm. To apply the summer time to the clocks, press [ ]
• Tap and hold Snooze to repeat the alarm after a → DST settings. When you tap on a clock, the
specified length of time. current time of the clock is adjusted forward 1 or 2
hours.
To delete an alarm:
tools
1. In Idle mode, select Applications → Clock → Alarm. To use the stopwatch:
2. Press [ ] → Delete. 1. In Idle mode, select Applications → Clock →
3. Select the alarms that you want to delete. Stopwatch.
4. Select Delete. 2. Select Start to begin the stopwatch.
To create a world clock: 3. Select Lap to record lap times.
1. In Idle mode, select Applications → Clock → World 4. When you are finished, select Stop.
clock. 5. Select Reset to clear the recorded times.
2. Select Add city or press [ ] → Add. To use the count-down timer:
3. Enter a city name or select one from the city list. 1. In Idle mode, select Applications → Clock → Timer.
86](https://image.slidesharecdn.com/galaxys-130104164348-phpapp01/75/Samsung-Galaxy-S-User-Manual-97-2048.jpg)
![2. Set the length of time to count down. Mini Diary
3. Select Start to begin the countdown. You can keep a photo diary on your phone.
You can now use other functions with the timer counting
down in the background. Press or [ ] and access To create a Mini Diary:
another application. 1. In Idle mode, select Applications → Mini Diary.
4. When the timer expires, tap and hold Stop to stop the 2. Select Create diary to create a new entry.
alert.
3. Tap on the date to change the current date.
tools
Calculator 4. Select Tap to add photo and add an existing image or
use the camera to capture a photo.
You can perform mathematical operations directly on your 5. Select Tap to create memo, enter the text, and then
phone, similar to using a hand-held or desktop calculator. select Save.
1. In Idle mode, select Applications → Calculator. 6. Select Save.
2. Perform the calculation. To view a Mini diary:
3. Select to close the calculator keypad.
1. In Idle mode, select Applications → Mini Diary.
The calculation history appears.
2. Select a diary.
4. To clear the history, press [ ] → Clear history.
87](https://image.slidesharecdn.com/galaxys-130104164348-phpapp01/75/Samsung-Galaxy-S-User-Manual-98-2048.jpg)
![To upload a mini diary to your community website, • More: Use additional features when using a file, such as
press [ ] → Publish. Move, Copy, Rename, Print via Bluetooth, Bluetooth
visibility, and Settings.
My Files
ThinkFree Office
You can quickly and easily access all of your images,
videos, music, sound clips, and other types of files stored in You can view and edit document files on a memory card
your phone and on a memory card. inserted in your phone. If you have an account with the
tools
ThinkFree and Google Docs™ web services, you can
1. In Idle mode, select Applications → My Files. manage documents online. This application supports the
2. Select a folder and then select a file. following file formats: .txt, .doc, .docx, .xls, .xlsx, .ppt, .pptx,
In a folder, press [ ] to use the following options: and .pdf.
• Share: Send a file to others via multimedia message, To create a new document:
email, or the Bluetooth wireless feature. 1. In Idle mode, select Applications → ThinkFree Office.
• Create folder: Create a new folder. 2. Select Accept to confirm, if you are launching this
• Delete: Delete files or folders. application for the first time.
• View by: Change the view mode. 3. Select My Docs.
• List by: Sort files or folders. 4. Press [ ] → New and select a document type.
88](https://image.slidesharecdn.com/galaxys-130104164348-phpapp01/75/Samsung-Galaxy-S-User-Manual-99-2048.jpg)
![5. Enter a name for the document and select OK. To manage documents online:
6. Enter contents in the document using the tools at the 1. In Idle mode, select Applications → ThinkFree Office.
bottom of the screen.
2. Select Online.
7. When you have finished editing, select on the toolbar or
3. Enter your user name and password to access your
press [ ] → File → Save.
account and then select Sign in.
To view and edit a document on your phone: 4. View and manage your documents on the server.
tools
1. In Idle mode, select Applications → ThinkFree Office.
2. Select My Docs and then select a document. Write and Go
3. Select a text encoding type (if necessary). You can enter text and send it as a message, upload it to a
4. View and edit the document. community website, or save it as a memo or calendar event.
• To move between pages or pan through the 1. In Idle mode, select Applications → Write and Go.
document, scroll in the corresponding direction.
2. Enter text using the text input panel.
• To open the toolbar to edit the document (word, text,
or excel file), press [ ] → Edit. 3. When you are finished, select one of the options:
• Send message: Send a text message with the text.
5. When you have finished editing, save the document.
• Update status: Upload the text to a community
website.
89](https://image.slidesharecdn.com/galaxys-130104164348-phpapp01/75/Samsung-Galaxy-S-User-Manual-100-2048.jpg)


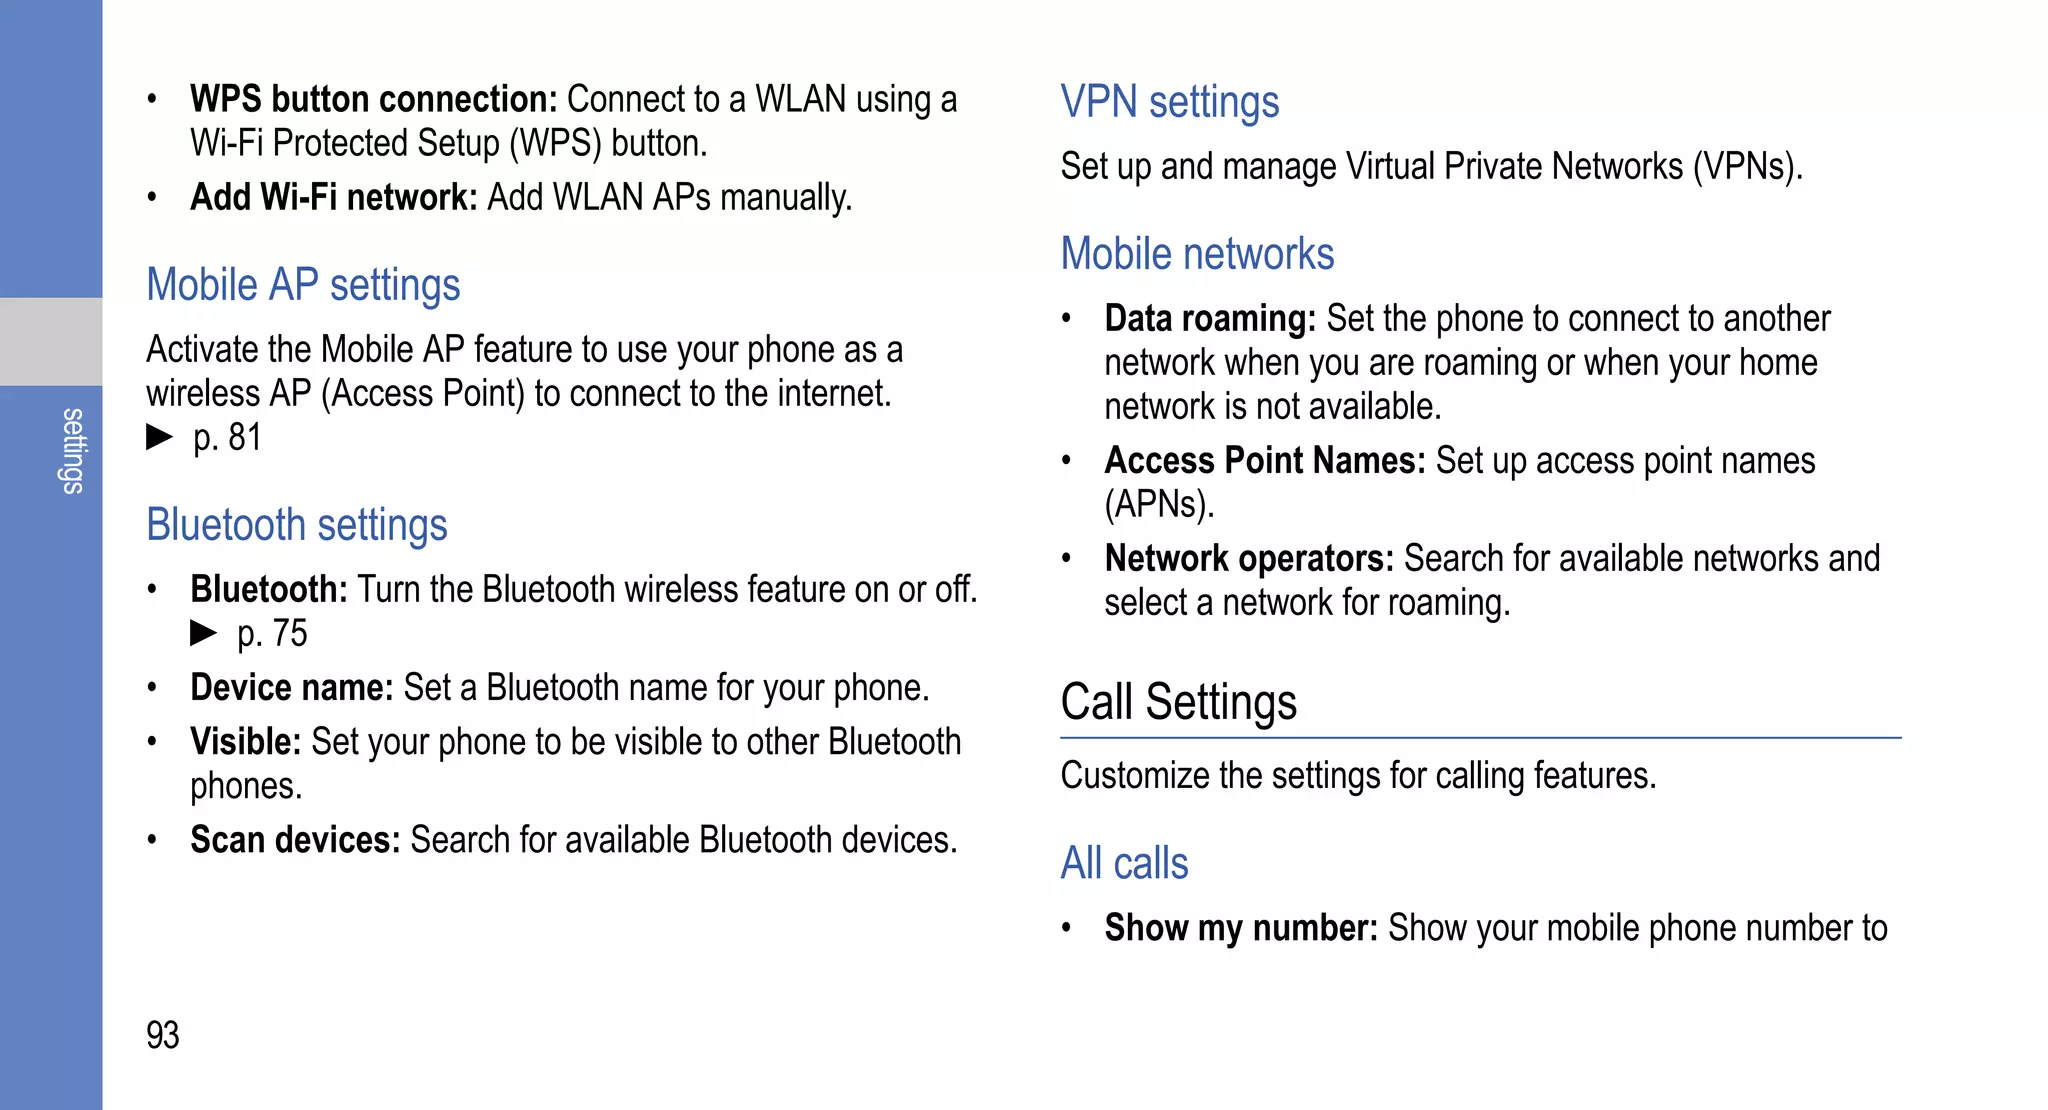


![• Use secure credentials: Use certificates and running or third-party applications installed additionally,
credentials to ensure secure use of various applications. press [ ] → Filter → Running, Third-party, or All.
• Install encrypted certificates: Install encrypted • Running services: View the services that you are using
certificates that are stored on a memory card. and access them to manage them.
• Set password: Create and confirm a password for • Development:
accessing credentials. • USB debugging: Select to connect your phone to a
• Clear storage: Erase the credential contents from the PC by using a PC data cable. This is for application
settings
phone and reset the password. development.
• Stay awake: Set the phone’s screen to stay on while
Applications charging the battery.
• Allow mock locations: Allow mock locations and
Change the setting for managing installed applications. service information to be sent to a Location Manager
• Unknown sources: Select to download applications service for testing. This is for application
from any source. If you do not select this option, you can development.
only download applications from the Android Market. • Samsung Apps: Select a network connection (Wi-Fi or
• Manage applications: Access the list of the applications packet switched data network) to get application update
installed on the phone and check the application notification from Samsung Apps.
information. To view the applications that are currently
98](https://image.slidesharecdn.com/galaxys-130104164348-phpapp01/75/Samsung-Galaxy-S-User-Manual-109-2048.jpg)


![Your phone displays “Service unavailable” or “Network • Restart your phone to clear any temporary software
error” bugs.
• When you are in areas with weak signals or poor • Ensure that your phone’s software is upgraded to the
reception, you might lose reception. Move to another latest version.
area and try again. • If the touch screen is scratched or damaged, take it to
• You cannot access some options without a subscription. your local Samsung Service Centre.
Contact your service provider for more details. Your phone freezes or has fatal errors
The touch screen responds slowly or improperly If your phone freezes or hangs, you might need to close
programs or reset the phone to regain functionality. If your
troubleshooting
If the touch screen is not responding properly, try the
following: phone is frozen and unresponsive, press and hold [ ] for 8-
10 seconds. The phone will reboot automatically.
• Remove any protective covers from the touch screen.
Protective covers might prevent the phone from If this does not solve the problem, perform a factory data
recognising your inputs and are not recommended for reset. In Idle mode, select Applications → Settings →
touch screen phones. Privacy → Factory data reset → Reset phone → Erase
everything.
• Ensure that your hands are clean and dry when tapping
the touch screen.
105](https://image.slidesharecdn.com/galaxys-130104164348-phpapp01/75/Samsung-Galaxy-S-User-Manual-116-2048.jpg)


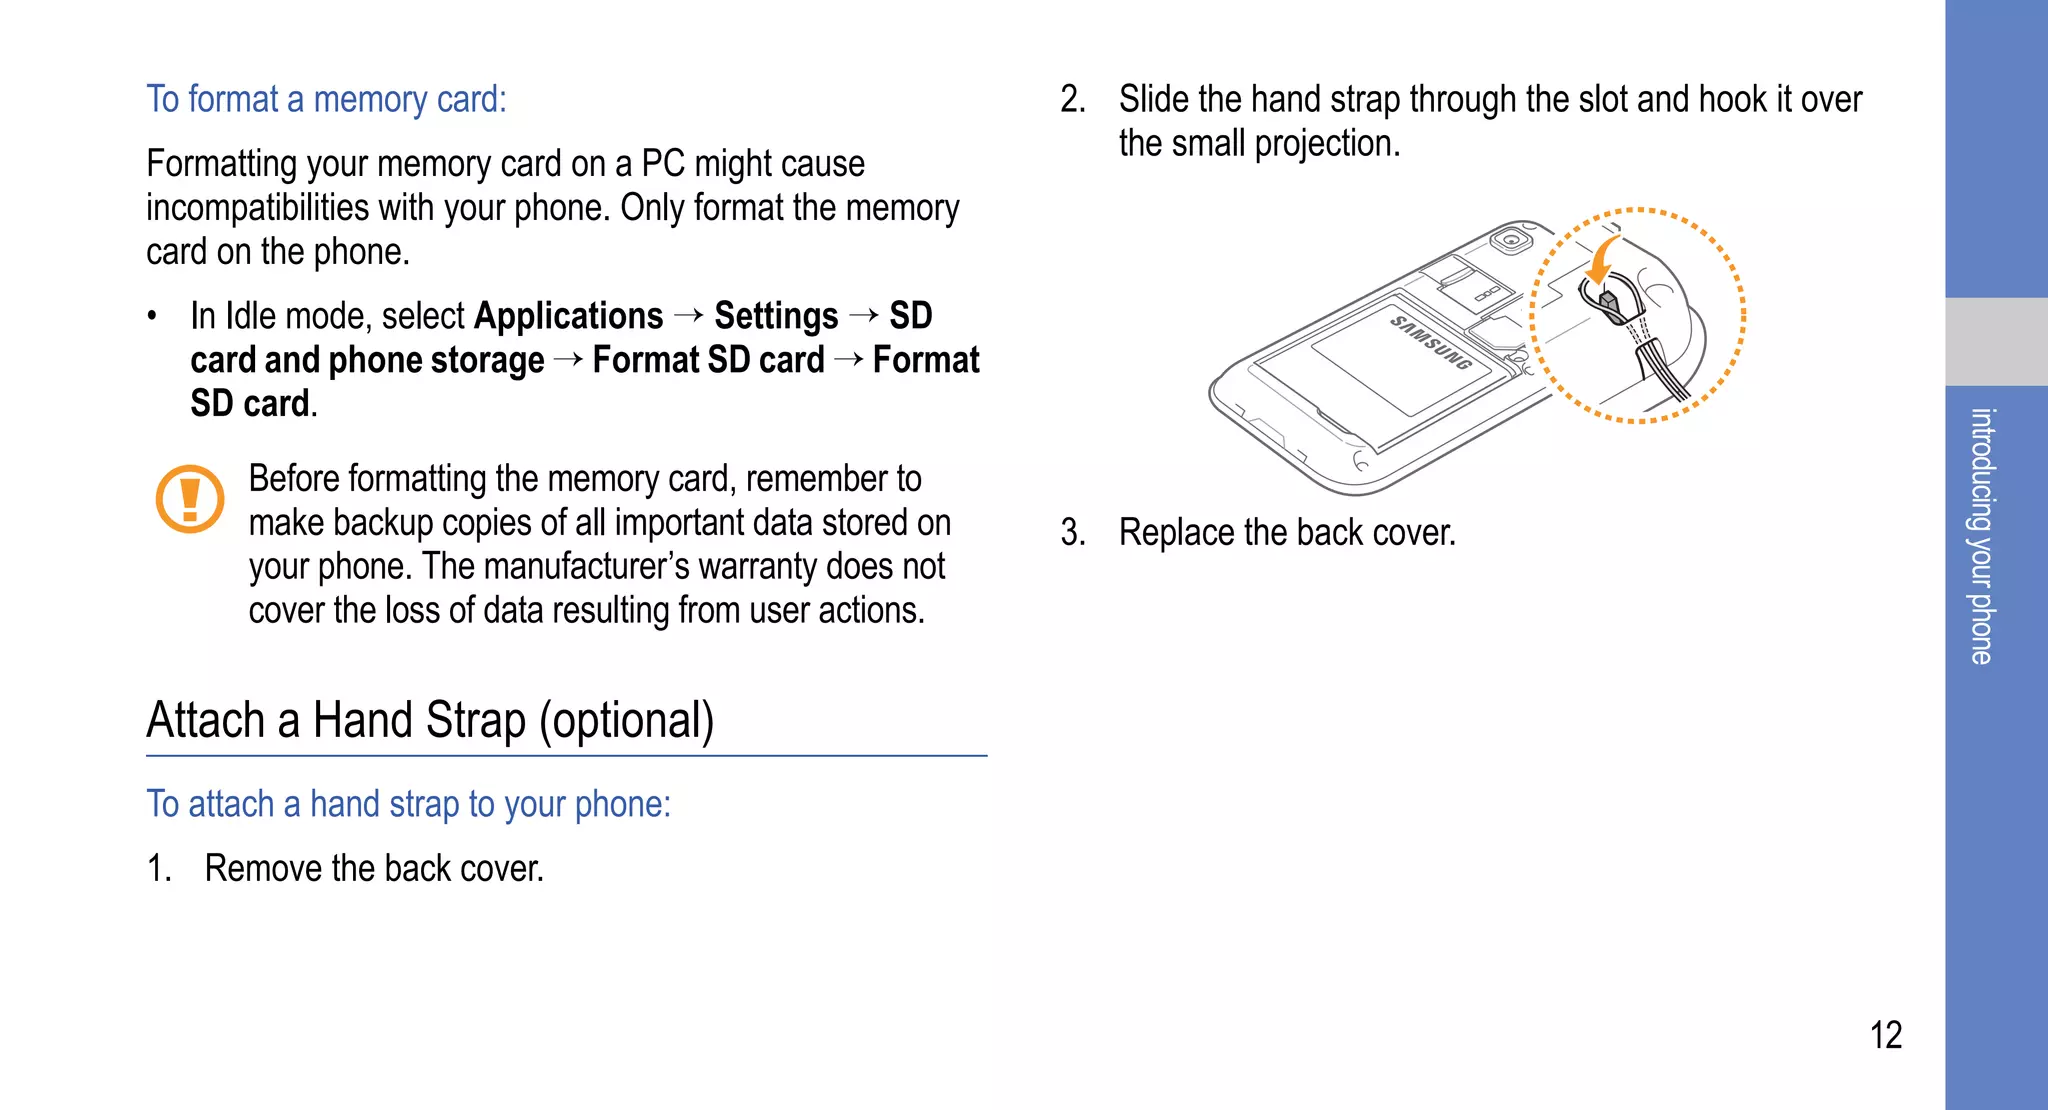
This user manual provides instructions for using the Samsung GT-I9000M mobile phone. It discusses unpacking the phone and accessories, phone layout and keys, installing the SIM card and battery, charging the battery, inserting an optional memory card, and an overview of getting started with the basic phone functions.


