This document is the Administrator's Guide for RSA Authentication Manager 8.6. It provides information to help administrators install, configure, and maintain an RSA Authentication Manager deployment. Key sections include deploying authentication agents, integrating LDAP directories, deploying RSA SecurID tokens, configuring Cloud Authentication, administering RADIUS, and performing system maintenance and disaster recovery. The guide is intended for authorized administrators and personnel.


![RSA Authentication Manager 8.6 Administrator's Guide
Manage RSA Authentication Manager Services Manually
Use the following procedure to manage RSA Authentication Manager services manually. You can perform the
following actions on a selected service or on all services at the same time:
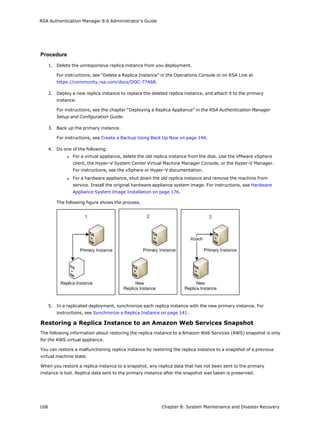
l Stop
l Start
l Display current status
l Restart
Procedure
1. Log on to the appliance with the User ID rsaadmin and the current operating system password:
On a hardware appliance, the Amazon Web Services appliance, or the Azure appliance, log on to the
appliance using an SSH client.
On a VMware virtual appliance, you can log on to the appliance using an SSH client or the VMware
vSphere client.
On a Hyper-V virtual appliance, you can log on to the appliance using an SSH client, the Hyper-V System
Center Virtual Machine Manager Console, or the Hyper-V Manager.
For instructions, see Log On to the Appliance Operating System with SSH on page 182.
2. Change the directory. Type:
cd /opt/rsa/am/server
and press ENTER.
3. Run a command. Type the following, and press ENTER:
./rsaserv stop|start|status|restart [service name] [nodep] [exclude service name]
where:
l stop, start, status, restart, and nodep are options for managing the RSA service. Use nodep if you
do not want to start dependent services. Use exclude and the service name to exclude that
service from the command.
l service name is the name of the Authentication Manager service that you want to manage.
Service names:
l all (All RSA services)
l console (RSA Console Server)
l biztier (RSA Runtime Server)
l admin (RSA Administration Server with Operations Console)
l db (RSA Database Server)
l primary replication (RSA Replication Primary)
l replica replication (RSA Replication Replica)
l radiusoc (RSA RADIUS Server Operations Console)
186 Chapter 9: Advanced Administration](https://image.slidesharecdn.com/rsaauthenticationmanager8-221103045416-f957f6cb/85/rsa_authentication_manager_8-6_administrators_guide-pdf-186-320.jpg)