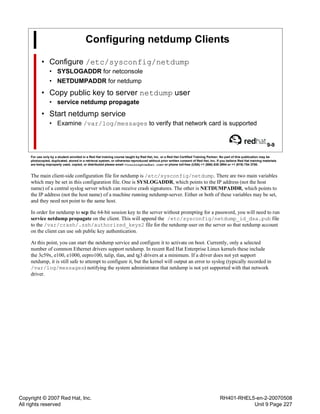
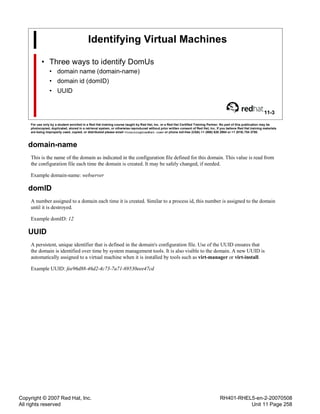
Downloaded 129 times


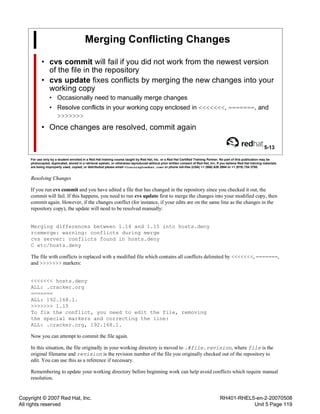
![Copyright © 2007 Red Hat, Inc.
All rights reserved
RH401-RHEL5-en-2-20070508
Introduction Page x
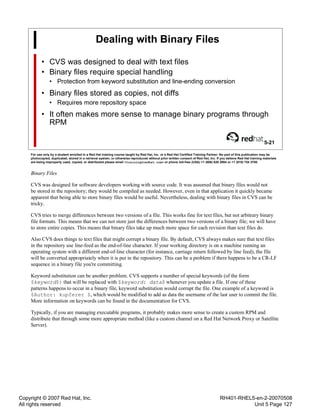
Notes on Internationalization
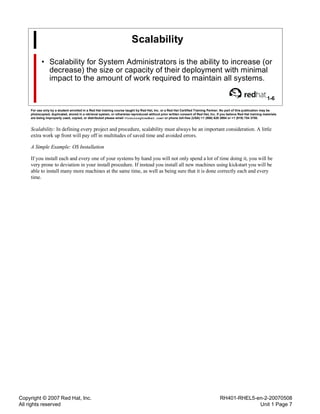
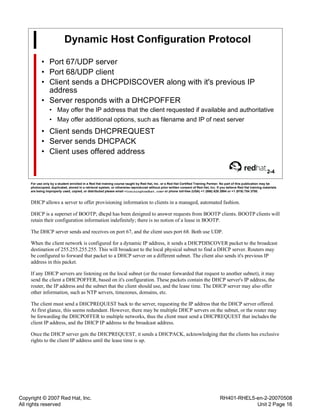
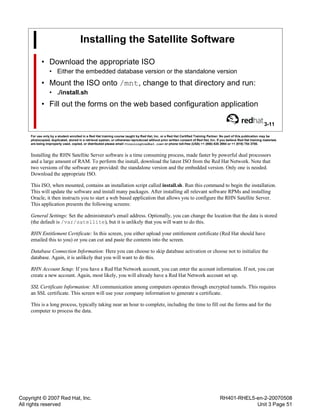
• Red Hat Enterprise Linux supports nineteen languages
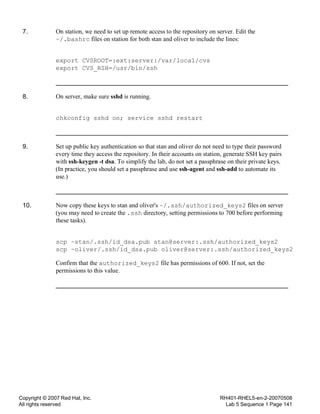
• Default language can be selected:
• During installation
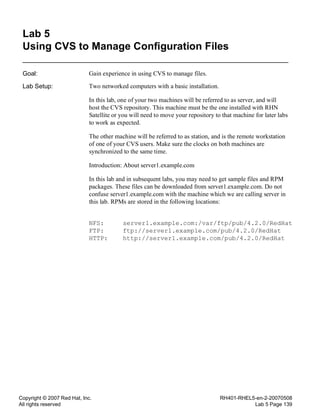
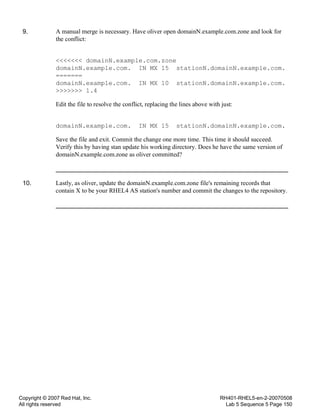
• With system-config-language
• System->Administration->Language
• Alternate languages can be used on a per-command basis:
$ LANG=en_US.UTF8 date
• Language settings are stored in /etc/sysconfig/i18n
3
For use only by a student enrolled in a Red Hat training course taught by Red Hat, Inc. or a Red Hat Certified Training Partner. No part of this publication may be
photocopied, duplicated, stored in a retrieval system, or otherwise reproduced without prior written consent of Red Hat, Inc. If you believe Red Hat training materials
are being improperly used, copied, or distributed please email <training@redhat.com> or phone toll-free (USA) +1 (866) 626 2994 or +1 (919) 754 3700.
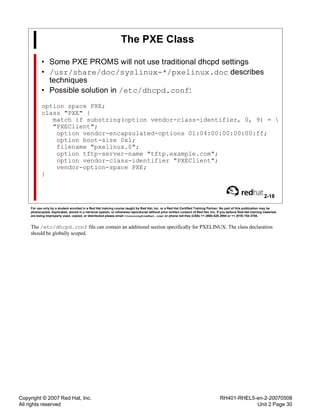
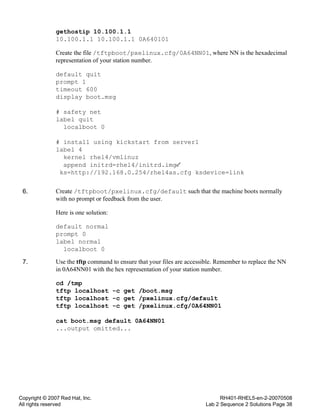
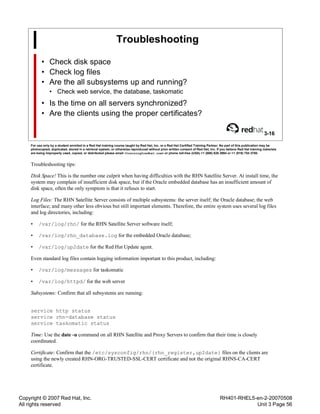
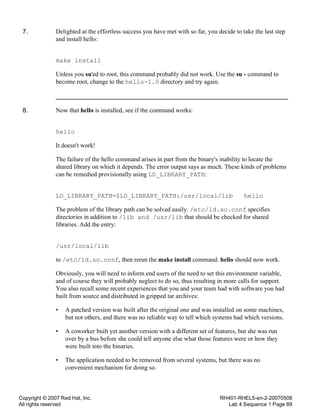
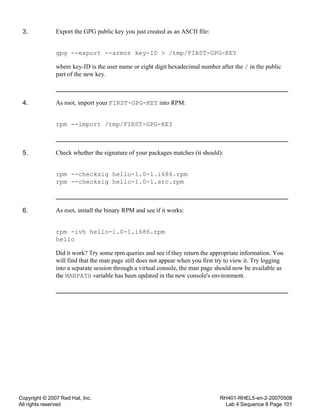
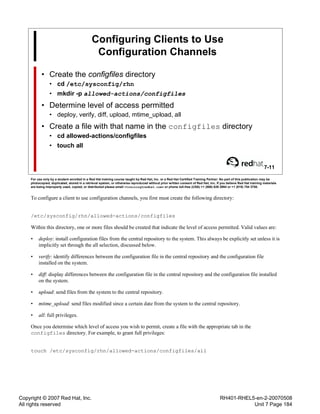
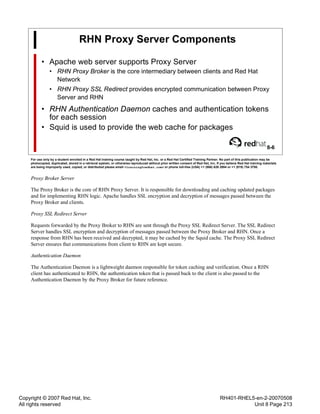
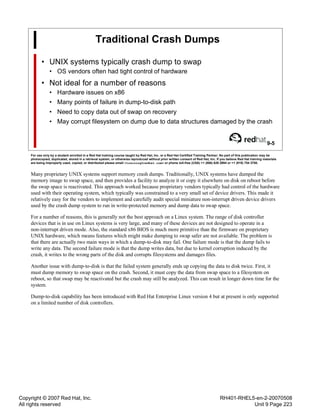
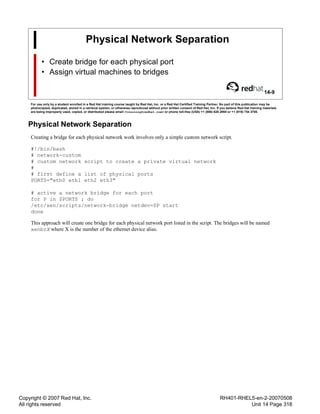
Red Hat Enterprise Linux 5 supports nineteen languages: English, Bengali, Chinese (Simplified), Chinese
(Traditional), French, German, Gujarati, Hindi, Italian, Japanese, Korean, Malayalam, Marathi, Oriya, Portuguese
(Brazilian), Punjabi, Russian, Spanish and Tamil. Support for Assamese, Kannada, Sinhalese and Telugu are provided
as technology previews.
A system's language can be selected during installation, but the default is US English. To use other languages, you
may need to install extra packages to provide the appropriate fonts, translations and so forth. These can be selected
during system installation or with system-config-packages ( Applications->Add/Remove Software).
The currently selected language is set with the LANG shell variable. Programs read this variable to determine what
language to use for output:
[student@stationX ~]$ echo $LANG
ru_RU.UTF8
A system's default language can be changed with system-config-language ( System+Administration->Language),
which affects the /etc/sysconfig/i18n file.
Languages with non-ASCII characters may have problems displaying in some environments. Kanji characters, for
example, may not display as expected on a virtual console. Individual commands can be made to use another language
by setting LANG on the command-line:
[student@stationX ~]$ LANG=en_US.UTF8 date
Thu Feb 22 13:54:34 EST 2007
Subsequent commands will revert to using the system's default language for output.
SCIM (Smart Common Input Method) can be used to input text in various languages under X if the appropriate
language support packages are installed. Type Ctrl-Space to switch input methods.](https://image.slidesharecdn.com/rh401rhel5-150518071859-lva1-app6892/85/Rh401-rhel5-2-12-320.jpg)


![Copyright © 2007 Red Hat, Inc.
All rights reserved
RH401-RHEL5-en-2-20070508
Unit 4 Page 70
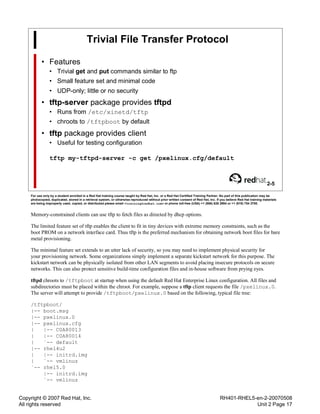
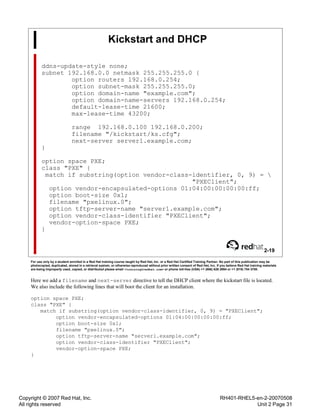
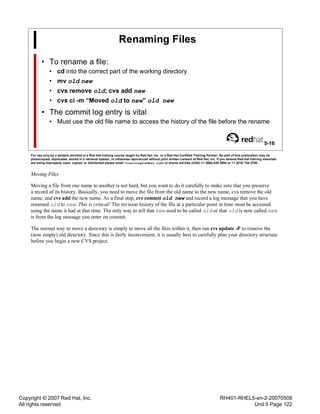
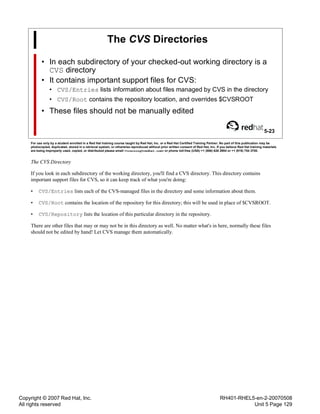
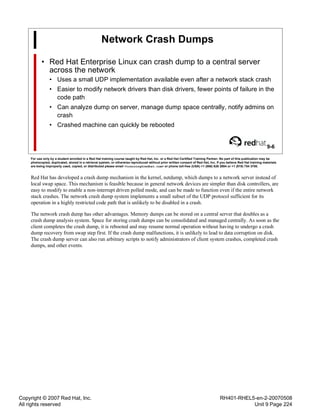
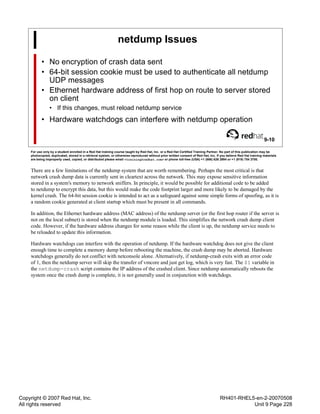
Spec File: Preamble
• Versioning: Name, Version, Release
• Supplementary Information
• Group, License, URL, Summary
• Prerequisites
• PreReq, Requires, BuildPreReq
• Provides, Obsoletes, Conflicts
• Inputs: Source[#], Patch[#]
• BuildRoot, BuildArch
4-7
For use only by a student enrolled in a Red Hat training course taught by Red Hat, Inc. or a Red Hat Certified Training Partner. No part of this publication may be
photocopied, duplicated, stored in a retrieval system, or otherwise reproduced without prior written consent of Red Hat, Inc. If you believe Red Hat training materials
are being improperly used, copied, or distributed please email <training@redhat.com> or phone toll-free (USA) +1 (866) 626 2994 or +1 (919) 754 3700.
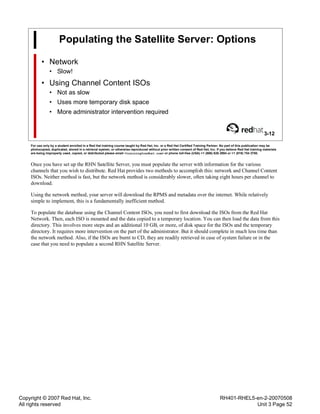
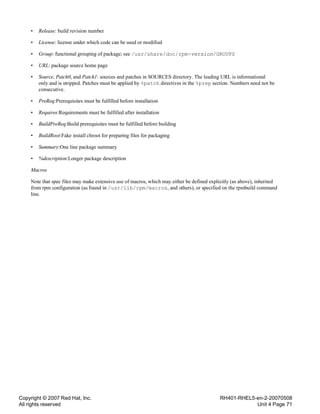
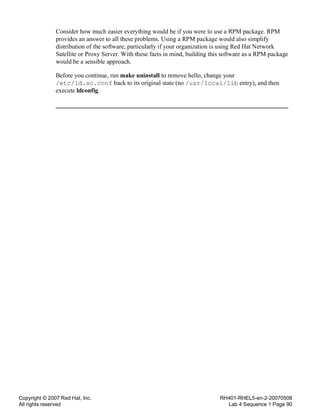
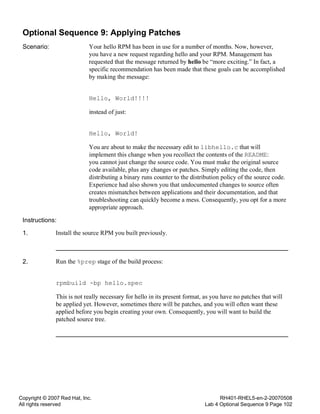
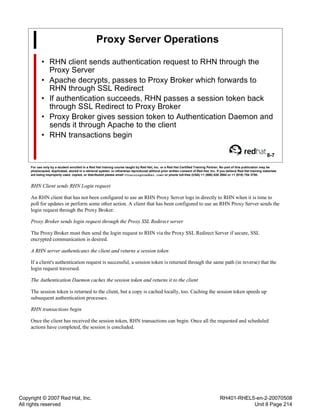
Preamble for a sample file
%define name foo
%define version 1.2
Name: %{name}
Version: %{version}
Release: 3
License: GPL
Group: Applications/Productivity
URL: http://www.foo.org
Source: ftp://www.foo.org/pub/people/elvis/%{name}-%{version}.tar.gz
Patch0: foo-1.2-change_default.patch
Patch1: foo-1.2-add_feature.patch
PreReq: unzip
Requires: pam
BuildPreReq: gcc >= 2.96
BuildRoot: %{_tmppath}/%{name}-root
Summary: A fictional open source package for the offering.
%description
The foo package provides an example for how RPM is used
to build compiled software from sources and patches. It
serves no real purpose.
Note the lines above:
• Name: package name
• Version: version of pristine source](https://image.slidesharecdn.com/rh401rhel5-150518071859-lva1-app6892/85/Rh401-rhel5-2-92-320.jpg)


![Copyright © 2007 Red Hat, Inc.
All rights reserved
RH401-RHEL5-en-2-20070508
Unit 4 Page 78
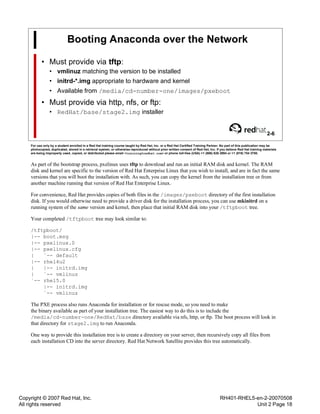
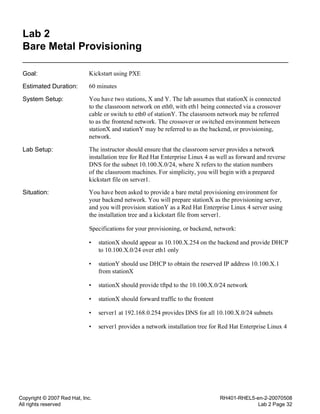
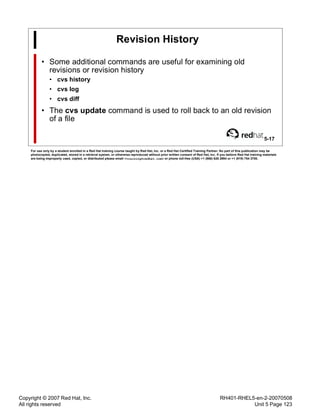
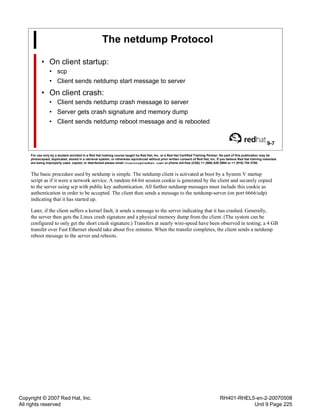
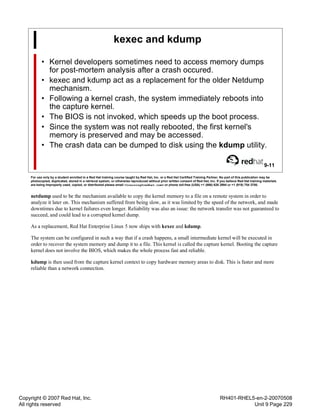
Spec File: Scriptlets
• %pre, %post
• Scripts run on package installation
• Should not be interactive
• %preun, %postun
• Scripts run on package removal
• rpm -q --scripts package displays scriptlets in package
4-12
For use only by a student enrolled in a Red Hat training course taught by Red Hat, Inc. or a Red Hat Certified Training Partner. No part of this publication may be
photocopied, duplicated, stored in a retrieval system, or otherwise reproduced without prior written consent of Red Hat, Inc. If you believe Red Hat training materials
are being improperly used, copied, or distributed please email <training@redhat.com> or phone toll-free (USA) +1 (866) 626 2994 or +1 (919) 754 3700.
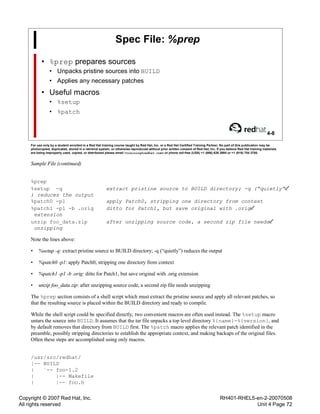
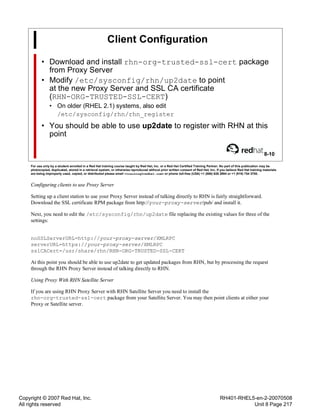
Sample File (continued)
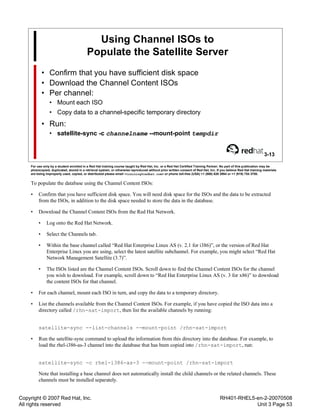
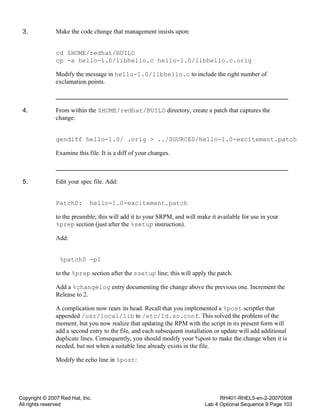
%pre
groupadd -g 201 foo
useradd -g foo -s /bin/false -d /var/foo -M foo
%post
/sbin/ldconfig
chkconfig --add food
%preun
if [ $1 = 0 ]
then
service food stop > /dev/null 2>&1
chkconfig --del food
fi
%postun
if [ $1 = 0 ]
then
userdel foo
groupdel foo
else
/sbin/ldconfig
service food condrestart > /dev/null 2>&1
fi
Scriptlets allow target machines to be dynamically configured when a RPM package is installed or removed. Best
practice dictates that installation or removal of a package should be non-interactive, and scriptlets should be designed
accordingly.
Network services should not be started automatically on installation. When a package is upgraded, if a service is
already running it may be okay to restart it. When a package is uninstalled, a running service should be stopped, but
you must first make sure that the uninstallation is not part of an upgrade. In a scriptlet, the $1 variable contains the
number of versions of the package that are installed. If $1 contains a 1, this is the first installation of the package. If
it contains a 2 or more, the package is probably being upgraded. If it contains a 0 while in the %postun scriptlet, the
package is being removed entirely.](https://image.slidesharecdn.com/rh401rhel5-150518071859-lva1-app6892/85/Rh401-rhel5-2-100-320.jpg)


![Copyright © 2007 Red Hat, Inc.
All rights reserved
RH401-RHEL5-en-2-20070508
Unit 4 Page 82
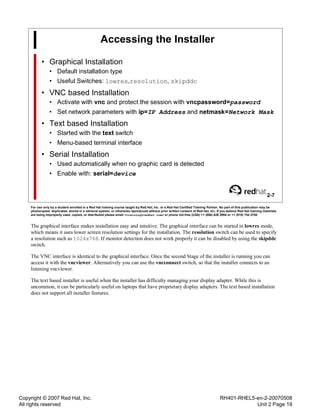
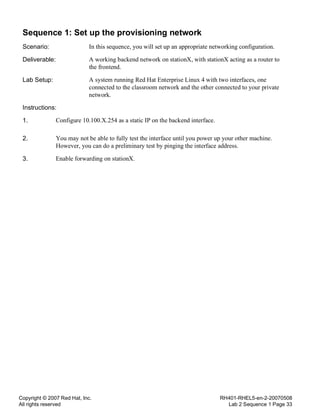
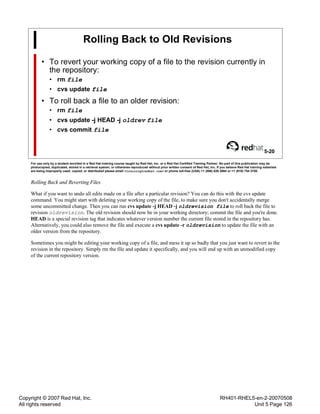
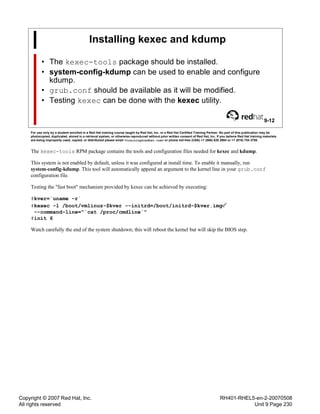
rpmbuild
• rpmbuild -b [...] specfile
• rpmbuild -t [...] tar_archive
• rpmbuild --rebuild SRPM
• Common Options:
• --buildroot directory
• --clean, --rmsource, --rmspec
• --target platform
• --define macro expr
4-15
For use only by a student enrolled in a Red Hat training course taught by Red Hat, Inc. or a Red Hat Certified Training Partner. No part of this publication may be
photocopied, duplicated, stored in a retrieval system, or otherwise reproduced without prior written consent of Red Hat, Inc. If you believe Red Hat training materials
are being improperly used, copied, or distributed please email <training@redhat.com> or phone toll-free (USA) +1 (866) 626 2994 or +1 (919) 754 3700.
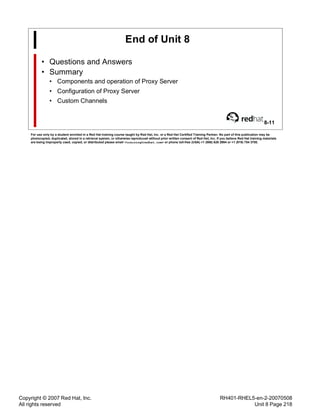
Using rpmbuild
RPM packages are built using the rpmbuild -b? command, where the following switches specify the following
stages:
• -p: up to "prep" phase only
• -c: up to "build" phase only
• -i: up to "install" phase only
• -b: build binary package file
• -s: build source package file
• -a: build both binary and source package files.
Often, a spec file will be bundled within the tar archive for a given distribution. As a convenience, rpmbuild can be
called with the -t command line switch instead of -b. The specified tar archive will be extracted, and rpmbuild will
recurse through the resulting files, using the first file that ends with the .spec extension as the spec file for the build.
The archive does not need to be located in the SOURCES directory.
As another convenience, a source RPM package file can be rebuilt into a binary package file using the --rebuild
command line switch.
Various command line switches can be added, causing rpmbuild to remove intermediary files used during the
building process. Otherwise, they are left on the build host by default. Use these with caution while you are developing
a RPM, particularly the --rmspec option.
By default, rpmbuild will use strip to discard debugging symbols from object files which are produced, to reduce their
size. A second binary package which can be installed to allow gdb to debug these files, %{name}-debuginfo, will
be automatically created by rpmbuild. Alternatively, you may disable the stripping of object files and generation of
debuginfo packages by setting the line %debug_packages %nil in your ~/.rpmmacros file.](https://image.slidesharecdn.com/rh401rhel5-150518071859-lva1-app6892/85/Rh401-rhel5-2-104-320.jpg)

![Copyright © 2007 Red Hat, Inc.
All rights reserved
RH401-RHEL5-en-2-20070508
Lab 4 Sequence 4 Page 94
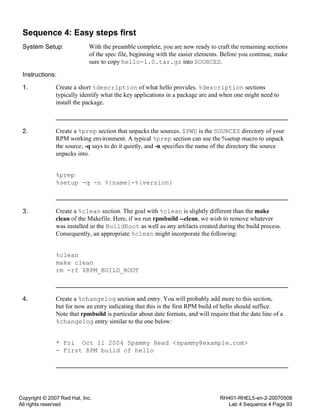
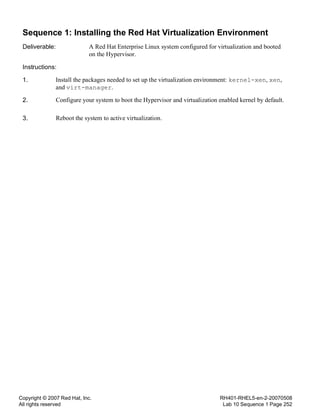
5. Check whether these sections and your preamble are in order as follows:
rpmbuild -bp --clean hello.spec
This command will test the %prep and %clean sections. Both sections should end with
exit 0:
Executing(%prep): /bin/sh -e /var/tmp/rpm-tmp.34334
+ umask 022
+ cd /home/oliver/rpmbuild/BUILD
[...many lines of output...]
+ exit 0
Executing(--clean): /bin/sh -e /var/tmp/rpm-tmp.56999
+ umask 022
+ cd /home/oliver/rpmbuild/BUILD
+ rm -rf hello-1.0
+ exit 0](https://image.slidesharecdn.com/rh401rhel5-150518071859-lva1-app6892/85/Rh401-rhel5-2-116-320.jpg)


![Copyright © 2007 Red Hat, Inc.
All rights reserved
RH401-RHEL5-en-2-20070508
Unit 5 Page 124
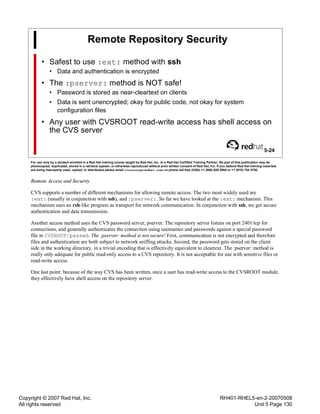
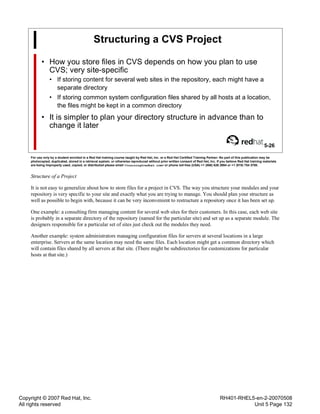
Viewing Repository History
• The repository keeps a record of events (check outs, commits,
and so on)
• To display check outs by all users:
• cvs history -a
• To display commits by all users:
• cvs history -a -c
• Times are displayed as UTC; add -z zone to specify a local
timezone instead
5-18
For use only by a student enrolled in a Red Hat training course taught by Red Hat, Inc. or a Red Hat Certified Training Partner. No part of this publication may be
photocopied, duplicated, stored in a retrieval system, or otherwise reproduced without prior written consent of Red Hat, Inc. If you believe Red Hat training materials
are being improperly used, copied, or distributed please email <training@redhat.com> or phone toll-free (USA) +1 (866) 626 2994 or +1 (919) 754 3700.
Repository History
The repository usually keeps a record of important events which can be accessed with the cvs history command. By
default it displays all checkouts by the user running the command, but it can report on operations performed by a
particular user or any user, commits, updates, or a number of other advanced operations. Each history line starts with a
single letter code indicating the type of event, followed by the time of the event, the user accessing the repository, and
then information about the exact operation performed. Some common letter codes are:
• O: Checkout
• M: New file revision committed
• A: New file addition committed
• R: File removal committed
To list all history events, use the -e option. To list all events for a particular user, use -u username.
All the times reported by cvs history are in UTC by default. You can use the -z timezone option to specify a different
timezone. It can take offsets from UTC (like -0500), which is the preferred format. Alternatively, you may be able to
use one of the more common “unofficial” time zone abbreviations, like EST or CET:
[paul@miskatonic]$ cvs history -a -c -z -0500
[...]
M 2002-09-06 16:07 -0500 ash 1.17 hosts.deny servers/etc
== <remote>
The sample entry above indicates that revision 1.17 of the file servers/etc/hosts.deny in the repository was
committed by user ash using a remote mechanism at 4:07 PM CDT on September 6, 2002.](https://image.slidesharecdn.com/rh401rhel5-150518071859-lva1-app6892/85/Rh401-rhel5-2-146-320.jpg)
![Copyright © 2007 Red Hat, Inc.
All rights reserved
RH401-RHEL5-en-2-20070508
Unit 5 Page 125
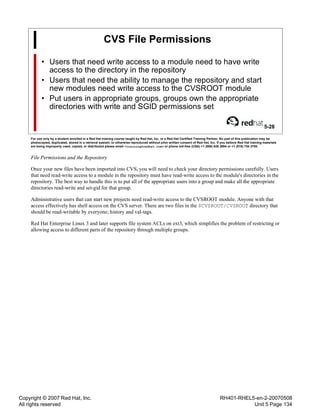
Examining Old Revisions
• To view log entries for each revision of a file:
• cvs log file
• The -d option can limit output by time period; time zone is UTC unless
specified
• To compare a current file to an old revision:
• cvs diff -r oldrev file
5-19
For use only by a student enrolled in a Red Hat training course taught by Red Hat, Inc. or a Red Hat Certified Training Partner. No part of this publication may be
photocopied, duplicated, stored in a retrieval system, or otherwise reproduced without prior written consent of Red Hat, Inc. If you believe Red Hat training materials
are being improperly used, copied, or distributed please email <training@redhat.com> or phone toll-free (USA) +1 (866) 626 2994 or +1 (919) 754 3700.
History for Individual Files
Rather than being interested in the history of all operations on the repository, you may be interested in specific
changes made to a particular file. There are a couple of commands that are useful for this purpose.
cvs log file will output all the log messages recorded for each revision of file, when and who committed those
revisions, and the “head” (current) revision number of the file in the repository. The -d option can be used to limit
the output by a particular time period. Using the argument < date will display all records from date and earlier, >
date means to display all records from date and later, and date1<date2 means to display all records between
date1 and date2. This can be confusing, since -d assumes times are in the local time zone by default, while the log
output records times in UTC:
[paul@miskatonic]$ cvs log -d '<2002-09-06 16:30' hosts.deny
[...]
---------------------------
revision 1.17
date: 2002/09/06 21:07:22; author: ash; state: Exp;
lines: +1 -0
Prohibited access from necronomicon.com
---------------------------
[...]
It looks like paul's command says he wants all log entries from 16:30 and earlier on the 6th, but the timestamp on the
entry he got is 21:07! What is happening? The log entry time stamp is in UTC, and the time on paul's command line is
assumed to be in the machine's local timezone. In this case, miskatonic is in the CDT (-0500) time zone; 16:30 CDT is
the same as 21:30 UTC.
Another useful command is cvs diff, which can be used to compare an old version in the repository with the copy of
the file in your working directory:
cvs diff -r 1.16 hosts.deny
This command may take many different options to output various diff formats. The command is useful if the
comments in the change log aren't sufficiently clear.](https://image.slidesharecdn.com/rh401rhel5-150518071859-lva1-app6892/85/Rh401-rhel5-2-147-320.jpg)


![Copyright © 2007 Red Hat, Inc.
All rights reserved
RH401-RHEL5-en-2-20070508
Lab 5 Sequence 2 Page 142
Sequence 2: Starting a New Project in CVS
Scenario: In this sequence we will set up a new project in the CVS repository for some
DNS configuration files we plan to use on our new name server.
Instructions:
1. As root on server, run the following commands to set up the module directory in the
repository and make it writable by members of group cvsusers and implement sgid
permission so that all files created within the module directory are group owned and
writable by cvsusers:
cd /var/local/cvs; mkdir dnsfiles
chgrp -R cvsadmin /var/local/cvs
chgrp -R cvsusers /var/local/cvs/dnsfiles
chmod g+ws /var/local/cvs /var/local/cvs/dnsfiles
2. Now we need to get the existing DNS configuration templates into the repository. As oliver
on station:
[oliver]$ mkdir -p ~/source/{etc,var/named}; cd ~/source
Use anonymous FTP to download all the files in /pub/namedfiles from
server1.example.com into ~/source. Then, move the files into appropriate directories:
[oliver]$ mv named.conf etc/
[oliver]$ mv *.zone var/named/](https://image.slidesharecdn.com/rh401rhel5-150518071859-lva1-app6892/85/Rh401-rhel5-2-164-320.jpg)
![Copyright © 2007 Red Hat, Inc.
All rights reserved
RH401-RHEL5-en-2-20070508
Lab 5 Sequence 2 Page 143
3. Now oliver will import all of these files into CVS (from within
/home/oliver/source):
[oliver]$ cvs import dnsfiles training start
Note that dnsfiles corresponds to the module directory above but training is simply
an arbitrary value we have chosen for the “vendor” argument.
The default text editor should open. Edit the file to contain a log entry, then save and quit:
Original files imported.
CVS:
----------------------------------------------------------------
------
CVS: Enter Log. Lines beginning with `CVS:' are removed
automatically
CVS:
CVS:
----------------------------------------------------------------
------
You should see output like the following:
N dnsfiles/var/named/127.0.0.zone
N dnsfiles/var/named/192.168.0.X.zone
N dnsfiles/var/named/domainX.example.com.zone
N dnsfiles/etc/named.conf
No conflicts created by this import.
4. Now that the files are safely in the repository, get rid of the original downloaded copies so
we do not get confused later on:
[oliver]$ cd; rm -rf ~/source](https://image.slidesharecdn.com/rh401rhel5-150518071859-lva1-app6892/85/Rh401-rhel5-2-165-320.jpg)
![Copyright © 2007 Red Hat, Inc.
All rights reserved
RH401-RHEL5-en-2-20070508
Lab 5 Sequence 3 Page 144
Sequence 3: Getting and Working With Files
Instructions:
1. On one of the machines, log in as oliver, and create a working directory:
[oliver]$ mkdir ~/cvs-work
2. Change directory into ~/cvs-work and checkout the DNS files from the repository:
[oliver]$ cd ~/cvs-work
[oliver]$ cvs checkout dnsfiles
You should see output like the following:
cvs checkout: Updating dnsfiles
U dnsfiles/var/named/127.0.0.zone
U dnsfiles/var/named/192.168.0.X.zone
U dnsfiles/var/named/domainX.example.com.zone
U dnsfiles/etc/named.conf
Look in ~/cvs-work/dnsfiles for the files you just checked out.
3. Change directory into ~/cvs-work/dnsfiles/etc. Open named.conf in a text
editor like you normally would. Find the comments that read REPLACE X HERE WITH
YOUR STATION NUMBER and change the occurrences of X in the zone declarations to
the last octet of your RHEL4 AS station's IP address.
4. Commit oliver's changes. We will use the -m option to enter the log message:
[oliver]$ cvs commit -m “Replaced X with station's IP.”](https://image.slidesharecdn.com/rh401rhel5-150518071859-lva1-app6892/85/Rh401-rhel5-2-166-320.jpg)
![Copyright © 2007 Red Hat, Inc.
All rights reserved
RH401-RHEL5-en-2-20070508
Lab 5 Sequence 3 Page 145
5. In another window, log in to one of the machines as stan. Repeat steps 1 and 2 to create
a working directory in stan's home directory, and have stan checkout a copy of dnsfiles.
Examine named.conf. The changes made by oliver should appear in that file.
6. As stan, edit 192.168.0.X.zone to replace every X with the last byte of your RHEL4 AS
station's IP address. Commit stan's changes.
7. As oliver, update your working directory:
[oliver]$ cvs update
You should get an updated revision of 192.168.0.X.zone with stan's changes applied.](https://image.slidesharecdn.com/rh401rhel5-150518071859-lva1-app6892/85/Rh401-rhel5-2-167-320.jpg)
![Copyright © 2007 Red Hat, Inc.
All rights reserved
RH401-RHEL5-en-2-20070508
Lab 5 Sequence 4 Page 146
Sequence 4: Moving Files
Instructions:
1. As stan, cd to dnsfiles/var/named. Use mv to rename 192.168.0.X.zone so that X is
the last byte of your RHEL4 AS station's IP address (given as N below).
[stan]$ mv 192.168.0.X.zone 192.168.0.N.zone
2. Remove the old filename from CVS.
[stan]$ cvs remove 192.168.0.X.zone
3. Add the new filename to CVS.
[stan]$ cvs add 192.168.0.N.zone
4. Commit your changes. Make sure that you log what filename you are changing from and
what filename you are changing to!
[stan]$ cvs commit -m “Moved 192.168.0.X.zone to
192.168.0.N.zone”
How do moves affect logs?
[ stan ] $ cvs log 192.168.0.N.zone
[ stan ] $ cvs log 192.168.0.X.zone
Note that log entries for the older name end with the move, and that entries for the new file
begin with the move. The log message entered it the only thing associating the one with the
other, so making such a log entry is an important practice.
5. Repeat steps 1 through 4 for the domainX.example.com.zone file.](https://image.slidesharecdn.com/rh401rhel5-150518071859-lva1-app6892/85/Rh401-rhel5-2-168-320.jpg)
![Copyright © 2007 Red Hat, Inc.
All rights reserved
RH401-RHEL5-en-2-20070508
Lab 5 Sequence 4 Page 147
6. Have the other user update their working copy and see what happens.
[oliver]$ cvs update](https://image.slidesharecdn.com/rh401rhel5-150518071859-lva1-app6892/85/Rh401-rhel5-2-169-320.jpg)
![Copyright © 2007 Red Hat, Inc.
All rights reserved
RH401-RHEL5-en-2-20070508
Lab 5 Sequence 5 Page 148
Sequence 5: Dealing with Conflicts
Instructions:
1. Have stan open domainN.example.com.zone in a text editor. Change only the Xs on
the SOA line to the last byte of your RHEL4 AS station's IP address:
@ IN SOA stationN.domainN.example.com.
root.stationN.domainN.example.com. (
Save, exit, and commit the changes.
2. Without updating first, have oliver open domainN.example.com.zone in a text editor.
Change only the Xs on the NS record line (the one that starts IN NS) to the last byte of
station's IP address. Save, exit, and have oliver attempt to commit the changes. This should
fail:
[oliver]$ cvs commit
cvs commit: Examining .
cvs commit: Up-to-date check failed for
`domainX.example.com.zone'
cvs [commit aborted]: correct above errors first!
3. Have oliver update his working directory. The updated copy of domainN.example.com.zone
that stan checked into the repository should automatically merge with oliver's changes:
[oliver]$ cvs update
cvs update: Updating .
RCS file:
/var/local/cvs/dnsfiles/var/named/domainN.example.com.zone,v
retrieving revision 1.1
retrieving revision 1.2
Merging differences between 1.1 and 1.2 into
domainN.example.com.zone
M domainN.example.com.zone
4. Finally, have oliver attempt to commit his changes again. This time it should succeed.](https://image.slidesharecdn.com/rh401rhel5-150518071859-lva1-app6892/85/Rh401-rhel5-2-170-320.jpg)
![Copyright © 2007 Red Hat, Inc.
All rights reserved
RH401-RHEL5-en-2-20070508
Lab 5 Sequence 5 Page 149
5. Have stan update his working directory before we go on to the next set of changes.
6. Now have stan open domainN.example.com.zone again, and change the Mail
Exchanger record to the last byte of your RHEL4 AS station's IP address. Be careful that
you do not change the X in MX. Commit.
7. Have oliver do the same thing, but also change the MX record priority to 15:
domainN.example.com. IN MX 15 stationN.domainN.example.com.
8. Have oliver attempt to commit. This will fail again due to conflicts. Now have oliver update
to try to automatically merge the conflicts like before. This time, the automatic merge will
also fail, since the conflicting changes are on the same line:
[oliver]$ cvs update
cvs update: Updating .
RCS file:
/var/local/cvs/dnsfiles/var/named/domainN.example.com.zone,v
retrieving revision 1.3
retrieving revision 1.4
Merging differences between 1.3 and 1.4 into
domainN.example.com.zone
rcsmerge: warning: conflicts during merge
cvs update: conflicts found in domainN.example.com.zone
C domainN.example.com.zone
Have oliver attempt to commit again anyway, so you can see what that error message looks
like.](https://image.slidesharecdn.com/rh401rhel5-150518071859-lva1-app6892/85/Rh401-rhel5-2-171-320.jpg)


![Copyright © 2007 Red Hat, Inc.
All rights reserved
RH401-RHEL5-en-2-20070508
Lab 7 Sequence 1 Page 192
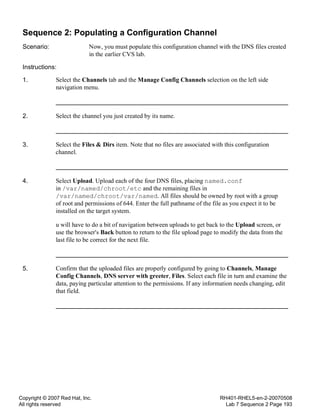
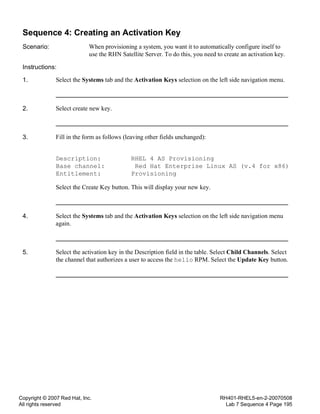
Sequence 1: Creating a Configuration Channel
Scenario: First, you must create the configuration channel.
Instructions:
1. Log in as stan or oliver on a machine where you have a checked-out CVS working
directory. Start a web browser.
2. From the web browser, log into your satellite server. Select the Channels tab and the
Manage Config Channels selection on the left side navigation menu.
3. At this point, no configuration channels should exist. Select create new config channel.
4. Enter the following information:
Name: DNS Server with Greeter
Label: dns-server-with-greeter
Description: [ Enter some useful description. ]
5. Select the Create Config Channel button.](https://image.slidesharecdn.com/rh401rhel5-150518071859-lva1-app6892/85/Rh401-rhel5-2-214-320.jpg)
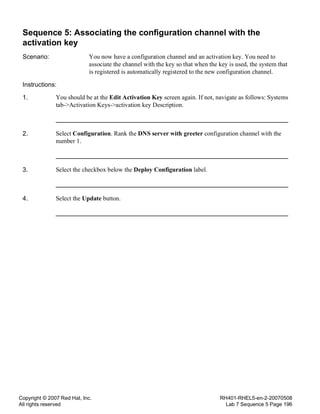
![Copyright © 2007 Red Hat, Inc.
All rights reserved
RH401-RHEL5-en-2-20070508
Lab 7 Sequence 8 Page 199
Sequence 8: Create a kickstart file
Scenario: Now that we have a kickstart distribution, we can create a kickstart profile.
Instructions:
1. Select the Systems tab. Select the Kickstart entry on the left side navigation toolbar. Select
create new kickstart.
2. Fill in the form as follows:
Name: DNS Server
Label: dns-server
Distribution: Select the most recently updated RHEL 4
distribution appropriate for your system
Active: [ leave this button checked ]
3. Select the Select Kickstart Options button.
4. Make any changes you consider appropriate. Changes to consider are:
Timezone
Hardware Clock uses UTC
Root Password (required)
5. Select the Create Kickstart button.](https://image.slidesharecdn.com/rh401rhel5-150518071859-lva1-app6892/85/Rh401-rhel5-2-221-320.jpg)


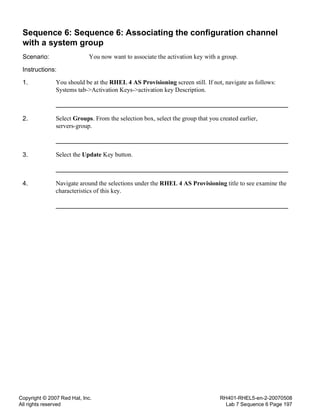
![Copyright © 2007 Red Hat, Inc.
All rights reserved
RH401-RHEL5-en-2-20070508
Lab 10 Sequence 1 Solutions Page 254
Sequence 1 Solutions
1. Using yum, install the packages needed to set up the Xen virtualization environment:
kernel-xen, xen, and virt-manager.
a. yum -y install kernel-xen xen virt-manager
2. Edit the grub.conf file to make the xen kernel boot by default.
a. If the Xen kernel is the first kernel listed in /boot/grub/grub.conf, then edit
that file to set default=0.
3. Reboot to the Hypervisor and virtualization enable kernel. Verify that the kernel name has
"xen" in it using the uname command.
a. [root@stationX]# reboot
Note that several items may fail including kdump and Intel microcode.
b. [root@stationX]# uname -r
2.6.18-8.el5xen](https://image.slidesharecdn.com/rh401rhel5-150518071859-lva1-app6892/85/Rh401-rhel5-2-276-320.jpg)
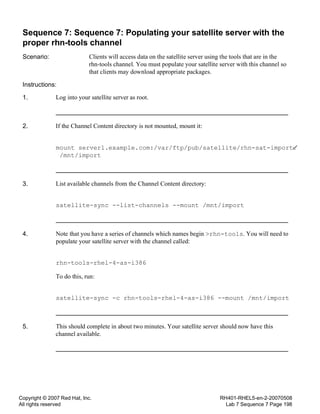
![Copyright © 2007 Red Hat, Inc.
All rights reserved
RH401-RHEL5-en-2-20070508
Lab 10 Sequence 2 Solutions Page 255
Sequence 2 Solutions
1. Using virt-manager create a new virtual machine using the following configuration
information:
• System Name: vm0
• Root Password: redhat
• Install Media URL: ftp://server1/pub
• VM Max Memory: 256 MB
• VCPUS: 1
• Simple File with File Location: /var/lib/xen/images/vm0.img
To create the new virtual machine, do the following:
a. Run the Virtual Machine Manager.
[root@stationX]# virt-manager
b. When the Open Connection dialog appears, select Local Xen host and click Connect.
c. The Virtual Machine Manager window will open. Start the new virtual system
wizard by selecting New Machine... from the File menu. Click Forward.
d. For System Name enter vm0 and click Forward.
e. Select Paravirtualized and click Forward.
f. For Install Media URL enter ftp://server1/pub. Click Forward.
g. Select Simple File, enter /var/lib/xen/images/vm0.img as the File
Location, and set the File Size to 2000 MB. Click Forward.
h. Set VM Max Memory and Vm Startup Memory to 256 MB and the number of
VCPUs to 1. Click Forward.
i. Review the summary screen and click Finish to boot and kickstart the new virtual
machine.
j. A new New Keyring Password dialog will open. Enter redhat as the password.
Click OK.
k. A window will open and the installer will run. When promped to enter an installation
number select skip. Choose the default options, and only the defualt packages. When
the installation finishes, select Reboot in the virtual machine's window. NOTE: The
new virtual machine will actually be shutdown even though Reboot is selected.](https://image.slidesharecdn.com/rh401rhel5-150518071859-lva1-app6892/85/Rh401-rhel5-2-277-320.jpg)

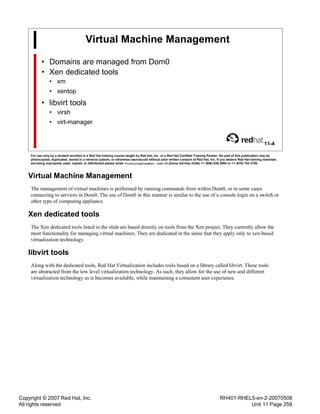
![Copyright © 2007 Red Hat, Inc.
All rights reserved
RH401-RHEL5-en-2-20070508
Unit 11 Page 260
xm
• Command Line Virtual Machine Management
• Usage:
• xm command [switches] [arguments] [variables]
• xm help
11-5
For use only by a student enrolled in a Red Hat training course taught by Red Hat, Inc. or a Red Hat Certified Training Partner. No part of this publication may be
photocopied, duplicated, stored in a retrieval system, or otherwise reproduced without prior written consent of Red Hat, Inc. If you believe Red Hat training materials
are being improperly used, copied, or distributed please email <training@redhat.com> or phone toll-free (USA) +1 (866) 626 2994 or +1 (919) 754 3700.
xm
The primary Xen tool for managing virtual machines is the xm command line tool.
The xm tool sends commands to the Hypervisor. It is important to note that most commands are executed by the
Hypervisor asynchronously.
After entering a command, the prompt will usually return immediately even though the command may not have yet
completed. Some actions, such as starting up or shutting down a DomU virtual machine, may take 30 seconds or more
to complete. It is always important to verify that a command has completed, never assume!](https://image.slidesharecdn.com/rh401rhel5-150518071859-lva1-app6892/85/Rh401-rhel5-2-282-320.jpg)
![Copyright © 2007 Red Hat, Inc.
All rights reserved
RH401-RHEL5-en-2-20070508
Unit 11 Page 261
xm create
• Instantiates a running instance of a virtual machine
• Usage
• xm [-c] create configfile [name=value]...
11-6
For use only by a student enrolled in a Red Hat training course taught by Red Hat, Inc. or a Red Hat Certified Training Partner. No part of this publication may be
photocopied, duplicated, stored in a retrieval system, or otherwise reproduced without prior written consent of Red Hat, Inc. If you believe Red Hat training materials
are being improperly used, copied, or distributed please email <training@redhat.com> or phone toll-free (USA) +1 (866) 626 2994 or +1 (919) 754 3700.
xm create
By default, a domain will be created with all the options as specified in the named configuration file. Adding the -c
option will open a connection to the domain's virtual serial console.
[root@stationX]# xm create webserver
Using config file "/etc/xen/webserver".
Going to boot Red Hat Enterprise Linux Server (2.6.18-8.el5xen)
kernel: /boot/vmlinuz-2.6.18-8.el5xen
initrd: /boot/initrd-2.6.18-8.el5xen.img
Started domain webserver
Any value in a domain's configuration file may be overridden by specifying it in the xm create command.
[root@stationX]# xm create webserver memory="512"](https://image.slidesharecdn.com/rh401rhel5-150518071859-lva1-app6892/85/Rh401-rhel5-2-283-320.jpg)
![Copyright © 2007 Red Hat, Inc.
All rights reserved
RH401-RHEL5-en-2-20070508
Unit 11 Page 262
xm list
• Display information about domains
[root@stationX]# xm list
Name ID Mem(MiB) VCPUs State Time(s)
Domain-0 0 940 1 r----- 30028.8
11-7
For use only by a student enrolled in a Red Hat training course taught by Red Hat, Inc. or a Red Hat Certified Training Partner. No part of this publication may be
photocopied, duplicated, stored in a retrieval system, or otherwise reproduced without prior written consent of Red Hat, Inc. If you believe Red Hat training materials
are being improperly used, copied, or distributed please email <training@redhat.com> or phone toll-free (USA) +1 (866) 626 2994 or +1 (919) 754 3700.
xm list
Prints information about one or more domains. If no domains are specified it prints out information about all domains.
The following fields are displayed in the list output:
name The name of the virtual machine.
domid The number of the domain ID in which this virtual machine is running.
memory Memory size in megabytes.
vcpus The number of virtual CPUs used by each domain.
state There are five state fields:
r running – the domain is running
b blocked – the domain is blocked, waiting on a resource
p paused – the domain is suspended
s shutdown – the domain is in the process of shutting down
c crashed – the domain has crashed (you are unlikely to see this as a crashed domain ceases to run
and would drop off the list entirely)
cputime How much CPU time (in seconds) used by each domain.](https://image.slidesharecdn.com/rh401rhel5-150518071859-lva1-app6892/85/Rh401-rhel5-2-284-320.jpg)
![Copyright © 2007 Red Hat, Inc.
All rights reserved
RH401-RHEL5-en-2-20070508
Unit 11 Page 263
Basic xm commands
• pause/unpause
• save/restore
• shutdown/reboot
• destroy
11-8
For use only by a student enrolled in a Red Hat training course taught by Red Hat, Inc. or a Red Hat Certified Training Partner. No part of this publication may be
photocopied, duplicated, stored in a retrieval system, or otherwise reproduced without prior written consent of Red Hat, Inc. If you believe Red Hat training materials
are being improperly used, copied, or distributed please email <training@redhat.com> or phone toll-free (USA) +1 (866) 626 2994 or +1 (919) 754 3700.
xm pause/unpause
[root@stationX]# xm pause|unpause domain
Using the pause and unpause commands you may suspend a domain in memory and resume it, respectively. A paused
domain still consumes memory and file descriptors but not CPU time.
xm save/restore
[root@stationX]# xm save domain statefile
Saves a running domain to a state file so that it can be restored later. Once the save completes, the domain will no
longer exist or consume resources.
[root@stationX]# xm restore domain statefile
Creates a domain from the named state file. This is similar to taking a computer out of hibernation.
xm shutdown/reboot
[root@stationX]# xm shutdown|reboot domain
Use the shutdown command to gracefully shutdown a domain, as if you had typed “shutdown -h now” on the console
of the domain. Similarly, the reboot will reboot a domain as if you had logged in and typed “shutdown -r now” on the
console.
xm destroy
[root@stationX]# xm destroy domain
The destroy command immediately kills a domain. It is the equivalent of pulling the virtual power cord out of a
virtual machine.](https://image.slidesharecdn.com/rh401rhel5-150518071859-lva1-app6892/85/Rh401-rhel5-2-285-320.jpg)
![Copyright © 2007 Red Hat, Inc.
All rights reserved
RH401-RHEL5-en-2-20070508
Unit 11 Page 265
virsh
• Command Line Virtual Machine Management
• Usage:
• virsh [command] [domID|domain-name|UUID] [options]
• Same basic commands as xm
• Optional interactive shell mode
11-10
For use only by a student enrolled in a Red Hat training course taught by Red Hat, Inc. or a Red Hat Certified Training Partner. No part of this publication may be
photocopied, duplicated, stored in a retrieval system, or otherwise reproduced without prior written consent of Red Hat, Inc. If you believe Red Hat training materials
are being improperly used, copied, or distributed please email <training@redhat.com> or phone toll-free (USA) +1 (866) 626 2994 or +1 (919) 754 3700.
virsh
The virsh program is the main libvirt-based tool for managing domains. The program can be used to create, suspend,
resume, save, and shutdown domains. It can also be used to list current domains and to get information about domains.
Use of virsh is encouraged as it is intended to be the long term management tool for Red Hat Virtualization.
Interactive terminal
[root@stationX]# virsh
Welcome to virsh, the virtualization interactive terminal.
Type: 'help' for help with commands
'quit' to quit
virsh # list
Id Name State
----------------------------------
0 Domain-0 running
1 webserver blocked
virsh # dominfo webserver
Id: 1
Name: webserver
UUID: 70a309f0-909a-7cb0-5457-b439d04a00a9
OS Type: linux
State: blocked
CPU(s): 1
CPU time: 120.1s
Max memory: 262144 kB
Used memory: 261968 kB
virsh # quit](https://image.slidesharecdn.com/rh401rhel5-150518071859-lva1-app6892/85/Rh401-rhel5-2-287-320.jpg)
![Copyright © 2007 Red Hat, Inc.
All rights reserved
RH401-RHEL5-en-2-20070508
Unit 11 Page 266
On-The-Fly Resource Management
• Memory
• DomU memory may be raised or lowered on-the-fly
• Max memory cannot exceed the amount set at the time the domain was
created
• CPU
• Number of CPUs in DomU may be raised or lowered on-the-fly
• Max numbers of CPUs cannot exceed the number set at the time the domain
was created
• DomUs may be "pinned" to physical CPUs
11-11
For use only by a student enrolled in a Red Hat training course taught by Red Hat, Inc. or a Red Hat Certified Training Partner. No part of this publication may be
photocopied, duplicated, stored in a retrieval system, or otherwise reproduced without prior written consent of Red Hat, Inc. If you believe Red Hat training materials
are being improperly used, copied, or distributed please email <training@redhat.com> or phone toll-free (USA) +1 (866) 626 2994 or +1 (919) 754 3700.
Memory
The amount of memory used by a DomU may be configured on-the-fly with either xm or virsh. Memory may be
adjusted up or down but may not exceed the amount set at the time the domain was created.
[root@stationX]# xm mem-set domain MB
[root@stationX]# virsh setmem domain|domID|UUID KB
Virtual CPU
The number of virtual CPUs in a DomU may be configured on-the-fly with either xm or virsh. This number may be
adjusted up or down but may not exceed the value set at the time the domain was created.
[root@stationX]# xm vcpu-set domain number
[root@stationX]# virsh setvcpus domain|domID|UUID number
CPU Pinning
Normally, each virtual CPU in a DomU may use cycles from all physical CPUs. The Hypervisor schedules CPU time
as needed for each DomU. This also means that all domains (including Dom0) are competing for the same pool of
CPU time. In some instances it may be necessary to change this behavior.
Also known as setting CPU affinity, CPU pinning allows a DomU to be restricted so that it only uses one or more
designated physical CPUs. Further, each virtual CPU in a DomU is independently pinned, offering flexibility. CPU
pinning may be set with either xm or virsh.
[root@stationX]# xm vcpu-pin domain VCPU CPU
[root@stationX]# virsh vcpupin domain|domID|UUID VCPU CPU,...
To lock the virtual CPU of DomU webserver to use only the second CPU (CPU number 1), use the following
command:](https://image.slidesharecdn.com/rh401rhel5-150518071859-lva1-app6892/85/Rh401-rhel5-2-288-320.jpg)
![Copyright © 2007 Red Hat, Inc.
All rights reserved
RH401-RHEL5-en-2-20070508
Unit 11 Page 267
[root@stationX]# virsh vcpupin webserver 0 1](https://image.slidesharecdn.com/rh401rhel5-150518071859-lva1-app6892/85/Rh401-rhel5-2-289-320.jpg)
![Copyright © 2007 Red Hat, Inc.
All rights reserved
RH401-RHEL5-en-2-20070508
Unit 11 Page 268
Accessing DomU Consoles
• DomU consoles may be accessed via commands in Dom0
• To access a virtual serial console
• xm console domain
• To access a graphical console
• Virtual Machine Manager
• vnc
11-12
For use only by a student enrolled in a Red Hat training course taught by Red Hat, Inc. or a Red Hat Certified Training Partner. No part of this publication may be
photocopied, duplicated, stored in a retrieval system, or otherwise reproduced without prior written consent of Red Hat, Inc. If you believe Red Hat training materials
are being improperly used, copied, or distributed please email <training@redhat.com> or phone toll-free (USA) +1 (866) 626 2994 or +1 (919) 754 3700.
Virtual Serial Consoles
Virtual serial consoles on DomUs may be accessed from Dom0 with the following command:
[root@stationX]# xm console domain
To escape from the console of a DomU type Ctrl-] as in a telnet session.
Graphical Consoles
To access a graphical console with Virtual Machine Manager highlight the domain you wish to access and click
Open.
In order to access a graphical console of a DomU with vnc, the domain must be configured to allow such connections.](https://image.slidesharecdn.com/rh401rhel5-150518071859-lva1-app6892/85/Rh401-rhel5-2-290-320.jpg)

![Copyright © 2007 Red Hat, Inc.
All rights reserved
RH401-RHEL5-en-2-20070508
Lab 11 Sequence 1 Solutions Page 275
Sequence 1 Solutions
1. Use the xm create command to boot up the virtual system installed in the previous lab.
a. [root@stationX]# xm create vm0](https://image.slidesharecdn.com/rh401rhel5-150518071859-lva1-app6892/85/Rh401-rhel5-2-297-320.jpg)
![Copyright © 2007 Red Hat, Inc.
All rights reserved
RH401-RHEL5-en-2-20070508
Lab 11 Sequence 2 Solutions Page 276
Sequence 2 Solutions
1. What is the IP address of your DomU, vm0?
Once vm0 is up, login and find your IP address.
a. [root@stationX]# xm console vm0
b. Login as root.
c. [root@vm0]# ip a
inet 192.168.0.Y
2. How much memory is being used by your DomU, vm0?
There is more than one way to get this information about a DomU. One way is to use xm:
a. [root@stationX]# xm list vm0
Name ID Mem(MiB) VCPUs State Time(s)
vm0 2 255 1 -b---- 219.6
In this case, the answer reported is 255.
3. What is the current domID of your DomU, vm0?
There is more than one way to get this information about a DomU. One way is to use xm as
in the previous question:
a. [root@stationX]# xm list vm0
Name ID Mem(MiB) VCPUs State Time(s)
vm0 2 255 1 -b---- 219.6
Another way is to use virsh:
a. [root@stationX]# virsh domid vm0
2
In either case, the answer reported is 2.
4. What is the UUID of your DomU, vm0?
Use the virsh to list this information. It may be used interactively or non-interactively. In
the example below it is used non-interactively.
a. [root@stationX]# virsh dominfo vm0
Id: 2
Name: vm0
UUID: 1293808f-8919-10ff-5b2f-c38e29f377ea
OS Type: linux
State: blocked
CPU(s): 1](https://image.slidesharecdn.com/rh401rhel5-150518071859-lva1-app6892/85/Rh401-rhel5-2-298-320.jpg)

![Copyright © 2007 Red Hat, Inc.
All rights reserved
RH401-RHEL5-en-2-20070508
Lab 11 Sequence 3 Solutions Page 278
Sequence 3 Solutions
1. Gracefully shutdown vm0.
[root@stationX]# xm shutdown vm0
2. Create vm0 with 512mb of memory.
[root@stationX]# xm create vm0 memory=512
3. How much memory is now available inside vm0?
Login to vm0 and run the following command:
[root@vm0X]# cat /proc/meminfo | grep MemTotal
MemTotal: 524288 kB
4. Change the amount of memory used by vm0 to 256.
[root@stationX]# virsh setmem vm0 262144
5. How much memory is now available inside vm0?
Login to vm0 and run the following command:
[root@vm0X]# cat /proc/meminfo | grep MemTotal
MemTotal: 262144 kB](https://image.slidesharecdn.com/rh401rhel5-150518071859-lva1-app6892/85/Rh401-rhel5-2-300-320.jpg)


![Copyright © 2007 Red Hat, Inc.
All rights reserved
RH401-RHEL5-en-2-20070508
Unit 12 Page 282
Virtual Machine Configuration
• Plain text configuration file
• /etc/xen/domain
• Created by utilities at install
• Virtual Machine Manager
• virt-install
• May be created by hand (or script) for maximum flexibility
12-4
For use only by a student enrolled in a Red Hat training course taught by Red Hat, Inc. or a Red Hat Certified Training Partner. No part of this publication may be
photocopied, duplicated, stored in a retrieval system, or otherwise reproduced without prior written consent of Red Hat, Inc. If you believe Red Hat training materials
are being improperly used, copied, or distributed please email <training@redhat.com> or phone toll-free (USA) +1 (866) 626 2994 or +1 (919) 754 3700.
Virtual Machine Configuration Files
The configuration files for DomUs are located in the /etc/xen/ directory of Dom0. Each DomU typically has
its own configuration file. It is also possible to create domains without a configuration file. This is accomplished by
passing all options to xm at the command line or in a python script using libvirt.
[root@stationX]# cat /etc/xen/example
# example domain-u config file
name = "server100"
memory = "256"
disk = [ 'file:/var/lib/xen/images/server100.img,hda,w' ]
vif = [ 'mac=00:16:3e:66:06:aa' ]
vfb = ["type=vnc,vncunused=1"]
uuid = "1293808f-8919-10ff-5b2f-c38e29f377ea"
bootloader="/usr/bin/pygrub"
on_reboot = 'restart'
on_crash = 'restart'
For detailed information on the options available for DomU configuration files see The Red Hat Virtualization Guide
or xmdomain.cfg(5).](https://image.slidesharecdn.com/rh401rhel5-150518071859-lva1-app6892/85/Rh401-rhel5-2-304-320.jpg)
![Copyright © 2007 Red Hat, Inc.
All rights reserved
RH401-RHEL5-en-2-20070508
Unit 12 Page 283
Virtual Machine Memory
• Suggested minimum: 256MiB
• Absolute minimum depends on application
• Maximum depends on hardware architecture
12-5
For use only by a student enrolled in a Red Hat training course taught by Red Hat, Inc. or a Red Hat Certified Training Partner. No part of this publication may be
photocopied, duplicated, stored in a retrieval system, or otherwise reproduced without prior written consent of Red Hat, Inc. If you believe Red Hat training materials
are being improperly used, copied, or distributed please email <training@redhat.com> or phone toll-free (USA) +1 (866) 626 2994 or +1 (919) 754 3700.
Virtual Machine Memory
Similar to a phsyical computer, the amount of memory needed by a virtual machine is highly dependent on the
application that will run on the virtual machine. While 256MiB is the suggested minimum, it is possible to create a
functioning virtual machine with less by restricting the packages which are installed.
Although the amount of memory assigned to a running virtual machine mabye be adjusted up or down, it may
never exceed the value used at the time domain creation. Thus it be useful to initially allocate more memory than is
needed. Also, there is currently no support for over-commiting memory. If the amount of memory called for in the
configuration file is not available at the time of doimain creation, the domain will not be created.
Hardware Limits
The maximum memory support for the total physical is limited by the hardware type. Currently the following is
supported:
32bit (x86) systems: up to 16GiB physical memory
64bit (x86_64) systems: up to 32GiB physical memory
Configuration File
In the DomU configuration file, the memory amount is specified in MiBs.
[root@stationX]# cat /etc/xen/example | grep memory
memory = "256"](https://image.slidesharecdn.com/rh401rhel5-150518071859-lva1-app6892/85/Rh401-rhel5-2-305-320.jpg)
![Copyright © 2007 Red Hat, Inc.
All rights reserved
RH401-RHEL5-en-2-20070508
Unit 12 Page 284
Virtual Machine Storage
• Exported from Dom0 as virtual block device
• Backend options
• Block device
• Image file
12-6
For use only by a student enrolled in a Red Hat training course taught by Red Hat, Inc. or a Red Hat Certified Training Partner. No part of this publication may be
photocopied, duplicated, stored in a retrieval system, or otherwise reproduced without prior written consent of Red Hat, Inc. If you believe Red Hat training materials
are being improperly used, copied, or distributed please email <training@redhat.com> or phone toll-free (USA) +1 (866) 626 2994 or +1 (919) 754 3700.
Virtual Block Devices
The drive that is used by a virtual machine is known as a virtual block device. To the virtual machine, this will appear
as a device such as /dev/xvda and may be partitioned and used just like an drive on any computer. The actual
devices used for storage are managed in Dom0 and exported to DomUs. These actual devices are known as backend
devices. Any valid block device in Dom0 maybe be used as a backend to a virtual block device, as well as an image
file.
Block Devices
Any device that is seen by the kernel in Dom0 may be export to a DomU as a virtual block device. This includes all of
the following examples.
A raw drive: /dev/sdc
A raw partition: /dev/hda9
A logical volume: /dev/VolGroup00/vbd1
A software raid device: /dev/md0
Additional possbilities include san devices, iscsi targets, gnbd nodes, and any other valid block device.
Image Files
An image file may also be used as the backend of a virtual block device. Both standard and sparse files are supported.
The directory /var/spool/xen/images is provided for storing image files. Both types of image file are created
with dd.
To create a 4GiB image file called hd.img:
[root@stationX]# dd if=/dev/zero of=hd.img bs=1M count=4096
To create a 4GiB sparse image file called hd.img:
[root@stationX]# dd if=/dev/zero of=hd.img bs=1M count=1 seek=4096
A sparse image file has the advantage that it takes up only the space used by the actual data written to it. A standard
image file always takes up the space of its full size.](https://image.slidesharecdn.com/rh401rhel5-150518071859-lva1-app6892/85/Rh401-rhel5-2-306-320.jpg)
![Copyright © 2007 Red Hat, Inc.
All rights reserved
RH401-RHEL5-en-2-20070508
Unit 12 Page 285
Configuration File
[root@stationX]# cat /etc/xen/example | grep disk
disk = ['phy:sdb7,xvda,w']
disk = ['file:/var/spool/xen/images/server100.img,xvdb,w']
The fields in the above examples are: type,device/file,vbd (name seen in DomU),writable (r = read only).](https://image.slidesharecdn.com/rh401rhel5-150518071859-lva1-app6892/85/Rh401-rhel5-2-307-320.jpg)
![Copyright © 2007 Red Hat, Inc.
All rights reserved
RH401-RHEL5-en-2-20070508
Unit 12 Page 286
Virtual Machine Network Devices
• Virtual Cross-Over Cables
• Default Virtual Network
• MAC addresses
12-7
For use only by a student enrolled in a Red Hat training course taught by Red Hat, Inc. or a Red Hat Certified Training Partner. No part of this publication may be
photocopied, duplicated, stored in a retrieval system, or otherwise reproduced without prior written consent of Red Hat, Inc. If you believe Red Hat training materials
are being improperly used, copied, or distributed please email <training@redhat.com> or phone toll-free (USA) +1 (866) 626 2994 or +1 (919) 754 3700.
Virtual Cross-Over Cables
Red Hat Virtualization uses connected pairs of network devices to allow for flexible configuration of network
connections. It is as if each pair of devices is connected by a virtual cross-over cable. One end would be a device as
seen in a DomU, such as eth0, and the other end would be visible in Dom0 as vif1.0.
Network connections are configured in Dom0. Given the above example, connecting vif1.0 to a virtual bridge is the
equivilant of cabling that DomU to said bridge.
Default Network Devices
A special network configuration is created when Dom0 boots and the virtualization services start. The following list
decribes the default network.
1. eth0 in Dom0 is a virtual network device paired with vif0.0
2. peth0 is the physical network port of the hardware
3. xenbr0 is a virtual network bridge
4. peth0 is connected to xenbr0
5. vif0.0 is connected to xenbr0
6. New virtual machines installed with Virtual Machine Manager or virt-install are connected via their backend
network device (such as vif1.0) to xenbr0
MAC addresses
The MAC addresses used for virtual network devices may be specified in the domain configuration file, or randomly
generated by the Hypervisor every time the domain is created. The MAC address header 00:16:3E is reserved for the
Xen project and randomly generated addresses will use this header.
Configuration File
[root@stationX]# cat /etc/xen/example | grep vif
vif = [ 'mac=00:16:3E:C0:FF:EE, bridge=xenbr0', ]](https://image.slidesharecdn.com/rh401rhel5-150518071859-lva1-app6892/85/Rh401-rhel5-2-308-320.jpg)
![Copyright © 2007 Red Hat, Inc.
All rights reserved
RH401-RHEL5-en-2-20070508
Unit 12 Page 288
Virtual Machine Consoles
• Virtual Serial Console
• Graphical Console
• vnc
• sdl
12-9
For use only by a student enrolled in a Red Hat training course taught by Red Hat, Inc. or a Red Hat Certified Training Partner. No part of this publication may be
photocopied, duplicated, stored in a retrieval system, or otherwise reproduced without prior written consent of Red Hat, Inc. If you believe Red Hat training materials
are being improperly used, copied, or distributed please email <training@redhat.com> or phone toll-free (USA) +1 (866) 626 2994 or +1 (919) 754 3700.
Virtual Serial Console
All DomU virtual machines have serial consoles. This is true whether or not installation was performed via serial
console. In order to provide a login on the virtual serial console, the following line must be in /etc/inittab on the
DomU:
co:2345:respawn:/sbin/agetty xvc0 9600 vt100-nav
To see actualt console messages on the virtual serial console, add a console= arguement to the kernel line in
/boot/grub/grub.conf on the DomU:
kernel /boot/vmlinuz-2.6.18-8.el5xen ro root=LABEL=/ console=xvc0 rhgb quiet
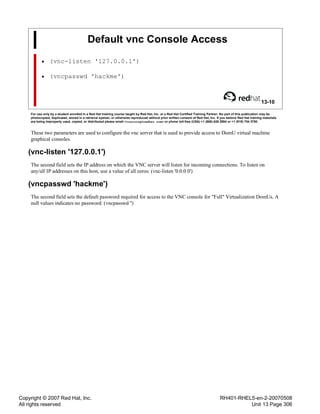
vnc Graphical Console
vnc graphical consoles may be access with either Virtual Machine Manager or any vnc viewer. The following line in a
DomU configuration file enables a graphical console:
vfb = ["type=vnc,vncunused=1"]
By default, the graphical console will listen for incoming vnc connections on localhost. Adding the listen= will
make the DomU listen for incoming vnc connections on the specified IP address:
vfb = ["type=vnc,vncunused=1,listen=192.168.50.1"]
For only a virtual serial console, and no graphical console, remove the above line completely.
sdl Graphical Console
A second type of graphical console, SDL consoles are only suitable in Thick Dom0 configurations. An SDL console
must be access from Virtual Machine Manager on the X server running in Dom0. The advantages of an SDL console
are that performance is better than vnc and there are not mouse pointer abberations.
vfb = ["type=sdl"]](https://image.slidesharecdn.com/rh401rhel5-150518071859-lva1-app6892/85/Rh401-rhel5-2-310-320.jpg)
![Copyright © 2007 Red Hat, Inc.
All rights reserved
RH401-RHEL5-en-2-20070508
Unit 12 Page 290
Install Utilities
• Virtual Machine Manager
• Graphical Tool
• Limited Install Options
• virt-install
• Command-Line Tool
• More Install Options
12-11
For use only by a student enrolled in a Red Hat training course taught by Red Hat, Inc. or a Red Hat Certified Training Partner. No part of this publication may be
photocopied, duplicated, stored in a retrieval system, or otherwise reproduced without prior written consent of Red Hat, Inc. If you believe Red Hat training materials
are being improperly used, copied, or distributed please email <training@redhat.com> or phone toll-free (USA) +1 (866) 626 2994 or +1 (919) 754 3700.
Virtual Machine Manager
Graphical and easy to use, Virtual Machine Manager allows only the default network connection. However, this can be
changed by editing the domain configuration file after installation.
virt-install
This command-line tool has both and interactive and non-interactive mode. Some options are only available when
passed explicitly at the command-line. Any required option which is not passed at the command-line will be prompted.
[root@stationX]# virt-install --help
usage: virt-install [options]
options:
-h, --help show this help message and exit
-n NAME, --name=NAME Name of the guest instance
-r MEMORY, --ram=MEMORY
Memory to allocate for guest instance in megabytes
-u UUID, --uuid=UUID UUID for the guest; if none is given a random UUID
will be generated
--vcpus=VCPUS Number of vcpus to configure for your guest
-f DISKFILE, --file=DISKFILE
File to use as the disk image
-s DISKSIZE, --file-size=DISKSIZE
Size of the disk image (if it doesn't exist) in
gigabytes
--nonsparse Don't use sparse files for disks. Note that this will
be significantly slower for guest creation
-m MAC, --mac=MAC Fixed MAC address for the guest; if none or RANDOM is
given a random address will be used
-b BRIDGE, --bridge=BRIDGE
Bridge to connect guest NIC to; if none given, will
try to determine the default
--vnc Use VNC for graphics support
--vncport=VNCPORT Port to use for VNC
--sdl Use SDL for graphics support](https://image.slidesharecdn.com/rh401rhel5-150518071859-lva1-app6892/85/Rh401-rhel5-2-312-320.jpg)
![Copyright © 2007 Red Hat, Inc.
All rights reserved
RH401-RHEL5-en-2-20070508
Unit 12 Page 292
Manual Install
• Domain Bootstrapping
• Aquire Phase 1 Images
• Prepare Storage
• Write Configuration File (optional)
• Create Domain With Install Options
12-12
For use only by a student enrolled in a Red Hat training course taught by Red Hat, Inc. or a Red Hat Certified Training Partner. No part of this publication may be
photocopied, duplicated, stored in a retrieval system, or otherwise reproduced without prior written consent of Red Hat, Inc. If you believe Red Hat training materials
are being improperly used, copied, or distributed please email <training@redhat.com> or phone toll-free (USA) +1 (866) 626 2994 or +1 (919) 754 3700.
Domain Bootstrapping
Domain Bootstrapping means manually initiating an installation of a DomU. This process involves several steps done
by hand. Scripting this process is often part of a dynamic virtual machine deployment system.
1. The first step is to create a configuration file for the new DomU. Technically this step is optional, as all the
information in the file may instead be passed at the command-line.
[root@stationX]# cat /etc/xen/example
name = "example"
memory = "256"
disk = [ 'phy:sda4/example,hda,w' ]
vif = [ 'mac=00:16:3e:44:40:a7' ]
on_reboot = 'restart'
on_crash = 'restart'
device_model = '/usr/lib/xen/bin/qemu-dm'
bootloader="/usr/bin/pygrub"
2. The next step is to prepare the devices that will serve as the backend storage. The following command will create
a 4G image:
[root@stationX]# dd if=/dev/zero of=hd.img bs=1M count=1 seek=4096
3. Finally, to bootstrap the install use the xm create command and include any options that are required to boot the
installer, such as the location of the kernel and ramdisk images.
xm create -c -f /etc/xen/example on_reboot=destroy
kernel=/path/to/images/xen/vmlinuz
ramdisk=/path/to/images/xen/initrd.img
extra="vnc askmethod" bootloader=""](https://image.slidesharecdn.com/rh401rhel5-150518071859-lva1-app6892/85/Rh401-rhel5-2-314-320.jpg)

![Copyright © 2007 Red Hat, Inc.
All rights reserved
RH401-RHEL5-en-2-20070508
Lab 12 Sequence 1 Solutions Page 296
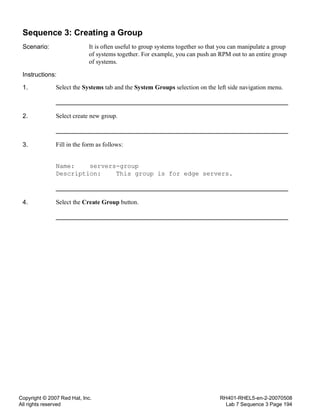
Sequence 1 Solutions
1. Use lvcreate to create a new logical volume.
a. [root@stationX]# lvcreate -L 4G -n vm1 vol0
2. Create a directory to hold the kernel and ramdisk image and use lftp to download them from
server1.
a. [root@stationX]# mkdir /var/lib/xen/images/bootstrap
b. [root@stationX]# cd /var/lib/xen/images/bootstrap
c. [root@stationX]# lftpget ftp://server1/pub/images/xen/vmlinuz
d. [root@stationX]# lftpget ftp://server1/pub/images/xen/initrd.img
3. Using your favorite text editor, create a new domain configuration file in /etc/xen.
NOTE: Change the XX in the mac address to your station number. If you have a single digit
station numner, pad with a leading zero.
a. [root@stationX]# cat /etc/xen/vm1
name = "vm1"
memory = "256"
disk = [ 'phy:/dev/vol0/vm1,xvda,w', ]
vif = [ 'mac=00:16:3e:aa:bb:XX, bridge=xenbr0', ]
bootloader="/usr/bin/pygrub"
vcpus=1
on_reboot = 'restart'
on_crash = 'restart'
4. Use xm to bootstrap the domain by passing all the needed options.
a. [root@stationX]# xm create -c -f /etc/xen/vm1
on_reboot=destroy
kernel=/var/lib/xen/images/bootstrap/vmlinuz
ramdisk=/var/lib/xen/images/bootstrap/initrd.img
extra="ks=ftp://server1/pub/gls/vm1-nox.cfg noipv6"
bootloader=""](https://image.slidesharecdn.com/rh401rhel5-150518071859-lva1-app6892/85/Rh401-rhel5-2-318-320.jpg)


![Copyright © 2007 Red Hat, Inc.
All rights reserved
RH401-RHEL5-en-2-20070508
Unit 14 Page 313
Snapshot Storage
• LVM Read/Write Snapshots
• Clone of existing logical volume
• Created instantly
• Only difference consume space
• Virtualization Uses
• Rapid instantiation of virtual machines
• Stateless virtual machines
14-4
For use only by a student enrolled in a Red Hat training course taught by Red Hat, Inc. or a Red Hat Certified Training Partner. No part of this publication may be
photocopied, duplicated, stored in a retrieval system, or otherwise reproduced without prior written consent of Red Hat, Inc. If you believe Red Hat training materials
are being improperly used, copied, or distributed please email <training@redhat.com> or phone toll-free (USA) +1 (866) 626 2994 or +1 (919) 754 3700.
LVM Read/Write Snapshots
A write enabled snapshot of a logical volume may be thought of as a fork of the filesystem contained on the original
volume. Intially, the snapshot will appear to be identical to the original volume. At this point, the snapshot uses no
disk space. Only new or changed data, written to the snapshot, consumes space on the snapshot. Therefore, only
enough space to hold the new or changed data need be assigned to the snapshot.
[root@stationX]# lvcreate -L2048 -s -n snapshot1 /dev/VolGroup00/original
Logical volume "snapshot1" created
Virtualization Uses
When there is a need to quickly provision new systems with a standard baseline configuration, snapshots allow new
machines to come online nearly as quickly as they boot. No time is spent on installation.
In a development or QA environment the use of snapshots makes it simple to instantly "reset" the testing environment.
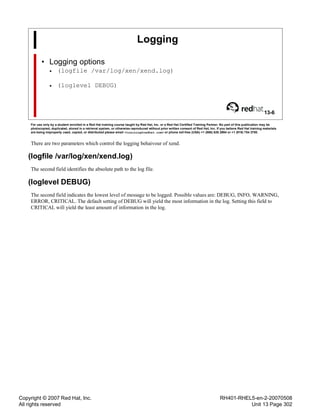
Snapshots can be destroyed and re-created almost instantly.](https://image.slidesharecdn.com/rh401rhel5-150518071859-lva1-app6892/85/Rh401-rhel5-2-335-320.jpg)

![Copyright © 2007 Red Hat, Inc.
All rights reserved
RH401-RHEL5-en-2-20070508
Unit 14 Page 316
Creating Private Virtual Networks
• brctl utility
• Edit xend-config.sxp
• Create custom network script
• (network-script network-custom)
• Configure virtual machines to use custom bridges
14-7
For use only by a student enrolled in a Red Hat training course taught by Red Hat, Inc. or a Red Hat Certified Training Partner. No part of this publication may be
photocopied, duplicated, stored in a retrieval system, or otherwise reproduced without prior written consent of Red Hat, Inc. If you believe Red Hat training materials
are being improperly used, copied, or distributed please email <training@redhat.com> or phone toll-free (USA) +1 (866) 626 2994 or +1 (919) 754 3700.
brctl
The brctl is used to set up, maintain, and inspect the ethernet bridge configuration in the linux kernel. This command
is called in a custom network script to create virtual private networks.
Custom Network Scripts
The Red Hat Virtualization environment may be customized by creating scripts to set up the desired network
configuration. Custom scripts are stored in the /etc/xen/scripts directory. The following is an example custom
network script.
#!/bin/bash
# network-custom
# custom network script to create a private virtual network
#
# first we must active the default network bridge, xenbr0
/etc/xen/scripts/network-bridge netdev=eth0 start
# next we create and activate a private bridge, private0
brctl addbr private0
ifconfig private0 up
To implement this script, edit /etc/xen/xend-config.sxp and change (network-script
network-bridge) to (network-script network-custom).
Lastly, configure virtual machines to use the private bridge, instead of the default.
vif = [ 'mac=00:16:3e:aa:aa:a0, bridge=private0', ]](https://image.slidesharecdn.com/rh401rhel5-150518071859-lva1-app6892/85/Rh401-rhel5-2-338-320.jpg)
![Copyright © 2007 Red Hat, Inc.
All rights reserved
RH401-RHEL5-en-2-20070508
Unit 14 Page 320
Live Migration
• Requires
• Shared Storage
• Network Bandwidth
• Matching CPU Arch
• Security Concerns
14-11
For use only by a student enrolled in a Red Hat training course taught by Red Hat, Inc. or a Red Hat Certified Training Partner. No part of this publication may be
photocopied, duplicated, stored in a retrieval system, or otherwise reproduced without prior written consent of Red Hat, Inc. If you believe Red Hat training materials
are being improperly used, copied, or distributed please email <training@redhat.com> or phone toll-free (USA) +1 (866) 626 2994 or +1 (919) 754 3700.
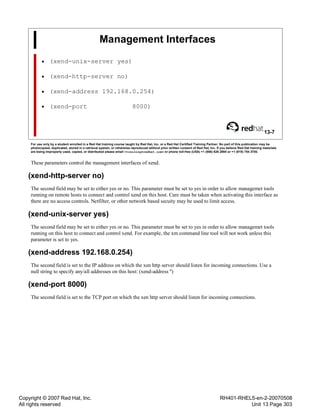
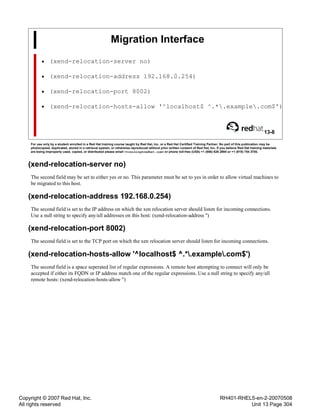
Live Migration
In order to Live Migrate a domain, the destination machine must be configured to accept such connections. The
following options must be enabled in /etc/xen/xend-config.sxp on the destination machine:
(xend-relocation-server yes)
(xend-relocation-address '')
(xend-relocation-hosts-allow '')
Shared Storage
The same storage device used when the domain was created must be available on the destination machine. This
requires some form of shared storage. Possiblities include san devices, network block devices such as GNBD, and disk
images files which reside on an NFS server. Obviously I/O performance will vary depending on the type of shared
storage. Another option, depending on the application, is using NFS rooted diskless virtual machines, which eliminates
the needs for shared storage managed in Dom0.
Network Bandwidth
The time it takes for a migration to complete is dependent on the available bandwidth between the two physical
machines, as well as the amount of memory used by the domain. The conents of the domain's memory must be copied
to the destination machine, over the network. Also, it is possible to saturate the network link during a migration,
preventing other domains from using the network. The -r option is used to specify the maximum Mbs to be used
during a migration, should limiting be needed.
Once all the right pieces are in place, the migration command is simply (note that the -l indicates live, without it the
domain would be shutdown and recreated on the destination machine):
xm migrate domain destination-machine -l [-r]
Security Concerns
The memory contents of the domain being migrated are transmitted over the network raw and unencrypted. This
means that it is potentially possible for a third party to capture and use this information. Migrations should only
be performed over secure networks. If possible, a dedicated migration and management network may be used.
Communication during a migration is between processes running in Dom0, on both the original and destination
machines. The domain being migrated need not have any connection to the network on which the xend daemons of the
respective Dom0's are running.](https://image.slidesharecdn.com/rh401rhel5-150518071859-lva1-app6892/85/Rh401-rhel5-2-342-320.jpg)

![Copyright © 2007 Red Hat, Inc.
All rights reserved
RH401-RHEL5-en-2-20070508
Lab 14 Sequence 1 Solutions Page 325
Sequence 1 Solutions
1. Use xm to create vm1 with its console open. Login and edit the file
/etc/sysconfig/network-scripts/ifcfg-eth0.
a. [root@stationX]# xm create -c vm1
b. Remove the MAC address line from ifcfg-eth0.
HWADDR=XX:XX:XX:XX:XX:XX
2. Use virsh to shutdown vm1.
a. [root@stationX]# virsh shutdown vm1
3. [root@stationX]# lvcreate -L 1024 -s -n snap /dev/vol0/vm1
4. The new file should look like this:
name = "snap"
memory = "256"
disk = [ 'phy:/dev/vol0/snap,xvda,w', ]
vif = [ 'bridge=xenbr0', ]
bootloader="/usr/bin/pygrub"
vcpus=1
on_reboot = 'restart'
on_crash = 'restart'
5. [root@stationX]# xm create -c snap](https://image.slidesharecdn.com/rh401rhel5-150518071859-lva1-app6892/85/Rh401-rhel5-2-347-320.jpg)
![Copyright © 2007 Red Hat, Inc.
All rights reserved
RH401-RHEL5-en-2-20070508
Lab 14 Sequence 2 Solutions Page 326
Sequence 2 Solutions
1. Using yum, install the packages needed to set up the Xen virtualization environment:
kernel-xen, xen, and virt-manager.
a. yum -y install kernel-xen xen virt-manager
2. Using yum, install the packages needed to set up GNBD: gnbd, and kmod-gnbd-xen.
a. yum -y install gnbd kmod-gnbd-xen
3. Use virsh to shutdown vm1.
a. [root@stationX]# virsh shutdown vm1
4. [root@stationX]# gnbd_serv -n
5. [root@stationX]# gnbd_export -d /dev/vol0/snap -e gnbd1 -c
6. [root@stationX|Y]# modprobe gnbd
7. [root@stationX|Y]# gnbd_import -i localhost -n
8. The new file should now look like this:
name = "snap"
memory = "256"
disk = [ 'phy:/dev/gnbd/gnbd1,xvda,w', ]
vif = [ 'bridge=xenbr0', ]
bootloader="/usr/bin/pygrub"
vcpus=1
on_reboot = 'restart'
on_crash = 'restart'
9. [root@stationX]# xm create snap
10. On stationY, edit the file /etc/xen/xend-config.sxp.
a. Locate the line that reads:
#(xend-relocation-server no)
and change it to read:
(xend-relocation-server yes)
b. Locate the line that reads:
#(xend-relocation-address '')
and uncomment it.](https://image.slidesharecdn.com/rh401rhel5-150518071859-lva1-app6892/85/Rh401-rhel5-2-348-320.jpg)
![Copyright © 2007 Red Hat, Inc.
All rights reserved
RH401-RHEL5-en-2-20070508
Lab 14 Sequence 2 Solutions Page 327
c. Locate the line that reads:
(xend-relocation-hosts-allow '^localhost$
^localhost.localdomain$')
and comment it out.
d. Locate the line that reads:
(xend-relocation-address '')
and remove the comment.
Restart the xend service:
service xend restart
11. [root@stationX]# xm mirgrate -l snap stationY
It make take a few minutes for the migration to complete. The snap domain should remain
active and available the entire time.
12. [root@stationX]# xm console snap
13. The Hypervisor on StationX will need to be configured to accept relocation connections.
14. The configuration file is only used during domain creation. As the snap domain is already
created, there is no need to copy the file to stationY. If the snap domain were shutdown
and you wanted to create it on stationY, then you would need to first copy over the
configuration file (or pass all of the configuration options at the command line).](https://image.slidesharecdn.com/rh401rhel5-150518071859-lva1-app6892/85/Rh401-rhel5-2-349-320.jpg)
![Copyright © 2007 Red Hat, Inc.
All rights reserved
RH401-RHEL5-en-2-20070508
Appendix A Page 329
Software Installation
A-2
For use only by a student enrolled in a Red Hat training course taught by Red Hat, Inc. or a Red Hat Certified Training Partner. No part of this publication may be
photocopied, duplicated, stored in a retrieval system, or otherwise reproduced without prior written consent of Red Hat, Inc. If you believe Red Hat training materials
are being improperly used, copied, or distributed please email <training@redhat.com> or phone toll-free (USA) +1 (866) 626 2994 or +1 (919) 754 3700.
In this course, you will be asked to configure software that may not be installed on the system. Below are a few
methods to locate and install required packages. You may use any one of theses methods as necessary.
Always verify that intended installations were successful, especially when using the wildcard character!
Using yum
1. Ensure the file /etc/yum.repos.d/server1.repo exists on your system. If does not, download the file
from server1:
[root@stationX]# cd /etc/yum.repos.d/
[root@stationX]# wget http://server1/pub/gls/server1.repo
It should contain the following content:
[Server]
name=Server
enable=1
gpgcheck=1
baseurl=http://192.168.0.254/pub/Server
2. After writing the file to disk, and returned to your prompt, enter the following command. You should see output
similar to that listed below.
# yum list redhat-release
This system is not registered with RHN.
RHN support will be disabled.
Setting up repositories
Server 100% |=========================| 0000 kB 00:00
Reading repository metadata in from local files
primary.xml.gz 100% |=========================| 0000 kB 00:00
######################################################### 0000/0000
Installed packages
redhat-release.i386 5.##Server-# installed
3. If your results are similar, you must now install the public GPG keys(note the asterisk):
# rpm --import /etc/pki/rpm-gpg/RPM-GPG-KEY-redhat*
4. You may now use the command listed below to install software:
# yum -y install packagename
Using NFS (may use the "*" wildcard in RPM name)
1. You may use the following commands to access and install software via NFS.
2. # mkdir /mnt/server1](https://image.slidesharecdn.com/rh401rhel5-150518071859-lva1-app6892/85/Rh401-rhel5-2-351-320.jpg)

This document provides an overview and table of contents for the RH401 course on Red Hat Enterprise Linux deployment, virtualization, and systems management. It covers topics such as system management tools, provisioning with DHCP and PXE, installing Red Hat Network satellite servers, building RPM packages, using CVS for configuration management, virtualization with KVM, and Red Hat Network management. The document lists learning objectives, prerequisites, and sequences of exercises for each unit.


![[발표자료] 오픈소스 Pacemaker 활용한 zabbix 이중화 방안(w/ Zabbix Korea Community)](https://cdn.slidesharecdn.com/ss_thumbnails/high-availabilityzabbixforopensourcepaceamker-191204120827-thumbnail.jpg?width=640&height=640&fit=bounds)


