
Recommended
More Related Content
Similar to Restraint, anti-embolism and traction.pptx
Similar to Restraint, anti-embolism and traction.pptx (20)
Recently uploaded
Recently uploaded (20)
Restraint, anti-embolism and traction.pptx
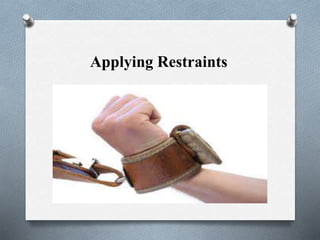
- 2. ODefinition: Restraints are devices used to limit the physical activity of a patient or a part of the body.
- 3. OTypes of Restraints:- Several types of restraints are available among the most common for adults are: O1. Jacket or vest restraints. O2. Mitt or hand restraints. O3. Belt restraints. O4. Limb restraints. O5.Elbow restraints
- 6. OPurposes: O1- To promote safety and prevent injury. O2- To allow a medical or surgical treatment to proceed without patient interference (e.g., to prevent movements that would disrupt therapy to a limb connected to tubes or appliance).
- 7. OAssessment: -The behavior indicating the possible need for a restraint. - Underlying causes for the assessed behavior. - What other protective measures can be implemented before applying a restraint - Status of skin to which restraint is to be applied. - Circulatory status distal to restraints and of extremities.
- 8. OEquipment: 1- Proper restraint (e.g., belt, wrist, mitten) 2- Padding (if needed).
- 9. OProcedure: O Step 1: Assess patient’s behavior (e.g., confusion, disorientation, agitation, restlessness, combativeness, repeated removal of tubing or other therapeutic devices, and inability to follow directions). O Rationale: If patient’s behavior continues despite treatment or restraint alternatives, use of restraint is indicated.
- 10. OStep 2: Follow agency policies regarding restraints. OCheck health care provider’s order for purpose, type, location, and time or duration of restraint. ODetermine if signed consent for use of restraint is necessary.
- 11. Rationale: In acute care settings a licensed health care provider who is responsible for care of patient must order least restrictive type of restraint. OEach original restraint order is limited to 4 hours for adults 18 years of age and older, 2 hours for children ages 9 through 17, and 1 hour for children younger than age 9.
- 12. OStep 3: Review manufacturer’s instructions for correct restraint application and determine most appropriate size restraint. ORationale: You need to be familiar with all devices used for patient care and protection. Incorrect application of restraint device can result in patient injury or death.
- 13. OStep 4: Inspect areas where restraint is to be placed. ONote if there is any nearby tubing or devices. OAssess condition of skin, sensation, adequacy of circulation, and range of motion (ROM).
- 14. OStep 5: Identify patient using two identifiers (e.g., name and birthday or name and account number) according to agency policy. OCompare identifiers with information on patient’s medication administration record (MAR) or medical record.
- 15. O Step 6: Provide privacy. Explain to patient and family purpose of restraint. O Be sure patient is comfortable and in correct anatomical position. OStep7: Pad skin and bony prominences (as necessary) that will be covered by restraint. OStep 8: Apply proper size restraint: Follow manufacturer’s directions.
- 16. Oa. Belt restraint: O - Have patient in a sitting position. Apply belt over clothes, gown. O Make sure to place restraint at waist, not the chest or abdomen. O - Remove wrinkles or creases in clothing. Bring ties through slots in belt. O - Help patient lie down if in bed. O Avoid applying the belt too tightly
- 17. OThis type of restraint may be contraindicated in patient who had abdominal surgery. ORoll belt restraint tied to the bed frame and to an area that does not cause the restraint to tighten when the bed frame is raised or lowered.
- 19. Belt restraint
- 20. Ob. Extremity (ankle or wrist) restraint: Commercially available limb restraints are composed of sheepskin with foam padding. OWrap limb restraint around wrist or ankle with soft part toward skin and secured snugly (not tightly) in place by Velcro straps. O Insert two fingers under secured restraint
- 21. ORationale: Restraint immobilizes one or all extremities to protect patient from fall or accidental removal of therapeutic device (e.g., intravenous [IV] tube, Foley catheter). OTight application will interfere with circulation and cause neurovascular injury.
- 22. Wrist restraint
- 23. O c. Mitten restraint: O Thumb less mitten device restrains patient’s hands. O - Place hand in mitten, being sure Velcro strap(s) is (are) around the wrist and not the forearm. O Rationale: Prevents patients from dislodging invasive equipment, removing dressings, or scratching yet allows greater movement than a wrist restraint.
- 24. Velcro strap
- 25. Mitten restraint
- 26. Od. Elbow restraint (freedom splint): ORestraint consists of rigidly padded fabric that wraps around arm and is closed with Velcro. O-Upper end has a clamp that hooks to patient’s gown sleeve.
- 27. Insert patient’s arm so elbow joint rests against padded area, keeping joint rigid Rationale: Commonly used with infants and children to prevent elbow flexion (e.g., when IV line is placed in antecubital fossa). May also be used for adults.
- 29. O Step 12: Remove restraints at least every 2 hours or according to agency policy, and assess patient each time. If patient is violent or noncompliant, remove one restraint at a time and/ or have staff assist while removing restraints. Rationale: Removal provides opportunity to change patient’s position, offer nutrients, perform full ROM, toilet, and exercise patient.
- 30. O Step 13: Secure call light. O Step 14: Leave bed or chair with wheels locked. Keep bed in lowest position. O Rationale: Locked wheels prevent bed or chair from moving if patient tries to get out. Placing bed in lowest position reduces chance of injury if patient falls out of bed.
- 31. Traction
- 33. Definition: It is means of immobilization using a pulling force applied to a part of the body while a second force called counter traction pulls in the opposite direction.
- 34. O - Traction usually applied while patient is in bed. The pull is achieved by using weights in the form of sandbags, free weight discs; counter pull is produced by patient's own weight.
- 35. OTypes of traction: 1. Skeletal traction: involves placing a pin or wire in the fractured bone. After one of these devices has been inserted, weights are attached to it so the bone can be pulled into the correct position. This is done through a surgery. 2. Skin traction: non invasive traction. It involves applying splints, bandages, or adhesive tapes to the skin directly below the fracture. Once the material has been applied, weights are fastened to it.
- 38. OEquipments needed: 1. Ropes, pulleys and weights. 2. Tape. 3. Foam rubber, or plastic sheeting. 4. Traction foam boot. 5. Elastic bandage.
- 41. O Preparation: O 1- Explain procedure to the patient. O 2- Provide a trapeze to assist the patient to move and lift the body for back care if he or she is unable to turn. O 3- Provide a bedpan as required to minimize the patient's movement during elimination.
- 42. The trapeze
- 43. O Assess the presence of pain in the area; exact location, degree, duration and description of pain (e.g., sharp, needle like) and identification of any movement or activity that wound initiate the pain.
- 44. O Planning: O 1- A physical therapist or orthopedic technician generally performs initial setup of traction. O 2- The nurse is responsible for caring for the patient in traction and ensuring that the traction is functioning properly.
- 45. O Procedure: O Step 1: Organize equipment and review the patient medical history. O Step 2: Place bed in semi-trendelenburg position. Make sure this position will not compromise patient's condition verify with physician before moving patient to this position.
- 48. O Step 3: Inspect skin for any signs of abrasion or lesions that could be disturbed when skin traction is applied. Make sure skin is clean and dry. O Rationale: Skin traction (tape and pressure) placed over abraded areas could aggravate skin condition.
- 49. O Step 4: Assess the neurovascular status of the affected extremity. Conduct a neurovascular assessment 30 minutes following application of the bandages, then every 2 hours for the first 24 hours. If the patient’s status is normal then assess every 4 hours during the traction. If the patient's status is not normal, continue assessments hourly.
- 50. O Step 5: Have a second person support the affected extremity so that you can apply the elastic bandage and foam boot. O Rationale: Ensures that the affected extremity remains in alignment reduces discomfort, allows the nurse the ability to apply the foot boot and elastic bandages (from the ankle up to knee)
- 51. O Step 6: Place heel protectors under the heels, sacrum, shoulders and other pressure areas. O Step 7: Position the patient in the center of the bed in good body alignment. O Rationale: Ensures effective counter pull without compromising neurovascular status.
- 52. O Step 8: Check patient's position every 1-2 hours to ensure that the patient is in proper position. O Step 9: Teach the patient ways to prevent problems associated with immobility. O a- Teach the patient deep-breathing and coughing exercises to prevent hypostatic pneumonia.
- 53. O b- Teach the patient appropriate exercises to maintain and develop muscle tone, prevent muscle contracture and atrophy and promote blood circulation - Rage of motion exercises. O c- Clinical signs of thrombi and emboli; Regularly assess for evidence of emboli. Inspect the patient's involved extremity for redness, swelling, and pain.
- 54. O Step10 : assess pressure areas for signs of skin irritation or breakdown. Note in particular: O (a) bony prominence e.g., the heels, ankles, sacrum, elbows and shoulders O (b) areas susceptible to pressure from the traction e.g., the tibia.
- 55. O Step11 : assess for presence of skin allergies, signs of infection or injury. O Step12 : assess for Inflammation and drainage at the pin sites for skeletal traction.
- 56. Step 13: Ensure That all weights hang freely and not rest against the bed or floor when the bed is in the lowest position. Step 14: Ensure that ropes are intact and not frayed, knotted or kinked between their points of attachment. Step 15: Provide pin site care daily if indicated by the primary care provider's orders and agency protocol.
- 57. O Step 16: Dispose of soiled equipment according to agency protocol. O Step 17: Remove and discard gloves if used. Perform hand hygiene. O Step 18: Document findings in the patient record.
- 59. ODefinition: Anti-embolism stockings are firm elastic hose that compress the veins of the legs. OTypes of anti-embolism stocking: 1- One type extends from the foot to the knee. 2- Another type extends from the foot to mid-thigh.
- 61. OPurposes: 1- To facilitate venous return from the lower extremities. 2- To prevent venous stasis and venous thrombosis. 3- To reduce peripheral edema.
- 62. OIndications: 1- After surgery. 2- Patients who are immobile. 3- Patients who have vascular disorders such as thrombophlebitis, varicose veins, and other conditions of impaired circulation of the lower extremities.
- 63. O Contraindications: 1-Suspected or proven peripheral arterial disease. 2- Peripheral arterial bypass grafting. 3-Local conditions for example skin dermatitis, gangrene or recent skin graft. 4- Severe leg oedema or pulmonary oedema from congestive heart failure. 5- Diagnosis of DVT (Deep Venous Thrombosis).
- 64. OAssessment: Assess both lower extremities for the following: 1- Rates, volumes, and rhythms of posterior tibial and dorsalis pedis pulses (note if unequal bilaterally). 2- Skin colour (note pallor, cyanosis, or other pigmentation). 3- Sensation (note any numbness, tingling, pain).
- 65. 4- Skin temperature (e.g., warm, cool). 5- Presence of edema (pitting or non-pitting). 6- Skin condition (e.g., thickened, shiny, taut, and hairless).
- 67. Planning: Before applying antiembolism stockings, determine any potential or present circulatory problems and the surgeon’s orders involving the lower extremities.
- 68. OEquipment: O - Measuring tape. O - Clean antiembolism stockings of appropriate size and type ordered (e.g., knee or mid-thigh).
- 69. Implementation: Preparation: O Take measurements as needed to obtain the appropriate size stockings: - Measure the length of both legs from the heel to the gluteal fold (for thigh-length stockings) or from the heel to the popliteal space (for knee-length stockings).
- 70. O Measure the circumference of each calf and each thigh at the widest point. Compare the measurements to the size chart to obtain stockings of correct size. O Large stockings do not place adequate pressure on the legs to facilitate venous return and may bunch, increasing the risk of pressure and skin irritation. O Stockings that are too small may impede blood flow to the feet and cause discomfort.
- 71. O Procedure: O Step1. Introduce yourself to the patient, and verify the patient’s identity. O Step 2: Explain to the patient what you are going to do, why it is necessary, and how he or she can participate. O Step 3: Perform hand hygiene, and follow other appropriate infection prevention and control procedures. O Step 4: Provide for patient privacy.
- 72. O Step 5: Select an appropriate time to apply the stockings: - Apply stockings in the morning, if possible, before the patient gets up from bed. O Rationale: In the sitting and standing positions, the veins can become distended, resulting in edema; the stockings should be applied before this happens.
- 73. O - Assist the patient who has been ambulating to lie down and elevate the legs for 15 to 30 minutes before applying the stockings. O Rationale: This facilitates venous return and reduces swelling.
- 74. O Step 6. Prepare the patient: - Assist the patient to the lying position in bed. - Wash and dry the legs, as needed. O Step 7. Apply the stockings: - Reach inside the stocking from the top, and grasping the heel, turn the upper portion of the stocking inside out over the foot portion.
- 76. O Rationale: Firm elastic stockings are easier to fit over the foot and calf when inverted in this manner, rather than bunching the stocking up. O - Ask the patient to point the toes, and position the stocking on the patient’s foot, taking care to place the toe and heel portions of the stocking appropriately.
- 77. O - Grasp the upper edge of the stocking, and gently pull the stocking over the leg, turning it right side out in the process. O - Inspect the patient’s leg and stocking, smoothing any folds or creases. O - Ensure that the stocking is not rolled down or bunched at the top or ankle.
- 79. O Remove the stockings for 30 minutes every 8 hours, inspecting the legs and skin while the stockings are off. O - Soiled stockings can be laundered by hand with warm water and mild soap. Hang to dry.
- 80. O Step 8: Document the procedure. Record the procedure, your assessment data, and when the stockings are removed and reapplied.
- 81. Thank you