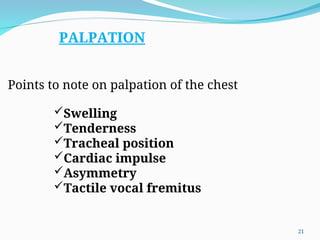
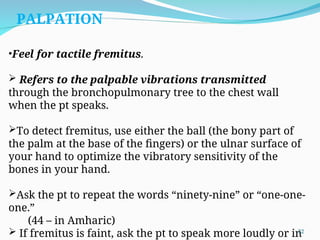
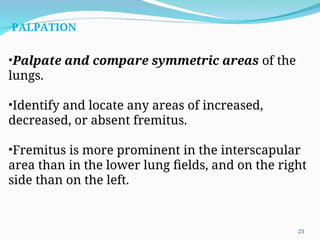
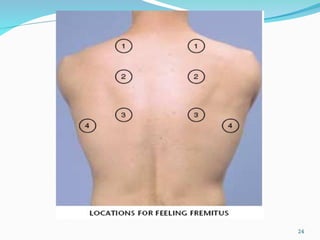
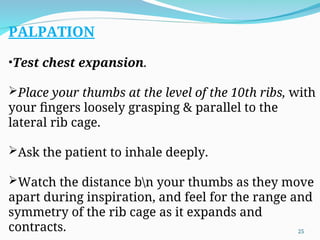
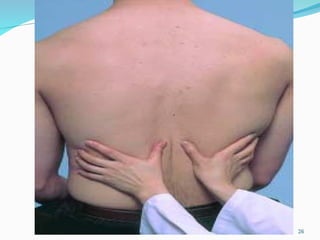
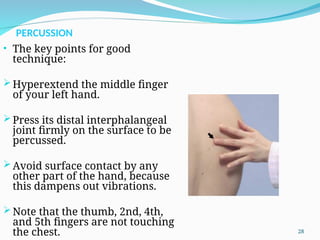
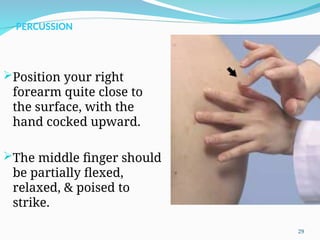
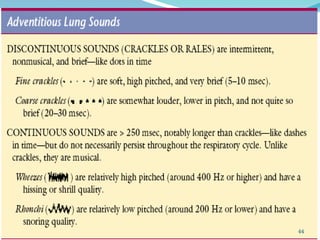
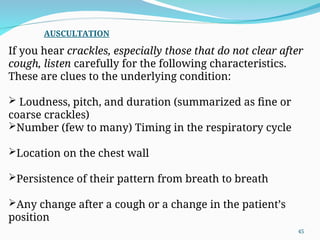
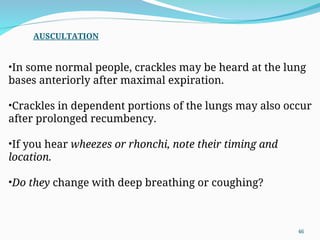
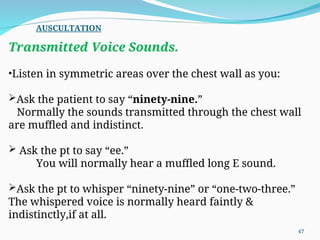
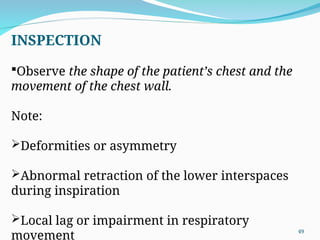
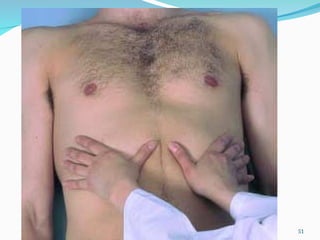
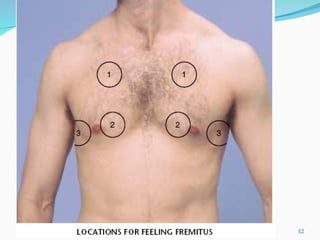
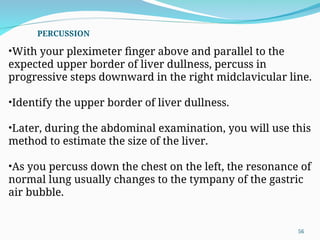
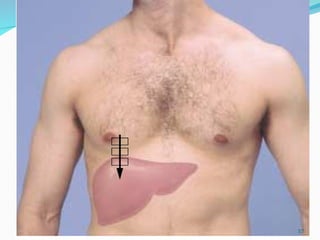
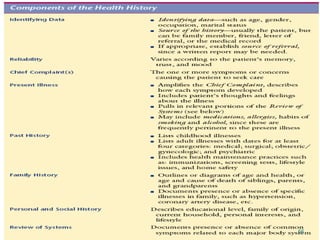
1
INTRODUCTION
•Diseases of the respiratory system account
for up to a third of deaths in most countries
and for a major proportion of visits to the
doctor and time away from work or school.
2
Locating Findings on the Chest
•Describe abnormalities of the chest in two
dimensions:
 along the vertical axis and
 around the circumference of the chest.
3
Locations on the Chest.
Be familiar with general anatomic terms used , such as:
Supraclavicular—above the clavicles
Infraclavicular—below the clavicles
Interscapular—between the scapulae
Infrascapular—below the scapula
Bases of the lungs—the lowermost portions
Upper, middle, and lower lung fields
4
5
THE HISTORY
Common or Concerning
Symptoms
• Dyspnea (BREATHLESSNESS)
•Cough, sputum
•Hemoptysis
•Wheezing
6
BREATHLESSNESS
•Breathlessness inappropriate to the level of
physical exertion, or even occurring at rest, is
called dyspnoea.
•Is the dyspnoea related only to exertion? How far
can the patient walk at a normal pace on the level?
•Are there any times of day or night that are
usually worse than others? (Asthma is often worse
at night & in the early morning.)
•Is there variability in the symptom?
Symptoms
(Dyspnea)
7
COUGH
•A cough may be dry or it may be productive of
sputum.
•How long has the cough been present?
•Is the cough worse at any time of day or night?
•Is the cough aggravated by anything, eg. dust,
pollen or cold air?
Symptoms
8
Hemoptysis -is the coughing up of blood from the lungs;
it may vary from blood-streaked phlegm to frank blood.
assess the volume of blood produced
ask about the related setting & activity and any associated
sxs.
•Before using the term “hemoptysis,” try to confirm the
source of the bleeding by both Hx & physical examination.
May originate in the mouth, pharynx, or GIT & is easily
mislabeled.
Symptoms cnd…
9
Wheezes
are musical respiratory sounds that
may be audible both to the patient and to
others.
Wheezing suggests partial airway obstruction from
secretions, tissue inflammation, or a foreign body.
Symptoms
10
chest pain
 The myocardium
 The pericardium
 The aorta
 The trachea & large
bronchi
 The parietal pleura
 The chest wall, including
the mss& skin
 The esophagus
 Extrathoracic structures
such as the neck,
gallbladder, and stomach.
 Angina pectoris, MI
 Pericarditis
 Dissecting aortic
aneurysm
 Bronchitis
 Pericarditis, pneumonia
 Costochondritis, herpes
zoster
 Reflux esophagitis,
esophageal spasm
 Cervical arthritis, biliary
colic,gastritis
Symptoms
11
THE EXAMINATION
GENERAL ASSESSMENT
Points to note in a general assessment
• Physique
• Voice
• Breathlessness
• Clubbing
• Cyanosis or pallor
• Intercostal recession
• Use of accessory respiratory muscles
• Venous pulses
• Lymph nodes
12
TECHNIQUES OF
EXAMINATION
•Examine the posterior thorax while the patient is
sitting, and the anterior thorax with the patient supine.
•Proceed in an orderly fashion:
inspect,
palpate,
percuss, and
auscultate.
•Compare one side with the other.
•Arrange the patient’s gown so that you can see the chest
fully.
•Cover the woman’s anterior chest when you examine the
13
•With the patient sitting, examine the posterior chest.
•The patient’s arms should be folded across the chest with
hands resting, if possible, on the opposite shoulders.
This position moves the scapulae partly out of the way
and increases your access to the lung fields.
•With the patient supine, examine the anterior chest.
•The supine position makes it easier to examine women
because the breasts can be gently displaced.
TECHNIQUES OF EXAMINATION cnd…
14
•For pts unable to sit up without aid, try to get help so
that you can examine the posterior chest in the sitting
position.
•If this is impossible, roll the pt to one side & then to the
other.
•Because ventilation is relatively greater in the
dependent lung, your chances of hearing wheezes or
crackles are greater on the dependent side.
TECHNIQUES OF EXAMINATION cnd…
15
Initial Survey of Respiration and the Thorax
•Observe the rate, rhythm, depth, and effort of breathing.
•A normal resting adult breathes quietly and regularly
about
14 to 20 times a minute.
•An occasional sigh is to be expected.
•Note whether expiration lasts longer than usual.
16
Always inspect the pt for any signs of respiratory
difficulty.
•Assess the patient’s color for cyanosis.
• Listen to the patient’s breathing. Is there any audible
wheezing? If so, where does it fall in the respiratory cycle?
• Inspect the neck. During inspiration, is there contraction
of the sternomastoid or other accessory muscles, or
supraclavicular retraction?
•Also observe the shape of the chest.
Initial Survey
17
Examination of the Posterior
Chest
INSPECTION
•From a midline position behind the pt, note the
shape of the chest and the way in which it moves,
including:
Deformities or asymmetry
Abnormal retraction of the interspaces during
inspiration.
Impaired respiratory movement on one or both
sides or a unilateral lag (or delay) in movement.
18
INSPECTION
Features to note in assessing the shape of
the chest
Kyphosis
Flattening
Scoliosis
Overinflation
19
Observing the chest
Rate of respiration
Rhythm of respiration
Chest expansion
Symmetry
20
Points to note on palpation of the chest
Swelling
Tenderness
Tracheal position
Cardiac impulse
Asymmetry
Tactile vocal fremitus
PALPATION
21
•Feel for tactile fremitus.
 Refers to the palpable vibrations transmitted
through the bronchopulmonary tree to the chest wall
when the pt speaks.
To detect fremitus, use either the ball (the bony part of
the palm at the base of the fingers) or the ulnar surface of
your hand to optimize the vibratory sensitivity of the
bones in your hand.
Ask the pt to repeat the words “ninety-nine” or “one-one-
one.”
(44 – in Amharic)
 If fremitus is faint, ask the pt to speak more loudly or in
PALPATION
22
•Palpate and compare symmetric areas of the
lungs.
•Identify and locate any areas of increased,
decreased, or absent fremitus.
•Fremitus is more prominent in the interscapular
area than in the lower lung fields, and on the right
side than on the left.
PALPATION
23
24
PALPATION
•Test chest expansion.
Place your thumbs at the level of the 10th ribs, with
your fingers loosely grasping & parallel to the
lateral rib cage.
Ask the patient to inhale deeply.
Watch the distance bn your thumbs as they move
apart during inspiration, and feel for the range and
symmetry of the rib cage as it expands and
contracts. 25
26
PERCUSSION
•Is one of the most important techniques of PE.
•Helps you establish whether the underlying
tissues are air-filled, fluid-filled, or solid.
•It penetrates only about 5 cm to 7 cm into the
chest, however, and therefore will not help you to
detect deep-seated lesions.
27
PERCUSSION
• The key points for good
technique:
Hyperextend the middle finger
of your left hand.
Press its distal interphalangeal
joint firmly on the surface to be
percussed.
Avoid surface contact by any
other part of the hand, because
this dampens out vibrations.
Note that the thumb, 2nd, 4th,
and 5th fingers are not touching
the chest. 28
PERCUSSION
Position your right
forearm quite close to
the surface, with the
hand cocked upward.
The middle finger should
be partially flexed,
relaxed, & poised to
strike.
29
PERCUSSION
• With a quick sharp but
relaxed wrist motion,
strike the pleximeter finger
with the right middle finger.
• Aim at your distal
interphalangeal joint.
 Strike using the tip of the
plexor finger, not the
finger pad.
 Your finger should be at
right angles to the
pleximeter. 30
In summary, the movement is at
the wrist. It is directed, brisk yet
relaxed, and a bit bouncy.
PERCUSSION
31
•While the patient keeps both arms crossed in front of the
chest, percuss the thorax in symmetric locations from the
apices to the lung bases.
•Percuss one side of the chest and then the other at
each level, as shown by the numbers below.
•Omit the areas over the scapulae—the thickness of
muscle
and bone alters the percussion notes over the lungs.
•Identify and locate the area and quality of any abnormal
percussion note.
PERCUSSION
32
33
Percussion Notes.
•Use the lightest percussion that produces a clear note.
•Percuss or strike twice in each location.
•Learn to identify five percussion notes.
These notes differ in their basic qualities of sound:
intensity, pitch, and duration.
•Normal lungs are resonant.
PERCUSSION
34
35
•Identify the descent of the diaphragms, or
diaphragmatic excursion.
•First, determine the level of diaphragmatic dullness during
quiet respiration.
•Holding the pleximeter finger above and parallel to the
expected level of dullness, percuss downward in progressive
steps until dullness clearly replaces resonance.
•Confirm this level of change by percussion near the middle
of the hemithorax and also more laterally.
PERCUSSION
36
• You can infer the probable location of the diaphragm
from the level of dullness.
•Now, estimate the extent of diaphragmatic excursion
by determining the distance between the level of
dullness on full expiration and the level of dullness on
full inspiration, normally about 5 cm or 6 cm.
PERCUSSION
37
38
AUSCULTATION
•Auscultation of the lungs is the most important examining
technique for assessing air flow through the
tracheobronchial tree.
•Auscultation involves
(1) listening to the sounds generated by breathing,
(2) listening for any adventitious (added) sounds,and
(3) if abnormalities are suspected, listening to the
sounds of the patient’s spoken or whispered voice as they
are transmitted through the chest wall.
39
Breath Sounds (Lung Sounds).
Identify patterns of breath sounds by their intensity, their
pitch, and the relative duration of their inspiratory and
expiratory phases.
Normal breath sounds are:
Vesicular, or soft and low pitched. They are heard through
inspiration, continue without pause through expiration, and
then fade away about one third of the way through
expiration.
 Bronchovesicular, with inspiratory and expiratory
sounds about equal in length, at times separated by a silent
interval.
Differences in pitch and intensity are often more easily
detected during expiration.
 Bronchial, or louder and higher in pitch, with a short
AUSCULTATION
40
•Listen to the breath sounds with the diaphragm of a
stethoscope after instructing the pt to breathe deeply
through an open mouth.
•Use the pattern suggested for percussion, moving from one
side to the other and comparing symmetric areas of the
lungs.
•If you hear or suspect abnormal sounds, auscultate
adjacent areas so that you can fully describe the extent of
any abnormality.
•Listen to at least one full breath in each location.
•Be alert for patient discomfort due to hyperventilation (e.g.,
AUSCULTATION
TECHNIQUES OF EXAMINATION
41
42
Adventitious (Added) Sounds.
•Listen for any added, or adventitious, sounds that are
superimposed on the usual breath sounds.
• crackles (rales), wheezes, and rhonchi.
AUSCULTATION
43
44
If you hear crackles, especially those that do not clear after
cough, listen carefully for the following characteristics.
These are clues to the underlying condition:
 Loudness, pitch, and duration (summarized as fine or
coarse crackles)
Number (few to many) Timing in the respiratory cycle
Location on the chest wall
Persistence of their pattern from breath to breath
Any change after a cough or a change in the patient’s
position
AUSCULTATION
45
•In some normal people, crackles may be heard at the lung
bases anteriorly after maximal expiration.
•Crackles in dependent portions of the lungs may also occur
after prolonged recumbency.
•If you hear wheezes or rhonchi, note their timing and
location.
•Do they change with deep breathing or coughing?
AUSCULTATION
46
Transmitted Voice Sounds.
•Listen in symmetric areas over the chest wall as you:
Ask the patient to say “ninety-nine.”
Normally the sounds transmitted through the chest wall
are muffled and indistinct.
 Ask the pt to say “ee.”
You will normally hear a muffled long E sound.
Ask the pt to whisper “ninety-nine” or “one-two-three.”
The whispered voice is normally heard faintly &
indistinctly,if at all.
AUSCULTATION
47
Examination of the Anterior Chest
•The patient, when examined in the supine position, should
lie comfortably with arms somewhat abducted.
•A patient who is having difficulty breathing should be
examined in the sitting position or with the head of the bed
elevated to a comfortable level.
48
INSPECTION
Observe the shape of the patient’s chest and the
movement of the chest wall.
Note:
Deformities or asymmetry
Abnormal retraction of the lower interspaces
during inspiration
Local lag or impairment in respiratory
movement
49
PALPATION
Palpation has four potential uses:
 Identification of tender areas
Assessment of observed abnormalities
Further assessment of chest expansion.
 Assessment of tactile fremitus.
50
51
52
PERCUSSION
•Percuss the anterior and lateral chest, again comparing
both sides.
•The heart normally produces an area of dullness to the left
of the sternum from the 3rd
to the 5th interspaces.
•Percuss the left lung lateral to it.
53
54
55
•With your pleximeter finger above and parallel to the
expected upper border of liver dullness, percuss in
progressive steps downward in the right midclavicular line.
•Identify the upper border of liver dullness.
•Later, during the abdominal examination, you will use this
method to estimate the size of the liver.
•As you percuss down the chest on the left, the resonance of
normal lung usually changes to the tympany of the gastric
air bubble.
PERCUSSION
56
57
AUSCULTATION
•Listen to the chest anteriorly and laterally as the patient
breathes with mouth open, somewhat more deeply than
normal.
•Compare symmetric areas of the lungs.
•Listen to the breath sounds.
•Identify any adventitious sounds.
•Listen for transmitted voice sounds.
58
Recording the Physical Examination
•“Chest is symmetric with good expansion. Lungs resonant.
Breath sounds vesicular; no rales, wheezes, or rhonchi.
Diaphragms descend 4 cm bilaterally.”
OR
•“Chest symmetric with moderate kyphosis and increased
AP diameter, decreased expansion. Lungs are
hyperresonant. Breath sounds distant with delayed
expiratory phase and scattered expiratory wheezes.
Fremitus decreased; no bronchophony, egophony, or
whispered pectoriloquy. Diaphragms descend 2 cm
bilaterally.”
59
Summary
Observe the patient generally, and the surroundings.
Ask the patient's permission for the examination, and
ensure they are lying back comfortably at 45°.
Examine the hands.
Check the face for anaemia or cyanosis.
Observe the respiratory rate.
Inspect the chest movements and the anterior chest
wall.
Feel the position of the trachea, & check for
lymphadenopathy.
Feel the position of the apex beat.
Check the symmetry of the chest movements by
palpation.
Percuss the anterior chest and axillae 60
Summary
Sit the patient forward
Inspect the posterior chest wall.
Percuss the back of the chest.
Listen to the breath sounds.
Check the vocal resonance.
Check the tactile vocal fremitus.
61
lying the patient back again
Listen to the breath sounds on the front of
the chest.
Check the vocal resonance.
Check the tactile vocal fremitus.
Summary
Stand back for a moment and reflect upon whether
you have omitted anything
Thank the patient and ensure they are
dressed or appropriately covered.
62
63
Tachypnoea
Cyanosis
Use of respiratory accessory muscles
Inter costal retractions
Flaring of alae nasae.
64
Identifying Data
Reliability
Chief Complaint(s)
Present Illness
Past History
Family History
Personal and Social History
Review of Systems
Components of the Health History
65
66
67
68
69

Respiratory System PE-1 [Autosaved].ppttiteciex

  • 1.
  • 2.
    INTRODUCTION •Diseases of therespiratory system account for up to a third of deaths in most countries and for a major proportion of visits to the doctor and time away from work or school. 2
  • 3.
    Locating Findings onthe Chest •Describe abnormalities of the chest in two dimensions:  along the vertical axis and  around the circumference of the chest. 3
  • 4.
    Locations on theChest. Be familiar with general anatomic terms used , such as: Supraclavicular—above the clavicles Infraclavicular—below the clavicles Interscapular—between the scapulae Infrascapular—below the scapula Bases of the lungs—the lowermost portions Upper, middle, and lower lung fields 4
  • 5.
  • 6.
    THE HISTORY Common orConcerning Symptoms • Dyspnea (BREATHLESSNESS) •Cough, sputum •Hemoptysis •Wheezing 6
  • 7.
    BREATHLESSNESS •Breathlessness inappropriate tothe level of physical exertion, or even occurring at rest, is called dyspnoea. •Is the dyspnoea related only to exertion? How far can the patient walk at a normal pace on the level? •Are there any times of day or night that are usually worse than others? (Asthma is often worse at night & in the early morning.) •Is there variability in the symptom? Symptoms (Dyspnea) 7
  • 8.
    COUGH •A cough maybe dry or it may be productive of sputum. •How long has the cough been present? •Is the cough worse at any time of day or night? •Is the cough aggravated by anything, eg. dust, pollen or cold air? Symptoms 8
  • 9.
    Hemoptysis -is thecoughing up of blood from the lungs; it may vary from blood-streaked phlegm to frank blood. assess the volume of blood produced ask about the related setting & activity and any associated sxs. •Before using the term “hemoptysis,” try to confirm the source of the bleeding by both Hx & physical examination. May originate in the mouth, pharynx, or GIT & is easily mislabeled. Symptoms cnd… 9
  • 10.
    Wheezes are musical respiratorysounds that may be audible both to the patient and to others. Wheezing suggests partial airway obstruction from secretions, tissue inflammation, or a foreign body. Symptoms 10
  • 11.
    chest pain  Themyocardium  The pericardium  The aorta  The trachea & large bronchi  The parietal pleura  The chest wall, including the mss& skin  The esophagus  Extrathoracic structures such as the neck, gallbladder, and stomach.  Angina pectoris, MI  Pericarditis  Dissecting aortic aneurysm  Bronchitis  Pericarditis, pneumonia  Costochondritis, herpes zoster  Reflux esophagitis, esophageal spasm  Cervical arthritis, biliary colic,gastritis Symptoms 11
  • 12.
    THE EXAMINATION GENERAL ASSESSMENT Pointsto note in a general assessment • Physique • Voice • Breathlessness • Clubbing • Cyanosis or pallor • Intercostal recession • Use of accessory respiratory muscles • Venous pulses • Lymph nodes 12
  • 13.
    TECHNIQUES OF EXAMINATION •Examine theposterior thorax while the patient is sitting, and the anterior thorax with the patient supine. •Proceed in an orderly fashion: inspect, palpate, percuss, and auscultate. •Compare one side with the other. •Arrange the patient’s gown so that you can see the chest fully. •Cover the woman’s anterior chest when you examine the 13
  • 14.
    •With the patientsitting, examine the posterior chest. •The patient’s arms should be folded across the chest with hands resting, if possible, on the opposite shoulders. This position moves the scapulae partly out of the way and increases your access to the lung fields. •With the patient supine, examine the anterior chest. •The supine position makes it easier to examine women because the breasts can be gently displaced. TECHNIQUES OF EXAMINATION cnd… 14
  • 15.
    •For pts unableto sit up without aid, try to get help so that you can examine the posterior chest in the sitting position. •If this is impossible, roll the pt to one side & then to the other. •Because ventilation is relatively greater in the dependent lung, your chances of hearing wheezes or crackles are greater on the dependent side. TECHNIQUES OF EXAMINATION cnd… 15
  • 16.
    Initial Survey ofRespiration and the Thorax •Observe the rate, rhythm, depth, and effort of breathing. •A normal resting adult breathes quietly and regularly about 14 to 20 times a minute. •An occasional sigh is to be expected. •Note whether expiration lasts longer than usual. 16
  • 17.
    Always inspect thept for any signs of respiratory difficulty. •Assess the patient’s color for cyanosis. • Listen to the patient’s breathing. Is there any audible wheezing? If so, where does it fall in the respiratory cycle? • Inspect the neck. During inspiration, is there contraction of the sternomastoid or other accessory muscles, or supraclavicular retraction? •Also observe the shape of the chest. Initial Survey 17
  • 18.
    Examination of thePosterior Chest INSPECTION •From a midline position behind the pt, note the shape of the chest and the way in which it moves, including: Deformities or asymmetry Abnormal retraction of the interspaces during inspiration. Impaired respiratory movement on one or both sides or a unilateral lag (or delay) in movement. 18
  • 19.
    INSPECTION Features to notein assessing the shape of the chest Kyphosis Flattening Scoliosis Overinflation 19
  • 20.
    Observing the chest Rateof respiration Rhythm of respiration Chest expansion Symmetry 20
  • 21.
    Points to noteon palpation of the chest Swelling Tenderness Tracheal position Cardiac impulse Asymmetry Tactile vocal fremitus PALPATION 21
  • 22.
    •Feel for tactilefremitus.  Refers to the palpable vibrations transmitted through the bronchopulmonary tree to the chest wall when the pt speaks. To detect fremitus, use either the ball (the bony part of the palm at the base of the fingers) or the ulnar surface of your hand to optimize the vibratory sensitivity of the bones in your hand. Ask the pt to repeat the words “ninety-nine” or “one-one- one.” (44 – in Amharic)  If fremitus is faint, ask the pt to speak more loudly or in PALPATION 22
  • 23.
    •Palpate and comparesymmetric areas of the lungs. •Identify and locate any areas of increased, decreased, or absent fremitus. •Fremitus is more prominent in the interscapular area than in the lower lung fields, and on the right side than on the left. PALPATION 23
  • 24.
  • 25.
    PALPATION •Test chest expansion. Placeyour thumbs at the level of the 10th ribs, with your fingers loosely grasping & parallel to the lateral rib cage. Ask the patient to inhale deeply. Watch the distance bn your thumbs as they move apart during inspiration, and feel for the range and symmetry of the rib cage as it expands and contracts. 25
  • 26.
  • 27.
    PERCUSSION •Is one ofthe most important techniques of PE. •Helps you establish whether the underlying tissues are air-filled, fluid-filled, or solid. •It penetrates only about 5 cm to 7 cm into the chest, however, and therefore will not help you to detect deep-seated lesions. 27
  • 28.
    PERCUSSION • The keypoints for good technique: Hyperextend the middle finger of your left hand. Press its distal interphalangeal joint firmly on the surface to be percussed. Avoid surface contact by any other part of the hand, because this dampens out vibrations. Note that the thumb, 2nd, 4th, and 5th fingers are not touching the chest. 28
  • 29.
    PERCUSSION Position your right forearmquite close to the surface, with the hand cocked upward. The middle finger should be partially flexed, relaxed, & poised to strike. 29
  • 30.
    PERCUSSION • With aquick sharp but relaxed wrist motion, strike the pleximeter finger with the right middle finger. • Aim at your distal interphalangeal joint.  Strike using the tip of the plexor finger, not the finger pad.  Your finger should be at right angles to the pleximeter. 30
  • 31.
    In summary, themovement is at the wrist. It is directed, brisk yet relaxed, and a bit bouncy. PERCUSSION 31
  • 32.
    •While the patientkeeps both arms crossed in front of the chest, percuss the thorax in symmetric locations from the apices to the lung bases. •Percuss one side of the chest and then the other at each level, as shown by the numbers below. •Omit the areas over the scapulae—the thickness of muscle and bone alters the percussion notes over the lungs. •Identify and locate the area and quality of any abnormal percussion note. PERCUSSION 32
  • 33.
  • 34.
    Percussion Notes. •Use thelightest percussion that produces a clear note. •Percuss or strike twice in each location. •Learn to identify five percussion notes. These notes differ in their basic qualities of sound: intensity, pitch, and duration. •Normal lungs are resonant. PERCUSSION 34
  • 35.
  • 36.
    •Identify the descentof the diaphragms, or diaphragmatic excursion. •First, determine the level of diaphragmatic dullness during quiet respiration. •Holding the pleximeter finger above and parallel to the expected level of dullness, percuss downward in progressive steps until dullness clearly replaces resonance. •Confirm this level of change by percussion near the middle of the hemithorax and also more laterally. PERCUSSION 36
  • 37.
    • You caninfer the probable location of the diaphragm from the level of dullness. •Now, estimate the extent of diaphragmatic excursion by determining the distance between the level of dullness on full expiration and the level of dullness on full inspiration, normally about 5 cm or 6 cm. PERCUSSION 37
  • 38.
  • 39.
    AUSCULTATION •Auscultation of thelungs is the most important examining technique for assessing air flow through the tracheobronchial tree. •Auscultation involves (1) listening to the sounds generated by breathing, (2) listening for any adventitious (added) sounds,and (3) if abnormalities are suspected, listening to the sounds of the patient’s spoken or whispered voice as they are transmitted through the chest wall. 39
  • 40.
    Breath Sounds (LungSounds). Identify patterns of breath sounds by their intensity, their pitch, and the relative duration of their inspiratory and expiratory phases. Normal breath sounds are: Vesicular, or soft and low pitched. They are heard through inspiration, continue without pause through expiration, and then fade away about one third of the way through expiration.  Bronchovesicular, with inspiratory and expiratory sounds about equal in length, at times separated by a silent interval. Differences in pitch and intensity are often more easily detected during expiration.  Bronchial, or louder and higher in pitch, with a short AUSCULTATION 40
  • 41.
    •Listen to thebreath sounds with the diaphragm of a stethoscope after instructing the pt to breathe deeply through an open mouth. •Use the pattern suggested for percussion, moving from one side to the other and comparing symmetric areas of the lungs. •If you hear or suspect abnormal sounds, auscultate adjacent areas so that you can fully describe the extent of any abnormality. •Listen to at least one full breath in each location. •Be alert for patient discomfort due to hyperventilation (e.g., AUSCULTATION TECHNIQUES OF EXAMINATION 41
  • 42.
  • 43.
    Adventitious (Added) Sounds. •Listenfor any added, or adventitious, sounds that are superimposed on the usual breath sounds. • crackles (rales), wheezes, and rhonchi. AUSCULTATION 43
  • 44.
  • 45.
    If you hearcrackles, especially those that do not clear after cough, listen carefully for the following characteristics. These are clues to the underlying condition:  Loudness, pitch, and duration (summarized as fine or coarse crackles) Number (few to many) Timing in the respiratory cycle Location on the chest wall Persistence of their pattern from breath to breath Any change after a cough or a change in the patient’s position AUSCULTATION 45
  • 46.
    •In some normalpeople, crackles may be heard at the lung bases anteriorly after maximal expiration. •Crackles in dependent portions of the lungs may also occur after prolonged recumbency. •If you hear wheezes or rhonchi, note their timing and location. •Do they change with deep breathing or coughing? AUSCULTATION 46
  • 47.
    Transmitted Voice Sounds. •Listenin symmetric areas over the chest wall as you: Ask the patient to say “ninety-nine.” Normally the sounds transmitted through the chest wall are muffled and indistinct.  Ask the pt to say “ee.” You will normally hear a muffled long E sound. Ask the pt to whisper “ninety-nine” or “one-two-three.” The whispered voice is normally heard faintly & indistinctly,if at all. AUSCULTATION 47
  • 48.
    Examination of theAnterior Chest •The patient, when examined in the supine position, should lie comfortably with arms somewhat abducted. •A patient who is having difficulty breathing should be examined in the sitting position or with the head of the bed elevated to a comfortable level. 48
  • 49.
    INSPECTION Observe the shapeof the patient’s chest and the movement of the chest wall. Note: Deformities or asymmetry Abnormal retraction of the lower interspaces during inspiration Local lag or impairment in respiratory movement 49
  • 50.
    PALPATION Palpation has fourpotential uses:  Identification of tender areas Assessment of observed abnormalities Further assessment of chest expansion.  Assessment of tactile fremitus. 50
  • 51.
  • 52.
  • 53.
    PERCUSSION •Percuss the anteriorand lateral chest, again comparing both sides. •The heart normally produces an area of dullness to the left of the sternum from the 3rd to the 5th interspaces. •Percuss the left lung lateral to it. 53
  • 54.
  • 55.
  • 56.
    •With your pleximeterfinger above and parallel to the expected upper border of liver dullness, percuss in progressive steps downward in the right midclavicular line. •Identify the upper border of liver dullness. •Later, during the abdominal examination, you will use this method to estimate the size of the liver. •As you percuss down the chest on the left, the resonance of normal lung usually changes to the tympany of the gastric air bubble. PERCUSSION 56
  • 57.
  • 58.
    AUSCULTATION •Listen to thechest anteriorly and laterally as the patient breathes with mouth open, somewhat more deeply than normal. •Compare symmetric areas of the lungs. •Listen to the breath sounds. •Identify any adventitious sounds. •Listen for transmitted voice sounds. 58
  • 59.
    Recording the PhysicalExamination •“Chest is symmetric with good expansion. Lungs resonant. Breath sounds vesicular; no rales, wheezes, or rhonchi. Diaphragms descend 4 cm bilaterally.” OR •“Chest symmetric with moderate kyphosis and increased AP diameter, decreased expansion. Lungs are hyperresonant. Breath sounds distant with delayed expiratory phase and scattered expiratory wheezes. Fremitus decreased; no bronchophony, egophony, or whispered pectoriloquy. Diaphragms descend 2 cm bilaterally.” 59
  • 60.
    Summary Observe the patientgenerally, and the surroundings. Ask the patient's permission for the examination, and ensure they are lying back comfortably at 45°. Examine the hands. Check the face for anaemia or cyanosis. Observe the respiratory rate. Inspect the chest movements and the anterior chest wall. Feel the position of the trachea, & check for lymphadenopathy. Feel the position of the apex beat. Check the symmetry of the chest movements by palpation. Percuss the anterior chest and axillae 60
  • 61.
    Summary Sit the patientforward Inspect the posterior chest wall. Percuss the back of the chest. Listen to the breath sounds. Check the vocal resonance. Check the tactile vocal fremitus. 61
  • 62.
    lying the patientback again Listen to the breath sounds on the front of the chest. Check the vocal resonance. Check the tactile vocal fremitus. Summary Stand back for a moment and reflect upon whether you have omitted anything Thank the patient and ensure they are dressed or appropriately covered. 62
  • 63.
  • 64.
    Tachypnoea Cyanosis Use of respiratoryaccessory muscles Inter costal retractions Flaring of alae nasae. 64
  • 65.
    Identifying Data Reliability Chief Complaint(s) PresentIllness Past History Family History Personal and Social History Review of Systems Components of the Health History 65
  • 66.
  • 67.
  • 68.
  • 69.

Editor's Notes

  • #2 Diseases of the respiratory system account for up to a third of deaths in most countries and for a major proportion of visits to the doctor and time away from work or school. As with every aspect of diagnosis in medicine, the key to success is a clear and carefully recorded history; symptoms may be trivial or extremely distressing, but either may indicate serious and life-threatening disease.
  • #4 To make vertical locations, you must be able to count the ribs and interspaces. The sternal angle, also termed the angle of Louis, is the best guide: place your finger in the hollow curve of the suprasternal notch, then move your finger down about 5 cm to the horizontal bony ridge joining the manubrium to the body of the sternum. Then move your finger laterally and find the adjacent 2nd rib and costal cartilage. From here, using two fingers, you can “walk down the interspaces,” one space at a time, on an oblique line illustrated by the red numbers below. Do not try to count interspaces along the lower edge of the sternum; the ribs there are too close together. In a woman, to find the interspaces either displace the breast laterally or palpate a little more medially than illustrated. Avoid pressing too hard on tender breast tissue.
  • #6 Most patients with respiratory disease will present with one or more of the following symptoms
  • #7 By contrast, people with pre-dominantly irreversible airways obstruction due to chronic obstructive pulmonary disease (COPD) will often say that as long as they are sitting in bed they feel quite normal; it is exercise that troubles them.
  • #8 How long has the cough been present? A cough lasting a few days following a cold has less significance than one lasting several weeks in a middle-aged smoker, which may be the first sign of a malignancy. Is the cough worse at any time of day or night? A dry cough at night may be an early symptom of asthma, as may cough that comes in spasms lasting several minutes. Is the cough aggravated by anything, for example dust, pollen or cold air? The increased reactivity of the airways seen in asthma, and in some normal people for several weeks after viral respiratory infections, may present in this way. Severe coughing, whatever its cause, may be followed by vomiting.
  • #9 Hemoptysis is the coughing up of blood from the lungs; it may vary from blood-streaked phlegm to frank blood. For patients reporting hemoptysis, assess the volume of blood produced as well as the other sputum attributes; ask about the related setting and activity and any associated symptoms. Before using the term “hemoptysis,” try to confirm the source of the bleeding by both history and physical examination. Blood or blood-streaked material may originate in the mouth, pharynx, or gastrointestinal tract and is easily mislabeled. When vomited, it probably originates in the gastrointestinal tract. Occasionally, however, blood from the nasopharynx or the gastrointestinal tract is aspirated and then coughed out. Blood originating in the stomach is usually darker than blood from the respiratory tract and may be mixed with food particles.
  • #10 Cough is a common symptom that ranges in significance from trivial to ominous. Typically, cough is a reflex response to stimuli that irritate receptors in the larynx, trachea, or large bronchi. These stimuli include mucus, pus, and blood, as well as external agents such as dusts, foreign bodies, or even extremely hot or cold air. Other causes include inflammation of the respiratory mucosa and pressure or tension in the air passages from a tumor or enlarged peribronchial lymph nodes. Although cough typically signals a problem in the respiratory tract, it may also be cardiovascular in origin. To help patients quantify volume, a multiple-choice question may be helpful . . . “How much do you think you cough up in 24 hours; a teaspoon, tablespoon, a quarter cup, half cup, cupful?” If possible, ask the patient to cough into a tissue; inspect the phlegm and note its characteristics. The symptoms associated with a cough often lead you to its cause.
  • #11 You should elicit all seven attributes of this symptom (see p. 27) to distinguish among the various causes of chest pain. THE SEVEN ATTRIBUTES OF A SYMPTOM 1. Location. Where is it? Does it radiate? 2. Quality. What is it like? 3. Quantity or severity. How bad is it? (For pain, ask for a rating on a scale of 1 to 10.) 4. Timing. When did (does) it start? How long did (does) it last? How often did (does) it come? 5. Setting in which it occurs. Include environmental factors, personal activities, emotional reactions, or other circumstances that may have contributed to the illness. 6. Remitting or exacerbating factors. Does anything make it better or worse? 7. Associated manifestations. Have you noticed anything else that accompanies it?
  • #13 It is helpful to examine the posterior thorax and lungs while the patient is sitting, and the anterior thorax and lungs with the patient supine. Proceed in an orderly fashion: inspect, palpate, percuss, and auscultate. Try to visualize the underlying lobes, and compare one side with the other, so the patient serves as his or her own control. Arrange the patient’s gown so that you can see the chest fully. For women, drape the gown over each half of the anterior chest as you examine the other half. Cover the woman’s anterior chest when you examine the back.
  • #14 Some authorities, however, prefer to examine both the back and the front of the chest with the patient sitting. This technique is also satisfactory).
  • #16 Even though you may have already recorded the respiratory rate when you took the vital signs, it is wise to again observe the rate, rhythm, depth, and effort of breathing. A normal resting adult breathes quietly and regularly about
  • #17 Always inspect the patient for any signs of respiratory difficulty. Assess the patient’s color for cyanosis. Recall any relevant findings from earlier parts of your examination, such as the shape of the fingernails. Listen to the patient’s breathing. Is there any audible wheezing? If so, where does it fall in the respiratory cycle? Inspect the neck. During inspiration, is there contraction of the sternomastoid or other accessory muscles, or supraclavicular retraction? Is the trachea midline? Also observe the shape of the chest. The anteroposterior (AP) diameter may increase with aging. Examination
  • #18 INSPECTION From a midline position behind the patient, note the shape of the chest and the way in which it moves, including: Deformities or asymmetry Abnormal retraction of the interspaces during inspiration. Retraction is most apparent in the lower interspaces. Supraclavicular retraction is often associated. Impaired respiratory movement on one or both sides or a unilateral lag (or delay) in movement.
  • #22 Some clinicians find using one hand more accurate. The simultaneous use of both hands to compare sides, however, increases your speed and may facilitate detection of differences.
  • #23 Palpate and compare symmetric areas of the lungs in the pattern shown in the photograph. Identify and locate any areas of increased, decreased, or absent fremitus. Fremitus is typically more prominent in the interscapular area than in the lower lung fields, and is often more prominent on the right side than on the left. It disappears below the diaphragm. Tactile fremitus is a relatively rough assessment tool, but as a scouting technique it directs your attention to possible abnormalities. Later in the examination you will check any suggested findings by listening for breath sounds, voice sounds, and whispered voice sounds. All these attributes tend to increase or decrease together Tactile fremitus is a relatively rough assessment tool, but as a scouting technique it directs your attention to possible abnormalities.
  • #24 It disappears below the diaphragm. Later in the examination you will check any suggested findings by listening for breath sounds, voice sounds, and whispered voice sounds. All these attributes tend to increase or decrease together.
  • #25 PALPATION As you palpate the chest, focus on areas of tenderness and abnormalities in the overlying skin, respiratory expansion, and fremitus. Identify tender areas. Carefully palpate any area where pain has been reported or where lesions or bruises are evident. Assess any observed abnormalities such as masses or sinus tracts (blind, inflammatory, tubelike structures opening onto the skin) Test chest expansion. Place your thumbs at about the level of the 10th ribs, with your fingers loosely grasping and parallel to the lateral rib cage. As you position your hands, slide them medially just enough to raise a loose fold of skin on each side between your thumb and the spine. Ask the patient to inhale deeply. Watch the distance between your thumbs as they move apart during inspiration, and feel for the range and symmetry of the rib cage as it expands and contracts.
  • #27 PERCUSSION Percussion is one of the most important techniques of physical examination. Percussion of the chest sets the chest wall and underlying tissues into motion, producing audible sound and palpable vibrations. Percussion helps you establish whether the underlying tissues are air-filled, fluid-filled, or solid. It penetrates only about 5 cm to 7 cm into the chest, however, and therefore will not help you to detect deep-seated lesions. The technique of percussion can be practiced on any surface. As you practice, listen for changes in percussion notes over different types of materials or different parts of the body. The key points for good technique, described for a right-handed person, are as follows:Hyperextend the middle finger of your left hand, known as the pleximeter finger. Press its distal interphalangeal joint firmly on the surface to be percussed. Avoid surface contact by any other part of the hand, because this dampens out vibrations. Note that the thumb, 2nd, 4th, and 5th fingers are not touching the chest. Position your right forearm quite close to the surface, with the hand cocked upward. The middle finger should be partially flexed, relaxed, and poised to strike.
  • #31 You are trying to transmit vibrations through the bones of this joint to the underlying chest wall.
  • #34 Percussion Notes. With your plexor or tapping finger, use the lightest percussion that produces a clear note. A thick chest wall requires heavier percussion than a thin one. However, if a louder note is needed, apply more pressure with the pleximeter finger (this is more effective for increasing percussion note volume than tapping harder with the plexor finger). When percussing the lower posterior chest, stand somewhat to the side rather than directly behind the patient. This allows you to place your pleximeter finger more firmly on the chest and your plexor is more effective, making a better percussion note. When comparing two areas, use the same percussion technique in both areas. Percuss or strike twice in each location. It is easier to detect differences in percussion notes by comparing one area with another than by striking repetitively in one place. Learn to identify five percussion notes. You can practice four of them on yourself. These notes differ in their basic qualities of sound: intensity, pitch, and duration. Train your ear to distinguish these differences by concentrating on one quality at a time as you percuss first in one location, then in another. Review the table below. Normal lungs are resonant. When comparing two areas, use the same percussion technique in both areas
  • #35 Distinguished mainly by its musical timbre.
  • #36 An abnormally high level suggests pleural effusion, or a high diaphragm as in atelectasis or diaphragmatic paralysis.
  • #37 Note that with this technique you are identifying the boundary between the resonant lung tissue and the duller structures below the diaphragm. This estimate does not correlate well, however, with radiologic assessment of diaphragmatic movement
  • #39 Together with percussion, it also helps the clinician to assess the condition of the surrounding lungs and pleural space.
  • #43 Detection of adventitious sounds—crackles (sometimes called rales), wheezes, and rhonchi— is an important part of your examination, often leading to diagnosis of cardiac and pulmonary conditions
  • #47 Transmitted Voice Sounds. If you hear abnormally located bronchovesicular or bronchial breath sounds, continue on to assess transmitted voice sounds. With a stethoscope, listen in symmetric areas over the chest wall as you: Ask the patient to say “ninety-nine.” Normally the sounds transmitted through the chest wall are muffled and indistinct. Ask the patient to say “ee.” You will normally hear a muffled long E sound. Ask the patient to whisper “ninety-nine” or “one-two-three.” The whispered voice is normally heard faintly and indistinctly, if at all. Vesicular breath sounds Bronchial breath sounds Vocal fremitus and resonance whispering pectoriloquy aegophony Added sounds pleural rub wheezes crackles
  • #50 PALPATION Palpation has four potential uses: Identification of tender areas Assessment of observed abnormalities Further assessment of chest expansion. Place your thumbs along each costal margin, your hands along the lateral rib cage. As you position your hands, slide them medially a bit to raise loose skin folds between your thumbs. Ask the patient to inhale deeply. Observe how far your thumbs diverge as the thorax expands, and feel for the extent and symmetry of respiratory movement.
  • #58 AUSCULTATION Listen to the chest anteriorly and laterally as the patient breathes with mouth open, somewhat more deeply than normal. Compare symmetric areas of the lungs, using the pattern suggested for percussion and extending it to adjacent areas as indicated. Listen to the breath sounds, noting their intensity and identifying any variations from normal vesicular breathing. Breath sounds are usually louder in the upper anterior lung fields. Bronchovesicular breath sounds may be heard over the large airways, especially on the right. Identify any adventitious sounds, time them in the respiratory cycle, and locate them on the chest wall. Do they clear with deep breathing? If indicated, listen for transmitted voice sounds.
  • #59 Recording the Physical Examination—The Thorax and Lungs Note that initially you may use sentences to describe your findings; later you will use phrases. The style below contains phrases appropriate for most write-ups. “Thorax is symmetric with good expansion. Lungs resonant. Breath sounds vesicular; no rales, wheezes, or rhonchi. Diaphragms descend 4 cm bilaterally.” OR “Thorax symmetric with moderate kyphosis and increased anteroposterior (AP) diameter, decreased expansion. Lungs are hyperresonant. Breath sounds distant with delayed expiratory phase and scattered expiratory wheezes. Fremitus decreased; no bronchophony, egophony, or whispered pectoriloquy. Diaphragms descend 2 cm bilaterally.”
  • #60 There is no single perfect way of examining the chest, and most doctors develop their own minor variations of order and procedure. The following is one scheme that combines efficiency with thoroughness: