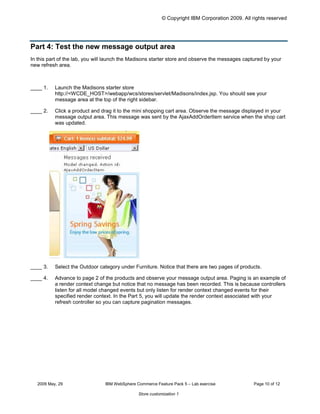
© Copyright IBM Corporation 2009 All rights reserved


                                           ®                    ®
                                     IBM WebSphere Commerce Feature Pack 5 – Lab exercise


                                               Store customization 1

What this exercise is about ................................................................................................................................... 2


What you should be able to do ............................................................................................................................. 2


Introduction ........................................................................................................................................................... 2


Requirements........................................................................................................................................................ 2


Part 1: Create the refresh controller............................................................................................................... 4


Part 2: Create the refresh area ............................................................................................................................. 6


Part 3: Add the message output area to the sidebar ............................................................................................ 9


Part 4: Test the new message output area ......................................................................................................... 10


Part 5: Change the render context for a refresh controller ................................................................................. 11


Part 6: What you did in this exercise................................................................................................................... 12


2009 May, 29                                IBM SWG WebSphere Commerce Feature Pack 5 – Lab exercise                                                     Page 1 of 12


                                                                       Store customization 1
© Copyright IBM Corporation 2009. All rights reserved


What this exercise is about
   In this tutorial, you will review many of the JavaScript classes that make up the WebSphere Commerce
   Ajax framework. You will also review how the framework uses the Dojo events system to notify page
   elements of changes they might be interested in. To demonstrate the framework, you will add a refresh
   area to the right sidebar of the Madisons starter store. Using a refresh controller, you will print out a
   message to the refresh area for each event generated by the WebSphere Commerce Ajax framework.

   This exercise is quite short and is intended mainly as a review of the concepts of refresh area, render
   context and refresh controller. If you already understand how these objects interact you can move on to
   Lab 2.

What you should be able to do
   After completing this exercise, you should be able to:

       •         Add a refresh area to a page

       •         Define a refresh controller

       •         Understand how Dojo events are used to drive partial page updates

Introduction
   The following naming conventions are used in the exercises:

                 Reference Variable                                             Description

<WCDE_INSTALL_DIR>                                          WebSphere Commerce Developer installation
                                                            directory

<WCDE_HOST>                                                 Host name for WebSphere Commerce Developer

<LAB_DIR>                                                   Directory of the lab files

   The .zip file, StoreCustomizationLab1.zip, provided with this lab contains all the new and modified files
   necessary to complete this lab. There is also a snippets file provided that contains just the text to be typed
   in. You should type in the code provided. However if you find this is too much typing or need assistance
   solving a problem, the solution files and snippets file are available.

Requirements
   Before beginning this lab, ensure you have:

       •    Installed WebSphere Commerce Developer 6.0
       •    Installed fix pack 7, fix LI74128
       •    Installed Feature Pack 4 and fix IZ41934

       •    Installed Feature Pack 5

       •    Enabled the following features :

                 o   management-center

  2009 May, 29                    IBM WebSphere Commerce Feature Pack 5 – Lab exercise              Page 2 of 12

                                                 Store customization 1
© Copyright IBM Corporation 2009. All rights reserved


                o	 madisons-starterstore

     •	   Published the Madisons starter store

     •	   Reviewed WCS6005_MadisonsStarterStoreCustomization to familiarize yourself with the
          WebSphere Commerce Ajax framework

     •	   Downloaded the lab files


2009 May, 29	                  IBM WebSphere Commerce Feature Pack 5 – Lab exercise              Page 3 of 12

                                              Store customization 1
© Copyright IBM Corporation 2009. All rights reserved


Part 1: Create the refresh controller
The first thing you need in order to listen for refresh events is a refresh controller. A refresh controller may
have multiple refresh areas associated with it and it’s the controller’s job to decide whether the refresh areas
need to be updated in response to events. In this part of the lab, you will define a refresh controller and the
methods it will use to evaluate incoming events.


____ 1.     Create a new directory structure for your custom code.

          __ a. Open WebSphere Commerce Developer and navigate to the Stores project.

          __ b. Expand the Stores project directory until you reach the Madisons directory as shown below.
                Right click the Madisons folder and select New > Folder.


          __ c. Create a folder named Lab1. All of your custom files will be stored under this directory.

____ 2.     Right click the Lab1 folder and select New > JavaScript file. Name the file MessageOutput.js and
            click Finish.

____ 3.     Delete the function call newFunction() that was added for you. Create your JavaScript file as
            described below.

          __ a. Declare a render context. The render context will not be used directly in this lab but each refresh
                controller must have an associated render context when it is defined. Add the following line:
                  wc.render.declareContext("MyLab1Context","","");

          __ b. Declare the refresh controller. Notice how the render context is used in the definition of the
                refresh controller. Create the modelChangedHandler and renderContextChangedHandler
                functions as specified below. These functions will be called when modelChanged and
                renderContextChanged events, respectively, are received. In this lab you will print a simple
                message to the screen but more commonly these methods are used to trigger a refresh area to
                redraw as a result of the change event. You can see an example of this in Lab 2. Add the
                following code to your file:
                  wc.render.declareRefreshController({


   2009 May, 29                    IBM WebSphere Commerce Feature Pack 5 – Lab exercise              Page 4 of 12

                                                  Store customization 1
© Copyright IBM Corporation 2009. All rights reserved


                      id: "MyLab1Controller",

                      renderContext: wc.render.getContextById("MyLab1Context"),

                      url: "",

                      formId: ""


                      ,modelChangedHandler: function(message, widget) {

                            var div = document.createElement("div");

                            var contentArea =

                                  document.getElementById("MessageContent");

                            contentArea.appendChild(div);

                            div.appendChild(document.createTextNode("Model changed.

                                  Action id: " + message.actionId));

                      }


                      ,renderContextChangedHandler: function(message, widget) {

                            var div = document.createElement("div");

                            var contentArea =

                                  document.getElementById("MessageContent");

                            contentArea.appendChild(div);

                            div.appendChild(document.createTextNode("Render context

                                  changed."));

                       }

               });

     __ c. Save the file.


2009 May, 29                IBM WebSphere Commerce Feature Pack 5 – Lab exercise              Page 5 of 12

                                           Store customization 1
© Copyright IBM Corporation 2009. All rights reserved


Part 2: Create the refresh area
A refresh area is a portion of a web page where the content displayed will be affected by a shopper’s actions.
The refresh controller you defined in Part 1 determines what the affect will be. In this case it will be to write a
message in the refresh area.

____ 1.	     Create a new JSP for your new refresh area

           __ a. Right click your new Lab1 directory and select New > JSP File.


           __ b. Name your new file MessageOutput. Click Finish to save the file.

____ 2.	     Define the refresh area. A refresh area is created using the RefreshArea widget. This widget is a
             WebSphere Commerce extension to the Dojo toolkit. It defines a container for the portion of the
             screen that can be modified while the remainder of the page stays unchanged.

           __ a. Make sure the Source tab is selected. Delete the automatically generated content. It is not
                 needed since the JSP will only generate a page fragment.


   2009 May, 29	                    IBM WebSphere Commerce Feature Pack 5 – Lab exercise              Page 6 of 12

                                                   Store customization 1
© Copyright IBM Corporation 2009. All rights reserved


     __ b. Some tag libraries and an environment setup JSP fragment are needed for the page to function.
           If you are interested you can stop and examine the contents of the JSTLEnvironmentSetup.jspf
           file. Add the following code at the top of the file:
                <%@ taglib uri="http://java.sun.com/jsp/jstl/core" prefix="c" %>

                <%@ taglib uri="http://commerce.ibm.com/base" prefix="wcbase" %>

                <%@ include file="../include/JSTLEnvironmentSetup.jspf" %>

     __ c. Import the JavaScript file you created in Part 1. The variable jspImgStoreDir is specified in
           the included file JSTLEnvironmentSetup. Add the following code:
                <script type="text/javascript" src="<c:out

                value="${jspStoreImgDir}Lab1/MessageOutput.js"/>"></script>

     __ d. Create the refresh area Dojo widget. A Dojo widget is created by inserting the attribute
           dojoType into an HTML element declaration. The value of the dojoType attribute specifies
           what Dojo class to use to create the widget. The definition below also contains attributes that
           enable accessibility support as summarized in the table that follows. Add the following code to
           your JSP:
                <div dojoType="wc.widget.RefreshArea" id="MyRefreshArea"

                      controllerId="MyLab1Controller" role="wairole:region"

                      waistate:live="polite" waistate:atomic="false"

                      waistate:relevant="all">


                      <div class="header">

                            <h2 class="black">Messages received</h2>

                      </div>

                      <div id="MessageContent" class="content">

                      </div>

                </div>


                Accessibility attribute	         Meaning

                role=”wairole:region”	           Declares the <div> structure as a “live region”. This
                                                 informs assistive technology that the content within

2009 May, 29	                   IBM WebSphere Commerce Feature Pack 5 – Lab exercise               Page 7 of 12

                                               Store customization 1
© Copyright IBM Corporation 2009. All rights reserved


                                                 the region can change

               waistate:live=”polite”            Specifies when to inform the user that live region
                                                 content has changed. The value “polite” signals to
                                                 wait until the user is idle

               waistate:atomic=”false”           Signals that the user needs to hear only the portion of
                                                 the live region that has changed, not the whole area.

               waistate:relevant=”all”           Specifies which types of changes need to be heard.
                                                 This can be limited to additions, removals or text. In
                                                 this example all changes will be heard.


2009 May, 29                    IBM WebSphere Commerce Feature Pack 5 – Lab exercise               Page 8 of 12

                                               Store customization 1
© Copyright IBM Corporation 2009. All rights reserved


Part 3: Add the message output area to the sidebar
In this part of the lab, you will update the existing sidebar JSP to include your new refresh area.


____ 1.	     Navigate to Madisons > include > styles > style1 and open the file
             CachedRightSidebarDisplay.jsp

____ 2.	     Import your message display refresh area. Locate the line <div id="right_nav"> near the top
             of the file.

           __ a. Add the following code immediately after the above line to include the message output area in
                 the sidebar.
                   <c:import url="${jspStoreDir}Lab1/MessageOutput.jsp">

                         <c:param name="storeId" value="${WCParam.storeId}" />

                         <c:param name="catalogId" value="${catalogId}" />

                         <c:param name="langId" value="${langId}" />

                   </c:import>

____ 3.	     Instruct the Dojo parser to parse the message output area. Since a refresh area is a custom Dojo
             widget, it needs to be parsed to create the corresponding JavaScript object that provides the refresh
             area function. In the Madisons starter store, the parser is turned off by default to improve
             performance. That means each new Dojo widget added to a page needs to be manually parsed.
             Add the following code just below the include statements at the top of the file.
             <script type="text/javascript">

                 dojo.addOnLoad(function() {

                       parseWidget("MyRefreshArea");

                 });

             </script>


   2009 May, 29	                   IBM WebSphere Commerce Feature Pack 5 – Lab exercise               Page 9 of 12

                                                  Store customization 1
© Copyright IBM Corporation 2009. All rights reserved


Part 4: Test the new message output area
In this part of the lab, you will launch the Madisons starter store and observe the messages captured by your
new refresh area.


____ 1.    Launch the Madisons starter store
           http://<WCDE_HOST>/webapp/wcs/stores/servlet/Madisons/index.jsp. You should see your
           message area at the top of the right sidebar.

____ 2.    Click a product and drag it to the mini shopping cart area. Observe the message displayed in your
           message output area. This message was sent by the AjaxAddOrderItem service when the shop cart
           was updated.


____ 3.    Select the Outdoor category under Furniture. Notice that there are two pages of products.

____ 4.    Advance to page 2 of the products and observe your message output area. Paging is an example of
           a render context change but notice that no message has been recorded. This is because controllers
           listen for all model changed events but only listen for render context changed events for their
           specified render context. In the Part 5, you will update the render context associated with your
           refresh controller so you can capture pagination messages.


   2009 May, 29                 IBM WebSphere Commerce Feature Pack 5 – Lab exercise              Page 10 of 12

                                               Store customization 1
© Copyright IBM Corporation 2009. All rights reserved


Part 5: Change the render context for a refresh controller
In this section, you will make a small change to your refresh controller definition so you receive render context
changed events when you page through products.

____ 1.	   Navigate to Madisons > Lab1 and open MessageOutput.js.

____ 2.	   Locate the line renderContext: wc.render.getContextById("MyLab1Context") and
           replace it with renderContext:
           wc.render.getContextById("CategoryDisplay_Context"). Save the file.

____ 3.	   Reload the page in your browser and page through the products again. You should now see the
           render context changed events being recorded. Drag a product to the mini shopping cart and you
           will see the model changed message.


  2009 May, 29	                  IBM WebSphere Commerce Feature Pack 5 – Lab exercise              Page 11 of 12

                                                Store customization 1
© Copyright IBM Corporation 2009. All rights reserved


Part 6: What you did in this exercise
In this tutorial you learned how to create refresh areas, refresh controllers and render contexts. You also saw
how user actions generate events and how you can listen and respond to event messages.

You should now understand how to complete the following tasks:

         •        Create a refresh controller that handles modelChanged and renderContextChanged events

         •        Create a refresh area on a store page and specify its accessibility attributes

         •        Invoke the Dojo parser

         •        Understand how events are used to communicate changes and drive page updates


   2009 May, 29                   IBM WebSphere Commerce Feature Pack 5 – Lab exercise              Page 12 of 12

                                                 Store customization 1

Refresh controller

  • 1.
    © Copyright IBMCorporation 2009 All rights reserved ® ® IBM WebSphere Commerce Feature Pack 5 – Lab exercise Store customization 1 What this exercise is about ................................................................................................................................... 2 What you should be able to do ............................................................................................................................. 2 Introduction ........................................................................................................................................................... 2 Requirements........................................................................................................................................................ 2 Part 1: Create the refresh controller............................................................................................................... 4 Part 2: Create the refresh area ............................................................................................................................. 6 Part 3: Add the message output area to the sidebar ............................................................................................ 9 Part 4: Test the new message output area ......................................................................................................... 10 Part 5: Change the render context for a refresh controller ................................................................................. 11 Part 6: What you did in this exercise................................................................................................................... 12 2009 May, 29 IBM SWG WebSphere Commerce Feature Pack 5 – Lab exercise Page 1 of 12 Store customization 1
  • 2.
    © Copyright IBMCorporation 2009. All rights reserved What this exercise is about In this tutorial, you will review many of the JavaScript classes that make up the WebSphere Commerce Ajax framework. You will also review how the framework uses the Dojo events system to notify page elements of changes they might be interested in. To demonstrate the framework, you will add a refresh area to the right sidebar of the Madisons starter store. Using a refresh controller, you will print out a message to the refresh area for each event generated by the WebSphere Commerce Ajax framework. This exercise is quite short and is intended mainly as a review of the concepts of refresh area, render context and refresh controller. If you already understand how these objects interact you can move on to Lab 2. What you should be able to do After completing this exercise, you should be able to: • Add a refresh area to a page • Define a refresh controller • Understand how Dojo events are used to drive partial page updates Introduction The following naming conventions are used in the exercises: Reference Variable Description <WCDE_INSTALL_DIR> WebSphere Commerce Developer installation directory <WCDE_HOST> Host name for WebSphere Commerce Developer <LAB_DIR> Directory of the lab files The .zip file, StoreCustomizationLab1.zip, provided with this lab contains all the new and modified files necessary to complete this lab. There is also a snippets file provided that contains just the text to be typed in. You should type in the code provided. However if you find this is too much typing or need assistance solving a problem, the solution files and snippets file are available. Requirements Before beginning this lab, ensure you have: • Installed WebSphere Commerce Developer 6.0 • Installed fix pack 7, fix LI74128 • Installed Feature Pack 4 and fix IZ41934 • Installed Feature Pack 5 • Enabled the following features : o management-center 2009 May, 29 IBM WebSphere Commerce Feature Pack 5 – Lab exercise Page 2 of 12 Store customization 1
  • 3.
    © Copyright IBMCorporation 2009. All rights reserved o madisons-starterstore • Published the Madisons starter store • Reviewed WCS6005_MadisonsStarterStoreCustomization to familiarize yourself with the WebSphere Commerce Ajax framework • Downloaded the lab files 2009 May, 29 IBM WebSphere Commerce Feature Pack 5 – Lab exercise Page 3 of 12 Store customization 1
  • 4.
    © Copyright IBMCorporation 2009. All rights reserved Part 1: Create the refresh controller The first thing you need in order to listen for refresh events is a refresh controller. A refresh controller may have multiple refresh areas associated with it and it’s the controller’s job to decide whether the refresh areas need to be updated in response to events. In this part of the lab, you will define a refresh controller and the methods it will use to evaluate incoming events. ____ 1. Create a new directory structure for your custom code. __ a. Open WebSphere Commerce Developer and navigate to the Stores project. __ b. Expand the Stores project directory until you reach the Madisons directory as shown below. Right click the Madisons folder and select New > Folder. __ c. Create a folder named Lab1. All of your custom files will be stored under this directory. ____ 2. Right click the Lab1 folder and select New > JavaScript file. Name the file MessageOutput.js and click Finish. ____ 3. Delete the function call newFunction() that was added for you. Create your JavaScript file as described below. __ a. Declare a render context. The render context will not be used directly in this lab but each refresh controller must have an associated render context when it is defined. Add the following line: wc.render.declareContext("MyLab1Context","",""); __ b. Declare the refresh controller. Notice how the render context is used in the definition of the refresh controller. Create the modelChangedHandler and renderContextChangedHandler functions as specified below. These functions will be called when modelChanged and renderContextChanged events, respectively, are received. In this lab you will print a simple message to the screen but more commonly these methods are used to trigger a refresh area to redraw as a result of the change event. You can see an example of this in Lab 2. Add the following code to your file: wc.render.declareRefreshController({ 2009 May, 29 IBM WebSphere Commerce Feature Pack 5 – Lab exercise Page 4 of 12 Store customization 1
  • 5.
    © Copyright IBMCorporation 2009. All rights reserved id: "MyLab1Controller", renderContext: wc.render.getContextById("MyLab1Context"), url: "", formId: "" ,modelChangedHandler: function(message, widget) { var div = document.createElement("div"); var contentArea = document.getElementById("MessageContent"); contentArea.appendChild(div); div.appendChild(document.createTextNode("Model changed. Action id: " + message.actionId)); } ,renderContextChangedHandler: function(message, widget) { var div = document.createElement("div"); var contentArea = document.getElementById("MessageContent"); contentArea.appendChild(div); div.appendChild(document.createTextNode("Render context changed.")); } }); __ c. Save the file. 2009 May, 29 IBM WebSphere Commerce Feature Pack 5 – Lab exercise Page 5 of 12 Store customization 1
  • 6.
    © Copyright IBMCorporation 2009. All rights reserved Part 2: Create the refresh area A refresh area is a portion of a web page where the content displayed will be affected by a shopper’s actions. The refresh controller you defined in Part 1 determines what the affect will be. In this case it will be to write a message in the refresh area. ____ 1. Create a new JSP for your new refresh area __ a. Right click your new Lab1 directory and select New > JSP File. __ b. Name your new file MessageOutput. Click Finish to save the file. ____ 2. Define the refresh area. A refresh area is created using the RefreshArea widget. This widget is a WebSphere Commerce extension to the Dojo toolkit. It defines a container for the portion of the screen that can be modified while the remainder of the page stays unchanged. __ a. Make sure the Source tab is selected. Delete the automatically generated content. It is not needed since the JSP will only generate a page fragment. 2009 May, 29 IBM WebSphere Commerce Feature Pack 5 – Lab exercise Page 6 of 12 Store customization 1
  • 7.
    © Copyright IBMCorporation 2009. All rights reserved __ b. Some tag libraries and an environment setup JSP fragment are needed for the page to function. If you are interested you can stop and examine the contents of the JSTLEnvironmentSetup.jspf file. Add the following code at the top of the file: <%@ taglib uri="http://java.sun.com/jsp/jstl/core" prefix="c" %> <%@ taglib uri="http://commerce.ibm.com/base" prefix="wcbase" %> <%@ include file="../include/JSTLEnvironmentSetup.jspf" %> __ c. Import the JavaScript file you created in Part 1. The variable jspImgStoreDir is specified in the included file JSTLEnvironmentSetup. Add the following code: <script type="text/javascript" src="<c:out value="${jspStoreImgDir}Lab1/MessageOutput.js"/>"></script> __ d. Create the refresh area Dojo widget. A Dojo widget is created by inserting the attribute dojoType into an HTML element declaration. The value of the dojoType attribute specifies what Dojo class to use to create the widget. The definition below also contains attributes that enable accessibility support as summarized in the table that follows. Add the following code to your JSP: <div dojoType="wc.widget.RefreshArea" id="MyRefreshArea" controllerId="MyLab1Controller" role="wairole:region" waistate:live="polite" waistate:atomic="false" waistate:relevant="all"> <div class="header"> <h2 class="black">Messages received</h2> </div> <div id="MessageContent" class="content"> </div> </div> Accessibility attribute Meaning role=”wairole:region” Declares the <div> structure as a “live region”. This informs assistive technology that the content within 2009 May, 29 IBM WebSphere Commerce Feature Pack 5 – Lab exercise Page 7 of 12 Store customization 1
  • 8.
    © Copyright IBMCorporation 2009. All rights reserved the region can change waistate:live=”polite” Specifies when to inform the user that live region content has changed. The value “polite” signals to wait until the user is idle waistate:atomic=”false” Signals that the user needs to hear only the portion of the live region that has changed, not the whole area. waistate:relevant=”all” Specifies which types of changes need to be heard. This can be limited to additions, removals or text. In this example all changes will be heard. 2009 May, 29 IBM WebSphere Commerce Feature Pack 5 – Lab exercise Page 8 of 12 Store customization 1
  • 9.
    © Copyright IBMCorporation 2009. All rights reserved Part 3: Add the message output area to the sidebar In this part of the lab, you will update the existing sidebar JSP to include your new refresh area. ____ 1. Navigate to Madisons > include > styles > style1 and open the file CachedRightSidebarDisplay.jsp ____ 2. Import your message display refresh area. Locate the line <div id="right_nav"> near the top of the file. __ a. Add the following code immediately after the above line to include the message output area in the sidebar. <c:import url="${jspStoreDir}Lab1/MessageOutput.jsp"> <c:param name="storeId" value="${WCParam.storeId}" /> <c:param name="catalogId" value="${catalogId}" /> <c:param name="langId" value="${langId}" /> </c:import> ____ 3. Instruct the Dojo parser to parse the message output area. Since a refresh area is a custom Dojo widget, it needs to be parsed to create the corresponding JavaScript object that provides the refresh area function. In the Madisons starter store, the parser is turned off by default to improve performance. That means each new Dojo widget added to a page needs to be manually parsed. Add the following code just below the include statements at the top of the file. <script type="text/javascript"> dojo.addOnLoad(function() { parseWidget("MyRefreshArea"); }); </script> 2009 May, 29 IBM WebSphere Commerce Feature Pack 5 – Lab exercise Page 9 of 12 Store customization 1
  • 10.
    © Copyright IBMCorporation 2009. All rights reserved Part 4: Test the new message output area In this part of the lab, you will launch the Madisons starter store and observe the messages captured by your new refresh area. ____ 1. Launch the Madisons starter store http://<WCDE_HOST>/webapp/wcs/stores/servlet/Madisons/index.jsp. You should see your message area at the top of the right sidebar. ____ 2. Click a product and drag it to the mini shopping cart area. Observe the message displayed in your message output area. This message was sent by the AjaxAddOrderItem service when the shop cart was updated. ____ 3. Select the Outdoor category under Furniture. Notice that there are two pages of products. ____ 4. Advance to page 2 of the products and observe your message output area. Paging is an example of a render context change but notice that no message has been recorded. This is because controllers listen for all model changed events but only listen for render context changed events for their specified render context. In the Part 5, you will update the render context associated with your refresh controller so you can capture pagination messages. 2009 May, 29 IBM WebSphere Commerce Feature Pack 5 – Lab exercise Page 10 of 12 Store customization 1
  • 11.
    © Copyright IBMCorporation 2009. All rights reserved Part 5: Change the render context for a refresh controller In this section, you will make a small change to your refresh controller definition so you receive render context changed events when you page through products. ____ 1. Navigate to Madisons > Lab1 and open MessageOutput.js. ____ 2. Locate the line renderContext: wc.render.getContextById("MyLab1Context") and replace it with renderContext: wc.render.getContextById("CategoryDisplay_Context"). Save the file. ____ 3. Reload the page in your browser and page through the products again. You should now see the render context changed events being recorded. Drag a product to the mini shopping cart and you will see the model changed message. 2009 May, 29 IBM WebSphere Commerce Feature Pack 5 – Lab exercise Page 11 of 12 Store customization 1
  • 12.
    © Copyright IBMCorporation 2009. All rights reserved Part 6: What you did in this exercise In this tutorial you learned how to create refresh areas, refresh controllers and render contexts. You also saw how user actions generate events and how you can listen and respond to event messages. You should now understand how to complete the following tasks: • Create a refresh controller that handles modelChanged and renderContextChanged events • Create a refresh area on a store page and specify its accessibility attributes • Invoke the Dojo parser • Understand how events are used to communicate changes and drive page updates 2009 May, 29 IBM WebSphere Commerce Feature Pack 5 – Lab exercise Page 12 of 12 Store customization 1