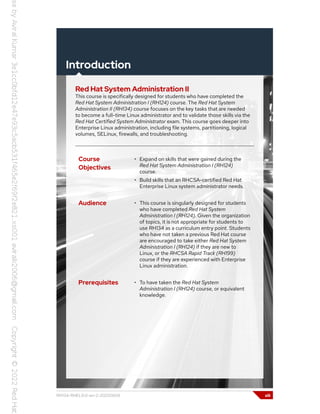
The document is a workbook for the Red Hat System Administration II course (RH134) focused on Red Hat Enterprise Linux 9.0, intended for students who have completed the RH124 course. It covers advanced topics in Linux administration, including scripting, system performance tuning, and SELinux management, along with corresponding lab exercises. Key components include instructional content, practical exercises, and guidelines for navigating the classroom environment and using virtual machines.


![Introduction
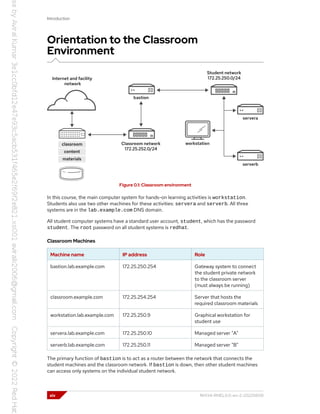
Several systems in the classroom provide supporting services. Two servers,
content.example.com and materials.example.com, are sources for software and lab
materials in hands-on activities. Information about how to use these servers is provided in the
instructions for those activities. The workstation virtual machine provides these activities. Both
classroom and bastion must always be running for proper use of the lab environment.
Note
When logging on to servera or serverb, you might see a message about
activating cockpit. You can ignore the message.
[student@workstation ~]$ ssh student@serverb
Warning: Permanently added 'serverb,172.25.250.11' (ECDSA) to the list of
known hosts.
Activate the web console with: systemctl enable --now cockpit.socket
[student@serverb ~]$
Controlling Your Systems
You are assigned remote computers in a Red Hat Online Learning (ROLE) classroom. Self-
paced courses are accessed through a web application that is hosted at rol.redhat.com [http://
rol.redhat.com]. Log in to this site with your Red Hat Customer Portal user credentials.
Controlling the Virtual Machines
The virtual machines in your classroom environment are controlled through web page interface
controls. The state of each classroom virtual machine is displayed on the Lab Environment tab.
Figure 0.2: An example course Lab Environment management page
RH134-RHEL9.0-en-2-20220609 xv](https://image.slidesharecdn.com/redhatenterpriselinux9-240713030337-3ff2819f/85/Red-Hat-Enterprise-Linux-Administration-9-0-RH134-pdf-15-320.jpg)
![Introduction
Performing Lab Exercises
You might see the following lab activity types in this course:
• A guided exercise is a hands-on practice exercise that follows a presentation section. It walks
you through a procedure to perform, step by step.
• A quiz is typically used when checking knowledge-based learning, or when a hands-on activity is
impractical for some other reason.
• An end-of-chapter lab is a gradable hands-on activity to help you to check your learning. You
work through a set of high-level steps, based on the guided exercises in that chapter, but the
steps do not walk you through every command. A solution is provided with a step-by-step walk-
through.
• A comprehensive review lab is used at the end of the course. It is also a gradable hands-on
activity, and might cover content from the entire course. You work through a specification of
what to accomplish in the activity, without receiving the specific steps to do so. Again, a solution
is provided with a step-by-step walk-through that meets the specification.
To prepare your lab environment at the start of each hands-on activity, run the lab start
command with a specified activity name from the activity's instructions. Likewise, at the end of
each hands-on activity, run the lab finish command with that same activity name to clean up
after the activity. Each hands-on activity has a unique name within a course.
The syntax for running an exercise script is as follows:
[student@workstation ~]$ lab action exercise
The action is a choice of start, grade, or finish. All exercises support start and finish.
Only end-of-chapter labs and comprehensive review labs support grade.
start
The start action verifies the required resources to begin an exercise. It might include
configuring settings, creating resources, checking prerequisite services, and verifying
necessary outcomes from previous exercises. You can take an exercise at any time, even
without taking preceding exercises.
grade
For gradable activities, the grade action directs the lab command to evaluate your work, and
shows a list of grading criteria with a PASS or FAIL status for each. To achieve a PASS status
for all criteria, fix the failures and rerun the grade action.
finish
The finish action cleans up resources that were configured during the exercise. You can
take an exercise as many times as you want.
The lab command supports tab completion. For example, to list all exercises that you can start,
enter lab start and then press the Tab key twice.
xviii RH134-RHEL9.0-en-2-20220609](https://image.slidesharecdn.com/redhatenterpriselinux9-240713030337-3ff2819f/85/Red-Hat-Enterprise-Linux-Administration-9-0-RH134-pdf-18-320.jpg)
![Chapter 1 | Improve Command-line Productivity
[user@host ~]$ which hello
~/bin/hello
[user@host ~]$ echo $PATH
/home/user/.local/bin:/home/user/bin:/sbin:/bin:/usr/sbin:/usr/bin:/usr/local/
sbin:/usr/local/bin
Quote Special Characters
A number of characters and words have special meaning to the Bash shell. When you need to use
these characters for their literal values, rather than for their special meanings, you will escape
them in the script. Use the backslash character (), single quotes (''), or double quotes ("") to
remove (or escape) the special meaning of these characters.
The backslash character removes the special meaning of the single character that immediately
follows the backslash. For example, to use the echo command to display the # not a comment
literal string, the # hash character must not be interpreted as a comment.
The following example shows the backslash character () modifying the hash character so it is not
interpreted as a comment.
[user@host ~]$ echo # not a comment
[user@host ~]$ echo # not a comment
# not a comment
To escape more than one character in a text string, either use the backslash character multiple
times or enclose the whole string in single quotes ('') to interpret literally. Single quotes preserve
the literal meaning of all characters that they enclose. Observe the backslash character and single
quotes in these examples:
[user@host ~]$ echo # not a comment #
[user@host ~]$ echo # not a comment #
# not a comment
[user@host ~]$ echo # not a comment #
# not a comment #
[user@host ~]$ echo '# not a comment #'
# not a comment #
Use double quotation marks to suppress globbing (file name pattern matching) and shell
expansion, but still allow command and variable substitution. Variable substitution is
conceptually identical to command substitution, but might use optional brace syntax. Observe the
following examples of various quotation mark forms.
Use single quotation marks to interpret all enclosed text literally. Besides suppressing globbing
and shell expansion, single quotations also direct the shell to suppress command and variable
substitution. The question mark (?) is included inside the quotations, because it is a metacharacter
that also needs escaping from expansion.
[user@host ~]$ var=$(hostname -s); echo $var
host
[user@host ~]$ echo "***** hostname is ${var} *****"
***** hostname is host *****
RH134-RHEL9.0-en-2-20220609 3](https://image.slidesharecdn.com/redhatenterpriselinux9-240713030337-3ff2819f/85/Red-Hat-Enterprise-Linux-Administration-9-0-RH134-pdf-21-320.jpg)
![Chapter 1 | Improve Command-line Productivity
[user@host ~]$ echo Your username variable is $USER.
Your username variable is $USER.
[user@host ~]$ echo "Will variable $var evaluate to $(hostname -s)?"
Will variable host evaluate to host?
[user@host ~]$ echo 'Will variable $var evaluate to $(hostname -s)?'
Will variable $var evaluate to $(hostname -s)?
[user@host ~]$ echo ""Hello, world""
"Hello, world"
[user@host ~]$ echo '"Hello, world"'
"Hello, world"
Provide Output from a Shell Script
The echo command displays arbitrary text by passing the text as an argument to the command.
By default, the text is sent to standard output (STDOUT), but you can send text elsewhere by
using output redirection. In the following simple Bash script, the echo command displays the
"Hello, world" message to STDOUT, which defaults to the screen device.
[user@host ~]$ cat ~/bin/hello
#!/usr/bin/bash
echo "Hello, world"
[user@host ~]$ hello
Hello, world
Note
This user can run hello at the prompt because the ~/bin (/home/user/bin)
directory is in the user's PATH variable and the hello script has executable
permission. The PATH parser will find the script first, if no other executable file
called hello is found in any earlier PATH directory. Your home directory's bin
subdirectory is intended to store your personal scripts so that scripts can be invoked
easily.
The echo command is widely used in shell scripts to display informational or error messages.
Messages are a helpful indicator of a script's progress, and can be directed to standard output,
standard error, or be redirected to a log file for archiving. When displaying error messages, good
programming practice is to redirect error messages to STDERR to segregate them from normal
program output.
[user@host ~]$ cat ~/bin/hello
#!/usr/bin/bash
echo "Hello, world"
echo "ERROR: Houston, we have a problem." >&2
[user@host ~]$ hello 2> hello.log
Hello, world
[user@host ~]$ cat hello.log
ERROR: Houston, we have a problem.
4 RH134-RHEL9.0-en-2-20220609](https://image.slidesharecdn.com/redhatenterpriselinux9-240713030337-3ff2819f/85/Red-Hat-Enterprise-Linux-Administration-9-0-RH134-pdf-22-320.jpg)
![Chapter 1 | Improve Command-line Productivity
Guided Exercise
Write Simple Bash Scripts
In this exercise, you write a simple Bash script with a sequence of commands and run it from
the command line.
Outcomes
• Write and execute a simple Bash script.
• Redirect the output of a simple Bash script to a file.
Before You Begin
As the student user on the workstation machine, use the lab command to prepare your
system for this exercise.
This command prepares your environment and ensures that all required resources are
available.
[student@workstation ~]$ lab start console-write
Instructions
1. Log in to the servera machine as the student user.
[student@workstation ~]$ ssh student@servera
...output omitted...
[student@servera ~]$
2. Create and execute a simple Bash script.
2.1. Use the vim command to create the firstscript.sh file under your home
directory.
[student@servera ~]$ vim firstscript.sh
2.2. Insert the following text, and save the file. The number of hash signs (#) is arbitrary.
#!/usr/bin/bash
echo "This is my first bash script" > ~/output.txt
echo "" >> ~/output.txt
echo "#####################################################" >> ~/output.txt
2.3. Use the sh command to execute the script.
[student@servera ~]$ sh firstscript.sh
2.4. Review the output file that the script generated.
6 RH134-RHEL9.0-en-2-20220609](https://image.slidesharecdn.com/redhatenterpriselinux9-240713030337-3ff2819f/85/Red-Hat-Enterprise-Linux-Administration-9-0-RH134-pdf-24-320.jpg)
![Chapter 1 | Improve Command-line Productivity
[student@servera ~]$ cat output.txt
This is my first bash script
#####################################################
3. Add more commands to the firstscript.sh script, execute it, and review the output.
3.1. Use the Vim text editor to edit the firstscript.sh script.
[student@servera ~]$ vim firstscript.sh
The following output shows the expected content of the firstscript.sh file:
#!/usr/bin/bash
#
echo "This is my first bash script" > ~/output.txt
echo "" >> ~/output.txt
echo "#####################################################" >> ~/output.txt
echo "LIST BLOCK DEVICES" >> ~/output.txt
echo "" >> ~/output.txt
lsblk >> ~/output.txt
echo "" >> ~/output.txt
echo "#####################################################" >> ~/output.txt
echo "FILESYSTEM FREE SPACE STATUS" >> ~/output.txt
echo "" >> ~/output.txt
df -h >> ~/output.txt
echo "#####################################################" >> ~/output.txt
3.2. Make the firstscript.sh file executable by using the chmod command.
[student@servera ~]$ chmod a+x firstscript.sh
3.3. Execute the firstscript.sh script.
[student@servera ~]$ ./firstscript.sh
3.4. Review the output file that the script generated.
[student@servera ~]$ cat output.txt
This is my first bash script
#####################################################
LIST BLOCK DEVICES
NAME MAJ:MIN RM SIZE RO TYPE MOUNTPOINTS
sr0 11:0 1 558K 0 rom
vda 252:0 0 10G 0 disk
├─vda1 252:1 0 1M 0 part
├─vda2 252:2 0 200M 0 part /boot/efi
├─vda3 252:3 0 500M 0 part /boot
└─vda4 252:4 0 9.3G 0 part /
RH134-RHEL9.0-en-2-20220609 7](https://image.slidesharecdn.com/redhatenterpriselinux9-240713030337-3ff2819f/85/Red-Hat-Enterprise-Linux-Administration-9-0-RH134-pdf-25-320.jpg)
![Chapter 1 | Improve Command-line Productivity
vdb 252:16 0 5G 0 disk
vdc 252:32 0 5G 0 disk
vdd 252:48 0 5G 0 disk
#####################################################
FILESYSTEM FREE SPACE STATUS
Filesystem Size Used Avail Use% Mounted on
devtmpfs 844M 0 844M 0% /dev
tmpfs 888M 0 888M 0% /dev/shm
tmpfs 355M 9.4M 346M 3% /run
/dev/vda4 9.4G 1.7G 7.7G 18% /
/dev/vda3 495M 161M 335M 33% /boot
/dev/vda2 200M 7.6M 193M 4% /boot/efi
tmpfs 178M 0 178M 0% /run/user/1000
#####################################################
4. Remove the exercise files and return to the workstation machine.
4.1. Delete the firstscript.sh and output.txt files.
[student@servera ~]$ rm firstscript.sh output.txt
4.2. Return to the workstation machine as the student user.
[student@servera ~]$ exit
logout
Connection to servera closed.
[student@workstation ~]$
Finish
On the workstation machine, change to the student user home directory and use the lab
command to complete this exercise. This step is important to ensure that resources from previous
exercises do not impact upcoming exercises.
[student@workstation ~]$ lab finish console-write
This concludes the section.
8 RH134-RHEL9.0-en-2-20220609](https://image.slidesharecdn.com/redhatenterpriselinux9-240713030337-3ff2819f/85/Red-Hat-Enterprise-Linux-Administration-9-0-RH134-pdf-26-320.jpg)
![Chapter 1 | Improve Command-line Productivity
Loops and Conditional Constructs in
Scripts
Objectives
Run repetitive tasks with for loops, evaluate exit codes from commands and scripts, run tests with
operators, and create conditional structures with if statements.
Use Loops to Iterate Commands
System administrators often encounter repetitive tasks in their daily activities. A repetitive task
example is running a command multiple times on a target, such as checking a process every
minute for 10 minutes to know whether it has completed. Another example is running a command
once each for multiple targets, such as backing up numerous databases on a system. The for loop
is a Bash looping construct to use for task iterations.
Process Items from the Command Line
In Bash, the for loop construct uses the following syntax:
for VARIABLE in LIST; do
COMMAND VARIABLE
done
The loop processes the strings that you provide in LIST and exits after processing the last string in
the list. The for loop temporarily stores each list string as the value of VARIABLE, then executes
the block of commands that use the variable. The variable name is arbitrary. Typically, you
reference the variable value with commands in the command block.
Provide the list of strings for the for loop from a list that the user enters directly, or that is
generated from shell expansion, such as variable, brace, or file name expansion, or command
substitution.
These examples demonstrate different ways to provide strings to for loops:
[user@host ~]$ for HOST in host1 host2 host3; do echo $HOST; done
host1
host2
host3
[user@host ~]$ for HOST in host{1,2,3}; do echo $HOST; done
host1
host2
host3
[user@host ~]$ for HOST in host{1..3}; do echo $HOST; done
host1
host2
host3
[user@host ~]$ for FILE in file{a..c}; do ls $FILE; done
filea
fileb
filec
RH134-RHEL9.0-en-2-20220609 9](https://image.slidesharecdn.com/redhatenterpriselinux9-240713030337-3ff2819f/85/Red-Hat-Enterprise-Linux-Administration-9-0-RH134-pdf-27-320.jpg)
![Chapter 1 | Improve Command-line Productivity
[user@host ~]$ for PACKAGE in $(rpm -qa | grep kernel);
do echo "$PACKAGE was installed on
$(date -d @$(rpm -q --qf "%{INSTALLTIME}n" $PACKAGE))"; done
kernel-tools-libs-5.14.0-70.2.1.el9_0.x86_64 was installed on Thu Mar 24 10:52:40
PM EDT 2022
kernel-tools-5.14.0-70.2.1.el9_0.x86_64 was installed on Thu Mar 24 10:52:40 PM
EDT 2022
kernel-core-5.14.0-70.2.1.el9_0.x86_64 was installed on Thu Mar 24 10:52:46 PM EDT
2022
kernel-modules-5.14.0-70.2.1.el9_0.x86_64 was installed on Thu Mar 24 10:52:47 PM
EDT 2022
kernel-5.14.0-70.2.1.el9_0.x86_64 was installed on Thu Mar 24 10:53:04 PM EDT 2022
[user@host ~]$ for EVEN in $(seq 2 2 10); do echo "$EVEN"; done
2
4
6
8
10
Bash Script Exit Codes
After a script interprets and processes all of its content, the script process exits and passes control
back to the parent process that called it. However, a script can be exited before it finishes, such as
when the script encounters an error condition. Use the exit command to immediately leave the
script, and skip processing the remainder of the script.
Use the exit command with an optional integer argument between 0 and 255, which represents
an exit code. An exit code is returned to a parent process to indicate the status at exit. An exit
code value of 0 represents a successful script completion with no errors. All other nonzero values
indicate an error exit code. The script programmer defines these codes. Use unique values to
represent the different error conditions that are encountered. Retrieve the exit code of the last
completed command from the built-in $? variable, as in the following examples:
[user@host bin]$ cat hello
#!/usr/bin/bash
echo "Hello, world"
exit 0
[user@host bin]$ ./hello
Hello, world
[user@host bin]$ echo $?
0
When a script's exit command is used without an exit code argument, then the script returns the
exit code of the last command that was run within the script.
Test Logic for Strings and Directories, and to Compare
Values
To ensure that unexpected conditions do not easily disrupt scripts, it is recommended to verify
command input such as command-line arguments, user input, command substitutions, variable
expansions, and file name expansions. You can check integrity in your scripts by using the Bash
test command.
All commands produce an exit code on completion.
10 RH134-RHEL9.0-en-2-20220609](https://image.slidesharecdn.com/redhatenterpriselinux9-240713030337-3ff2819f/85/Red-Hat-Enterprise-Linux-Administration-9-0-RH134-pdf-28-320.jpg)
![Chapter 1 | Improve Command-line Productivity
To see the exit status, view the $? variable immediately following the execution of the test
command. An exit status of 0 indicates a successful exit with nothing to report, and nonzero values
indicate some condition or failure. Perform tests by using various operators to determine whether
a number is greater than (gt), greater than or equal to (ge), less than (lt), less than or equal to
(le), or equal (eq) to another number.
Use operators to test whether a string of text is the same (= or ==) or not the same (!=) as
another string of text, or whether the string has zero length (z) or has a non-zero length (n). You
can also test if a regular file (-f) or directory (-d) exists and some special attributes, such as if the
file is a symbolic link (-L) or if the user has read permissions (-r).
Note
Shell scripting uses many types of operators, beyond those operators discussed
here. The test(1) man page lists the conditional expression operators with
descriptions. The bash(1) man page also explains operator use and evaluation,
but can be complex to read. Red Hat recommends that students learn shell scripting
through quality books and courses that are dedicated to shell programming.
The following examples demonstrate the test command with Bash numeric comparison
operators:
[user@host ~]$ test 1 -gt 0 ; echo $?
0
[user@host ~]$ test 0 -gt 1 ; echo $?
1
Perform tests by using the Bash test command syntax, [ <TESTEXPRESSION> ] or the
newer extended test command syntax, [[ <TESTEXPRESSION> ]], which provides features
such as file name globbing and regex pattern matching. In most cases you should use the
[[ <TESTEXPRESSION> ]] syntax.
The following examples demonstrate the Bash test command syntax and numeric comparison
operators:
[user@host ~]$ [[ 1 -eq 1 ]]; echo $?
0
[user@host ~]$ [[ 1 -ne 1 ]]; echo $?
1
[user@host ~]$ [[ 8 -gt 2 ]]; echo $?
0
[user@host ~]$ [[ 2 -ge 2 ]]; echo $?
0
[user@host ~]$ [[ 2 -lt 2 ]]; echo $?
1
[user@host ~]$ [[ 1 -lt 2 ]]; echo $?
0
The following examples demonstrate the Bash string comparison operators:
RH134-RHEL9.0-en-2-20220609 11](https://image.slidesharecdn.com/redhatenterpriselinux9-240713030337-3ff2819f/85/Red-Hat-Enterprise-Linux-Administration-9-0-RH134-pdf-29-320.jpg)
![Chapter 1 | Improve Command-line Productivity
[user@host ~]$ [[ abc = abc ]]; echo $?
0
[user@host ~]$ [[ abc == def ]]; echo $?
1
[user@host ~]$ [[ abc != def ]]; echo $?
0
The following examples demonstrate the use of Bash string unary (one argument) operators:
[user@host ~]$ STRING=''; [[ -z "$STRING" ]]; echo $?
0
[user@host ~]$ STRING='abc'; [[ -n "$STRING" ]]; echo $?
0
Note
The space characters inside the brackets are mandatory, because they separate the
words and elements within the test expression. The shell's command parsing routine
divides the command elements into words and operators by recognizing spaces
and other metacharacters, according to built-in parsing rules. For full treatment
of this advanced concept, see the getopt(3) man page. The left square bracket
character ([) is itself a built-in alias for the test command. Shell words, whether
they are commands, subcommands, options, arguments, or other token elements,
are always delimited by spaces.
Conditional Structures
Simple shell scripts represent a collection of commands that are executed from beginning to end.
Programmers incorporate decision-making into shell scripts using conditional structures. A script
can execute specific routines when stated conditions are met.
Use the If/Then Construct
The simplest of the conditional structures is the if/then construct, with the following syntax:
if <CONDITION>; then
<STATEMENT>
...
<STATEMENT>
fi
With this construct, if the script meets the given condition, then it executes the code in the
statement block. It does not take action if the given condition is not met. Common test conditions
in the if/then statements include the previously discussed numeric, string, and file tests. The fi
statement at the end closes the if/then construct. The following code section demonstrates the
use of an if/then construct to start the psacct service if it is not active:
[user@host ~]$ systemctl is-active psacct > /dev/null 2>&1
[user@host ~]$ if [[ $? -ne 0 ]]; then sudo systemctl start psacct; fi
12 RH134-RHEL9.0-en-2-20220609](https://image.slidesharecdn.com/redhatenterpriselinux9-240713030337-3ff2819f/85/Red-Hat-Enterprise-Linux-Administration-9-0-RH134-pdf-30-320.jpg)
![Chapter 1 | Improve Command-line Productivity
Use the If/Then/Else Construct
You can further expand the if/then construct so that it takes different sets of actions depending
on whether a condition is met. Use the if/then/else construct to accomplish this behavior, as
in this example:
if <CONDITION>; then
<STATEMENT>
...
<STATEMENT>
else
<STATEMENT>
...
<STATEMENT>
fi
The following code section demonstrates an if/then/else statement to start the psacct
service if it is not active, and to stop it if it is active:
[user@host ~]$ systemctl is-active psacct > /dev/null 2>&1
[user@host ~]$ if [[ $? -ne 0 ]]; then
sudo systemctl start psacct;
else
sudo systemctl stop psacct;
fi
Use the If/Then/Elif/Then/Else Construct
Expand an if/then/else construct to test more than one condition and execute a different set
of actions when it meets a specific condition. The next example shows the construct for an added
condition:
if <CONDITION>; then
<STATEMENT>
...
<STATEMENT>
elif <CONDITION>; then
<STATEMENT>
...
<STATEMENT>
else
<STATEMENT>
...
<STATEMENT>
fi
In this conditional structure, Bash tests the conditions as they are ordered in the script. When a
condition is true, Bash executes the actions that are associated with the condition and then skips
the remainder of the conditional structure. If none of the conditions are true, then Bash executes
the actions in the else clause.
The following example demonstrates the use of an if/then/elif/then/else statement to
run the mysql client if the mariadb service is active, or run the psql client if the postgresql
RH134-RHEL9.0-en-2-20220609 13](https://image.slidesharecdn.com/redhatenterpriselinux9-240713030337-3ff2819f/85/Red-Hat-Enterprise-Linux-Administration-9-0-RH134-pdf-31-320.jpg)
![Chapter 1 | Improve Command-line Productivity
service is active, or run the sqlite3 client if both the mariadb and the postgresql service are
inactive:
[user@host ~]$ systemctl is-active mariadb > /dev/null 2>&1
[user@host ~]$ MARIADB_ACTIVE=$?
[user@host ~]$ sudo systemctl is-active postgresql > /dev/null 2>&1
[user@host ~]$ POSTGRESQL_ACTIVE=$?
[user@host ~]$ if [[ "$MARIADB_ACTIVE" -eq 0 ]]; then
mysql;
elif [[ "$POSTGRESQL_ACTIVE" -eq 0 ]]; then
psql;
else
sqlite3;
fi
References
bash(1) man page
14 RH134-RHEL9.0-en-2-20220609](https://image.slidesharecdn.com/redhatenterpriselinux9-240713030337-3ff2819f/85/Red-Hat-Enterprise-Linux-Administration-9-0-RH134-pdf-32-320.jpg)
![Chapter 1 | Improve Command-line Productivity
Guided Exercise
Loops and Conditional Constructs in
Scripts
In this exercise, you use loops to efficiently print the hostname from multiple servers.
Outcomes
• Create a for loop to iterate through a list of items from the command line and in a shell
script.
Before You Begin
As the student user on the workstation machine, use the lab command to prepare your
system for this exercise.
This command prepares your environment and ensures that all required resources are
available.
[student@workstation ~]$ lab start console-commands
Instructions
1. Use the ssh and hostname commands to print the hostname of the servera and
serverb machines to standard output.
[student@workstation ~]$ ssh student@servera hostname
servera.lab.example.com
[student@workstation ~]$ ssh student@serverb hostname
serverb.lab.example.com
2. Create a for loop to execute the hostname command on the servera and serverb
machines.
[student@workstation ~]$ for HOST in servera serverb
do
ssh student@${HOST} hostname
done
servera.lab.example.com
serverb.lab.example.com
3. Create a shell script in the /home/student/bin directory to execute the same for loop.
Ensure that the script is included in the PATH environment variable.
3.1. Create the /home/student/bin directory to contain the shell script, if it does not
already exist.
RH134-RHEL9.0-en-2-20220609 15](https://image.slidesharecdn.com/redhatenterpriselinux9-240713030337-3ff2819f/85/Red-Hat-Enterprise-Linux-Administration-9-0-RH134-pdf-33-320.jpg)
![Chapter 1 | Improve Command-line Productivity
[student@workstation ~]$ mkdir ~/bin
3.2. Verify that the bin subdirectory of your home directory is in your PATH environment
variable.
[student@workstation ~]$ echo $PATH
/home/student/.local/bin:/home/student/bin:/sbin:/bin:/usr/sbin:/usr/bin:/usr/
local/sbin:/usr/local/bin:/home/student/.venv/labs/bin
3.3. Create a shell script called printhostname.sh in the /home/student/bin
directory to perform the for loop. Use the cat command to verify the content of the
printhostname.sh file.
[student@workstation ~]$ vim ~/bin/printhostname.sh
[student@workstation ~]$ cat ~/bin/printhostname.sh
#!/usr/bin/bash
#Execute for loop to print server hostname.
for HOST in servera serverb
do
ssh student@${HOST} hostname
done
exit 0
3.4. Give the created script executable permission.
[student@workstation ~]$ chmod +x ~/bin/printhostname.sh
3.5. Run the script from your home directory.
[student@workstation ~]$ printhostname.sh
servera.lab.example.com
serverb.lab.example.com
3.6. Verify that the exit code of your script is 0.
[student@workstation ~]$ echo $?
0
Finish
On the workstation machine, change to the student user home directory and use the lab
command to complete this exercise. This step is important to ensure that resources from previous
exercises do not impact upcoming exercises.
[student@workstation ~]$ lab finish console-commands
This concludes the section.
16 RH134-RHEL9.0-en-2-20220609](https://image.slidesharecdn.com/redhatenterpriselinux9-240713030337-3ff2819f/85/Red-Hat-Enterprise-Linux-Administration-9-0-RH134-pdf-34-320.jpg)
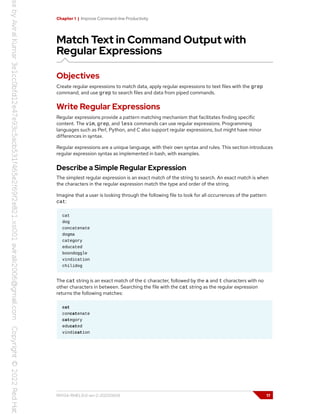
![Chapter 1 | Improve Command-line Productivity
Match the Start and End of a Line
The regular expression would match the search string anywhere on the line on which it occurred:
the beginning, middle, or end of the word or line. Use a line anchor metacharacter to control where
on a line to look for a match.
To match only at the beginning of a line, use the caret character (^). To match only at the end of a
line, use the dollar sign ($).
Using the same file as for the previous example, the ^cat regular expression would match two
lines.
cat
category
The cat$ regular expression would not find only one match, where the cat characters are at the
end of a line.
cat
Locate lines in the file that end with dog by using an end-of-line anchor to create the dog$ regular
expression, which will match two lines:
dog
chilidog
To locate a line that contains only the search expression exactly, use both the beginning and end-
of-line anchors. For example, to locate the word cat when it is both at the beginning and the end
of a line simultaneously, use ^cat$.
cat
Wildcard and Multiplier Usage in Regular Expressions
Regular expressions use a dot character (.) as a wildcard to match any single character on a single
line. The c.t regular expression searches for a string that contains a c followed by any single
character followed by a t. Example matches might include cat, concatenate, vindication,
cut, and c$t.
With an unrestricted wildcard, you cannot predict the character that matches the wildcard. To
match specific characters, replace the unrestricted wildcard with appropriate characters.
Using bracket characters, such as in the c[aou]t regular expression, matches patterns that start
with a c, followed by an a, o, or u, followed by a t. Possible matching expressions can be have the
cat, cot, and cut strings.
Multipliers are a mechanism often used with wildcards. Multipliers apply to the previous character
or wildcard in the regular expression. One of the most commonly used multipliers is the asterisk
(*) character. When used in a regular expression, the asterisk multiplier matches zero or more
occurrences of the multiplied expression. You can use the asterisk with expressions, in addition to
characters.
For example, the the c[aou]*t regular expression could match coat or coot. A regular
expression of c.*t matches cat, coat, culvert, and even ct (matching zero characters
18 RH134-RHEL9.0-en-2-20220609](https://image.slidesharecdn.com/redhatenterpriselinux9-240713030337-3ff2819f/85/Red-Hat-Enterprise-Linux-Administration-9-0-RH134-pdf-36-320.jpg)
![Chapter 1 | Improve Command-line Productivity
between the c and the t). Any string that starts with a c, is followed by zero or more characters,
and ends with a t will be a match.
Another type of multiplier indicates a more precise number of characters desired in the pattern. An
example of an explicit multiplier is the 'c.{2}t' regular expression, which matches any word
that begins with a c, followed by exactly any two characters, and ends with a t. The 'c.{2}t'
expression would match two words in the following example:
cat
coat
convert
cart
covert
cypher
Note
This course introduced two metacharacter text parsing mechanisms: shell pattern
matching (also known as file globbing or file name expansion), and regular
expressions. Because both systems use similar metacharacters, such as the asterisk
character (*), but have differences in metacharacter interpretation and rules, the
two mechanisms can be confusing until each is sufficiently practiced.
Pattern matching is a command-line parsing technique designed for easily
specifying multiple file names, and is primarily supported only for representing file-
name patterns on the command line. Regular expressions are designed to represent
any form or pattern in text strings, no matter how complex. Regular expressions
are internally supported by numerous text processing commands, such as the
grep, sed, awk, python, and perl commands, and many applications, with some
command-dependent variations in interpretation rules.
Regular Expressions in Bash
Option Description
. The period (.) matches any single character.
? The preceding item is optional and is matched at most once.
* The preceding item is matched zero or more times.
+ The preceding item is matched one or more times.
{n} The preceding item is matched exactly n times.
{n,} The preceding item is matched n or more times.
{,m} The preceding item is matched at most m times.
{n,m} The preceding item is matched at least n times, but not more than m times.
[:alnum:] Alphanumeric characters: [:alpha:] and [:digit:]; in the 'C' locale
and ASCII character encoding, this expression is the same as [0-9A-Za-
z].
RH134-RHEL9.0-en-2-20220609 19](https://image.slidesharecdn.com/redhatenterpriselinux9-240713030337-3ff2819f/85/Red-Hat-Enterprise-Linux-Administration-9-0-RH134-pdf-37-320.jpg)
![Chapter 1 | Improve Command-line Productivity
Option Description
[:alpha:] Alphabetic characters: [:lower:] and [:upper:]; in the 'C' locale and
ASCII character encoding, this expression is the same as [A-Za-z].
[:blank:] Blank characters: space and tab.
[:cntrl:] Control characters. In ASCII, these characters have octal codes 000
through 037, and 177 (DEL).
[:digit:] Digits: 0 1 2 3 4 5 6 7 8 9.
[:graph:] Graphical characters: [:alnum:] and [:punct:].
[:lower:] Lowercase letters; in the 'C' locale and ASCII character encoding: a b c d e f
g h i j k l m n o p q r s t u v w x y z.
[:print:] Printable characters: [:alnum:], [:punct:], and space.
[:punct:] Punctuation characters; in the 'C' locale and ASCII character encoding: ! " #
$ % & ' ( ) * + , - . / : ; < = > ? @ [ ] ^ _ ' { | } ~.
[:space:] Space characters: in the 'C' locale, this is tab, newline, vertical tab, form
feed, carriage return, and space.
[:upper:] Uppercase letters: in the 'C' locale and ASCII character encoding: A B C D E
F G H I J K L M N O P Q R S T U V W X Y Z.
[:xdigit:] Hexadecimal digits: 0 1 2 3 4 5 6 7 8 9 A B C D E F a b c d e f.
b Match the empty string at the edge of a word.
B Match the empty string provided that it is not at the edge of a word.
< Match the empty string at the beginning of a word.
> Match the empty string at the end of a word.
w Match word constituent. Synonym for [_[:alnum:]].
W Match non-word constituent. Synonym for [^_[:alnum:]].
s Match white space. Synonym for '[[:space:]`].
S Match non-white space. Synonym for [^[:space:]].
Match Regular Expressions in the Command Line
The grep command uses regular expressions to isolate matching data. You can use the grep
command to match data in a single file or in multiple files. When you use grep to match data in
multiple files, it prints the file name followed by a colon character and then the lines that match
the regular expression.
Isolating Data with the grep Command
The grep command specifies a regular expression and a file to parse for matches.
20 RH134-RHEL9.0-en-2-20220609](https://image.slidesharecdn.com/redhatenterpriselinux9-240713030337-3ff2819f/85/Red-Hat-Enterprise-Linux-Administration-9-0-RH134-pdf-38-320.jpg)
![Chapter 1 | Improve Command-line Productivity
[user@host ~]$ grep '^computer' /usr/share/dict/words
computer
computerese
computerise
computerite
computerizable
computerization
computerize
computerized
computerizes
computerizing
computerlike
computernik
computers
Note
It is recommended practice to use single quotation marks to encapsulate the
regular expression to protect any shell metacharacters (such as the $, *, and {}
characters). Encapsulating the regular expression ensures that the characters are
interpreted by the intended command and not by the shell.
The grep command can process output from other commands by using a pipe operator character
(|). The following example shows the grep command parsing lines from the output of another
command.
[root@host ~]# ps aux | grep chrony
chrony 662 0.0 0.1 29440 2468 ? S 10:56 0:00 /usr/sbin/chronyd
The grep Command Options
The grep command has many useful options for controlling how it parses lines.
Table of Common grep Options
Option Function
-i Use the provided regular expression but do not enforce case sensitivity
(run case-insensitive).
-v Display only lines that do not contain matches to the regular
expression.
-r Search for data that matches the regular expression recursively in a
group of files or directories.
-A NUMBER Display NUMBER of lines after the regular expression match.
-B NUMBER Display NUMBER of lines before the regular expression match.
-e If multiple -e options are used, then multiple regular expressions can
be supplied and are used with a logical OR.
RH134-RHEL9.0-en-2-20220609 21](https://image.slidesharecdn.com/redhatenterpriselinux9-240713030337-3ff2819f/85/Red-Hat-Enterprise-Linux-Administration-9-0-RH134-pdf-39-320.jpg)
![Chapter 1 | Improve Command-line Productivity
View the man pages to find other options for the grep command.
Examples of the grep Command
The following examples use various configuration files and log files.
Regular expressions are case-sensitive by default. Use the grep command -i option to run a
case-insensitive search. The following example shows an excerpt of the /etc/httpd/conf/
httpd.conf configuration file.
[user@host ~]$ cat /etc/httpd/conf/httpd.conf
...output omitted...
ServerRoot "/etc/httpd"
#
# Listen: Allows you to bind Apache to specific IP addresses and/or
# ports, instead of the default. See also the <VirtualHost>
# directive.
#
# Change this to Listen on a specific IP address, but note that if
# httpd.service is enabled to run at boot time, the address may not be
# available when the service starts. See the httpd.service(8) man
# page for more information.
#
#Listen 12.34.56.78:80
Listen 80
...output omitted...
The following example searches for the serverroot regular expression in the /etc/httpd/
conf/httpd.conf configuration file.
[user@host ~]$ grep -i serverroot /etc/httpd/conf/httpd.conf
# with "/", the value of ServerRoot is prepended -- so 'log/access_log'
# with ServerRoot set to '/www' will be interpreted by the
# ServerRoot: The top of the directory tree under which the server's
# ServerRoot at a non-local disk, be sure to specify a local disk on the
# same ServerRoot for multiple httpd daemons, you will need to change at
ServerRoot "/etc/httpd"
Use the grep command -v option to reverse search the regular expression. This option displays
only the lines that do not match the regular expression.
In the following example, all lines, regardless of case, that do not contain the server regular
expression are returned.
[user@host ~]$ grep -v -i server /etc/hosts
127.0.0.1 localhost.localdomain localhost
172.25.254.254 classroom.example.com classroom
172.25.254.254 content.example.com content
172.25.254.254 materials.example.com materials
### rht-vm-hosts file listing the entries to be appended to /etc/hosts
172.25.250.9 workstation.lab.example.com workstation
22 RH134-RHEL9.0-en-2-20220609](https://image.slidesharecdn.com/redhatenterpriselinux9-240713030337-3ff2819f/85/Red-Hat-Enterprise-Linux-Administration-9-0-RH134-pdf-40-320.jpg)
![Chapter 1 | Improve Command-line Productivity
172.25.250.254 bastion.lab.example.com bastion
172.25.250.220 utility.lab.example.com utility
172.25.250.220 registry.lab.example.com registry
To look at a file without being distracted by comment lines, use the grep command -v option. In
the following example, the regular expression matches all lines that begin with a hash character (#)
or the semicolon (;) character. Either of these two characters at the beginning of a line indicates a
comment that is omitted from the output.
[user@host ~]$ grep -v '^[#;]' /etc/ethertypes
IPv4 0800 ip ip4 # Internet IP (IPv4)
X25 0805
ARP 0806 ether-arp #
FR_ARP 0808 # Frame Relay ARP [RFC1701]
The grep command -e option allows you to search for more than one regular expression at a time.
The following example, which uses a combination of the less and grep commands, locates all
occurrences of pam_unix, user root, and Accepted publickey in the /var/log/secure
log file.
[root@host ~]# cat /var/log/secure | grep -e 'pam_unix'
-e 'user root' -e 'Accepted publickey' | less
Mar 4 03:31:41 localhost passwd[6639]: pam_unix(passwd:chauthtok): password
changed for root
Mar 4 03:32:34 localhost sshd[15556]: Accepted publickey for devops from
10.30.0.167 port 56472 ssh2: RSA SHA256:M8ikhcEDm2tQ95Z0o7ZvufqEixCFCt
+wowZLNzNlBT0
Mar 4 03:32:34 localhost systemd[15560]: pam_unix(systemd-user:session): session
opened for user devops(uid=1001) by (uid=0)
To search for text in a file that is you have open with the vim or less commands, first enter the
slash character (/) and then type the pattern to find. Press Enter to start the search. Press N to
find the next match.
[root@host ~]# vim /var/log/boot.log
...output omitted...
[^[[0;32m OK ^[[0m] Finished ^[[0;1;39mdracut pre-pivot and cleanup hook^[[0m.^M
Starting ^[[0;1;39mCleaning Up and Shutting Down Daemons^[[0m...^M
[^[[0;32m OK ^[[0m] Stopped target ^[[0;1;39mRemote Encrypted Volumes^[[0m.^M
[^[[0;32m OK ^[[0m] Stopped target ^[[0;1;39mTimer Units^[[0m.^M
[^[[0;32m OK ^[[0m] Closed ^[[0;1;39mD-Bus System Message Bus Socket^[[0m.^M
/Daemons
[root@host ~]# less /var/log/messages
...output omitted...
Mar 4 03:31:19 localhost kernel: pci 0000:00:02.0: vgaarb: setting as boot VGA
device
Mar 4 03:31:19 localhost kernel: pci 0000:00:02.0: vgaarb: VGA device added:
decodes=io+mem,owns=io+mem,locks=none
Mar 4 03:31:19 localhost kernel: pci 0000:00:02.0: vgaarb: bridge control
possible
Mar 4 03:31:19 localhost kernel: vgaarb: loaded
RH134-RHEL9.0-en-2-20220609 23](https://image.slidesharecdn.com/redhatenterpriselinux9-240713030337-3ff2819f/85/Red-Hat-Enterprise-Linux-Administration-9-0-RH134-pdf-41-320.jpg)
![Chapter 1 | Improve Command-line Productivity
Guided Exercise
Match Text in Command Output with
Regular Expressions
In this lab, you search for text in the system logs and the output of commands to find
information more efficiently.
Outcomes
• Efficiently search for text in log files and configuration files.
Before You Begin
As the student user on the workstation machine, use the lab command to prepare your
system for this exercise.
This command ensures that all required resources are available.
[student@workstation ~]$ lab start console-regex
Instructions
1. Log in to the servera machine as the student user and switch to the root user.
[student@workstation ~]$ ssh student@servera
...output omitted...
[student@servera ~]$ sudo -i
[sudo] password for student: student
[root@servera ~]#
2. Use the grep command to find the GID and UID for the postfix and postdrop groups
and users. To do so, use the rpm -q --scripts command which queries the information
for a specific package and shows the scripts that are used as part of the installation
process.
[student@servera ~]$ rpm -q --scripts postfix | grep -e 'user' -e 'group'
# Add user and groups if necessary
/usr/sbin/groupadd -g 90 -r postdrop 2>/dev/null
/usr/sbin/groupadd -g 89 -r postfix 2>/dev/null
/usr/sbin/groupadd -g 12 -r mail 2>/dev/null
/usr/sbin/useradd -d /var/spool/postfix -s /sbin/nologin -g postfix -G mail -M -r
-u 89 postfix 2>/dev/null
setgid_group=postdrop
3. Modify the previous regular expression to display the first two messages in the /var/log/
maillog file. In this search, you do not need to use the caret character (^), because you
are not searching for the first character in a line.
RH134-RHEL9.0-en-2-20220609 25](https://image.slidesharecdn.com/redhatenterpriselinux9-240713030337-3ff2819f/85/Red-Hat-Enterprise-Linux-Administration-9-0-RH134-pdf-43-320.jpg)
![Chapter 1 | Improve Command-line Productivity
[root@servera ~]# grep 'postfix' /var/log/maillog | head -n 2
Apr 1 15:27:16 servera postfix/postfix-script[3121]: starting the Postfix mail
system
Apr 1 15:27:16 servera postfix/master[3123]: daemon started -- version 3.5.9,
configuration /etc/postfix
4. Find the name of the queue directory for the Postfix server. Search the /etc/
postfix/main.cf configuration file for all information about queues. Use the grep
command -i option to ignore case distinctions.
[root@servera ~]# grep -i 'queue' /etc/postfix/main.cf
# testing. When soft_bounce is enabled, mail will remain queued that
# The queue_directory specifies the location of the Postfix queue.
queue_directory = /var/spool/postfix
# QUEUE AND PROCESS OWNERSHIP
# The mail_owner parameter specifies the owner of the Postfix queue
# is the Sendmail-compatible mail queue listing command.
# setgid_group: The group for mail submission and queue management
5. Confirm that the postfix service writes messages to the /var/log/messages file. Use
the less command and then the slash character (/) to search the file. Press n to move to
the next entry that matches the search. Press q to quit the less command.
[root@servera ~]# less /var/log/messages
...output omitted...
Apr 1 15:27:15 servera systemd[1]: Starting Postfix Mail Transport Agent...
...output omitted...
Apr 1 15:27:16 servera systemd[1]: Started Postfix Mail Transport Agent.
...output omitted...
/Postfix
6. Use the ps aux command to confirm that the postfix server is currently running. Use
the grep command to limit the output to the necessary lines.
[root@servera ~]# ps aux | grep postfix
root 3123 0.0 0.2 38172 4384 ? Ss 15:27 0:00 /usr/
libexec/postfix/master -w
postfix 3124 0.0 0.4 45208 8236 ? S 15:27 0:00 pickup -l -t
unix -u
postfix 3125 0.0 0.4 45252 8400 ? S 15:27 0:00 qmgr -l -t unix
-u
root 3228 0.0 0.1 221668 2288 pts/0 S+ 15:55 0:00 grep --
color=auto postfix
26 RH134-RHEL9.0-en-2-20220609](https://image.slidesharecdn.com/redhatenterpriselinux9-240713030337-3ff2819f/85/Red-Hat-Enterprise-Linux-Administration-9-0-RH134-pdf-44-320.jpg)
![Chapter 1 | Improve Command-line Productivity
7. Confirm that the qmgr, cleanup, and pickup queues are correctly configured. Use the
grep command -e option to match multiple entries in the same file. The /etc/postfix/
master.cf file is the configuration file.
[root@servera ~]# grep -e qmgr -e pickup -e cleanup /etc/postfix/master.cf
pickup unix n - n 60 1 pickup
cleanup unix n - n - 0 cleanup
qmgr unix n - n 300 1 qmgr
#qmgr unix n - n 300 1 oqmgr
8. Return to the workstation machine as the student user.
[root@servera ~]# exit
logout
[student@servera ~]$ exit
logout
Connection to servera closed.
[student@workstation ~]$
Finish
On the workstation machine, change to the student user home directory and use the lab
command to complete this exercise. This step is important to ensure that resources from previous
exercises do not impact upcoming exercises.
[student@workstation ~]$ lab finish console-regex
This concludes the section.
RH134-RHEL9.0-en-2-20220609 27](https://image.slidesharecdn.com/redhatenterpriselinux9-240713030337-3ff2819f/85/Red-Hat-Enterprise-Linux-Administration-9-0-RH134-pdf-45-320.jpg)
![Chapter 1 | Improve Command-line Productivity
Lab
Improve Command-line Productivity
In this lab, you create a Bash script that can filter and get relevant information from different
hosts.
Outcomes
• Create a Bash script and redirect its output to a file.
• Use loops to simplify your code.
• Filter the relevant content by using grep and regular expressions.
Before You Begin
As the student user on the workstation machine, use the lab command to prepare your
system for this exercise.
This command prepares your environment and ensures that all required resources are
available.
[student@workstation ~]$ lab start console-review
Instructions
1. Create the /home/student/bin/bash-lab script file on the workstation machine. The
initial content in the script will be the shebang interpreter directive.
2. Edit your newly created script file to comply with the following requested information from
the servera and serverb hosts. The systems use SSH keys for authentication, and
therefore you do not require a password.
Command or file Content requested
hostname -f Get all the output.
echo "#####" Get all the output.
lscpu Get only the lines that start with the string
CPU.
echo "#####" Get all the output.
/etc/selinux/config Ignore empty lines. Ignore lines starting with
#.
echo "#####" Get all the output.
/var/log/secure Get all "Failed password" entries.
echo "#####" Get all the output.
28 RH134-RHEL9.0-en-2-20220609](https://image.slidesharecdn.com/redhatenterpriselinux9-240713030337-3ff2819f/85/Red-Hat-Enterprise-Linux-Administration-9-0-RH134-pdf-46-320.jpg)
![Chapter 1 | Improve Command-line Productivity
Save the required information to the output-servera and output-serverb files in the
/home/student directory on workstation.
Note
You can use the sudo command without requiring a password on the servera and
serverb hosts. Remember to use a loop to simplify your script. You can also use
multiple grep commands that are concatenated with the use of the pipe character
(|).
3. Execute the /home/student/bin/bash-lab script, and review the output content on
workstation.
Evaluation
As the student user on the workstation machine, use the lab command to grade your work.
Correct any reported failures and rerun the command until successful.
[student@workstation ~]$ lab grade console-review
Finish
On the workstation machine, change to the student user home directory and use the lab
command to complete this exercise. This step is important to ensure that resources from previous
exercises do not impact upcoming exercises.
[student@workstation ~]$ lab finish console-review
This concludes the section.
RH134-RHEL9.0-en-2-20220609 29](https://image.slidesharecdn.com/redhatenterpriselinux9-240713030337-3ff2819f/85/Red-Hat-Enterprise-Linux-Administration-9-0-RH134-pdf-47-320.jpg)
![Chapter 1 | Improve Command-line Productivity
Solution
Improve Command-line Productivity
In this lab, you create a Bash script that can filter and get relevant information from different
hosts.
Outcomes
• Create a Bash script and redirect its output to a file.
• Use loops to simplify your code.
• Filter the relevant content by using grep and regular expressions.
Before You Begin
As the student user on the workstation machine, use the lab command to prepare your
system for this exercise.
This command prepares your environment and ensures that all required resources are
available.
[student@workstation ~]$ lab start console-review
Instructions
1. Create the /home/student/bin/bash-lab script file on the workstation machine. The
initial content in the script will be the shebang interpreter directive.
1.1. On the workstation machine, create the /home/student/bin/ directory if
needed.
[student@workstation ~]$ mkdir -p /home/student/bin
1.2. Use the vim command to create and edit the /home/student/bin/bash-lab script
file.
[student@workstation ~]$ vim ~/bin/bash-lab
1.3. Insert the following text and save the file.
#!/usr/bin/bash
1.4. Make your script file executable.
[student@workstation ~]$ chmod a+x ~/bin/bash-lab
2. Edit your newly created script file to comply with the following requested information from
the servera and serverb hosts. The systems use SSH keys for authentication, and
therefore you do not require a password.
30 RH134-RHEL9.0-en-2-20220609](https://image.slidesharecdn.com/redhatenterpriselinux9-240713030337-3ff2819f/85/Red-Hat-Enterprise-Linux-Administration-9-0-RH134-pdf-48-320.jpg)
![Chapter 1 | Improve Command-line Productivity
Command or file Content requested
hostname -f Get all the output.
echo "#####" Get all the output.
lscpu Get only the lines that start with the string
CPU.
echo "#####" Get all the output.
/etc/selinux/config Ignore empty lines. Ignore lines starting with
#.
echo "#####" Get all the output.
/var/log/secure Get all "Failed password" entries.
echo "#####" Get all the output.
Save the required information to the output-servera and output-serverb files in the
/home/student directory on workstation.
Note
You can use the sudo command without requiring a password on the servera and
serverb hosts. Remember to use a loop to simplify your script. You can also use
multiple grep commands that are concatenated with the use of the pipe character
(|).
2.1. Use the vim command to open and edit the /home/student/bin/bash-lab script
file.
[student@workstation ~]$ vim ~/bin/bash-lab
2.2. Append the following bold lines to the /home/student/bin/bash-lab script file.
Note
The following output is an example of how you can achieve the requested script. In
Bash scripting, you can take different approaches and obtain the same result.
RH134-RHEL9.0-en-2-20220609 31](https://image.slidesharecdn.com/redhatenterpriselinux9-240713030337-3ff2819f/85/Red-Hat-Enterprise-Linux-Administration-9-0-RH134-pdf-49-320.jpg)
![Chapter 1 | Improve Command-line Productivity
#!/usr/bin/bash
#
USR='student'
OUT='/home/student/output'
#
for SRV in servera serverb
do
ssh ${USR}@${SRV} "hostname -f" > ${OUT}-${SRV}
echo "#####" >> ${OUT}-${SRV}
ssh ${USR}@${SRV} "lscpu | grep '^CPU'" >> ${OUT}-${SRV}
echo "#####" >> ${OUT}-${SRV}
ssh ${USR}@${SRV} "grep -v '^$' /etc/selinux/config|grep -v '^#'" >> ${OUT}-${SRV}
echo "#####" >> ${OUT}-${SRV}
ssh ${USR}@${SRV} "sudo grep 'Failed password' /var/log/secure" >> ${OUT}-${SRV}
echo "#####" >> ${OUT}-${SRV}
done
3. Execute the /home/student/bin/bash-lab script, and review the output content on
workstation.
3.1. On workstation, execute the /home/student/bin/bash-lab script.
[student@workstation ~]$ bash-lab
3.2. Review the content of the /home/student/output-servera and /home/
student/output-serverb files.
[student@workstation ~]$ cat /home/student/output-servera
servera.lab.example.com
#####
CPU op-mode(s): 32-bit, 64-bit
CPU(s): 2
CPU family: 6
#####
SELINUX=enforcing
SELINUXTYPE=targeted
#####
Apr 1 05:42:07 servera sshd[1275]: Failed password for invalid user operator1
from 172.25.250.9 port 42460 ssh2
Apr 1 05:42:09 servera sshd[1277]: Failed password for invalid user sysadmin1
from 172.25.250.9 port 42462 ssh2
Apr 1 05:42:11 servera sshd[1279]: Failed password for invalid user manager1 from
172.25.250.9 port 42464 ssh2
#####
[student@workstation ~]$ cat /home/student/output-serverb
serverb.lab.example.com
#####
CPU op-mode(s): 32-bit, 64-bit
CPU(s): 2
CPU family: 6
#####
SELINUX=enforcing
32 RH134-RHEL9.0-en-2-20220609](https://image.slidesharecdn.com/redhatenterpriselinux9-240713030337-3ff2819f/85/Red-Hat-Enterprise-Linux-Administration-9-0-RH134-pdf-50-320.jpg)
![Chapter 1 | Improve Command-line Productivity
SELINUXTYPE=targeted
#####
Apr 1 05:42:14 serverb sshd[1252]: Failed password for invalid user operator1
from 172.25.250.9 port 53494 ssh2
Apr 1 05:42:17 serverb sshd[1257]: Failed password for invalid user sysadmin1
from 172.25.250.9 port 53496 ssh2
Apr 1 05:42:19 serverb sshd[1259]: Failed password for invalid user manager1 from
172.25.250.9 port 53498 ssh2
#####
Evaluation
As the student user on the workstation machine, use the lab command to grade your work.
Correct any reported failures and rerun the command until successful.
[student@workstation ~]$ lab grade console-review
Finish
On the workstation machine, change to the student user home directory and use the lab
command to complete this exercise. This step is important to ensure that resources from previous
exercises do not impact upcoming exercises.
[student@workstation ~]$ lab finish console-review
This concludes the section.
RH134-RHEL9.0-en-2-20220609 33](https://image.slidesharecdn.com/redhatenterpriselinux9-240713030337-3ff2819f/85/Red-Hat-Enterprise-Linux-Administration-9-0-RH134-pdf-51-320.jpg)

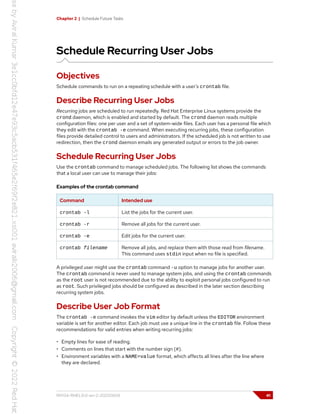
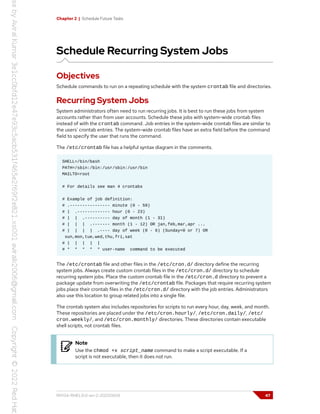
![Chapter 2 | Schedule Future Tasks
Schedule a Deferred User Job
Objectives
Set up a command to run once at a future time.
Describe Deferred User Tasks
Sometimes you might need to run one or more commands at a specific future time. An example
is a user scheduling a long-running maintenance task to occur in the middle of the night. Another
example is a system administrator who is working on a firewall configuration and queues a safety
job to reset the firewall settings to a former working state in ten minute's time, unless they
deactivate the job before it runs, because the new firewall configuration worked.
These scheduled commands are called tasks or jobs, and the deferred term indicates that these
tasks run in the future.
One available solution for Red Hat Enterprise Linux users to schedule deferred tasks is the at
command, which is installed and enabled by default. The at package provides the atd system
daemon, and the at and atq commands to interact with the daemon.
Any user can queue jobs for the atd daemon by using the at command. The atd daemon
provides 26 queues, identified from a to z, with jobs in alphabetically later queues getting lower
system priority (using higher nice values, discussed in a later chapter).
Schedule Deferred User Tasks
Use the at TIMESPEC command to start entering a new job to schedule. The at command
then reads from STDIN (your keyboard) to obtain the commands to run. When manually entering
commands, complete the input by pressing Ctrl+D while on an empty line. You can use input
redirection from a script file for entering more complex commands. For example, use the at now
+5min < myscript command to schedule the commands in myscript to start in 5 minutes,
without needing to type the commands manually in a terminal window.
The at command TIMESPEC argument accepts natural time specifications to describe when a
job should run. For example, specify a time as 02:00pm, 15:59, midnight, or even teatime,
followed by an optional date or number of days in the future.
The TIMESPEC argument expects time and date specifications in that order. If you provide the
date and not the time, then the time defaults to the current time. If you provide the time and not
the date, then the date is consider matched and the jobs runs when the time next matches.
The following example shows a job schedule without providing the date. The at command
schedules the job for today or tomorrow depending on whether the time has passed or not.
[user@host ~]$ date
Wed May 18 21:01:18 CDT 2022
[user@host ~]$ at 21:03 < myscript
job 3 at Wed May 18 21:03:00 2022
[user@host ~]$ at 21:00 < myscript
job 4 at Thu May 19 21:00:00 2022
36 RH134-RHEL9.0-en-2-20220609](https://image.slidesharecdn.com/redhatenterpriselinux9-240713030337-3ff2819f/85/Red-Hat-Enterprise-Linux-Administration-9-0-RH134-pdf-54-320.jpg)
![Chapter 2 | Schedule Future Tasks
The man pages for the at command and other documentation sources use lowercase to write
the natural time specifications, but you can use lowercase, sentence case, or uppercase. Here are
examples of time specifications you can use:
• now +5min
• teatime tomorrow (teatime is 16:00)
• noon +4 days
• 5pm august 3 2021
For other valid time specifications, refer to the local timespec document listed in the references.
Inspect and Manage Deferred User Jobs
For an overview of the pending jobs for the current user, use the atq or the at -l command.
[user@host ~]$ atq
28 Mon May 16 05:13:00 2022 a user
29 Tue May 17 16:00:00 2022 h user
30 Wed May 18 12:00:00 2022 a user
In the preceding output, every line represents a different scheduled future job. The following
description applies to the first line of the output:
• 28 is the unique job number.
• Mon May 16 05:13:00 2022 is the execution date and time for the scheduled job.
• a indicates that the job is scheduled with the default queue a.
• user is the owner of the job (and the user that the job runs as).
Important
Unprivileged users can view and manage only their own jobs. The root user can
view and manage all jobs.
Use the at -c JOBNUMBER command to inspect the commands that run when the atd
daemon executes a job. This command shows the job's environment, which is set from the user's
environment when they created the job, and the command syntax to be run.
Remove Jobs from Schedule
The atrm JOBNUMBER command removes a scheduled job. Remove the scheduled job when you
no longer need it, for example, when a remote firewall configuration succeeded, and you do not
need to reset it.
References
at(1) and atd(8) man pages
/usr/share/doc/at/timespec
RH134-RHEL9.0-en-2-20220609 37](https://image.slidesharecdn.com/redhatenterpriselinux9-240713030337-3ff2819f/85/Red-Hat-Enterprise-Linux-Administration-9-0-RH134-pdf-55-320.jpg)
![Chapter 2 | Schedule Future Tasks
Guided Exercise
Schedule a Deferred User Job
In this exercise, you use the at command to schedule several commands to run at specified
future times.
Outcomes
• Schedule a job to run at a specified future time.
• Inspect the commands that a scheduled job runs.
• Delete the scheduled jobs.
Before You Begin
As the student user on the workstation machine, use the lab command to prepare your
system for this exercise.
This command prepares your environment and ensures that all required resources are
available.
[student@workstation ~]$ lab start scheduling-at
Instructions
1. From workstation, open an SSH session to servera as the student user.
[student@workstation ~]$ ssh student@servera
...output omitted...
[student@servera ~]$
2. Schedule a job to run three minutes from now. Save the output of the date command to
the /home/student/myjob.txt file.
2.1. Pass the date >> /home/student/myjob.txt string as the input to the at
command, so that the job runs three minutes from now.
[student@servera ~]$ echo "date >> /home/student/myjob.txt" | at now +3min
warning: commands will be executed using /bin/sh
job 1 at Mon Apr 4 05:00:00 2022
2.2. List the scheduled jobs.
[student@servera ~]$ atq
1 Mon Apr 4 05:00:00 2022 a student
2.3. Monitor the deferred jobs queue in real time. After it executes, the atd daemon
removes the job from the queue.
38 RH134-RHEL9.0-en-2-20220609](https://image.slidesharecdn.com/redhatenterpriselinux9-240713030337-3ff2819f/85/Red-Hat-Enterprise-Linux-Administration-9-0-RH134-pdf-56-320.jpg)
![Chapter 2 | Schedule Future Tasks
The command updates the output of the atq command every two seconds, by
default. After the atd daemon removes the deferred job from the queue, press
Ctrl+c to exit the watch command and return to the shell prompt.
[student@servera ~]$ watch atq
Every 2.0s: atq servera.lab.example.com: Mon Apr 4 04:58:43 2022
1 Mon Apr 4 05:00:00 2022 a student
2.4. Verify that the contents of the /home/student/myjob.txt file match the output
of the date command.
The output matches the output of the date command, which confirms that the
scheduled job executed successfully.
[student@servera ~]$ cat myjob.txt
Mon Apr 4 05:00:00 AM EDT 2022
3. Interactively schedule a job in the g queue that runs at teatime (16:00). The job should
print the It's teatime message to the /home/student/tea.txt file. Append the new
messages to the /home/student/tea.txt file.
[student@servera ~]$ at -q g teatime
warning: commands will be executed using /bin/sh
at> echo "It's teatime" >> /home/student/tea.txt
at> Ctrl+d
job 2 at Mon Apr 4 16:00:00 2022
4. Interactively schedule another job with the b queue that runs at 16:05. The job should print
The cookies are good message to the /home/student/cookies.txt file. Append
the new messages to the /home/student/cookies.txt file.
[student@servera ~]$ at -q b 16:05
warning: commands will be executed using /bin/sh
at> echo "The cookies are good" >> /home/student/cookies.txt
at> Ctrl+d
job 3 at Mon Apr 4 16:05:00 2022
5. Inspect the commands in the pending jobs.
5.1. View the job numbers of the pending jobs.
Note the job numbers in the output, which might vary on your system. Use the job
numbers from your system.
[student@servera ~]$ atq
2 Mon Apr 4 16:00:00 2022 g student
3 Mon Apr 4 16:05:00 2022 b student
5.2. View the commands in the pending job number 2.
The job executes an echo command that appends the It's teatime message to
the /home/student/tea.txt file.
RH134-RHEL9.0-en-2-20220609 39](https://image.slidesharecdn.com/redhatenterpriselinux9-240713030337-3ff2819f/85/Red-Hat-Enterprise-Linux-Administration-9-0-RH134-pdf-57-320.jpg)
![Chapter 2 | Schedule Future Tasks
[student@servera ~]$ at -c 2
...output omitted...
echo "It's teatime" >> /home/student/tea.txt
marcinDELIMITER274c4275
5.3. View the commands in the pending job number 3.
The job executes an echo command that appends the message The cookies are
good to the /home/student/cookies.txt file.
[student@servera ~]$ at -c 3
...output omitted...
echo "The cookies are good" >> /home/student/cookies.txt
marcinDELIMITER73e30b75
6. View the job number of a job that runs at teatime (16:00), and remove it by using the
atrm command.
[student@servera ~]$ atq
2 Mon Apr 4 16:00:00 2022 g student
3 Mon Apr 4 16:05:00 2022 b student
[student@servera ~]$ atrm 2
7. Verify that the scheduled job to run at teatime (16:00) no longer exists.
7.1. View the list of pending jobs and confirm that the scheduled job to run at teatime
(16:00) no longer exists.
[student@servera ~]$ atq
3 Mon Apr 4 16:05:00 2022 b student
7.2. Return to the workstation machine as the student user.
[student@servera ~]$ exit
logout
Connection to servera closed.
[student@workstation ~]$
Finish
On the workstation machine, change to the student user home directory and use the lab
command to complete this exercise. This step is important to ensure that resources from previous
exercises do not impact upcoming exercises.
[student@workstation ~]$ lab finish scheduling-at
This concludes the section.
40 RH134-RHEL9.0-en-2-20220609](https://image.slidesharecdn.com/redhatenterpriselinux9-240713030337-3ff2819f/85/Red-Hat-Enterprise-Linux-Administration-9-0-RH134-pdf-58-320.jpg)
![Chapter 2 | Schedule Future Tasks
Guided Exercise
Schedule Recurring User Jobs
In this exercise, you schedule commands to run on a repeating schedule as a non-privileged
user, with the crontab command.
Outcomes
• Schedule recurring jobs to run as a non-privileged user.
• Inspect the commands that a scheduled recurring job runs.
• Remove scheduled recurring jobs.
Before You Begin
As the student user on the workstation machine, use the lab command to prepare your
system for this exercise.
This command prepares your environment and ensures that all required resources are
available.
[student@workstation ~]$ lab start scheduling-cron
Instructions
1. Log in to the servera machine as the student user .
[student@workstation ~]$ ssh student@servera
...output omitted...
[student@servera ~]$
2. Schedule a recurring job as the student user that appends the current date and time to
the /home/student/my_first_cron_job.txt file every two minutes. The job must
run only from Monday to Friday, not on Saturday or Sunday.
Important
If you are working on this exercise outside the specified days in the preceding
instruction, then adjust your system time and date accordingly so that the job runs
while you are working.
2.1. Open the crontab file with the default text editor.
[student@servera ~]$ crontab -e
2.2. Insert the following line:
*/2 * * * Mon-Fri /usr/bin/date >> /home/student/my_first_cron_job.txt
44 RH134-RHEL9.0-en-2-20220609](https://image.slidesharecdn.com/redhatenterpriselinux9-240713030337-3ff2819f/85/Red-Hat-Enterprise-Linux-Administration-9-0-RH134-pdf-62-320.jpg)
![Chapter 2 | Schedule Future Tasks
2.3. Press Esc and type :wq to save the changes and exit the editor. When the editor
exits, you should see the following output:
...output omitted...
crontab: installing new crontab
[student@servera ~]$
3. Use the crontab -l command to list the scheduled recurring jobs. Inspect the command
that you scheduled to run as a recurring job in the preceding step.
Verify that the job runs the /usr/bin/date command and appends its output to the
/home/student/my_first_cron_job.txt file.
[student@servera ~]$ crontab -l
*/2 * * * Mon-Fri /usr/bin/date >> /home/student/my_first_cron_job.txt
4. Have your shell prompt sleep until the /home/student/my_first_cron_job.txt file is
created as a result of the successful execution of the recurring job that you scheduled. Wait
for your shell prompt to return.
The while command uses ! test -f to continue to run a loop and sleeps for one second
until the my_first_cron_job.txt file is created in the /home/student directory.
[student@servera ~]$ while ! test -f my_first_cron_job.txt; do sleep 1s; done
5. Verify that the contents of the /home/student/my_first_cron_job.txt file match
the output of the date command.
[student@servera ~]$ cat my_first_cron_job.txt
Mon Apr 4 03:04:01 AM EDT 2022
6. Remove all the scheduled recurring jobs for the student user.
6.1. Remove all the scheduled recurring jobs for the student user.
[student@servera ~]$ crontab -r
6.2. Verify that no recurring jobs exist for the student user.
[student@servera ~]$ crontab -l
no crontab for student
6.3. Return to the workstation machine as the student user.
[student@servera ~]$ exit
logout
Connection to servera closed.
[student@workstation ~]$
RH134-RHEL9.0-en-2-20220609 45](https://image.slidesharecdn.com/redhatenterpriselinux9-240713030337-3ff2819f/85/Red-Hat-Enterprise-Linux-Administration-9-0-RH134-pdf-63-320.jpg)
![Chapter 2 | Schedule Future Tasks
Finish
On the workstation machine, change to the student user home directory and use the lab
command to complete this exercise. This step is important to ensure that resources from previous
exercises do not impact upcoming exercises.
[student@workstation ~]$ lab finish scheduling-cron
This concludes the section.
46 RH134-RHEL9.0-en-2-20220609](https://image.slidesharecdn.com/redhatenterpriselinux9-240713030337-3ff2819f/85/Red-Hat-Enterprise-Linux-Administration-9-0-RH134-pdf-64-320.jpg)
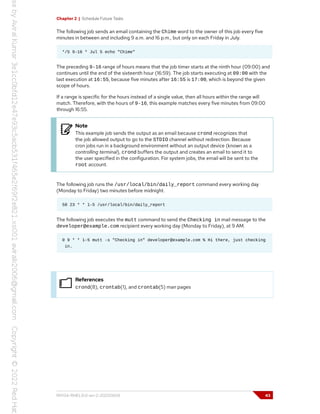
![Chapter 2 | Schedule Future Tasks
Run Periodic Commands with Anacron
The run-parts command also runs the daily, weekly, and monthly jobs from the /etc/
anacrontab configuration file.
The /etc/anacrontab file ensures that scheduled jobs always run and are not skipped
accidentally because the system was turned off or hibernated. For example, when a system job
that runs daily was not executed at a specified time because the system was rebooting, then the
job is completed when the system becomes ready. A delay might occur before the job starts, if
specified in the Delay in minutes parameter in the /etc/anacrontab file.
Files in the /var/spool/anacron/ directory determine the daily, weekly, and monthly jobs.
When the crond daemon starts a job from the /etc/anacrontab file, it updates the timestamps
of those files. With this timestamp, you can determine the last time that the job executed. The
syntax of the /etc/anacrontab file is different from the regular crontab configuration files.
The /etc/anacrontab file contains four fields per line, as follows.
Period in days
Defines the interval in days for the job to run on a recurring schedule. This field accepts an
integer or a macro value. For example, the macro @daily is equivalent to the 1 integer, which
executes the job daily. Similarly, the macro @weekly is equivalent to the 7 integer, which
executes the job weekly.
Delay in minutes
Defines the time that the crond daemon must wait before it starts the job.
Job identifier
This field identifies the unique name of the job in the log messages.
Command
The command to be executed.
The /etc/anacrontab file also contains environment variable declarations with the
NAME=value syntax. The START_HOURS_RANGE variable specifies the time interval for the jobs
to run. Jobs do not start outside this range. When a job does not run within this time interval on a
particular day, then the job must wait until the next day for execution.
Systemd Timer
The systemd timer unit activates another unit of a different type (such as a service) whose unit
name matches the timer unit name. The timer unit allows timer-based activation of other units.
The systemd timer unit logs timer events in system journals for easier debugging.
Sample Timer Unit
The sysstat package provides the systemd timer unit, called the sysstat-collect.timer
service, to collect system statistics every 10 minutes. The following output shows the contents of
the /usr/lib/systemd/system/sysstat-collect.timer configuration file.
...output omitted...
[Unit]
Description=Run system activity accounting tool every 10 minutes
[Timer]
OnCalendar=*:00/10
48 RH134-RHEL9.0-en-2-20220609](https://image.slidesharecdn.com/redhatenterpriselinux9-240713030337-3ff2819f/85/Red-Hat-Enterprise-Linux-Administration-9-0-RH134-pdf-66-320.jpg)
![Chapter 2 | Schedule Future Tasks
[Install]
WantedBy=sysstat.service
The OnCalendar=*:00/10 option signifies that this timer unit activates the corresponding
sysstat-collect.service unit every 10 minutes. You might specify more complex time
intervals.
For example, a 2022-04-* 12:35,37,39:16 value against the OnCalendar option causes
the timer unit to activate the corresponding service unit at the 12:35:16, 12:37:16, and
12:39:16 times, every day during April 2022. You might also specify relative timers with the
OnUnitActiveSec option. For example, with the OnUnitActiveSec=15min option, the timer
unit triggers the corresponding unit to start 15 minutes after the last time that the timer unit
activated its corresponding unit.
Important
Do not modify any units in the configuration files under the
/usr/lib/systemd/system directory, because the systemd unit overrides
the configuration changes in that file. Create a copy of the configuration file
in the /etc/systemd/system directory and then modify the copied file to
prevent any update to the provider package from overriding the changes. If
two files exist with the same name in the /usr/lib/systemd/system and
/etc/systemd/system directories, then the systemd timer unit parses the file in
the /etc/systemd/system directory.
After you change the timer unit configuration file, use the systemctl daemon-reload
command to ensure that the systemd timer unit loads the changes.
[root@host ~]# systemctl daemon-reload
After reloading the systemd daemon configuration, use the systemctl command to activate the
timer unit.
[root@host ~]# systemctl enable --now <unitname>.timer
References
crontab(5), anacron(8), anacrontab(5), systemd.time(7),
systemd.timer(5), and crond(8) man pages
RH134-RHEL9.0-en-2-20220609 49](https://image.slidesharecdn.com/redhatenterpriselinux9-240713030337-3ff2819f/85/Red-Hat-Enterprise-Linux-Administration-9-0-RH134-pdf-67-320.jpg)
![Chapter 2 | Schedule Future Tasks
Guided Exercise
Schedule Recurring System Jobs
In this exercise, you schedule commands to run on various schedules by adding configuration
files to the system crontab directories.
Outcomes
• Schedule a recurring system job to count the number of active users.
• Update the systemd timer unit that gathers system activity data.
Before You Begin
As the student user on the workstation machine, use the lab command to prepare your
system for this exercise.
This command prepares your environment and ensures that all required resources are
available.
[student@workstation ~]$ lab start scheduling-system
Instructions
1. Log in to the servera machine as the student user and switch to the root user.
[student@workstation ~]$ ssh student@servera
...output omitted...
[student@servera ~]$ sudo -i
[sudo] password for student: student
[root@servera ~]#
2. Schedule a recurring system job that generates a log message that indicates the number of
active users in the system. This job must run daily and use the w -h | wc -l command to
retrieve the number of active users in the system. Use the logger command to generate
the log message of currently active users.
2.1. Create the /etc/cron.daily/usercount script file with the following content:
#!/bin/bash
USERCOUNT=$(w -h | wc -l)
logger "There are currently ${USERCOUNT} active users"
2.2. Make the script file executable.
[root@servera ~]# chmod +x /etc/cron.daily/usercount
50 RH134-RHEL9.0-en-2-20220609](https://image.slidesharecdn.com/redhatenterpriselinux9-240713030337-3ff2819f/85/Red-Hat-Enterprise-Linux-Administration-9-0-RH134-pdf-68-320.jpg)
![Chapter 2 | Schedule Future Tasks
3. Install the sysstat package. The timer unit must trigger the service unit every ten minutes
to collect system activity data with the /usr/lib64/sa/sa1 shell script. Change the
timer unit configuration file to collect the system activity data every two minutes.
3.1. Install the sysstat package.
[root@servera ~]# dnf install sysstat
...output omitted...
Is this ok [y/N]: y
...output omitted...
Complete!
3.2. Copy the /usr/lib/systemd/system/sysstat-collect.timer file to the
/etc/systemd/system/sysstat-collect.timer file.
[root@servera ~]# cp /usr/lib/systemd/system/sysstat-collect.timer
/etc/systemd/system/sysstat-collect.timer
3.3. Edit the /etc/systemd/system/sysstat-collect.timer file for the timer
unit to run every two minutes. Replace any occurrence of the 10 minutes string
with 2 minutes throughout the unit configuration file, including the occurrences
in the commented lines. Use the vim /etc/systemd/system/sysstat-
collect.timer command to edit the configuration file.
From these changes, the sysstat-collect.timer unit triggers the sysstat-
collect.service unit every two minutes and collects the system activity data in a
binary file in the /var/log/sa directory.
...output omitted...
# Activates activity collector every 2 minutes
[Unit]
Description=Run system activity accounting tool every 2 minutes
[Timer]
OnCalendar=*:00/2
[Install]
WantedBy=sysstat.service
3.4. Make the systemd daemon aware of the changes.
[root@servera ~]# systemctl daemon-reload
3.5. Activate the sysstat-collect.timer unit.
[root@servera ~]# systemctl enable --now sysstat-collect.timer
...output omitted...
3.6. Wait until the binary file is created in the /var/log/sa directory.
The while command, ls /var/log/sa | wc -l returns 0 when the file does not
exist, or returns 1 when the file exists. The while command pauses for one second
when the file is not present. The while loop exits when the file is present.
RH134-RHEL9.0-en-2-20220609 51](https://image.slidesharecdn.com/redhatenterpriselinux9-240713030337-3ff2819f/85/Red-Hat-Enterprise-Linux-Administration-9-0-RH134-pdf-69-320.jpg)
![Chapter 2 | Schedule Future Tasks
[root@servera ~]# while [ $(ls /var/log/sa | wc -l) -eq 0 ];
do sleep 1s; done
3.7. Verify that the binary file in the /var/log/sa directory was modified within two
minutes.
[root@servera ~]# ls -l /var/log/sa
total 4
-rw-r--r--. 1 root root 2540 Apr 5 04:08 sa05
[root@servera ~]# date
Tue Apr 5 04:08:29 AM EDT 2022
3.8. Return to the workstation machine as the student user.
[root@servera ~]# exit
logout
[student@servera ~]$ exit
logout
Connection to servera closed.
[student@workstation ~]$
Finish
On the workstation machine, change to the student user home directory and use the lab
command to complete this exercise. This step is important to ensure that resources from previous
exercises do not impact upcoming exercises.
[student@workstation ~]$ lab finish scheduling-system
This concludes the section.
52 RH134-RHEL9.0-en-2-20220609](https://image.slidesharecdn.com/redhatenterpriselinux9-240713030337-3ff2819f/85/Red-Hat-Enterprise-Linux-Administration-9-0-RH134-pdf-70-320.jpg)
![Chapter 2 | Schedule Future Tasks
Manage Temporary Files
Objectives
Enable and disable systemd timers, and configure a timer that manages temporary files.
Manage Temporary Files
Most critical applications and services use temporary files and directories. Some applications and
users use the /tmp directory to hold transient working data, while other applications use task-
specific locations such as daemon- and user-specific volatile directories under /run, which exist
only in memory. When the system reboots or loses power, memory-based file systems are self-
cleaning.
Commonly, daemons and scripts operate properly only when their expected temporary files and
directories exist. Additionally, purging temporary files located on persistent storage is necessary to
prevent disk space issues or stale working data.
Red Hat Enterprise Linux includes the systemd-tmpfiles tool, which provides a structured and
configurable method to manage temporary directories and files.
At system boot, one of the first systemd service units launched is the systemd-tmpfiles-
setup service. This service runs the systemd-tmpfiles command --create --remove
options, which reads instructions from the /usr/lib/tmpfiles.d/*.conf, /run/
tmpfiles.d/*.conf, and /etc/tmpfiles.d/*.conf configuration files. These configuration
files list files and directories that the systemd-tmpfiles-setup service is instructed to create,
delete, or secure with permissions.
Clean Temporary Files with a Systemd Timer
To prevent long-running systems from filling up their disks with stale data, a systemd timer unit
called systemd-tmpfiles-clean.timer at a regular interval triggers systemd-tmpfiles-
clean.service, which executes the systemd-tmpfiles --clean command.
A systemd timer unit configuration has a [Timer] section for indicating how to start the service
with the same name as the timer.
Use the following systemctl command to view the contents of the systemd-tmpfiles-
clean.timer unit configuration file.
[user@host ~]$ systemctl cat systemd-tmpfiles-clean.timer
# /usr/lib/systemd/system/systemd-tmpfiles-clean.timer
# SPDX-License-Identifier: LGPL-2.1-or-later
#
# This file is part of systemd.
#
# systemd is free software; you can redistribute it and/or modify it
# under the terms of the GNU Lesser General Public License as published by
# the Free Software Foundation; either version 2.1 of the License, or
# (at your option) any later version.
RH134-RHEL9.0-en-2-20220609 53](https://image.slidesharecdn.com/redhatenterpriselinux9-240713030337-3ff2819f/85/Red-Hat-Enterprise-Linux-Administration-9-0-RH134-pdf-71-320.jpg)
![Chapter 2 | Schedule Future Tasks
[Unit]
Description=Daily Cleanup of Temporary Directories
Documentation=man:tmpfiles.d(5) man:systemd-tmpfiles(8)
ConditionPathExists=!/etc/initrd-release
[Timer]
OnBootSec=15min
OnUnitActiveSec=1d
In the preceding configuration, the OnBootSec=15min parameter indicates that the systemd-
tmpfiles-clean.service unit gets triggered 15 minutes after the system boots up.
The OnUnitActiveSec=1d parameter indicates that any further trigger to the systemd-
tmpfiles-clean.service unit happens 24 hours after the service unit was last activated.
Change the parameters in the systemd-tmpfiles-clean.timer timer unit configuration file
to meet your requirements. For example, a 30min value for the OnUnitActiveSec parameter
triggers the systemd-tmpfiles-clean.service service unit 30 minutes after the service
unit is last activated. As a result, systemd-tmpfiles-clean.service gets triggered every 30
minutes after the changes are recognized.
After changing the timer unit configuration file, use the systemctl daemon-reload command
to ensure that systemd loads the new configuration.
[root@host ~]# systemctl daemon-reload
After reloading the systemd manager configuration, use the following systemctl command to
activate the systemd-tmpfiles-clean.timer unit.
[root@host ~]# systemctl enable --now systemd-tmpfiles-clean.timer
Clean Temporary Files Manually
The systemd-tmpfiles --clean command parses the same configuration files as the
systemd-tmpfiles --create command, but instead of creating files and directories, it purges
all files that were not accessed, changed, or modified more recently than the maximum age as
defined in the configuration file.
Find detailed information about the format of the configuration files for the systemd-tmpfiles
service in the tmpfiles.d(5) man page. The basic syntax consists of the following columns:
Type, Path, Mode, UID, GID, Age, and Argument. Type refers to the action that the systemd-
tmpfiles service should take; for example, d to create a directory if it does not exist, or Z to
recursively restore SELinux contexts, file permissions, and ownership.
The following are examples of purge configuration with explanations:
d /run/systemd/seats 0755 root root -
When you create files and directories, create the /run/systemd/seats directory if it does not
exist, with the root user and the root group as owners, and with permissions of rwxr-xr-x. If
this directory does exist, then take no action. The systemd-tmpfiles service does not purge
this directory automatically.
54 RH134-RHEL9.0-en-2-20220609](https://image.slidesharecdn.com/redhatenterpriselinux9-240713030337-3ff2819f/85/Red-Hat-Enterprise-Linux-Administration-9-0-RH134-pdf-72-320.jpg)
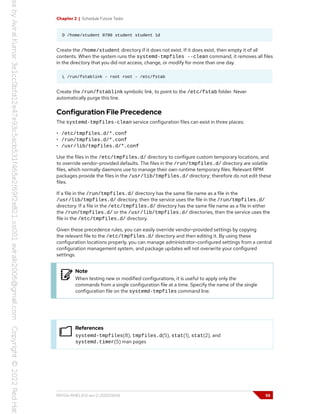
![Chapter 2 | Schedule Future Tasks
Guided Exercise
Manage Temporary Files
In this exercise, you configure systemd-tmpfiles to change how quickly it removes
temporary files from /tmp, and also to periodically purge files from another directory.
Outcomes
• Configure systemd-tmpfiles to remove unused temporary files from /tmp.
• Configure systemd-tmpfiles to periodically purge files from another directory.
Before You Begin
As the student user on the workstation machine, use the lab command to prepare your
system for this exercise.
This command prepares your environment and ensures that all required resources are
available.
[student@workstation ~]$ lab start scheduling-tempfiles
Instructions
1. Log in to the servera system as the student user and switch to the root user.
[student@workstation ~]$ ssh student@servera
...output omitted...
[student@servera ~]$ sudo -i
[sudo] password for student: student
[root@servera ~]#
2. Configure the systemd-tmpfiles service to clean the /tmp directory of any unused files
from the last five days. Ensure that a package update does not overwrite the configuration
files.
2.1. Copy the /usr/lib/tmpfiles.d/tmp.conf file to the /etc/tmpfiles.d
directory.
[root@servera ~]# cp /usr/lib/tmpfiles.d/tmp.conf
/etc/tmpfiles.d/tmp.conf
2.2. Search for the configuration line in the /etc/tmpfiles.d/tmp.conf file that
applies to the /tmp directory. Replace the existing age of the temporary files in that
configuration line with the new age of 5 days. Remove from the file all the other
lines, including the commented lines. You can use the vim /etc/tmpfiles.d/
tmp.conf command to edit the configuration file.
In the configuration, the q type is identical to the d type and instructs the systemd-
tmpfiles service to create the /tmp directory if it does not exist. The directory's
56 RH134-RHEL9.0-en-2-20220609](https://image.slidesharecdn.com/redhatenterpriselinux9-240713030337-3ff2819f/85/Red-Hat-Enterprise-Linux-Administration-9-0-RH134-pdf-74-320.jpg)
![Chapter 2 | Schedule Future Tasks
octal permissions must be set to 1777. Both the owning user and group of the /tmp
directory must be root. The /tmp directory must not contain the unused temporary
files from the last five days.
The /etc/tmpfiles.d/tmp.conf file should appear as follows:
q /tmp 1777 root root 5d
2.3. Verify the /etc/tmpfiles.d/tmp.conf file configuration.
Because the command does not return any errors, it confirms that the configuration
settings are correct.
[root@servera ~]# systemd-tmpfiles --clean /etc/tmpfiles.d/tmp.conf
3. Add a new configuration that ensures that the /run/momentary directory exists with user
and group ownership set to root. The octal permissions for the directory must be 0700.
The configuration must purge any file in this directory that remains unused in the last 30
seconds.
3.1. Create the /etc/tmpfiles.d/momentary.conf file with the following content.
With the configuration, the systemd-tmpfiles service ensures that the /run/
momentary directory exists and that its octal permissions are set to 0700. The
ownership of the /run/momentary directory must be the root user and group. The
service purges any file in this directory if it remains unused for 30 seconds.
[root@servera ~]# vim /etc/tmpfiles.d/momentary.conf
d /run/momentary 0700 root root 30s
3.2. Verify the /etc/tmpfiles.d/momentary.conf file configuration. The command
creates the /run/momentary directory if it does not exist.
Because the command does not return any errors, it confirms that the configuration
settings are correct.
[root@servera ~]# systemd-tmpfiles --create
/etc/tmpfiles.d/momentary.conf
3.3. Verify that the systemd-tmpfiles command creates the /run/momentary
directory with the appropriate permissions, owner, and group owner.
The octal permission for the /run/momentary directory is set to 0700, and the user
and group ownership are set to root.
[root@servera ~]# ls -ld /run/momentary
drwx------. 2 root root 40 Apr 4 06:35 /run/momentary
4. Verify that the systemd-tmpfiles --clean command removes any file under the
/run/momentary directory that is unused in the last 30 seconds, based on the systemd-
tmpfiles configuration for the directory.
4.1. Create the /run/momentary/test file.
RH134-RHEL9.0-en-2-20220609 57](https://image.slidesharecdn.com/redhatenterpriselinux9-240713030337-3ff2819f/85/Red-Hat-Enterprise-Linux-Administration-9-0-RH134-pdf-75-320.jpg)
![Chapter 2 | Schedule Future Tasks
[root@servera ~]# touch /run/momentary/test
4.2. Configure your shell prompt to not to return for 30 seconds.
[root@servera ~]# sleep 30
4.3. After your shell prompt returns, clean stale files from the /run/momentary
directory, based on the referenced rule in the /etc/tmpfiles.d/
momentary.conf configuration file.
The command removes the /run/momentary/test file, because it remains
unused for 30 seconds. This behavior is based on the referenced rule in the /etc/
tmpfiles.d/momentary.conf configuration file.
[root@servera ~]# systemd-tmpfiles --clean
/etc/tmpfiles.d/momentary.conf
4.4. Verify that the /run/momentary/test file does not exist.
[root@servera ~]# ls -l /run/momentary/test
ls: cannot access '/run/momentary/test': No such file or directory
4.5. Return to the workstation machine as the student user.
[root@servera ~]# exit
logout
[student@servera ~]$ exit
logout
Connection to servera closed.
[student@workstation ~]$
Finish
On the workstation machine, change to the student user home directory and use the lab
command to complete this exercise. This step is important to ensure that resources from previous
exercises do not impact upcoming exercises.
[student@workstation ~]$ lab finish scheduling-tempfiles
This concludes the section.
58 RH134-RHEL9.0-en-2-20220609](https://image.slidesharecdn.com/redhatenterpriselinux9-240713030337-3ff2819f/85/Red-Hat-Enterprise-Linux-Administration-9-0-RH134-pdf-76-320.jpg)


![Chapter 3 | Tune System Performance
By default, dynamic tuning is disabled. You can enable it by setting the dynamic_tuning
variable to 1 in the /etc/tuned/tuned-main.conf configuration file. If you enable dynamic
tuning, then the tuned daemon monitors periodically the system and adjust the tuning settings
to runtime behavior changes. You can set the time in seconds between updates by using the
update_interval variable in the /etc/tuned/tuned-main.conf configuration file.
[root@host ~]$ cat /etc/tuned/tuned-main.conf
...output omitted...
# Dynamicaly tune devices, if disabled only static tuning will be used.
dynamic_tuning = 1
...output omitted...
# Update interval for dynamic tunings (in seconds).
# It must be multiply of the sleep_interval.
update_interval = 10
...output omitted...
The tuned Utility
A minimal Red Hat Enterprise Linux installation includes the tuned package by default. You can
install and enable the package manually by using the following commands:
[root@host ~]$ dnf install tuned
...output omitted...
[root@host ~]$ systemctl enable --now tuned
Created symlink /etc/systemd/system/multi-user.target.wants/tuned.service → /usr/
lib/systemd/system/tuned.service.
The tuned application provides profiles in the following categories:
• Power-saving profiles
• Performance-boosting profiles
The performance-boosting profiles include profiles that focus on the following aspects:
• Low latency for storage and network
• High throughput for storage and network
• Virtual machine performance
• Virtualization host performance
The next table shows a list of the tuning profiles distributed with Red Hat Enterprise Linux 9.
Tuning Profiles Distributed with Red Hat Enterprise Linux 9
Tuned Profile Purpose
balanced Ideal for systems that require a compromise between power
saving and performance.
powersave Tunes the system for maximum power saving.
throughput-performance Tunes the system for maximum throughput.
accelerator-
performance
Tunes the same as throughput-performance, and also
reduces the latency to less than 100 μs.
RH134-RHEL9.0-en-2-20220609 67](https://image.slidesharecdn.com/redhatenterpriselinux9-240713030337-3ff2819f/85/Red-Hat-Enterprise-Linux-Administration-9-0-RH134-pdf-85-320.jpg)
![Chapter 3 | Tune System Performance
Tuned Profile Purpose
latency-performance Ideal for server systems that require low latency at the
expense of power consumption.
network-throughput Derived from the throughput-performance profile.
Additional network tuning parameters are applied for
maximum network throughput.
network-latency Derived from the latency-performance profile. Enables
additional network tuning parameters to provide low network
latency.
desktop Derived from the balanced profile. Provides faster response
of interactive applications.
hpc-compute Derived from the latency-performance profile. Ideal for
high-performance computing.
virtual-guest Tunes the system for maximum performance if it runs on a
virtual machine.
virtual-host Tunes the system for maximum performance if it acts as a
host for virtual machines.
intel-sst Optimized for systems with Intel Speed Select Technology
configurations. Use it as an overlay on other profiles.
optimize-serial-
console
Increases responsiveness of the serial console. Use it as an
overlay on other profiles.
The tuned application stores the tuning profiles under the /usr/lib/tuned and /etc/tuned
directories. Every profile has a separate directory, and inside the directory the tuned.conf main
configuration file and, optionally, other files.
[root@host ~]# cd /usr/lib/tuned
[root@host tuned]# ls
accelerator-performance hpc-compute network-throughput throughput-
performance
balanced intel-sst optimize-serial-console virtual-
guest
desktop latency-performance powersave virtual-
host
functions network-latency recommend.d
[root@host tuned]$ ls virtual-guest
tuned.conf
A typical tuned.conf configuration file looks as follows:
[root@host tuned]# cat virtual-guest/tuned.conf
#
# tuned configuration
#
68 RH134-RHEL9.0-en-2-20220609](https://image.slidesharecdn.com/redhatenterpriselinux9-240713030337-3ff2819f/85/Red-Hat-Enterprise-Linux-Administration-9-0-RH134-pdf-86-320.jpg)
![Chapter 3 | Tune System Performance
[main]
summary=Optimize for running inside a virtual guest
include=throughput-performance
[sysctl]
# If a workload mostly uses anonymous memory and it hits this limit, the entire
# working set is buffered for I/O, and any more write buffering would require
# swapping, so it's time to throttle writes until I/O can catch up. Workloads
# that mostly use file mappings may be able to use even higher values.
#
# The generator of dirty data starts writeback at this percentage (system default
# is 20%)
vm.dirty_ratio = 30
# Filesystem I/O is usually much more efficient than swapping, so try to keep
# swapping low. It's usually safe to go even lower than this on systems with
# server-grade storage.
vm.swappiness = 30
The [main] section in the file might include a summary of the tuning profile. This section also
accepts the include parameter, that you can use to make the profile inherit all the settings from
the referenced profile.
This is very useful when creating new tuning profiles, because you can use one of the provided
profiles as a basis and then add or modify the parameters that you want to configure. To create
or modify tuning profiles, copy the tuning profile files from the /usr/lib/tuned directory to
the /etc/tuned directory and then modify them. In case there are profile directories with the
same name under the /usr/lib/tuned and /etc/tuned directories, the latter always take
precedence. Thus, never directly modify files in the /usr/lib/tuned system directory.
The rest of the sections in the tuned.conf file use the tuning plug-ins to modify parameters in
the system. In the previous example, the [sysctl] section modifies the vm.dirty_ratio and
vm.swappiness kernel parameters through the sysctl plug-in.
Manage Profiles from the Command Line
Use the tuned-adm command to change the settings of the tuned daemon. The tuned-adm
command queries current settings, lists available profiles, recommends a tuning profile for the
system, changes profiles directly, or turns off tuning.
You can identify the currently active tuning profile with the tuned-adm active command.
[root@host ~]# tuned-adm active
Current active profile: virtual-guest
The tuned-adm list command lists all available tuning profiles, including both built-in profiles
and the custom-created tuning profiles.
[root@host ~]# tuned-adm list
Available profiles:
- accelerator-performance - Throughput performance based tuning with ...
- balanced - General non-specialized tuned profile
- desktop - Optimize for the desktop use-case
- hpc-compute - Optimize for HPC compute workloads
RH134-RHEL9.0-en-2-20220609 69](https://image.slidesharecdn.com/redhatenterpriselinux9-240713030337-3ff2819f/85/Red-Hat-Enterprise-Linux-Administration-9-0-RH134-pdf-87-320.jpg)
![Chapter 3 | Tune System Performance
- intel-sst - Configure for Intel Speed Select Base Frequency
- latency-performance - Optimize for deterministic performance at ...
- network-latency - Optimize for deterministic performance at ...
...output omitted...
Current active profile: virtual-guest
Use the tuned-adm profile profilename command to switch to a different active profile
that better matches the system's current tuning requirements.
[root@host ~]$ tuned-adm profile throughput-performance
[root@host ~]$ tuned-adm active
Current active profile: throughput-performance
The tuned-adm recommend command can recommend a tuning profile for the system. The
system uses this mechanism to determine the default profile after its installation.
[root@host ~]$ tuned-adm recommend
virtual-guest
Note
The tuned-adm recommend command bases its recommendation on various
system characteristics, including whether the system is a virtual machine and other
predefined selected categories during system installation.
To revert the setting changes that the current profile applied, either switch to another profile
or deactivate the tuned daemon. Turn off the tuned application tuning activity by using the
tuned-adm off command.
[root@host ~]$ tuned-adm off
[root@host ~]$ tuned-adm active
No current active profile.
Manage Profiles with the Web Console
To manage system performance profiles with the web console, you need to log in and escalate
privileges. Privilege escalation mode permits the user to execute commands, with administrative
privileges, that modify system performance profiles. Because changing tuning profiles modifies
some system parameters, you need to do it with administrative privileges.
You can switch to the administrative access mode in the web console by clicking the Limited
access or Turn on administrative access buttons. Then, enter your password when prompted.
After you escalate privileges, the Limited access button changes to Administrative access. As a
security reminder, remember to always toggle back to limited access mode once you perform on
your system the task that requires administrative privileges.
As a privileged user, click the Overview menu option in the left navigation bar. The Performance
profile field displays the current active profile.
70 RH134-RHEL9.0-en-2-20220609](https://image.slidesharecdn.com/redhatenterpriselinux9-240713030337-3ff2819f/85/Red-Hat-Enterprise-Linux-Administration-9-0-RH134-pdf-88-320.jpg)
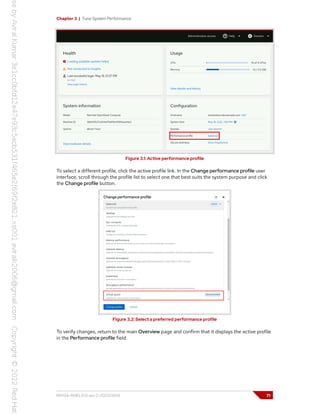
![Chapter 3 | Tune System Performance
Guided Exercise
Adjust Tuning Profiles
In this exercise, you tune server performance by activating the tuned service and applying a
tuning profile.
Outcomes
• Configure a system to use a tuning profile.
Before You Begin
As the student user on the workstation machine, use the lab command to prepare your
system for this exercise.
This command prepares your environment and ensures that all required resources are
available.
[student@workstation ~]$ lab start tuning-profiles
Instructions
1. Log in to servera as the student user.
[student@workstation ~]$ ssh student@servera
...output omitted...
[student@servera ~]$
2. Verify that the tuned package is installed, enabled, and started.
2.1. Verify that the tuned package is installed.
[student@servera ~]$ dnf list tuned
...output omitted...
Installed Packages
tuned.noarch 2.18.0-1.el9 @System
2.2. Verify that the service is enabled.
[student@servera ~]$ systemctl is-enabled tuned
enabled
2.3. Verify that the service is currently running.
[student@servera ~] systemctl is-active tuned
active
RH134-RHEL9.0-en-2-20220609 73](https://image.slidesharecdn.com/redhatenterpriselinux9-240713030337-3ff2819f/85/Red-Hat-Enterprise-Linux-Administration-9-0-RH134-pdf-91-320.jpg)
![Chapter 3 | Tune System Performance
3. List the available tuning profiles and identify the active profile.
[student@servera ~]$ sudo tuned-adm list
[sudo] password for student: student
Available profiles:
- accelerator-performance - Throughput performance based tuning with disabled
higher latency STOP states
- balanced - General non-specialized tuned profile
- desktop - Optimize for the desktop use-case
- hpc-compute - Optimize for HPC compute workloads
- intel-sst - Configure for Intel Speed Select Base Frequency
- latency-performance - Optimize for deterministic performance at the cost
of increased power consumption
- network-latency - Optimize for deterministic performance at the cost
of increased power consumption, focused on low latency network performance
- network-throughput - Optimize for streaming network throughput,
generally only necessary on older CPUs or 40G+ networks
- optimize-serial-console - Optimize for serial console use.
- powersave - Optimize for low power consumption
- throughput-performance - Broadly applicable tuning that provides excellent
performance across a variety of common server workloads
- virtual-guest - Optimize for running inside a virtual guest
- virtual-host - Optimize for running KVM guests
Current active profile: virtual-guest
4. Review the tuned.conf configuration file for the current active profile, virtual-guest.
You can find it in the /usr/lib/tuned/virtual-guest directory. The virtual-
guest tuning profile is based on the throughput-performance profile, but it sets
different values for the vm.dirty_ratio and vm.swappiness parameters. Verify that
the virtual-guest tuning profile applies these values on your system.
4.1. Review the virtual-guest configuration file in the /usr/lib/tuned/virtual-
guest directory. Check the values for the vm.dirty_ratio and vm.swappiness
parameters.
[student@servera ~]$ cat /usr/lib/tuned/virtual-guest/tuned.conf
#
# tuned configuration
#
[main]
summary=Optimize for running inside a virtual guest
include=throughput-performance
[sysctl]
# If a workload mostly uses anonymous memory and it hits this limit, the entire
# working set is buffered for I/O, and any more write buffering would require
# swapping, so it's time to throttle writes until I/O can catch up. Workloads
# that mostly use file mappings may be able to use even higher values.
#
# The generator of dirty data starts writeback at this percentage (system default
# is 20%)
vm.dirty_ratio = 30
74 RH134-RHEL9.0-en-2-20220609](https://image.slidesharecdn.com/redhatenterpriselinux9-240713030337-3ff2819f/85/Red-Hat-Enterprise-Linux-Administration-9-0-RH134-pdf-92-320.jpg)
![Chapter 3 | Tune System Performance
# Filesystem I/O is usually much more efficient than swapping, so try to keep
# swapping low. It's usually safe to go even lower than this on systems with
# server-grade storage.
vm.swappiness = 30
4.2. Verify that the tuning profile applies these values on your system.
[student@servera ~]$ sysctl vm.dirty_ratio
vm.dirty_ratio = 30
[student@servera ~]$ sysctl vm.swappiness
vm.swappiness = 30
5. Review the tuned.conf configuration file for the virtual-guest parent's tuning profile,
throughput-performance. You can find it in the /usr/lib/tuned/throughput-
performance directory. Notice that the throughput-performance tuning profile sets a
different value for the vm.dirty_ratio and vm.swappiness parameters, although the
virtual-guest profile overwrites them. Verify that the virtual-guest tuning profile
applies the value for the vm.dirty_background_ratio parameter, which inherits from
the throughput-performance profile.
5.1. Review the throughput-performance configuration file in the /usr/lib/
tuned/throughput-performance directory. Check the values for the
vm.dirty_ratio, vm.swappiness, and vm.dirty_background_ratio
parameters.
[student@servera ~]$ cat /usr/lib/tuned/throughput-performance/tuned.conf
#
# tuned configuration
#
[main]
summary=Broadly applicable tuning that provides excellent performance across a
variety of common server workloads
...output omitted...
[sysctl]
# If a workload mostly uses anonymous memory and it hits this limit, the entire
# working set is buffered for I/O, and any more write buffering would require
# swapping, so it's time to throttle writes until I/O can catch up. Workloads
# that mostly use file mappings may be able to use even higher values.
#
# The generator of dirty data starts writeback at this percentage (system default
# is 20%)
vm.dirty_ratio = 40
# Start background writeback (via writeback threads) at this percentage (system
# default is 10%)
vm.dirty_background_ratio = 10
# PID allocation wrap value. When the kernel's next PID value
# reaches this value, it wraps back to a minimum PID value.
# PIDs of value pid_max or larger are not allocated.
#
RH134-RHEL9.0-en-2-20220609 75](https://image.slidesharecdn.com/redhatenterpriselinux9-240713030337-3ff2819f/85/Red-Hat-Enterprise-Linux-Administration-9-0-RH134-pdf-93-320.jpg)
![Chapter 3 | Tune System Performance
# A suggested value for pid_max is 1024 * <# of cpu cores/threads in system>
# e.g., a box with 32 cpus, the default of 32768 is reasonable, for 64 cpus,
# 65536, for 4096 cpus, 4194304 (which is the upper limit possible).
#kernel.pid_max = 65536
# The swappiness parameter controls the tendency of the kernel to move
# processes out of physical memory and onto the swap disk.
# 0 tells the kernel to avoid swapping processes out of physical memory
# for as long as possible
# 100 tells the kernel to aggressively swap processes out of physical memory
# and move them to swap cache
vm.swappiness=10
...output omitted...
5.2. Verify that the virtual-guest tuning profile applies the inherited
vm.dirty_background_ratio parameter.
[student@servera ~]$ sysctl vm.dirty_background_ratio
vm.dirty_background_ratio = 10
6. Change the current active tuning profile to throughput-performance, and then confirm
the results. Verify that the vm.dirty_ratio and vm.swappiness parameters change to
the values in the throughput-performance configuration file.
6.1. Change the current active tuning profile.
[student@servera ~]$ sudo tuned-adm profile throughput-performance
6.2. Confirm that throughput-performance is the active tuning profile.
[student@servera ~]$ sudo tuned-adm active
Current active profile: throughput-performance
6.3. Verify the values for the vm.dirty_ratio and vm.swappiness parameters.
[student@servera ~]$ sysctl vm.dirty_ratio
vm.dirty_ratio = 40
[student@servera ~]$ sysctl vm.swappiness
vm.swappiness = 10
7. Return to the workstation machine as the student user.
[student@servera ~]$ exit
logout
Connection to servera closed.
[student@workstation ~]$
76 RH134-RHEL9.0-en-2-20220609](https://image.slidesharecdn.com/redhatenterpriselinux9-240713030337-3ff2819f/85/Red-Hat-Enterprise-Linux-Administration-9-0-RH134-pdf-94-320.jpg)
![Chapter 3 | Tune System Performance
Finish
On the workstation machine, change to the student user home directory and use the lab
command to complete this exercise. This step is important to ensure that resources from previous
exercises do not impact upcoming exercises.
[student@workstation ~]$ lab finish tuning-profiles
This concludes the section.
RH134-RHEL9.0-en-2-20220609 77](https://image.slidesharecdn.com/redhatenterpriselinux9-240713030337-3ff2819f/85/Red-Hat-Enterprise-Linux-Administration-9-0-RH134-pdf-95-320.jpg)
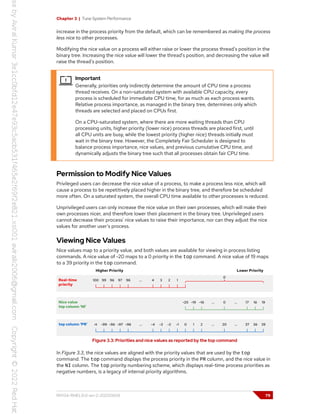
![Chapter 3 | Tune System Performance
The following output is the summary and a partial process listing in the top command:
Tasks: 192 total, 1 running, 191 sleeping, 0 stopped, 0 zombie
%Cpu(s): 0.0 us, 1.6 sy, 0.0 ni, 96.9 id, 0.0 wa, 0.0 hi, 1.6 si, 0.0 st
MiB Mem : 5668.6 total, 4655.6 free, 470.1 used, 542.9 buff/cache
MiB Swap: 0.0 total, 0.0 free, 0.0 used. 4942.6 avail Mem
PID USER PR NI VIRT RES SHR S %CPU %MEM TIME+ COMMAND
1 root 20 0 172180 16232 10328 S 0.0 0.3 0:01.49 systemd
2 root 20 0 0 0 0 S 0.0 0.0 0:00.01 kthreadd
3 root 0 -20 0 0 0 I 0.0 0.0 0:00.00 rcu_gp
4 root 0 -20 0 0 0 I 0.0 0.0 0:00.00 rcu_par_gp
The ps command displays process nice values, when using the default formatting options.
The following ps command lists all processes with their process ID, process name, nice value, and
scheduling class, sorted in descending order by nice value. In the CLS scheduling class column,
TS stands for time sharing, which is another name for the normal scheduling policies, including
SCHED_NORMAL. Other CLS values, such as FF for first in first out and RR for round robin, indicate
real-time processes. Real-time processes are not assigned nice values, as indicated by the dash
(-) in the NI column. Advanced scheduling policies are taught in the Red Hat Performance Tuning:
Linux in Physical, Virtual, and Cloud (RH442) course.
[user@host ~]$ ps axo pid,comm,nice,cls --sort=-nice
PID COMMAND NI CLS
33 khugepaged 19 TS
32 ksmd 5 TS
814 rtkit-daemon 1 TS
1 systemd 0 TS
2 kthreadd 0 TS
5 kworker/0:0-cgr 0 TS
7 kworker/0:1-rcu 0 TS
8 kworker/u4:0-ev 0 TS
15 migration/0 - FF
...output omitted...
Start Processes with User-set Nice Values
When a process is created, it inherits its parent's nice value. When a process starts from the
command line, it inherits its nice value from the shell process. Typically, new processes run with the
default nice value of 0.
The following example starts a process from the shell, and displays the process's nice value. Note
the use of the PID option in the ps command to specify the requested output.
Note
The example command is used here purely for demonstrating nice values, and was
chosen for its low resource consumption.
80 RH134-RHEL9.0-en-2-20220609](https://image.slidesharecdn.com/redhatenterpriselinux9-240713030337-3ff2819f/85/Red-Hat-Enterprise-Linux-Administration-9-0-RH134-pdf-98-320.jpg)
![Chapter 3 | Tune System Performance
[user@host ~]$ sleep 60 &
[1] 2667
[user@host ~]$ ps -o pid,comm,nice 2667
PID COMMAND NI
2667 sleep 0
All users can use the nice command to start commands with a default or higher nice value.
Without options, the nice command starts a process with a default nice value of 10. Setting a
higher value by default ensures that the new process is a lower priority than your current working
shell, and less likely to affect your current interactive session.
The following example starts the same command as a background job with the default nice value
and displays the process's nice value:
[user@host ~]$ nice sleep 60 &
[1] 2736
[user@host ~]$ ps -o pid,comm,nice 2736
PID COMMAND NI
2736 sleep 10
Use the nice command -n option to apply a user-defined nice value to the starting process. The
default is to add 10 to the process's current nice value. The following example starts a background
job with a user-defined nice value of 15 and displays the result:
[user@host ~]$ nice -n 15 sleep 60 &
[1] 2673
[user@host ~]$ ps -o pid,comm,nice 2740
PID COMMAND NI
2740 sleep 15
Important
Unprivileged users may only increase the nice value from its current value, to a
maximum of 19. If the value is increased, then unprivileged users cannot reduce the
value to revert to the previous nice value. However, a privileged user may reduce the
nice value from any current value, to a minimum of -20.
Change the Nice Value of an Existing Process
You can change the nice value of an existing process with the renice command. This example
uses the process ID from the previous example to change from the current nice value of 15 to a
new nice value of 19.
[user@host ~]$ renice -n 19 2740
2740 (process ID) old priority 15, new priority 19
You can also use the top command to change the nice value on an existing process. From the top
interactive interface, press the r option to access the renice command. Enter the process ID,
and then the new nice value.
RH134-RHEL9.0-en-2-20220609 81](https://image.slidesharecdn.com/redhatenterpriselinux9-240713030337-3ff2819f/85/Red-Hat-Enterprise-Linux-Administration-9-0-RH134-pdf-99-320.jpg)
![Chapter 3 | Tune System Performance
Guided Exercise
Influence Process Scheduling
In this exercise, you adjust the scheduling priority of processes with the nice and renice
commands and observe the effects on process execution.
Outcomes
• Adjust scheduling priorities for processes.
Before You Begin
As the student user on the workstation machine, use the lab command to prepare your
system for this exercise.
This command ensures that all required resources are available.
[student@workstation ~]$ lab start tuning-procscheduling
Important
This exercise uses commands that perform an endless checksum on a device
file while intentionally using significant CPU resources. Verify that you have
terminated all exercise processes before leaving this exercise.
Instructions
1. Use the ssh command to log in to the servera machine as the student user.
[student@workstation ~]$ ssh student@servera
...output omitted...
[student@servera ~]$
2. Determine the number of CPU cores on the servera machine and then start two instances
of the sha1sum /dev/zero & command for each core.
2.1. Use the grep command to parse the number of existing virtual processors (CPU
cores) from the /proc/cpuinfo file.
[student@servera ~]$ grep -c '^processor' /proc/cpuinfo
2
2.2. Use a looping command to start multiple instances of the sha1sum /dev/zero &
command. Start two instances for each virtual processor that was indicated in the
previous step. In this example, a for loop creates four instances. The PID values in
your output might vary from the example.
RH134-RHEL9.0-en-2-20220609 83](https://image.slidesharecdn.com/redhatenterpriselinux9-240713030337-3ff2819f/85/Red-Hat-Enterprise-Linux-Administration-9-0-RH134-pdf-101-320.jpg)
![Chapter 3 | Tune System Performance
[student@servera ~]$ for i in {1..4}; do sha1sum /dev/zero & done
[1] 1132
[2] 1133
[3] 1134
[4] 1135
3. Verify that the background jobs are running for each of the sha1sum processes.
[student@servera ~]$ jobs
[1] Running sha1sum /dev/zero &
[2] Running sha1sum /dev/zero &
[3]- Running sha1sum /dev/zero &
[4]+ Running sha1sum /dev/zero &
4. Use the ps and pgrep commands to display the percentage of CPU usage for each
sha1sum process.
[student@servera ~]$ ps u $(pgrep sha1sum)
USER PID %CPU %MEM VSZ RSS TTY STAT START TIME COMMAND
student 1132 49.6 0.1 225336 2288 pts/0 R 11:40 2:40 sha1sum /dev/zero
student 1133 49.6 0.1 225336 2296 pts/0 R 11:40 2:40 sha1sum /dev/zero
student 1134 49.6 0.1 225336 2264 pts/0 R 11:40 2:40 sha1sum /dev/zero
student 1135 49.6 0.1 225336 2280 pts/0 R 11:40 2:40 sha1sum /dev/zero
5. Terminate all sha1sum processes, and then verify that no jobs are running.
5.1. Use the pkill command to terminate all running processes with the name pattern
sha1sum.
[student@servera ~]$ pkill sha1sum
[2] Terminated sha1sum /dev/zero
[4]+ Terminated sha1sum /dev/zero
[1]- Terminated sha1sum /dev/zero
[3]+ Terminated sha1sum /dev/zero
5.2. Verify that no jobs are running.
[student@servera ~]$ jobs
[student@servera ~]$
6. Start multiple instances of the sha1sum /dev/zero & command, and then start one
additional instance of the sha1sum /dev/zero & command with a nice level of 10. Start
at least as many instances as the number of system virtual processors. In this example,
three regular instances are started, plus another with a higher nice level.
6.1. Use looping to start three instances of the sha1sum /dev/zero & command.
84 RH134-RHEL9.0-en-2-20220609](https://image.slidesharecdn.com/redhatenterpriselinux9-240713030337-3ff2819f/85/Red-Hat-Enterprise-Linux-Administration-9-0-RH134-pdf-102-320.jpg)
![Chapter 3 | Tune System Performance
[student@servera ~]$ for i in {1..3}; do sha1sum /dev/zero & done
[1] 1207
[2] 1208
[3] 1209
6.2. Use the nice command to start the fourth instance with a nice level of 10.
[student@servera ~]$ nice -n 10 sha1sum /dev/zero &
[4] 1210
7. Use the ps and pgrep commands to display the PID, percentage of CPU usage, nice value,
and executable name for each process. The instance with the nice value of 10 should display
a lower percentage of CPU usage than the other instances.
[student@servera ~]$ ps -o pid,pcpu,nice,comm $(pgrep sha1sum)
PID %CPU NI COMMAND
1207 64.2 0 sha1sum
1208 65.0 0 sha1sum
1209 63.9 0 sha1sum
1210 8.2 10 sha1sum
8. Use the sudo renice command to lower the nice level of a process from the previous
step. Use the PID value of the process instance with the nice level of 10 to lower its nice
level to 5.
[student@servera ~]$ sudo renice -n 5 1210
[sudo] password for student: student
1210 (process ID) old priority 10, new priority 5
9. Repeat the ps and pgrep commands to display the CPU percentage and nice level.
[student@servera ~]$ ps -o pid,pcpu,nice,comm $(pgrep sha1sum)
PID %CPU NI COMMAND
1207 62.9 0 sha1sum
1208 63.2 0 sha1sum
1209 63.2 0 sha1sum
1210 10.9 5 sha1sum
10. Use the pkill command to terminate all running processes with the sha1sum name
pattern.
[student@servera ~]$ pkill sha1sum
...output omitted...
11. Return to the workstation machine as the student user.
RH134-RHEL9.0-en-2-20220609 85](https://image.slidesharecdn.com/redhatenterpriselinux9-240713030337-3ff2819f/85/Red-Hat-Enterprise-Linux-Administration-9-0-RH134-pdf-103-320.jpg)
![Chapter 3 | Tune System Performance
[student@servera ~]$ exit
logout
Connection to servera closed.
[student@workstation ~]$
Finish
On the workstation machine, change to the student user home directory and use the lab
command to complete this exercise. This step is important to ensure that resources from previous
exercises do not impact upcoming exercises.
[student@workstation ~]$ lab finish tuning-procscheduling
This concludes the section.
86 RH134-RHEL9.0-en-2-20220609](https://image.slidesharecdn.com/redhatenterpriselinux9-240713030337-3ff2819f/85/Red-Hat-Enterprise-Linux-Administration-9-0-RH134-pdf-104-320.jpg)
![Chapter 3 | Tune System Performance
Lab
Tune System Performance
In this lab, you apply a specific tuning profile and adjust the scheduling priority of an existing
process with high CPU usage.
Outcomes
• Activate a specific tuning profile for a computer system.
• Adjust the CPU scheduling priority of a process.
Before You Begin
As the student user on the workstation machine, use the lab command to prepare your
system for this exercise.
This command prepares your environment and ensures that all required resources are
available.
[student@workstation ~]$ lab start tuning-review
Important
This lab uses commands that perform an endless checksum on a device
file while intentionally using significant CPU resources. Verify that you have
terminated all lab processes before leaving this lab.
Instructions
1. Change the current tuning profile for the serverb machine to the balanced profile, a
general non-specialized tuned profile. List the information for the balanced tuning profile
when it is the current tuning profile.
2. Two processes on serverb are consuming a high percentage of CPU usage. Adjust each
process's nice level to 10 to allow more CPU time for other processes.
Evaluation
As the student user on the workstation machine, use the lab command to grade your work.
Correct any reported failures and rerun the command until successful.
[student@workstation ~]$ lab grade tuning-review
Finish
On the workstation machine, change to the student user home directory and use the lab
command to complete this exercise. This step is important to ensure that resources from previous
exercises do not impact upcoming exercises.
RH134-RHEL9.0-en-2-20220609 87](https://image.slidesharecdn.com/redhatenterpriselinux9-240713030337-3ff2819f/85/Red-Hat-Enterprise-Linux-Administration-9-0-RH134-pdf-105-320.jpg)
![Chapter 3 | Tune System Performance
[student@workstation ~]$ lab finish tuning-review
This concludes the section.
88 RH134-RHEL9.0-en-2-20220609](https://image.slidesharecdn.com/redhatenterpriselinux9-240713030337-3ff2819f/85/Red-Hat-Enterprise-Linux-Administration-9-0-RH134-pdf-106-320.jpg)
![Chapter 3 | Tune System Performance
Solution
Tune System Performance
In this lab, you apply a specific tuning profile and adjust the scheduling priority of an existing
process with high CPU usage.
Outcomes
• Activate a specific tuning profile for a computer system.
• Adjust the CPU scheduling priority of a process.
Before You Begin
As the student user on the workstation machine, use the lab command to prepare your
system for this exercise.
This command prepares your environment and ensures that all required resources are
available.
[student@workstation ~]$ lab start tuning-review
Important
This lab uses commands that perform an endless checksum on a device
file while intentionally using significant CPU resources. Verify that you have
terminated all lab processes before leaving this lab.
Instructions
1. Change the current tuning profile for the serverb machine to the balanced profile, a
general non-specialized tuned profile. List the information for the balanced tuning profile
when it is the current tuning profile.
1.1. Log in to the serverb machine as the student user.
[student@workstation ~]$ ssh student@serverb
...output omitted...
[student@serverb ~]$
1.2. Verify that the tuned package is installed.
[student@serverb ~]$ dnf list tuned
...output omitted...
Installed Packages
tuned.noarch 2.18.0-1.el9 @System
1.3. Verify the tuned service state.
RH134-RHEL9.0-en-2-20220609 89](https://image.slidesharecdn.com/redhatenterpriselinux9-240713030337-3ff2819f/85/Red-Hat-Enterprise-Linux-Administration-9-0-RH134-pdf-107-320.jpg)
![Chapter 3 | Tune System Performance
[student@serverb ~]$ systemctl is-active tuned
active
1.4. List all available tuning profiles and their descriptions. Note that the current active
profile is virtual-guest.
[student@serverb ~]$ sudo tuned-adm list
[sudo] password for student: student
Available profiles:
- accelerator-performance - Throughput performance based tuning with disabled
higher latency STOP states
- balanced - General non-specialized tuned profile
- desktop - Optimize for the desktop use-case
- hpc-compute - Optimize for HPC compute workloads
- intel-sst - Configure for Intel Speed Select Base Frequency
- latency-performance - Optimize for deterministic performance at the cost
of increased power consumption
- network-latency - Optimize for deterministic performance at the cost
of increased power consumption, focused on low
latency network performance
- network-throughput - Optimize for streaming network throughput, generally
only necessary on older CPUs or 40G+ networks
- optimize-serial-console - Optimize for serial console use.
- powersave - Optimize for low power consumption
- throughput-performance - Broadly applicable tuning that provides excellent
performance across a variety of common server
workloads
- virtual-guest - Optimize for running inside a virtual guest
- virtual-host - Optimize for running KVM guests
Current active profile: virtual-guest
1.5. Change the current active tuning profile to the balanced profile.
[student@serverb ~]$ sudo tuned-adm profile balanced
1.6. List summary information of the current active tuned profile. Verify that the active
profile is the balanced profile.
[student@serverb ~]$ sudo tuned-adm profile_info
Profile name:
balanced
Profile summary:
General non-specialized tuned profile
...output omitted...
2. Two processes on serverb are consuming a high percentage of CPU usage. Adjust each
process's nice level to 10 to allow more CPU time for other processes.
2.1. Determine the top two CPU consumers on the serverb machine. The ps command
lists the top CPU consumers at the bottom of the output. CPU percentage values
might vary on your machine.
90 RH134-RHEL9.0-en-2-20220609](https://image.slidesharecdn.com/redhatenterpriselinux9-240713030337-3ff2819f/85/Red-Hat-Enterprise-Linux-Administration-9-0-RH134-pdf-108-320.jpg)
![Chapter 3 | Tune System Performance
[student@serverb ~]$ ps aux --sort=pcpu
USER PID %CPU %MEM VSZ RSS TTY STAT START TIME COMMAND
...output omitted...
root 1079 98.5 0.1 225340 2300 ? RN 06:25 4:29 sha1sum /dev/zero
root 1095 99.0 0.1 225340 2232 ? R< 06:25 4:30 md5sum /dev/zero
2.2. Identify the current nice level for each of the top two CPU consumers.
[student@serverb ~]$ ps -o pid,pcpu,nice,comm
$(pgrep sha1sum;pgrep md5sum)
PID %CPU NI COMMAND
1079 98.8 2 sha1sum
1095 99.1 -2 md5sum
2.3. Adjust the nice level for each process to 10. Use the correct PID values for your
processes from the previous command output.
[student@serverb ~]$ sudo renice -n 10 1079 1095
[sudo] password for student: student
1079 (process ID) old priority 2, new priority 10
1095 (process ID) old priority -2, new priority 10
2.4. Verify that the current nice level for each process is 10.
[student@serverb ~]$ ps -o pid,pcpu,nice,comm
$(pgrep sha1sum;pgrep md5sum)
PID %CPU NI COMMAND
1079 98.9 10 sha1sum
1095 99.2 10 md5sum
2.5. Return to the workstation machine as the student user.
[student@serverb ~]$ exit
logout
Connection to serverb closed.
[student@workstation ~]$
Evaluation
As the student user on the workstation machine, use the lab command to grade your work.
Correct any reported failures and rerun the command until successful.
[student@workstation ~]$ lab grade tuning-review
Finish
On the workstation machine, change to the student user home directory and use the lab
command to complete this exercise. This step is important to ensure that resources from previous
exercises do not impact upcoming exercises.
RH134-RHEL9.0-en-2-20220609 91](https://image.slidesharecdn.com/redhatenterpriselinux9-240713030337-3ff2819f/85/Red-Hat-Enterprise-Linux-Administration-9-0-RH134-pdf-109-320.jpg)
![Chapter 3 | Tune System Performance
[student@workstation ~]$ lab finish tuning-review
This concludes the section.
92 RH134-RHEL9.0-en-2-20220609](https://image.slidesharecdn.com/redhatenterpriselinux9-240713030337-3ff2819f/85/Red-Hat-Enterprise-Linux-Administration-9-0-RH134-pdf-110-320.jpg)


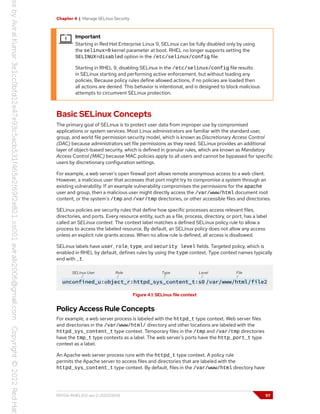
![Chapter 4 | Manage SELinux Security
the httpd_sys_content_t type context. A web server policy has by default no allow rules for
using files that are labeled tmp_t, such as in the /tmp and /var/tmp directories, thus disallowing
access. With SELinux enabled, a malicious user who uses a compromised Apache process would
still not have access to the /tmp directory files.
A MariaDB server process runs with the mysqld_t type context. By default, files in the
/data/mysql directory have the mysqld_db_t type context. A MariaDB server can access the
mysqld_db_t labeled files, but has no rules to allow access to files for other services, such as
httpd_sys_content_t labeled files.
Figure 4.2: SELinux decision-making flow
Many commands that list resources use the -Z option to manage SELinux contexts. For example,
the ps, ls, cp, and mkdir commands all use the -Z option.
[root@host ~]# ps axZ
LABEL PID TTY STAT TIME COMMAND
system_u:system_r:kernel_t:s0 2 ? S 0:00 [kthreadd]
system_u:system_r:kernel_t:s0 3 ? I< 0:00 [rcu_gp]
system_u:system_r:kernel_t:s0 4 ? I< 0:00 [rcu_par_gp]
...output omitted...
[root@host ~]# systemctl start httpd
[root@host ~]# ps -ZC httpd
LABEL PID TTY TIME CMD
system_u:system_r:httpd_t:s0 1550 ? 00:00:00 httpd
system_u:system_r:httpd_t:s0 1551 ? 00:00:00 httpd
system_u:system_r:httpd_t:s0 1552 ? 00:00:00 httpd
system_u:system_r:httpd_t:s0 1553 ? 00:00:00 httpd
system_u:system_r:httpd_t:s0 1554 ? 00:00:00 httpd
98 RH134-RHEL9.0-en-2-20220609](https://image.slidesharecdn.com/redhatenterpriselinux9-240713030337-3ff2819f/85/Red-Hat-Enterprise-Linux-Administration-9-0-RH134-pdf-116-320.jpg)
![Chapter 4 | Manage SELinux Security
[root@host ~]# ls -Z /var/www
system_u:object_r:httpd_sys_script_exec_t:s0 cgi-bin
system_u:object_r:httpd_sys_content_t:s0 html
Change the SELinux Mode
Use the getenforce command to view the current SELinux mode. Use the setenforce
command to change the SELinux mode.
[root@host ~]# getenforce
Enforcing
[root@host ~]# setenforce
usage: setenforce [ Enforcing | Permissive | 1 | 0 ]
[root@host ~]# setenforce 0
[root@host ~]# getenforce
Permissive
[root@host ~]# setenforce Enforcing
[root@host ~]# getenforce
Enforcing
Alternatively, set the SELinux mode at boot time with a kernel parameter. Pass the enforcing=0
kernel parameter to boot the system into permissive mode, or pass enforcing=1 to boot
into enforcing mode. Disable SELinux by passing the selinux=0 kernel parameter, or pass
selinux=1 to enable SELinux.
Red Hat recommends to reboot the server when you change the SELinux mode from
Permissive to Enforcing. This reboot ensures that the services started in permissive mode are
confined in the next boot.
Set the Default SELinux Mode
To configure SELinux persistently, use the /etc/selinux/config file. In the following default
example, the configuration sets SELinux to enforcing mode. The comments list other valid
values, such as the permissive and disabled modes.
# This file controls the state of SELinux on the system.
# SELINUX= can take one of these three values:
# enforcing - SELinux security policy is enforced.
# permissive - SELinux prints warnings instead of enforcing.
# disabled - No SELinux policy is loaded.
...output omitted...
#
# NOTE: In earlier Fedora kernel builds, SELINUX=disabled would also
# fully disable SELinux during boot. If you need a system with SELinux
# fully disabled instead of SELinux running with no policy loaded, you
# need to pass selinux=0 to the kernel command line. You can use grubby
# to persistently set the bootloader to boot with selinux=0:
#
# grubby --update-kernel ALL --args selinux=0
#
# To revert back to SELinux enabled:
#
# grubby --update-kernel ALL --remove-args selinux
#
RH134-RHEL9.0-en-2-20220609 99](https://image.slidesharecdn.com/redhatenterpriselinux9-240713030337-3ff2819f/85/Red-Hat-Enterprise-Linux-Administration-9-0-RH134-pdf-117-320.jpg)
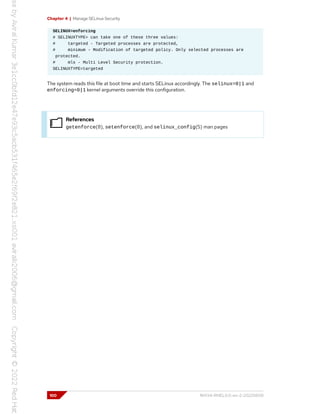
![Chapter 4 | Manage SELinux Security
Guided Exercise
Change the SELinux Enforcement Mode
In this lab, you manage SELinux modes, both temporarily and persistently.
Outcomes
• View and set the current SELinux mode.
Before You Begin
As the student user on the workstation machine, use the lab command to prepare your
system for this exercise.
This command prepares your environment and ensures that all required resources are
available.
[student@workstation ~]$ lab start selinux-opsmode
Instructions
1. On the workstation machine, use the ssh command to log in to the servera machine
as the student user and then switch to the root user.
[student@workstation ~]$ ssh student@servera
...output omitted...
[student@servera ~]$ sudo -i
[sudo] password for student: student
[root@servera ~]#
2. Change the default SELinux mode to permissive.
2.1. Use the getenforce command to verify the current SELinux mode on the servera
machine.
[root@servera ~]# getenforce
Enforcing
2.2. Use the vim /etc/selinux/config command to edit the configuration file.
Change the SELINUX parameter from enforcing to permissive mode.
[root@servera ~]# vim /etc/selinux/config
2.3. Use the grep command to confirm that the SELINUX parameter displays the
permissive mode.
RH134-RHEL9.0-en-2-20220609 101](https://image.slidesharecdn.com/redhatenterpriselinux9-240713030337-3ff2819f/85/Red-Hat-Enterprise-Linux-Administration-9-0-RH134-pdf-119-320.jpg)
![Chapter 4 | Manage SELinux Security
[root@servera ~]# grep '^SELINUX' /etc/selinux/config
SELINUX=permissive
SELINUXTYPE=targeted
2.4. Use the getenforce command to confirm that the SELINUX parameter displays the
enforcing mode.
[root@servera ~]# getenforce
Enforcing
2.5. Use the setenforce command to change the SELINUX mode to permissive
mode and verify the change.
[root@servera ~]# setenforce 0
[root@servera ~]# getenforce
Permissive
3. Change the default SELinux mode back to the enforcing mode in the configuration file.
3.1. Use the vim /etc/selinux/config command to edit the configuration file.
Change the SELINUX parameter from permissive to enforcing mode.
[root@servera ~]# vim /etc/selinux/config
3.2. Use the grep command to confirm that the SELINUX parameter sets the
enforcing mode on booting.
[root@servera ~]# grep '^SELINUX' /etc/selinux/config
SELINUX=enforcing
SELINUXTYPE=targeted
4. Set the SELinux mode to enforcing in the command line. Reboot the servera machine
and verify the SELinux mode.
4.1. Use the setenforce command to set the current SELinux mode to the enforcing
mode. Use the getenforce command to confirm that SELinux is set to the
enforcing mode.
[root@servera ~]# setenforce 1
[root@servera ~]# getenforce
Enforcing
4.2. Reboot the servera machine to implement the persistent configuration.
[root@servera ~]# systemctl reboot
Connection to servera closed by remote host.
Connection to servera closed.
[student@workstation ~]$
4.3. Log in to servera machine and verify the SELinux mode.
102 RH134-RHEL9.0-en-2-20220609](https://image.slidesharecdn.com/redhatenterpriselinux9-240713030337-3ff2819f/85/Red-Hat-Enterprise-Linux-Administration-9-0-RH134-pdf-120-320.jpg)
![Chapter 4 | Manage SELinux Security
[student@workstation ~]$ ssh student@servera
...output omitted...
[student@servera ~]$ sudo -i
[sudo] password for student: student
[root@servera ~]# getenforce
Enforcing
5. Return to the workstation machine as the student user.
[root@servera ~]# exit
logout
[student@servera ~]$ exit
logout
Connection to servera closed.
[student@workstation ~]$
Finish
On the workstation machine, change to the student user home directory and use the lab
command to complete this exercise. This step is important to ensure that resources from previous
exercises do not impact upcoming exercises.
[student@workstation ~]$ lab finish selinux-opsmode
This concludes the section.
RH134-RHEL9.0-en-2-20220609 103](https://image.slidesharecdn.com/redhatenterpriselinux9-240713030337-3ff2819f/85/Red-Hat-Enterprise-Linux-Administration-9-0-RH134-pdf-121-320.jpg)
![Chapter 4 | Manage SELinux Security
• The moved file retains the file context that was labeled from the original /tmp directory.
• The copied file has a new inode and inherits the SELinux context from the destination /var/
www/html directory.
The ls -Z command displays the SELinux context of a file. Observe the label of the files that are
created in the /tmp directory.
[root@host ~]# touch /tmp/file1 /tmp/file2
[root@host ~]# ls -Z /tmp/file*
unconfined_u:object_r:user_tmp_t:s0 /tmp/file1
unconfined_u:object_r:user_tmp_t:s0 /tmp/file2
The ls -Zd command displays the SELinux context of the specified directory. Note the label on
the /var/www/html directory and the files inside it.
[root@host ~]# ls -Zd /var/www/html/
system_u:object_r:httpd_sys_content_t:s0 /var/www/html/
[root@host ~]# ls -Z /var/www/html/index.html
unconfined_u:object_r:httpd_sys_content_t:s0 /var/www/html/index.html
Move one file from the /tmp directory to the /var/www/html directory. Copy the other file to
the same directory. Note the resulting label on each file.
[root@host ~]# mv /tmp/file1 /var/www/html/
[root@host ~]# cp /tmp/file2 /var/www/html/
[root@host ~]# ls -Z /var/www/html/file*
unconfined_u:object_r:user_tmp_t:s0 /var/www/html/file1
unconfined_u:object_r:httpd_sys_content_t:s0 /var/www/html/file2
The moved file retained its original label and the copied file inherited the destination directory
label. Although not important to this discussion, unconfined_u is the SELinux user, object_r
is the SELinux role, and s0 is the (lowest possible) sensitivity level. Advanced SELinux
configurations and features use these values.
Change the SELinux Context
You change the SELinux context on files with the semanage fcontext, restorecon, and
chcon commands.
The recommended method to set the context for a file is to create a file context policy by using
the semanage fcontext command, and then apply the specified context in the policy to the file
by using the restorecon command. This method ensures that you can easily relabel the file to
its correct context with the restorecon command whenever necessary. The advantage of this
method is that you do not need to remember what the context is supposed to be, and you can
easily correct the context on a set of files.
The chcon command sets SELinux context directly on files, but without referencing the system's
SELinux policy. Although chcon is useful for testing and debugging, setting contexts manually
with this method is temporary. File contexts that are set manually survive a reboot, but might be
replaced if you run restorecon to relabel the contents of the file system.
RH134-RHEL9.0-en-2-20220609 105](https://image.slidesharecdn.com/redhatenterpriselinux9-240713030337-3ff2819f/85/Red-Hat-Enterprise-Linux-Administration-9-0-RH134-pdf-123-320.jpg)
![Chapter 4 | Manage SELinux Security
Important
When an SELinux system relabel occurs, all files on a system are labeled with their
policy defaults. When you use restorecon on a file, any context that you set
manually on the file is replaced if it does not match the rules in the SELinux policy.
The following example creates a directory with a default_t SELinux context, which it inherited
from the / parent directory.
[root@host ~]# mkdir /virtual
[root@host ~]# ls -Zd /virtual
unconfined_u:object_r:default_t:s0 /virtual
The chcon command sets the file context of the /virtual directory to the
httpd_sys_content_t type.
[root@host ~]# chcon -t httpd_sys_content_t /virtual
[root@host ~]# ls -Zd /virtual
unconfined_u:object_r:httpd_sys_content_t:s0 /virtual
Running the restorecon command resets the context to the default value of default_t. Note
the Relabeled message.
[root@host ~]# restorecon -v /virtual
Relabeled /virtual from unconfined_u:object_r:httpd_sys_content_t:s0 to
unconfined_u:object_r:default_t:s0
[root@host ~]# ls -Zd /virtual
unconfined_u:object_r:default_t:s0 /virtual
Define SELinux Default File Context Policies
The semanage fcontext command displays and modifies the policies that determine the
default file contexts. You can list all the file context policy rules by running the semanage
fcontext -l command. These rules use extended regular expression syntax to specify the path
and file names.
When viewing policies, the most common extended regular expression is (/.*)?, which is usually
appended to a directory name. This notation is humorously called the pirate, because it looks like a
face with an eye patch and a hooked hand next to it.
This syntax is described as "a set of characters beginning with a slash and followed by any number
of characters, where the set can either exist or not exist". Stated more simply, this syntax matches
the directory itself, even when empty, but also matches almost any file name that is created within
that directory.
For example, the following rule specifies that the /var/www/cgi-bin directory, and
any files in it or in its subdirectories (and their subdirectories, and so on), should have the
system_u:object_r:httpd_sys_script_exec_t:s0 SELinux context, unless a more
specific rule overrides this one.
/var/www/cgi-bin(/.*)? all files system_u:object_r:httpd_sys_script_exec_t:s0
106 RH134-RHEL9.0-en-2-20220609](https://image.slidesharecdn.com/redhatenterpriselinux9-240713030337-3ff2819f/85/Red-Hat-Enterprise-Linux-Administration-9-0-RH134-pdf-124-320.jpg)
![Chapter 4 | Manage SELinux Security
Basic File Context Operations
The following table is a reference for the semanage fcontext command options to add,
remove, or list SELinux file context policies.
semanage fcontext commands
option description
-a, --add Add a record of the specified object type
-d, --delete Delete a record of the specified object type
-l, --list List records of the specified object type
To manage SELinux contexts, install the policycoreutils and policycoreutils-python-
utils packages, which contain the restorecon and semanage commands.
To reset all files in a directory to the default policy context, first use the semanage fcontext
-l command to locate and verify that the correct policy exists with the intended file context.
Then, use the restorecon command on the wildcarded directory name to reset all the files
recursively. In the following example, view the file contexts before and after using the semanage
and restorecon commands.
First, check the SELinux context for the files:
[root@host ~]# ls -Z /var/www/html/file*
unconfined_u:object_r:user_tmp_t:s0 /var/www/html/file1
unconfined_u:object_r:httpd_sys_content_t:s0 /var/www/html/file2
Then, use the semanage fcontext -l command to list the default SELinux file contexts:
[root@host ~]# semanage fcontext -l
...output omitted...
/var/www(/.*)? all files system_u:object_r:httpd_sys_content_t:s0
...output omitted...
The semanage command output indicates that all the files and subdirectories in the /var/
www/ directory will have the httpd_sys_content_t context by default. Running restorecon
command on the wildcarded folder restores the default context on all files and subdirectories.
[root@host ~]# restorecon -Rv /var/www/
Relabeled /var/www/html/file1 from unconfined_u:object_r:user_tmp_t:s0 to
unconfined_u:object_r:httpd_sys_content_t:s0
[root@host ~]# ls -Z /var/www/html/file*
unconfined_u:object_r:httpd_sys_content_t:s0 /var/www/html/file1
unconfined_u:object_r:httpd_sys_content_t:s0 /var/www/html/file2
The following example uses the semanage command to add a context policy for a new directory.
First, create the /virtual directory with an index.html file inside it. View the SELinux context
for the file and the directory.
RH134-RHEL9.0-en-2-20220609 107](https://image.slidesharecdn.com/redhatenterpriselinux9-240713030337-3ff2819f/85/Red-Hat-Enterprise-Linux-Administration-9-0-RH134-pdf-125-320.jpg)
![Chapter 4 | Manage SELinux Security
[root@host ~]# mkdir /virtual
[root@host ~]# touch /virtual/index.html
[root@host ~]# ls -Zd /virtual/
unconfined_u:object_r:default_t:s0 /virtual
[root@host ~]# ls -Z /virtual/
unconfined_u:object_r:default_t:s0 index.html
Next, use the semanage fcontext command to add an SELinux file context policy for the
directory.
[root@host ~]# semanage fcontext -a -t httpd_sys_content_t '/virtual(/.*)?'
Use the restorecon command on the wildcarded directory to set the default context on the
directory and all files within it.
[root@host ~]# restorecon -RFvv /virtual
Relabeled /virtual from unconfined_u:object_r:default_t:s0 to
system_u:object_r:httpd_sys_content_t:s0
Relabeled /virtual/index.html from unconfined_u:object_r:default_t:s0 to
system_u:object_r:httpd_sys_content_t:s0
[root@host ~]# ls -Zd /virtual/
drwxr-xr-x. root root system_u:object_r:httpd_sys_content_t:s0 /virtual/
[root@host ~]# ls -Z /virtual/
-rw-r--r--. root root system_u:object_r:httpd_sys_content_t:s0 index.html
Use the semanage fcontext -l -C command to view any local customizations to the default
policy.
[root@host ~]# semanage fcontext -l -C
SELinux fcontext type Context
/virtual(/.*)? all files system_u:object_r:httpd_sys_content_t:s0
References
chcon(1), restorecon(8), semanage(8), and semanage-fcontext(8) man
pages
108 RH134-RHEL9.0-en-2-20220609](https://image.slidesharecdn.com/redhatenterpriselinux9-240713030337-3ff2819f/85/Red-Hat-Enterprise-Linux-Administration-9-0-RH134-pdf-126-320.jpg)
![Chapter 4 | Manage SELinux Security
Guided Exercise
Control SELinux File Contexts
In this lab, you persistently change the SELinux context of a directory and its contents.
Outcomes
• Configure the Apache HTTP server to publish web content from a non-standard
document root.
Before You Begin
As the student user on the workstation machine, use the lab command to prepare your
system for this exercise.
This command prepares your environment and ensures that all required resources are
available.
[student@workstation ~]$ lab start selinux-filecontexts
Instructions
1. Log in to servera as the student user and switch to the root user.
[student@workstation ~]$ ssh student@servera
...output omitted...
[student@servera ~]$
[student@servera ~]$ sudo -i
[sudo] password for student: student
[root@servera ~]#
2. Configure Apache to use a document directory in a non-standard location.
2.1. Create the /custom directory.
[root@servera ~]# mkdir /custom
2.2. Create the index.html file in the /custom directory. The index.html file should
contain the This is SERVERA. text.
[root@servera ~]# echo 'This is SERVERA.' > /custom/index.html
2.3. Configure Apache to use the new directory location. Edit the Apache
/etc/httpd/conf/httpd.conf configuration file and replace the two
occurrences of the /var/www/html directory with the /custom directory. You can
use the vim /etc/httpd/conf/httpd.conf command to do so. The following
example shows the expected content of the /etc/httpd/conf/httpd.conf file.
RH134-RHEL9.0-en-2-20220609 109](https://image.slidesharecdn.com/redhatenterpriselinux9-240713030337-3ff2819f/85/Red-Hat-Enterprise-Linux-Administration-9-0-RH134-pdf-127-320.jpg)
![Chapter 4 | Manage SELinux Security
[root@servera ~]# cat /etc/httpd/conf/httpd.conf
...output omitted...
DocumentRoot "/custom"
...output omitted...
<Directory "/custom">
...output omitted...
3. Start and enable the Apache web service and confirm that the service is running.
3.1. Start and enable the Apache web service by using the systemctl command.
[root@servera ~]# systemctl enable --now httpd
Created symlink /etc/systemd/system/multi-user.target.wants/httpd.service → /usr/
lib/systemd/system/httpd.service.
3.2. Verify that the service is running.
[root@servera ~]# systemctl status httpd
● httpd.service - The Apache HTTP Server
Loaded: loaded (/usr/lib/systemd/system/httpd.service; enabled; vendor
preset: disabled)
Active: active (running) since Wed 2022-04-06 05:21:19 EDT; 22s ago
Docs: man:httpd.service(8)
Main PID: 1676 (httpd)
...output omitted...
Apr 06 05:21:19 servera.lab.example.com systemd[1]: Starting The Apache HTTP
Server...
Apr 06 05:21:19 servera.lab.example.com systemd[1]: Started The Apache HTTP
Server.
Apr 06 05:21:19 servera.lab.example.com httpd[1676]: Server configured, listening
on: port 80
4. Open a web browser on workstation and try to view the http://servera/
index.html web page. You get an error message that you do not have permission to
access the file.
5. To permit access to the index.html file on servera, you must configure the
SELinux context. Define an SELinux file context rule that sets the context type to
httpd_sys_content_t for the /custom directory and all the files under it.
[root@servera ~]# semanage fcontext -a
-t httpd_sys_content_t '/custom(/.*)?'
6. Correct the file contexts in the /custom directory.
[root@servera ~]# restorecon -Rv /custom
Relabeled /custom from unconfined_u:object_r:default_t:s0 to
unconfined_u:object_r:httpd_sys_content_t:s0
Relabeled /custom/index.html from unconfined_u:object_r:default_t:s0 to
unconfined_u:object_r:httpd_sys_content_t:s0
110 RH134-RHEL9.0-en-2-20220609](https://image.slidesharecdn.com/redhatenterpriselinux9-240713030337-3ff2819f/85/Red-Hat-Enterprise-Linux-Administration-9-0-RH134-pdf-128-320.jpg)
![Chapter 4 | Manage SELinux Security
7. Try to view http://servera/index.html again in the web browser on the
workstation machine. You should see the This is SERVERA. message.
8. Return to the workstation machine as the student user.
[root@servera ~]# exit
logout
[student@servera ~]$ exit
logout
Connection to servera closed.
[student@workstation ~]$
Finish
On the workstation machine, change to the student user home directory and use the lab
command to complete this exercise. This step is important to ensure that resources from previous
exercises do not impact upcoming exercises.
[student@workstation ~]$ lab finish selinux-filecontexts
This concludes the section.
RH134-RHEL9.0-en-2-20220609 111](https://image.slidesharecdn.com/redhatenterpriselinux9-240713030337-3ff2819f/85/Red-Hat-Enterprise-Linux-Administration-9-0-RH134-pdf-129-320.jpg)
![Chapter 4 | Manage SELinux Security
Adjust SELinux Policy with Booleans
Objectives
Activate and deactivate SELinux policy rules with the setsebool command, manage the
persistent value of SELinux Booleans with the semanage boolean -l command, and consult
man pages that end with _selinux to find useful information about SELinux Booleans.
SELinux Booleans
An application or service developer writes an SELinux targeted policy to define the allowed
behavior of the targeted application. A developer can include optional application behavior
in the SELinux policy that can be enabled when the behavior is allowed on a specific system.
SELinux Booleans enable or disable the SELinux policy's optional behavior. With Booleans, you can
selectively tune the behavior of an application.
These optional behaviors are application-specific, and must be discovered and selected for
each targeted application. Service-specific Booleans are documented in that service's SELinux
man page. For example, the web server httpd service has its httpd(8) man page, and an
httpd_selinux(8) man page to document its SELinux policy, including the supported process
types, file contexts, and the available Boolean-enabled behaviors. The SELinux man pages are
provided in the selinux-policy-doc package.
Use the getsebool command to list available Booleans for the targeted policies on this system,
and the current Boolean status. Use the setsebool command to enable or disable the running
state of these behaviors. The setsebool -P command option makes the setting persistent by
writing to the policy file. Only privileged users can set SELinux Booleans.
[root@host ~]# getsebool -a
abrt_anon_write --> off
abrt_handle_event --> off
abrt_upload_watch_anon_write --> on
...output omitted...
Example httpd Policy Boolean
The httpd service policy includes the httpd_enable_homedirs Boolean, which enables the
sharing of home directories with httpd. Typically, a user's local home directory is accessible to
the user only when logged in to the local system. Alternatively, home directories are shared and
accessed by using a remote file sharing protocol, such as NFS. In both scenarios, home directories
are not shared by using https, by default, and are not available to the user through a browser.
[root@host ~]# getsebool httpd_enable_homedirs
httpd_enable_homedirs --> off
You can enable sharing and allow users to access their home directories with a browser. When
enabled, the httpd service shares home directories that are labeled with the user_home_dir_t
file context. Users can then access and manage their home directory files from a browser.
112 RH134-RHEL9.0-en-2-20220609](https://image.slidesharecdn.com/redhatenterpriselinux9-240713030337-3ff2819f/85/Red-Hat-Enterprise-Linux-Administration-9-0-RH134-pdf-130-320.jpg)
![Chapter 4 | Manage SELinux Security
Manage the Policy Boolean
Setting SELinux Booleans with the setsebool command without the -P option is temporary,
and settings will return to the persistent values after rebooting. View additional information with
the semanage boolean -l command, which lists the Booleans from the policy files, including
whether a Boolean is persistent, the default and current values, and a short description.
[root@host ~]# semanage boolean -l | grep httpd_enable_homedirs
httpd_enable_homedirs (off , off) Allow httpd to enable homedirs
[root@host ~]# setsebool httpd_enable_homedirs on
[root@host ~]# semanage boolean -l | grep httpd_enable_homedirs
httpd_enable_homedirs (on , off) Allow httpd to enable homedirs
[root@host ~]# getsebool httpd_enable_homedirs
httpd_enable_homedirs --> on
To list only Booleans with a current setting that is different from the default setting at boot, use
the semanage boolean -l -C command. This example has the same result as the previous
example, without requiring the grep filtering.
[root@host ~]# semanage boolean -l -C
SELinux boolean State Default Description
httpd_enable_homedirs (on , off) Allow httpd to enable homedirs
The previous example temporarily set the current value for the httpd_enable_homedirs
Boolean to on, until the system reboots. To change the default setting, use the setsebool -P
command to make the setting persistent. The following example sets a persistent value, and then
views the Boolean's information from the policy file.
[root@host ~]# setsebool -P httpd_enable_homedirs on
[root@host ~]# semanage boolean -l | grep httpd_enable_homedirs
httpd_enable_homedirs (on , on) Allow httpd to enable homedirs
Use the semanage boolean -l -C command again. The Boolean is displayed despite
the appearance that the current and default settings are the same. However, the -C option
matches when the current setting is different from the default setting from the last boot. For this
httpd_enable_homedirs example, the original default boot setting was off.
[root@host ~]# semanage boolean -l -C
SELinux boolean State Default Description
httpd_enable_homedirs (on , on) Allow httpd to enable homedirs
References
booleans(8), getsebool(8), setsebool(8), semanage(8), and semanage-
boolean(8) man pages
RH134-RHEL9.0-en-2-20220609 113](https://image.slidesharecdn.com/redhatenterpriselinux9-240713030337-3ff2819f/85/Red-Hat-Enterprise-Linux-Administration-9-0-RH134-pdf-131-320.jpg)
![Chapter 4 | Manage SELinux Security
Guided Exercise
Adjust SELinux Policy with Booleans
In this exercise, you configure Apache to publish web content from users' home directories.
Outcomes
• Configure Apache web service to publish web content from the user's home directory.
Before You Begin
As the student user on the workstation machine, use the lab command to prepare your
system for this exercise.
This command prepares your environment and ensures that all required resources are
available.
[student@workstation ~]$ lab start selinux-booleans
Instructions
1. On the workstation machine, use the ssh command to log in to the servera machine
as the student user and then switch to the root user.
[student@workstation ~]$ ssh student@servera
...output omitted...
[student@servera ~]$ sudo -i
[sudo] password for student: student
[root@servera ~]#
2. Edit the /etc/httpd/conf.d/userdir.conf configuration file to enable the Apache
feature so that users can publish web content from their home directory. Comment out the
line in the IfModule section that sets the UserDir variable to the disabled value, and
uncomment the line that sets the UserDir variable to the public_html value.
[root@servera ~]# vim /etc/httpd/conf.d/userdir.conf
<IfModule mod_userdir.c>
...output omitted...
# UserDir disabled
...output omitted...
UserDir public_html
...output omitted...
</IfModule>
3. Start and enable the Apache web service.
114 RH134-RHEL9.0-en-2-20220609](https://image.slidesharecdn.com/redhatenterpriselinux9-240713030337-3ff2819f/85/Red-Hat-Enterprise-Linux-Administration-9-0-RH134-pdf-132-320.jpg)
![Chapter 4 | Manage SELinux Security
[root@servera ~]# systemctl enable --now httpd
4. Open another terminal window, and use the ssh command to log in to the servera
machine as the student user. Create the index.html web content file in the
~/public_html directory.
4.1. In another terminal window, use the ssh command to log in to the servera machine
as the student user.
[student@workstation ~]$ ssh student@servera
...output omitted...
[student@servera ~]$
4.2. Use the mkdir command to create the ~/public_html directory.
[student@servera ~]$ mkdir ~/public_html
4.3. Create the index.html file with the following content:
[student@servera ~]$ echo 'This is student content on SERVERA.' >
~/public_html/index.html
4.4. For the Apache web service to serve the contents of the
/home/student/public_html directory, it must be allowed to share files
and subdirectories in the /home/student directory. When you created the
/home/student/public_html directory, it was automatically configured with
permissions that allow anyone with home directory permission to access its contents.
Change the /home/student directory permissions to allow the Apache web service
to access the public_html subdirectory.
[student@servera ~]$ chmod 711 ~
[student@servera ~]$ ls -ld ~
drwx--x--x. 16 student student 4096 Nov 3 09:28 /home/student
5. Open a web browser on the workstation machine and enter the
http://servera/~student/index.html address. An error message states that you
do not have permission to access the file.
6. Switch to the other terminal and use the getsebool command to see if any Booleans
restrict access to home directories for the httpd service.
[root@servera ~]# getsebool -a | grep home
...output omitted...
httpd_enable_homedirs --> off
...output omitted...
7. Use the setsebool command to enable persistent access to the home directory for the
httpd service.
RH134-RHEL9.0-en-2-20220609 115](https://image.slidesharecdn.com/redhatenterpriselinux9-240713030337-3ff2819f/85/Red-Hat-Enterprise-Linux-Administration-9-0-RH134-pdf-133-320.jpg)
![Chapter 4 | Manage SELinux Security
[root@servera ~]# setsebool -P httpd_enable_homedirs on
8. Verify that you can now see the This is student content on SERVERA. message in
the web browser after entering the http://servera/~student/index.html address.
9. Return to the workstation machine as the student user.
[root@servera ~]# exit
logout
[student@servera ~]$ exit
logout
Connection to servera closed.
[student@workstation ~]$
Finish
On the workstation machine, change to the student user home directory and use the lab
command to complete this exercise. This step is important to ensure that resources from previous
exercises do not impact upcoming exercises.
[student@workstation ~]$ lab finish selinux-booleans
This concludes the section.
116 RH134-RHEL9.0-en-2-20220609](https://image.slidesharecdn.com/redhatenterpriselinux9-240713030337-3ff2819f/85/Red-Hat-Enterprise-Linux-Administration-9-0-RH134-pdf-134-320.jpg)
![Chapter 4 | Manage SELinux Security
Consider the following example sequence of commands on a standard Apache web server. You
create /root/mypage and move it to the default Apache content folder (/var/www/html).
Then, after starting the Apache service, you try to retrieve the file content.
[root@host ~]# touch /root/mypage
[root@host ~]# mv /root/mypage /var/www/html
[root@host ~]# systemctl start httpd
[root@host ~]# curl http://localhost/mypage
<!DOCTYPE HTML PUBLIC "-//IETF//DTD HTML 2.0//EN">
<html><head>
<title>403 Forbidden</title>
</head><body>
<h1>Forbidden</h1>
<p>You don't have permission to access this resource.</p>
</body></html>
The web server does not display the content and returns a permission denied error. An AVC
event is logged to the /var/log/audit/audit.log and /var/log/messages files. Note the
suggested sealert command and UUID in the /var/log/messages event message.
[root@host ~]# tail /var/log/audit/audit.log
...output omitted...
type=AVC msg=audit(1649249057.067:212): avc: denied { getattr }
for pid=2332 comm="httpd" path="/var/www/html/mypage"
dev="vda4" ino=9322502 scontext=system_u:system_r:httpd_t:s0
tcontext=unconfined_u:object_r:admin_home_t:s0 tclass=file permissive=0
...output omitted
[root@host ~]# tail /var/log/messages
...output omitted...
Apr 6 08:44:19 host setroubleshoot[2547]: SELinux is preventing /usr/sbin/httpd
from getattr access on the file /var/www/html/mypage. For complete SELinux
messages run: sealert -l 95f41f98-6b56-45bc-95da-ce67ec9a9ab7
...output omitted...
The sealert output describes the event including the affected process, the accessed file, and
the attempted and denied action. The output includes advice for correcting the file's label, if
appropriate. Additional advice describes how to generate a new policy to allow the denied action.
Use the given advice only when it is appropriate for your scenario.
Important
The sealert output includes a confidence rating, which indicates the level of
confidence that the given advice will mitigate the denial. However, that advice might
not be appropriate for your scenario.
For example, if the AVC denial is because the denied file is in the wrong location,
then advice that states either to adjust the file's context label, or to create a new
policy for this location and action, is technically accurate, but not the correct
solution for your scenario. If the root cause is a wrong location or file name, then
moving or renaming the file and then restoring a correct file context is the correct
solution instead.
118 RH134-RHEL9.0-en-2-20220609](https://image.slidesharecdn.com/redhatenterpriselinux9-240713030337-3ff2819f/85/Red-Hat-Enterprise-Linux-Administration-9-0-RH134-pdf-136-320.jpg)
![Chapter 4 | Manage SELinux Security
[root@host ~]# sealert -l 95f41f98-6b56-45bc-95da-ce67ec9a9ab7
SELinux is preventing /usr/sbin/httpd from getattr access on the file /var/www/
html/mypage.
***** Plugin restorecon (99.5 confidence) suggests ************************
If you want to fix the label.
/var/www/html/mypage default label should be httpd_sys_content_t.
Then you can run restorecon. The access attempt may have been stopped due to
insufficient permissions to access a parent directory in which case try to change
the following command accordingly.
Do
# /sbin/restorecon -v /var/www/html/mypage
***** Plugin catchall (1.49 confidence) suggests **************************
If you believe that httpd should be allowed getattr access on the mypage file by
default.
Then you should report this as a bug.
You can generate a local policy module to allow this access.
Do
allow this access for now by executing:
# ausearch -c 'httpd' --raw | audit2allow -M my-httpd
# semodule -X 300 -i my-httpd.pp
Additional Information:
Source Context system_u:system_r:httpd_t:s0
Target Context unconfined_u:object_r:admin_home_t:s0
Target Objects /var/www/html/mypage [ file ]
Source httpd
Source Path /usr/sbin/httpd
...output omitted...
Raw Audit Messages
type=AVC msg=audit(1649249057.67:212): avc: denied { getattr }
for pid=2332 comm="httpd" path="/var/www/html/mypage"
dev="vda4" ino=9322502 scontext=system_u:system_r:httpd_t:s0
tcontext=unconfined_u:object_r:admin_home_t:s0 tclass=file permissive=0
type=SYSCALL msg=audit(1649249057.67:212): arch=x86_64 syscall=newfstatat
success=no exit=EACCES a0=ffffff9c a1=7fe9c00048f8 a2=7fe9ccfc8830 a3=100
items=0 ppid=2329 pid=2332 auid=4294967295 uid=48 gid=48 euid=48 suid=48 fsuid=48
egid=48 sgid=48 fsgid=48 tty=(none) ses=4294967295 comm=httpd exe=/usr/sbin/httpd
subj=system_u:system_r:httpd_t:s0 key=(null)
Hash: httpd,httpd_t,admin_home_t,file,getattr
In this example, the accessed file is in the correct location, but does not have the correct SELinux
file context. The Raw Audit Messages section displays information from the /var/log/
audit.log event entry. Use the restorecon /var/www/html/mypage command to set the
correct context label. To correct multiple files recursively, use the restorecon -R command on
the parent directory.
RH134-RHEL9.0-en-2-20220609 119](https://image.slidesharecdn.com/redhatenterpriselinux9-240713030337-3ff2819f/85/Red-Hat-Enterprise-Linux-Administration-9-0-RH134-pdf-137-320.jpg)
![Chapter 4 | Manage SELinux Security
Use the ausearch command to search for AVC events in the /var/log/audit.log log file. Use
the -m option to specify the AVC message type and the -ts option to provide a time hint, such as
recent.
[root@host ~]# ausearch -m AVC -ts recent
----
time->Tue Apr 6 13:13:07 2019
type=PROCTITLE msg=audit(1554808387.778:4002):
proctitle=2F7573722F7362696E2F6874747064002D44464F524547524F554E44
type=SYSCALL msg=audit(1554808387.778:4002): arch=c000003e syscall=49
success=no exit=-13 a0=3 a1=55620b8c9280 a2=10 a3=7ffed967661c items=0
ppid=1 pid=9340 auid=4294967295 uid=0 gid=0 euid=0 suid=0 fsuid=0 egid=0
sgid=0 fsgid=0 tty=(none) ses=4294967295 comm="httpd" exe="/usr/sbin/httpd"
subj=system_u:system_r:httpd_t:s0 key=(null)
type=AVC msg=audit(1554808387.778:4002): avc: denied { name_bind }
for pid=9340 comm="httpd" src=82 scontext=system_u:system_r:httpd_t:s0
tcontext=system_u:object_r:reserved_port_t:s0 tclass=tcp_socket permissive=0
Troubleshoot SELinux Issues with the Web Console
The RHEL web console includes tools for troubleshooting SELinux issues. Select SELinux from
the menu on the left. The SELinux policy window displays the current enforcing state. The SELinux
access control errors section lists current SELinux issues.
Figure 4.3: SELinux policy and errors in the web console
Click the > character to display event details. Click solution details to display all event details and
advice. You can click Apply the solution to apply the suggested advice.
After correcting the issue, the SELinux access control errors section should remove that event
from view. If the No SELinux alerts message appears, then you have corrected all current
SELinux issues.
References
sealert(8) man page
120 RH134-RHEL9.0-en-2-20220609](https://image.slidesharecdn.com/redhatenterpriselinux9-240713030337-3ff2819f/85/Red-Hat-Enterprise-Linux-Administration-9-0-RH134-pdf-138-320.jpg)
![Chapter 4 | Manage SELinux Security
Guided Exercise
Investigate and Resolve SELinux Issues
In this lab, you learn how to troubleshoot SELinux security denials.
Outcomes
• Gain experience with SELinux troubleshooting tools.
Before You Begin
As the student user on the workstation machine, use the lab command to prepare your
system for this exercise.
This command prepares your environment and ensures that all required resources are
available.
[student@workstation ~]$ lab start selinux-issues
Instructions
1. From a web browser on the workstation machine, open the http://servera/
index.html web page. An error message states that you do not have permission to
access the file.
2. Use the ssh command to log in to servera as the student user. Use the sudo -i
command to switch to the root user.
[student@workstation ~]$ ssh student@servera
...output omitted...
[student@servera ~]$ sudo -i
[sudo] password for student: student
[root@servera ~]#
3. Use the less command to view the contents of the /var/log/messages file. You use
the / character and search for the sealert text. Press the n key until you reach the last
occurrence, because previous exercises might also have generated SELinux messages.
Copy the suggested sealert command so that you can use it in the next step. Use the q
key to quit the less command.
[root@servera ~]# less /var/log/messages
...output omitted...
Apr 7 04:52:18 servera setroubleshoot[20715]: SELinux is preventing /usr/sbin/
httpd from getattr access on the file /custom/index.html. For complete SELinux
messages run: sealert -l 9a96294a-239b-4568-8f1e-9f35b5fb472b
...output omitted...
RH134-RHEL9.0-en-2-20220609 121](https://image.slidesharecdn.com/redhatenterpriselinux9-240713030337-3ff2819f/85/Red-Hat-Enterprise-Linux-Administration-9-0-RH134-pdf-139-320.jpg)
![Chapter 4 | Manage SELinux Security
4. Run the suggested sealert command. Note the source context, the target objects, the
policy, and the enforcing mode. Find the correct SELinux context label for the file that the
httpd service tries to serve.
4.1. Run the sealert command.
The output explains that the /custom/index.html file has an incorrect context
label.
[root@servera ~]# sealert -l 9a96294a-239b-4568-8f1e-9f35b5fb472b
SELinux is preventing /usr/sbin/httpd from getattr access on the file /custom/
index.html.
***** Plugin catchall_labels (83.8 confidence) suggests *******************
If you want to allow httpd to have getattr access on the index.html file
Then you need to change the label on /custom/index.html
Do
# semanage fcontext -a -t FILE_TYPE '/custom/index.html'
where FILE_TYPE is one of the following: NetworkManager_exec_t,
NetworkManager_log_t, NetworkManager_tmp_t, abrt_dump_oops_exec_t,
abrt_etc_t, abrt_exec_t, abrt_handle_event_exec_t, abrt_helper_exec_t,
abrt_retrace_coredump_exec_t, abrt_retrace_spool_t, abrt_retrace_worker_exec_t,
abrt_tmp_t, abrt_upload_watch_tmp_t, abrt_var_cache_t, abrt_var_log_t,
abrt_var_run_t, accountsd_exec_t, acct_data_t, acct_exec_t, admin_crontab_tmp_t,
admin_passwd_exec_t, afs_logfile_t, aide_exec_t, aide_log_t, alsa_exec_t,
alsa_tmp_t, amanda_exec_t, amanda_log_t, amanda_recover_exec_t, amanda_tmp_t,
amtu_exec_t, anacron_exec_t, anon_inodefs_t
...output omitted...
Additional Information:
Source Context system_u:system_r:httpd_t:s0
Target Context unconfined_u:object_r:default_t:s0
Target Objects /custom/index.html [ file ]
Source httpd
Source Path /usr/sbin/httpd
Port <Unknown>
Host servera.lab.example.com
Source RPM Packages httpd-2.4.51-7.el9_0.x86_64
Target RPM Packages
SELinux Policy RPM selinux-policy-targeted-34.1.27-1.el9.noarch
Local Policy RPM selinux-policy-targeted-34.1.27-1.el9.noarch
Selinux Enabled True
Policy Type targeted
Enforcing Mode Enforcing
Host Name servera.lab.example.com
Platform Linux servera.lab.example.com
5.14.0-70.2.1.el9_0.x86_64 #1 SMP PREEMPT Wed Mar
16 18:15:38 EDT 2022 x86_64 x86_64
Alert Count 4
First Seen 2022-04-07 04:51:38 EDT
Last Seen 2022-04-07 04:52:13 EDT
Local ID 9a96294a-239b-4568-8f1e-9f35b5fb472b
Raw Audit Messages
122 RH134-RHEL9.0-en-2-20220609](https://image.slidesharecdn.com/redhatenterpriselinux9-240713030337-3ff2819f/85/Red-Hat-Enterprise-Linux-Administration-9-0-RH134-pdf-140-320.jpg)
![Chapter 4 | Manage SELinux Security
type=AVC msg=audit(1649321533.406:1024): avc: denied { getattr } for
pid=20464 comm="httpd" path="/custom/index.html" dev="vda4" ino=25571802
scontext=system_u:system_r:httpd_t:s0 tcontext=unconfined_u:object_r:default_t:s0
tclass=file permissive=0
...output omitted...
4.2. Check the SELinux context for the directory from where the httpd service serves
the content by default, /var/www/html. The httpd_sys_content_t SELinux
context is appropriate for the /custom/index.html file.
[root@servera ~]# ls -ldZ /var/www/html
drwxr-xr-x. 2 root root system_u:object_r:httpd_sys_content_t:s0 6 Mar 21 11:47 /
var/www/html
5. The Raw Audit Messages section of the sealert command contains information
from the /var/log/audit/audit.log file. Use the ausearch command to search the
/var/log/audit/audit.log file. The -m option searches on the message type. The
-ts option searches based on time. The following entry identifies the relevant process and
file that cause the alert. The process is the httpd Apache web server, the file is /custom/
index.html, and the context is system_r:httpd_t.
[root@servera ~]# ausearch -m AVC -ts today
...output omitted...
----
time->Thu Apr 7 04:52:13 2022
type=PROCTITLE msg=audit(1649321533.406:1024):
proctitle=2F7573722F7362696E2F6874747064002D44464F524547524F554E44
type=SYSCALL msg=audit(1649321533.406:1024): arch=c000003e syscall=262 success=no
exit=-13 a0=ffffff9c a1=7fefc403d850 a2=7fefc89bc830 a3=100 items=0 ppid=20461
pid=20464 auid=4294967295 uid=48 gid=48 euid=48 suid=48 fsuid=48 egid=48
sgid=48 fsgid=48 tty=(none) ses=4294967295 comm="httpd" exe="/usr/sbin/httpd"
subj=system_u:system_r:httpd_t:s0 key=(null)
type=AVC msg=audit(1649321533.406:1024): avc: denied
{ getattr } for pid=20464 comm="httpd" path="/custom/index.html"
dev="vda4" ino=25571802 scontext=system_u:system_r:httpd_t:s0
tcontext=unconfined_u:object_r:default_t:s0 tclass=file permissive=0
6. Resolve the issue by applying the httpd_sys_content_t context.
[root@servera ~]# semanage fcontext -a
-t httpd_sys_content_t '/custom(/.*)?'
[root@servera ~]# restorecon -Rv /custom
Relabeled /custom from unconfined_u:object_r:default_t:s0 to
unconfined_u:object_r:httpd_sys_content_t:s0
Relabeled /custom/index.html from unconfined_u:object_r:default_t:s0 to
unconfined_u:object_r:httpd_sys_content_t:s0
7. Again, attempt to view http://servera/index.html. The This is SERVERA.
message is displayed.
8. Return to the workstation machine as the student user.
RH134-RHEL9.0-en-2-20220609 123](https://image.slidesharecdn.com/redhatenterpriselinux9-240713030337-3ff2819f/85/Red-Hat-Enterprise-Linux-Administration-9-0-RH134-pdf-141-320.jpg)
![Chapter 4 | Manage SELinux Security
[root@servera ~]# exit
logout
[student@servera ~]$ exit
logout
Connection to servera closed.
[student@workstation ~]$
Finish
On the workstation machine, change to the student user home directory and use the lab
command to complete this exercise. This step is important to ensure that resources from previous
exercises do not impact upcoming exercises.
[student@workstation ~]$ lab finish selinux-issues
This concludes the section.
124 RH134-RHEL9.0-en-2-20220609](https://image.slidesharecdn.com/redhatenterpriselinux9-240713030337-3ff2819f/85/Red-Hat-Enterprise-Linux-Administration-9-0-RH134-pdf-142-320.jpg)
![Chapter 4 | Manage SELinux Security
Lab
Manage SELinux Security
In this lab, you identify issues in system log files and adjust the SELinux configuration.
Outcomes
• Identify issues in system log files.
• Adjust the SELinux configuration.
Before You Begin
As the student user on the workstation machine, use the lab command to prepare your
system for this exercise.
This command prepares your environment and ensures that all required resources are
available.
[student@workstation ~]$ lab start selinux-review
Instructions
1. Log in to the serverb machine as the student user and switch to the root user.
2. From a web browser on the workstation machine, view the http://serverb/lab.html
web page. You see the error message: You do not have permission to access
this resource.
3. Research and identify the SELinux issue that prevents the Apache service from serving web
content.
4. Display the SELinux context of the new HTTP document directory and the original HTTP
document directory. Resolve the SELinux issue that prevents the Apache server from serving
web content.
5. Verify that the Apache server can now serve web content.
6. Return to the workstation machine as the student user.
Evaluation
As the student user on the workstation machine, use the lab command to grade your work.
Correct any reported failures and rerun the command until successful.
[student@workstation ~]$ lab grade selinux-review
Finish
On the workstation machine, change to the student user home directory and use the lab
command to complete this exercise. This step is important to ensure that resources from previous
exercises do not impact upcoming exercises.
RH134-RHEL9.0-en-2-20220609 125](https://image.slidesharecdn.com/redhatenterpriselinux9-240713030337-3ff2819f/85/Red-Hat-Enterprise-Linux-Administration-9-0-RH134-pdf-143-320.jpg)
![Chapter 4 | Manage SELinux Security
[student@workstation ~]$ lab finish selinux-review
This concludes the section.
126 RH134-RHEL9.0-en-2-20220609](https://image.slidesharecdn.com/redhatenterpriselinux9-240713030337-3ff2819f/85/Red-Hat-Enterprise-Linux-Administration-9-0-RH134-pdf-144-320.jpg)
![Chapter 4 | Manage SELinux Security
Solution
Manage SELinux Security
In this lab, you identify issues in system log files and adjust the SELinux configuration.
Outcomes
• Identify issues in system log files.
• Adjust the SELinux configuration.
Before You Begin
As the student user on the workstation machine, use the lab command to prepare your
system for this exercise.
This command prepares your environment and ensures that all required resources are
available.
[student@workstation ~]$ lab start selinux-review
Instructions
1. Log in to the serverb machine as the student user and switch to the root user.
[student@workstation ~]$ ssh student@serverb
...output omitted...
[student@serverb ~]$ sudo -i
[sudo] password for student: student
[root@serverb ~]#
2. From a web browser on the workstation machine, view the http://serverb/lab.html
web page. You see the error message: You do not have permission to access
this resource.
3. Research and identify the SELinux issue that prevents the Apache service from serving web
content.
3.1. View the contents of the /var/log/messages file. Use the / key and search for the
sealert string. Use the q key to quit the less command.
RH134-RHEL9.0-en-2-20220609 127](https://image.slidesharecdn.com/redhatenterpriselinux9-240713030337-3ff2819f/85/Red-Hat-Enterprise-Linux-Administration-9-0-RH134-pdf-145-320.jpg)
![Chapter 4 | Manage SELinux Security
[root@serverb ~]# less /var/log/messages
...output omitted...
Apr 7 06:16:15 serverb setroubleshoot[26509]: failed to retrieve rpm info for /
lab-content/la
b.html
Apr 7 06:16:17 serverb setroubleshoot[26509]: SELinux is preventing /usr/sbin/
httpd from getattr access on the file /lab-content/lab.html. For complete SELinux
messages run: sealert -l 35c9e452-2552-4ca3-8217-493b72ba6d0b
Apr 7 06:16:17 serverb setroubleshoot[26509]: SELinux is preventing /usr/sbin/
httpd from getattr access on the file /lab-content/lab.html
...output omitted...
3.2. Run the suggested sealert command. Note the source context, the target objects,
the policy, and the enforcing mode.
[root@serverb ~]# sealert -l 35c9e452-2552-4ca3-8217-493b72ba6d0b
SELinux is preventing /usr/sbin/httpd from getattr access on the file /lab-
content/lab.html.
***** Plugin catchall_labels (83.8 confidence) suggests *******************
If you want to allow httpd to have getattr access on the lab.html file
Then you need to change the label on /lab-content/lab.html
Do
# semanage fcontext -a -t FILE_TYPE '/lab-content/lab.html'
where FILE_TYPE is one of the following:
...output omitted...
Additional Information:
Source Context system_u:system_r:httpd_t:s0
Target Context unconfined_u:object_r:default_t:s0
Target Objects /lab-content/lab.html [ file ]
Source httpd
Source Path /usr/sbin/httpd
Port <Unknown>
Host serverb.lab.example.com
Source RPM Packages httpd-2.4.51-7.el9_0.x86_64
Target RPM Packages
SELinux Policy RPM selinux-policy-targeted-34.1.27-1.el9.noarch
Local Policy RPM selinux-policy-targeted-34.1.27-1.el9.noarch
Selinux Enabled True
Policy Type targeted
Enforcing Mode Enforcing
Host Name serverb.lab.example.com
Platform Linux serverb.lab.example.com
5.14.0-70.2.1.el9_0.x86_64 #1 SMP PREEMPT Wed Mar
16 18:15:38 EDT 2022 x86_64 x86_64
Alert Count 8
First Seen 2022-04-07 06:14:45 EDT
Last Seen 2022-04-07 06:16:12 EDT
Local ID 35c9e452-2552-4ca3-8217-493b72ba6d0b
Raw Audit Messages
128 RH134-RHEL9.0-en-2-20220609](https://image.slidesharecdn.com/redhatenterpriselinux9-240713030337-3ff2819f/85/Red-Hat-Enterprise-Linux-Administration-9-0-RH134-pdf-146-320.jpg)
![Chapter 4 | Manage SELinux Security
type=AVC msg=audit(1649326572.86:407): avc: denied { getattr } for
pid=10731 comm="httpd" path="/lab-content/lab.html" dev="vda4" ino=18192752
scontext=system_u:system_r:httpd_t:s0 tcontext=unconfined_u:object_r:default_t:s0
tclass=file permissive=0
type=SYSCALL msg=audit(1649326572.86:407): arch=x86_64 syscall=newfstatat
success=no exit=EACCES a0=ffffff9c a1=7f7c8c0457c0 a2=7f7c887f7830 a3=100 items=0
ppid=10641 pid=10731 auid=4294967295 uid=48 gid=48 euid=48 suid=48 fsuid=48
egid=48 sgid=48 fsgid=48 tty=(none) ses=4294967295 comm=httpd exe=/usr/sbin/httpd
subj=system_u:system_r:httpd_t:s0 key=(null)
Hash: httpd,httpd_t,default_t,file,getattr
3.3. The Raw Audit Messages section of the sealert command contains information
from the /var/log/audit/audit.log file. Search the /var/log/audit/
audit.log file. The -m option searches on the message type. The ts option searches
based on time. The following entry identifies the relevant process and file that cause
the alert. The process is the httpd Apache web server, the file is /lab-content/
lab.html, and the context is system_r:httpd_t.
[root@serverb ~]# ausearch -m AVC -ts recent
...output omitted...
----
time->Thu Apr 7 06:16:12 2022
type=PROCTITLE msg=audit(1649326572.086:407):
proctitle=2F7573722F7362696E2F6874747064002D44464F524547524F554E44
type=SYSCALL msg=audit(1649326572.086:407): arch=c000003e syscall=262 success=no
exit=-13 a0=ffffff9c a1=7f7c8c0457c0 a2=7f7c887f7830 a3=100 items=0 ppid=10641
pid=10731 auid=4294967295 uid=48 gid=48 euid=48 suid=48 fsuid=48 egid=48
sgid=48 fsgid=48 tty=(none) ses=4294967295 comm="httpd" exe="/usr/sbin/httpd"
subj=system_u:system_r:httpd_t:s0 key=(null)
type=AVC msg=audit(1649326572.086:407): avc: denied { getattr } for
pid=10731 comm="httpd" path="/lab-content/lab.html" dev="vda4" ino=18192752
scontext=system_u:system_r:httpd_t:s0 tcontext=unconfined_u:object_r:default_t:s0
tclass=file permissive=0
4. Display the SELinux context of the new HTTP document directory and the original HTTP
document directory. Resolve the SELinux issue that prevents the Apache server from serving
web content.
4.1. Compare the SELinux context for the /lab-content and /var/www/html
directories.
[root@serverb ~]# ls -dZ /lab-content /var/www/html
unconfined_u:object_r:default_t:s0 /lab-content
system_u:object_r:httpd_sys_content_t:s0 /var/www/html
4.2. Create a file context rule that sets the default type to httpd_sys_content_ for the
/lab-content directory and all the files under it.
[root@serverb ~]# semanage fcontext -a
-t httpd_sys_content_t '/lab-content(/.*)?'
RH134-RHEL9.0-en-2-20220609 129](https://image.slidesharecdn.com/redhatenterpriselinux9-240713030337-3ff2819f/85/Red-Hat-Enterprise-Linux-Administration-9-0-RH134-pdf-147-320.jpg)
![Chapter 4 | Manage SELinux Security
4.3. Correct the SELinux context for the files in the /lab-content directory.
[root@serverb ~]# restorecon -R /lab-content/
5. Verify that the Apache server can now serve web content.
5.1. Use your web browser to refresh the http://serverb/lab.html link. If the content
is displayed, then your issue is resolved.
This is the html file for the SELinux final lab on SERVERB.
6. Return to the workstation machine as the student user.
[root@serverb ~]# exit
logout
[student@serverb ~]$ exit
logout
Connection to serverb closed.
[student@workstation ~]$
Evaluation
As the student user on the workstation machine, use the lab command to grade your work.
Correct any reported failures and rerun the command until successful.
[student@workstation ~]$ lab grade selinux-review
Finish
On the workstation machine, change to the student user home directory and use the lab
command to complete this exercise. This step is important to ensure that resources from previous
exercises do not impact upcoming exercises.
[student@workstation ~]$ lab finish selinux-review
This concludes the section.
130 RH134-RHEL9.0-en-2-20220609](https://image.slidesharecdn.com/redhatenterpriselinux9-240713030337-3ff2819f/85/Red-Hat-Enterprise-Linux-Administration-9-0-RH134-pdf-148-320.jpg)

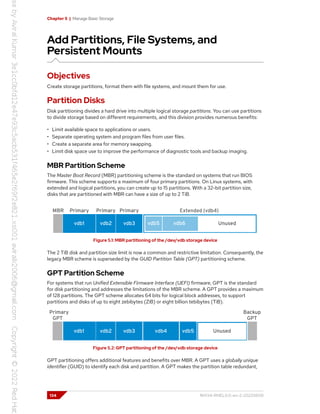
![Chapter 5 | Manage Basic Storage
with the primary GPT at the head of the disk, and a backup secondary GPT at the end of the disk.
A GPT uses a checksum to detect errors in the GPT header and partition table.
Manage Partitions
An administrator can use a partition editor program to change a disk's partitions, such as creating
and deleting partitions, and changing partition types.
Note
Which partition editor should you use? Although IT professionals have strong
opinions about feature distinctions, each listed editor here performs common disk
preparation tasks successfully.
• fdisk is a historical favorite and has supported GPT partitions for years.
• gdisk and other fdisk variants were initially created to support GPT.
• parted and the libparted library have been the RHEL standard for years.
• The Anaconda installer continues to use the libparted library.
• gnome-disk is the default GNOME graphical tool, replacing gparted upstream.
• Almost all CLI editors are good for scripting, and parted was designed for it.
Administrators can use the parted partition editor for both the MBR and the GPT partitioning
scheme. The parted command takes the whole disk device name as the first argument, followed
by subcommands. The following example uses the print subcommand to display the partition
table on the /dev/vda disk.
[root@host ~]# parted /dev/vda print
Model: Virtio Block Device (virtblk)
Disk /dev/vda: 53.7GB
Sector size (logical/physical): 512B/512B
Partition Table: msdos
Disk Flags:
Number Start End Size Type File system Flags
1 1049kB 10.7GB 10.7GB primary xfs boot
2 10.7GB 53.7GB 42.9GB primary xfs
Use the parted command without a subcommand to open an interactive partitioning session.
[root@host ~]# parted /dev/vda
GNU Parted 3.4
Using /dev/vda
Welcome to GNU Parted! Type 'help' to view a list of commands.
(parted) print
Model: Virtio Block Device (virtblk)
Disk /dev/vda: 53.7GB
Sector size (logical/physical): 512B/512B
Partition Table: msdos
Disk Flags:
Number Start End Size Type File system Flags
1 1049kB 10.7GB 10.7GB primary xfs boot
2 10.7GB 53.7GB 42.9GB primary xfs
RH134-RHEL9.0-en-2-20220609 135](https://image.slidesharecdn.com/redhatenterpriselinux9-240713030337-3ff2819f/85/Red-Hat-Enterprise-Linux-Administration-9-0-RH134-pdf-153-320.jpg)
![Chapter 5 | Manage Basic Storage
(parted) quit
[root@host ~]#
By default, the parted command displays sizes in powers of 10 (KB, MB, GB). You can change the
unit size with the unit parameter, which accepts the following values:
• s for sector
• B for byte
• MiB , GiB , or TiB (powers of 2)
• MB , GB , or TB (powers of 10)
[root@host ~]# parted /dev/vda unit s print
Model: Virtio Block Device (virtblk)
Disk /dev/vda: 104857600s
Sector size (logical/physical): 512B/512B
Partition Table: msdos
Disk Flags:
Number Start End Size Type File system Flags
1 2048s 20971486s 20969439s primary xfs boot
2 20971520s 104857535s 83886016s primary xfs
As shown in the previous example, you can also specify multiple subcommands (here, unit and
print) on the same line.
Write the Partition Table on a New Disk
To partition a new drive, first write a disk label. The disk label indicates which partitioning scheme
to use. Use parted to write an MBR disk label or a GPT disk label.
[root@host ~]# parted /dev/vdb mklabel msdos
[root@host ~]# parted /dev/vdb mklabel gpt
Warning
The mklabel subcommand wipes the existing partition table. Use the mklabel
subcommand when the intent is to reuse the disk without regard to the existing
data. If a new label moves the partition boundaries, then all data in existing file
systems becomes inaccessible.
Create MBR Partitions
The following instructions create an MBR disk partition. Specify the disk device to create the
partition on.
Run the parted command and specify the disk device name as an argument, to start in interactive
mode. The session displays (parted) as a subcommand prompt.
136 RH134-RHEL9.0-en-2-20220609](https://image.slidesharecdn.com/redhatenterpriselinux9-240713030337-3ff2819f/85/Red-Hat-Enterprise-Linux-Administration-9-0-RH134-pdf-154-320.jpg)
![Chapter 5 | Manage Basic Storage
[root@host ~]# parted /dev/vdb
GNU Parted 3.4
Using /dev/vdb
Welcome to GNU Parted! Type 'help' to view a list of commands.
(parted)
Use the mkpart subcommand to create a primary or extended partition.
(parted) mkpart
Partition type? primary/extended? primary
Note
If you need more than four partitions on an MBR-partitioned disk, then create three
primary partitions and one extended partition. The extended partition serves as a
container within which you can create multiple logical partitions.
Indicate the file-system type that you want to create on the partition, such as xfs or ext4. This
value does not create the file system, but it is only a useful partition type label.
File system type? [ext2]? xfs
To list the supported file-system types, use the following command:
[root@host ~]# parted /dev/vdb help mkpart
...output omitted...
mkpart PART-TYPE [FS-TYPE] START END make a partition
PART-TYPE is one of: primary, logical, extended
FS-TYPE is one of: udf, btrfs, nilfs2, ext4, ext3, ext2, f2fs, fat32, fat16,
hfsx, hfs+, hfs, jfs, swsusp, linux-swap(v1), linux-swap(v0), ntfs,
reiserfs, hp-ufs, sun-ufs, xfs, apfs2, apfs1, asfs, amufs5, amufs4, amufs3,
amufs2, amufs1, amufs0, amufs, affs7, affs6, affs5, affs4, affs3, affs2,
affs1, affs0, linux-swap, linux-swap(new), linux-swap(old)
'mkpart' makes a partition without creating a new file system on the
partition. FS-TYPE may be specified to set an appropriate partition
ID.
Specify the disk sector to start the new partition on.
Start? 2048s
The s suffix provides the value in sectors, or uses the MiB, GiB, TiB, MB, GB, or TB suffixes. The
parted command defaults to the MB suffix. The parted command rounds provided values to
satisfy disk constraints.
When the parted command starts, it retrieves the disk topology from the device, such as the
disk physical block size. The parted command ensures that the start position that you provide
correctly aligns the partition with the disk structure, to optimize performance. If the start position
RH134-RHEL9.0-en-2-20220609 137](https://image.slidesharecdn.com/redhatenterpriselinux9-240713030337-3ff2819f/85/Red-Hat-Enterprise-Linux-Administration-9-0-RH134-pdf-155-320.jpg)
![Chapter 5 | Manage Basic Storage
results in a misaligned partition, then the parted command displays a warning. With most disks, a
start sector that is a multiple of 2048 is safe.
Specify the disk sector where the new partition should end, and exit parted. You can specify the
end as a size or as an ending location.
End? 1000MB
(parted) quit
Information: You may need to update /etc/fstab.
[root@host ~]#
When you provide the end position, the parted command updates the partition table on the disk
with the new partition details.
Run the udevadm settle command. This command waits for the system to detect the new
partition and to create the associated device file under the /dev directory. The prompt returns
when the task is done.
[root@host ~]# udevadm settle
As an alternative to interactive mode, you can create a partition in a single command:
[root@host ~]# parted /dev/vdb mkpart primary xfs 2048s 1000MB
Create GPT Partitions
The GPT scheme also uses the parted command to create partitions. Specify the disk device to
create the partition on.
As the root user, execute the parted command and specify the disk device name as an
argument.
[root@host ~]# parted /dev/vdb
GNU Parted 3.4
Using /dev/vdb
Welcome to GNU Parted! Type 'help' to view a list of commands.
(parted)
Use the mkpart subcommand to begin creating the partition. With the GPT scheme, each
partition is given a name.
(parted) mkpart
Partition name? []? userdata
Indicate the file-system type that you want to create on the partition, such as xfs or ext4. This
value does not create the file system, but is a useful partition type label.
File system type? [ext2]? xfs
Specify the disk sector that the new partition starts on.
138 RH134-RHEL9.0-en-2-20220609](https://image.slidesharecdn.com/redhatenterpriselinux9-240713030337-3ff2819f/85/Red-Hat-Enterprise-Linux-Administration-9-0-RH134-pdf-156-320.jpg)
![Chapter 5 | Manage Basic Storage
Start? 2048s
Specify the disk sector where the new partition should end, and exit parted. When you provide
the end position, the parted command updates the GPT on the disk with the new partition
details.
End? 1000MB
(parted) quit
Information: You may need to update /etc/fstab.
[root@host ~]#
Run the udevadm settle command. This command waits for the system to detect the new
partition and to create the associated device file under the /dev directory. The prompt returns
when the task is done.
[root@host ~]# udevadm settle
As an alternative to interactive mode, you can create a partition in a single command:
[root@host ~]# parted /dev/vdb mkpart userdata xfs 2048s 1000MB
Delete Partitions
The following instructions apply for both the MBR and GPT partitioning schemes. Specify the disk
that contains the partition to remove.
Run the parted command with the disk device as the only argument.
[root@host ~]# parted /dev/vdb
GNU Parted 3.4
Using /dev/vdb
Welcome to GNU Parted! Type 'help' to view a list of commands.
(parted)
Identify the partition number of the partition to delete.
(parted) print
Model: Virtio Block Device (virtblk)
Disk /dev/vdb: 5369MB
Sector size (logical/physical): 512B/512B
Partition Table: gpt
Disk Flags:
Number Start End Size File system Name Flags
1 1049kB 1000MB 999MB xfs usersdata
Delete the partition, and exit parted. The rm subcommand immediately deletes the partition
from the partition table on the disk.
RH134-RHEL9.0-en-2-20220609 139](https://image.slidesharecdn.com/redhatenterpriselinux9-240713030337-3ff2819f/85/Red-Hat-Enterprise-Linux-Administration-9-0-RH134-pdf-157-320.jpg)
![Chapter 5 | Manage Basic Storage
(parted) rm 1
(parted) quit
Information: You may need to update /etc/fstab.
[root@host ~]#
As an alternative to interactive mode, you can delete a partition in a single command:
[root@host ~]# parted /dev/vdb rm 1
Create File Systems
After a block device is created, the next step is to add a file system to it. Red Hat Enterprise Linux
supports multiple file-system types, and XFS is the recommended default.
As the root user, use the mkfs.xfs command to apply an XFS file system to a block device. For
an ext4 file system, use the mkfs.ext4 command.
[root@host ~]# mkfs.xfs /dev/vdb1
meta-data=/dev/vdb1 isize=512 agcount=4, agsize=60992 blks
= sectsz=512 attr=2, projid32bit=1
= crc=1 finobt=1, sparse=1, rmapbt=0
= reflink=1 bigtime=1 inobtcount=1
data = bsize=4096 blocks=243968, imaxpct=25
= sunit=0 swidth=0 blks
naming =version 2 bsize=4096 ascii-ci=0, ftype=1
log =internal log bsize=4096 blocks=1566, version=2
= sectsz=512 sunit=0 blks, lazy-count=1
realtime =none extsz=4096 blocks=0, rtextents=0
Mount File Systems
After you add the file system, the last step is to mount the file system to a directory in the
directory structure. When you mount a file system onto the directory hierarchy, user-space utilities
can access or write files on the device.
Manually Mount File Systems
Use the mount command to manually attach a device to a mount point directory location. The
mount command requires a device and mount point, and can include file-system mount options.
File-system options customize the behavior of the file system.
[root@host ~]# mount /dev/vdb1 /mnt
You also use the mount command to view currently mounted file systems, the mount points, and
their options.
[root@host ~]# mount | grep vdb1
/dev/vdb1 on /mnt type xfs (rw,relatime,seclabel,attr2,inode64,noquota)
140 RH134-RHEL9.0-en-2-20220609](https://image.slidesharecdn.com/redhatenterpriselinux9-240713030337-3ff2819f/85/Red-Hat-Enterprise-Linux-Administration-9-0-RH134-pdf-158-320.jpg)
![Chapter 5 | Manage Basic Storage
Persistently Mount File Systems
Manually mounting a file system is a good way to verify that a formatted device is accessible and
working as expected. However, when the server reboots, the system does not automatically mount
the file system again.
To configure the system to automatically mount the file system during system boot, add an entry
to the /etc/fstab file. This configuration file lists the file systems to mount at system boot.
The /etc/fstab file is a white-space-delimited file with six fields per line.
[root@host ~]# cat /etc/fstab
#
# /etc/fstab
# Created by anaconda on Thu Apr 5 12:05:19 2022
#
# Accessible filesystems, by reference, are maintained under '/dev/disk/'.
# See man pages fstab(5), findfs(8), mount(8) and/or blkid(8) for more info.
#
# After editing this file, run 'systemctl daemon-reload' to update systemd
# units generated from this file.
#
UUID=a8063676-44dd-409a-b584-68be2c9f5570 / xfs defaults 0 0
UUID=7a20315d-ed8b-4e75-a5b6-24ff9e1f9838 /dbdata xfs defaults 0 0
The first field specifies the device. This example uses a UUID to specify the device. File systems
create and store the UUID in the partition super block at creation time. Alternatively, you could use
the device file, such as /dev/vdb1.
The second field is the directory mount point, from which the block device is accessible in the
directory structure. The mount point must exist; if not, create it with the mkdir command.
The third field contains the file-system type, such as xfs or ext4.
The fourth field is the comma-separated list of options to apply to the device. defaults is a set
of commonly used options. The mount(8) man page documents the other available options.
The fifth field is used by the dump command to back up the device. Other backup applications do
not usually use this field.
The last field, the fsck order field, determines whether the fsck command should be run at
system boot to verify that the file systems are clean. The value in this field indicates the order in
which fsck should run. For XFS file systems, set this field to 0, because XFS does not use fsck to
check its file-system status. For ext4 file systems, set it to 1 for the root file system, and 2 for the
other ext4 file systems. By using this notation, the fsck utility processes the root file system first
and then checks file systems on separate disks concurrently, and file systems on the same disk in
sequence.
RH134-RHEL9.0-en-2-20220609 141](https://image.slidesharecdn.com/redhatenterpriselinux9-240713030337-3ff2819f/85/Red-Hat-Enterprise-Linux-Administration-9-0-RH134-pdf-159-320.jpg)
![Chapter 5 | Manage Basic Storage
Note
An incorrect entry in /etc/fstab might render the machine non-bootable. Verify
that an entry is valid by manually unmounting the new file system and then by using
mount /mountpoint to read the /etc/fstab file, and remount the file system
with that entry's mount options. If the mount command returns an error, then
correct it before rebooting the machine.
Alternatively, use the findmnt --verify command to parse the /etc/fstab file
for partition usability.
When you add or remove an entry in the /etc/fstab file, run the systemctl daemon-reload
command, or reboot the server, to ensure that the systemd daemon loads and uses the new
configuration.
[root@host ~]# systemctl daemon-reload
Red Hat recommends the use of UUIDs to persistently mount file systems, because block device
names can change in certain scenarios, such as if a cloud provider changes the underlying storage
layer of a virtual machine, or if disks are detected in a different order on a system boot. The block
device file name might change, but the UUID remains constant in the file-system's super block.
Use the lsblk --fs command to scan the block devices that are connected to a machine and
retrieve the file-system UUIDs.
[root@host ~]# lsblk --fs
NAME FSTYPE FSVER LABEL UUID FSAVAIL FSUSE% MOUNTPOINTS
vda
├─vda1
├─vda2 xfs boot 49dd...75fdf 312M 37% /boot
└─vda3 xfs root 8a90...ce0da 4.8G 48% /
References
info parted (GNU Parted User Manual)
parted(8), mkfs(8), mount(8), lsblk(8), and fstab(5) man pages
For more information, refer to the Configuring and Managing File Systems guide at
https://access.redhat.com/documentation/en-us/red_hat_enterprise_linux/9/html-
single/managing_file_systems/index
142 RH134-RHEL9.0-en-2-20220609](https://image.slidesharecdn.com/redhatenterpriselinux9-240713030337-3ff2819f/85/Red-Hat-Enterprise-Linux-Administration-9-0-RH134-pdf-160-320.jpg)
![Chapter 5 | Manage Basic Storage
Guided Exercise
Add Partitions, File Systems, and
Persistent Mounts
In this exercise, you create a partition on a new storage device, format it with an XFS file
system, configure it to mount at boot, and mount it for use.
Outcomes
• Use the parted, mkfs.xfs, and other commands to create a partition on a new disk,
format it, and persistently mount it.
Before You Begin
As the student user on the workstation machine, use the lab command to prepare your
system for this exercise.
This command prepares your environment and ensures that all required resources are
available.
[student@workstation ~]$ lab start storage-partitions
Instructions
1. Log in to servera as the student user and switch to the root user.
student@workstation ~]$ ssh student@servera
...output omitted...
[student@servera ~]$ sudo -i
[sudo] password for student: student
[root@servera ~]#
2. Create an msdos disk label on the /dev/vdb device.
[root@servera ~]# parted /dev/vdb mklabel msdos
Information: You may need to update /etc/fstab.
3. Add a 1 GB primary partition. For proper alignment, start the partition at the sector 2048.
Set the partition file-system type to XFS.
3.1. Use parted interactive mode to create the partition.
[root@servera ~]# parted /dev/vdb
GNU Parted 3.4
Using /dev/vdb
Welcome to GNU Parted! Type 'help' to view a list of commands.
(parted) mkpart
RH134-RHEL9.0-en-2-20220609 143](https://image.slidesharecdn.com/redhatenterpriselinux9-240713030337-3ff2819f/85/Red-Hat-Enterprise-Linux-Administration-9-0-RH134-pdf-161-320.jpg)
![Chapter 5 | Manage Basic Storage
Partition type? primary/extended? primary
File system type? [ext2]? xfs
Start? 2048s
End? 1001MB
(parted) quit
Information: You may need to update /etc/fstab.
Because the partition starts at the sector 2048, the previous command sets the end
position to 1001 MB to get a partition size of 1000 MB (1 GB).
Alternatively, you can perform the same operation with the following non-interactive
command: parted /dev/vdb mkpart primary xfs 2048s 1001 MB
3.2. Verify your work by listing the partitions on the /dev/vdb device.
[root@servera ~]# parted /dev/vdb print
Model: Virtio Block Device (virtblk)
Disk /dev/vdb: 5369MB
Sector size (logical/physical): 512B/512B
Partition Table: msdos
Disk Flags:
Number Start End Size Type File system Flags
1 1049kB 1001MB 1000MB primary
3.3. Run the udevadm settle command. This command waits for the system to register
the new partition and returns when it is done.
[root@servera ~]# udevadm settle
4. Format the new partition with the XFS file system.
[root@servera ~]# mkfs.xfs /dev/vdb1
meta-data=/dev/vdb1 isize=512 agcount=4, agsize=61056 blks
= sectsz=512 attr=2, projid32bit=1
= crc=1 finobt=1, sparse=1, rmapbt=0
= reflink=1 bigtime=1 inobtcount=1
data = bsize=4096 blocks=244224, imaxpct=25
= sunit=0 swidth=0 blks
naming =version 2 bsize=4096 ascii-ci=0, ftype=1
log =internal log bsize=4096 blocks=1566, version=2
= sectsz=512 sunit=0 blks, lazy-count=1
realtime =none extsz=4096 blocks=0, rtextents=0
5. Configure the new file system to mount onto the /archive directory persistently.
5.1. Create the /archive directory.
[root@servera ~]# mkdir /archive
5.2. Discover the UUID of the /dev/vdb1 device. The UUID in the output is probably
different on your system.
144 RH134-RHEL9.0-en-2-20220609](https://image.slidesharecdn.com/redhatenterpriselinux9-240713030337-3ff2819f/85/Red-Hat-Enterprise-Linux-Administration-9-0-RH134-pdf-162-320.jpg)
![Chapter 5 | Manage Basic Storage
[root@servera ~]# lsblk --fs /dev/vdb
NAME FSTYPE FSVER LABEL UUID FSAVAIL FSUSE%
MOUNTPOINTS
vdb
└─vdb1 xfs 881e856c-37b1-41e3-b009-ad526e46d987
5.3. Add an entry to the /etc/fstab file. Replace the UUID with the one that you
discovered from the previous step.
...output omitted...
UUID=881e856c-37b1-41e3-b009-ad526e46d987 /archive xfs defaults 0 0
5.4. Update the systemd daemon for the system to register the new /etc/fstab file
configuration.
[root@servera ~]# systemctl daemon-reload
5.5. Mount the new file system with the new entry in the /etc/fstab file.
[root@servera ~]# mount /archive
5.6. Verify that the new file system is mounted onto the /archive directory.
[root@servera ~]# mount | grep /archive
/dev/vdb1 on /archive type xfs
(rw,relatime,seclabel,attr2,inode64,logbufs=8,logbsize=32k,noquota)
6. Reboot servera. After the server rebooted, log in and verify that the /dev/vdb1 device is
mounted on the /archive directory. When done, log out from servera.
6.1. Reboot servera.
[root@servera ~]# systemctl reboot
Connection to servera closed by remote host.
Connection to servera closed.
[student@workstation ~]$
6.2. Wait for servera to reboot and log in as the student user.
[student@workstation ~]$ ssh student@servera
...output omitted...
[student@servera ~]$
6.3. Verify that the /dev/vdb1 device is mounted on the /archive directory.
[student@servera ~]$ mount | grep /archive
/dev/vdb1 on /archive type xfs
(rw,relatime,seclabel,attr2,inode64,logbufs=8,logbsize=32k,noquota)
RH134-RHEL9.0-en-2-20220609 145](https://image.slidesharecdn.com/redhatenterpriselinux9-240713030337-3ff2819f/85/Red-Hat-Enterprise-Linux-Administration-9-0-RH134-pdf-163-320.jpg)
![Chapter 5 | Manage Basic Storage
6.4. Return to the workstation machine as the student user.
[student@servera ~]$ exit
logout
Connection to servera closed.
[student@workstation ~]$
Finish
On the workstation machine, change to the student user home directory and use the lab
command to complete this exercise. This step is important to ensure that resources from previous
exercises do not impact upcoming exercises.
[student@workstation ~]$ lab finish storage-partitions
This concludes the section.
146 RH134-RHEL9.0-en-2-20220609](https://image.slidesharecdn.com/redhatenterpriselinux9-240713030337-3ff2819f/85/Red-Hat-Enterprise-Linux-Administration-9-0-RH134-pdf-164-320.jpg)
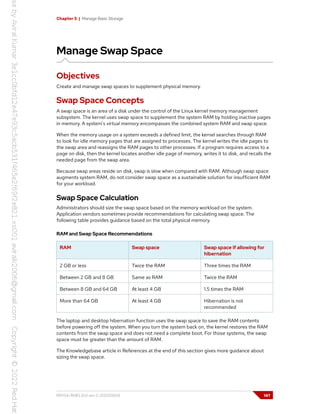
![Chapter 5 | Manage Basic Storage
Create Swap Space
To create a swap space, you need to perform the following steps:
• Create a partition with a file-system type of linux-swap.
• Place a swap signature on the device.
Create a Swap Partition
Use the parted command to create a partition of the appropriate size and set its file-system
type to linux-swap. In the past, tools determined from the partition file-system type whether
to activate the device; however, that requirement is no longer the case. Even though utilities no
longer use the partition file-system type, administrators can quickly determine the partition's
purpose from that type.
The following example creates a 256 MB partition.
[root@host ~]# parted /dev/vdb
GNU Parted 3.4
Using /dev/vdb
Welcome to GNU Parted! Type 'help' to view a list of commands.
(parted) print
Model: Virtio Block Device (virtblk)
Disk /dev/vdb: 5369MB
Sector size (logical/physical): 512B/512B
Partition Table: gpt
Disk Flags:
Number Start End Size File system Name Flags
1 1049kB 1001MB 1000MB data
(parted) mkpart
Partition name? []? swap1
File system type? [ext2]? linux-swap
Start? 1001MB
End? 1257MB
(parted) print
Model: Virtio Block Device (virtblk)
Disk /dev/vdb: 5369MB
Sector size (logical/physical): 512B/512B
Partition Table: gpt
Disk Flags:
Number Start End Size File system Name Flags
1 1049kB 1001MB 1000MB data
2 1001MB 1257MB 256MB linux-swap(v1) swap1
(parted) quit
Information: You may need to update /etc/fstab.
[root@host ~]#
After creating the partition, run the udevadm settle command. This command waits for the
system to detect the new partition and to create the associated device file in the /dev directory.
The command returns only when it is finished.
148 RH134-RHEL9.0-en-2-20220609](https://image.slidesharecdn.com/redhatenterpriselinux9-240713030337-3ff2819f/85/Red-Hat-Enterprise-Linux-Administration-9-0-RH134-pdf-166-320.jpg)
![Chapter 5 | Manage Basic Storage
[root@host ~]# udevadm settle
Format Swap Space
The mkswap command applies a swap signature to the device. Unlike other formatting utilities, the
mkswap command writes a single block of data at the beginning of the device, leaving the rest of
the device unformatted so that the kernel can use it for storing memory pages.
[root@host ~]# mkswap /dev/vdb2
Setting up swapspace version 1, size = 244 MiB (255848448 bytes)
no label, UUID=39e2667a-9458-42fe-9665-c5c854605881
Activate Swap Space
You can use the swapon command to activate a formatted swap space.
Use swapon with the device as a parameter, or use swapon -a to activate all the listed swap
spaces in the /etc/fstab file. Use the swapon --show and free commands to inspect the
available swap spaces.
[root@host ~]# free
total used free shared buff/cache available
Mem: 1873036 134688 1536436 16748 201912 1576044
Swap: 0 0 0
[root@host ~]# swapon /dev/vdb2
[root@host ~]# free
total used free shared buff/cache available
Mem: 1873036 135044 1536040 16748 201952 1575680
Swap: 249852 0 249852
You can deactivate a swap space with the swapoff command. If pages are written to the swap
space, then the swapoff command tries to move those pages to other active swap spaces or
back into memory. If the swapoff command cannot write data to other places, then it fails with an
error, and the swap space stays active.
Activate Swap Space Persistently
Create an entry in the /etc/fstab file to ensure an active swap space at system boot. The
following example shows a typical line in the /etc/fstab file based on the previously created
swap space.
UUID=39e2667a-9458-42fe-9665-c5c854605881 swap swap defaults 0 0
The example uses the UUID as the first field. When you format the device, the mkswap command
displays that UUID. If you lost the output of mkswap, then use the lsblk --fs command. As an
alternative, you can use the device name in the first field.
The second field is typically reserved for the mount point. However, for swap devices, which
are not accessible through the directory structure, this field takes the swap placeholder value.
The fstab(5) man page uses a none placeholder value; however, a swap value gives more
informative error messages if something goes wrong.
RH134-RHEL9.0-en-2-20220609 149](https://image.slidesharecdn.com/redhatenterpriselinux9-240713030337-3ff2819f/85/Red-Hat-Enterprise-Linux-Administration-9-0-RH134-pdf-167-320.jpg)
![Chapter 5 | Manage Basic Storage
The third field is the file-system type. The file-system type for swap space is swap.
The fourth field is for options. The example uses the defaults option. The defaults option
includes the auto mount option, which activates the swap space automatically at system boot.
The final two fields are the dump flag and fsck order. Swap spaces do not require backing up or
file-system checking, and so these fields should be set to zero.
When you add or remove an entry in the /etc/fstab file, run the systemctl daemon-reload
command, or reboot the server, for systemd to register the new configuration.
[root@host ~]# systemctl daemon-reload
Set Swap Space Priority
By default, the system uses swap spaces in series, meaning that the kernel uses the first activated
swap space until it is full, and then it starts using the second swap space. You can instead define a
priority for each swap space to force a particular order.
To set the priority, use the pri option in the /etc/fstab file. The kernel uses the swap space
with the highest priority first. The default priority is -2.
The following example shows three defined swap spaces in the /etc/fstab file. The kernel uses
the last entry first, because its priority is set to 10. When that space is full, it uses the second entry,
because its priority is set to 4. Finally, it uses the first entry, which has a default priority of -2.
UUID=af30cbb0-3866-466a-825a-58889a49ef33 swap swap defaults 0 0
UUID=39e2667a-9458-42fe-9665-c5c854605881 swap swap pri=4 0 0
UUID=fbd7fa60-b781-44a8-961b-37ac3ef572bf swap swap pri=10 0 0
Use the swapon --show command to display the swap space priorities.
When swap spaces have the same priority, the kernel writes to them in a round-robin fashion.
References
mkswap(8), swapon(8), swapoff(8), mount(8), and parted(8) man pages
Knowledgebase: What Is the Recommended Swap Size for Red Hat Platforms?
https://access.redhat.com/solutions/15244
150 RH134-RHEL9.0-en-2-20220609](https://image.slidesharecdn.com/redhatenterpriselinux9-240713030337-3ff2819f/85/Red-Hat-Enterprise-Linux-Administration-9-0-RH134-pdf-168-320.jpg)
![Chapter 5 | Manage Basic Storage
Guided Exercise
Manage Swap Space
In this exercise, you create and format a partition for use as swap space, format it as swap,
and activate it persistently.
Outcomes
• Create a partition and a swap space on a disk by using the GPT partitioning scheme.
Before You Begin
As the student user on the workstation machine, use the lab command to prepare your
system for this exercise.
This command prepares your environment and ensures that all required resources are
available.
[student@workstation ~]$ lab start storage-swap
Instructions
1. Log in to servera as the student user and switch to the root user.
[student@workstation ~]$ ssh student@servera
...output omitted...
[student@servera ~]$ sudo -i
[sudo] password for student: student
[root@servera ~]#
2. Inspect the /dev/vdb disk. The disk already has a partition table and uses the GPT
partitioning scheme. Also, it has an existing 1 GB partition.
[root@servera ~]# parted /dev/vdb print
Model: Virtio Block Device (virtblk)
Disk /dev/vdb: 5369MB
Sector size (logical/physical): 512B/512B
Partition Table: gpt
Disk Flags:
Number Start End Size File system Name Flags
1 1049kB 1001MB 1000MB data
3. Add a new partition of 500 MB for use as swap space. Set the partition type to
linux-swap.
3.1. Create the myswap partition. Because the disk uses the GPT partitioning scheme,
you must give a name to the partition. Notice that the start position, 1001 MB,
is the end of the existing first partition. The parted command ensures that the
RH134-RHEL9.0-en-2-20220609 151](https://image.slidesharecdn.com/redhatenterpriselinux9-240713030337-3ff2819f/85/Red-Hat-Enterprise-Linux-Administration-9-0-RH134-pdf-169-320.jpg)
![Chapter 5 | Manage Basic Storage
new partition immediately follows the previous one, without any gap. Because the
partition starts at the 1001 MB position, the command sets the end position to
1501 MB to get a partition size of 500 MB.
[root@servera ~]# parted /dev/vdb mkpart myswap linux-swap
1001MB 1501MB
Information: You may need to update /etc/fstab.
3.2. Verify your work by listing the partitions on the /dev/vdb disk. The size of the
new partition is not exactly 500 MB. The difference in size is because the parted
command must align the partition with the disk layout.
[root@servera ~]# parted /dev/vdb print
Model: Virtio Block Device (virtblk)
Disk /dev/vdb: 5369MB
Sector size (logical/physical): 512B/512B
Partition Table: gpt
Disk Flags:
Number Start End Size File system Name Flags
1 1049kB 1001MB 1000MB data
2 1001MB 1501MB 499MB myswap swap
3.3. Run the udevadm settle command. This command waits for the system to register
the new partition and returns when it is done.
[root@servera ~]# udevadm settle
4. Initialize the new partition as swap space.
[root@servera ~]# mkswap /dev/vdb2
Setting up swapspace version 1, size = 476 MiB (499118080 bytes)
no label, UUID=cb7f71ca-ee82-430e-ad4b-7dda12632328
5. Enable the new swap space.
5.1. Verify that creating and initializing the swap space does not yet enable it for use.
[root@servera ~]# swapon --show
5.2. Enable the new swap space.
[root@servera ~]# swapon /dev/vdb2
5.3. Verify that the new swap space is now available.
[root@servera ~]# swapon --show
NAME TYPE SIZE USED PRIO
/dev/vdb2 partition 476M 0B -2
5.4. Disable the swap space.
152 RH134-RHEL9.0-en-2-20220609](https://image.slidesharecdn.com/redhatenterpriselinux9-240713030337-3ff2819f/85/Red-Hat-Enterprise-Linux-Administration-9-0-RH134-pdf-170-320.jpg)
![Chapter 5 | Manage Basic Storage
[root@servera ~]# swapoff /dev/vdb2
5.5. Confirm that the swap space is disabled.
[root@servera ~]# swapon --show
6. Enable the new swap space at system boot.
6.1. Use the lsblk command with the --fs option to discover the UUID of the
/dev/vdb2 device. The UUID in the output will be different on your system.
[root@servera ~]# lsblk --fs /dev/vdb2
NAME FSTYPE FSVER LABEL UUID FSAVAIL FSUSE%
MOUNTPOINTS
vdb2 swap 1 762735cb-a52a-4345-9ed0-e3a68aa8bb97
6.2. Add an entry to the /etc/fstab file. In the following command, replace the UUID
with the one that you discovered from the previous step.
...output omitted...
UUID=762735cb-a52a-4345-9ed0-e3a68aa8bb97 swap swap defaults 0 0
6.3. Update the systemd daemon for the system to register the new /etc/fstab file
configuration.
[root@servera ~]# systemctl daemon-reload
6.4. Enable the swap space by using the entry in the /etc/fstab file.
[root@servera ~]# swapon -a
6.5. Verify that the new swap space is enabled.
[root@servera ~]# swapon --show
NAME TYPE SIZE USED PRIO
/dev/vdb2 partition 476M 0B -2
7. Reboot the servera machine. After the server reboots, log in and verify that the swap
space is enabled. When done, log out from servera.
7.1. Reboot the servera machine.
[root@servera ~]# systemctl reboot
Connection to servera closed by remote host.
Connection to servera closed.
[student@workstation ~]$
7.2. Wait for servera to reboot and log in as the student user.
RH134-RHEL9.0-en-2-20220609 153](https://image.slidesharecdn.com/redhatenterpriselinux9-240713030337-3ff2819f/85/Red-Hat-Enterprise-Linux-Administration-9-0-RH134-pdf-171-320.jpg)
![Chapter 5 | Manage Basic Storage
[student@workstation ~]$ ssh student@servera
...output omitted...
[student@servera ~]$
7.3. Verify that the swap space is enabled.
[student@servera ~]# swapon --show
NAME TYPE SIZE USED PRIO
/dev/vdb2 partition 476M 0B -2
7.4. Return to the workstation machine as the student user.
[student@servera ~]$ exit
logout
Connection to servera closed.
[student@workstation ~]$
Finish
On the workstation machine, change to the student user home directory and use the lab
command to complete this exercise. This step is important to ensure that resources from previous
exercises do not impact upcoming exercises.
[student@workstation ~]$ lab finish storage-swap
This concludes the section.
154 RH134-RHEL9.0-en-2-20220609](https://image.slidesharecdn.com/redhatenterpriselinux9-240713030337-3ff2819f/85/Red-Hat-Enterprise-Linux-Administration-9-0-RH134-pdf-172-320.jpg)
![Chapter 5 | Manage Basic Storage
Lab
Manage Basic Storage
In this lab, you create several partitions on a new disk, formatting some with file systems and
mounting them, and activating others as swap spaces.
Outcomes
• Display and create partitions with the parted command.
• Create file systems on partitions and persistently mount them.
• Create swap spaces and activate them at boot.
Before You Begin
As the student user on the workstation machine, use the lab command to prepare your
system for this exercise.
This command prepares your environment and ensures that all required resources are
available.
[student@workstation ~]$ lab start storage-review
Instructions
1. The serverb machine has several unused disks. On the first unused disk, create a 2 GB GPT
backup partition. Because it is difficult to set an exact size, a size between 1.8 GB and 2.2 GB
is acceptable. Configure the backup partition to host an XFS file system.
2. Format the 2 GB backup partition with an XFS file system and persistently mount it to the
/backup directory.
3. On the same disk, create two 512 MB GPT partitions called swap1 and swap2. A size
between 460 MB and 564 MB is acceptable. Configure the file-system types of the
partitions to host swap spaces.
4. Initialize the two 512 MiB partitions as swap spaces and configure them to activate at boot.
Set the swap space on the swap2 partition to be preferred over the other.
5. To verify your work, reboot the serverb machine. Confirm that the system automatically
mounts the first partition onto the /backup directory. Also, confirm that the system
activates the two swap spaces.
Evaluation
As the student user on the workstation machine, use the lab command to grade your work.
Correct any reported failures and rerun the command until successful.
[student@workstation ~]$ lab grade storage-review
RH134-RHEL9.0-en-2-20220609 155](https://image.slidesharecdn.com/redhatenterpriselinux9-240713030337-3ff2819f/85/Red-Hat-Enterprise-Linux-Administration-9-0-RH134-pdf-173-320.jpg)
![Chapter 5 | Manage Basic Storage
Finish
On the workstation machine, change to the student user home directory and use the lab
command to complete this exercise. This step is important to ensure that resources from previous
exercises do not impact upcoming exercises.
[student@workstation ~]$ lab finish storage-review
This concludes the section.
156 RH134-RHEL9.0-en-2-20220609](https://image.slidesharecdn.com/redhatenterpriselinux9-240713030337-3ff2819f/85/Red-Hat-Enterprise-Linux-Administration-9-0-RH134-pdf-174-320.jpg)
![Chapter 5 | Manage Basic Storage
Solution
Manage Basic Storage
In this lab, you create several partitions on a new disk, formatting some with file systems and
mounting them, and activating others as swap spaces.
Outcomes
• Display and create partitions with the parted command.
• Create file systems on partitions and persistently mount them.
• Create swap spaces and activate them at boot.
Before You Begin
As the student user on the workstation machine, use the lab command to prepare your
system for this exercise.
This command prepares your environment and ensures that all required resources are
available.
[student@workstation ~]$ lab start storage-review
Instructions
1. The serverb machine has several unused disks. On the first unused disk, create a 2 GB GPT
backup partition. Because it is difficult to set an exact size, a size between 1.8 GB and 2.2 GB
is acceptable. Configure the backup partition to host an XFS file system.
1.1. Log in to serverb as the student user and switch to the root user.
[student@workstation ~]$ ssh student@serverb
...output omitted...
[student@serverb ~]$ sudo -i
[sudo] password for student: student
[root@serverb ~]#
1.2. Identify the unused disks. The first unused disk, /dev/vdb, does not have any
partitions.
[root@serverb ~]# lsblk
NAME MAJ:MIN RM SIZE RO TYPE MOUNTPOINTS
vda 252:0 0 10G 0 disk
├─vda1 252:1 0 1M 0 part
├─vda2 252:2 0 200M 0 part /boot/efi
├─vda3 252:3 0 500M 0 part /boot
└─vda4 252:4 0 9.3G 0 part /
vdb 252:16 0 5G 0 disk
vdc 252:32 0 5G 0 disk
vdd 252:48 0 5G 0 disk
RH134-RHEL9.0-en-2-20220609 157](https://image.slidesharecdn.com/redhatenterpriselinux9-240713030337-3ff2819f/85/Red-Hat-Enterprise-Linux-Administration-9-0-RH134-pdf-175-320.jpg)
![Chapter 5 | Manage Basic Storage
1.3. Confirm that the /dev/vdb disk has no label.
[root@serverb ~]# parted /dev/vdb print
Error: /dev/vdb: unrecognised disk label
Model: Virtio Block Device (virtblk)
Disk /dev/vdb: 5369MB
Sector size (logical/physical): 512B/512B
Partition Table: unknown
Disk Flags:
1.4. Define the GPT partitioning scheme.
[root@serverb ~]# parted /dev/vdb mklabel gpt
Information: You may need to update /etc/fstab.
1.5. Create the 2 GB backup partition with an xfs file-system type. Start the partition at
sector 2048.
[root@serverb ~]# parted /dev/vdb mkpart backup xfs 2048s 2GB
Information: You may need to update /etc/fstab.
1.6. Confirm the creation of the backup partition.
[root@serverb ~]# parted /dev/vdb print
Model: Virtio Block Device (virtblk)
Disk /dev/vdb: 5369MB
Sector size (logical/physical): 512B/512B
Partition Table: gpt
Disk Flags:
Number Start End Size File system Name Flags
1 1049kB 2000MB 1999MB backup
1.7. Run the udevadm settle command. This command waits for the system to detect
the new partition and to create the /dev/vdb1 device file.
[root@serverb ~]# udevadm settle
2. Format the 2 GB backup partition with an XFS file system and persistently mount it to the
/backup directory.
2.1. Format the /dev/vbd1 partition.
[root@serverb ~]# mkfs.xfs /dev/vdb1
meta-data=/dev/vdb1 isize=512 agcount=4, agsize=121984 blks
= sectsz=512 attr=2, projid32bit=1
= crc=1 finobt=1, sparse=1, rmapbt=0
= reflink=1 bigtime=1 inobtcount=1
data = bsize=4096 blocks=487936, imaxpct=25
= sunit=0 swidth=0 blks
naming =version 2 bsize=4096 ascii-ci=0, ftype=1
158 RH134-RHEL9.0-en-2-20220609](https://image.slidesharecdn.com/redhatenterpriselinux9-240713030337-3ff2819f/85/Red-Hat-Enterprise-Linux-Administration-9-0-RH134-pdf-176-320.jpg)
![Chapter 5 | Manage Basic Storage
log =internal log bsize=4096 blocks=2560, version=2
= sectsz=512 sunit=0 blks, lazy-count=1
realtime =none extsz=4096 blocks=0, rtextents=0
2.2. Create the /backup mount point.
[root@serverb ~]# mkdir /backup
2.3. Before adding the new file system to the /etc/fstab file, retrieve its UUID. The UUID
on your system might be different.
[root@serverb ~]# lsblk --fs /dev/vdb1
NAME FSTYPE FSVER LABEL UUID FSAVAIL FSUSE%
MOUNTPOINTS
vdb1 xfs f74ed805-b1fc-401a-a5ee-140f97c6757d
2.4. Edit the /etc/fstab file and define the new file system.
[root@serverb ~]# vim /etc/fstab
...output omitted...
UUID=f74ed805-b1fc-401a-a5ee-140f97c6757d /backup xfs defaults 0 0
2.5. Force the systemd daemon to reread the /etc/fstab file.
[root@serverb ~]# systemctl daemon-reload
2.6. Manually mount the /backup directory to verify your work. Confirm that the mount is
successful.
[root@serverb ~]# mount /backup
[root@serverb ~]# mount | grep /backup
/dev/vdb1 on /backup type xfs
(rw,relatime,seclabel,attr2,inode64,logbufs=8,logbsize=32k,noquota)
3. On the same disk, create two 512 MB GPT partitions called swap1 and swap2. A size
between 460 MB and 564 MB is acceptable. Configure the file-system types of the
partitions to host swap spaces.
3.1. Retrieve the end position of the first partition by displaying the current partition table
on the /dev/vdb disk. In the next step, you use that value as the start of the swap1
partition.
[root@serverb ~]# parted /dev/vdb print
Model: Virtio Block Device (virtblk)
Disk /dev/vdb: 5369MB
Sector size (logical/physical): 512B/512B
Partition Table: gpt
Disk Flags:
Number Start End Size File system Name Flags
1 1049kB 2000MB 1999MB xfs backup
RH134-RHEL9.0-en-2-20220609 159](https://image.slidesharecdn.com/redhatenterpriselinux9-240713030337-3ff2819f/85/Red-Hat-Enterprise-Linux-Administration-9-0-RH134-pdf-177-320.jpg)
![Chapter 5 | Manage Basic Storage
3.2. Create the first 512 MB swap1 partition. Set its type to linux-swap. Use the end
position of the first partition as the starting point. The end position is 2000 MB +
512 MB = 2512 MB
[root@serverb ~]# parted /dev/vdb mkpart swap1 linux-swap 2000M 2512M
Information: You may need to update /etc/fstab.
3.3. Create the second 512 MB swap2 partition. Set its type to linux-swap. Use the end
position of the previous partition as the starting point: 2512M. The end position is
2512 MB + 512 MB = 3024 MB
[root@serverb ~]# parted /dev/vdb mkpart swap2 linux-swap 2512M 3024M
Information: You may need to update /etc/fstab.
3.4. Display the partition table to verify your work.
[root@serverb ~]# parted /dev/vdb print
Model: Virtio Block Device (virtblk)
Disk /dev/vdb: 5369MB
Sector size (logical/physical): 512B/512B
Partition Table: gpt
Disk Flags:
Number Start End Size File system Name Flags
1 1049kB 2000MB 1999MB xfs backup
2 2000MB 2512MB 513MB swap1 swap
3 2512MB 3024MB 512MB swap2 swap
3.5. Run the udevadm settle command. The command waits for the system to register
the new partitions and to create the device files.
[root@serverb ~]# udevadm settle
4. Initialize the two 512 MiB partitions as swap spaces and configure them to activate at boot.
Set the swap space on the swap2 partition to be preferred over the other.
4.1. Use the mkswap command to initialize the swap partitions. Note the UUIDs of the two
swap spaces, because you will use that information in the next step. If you clear the
mkswap output, then use the lsblk --fs command to retrieve the UUIDs.
[root@serverb ~]# mkswap /dev/vdb2
Setting up swapspace version 1, size = 489 MiB (512749568 bytes)
no label, UUID=87976166-4697-47b7-86d1-73a02f0fc803
[root@serverb ~]# mkswap /dev/vdb3
Setting up swapspace version 1, size = 488 MiB (511700992 bytes)
no label, UUID=4d9b847b-98e0-4d4e-9ef7-dfaaf736b942
4.2. Edit the /etc/fstab file and define the new swap spaces. To set the swap space on
the swap2 partition to be preferred over the swap1 partition, give the swap2 partition
a higher priority with the pri option.
160 RH134-RHEL9.0-en-2-20220609](https://image.slidesharecdn.com/redhatenterpriselinux9-240713030337-3ff2819f/85/Red-Hat-Enterprise-Linux-Administration-9-0-RH134-pdf-178-320.jpg)
![Chapter 5 | Manage Basic Storage
[root@serverb ~]# vim /etc/fstab
...output omitted...
UUID=a3665c6b-4bfb-49b6-a528-74e268b058dd /backup xfs defaults 0 0
UUID=87976166-4697-47b7-86d1-73a02f0fc803 swap swap pri=10 0 0
UUID=4d9b847b-98e0-4d4e-9ef7-dfaaf736b942 swap swap pri=20 0 0
4.3. Force the systemd daemon to reread the /etc/fstab file.
[root@serverb ~]# systemctl daemon-reload
4.4. Activate the new swap spaces. Verify the correct activation of the swap spaces.
[root@serverb ~]# swapon -a
[root@serverb ~]# swapon --show
NAME TYPE SIZE USED PRIO
/dev/vdb2 partition 489M 0B 10
/dev/vdb3 partition 488M 0B 20
5. To verify your work, reboot the serverb machine. Confirm that the system automatically
mounts the first partition onto the /backup directory. Also, confirm that the system
activates the two swap spaces.
5.1. Reboot serverb.
[root@serverb ~]# systemctl reboot
Connection to serverb closed by remote host.
Connection to serverb closed.
[student@workstation ~]$
5.2. Wait for serverb to boot and then log in as the student user.
[student@workstation ~]$ ssh student@serverb
...output omitted...
[student@serverb ~]$
5.3. Verify that the system automatically mounts the /dev/vdb1 partition onto the
/backup directory.
[student@serverb ~]$ mount | grep /backup
/dev/vdb1 on /backup type xfs (rw,relatime,seclabel,attr2,inode64,noquota)
5.4. Verify that the system activates both swap spaces.
[student@serverb ~]$ swapon --show
NAME TYPE SIZE USED PRIO
/dev/vdb2 partition 489M 0B 10
/dev/vdb3 partition 488M 0B 20
5.5. Return to the workstation machine as the student user.
RH134-RHEL9.0-en-2-20220609 161](https://image.slidesharecdn.com/redhatenterpriselinux9-240713030337-3ff2819f/85/Red-Hat-Enterprise-Linux-Administration-9-0-RH134-pdf-179-320.jpg)
![Chapter 5 | Manage Basic Storage
[student@serverb ~]$ exit
logout
Connection to serverb closed.
[student@workstation ~]$
Evaluation
As the student user on the workstation machine, use the lab command to grade your work.
Correct any reported failures and rerun the command until successful.
[student@workstation ~]$ lab grade storage-review
Finish
On the workstation machine, change to the student user home directory and use the lab
command to complete this exercise. This step is important to ensure that resources from previous
exercises do not impact upcoming exercises.
[student@workstation ~]$ lab finish storage-review
This concludes the section.
162 RH134-RHEL9.0-en-2-20220609](https://image.slidesharecdn.com/redhatenterpriselinux9-240713030337-3ff2819f/85/Red-Hat-Enterprise-Linux-Administration-9-0-RH134-pdf-180-320.jpg)


![Chapter 6 | Manage Storage Stack
Figure 6.1: Logical Volume Manager workflow
Note
The examples here use a /dev/vdb device name and its storage partitions. The
device names on your classroom system may be different. Use the lsblk, blkid,
or cat /proc/partitions commands to identify your system's devices.
Build LVM Storage
Creating a logical volume involves creating physical device partitions, physical volumes, and
volume groups. After creating an LV, format the volume and mount it to access it as storage.
Prepare Physical Devices
Partitioning is optional when already present. Use the parted command to create a new partition
on the physical device. Set the physical device to the Linux LVM partition type. Use the
udevadm settle command to register the new partition with the kernel.
[root@host ~]# parted /dev/vdb mklabel gpt mkpart primary 1MiB 769MiB
...output omitted...
[root@host ~]# parted /dev/vdb mkpart primary 770MiB 1026MiB
[root@host ~]# parted /dev/vdb set 1 lvm on
[root@host ~]# parted /dev/vdb set 2 lvm on
[root@host ~]# udevadm settle
Create Physical Volumes
Use the pvcreate command to label the physical partition as an LVM physical volume. Label
multiple devices simultaneously by using space-delimited device names as arguments to the
pvcreate command. This example labels the /dev/vdb1 and /dev/vdb2 devices as PVs that
are ready for creating volume groups.
RH134-RHEL9.0-en-2-20220609 167](https://image.slidesharecdn.com/redhatenterpriselinux9-240713030337-3ff2819f/85/Red-Hat-Enterprise-Linux-Administration-9-0-RH134-pdf-185-320.jpg)
![Chapter 6 | Manage Storage Stack
[root@host ~]# pvcreate /dev/vdb1 /dev/vdb2
Physical volume "/dev/vdb1" successfully created.
Physical volume "/dev/vdb2" successfully created.
Creating devices file /etc/lvm/devices/system.devices
Create a Volume Group
The vgcreate command builds one or more physical volumes into a volume group. The first
argument is a volume group name, followed by one or more physical volumes to allocate to this
VG. This example creates the vg01 VG using the /dev/vdb1 and /dev/vdb2 PVs.
[root@host ~]# vgcreate vg01 /dev/vdb1 /dev/vdb2
Volume group "vg01" successfully created
Create a Logical Volume
The lvcreate command creates a new logical volume from the available PEs in a volume group.
Use the lvcreate command to set the LV name and size and the VG name that will contain this
logical volume. This example creates lv01 LV with 700 MiB in size in the vg01 VG.
[root@host ~]# lvcreate -n lv01 -L 300M vg01
Logical volume "lv01" created.
This command might fail if the volume group does not have sufficient free physical extents. The LV
size rounds up to the next value of PE size when the size does not exactly match.
The lvcreate command -L option requires sizes in bytes, mebibytes (binary megabytes,
1048576 bytes), and gibibytes (binary gigabytes), or similar. The lower case -l requires sizes
specified as a number of physical extents. The following commands are two choices for creating
the same LV with the same size:
• lvcreate -n lv01 -L 128M vg01 : create an LV of size 128 MiB, rounded to the next PE.
• lvcreate -n lv01 -l 32 vg01 : create an LV of size 32 PEs at 4 MiB each is 128 MiB.
Create a Logical Volume with Deduplication and Compression
RHEL 9 uses an LVM VDO implementation for managing VDO volumes. The previous
python-based VDO management tools are still available but are no longer needed.
The Virtual Data Optimizer (VDO) provides in-line block-level deduplication, compression, and
thin provisioning for storage. Configure a VDO volume to use up to 256 TB of physical storage.
Manage VDO as a type of LVM logical volume (LVs), similar to LVM thinly provisioned volumes. An
LVM VDO is composed of two logical volumes:
VDO pool LV
This LV stores, deduplicates, and compresses data and sets the size of the VDO volume
backed by the physical device. VDO is deduplicated and compresses each VDO LV separately
because each VDO pool LV can hold only one VDO LV.
VDO LV
A virtual device is provisioned on top of the VDO pool LV and sets the logical size of the VDO
volume storing the data before deduplication and compression occur.
168 RH134-RHEL9.0-en-2-20220609](https://image.slidesharecdn.com/redhatenterpriselinux9-240713030337-3ff2819f/85/Red-Hat-Enterprise-Linux-Administration-9-0-RH134-pdf-186-320.jpg)
![Chapter 6 | Manage Storage Stack
LVM VDO presents the deduplicated storage as a regular logical volume (LV). The VDO volume
can be formatted with a standard file systems, shared as a block device, or used to build other
storage layers, the same as any normal logical volume.
To be able to use VDO deduplication and compression, install the vdo and kmod-kvdo packages.
[root@host ~]# dnf install vdo kmod-kvdo
Verify that the selected LVM volume group has sufficient free storage capacity. Use the
lvcreate command with the --type vdo parameter to create a VDO LV.
[root@host ~]# lvcreate --type vdo --name vdo-lv01 --size 5G vg01
Logical blocks defaulted to 523108 blocks.
The VDO volume can address 2 GB in 1 data slab.
It can grow to address at most 16 TB of physical storage in 8192 slabs.
If a larger maximum size might be needed, use bigger slabs.
Logical volume "vdo-lv01" created.
Create a File System on the Logical Volume
Specify the logical volume by using either the /dev/vgname/lvname traditional name, or the
/dev/mapper/_vgname-lvname_ kernel device mapper name.
Use the mkfs command to create a file system on the new logical volume.
[root@host ~]# mkfs -t xfs /dev/vg01/lv01
...output omitted...
Create a mount point using the mkdir command.
[root@host ~]# mkdir /mnt/data
To make the file system available persistently, add an entry to the /etc/fstab file.
/dev/vg01/lv01 /mnt/data xfs defaults 0 0
Mount the LV by using the mount command.
[root@host ~]# mount /mnt/data/
Note
You can mount a logical volume by name or by UUID because LVM parses the PVs
looking for the UUID. This behavior successful even when the VG was created using
a name, because the PV will always contain a UUID.
RH134-RHEL9.0-en-2-20220609 169](https://image.slidesharecdn.com/redhatenterpriselinux9-240713030337-3ff2819f/85/Red-Hat-Enterprise-Linux-Administration-9-0-RH134-pdf-187-320.jpg)
![Chapter 6 | Manage Storage Stack
Display LVM Component Status
LVM provides various utilities to display the status information of PV, VG, and LV. Use the
pvdisplay, vgdisplay, and lvdisplay commands to show the status information of the LVM
components.
The associated pvs, vgs, and lvs commands are commonly used and show a subset of the status
information, with one line for each entity.
Display Physical Volume Information
The pvdisplay command displays information about the PVs. Use the command without
arguments to list information of all PVs present on the system. Providing the name of the PV as
the argument to the command shows the information specific to the PV.
[root@host ~]# pvdisplay /dev/vdb1
--- Physical volume ---
PV Name /dev/vdb1
VG Name vg01
PV Size 731.98 MiB / not usable 3.98 MiB
Allocatable yes
PE Size 4.00 MiB
Total PE 182
Free PE 107
Allocated PE 75
PV UUID zP0gD9-NxTV-Qtoi-yfQD-TGpL-0Yj0-wExh2N
PV Name shows the device name.
VG Name shows the volume group where the PV is allocated.
PV Size shows the physical size of the PV, including unusable space.
PE Size shows the physical extent size.
Free PE shows the PE size available in the VG to create new LVs or extend existing LVs.
Display Volume Group Information
The vgdisplay command shows the information about volume groups. To list information about
all VGs, use the command without arguments. Provide the name of the VG as an argument to list
information specific to the VG.
[root@host ~]# vgdisplay vg01
--- Volume group ---
VG Name vg01
System ID
Format lvm2
Metadata Areas 2
Metadata Sequence No 2
VG Access read/write
VG Status resizable
MAX LV 0
Cur LV 1
Open LV 1
170 RH134-RHEL9.0-en-2-20220609](https://image.slidesharecdn.com/redhatenterpriselinux9-240713030337-3ff2819f/85/Red-Hat-Enterprise-Linux-Administration-9-0-RH134-pdf-188-320.jpg)
![Chapter 6 | Manage Storage Stack
Max PV 0
Cur PV 2
Act PV 2
VG Size 1012.00 MiB
PE Size 4.00 MiB
Total PE 253
Alloc PE / Size 75 / 300.00 MiB
Free PE / Size 178 / 712.00 MiB
VG UUID jK5M1M-Yvlk-kxU2-bxmS-dNjQ-Bs3L-DRlJNc
VG Name shows the name of the volume group.
VG Size displays the total size of the storage pool available for LV allocation.
Total PE shows the total size of PE units.
Free PE / Size shows the available space in the VG to create new LVs or extend existing
LVs.
Display Logical Volume Information
The lvdisplay command displays information about logical volumes. Use the command without
arguments to list information of all LVs. Providing the name of the LV as an argument displays the
information specific to the LV.
[root@host ~]# lvdisplay /dev/vg01/lv01
--- Logical volume ---
LV Path /dev/vg01/lv01
LV Name lv01
VG Name vg01
LV UUID FVmNel-u25R-dt3p-C5L6-VP2w-QRNP-scqrbq
LV Write Access read/write
LV Creation host, time servera.lab.example.com, 2022-04-07 10:45:34 -0400
LV Status available
# open 1
LV Size 300.00 MiB
Current LE 75
Segments 1
Allocation inherit
Read ahead sectors auto
- currently set to 8192
Block device 253:0
LV Path shows the device name of the LV.
VG Name shows the VG used for creating this LV.
LV Size shows the total size of the LV. Use the file-system tools to determine the free and
used space for the LV.
Current LE shows the number of logical extents used by this LV.
RH134-RHEL9.0-en-2-20220609 171](https://image.slidesharecdn.com/redhatenterpriselinux9-240713030337-3ff2819f/85/Red-Hat-Enterprise-Linux-Administration-9-0-RH134-pdf-189-320.jpg)
![Chapter 6 | Manage Storage Stack
Extend and Reduce LVM Storage
After creating a logical volume, you can extend the volume to expand the file system. You may
require extending PV or VG to increase the storage capacity of the LV.
Extend a Volume Group Size
You might need to add more disk space to extend a VG. You can add additional physical volumes
to a VG to extend its available size.
Prepare the physical device and create the physical volume when not present.
[root@host ~]# parted /dev/vdb mkpart primary 1072MiB 1648MiB
...output omitted...
[root@host ~]# parted /dev/vdb set 3 lvm on
...output omitted...
[root@host ~]# udevadm settle
[root@host ~]# pvcreate /dev/vdb3
Physical volume "/dev/vdb3" successfully created.
The vgextend command adds the new PV to the VG. Provide the VG and PV names as
arguments to the vgextend command.
[root@host ~]# vgextend vg01 /dev/vdb3
Volume group "vg01" successfully extended
This command extends the vg01 VG by the /dev/vdb3 PV size.
Extend a Logical Volume Size
A benefit of using logical volumes is increasing their size without experiencing any downtime. Add
free physical extents to the LV in the VG to extend its capacity to expand the LV's file system. Use
the vgdisplay command to confirm that the volume group has sufficient free space for the LV
extension.
Use the lvextend command to extend the LV.
[root@host ~]# lvextend -L +500M /dev/vg01/lv01
Size of logical volume vg01/lv01 changed from 300.00 MiB (75 extents) to 800.00
MiB (200 extents).
Logical volume vg01/lv01 successfully resized.
This command increases the size of the lv01 logical volume by 500 MiB. The (+) plus sign in front
of the size means you want to add this value to the existing size; otherwise, without the plus sign,
the value defines the final size of the LV.
The lvextend command uses different methods to specify the size. The lvextend command -l
option expects the number of PE as the argument. The lvextend command -L option expects
sizes in bytes, mebibytes, gibibytes, and similar.
172 RH134-RHEL9.0-en-2-20220609](https://image.slidesharecdn.com/redhatenterpriselinux9-240713030337-3ff2819f/85/Red-Hat-Enterprise-Linux-Administration-9-0-RH134-pdf-190-320.jpg)
![Chapter 6 | Manage Storage Stack
Extend an XFS File System to the Logical Volume Size
The xfs_growfs command helps expand the file system to occupy the extended LV. The target
file system must be mounted before you use the xfs_growfs command. You can continue to use
the file system while resizing.
[root@host ~]# xfs_growfs /mnt/data/
...output omitted...
data blocks changed from 76800 to 204800
Important
Always run the xfs_growfs command after executing the lvextend command.
Use the lvextend command -r option to run the two steps consecutively. After
extending the LV, it resizes the file system by using the fsadm command. This
option supports several other file systems.
Extend an EXT4 File System to the Logical Volume Size
The steps for extending LV using the ext4 file system are the same for LV using the XFS file
system, except for the step to resize the file system.
The resize2fs command expands the file system to occupy the new extended LV. You can
continue to use the file system while resizing.
[root@host ~]# resize2fs /dev/vg01/lv01
resize2fs 1.46.5 (30-Dec-2021)
Resizing the filesystem on /dev/vg01/lv01 to 256000 (4k) blocks.
The filesystem on /dev/vg01/lv01 is now 256000 (4k) blocks long.
The primary difference between xfs_growfs and resize2fs is the argument passed to identify
the file system. The xfs_growfs command takes the mount point as an argument, and the
resize2fs command takes the LV name as an argument. The xfs_growfs command only
supports an online resize whereas the resize2fs command supports both online and offline
resizing. You can resize an ext4 file system up or down, but you can only resize an XFS file system
up.
Extend Swap Space Logical Volumes
You can extend the LVs used as swap space; however, the process differs from expanding the
ext4 or XFS file system. Logical volumes used as swap space must be offline to extend them.
Use the swapoff command to deactivate the swap space on the LV.
[root@host ~]# swapoff -v /dev/vg01/swap
swapoff /dev/vg01/swap
Use the lvextend command to extend the LV.
RH134-RHEL9.0-en-2-20220609 173](https://image.slidesharecdn.com/redhatenterpriselinux9-240713030337-3ff2819f/85/Red-Hat-Enterprise-Linux-Administration-9-0-RH134-pdf-191-320.jpg)
![Chapter 6 | Manage Storage Stack
[root@host ~]# lvextend -L +300M /dev/vg01/swap
Size of logical volume vg01/swap changed from 500.00 MiB (125 extents) to 800.00
MiB (200 extents).
Logical volume vg01/swap successfully resized.
Use the mkswap command to format the LV as swap space.
[root@host ~]# mkswap /dev/vg01/swap
mkswap: /dev/vg01/swap: warning: wiping old swap signature.
Setting up swapspace version 1, size = 800 MiB (838856704 bytes)
no label, UUID=25b4d602-6180-4b1c-974e-7f40634ad660
Use the swapon command to activate the swap space on the LV.
[root@host ~]# swapon /dev/vg01/swap
Reduce Volume Group Storage
Reducing a VG involves removing unused PV from the VG. The pvmove command moves data
from extents on one PV to extents on another PV with enough free extents in the same VG. You
may continue to use the LV from the same VG while reducing. Use the pvmove command -A
option to automatically backup the metadata of the VG after a change. This option uses the
vgcfgbackup command to backup metadata automatically.
[root@host ~]# pvmove /dev/vdb3
Warning
Before using the pvmove command, back up the data stored on all LVs in the VG. An
unexpected power loss during the operation might leave the VG in an inconsistent
state which might cause a loss of data on LVs.
Use the vgreduce command to remove a PV from a VG.
[root@host ~]# vgreduce vg01 /dev/vdb3
Removed "/dev/vdb3" from volume group "vg01"
Important
The GFS2 and XFS file systems do not support shrinking, so you cannot reduce the
size of an LV.
Remove LVM Storage
Use the lvremove, vgremove, and pvremove commands to remove an LVM component that is
no longer required.
174 RH134-RHEL9.0-en-2-20220609](https://image.slidesharecdn.com/redhatenterpriselinux9-240713030337-3ff2819f/85/Red-Hat-Enterprise-Linux-Administration-9-0-RH134-pdf-192-320.jpg)
![Chapter 6 | Manage Storage Stack
Prepare the File System
Move all data that must be kept to another file system. Use the umount command to unmount the
file system and then remove any /etc/fstab entries associated with this file system.
[root@host ~]# umount /mnt/data
Warning
Removing a logical volume destroys any data stored on the logical volume. Back up
or move your data before you remove the logical volume.
Remove the Logical Volume
Use the lvremove DEVICE-NAME command to remove a logical volume that is no longer
needed. Unmount the LV file system before running this command. The command prompts for
confirmation before removing the LV.
[root@host ~]# lvremove /dev/vg01/lv01
Do you really want to remove active logical volume vg01/lv01? [y/n]: y
Logical volume "lv01" successfully removed.
The LV's physical extents are freed and made available for assignment to existing or new LVs in the
volume group.
Remove the Volume Group
Use the vgremove VG-NAME command to remove a volume group that is no longer needed.
[root@host ~]# vgremove vg01
Volume group "vg01" successfully removed
The VG's physical volumes are freed and made available for assignment to existing or new VGs on
the system.
Remove the Physical Volumes
Use the pvremove command to remove physical volumes that are no longer needed. Use a
space-delimited list of PV devices to remove more than one at a time. This command deletes the
PV metadata from the partition (or disk). The partition is now free for reallocation or reformatting.
[root@host ~]# pvremove /dev/vdb1 /dev/vdb2
Labels on physical volume "/dev/vdb1" successfully wiped.
Labels on physical volume "/dev/vdb2" successfully wiped.
RH134-RHEL9.0-en-2-20220609 175](https://image.slidesharecdn.com/redhatenterpriselinux9-240713030337-3ff2819f/85/Red-Hat-Enterprise-Linux-Administration-9-0-RH134-pdf-193-320.jpg)
![Chapter 6 | Manage Storage Stack
Guided Exercise
Create and Extend Logical Volumes
In this lab, you create and extend a physical volume, volume group, logical volume, and an
XFS file system. You also persistently mount the logical volume file system.
Outcomes
• Create physical volumes, volume groups, and logical volumes with LVM tools.
• Create new file systems on logical volumes and persistently mount them.
• Extend the volume group to include an additional physical volume.
• Resize the logical volume while the file system is still mounted and in use.
Before You Begin
As the student user on the workstation machine, use the lab command to prepare your
system for this exercise.
This command prepares your environment and ensures that all required resources are
available.
[student@workstation ~]$ lab start lvm-manage
Instructions
1. Log in to the servera machine as the student user and switch to the root user.
[student@workstation ~]$ ssh student@servera
...output omitted...
[student@servera ~]$ sudo -i
[sudo] password for student: student
[root@servera ~]#
2. Create the physical device partition on the /dev/vdb storage device.
2.1. Create two partitions of 256 MiB each in size and set to the Linux LVM type. Use
first and second as the names for these partitions.
[root@servera ~]# parted /dev/vdb mklabel gpt
[root@servera ~]# parted /dev/vdb mkpart first 1MiB 258MiB
[root@servera ~]# parted /dev/vdb set 1 lvm on
[root@servera ~]# parted /dev/vdb mkpart second 258MiB 514MiB
[root@servera ~]# parted /dev/vdb set 2 lvm on
2.2. Register the new partitions with the kernel.
[root@servera ~]# udevadm settle
RH134-RHEL9.0-en-2-20220609 177](https://image.slidesharecdn.com/redhatenterpriselinux9-240713030337-3ff2819f/85/Red-Hat-Enterprise-Linux-Administration-9-0-RH134-pdf-195-320.jpg)
![Chapter 6 | Manage Storage Stack
2.3. List the partitions on the /dev/vdb storage device. In the Number column, the
values 1 and 2 correspond to the /dev/vdb1 and /dev/vdb2 device partitions. The
Flags column indicates the partition type.
[root@servera ~]# parted /dev/vdb print
Model: Virtio Block Device (virtblk)
Disk /dev/vdb: 5369MB
Sector size (logical/physical): 512B/512B
Partition Table: gpt
Disk Flags:
Number Start End Size File system Name Flags
1 1049kB 271MB 269MB first lvm
2 271MB 539MB 268MB second lvm
3. Label the two new partitions as physical volumes.
[root@servera ~]# pvcreate /dev/vdb1 /dev/vdb2
Physical volume "/dev/vdb1" successfully created.
Physical volume "/dev/vdb2" successfully created.
Creating devices file /etc/lvm/devices/system.devices
4. Create the servera_group volume group by using the two new PVs.
[root@servera ~]# vgcreate servera_group /dev/vdb1 /dev/vdb2
Volume group "servera_group" successfully created
5. Create the servera_volume logical volume with a size of 400 MiB. This command creates
the /dev/servera_group/servera_volume LV without a file system.
[root@servera ~]# lvcreate -n servera_volume -L 400M servera_group
Logical volume "servera_volume" created.
6. Format the newly created LV and mount it persistently.
6.1. Format the servera_volume LV with the XFS file system.
[root@servera ~]# mkfs -t xfs /dev/servera_group/servera_volume
...output omitted...
6.2. Create the /data directory as a mount point.
[root@servera ~]# mkdir /data
6.3. To persistently mount the newly created file system, add the following content in the
/etc/fstab file.
/dev/servera_group/servera_volume /data xfs defaults 0 0
6.4. Mount the servera_volume LV.
178 RH134-RHEL9.0-en-2-20220609](https://image.slidesharecdn.com/redhatenterpriselinux9-240713030337-3ff2819f/85/Red-Hat-Enterprise-Linux-Administration-9-0-RH134-pdf-196-320.jpg)
![Chapter 6 | Manage Storage Stack
[root@servera ~]# mount /data
7. Verify that the mounted file system is accessible and display the status information of the
LVM.
7.1. Verify that you can copy files to the /data directory.
[root@servera ~]# cp -a /etc/*.conf /data
[root@servera ~]# ls /data | wc -l
32
7.2. View the PV status information. The output shows that the PV uses the
servera_group VG. The PV has a size of 256 MiB and the physical extent size of
4 MiB.
There are 63 PEs, with 27 PEs available for allocation and 36 PEs currently allocated
to LVs. When calculating the size in MiBs:
• Total 252 MiB (63 PEs x 4 MiB).
• Free 108 MiB (27 PEs x 4 MiB).
• Allocated 144 MiB (36 PEs x 4 MiB).
[root@servera ~]# pvdisplay /dev/vdb2
--- Physical volume ---
PV Name /dev/vdb2
VG Name servera_group
PV Size 256.00 MiB / not usable 4.00 MiB
Allocatable yes
PE Size 4.00 MiB
Total PE 63
Free PE 27
Allocated PE 36
PV UUID FKKFYJ-wJiR-1jt2-sfy3-yjPy-TylN-LG92jj
7.3. View the VG status information of the servera_group VG. The output shows the
VG size of 508 MiB with PE size of 4 MiB. The available size from the VG is 108 MiB.
[root@servera ~]# vgdisplay servera_group
--- Volume group ---
VG Name servera_group
System ID
Format lvm2
Metadata Areas 2
Metadata Sequence No 2
VG Access read/write
VG Status resizable
MAX LV 0
Cur LV 1
Open LV 1
Max PV 0
Cur PV 2
Act PV 2
RH134-RHEL9.0-en-2-20220609 179](https://image.slidesharecdn.com/redhatenterpriselinux9-240713030337-3ff2819f/85/Red-Hat-Enterprise-Linux-Administration-9-0-RH134-pdf-197-320.jpg)
![Chapter 6 | Manage Storage Stack
VG Size 508.00 MiB
PE Size 4.00 MiB
Total PE 127
Alloc PE / Size 100 / 400.00 MiB
Free PE / Size 27 / 108.00 MiB
VG UUID g0ahyT-90J5-iGic-nnb5-G6T9-tLdK-dX8c9M
7.4. View the status information for the servera_volume LV. The output shows the VG
name used for creating the LV. It also shows the LV size of 400 MiB and LE size of
100.
[root@servera ~]# lvdisplay /dev/servera_group/servera_volume
--- Logical volume ---
LV Path /dev/servera_group/servera_volume
LV Name servera_volume
VG Name servera_group
LV UUID 93MfUt-esgT-B5HM-r1p5-DVZH-n5cn-J5e2tw
LV Write Access read/write
LV Creation host, time servera.lab.example.com, 2022-04-11 03:25:12 -0400
LV Status available
# open 1
LV Size 400.00 MiB
Current LE 100
Segments 2
Allocation inherit
Read ahead sectors auto
- currently set to 8192
Block device 253:0
7.5. View the free disk space in human-readable units. The output shows the total size of
395 MiB with the available size of 372 MiB.
[root@servera ~]# df -h /data
Filesystem Size Used Avail Use% Mounted on
/dev/mapper/servera_group-servera_volume 395M 24M 372M 6% /data
8. Create the physical resource on the /dev/vdb storage device.
8.1. Create an additional partition of 512 MiB and set it to type Linux LVM. Use third as
the name for this partition.
[root@servera ~]# parted /dev/vdb mkpart third 514MiB 1026MiB
[root@servera ~]# parted /dev/vdb set 3 lvm on
8.2. Register the new partition with the kernel.
[root@servera ~]# udevadm settle
8.3. Add the new partition as a PV.
180 RH134-RHEL9.0-en-2-20220609](https://image.slidesharecdn.com/redhatenterpriselinux9-240713030337-3ff2819f/85/Red-Hat-Enterprise-Linux-Administration-9-0-RH134-pdf-198-320.jpg)
![Chapter 6 | Manage Storage Stack
[root@servera ~]# pvcreate /dev/vdb3
Physical volume "/dev/vdb3" successfully created.
9. Using the newly created disk space, extend the file system on the servera_volume to be
a total size of 700 MiB.
9.1. Extend the servera_group VG using the new /dev/vdb3 PV.
[root@servera ~]# vgextend servera_group /dev/vdb3
Volume group "servera_group" successfully extended
9.2. Extend the existing servera_volume LV to 700 MiB.
[root@servera ~]# lvextend -L 700M /dev/servera_group/servera_volume
Size of logical volume servera_group/servera_volume changed from 400.00 MiB (100
extents) to 700.00 MiB (175 extents).
Logical volume servera_group/servera_volume successfully resized.
9.3. Extend the XFS file system using the free space on the LV.
[root@servera ~]# xfs_growfs /data
...output omitted...
data blocks changed from 102400 to 179200
10. Verify that the LV size has been extended and the contents are still present in the volume.
10.1. Verify the size of the extended LV by using the lvdisplay command.
[root@servera ~]# lvdisplay /dev/servera_group/servera_volume
--- Logical volume ---
LV Path /dev/servera_group/servera_volume
LV Name servera_volume
VG Name servera_group
LV UUID mLQhsD-hyL0-KC2B-2nug-o2Nc-0znS-Q428fK
LV Write Access read/write
LV Creation host, time servera.lab.example.com, 2022-04-12 06:04:12 -0400
LV Status available
# open 1
LV Size 700.00 MiB
Current LE 175
Segments 3
Allocation inherit
Read ahead sectors auto
- currently set to 8192
Block device 253:0
10.2. Verify the new file-system size. Verify that the previously copied files are still present.
RH134-RHEL9.0-en-2-20220609 181](https://image.slidesharecdn.com/redhatenterpriselinux9-240713030337-3ff2819f/85/Red-Hat-Enterprise-Linux-Administration-9-0-RH134-pdf-199-320.jpg)
![Chapter 6 | Manage Storage Stack
[root@servera ~]# df -h /data
Filesystem Size Used Avail Use% Mounted on
/dev/mapper/servera_group-servera_volume 695M 26M 670M 4% /data
[root@servera ~]# ls /data | wc -l
32
11. Return to the workstation machine as the student user.
[root@servera ~]# exit
logout
[student@servera ~]$ exit
logout
Connection to servera closed.
Finish
On the workstation machine, change to the student user home directory and use the lab
command to complete this exercise. This step is important to ensure that resources from previous
exercises do not impact upcoming exercises.
[student@workstation ~]$ lab finish lvm-manage
This concludes the section.
182 RH134-RHEL9.0-en-2-20220609](https://image.slidesharecdn.com/redhatenterpriselinux9-240713030337-3ff2819f/85/Red-Hat-Enterprise-Linux-Administration-9-0-RH134-pdf-200-320.jpg)
![Chapter 6 | Manage Storage Stack
File System or Other Use
The top layer of the stack is typically a file system, but can be used as raw space for databases
or custom application data requirements. RHEL supports multiple file-system types, but
recommends XFS for most modern use cases. XFS is required when the utility implementing LVM
is Red Hat Ceph Storage or the Stratis storage tool.
Database server applications consume storage in different ways, depending on their architecture
and size. Some smaller database store their structures in regular files that are contained in a file
system Because of the additional overhead or restrictions of file system access, this architecture
has scaling limits. Larger databases that want to bypass file system caching, and use their own
caching mechanisms, prefer to create their database structures on raw storage. Logical volumes
are suitable for use for database and other raw storage use cases.
Red Hat Ceph Storage also prefers to create its own storage management metadata structures
on raw devices to be used to create Ceph Object Storage Devices (OSDs). In the latest Red Hat
Ceph Storage versions, Ceph uses LVM to initialize disk devices for use as OSDs. More information
is available in the Cloud Storage with Red Hat Ceph Storage (CL260) course.
Stratis Storage Management
Stratis is a local storage management tool developed by Red Hat and the upstream Fedora
community. Stratis makes it easier to perform an initial storage configuration, change a storage
configuration, and use advanced storage features.
Important
Stratis is currently available as a Technology Preview, but is expected to be
supported in a later RHEL 9 version. For information on Red Hat scope of support
for Technology Preview features, see the Technology Features Support Scope
[https://access.redhat.com/support/offerings/techpreview] document.
Red Hat encourages customers to provide feedback when deploying Stratis.
Stratis runs as a service that manages pools of physical storage devices and transparently creates
and manages volumes for the newly created file systems.
Stratis builds file systems from shared pools of disk devices by using a concept known as thin
provisioning. Instead of immediately allocating physical storage space to the file system when you
create it, Stratis dynamically allocates that space from the pool as the file system stores more
data. Therefore, the file system might appear to be 1 TiB in size, but might only have 100 GiB of
real storage actually allocated to it from the pool.
You can create multiple pools from different storage devices. From each pool, you can create one
or more file systems. Currently, you can create up to 224
file systems per pool.
Stratis builds the components that make up a Stratis-managed file system from standard Linux
components. Internally, Stratis uses the Device Mapper infrastructure that LVM also uses. Stratis
formats the managed file systems with XFS.
Figure 6.3 illustrates how Stratis assembles the elements of its storage management solution.
Stratis assigns block storage devices such as hard disks or SSDs to pools, each contributing some
physical storage to the pool. Then, it creates file systems from the pools, and maps physical
storage to each file system as needed.
RH134-RHEL9.0-en-2-20220609 185](https://image.slidesharecdn.com/redhatenterpriselinux9-240713030337-3ff2819f/85/Red-Hat-Enterprise-Linux-Administration-9-0-RH134-pdf-203-320.jpg)
![Chapter 6 | Manage Storage Stack
Figure 6.3: Stratis Architecture
Stratis Administration Methods
To manage file systems with the Stratis storage management solution, install the stratis-
cli and stratisd packages. The stratis-cli package provides the stratis command,
which sends reconfiguration requests to the stratisd system daemon. The stratisd package
provides the stratisd service, which handles reconfiguration requests and manages and
monitors Stratis's block devices, pools, and file systems.
Stratis administration is included in the RHEL web console.
Warning
Reconfigure file systems created by Stratis only with Stratis tools and commands.
Stratis uses stored metadata to recognize managed pools, volumes, and file
systems. Manually configuring Stratis file systems with non-Stratis commands can
result in overwriting that metadata and prevent Stratis from recognizing the file
system volumes it had previously created.
Install and Enable Stratis
To use Stratis, ensure that your system has the required software and that the stratisd
service is running. Install the stratis-cli and stratisd packages, and start and enable the
stratisd service.
[root@host ~]# dnf install stratis-cli stratisd
...output omitted...
Is this ok [y/N]: y
...output omitted...
Complete!
[root@host ~]# systemctl enable --now stratisd
Create Stratis Pools
Create pools of one or more block devices by using the stratis pool create command. Then,
Use the stratis pool list command to view the list of available pools.
186 RH134-RHEL9.0-en-2-20220609](https://image.slidesharecdn.com/redhatenterpriselinux9-240713030337-3ff2819f/85/Red-Hat-Enterprise-Linux-Administration-9-0-RH134-pdf-204-320.jpg)
![Chapter 6 | Manage Storage Stack
[root@host ~]# stratis pool create pool1 /dev/vdb
[root@host ~]# stratis pool list
Name Total Physical Properties UUID
pool1 5 GiB / 37.63 MiB / 4.96 GiB ~Ca,~Cr 11f6f3c5-5...
Warning
The stratis pool list command displays the actual storage space that is in
use and the pool space that is still available. Currently, if a pool becomes full, then
further data written to the pool's file systems is quietly discarded.
Use the stratis pool add-data command to add additional block devices to a pool. Then,
use the stratis blockdev list command to verify the block devices of a pool.
[root@host ~]# stratis pool add-data pool1 /dev/vdc
[root@host ~]# stratis blockdev list pool1
Pool Name Device Node Physical Size Tier
pool1 /dev/vdb 5 GiB Data
pool1 /dev/vdc 5 GiB Data
Manage Stratis File Systems
Use the stratis filesystem create command to create a file system from a pool. The
links to the Stratis file systems are in the /dev/stratis/pool1 directory. Use the stratis
filesystem list command to view the list of available file systems.
[root@host ~]# stratis filesystem create pool1 fs1
[root@host ~]# stratis filesystem list
Pool Name Name Used Created Device UUID
pool1 fs1 546 MiB Apr 08 2022 04:05 /dev/stratis/pool1/fs1
c7b5719...
Create a Stratis file system snapshot by using the stratis filesystem snapshot command.
Snapshots are independent of the source file systems. Stratis dynamically allocates the snapshot
storage space and uses an initial 560 MB to store the file system's journal.
[root@host ~]# stratis filesystem snapshot pool1 fs1 snapshot1
Persistently Mount Stratis File Systems
You can persistently mount Stratis file systems by editing the /etc/fstab file and specifying
the details of the file system. Use the lsblk command to display the UUID of the file system that
you should use in the /etc/fstab file to identify the file system. You can also use the stratis
filesystem list command to obtain the UUID of the file system.
[root@host ~]# lsblk --output=UUID /dev/stratis/pool1/fs1
UUID
c7b57190-8fba-463e-8ec8-29c80703d45e
RH134-RHEL9.0-en-2-20220609 187](https://image.slidesharecdn.com/redhatenterpriselinux9-240713030337-3ff2819f/85/Red-Hat-Enterprise-Linux-Administration-9-0-RH134-pdf-205-320.jpg)
![Chapter 6 | Manage Storage Stack
Guided Exercise
Manage Layered Storage
In this exercise, you use Stratis to create file systems from pools of storage provided by
physical storage devices.
Outcomes
• Create a thin-provisioned file system by using Stratis storage management solution.
• Verify that the Stratis volumes grow dynamically to support real-time data growth.
• Access data from the snapshot of a thin-provisioned file system.
Before You Begin
As the student user on the workstation machine, use the lab command to prepare your
system for this exercise.
This command prepares your environment and ensures that all required resources are
available.
[student@workstation ~]$ lab start lvm-stratis
Instructions
1. Log in to the servera machine as the student user and switch to the root user.
[student@workstation ~]$ ssh student@servera
...output omitted...
[student@servera ~]$ sudo -i
[sudo] password for student: student
[root@servera ~]#
2. Install the stratisd and stratis-cli packages.
[root@servera ~]# dnf install stratisd stratis-cli
...output omitted...
Is this ok [y/N]: y
...output omitted...
Complete!
3. Activate the stratisd service.
[root@servera ~]# systemctl enable --now stratisd
4. Ensure that the stratispool1 Stratis pool exists on the /dev/vdb block device.
4.1. Create the stratispool1 Stratis pool.
RH134-RHEL9.0-en-2-20220609 189](https://image.slidesharecdn.com/redhatenterpriselinux9-240713030337-3ff2819f/85/Red-Hat-Enterprise-Linux-Administration-9-0-RH134-pdf-207-320.jpg)
![Chapter 6 | Manage Storage Stack
[root@servera ~]# stratis pool create stratispool1 /dev/vdb
4.2. Verify the availability of the stratispool1 pool. Note the size of the pool.
[root@servera ~]# stratis pool list
Name Total Physical Properties UUID
stratispool1 5 GiB / 37.63 MiB / 4.96 GiB ~Ca,~Cr 3557c389-7...
5. Expand the capacity of the stratispool1 pool by adding the /dev/vdc block device.
5.1. Add the /dev/vdc block device to the stratispool1 pool.
[root@servera ~]# stratis pool add-data stratispool1 /dev/vdc
5.2. Verify the size of the stratispool1 pool. The stratispool1 pool size increases
when you add the block device.
[root@servera ~]# stratis pool list
Name Total Physical Properties UUID
stratispool1 10 GiB / 41.63 MiB / 9.96 GiB ~Ca,~Cr 3557c389-7...
5.3. Verify the block devices that are currently members of the stratispool1 pool.
[root@servera ~]# stratis blockdev list stratispool1
Pool Name Device Node Physical Size Tier
stratispool1 /dev/vdb 5 GiB Data
stratispool1 /dev/vdc 5 GiB Data
6. Add a thin-provisioned file system called stratis-filesystem1 in the stratispool1
pool. Mount the file system on the /stratisvol directory. Create a file on the stratis-
filesystem1 file system called file1 containing the text Hello World!. Modify the
/etc/fstab file to persistently mount the file system on the /stratisvol directory.
Reboot your system and verify that the file system is persistently mounted across reboots.
6.1. Create the thin-provisioned file system stratis-filesystem1 on the
stratispool1 pool. It might take up to a minute for the command to complete.
[root@servera ~]# stratis filesystem create stratispool1 stratis-filesystem1
6.2. Verify the availability of the stratis-filesystem1 file system. Note the current
usage of the stratis-filesystem1 file system. The usage of the file system will
increase on-demand in the later steps.
[root@servera ~]# stratis filesystem list
Pool Name Name Used Created Device
UUID
stratispool1 stratis-filesystem1 546 MiB Apr 08 2022 07:12 /dev/stratis/
stratispool1/stratis-filesystem1 48e8...
6.3. Create the /stratisvol directory.
190 RH134-RHEL9.0-en-2-20220609](https://image.slidesharecdn.com/redhatenterpriselinux9-240713030337-3ff2819f/85/Red-Hat-Enterprise-Linux-Administration-9-0-RH134-pdf-208-320.jpg)
![Chapter 6 | Manage Storage Stack
[root@servera ~]# mkdir /stratisvol
6.4. Mount the stratis-filesystem1 file system on the /stratisvol directory.
[root@servera ~]# mount /dev/stratis/stratispool1/stratis-filesystem1
/stratisvol
6.5. Verify that the stratis-filesystem1 volume is mounted on the /stratisvol
directory.
[root@servera ~]# mount
...output omitted...
/dev/mapper/stratis-1-3557...fbd3-thin-fs-48e8...9ebe on /stratisvol type xfs
(rw,relatime,seclabel,attr2,inode64,logbufs=8,logbsize=32k,sunit=2048,swidth=2048,
noquota)
6.6. Create the /stratisvol/file1 text file.
[root@servera ~]# echo "Hello World!" > /stratisvol/file1
6.7. Obtain the UUID of the file system. Note that the UUID would be different in your
system.
[root@servera ~]# lsblk --output=UUID
/dev/stratis/stratispool1/stratis-filesystem1
UUID
d18cb4fc-753c-473a-9ead-d6661533b475
6.8. Modify the /etc/fstab file to persistently mount the file system on the
/stratisvol directory. To do so, use the vim /etc/fstab command and add the
following line. Replace the UUID by the correct one for your system.
UUID=d18c... /stratisvol xfs defaults,x-systemd.requires=stratisd.service 0 0
6.9. Reboot your system and verify that the file system is persistently mounted across
reboots.
[root@servera ~]# systemctl reboot
...output omitted...
[student@workstation ~]$ ssh student@servera
...output omitted...
[student@servera ~]$ sudo -i
[sudo] password for student: student
[root@servera ~]# mount
...output omitted...
/dev/mapper/stratis-1-3557...fbd3-thin-fs-d18c...b475 on /stratisvol type xfs
(rw,relatime,seclabel,attr2,inode64,logbufs=8,logbsize=32k,sunit=2048,swidth=2048,
noquota,x-systemd.requires=stratisd.service)
RH134-RHEL9.0-en-2-20220609 191](https://image.slidesharecdn.com/redhatenterpriselinux9-240713030337-3ff2819f/85/Red-Hat-Enterprise-Linux-Administration-9-0-RH134-pdf-209-320.jpg)
![Chapter 6 | Manage Storage Stack
7. Verify that the stratis-filesystem1 thin-provisioned file system dynamically grows as
the data on the file system grows.
7.1. View the current usage of the stratis-filesystem1 file system.
[root@servera ~]# stratis filesystem list
Pool Name Name Used Created Device
UUID
stratispool1 stratis-filesystem1 546 MiB Apr 08 2022 07:12 /dev/stratis/
stratispool1/stratis-filesystem1 48e8...
7.2. Create a 2 GiB file on the stratis-filesystem1 file system. It might take up to a
minute for the command to complete.
[root@servera ~]# dd if=/dev/urandom of=/stratisvol/file2 bs=1M count=2048
7.3. Verify the space used in the stratis-filesystem1 file system.
The output shows that the used space in the stratis-filesystem1 file system
has increased. The used-space increase confirms that the thin-provisioned file
system dynamically expands as needed.
[root@servera ~]# stratis filesystem list
Pool Name Name Used Created Device
UUID
stratispool1 stratis-filesystem1 2.60 GiB Apr 08 2022 07:12 /dev/stratis/
stratispool1/stratis-filesystem1 48e8...
8. Create a snapshot of the stratis-filesystem1 file system called stratis-
filesystem1-snap. The snapshot provides you with access to any file that you delete
from the stratis-filesystem1 file system.
8.1. Create a snapshot of the stratis-filesystem1 file system. It might take up to a
minute for the command to complete.
[root@servera ~]# stratis filesystem snapshot stratispool1
stratis-filesystem1 stratis-filesystem1-snap
8.2. Verify the availability of the snapshot.
[root@servera ~]# stratis filesystem list
Pool Name Name Used Created Device
UUID
stratispool1 stratis-filesystem1-snap 2.73 GiB Apr 08 2022 07:22 /dev/
stratis/stratispool1/stratis-filesystem1-snap 5774...
stratispool1 stratis-filesystem1 2.73 GiB Apr 08 2022 07:12 /dev/
stratis/stratispool1/stratis-filesystem1 48e8...
8.3. Remove the /stratisvol/file1 file.
[root@servera ~]# rm /stratisvol/file1
rm: remove regular file '/stratisvol/file1'? y
192 RH134-RHEL9.0-en-2-20220609](https://image.slidesharecdn.com/redhatenterpriselinux9-240713030337-3ff2819f/85/Red-Hat-Enterprise-Linux-Administration-9-0-RH134-pdf-210-320.jpg)
![Chapter 6 | Manage Storage Stack
8.4. Create the /stratisvol-snap directory.
[root@servera ~]# mkdir /stratisvol-snap
8.5. Mount the stratis-filesystem1-snap snapshot on the /stratisvol-snap
directory.
[root@servera ~]# mount /dev/stratis/stratispool1/stratis-filesystem1-snap
/stratisvol-snap
8.6. Verify that you can still access the file you deleted from the stratis-filesystem1
file system in the snapshot.
[root@servera ~]# cat /stratisvol-snap/file1
Hello World!
9. Unmount the /stratisvol and /stratisvol-snap volumes.
[root@servera ~]# umount /stratisvol-snap
[root@servera ~]# umount /stratisvol
10. Remove the stratis-filesystem1 thin-provisioned file system and the stratis-
filesystem1-snap snapshot from the system.
10.1. Destroy the stratis-filesystem1-snap snapshot.
[root@servera ~]# stratis filesystem destroy stratispool1 stratis-filesystem1-snap
10.2. Destroy the stratis-filesystem1 file system.
[root@servera ~]# stratis filesystem destroy stratispool1 stratis-filesystem1
10.3. Return to the workstation system as the student user.
[root@servera ~]# exit
logout
[student@servera ~]$ exit
logout
Connection to servera closed.
[student@workstation ~]$
Finish
On the workstation machine, change to the student user home directory and use the lab
command to complete this exercise. This step is important to ensure that resources from previous
exercises do not impact upcoming exercises.
[student@workstation ~]$ lab finish lvm-stratis
This concludes the section.
RH134-RHEL9.0-en-2-20220609 193](https://image.slidesharecdn.com/redhatenterpriselinux9-240713030337-3ff2819f/85/Red-Hat-Enterprise-Linux-Administration-9-0-RH134-pdf-211-320.jpg)
![Chapter 6 | Manage Storage Stack
Lab
Manage Storage Stack
In this lab, you resize an existing logical volume, add LVM resources as necessary, and then
add a new logical volume with a persistently mounted XFS file system on it.
Outcomes
• Resize the serverb_01_lv logical volume to 768 MiB.
• Create the new serverb_02_lv logical volume with 128 MiB with an XFS file system.
• Persistently mount the volume on the /storage/data2 directory.
Before You Begin
As the student user on the workstation machine, use the lab command to prepare your
system for this exercise.
This command prepares your environment and ensures that all required resources are
available.
[student@workstation ~]$ lab start lvm-review
Instructions
On the serverb machine, the serverb_01_lv logical volume mounted on the /storage/
data1 directory is running out of disk space and needs to be extended to 768 MiB. You must
ensure that the serverb_01_lv LV remains persistently mounted on the /storage/data1
directory.
The serverb_01_lv LV is present on the serverb_01_vg volume group. Unfortunately, it
has insufficient space to extend the existing logical volume. A 512 MiB partition exists on the
/dev/vdb disk. Create a new partition using the successive 512 MiB size on the /dev/vdb disk.
Create the serverb_02_lv LV with 128 MiB. Create the XFS file system on the newly created
volume. Mount the newly created logical volume on the /storage/data2 directory
1. Create a 512 MiB partition on the /dev/vdb disk. Initialize this partition as a physical volume,
and extend the serverb_01_vg volume group to use this partition.
2. Extend the serverb_01_lv logical volume to 768 MiB.
3. In the existing volume group, create the new serverb_02_lv logical volume with 128 MiB.
Add an XFS file system and mount it persistently on the /storage/data2 directory.
4. Verify that the newly created LV is mounted with the desired size.
Evaluation
As the student user on the workstation machine, use the lab command to grade your work.
Correct any reported failures and rerun the command until successful.
[student@workstation ~]$ lab grade lvm-review
194 RH134-RHEL9.0-en-2-20220609](https://image.slidesharecdn.com/redhatenterpriselinux9-240713030337-3ff2819f/85/Red-Hat-Enterprise-Linux-Administration-9-0-RH134-pdf-212-320.jpg)
![Chapter 6 | Manage Storage Stack
Finish
On the workstation machine, change to the student user home directory and use the lab
command to complete this exercise. This step is important to ensure that resources from previous
exercises do not impact upcoming exercises.
[student@workstation ~]$ lab finish lvm-review
This concludes the section.
RH134-RHEL9.0-en-2-20220609 195](https://image.slidesharecdn.com/redhatenterpriselinux9-240713030337-3ff2819f/85/Red-Hat-Enterprise-Linux-Administration-9-0-RH134-pdf-213-320.jpg)
![Chapter 6 | Manage Storage Stack
Solution
Manage Storage Stack
In this lab, you resize an existing logical volume, add LVM resources as necessary, and then
add a new logical volume with a persistently mounted XFS file system on it.
Outcomes
• Resize the serverb_01_lv logical volume to 768 MiB.
• Create the new serverb_02_lv logical volume with 128 MiB with an XFS file system.
• Persistently mount the volume on the /storage/data2 directory.
Before You Begin
As the student user on the workstation machine, use the lab command to prepare your
system for this exercise.
This command prepares your environment and ensures that all required resources are
available.
[student@workstation ~]$ lab start lvm-review
Instructions
On the serverb machine, the serverb_01_lv logical volume mounted on the /storage/
data1 directory is running out of disk space and needs to be extended to 768 MiB. You must
ensure that the serverb_01_lv LV remains persistently mounted on the /storage/data1
directory.
The serverb_01_lv LV is present on the serverb_01_vg volume group. Unfortunately, it
has insufficient space to extend the existing logical volume. A 512 MiB partition exists on the
/dev/vdb disk. Create a new partition using the successive 512 MiB size on the /dev/vdb disk.
Create the serverb_02_lv LV with 128 MiB. Create the XFS file system on the newly created
volume. Mount the newly created logical volume on the /storage/data2 directory
1. Create a 512 MiB partition on the /dev/vdb disk. Initialize this partition as a physical volume,
and extend the serverb_01_vg volume group to use this partition.
1.1. Log in to the serverb machine as the student user and switch to the root user.
[student@workstation ~]$ ssh student@serverb
...output omitted...
[student@serverb ~]$ sudo -i
[sudo] password for student: student
[root@serverb ~]#
1.2. Create the 512 MiB partition and set the lvm partition type.
196 RH134-RHEL9.0-en-2-20220609](https://image.slidesharecdn.com/redhatenterpriselinux9-240713030337-3ff2819f/85/Red-Hat-Enterprise-Linux-Administration-9-0-RH134-pdf-214-320.jpg)
![Chapter 6 | Manage Storage Stack
[root@serverb ~]# parted /dev/vdb mkpart primary 514MiB 1026MiB
[root@serverb ~]# parted /dev/vdb set 2 lvm on
1.3. Register the new partition with the kernel.
[root@serverb ~]# udevadm settle
1.4. Initialize the partition as a PV.
[root@serverb ~]# pvcreate /dev/vdb2
Physical volume "/dev/vdb2" successfully created.
1.5. Extend the serverb_01_vg VG using the new /dev/vdb2 PV.
[root@serverb ~]# vgextend serverb_01_vg /dev/vdb2
Volume group "serverb_01_vg" successfully extended
2. Extend the serverb_01_lv logical volume to 768 MiB.
2.1. Extend the serverb_01_lv LV to 768 MiB.
Alternatively, you can also use the lvcreate command -L +512M option to resize the
LV.
[root@serverb ~]# lvextend -L 768M /dev/serverb_01_vg/serverb_01_lv
Size of logical volume serverb_01_vg/serverb_01_lv changed from 256.00 MiB (64
extents) to 768.00 MiB (192 extents).
Logical volume serverb_01_vg/serverb_01_lv successfully resized.
2.2. Extend the XFS file system consuming the remaining space on the LV.
[root@serverb ~]# xfs_growfs /storage/data1
meta-data=/dev/mapper/serverb_01_vg-serverb_01_lv isize=512 agcount=4,
agsize=16384 blks
...output omitted...
data blocks changed from 65536 to 196608
Note
The xfs_growfs command introduces an additional step to extend the file system.
An alternative would be using the lvextend command -r option.
3. In the existing volume group, create the new serverb_02_lv logical volume with 128 MiB.
Add an XFS file system and mount it persistently on the /storage/data2 directory.
3.1. Create the serverb_02_lv LV with 128 MiB from the serverb_01_vg VG.
[root@serverb ~]# lvcreate -n serverb_02_lv -L 128M serverb_01_vg
Logical volume "serverb_02_lv" created.
RH134-RHEL9.0-en-2-20220609 197](https://image.slidesharecdn.com/redhatenterpriselinux9-240713030337-3ff2819f/85/Red-Hat-Enterprise-Linux-Administration-9-0-RH134-pdf-215-320.jpg)
![Chapter 6 | Manage Storage Stack
3.2. Create the xfs file system on the serverb_02_lv LV.
[root@serverb ~]# mkfs -t xfs /dev/serverb_01_vg/serverb_02_lv
...output omitted...
3.3. Create the /storage/data2 directory as the mount point.
[root@serverb ~]# mkdir /storage/data2
3.4. Add the following line to the end of the /etc/fstab file:
/dev/serverb_01_vg/serverb_02_lv /storage/data2 xfs defaults 0 0
3.5. Update the systemd daemon with the new /etc/fstab configuration file.
[root@serverb ~]# systemctl daemon-reload
3.6. Mount the serverb_02_lv LV.
[root@serverb ~]# mount /storage/data2
4. Verify that the newly created LV is mounted with the desired size.
4.1. Use the df command to verify the serverb_01_lv LV size.
[root@serverb ~]# df -h /storage/data1
Filesystem Size Used Avail Use% Mounted on
/dev/mapper/serverb_01_vg-serverb_01_lv 763M 19M 744M 3% /storage/data1
4.2. Verify the serverb_02_lv LV size.
[root@serverb ~]# df -h /storage/data2
Filesystem Size Used Avail Use% Mounted on
/dev/mapper/serverb_01_vg-serverb_02_lv 123M 7.6M 116M 7% /storage/data2
4.3. Verify the serverb_01_lv LV details.
[root@serverb ~]# lvdisplay /dev/serverb_01_vg/serverb_01_lv
--- Logical volume ---
LV Path /dev/serverb_01_vg/serverb_01_lv
LV Name serverb_01_lv
VG Name serverb_01_vg
LV UUID 1pY3DZ-fs1F-mptC-fL32-e8tG-PFBT-bs7LSJ
LV Write Access read/write
LV Creation host, time serverb.lab.example.com, 2022-05-05 14:40:51 -0400
LV Status available
# open 1
LV Size 768.00 MiB
Current LE 192
Segments 2
198 RH134-RHEL9.0-en-2-20220609](https://image.slidesharecdn.com/redhatenterpriselinux9-240713030337-3ff2819f/85/Red-Hat-Enterprise-Linux-Administration-9-0-RH134-pdf-216-320.jpg)
![Chapter 6 | Manage Storage Stack
Allocation inherit
Read ahead sectors auto
- currently set to 8192
Block device 253:0
4.4. Verify the serverb_02_lv LV details.
[root@serverb ~]# lvdisplay /dev/serverb_01_vg/serverb_02_lv
--- Logical volume ---
LV Path /dev/serverb_01_vg/serverb_02_lv
LV Name serverb_02_lv
VG Name serverb_01_vg
LV UUID 0aJIb6-Ti2b-jLCk-imB6-rkLx-mUoX-acjkz9
LV Write Access read/write
LV Creation host, time serverb.lab.example.com, 2022-05-05 14:45:46 -0400
LV Status available
# open 1
LV Size 128.00 MiB
Current LE 32
Segments 1
Allocation inherit
Read ahead sectors auto
- currently set to 8192
Block device 253:1
Evaluation
As the student user on the workstation machine, use the lab command to grade your work.
Correct any reported failures and rerun the command until successful.
[student@workstation ~]$ lab grade lvm-review
Finish
On the workstation machine, change to the student user home directory and use the lab
command to complete this exercise. This step is important to ensure that resources from previous
exercises do not impact upcoming exercises.
[student@workstation ~]$ lab finish lvm-review
This concludes the section.
RH134-RHEL9.0-en-2-20220609 199](https://image.slidesharecdn.com/redhatenterpriselinux9-240713030337-3ff2819f/85/Red-Hat-Enterprise-Linux-Administration-9-0-RH134-pdf-217-320.jpg)
![Chapter 7 | Access Network-Attached Storage
Manage Network-Attached Storage with
NFS
Objectives
Identify NFS export information, create a directory to use as a mount point, mount an NFS export
with the mount command or by configuring the /etc/fstab file, and unmount an NFS export
with the umount command.
Accessing Exported NFS Directories
The Network File System (NFS) is an internet standard protocol that Linux, UNIX, and similar
operating systems use as their native network file system. NFS is an open standard that supports
native Linux permissions and file-system attributes.
By default, Red Hat Enterprise Linux 9 uses NFS version 4.2. RHEL fully supports both NFSv3 and
NFSv4 protocols. NFSv3 could use either a TCP or a UDP transport protocol, but NFSv4 allows
only TCP connections.
NFS servers export directories. NFS clients mount exported directories to an existing local mount
point directory. NFS clients can mount exported directories in multiple ways:
• Manually by using the mount command.
• Persistently at boot by configuring entries in the /etc/fstab file.
• On demand by configuring an automounter method.
The automounter methods, which include the autofs service and the systemd.automount
facility, are discussed in the Automount Network-Attached Storage section. You
must install the nfs-utils package to obtain the client tools for manually mounting, or for
automounting, to obtain exported NFS directories.
[root@host ~]# dnf install nfs-utils
RHEL also supports mounting shared directories from Microsoft Windows systems by using the
same methods as for the NFS protocol, by using either the Server Message Block (SMB) or the
Common Internet File System (CIFS) protocols. Mounting options are protocol-specific and
depend on your Windows Server or Samba Server configuration.
Query a Server's Exported NFS Directories
The NFS protocol changed significantly between NFSv3 and NFSv4. The method to query a
server to view the available exports is different for each protocol version.
NFSv3 used the RPC protocol, which requires a file server that supports NFSv3 connections to run
the rpcbind service. An NFSv3 client connects to the rpcbind service at port 111 on the server
to request NFS service. The server responds with the current port for the NFS service. Use the
showmount command to query the available exports on an RPC-based NFSv3 server.
202 RH134-RHEL9.0-en-2-20220609](https://image.slidesharecdn.com/redhatenterpriselinux9-240713030337-3ff2819f/85/Red-Hat-Enterprise-Linux-Administration-9-0-RH134-pdf-220-320.jpg)
![Chapter 7 | Access Network-Attached Storage
[root@host ~]# showmount --exports server
Export list for server
/shares/test1
/shares/test2
The NFSv4 protocol eliminated the use of the legacy RPC protocol for NFS transactions. Use of
the showmount command on a server that supports only NFSv4 times out without receiving a
response, because the rpcbind service is not running on the server. However, querying an NFSv4
server is simpler than querying an NFSv3 server.
NFSv4 introduced an export tree that contains all of the paths for the server's exported
directories. To view all of the exported directories, mount the root (/) of the server's export tree.
Mounting the export tree's root provides browseable paths for all exported directories, as children
of the tree's root directory, but does not mount ("bind") any of the exported directories.
[root@host ~]# mkdir /mountpoint
[root@host ~]# mount server:/ /mountpoint
[root@host ~]# ls /mountpoint
To mount an NFSv4 export while browsing the mounted export tree, change directory into an
exported directory path. Alternatively, use the mount command with an exported directory's
full path name to mount a single exported directory. Exported directories that use Kerberos
security do not allow mounting or accessing a directory while browsing an export tree, even though
you can view the export's path name. Mounting Kerberos-protected shares requires additional
server configuration and using Kerberos user credentials, which are discussed in the Red Hat
Security: Identity Management and Active Directory Integration (RH362)
training course.
Manually Mount Exported NFS Directories
After identifying the NFS export to mount, create a local mount point if it does not yet exist. The
mnt directory is available for use as a temporary mount point, but recommended practice is not
to use mnt for long-term or persistent mounting.
[root@host ~]# mkdir /mountpoint
As with local volume file systems, mount the NFS export to access its contents. NFS shares can be
mounted temporarily or permanently, only by a privileged user.
[root@host ~]# mount -t nfs -o rw,sync server:/export /mountpoint
The -t nfs option specifies the NFS file-system type. However, when the mount command
detects the server:/export syntax, the command defaults to the NFS type. The -o sync option
specifies that all transactions to the exported file system are performed synchronously, which is
strongly recommended for all production network mounts where transactions must be completed
or else return as failed.
Using a manual mount command is not persistent. When the system reboots, that NFS export will
not still be mounted. Manual mounts are useful for providing temporary access to an exported
directory, or for test mounting an NFS export before persistently mounting it.
RH134-RHEL9.0-en-2-20220609 203](https://image.slidesharecdn.com/redhatenterpriselinux9-240713030337-3ff2819f/85/Red-Hat-Enterprise-Linux-Administration-9-0-RH134-pdf-221-320.jpg)
![Chapter 7 | Access Network-Attached Storage
Persistently Mount Exported NFS Directories
To persistently mount an NFS export, edit the /etc/fstab file and add the mount entry with
similar syntax to manual mounting.
[root@host ~]# vim /etc/fstab
...
server:/export /mountpoint nfs rw,soft 0 0
Then, you can mount the NFS export by using only the mount point. The mount command obtains
the NFS server and mount options from the matching entry in the /etc/fstab file.
[root@host ~]# mount /mountpoint
Unmount Exported NFS Directories
As a privileged user, unmount an NFS export with the umount command. Unmounting a share
does not remove its entry in the /etc/fstab file, if that file exists. Entries in the /etc/fstab file
are persistent and are remounted during boot.
[root@host ~]# umount /mountpoint
A mounted directory can sometimes fail to unmount, and returns an error that the device is
busy. The device is busy because either an application is keeping a file open within the file system,
or some user's shell has a working directory in the mounted file-system's root directory or below it.
To resolve the error, check your own active shell windows, and use the cd command to leave the
mounted file system. If subsequent attempts to unmount the file system still fail, then use the
lsof (list open files) command to query the mount point. The lsof command returns a list of
open file names and the process which is keeping the file open.
[root@host ~]# lsof /mountpoint
COMMAND PID USER FD TYPE DEVICE SIZE/OFF NODE NAME
program 5534 user txt REG 252.4 910704 128 /home/user/program
With this information, gracefully close any processes that are using files on this file system, and
retry the unmount. In critical scenarios only, when an application cannot be closed gracefully, kill
the process to close the file. Alternatively, use the umount -f option to force the unmount, which
can cause loss of unwritten data for all open files.
References
mount(8), umount(8), showmount(8), fstab(5), mount.nfs(8), nfsconf(8),
and rpcbind(8) man pages
204 RH134-RHEL9.0-en-2-20220609](https://image.slidesharecdn.com/redhatenterpriselinux9-240713030337-3ff2819f/85/Red-Hat-Enterprise-Linux-Administration-9-0-RH134-pdf-222-320.jpg)
![Chapter 7 | Access Network-Attached Storage
Guided Exercise
Manage Network-Attached Storage with
NFS
Performance Checklist
In this exercise, you modify the /etc/fstab file to persistently mount an NFS export at
boot time.
Outcomes
• Test an NFS server with the mount command.
• Configure NFS exports in the /etc/fstab configuration file to save changes even after a
system reboots.
Before You Begin
As the student user on the workstation machine, use the lab command to prepare your
system for this exercise.
This command prepares your environment and ensures that all required resources are
available.
[student@workstation ~]$ lab start netstorage-nfs
Instructions
A shipping company uses a central NFS server, serverb, to host various exported documents
and directories. Users on servera, who are all members of the admin group, need access to the
persistently mounted NFS export.
Environment Characteristics:
• The serverb machine exports the /shares/public directory, which contains some text files.
• Members of the admin group (admin1, sysmanager1) have read and write access to the
/shares/public exported directory.
• The mount point on servera must be the /public directory.
• All user passwords are set to redhat.
• The nfs-utils package is already installed.
1. Log in to servera as the student user and switch to the root user.
1.1. Log in to servera as the student user and switch to the root user.
[student@workstation ~]$ ssh student@servera
...output omitted...
[student@servera ~]$ sudo -i
[sudo] password for student: student
[root@servera ~]#
RH134-RHEL9.0-en-2-20220609 205](https://image.slidesharecdn.com/redhatenterpriselinux9-240713030337-3ff2819f/85/Red-Hat-Enterprise-Linux-Administration-9-0-RH134-pdf-223-320.jpg)
![Chapter 7 | Access Network-Attached Storage
2. Test the NFS server on serverb with servera as the NFS client.
2.1. Create the /public mount point on the servera machine.
[root@servera ~]# mkdir /public
2.2. On servera, verify that the /share/public NFS export from serverb
successfully mounts to the /public directory.
[root@servera ~]# mount -t nfs
serverb.lab.example.com:/shares/public /public
2.3. List the contents of the mounted NFS export.
[root@servera ~]# ls -l /public
total 16
-rw-r--r--. 1 root admin 42 Apr 8 22:36 Delivered.txt
-rw-r--r--. 1 root admin 46 Apr 8 22:36 NOTES.txt
-rw-r--r--. 1 root admin 20 Apr 8 22:36 README.txt
-rw-r--r--. 1 root admin 27 Apr 8 22:36 Trackings.txt
2.4. Explore the mount command options for the mounted NFS export.
[root@servera ~]# mount | grep public
serverb.lab.example.com:/shares/public on /public type nfs4
(rw,relatime,vers=4.2,rsize=262144,wsize=262144,namlen=255,sync
,proto=tcp,timeo=600,retrans=2,sec=sys,clientaddr=172.25.250.10,
local_lock=none,addr=172.25.250.11)
2.5. Unmount the NFS export.
[root@servera ~]# umount /public
3. Configure servera so that the /share/public export is persistently mounted.
3.1. Edit the /etc/fstab file.
[root@servera ~]# vim /etc/fstab
Add the following line to the end of the file:
serverb.lab.example.com:/shares/public /public nfs rw,sync 0 0
3.2. Mount the exported directory.
[root@servera ~]# mount /public
3.3. List the contents of the exported directory.
206 RH134-RHEL9.0-en-2-20220609](https://image.slidesharecdn.com/redhatenterpriselinux9-240713030337-3ff2819f/85/Red-Hat-Enterprise-Linux-Administration-9-0-RH134-pdf-224-320.jpg)
![Chapter 7 | Access Network-Attached Storage
[root@servera ~]# ls -l /public
total 16
-rw-r--r--. 1 root admin 42 Apr 8 22:36 Delivered.txt
-rw-r--r--. 1 root admin 46 Apr 8 22:36 NOTES.txt
-rw-r--r--. 1 root admin 20 Apr 8 22:36 README.txt
-rw-r--r--. 1 root admin 27 Apr 8 22:36 Trackings.txt
3.4. Reboot the servera machine.
[root@servera ~]# systemctl reboot
4. After servera has finished rebooting, log in to servera as the admin1 user and test the
persistently mounted NFS export.
4.1. Log in to servera as the admin1 user.
[student@workstation ~]$ ssh admin1@servera
[admin1@servera ~]$
4.2. Test the NFS export that is mounted on the /public directory.
[admin1@servera ~]$ ls -l /public
total 16
-rw-r--r--. 1 root admin 42 Apr 8 22:36 Delivered.txt
-rw-r--r--. 1 root admin 46 Apr 8 22:36 NOTES.txt
-rw-r--r--. 1 root admin 20 Apr 8 22:36 README.txt
-rw-r--r--. 1 root admin 27 Apr 8 22:36 Trackings.txt
[admin1@servera ~]$ cat /public/NOTES.txt
###In this file you can log all your notes###
[admin1@servera ~]$ echo "This is a test" > /public/Test.txt
[admin1@servera ~]$ cat /public/Test.txt
This is a test
4.3. Return to the workstation machine as the student user.
[admin1@servera ~]$ exit
logout
Connection to servera closed.
Finish
On the workstation machine, change to the student user home directory and use the lab
command to complete this exercise. This step is important to ensure that resources from previous
exercises do not impact upcoming exercises.
[student@workstation ~]$ lab finish netstorage-nfs
This concludes the section.
RH134-RHEL9.0-en-2-20220609 207](https://image.slidesharecdn.com/redhatenterpriselinux9-240713030337-3ff2819f/85/Red-Hat-Enterprise-Linux-Administration-9-0-RH134-pdf-225-320.jpg)
![Chapter 7 | Access Network-Attached Storage
file system remains unmounted until the mount point is accessed, which causes the file system to
mount immediately, and to remain mounted while the file system is in use. When all files on the file
system are closed, and all users and processes leave the mount point directory, the automounter
unmounts the file system after a minimal time out.
Direct and Indirect Map Use Cases
The automounter supports both direct and indirect mount-point mapping, to handle the two types
of demand mounting. A direct mount is when a file system mounts to an unchanging, known mount
point location. Almost all the file system mounts that you configured, before learning about the
automounter, are examples of direct mounts. A direct mount point exists as a permanent directory,
the same as other normal directories.
An indirect mount is when the mount point location is not known until the mount demand occurs.
An example of an indirect mount is the configuration for remote-mounted home directories,
where a user's home directory includes their username in the directory path. The user's remote file
system is mounted to their home directory, only after the automounter learns which user specified
to mount their home directory, and determines the mount point location to use. Although indirect
mount points appear to exist, the autofs service creates them when the mount demand occurs,
and deletes them again when the demand has ended and the file system is unmounted.
Configure the Automounter Service
The process to configure an automount has many steps.
First, you must install the autofs and nfs-utils packages.
[user@host ~]$ sudo dnf install autofs nfs-utils
These packages contain all requirements to use the automounter for NFS exports.
Create a Master Map
Next, add a master map file to /etc/auto.master.d. This file identifies the base directory for
mount points and identifies the mapping file to create the automounts.
[user@host ~]$ sudo vim /etc/auto.master.d/demo.autofs
The name of the master map file is mostly arbitrary (although typically meaningful), and it must
have an extension of .autofs for the subsystem to recognize it. You can place multiple entries in
a single master map file; alternatively, you can create multiple master map files, each with its own
logically grouped entries.
Add the master map entry for indirectly mapped mounts, in this case:
/shares /etc/auto.demo
This entry uses the /shares directory as the base for indirect automounts. The /etc/
auto.demo file contains the mount details. Use an absolute file name. The auto.demo file must
be created before starting the autofs service.
RH134-RHEL9.0-en-2-20220609 209](https://image.slidesharecdn.com/redhatenterpriselinux9-240713030337-3ff2819f/85/Red-Hat-Enterprise-Linux-Administration-9-0-RH134-pdf-227-320.jpg)
![Chapter 7 | Access Network-Attached Storage
Create an Indirect Map
Now, create the mapping files. Each mapping file identifies the mount point, mount options, and
source location to mount for a set of automounts.
[user@host ~]$ sudo vim /etc/auto.demo
The mapping file-naming convention is /etc/auto.name, where name reflects the content of
the map.
work -rw,sync serverb:/shares/work
The format of an entry is mount point, mount options, and source location. This example shows a
basic indirect mapping entry. Direct maps and indirect maps that use wildcards are covered later in
this section.
Known as the key in the man pages, the mount point is created and removed automatically by the
autofs service. In this case, the fully qualified mount point is /shares/work (see the master
map file). The /shares and /shares/work directories are created and removed as needed by
the autofs service.
In this example, the local mount point mirrors the server's directory structure. However, this
mirroring is not required; the local mount point can have an arbitrary name. The autofs service
does not enforce a specific naming structure on the client.
Mount options start with a dash character (-) and are comma-separated with no white space.
The file system mount options for manual mounting are also available when automounting. In this
example, the automounter mounts the export with read/write access (rw option), and the server is
synchronized immediately during write operations (sync option).
Useful automounter-specific options include -fstype= and -strict. Use fstype to specify
the file-system type, for example nfs4 or xfs, and use strict to treat errors when mounting file
systems as fatal.
The source location for NFS exports follows the host:/pathname pattern, in this example
serverb:/shares/work. For this automount to succeed, the NFS server, serverb, must
export the directory with read/write access, and the user that requests access must have standard
Linux file permissions on the directory. If serverb exports the directory with read/only access,
then the client gets read/only access even if it requested read/write access.
Wildcards in an Indirect Map
When an NFS server exports multiple subdirectories within a directory, then the automounter can
be configured to access any of those subdirectories with a single mapping entry.
Continuing the previous example, if serverb:/shares exports two or more subdirectories, and
they are accessible with the same mount options, then the content for the /etc/auto.demo file
might appear as follows:
* -rw,sync serverb:/shares/&
The mount point (or key) is an asterisk character (*), and the subdirectory on the source location is
an ampersand character (&). Everything else in the entry is the same.
210 RH134-RHEL9.0-en-2-20220609](https://image.slidesharecdn.com/redhatenterpriselinux9-240713030337-3ff2819f/85/Red-Hat-Enterprise-Linux-Administration-9-0-RH134-pdf-228-320.jpg)
![Chapter 7 | Access Network-Attached Storage
When a user attempts to access /shares/work, the * key (which is work in this example)
replaces the ampersand in the source location and serverb:/exports/work is mounted.
As with the indirect example, the autofs service creates and removes the work directory
automatically.
Create a Direct Map
A direct map is used to map an NFS export to an absolute path mount point. Only one direct map
file is necessary, and can contain any number of direct maps.
To use directly mapped mount points, the master map file might appear as follows:
/- /etc/auto.direct
All direct map entries use /- as the base directory. In this case, the mapping file that contains the
mount details is /etc/auto.direct.
The content for the /etc/auto.direct file might appear as follows:
/mnt/docs -rw,sync serverb:/shares/docs
The mount point (or key) is always an absolute path. The rest of the mapping file uses the same
structure.
In this example, the /mnt directory exists, and it is not managed by the autofs service. The
autofs service creates and removed the full /mnt/docs directory automatically.
Start the Automounter Service
Lastly, use the systemctl command to start and enable the autofs service.
[user@host ~]$ sudo systemctl enable --now autofs
Created symlink /etc/systemd/system/multi-user.target.wants/autofs.service → /usr/
lib/systemd/system/autofs.service.
The Alternative systemd.automount Method
The systemd daemon can automatically create unit files for entries in /etc/fstab that include
the x-systemd.automount option. Use the systemctl daemon-reload command after
modifying an entry's mount options, to generate a new unit file, and then use the systemctl
start unit.automount command to enable that automount configuration.
The naming of the unit is based on its mount location. For example, if the mount point is
/remote/finance, then the unit file is named remote-finance.automount. The systemd
daemon mounts the file system when the /remote/finance directory is initially accessed.
This method can be simpler than installing and configuring the autofs service. However, a
systemd.automount unit can support only absolute path mount points, similar to autofs direct
maps.
References
autofs(5), automount(8), auto.master(5), mount.nfs(8), and
systemd.automount(5) man pages
RH134-RHEL9.0-en-2-20220609 211](https://image.slidesharecdn.com/redhatenterpriselinux9-240713030337-3ff2819f/85/Red-Hat-Enterprise-Linux-Administration-9-0-RH134-pdf-229-320.jpg)
![Chapter 7 | Access Network-Attached Storage
Guided Exercise
Automount Network-Attached Storage
Performance Checklist
In this exercise, you create direct-mapped and indirect-mapped automount-managed mount
points that mount NFS file systems.
Outcomes
• Install required packages for the automounter.
• Configure direct and indirect automounter maps, with resources from a preconfigured
NFSv4 server.
• Describe the difference between direct and indirect automounter maps.
Before You Begin
As the student user on the workstation machine, use the lab command to prepare your
system for this exercise.
This start script determines whether servera and serverb are reachable on the network.
The script alerts you if they are not available. The start script configures serverb as an
NFSv4 server, sets up permissions, and exports directories. The script also creates users and
groups that are needed on both servera and serverb.
[student@workstation ~]$ lab start netstorage-autofs
Instructions
An internet service provider uses a central server, serverb, to host shared directories with
important documents that must be available on demand. When users log in to servera, they
need access to the automounted shared directories.
Environment Characteristics:
• The serverb machine exports the /shares/indirect directory, which in turn contains the
west, central, and east subdirectories.
• The serverb machine also exports the /shares/direct/external directory.
• The operators group consists of the operator1 and operator2 users. They have read
and write access to the /shares/indirect/west, /shares/indirect/central, and
/shares/indirect/east exported directories.
• The contractors group consists of the contractor1 and contractor2 users. They have
read and write access to the /shares/direct/external exported directory.
• The expected mount points for servera are /external and /internal.
• The /shares/direct/external exported directory is automounted on servera with a
direct map on /external.
• The /shares/indirect/west exported directory is automounted on servera with an
indirect map on /internal/west.
• The /shares/indirect/central exported directory is automounted on servera with an
indirect map on /internal/central.
212 RH134-RHEL9.0-en-2-20220609](https://image.slidesharecdn.com/redhatenterpriselinux9-240713030337-3ff2819f/85/Red-Hat-Enterprise-Linux-Administration-9-0-RH134-pdf-230-320.jpg)
![Chapter 7 | Access Network-Attached Storage
• The /shares/indirect/east exported directory is automounted on servera with an
indirect map on /internal/east.
• All user passwords are set to redhat.
• The nfs-utils package is already installed.
1. Log in to servera and install the required packages.
1.1. Log in to servera as the student user and switch to the root user.
[student@workstation ~]$ ssh student@servera
...output omitted...
[student@servera ~]$ sudo -i
[sudo] password for student: student
[root@servera ~]#
1.2. Install the autofs package.
[root@servera ~]# dnf install autofs
...output omitted...
Is this ok [y/N]: y
...output omitted...
Complete!
2. Configure an automounter direct map on servera with exports from serverb. Create
the direct map with files that are named /etc/auto.master.d/direct.autofs for the
master map and /etc/auto.direct for the mapping file. Use the /external directory
as the main mount point on servera.
2.1. Test the NFS server and export before you configure the automounter.
[root@servera ~]# mount -t nfs
serverb.lab.example.com:/shares/direct/external /mnt
[root@servera ~]# ls -l /mnt
total 4
-rw-r--r--. 1 root contractors 22 Apr 7 23:15 README.txt
[root@servera ~]# umount /mnt
2.2. Create a master map file named /etc/auto.master.d/direct.autofs, insert
the following content, and save the changes.
/- /etc/auto.direct
2.3. Create a direct map file named /etc/auto.direct, insert the following content,
and save the changes.
/external -rw,sync,fstype=nfs4 serverb.lab.example.com:/shares/direct/external
3. Configure an automounter indirect map on servera with exports from serverb. Create
the indirect map with files that are named /etc/auto.master.d/indirect.autofs
for the master map and /etc/auto.indirect for the mapping file. Use the /internal
directory as the main mount point on servera.
RH134-RHEL9.0-en-2-20220609 213](https://image.slidesharecdn.com/redhatenterpriselinux9-240713030337-3ff2819f/85/Red-Hat-Enterprise-Linux-Administration-9-0-RH134-pdf-231-320.jpg)
![Chapter 7 | Access Network-Attached Storage
3.1. Test the NFS server and export before you configure the automounter.
[root@servera ~]# mount -t nfs
serverb.lab.example.com:/shares/indirect /mnt
[root@servera ~]# ls -l /mnt
total 0
drwxrws---. 2 root operators 24 Apr 7 23:34 central
drwxrws---. 2 root operators 24 Apr 7 23:34 east
drwxrws---. 2 root operators 24 Apr 7 23:34 west
[root@servera ~]# umount /mnt
3.2. Create a master map file named /etc/auto.master.d/indirect.autofs, insert
the following content, and save the changes.
/internal /etc/auto.indirect
3.3. Create an indirect map file named /etc/auto.indirect, insert the following
content, and save the changes.
* -rw,sync,fstype=nfs4 serverb.lab.example.com:/shares/indirect/&
4. Start the autofs service on servera and enable it to start automatically at boot time.
Reboot servera to determine whether the autofs service starts automatically.
4.1. Start and enable the autofs service on servera.
[root@servera ~]# systemctl enable --now autofs
Created symlink /etc/systemd/system/multi-user.target.wants/autofs.service → /usr/
lib/systemd/system/autofs.service.
4.2. Reboot the servera machine.
[root@servera ~]# systemctl reboot
5. Test the direct automounter map as the contractor1 user. When done, exit from the
contractor1 user session on servera.
5.1. After the servera machine is finished booting, log in to servera as the student
user.
[student@workstation ~]$ ssh student@servera
...output omitted...
[student@servera ~]$
5.2. Switch to the contractor1 user.
[student@servera ~]$ su - contractor1
Password: redhat
5.3. List the /external mount point.
214 RH134-RHEL9.0-en-2-20220609](https://image.slidesharecdn.com/redhatenterpriselinux9-240713030337-3ff2819f/85/Red-Hat-Enterprise-Linux-Administration-9-0-RH134-pdf-232-320.jpg)
![Chapter 7 | Access Network-Attached Storage
[contractor1@servera ~]$ ls -l /external
total 4
-rw-r--r--. 1 root contractors 22 Apr 7 23:34 README.txt
5.4. Review the content and test the access to the /external mount point.
[contractor1@servera ~]$ cat /external/README.txt
###External Folder###
[contractor1@servera ~]$ echo testing-direct > /external/testing.txt
[contractor1@servera ~]$ cat /external/testing.txt
testing-direct
5.5. Exit from the contractor1 user session.
[contractor1@servera ~]$ exit
logout
[student@servera ~]$
6. Test the indirect automounter map as the operator1 user. When done, log out from
servera.
6.1. Switch to the operator1 user.
[student@servera ~]$ su - operator1
Password: redhat
6.2. List the /internal mount point.
[operator1@servera ~]$ ls -l /internal
total 0
Note
With an automounter indirect map, you must access each exported subdirectory
for them to mount. With an automounter direct map, after you access the mapped
mount point, you can immediately view and access the subdirectories and content in
the exported directory.
6.3. Test the /internal/west automounter exported directory access.
[operator1@servera ~]$ ls -l /internal/west/
total 4
-rw-r--r--. 1 root operators 18 Apr 7 23:34 README.txt
[operator1@servera ~]$ cat /internal/west/README.txt
###West Folder###
[operator1@servera ~]$ echo testing-1 > /internal/west/testing-1.txt
[operator1@servera ~]$ cat /internal/west/testing-1.txt
testing-1
RH134-RHEL9.0-en-2-20220609 215](https://image.slidesharecdn.com/redhatenterpriselinux9-240713030337-3ff2819f/85/Red-Hat-Enterprise-Linux-Administration-9-0-RH134-pdf-233-320.jpg)
![Chapter 7 | Access Network-Attached Storage
[operator1@servera ~]$ ls -l /internal
total 0
drwxrws---. 2 root operators 24 Apr 7 23:34 west
6.4. Test the /internal/central automounter exported directory access.
[operator1@servera ~]$ ls -l /internal/central
total 4
-rw-r--r--. 1 root operators 21 Apr 7 23:34 README.txt
[operator1@servera ~]$ cat /internal/central/README.txt
###Central Folder###
[operator1@servera ~]$ echo testing-2 > /internal/central/testing-2.txt
[operator1@servera ~]$ cat /internal/central/testing-2.txt
testing-2
[operator1@servera ~]$ ls -l /internal
total 0
drwxrws---. 2 root operators 24 Apr 7 23:34 central
drwxrws---. 2 root operators 24 Apr 7 23:34 west
6.5. Test the /internal/east automounter exported directory access.
[operator1@servera ~]$ ls -l /internal/east
total 4
-rw-r--r--. 1 root operators 18 Apr 7 23:34 README.txt
[operator1@servera ~]$ cat /internal/east/README.txt
###East Folder###
[operator1@servera ~]$ echo testing-3 > /internal/east/testing-3.txt
[operator1@servera ~]$ cat /internal/east/testing-3.txt
testing-3
[operator1@servera ~]$ ls -l /internal
total 0
drwxrws---. 2 root operators 24 Apr 7 23:34 central
drwxrws---. 2 root operators 24 Apr 7 23:34 east
drwxrws---. 2 root operators 24 Apr 7 23:34 west
6.6. Test the /external automounter exported directory access.
[operator1@servera ~]$ ls -l /external
ls: cannot open directory '/external': Permission denied
6.7. Return to the workstation machine as the student user.
[operator1@servera ~]$ exit
logout
[student@servera ~]$ exit
logout
Connection to servera closed.
216 RH134-RHEL9.0-en-2-20220609](https://image.slidesharecdn.com/redhatenterpriselinux9-240713030337-3ff2819f/85/Red-Hat-Enterprise-Linux-Administration-9-0-RH134-pdf-234-320.jpg)
![Chapter 7 | Access Network-Attached Storage
Finish
On the workstation machine, change to the student user home directory and use the lab
command to complete this exercise. This step is important to ensure that resources from previous
exercises do not impact upcoming exercises.
[student@workstation ~]$ lab finish netstorage-autofs
This concludes the section.
RH134-RHEL9.0-en-2-20220609 217](https://image.slidesharecdn.com/redhatenterpriselinux9-240713030337-3ff2819f/85/Red-Hat-Enterprise-Linux-Administration-9-0-RH134-pdf-235-320.jpg)
![Chapter 7 | Access Network-Attached Storage
Lab
Access Network-Attached Storage
Performance Checklist
In this lab, you configure the automounter with an indirect map, using exports from an NFSv4
server.
Outcomes
• Install required packages to set up the automounter.
• Configure an automounter indirect map, with resources from a preconfigured NFSv4
server.
Before You Begin
As the student user on the workstation machine, use the lab command to prepare your
system for this exercise.
This start script determines whether the servera and serverb systems are reachable on
the network. The start script configures serverb as an NFSv4 server, sets up permissions,
and exports directories. The script also creates users and groups that are needed on both
servera and serverb systems.
[student@workstation ~]$ lab start netstorage-review
Instructions
An IT support company uses a central server, serverb, to host some exported directories
on /shares for their groups and users. Users must be able to log in and have their exported
directories mounted on demand and ready to use, under the /remote directory on servera.
Environment Characteristics:
• The serverb machine is sharing the /shares directory, which in turn contains the
management, production, and operation subdirectories.
• The managers group consists of the manager1 and manager2 users. They have read and write
access to the /shares/management exported directory.
• The production group consists of the dbuser1 and sysadmin1 users. They have read and
write access to the /shares/production exported directory.
• The operators group consists of the contractor1 and consultant1 users. They have read
and write access to the /shares/operation exported directory.
• The main mount point for servera is the /remote directory.
• Use the /etc/auto.master.d/shares.autofs file as the master map file and the /etc/
auto.shares file as the indirect map file.
• The /shares/management exported directory is automounted on /remote/management on
servera.
218 RH134-RHEL9.0-en-2-20220609](https://image.slidesharecdn.com/redhatenterpriselinux9-240713030337-3ff2819f/85/Red-Hat-Enterprise-Linux-Administration-9-0-RH134-pdf-236-320.jpg)
![Chapter 7 | Access Network-Attached Storage
• The /shares/production exported directory is automounted on /remote/production on
servera.
• The /shares/operation exported directory is automounted on /remote/operation on
servera.
• All user passwords are set to redhat.
1. Log in to servera and install the required packages.
2. Configure an automounter indirect map on servera with exports from serverb. Create
an indirect map with files that are named /etc/auto.master.d/shares.autofs for
the master map and /etc/auto.shares for the mapping file. Use the /remote directory
as the main mount point on servera. Reboot servera to determine whether the autofs
service starts automatically.
3. Test the autofs configuration with the various users. When done, log out from servera.
Evaluation
On the workstation machine, use the lab command to confirm success of this exercise.
[student@workstation ~]$ lab grade netstorage-review
Finish
On the workstation machine, change to the student user home directory and use the lab
command to complete this exercise. This step is important to ensure that resources from previous
exercises do not impact upcoming exercises.
[student@workstation ~]$ lab finish netstorage-review
This concludes the section.
RH134-RHEL9.0-en-2-20220609 219](https://image.slidesharecdn.com/redhatenterpriselinux9-240713030337-3ff2819f/85/Red-Hat-Enterprise-Linux-Administration-9-0-RH134-pdf-237-320.jpg)
![Chapter 7 | Access Network-Attached Storage
Solution
Access Network-Attached Storage
Performance Checklist
In this lab, you configure the automounter with an indirect map, using exports from an NFSv4
server.
Outcomes
• Install required packages to set up the automounter.
• Configure an automounter indirect map, with resources from a preconfigured NFSv4
server.
Before You Begin
As the student user on the workstation machine, use the lab command to prepare your
system for this exercise.
This start script determines whether the servera and serverb systems are reachable on
the network. The start script configures serverb as an NFSv4 server, sets up permissions,
and exports directories. The script also creates users and groups that are needed on both
servera and serverb systems.
[student@workstation ~]$ lab start netstorage-review
Instructions
An IT support company uses a central server, serverb, to host some exported directories
on /shares for their groups and users. Users must be able to log in and have their exported
directories mounted on demand and ready to use, under the /remote directory on servera.
Environment Characteristics:
• The serverb machine is sharing the /shares directory, which in turn contains the
management, production, and operation subdirectories.
• The managers group consists of the manager1 and manager2 users. They have read and write
access to the /shares/management exported directory.
• The production group consists of the dbuser1 and sysadmin1 users. They have read and
write access to the /shares/production exported directory.
• The operators group consists of the contractor1 and consultant1 users. They have read
and write access to the /shares/operation exported directory.
• The main mount point for servera is the /remote directory.
• Use the /etc/auto.master.d/shares.autofs file as the master map file and the /etc/
auto.shares file as the indirect map file.
• The /shares/management exported directory is automounted on /remote/management on
servera.
220 RH134-RHEL9.0-en-2-20220609](https://image.slidesharecdn.com/redhatenterpriselinux9-240713030337-3ff2819f/85/Red-Hat-Enterprise-Linux-Administration-9-0-RH134-pdf-238-320.jpg)
![Chapter 7 | Access Network-Attached Storage
• The /shares/production exported directory is automounted on /remote/production on
servera.
• The /shares/operation exported directory is automounted on /remote/operation on
servera.
• All user passwords are set to redhat.
1. Log in to servera and install the required packages.
1.1. Log in to servera as the student user and switch to the root user.
[student@workstation ~]$ ssh student@servera
...output omitted...
[student@servera ~]$
[student@servera ~]$ sudo -i
[sudo] password for student: student
[root@servera ~]#
1.2. Install the autofs package.
[root@servera ~]# dnf install autofs
...output omitted...
Is this ok [y/N]: y
...output omitted...
Complete!
2. Configure an automounter indirect map on servera with exports from serverb. Create
an indirect map with files that are named /etc/auto.master.d/shares.autofs for
the master map and /etc/auto.shares for the mapping file. Use the /remote directory
as the main mount point on servera. Reboot servera to determine whether the autofs
service starts automatically.
2.1. Test the NFS server before you configure the automounter.
[root@servera ~]# mount -t nfs serverb.lab.example.com:/shares /mnt
[root@servera ~]# ls -l /mnt
total 0
drwxrwx---. 2 root managers 25 Apr 4 01:13 management
drwxrwx---. 2 root operators 25 Apr 4 01:13 operation
drwxrwx---. 2 root production 25 Apr 4 01:13 production
[root@servera ~]# umount /mnt
2.2. Create a master map file named /etc/auto.master.d/shares.autofs, insert the
following content, and save the changes.
/remote /etc/auto.shares
2.3. Create an indirect map file named /etc/auto.shares, insert the following content,
and save the changes.
* -rw,sync,fstype=nfs4 serverb.lab.example.com:/shares/&
RH134-RHEL9.0-en-2-20220609 221](https://image.slidesharecdn.com/redhatenterpriselinux9-240713030337-3ff2819f/85/Red-Hat-Enterprise-Linux-Administration-9-0-RH134-pdf-239-320.jpg)
![Chapter 7 | Access Network-Attached Storage
2.4. Start and enable the autofs service on servera.
[root@servera ~]# systemctl enable --now autofs
Created symlink /etc/systemd/system/multi-user.target.wants/autofs.service → /usr/
lib/systemd/system/autofs.service.
2.5. Reboot the servera machine.
[root@servera ~]# systemctl reboot
3. Test the autofs configuration with the various users. When done, log out from servera.
3.1. After the servera machine is finished booting, log in to servera as the student
user.
[student@workstation ~]$ ssh student@servera
...output omitted...
[student@servera ~]$
3.2. Switch to the manager1 user and test access.
[student@servera ~]$ su - manager1
Password: redhat
[manager1@servera ~]$ ls -l /remote/management/
total 4
-rw-r--r--. 1 root managers 46 Apr 4 01:13 Welcome.txt
[manager1@servera ~]$ cat /remote/management/Welcome.txt
###Welcome to Management Folder on SERVERB###
[manager1@servera ~]$ echo TEST1 > /remote/management/Test.txt
[manager1@servera ~]$ cat /remote/management/Test.txt
TEST1
[manager1@servera ~]$ ls -l /remote/operation/
ls: cannot open directory '/remote/operation/': Permission denied
[manager1@servera ~]$ ls -l /remote/production/
ls: cannot open directory '/remote/production/': Permission denied
[manager1@servera ~]$ exit
logout
[student@servera ~]$
3.3. Switch to the dbuser1 user and test access.
[student@servera ~]$ su - dbuser1
Password: redhat
[dbuser1@servera ~]$ ls -l /remote/production/
total 4
-rw-r--r--. 1 root production 46 Apr 4 01:13 Welcome.txt
[dbuser1@servera ~]$ cat /remote/production/Welcome.txt
###Welcome to Production Folder on SERVERB###
[dbuser1@servera ~]$ echo TEST2 > /remote/production/Test.txt
[dbuser1@servera ~]$ cat /remote/production/Test.txt
TEST2
[dbuser1@servera ~]$ ls -l /remote/operation/
222 RH134-RHEL9.0-en-2-20220609](https://image.slidesharecdn.com/redhatenterpriselinux9-240713030337-3ff2819f/85/Red-Hat-Enterprise-Linux-Administration-9-0-RH134-pdf-240-320.jpg)
![Chapter 7 | Access Network-Attached Storage
ls: cannot open directory '/remote/operation/': Permission denied
[dbuser1@servera ~]$ ls -l /remote/management/
ls: cannot open directory '/remote/management/': Permission denied
[dbuser1@servera ~]$ exit
logout
[student@servera ~]$
3.4. Switch to the contractor1 user and test access.
[student@servera ~]$ su - contractor1
Password: redhat
[contractor1@servera ~]$ ls -l /remote/operation/
total 4
-rw-r--r--. 1 root operators 45 Apr 4 01:13 Welcome.txt
[contractor1@servera ~]$ cat /remote/operation/Welcome.txt
###Welcome to Operation Folder on SERVERB###
[contractor1@servera ~]$ echo TEST3 > /remote/operation/Test.txt
[contractor1@servera ~]$ cat /remote/operation/Test.txt
TEST3
[contractor1@servera ~]$ ls -l /remote/management/
ls: cannot open directory '/remote/management/': Permission denied
[contractor1@servera ~]$ ls -l /remote/production/
ls: cannot open directory '/remote/production/': Permission denied
[contractor1@servera ~]$ exit
logout
[student@servera ~]$
3.5. Explore the mount options for the NFS automounted export.
[student@servera ~]$ mount | grep nfs
rpc_pipefs on /var/lib/nfs/rpc_pipefs type rpc_pipefs (rw,relatime)
serverb.lab.example.com:/shares/management on /remote/management type nfs4
(rw,relatime,vers=4.2,rsize=262144,wsize=262144,namlen=255,
sync,proto=tcp,timeo=600,retrans=2,sec=sys,clientaddr=172.25.250.10,
local_lock=none,addr=172.25.250.11)
serverb.lab.example.com:/shares/operation on /remote/operation type nfs4
(rw,relatime,vers=4.2,rsize=262144,wsize=262144,namlen=255,
sync,proto=tcp,timeo=600,retrans=2,sec=sys,clientaddr=172.25.250.10,
local_lock=none,addr=172.25.250.11)
serverb.lab.example.com:/shares/production on /remote/production type nfs4
(rw,relatime,vers=4.2,rsize=262144,wsize=262144,namlen=255,
sync,proto=tcp,timeo=600,retrans=2,sec=sys,clientaddr=172.25.250.10,
local_lock=none,addr=172.25.250.11)
3.6. Return to the workstation machine as the student user.
[student@servera ~]$ exit
logout
[student@workstation ~]$
Evaluation
On the workstation machine, use the lab command to confirm success of this exercise.
RH134-RHEL9.0-en-2-20220609 223](https://image.slidesharecdn.com/redhatenterpriselinux9-240713030337-3ff2819f/85/Red-Hat-Enterprise-Linux-Administration-9-0-RH134-pdf-241-320.jpg)
![Chapter 7 | Access Network-Attached Storage
[student@workstation ~]$ lab grade netstorage-review
Finish
On the workstation machine, change to the student user home directory and use the lab
command to complete this exercise. This step is important to ensure that resources from previous
exercises do not impact upcoming exercises.
[student@workstation ~]$ lab finish netstorage-review
This concludes the section.
224 RH134-RHEL9.0-en-2-20220609](https://image.slidesharecdn.com/redhatenterpriselinux9-240713030337-3ff2819f/85/Red-Hat-Enterprise-Linux-Administration-9-0-RH134-pdf-242-320.jpg)

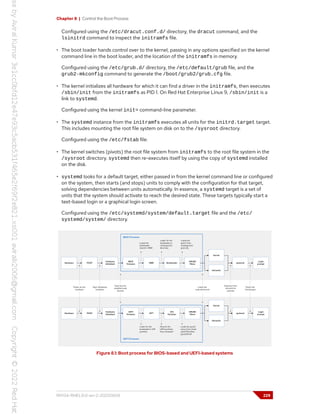
![Chapter 8 | Control the Boot Process
Reboot and Shut Down
To power off or reboot a running system from the command line, you can use the systemctl
command.
The systemctl poweroff command stops all running services, unmounts all file systems (or
remounts them read-only when they cannot be unmounted), and then powers down the system.
The systemctl reboot command stops all running services, unmounts all file systems, and then
reboots the system.
You can also use the shorter version of these commands, poweroff and reboot, which are
symbolic links to their systemctl equivalents.
Note
The systemctl halt and the halt commands are also available to stop the
system, but unlike the poweroff command, these commands do not power off the
system; they bring a system down to a point where it is safe to power it off manually.
Select a Systemd Target
A systemd target is a set of systemd units that the system should start to reach a desired state.
The following table lists the most important targets.
Commonly Used Targets
Target Purpose
graphical.target System supports multiple users, graphical- and text-based
logins.
multi-user.target System supports multiple users, text-based logins only.
rescue.target sulogin prompt, basic system initialization completed.
emergency.target sulogin prompt, initramfs pivot complete, and system
root mounted on / read only.
A target can be a part of another target. For example, the graphical.target includes
multi-user.target, which in turn depends on basic.target and others. You can view these
dependencies with the following command.
[user@host ~]$ systemctl list-dependencies graphical.target | grep target
graphical.target
* └─multi-user.target
* ├─basic.target
* │ ├─paths.target
* │ ├─slices.target
* │ ├─sockets.target
* │ ├─sysinit.target
* │ │ ├─cryptsetup.target
230 RH134-RHEL9.0-en-2-20220609](https://image.slidesharecdn.com/redhatenterpriselinux9-240713030337-3ff2819f/85/Red-Hat-Enterprise-Linux-Administration-9-0-RH134-pdf-248-320.jpg)
![Chapter 8 | Control the Boot Process
* | | ├─integritysetup.target
* │ │ ├─local-fs.target
...output omitted...
To list the available targets, use the following command.
[user@host ~]$ systemctl list-units --type=target --all
UNIT LOAD ACTIVE SUB DESCRIPTION
---------------------------------------------------------------------------
basic.target loaded active active Basic System
...output omitted...
cloud-config.target loaded active active Cloud-config availability
cloud-init.target loaded active active Cloud-init target
cryptsetup-pre.target loaded inactive dead Local Encrypted Volumes
(Pre)
cryptsetup.target loaded active active Local Encrypted Volumes
...output omitted...
Select a Target at Runtime
On a running system, administrators can switch to a different target by using the systemctl
isolate command.
[root@host ~]# systemctl isolate multi-user.target
Isolating a target stops all services not required by that target (and its dependencies), and starts
any required services not yet started.
Not all targets can be isolated. You can only isolate targets that have AllowIsolate=yes set in
their unit files. For example, you can isolate the graphical target, but not the cryptsetup target.
[user@host ~]$ systemctl cat graphical.target
# /usr/lib/systemd/system/graphical.target
...output omitted...
[Unit]
Description=Graphical Interface
Documentation=man:systemd.special(7)
Requires=multi-user.target
Wants=display-manager.service
Conflicts=rescue.service rescue.target
After=multi-user.target rescue.service rescue.target display-manager.service
AllowIsolate=yes
[user@host ~]$ systemctl cat cryptsetup.target
# /usr/lib/systemd/system/cryptsetup.target
...output omitted...
[Unit]
Description=Local Encrypted Volumes
Documentation=man:systemd.special(7)
Set a Default Target
When the system starts, systemd activates the default.target target. Normally the default
target in /etc/systemd/system/ is a symbolic link to either the graphical.target or the
RH134-RHEL9.0-en-2-20220609 231](https://image.slidesharecdn.com/redhatenterpriselinux9-240713030337-3ff2819f/85/Red-Hat-Enterprise-Linux-Administration-9-0-RH134-pdf-249-320.jpg)
![Chapter 8 | Control the Boot Process
multi-user.target targets. Instead of editing this symbolic link by hand, the systemctl
command provides two subcommands to manage this link: get-default and set-default.
[root@host ~]# systemctl get-default
multi-user.target
[root@host ~]# systemctl set-default graphical.target
Removed /etc/systemd/system/default.target.
Created symlink /etc/systemd/system/default.target -> /usr/lib/systemd/system/
graphical.target.
[root@host ~]# systemctl get-default
graphical.target
Select a Different Target at Boot Time
To select a different target at boot time, append the systemd.unit=target.target option to
the kernel command line from the boot loader.
For example, to boot the system into a rescue shell where you can change the system
configuration with almost no services running, append the following option to the kernel command
line from the boot loader.
systemd.unit=rescue.target
This configuration change only affects a single boot, making it a useful tool to troubleshoot the
boot process.
To use this method to select a different target, use the following procedure:
1. Boot or reboot the system.
2. Interrupt the boot loader menu countdown by pressing any key (except Enter which would
initiate a normal boot).
3. Move the cursor to the kernel entry that you want to start.
4. Press e to edit the current entry.
5. Move the cursor to the line that starts with linux. This is the kernel command line.
6. Append systemd.unit=target.target. For example,
systemd.unit=emergency.target.
7. Press Ctrl+x to boot with these changes.
232 RH134-RHEL9.0-en-2-20220609](https://image.slidesharecdn.com/redhatenterpriselinux9-240713030337-3ff2819f/85/Red-Hat-Enterprise-Linux-Administration-9-0-RH134-pdf-250-320.jpg)
![Chapter 8 | Control the Boot Process
Guided Exercise
Select the Boot Target
In this exercise, you determine the default target into which a system boots, and boot that
system into other targets.
Outcomes
• Update the system default target and use a temporary target from the boot loader.
Before You Begin
As the student user on the workstation machine, use the lab command to prepare your
system for this exercise.
This command ensures that all required resources are available.
[student@workstation ~]$ lab start boot-selecting
Instructions
1. On the workstation machine, open a terminal and confirm that the default target is
graphical.target.
[student@workstation ~]$ systemctl get-default
graphical.target
2. On the workstation machine, switch to the multi-user target manually without
rebooting. Use the sudo command and if prompted, use student as the password.
[student@workstation ~]$ sudo systemctl isolate multi-user.target
[sudo] password for student: student
3. Access a text-based console. Use the Ctrl+Alt+F1 key sequence by using the relevant
button or menu entry. Log in as the root user by using redhat as the password.
Note
Reminder: If you are using the terminal through a web page, then you can click the
Show Keyboard icon in the menu on the right side of the screen under your web
browser's URL bar.
workstation login: root
Password: redhat
[root@workstation ~]#
234 RH134-RHEL9.0-en-2-20220609](https://image.slidesharecdn.com/redhatenterpriselinux9-240713030337-3ff2819f/85/Red-Hat-Enterprise-Linux-Administration-9-0-RH134-pdf-252-320.jpg)
![Chapter 8 | Control the Boot Process
4. Configure the workstation machine to automatically boot into the multi-user target,
and then reboot the workstation machine to verify. When done, change the default
systemd target back to the graphical target.
4.1. Set the default target.
[root@workstation ~]# systemctl set-default multi-user.target
Removed /etc/systemd/system/default.target.
Created symlink /etc/systemd/system/default.target -> /usr/lib/systemd/system/
multi-user.target.
4.2. Reboot the workstation machine. After reboot, the system presents a text-based
console and not a graphical login screen.
[root@workstation ~]# systemctl reboot
4.3. Log in as the root user.
workstation login: root
Password: redhat
Last login: Thu Mar 28 14:50:53 on tty1
[root@workstation ~]#
4.4. Set the default systemd target back to the graphical target.
[root@workstation ~]# systemctl set-default graphical.target
Removed /etc/systemd/system/default.target.
Created symlink /etc/systemd/system/default.target -> /usr/lib/systemd/system/
graphical.target.
4.5. This concludes the first part of the exercise where you practice setting the default
systemd target.
5. In this second part of the exercise, you will practice by using rescue mode to recover the
system.
Access the boot loader by rebooting workstation again. From within the boot loader
menu, boot into the rescue target.
5.1. Initiate the reboot.
[root@workstation ~]# systemctl reboot
5.2. When the boot loader menu appears, press any key to interrupt the countdown
(except Enter, which would initiate a normal boot).
5.3. Use the cursor keys to highlight the default boot loader entry.
5.4. Press e to edit the current entry.
5.5. Using the cursor keys, navigate to the line that starts with linux.
5.6. Press End to move the cursor to the end of the line.
RH134-RHEL9.0-en-2-20220609 235](https://image.slidesharecdn.com/redhatenterpriselinux9-240713030337-3ff2819f/85/Red-Hat-Enterprise-Linux-Administration-9-0-RH134-pdf-253-320.jpg)
![Chapter 8 | Control the Boot Process
5.7. Append systemd.unit=rescue.target to the end of the line.
5.8. Press Ctrl+x to boot by using the modified configuration.
5.9. Log in to rescue mode. You might need to hit enter to get a clean prompt.
Give root password for maintenance
(or press Control-D to continue): redhat
[root@workstation ~]#
6. Confirm that in rescue mode, the root file system is in read/write mode.
[root@workstation ~]# mount
...output omitted...
/dev/vda4 on / type xfs
(rw,relatime,seclabel,attr2,inode64,logbufs=8,logbsize=32k,noquota)
...output omitted...
7. Press Ctrl+d to continue with the boot process.
The system presents a graphical login. Log in as the student user.
Finish
On the workstation machine, change to the student user home directory and use the lab
command to complete this exercise. This step is important to ensure that resources from previous
exercises do not impact upcoming exercises.
[student@workstation ~]$ lab finish boot-selecting
This concludes the section.
236 RH134-RHEL9.0-en-2-20220609](https://image.slidesharecdn.com/redhatenterpriselinux9-240713030337-3ff2819f/85/Red-Hat-Enterprise-Linux-Administration-9-0-RH134-pdf-254-320.jpg)
![Chapter 8 | Control the Boot Process
5. Type exit twice. The first command exits the chroot jail, and the second command exits the
initramfs debug shell.
At this point, the system continues booting, performs a full SELinux relabel, and then reboots
again.
Inspect Logs
Looking at the logs of previously failed boots can be useful. If the system journals are persistent
across reboots, you can use the journalctl tool to inspect those logs.
Remember that by default, the system journals are kept in the /run/log/journal directory,
which means the journals are cleared when the system reboots. To store journals in the
/var/log/journal directory, which persists across reboots, set the Storage parameter to
persistent in /etc/systemd/journald.conf.
[root@host ~]# vim /etc/systemd/journald.conf
...output omitted...
[Journal]
Storage=persistent
...output omitted...
[root@host ~]# systemctl restart systemd-journald.service
To inspect the logs of a previous boot, use the journalctl command -b option. Without any
arguments, the journalctl command -b option only displays messages since the last boot. With
a negative number as an argument, it displays the logs of previous boots.
[root@host ~]# journalctl -b -1 -p err
This command shows all messages rated as an error or worse from the previous boot.
Repair Systemd Boot Issues
To troubleshoot service startup issues at boot time, Red Hat Enterprise Linux 8 and later have the
following tools available.
Enable the Early Debug Shell
By enabling the debug-shell service with systemctl enable debug-shell.service, the
system spawns a root shell on TTY9 (Ctrl+Alt+F9) early during the boot sequence. This shell is
automatically logged in as root, so that administrators can debug the system while the operating
system is still booting.
Warning
Do not forget to disable the debug-shell.service service when you are done
debugging, because it leaves an unauthenticated root shell open to anyone with
local console access.
Alternatively, to activate the debug shell during the boot using the GRUB2 menu, follow these
steps:
1. Reboot the system.
RH134-RHEL9.0-en-2-20220609 239](https://image.slidesharecdn.com/redhatenterpriselinux9-240713030337-3ff2819f/85/Red-Hat-Enterprise-Linux-Administration-9-0-RH134-pdf-257-320.jpg)
![Chapter 8 | Control the Boot Process
Guided Exercise
Reset the Root Password
In this exercise, you reset the root password on a system.
Outcomes
• Reset the lost root user password.
Before You Begin
As the student user on the workstation machine, use the lab command to prepare your
system for this exercise.
This command runs a start script that determines if the servera machine is reachable on
the network. It also resets the root password to a random string and sets a higher time-out
for the GRUB2 menu.
[student@workstation ~]$ lab start boot-resetting
Instructions
1. Reboot servera, and interrupt the countdown in the boot-loader menu.
1.1. Locate the icon for the servera console, as appropriate for your classroom
environment, then open the console.
Send a Ctrl+Alt+Del to your system by using the relevant button or menu entry.
1.2. When the boot-loader menu appears, press any key to interrupt the countdown,
except Enter.
2. Edit the rescue kernel boot-loader entry, in memory, to abort the boot process just after
the kernel mounts all the file systems, but before it hands over control to systemd.
2.1. Use the cursor keys to highlight the rescue kernel entry (the one with the word rescue
in its name).
2.2. Press e to edit the current entry.
2.3. Use the cursor keys to navigate to the line that starts with linux.
2.4. Press End to move the cursor to the end of the line.
2.5. Append rd.break to the end of the line.
2.6. Press Ctrl+x to boot using the modified configuration.
3. Press Enter to perform maintenance. At the sh-5.1# prompt, remount the /sysroot file
system read/write, then use the chroot command to enter a chroot jail at /sysroot.
RH134-RHEL9.0-en-2-20220609 241](https://image.slidesharecdn.com/redhatenterpriselinux9-240713030337-3ff2819f/85/Red-Hat-Enterprise-Linux-Administration-9-0-RH134-pdf-259-320.jpg)
![Chapter 8 | Control the Boot Process
sh-5.1# mount -o remount,rw /sysroot
...output omitted...
sh-5.1# chroot /sysroot
4. Change the root password back to redhat.
sh-5.1# passwd root
Changing password for user root.
New password: redhat
BAD PASSWORD: The password is shorter than 8 characters
Retype new password: redhat
passwd: all authentication tokens updated successfully.
5. Configure the system to automatically perform a full SELinux relabel after boot. This is
necessary because the passwd command recreates the /etc/shadow file without an
SELinux context.
sh-5.1# touch /.autorelabel
6. Type exit twice to continue booting your system as usual. The system runs an SELinux
relabel operation, then reboots automatically. When the system is up, verify your work by
logging in as root at the console.
Finish
On the workstation machine, change to the student user home directory and use the lab
command to complete this exercise. This step is important to ensure that resources from previous
exercises do not impact upcoming exercises.
[student@workstation ~]$ lab finish boot-resetting
This concludes the section.
242 RH134-RHEL9.0-en-2-20220609](https://image.slidesharecdn.com/redhatenterpriselinux9-240713030337-3ff2819f/85/Red-Hat-Enterprise-Linux-Administration-9-0-RH134-pdf-260-320.jpg)
![Chapter 8 | Control the Boot Process
Repair File System Issues at Boot
Objectives
Manually repair file-system configuration or corruption issues that stop the boot process.
File-system Issues
During the boot process, the systemd service mounts the persistent file-systems defined in the
/etc/fstab file.
Errors in the /etc/fstab file or corrupt file systems can block a system from completing the
boot process. In some failure scenarios, the system breaks out of the boot process and opens an
emergency shell that requires the root user password.
The following list describes some common file system mounting issues when parsing /etc/fstab
during the boot process:
Corrupt file system
The systemd service attempts to repair the file system. If the problem can not be
automatically repaired, then the system opens an emergency shell.
Nonexistent device or UUID
The systemd service times out waiting for the device to become available. If the device does
not respond, then the system opens an emergency shell.
Nonexistent or incorrect mount point
The system opens an emergency shell.
Repair File-system Issues
To gain access to a system that cannot complete booting because of file-system issues, the
systemd architecture provides an emergency boot target, which opens an emergency shell that
requires the root password for access.
The next example demonstrates the boot process output when the system finds a file-system
issue and switches to the emergency target:
...output omitted...
[* ] A start job is running for /dev/vda2 (27s / 1min 30s)
[ TIME ] Timed out waiting for device /dev/vda2.
[DEPEND] Dependency failed for /mnt/mountfolder
[DEPEND] Dependency failed for Local File Systems.
[DEPEND] Dependency failed for Mark need to relabel after reboot.
...output omitted...
[ OK ] Started Emergency Shell.
[ OK ] Reached target Emergency Mode.
...output omitted...
Give root password for maintenance
(or press Control-D to continue):
RH134-RHEL9.0-en-2-20220609 243](https://image.slidesharecdn.com/redhatenterpriselinux9-240713030337-3ff2819f/85/Red-Hat-Enterprise-Linux-Administration-9-0-RH134-pdf-261-320.jpg)
![Chapter 8 | Control the Boot Process
The systemd daemon failed to mount the /dev/vda2 device and timed out. Because the device
is not available, the system opens an emergency shell for maintenance access.
To repair file-system issues when your system opens an emergency shell, first locate the errant
file system, determine and repair the fault, then reload the 'systemd configuration to retry the
automatic mounting.
Use the mount command to determine which file systems are currently mounted by the systemd
daemon.
[root@host ~]# mount
...output omitted...
/dev/vda1 on / type xfs (ro,relatime,seclabel,attr2,inode64,noquota)
...output omitted...
If the root file system is mounted with the ro (read-only) option, then you are unable to edit the
/etc/fstab file. Temporarily remount the root file system with the rw (read-write) option, if
necessary, before opening the /etc/fstab file. The remount option allows an in-use file system
to modify its mount parameters without actually unmounting the file system.
[root@host ~]# mount -o remount,rw /
Attempt to mount all the file systems listed in the /etc/fstab file by using the mount --all
option. This option mounts processes on every entry file-system entry, but skips those that are
already mounted. The command displays any errors that occur when mounting a file system.
[root@host ~]# mount --all
mount: /mnt/mountfolder: mount point does not exist.
In this scenario, the /mnt/mountfolder mount directory does not exist, create the /mnt/
mountfolder directory before reattempting the mount. Other error messages can occur,
including typos in the entries, or incorrect device names or UUIDs.
When you have corrected all of the issues in the /etc/fstab file, inform the the systemd
daemon to register the new /etc/fstab file by using the systemctl daemon-reload
command, then reattempt mounting all of the entries.
[root@host ~]# systemctl daemon-reload
[root@host ~]# mount --all
Note
The systemd service processes the /etc/fstab file by transforming each entry
into a .mount type systemd unit configuration and then starting the unit as a
service. The daemon-reload requests systemd to rebuild and reload all unit
configurations.
If the mount --all attempt succeeds without further errors, then the final test is to verify that
file-system mounting is successfully during a system boot. Reboot the system and wait for the
boot to complete normally.
244 RH134-RHEL9.0-en-2-20220609](https://image.slidesharecdn.com/redhatenterpriselinux9-240713030337-3ff2819f/85/Red-Hat-Enterprise-Linux-Administration-9-0-RH134-pdf-262-320.jpg)
![Chapter 8 | Control the Boot Process
[root@host ~]# systemctl reboot
To perform quick tests in the /etc/fstab file, use the nofail mount entry option. Using the
nofail option in an /etc/fstab entry allows the system to boot even if that file-system mount
is unsuccessful. This option should not be used with production file systems that must always
mount. With the nofail option, an application could start with its file-system data missing, with
possibly severe consequences.
References
systemd-fsck(8), systemd-fstab-generator(8), and systemd.mount(5)
man pages
RH134-RHEL9.0-en-2-20220609 245](https://image.slidesharecdn.com/redhatenterpriselinux9-240713030337-3ff2819f/85/Red-Hat-Enterprise-Linux-Administration-9-0-RH134-pdf-263-320.jpg)
![Chapter 8 | Control the Boot Process
Guided Exercise
Repair File System Issues at Boot
In this exercise, you recover a system from a misconfiguration in the /etc/fstab file where
the boot process fails.
Outcomes
• Diagnose /etc/fstab file issues and use emergency mode to recover the system.
Before You Begin
As the student user on the workstation machine, use the lab command to prepare your
system for this exercise.
This command prepares your environment and ensures that all required resources are
available.
[student@workstation ~]$ lab start boot-repairing
Instructions
1. Access the servera machine console and notice that the boot process is stuck early on.
1.1. Locate the icon for the servera console, as appropriate for your classroom
environment. Open the console.
Notice that a start job does not seem to complete. Take a minute to speculate about
a possible cause for this behavior.
1.2. Reboot the servera machine, sending a Ctrl+Alt+Del to your system by using
the relevant button or menu entry. With this particular boot problem, this key
sequence might not immediately abort the running job, and you might have to wait for
it to time out before the system reboots.
If you wait for the task to time out without sending a Ctrl+Alt+Del, then the
system eventually spawns an emergency shell by itself.
1.3. When the boot-loader menu appears, press any key to interrupt the countdown,
except the Enter key.
2. Looking at the error from the previous boot, it appears that at least parts of the system are
still functioning. Use redhat as the root user password to attempt an emergency boot.
2.1. Use the cursor keys to highlight the default boot loader entry.
2.2. Press the e key to edit the current entry.
2.3. Use the cursor keys to navigate to the line that starts with the linux word.
2.4. Press End to move the cursor to the end of the line.
2.5. Append the systemd.unit=emergency.target string to the end of the line.
246 RH134-RHEL9.0-en-2-20220609](https://image.slidesharecdn.com/redhatenterpriselinux9-240713030337-3ff2819f/85/Red-Hat-Enterprise-Linux-Administration-9-0-RH134-pdf-264-320.jpg)
![Chapter 8 | Control the Boot Process
2.6. Press Ctrl+x to boot by using the modified configuration.
3. Log in to emergency mode.
Give root password for maintenance
(or press Control-D to continue): redhat
[root@servera ~]#
4. Determine which file systems the systemd daemon currently mounts. Notice the systemd
daemon mounts the root file system in read-only mode.
[root@servera ~]# mount
...output omitted...
/dev/vda4 on / type xfs
(ro,relatime,seclabel,attr2,inode64,logbufs=8,logbsize=32k,noquota)
...output omitted...
5. Remount the root file system in read/write mode.
[root@servera ~]# mount -o remount,rw /
6. Attempt to mount all the other file systems. The --all (-a) option mounts all the file
systems listed in the /etc/fstab file that are not yet mounted.
[root@servera ~]# mount -a
mount: /RemoveMe: mount point does not exist.
7. Edit the /etc/fstab file to fix the issue.
7.1. Remove or comment out the incorrect line by using the vim /etc/fstab command.
[root@servera ~]# cat /etc/fstab
...output omitted...
# /dev/sdz1 /RemoveMe xfs defaults 0 0
7.2. Reload the systemd daemon for the system to register the new /etc/fstab file
configuration.
[root@servera ~]# systemctl daemon-reload
8. Verify that the /etc/fstab file is now correct by attempting to mount all entries.
[root@servera ~]# mount -a
9. Reboot the system and wait for the boot to complete. The system should now boot
normally.
[root@servera ~]# systemctl reboot
RH134-RHEL9.0-en-2-20220609 247](https://image.slidesharecdn.com/redhatenterpriselinux9-240713030337-3ff2819f/85/Red-Hat-Enterprise-Linux-Administration-9-0-RH134-pdf-265-320.jpg)
![Chapter 8 | Control the Boot Process
Finish
On the workstation machine, change to the student user home directory and use the lab
command to complete this exercise. This step is important to ensure that resources from previous
exercises do not impact upcoming exercises.
[student@workstation ~]$ lab finish boot-repairing
This concludes the section.
248 RH134-RHEL9.0-en-2-20220609](https://image.slidesharecdn.com/redhatenterpriselinux9-240713030337-3ff2819f/85/Red-Hat-Enterprise-Linux-Administration-9-0-RH134-pdf-266-320.jpg)
![Chapter 8 | Control the Boot Process
Lab
Control the Boot Process
In this lab, you reset the root password on a system, recover from a misconfiguration, and
set the default boot target.
Outcomes
• Reset a lost password for the root user.
• Diagnose and fix boot issues.
• Set the default systemd target.
Before You Begin
As the student user on the workstation machine, use the lab command to prepare your
system for this exercise.
This command prepares your environment and ensures that all required resources are
available.
[student@workstation ~]$ lab start boot-review
Instructions
1. On the serverb machine, reset the password to redhat for the root user.
Locate the icon for the serverb machine console as appropriate for your classroom
environment, then open the console.
2. In the boot-loader menu, select the default kernel boot-loader entry. The system fails to boot
because a start job does not complete successfully. Fix the issue from the console of the
serverb machine.
3. Change the default systemd target on the serverb machine for the system to
automatically start a graphical interface when it boots.
No graphical interface is installed on the serverb machine. Only set the default target for
this exercise and do not install the packages.
Evaluation
As the student user on the workstation machine, use the lab command to grade your work.
Correct any reported failures and rerun the command until successful.
[student@workstation ~]$ lab grade boot-review
Finish
On the workstation machine, change to the student user home directory and use the lab
command to complete this exercise. This step is important to ensure that resources from previous
exercises do not impact upcoming exercises.
RH134-RHEL9.0-en-2-20220609 249](https://image.slidesharecdn.com/redhatenterpriselinux9-240713030337-3ff2819f/85/Red-Hat-Enterprise-Linux-Administration-9-0-RH134-pdf-267-320.jpg)
![Chapter 8 | Control the Boot Process
[student@workstation ~]$ lab finish boot-review
This concludes the section.
250 RH134-RHEL9.0-en-2-20220609](https://image.slidesharecdn.com/redhatenterpriselinux9-240713030337-3ff2819f/85/Red-Hat-Enterprise-Linux-Administration-9-0-RH134-pdf-268-320.jpg)
![Chapter 8 | Control the Boot Process
Solution
Control the Boot Process
In this lab, you reset the root password on a system, recover from a misconfiguration, and
set the default boot target.
Outcomes
• Reset a lost password for the root user.
• Diagnose and fix boot issues.
• Set the default systemd target.
Before You Begin
As the student user on the workstation machine, use the lab command to prepare your
system for this exercise.
This command prepares your environment and ensures that all required resources are
available.
[student@workstation ~]$ lab start boot-review
Instructions
1. On the serverb machine, reset the password to redhat for the root user.
Locate the icon for the serverb machine console as appropriate for your classroom
environment, then open the console.
1.1. Send a Ctrl+Alt+Del to your system by using the relevant button or menu entry.
1.2. When the boot-loader menu appears, press any key to interrupt the countdown, except
the Enter key.
1.3. Use the cursor keys to highlight the rescue kernel boot-loader entry (the one with the
word rescue in its name).
1.4. Press e to edit the current entry.
1.5. Use the cursor keys to navigate the line that starts with the linux text.
1.6. Press Ctrl+e to move the cursor to the end of the line.
1.7. Append the rd.break text to the end of the line.
1.8. Press Ctrl+x to boot using the modified configuration.
1.9. Press Enter to enter the maintenance mode.
1.10. At the sh-5.1 prompt, remount the /sysroot file system as writable, and then use
the chroot command for the /sysroot directory.
RH134-RHEL9.0-en-2-20220609 251](https://image.slidesharecdn.com/redhatenterpriselinux9-240713030337-3ff2819f/85/Red-Hat-Enterprise-Linux-Administration-9-0-RH134-pdf-269-320.jpg)
![Chapter 8 | Control the Boot Process
sh-5.1# mount -o remount,rw /sysroot
...output omitted...
sh-5.1# chroot /sysroot
1.11. Set redhat as the password for the root user.
sh-5.1# passwd root
Changing password for user root.
New password: redhat
BAD PASSWORD: The password is shorter than 8 characters
Retype new password: redhat
passwd: all authentication tokens updated successfully.
1.12. Configure the system to perform a full SELinux relabel after boot automatically.
sh-5.1# touch /.autorelabel
1.13. Exit the chroot environment and the sh-5.1 prompt. After the file system is
relabeled, the system prompts to enter maintenance mode, but if you wait, it completes
the reboot and shows the boot-loader menu.
2. In the boot-loader menu, select the default kernel boot-loader entry. The system fails to boot
because a start job does not complete successfully. Fix the issue from the console of the
serverb machine.
2.1. Boot the system into emergency mode. Reboot the serverb machine by sending a
Ctrl+Alt+Del to your system by using the relevant button or menu entry.
2.2. When the boot-loader menu appears, press any key to interrupt the countdown, except
Enter.
2.3. Use the cursor keys to highlight the default boot-loader entry.
2.4. Press e to edit the current entry.
2.5. Use the cursor keys to navigate the line that starts with linux text.
2.6. Press Ctrl+e to move the cursor to the end of the line.
2.7. Append the systemd.unit=emergency.target text to the end of the line.
2.8. Press Ctrl+x to boot using the modified configuration.
2.9. Log in to emergency mode.
Give root password for maintenance
(or press Control-D to continue): redhat
[root@serverb ~]#
2.10. Remount the / file system as writable.
[root@serverb ~]# mount -o remount,rw /
...output omitted...
252 RH134-RHEL9.0-en-2-20220609](https://image.slidesharecdn.com/redhatenterpriselinux9-240713030337-3ff2819f/85/Red-Hat-Enterprise-Linux-Administration-9-0-RH134-pdf-270-320.jpg)
![Chapter 8 | Control the Boot Process
2.11. Mount all file systems.
[root@serverb ~]# mount -a
mount: /olddata: can't find UUID=4d5c85a5-8921-4a06-8aff-80567e9689bc.
2.12. Edit the /etc/fstab file to remove or comment out the incorrect line mounting the
/olddata mount point.
[root@serverb ~]# vim /etc/fstab
...output omitted...
#UUID=4d5c85a5-8921-4a06-8aff-80567e9689bc /olddata xfs defaults 0 0
2.13. Update the systemd daemon for the system to register the changes in the /etc/
fstab file configuration.
[root@serverb ~]# systemctl daemon-reload
2.14. Verify that the /etc/fstab file configuration is correct by attempting to mount all
entries.
[root@serverb ~]# mount -a
2.15. Reboot the system and wait for the boot to complete. The system should now boot
normally.
[root@serverb ~]# systemctl reboot
3. Change the default systemd target on the serverb machine for the system to
automatically start a graphical interface when it boots.
No graphical interface is installed on the serverb machine. Only set the default target for
this exercise and do not install the packages.
3.1. Log in to the servera machine as the student user and switch to the root user.
[student@workstation ~]$ ssh student@serverb
...output omitted...
[student@serverb ~]$ sudo -i
[sudo] password for student: student
[root@serverb ~]#
3.2. Set the graphical.target as the default target.
[root@serverb ~]# systemctl set-default graphical.target
Removed /etc/systemd/system/default.target.
Created symlink /etc/systemd/system/default.target → /usr/lib/systemd/system/
graphical.target.
3.3. Verify that the correct default is set.
RH134-RHEL9.0-en-2-20220609 253](https://image.slidesharecdn.com/redhatenterpriselinux9-240713030337-3ff2819f/85/Red-Hat-Enterprise-Linux-Administration-9-0-RH134-pdf-271-320.jpg)
![Chapter 8 | Control the Boot Process
[root@serverb ~]# systemctl get-default
graphical.target
3.4. Return to the workstation machine as the student user.
[root@serverb ~]# exit
logout
[student@serverb ~]$ exit
logout
Connection to serverb closed.
Evaluation
As the student user on the workstation machine, use the lab command to grade your work.
Correct any reported failures and rerun the command until successful.
[student@workstation ~]$ lab grade boot-review
Finish
On the workstation machine, change to the student user home directory and use the lab
command to complete this exercise. This step is important to ensure that resources from previous
exercises do not impact upcoming exercises.
[student@workstation ~]$ lab finish boot-review
This concludes the section.
254 RH134-RHEL9.0-en-2-20220609](https://image.slidesharecdn.com/redhatenterpriselinux9-240713030337-3ff2819f/85/Red-Hat-Enterprise-Linux-Administration-9-0-RH134-pdf-272-320.jpg)


![Chapter 9 | Manage Network Security
Zone name Default configuration
external Reject incoming traffic unless related to outgoing traffic or matching
the ssh predefined service. Outgoing IPv4 traffic forwarded through
this zone is masqueraded to look like it originated from the IPv4
address of the outgoing network interface.
dmz Reject incoming traffic unless related to outgoing traffic or matching
the ssh predefined service.
block Reject all incoming traffic unless related to outgoing traffic.
drop Drop all incoming traffic unless related to outgoing traffic (do not even
respond with ICMP errors).
For a list of available predefined zones and their intended use, see the firewalld.zones(5) man
page.
Predefined Services
The firewalld service includes a number of predefined configurations for common services, to
simplify setting firewall rules. For example, instead of researching the relevant ports for an NFS
server, use the predefined nfs configuration create rules for the correct ports and protocols. The
following table lists the predefined service configurations that the firewalld service uses in its
default configuration.
Selected Predefined Firewalld Services
Service name Configuration
ssh Local SSH server. Traffic to 22/tcp.
dhcpv6-client Local DHCPv6 client. Traffic to 546/udp on the fe80::/64 IPv6
network.
ipp-client Local IPP printing. Traffic to 631/udp.
samba-client Local Windows file and print sharing client. Traffic to 137/udp and 138/
udp.
mdns Multicast DNS (mDNS) local-link name resolution. Traffic to 5353/udp
to the 224.0.0.251 (IPv4) or ff02::fb (IPv6) multicast addresses.
The firewalld package includes many predefined service configurations. You can list the
services with the firewall-cmd --get-services command.
[root@host ~]# firewall-cmd --get-services
RH-Satellite-6 RH-Satellite-6-capsule amanda-client amanda-k5-client amqp amqps
apcupsd audit bacula bacula-client bb bgp bitcoin bitcoin-rpc bitcoin-testnet
bitcoin-testnet-rpc bittorrent-lsd ceph ceph-mon cfengine cockpit collectd
...output omitted...
260 RH134-RHEL9.0-en-2-20220609](https://image.slidesharecdn.com/redhatenterpriselinux9-240713030337-3ff2819f/85/Red-Hat-Enterprise-Linux-Administration-9-0-RH134-pdf-278-320.jpg)
![Chapter 9 | Manage Network Security
Figure 9.5: The web console firewall overview
Configure the Firewall from the Command Line
The firewall-cmd command interfaces with the firewalld daemon. It is installed as part of
the firewalld package and is available for administrators who prefer to work on the command
line, for working on systems without a graphical environment, or for scripting a firewall set up.
The following table lists frequently used firewall-cmd commands, along with an explanation.
Note that unless otherwise specified, almost all commands work on the runtime configuration,
unless the --permanent option is specified. If the --permanent option is specified, then you
must activate the setting by also running the firewall-cmd --reload command, which reads
the current permanent configuration and applies it as the new runtime configuration. Many of the
commands listed take the --zone=ZONE option to determine which zone they affect. Where a
netmask is required, use CIDR notation, such as 192.168.1/24.
firewall-cmd commands Explanation
--get-default-zone Query the current default zone.
--set-default-zone=ZONE Set the default zone. This changes both the
runtime and the permanent configuration.
--get-zones List all available zones.
--get-active-zones List all zones currently in use (have an
interface or source tied to them), along with
their interface and source information.
--add-source=CIDR [--zone=ZONE] Route all traffic coming from the IP address or
network/netmask to the specified zone. If no
--zone= option is provided, then the default
zone is used.
--remove-source=CIDR [--zone=ZONE] Remove the rule routing all traffic from the
zone coming from the IP address or network.
If no --zone= option is provided, then the
default zone is used.
--add-interface=INTERFACE [--
zone=ZONE]
Route all traffic coming from INTERFACE to
the specified zone. If no --zone= option is
provided, then the default zone is used.
RH134-RHEL9.0-en-2-20220609 263](https://image.slidesharecdn.com/redhatenterpriselinux9-240713030337-3ff2819f/85/Red-Hat-Enterprise-Linux-Administration-9-0-RH134-pdf-281-320.jpg)
![Chapter 9 | Manage Network Security
firewall-cmd commands Explanation
--change-interface=INTERFACE [--
zone=ZONE]
Associate the interface with ZONE instead
of its current zone. If no --zone= option is
provided, then the default zone is used.
--list-all [--zone=ZONE] List all configured interfaces, sources,
services, and ports for ZONE. If no --zone=
option is provided, then the default zone is
used.
--list-all-zones Retrieve all information for all zones
(interfaces, sources, ports, services).
--add-service=SERVICE [--
zone=ZONE]
Allow traffic to SERVICE. If no --zone=
option is provided, then the default zone is
used.
--add-port=PORT/PROTOCOL [--
zone=ZONE]
Allow traffic to the PORT/PROTOCOL port(s).
If no --zone= option is provided, then the
default zone is used.
--remove-service=SERVICE [--
zone=ZONE]
Remove SERVICE from the allowed list for the
zone. If no --zone= option is provided, then
the default zone is used.
--remove-port=PORT/PROTOCOL [--
zone=ZONE]
Remove the PORT/PROTOCOL port(s) from
the allowed list for the zone. If no --zone=
option is provided, then the default zone is
used.
--reload Drop the runtime configuration and apply the
persistent configuration.
The following example sets the default zone to dmz, assigns all traffic coming from the
192.168.0.0/24 network to the internal zone, and opens the network ports for the mysql
service on the internal zone.
[root@host ~]# firewall-cmd --set-default-zone=dmz
[root@host ~]# firewall-cmd --permanent --zone=internal
--add-source=192.168.0.0/24
[root@host ~]# firewall-cmd --permanent --zone=internal --add-service=mysql
[root@host ~]# firewall-cmd --reload
Note
For situations where the basic syntax is not enough, you can add rich-rules to write
complex rules. If even the rich-rules syntax is not enough, then you can also use
Direct Configuration rules (raw nft syntax mixed in with firewalld rules). These
advanced configurations are beyond the scope of this chapter.
264 RH134-RHEL9.0-en-2-20220609](https://image.slidesharecdn.com/redhatenterpriselinux9-240713030337-3ff2819f/85/Red-Hat-Enterprise-Linux-Administration-9-0-RH134-pdf-282-320.jpg)
![Chapter 9 | Manage Network Security
Guided Exercise
Manage Server Firewalls
In this exercise, you control access to system services by adjusting system firewall rules with
firewalld.
Outcomes
• Configure firewall rules to control access to services.
Before You Begin
As the student user on the workstation machine, use the lab command to prepare your
system for this exercise.
This command prepares your environment and ensures that all required resources are
available.
[student@workstation ~]$ lab start netsecurity-firewalls
Instructions
1. Log in to the servera machine as the student user and switch to the root user.
[student@workstation ~]$ ssh student@servera
...output omitted...
[student@servera ~]$ sudo -i
[sudo] password for student: student
[root@servera ~]#
2. Install the httpd and mod_ssl packages. These packages provide the Apache web server
and the necessary extensions for the web server to serve content over SSL.
[root@servera ~]# dnf install httpd mod_ssl
...output omitted...
Is this ok [y/N]: y
...output omitted...
Complete!
3. Create the /var/www/html/index.html file. Add one line of text that reads: I am
servera.
[root@servera ~]# echo 'I am servera.' > /var/www/html/index.html
4. Start and enable the httpd service.
266 RH134-RHEL9.0-en-2-20220609](https://image.slidesharecdn.com/redhatenterpriselinux9-240713030337-3ff2819f/85/Red-Hat-Enterprise-Linux-Administration-9-0-RH134-pdf-284-320.jpg)
![Chapter 9 | Manage Network Security
[root@servera ~]# systemctl enable --now httpd
Created symlink /etc/systemd/system/multi-user.target.wants/httpd.service → /usr/
lib/systemd/system/httpd.service.
5. Return to the workstation machine as the student user.
[root@servera ~]# exit
logout
[student@servera ~]$ exit
logout
Connection to servera closed.
[student@workstation ~]$
6. From workstation, attempt to access the web server on servera by using both the
clear-text port 80/TCP and the SSL encapsulated port 443/TCP. Both attempts should
fail.
6.1. The curl command should fail.
[student@workstation ~]$ curl http://servera.lab.example.com
curl: (7) Failed to connect to servera.lab.example.com port 80: No route to host
6.2. The curl command with the -k option for insecure connections should also fail.
[student@workstation ~]$ curl -k https://servera.lab.example.com
curl: (7) Failed to connect to servera.lab.example.com port 443: No route to host
7. Verify that the firewalld service on servera is enabled and running.
[student@workstation ~]$ ssh student@servera 'systemctl status firewalld'
● firewalld.service - firewalld - dynamic firewall daemon
Loaded: loaded (/usr/lib/systemd/system/firewalld.service; enabled; vendor
preset: enabled)
Active: active (running) since Wed 2022-04-13 11:22:50 EDT; 7min ago
Docs: man:firewalld(1)
Main PID: 768 (firewalld)
Tasks: 2 (limit: 10798)
Memory: 39.9M
CPU: 584ms
CGroup: /system.slice/firewalld.service
└─768 /usr/bin/python3 -s /usr/sbin/firewalld --nofork --nopid
Apr 13 11:22:49 servera.lab.example.com systemd[1]: Starting firewalld - dynamic
firewall daemon...
Apr 13 11:22:50 servera.lab.example.com systemd[1]: Started firewalld - dynamic
firewall daemon.
8. From workstation, open Firefox and log in to the web console running on servera to
add the https service to the public firewall zone.
RH134-RHEL9.0-en-2-20220609 267](https://image.slidesharecdn.com/redhatenterpriselinux9-240713030337-3ff2819f/85/Red-Hat-Enterprise-Linux-Administration-9-0-RH134-pdf-285-320.jpg)
![Chapter 9 | Manage Network Security
8.1. Open Firefox and browse to https://servera.lab.example.com:9090 to
access the web console. Click Advanced and Accept the Risk and Continue to accept
the self-signed certificate.
8.2. Log in as the student user and provide student as the password.
8.3. Click Turn on administrative access and enter the student password again.
8.4. Click Networking in the left navigation bar.
8.5. Click Edit rules and zones in Firewall section of the Networking page.
8.6. Click Add services located in the upper right corner of the public zone section.
8.7. In the Add services interface, scroll down or use Filter services to locate and select
the check box next to the https service.
8.8. Click Add services to apply the change.
9. Return to a terminal on workstation and verify your work by attempting to access the
servera web server.
9.1. The curl command to the standard port 80 should fail.
[student@workstation ~]$ curl http://servera.lab.example.com
curl: (7) Failed to connect to servera.lab.example.com port 80: No route to host
9.2. The curl command with the -k option to the port 443 should succeed.
[student@workstation ~]$ curl -k https://servera.lab.example.com
I am servera.
Finish
On the workstation machine, change to the student user home directory and use the lab
command to complete this exercise. This step is important to ensure that resources from previous
exercises do not impact upcoming exercises.
[student@workstation ~]$ lab finish netsecurity-firewalls
This concludes the section.
268 RH134-RHEL9.0-en-2-20220609](https://image.slidesharecdn.com/redhatenterpriselinux9-240713030337-3ff2819f/85/Red-Hat-Enterprise-Linux-Administration-9-0-RH134-pdf-286-320.jpg)
![Chapter 9 | Manage Network Security
Control SELinux Port Labeling
Objectives
Verify that network ports have the correct SELinux type for services to bind to them.
SELinux Port Labeling
In addition to file context and process type labeling, SELinux labels network ports with an SELinux
context. SELinux controls network access by labeling the network ports and including rules in a
service's targeted policy. For example, the SSH targeted policy includes the 22/TCP port with a
ssh_port_t port context label. In the HTTP policy, the default 80/TCP and 443/TCP ports use
an http_port_t port context label.
When a targeted process attempts to open a port for listening, the SELinux verifies that the
targeted policy includes entries, which allow that process type to bind with that port context type.
SElinux can then block a rogue service from taking over ports used by other legitimate network
services.
Manage SELinux Port Labeling
If a service attempts to listen on a nonstandard port, SELinux blocks the attempt, unless you add
include the port in the service's targeted policy by labeling the port with the correct port context.
Typically, the targeted policy has already labeled all expected ports with the correct type. For
example, because port 8008/TCP is often used for web applications, that port is already labeled
with http_port_t, the default port type for use by a web server. Individual ports can be labeled
with only one port context.
List Port Labels
Use the grep command to filter the port number.
[root@host ~]# grep gopher /etc/services
gopher 70/tcp # Internet Gopher
gopher 70/udp
Use the semanage command to list the current port label assignments.
[root@host ~]# semanage port -l
...output omitted...
http_cache_port_t tcp 8080, 8118, 8123, 10001-10010
http_cache_port_t udp 3130
http_port_t tcp 80, 81, 443, 488, 8008, 8009, 8443, 9000
...output omitted...
Use the grep command to filter the SELinux port label using the service name.
RH134-RHEL9.0-en-2-20220609 269](https://image.slidesharecdn.com/redhatenterpriselinux9-240713030337-3ff2819f/85/Red-Hat-Enterprise-Linux-Administration-9-0-RH134-pdf-287-320.jpg)
![Chapter 9 | Manage Network Security
[root@host ~]# semanage port -l | grep ftp
ftp_data_port_t tcp 20
ftp_port_t tcp 21, 989, 990
ftp_port_t udp 989, 990
tftp_port_t udp 69
A port label can appear in the list multiple times for each supported networking protocol.
Use the grep command to filter the SELinux port label using the port number.
[root@host ~]# semanage port -l | grep -w 70
gopher_port_t tcp 70
gopher_port_t udp 70
Manage Port Bindings
Use the semanage command to assign new port labels, remove port labels, and modify existing
ones.
Important
Virtually all of the services included in the RHEL distribution provide an SELinux
policy module, which includes that service's default port contexts. You cannot
change default port labels using the semanage command. Instead, you must modify
and reload the targeted service's policy module. Writing and generating policy
modules is not discussed in this course.
You can label a new port with an existing port context label (type). The semanage port
command's -a option adds a new port label, the -t option denotes the type, and the -p option
denotes the protocol.
[root@host ~]# semanage port -a -t port_label -p tcp|udp PORTNUMBER
For example, to allow the gopher service to listen on port 71/TCP:
[root@host~]# semanage port -a -t gopher_port_t -p tcp 71
To view local changes to the default policy, use the semanage port command's -C option.
[root@host~]# semanage port -l -C
SELinux Port Type Proto Port Number
gopher_port_t tcp 71
The targeted policies include many port types.
Service-specific SELinux man pages are named by using the service name plus _selinux. These
man pages include service-specific information on SELinux types, Booleans, and port types, but
are not installed by default. To view a list of all of the available SELinux man pages, install the
package and then run a man -k keyword search for _selinux
270 RH134-RHEL9.0-en-2-20220609](https://image.slidesharecdn.com/redhatenterpriselinux9-240713030337-3ff2819f/85/Red-Hat-Enterprise-Linux-Administration-9-0-RH134-pdf-288-320.jpg)
![Chapter 9 | Manage Network Security
[root@host ~]# dnf -y install selinux-policy-doc
[root@host ~]# man -k _selinux
Use the semanage command for deleting a port label, with the -d option. For example, to remove
the binding of port 71/TCP to the gopher_port_t type:
[root@host ~]# semanage port -d -t gopher_port_t -p tcp 71
To change a port binding, when requirements change, use the -m option. This is more efficient
than deleting the old binding and adding the new one.
For example, to modify port 71/TCP from gopher_port_t to http_port_t, use the following
command:
[root@server ~]# semanage port -m -t http_port_t -p tcp 71
View the modification by using the semanage command.
[root@server ~]# semanage port -l -C
SELinux Port Type Proto Port Number
http_port_t tcp 71
[root@server ~]# semanage port -l | grep http
http_cache_port_t tcp 8080, 8118, 8123, 10001-10010
http_cache_port_t udp 3130
http_port_t tcp 71, 80, 81, 443, 488, 8008, 8009, 8443,
9000
pegasus_http_port_t tcp 5988
pegasus_https_port_t tcp 5989
References
semanage(8), semanage-port(8), and *_selinux(8) man pages
RH134-RHEL9.0-en-2-20220609 271](https://image.slidesharecdn.com/redhatenterpriselinux9-240713030337-3ff2819f/85/Red-Hat-Enterprise-Linux-Administration-9-0-RH134-pdf-289-320.jpg)
![Chapter 9 | Manage Network Security
Guided Exercise
Control SELinux Port Labeling
In this lab, you configure your system to allow HTTP access on a nonstandard port.
Outcomes
• Configure a web server running on servera to successfully serve content using a
nonstandard port.
Before You Begin
As the student user on the workstation machine, use the lab command to prepare your
system for this exercise.
This command determines whether the servera machine is reachable on the network,
installs the httpd service, and configures the firewall on servera to allow http connections.
[student@workstation ~]$ lab start netsecurity-ports
Instructions
Your organization is deploying a new custom web application. The web application is running on a
nonstandard port; in this case, 82/TCP.
One of your junior administrators has already configured the application on your servera host.
However, the web server content is not accessible.
1. Log in to servera as the student user and switch to the root user.
[student@workstation ~]$ ssh student@servera
...output omitted...
[student@servera ~]$
[student@servera ~]$ sudo -i
[sudo] password for student: student
[root@servera ~]#
2. Attempt to fix the web content problem by restarting the httpd service.
2.1. Restart the httpd.service. This command is expected to fail.
[root@servera ~]# systemctl restart httpd.service
Job for httpd.service failed because the control process exited with error code.
See "systemctl status httpd.service" and "journalctl -xe" for details.
2.2. View the status of the httpd service. Note the permission denied error.
272 RH134-RHEL9.0-en-2-20220609](https://image.slidesharecdn.com/redhatenterpriselinux9-240713030337-3ff2819f/85/Red-Hat-Enterprise-Linux-Administration-9-0-RH134-pdf-290-320.jpg)
![Chapter 9 | Manage Network Security
[root@servera ~]# systemctl status -l httpd.service
● httpd.service - The Apache HTTP Server
Loaded: loaded (/usr/lib/systemd/system/httpd.service; enabled; vendor preset:
disabled)
Active: failed (Result: exit-code) since Mon 2019-04-08 14:23:29 CEST; 3min 33s
ago
Docs: man:httpd.service(8)
Process: 28078 ExecStart=/usr/sbin/httpd $OPTIONS -DFOREGROUND (code=exited,
status=1/FAILURE)
Main PID: 28078 (code=exited, status=1/FAILURE)
Status: "Reading configuration..."
Apr 08 14:23:29 servera.lab.example.com systemd[1]: Starting The Apache HTTP
Server...
Apr 08 14:23:29 servera.lab.example.com httpd[28078]: (13)Permission denied:
AH00072: make_sock: could not bind to address [::]:82
Apr 08 14:23:29 servera.lab.example.com httpd[28078]: (13)Permission denied:
AH00072: make_sock: could not bind to address 0.0.0.0:82
Apr 08 14:23:29 servera.lab.example.com httpd[28078]: no listening sockets
available, shutting down
Apr 08 14:23:29 servera.lab.example.com httpd[28078]: AH00015: Unable to open logs
Apr 08 14:23:29 servera.lab.example.com systemd[1]: httpd.service: Main process
exited, code=exited, status=1/FAILURE
Apr 08 14:23:29 servera.lab.example.com systemd[1]: httpd.service: Failed with
result 'exit-code'.
Apr 08 14:23:29 servera.lab.example.com systemd[1]: Failed to start The Apache
HTTP Server.
2.3. Check if SELinux is blocking httpd from binding to port 82/TCP.
[root@servera ~]# sealert -a /var/log/audit/audit.log
100% done
found 1 alerts in /var/log/audit/audit.log
--------------------------------------------------------------------------------
SELinux is preventing /usr/sbin/httpd from name_bind access on the tcp_socket port
82.
***** Plugin bind_ports (99.5 confidence) suggests ************************
If you want to allow /usr/sbin/httpd to bind to network port 82
Then you need to modify the port type.
Do
# semanage port -a -t PORT_TYPE -p tcp 82 where PORT_TYPE is one of the following:
http_cache_port_t, http_port_t, jboss_management_port_t, jboss_messaging_port_t,
ntop_port_t, puppet_port_t.
...output omitted...
Raw Audit Messages
type=AVC msg=audit(1554726569.188:852): avc: denied { name_bind } for
pid=28393 comm="httpd" src=82 scontext=system_u:system_r:httpd_t:s0
tcontext=system_u:object_r:reserved_port_t:s0 tclass=tcp_socket permissive=0
...output omitted...
RH134-RHEL9.0-en-2-20220609 273](https://image.slidesharecdn.com/redhatenterpriselinux9-240713030337-3ff2819f/85/Red-Hat-Enterprise-Linux-Administration-9-0-RH134-pdf-291-320.jpg)
![Chapter 9 | Manage Network Security
3. Configure SELinux to allow httpd to bind to port 82/TCP, then restart the
httpd.service service.
3.1. Find an appropriate port type for port 82/TCP.
The http_port_t type includes the default HTTP ports, 80/TCP and 443/TCP.
This is the correct port type for the web server.
[root@servera ~]# semanage port -l | grep http
http_cache_port_t tcp 8080, 8118, 8123, 10001-10010
http_cache_port_t udp 3130
http_port_t tcp 80, 81, 443, 488, 8008, 8009, 8443, 9000
pegasus_http_port_t tcp 5988
pegasus_https_port_t tcp 5989
3.2. Assign port 82/TCP the http_port_t type.
[root@servera ~]# semanage port -a -t http_port_t -p tcp 82
3.3. Restart the httpd.service service. This command should succeed.
[root@servera ~]# systemctl restart httpd.service
4. Verify that you can now access the web server running on port 82/TCP.
[root@servera ~]# curl http://servera.lab.example.com:82
Hello
5. In a different terminal window, check whether you can access the new web service from
workstation.
[student@workstation ~]$ curl http://servera.lab.example.com:82
curl: (7) Failed to connect to servera.example.com:82; No route to host
That error means you still can not connect to the web service from workstation.
6. On servera, open port 82/TCP on the firewall.
6.1. Open port 82/TCP in the permanent configuration, for the default zone on the
firewall, on servera.
[root@servera ~]# firewall-cmd --permanent --add-port=82/tcp
success
6.2. Activate your firewall changes on servera.
[root@servera ~]# firewall-cmd --reload
success
7. Access the web service from workstation.
274 RH134-RHEL9.0-en-2-20220609](https://image.slidesharecdn.com/redhatenterpriselinux9-240713030337-3ff2819f/85/Red-Hat-Enterprise-Linux-Administration-9-0-RH134-pdf-292-320.jpg)
![Chapter 9 | Manage Network Security
[student@workstation ~]$ curl http://servera.lab.example.com:82
Hello
8. Return to the workstation system as the student user.
[root@servera ~]# exit
logout
[student@servera ~]$ exit
logout
Connection to servera closed.
[student@workstation ~]$
Finish
On the workstation machine, change to the student user home directory and use the lab
command to complete this exercise. This step is important to ensure that resources from previous
exercises do not impact upcoming exercises.
[student@workstation ~]$ lab finish netsecurity-ports
This concludes the section.
RH134-RHEL9.0-en-2-20220609 275](https://image.slidesharecdn.com/redhatenterpriselinux9-240713030337-3ff2819f/85/Red-Hat-Enterprise-Linux-Administration-9-0-RH134-pdf-293-320.jpg)
![Chapter 9 | Manage Network Security
Lab
Manage Network Security
In this lab, you configure firewall and SELinux settings to allow access to multiple web servers
running on the same host.
Outcomes
• Configure firewall and SELinux settings on a web server host.
Before You Begin
As the student user on the workstation machine, use the lab command to prepare your
system for this exercise.
This command prepares your environment and ensures that all required resources are
available.
[student@workstation ~]$ lab start netsecurity-review
Instructions
Your company has decided to run a new web app. This application listens on ports 80/TCP and
1001/TCP. You should also make available port 22/TCP for ssh access. All changes you make
should persist across a reboot.
Important
Red Hat Online Learning environment needs port 5900/TCP to remain available to
use the graphical interface. This port is also known under the vnc-server service.
If you accidentally lock yourself out from the serverb machine, then you can either
attempt to recover by using the ssh command to your serverb machine from
your workstation machine, or reset your serverb machine. If you elect to reset
your serverb machine, then you should run the setup scripts for this lab again.
The configuration on your machines already includes a custom zone called ROL that
opens these ports.
1. From the workstation machine, test access to the default web server at
http://serverb.lab.example.com and to the virtual host at http://
serverb.lab.example.com:1001.
2. Log in to the serverb machine to determine what is preventing access to the web servers.
3. Configure SELinux to allow the httpd service to listen on port 1001/TCP.
4. From workstation, test again access to the default web server at
http://serverb.lab.example.com and to the virtual host at http://
serverb.lab.example.com:1001.
5. Log in to the serverb machine to determine whether the correct ports are assigned to the
firewall.
276 RH134-RHEL9.0-en-2-20220609](https://image.slidesharecdn.com/redhatenterpriselinux9-240713030337-3ff2819f/85/Red-Hat-Enterprise-Linux-Administration-9-0-RH134-pdf-294-320.jpg)
![Chapter 9 | Manage Network Security
6. Add port 1001/TCP to the permanent configuration for the public network zone. Confirm
your configuration.
7. From workstation, confirm that the default web server at serverb.lab.example.com
returns SERVER B and the virtual host at serverb.lab.example.com:1001 returns
VHOST 1.
Evaluation
As the student user on the workstation machine, use the lab command to grade your work.
Correct any reported failures and rerun the command until successful.
[student@workstation ~]$ lab grade netsecurity-review
Finish
On the workstation machine, change to the student user home directory and use the lab
command to complete this exercise. This step is important to ensure that resources from previous
exercises do not impact upcoming exercises.
[student@workstation ~]$ lab finish netsecurity-review
This concludes the section.
RH134-RHEL9.0-en-2-20220609 277](https://image.slidesharecdn.com/redhatenterpriselinux9-240713030337-3ff2819f/85/Red-Hat-Enterprise-Linux-Administration-9-0-RH134-pdf-295-320.jpg)
![Chapter 9 | Manage Network Security
Solution
Manage Network Security
In this lab, you configure firewall and SELinux settings to allow access to multiple web servers
running on the same host.
Outcomes
• Configure firewall and SELinux settings on a web server host.
Before You Begin
As the student user on the workstation machine, use the lab command to prepare your
system for this exercise.
This command prepares your environment and ensures that all required resources are
available.
[student@workstation ~]$ lab start netsecurity-review
Instructions
Your company has decided to run a new web app. This application listens on ports 80/TCP and
1001/TCP. You should also make available port 22/TCP for ssh access. All changes you make
should persist across a reboot.
Important
Red Hat Online Learning environment needs port 5900/TCP to remain available to
use the graphical interface. This port is also known under the vnc-server service.
If you accidentally lock yourself out from the serverb machine, then you can either
attempt to recover by using the ssh command to your serverb machine from
your workstation machine, or reset your serverb machine. If you elect to reset
your serverb machine, then you should run the setup scripts for this lab again.
The configuration on your machines already includes a custom zone called ROL that
opens these ports.
1. From the workstation machine, test access to the default web server at
http://serverb.lab.example.com and to the virtual host at http://
serverb.lab.example.com:1001.
1.1. Test access to the http://serverb.lab.example.com web server. The test
currently fails. Ultimately, the web server should return SERVER B.
[student@workstation ~]$ curl http://serverb.lab.example.com
curl: (7) Failed to connect to serverb.lab.example.com port 80: Connection refused
1.2. Test access to the http://serverb.lab.example.com:1001 virtual host. The test
currently fails. Ultimately, the virtual host should return VHOST 1.
278 RH134-RHEL9.0-en-2-20220609](https://image.slidesharecdn.com/redhatenterpriselinux9-240713030337-3ff2819f/85/Red-Hat-Enterprise-Linux-Administration-9-0-RH134-pdf-296-320.jpg)
![Chapter 9 | Manage Network Security
[student@workstation ~]$ curl http://serverb.lab.example.com:1001
curl: (7) Failed to connect to serverb.lab.example.com port 1001: No route to host
2. Log in to the serverb machine to determine what is preventing access to the web servers.
2.1. Log in to the serverb machine as student user.
[student@workstation ~]$ ssh student@serverb
...output omitted...
[student@serverb ~]$
2.2. Determine whether the httpd service is active.
[student@serverb ~]$ systemctl is-active httpd
inactive
2.3. Enable and start the httpd service. The httpd service fails to start.
[student@serverb ~]$ sudo systemctl enable --now httpd
[sudo] password for student: student
Created symlink /etc/systemd/system/multi-user.target.wants/httpd.service → /usr/
lib/systemd/system/httpd.service.
Job for httpd.service failed because the control process exited with error code.
See "systemctl status httpd.service" and "journalctl -xeu httpd.service" for
details.
2.4. Investigate the reasons why the httpd service fails to start.
[student@serverb ~]$ systemctl status httpd.service
× httpd.service - The Apache HTTP Server
Loaded: loaded (/usr/lib/systemd/system/httpd.service; enabled; vendor
preset: disabled)
Active: failed (Result: exit-code) since Wed 2022-04-13 06:55:01 EDT; 2min
52s ago
Docs: man:httpd.service(8)
Process: 1640 ExecStart=/usr/sbin/httpd $OPTIONS -DFOREGROUND (code=exited,
status=1/FAILURE)
Main PID: 1640 (code=exited, status=1/FAILURE)
Status: "Reading configuration..."
CPU: 31ms
Apr 13 06:55:01 serverb.lab.example.com systemd[1]: Starting The Apache HTTP
Server...
Apr 13 06:55:01 serverb.lab.example.com httpd[1640]: (13)Permission denied:
AH00072: make_sock: could not bind to address [::]:1001
Apr 13 06:55:01 serverb.lab.example.com httpd[1640]: (13)Permission denied:
AH00072: make_sock: could not bind to address 0.0.0.0:1001
Apr 13 06:55:01 serverb.lab.example.com httpd[1640]: no listening sockets
available, shutting down
Apr 13 06:55:01 serverb.lab.example.com httpd[1640]: AH00015: Unable to open logs
RH134-RHEL9.0-en-2-20220609 279](https://image.slidesharecdn.com/redhatenterpriselinux9-240713030337-3ff2819f/85/Red-Hat-Enterprise-Linux-Administration-9-0-RH134-pdf-297-320.jpg)
![Chapter 9 | Manage Network Security
Apr 13 06:55:01 serverb.lab.example.com systemd[1]: httpd.service: Main process
exited, code=exited, status=1/FAILURE
Apr 13 06:55:01 serverb.lab.example.com systemd[1]: httpd.service: Failed with
result 'exit-code'.
Apr 13 06:55:01 serverb.lab.example.com systemd[1]: Failed to start The Apache
HTTP Server.
2.5. Check whether SELinux is blocking the httpd service from binding to port 1001/TCP.
[student@serverb ~]$ sudo sealert -a /var/log/audit/audit.log
100% done
found 1 alerts in /var/log/audit/audit.log
--------------------------------------------------------------------------------
SELinux is preventing /usr/sbin/httpd from name_bind access on the tcp_socket port
1001.
***** Plugin bind_ports (99.5 confidence) suggests ************************
If you want to allow /usr/sbin/httpd to bind to network port 1001
Then you need to modify the port type.
Do
# semanage port -a -t PORT_TYPE -p tcp 1001
where PORT_TYPE is one of the following: http_cache_port_t, http_port_t,
jboss_management_port_t, jboss_messaging_port_t, ntop_port_t, puppet_port_t.
***** Plugin catchall (1.49 confidence) suggests **************************
...output omitted...
3. Configure SELinux to allow the httpd service to listen on port 1001/TCP.
3.1. Use the semanage command to find the correct port type.
[student@serverb ~]$ sudo semanage port -l | grep 'http'
http_cache_port_t tcp 8080, 8118, 8123, 10001-10010
http_cache_port_t udp 3130
http_port_t tcp 80, 81, 443, 488, 8008, 8009, 8443, 9000
pegasus_http_port_t tcp 5988
pegasus_https_port_t tcp 5989
3.2. Bind port 1001/TCP to the http_port_t type.
[student@serverb ~]$ sudo semanage port -a -t http_port_t -p tcp 1001
3.3. Confirm that port 1001/TCP is bound to the http_port_t port type.
[student@serverb ~]$ sudo semanage port -l | grep '^http_port_t'
http_port_t tcp 1001, 80, 81, 443, 488, 8008, 8009, 8443, 9000
3.4. Enable and start the httpd service.
[student@serverb ~]$ sudo systemctl enable --now httpd
280 RH134-RHEL9.0-en-2-20220609](https://image.slidesharecdn.com/redhatenterpriselinux9-240713030337-3ff2819f/85/Red-Hat-Enterprise-Linux-Administration-9-0-RH134-pdf-298-320.jpg)
![Chapter 9 | Manage Network Security
3.5. Verify the running state of the httpd service.
[student@serverb ~]$ systemctl is-active httpd
active
[student@serverb ~]$ systemctl is-enabled httpd
enabled
3.6. Return to the workstation machine as the student user.
[student@serverb ~]$ exit
logout
Connection to serverb closed.
[student@workstation ~]$
4. From workstation, test again access to the default web server at
http://serverb.lab.example.com and to the virtual host at http://
serverb.lab.example.com:1001.
4.1. Test access to the http://serverb.lab.example.com web server. The web server
should return SERVER B.
[student@workstation ~]$ curl http://serverb.lab.example.com
SERVER B
4.2. Test access to the http://serverb.lab.example.com:1001 virtual host. The test
continues to fail.
[student@workstation ~]$ curl http://serverb.lab.example.com:1001
curl: (7) Failed to connect to serverb.lab.example.com port 1001: No route to host
5. Log in to the serverb machine to determine whether the correct ports are assigned to the
firewall.
5.1. Log in to the serverb machine as the student user.
[student@workstation ~]$ ssh student@serverb
...output omitted...
[student@serverb ~]$
5.2. Verify that the default firewall zone is set to the public zone.
[student@serverb ~]$ firewall-cmd --get-default-zone
public
5.3. If the previous step does not return public as the default zone, then correct it with the
following command:
[student@serverb ~]$ sudo firewall-cmd --set-default-zone public
5.4. Determine the open ports listed in the public network zone.
RH134-RHEL9.0-en-2-20220609 281](https://image.slidesharecdn.com/redhatenterpriselinux9-240713030337-3ff2819f/85/Red-Hat-Enterprise-Linux-Administration-9-0-RH134-pdf-299-320.jpg)
![Chapter 9 | Manage Network Security
[student@serverb ~]$ sudo firewall-cmd --permanent --zone=public --list-all
[sudo] password for student: student
public
target: default
icmp-block-inversion: no
interfaces:
sources:
services: cockpit dhcpv6-client http ssh
ports:
protocols:
forward: yes
masquerade: no
forward-ports:
source-ports:
icmp-blocks:
rich rules:
6. Add port 1001/TCP to the permanent configuration for the public network zone. Confirm
your configuration.
6.1. Add port 1001/TCP to the public network zone.
[student@serverb ~]$ sudo firewall-cmd --permanent --zone=public
--add-port=1001/tcp
success
6.2. Reload the firewall configuration.
[student@serverb ~]$ sudo firewall-cmd --reload
success
6.3. Verify your configuration.
[student@serverb ~]$ sudo firewall-cmd --permanent --zone=public --list-all
public
target: default
icmp-block-inversion: no
interfaces:
sources:
services: cockpit dhcpv6-client http ssh
ports: 1001/tcp
protocols:
forward: yes
masquerade: no
forward-ports:
source-ports:
icmp-blocks:
rich rules:
6.4. Return to the workstation machine as the student user.
282 RH134-RHEL9.0-en-2-20220609](https://image.slidesharecdn.com/redhatenterpriselinux9-240713030337-3ff2819f/85/Red-Hat-Enterprise-Linux-Administration-9-0-RH134-pdf-300-320.jpg)
![Chapter 9 | Manage Network Security
[student@serverb ~]$ exit
logout
Connection to serverb closed.
[student@workstation ~]$
7. From workstation, confirm that the default web server at serverb.lab.example.com
returns SERVER B and the virtual host at serverb.lab.example.com:1001 returns
VHOST 1.
7.1. Test access to the http://serverb.lab.example.com web server.
[student@workstation ~]$ curl http://serverb.lab.example.com
SERVER B
7.2. Test access to the http://serverb.lab.example.com:1001 virtual host.
[student@workstation ~]$ curl http://serverb.lab.example.com:1001
VHOST 1
Evaluation
As the student user on the workstation machine, use the lab command to grade your work.
Correct any reported failures and rerun the command until successful.
[student@workstation ~]$ lab grade netsecurity-review
Finish
On the workstation machine, change to the student user home directory and use the lab
command to complete this exercise. This step is important to ensure that resources from previous
exercises do not impact upcoming exercises.
[student@workstation ~]$ lab finish netsecurity-review
This concludes the section.
RH134-RHEL9.0-en-2-20220609 283](https://image.slidesharecdn.com/redhatenterpriselinux9-240713030337-3ff2819f/85/Red-Hat-Enterprise-Linux-Administration-9-0-RH134-pdf-301-320.jpg)
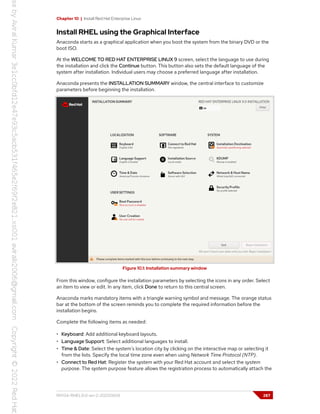
![Chapter 10 | Install Red Hat Enterprise Linux
Guided Exercise
Install Red Hat Enterprise Linux
In this exercise, you reinstall one of your servers with a minimal installation of Red Hat
Enterprise Linux.
Outcomes
• Manually install Red Hat Enterprise Linux 9.
Before You Begin
As the student user on the workstation machine, use the lab command to prepare your
system for this exercise.
This command prepares your environment and ensures that all required resources are
available.
[student@workstation ~]$ lab start installing-install
Instructions
1. Access the servera console and reboot the system into the installation media.
1.1. Locate the servera console icon in your classroom environment. Open the console.
1.2. To reboot, send a Ctrl+Alt+Del to your system using the relevant keyboard, virtual,
or menu entry.
1.3. When the boot loader menu appears, select the Install Red Hat Enterprise Linux 9
menu entry.
2. Keep the default selected language and click the Continue button.
3. Use automatic disk partitioning on the /dev/vda disk.
3.1. Click the Installation Destination button.
3.2. Click the vda disk and then click the Done button to use the default automatic
partitioning option.
3.3. In the Installation Options window, click the Reclaim space button. The /dev/vda
disk already has partitions and file systems from the previous installation. This
selection allows you to wipe the disk for the new installation. In the Reclaim Disk
Space window, click the Delete all button, and then click the Reclaim space button.
4. Set the servera.lab.example.com hostname for the system and verify the network
interface configuration.
4.1. Click the Network & Host Name button.
290 RH134-RHEL9.0-en-2-20220609](https://image.slidesharecdn.com/redhatenterpriselinux9-240713030337-3ff2819f/85/Red-Hat-Enterprise-Linux-Administration-9-0-RH134-pdf-308-320.jpg)
![Chapter 10 | Install Red Hat Enterprise Linux
9. Click the Begin Installation button.
10. Click the Reboot button when the installation is complete.
11. When the system displays the login prompt, log in as the student user.
12. After you validate the installation, reset the servera machine from the web page of the
classroom environment.
Finish
On the workstation machine, change to the student user home directory and use the lab
command to complete this exercise. This step is important to ensure that resources from previous
exercises do not impact upcoming exercises.
[student@workstation ~]$ lab finish installing-install
This concludes the section.
292 RH134-RHEL9.0-en-2-20220609](https://image.slidesharecdn.com/redhatenterpriselinux9-240713030337-3ff2819f/85/Red-Hat-Enterprise-Linux-Administration-9-0-RH134-pdf-310-320.jpg)
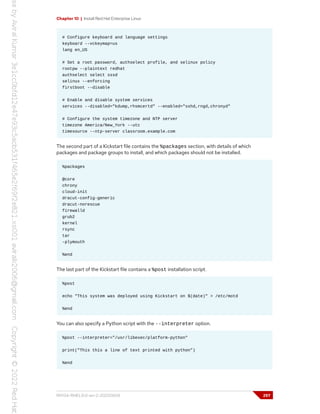
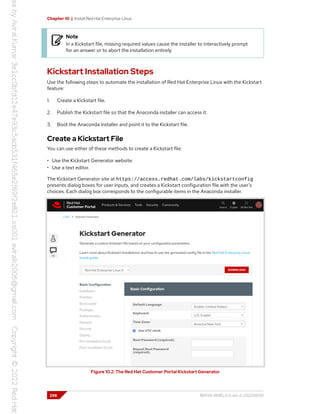
![Chapter 10 | Install Red Hat Enterprise Linux
Creating a Kickstart file from scratch is complex, so you should start by trying to edit an existing
file. Every installation creates a /root/anaconda-ks.cfg file containing the Kickstart directives
used in the installation. This file is a good starting point to create a new Kickstart file.
The ksvalidator utility checks for syntax errors in a Kickstart file. It ensures that keywords
and options are properly used, but it does not validate URL paths, individual packages, groups,
nor any part of %post or %pre scripts. For instance, if the firewall --disabled directive is
misspelled, then the ksvalidator command could produce one of the following errors:
[user@host ~]$ ksvalidator /tmp/anaconda-ks.cfg
The following problem occurred on line 10 of the kickstart file:
Unknown command: frewall
[user@host ~]$ ksvalidator /tmp/anaconda-ks.cfg
The following problem occurred on line 10 of the kickstart file:
no such option: --dsabled
The ksverdiff utility displays syntax differences between different OS versions. For example,
the following command displays the Kickstart syntax changes between RHEL 8 and RHEL 9:
[user@host ~]$ ksverdiff -f RHEL8 -t RHEL9
The following commands were removed in RHEL9:
device deviceprobe dmraid install multipath
The following commands were deprecated in RHEL9:
autostep btrfs method
The following commands were added in RHEL9:
timesource
...output omitted...
The pykickstart package provides the ksvalidator and ksverdiff utilities.
Publish the Kickstart File to Anaconda
Make the Kickstart file available to the installer by placing it in one of these locations:
• A network server available at install time using FTP, HTTP, or NFS.
• An available USB disk or CD-ROM.
• A local hard disk on the system.
The installer must access the Kickstart file to begin an automated installation. Usually the
file is made available via an FTP, web, or NFS server. Network servers facilitate Kickstart file
maintenance because changes can be made once, and then immediately used for future
installations.
Providing Kickstart files on USB or CD-ROM is also convenient. The Kickstart file can be
embedded on the boot media used to start the installation. However, when the Kickstart file is
changed, you must generate new installation media.
Providing the Kickstart file on a local disk allows you to quickly rebuild a system.
RH134-RHEL9.0-en-2-20220609 299](https://image.slidesharecdn.com/redhatenterpriselinux9-240713030337-3ff2819f/85/Red-Hat-Enterprise-Linux-Administration-9-0-RH134-pdf-317-320.jpg)
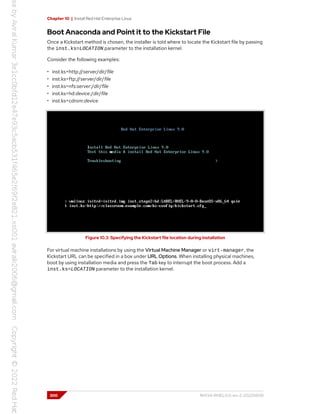

![Chapter 10 | Install Red Hat Enterprise Linux
Guided Exercise
Automate Installation with Kickstart
In this lab, you create a kickstart file and validate the syntax.
Outcomes
• Create a kickstart file.
• Validate the kickstart file's syntax.
Before You Begin
As the student user on the workstation machine, use the lab command to prepare your
system for this exercise.
This command prepares your environment and ensures that all required resources are
available.
[student@workstation ~]$ lab start installing-kickstart
Instructions
1. Log in to servera as the student user.
[student@workstation ~]$ ssh student@servera
...output omitted...
[student@servera ~]$
2. Create the /home/student/kickstart.cfg file by copying the contents of the /root/
anaconda-ks.cfg file using privileged access.
[student@servera ~]$ sudo cat /root/anaconda-ks.cfg > ~/kickstart.cfg
[sudo] password for student: student
3. Make the following changes to the /home/student/kickstart.cfg file.
3.1. Comment out the reboot command:
#reboot
3.2. Modify the repo commands to specify the classroom server's BaseOS and
AppStream repositories:
repo --name="BaseOS" --baseurl="http://classroom.example.com/content/rhel9.0/
x86_64/dvd/BaseOS/"
repo --name="Appstream" --baseurl="http://classroom.example.com/content/rhel9.0/
x86_64/dvd/AppStream/"
302 RH134-RHEL9.0-en-2-20220609](https://image.slidesharecdn.com/redhatenterpriselinux9-240713030337-3ff2819f/85/Red-Hat-Enterprise-Linux-Administration-9-0-RH134-pdf-320-320.jpg)
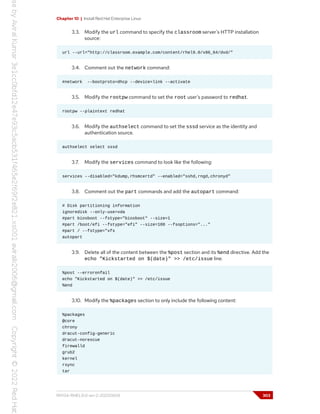
![Chapter 10 | Install Red Hat Enterprise Linux
httpd
-plymouth
%end
3.11. Save and exit the file.
4. Validate the Kickstart file for syntax errors. If there are no errors, then the command has no
output.
[student@servera ~]$ ksvalidator kickstart.cfg
5. Copy the kickstart.cfg file to the /var/www/html/ks-config directory.
[student@servera ~]$ sudo cp ~/kickstart.cfg /var/www/html/ks-config
[sudo] password for student: student
6. Return to the workstation machine as the student user.
[student@servera ~]$ exit
logout
Connection to servera closed.
[student@workstation ~]$
Finish
On the workstation machine, change to the student user home directory and use the lab
command to complete this exercise. This step is important to ensure that resources from previous
exercises do not impact upcoming exercises.
[student@workstation ~]$ lab finish installing-kickstart
This concludes the section.
304 RH134-RHEL9.0-en-2-20220609](https://image.slidesharecdn.com/redhatenterpriselinux9-240713030337-3ff2819f/85/Red-Hat-Enterprise-Linux-Administration-9-0-RH134-pdf-322-320.jpg)
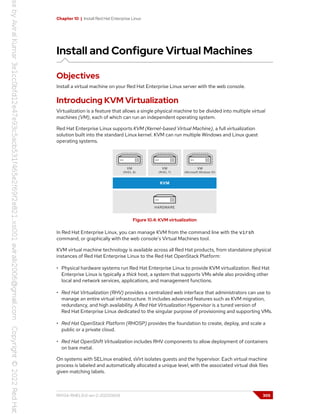
![Chapter 10 | Install Red Hat Enterprise Linux
Virtual Machine Types
There are two main virtual machine types available to install the guest operating system on. The
older of the two uses the i440FX chip set, and provides ISA and PCI bridges, an IDE controller, and
VGA and Ethernet adapters. The Q35 machine type is the newer of the two, and should be used in
most cases. It supports newer virtual hardware interfaces such as PCIe and SATA, and includes an
SM Bus controller.
In Red Hat Enterprise Linux 8 and later versions, UEFI and Secure Boot support for virtual
machines is provided by Open Virtual Machine Firmware (OVMF), in the edk2-ovmf package.
Supported Guest Operating Systems
The list of Red Hat supported guest operating systems varies depending on the product in use.
The RHV, RHOSP, and OpenShift Virtualization products all include Server Virtualization Validation
Program (SVVP) certified drivers, allowing for a greater number of supported Windows guest
operating systems. A RHEL system running KVM only has SVVP support for specific subscriptions.
There are no general rules to determine whether a guest operating system is supported, review
one of the following documents:
• RHEL with KVM: Certified guest operating systems for Red Hat Enterprise Linux with KVM
[https://access.redhat.com/articles/973133]
• RHV, RHOSP, and OpenShift Virtualization: Certified Guest Operating Systems in Red
Hat OpenStack Platform, Red Hat Virtualization and OpenShift Virtualization [https://
access.redhat.com/articles/973163]
Configure a Red Hat Enterprise Linux Physical System
as a Virtualization Host
Administrators can configure a Red Hat Enterprise Linux system as a virtualization host,
appropriate for development, testing, training, or when needing to work in multiple operating
systems at the same time.
Install the Virtualization Tools
Install the Virtualization Host DNF package group to prepare a system to become a
virtualization host.
[root@host ~]# dnf group list | grep -i virt
Virtualization Host
[root@host ~]# dnf group info "Virtualization Host"
...output omitted...
Environment Group: Virtualization Host
Description: Minimal virtualization host.
Mandatory Groups:
Base
Core
Standard
Virtualization Hypervisor
Virtualization Tools
Optional Groups:
Debugging Tools
Network File System Client
Remote Management for Linux
306 RH134-RHEL9.0-en-2-20220609](https://image.slidesharecdn.com/redhatenterpriselinux9-240713030337-3ff2819f/85/Red-Hat-Enterprise-Linux-Administration-9-0-RH134-pdf-324-320.jpg)
![Chapter 10 | Install Red Hat Enterprise Linux
Virtualization Platform
[root@host ~]# dnf group install "Virtualization Host"
...output omitted...
Verify the System Requirements for Virtualization
KVM requires either an Intel processor with the Intel VT-x and Intel 64 extensions for x86-
based systems, or an AMD processor with the AMD-V and the AMD64 extensions. To verify your
hardware and check the system requirements, use the virt-host-validate command.
[root@host ~]# virt-host-validate
QEMU: Checking for hardware virtualization : PASS
QEMU: Checking if device /dev/kvm exists : PASS
QEMU: Checking if device /dev/kvm is accessible : PASS
QEMU: Checking if device /dev/vhost-net exists : PASS
QEMU: Checking if device /dev/net/tun exists : PASS
QEMU: Checking for cgroup 'cpu' controller support : PASS
QEMU: Checking for cgroup 'cpuacct' controller support : PASS
QEMU: Checking for cgroup 'cpuset' controller support : PASS
QEMU: Checking for cgroup 'memory' controller support : PASS
QEMU: Checking for cgroup 'devices' controller support : PASS
QEMU: Checking for cgroup 'blkio' controller support : PASS
QEMU: Checking for device assignment IOMMU support : PASS
QEMU: Checking for secure guest support : PASS
The system must pass all the validation items to operate as a KVM host.
Install a Virtual Machine from the Command Line
Install the virt-install package, then use the virt-install command to deploy a virtual
machine from the command line. There are many installation sources supported such as ISO, NFS,
HTTP, and FTP. The following example uses the virt-install command's --cdrom option to
install the guest from an ISO image.
[root@host ~]# virt-install --name demo --memory 4096 --vcpus 2 --disk size=40
--os-type linux --cdrom /root/rhel.iso
...output omitted...
Manage Virtual Machines with the Web Console
The libvirt-client package provides the virsh command, that is used to manage virtual
machines from the command line. However, you can create and manage virtual machines
graphically using the web console Virtual Machines plug-in.
Install the cockpit-machines package to add the Virtual Machines menu to web console.
[root@host ~]# dnf install cockpit-machines
If the web console is not already running, start and enable it.
[root@host ~]# systemctl enable --now cockpit.socket
RH134-RHEL9.0-en-2-20220609 307](https://image.slidesharecdn.com/redhatenterpriselinux9-240713030337-3ff2819f/85/Red-Hat-Enterprise-Linux-Administration-9-0-RH134-pdf-325-320.jpg)
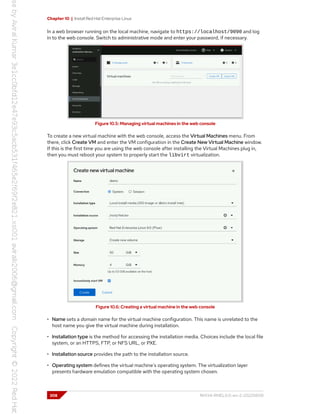
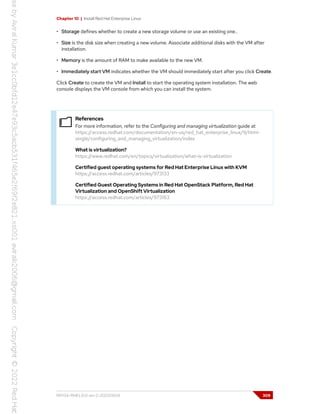
![Chapter 10 | Install Red Hat Enterprise Linux
Lab
Install Red Hat Enterprise Linux
In this lab, you create a kickstart file and make it available to the installer.
Outcomes
• Create a kickstart file.
• Make the kickstart file available to the installer.
Before You Begin
As the student user on the workstation machine, use the lab command to prepare your
system for this exercise.
This command prepares your environment and ensures that all required resources are
available.
[student@workstation ~]$ lab start installing-review
Instructions
Prepare a kickstart file on the serverb machine as specified and make it available at the
http://serverb.lab.example.com/ks-config/kickstart.cfg address.
1. On the serverb machine, copy the /root/anaconda-ks.cfg kickstart file to the /home/
student/kickstart.cfg kickstart file for making it editable for the student user.
2. Make changes to the /home/student/kickstart.cfg kickstart file.
• Comment out the reboot command.
• Modify the repo command for the BaseOS and AppStream repositories. Modify the repo
command for the BaseOS repository to use the http://classroom.example.com/
content/rhel9.0/x86_64/dvd/BaseOS/ address. Modify the repo command for
the AppStream repository to use the http://classroom.example.com/content/
rhel9.0/x86_64/dvd/AppStream/ address.
• Change the url command to use http://classroom.example.com/content/
rhel9.0/x86_64/dvd/ as the installation source.
• Comment out the network command.
• Change the rootpw command to set redhat as the root user password.
• Modify the authselect command to set the sssd service as the identity and
authentication source.
• Modify the services command to disable the kdump and rhsmcertd services and
enable the sshd, rngd, and chronyd services.
• Delete the part commands and add the autopart command.
312 RH134-RHEL9.0-en-2-20220609](https://image.slidesharecdn.com/redhatenterpriselinux9-240713030337-3ff2819f/85/Red-Hat-Enterprise-Linux-Administration-9-0-RH134-pdf-330-320.jpg)
![Chapter 10 | Install Red Hat Enterprise Linux
• Simplify the %post section so that it only runs a script to append the text Kickstarted
on DATE at the end of the /etc/issue file. Use the date command to insert the date
with no additional options.
• Simplify the %package section as follows: include the @core, chrony, dracut-config-
generic, dracut-norescue, firewalld, grub2, kernel, rsync, tar, and httpd
packages. Ensure that the plymouth package does not install.
3. Validate the syntax of the kickstart.cfg kickstart file.
4. Make the /home/student/kickstart.cfg file available at the
http://serverb.lab.example.com/ks-config/kickstart.cfg address.
Evaluation
As the student user on the workstation machine, use the lab command to grade your work.
Correct any reported failures and rerun the command until successful.
[student@workstation ~]$ lab grade installing-review
Finish
On the workstation machine, change to the student user home directory and use the lab
command to complete this exercise. This step is important to ensure that resources from previous
exercises do not impact upcoming exercises.
[student@workstation ~]$ lab finish installing-review
This concludes the section.
RH134-RHEL9.0-en-2-20220609 313](https://image.slidesharecdn.com/redhatenterpriselinux9-240713030337-3ff2819f/85/Red-Hat-Enterprise-Linux-Administration-9-0-RH134-pdf-331-320.jpg)
![Chapter 10 | Install Red Hat Enterprise Linux
Solution
Install Red Hat Enterprise Linux
In this lab, you create a kickstart file and make it available to the installer.
Outcomes
• Create a kickstart file.
• Make the kickstart file available to the installer.
Before You Begin
As the student user on the workstation machine, use the lab command to prepare your
system for this exercise.
This command prepares your environment and ensures that all required resources are
available.
[student@workstation ~]$ lab start installing-review
Instructions
Prepare a kickstart file on the serverb machine as specified and make it available at the
http://serverb.lab.example.com/ks-config/kickstart.cfg address.
1. On the serverb machine, copy the /root/anaconda-ks.cfg kickstart file to the /home/
student/kickstart.cfg kickstart file for making it editable for the student user.
1.1. Log in to the servera machine as the student user.
[student@workstation ~]$ ssh student@serverb
...output omitted...
[student@serverb ~]$
1.2. On the serverb machine, copy the /root/anaconda-ks.cfg file to the /home/
student/kickstart.cfg file.
[student@serverb ~]$ sudo cat /root/anaconda-ks.cfg > ~/kickstart.cfg
[sudo] password for student: student
2. Make changes to the /home/student/kickstart.cfg kickstart file.
• Comment out the reboot command.
• Modify the repo command for the BaseOS and AppStream repositories. Modify the repo
command for the BaseOS repository to use the http://classroom.example.com/
content/rhel9.0/x86_64/dvd/BaseOS/ address. Modify the repo command for
the AppStream repository to use the http://classroom.example.com/content/
rhel9.0/x86_64/dvd/AppStream/ address.
314 RH134-RHEL9.0-en-2-20220609](https://image.slidesharecdn.com/redhatenterpriselinux9-240713030337-3ff2819f/85/Red-Hat-Enterprise-Linux-Administration-9-0-RH134-pdf-332-320.jpg)
![Chapter 10 | Install Red Hat Enterprise Linux
2.6. Modify the authselect command to set the sssd service as the identity and
authentication source.
authselect select sssd
2.7. Simplify the services command to look exactly like the following.
services --disabled="kdump,rhsmcertd" --enabled="sshd,rngd,chronyd"
2.8. Comment out the part commands and add the autopart command:
# Disk partitioning information
ignoredisk --only-use=vda
#part biosboot --fstype="biosboot" --size=1
#part /boot/efi --fstype="efi" --size=100 --
fsoptions="defaults,uid=0,gid=0,umask=077,shortname=winnt"
#part / --fstype="xfs" --size=10137 --label=root
autopart
2.9. Delete all content between the %post and %end sections. Add the echo
"Kickstarted on $(date)" >> /etc/issue line.
%post --erroronfail
echo "Kickstarted on $(date)" >> /etc/issue
%end
2.10. Simplify the package specification to look exactly like the following.
%packages
@core
chrony
dracut-config-generic
dracut-norescue
firewalld
grub2
kernel
rsync
tar
httpd
-plymouth
%end
3. Validate the syntax of the kickstart.cfg kickstart file.
3.1. Validate the Kickstart file for syntax errors.
[student@serverb ~]$ ksvalidator kickstart.cfg
4. Make the /home/student/kickstart.cfg file available at the
http://serverb.lab.example.com/ks-config/kickstart.cfg address.
4.1. Copy the kickstart.cfg file to the /var/www/html/ks-config/ directory.
316 RH134-RHEL9.0-en-2-20220609](https://image.slidesharecdn.com/redhatenterpriselinux9-240713030337-3ff2819f/85/Red-Hat-Enterprise-Linux-Administration-9-0-RH134-pdf-334-320.jpg)
![Chapter 10 | Install Red Hat Enterprise Linux
[student@serverb ~]$ sudo cp kickstart.cfg /var/www/html/ks-config/
[sudo] password for student: student
4.2. Return to the workstation machine as the student user.
[student@serverb ~]$ exit
logout
Connection to serverb closed.
[student@workstation ~]$
Evaluation
As the student user on the workstation machine, use the lab command to grade your work.
Correct any reported failures and rerun the command until successful.
[student@workstation ~]$ lab grade installing-review
Finish
On the workstation machine, change to the student user home directory and use the lab
command to complete this exercise. This step is important to ensure that resources from previous
exercises do not impact upcoming exercises.
[student@workstation ~]$ lab finish installing-review
This concludes the section.
RH134-RHEL9.0-en-2-20220609 317](https://image.slidesharecdn.com/redhatenterpriselinux9-240713030337-3ff2819f/85/Red-Hat-Enterprise-Linux-Administration-9-0-RH134-pdf-335-320.jpg)
![Chapter 11 | Run Containers
Container Concepts
Objectives
Explain container concepts and the core technologies for building, storing, and running containers.
Container Technology
Software applications typically depend on system libraries, configuration files, or services
that their runtime environment provides. Traditionally, the runtime environment for a software
application is installed in an operating system that runs on a physical host or virtual machine.
Administrators then install application dependencies on top of the operating system.
In Red Hat Enterprise Linux, packaging systems such as RPM help administrators to manage
application dependencies. When you install the httpd package, the RPM system ensures that the
correct libraries and other dependencies for that package are also installed.
The major drawback to traditionally deployed software applications is that these dependencies are
entangled with the runtime environment. An application might require older or newer versions of
supporting software than the software that is provided with the operating system. Similarly, two
applications on the same system might require different and incompatible versions of the same
software.
One way to resolve these conflicts is to package and deploy the application as a container.
A container is a set of one or more processes that are isolated from the rest of the system.
Software containers provide a way to package applications and to simplify their deployment and
management.
Think of a physical shipping container. A shipping container is a standard way to package and ship
goods. It is labeled, loaded, unloaded, and transported from one location to another as a single
box. The container's contents are isolated from the contents of other containers so that they do
not affect each other. These underlying principles also apply to software containers.
Red Hat Enterprise Linux supports containers by using the following core technologies:
• Control Groups (cgroups) for resource management.
• Namespaces for process isolation.
• SELinux and Seccomp (Secure Computing mode) to enforce security boundaries.
Note
For a more in-depth discussion of container architecture and security, refer to the
"Ten layers of container security" [https://www.redhat.com/en/resources/container-
security-openshift-cloud-devops-whitepaper] white paper.
Differences Between Containers and Virtual Machines
Containers provide many of the same benefits as virtual machines, such as security, storage, and
network isolation.
320 RH134-RHEL9.0-en-2-20220609](https://image.slidesharecdn.com/redhatenterpriselinux9-240713030337-3ff2819f/85/Red-Hat-Enterprise-Linux-Administration-9-0-RH134-pdf-338-320.jpg)
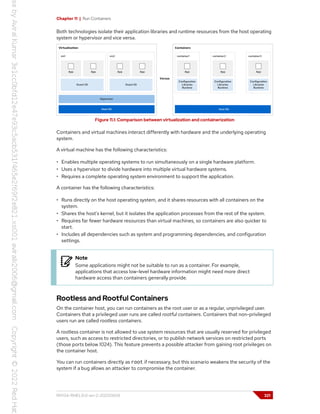
![Chapter 11 | Run Containers
A container registry is a repository for storing and retrieving container images. A developer pushes
or uploads container images to a container registry. You can pull or download container images
from a registry to a local system to run containers.
You might use a public registry that contains third-party images, or you might use a private
registry that your organization controls. The source of your container images matters. As with any
other software package, you must know whether you can trust the code in the container image.
Policies vary between registries about whether and how they provide, evaluate, and test container
images that are submitted to them.
Red Hat distributes certified container images through two main container registries that you can
access with your Red Hat login credentials.
• registry.redhat.io for containers that are based on official Red Hat products.
• registry.connect.redhat.com for containers that are based on third-party products.
The Red Hat Container Catalog (https://access.redhat.com/containers) provides a web-based
interface to search these registries for certified content.
Note
Red Hat provides the Universal Base Image (UBI) image as an initial layer to build
containers. The UBI image is a minimized container image that can be a first layer
for an application build.
You need a Red Hat Developer account to download an image from the Red Hat registries. You
can use the podman login command to authenticate to the registries. If you do not provide a
registry URL to the podman login command, then it authenticates to the default configured
registry.
[user@host ~]$ podman login registry.lab.example.com
Username: RH134
Password: EXAMPLEPASSWORD
Login Succeeded!
You can also use the podman login command --username and --password-stdin options,
to specify the user and password to log in to the registry. The --password-stdin option reads
the password from stdin. Red Hat does not recommend to use the --password option to provide
the password directly, as this option stores the password in the log files.
[user@host ~]# echo $PASSWORDVAR | podman login --username RH134
--password-stdin registry.access.redhat.com
To verify that you are logged in to a registry, use the podman login command --get-login
option.
[user01@rhel-vm ~]$ podman login registry.access.redhat.com --get-login
RH134
[user01@rhel-vm ~]$ podman login quay.io --get-login
Error: not logged into quay.io
RH134-RHEL9.0-en-2-20220609 323](https://image.slidesharecdn.com/redhatenterpriselinux9-240713030337-3ff2819f/85/Red-Hat-Enterprise-Linux-Administration-9-0-RH134-pdf-341-320.jpg)
![Chapter 11 | Run Containers
In the preceding output, the podman utility is authenticated to the
registry.access.redhat.com registry with the RH134 user credentials, but the podman
utility is not authenticated to the quay.io registry.
Configure Container Registries
The default configuration file for container registries is the /etc/containers/
registries.conf file.
[user@host ~]$ cat /etc/containers/registries.conf
...output omitted...
[registries.search]
registries = ['registry.redhat.io', 'quay.io', 'docker.io']
# If you need to access insecure registries, add the registry's fully-qualified
name.
# An insecure registry is one that does not have a valid SSL certificate or only
does HTTP.
[registries.insecure]
registries = []
...output omitted...
Because Red Hat recommends to use a non-privileged user to manage containers, you can
create a registries.conf file for container registries in the $HOME/.config/containers
directory. The configuration file in this directory overrides the settings in the /etc/containers/
registries.conf file.
The list of registries to look for containers is configured in the [registries.search] section of
this file. If you specify the fully qualified name of a container image from the command line, then
the container utility does not search in this section.
Insecure registries are listed in the [registries.insecure] section of the registries.conf
file. If a registry is listed as insecure, then connections to that registry are not protected with
TLS encryption. If a registry is both searchable and insecure, then it can be listed in both
[registries.search] and [registries.insecure].
Note
This classroom runs a private insecure registry based on Red Hat Quay to provide
container images. This registry meets the classroom need; however, you would not
expect to work with insecure registries in real-world scenarios. For more information
about this software, see https://access.redhat.com/products/red-hat-quay.
Container Files to Build Container Images
A container file is a text file with the instructions to build a container image. A container file usually
has a context that defines the path or URL where its files and directories are located. The resulting
container image consists of read-only layers, where each layer represents an instruction from the
container file.
The following output is an example of a container file that uses the UBI image from the
registry.access.redhat.com registry, installs the python3 package, and prints the hello
string to the console.
324 RH134-RHEL9.0-en-2-20220609](https://image.slidesharecdn.com/redhatenterpriselinux9-240713030337-3ff2819f/85/Red-Hat-Enterprise-Linux-Administration-9-0-RH134-pdf-342-320.jpg)
![Chapter 11 | Run Containers
[user@host ~]$ cat Containerfile
FROM registry.access.redhat.com/ubi8/ubi:latest
RUN dnf install -y python3
CMD ["/bin/bash", "-c", "echo hello"]
Note
Creating a container file and its usage instructions are out of scope for this course.
For more information about container files, refer to the DO180 course.
Container Management at Scale
New applications increasingly use containers to implement functional components. Those
containers provide services that other parts of the application consume. In an organization,
managing a growing number of containers might quickly become an overwhelming task.
Deploying containers at scale in production requires an environment that can adapt to the
following challenges:
• The platform must ensure the availability of containers that provide essential services.
• The environment must respond to application usage spikes by increasing or decreasing the
number of running containers and load balancing the traffic.
• The platform must detect the failure of a container or a host and react accordingly.
• Developers might need an automated workflow to deliver new application versions transparently
and securely.
Kubernetes is an orchestration service that deploys, manages, and scales container-based
applications across a cluster of container hosts. Kubernetes redirects traffic to your containers
with a load balancer, so that you can scale the number of containers that provide a service.
Kubernetes also supports user-defined health checks to monitor your containers and to restart
them if they fail.
Red Hat provides a distribution of Kubernetes called Red Hat OpenShift. Red Hat OpenShift is a
set of modular components and services that are built on top of the Kubernetes infrastructure. It
provides additional features, such as remote web-based management, multitenancy, monitoring
and auditing, advanced security features, application lifecycle management, and self-service
instances for developers.
Red Hat OpenShift is beyond the scope of this course, but you can learn more about it at
https://www.openshift.com.
Note
In the enterprise, individual containers are not generally run from the command line.
Instead, it is preferable to run containers in production with a Kubernetes-based
platform, such as Red Hat OpenShift.
However, you might need to use commands to manage containers and images
manually or at a small scale. This chapter focuses on this use case to improve your
grasp of the core concepts behind containers, how they work, and how they can be
useful.
RH134-RHEL9.0-en-2-20220609 325](https://image.slidesharecdn.com/redhatenterpriselinux9-240713030337-3ff2819f/85/Red-Hat-Enterprise-Linux-Administration-9-0-RH134-pdf-343-320.jpg)
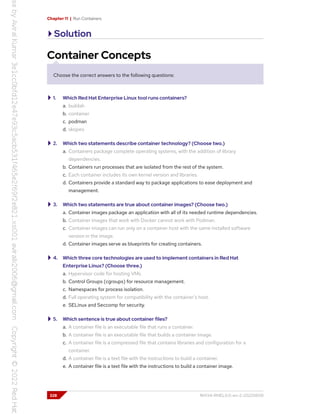
![Chapter 11 | Run Containers
Install Container Utilities
The container-tools meta-package contains required utilities to interact with containers
and container images. To download, run, and compare containers on your system, you install
the container-tools meta-package with the dnf install command. Use the dnf info
command to view the version and contents of the container-tools package.
[root@host ~]# dnf install container-tools
...output omitted...
[user@host ~]$ dnf info container-tools
...output omitted...
Summary : A meta-package witch container tools such as podman, buildah,
: skopeo, etc.
License : MIT
Description : Latest versions of podman, buildah, skopeo, runc, conmon, CRIU,
: Udica, etc as well as dependencies such as container-selinux
: built and tested together, and updated.
...output omitted...
The container-tools meta-package provides the needed podman and skopeo utilities to
achieve the assigned tasks.
Download a Container Image from a Registry
First, you ensure that the podman utility is configured to search and download containers from the
registry.redhat.io registry. The podman info command displays configuration information
of the podman utility, including the configured registries.
[user@host ~]$ podman info
...output omitted...
insecure registries:
registries: []
registries:
registries:
- registry.redhat.io
- quay.io
- docker.io
...output omitted...
The podman search command searches for a matching image in the list of configured registries.
By default, Podman searches in all unqualified-search registries. Depending on the Docker
distribution API that is implemented with the registry, some registries might not support the
search feature.
Use the podman search command to display a list of images on the configured registries that
contain the python-38 package.
330 RH134-RHEL9.0-en-2-20220609](https://image.slidesharecdn.com/redhatenterpriselinux9-240713030337-3ff2819f/85/Red-Hat-Enterprise-Linux-Administration-9-0-RH134-pdf-348-320.jpg)
![Chapter 11 | Run Containers
[user@host ~]$ podman search python-38
NAME DESCRIPTION
registry.access.redhat.com/ubi7/python-38 Python 3.8 platform for building and
running applications
registry.access.redhat.com/ubi8/python-38 Platform for building and running
Python 3.8 applications
...output omitted...
The registry.access.redhat.com/ubi8/python-38 image seems to match the criteria for
the required container.
You can use the skopeo inspect command to examine different container image formats
from a local directory or a remote registry without downloading the image. This command output
displays a list of the available version tags, exposed ports of the containerized application, and
metadata of the container image. You use the skopeo inspect command to verify that the
image contains the required python-38 package.
[user@host ~]$ skopeo inspect docker://registry.access.redhat.com/ubi8/python-38
{
"Name": "registry.access.redhat.com/ubi8/python-38",
"Digest":
"sha256:c6e522cba2cf2b3ae4a875d5210fb94aa1e7ba71b6cebd902a4f4df73cb090b8",
"RepoTags": [
...output omitted...
"1-68",
"1-77-source",
"latest"
...output omitted...
"name": "ubi8/python-38",
"release": "86.1648121386",
"summary": "Platform for building and running Python 3.8 applications",
...output omitted...
The registry.access.redhat.com/ubi8/python-38 image contains the required package
and it is based on the required image. You use the podman pull command to download the
selected image to the local machine. You can use the fully qualified name of the image from the
preceding output to avoid ambiguity on container versions or registries.
[user@host ~]$ podman pull registry.access.redhat.com/ubi8/python-38
Trying to pull registry.access.redhat.com/ubi8/python-38:latest...
Getting image source signatures
Checking if image destination supports signatures
Copying blob c530010fb61c done
...output omitted...
Then, you use the podman images command to display the local images.
[user@host ~]$ podman images
REPOSITORY TAG IMAGE ID CREATED SIZE
registry.access.redhat.com/ubi8/python-38 latest a33d92f90990 1 hour ago 901 MB
RH134-RHEL9.0-en-2-20220609 331](https://image.slidesharecdn.com/redhatenterpriselinux9-240713030337-3ff2819f/85/Red-Hat-Enterprise-Linux-Administration-9-0-RH134-pdf-349-320.jpg)
![Chapter 11 | Run Containers
Create a Container Image from a Container File
You are provided with the following container file to create the container image in the python36-
app directory:
[user@host python36-app]$ cat Containerfile
FROM registry.access.redhat.com/ubi8/ubi:latest
RUN dnf install -y python36
CMD ["/bin/bash", "-c", "sleep infinity"]
The previous container file uses the registry.access.redhat.com/ubi8/ubi:latest
image as the base image. The container file then installs the python36 package and runs the
sleep infinity bash command to prevent the container from exiting.
Normally, a container runs a process, and then exits after that process is complete. The sleep
infinity command prevents the container from exiting, because the process never completes.
You can then test, develop, and debug inside the container.
After examining the container file, you use the podman build command to build the image.
The podman build command builds a container image by using instructions from one or more
container files. You must be in the directory with the container file to build the image with the
podman build command. You can use the podman build command -t option to provide the
name and python36:1.0 tag for the new image.
[user@host python36-app]$ podman build -t python36:1.0 .
STEP 1/3: FROM registry.access.redhat.com/ubi8/ubi:latest
STEP 2/3: RUN dnf install -y python36
...output omitted...
STEP 3/3: CMD ["/bin/bash", "-c", "sleep infinity"]
COMMIT python36:1.0
--> 35ab820880f
Successfully tagged localhost/python36:1.0
35ab820880f1708fa310f835407ffc94cb4b4fe2506b882c162a421827b156fc
The last line of the preceding output shows the container image ID. Most Podman commands
use the first 12 characters of the container image ID to refer to the container image. You can use
this short ID or the name of a container or a container image as arguments for most Podman
commands.
Note
If a version number is not specified in the tag, then the image is created with the
:latest tag. If an image name is not specified, then the image and tag fields show
the <none> string.
You use the podman images command to verify that the image is created with the defined name
and tag.
[user@host ~]$ podman images
REPOSITORY TAG IMAGE ID CREATED SIZE
localhost/python36 1.0 35ab820880f1 3 minute ago 266 MB
registry.access.redhat.com/ubi8/python-38 latest a33d92f90990 1 hour ago 901 MB
332 RH134-RHEL9.0-en-2-20220609](https://image.slidesharecdn.com/redhatenterpriselinux9-240713030337-3ff2819f/85/Red-Hat-Enterprise-Linux-Administration-9-0-RH134-pdf-350-320.jpg)
![Chapter 11 | Run Containers
You then use the podman inspect command to view the low-level information of the container
image and verify that its content matches the requirements for the container.
[user@host ~]$ podman inspect localhost/python36:1.0
...output omitted...
"Cmd": [
"/bin/bash",
"-c",
"sleep infinity"
],
...output omitted...
{
"created": "2022-04-18T19:47:52.708227513Z",
"created_by": "/bin/sh -c dnf install -y python36",
"comment": "FROM registry.access.redhat.com/ubi8/ubi:latest"
},
...output omitted...
The output of the podman inspect command shows the registry.access.redhat.com/
ubi8/ubi:latest base image, the dnf command to install the python36 package, and the
sleep infinity bash command that is executed at runtime to prevent the container from
exiting.
Note
The podman inspect command output varies from the python-38 image to
the python36 image, because you created the /python36 image by adding a
layer with changes to the existing registry.access.redhat.com/ubi8/
ubi:latest base image, whereas the python-38 image is itself a base image.
Run Containers
Now that you have the required container images, you can use them to run containers. A container
can be in one of the following states:
Created
A container that is created but is not started.
Running
A container that is running with its processes.
Stopped
A container with its processes stopped.
Paused
A container with its processes paused. Not supported for rootless containers.
Deleted
A container with its processes in a dead state.
The podman ps command lists the running containers on the system. Use the podman ps -a
command to view all containers (created, stopped, paused, or running) in the machine.
You use the podman create command to create the container to run later. To create the
container, you use the ID of the localhost/python36 container image. You also use the --
RH134-RHEL9.0-en-2-20220609 333](https://image.slidesharecdn.com/redhatenterpriselinux9-240713030337-3ff2819f/85/Red-Hat-Enterprise-Linux-Administration-9-0-RH134-pdf-351-320.jpg)
![Chapter 11 | Run Containers
name option to set a name to identify the container. The output of the command is the long ID of
the container.
[user@host ~]$ podman create --name python36 dd6ca291f097
c54c7ee281581c198cb96b07d78a0f94be083ae94dacbae69c05bd8cd354bbec
Note
If you do not set a name for the container with the podman create or podman
run command with the --name option, then the podman utility assigns a random
name to the container.
You then use the podman ps and podman ps -a commands to verify that the container is
created but is not started. You can see information about the python36 container, such as
the short ID, name, and the status of the container, the command that the container runs when
started, and the image to create the container.
[user@host ~]$ podman create --name python36 dd6ca291f097
c54c7ee281581c198cb96b07d78a0f94be083ae94dacbae69c05bd8cd354bbec
[user@host ~]$ podman ps
CONTAINER ID IMAGE COMMAND CREATED STATUS PORTS NAMES
[user@host ~]$ podman ps -a
CONTAINER ID IMAGE COMMAND CREATED STATUS
PORTS NAMES
c54c7ee28158 localhost/python36:1.0 /bin/bash -c slee... 5 seconds ago Created
python36
Now that you verified that the container is created correctly, you decide to start the container,
so you run the podman start command. You can use the name or the container ID to start the
container. The output of this command is the name of the container.
[user@host ~]$ podman start python36
python36
[user@host ~]$ podman ps
CONTAINER ID IMAGE COMMAND CREATED STATUS
PORTS NAMES
c54c7ee28158 localhost/python36:1.0 /bin/bash -c slee... 6 minutes ago Up 3
seconds ago python36
Run a Container from a Remote Repository
You can use the podman run command to create and run the container in one step. The podman
run command runs a process inside a container, and this process starts the new container.
You use the podman run command -d option to run a container in detached mode, which runs
the container in the background instead of in the foreground of the session. In the example of the
python36 container, you do not need to provide a command for the container to run, because the
sleep infinity command was already provided in the container file that created the image for
that container.
334 RH134-RHEL9.0-en-2-20220609](https://image.slidesharecdn.com/redhatenterpriselinux9-240713030337-3ff2819f/85/Red-Hat-Enterprise-Linux-Administration-9-0-RH134-pdf-352-320.jpg)
![Chapter 11 | Run Containers
To create the python38 container, you decide to use the podman run command and to refer
to the registry.access.redhat.com/ubi8/python-38 image. You also decide to use the
sleep infinity command to prevent the container from exiting.
[user@host ~]$ podman run -d --name python38
registry.access.redhat.com/ubi8/python-38
sleep infinity
a60f71a1dc1b997f5ef244aaed232e5de71dd1e8a2565428ccfebde73a2f9462
[user@host ~]$ podman ps
CONTAINER ID IMAGE COMMAND
CREATED STATUS PORTS NAMES
c54c7ee28158 localhost/python36:1.0 /bin/bash -c
slee... 37 minutes ago Up 30 minutes ago python36
a60f71a1dc1b registry.access.redhat.com/ubi8/python-38:latest sleep infinity
32 seconds ago Up 33 seconds ago python38
Important
If you run a container by using the fully qualified image name, but the image is not
yet stored locally, then the podman run command first pulls the image from the
registry and then runs.
Environment Isolation in Containers
Containers isolate the environment of an application. Each container has its own file system,
networking, and processes. You can notice the isolation feature when you look at the output of the
ps command and compare it between the host machine and a running container.
You first run the ps -ax command on the local machine and the command returns an expected
result with many processes.
[root@host ~]# ps -ax
PID TTY STAT TIME COMMAND
1 ? Ss 0:01 /usr/lib/systemd/systemd --switched-root --system --
deseriali
2 ? S 0:00 [kthreadd]
3 ? I< 0:00 [rcu_gp]
4 ? I< 0:00 [rcu_par_gp]
...output omitted...
The podman exec command executes a command inside a running container. The command
takes the name or ID of the container as the first argument and the following arguments as
commands to run inside the container. You use the podman exec command to view the running
processes in the python36 container. The output from the ps aux command looks different,
because it is running different processes from the local machine.
[student@host ~]$ podman exec python38 ps -ax
PID TTY STAT TIME COMMAND
1 ? Ss 0:00 /usr/bin/coreutils --coreutils-prog-shebang=sleep /
usr/bin/sleep infinity
7 ? R 0:00 ps -ax
RH134-RHEL9.0-en-2-20220609 335](https://image.slidesharecdn.com/redhatenterpriselinux9-240713030337-3ff2819f/85/Red-Hat-Enterprise-Linux-Administration-9-0-RH134-pdf-353-320.jpg)
![Chapter 11 | Run Containers
You can use the sh -c command to encapsulate the command to execute in the container. In the
following example, the ps -ax > /tmp/process-data.log command is interpreted as the
command to be executed in the container. If you do not encapsulate the command, then Podman
might interpret the greater-than character (>) as part of the podman command instead of as an
argument to the podman exec option.
[student@host ~]$ podman exec python38 sh -c 'ps -ax > /tmp/process-data.log'
PID TTY STAT TIME COMMAND
1 ? Ss 0:00 /usr/bin/coreutils --coreutils-prog-shebang=sleep /
usr/bin/sleep infinity
7 ? R 0:00 ps -ax
You decide to compare the installed python version on the host system with the installed python
version on the containers.
[user@host ~]$ python3 --version
Python 3.9.10
[user@host ~]$ podman exec python36 python3 --version
Python 3.6.8
[user@host ~]$ podman exec python38 python3 --version
Python 3.8.8
File-system Isolation in Containers
Developers can use the file-system isolation feature to write and test applications for different
versions of programming languages without the need to use multiple physical or virtual machines.
You create a simple bash script that displays hello world on the terminal in the /tmp directory.
[user@host ~]$ echo "echo 'hello world'" > /tmp/hello.sh
The /tmp/hello.sh file exists on the host machine, and does not exist on the file system inside
the containers. If you try to use the podman exec to execute the script, then it gives an error,
because the /tmp/hello.sh script does not exist in the container.
[user@host ~]$ stat /tmp/hello.sh
File: /tmp/hello.sh
Size: 19 Blocks: 8 IO Block: 4096 regular file
Device: fc04h/64516d Inode: 17655599 Links: 1
Access: (0644/-rw-r--r--) Uid: ( 1000/ user) Gid: ( 1000/ user)
Context: unconfined_u:object_r:user_tmp_t:s0
Access: 2022-04-19 21:47:40.101601412 -0400
Modify: 2022-04-19 21:47:36.497558132 -0400
Change: 2022-04-19 21:47:36.497558132 -0400
Birth: 2022-04-19 21:45:24.785976758 -0400
[user@host ~]$ podman exec python38 stat /tmp/hello.sh
stat: cannot statx '/tmp/hello.sh': No such file or directory
The podman cp command copies files and folders between host and container file systems. You
can copy the /tmp/hello.sh file to the python38 container with the podman cp command.
336 RH134-RHEL9.0-en-2-20220609](https://image.slidesharecdn.com/redhatenterpriselinux9-240713030337-3ff2819f/85/Red-Hat-Enterprise-Linux-Administration-9-0-RH134-pdf-354-320.jpg)
![Chapter 11 | Run Containers
[user@host ~]$ podman cp /tmp/hello.sh python38:/tmp/hello.sh
[user@host ~]$ podman exec python38 stat /tmp/hello.sh
File: /tmp/hello.sh
Size: 19 Blocks: 8 IO Block: 4096 regular file
Device: 3bh/59d Inode: 12280058 Links: 1
Access: (0644/-rw-r--r--) Uid: ( 1001/ default) Gid: ( 0/ root)
Access: 2022-04-20 01:47:36.000000000 +0000
Modify: 2022-04-20 01:47:36.000000000 +0000
Change: 2022-04-20 02:02:04.732982187 +0000
Birth: 2022-04-20 02:02:04.732982187 +0000
After the script is copied to the container file system, it can be executed from within the container.
[user@host ~]$ podman exec python38 bash /tmp/hello.sh
hello world
Remove Containers and Images
You can remove containers and images by using the podman rm and podman rmi commands,
respectively. Before you remove a container image, any existing running containers from that
image must be removed.
You decide to remove the python38 container and its related image. If you attempt to remove
the registry.access.redhat.com/ubi8/python-38 image while the python38 container
exists, then it gives an error.
[user@host ~]$ podman rmi registry.access.redhat.com/ubi8/python-38
Error: Image used by
a60f71a1dc1b997f5ef244aaed232e5de71dd1e8a2565428ccfebde73a2f9462: image is in use
by a container
You must stop the container before you can remove it. To stop a container, use the podman stop
command.
[user@host ~]$ podman stop python38
After you stop the container, use the podman rm command to remove the container.
[user@host ~]$ podman rm python38
a60f71a1dc1b997f5ef244aaed232e5de71dd1e8a2565428ccfebde73a2f9462
When the container no longer exists, the registry.access.redhat.com/ubi8/python-38
can be removed with the podman rmi command.
[user@host ~]$ podman rmi registry.access.redhat.com/ubi8/python-38
Untagged: registry.access.redhat.com/ubi8/python-38:latest
Deleted: a33d92f90990c9b1bad9aa98fe017e48f30c711b49527dcc797135352ea57d12
RH134-RHEL9.0-en-2-20220609 337](https://image.slidesharecdn.com/redhatenterpriselinux9-240713030337-3ff2819f/85/Red-Hat-Enterprise-Linux-Administration-9-0-RH134-pdf-355-320.jpg)
![Chapter 11 | Run Containers
Guided Exercise
Deploy Containers
In this exercise, you use container management tools to build an image, run a container, and
query the running container environment.
Outcomes
• Configure a container image registry and create a container from an existing image.
• Create a container by using a container file.
• Copy a script from a host machine into containers and run the script.
• Delete containers and images.
Before You Begin
As the student user on the workstation machine, use the lab command to prepare your
system for this exercise.
This command prepares your environment and ensures that all required resources are
available.
[student@workstation ~]$ lab start containers-deploy
Instructions
1. Log in to the servera machine as the student user.
[student@workstation ~]$ ssh student@servera
...output omitted...
[student@servera ~]$
2. Install the container-tools meta-package.
[student@servera ~]$ sudo dnf install container-tools
[sudo] password for student: student
...output omitted...
Is this ok [y/N]: y
...output omitted...
Complete!
3. Configure the registry.lab.example.com classroom registry in your home directory.
Log in to the container registry with admin as the user and redhat321 as the password.
3.1. Create the /home/student/.config/containers directory.
[student@servera ~]$ mkdir -p /home/student/.config/containers
RH134-RHEL9.0-en-2-20220609 339](https://image.slidesharecdn.com/redhatenterpriselinux9-240713030337-3ff2819f/85/Red-Hat-Enterprise-Linux-Administration-9-0-RH134-pdf-357-320.jpg)
![Chapter 11 | Run Containers
3.2. Create the /home/student/.config/containers/registries.conf file with
the following contents:
unqualified-search-registries = ['registry.lab.example.com']
[[registry]]
location = "registry.lab.example.com"
insecure = true
blocked = false
3.3. Verify that the classroom registry is added.
[student@servera ~]$ podman info
...output omitted...
registries:
registry.lab.example.com:
Blocked: false
Insecure: true
Location: registry.lab.example.com
MirrorByDigestOnly: false
Mirrors: null
Prefix: registry.lab.example.com
search:
- registry.lab.example.com
...output omitted...
3.4. Log in to the classroom registry.
[student@servera ~]$ podman login registry.lab.example.com
Username: admin
Password: redhat321
Login Succeeded!
4. Run the python38 container in detached mode from an image with the python 3.8
package and based on the ubi8 image. The image is hosted on a remote registry.
4.1. Search for a python-38 container in the registry.lab.example.com registry.
[student@servera ~]$ podman search registry.lab.example.com/
NAME DESCRIPTION
...output omitted...
registry.lab.example.com/ubi8/python-38
registry.lab.example.com/ubi8/httpd-24
registry.lab.example.com/rhel8/php-74
4.2. Inspect the image.
340 RH134-RHEL9.0-en-2-20220609](https://image.slidesharecdn.com/redhatenterpriselinux9-240713030337-3ff2819f/85/Red-Hat-Enterprise-Linux-Administration-9-0-RH134-pdf-358-320.jpg)
![Chapter 11 | Run Containers
[student@servera ~]$ skopeo inspect
docker://registry.lab.example.com/ubi8/python-38
...output omitted...
"description": "Python 3.8 available as container is a base platform for
building and running various Python 3.8 applications and frameworks.
...output omitted...
4.3. Pull the python-38 container image.
[student@servera ~]$ podman pull registry.lab.example.com/ubi8/python-38
Trying to pull registry.lab.example.com/ubi8/python-38:latest...
...output omitted...
671cc3cb42984e338733ebb5a9a68e69e267cb7f9cb802283d3bc066f6321617
4.4. Verify that the container is downloaded to the local image repository.
[student@servera ~]$ podman images
REPOSITORY TAG IMAGE ID CREATED
SIZE
registry.lab.example.com/ubi8/python-38 latest 671cc3cb4298 5 days ago
901 MB
4.5. Start the python38 container.
[student@servera ~]$ podman run -d --name python38
registry.lab.example.com/ubi8/python-38 sleep infinity
004756b52d3d3326545f5075594cffa858afd474b903288723a3aa299e72b1af
4.6. Verify that the container was created.
[student@servera ~]$ podman ps
CONTAINER ID IMAGE COMMAND
CREATED STATUS PORTS NAMES
004756b52d3d registry.lab.example.com/ubi8/python-38:latest sleep infinity
About a minute ago Up About a minute ago python38
5. Build a container image called python36:1.0 from a container file, and use the image to
create a container called python36.
5.1. Change into the /home/student/python36 directory and examine the container
file called Containerfile.
[student@servera ~]$ cd /home/student/python36
[student@servera python36]$ cat Containerfile
FROM registry.lab.example.com/ubi8/ubi:latest
RUN dnf install -y python36
CMD ["/bin/bash", "-c", "sleep infinity"]
5.2. Create the container image from the container file.
RH134-RHEL9.0-en-2-20220609 341](https://image.slidesharecdn.com/redhatenterpriselinux9-240713030337-3ff2819f/85/Red-Hat-Enterprise-Linux-Administration-9-0-RH134-pdf-359-320.jpg)
![Chapter 11 | Run Containers
[student@servera python36]$ podman build -t python36:1.0 .
STEP 1/3: FROM registry.lab.example.com/ubi8/ubi:latest
...output omitted...
STEP 2/3: RUN dnf install -y python36
...output omitted...
STEP 3/3: CMD ["/bin/bash", "-c", "sleep infinity"]
...output omitted...
Successfully tagged localhost/python36:1.0
80e68c195925beafe3b2ad7a54fe1e5673993db847276bc62d5f9d109e9eb499
5.3. Verify that the container image exists in the local image repository.
[student@servera ~]$ podman images
REPOSITORY TAG IMAGE ID CREATED
SIZE
localhost/python36 1.0 80e68c195925 3 minutes ago
266 MB
registry.lab.example.com/ubi8/python-38 latest 671cc3cb4298 5 days ago
901 MB
registry.lab.example.com/ubi8/ubi latest fca12da1dc30 4 months ago
235 MB
5.4. Inspect the python36 container.
[student@servera ~]$ podman inspect localhost/python36:1.0
...output omitted...
"created": "2022-04-26T20:58:13.448031264Z",
"created_by": "/bin/sh -c dnf install -y python36",
"comment": "FROM registry.lab.example.com/ubi8/ubi:latest"
},
{
"created": "2022-04-26T20:58:14.057396235Z",
"created_by": "/bin/sh -c #(nop) CMD ["/bin/bash", "-c",
"sleep infinity"]",
...output omitted...
5.5. Create the python36 container.
[student@servera ~]$ podman create --name python36 localhost/python36:1.0
3db4eabe9043224a7bdf195ab5fd810bf95db98dc29193392cef7b94489e1aae
5.6. Start the python36 container.
[student@servera ~]$ podman start python36
python36
5.7. Verify that the container is running.
342 RH134-RHEL9.0-en-2-20220609](https://image.slidesharecdn.com/redhatenterpriselinux9-240713030337-3ff2819f/85/Red-Hat-Enterprise-Linux-Administration-9-0-RH134-pdf-360-320.jpg)
![Chapter 11 | Run Containers
[student@servera ~]$ podman ps
CONTAINER ID IMAGE COMMAND
CREATED STATUS PORTS NAMES
004756b52d3d registry.lab.example.com/ubi8/python-38:latest sleep infinity
33 minutes ago Up 33 minutes ago python38
3db4eabe9043 localhost/python36:1.0 /bin/bash -c
slee... About a minute ago Up 42 seconds ago python36
6. Copy the /home/student/script.py script into the /tmp directory of the running
containers and run the script on each container.
6.1. Copy the /home/student/script.py python script into the /tmp directory in
both containers.
[student@servera ~]$ podman cp /home/student/script.py python36:/tmp/script.py
[student@servera ~]$ podman cp /home/student/script.py python38:/tmp/script.py
6.2. Run the Python script in both containers, and then run the Python script on the host.
[student@servera ~]$ podman exec -it python36 python3 /tmp/script.py
This script was not run on the correct version of Python
Expected version of Python is 3.8
Current version of python is 3.6
[student@servera ~]$ podman exec -it python38 python3 /tmp/script.py
This script was correctly run on Python 3.8
[student@servera ~]$ python3 /home/student/script.py
This script was not run on the correct version of Python
Expected version of Python is 3.8
Current version of python is 3.9
7. Delete containers and images.
7.1. Stop both containers.
[student@servera ~]$ podman stop python36 python38
...output omitted...
python38
python36
7.2. Remove both containers.
[student@servera ~]$ podman rm python36 python38
3db4eabe9043224a7bdf195ab5fd810bf95db98dc29193392cef7b94489e1aae
004756b52d3d3326545f5075594cffa858afd474b903288723a3aa299e72b1af
7.3. Remove both container images.
RH134-RHEL9.0-en-2-20220609 343](https://image.slidesharecdn.com/redhatenterpriselinux9-240713030337-3ff2819f/85/Red-Hat-Enterprise-Linux-Administration-9-0-RH134-pdf-361-320.jpg)
![Chapter 11 | Run Containers
[student@servera ~]$ podman rmi localhost/python36:1.0
registry.lab.example.com/ubi8/python-38:latest
registry.lab.example.com/ubi8/ubi
Untagged: localhost/python36:1.0
Untagged: registry.lab.example.com/ubi8/python-38:latest
Deleted: 80e68c195925beafe3b2ad7a54fe1e5673993db847276bc62d5f9d109e9eb499
Deleted: 219e43f6ff96fd11ea64f67cd6411c354dacbc5cbe296ff1fdbf5b717f01d89a
Deleted: 671cc3cb42984e338733ebb5a9a68e69e267cb7f9cb802283d3bc066f6321617
Finish
On the workstation machine, change to the student user home directory and use the lab
command to complete this exercise. This step is important to ensure that resources from previous
exercises do not impact upcoming exercises.
[student@workstation ~]$ lab finish containers-deploy
This concludes the section.
344 RH134-RHEL9.0-en-2-20220609](https://image.slidesharecdn.com/redhatenterpriselinux9-240713030337-3ff2819f/85/Red-Hat-Enterprise-Linux-Administration-9-0-RH134-pdf-362-320.jpg)
![Chapter 11 | Run Containers
[user@host ~]$ podman run -d registry.lab.example.com/rhel8/mariadb-105
--name db01
20751a03897f14764fb0e7c58c74564258595026124179de4456d26c49c435ad
[user@host ~]$ podman ps -a
CONTAINER ID IMAGE COMMAND
CREATED STATUS PORTS NAMES
20751a03897f registry.lab.example.com/rhel8/mariadb-105:latest run-mysqld
29 seconds ago Exited (1) 29 seconds ago db01
You use the podman container logs command to investigate the reason of the container
status.
[user@host ~]$ podman container logs db01
...output omitted...
You must either specify the following environment variables:
MYSQL_USER (regex: '^[a-zA-Z0-9_]+$')
MYSQL_PASSWORD (regex: '^[a-zA-Z0-9_~!@#$%^&*()-=<>,.?;:|]+$')
MYSQL_DATABASE (regex: '^[a-zA-Z0-9_]+$')
Or the following environment variable:
MYSQL_ROOT_PASSWORD (regex: '^[a-zA-Z0-9_~!@#$%^&*()-=<>,.?;:|]+$')
Or both.
...output omitted...
From the preceding output, you determine that the container did not continue to run because
the required environment variables were not passed to the container. So you inspect the
mariadb-105 container image to find more information about the environment variables to
customize the container.
[user@host ~]$ skopeo inspect docker://registry.lab.example.com/rhel8/mariadb-105
...output omitted...
"name": "rhel8/mariadb-105",
"release": "40.1647451927",
"summary": "MariaDB 10.5 SQL database server",
"url": "https://access.redhat.com/containers/#/registry.access.redhat.com/
rhel8/mariadb-105/
images/1-40.1647451927",
"usage": "podman run -d -e MYSQL_USER=user -e MYSQL_PASSWORD=pass -e
MYSQL_DATABASE=db -p 3306:3306 rhel8/mariadb-105",
"vcs-ref": "c04193b96a119e176ada62d779bd44a0e0edf7a6",
"vcs-type": "git",
"vendor": "Red Hat, Inc.",
...output omitted...
The usage label from the output provides an example of how to run the image. The url label
points to a web page in the Red Hat Container Catalog that documents environment variables and
other information about how to use the container image.
The documentation for this image shows that the container uses the 3306 port for the database
service. The documentation also shows that the following environment variables are available to
configure the database service:
346 RH134-RHEL9.0-en-2-20220609](https://image.slidesharecdn.com/redhatenterpriselinux9-240713030337-3ff2819f/85/Red-Hat-Enterprise-Linux-Administration-9-0-RH134-pdf-364-320.jpg)
![Chapter 11 | Run Containers
Environment Variables for the mariadb Image
Variable Description
MYSQL_USER Username for the MySQL account to be created
MYSQL_PASSWORD Password for the user account
MYSQL_DATABASE Database name
MYSQL_ROOT_PASSWORD Password for the root user (optional)
After examining the available environment variables for the image, you use the podman run
command -e option to pass environment variables to the container, and use the podman ps
command to verify that it is running.
[user@host ~]$ podman run -d --name db01
-e MYSQL_USER=student
-e MYSQL_PASSWORD=student
-e MYSQL_DATABASE=dev_data
-e MYSQL_ROOT_PASSWORD=redhat
registry.lab.example.com/rhel8/mariadb-105
[user@host ~]$ podman ps
CONTAINER ID IMAGE COMMAND
CREATED STATUS PORTS NAMES
4b8f01be7fd6 registry.lab.example.com/rhel8/mariadb-105:latest run-mysqld 6
seconds ago Up 6 seconds ago db01
Container Persistent Storage
By default, the storage that a container uses is ephemeral. The ephemeral nature of container
storage means that its contents are lost after you remove the container. You must consider file-
system level permissions when you mount a persistent volume in a container.
In the MariaDB image, the mysql user must own the /var/lib/mysql directory, the same as
if MariaDB was running on the host machine. The directory that you intend to mount into the
container must have mysql as the user and group owner (or the UID/GID of the mysql user, if
MariaDB is not installed on the host machine). If you run a container as the root user, then the
UIDs and GIDs on your host machine match the UIDs and GIDs inside the container.
The UID and GID matching configuration does not occur the same way in a rootless container. In a
rootless container, the user has root access from within the container, because Podman launches a
container inside the user namespace.
You can use the podman unshare command to run a command inside the user namespace. To
obtain the UID mapping for your user namespace, use the podman unshare cat command.
[user@host ~]$ podman unshare cat /proc/self/uid_map
0 1000 1
1 100000 65536
[user@host ~]$ podman unshare cat /proc/self/gid_map
0 1000 1
1 100000 65536
RH134-RHEL9.0-en-2-20220609 347](https://image.slidesharecdn.com/redhatenterpriselinux9-240713030337-3ff2819f/85/Red-Hat-Enterprise-Linux-Administration-9-0-RH134-pdf-365-320.jpg)
![Chapter 11 | Run Containers
The preceding output shows that in the container, the root user (UID and GID of 0) maps to your
user (UID and GID of 1000) on the host machine. In the container, the UID and GID of 1 maps to
the UID and GID of 100000 on the host machine. Every UID and GID after 1 increments by 1. For
example, the UID and GID of 30 inside a container maps to the UID and GID of 100029 on the
host machine.
You use the podman exec command to view the mysql user UID and GID inside the container
that is running with ephemeral storage.
[user@host ~]$ podman exec -it db01 grep mysql /etc/passwd
mysql:x:27:27:MySQL Server:/var/lib/mysql:/sbin/nologin
You decide to mount the /home/user/db_data directory into the db01 container to provide
persistent storage on the /var/lib/mysql directory of the container. You then create the
/home/user/db_data directory and use the podman unshare command to set the user
namespace UID and GID of 27 as the owner of the directory.
[user@host ~]$ mkdir /home/user/db_data
[user@host ~]$ podman unshare chown 27:27 /home/user/db_data
The UID and GUI of 27 in the container maps to the UID and GID of 100026 on the host machine.
You can verify the mapping by viewing the ownership of the /home/user/db_data directory
with the ls command.
[student@workstation ~]$ ls -l /home/user/
total 0
drwxrwxr-x. 3 100026 100026 18 May 5 14:37 db_data
...output omitted...
Now that the correct file-system level permissions are set, you use the podman run command -v
option to mount the directory.
[user@host ~]$ podman run -d --name db01
-e MYSQL_USER=student
-e MYSQL_PASSWORD=student
-e MYSQL_DATABASE=dev_data
-e MYSQL_ROOT_PASSWORD=redhat
-v /home/user/db_data:/var/lib/mysql
registry.lab.example.com/rhel8/mariadb-105
You notice that the db01 container is not running.
[user@host ~]$ podman ps -a
CONTAINER ID IMAGE COMMAND
CREATED STATUS PORTS NAMES
dfdc20cf9a7e registry.lab.example.com/rhel8/mariadb-105:latest run-mysqld
29 seconds ago Exited (1) 29 seconds ago db01
The podman container logs command shows a permission error for the /var/lib/mysql/
data directory.
348 RH134-RHEL9.0-en-2-20220609](https://image.slidesharecdn.com/redhatenterpriselinux9-240713030337-3ff2819f/85/Red-Hat-Enterprise-Linux-Administration-9-0-RH134-pdf-366-320.jpg)
![Chapter 11 | Run Containers
[user@host ~]$ podman container logs db01
...output omitted...
---> 16:41:25 Initializing database ...
---> 16:41:25 Running mysql_install_db ...
mkdir: cannot create directory '/var/lib/mysql/data': Permission denied
Fatal error Can't create database directory '/var/lib/mysql/data'
This error happens because of the incorrect SELinux context that is set on the /home/user/
db_data directory on the host machine.
SELinux Contexts for Container Storage
You must set the container_file_t SELinux context type before you can mount the directory
as persistent storage to a container. If the directory does not have the container_file_t
SELinux context, then the container cannot access the directory. You can append the Z option to
the argument of the podman run command -v option to automatically set the SELinux context
on the directory.
So you use the podman run -v /home/user/dbfiles:/var/lib/mysql:Z command to
set the SELinux context for the /home/user/dbfiles directory when you mount it as persistent
storage for the /var/lib/mysql directory.
[user@host ~]$ podman run -d --name db01
-e MYSQL_USER=student
-e MYSQL_PASSWORD=student
-e MYSQL_DATABASE=dev_data
-e MYSQL_ROOT_PASSWORD=redhat
-v /home/user/db_data:/var/lib/mysql:Z
registry.lab.example.com/rhel8/mariadb-105
You then verify that the correct SELinux context is set on the /home/user/dbfiles directory
with the ls command -Z option.
[user@host ~]$ ls -Z /home/user/
system_u:object_r:container_file_t:s0:c81,c1009 dbfiles
...output omitted...
Assign a Port Mapping to Containers
To provide network access to containers, clients must connect to ports on the container host that
pass the network traffic through to ports in the container. When you map a network port on the
container host to a port in the container, network traffic that is sent to the host network port is
received by the container.
For example, you can map the 13306 port on the container host to the 3306 port on the container
for communication with the MariaDB container. Therefore, traffic that is sent to the container host
port 13306 would be received by MariaDB that is running in the container.
You use the podman run command -p option to set a port mapping from the 13306 port from
the container host to the 3306 port on the db01 container.
RH134-RHEL9.0-en-2-20220609 349](https://image.slidesharecdn.com/redhatenterpriselinux9-240713030337-3ff2819f/85/Red-Hat-Enterprise-Linux-Administration-9-0-RH134-pdf-367-320.jpg)
![Chapter 11 | Run Containers
[user@host ~]$ podman run -d --name db01
-e MYSQL_USER=student
-e MYSQL_PASSWORD=student
-e MYSQL_DATABASE=dev_data
-e MYSQL_ROOT_PASSWORD=redhat
-v /home/user/db_data:/var/lib/mysql:Z
-p 13306:3306
registry.lab.example.com/rhel8/mariadb-105
Use the podman port command -a option to show all container port mappings in use. You can
also use the podman port db01 command to show the mapped ports for the db01 container.
[user@host ~]$ podman port -a
1c22fd905120 3306/tcp -> 0.0.0.0:13306
[user@host ~]$ podman port db01
3306/tcp -> 0.0.0.0:13306
You use the firewall-cmd command to allow port 13306 traffic into the container host machine
so that it can be redirected to the container.
[root@host ~]# firewall-cmd --add-port=13306/tcp --permanent
[root@host ~]# firewall-cmd --reload
Important
A rootless container cannot open a privileged port (ports below 1024) on the
container. That is, the podman run -p 80:8080 command does not normally
work for a running rootless container. To map a port on the container host below
1024 to a container port, you must run Podman as root or make other adjustments
to the system.
You can map a port above 1024 on the container host to a privileged port on the
container, even if you are running a rootless container. The 8080:80 mapping works
if the container provides service listening on port 80.
DNS Configuration in a Container
Podman v4.0 supports two network back ends for containers, Netavark and CNI. Starting with
RHEL 9, systems use Netavark by default. To verify which network back end is used, run the
following podman info command.
[user@host ~]$ podman info --format {{.Host.NetworkBackend}}
netavark
350 RH134-RHEL9.0-en-2-20220609](https://image.slidesharecdn.com/redhatenterpriselinux9-240713030337-3ff2819f/85/Red-Hat-Enterprise-Linux-Administration-9-0-RH134-pdf-368-320.jpg)
![Chapter 11 | Run Containers
Note
The container-tools meta-package includes the netavark and aardvark-
dns packages. If Podman was installed as a stand-alone package, or if the
container-tools meta-package was installed later, then the result of the
previous command might be cni. To change the network back end, set the
following configuration in the /usr/share/containers/containers.conf file:
[network]
...output omitted...
network_backend = "netavark"
Existing containers on the host that use the default Podman network cannot resolve each other's
hostnames, because DNS is not enabled on the default network.
Use the podman network create command to create a DNS-enabled network. You use the
podman network create command to create the network called db_net, and specify the
subnet as 10.87.0.0/16 and the gateway as 10.87.0.1.
[user@host ~]$ podman network create --gateway 10.87.0.1
--subnet 10.87.0.0/16 db_net
db_net
If you do not specify the --gateway or --subnet options, then they are created with the default
values.
The podman network inspect command displays information about a specific network. You
use the podman network inspect command to verify that the gateway and subnet were
correctly set and that the new db_net network is DNS-enabled.
[user@host ~]$ podman network inspect db_net
[
{
"name": "db_net",
...output omitted...
"subnets": [
{
"subnet": "10.87.0.0/16",
"gateway": "10.87.0.1"
}
],
...output omitted...
"dns_enabled": true,
...output omitted...
You can add the DNS-enabled db_net network to a new container with the podman run
command --network option. You use the podman run command --network option to create
the db01 and client01 containers that are connected to the db_net network.
[user@host ~]$ podman run -d --name db01
-e MYSQL_USER=student
-e MYSQL_PASSWORD=student
RH134-RHEL9.0-en-2-20220609 351](https://image.slidesharecdn.com/redhatenterpriselinux9-240713030337-3ff2819f/85/Red-Hat-Enterprise-Linux-Administration-9-0-RH134-pdf-369-320.jpg)
![Chapter 11 | Run Containers
-e MYSQL_DATABASE=dev_data
-e MYSQL_ROOT_PASSWORD=redhat
-v /home/user/db_data:/var/lib/mysql:Z
-p 13306:3306
--network db_net
registry.lab.example.com/rhel8/mariadb-105
[user@host ~]$ podman run -d --name client01
--network db_net
registry.lab.example.com/ubi8/ubi:latest
sleep infinity
Because containers are designed to have only the minimum required packages, the containers
might not have the required utilities to test communication such as the ping and ip commands.
You can install these utilities in the container by using the podman exec command.
[user@host ~]$ podman exec -it db01 dnf install -y iputils iproute
...output omitted...
[user@host ~]$ podman exec -it client01 dnf install -y iputils iproute
...output omitted...
The containers can now ping each other by container name. You test the DNS resolution with the
podman exec command. The names resolve to IPs within the subnet that was manually set for
the db_net network.
[user@host ~]$ podman exec -it db01 ping -c3 client01
PING client01.dns.podman (10.87.0.4) 56(84) bytes of data.
64 bytes from 10.87.0.4 (10.87.0.4): icmp_seq=1 ttl=64 time=0.049 ms
...output omitted...
--- client01.dns.podman ping statistics ---
3 packets transmitted, 3 received, 0% packet loss, time 2007ms
rtt min/avg/max/mdev = 0.049/0.060/0.072/0.013 ms
[user@host ~]$ podman exec -it client01 ping -c3 db01
PING db01.dns.podman (10.87.0.3) 56(84) bytes of data.
64 bytes from 10.87.0.3 (10.87.0.3): icmp_seq=1 ttl=64 time=0.021 ms
...output omitted...
--- db01.dns.podman ping statistics ---
3 packets transmitted, 3 received, 0% packet loss, time 2047ms
rtt min/avg/max/mdev = 0.021/0.040/0.050/0.013 ms
You verify that the IP addresses in each container match the DNS resolution with the podman
exec command.
[user@host ~]$ podman exec -it db01 ip a | grep 10.8
inet 10.87.0.3/16 brd 10.87.255.255 scope global eth0
inet 10.87.0.4/16 brd 10.87.255.255 scope global eth0
[user@host ~]$ podman exec -it client01 ip a | grep 10.8
inet 10.87.0.3/16 brd 10.87.255.255 scope global eth0
inet 10.87.0.4/16 brd 10.87.255.255 scope global eth0
352 RH134-RHEL9.0-en-2-20220609](https://image.slidesharecdn.com/redhatenterpriselinux9-240713030337-3ff2819f/85/Red-Hat-Enterprise-Linux-Administration-9-0-RH134-pdf-370-320.jpg)
![Chapter 11 | Run Containers
Multiple Networks to a Single Container
Multiple networks can be connected to a container at the same time to help to separate different
types of traffic.
You use the podman network create command to create the backend network.
[user@host ~]$ podman network create backend
You then use the podman network ls command to view all the Podman networks.
[user@host ~]$ podman network ls
NETWORK ID NAME DRIVER
a7fea510a6d1 backend bridge
fe680efc5276 db01 bridge
2f259bab93aa podman bridge
The subnet and gateway were not specified with the podman network create command
--gateway and --subnet options.
You use the podman network inspect command to obtain the IP information of the backend
network.
[user@host ~]$ podman network inspect backend
[
{
"name": "backend",
...output omitted...
"subnets": [
{
"subnet": "10.89.1.0/24",
"gateway": "10.89.1.1"
...output omitted...
You can use the podman network connect command to connect additional networks to a
container when it is running. You use the podman network connect command to connect the
backend network to the db01 and client01 containers.
[user@host ~]$ podman network connect backend db01
[user@host ~]$ podman network connect backend client01
Important
If a network is not specified with the podman run command, then the container
connects to the default network. The default network uses the slirp4netns
network mode, and the networks that you create with the podman network
create command use the bridge network mode. If you try to connect a bridge
network to a container by using the slirp4netns network mode, then the
command fails:
Error: "slirp4netns" is not supported: invalid network mode
RH134-RHEL9.0-en-2-20220609 353](https://image.slidesharecdn.com/redhatenterpriselinux9-240713030337-3ff2819f/85/Red-Hat-Enterprise-Linux-Administration-9-0-RH134-pdf-371-320.jpg)
![Chapter 11 | Run Containers
You use the podman inspect command to verify that both networks are connected to each
container and to display the IP information.
[user@host ~]$ podman inspect db01
...output omitted...
"backend": {
"EndpointID": "",
"Gateway": "10.89.1.1",
"IPAddress": "10.89.1.4",
...output omitted...
},
"db_net": {
"EndpointID": "",
"Gateway": "10.87.0.1",
"IPAddress": "10.87.0.3",
...output omitted...
[user@host ~]$ podman inspect client01
...output omitted...
"backend": {
"EndpointID": "",
"Gateway": "10.89.1.1",
"IPAddress": "10.89.1.5",
...output omitted...
},
"db_net": {
"EndpointID": "",
"Gateway": "10.87.0.1",
"IPAddress": "10.87.0.4",
...output omitted...
The client01 container can now communicate with the db01 container on both networks.
You use the podman exec command to ping both networks on the db01 container from the
client01 container.
[user@host ~]$ podman exec -it client01 ping -c3 10.89.1.4 | grep 'packet loss'
3 packets transmitted, 3 received, 0% packet loss, time 2052ms
[user@host ~]$ podman exec -it client01 ping -c3 10.87.0.3 | grep 'packet loss'
3 packets transmitted, 3 received, 0% packet loss, time 2054ms
References
podman(1), podman-exec(1), podman-info(1), podman-network(1), podman-
network-create(1), podman-network-inspect(1), podman-network-ls(1),
podman-port(1), podman-run(1), and podman-unshare(1) man pages
For more information, refer to the Working with containers chapter in the Building,
running, and managing Linux containers on Red Hat Enterprise Linux 9 Guide at
https://access.redhat.com/documentation/en-us/red_hat_enterprise_linux/9/
html-single/building_running_and_managing_containers/assembly_working-with-
containers_building-running-and-managing-containers
354 RH134-RHEL9.0-en-2-20220609](https://image.slidesharecdn.com/redhatenterpriselinux9-240713030337-3ff2819f/85/Red-Hat-Enterprise-Linux-Administration-9-0-RH134-pdf-372-320.jpg)
![Chapter 11 | Run Containers
Guided Exercise
Manage Container Storage and Network
Resources
In this exercise, you pass environment variables to a container during creation, mount
persistent storage to a container, create and connect multiple container networks, and
expose container ports from the host machine.
Outcomes
• Create container networks and connect them to containers.
• Troubleshoot failed containers.
• Pass environment variables to containers during creation.
• Create and mount persistent storage to containers.
• Map host ports to ports inside containers.
Before You Begin
As the student user on the workstation machine, use the lab command to prepare your
system for this exercise.
This command prepares your environment and ensures that all required resources are
available.
[student@workstation ~]$ lab start containers-resources
Instructions
1. Log in to the servera machine as the student user.
[student@workstation ~]$ ssh student@servera
...output omitted...
[student@servera ~]$
2. Create the frontend container network. Create the db_client and db_01 containers
and connect them to the frontend network.
2.1. Use the podman network create command --subnet and --gateway
options to create the frontend network with the 10.89.1.0/24 subnet and the
10.89.1.1 gateway.
[student@servera ~]$ podman network create --subnet 10.89.1.0/24
--gateway 10.89.1.1 frontend
frontend
2.2. Log in to the registry.lab.example.com registry.
RH134-RHEL9.0-en-2-20220609 355](https://image.slidesharecdn.com/redhatenterpriselinux9-240713030337-3ff2819f/85/Red-Hat-Enterprise-Linux-Administration-9-0-RH134-pdf-373-320.jpg)
![Chapter 11 | Run Containers
[student@servera ~]$ podman login registry.lab.example.com
Username: admin
Password: redhat321
Login Succeeded!
2.3. Create the db_client container that is connected to the frontend network. Mount
the /etc/yum.repos.d DNF repositories directory inside the container at /etc/
yum.repos.d to allow package installation.
[student@servera ~]$ podman run -d --name db_client
--network frontend
-v /etc/yum.repos.d:/etc/yum.repos.d
registry.lab.example.com/ubi9-beta/ubi
sleep infinity
e20dfed7e392abe4b7bea3c25e9cb17ef95d16af9cedd50d68f997a663ba6c15
2.4. Create the db_01 container that is connected to the frontend network.
[student@servera ~]$ podman run -d --name db_01 --network frontend
registry.lab.example.com/rhel8/mariadb-105
3e767ae6eea4578152a216beb5ae98c8ef03a2d66098debe2736b8b458bab405
2.5. View all containers.
[student@servera ~]$ podman ps -a
CONTAINER ID IMAGE COMMAND
CREATED STATUS PORTS NAMES
e20dfed7e392 registry.lab.example.com/ubi8/ubi:latest sleep infinity
56 seconds ago Up 56 seconds ago db_client
3e767ae6eea4 registry.lab.example.com/rhel8/mariadb-105:latest run-mysqld 1
second ago Exited (1) 1 second ago db_01
3. Troubleshoot the db_01 container and determine why it is not running. Re-create the
db_01 container by using the required environment variables.
3.1. View the container logs and determine why the container exited.
[student@servera ~]$ podman container logs db_01
...output omitted...
You must either specify the following environment variables:
MYSQL_USER (regex: '^[a-zA-Z0-9_]+$')
MYSQL_PASSWORD (regex: '^[a-zA-Z0-9_~!@#$%^&*()-=<>,.?;:|]+$')
MYSQL_DATABASE (regex: '^[a-zA-Z0-9_]+$')
Or the following environment variable:
MYSQL_ROOT_PASSWORD (regex: '^[a-zA-Z0-9_~!@#$%^&*()-=<>,.?;:|]+$')
Or both.
...output omitted...
3.2. Remove the db_01 container and create it again with environment variables. Provide
the required environment variables.
356 RH134-RHEL9.0-en-2-20220609](https://image.slidesharecdn.com/redhatenterpriselinux9-240713030337-3ff2819f/85/Red-Hat-Enterprise-Linux-Administration-9-0-RH134-pdf-374-320.jpg)
![Chapter 11 | Run Containers
[student@servera ~]$ podman rm db_01
3e767ae6eea4578152a216beb5ae98c8ef03a2d66098debe2736b8b458bab405
[student@servera ~]$ podman run -d --name db_01
--network frontend
-e MYSQL_USER=dev1
-e MYSQL_PASSWORD=devpass
-e MYSQL_DATABASE=devdb
-e MYSQL_ROOT_PASSWORD=redhat
registry.lab.example.com/rhel8/mariadb-105
948c4cd767b561432056e77adb261ab4024c1b66a22af17861aba0f16c66273b
3.3. View the current running containers.
[student@servera ~]$ podman ps
CONTAINER ID IMAGE COMMAND
CREATED STATUS PORTS NAMES
e20dfed7e392 registry.lab.example.com/ubi8/ubi:latest sleep infinity
56 seconds ago Up 56 seconds ago db_client
948c4cd767b5 registry.lab.example.com/rhel8/mariadb-105:latest run-mysqld
11 seconds ago Up 12 seconds ago db_01
4. Create persistent storage for the containerized MariaDB service, and map the local
machine 13306 port to the 3306 port in the container. Allow traffic to the 13306 port on the
servera machine.
4.1. Create the /home/student/database directory on the servera machine.
[student@servera ~]$ mkdir /home/student/databases
4.2. Obtain the mysql UID and GID from the db_01 container, and then remove the db01
container.
[student@servera ~]$ podman exec -it db_01 grep mysql /etc/passwd
mysql:x:27:27:MySQL Server:/var/lib/mysql:/sbin/nologin
[student@servera ~]$ podman stop db_01
db_01
[student@servera ~]$ podman rm db_01
948c4cd767b561432056e77adb261ab4024c1b66a22af17861aba0f16c66273b
4.3. Run the chown command inside the container namespace, and set the user and
group owner to 27 on the /home/student/database directory.
[student@servera ~]$ podman unshare chown 27:27 /home/student/databases/
[student@servera ~]$ ls -l /home/student/
total 0
drwxr-xr-x. 2 100026 100026 6 May 9 17:40 databases
4.4. Create the db_01 container, and mount the /home/student/databases directory
from the servera machine to the /var/lib/mysql directory inside the db_01
container. Use the Z option to apply the required SELinux context.
RH134-RHEL9.0-en-2-20220609 357](https://image.slidesharecdn.com/redhatenterpriselinux9-240713030337-3ff2819f/85/Red-Hat-Enterprise-Linux-Administration-9-0-RH134-pdf-375-320.jpg)
![Chapter 11 | Run Containers
[student@servera ~]$ podman run -d --name db_01
--network frontend
-e MYSQL_USER=dev1
-e MYSQL_PASSWORD=devpass
-e MYSQL_DATABASE=devdb
-e MYSQL_ROOT_PASSWORD=redhat
-v /home/student/databases:/var/lib/mysql:Z
-p 13306:3306
registry.lab.example.com/rhel8/mariadb-105
4.5. Install the mariadb package in the db_client container.
[student@servera ~]$ podman exec -it db_client dnf install -y mariadb
...output omitted...
Complete!
4.6. Create the crucial_data table in the dev_db database in the db_01 container
from the db_client container.
[student@servera ~]$ podman exec -it db_client mysql -u dev1 -p -h db_01
Enter password: devpass
...output omitted...
MariaDB [(none)]> USE devdb;
Database changed
MariaDB [devdb]> CREATE TABLE crucial_data(column1 int);
Query OK, 0 rows affected (0.036 sec)
MariaDB [devdb]> SHOW TABLES;
+-----------------+
| Tables_in_devdb |
+-----------------+
| crucial_data |
+-----------------+
1 row in set (0.001 sec)
MariaDB [devdb]> quit
Bye
4.7. Allow port 13306 traffic in the firewall on the servera machine.
[student@servera ~]$ sudo firewall-cmd --add-port=13306/tcp --permanent
[sudo] password for student: student
success
[student@servera ~]$ sudo firewall-cmd --reload
success
4.8. Open a second terminal on the Workstation machine and use the MariaDB client
to connect to the servera machine on port 13306 to show tables inside the db_01
container that are stored in the persistent storage.
358 RH134-RHEL9.0-en-2-20220609](https://image.slidesharecdn.com/redhatenterpriselinux9-240713030337-3ff2819f/85/Red-Hat-Enterprise-Linux-Administration-9-0-RH134-pdf-376-320.jpg)
![Chapter 11 | Run Containers
[student@workstation ~]$ mysql -u dev1 -p -h servera --port 13306
devdb -e 'SHOW TABLES';
Enter password: devpass
+-----------------+
| Tables_in_devdb |
+-----------------+
| crucial_data |
+-----------------+
5. Create a second container network called backend, and connect the backend network
to the db_client and db_01 containers. Test network connectivity and DNS resolution
between the containers.
5.1. Create the backend network with the 10.90.0.0/24 subnet and the 10.90.0.1
gateway.
[student@servera ~]$ podman network create --subnet 10.90.0.0/24
--gateway 10.90.0.1 backend
backend
5.2. Connect the backend container network to the db_client and db_01 containers.
[student@servera ~]$ podman network connect backend db_client
[student@servera ~]$ podman network connect backend db_01
5.3. Obtain the IP addresses of the db_01 container.
[student@servera ~]$ podman inspect db_01
...output omitted...
"Networks": {
"backend": {
"EndpointID": "",
"Gateway": "10.90.0.1",
"IPAddress": "10.90.0.3",
...output omitted...
"frontend": {
"EndpointID": "",
"Gateway": "10.89.1.1",
"IPAddress": "10.89.1.6",
...output omitted...
5.4. Install the iputils package in the db_client container.
[student@servera ~]$ podman exec -it db_client dnf install -y iputils
...output omitted...
Complete!
5.5. Ping the db_01 container name from the db_client container.
RH134-RHEL9.0-en-2-20220609 359](https://image.slidesharecdn.com/redhatenterpriselinux9-240713030337-3ff2819f/85/Red-Hat-Enterprise-Linux-Administration-9-0-RH134-pdf-377-320.jpg)
![Chapter 11 | Run Containers
[student@servera ~]$ podman exec -it db_client ping -c4 db_01
PING db_01.dns.podman (10.90.0.3) 56(84) bytes of data.
...output omitted...
--- db_01.dns.podman ping statistics ---
4 packets transmitted, 4 received, 0% packet loss, time 3048ms
rtt min/avg/max/mdev = 0.043/0.049/0.054/0.004 ms
5.6. Exit the servera machine.
[student@servera ~]$ exit
logout
Connection to servera closed.
[student@workstation ~]$
Finish
On the workstation machine, change to the student user home directory and use the lab
command to complete this exercise. This step is important to ensure that resources from previous
exercises do not impact upcoming exercises.
[student@workstation ~]$ lab finish containers-resources
This concludes the section.
360 RH134-RHEL9.0-en-2-20220609](https://image.slidesharecdn.com/redhatenterpriselinux9-240713030337-3ff2819f/85/Red-Hat-Enterprise-Linux-Administration-9-0-RH134-pdf-378-320.jpg)
![Chapter 11 | Run Containers
[user@host ~]$ sudo useradd appdev-adm
myapp.service
[user@host ~]$ sudo passwd appdev-adm
Changing password for user appdev-adm.
New password: redhat
BAD PASSWORD: The password is shorter than 8 characters
Retype new password: redhat
passwd: all authentication tokens updated successfully.
You then use the su command to switch to the appdev-adm user, and you start using the podman
command.
[user@host ~]$ su appdev-adm
Password: redhat
[appdev-adm@host ~]$ podman info
ERRO[0000] XDG_RUNTIME_DIR directory "/run/user/1000" is not owned by the current
user
[appdev-adm@host ~]$
Podman is a stateless utility and requires a full login session. Podman must be used within an SSH
session and cannot be used in a sudo or an su shell. So you exit the su shell and log in to the
machine via SSH.
[appdev-adm@host ~]$ exit
[user@host ~]$ exit
[user@example ~]$ ssh appdev-adm@host
[appdev-adm@host ~]$
You then configure the container registry and authenticate with your credentials. You run the http
container with the following command.
[appdev-adm@host ~]$ podman run -d --name webserver1 -p 8080:8080 -v
~/app-artifacts:/var/www:Z registry.access.redhat.com/ubi8/httpd-24
af84e1ec33ea2f0d9787c56fbe7a62a4b9ce8ac03911be9e97f95575b306c297
[appdev-adm@host ~]$ podman ps -a
CONTAINER ID IMAGE COMMAND
CREATED STATUS PORTS NAMES
af84e1ec33ea registry.access.redhat.com/ubi8/httpd-24:latest /usr/bin/run-
http... 16 seconds ago Exited (1) 15 seconds ago 0.0.0.0:8080->8080/tcp
webserver1
You notice that the webserver1 container did not start, so you run the podman container
logs command to view the logs of the container.
362 RH134-RHEL9.0-en-2-20220609](https://image.slidesharecdn.com/redhatenterpriselinux9-240713030337-3ff2819f/85/Red-Hat-Enterprise-Linux-Administration-9-0-RH134-pdf-380-320.jpg)
![Chapter 11 | Run Containers
[appdev-adm@host ~]$ podman container logs webserver1
=> sourcing 10-set-mpm.sh ...
=> sourcing 20-copy-config.sh ...
=> sourcing 40-ssl-certs.sh ...
---> Generating SSL key pair for httpd...
AH00526: Syntax error on line 122 of /etc/httpd/conf/httpd.conf:
DocumentRoot '/var/www/html' is not a directory, or is not readable
[appdev-adm@servera ~]$
The logs of the webserver1 container show that the /var/www/html file is not readable. This
error occurs because the container mount directory cannot find the html subdirectory. You delete
the existing container, update the command, and run it as follows:
[appdev-adm@host ~]$ podman run -d --name webserver1 -p 8080:8080 -v
~/app-artifacts:/var/www/html:Z registry.access.redhat.com/ubi8/httpd-24
cde4a3d8c9563fd50cc39de8a4873dcf15a7e881ba4548d5646760eae7a35d81
[appdev-adm@host ~]$ podman ps
CONTAINER ID IMAGE COMMAND
CREATED STATUS PORTS NAMES
cde4a3d8c956 registry.access.redhat.com/ubi8/httpd-24:latest /usr/bin/run-
http... 4 seconds ago Up 5 seconds ago 0.0.0.0:8080->8080/tcp webserver1
Create systemd User Files for Containers
You can manually define systemd services in the ~/.config/systemd/user/ directory. The
file syntax for user services is the same as for the system services files. For more details, review
the systemd.unit(5) and systemd.service(5) man pages.
Use the podman generate systemd command to generate systemd service files for an
existing container. The podman generate systemd command uses a container as a model to
create the configuration file.
The podman generate systemd command --new option instructs the podman utility to
configure the systemd service to create the container when the service starts, and to delete the
container when the service stops.
Important
Without the --new option, the podman utility configures the service unit file to start
and stop the existing container without deleting it.
You use the podman generate systemd command with the --name option to display the
systemd service file that is modeled for the webserver1 container.
[appdev-adm@host ~]$ podman generate systemd --name webserver1
...output omitted...
ExecStart=/usr/bin/podman start webserver1
ExecStop=/usr/bin/podman stop -t 10 webserver1
ExecStopPost=/usr/bin/podman stop -t 10 webserver1
...output omitted...
RH134-RHEL9.0-en-2-20220609 363](https://image.slidesharecdn.com/redhatenterpriselinux9-240713030337-3ff2819f/85/Red-Hat-Enterprise-Linux-Administration-9-0-RH134-pdf-381-320.jpg)
![Chapter 11 | Run Containers
On start, the systemd daemon executes the podman start command to start the existing
container.
On stop, the systemd daemon executes the podman stop command to stop the container.
Notice that the systemd daemon does not delete the container on this action.
You then use the previous command with the addition of the --new option to compare the
systemd configuration.
[appdev-adm@host ~]$ podman generate systemd --name webserver1 --new
...output omitted...
ExecStartPre=/bin/rm -f %t/%n.ctr-id
ExecStart=/usr/bin/podman run --cidfile=%t/%n.ctr-id --cgroups=no-conmon --rm --
sdnotify=conmon --replace -d --name webserver1 -p 8080:8080 -v /home/appdev-adm/
app-artifacts:/var/www/html:Z registry.access.redhat.com/ubi8/httpd-24
ExecStop=/usr/bin/podman stop --ignore --cidfile=%t/%n.ctr-id
ExecStopPost=/usr/bin/podman rm -f --ignore --cidfile=%t/%n.ctr-id
...output omitted...
On start, the systemd daemon executes the podman run command to create and then
start a new container. This action uses the podman run command --rm option, which
removes the container on stop.
On stop, systemd executes the podman stop command to stop the container.
After systemd has stopped the container, systemd removes it using the podman rm -f
command.
You verify the output of the podman generate systemd command and run the previous
command with the --files option to create the systemd user file in the current directory.
Because the webserver1 container uses persistent storage, you choose to use the podman
generate systemd command with the --new option. You then create the ~/.config/
systemd/user/ directory and move the file to this location.
[appdev-adm@host ~]$ podman generate systemd --name webserver1 --new --files
/home/appdev-adm/container-webserver1.service
[appdev-adm@host ~]$ mkdir -p ~/.config/systemd/user/
[appdev-adm@host ~]$ mv container-webserver1.service ~/.config/systemd/user/
Manage systemd User Files for Containers
Now that you created the systemd user file, you can use the systemctl command --user
option to manage the webserver1 container.
First, you reload the systemd daemon to make the systemctl command aware of the new user
file. You use the systemctl --user start command to start the webserver1 container. Use
the name of the generated systemd user file for the container.
[appdev-adm@host ~]$ systemctl --user start container-webserver1.service
[appdev-adm@host ~]$ systemctl --user status container-webserver1.service
● container-webserver1.service - Podman container-webserver1.service
Loaded: loaded (/home/appdev-adm/.config/systemd/user/container-
webserver1.service; disabled; vendor preset: disabled)
Active: active (running) since Thu 2022-04-28 21:22:26 EDT; 18s ago
364 RH134-RHEL9.0-en-2-20220609](https://image.slidesharecdn.com/redhatenterpriselinux9-240713030337-3ff2819f/85/Red-Hat-Enterprise-Linux-Administration-9-0-RH134-pdf-382-320.jpg)
![Chapter 11 | Run Containers
Docs: man:podman-generate-systemd(1)
Process: 31560 ExecStartPre=/bin/rm -f /run/user/1003/container-
webserver1.service.ctr-id (code=exited, status=0/SUCCESS)
Main PID: 31600 (conmon)
...output omitted...
[appdev-adm@host ~]$ podman ps
CONTAINER ID IMAGE COMMAND
CREATED STATUS PORTS NAMES
18eb00f42324 registry.access.redhat.com/ubi8/httpd-24:latest /usr/bin/run-
http... 28 seconds ago Up 29 seconds ago 0.0.0.0:8080->8080/tcp webserver1
Created symlink /home/appdev-adm/.config/systemd/user/default.target.wants/
container-webserver1.service → /home/appdev-adm/.config/systemd/user/container-
webserver1.service.
Important
When you configure a container with the systemd daemon, the daemon monitors
the container status and restarts the container if it fails. Do not use the podman
command to start or stop these containers. Doing so might interfere with the
systemd daemon monitoring.
The following table summarizes the different directories and commands that are used between
systemd system and user services.
Comparing System and User Services
System services /etc/systemd/system/unit.service
Storing custom
unit files
User services ~/.config/systemd/user/unit.service
System services
# systemctl daemon-reload
Reloading unit
files
User services
$ systemctl --user daemon-reload
System services
# systemctl start UNIT
# systemctl stop UNIT
Starting and
stopping a
service
User services
$ systemctl --user start UNIT
$ systemctl --user stop UNIT
System services
# systemctl enable UNIT
Starting a
service when
the machine
starts User services
$ loginctl enable-linger
$ systemctl --user enable UNIT
RH134-RHEL9.0-en-2-20220609 365](https://image.slidesharecdn.com/redhatenterpriselinux9-240713030337-3ff2819f/85/Red-Hat-Enterprise-Linux-Administration-9-0-RH134-pdf-383-320.jpg)
![Chapter 11 | Run Containers
Configure Containers to Start at System Boot
Now that the systemd configuration for the container is complete, you exit the SSH session.
Some time after, you are notified that the container stops after you exited the session.
You can change this default behavior and force your enabled services to start with the server and
stop during the shutdown by running the loginctl enable-linger command.
You use the loginctl command to configure the systemd user service to persist after the last
user session of the configured service closes. You then verify the successful configuration with the
loginctl show-user command.
[user@host ~]$ loginctl show-user appdev-adm
...output omitted...
Linger=no
[user@host ~]$ loginctl enable-linger
[user@host ~]$ loginctl show-user appdev-adm
...output omitted...
Linger=yes
To revert the operation, use the loginctl disable-linger command.
Manage Containers as Root with systemd
You can also configure containers to run as root and manage them with systemd service files.
One advantage of this approach is that you can configure the service files to work exactly like
common systemd unit files, rather than as a particular user.
The procedure to set the service file as root is similar to the previously outlined procedure for
rootless containers, with the following exceptions:
• Do not create a dedicated user for container management.
• The service file must be in the /etc/systemd/system directory instead of in the
~/.config/systemd/user directory.
• You manage the containers with the systemctl command without the --user option.
• Do not run the loginctl enable-linger command as the root user.
For a demonstration, see the YouTube video from the Red Hat Videos channel that is listed in the
References at the end of this section.
References
loginctl(1), systemd.unit(5), systemd.service(5), subuid(5), and
podman-generate-systemd(1) man pages
Managing Containers in Podman with Systemd Unit Files
https://www.youtube.com/watch?v=AGkM2jGT61Y
For more information, refer to the Running Containers as Systemd Services with
Podman chapter in the Red Hat Enterprise Linux 9 Building, Running, and Managing
Containers Guide at
https://access.redhat.com/documentation/en-us/red_hat_enterprise_linux/9/html-
single/building_running_and_managing_containers/index
366 RH134-RHEL9.0-en-2-20220609](https://image.slidesharecdn.com/redhatenterpriselinux9-240713030337-3ff2819f/85/Red-Hat-Enterprise-Linux-Administration-9-0-RH134-pdf-384-320.jpg)
![Chapter 11 | Run Containers
Guided Exercise
Manage Containers as System Services
In this exercise, you configure a container to manage it as a systemd service, and use
systemctl commands to manage that container so that it automatically starts when the
host machine starts.
Outcomes
• Create systemd service files to manage a container.
• Configure a container so you can manage it with systemctl commands.
• Configure a user account for systemd user services to start a container when the host
machine starts.
Before You Begin
As the student user on the workstation machine, use the lab command to prepare your
system for this exercise.
This command prepares your environment and ensures that all required resources are
available.
[student@workstation ~]$ lab start containers-services
Instructions
1. Log in to the servera machine as the student user.
[student@workstation ~]$ ssh student@servera
...output omitted...
[student@servera ~]$
2. Create a user account called contsvc and use redhat as the password. Use this user
account to run containers as systemd services.
2.1. Create the contsvc user. Set redhat as the password for the contsvc user.
[student@servera ~]$ sudo useradd contsvc
[sudo] password for student: student
[student@servera ~]$ sudo passwd contsvc
Changing password for user contsvc.
New password: redhat
BAD PASSWORD: The password is shorter than 8 characters
Retype new password: redhat
passwd: all authentication tokens updated successfully.
2.2. To manage the systemd user services with the contsvc account, you must log in
directly as the contsvc user. You cannot use the su and sudo commands to create a
session with the contsvc user.
RH134-RHEL9.0-en-2-20220609 367](https://image.slidesharecdn.com/redhatenterpriselinux9-240713030337-3ff2819f/85/Red-Hat-Enterprise-Linux-Administration-9-0-RH134-pdf-385-320.jpg)
![Chapter 11 | Run Containers
Return to the workstation machine as the student user, and then log in as the
contsvc user.
[student@servera ~]$ exit
logout
Connection to servera closed.
[student@workstation ~]$ ssh contsvc@servera
...output omitted...
[contsvc@servera ~]$
3. Configure access to the registry.lab.example.com classroom registry in your home
directory. Use the /tmp/containers-services/registries.conf file as a template.
3.1. Create the ~/.config/containers/ directory.
[contsvc@servera ~]$ mkdir -p ~/.config/containers/
3.2. The lab script prepares the registries.conf file in the /tmp/containers-
services/ directory. Copy that file to the ~/.config/containers/ directory.
[contsvc@servera ~]$ cp /tmp/containers-services/registries.conf
~/.config/containers/
3.3. Verify that you can access the registry.lab.example.com registry. If everything
works as expected, then the command should list some images.
[contsvc@servera ~]$ podman search ubi
NAME DESCRIPTION
registry.lab.example.com/ubi7/ubi
registry.lab.example.com/ubi8/ubi
registry.lab.example.com/ubi9-beta/ubi
4. Use the /home/contsvc/webcontent/html/ directory as persistent storage for the
web server container. Create the index.html test page with the Hello World line inside
the directory.
4.1. Create the ~/webcontent/html/ directory.
[contsvc@servera ~]$ mkdir -p ~/webcontent/html/
4.2. Create the index.html file and add the Hello World line.
[contsvc@servera ~]$ echo "Hello World" > ~/webcontent/html/index.html
4.3. Confirm that the permission for others is set to r-- in the index.html file. The
container uses a non-privileged user that must be able to read the index.html file.
368 RH134-RHEL9.0-en-2-20220609](https://image.slidesharecdn.com/redhatenterpriselinux9-240713030337-3ff2819f/85/Red-Hat-Enterprise-Linux-Administration-9-0-RH134-pdf-386-320.jpg)
![Chapter 11 | Run Containers
[contsvc@servera ~]$ ls -ld webcontent/html/
drwxr-xr-x. 2 contsvc contsvc 24 Aug 28 04:56 webcontent/html/
[contsvc@servera ~]$ ls -l webcontent/html/index.html
-rw-r--r--. 1 contsvc contsvc 12 Aug 28 04:56 webcontent/html/index.html
5. Use the registry.lab.example.com/rhel8/httpd-24:1-105 image to run a
container called webapp in detached mode. Redirect the 8080 port on the local host to the
container 8080 port. Mount the ~/webcontent directory from the host to the /var/www
directory in the container.
5.1. Log in to the registry.lab.example.com registry as the admin user with
redhat321 as the password.
[contsvc@servera ~]$ podman login registry.lab.example.com
Username: admin
Password: redhat321
Login Succeeded!
5.2. Use the registry.lab.example.com/rhel8/httpd-24:1-163 image to run
a container called webapp in detached mode. Use the -p option to map the 8080
port on servera to the 8080 port in the container. Use the -v option to mount the
~/webcontent directory on servera to the /var/www directory in the container.
[contsvc@servera ~]$ podman run -d --name webapp -p 8080:8080 -v
~/webcontent:/var/www:Z registry.access.redhat.com/ubi8/httpd-24:1-163
750a681bd37cb6825907e9be4347eec2c4cd79550439110fc6d41092194d0e06
...output omitted...
5.3. Verify that the web service is working on port 8080.
[contsvc@servera ~]$ curl http://localhost:8080
Hello World
6. Create a systemd service file to manage the webapp container with systemctl
commands. Configure the systemd service so that when you start the service, the
systemd daemon creates a container. After you finish the configuration, stop and then
delete the webapp container. Remember that the systemd daemon expects that the
container does not exist initially.
6.1. Create and change to the ~/.config/systemd/user/ directory.
[contsvc@servera ~]$ mkdir -p ~/.config/systemd/user/
[contsvc@servera ~]$ cd ~/.config/systemd/user
6.2. Create the unit file for the webapp container. Use the --new option so that systemd
creates a container when starting the service and deletes the container when
stopping the service.
[contsvc@servera user]$ podman generate systemd --name webapp --files --new
/home/contsvc/.config/systemd/user/container-webapp.service
RH134-RHEL9.0-en-2-20220609 369](https://image.slidesharecdn.com/redhatenterpriselinux9-240713030337-3ff2819f/85/Red-Hat-Enterprise-Linux-Administration-9-0-RH134-pdf-387-320.jpg)
![Chapter 11 | Run Containers
6.3. Stop and then delete the webapp container.
[contsvc@servera user]$ podman stop webapp
webapp
[contsvc@servera user]$ podman rm webapp
750a681bd37cb6825907e9be4347eec2c4cd79550439110fc6d41092194d0e06
[contsvc@servera user]$ podman ps -a
CONTAINER ID IMAGE COMMAND CREATED STATUS PORTS NAMES
7. Reload the systemd daemon configuration, and then enable and start your new
container-webapp user service. Verify the systemd service configuration, stop and
start the service, and display the web server response and the container status.
7.1. Reload the configuration to recognize the new unit file.
[contsvc@servera user]$ systemctl --user daemon-reload
7.2. Enable and start the container-webapp service.
[contsvc@servera user]$ systemctl --user enable --now container-webapp
Created symlink /home/contsvc/.config/systemd/user/multi-user.target.wants/
container-webapp.service → /home/contsvc/.config/systemd/user/container-
webapp.service.
Created symlink /home/contsvc/.config/systemd/user/default.target.wants/container-
webapp.service → /home/contsvc/.config/systemd/user/container-webapp.service.
7.3. Verify that the web server responds to requests.
[contsvc@servera user]$ curl http://localhost:8080
Hello World
7.4. Verify that the container is running.
[contsvc@servera user]$ podman ps
CONTAINER ID IMAGE COMMAND
CREATED STATUS PORTS NAMES
3e996db98071 registry.access.redhat.com/ubi8/httpd-24:1-163 /usr/bin/run-http...
3 minutes ago Up 3 minutes ago 0.0.0.0:8080->8080/tcp webapp
Notice the container ID. Use this information to confirm that systemd creates a
container when you restart the service.
7.5. Stop the container-webapp service, and confirm that the container no longer
exists. When you stop the service, systemd stops and then deletes the container.
[contsvc@servera user]$ systemctl --user stop container-webapp
[contsvc@servera user]$ podman ps --all
CONTAINER ID IMAGE COMMAND CREATED STATUS PORTS NAMES
7.6. Start the container-webapp service, and then confirm that the container is
running.
370 RH134-RHEL9.0-en-2-20220609](https://image.slidesharecdn.com/redhatenterpriselinux9-240713030337-3ff2819f/85/Red-Hat-Enterprise-Linux-Administration-9-0-RH134-pdf-388-320.jpg)
![Chapter 11 | Run Containers
The container ID is different, because the systemd daemon creates a container with
the start instruction and deletes the container with the stop instruction.
[contsvc@servera user]$ systemctl --user start container-webapp
[contsvc@servera user]$ podman ps
CONTAINER ID IMAGE COMMAND
CREATED STATUS PORTS NAMES
4584b4df514c registry.access.redhat.com/ubi8/httpd-24:1-163 /usr/bin/run-http...
6 seconds ago Up 7 seconds ago 0.0.0.0:8080->8080/tcp webapp
8. Ensure that the services for the contsvc user start at system boot. When done, restart the
servera machine.
8.1. Run the loginctl enable-linger command.
[contsvc@servera user]$ loginctl enable-linger
8.2. Confirm that the Linger option is set for the contsvc user.
[contsvc@servera user]$ loginctl show-user contsvc
...output omitted...
Linger=yes
8.3. Switch to the root user, and then use the systemctl reboot command to restart
servera.
[contsvc@servera user]$ su -
Password: redhat
Last login: Fri Aug 28 07:43:40 EDT 2020 on pts/0
[root@servera ~]# systemctl reboot
Connection to servera closed by remote host.
Connection to servera closed.
[student@workstation ~]$
9. When the servera machine is up again, log in to servera as the contsvc user. Verify
that systemd started the webapp container and that the web content is available.
9.1. Log in to servera as the contsvc user.
[student@workstation ~]$ ssh contsvc@servera
...output omitted...
9.2. Verify that the container is running.
[contsvc@servera ~]$ podman ps
CONTAINER ID IMAGE COMMAND
CREATED STATUS PORTS NAMES
6c325bf49f84 registry.access.redhat.com/ubi8/httpd-24:1-163 /usr/bin/run-http...
2 minutes ago Up 2 minutes ago 0.0.0.0:8080->8080/tcp webapp
9.3. Access the web content.
RH134-RHEL9.0-en-2-20220609 371](https://image.slidesharecdn.com/redhatenterpriselinux9-240713030337-3ff2819f/85/Red-Hat-Enterprise-Linux-Administration-9-0-RH134-pdf-389-320.jpg)
![Chapter 11 | Run Containers
[contsvc@servera ~]$ curl http://localhost:8080
Hello World
9.4. Return to the workstation machine as the student user.
[contsvc@servera ~]$ exit
logout
Connection to servera closed.
[student@workstation ~]$
Finish
On the workstation machine, run the lab finish containers-services script to
complete this exercise.
[student@workstation ~]$ lab finish containers-services
This concludes the section.
372 RH134-RHEL9.0-en-2-20220609](https://image.slidesharecdn.com/redhatenterpriselinux9-240713030337-3ff2819f/85/Red-Hat-Enterprise-Linux-Administration-9-0-RH134-pdf-390-320.jpg)
![Chapter 11 | Run Containers
Lab
Run Containers
In this lab, you configure a container on your server that provides a MariaDB database
service, stores its database on persistent storage, and starts automatically with the server.
Outcomes
• Create detached containers.
• Configure port redirection and persistent storage.
• Configure systemd for containers to start when the host machine starts.
Before You Begin
As the student user on the workstation machine, use the lab command to prepare your
system for this exercise.
This command prepares your environment and ensures that all required resources are
available.
[student@workstation ~]$ lab start containers-review
Instructions
1. On serverb, install the container tools package.
2. The container image registry at registry.lab.example.com stores the rhel8/
mariadb-103 image with several tags. Use the podsvc user to list the available tags and
note the tag with the lowest version number. Use the admin user and redhat321 password
to authenticate to the registry. Use the /tmp/registries.conf file as a template for the
registry configuration.
3. As the podsvc user, create the /home/podsvc/db_data directory. Configure the directory
so that containers have read/write access.
4. Create the inventorydb detached container. Use the rhel8/mariadb-103 image from
the registry.lab.example.com registry, and specify the tag with the lowest version
number on that image, which you found in a preceding step. Map port 3306 in the container
to port 13306 on the host. Mount the /home/podsvc/db_data directory on the host as
/var/lib/mysql/data in the container. Declare the following variable values for the
container:
Variable Value
MYSQL_USER operator1
MYSQL_PASSWORD redhat
MYSQL_DATABASE inventory
MYSQL_ROOT_PASSWORD redhat
RH134-RHEL9.0-en-2-20220609 373](https://image.slidesharecdn.com/redhatenterpriselinux9-240713030337-3ff2819f/85/Red-Hat-Enterprise-Linux-Administration-9-0-RH134-pdf-391-320.jpg)
![Chapter 11 | Run Containers
You can copy and paste these parameters from the /home/podsvc/containers-
review/variables file on serverb. Execute the /home/podsvc/containers-
review/testdb.sh script to confirm that the MariaDB database is running.
5. Configure the systemd daemon so that the inventorydb container starts automatically
when the system boots.
Evaluation
As the student user on the workstation machine, use the lab command to grade your work.
Correct any reported failures and rerun the command until successful.
[student@workstation ~]$ lab grade containers-review
Finish
On the workstation machine, change to the student user home directory and use the lab
command to complete this exercise. This step is important to ensure that resources from previous
exercises do not impact upcoming exercises.
[student@workstation ~]$ lab finish containers-review
This concludes the section.
374 RH134-RHEL9.0-en-2-20220609](https://image.slidesharecdn.com/redhatenterpriselinux9-240713030337-3ff2819f/85/Red-Hat-Enterprise-Linux-Administration-9-0-RH134-pdf-392-320.jpg)
![Chapter 11 | Run Containers
Solution
Run Containers
In this lab, you configure a container on your server that provides a MariaDB database
service, stores its database on persistent storage, and starts automatically with the server.
Outcomes
• Create detached containers.
• Configure port redirection and persistent storage.
• Configure systemd for containers to start when the host machine starts.
Before You Begin
As the student user on the workstation machine, use the lab command to prepare your
system for this exercise.
This command prepares your environment and ensures that all required resources are
available.
[student@workstation ~]$ lab start containers-review
Instructions
1. On serverb, install the container tools package.
1.1. Log in to serverb as the student user.
[student@workstation ~]$ ssh student@serverb
...output omitted...
[student@serverb ~]$
1.2. Install the container-tools package.
[student@serverb ~]$ sudo dnf install container-tools
[sudo] password for student: student
...output omitted...
Is this ok [y/N]: y
...output omitted...
Complete!
2. The container image registry at registry.lab.example.com stores the rhel8/
mariadb-103 image with several tags. Use the podsvc user to list the available tags and
note the tag with the lowest version number. Use the admin user and redhat321 password
to authenticate to the registry. Use the /tmp/registries.conf file as a template for the
registry configuration.
2.1. Return to the workstation machine as the student user.
RH134-RHEL9.0-en-2-20220609 375](https://image.slidesharecdn.com/redhatenterpriselinux9-240713030337-3ff2819f/85/Red-Hat-Enterprise-Linux-Administration-9-0-RH134-pdf-393-320.jpg)
![Chapter 11 | Run Containers
[student@serverb ~]$ exit
logout
Connection to serverb closed.
[student@workstation ~]$
2.2. Log in to serverb as the podsvc user.
[student@workstation ~]$ ssh podsvc@serverb
...output omitted...
[podsvc@serverb ~]$
2.3. Configure access to the registry.lab.example.com classroom registry in your
home directory. Use the /tmp/registries.conf file as a template.
[podsvc@serverb ~]$ mkdir -p ~/.config/containers/
[podsvc@serverb ~]$ cp /tmp/registries.conf
~/.config/containers/
2.4. Log in to the container registry with the podman login command.
[podsvc@serverb ~]$ podman login registry.lab.example.com
Username: admin
Password: redhat321
Login Succeeded!
2.5. View information about the registry.lab.example.com/rhel8/mariadb-103
image.
[podsvc@serverb ~]$ skopeo inspect
docker://registry.lab.example.com/rhel8/mariadb-103
{
"Name": "registry.lab.example.com/rhel8/mariadb-103",
"Digest": "sha256:a95b...4816",
"RepoTags": [
"1-86",
"1-102",
"latest"
],
...output omitted...
The lowest version tag is the 1-86 version.
3. As the podsvc user, create the /home/podsvc/db_data directory. Configure the directory
so that containers have read/write access.
3.1. Create the /home/podsvc/db_data directory.
[podsvc@serverb ~]$ mkdir /home/podsvc/db_data
3.2. Set the access mode of the directory to 777 so that everyone has read/write access.
376 RH134-RHEL9.0-en-2-20220609](https://image.slidesharecdn.com/redhatenterpriselinux9-240713030337-3ff2819f/85/Red-Hat-Enterprise-Linux-Administration-9-0-RH134-pdf-394-320.jpg)
![Chapter 11 | Run Containers
[podsvc@serverb ~]$ chmod 777 /home/podsvc/db_data
4. Create the inventorydb detached container. Use the rhel8/mariadb-103 image from
the registry.lab.example.com registry, and specify the tag with the lowest version
number on that image, which you found in a preceding step. Map port 3306 in the container
to port 13306 on the host. Mount the /home/podsvc/db_data directory on the host as
/var/lib/mysql/data in the container. Declare the following variable values for the
container:
Variable Value
MYSQL_USER operator1
MYSQL_PASSWORD redhat
MYSQL_DATABASE inventory
MYSQL_ROOT_PASSWORD redhat
You can copy and paste these parameters from the /home/podsvc/containers-
review/variables file on serverb. Execute the /home/podsvc/containers-
review/testdb.sh script to confirm that the MariaDB database is running.
4.1. Create the container.
[podsvc@serverb ~]$ podman run -d --name inventorydb -p 13306:3306
-e MYSQL_USER=operator1
-e MYSQL_PASSWORD=redhat
-e MYSQL_DATABASE=inventory
-e MYSQL_ROOT_PASSWORD=redhat
-v /home/podsvc/db_data:/var/lib/mysql/data:Z
registry.lab.example.com/rhel8/mariadb-103:1-86
...output omitted...
4.2. Confirm that the database is running.
[podsvc@serverb ~]$ ~/containers-review/testdb.sh
Testing the access to the database...
SUCCESS
5. Configure the systemd daemon so that the inventorydb container starts automatically
when the system boots.
5.1. If you used sudo or su to log in as the podsvc user, then exit serverb and use the
ssh command to directly log in to serverb as the podsvc user. Remember, the
systemd daemon requires the user to open a direct session from the console or
through SSH. Omit this step if you already logged in to the serverb machine as the
podsvc user by using SSH.
[student@workstation ~]$ ssh podsvc@serverb
...output omitted...
[podsvc@serverb ~]$
RH134-RHEL9.0-en-2-20220609 377](https://image.slidesharecdn.com/redhatenterpriselinux9-240713030337-3ff2819f/85/Red-Hat-Enterprise-Linux-Administration-9-0-RH134-pdf-395-320.jpg)
![Chapter 11 | Run Containers
5.2. Create the ~/.config/systemd/user/ directory.
[podsvc@serverb ~]$ mkdir -p ~/.config/systemd/user/
5.3. Create the systemd unit file from the running container.
[podsvc@serverb ~]$ cd ~/.config/systemd/user/
[podsvc@serverb user]$ podman generate systemd --name inventorydb --files --new
/home/podsvc/.config/systemd/user/container-inventorydb.service
5.4. Stop and then delete the inventorydb container.
[podsvc@serverb user]$ podman stop inventorydb
inventorydb
[podsvc@serverb user]$ podman rm inventorydb
0d28f0e0a4118ff019691e34afe09b4d28ee526079b58d19f03b324bd04fd545
5.5. Instruct the systemd daemon to reload its configuration, and then enable and start the
container-inventorydb service.
[podsvc@serverb user]$ systemctl --user daemon-reload
[podsvc@serverb user]$ systemctl --user enable --now container-inventorydb.service
Created symlink /home/podsvc/.config/systemd/user/multi-user.target.wants/
container-inventorydb.service → /home/podsvc/.config/systemd/user/container-
inventorydb.service.
Created symlink /home/podsvc/.config/systemd/user/default.target.wants/
container-inventorydb.service → /home/podsvc/.config/systemd/user/container-
inventorydb.service.
5.6. Confirm that the container is running.
[podsvc@serverb user]$ ~/containers-review/testdb.sh
Testing the access to the database...
SUCCESS
[podsvc@serverb user]$ podman ps
CONTAINER ID IMAGE COMMAND CREATED
STATUS PORTS NAMES
3ab24e7f000d registry.lab.example.com/rhel8/mariadb-103:1-86 run-mysqld 47
seconds ago Up 46 seconds ago 0.0.0.0:13306->3306/tcp inventorydb
5.7. Run the loginctl enable-linger command for the user services to start
automatically when the server starts.
[podsvc@serverb ~]$ loginctl enable-linger
5.8. Return to the workstation machine as the student user.
378 RH134-RHEL9.0-en-2-20220609](https://image.slidesharecdn.com/redhatenterpriselinux9-240713030337-3ff2819f/85/Red-Hat-Enterprise-Linux-Administration-9-0-RH134-pdf-396-320.jpg)
![Chapter 11 | Run Containers
[podsvc@serverb ~]$ exit
logout
Connection to serverb closed.
[student@workstation ~]$
Evaluation
As the student user on the workstation machine, use the lab command to grade your work.
Correct any reported failures and rerun the command until successful.
[student@workstation ~]$ lab grade containers-review
Finish
On the workstation machine, change to the student user home directory and use the lab
command to complete this exercise. This step is important to ensure that resources from previous
exercises do not impact upcoming exercises.
[student@workstation ~]$ lab finish containers-review
This concludes the section.
RH134-RHEL9.0-en-2-20220609 379](https://image.slidesharecdn.com/redhatenterpriselinux9-240713030337-3ff2819f/85/Red-Hat-Enterprise-Linux-Administration-9-0-RH134-pdf-397-320.jpg)
![Chapter 12 | Comprehensive Review
Lab
Fix Boot Issues and Maintain Servers
Note
If you plan to take the RHCSA exam, then use the following approach to
maximize the benefit of this Comprehensive Review: attempt each lab
without viewing the solution buttons or referring to the course content. Use
the grading scripts to gauge your progress as you complete each lab.
In this review, you troubleshoot and repair boot problems and update the system default
target. You also schedule tasks to run on a repeating schedule as a normal user.
Outcomes
• Diagnose issues and recover the system from emergency mode.
• Change the default target from graphical.target to multi-user.target.
• Schedule recurring jobs to run as a normal user.
Before You Begin
If you did not reset your workstation and server machines at the end of the last chapter,
then save any work that you want to keep from earlier exercises on those machines, and
reset them now.
As the student user on the workstation machine, use the lab command to prepare your
system for this exercise.
This command prepares your environment and ensures that all required resources are
available.
[student@workstation ~]$ lab start rhcsa-compreview1
Specifications
• On workstation, run the /tmp/rhcsa-break1 script. This script causes an issue with the
boot process on serverb and then reboots the machine. Troubleshoot the cause and repair the
boot issue. When prompted, use redhat as the password of the root user.
• On workstation, run the /tmp/rhcsa-break2 script. This script causes the default target
to switch from the multi-user target to the graphical target on the serverb machine
and then reboots the machine. On serverb, reset the default target to use the multi-user
target. The default target settings must persist after reboot without manual intervention. As the
student user, use the sudo command for performing privileged commands. Use student as
the password, when required.
• On serverb, schedule a recurring job as the student user that executes the /home/
student/backup-home.sh script hourly between 7 PM and 9 PM every day except on
Saturday and Sunday. Download the backup script from http://materials.example.com/
labs/backup-home.sh. The backup-home.sh script backs up the /home/student
RH134-RHEL9.0-en-2-20220609 385](https://image.slidesharecdn.com/redhatenterpriselinux9-240713030337-3ff2819f/85/Red-Hat-Enterprise-Linux-Administration-9-0-RH134-pdf-403-320.jpg)
![Chapter 12 | Comprehensive Review
directory from serverb to servera in the /home/student/serverb-backup directory. Use
the backup-home.sh script to schedule the recurring job as the student user.
• Reboot the serverb machine and wait for the boot to complete before grading.
Evaluation
As the student user on the workstation machine, use the lab command to grade your work.
Correct any reported failures and rerun the command until successful.
[student@workstation ~]$ lab grade rhcsa-compreview1
Finish
On the workstation machine, change to the student user home directory and use the lab
command to complete this exercise. This step is important to ensure that resources from previous
exercises do not impact upcoming exercises.
[student@workstation ~]$ lab finish rhcsa-compreview1
This concludes the section.
386 RH134-RHEL9.0-en-2-20220609](https://image.slidesharecdn.com/redhatenterpriselinux9-240713030337-3ff2819f/85/Red-Hat-Enterprise-Linux-Administration-9-0-RH134-pdf-404-320.jpg)
![Chapter 12 | Comprehensive Review
Solution
Fix Boot Issues and Maintain Servers
Note
If you plan to take the RHCSA exam, then use the following approach to
maximize the benefit of this Comprehensive Review: attempt each lab
without viewing the solution buttons or referring to the course content. Use
the grading scripts to gauge your progress as you complete each lab.
In this review, you troubleshoot and repair boot problems and update the system default
target. You also schedule tasks to run on a repeating schedule as a normal user.
Outcomes
• Diagnose issues and recover the system from emergency mode.
• Change the default target from graphical.target to multi-user.target.
• Schedule recurring jobs to run as a normal user.
Before You Begin
If you did not reset your workstation and server machines at the end of the last chapter,
then save any work that you want to keep from earlier exercises on those machines, and
reset them now.
As the student user on the workstation machine, use the lab command to prepare your
system for this exercise.
This command prepares your environment and ensures that all required resources are
available.
[student@workstation ~]$ lab start rhcsa-compreview1
1. On workstation, run the /tmp/rhcsa-break1 script.
[student@workstation ~]$ sh /tmp/rhcsa-break1
2. After the serverb machine boots, access the console and notice that the boot process
stopped early. Take a moment to speculate about a possible cause for this behavior.
2.1. Locate the icon for the serverb console, as appropriate for your classroom
environment. Open the console and inspect the error. It might take a few seconds for
the error to appear.
2.2. Press Ctrl+Alt+Del to reboot the serverb machine. When the boot-loader menu
appears, press any key except Enter to interrupt the countdown.
2.3. Edit the default boot-loader entry, in memory, to log in to the emergency mode. Press
e to edit the current entry.
RH134-RHEL9.0-en-2-20220609 387](https://image.slidesharecdn.com/redhatenterpriselinux9-240713030337-3ff2819f/85/Red-Hat-Enterprise-Linux-Administration-9-0-RH134-pdf-405-320.jpg)
![Chapter 12 | Comprehensive Review
2.4. Use the cursor keys to navigate to the line that starts with linux. Append
systemd.unit=emergency.target.
2.5. Press Ctrl+x to boot with the modified configuration.
2.6. Log in to emergency mode. Use redhat as the root user's password.
Give root password for maintenance
(or press Control-D to continue): redhat
[root@serverb ~]#
3. Remount the / file system with read and write capabilities. Use the mount -a command to
attempt to mount all the other file systems.
3.1. Remount the / file system with read and write capabilities to edit the file system.
[root@serverb ~]# mount -o remount,rw /
3.2. Attempt to mount all the other file systems. Notice that one of the file systems does
not mount.
[root@serverb ~]# mount -a
...output omitted...
mount: /FakeMount: can't find UUID=fake.
3.3. Edit the /etc/fstab file to fix the issue. Remove or comment out the incorrect line.
[root@serverb ~]# vim /etc/fstab
...output omitted...
#UUID=fake /FakeMount xfs defaults 0 0
3.4. Update the systemd daemon for the system to register the new /etc/fstab file
configuration.
[root@serverb ~]# systemctl daemon-reload
[ 206.828912] systemd[1]: Reloading.
3.5. Verify that /etc/fstab file is now correct by attempting to mount all entries.
[root@serverb ~]# mount -a
3.6. Reboot serverb and wait for the boot to complete. The system should now boot
without errors.
[root@serverb ~]# systemctl reboot
4. On workstation, run the /tmp/rhcsa-break2 script. Wait for the serverb machine to
reboot before proceeding.
[student@workstation ~]$ sh /tmp/rhcsa-break2
388 RH134-RHEL9.0-en-2-20220609](https://image.slidesharecdn.com/redhatenterpriselinux9-240713030337-3ff2819f/85/Red-Hat-Enterprise-Linux-Administration-9-0-RH134-pdf-406-320.jpg)
![Chapter 12 | Comprehensive Review
5. On serverb, set the multi-user target as the current and default target.
5.1. Log in to serverb as the student user.
[student@workstation ~]$ ssh student@serverb
...output omitted...
[student@serverb ~]$
5.2. Determine the default target.
[student@serverb ~]$ systemctl get-default
graphical.target
5.3. Switch to the multi-user target.
[student@serverb ~]$ sudo systemctl isolate multi-user.target
[sudo] password for student: student
5.4. Set the multi-user target as the default target.
[student@serverb ~]$ sudo systemctl set-default multi-user.target
Removed /etc/systemd/system/default.target.
Created symlink /etc/systemd/system/default.target -> /usr/lib/systemd/system/
multi-user.target.
5.5. Reboot serverb and verify that the multi-user target is set as the default target.
[student@serverb ~]$ sudo systemctl reboot
Connection to serverb closed by remote host.
Connection to serverb closed.
[student@workstation ~]$
5.6. After the system reboots, open an SSH session to serverb as the student user.
Verify that the multi-user target is set as the default target.
[student@workstation ~]$ ssh student@serverb
...output omitted...
[student@serverb ~]$ systemctl get-default
multi-user.target
6. On serverb, schedule a recurring job as the student user that executes the /home/
student/backup-home.sh script hourly between 7 PM and 9 PM on all days except
Saturday and Sunday. Use the backup-home.sh script to schedule the recurring job.
Download the backup script from http://materials.example.com/labs/backup-
home.sh.
6.1. On serverb, download the backup script from http://materials.example.com/
labs/backup-home.sh. Use chmod to make the backup script executable.
RH134-RHEL9.0-en-2-20220609 389](https://image.slidesharecdn.com/redhatenterpriselinux9-240713030337-3ff2819f/85/Red-Hat-Enterprise-Linux-Administration-9-0-RH134-pdf-407-320.jpg)
![Chapter 12 | Comprehensive Review
[student@serverb ~]$ wget http://materials.example.com/labs/backup-home.sh
...output omitted...
[student@serverb ~]$ chmod +x backup-home.sh
6.2. Open the crontab file with the default text editor.
[student@serverb ~]$ crontab -e
6.3. Edit the file to add the following line:
0 19-21 * * Mon-Fri /home/student/backup-home.sh
Save the changes and exit the editor.
6.4. Use the crontab -l command to list the scheduled recurring jobs.
[student@serverb ~]$ crontab -l
0 19-21 * * Mon-Fri /home/student/backup-home.sh
7. Reboot serverb and wait for the boot to complete before grading.
[student@serverb ~]$ sudo systemctl reboot
[sudo] password for student: student
Connection to serverb closed by remote host.
Connection to serverb closed.
[student@workstation ~]$
Evaluation
As the student user on the workstation machine, use the lab command to grade your work.
Correct any reported failures and rerun the command until successful.
[student@workstation ~]$ lab grade rhcsa-compreview1
Finish
On the workstation machine, change to the student user home directory and use the lab
command to complete this exercise. This step is important to ensure that resources from previous
exercises do not impact upcoming exercises.
[student@workstation ~]$ lab finish rhcsa-compreview1
This concludes the section.
390 RH134-RHEL9.0-en-2-20220609](https://image.slidesharecdn.com/redhatenterpriselinux9-240713030337-3ff2819f/85/Red-Hat-Enterprise-Linux-Administration-9-0-RH134-pdf-408-320.jpg)
![Chapter 12 | Comprehensive Review
Lab
Configure and Manage File Systems and
Storage
Note
If you plan to take the RHCSA exam, then use the following approach to
maximize the benefit of this Comprehensive Review: attempt each lab
without viewing the solution buttons or referring to the course content. Use
the grading scripts to gauge your progress as you complete each lab.
In this review, you create a logical volume, mount a network file system, and create a swap
partition that is automatically activated at boot. You also configure directories to store
temporary files.
Outcomes
• Create a logical volume.
• Mount a network file system.
• Create a swap partition that is automatically activated at boot.
• Configure a directory to store temporary files.
Before You Begin
If you did not reset your workstation and server machines at the end of the last chapter,
then save any work that you want to keep from earlier exercises on those machines, and
reset them now.
As the student user on the workstation machine, use the lab command to prepare your
system for this exercise.
This command prepares your environment and ensures that all required resources are
available.
[student@workstation ~]$ lab start rhcsa-compreview2
Specifications
• On serverb, configure a new 1 GiB vol_home logical volume in a new 2 GiB extra_storage
volume group. Use the unpartitioned /dev/vdb disk to create the partition.
• Format the vol_home logical volume with the XFS file-system type, and persistently mount it
on the /user-homes directory.
• On serverb, persistently mount the /share network file system that servera exports on the
/local-share directory. The servera machine exports the servera.lab.example.com:/
share path.
RH134-RHEL9.0-en-2-20220609 391](https://image.slidesharecdn.com/redhatenterpriselinux9-240713030337-3ff2819f/85/Red-Hat-Enterprise-Linux-Administration-9-0-RH134-pdf-409-320.jpg)
![Chapter 12 | Comprehensive Review
• On serverb, create a new 512 MiB swap partition on the /dev/vdc disk. Persistently mount
the swap partition.
• Create the production user group. Create the production1, production2, production3,
and production4 users with the production group as their supplementary group.
• On serverb, configure the /run/volatile directory to store temporary files. If the files in
this directory are not accessed for more than 30 seconds, then the system automatically deletes
them. Set 0700 as the octal permissions for the directory. Use the /etc/tmpfiles.d/
volatile.conf file to configure the time-based deletion of the files in the /run/volatile
directory.
Evaluation
As the student user on the workstation machine, use the lab command to grade your work.
Correct any reported failures and rerun the command until successful.
[student@workstation ~]$ lab grade rhcsa-compreview2
Finish
On the workstation machine, change to the student user home directory and use the lab
command to complete this exercise. This step is important to ensure that resources from previous
exercises do not impact upcoming exercises.
[student@workstation ~]$ lab finish rhcsa-compreview2
This concludes the section.
392 RH134-RHEL9.0-en-2-20220609](https://image.slidesharecdn.com/redhatenterpriselinux9-240713030337-3ff2819f/85/Red-Hat-Enterprise-Linux-Administration-9-0-RH134-pdf-410-320.jpg)
![Chapter 12 | Comprehensive Review
Solution
Configure and Manage File Systems and
Storage
Note
If you plan to take the RHCSA exam, then use the following approach to
maximize the benefit of this Comprehensive Review: attempt each lab
without viewing the solution buttons or referring to the course content. Use
the grading scripts to gauge your progress as you complete each lab.
In this review, you create a logical volume, mount a network file system, and create a swap
partition that is automatically activated at boot. You also configure directories to store
temporary files.
Outcomes
• Create a logical volume.
• Mount a network file system.
• Create a swap partition that is automatically activated at boot.
• Configure a directory to store temporary files.
Before You Begin
If you did not reset your workstation and server machines at the end of the last chapter,
then save any work that you want to keep from earlier exercises on those machines, and
reset them now.
As the student user on the workstation machine, use the lab command to prepare your
system for this exercise.
This command prepares your environment and ensures that all required resources are
available.
[student@workstation ~]$ lab start rhcsa-compreview2
1. On serverb, configure a new 1 GiB vol_home logical volume in a new 2 GiB
extra_storage volume group. Use the unpartitioned /dev/vdb disk to create the
partition.
1.1. Log in to serverb as the student user and switch to the root user.
[student@workstation ~]$ ssh student@serverb
...output omitted...
[student@serverb ~]$ sudo -i
[sudo] password for student: student
[root@serverb ~]#
RH134-RHEL9.0-en-2-20220609 393](https://image.slidesharecdn.com/redhatenterpriselinux9-240713030337-3ff2819f/85/Red-Hat-Enterprise-Linux-Administration-9-0-RH134-pdf-411-320.jpg)
![Chapter 12 | Comprehensive Review
1.2. Create a 2 GiB partition on the /dev/vdb disk.
[root@serverb ~]# parted /dev/vdb mklabel msdos
...output omitted...
[root@serverb ~]# parted /dev/vdb mkpart primary 1GiB 3GiB
...output omitted...
[root@serverb ~]# parted /dev/vdb set 1 lvm on
...output omitted...
1.3. Declare the /dev/vdb1 block device as a physical volume.
[root@serverb ~]# pvcreate /dev/vdb1
...output omitted...
1.4. Create the extra_storage volume group with the /dev/vdb1 partition.
[root@serverb ~]# vgcreate extra_storage /dev/vdb1
...output omitted...
1.5. Create the 1 GiB vol_home logical volume.
[root@serverb ~]# lvcreate -L 1GiB -n vol_home extra_storage
...output omitted...
2. Format the vol_home logical volume with the XFS file-system type, and persistently mount
it on the /user-homes directory.
2.1. Create the /user-homes directory.
[root@serverb ~]# mkdir /user-homes
2.2. Format the /dev/extra_storage/vol_home partition with the XFS file-system
type.
[root@serverb ~]# mkfs -t xfs /dev/extra_storage/vol_home
...output omitted...
2.3. Persistently mount the /dev/extra_storage/vol_home partition on the /user-
homes directory. Use the partition's UUID for the /etc/fstab file entry.
[root@serverb ~]# lsblk -o UUID /dev/extra_storage/vol_home
UUID
988cf149-0667-4733-abca-f80c6ec50ab6
[root@serverb ~]# echo "UUID=988c...0ab6 /user-homes xfs defaults 0 0"
>> /etc/fstab
[root@serverb ~]# mount /user-homes
3. On serverb, persistently mount the /share network file system that servera
exports on the /local-share directory. The servera machine exports the
servera.lab.example.com:/share path.
394 RH134-RHEL9.0-en-2-20220609](https://image.slidesharecdn.com/redhatenterpriselinux9-240713030337-3ff2819f/85/Red-Hat-Enterprise-Linux-Administration-9-0-RH134-pdf-412-320.jpg)
![Chapter 12 | Comprehensive Review
3.1. Create the /local-share directory.
[root@serverb ~]# mkdir /local-share
3.2. Append the appropriate entry to the /etc/fstab file to persistently mount the
servera.lab.example.com:/share network file system.
[root@serverb ~]# echo "servera.lab.example.com:/share /local-share
nfs rw,sync 0 0" >> /etc/fstab
3.3. Mount the network file system on the /local-share directory.
[root@serverb ~]# mount /local-share
4. On serverb, create a 512 MiB swap partition on the /dev/vdc disk. Activate and
persistently mount the swap partition.
4.1. Create a 512 MiB partition on the /dev/vdc disk.
[root@serverb ~]# parted /dev/vdc mklabel msdos
...output omitted...
[root@serverb ~]# parted /dev/vdc mkpart primary linux-swap 1MiB 513MiB
...output omitted...
4.2. Create the swap space on the /dev/vdc1 partition.
[root@serverb ~]# mkswap /dev/vdc1
...output omitted...
4.3. Create an entry in the /etc/fstab file to persistently mount the swap space. Use the
partition's UUID to create the /etc/fstab file entry. Activate the swap space.
[root@serverb ~]# lsblk -o UUID /dev/vdc1
UUID
cc18ccb6-bd29-48a5-8554-546bf3471b69
[root@serverb ~]# echo "UUID=cc18...1b69 swap swap defaults 0 0" >> /etc/fstab
[root@serverb ~]# swapon -a
5. Create the production user group. Then, create the production1, production2,
production3, and production4 users with the production group as their
supplementary group.
[root@serverb ~]# groupadd production
[root@serverb ~]# for i in 1 2 3 4; do useradd -G production production$i; done
6. On serverb, configure the /run/volatile directory to store temporary files. If
the files in this directory are not accessed for more than 30 seconds, then the system
automatically deletes them. Set 0700 as the octal permissions for the directory. Use the
/etc/tmpfiles.d/volatile.conf file to configure the time-based deletion of the files
in the /run/volatile directory.
RH134-RHEL9.0-en-2-20220609 395](https://image.slidesharecdn.com/redhatenterpriselinux9-240713030337-3ff2819f/85/Red-Hat-Enterprise-Linux-Administration-9-0-RH134-pdf-413-320.jpg)
![Chapter 12 | Comprehensive Review
6.1. Create the /etc/tmpfiles.d/volatile.conf file with the following content:
d /run/volatile 0700 root root 30s
6.2. Use the systemd-tmpfiles --create command to create the /run/volatile
directory if it does not exist.
[root@serverb ~]# systemd-tmpfiles --create /etc/tmpfiles.d/volatile.conf
6.3. Return to the workstation machine as the student user.
[student@serverb ~]$ exit
logout
Connection to serverb closed.
Evaluation
As the student user on the workstation machine, use the lab command to grade your work.
Correct any reported failures and rerun the command until successful.
[student@workstation ~]$ lab grade rhcsa-compreview2
Finish
On the workstation machine, change to the student user home directory and use the lab
command to complete this exercise. This step is important to ensure that resources from previous
exercises do not impact upcoming exercises.
[student@workstation ~]$ lab finish rhcsa-compreview2
This concludes the section.
396 RH134-RHEL9.0-en-2-20220609](https://image.slidesharecdn.com/redhatenterpriselinux9-240713030337-3ff2819f/85/Red-Hat-Enterprise-Linux-Administration-9-0-RH134-pdf-414-320.jpg)
![Chapter 12 | Comprehensive Review
Lab
Configure and Manage Server Security
Note
If you plan to take the RHCSA exam, then use the following approach to
maximize the benefit of this Comprehensive Review: attempt each lab
without viewing the solution buttons or referring to the course content. Use
the grading scripts to gauge your progress as you complete each lab.
In this review, you configure SSH key-based authentication, change firewall settings, adjust
the SELinux mode and an SELinux Boolean, and troubleshoot SELinux issues.
Outcomes
• Configure SSH key-based authentication.
• Configure firewall settings.
• Adjust the SELinux mode and SELinux Booleans.
• Troubleshoot SELinux issues.
Before You Begin
If you did not reset your workstation and server machines at the end of the last chapter,
then save any work that you want to keep from earlier exercises on those machines, and
reset them now.
As the student user on the workstation machine, use the lab command to prepare your
system for this exercise.
This command prepares your environment and ensures that all required resources are
available.
[student@workstation ~]$ lab start rhcsa-compreview3
Specifications
• On serverb, generate an SSH key pair for the student user. Do not protect the private key
with a passphrase.
• Configure the student user on servera to accept login authentication with the SSH key pair
that you generated on the serverb machine. The student user on serverb must be able to
log in to servera via SSH without entering a password.
• On servera, check the /user-homes/production5 directory permissions. Then, configure
SELinux to run in the permissive mode by default.
• On serverb, verify that the /localhome directory does not exist. Then, configure the
production5 user's home directory to mount the /user-homes/production5 network
file system. The servera.lab.example.com machine exports the file system as the
servera.lab.example.com:/user-homes/production5 NFS share. Use the
RH134-RHEL9.0-en-2-20220609 397](https://image.slidesharecdn.com/redhatenterpriselinux9-240713030337-3ff2819f/85/Red-Hat-Enterprise-Linux-Administration-9-0-RH134-pdf-415-320.jpg)
![Chapter 12 | Comprehensive Review
autofs service to mount the network share. Verify that the autofs service creates the
/localhome/production5 directory with the same permissions as on servera.
• On serverb, adjust the appropriate SELinux Boolean so that the production5 user may use
the NFS-mounted home directory after authenticating with an SSH key. If required, use redhat
as the password of the production5 user.
• On serverb, adjust the firewall settings to reject all connection requests from the servera
machine. Use the servera IPv4 address (172.25.250.10) to configure the firewall rule.
• On serverb, investigate and fix the issue with the failing Apache web service, which listens
on port 30080/TCP for connections. Adjust the firewall settings appropriately so that the port
30080/TCP is open for incoming connections.
Evaluation
As the student user on the workstation machine, use the lab command to grade your work.
Correct any reported failures and rerun the command until successful.
[student@workstation ~]$ lab grade rhcsa-compreview3
Finish
On the workstation machine, change to the student user home directory and use the lab
command to complete this exercise. This step is important to ensure that resources from previous
exercises do not impact upcoming exercises.
[student@workstation ~]$ lab finish rhcsa-compreview3
This concludes the section.
398 RH134-RHEL9.0-en-2-20220609](https://image.slidesharecdn.com/redhatenterpriselinux9-240713030337-3ff2819f/85/Red-Hat-Enterprise-Linux-Administration-9-0-RH134-pdf-416-320.jpg)
![Chapter 12 | Comprehensive Review
Solution
Configure and Manage Server Security
Note
If you plan to take the RHCSA exam, then use the following approach to
maximize the benefit of this Comprehensive Review: attempt each lab
without viewing the solution buttons or referring to the course content. Use
the grading scripts to gauge your progress as you complete each lab.
In this review, you configure SSH key-based authentication, change firewall settings, adjust
the SELinux mode and an SELinux Boolean, and troubleshoot SELinux issues.
Outcomes
• Configure SSH key-based authentication.
• Configure firewall settings.
• Adjust the SELinux mode and SELinux Booleans.
• Troubleshoot SELinux issues.
Before You Begin
If you did not reset your workstation and server machines at the end of the last chapter,
then save any work that you want to keep from earlier exercises on those machines, and
reset them now.
As the student user on the workstation machine, use the lab command to prepare your
system for this exercise.
This command prepares your environment and ensures that all required resources are
available.
[student@workstation ~]$ lab start rhcsa-compreview3
1. On serverb, generate an SSH key pair for the student user. Do not protect the private key
with a passphrase.
1.1. Log in to serverb as the student user.
[student@workstation ~]$ ssh student@serverb
...output omitted...
1.2. Use the ssh-keygen command to generate an SSH key pair. Do not protect the
private key with a passphrase.
[student@serverb ~]$ ssh-keygen
Generating public/private rsa key pair.
Enter file in which to save the key (/home/student/.ssh/id_rsa): Enter
RH134-RHEL9.0-en-2-20220609 399](https://image.slidesharecdn.com/redhatenterpriselinux9-240713030337-3ff2819f/85/Red-Hat-Enterprise-Linux-Administration-9-0-RH134-pdf-417-320.jpg)
![Chapter 12 | Comprehensive Review
Created directory '/home/student/.ssh'.
Enter passphrase (empty for no passphrase): Enter
Enter same passphrase again: Enter
Your identification has been saved in /home/student/.ssh/id_rsa.
Your public key has been saved in /home/student/.ssh/id_rsa.pub.
The key fingerprint is:
SHA256:+ijpGqjEQSGBR8ORNchiRTHw/URQksVdHjsHqVBXeYI student@serverb.lab.example.com
The key's randomart image is:
+---[RSA 3072]----+
|+BBX+o*+o..=+.. |
|+.O.oooo .oE+o . |
|.+ . . .. .+ .o |
|. o . o |
| . .S |
|... . |
|.o. .. |
|o .o o |
|. .o... . |
+----[SHA256]-----+
2. Configure the student user on servera to accept login authentication with the SSH key
pair that you generated on the serverb machine. The student user on serverb must be
able to log in to servera via SSH without entering a password.
2.1. Send the public key of the newly generated SSH key pair to the student user on the
servera machine.
[student@serverb ~]$ ssh-copy-id student@servera
/usr/bin/ssh-copy-id: INFO: Source of key(s) to be installed: "/home/student/.ssh/
id_rsa.pub"
The authenticity of host 'servera (172.25.250.10)' can't be established.
ED25519 key fingerprint is SHA256:shYfoFG0Nnv42pv7j+HG+FISmCAm4Bh5jfjwwSMJbrw.
This key is not known by any other names
Are you sure you want to continue connecting (yes/no/[fingerprint])? yes
/usr/bin/ssh-copy-id: INFO: attempting to log in with the new key(s), to filter
out any that are already installed
/usr/bin/ssh-copy-id: INFO: 1 key(s) remain to be installed -- if you are prompted
now it is to install the new keys
student@servera's password: student
Number of key(s) added: 1
Now try logging in to the machine, with: "ssh 'student@servera'"
and check to make sure that only the key(s) you wanted were added.
2.2. Verify that the student user can log in to servera from serverb without entering a
password. Do not close the connection.
[student@serverb ~]$ ssh student@servera
...output omitted...
[student@servera ~]$
3. On servera, check the /user-homes/production5 directory permissions. Then,
configure SELinux to run in the permissive mode by default.
400 RH134-RHEL9.0-en-2-20220609](https://image.slidesharecdn.com/redhatenterpriselinux9-240713030337-3ff2819f/85/Red-Hat-Enterprise-Linux-Administration-9-0-RH134-pdf-418-320.jpg)
![Chapter 12 | Comprehensive Review
3.1. Check the /user-homes/production5 directory permissions.
[student@servera ~]$ ls -ld /user-homes/production5
drwx------. 2 production5 production5 62 May 6 05:27 /user-homes/production5
3.2. Edit the /etc/sysconfig/selinux file to set the SELINUX parameter to the
permissive value.
[student@servera ~]$ sudo vi /etc/sysconfig/selinux
...output omitted...
#SELINUX=enforcing
SELINUX=permissive
...output omitted...
3.3. Reboot the system.
[student@servera ~]$ sudo systemctl reboot
Connection to servera closed by remote host.
Connection to servera closed.
[student@serverb ~]$
4. On serverb, verify that the /localhome directory does not exist. Then, configure the
production5 user's home directory to mount the /user-homes/production5 network
file system. The servera.lab.example.com machine exports the file system as the
servera.lab.example.com:/user-homes/production5 NFS share. Use the
autofs service to mount the network share. Verify that the autofs service creates the
/localhome/production5 directory with the same permissions as on servera.
4.1. Verify that the /localhome directory does not exist.
[student@serverb ~]$ ls -ld /localhome
ls: cannot access '/localhome': No such file or directory
4.2. On serverb, switch to the root user.
[student@serverb ~]$ sudo -i
[sudo] password for student: student
[root@serverb ~]#
4.3. Install the autofs package.
[root@serverb ~]# dnf install autofs
...output omitted...
Is this ok [y/N]: y
...output omitted...
Installed:
autofs-1:5.1.7-27.el9.x86_64 libsss_autofs-2.6.2-2.el9.x86_64
Complete!
4.4. Create the /etc/auto.master.d/production5.autofs map file with the
following content:
RH134-RHEL9.0-en-2-20220609 401](https://image.slidesharecdn.com/redhatenterpriselinux9-240713030337-3ff2819f/85/Red-Hat-Enterprise-Linux-Administration-9-0-RH134-pdf-419-320.jpg)
![Chapter 12 | Comprehensive Review
/- /etc/auto.production5
4.5. Determine the production5 user's home directory.
[root@serverb ~]# getent passwd production5
production5:x:5001:5001::/localhome/production5:/bin/bash
4.6. Create the /etc/auto.production5 file with the following content:
/localhome/production5 -rw servera.lab.example.com:/user-homes/production5
4.7. Restart the autofs service.
[root@serverb ~]# systemctl restart autofs
4.8. Verify that the autofs service creates the /localhome/production5 directory with
the same permissions as on servera.
[root@serverb ~]# ls -ld /localhome/production5
drwx------. 2 production5 production5 62 May 6 05:52 /localhome/production5
5. On serverb, adjust the appropriate SELinux Boolean so that the production5 user may
use the NFS-mounted home directory after authenticating with an SSH key. If required, use
redhat as the password of the production5 user.
5.1. Open a new terminal window and verify from servera that the production5 user is
not able to log in to serverb with SSH key-based authentication. An SELinux Boolean
is preventing the user from logging in. From workstation, open a new terminal and
log in to servera as the student user.
[student@workstation ~]$ ssh student@servera
...output omitted...
[student@servera ~]$
5.2. Switch to the production5 user. When prompted, use redhat as the password of the
production5 user.
[student@servera ~]$ su - production5
Password: redhat
[production5@servera ~]$
5.3. Generate an SSH key pair.
[production5@servera ~]$ ssh-keygen
Generating public/private rsa key pair.
Enter file in which to save the key (/home/production5/.ssh/id_rsa): Enter
Created directory '/home/production5/.ssh'.
Enter passphrase (empty for no passphrase): Enter
Enter same passphrase again: Enter
Your identification has been saved in /home/production5/.ssh/id_rsa.
402 RH134-RHEL9.0-en-2-20220609](https://image.slidesharecdn.com/redhatenterpriselinux9-240713030337-3ff2819f/85/Red-Hat-Enterprise-Linux-Administration-9-0-RH134-pdf-420-320.jpg)
![Chapter 12 | Comprehensive Review
Your public key has been saved in /home/production5/.ssh/id_rsa.pub.
The key fingerprint is:
SHA256:AbUcIBXneyiGIhr4wS1xzs3WqDvbTP+eZuSRn9HQ/cw
production5@servera.lab.example.com
The key's randomart image is:
+---[RSA 3072]----+
| ..=++ |
| . = o |
| . . = . . |
|.. * + o + . . .|
|+ = = B S .. o o.|
|.+ + + . .+ . . E|
|. . . . o o o |
| .= . +.o |
| ooo .=+ |
+----[SHA256]-----+
5.4. Transfer the public key of the SSH key pair to the production5 user on the serverb
machine. When prompted, use redhat as the password of the production5 user.
[production5@servera ~]$ ssh-copy-id production5@serverb
/usr/bin/ssh-copy-id: INFO: Source of key(s) to be installed: "/home/
production5/.ssh/id_rsa.pub"
The authenticity of host 'serverb (172.25.250.11)' can't be established.
ECDSA key fingerprint is SHA256:ciCkaRWF4g6eR9nSdPxQ7KL8czpViXal6BousK544TY.
Are you sure you want to continue connecting (yes/no)? yes
/usr/bin/ssh-copy-id: INFO: attempting to log in with the new key(s), to filter
out any that are already installed
/usr/bin/ssh-copy-id: INFO: 1 key(s) remain to be installed -- if you are prompted
now it is to install the new keys
production5@serverb's password: redhat
Number of key(s) added: 1
Now try logging in to the machine, with: "ssh 'production5@serverb'"
and check to make sure that only the key(s) you wanted were added.
5.5. Use SSH public key-based authentication instead of password-based authentication to
log in to serverb as the production5 user. This command should fail.
[production5@servera ~]$ ssh -o pubkeyauthentication=yes
-o passwordauthentication=no production5@serverb
production5@serverb: Permission denied (publickey,gssapi-keyex,gssapi-with-
mic,password).
5.6. On the terminal that is connected to serverb as the root user, set the
use_nfs_home_dirs SELinux Boolean to true.
[root@serverb ~]# setsebool -P use_nfs_home_dirs true
5.7. Return to the terminal that is connected to servera as the production5 user, and
use SSH public key-based authentication instead of password-based authentication to
log in to serverb as the production5 user. This command should succeed.
RH134-RHEL9.0-en-2-20220609 403](https://image.slidesharecdn.com/redhatenterpriselinux9-240713030337-3ff2819f/85/Red-Hat-Enterprise-Linux-Administration-9-0-RH134-pdf-421-320.jpg)
![Chapter 12 | Comprehensive Review
[production5@servera ~]$ ssh -o pubkeyauthentication=yes
-o passwordauthentication=no production5@serverb
...output omitted...
[production5@serverb ~]$
5.8. Exit and close the terminal that is connected to serverb as the production5 user.
Keep open the terminal that is connected to serverb as the root user.
6. On serverb, adjust the firewall settings to reject all connection requests that originate from
the servera machine. Use the servera IPv4 address (172.25.250.10) to configure the
firewall rule.
6.1. Add the IPv4 address of servera to the block zone.
[root@serverb ~]# firewall-cmd --add-source=172.25.250.10/32
--zone=block --permanent
success
6.2. Reload the changes in the firewall settings.
[root@serverb ~]# firewall-cmd --reload
success
7. On serverb, investigate and fix the issue with the failing Apache web service, which listens
on port 30080/TCP for connections. Adjust the firewall settings appropriately so that the
port 30080/TCP is open for incoming connections.
7.1. Restart the httpd service. This command fails to restart the service.
[root@serverb ~]# systemctl restart httpd.service
Job for httpd.service failed because the control process exited with error code.
See "systemctl status httpd.service" and "journalctl -xeu httpd.service" for
details.
7.2. Investigate why the httpd service is failing. Notice the permission error that indicates
that the httpd daemon failed to bind to port 30080/TCP on startup. SELinux policies
can prevent an application from binding to a non-standard port. Press q to quit the
command.
[root@serverb ~]# systemctl status httpd.service
× httpd.service - The Apache HTTP Server
Loaded: loaded (/usr/lib/systemd/system/httpd.service; disabled; vendor
preset: disabled)
Active: failed (Result: exit-code) since Mon 2022-05-02 13:20:46 EDT; 29s ago
Docs: man:httpd.service(8)
Process: 2322 ExecStart=/usr/sbin/httpd $OPTIONS -DFOREGROUND (code=exited,
status=1/FAILURE)
Main PID: 2322 (code=exited, status=1/FAILURE)
Status: "Reading configuration..."
CPU: 30ms
404 RH134-RHEL9.0-en-2-20220609](https://image.slidesharecdn.com/redhatenterpriselinux9-240713030337-3ff2819f/85/Red-Hat-Enterprise-Linux-Administration-9-0-RH134-pdf-422-320.jpg)
![Chapter 12 | Comprehensive Review
May 02 13:20:46 serverb.lab.example.com systemd[1]: Starting The Apache HTTP
Server...
May 02 13:20:46 serverb.lab.example.com httpd[2322]: (13)Permission denied:
AH00072: make_sock: could not bind to address [::]:30080
May 02 13:20:46 serverb.lab.example.com httpd[2322]: (13)Permission denied:
AH00072: make_sock: could not bind to address 0.0.0.0:30080
May 02 13:20:46 serverb.lab.example.com httpd[2322]: no listening sockets
available, shutting down
...output omitted...
7.3. Determine whether an SELinux policy is preventing the httpd service from binding to
port 30080/TCP. The log messages reveal that the port 30080/TCP does not have
the appropriate http_port_t SELinux context, which causes SELinux to prevent the
httpd service from binding to the port. The log message also produces the syntax of
the semanage port command, so that you can easily fix the issue.
[root@serverb ~]# sealert -a /var/log/audit/audit.log
...output omitted...
SELinux is preventing /usr/sbin/httpd from name_bind access on the tcp_socket port
30080.
***** Plugin bind_ports (92.2 confidence) suggests ************************
If you want to allow /usr/sbin/httpd to bind to network port 30080
Then you need to modify the port type.
Do
# semanage port -a -t PORT_TYPE -p tcp 30080
where PORT_TYPE is one of the following: http_cache_port_t, http_port_t,
jboss_management_port_t, jboss_messaging_port_t, ntop_port_t, puppet_port_t.
...output omitted...
7.4. Set the appropriate SELinux context on the port 30080/TCP for the httpd service to
bind to it.
[root@serverb ~]# semanage port -a -t http_port_t -p tcp 30080
7.5. Restart the httpd service. This command should successfully restart the service.
[root@serverb ~]# systemctl restart httpd
7.6. Add the port 30080/TCP to the default public zone.
[root@serverb ~]# firewall-cmd --add-port=30080/tcp --permanent
success
[root@serverb ~]# firewall-cmd --reload
success
7.7. Return to the workstation machine as the student user.
RH134-RHEL9.0-en-2-20220609 405](https://image.slidesharecdn.com/redhatenterpriselinux9-240713030337-3ff2819f/85/Red-Hat-Enterprise-Linux-Administration-9-0-RH134-pdf-423-320.jpg)
![Chapter 12 | Comprehensive Review
[root@serverb ~]# exit
logout
[student@serverb ~]$ exit
logout
Connection to serverb closed.
Evaluation
As the student user on the workstation machine, use the lab command to grade your work.
Correct any reported failures and rerun the command until successful.
[student@workstation ~]$ lab grade rhcsa-compreview3
Finish
On the workstation machine, change to the student user home directory and use the lab
command to complete this exercise. This step is important to ensure that resources from previous
exercises do not impact upcoming exercises.
[student@workstation ~]$ lab finish rhcsa-compreview3
This concludes the section.
406 RH134-RHEL9.0-en-2-20220609](https://image.slidesharecdn.com/redhatenterpriselinux9-240713030337-3ff2819f/85/Red-Hat-Enterprise-Linux-Administration-9-0-RH134-pdf-424-320.jpg)
![Chapter 12 | Comprehensive Review
Lab
Run Containers
Note
If you plan to take the RHCSA exam, then use the following approach to
maximize the benefit of this Comprehensive Review: attempt each lab
without viewing the solution buttons or referring to the course content. Use
the grading scripts to gauge your progress as you complete each lab.
Outcomes
• Create rootless detached containers.
• Configure port mapping and persistent storage.
• Configure systemd for a container to manage it with systemctl commands.
Before You Begin
If you did not reset your workstation and server machines at the end of the last chapter,
then save any work that you want to keep from earlier exercises on those machines, and
reset them now.
As the student user on the workstation machine, use the lab command to prepare your
system for this exercise.
This command prepares your environment and ensures that all required resources are
available.
[student@workstation ~]$ lab start rhcsa-compreview4
Specifications
• On serverb, configure the podmgr user with redhat as the password and set up the
appropriate tools for the podmgr user to manage the containers for this comprehensive review.
Configure the registry.lab.example.com as the remote registry. Use admin as the
user and redhat321 as the password to authenticate. You can use the /tmp/review4/
registry.conf file to configure the registry.
• The /tmp/review4/container-dev directory contains two directories with development
files for the containers in this comprehensive review. Copy the two directories under the
/tmp/review4/container-dev directory to the podmgr home directory. Configure the
/home/podmgr/storage/database subdirectory so that you can use it as persistent storage
for a container.
• Create the production DNS-enabled container network. Use the 10.81.0.0/16 subnet and
10.81.0.1 as the gateway. Use this container network for the containers that you create in this
comprehensive review.
• Create the db-app01 detached container based on the registry.lab.example.com/
rhel8/mariadb-103 container image with the lowest tag number in the production
RH134-RHEL9.0-en-2-20220609 407](https://image.slidesharecdn.com/redhatenterpriselinux9-240713030337-3ff2819f/85/Red-Hat-Enterprise-Linux-Administration-9-0-RH134-pdf-425-320.jpg)
![Chapter 12 | Comprehensive Review
network. Use the /home/podmgr/storage/database directory as persistent storage for
the /var/lib/mysql/data directory of the db-app01 container. Map the 13306 port on the
local machine to the 3306 port in the container. Use the values of the following table to set the
environment variables to create the containerized database.
Variable Value
MYSQL_USER developer
MYSQL_PASSWORD redhat
MYSQL_DATABASE inventory
MYSQL_ROOT_PASSWORD redhat
• Create a systemd service file to manage the db-app01 container. Configure the systemd
service so that when you start the service, the systemd daemon keeps the original container.
Start and enable the container as a systemd service. Configure the db-app01 container to
start at system boot.
• Copy the /home/podmgr/db-dev/inventory.sql script into the /tmp directory of the db-
app01 container and execute it inside the container. If you executed the script locally, then you
would use the mysql -u root inventory < /tmp/inventory.sql command.
• Use the container file in the /home/podmgr/http-dev directory to create the http-app01
detached container in the production network. The container image name must be http-
client with the 9.0 tag. Map the 8080 port on the local machine to the 8080 port in the
container.
• Use the curl command to query the content of the http-app01 container. Verify that the
output of the command shows the container name of the client and that the status of the
database is up.
Evaluation
As the student user on the workstation machine, use the lab command to grade your work.
Correct any reported failures and rerun the command until successful.
[student@workstation ~]$ lab grade rhcsa-compreview4
Finish
On the workstation machine, change to the student user home directory and use the lab
command to complete this exercise. This step is important to ensure that resources from previous
exercises do not impact upcoming exercises.
[student@workstation ~]$ lab finish rhcsa-compreview4
This concludes the section.
408 RH134-RHEL9.0-en-2-20220609](https://image.slidesharecdn.com/redhatenterpriselinux9-240713030337-3ff2819f/85/Red-Hat-Enterprise-Linux-Administration-9-0-RH134-pdf-426-320.jpg)
![Chapter 12 | Comprehensive Review
Solution
Run Containers
Note
If you plan to take the RHCSA exam, then use the following approach to
maximize the benefit of this Comprehensive Review: attempt each lab
without viewing the solution buttons or referring to the course content. Use
the grading scripts to gauge your progress as you complete each lab.
Outcomes
• Create rootless detached containers.
• Configure port mapping and persistent storage.
• Configure systemd for a container to manage it with systemctl commands.
Before You Begin
If you did not reset your workstation and server machines at the end of the last chapter,
then save any work that you want to keep from earlier exercises on those machines, and
reset them now.
As the student user on the workstation machine, use the lab command to prepare your
system for this exercise.
This command prepares your environment and ensures that all required resources are
available.
[student@workstation ~]$ lab start rhcsa-compreview4
1. On serverb, configure the podmgr user with redhat as the password and set up the
appropriate tools for the podmgr user to manage the containers for this comprehensive
review. Configure the registry.lab.example.com as the remote registry. Use admin as
the user and redhat321 as the password to authenticate. You can use the /tmp/review4/
registry.conf file to configure the registry.
1.1. Log in to serverb as the student user.
[student@workstation ~]$ ssh student@serverb
...output omitted...
[student@serverb ~]$
1.2. Install the container-tools meta-package.
RH134-RHEL9.0-en-2-20220609 409](https://image.slidesharecdn.com/redhatenterpriselinux9-240713030337-3ff2819f/85/Red-Hat-Enterprise-Linux-Administration-9-0-RH134-pdf-427-320.jpg)
![Chapter 12 | Comprehensive Review
[student@serverb ~]$ sudo dnf install container-tools
[sudo] password for student: student
...output omitted...
Is this ok [y/N]: y
...output omitted...
Complete!
1.3. Create the podmgr user and set redhat as the password for the user.
[student@serverb ~]$ sudo useradd podmgr
[student@serverb ~]$ sudo passwd podmgr
Changing password for user podmgr.
New password: redhat
BAD PASSWORD: The password is shorter than 8 characters
Retype new password: redhat
passwd: all authentication tokens updated successfully.
1.4. Exit the student user session. Log in to the serverb machine as the podmgr user. If
prompted, use redhat as the password.
[student@serverb ~]$ exit
logout
Connection to serverb closed.
[student@workstation ~]$ ssh podmgr@serverb
...output omitted...
[podmgr@serverb ~]$
1.5. Create the ~/.config/containers directory.
[podmgr@serverb ~]$ mkdir -p ~/.config/containers
1.6. Copy the /tmp/review4/registries.conf file to the container configuration
directory in the home directory.
[podmgr@serverb ~]$ cp /tmp/review4/registries.conf ~/.config/containers/
1.7. Log in to the registry to verify the configuration.
[podmgr@serverb ~]$ podman login registry.lab.example.com
Username: admin
Password: redhat321
Login Succeeded!
2. The /tmp/review4/container-dev directory contains two directories with development
files for the containers in this comprehensive review. Copy the two directories under the
/tmp/review4/container-dev directory to the podmgr home directory. Configure the
/home/podmgr/storage/database subdirectory so that you can use it as persistent
storage for a container.
2.1. Copy the content of the /tmp/review4/container-dev directory to the podmgr
home directory.
410 RH134-RHEL9.0-en-2-20220609](https://image.slidesharecdn.com/redhatenterpriselinux9-240713030337-3ff2819f/85/Red-Hat-Enterprise-Linux-Administration-9-0-RH134-pdf-428-320.jpg)
![Chapter 12 | Comprehensive Review
[podmgr@serverb ~]$ cp -r /tmp/review4/container-dev/* .
[podmgr@serverb ~]$ ls -l
total 0
drwxr-xr-x. 2 podmgr podmgr 27 May 10 21:52 db-dev
drwxr-xr-x. 2 podmgr podmgr 44 May 10 21:52 http-dev
2.2. Create the /home/podmgr/storage/database directory in the podmgr home
directory. Set the appropriate permissions on the directory for the container to mount
it as persistent storage.
[podmgr@serverb ~]$ mkdir -p storage/database
[podmgr@serverb ~]$ chmod 0777 storage/database
[podmgr@serverb ~]$ ls -l storage/
total 0
drwxrwxrwx. 2 podmgr podmgr 6 May 10 21:55 database
3. Create the production DNS-enabled container network. Use the 10.81.0.0/16 subnet
and 10.81.0.1 as the gateway. Use this container network for the containers that you
create in this comprehensive review.
3.1. Create the production DNS-enabled container network. Use the 10.81.0.0/16
subnet and 10.81.0.1 as the gateway.
[podmgr@serverb ~]$ podman network create --gateway 10.81.0.1
--subnet 10.81.0.0/16 production
production
3.2. Verify that the DNS feature is enabled in the production network.
[podmgr@serverb ~]$ podman network inspect production
[
{
"name": "production",
...output omitted...
"subnets": [
{
"subnet": "10.81.0.0/16",
"gateway": "10.81.0.1"
}
],
...output omitted...
"dns_enabled": true,
...output omitted...
4. Create the db-app01 detached container based on the registry.lab.example.com/
rhel8/mariadb-103 container image with the lowest tag number in the production
network. Use the /home/podmgr/storage/database directory as persistent storage for
the /var/lib/mysql/data directory of the db-app01 container. Map the 13306 port on
the local machine to the 3306 port in the container. Use the values of the following table to
set the environment variables to create the containerized database.
RH134-RHEL9.0-en-2-20220609 411](https://image.slidesharecdn.com/redhatenterpriselinux9-240713030337-3ff2819f/85/Red-Hat-Enterprise-Linux-Administration-9-0-RH134-pdf-429-320.jpg)
![Chapter 12 | Comprehensive Review
Variable Value
MYSQL_USER developer
MYSQL_PASSWORD redhat
MYSQL_DATABASE inventory
MYSQL_ROOT_PASSWORD redhat
4.1. Search for the oldest version tag number of the registry.lab.example.com/
rhel8/mariadb container image.
[podmgr@serverb ~]$ skopeo inspect
docker://registry.lab.example.com/rhel8/mariadb-103
{
"Name": "registry.lab.example.com/rhel8/mariadb-103",
"Digest":
"sha256:a95b678e52bb9f4305cb696e45c91a38c19a7c2c5c360ba6c681b10717394816",
"RepoTags": [
"1-86",
"1-102",
"latest"
...output omitted...
4.2. Use the oldest version tag number from the output of the previous step to create the
detached db-app01 container in the production network. Use the /home/podmgr/
storage/database directory as persistent storage for the container. Map the 13306
port to the 3306 container port. Use the data that is provided in the table to set the
environment variables for the container.
[podmgr@serverb ~]$ podman run -d --name db-app01
-e MYSQL_USER=developer
-e MYSQL_PASSWORD=redhat
-e MYSQL_DATABASE=inventory
-e MYSQL_ROOT_PASSWORD=redhat
--network production -p 13306:3306
-v /home/podmgr/storage/database:/var/lib/mysql/data:Z
registry.lab.example.com/rhel8/mariadb-103:1-86
...output omitted...
ba398d080e00ba1d52b1cf4f5959c477681cce343c11cc7fc39e4ce5f1cf2384
[podmgr@serverb ~]$ podman ps -a
CONTAINER ID IMAGE COMMAND CREATED
STATUS PORTS NAMES
ba398d080e00 registry.lab.example.com/rhel8/mariadb-103:1-86 run-mysqld 20
seconds ago Up 20 seconds ago 0.0.0.0:13306->3306/tcp db-app01
5. Create a systemd service file to manage the db-app01 container. Configure the systemd
service so that when you start the service, the systemd daemon keeps the original container.
Start and enable the container as a systemd service. Configure the db-app01 container to
start at system boot.
5.1. Create the ~/.config/systemd/user/ directory for the container unit file.
412 RH134-RHEL9.0-en-2-20220609](https://image.slidesharecdn.com/redhatenterpriselinux9-240713030337-3ff2819f/85/Red-Hat-Enterprise-Linux-Administration-9-0-RH134-pdf-430-320.jpg)
![Chapter 12 | Comprehensive Review
[podmgr@serverb ~]$ mkdir -p ~/.config/systemd/user/
5.2. Create the systemd unit file for the db-app01 container, and move the unit file to the
~/.config/systemd/user/ directory.
[podmgr@serverb ~]$ podman generate systemd --name db-app01 --files
/home/podmgr/container-db-app01.service
[podmgr@serverb ~]$ mv container-db-app01.service ~/.config/systemd/user/
5.3. Stop the db-app01 container.
[podmgr@serverb ~]$ podman stop db-app01
db-app01
[podmgr@serverb ~]$ podman ps -a
CONTAINER ID IMAGE COMMAND CREATED
STATUS PORTS NAMES
ba398d080e00 registry.lab.example.com/rhel8/mariadb-103:1-86 run-mysqld About
an hour ago Exited (0) 3 seconds ago 0.0.0.0:13306->3306/tcp db-app01
5.4. Reload the user systemd service to use the new service unit.
[podmgr@serverb ~]$ systemctl --user daemon-reload
5.5. Start and enable the systemd unit for the db-app01 container.
[podmgr@serverb ~]$ systemctl --user enable --now container-db-app01
Created symlink /home/podmgr/.config/systemd/user/default.target.wants/container-
db-app01.service → /home/podmgr/.config/systemd/user/container-db-app01.service.
[podmgr@serverb ~]$ systemctl --user status container-db-app01
● container-db-app01.service - Podman container-db-app01.service
Loaded: loaded (/home/podmgr/.config/systemd/user/container-db-app01.service;
disabled; vendor preset: disabled)
Active: active (running) since Tue 2022-05-10 22:16:23 EDT; 7s ago
...output omitted...
[podmgr@serverb ~]$ podman ps -a
CONTAINER ID IMAGE COMMAND CREATED
STATUS PORTS NAMES
ba398d080e00 registry.lab.example.com/rhel8/mariadb-103:1-86 run-mysqld 59
seconds ago Up About a minute ago 0.0.0.0:13306->3306/tcp db-app01
5.6. Use the loginctl command to configure the db-app01 container to start at system
boot.
[podmgr@serverb ~]$ loginctl enable-linger
6. Copy the /home/podmgr/db-dev/inventory.sql script into the /tmp directory of
the db-app01 container, and execute it inside the container. If you executed the script
locally, then you would use the mysql -u root inventory < /tmp/inventory.sql
command.
RH134-RHEL9.0-en-2-20220609 413](https://image.slidesharecdn.com/redhatenterpriselinux9-240713030337-3ff2819f/85/Red-Hat-Enterprise-Linux-Administration-9-0-RH134-pdf-431-320.jpg)
![Chapter 12 | Comprehensive Review
6.1. Copy the /home/podmgr/db-dev/inventory.sql script into the /tmp directory of
the db-app01 container.
[podmgr@serverb ~]$ podman cp /home/podmgr/db-dev/inventory.sql
db-app01:/tmp/inventory.sql
6.2. Execute the inventory.sql script in the db-app01 container.
[podmgr@serverb ~]$ podman exec -it db-app01 sh -c 'mysql -u root inventory
< /tmp/inventory.sql'
7. Use the container file in the /home/podmgr/http-dev directory to create the http-
app01 detached container in the production network. The container image name must be
http-client with the 9.0 tag. Map the 8080 port on the local machine to the 8080 port
in the container.
7.1. Create the http-client:9.0 image with the container file in the /home/podmgr/
http-dev directory.
[podmgr@serverb ~]$ podman build -t http-client:9.0 http-dev/
STEP 1/7: FROM registry.lab.example.com/rhel8/php-74:1-63
...output omitted...
7.2. Create the http-app01 detached container in the production network. Map the
8080 port from the local machine to the 8080 port in the container.
[podmgr@serverb ~]$ podman run -d --name http-app01
--network production -p 8080:8080 localhost/http-client:9.0
[podmgr@serverb ~]$ podman ps -a
CONTAINER ID IMAGE COMMAND CREATED
STATUS PORTS NAMES
ba398d080e00 registry.lab.example.com/rhel8/mariadb-103:1-86 run-mysqld 20
minutes ago Up 20 seconds ago 0.0.0.0:13306->3306/tcp db-app01
ee424df19621 localhost/http-client:9.0 /bin/sh -c 4
seconds ago Up 4 seconds ago 0.0.0.0:8080->8080/tcp http-app01
8. Query the content of the http-app01 container. Verify that it shows the container name of
the client and that the status of the database is up.
8.1. Verify that the http-app01 container responds to http requests.
[podmgr@serverb ~]$ curl 127.0.0.1:8080
This is the server http-app01 and the database is up
9. Return to the workstation machine as the student user.
[podmgr@serverb ~]$ exit
logout
Connection to serverb closed.
[student@workstation ~]$
414 RH134-RHEL9.0-en-2-20220609](https://image.slidesharecdn.com/redhatenterpriselinux9-240713030337-3ff2819f/85/Red-Hat-Enterprise-Linux-Administration-9-0-RH134-pdf-432-320.jpg)
![Chapter 12 | Comprehensive Review
Evaluation
As the student user on the workstation machine, use the lab command to grade your work.
Correct any reported failures and rerun the command until successful.
[student@workstation ~]$ lab grade rhcsa-compreview4
Finish
On the workstation machine, change to the student user home directory and use the lab
command to complete this exercise. This step is important to ensure that resources from previous
exercises do not impact upcoming exercises.
[student@workstation ~]$ lab finish rhcsa-compreview4
This concludes the section.
RH134-RHEL9.0-en-2-20220609 415](https://image.slidesharecdn.com/redhatenterpriselinux9-240713030337-3ff2819f/85/Red-Hat-Enterprise-Linux-Administration-9-0-RH134-pdf-433-320.jpg)