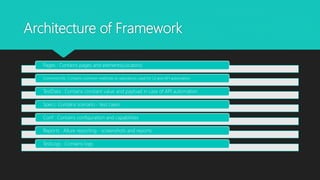
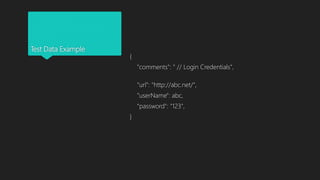
Protractor
By: Syed Shadab Gilani
Introduction
 Protractor, formally known as E2E testing framework, is an open source functional automation framework designed
specifically for AngularJS web applications. It was introduced during AngularJS 1.2 as a replacement of the existing E2E
testing framework. The Protractor automation tool is also recommended by AngularJS for scenario testing.
 For an angular app functional automation framework to automate the UI and functionality of the web application, we zeroed
in on the Protractor automation tool.
Features
 Built on the top of WebdriverJS and Selenium server
 Introduced new simple syntax to write tests
 Allows running tests targeting remote addresses
 Can take advantage of Selenium grid to run multiple browsers at once
 Can use Jasmine or Mocha to write test suites
Benefits
 Protractor is a wrapper (built on the top) around Selenium WebDriver, so it contains every feature that is available in the
Selenium WebDriver. Additionally, Protractor provides some new locator strategies and functions which are very helpful to
automate the AngularJS application. Examples include things like: waitForAngular, By.binding, By.repeater, By.textarea,
By.model, WebElement.all, WebElement.evaluate, etc.
Installation
Pre Requisite:
 Download and install NodeJS. http://nodejs.org/download/. After installation make sure its path is configured correctly, so
that command execution can find Node.
Installation…
 Open the command prompt and type in the following command to install protractor globally.
- npm install –g protractor
 Install Protractor Locally
You can install protractor locally in your project directory. Go to your project directory and type in the following command in the command
prompt:
- npm install protractor
 Verify Installation
To verify your installation, please type in the command
- Protractor –version
 If Protractor is installed successfully then the system will display the installed version. Otherwise you will have to recheck the installation.
 If you don’t have the Selenium server on your machine, then download the latest version onto your machine. If you want to run tests on different
browsers, then please download the respective drivers as well. For example, Chrome driver will come in handy to run tests on the Chrome browser.
Architecture of Framework
Pages : Contains pages and elements(Locators)
CommonUtils: Contains common methods or operations used for UI and API automation
TestData : Contains constant value and payload in case of API automation
Specs: Contains scenario - test cases
Conf : Contains configuration and capabilities
Reports : Allure reporting - screenshots and reports
TestLogs : Contains logs
Pages Example
"use strict";
//Importing required files
var data = require('../TestData/TestData.json');
var commonCode = require('../CommonUtils/CommonCode.js')
var elementsPage = require('../CommonUtils/ElementsPage.js');
var log4js = require('log4js');
var logger = log4js.getLogger();
var XYZPage = function () {
var EC = protractor.ExpectedConditions;
// Login to the application
this.loginInToTheApplication = async function (userNameElement,userName,passwordElement, password) {
try {
commonCode.wait_tillVisible(elementsPage.adminEmailTextbox);
commonCode.sendDataToTextBox(userNameElement,userName);
commonCode.sendDataToTextBox(passwordElement, password);
commonCode.clickAction(elementsPage.loginButton);
commonCode.wait_tillVisible(elementsPage.someTitle);
expect(elementsPage.someTitle.isDisplayed()).toBe(true);
} catch (e) {
logger.error('Error while Logging in to the application' + e.message);
}
};
};
module.exports = new XYZPage();
It is used for UI automation.
Common Code Example
// To perform Click operation
this.clickAction = async function (element) {
try {
this.wait_tillClickable(element);
this.highlightElement(element);
element.click();
} catch (e) {
logger.error('Error while clicking on the web element' +
e.message);
}
};
For UI
Common Code Example
// Get method with cookie
this.getMethodWithCookie = async function (IP, PATH,
COOKIE) {
const expect = chai.expect;
const chaiHttp1 = chai.request(IP);
const response = await chaiHttp1.get(PATH).set(COOKIE);
return response;
};
For API
Elements File Example
"use strict";
var ElementsPage = function () {
//landingPage
this.xyz_button = element.all(by.css('input[value*="xyz"]')).get(0);
this.emailTextbox = element(by.css('input[placeholder*="E-mail
Address"]'));
this.passwordTextbox = element(by.css('input[placeholder*="Password"]'));
this.loginButton = element(by.css('button[class*="btn-login-btn"]'));
};
module.exports = new ElementsPage();
Test Data Example
{
"comments": " // Login Credentials",
“url": "http://abc.net/",
”userName": abc,
“password": "123",
}
Specs File Example
"use strict";
//Importing required files
var data = require('../TestData/TestData.json');
var commonCode = require('../CommonUtils/CommonCode.js')
var elementsPage = require('../CommonUtils/ElementsPage.js');
var landingPage = require('../Pages/LandingPage.js');
//* Login scenario for XYZ automation
describe("Login for XYZ - ", function () {
beforeAll(function () {
commonCode.appInitialization(data["url"]);
});
it("Login to the portal", async function () {
abcPage.loginInToTheApplication(elementsPage.emailTextbox,data["username"],elementsPage.passwordTextbox,data
["password"]);
});
});
For UI
Specs File Example
"use strict";
// Importing necessary plugins and required files
var chai = require('chai'),
chaiHttp = require('chai-http');
chai.use(chaiHttp);
var data = require('../TestData/TestData.json');
var commonCode = require('../CommonUtils/CommonCode.js')
var elementsPage = require('../CommonUtils/ElementsPage.js');
// Sample API scenarios
describe("Sample Api test cases - ", function () {
beforeAll(function () {
commonCode.appInitialization(data["adminURL"]);
commonCode.getCookie();
browser.sleep(10000);
});
// Get method with cookie sample
it("GET method with cookie", async function () {
const expect = chai.expect;
await commonCode.getMethodWithCookie(IP, Path, global.cookie).then(function (response) {
console.log(JSON.stringify(response));
console.log(response.status);
console.log(JSON.stringify(response.body));
global.DataOne = response.body.dataOne;
console.log('dataOne : ', response.body.dataOne);
expect(response).to.have.status(data.successStatusCode);
});
});
});
For API
Conf File Example
"use strict";
const log4js = require('log4js');
log4js.configure({
appenders: {
everything: {
type: 'file',
filename:
'testLogs/Execution_Logs_Consolidated.log',
maxLogSize: 10485760,
backups: 3,
compress: true
}
},
categories: {
default: {
appenders: ['everything'],
level: 'debug'
}
}
});
exports.config = {
// Browser use
capabilities: {
'browserName': 'chrome',
//'chromeOptions': {
//'args': ["no-sandbox", "--headless", "--disable-gpu",
"--window-size=800x600"]
//}
},
// Framework selection
framework: 'jasmine2',
// Executing a single test case - "protractor Config.js"
specs: ['./Specs/SampleSpecs.js'],
// Executing suite - "protractor Config.js --suite
spec1,spec2"
suites: {
spec1: [
'Specs/FirstSpecs.js'
],
spec2: [
'Specs/SecondSpecs.js'
]
},
Conf File Example
jasmineNodeOpts: {
showColors: true,
defaultTimeoutInterval: 400000,
isVerbose: true,
includeStackTrace: true
},
onPrepare: function () {
var AllureReporter = require('jasmine-allure-reporter');
jasmine.getEnv().addReporter(new AllureReporter({
allureReport: {
resultsDir: 'allure-results'
}
}));
jasmine.getEnv().afterEach(function (done) {
browser.takeScreenshot().then(function (png) {
allure.createAttachment('Screenshot', function () {
return new Buffer(png, 'base64');
}, 'image/png')();
done();
});
});
}
};
Allure Reporting
 For Windows, Allure is available from the Scoop commandline-installer.
 To install Allure, download and install Scoop and then execute in the Powershell:
- scoop install allure
 Also Scoop is capable of updating Allure distribution installations. To do so navigate to the Scoop installation directory and
execute
 bincheckver.ps1 allure -u
 This will check for newer versions of Allure, and update the manifest file. Then execute
- scoop update allure
Alternate commands….
 Using Allure Command Line Tool
 Add the allure-commandline dependency in your current project by running the below command.
- npm install allure-commandline --save-dev
Some Useful NPM commands
 Installing node modules : npm install
 Downgrade npm to specific version: npm install –g npm@2
 Check npm version: npm –version
 Install package locally: npm install package_name
 Install package locally and make an entry in package.json as dependency : npm install package_name --save
 List installed packages: npm ls
 Update npm: npm update
 Clean npm cache: npm cache clean –f
………….
Protractor framework architecture with example

Protractor framework architecture with example

  • 1.
  • 2.
    Introduction  Protractor, formallyknown as E2E testing framework, is an open source functional automation framework designed specifically for AngularJS web applications. It was introduced during AngularJS 1.2 as a replacement of the existing E2E testing framework. The Protractor automation tool is also recommended by AngularJS for scenario testing.  For an angular app functional automation framework to automate the UI and functionality of the web application, we zeroed in on the Protractor automation tool.
  • 3.
    Features  Built onthe top of WebdriverJS and Selenium server  Introduced new simple syntax to write tests  Allows running tests targeting remote addresses  Can take advantage of Selenium grid to run multiple browsers at once  Can use Jasmine or Mocha to write test suites
  • 4.
    Benefits  Protractor isa wrapper (built on the top) around Selenium WebDriver, so it contains every feature that is available in the Selenium WebDriver. Additionally, Protractor provides some new locator strategies and functions which are very helpful to automate the AngularJS application. Examples include things like: waitForAngular, By.binding, By.repeater, By.textarea, By.model, WebElement.all, WebElement.evaluate, etc.
  • 5.
    Installation Pre Requisite:  Downloadand install NodeJS. http://nodejs.org/download/. After installation make sure its path is configured correctly, so that command execution can find Node.
  • 6.
    Installation…  Open thecommand prompt and type in the following command to install protractor globally. - npm install –g protractor  Install Protractor Locally You can install protractor locally in your project directory. Go to your project directory and type in the following command in the command prompt: - npm install protractor  Verify Installation To verify your installation, please type in the command - Protractor –version  If Protractor is installed successfully then the system will display the installed version. Otherwise you will have to recheck the installation.  If you don’t have the Selenium server on your machine, then download the latest version onto your machine. If you want to run tests on different browsers, then please download the respective drivers as well. For example, Chrome driver will come in handy to run tests on the Chrome browser.
  • 7.
    Architecture of Framework Pages: Contains pages and elements(Locators) CommonUtils: Contains common methods or operations used for UI and API automation TestData : Contains constant value and payload in case of API automation Specs: Contains scenario - test cases Conf : Contains configuration and capabilities Reports : Allure reporting - screenshots and reports TestLogs : Contains logs
  • 8.
    Pages Example "use strict"; //Importingrequired files var data = require('../TestData/TestData.json'); var commonCode = require('../CommonUtils/CommonCode.js') var elementsPage = require('../CommonUtils/ElementsPage.js'); var log4js = require('log4js'); var logger = log4js.getLogger(); var XYZPage = function () { var EC = protractor.ExpectedConditions; // Login to the application this.loginInToTheApplication = async function (userNameElement,userName,passwordElement, password) { try { commonCode.wait_tillVisible(elementsPage.adminEmailTextbox); commonCode.sendDataToTextBox(userNameElement,userName); commonCode.sendDataToTextBox(passwordElement, password); commonCode.clickAction(elementsPage.loginButton); commonCode.wait_tillVisible(elementsPage.someTitle); expect(elementsPage.someTitle.isDisplayed()).toBe(true); } catch (e) { logger.error('Error while Logging in to the application' + e.message); } }; }; module.exports = new XYZPage(); It is used for UI automation.
  • 9.
    Common Code Example //To perform Click operation this.clickAction = async function (element) { try { this.wait_tillClickable(element); this.highlightElement(element); element.click(); } catch (e) { logger.error('Error while clicking on the web element' + e.message); } }; For UI
  • 10.
    Common Code Example //Get method with cookie this.getMethodWithCookie = async function (IP, PATH, COOKIE) { const expect = chai.expect; const chaiHttp1 = chai.request(IP); const response = await chaiHttp1.get(PATH).set(COOKIE); return response; }; For API
  • 11.
    Elements File Example "usestrict"; var ElementsPage = function () { //landingPage this.xyz_button = element.all(by.css('input[value*="xyz"]')).get(0); this.emailTextbox = element(by.css('input[placeholder*="E-mail Address"]')); this.passwordTextbox = element(by.css('input[placeholder*="Password"]')); this.loginButton = element(by.css('button[class*="btn-login-btn"]')); }; module.exports = new ElementsPage();
  • 12.
    Test Data Example { "comments":" // Login Credentials", “url": "http://abc.net/", ”userName": abc, “password": "123", }
  • 13.
    Specs File Example "usestrict"; //Importing required files var data = require('../TestData/TestData.json'); var commonCode = require('../CommonUtils/CommonCode.js') var elementsPage = require('../CommonUtils/ElementsPage.js'); var landingPage = require('../Pages/LandingPage.js'); //* Login scenario for XYZ automation describe("Login for XYZ - ", function () { beforeAll(function () { commonCode.appInitialization(data["url"]); }); it("Login to the portal", async function () { abcPage.loginInToTheApplication(elementsPage.emailTextbox,data["username"],elementsPage.passwordTextbox,data ["password"]); }); }); For UI
  • 14.
    Specs File Example "usestrict"; // Importing necessary plugins and required files var chai = require('chai'), chaiHttp = require('chai-http'); chai.use(chaiHttp); var data = require('../TestData/TestData.json'); var commonCode = require('../CommonUtils/CommonCode.js') var elementsPage = require('../CommonUtils/ElementsPage.js'); // Sample API scenarios describe("Sample Api test cases - ", function () { beforeAll(function () { commonCode.appInitialization(data["adminURL"]); commonCode.getCookie(); browser.sleep(10000); }); // Get method with cookie sample it("GET method with cookie", async function () { const expect = chai.expect; await commonCode.getMethodWithCookie(IP, Path, global.cookie).then(function (response) { console.log(JSON.stringify(response)); console.log(response.status); console.log(JSON.stringify(response.body)); global.DataOne = response.body.dataOne; console.log('dataOne : ', response.body.dataOne); expect(response).to.have.status(data.successStatusCode); }); }); }); For API
  • 15.
    Conf File Example "usestrict"; const log4js = require('log4js'); log4js.configure({ appenders: { everything: { type: 'file', filename: 'testLogs/Execution_Logs_Consolidated.log', maxLogSize: 10485760, backups: 3, compress: true } }, categories: { default: { appenders: ['everything'], level: 'debug' } } }); exports.config = { // Browser use capabilities: { 'browserName': 'chrome', //'chromeOptions': { //'args': ["no-sandbox", "--headless", "--disable-gpu", "--window-size=800x600"] //} }, // Framework selection framework: 'jasmine2', // Executing a single test case - "protractor Config.js" specs: ['./Specs/SampleSpecs.js'], // Executing suite - "protractor Config.js --suite spec1,spec2" suites: { spec1: [ 'Specs/FirstSpecs.js' ], spec2: [ 'Specs/SecondSpecs.js' ] },
  • 16.
    Conf File Example jasmineNodeOpts:{ showColors: true, defaultTimeoutInterval: 400000, isVerbose: true, includeStackTrace: true }, onPrepare: function () { var AllureReporter = require('jasmine-allure-reporter'); jasmine.getEnv().addReporter(new AllureReporter({ allureReport: { resultsDir: 'allure-results' } })); jasmine.getEnv().afterEach(function (done) { browser.takeScreenshot().then(function (png) { allure.createAttachment('Screenshot', function () { return new Buffer(png, 'base64'); }, 'image/png')(); done(); }); }); } };
  • 17.
    Allure Reporting  ForWindows, Allure is available from the Scoop commandline-installer.  To install Allure, download and install Scoop and then execute in the Powershell: - scoop install allure  Also Scoop is capable of updating Allure distribution installations. To do so navigate to the Scoop installation directory and execute  bincheckver.ps1 allure -u  This will check for newer versions of Allure, and update the manifest file. Then execute - scoop update allure
  • 18.
    Alternate commands….  UsingAllure Command Line Tool  Add the allure-commandline dependency in your current project by running the below command. - npm install allure-commandline --save-dev
  • 19.
    Some Useful NPMcommands  Installing node modules : npm install  Downgrade npm to specific version: npm install –g npm@2  Check npm version: npm –version  Install package locally: npm install package_name  Install package locally and make an entry in package.json as dependency : npm install package_name --save  List installed packages: npm ls  Update npm: npm update  Clean npm cache: npm cache clean –f ………….