The document discusses the basic concepts for drawing orthographic projections of points, lines, planes and solids. It provides information on the necessary components for drawing projections, including the object, observer location and position of the object relative to the horizontal and vertical planes. It then examines different cases for projecting points and lines, showing how their front, top and side views change based on the object's location in one of the four quadrants formed by the planes. Diagrams illustrate the projected views and how they are drawn on the orthographic planes.
The document discusses the basic concepts for drawing orthographic projections of points, lines, planes and solids. It provides instructions on the information needed about the object and its location in relation to the observer and reference planes. Point projections always have the front and top views lying in the same vertical line. The position of the views indicates whether the point is above, below or in the reference planes. Line projections show the true length, orientations and inclinations to the planes. Simple cases of vertical, parallel and inclined lines are illustrated with their front and top views. Plane and solid projections are constructed by projecting their constituent points and lines.
The document discusses the basic concepts for drawing orthographic projections of points, lines, planes and solids. It explains that to draw projections, one needs information about the object, observer and location of the object. Projections of a point always have the front view (FV) and top view (TV) in the same vertical line. The position of FV and TV indicate whether the point is above, below or in the reference planes. Simple cases of projecting straight lines include vertical lines, lines parallel to reference planes and lines inclined to the planes. Illustrations demonstrate how the nature of FV and TV changes based on the line's orientation.
Let me solve this step-by-step:
1) A is in HP and 12mm in front of VP. So mark a at 12mm below XY line.
2) TL of AB is 90mm. Draw a line making an angle of 45° with XY line. This will be the TV of AB. Let it measure b1a.
3) Given true inclination (θ) of AB with HP is 45°. So TV gives the true length.
4) True inclination (Ø) of AB with VP is to be found. We know, inclination of TV (β) with VP is 60°.
5) Apply tan(β) = Projected length/True length
tan(60
Okay, let's solve this step-by-step:
* Given: Length of line AB (TL) = 90mm
θ (inclination with HP) = 45°
TV makes an angle of 60° with VP
* To find: Inclinations with planes (θ, Ø), projections of line AB
* Since θ is given as 45°, draw FV making an angle of 45° with XY line.
* TV makes an angle of 60° with VP. So draw TV making an angle of 60° with XY line.
* TV gives the length of TL when it is parallel to XY line. So TL = 90mm.
* This gives the projections of line AB.
This document discusses engineering drawings and orthographic projections. It defines engineering drawings as drawings made by engineers using engineering tools, concepts and principles for engineering applications. It then explains orthographic projections as a way to represent 3D objects in 2D using multiple views. It outlines the principal planes of projection, principal views, positioning of objects in different quadrants, and conventions for first angle and third angle projections.
The document describes the process of orthographic projections to draw 2D projections of 3D objects. It defines key terms like object, observer, horizontal plane, vertical plane and the four quadrants formed. It explains how to draw front, top and side views of points and lines placed in different quadrants, and how the views are affected. It provides notations for labeling different views. It then describes in detail the process to draw projections of straight lines placed in different positions, including obtaining their true lengths and inclinations when only limited data is available from the views. Pictorial diagrams are also provided to visualize each case.
1) Drawings provide a better understanding of the shape, size, and appearance of objects compared to verbal or written descriptions, and have become an important communication tool across many fields.
2) There are different types of drawings including nature drawings, maps, botanical drawings, portraits, and engineering drawings.
3) Orthographic projections are a type of technical drawing that projects different views of an object onto planes perpendicular to the view, with the views including a front, top, and side view.
1. A plane is a two-dimensional geometrical entity with length and width but no thickness. For practical purposes, a flat face of an object may be treated as a plane.
2. When projecting a plane, its shape, inclination to reference planes, and the inclination of edges are given. Planes can be parallel or inclined to one or both reference planes.
3. This document provides examples of projecting rectangular and pentagonal planes in different positions relative to the reference planes. The examples demonstrate determining the true shape view and projecting points for planes oriented parallel or inclined to the horizontal and vertical planes.
The document discusses the orientation and projections of points in solid geometry. It covers 9 different positions that a point can occupy in three-dimensional space relative to the horizontal and vertical planes. For each position, it shows the three-dimensional orientation of the point and its two-dimensional front and top projections, indicating whether it is above or below the x- and y-axes.
Drawings provide a better understanding of objects than verbal or written descriptions by depicting the shape, size, and appearance in less time. Drawings have become an important communication medium in engineering and other fields. There are different types of drawings like portraits, nature drawings, maps, botanical drawings, zoological drawings, and engineering drawings which use techniques like orthographic projections, isometric views, and perspective views. Orthographic projections project different views of an object onto reference planes to show the front, top, and side views.
Drawings provide a better understanding of objects than verbal or written descriptions by depicting the shape, size, and appearance in less time. Drawings have become an important communication medium in engineering and other fields. Some common types of drawings include portraits, nature drawings, maps, botanical drawings, zoological drawings, and engineering drawings using techniques like orthographic projections, isometric views, and perspectives. Orthographic projections show different views of an object projected onto reference planes, with front, top, and side views created by observing perpendicular to the respective planes.
For case (a): The plane makes an angle of 30° with the H.P.
For case (b): The plane makes an angle of 60° with the H.P.
In both cases, the hexagonal plate of 40mm size is shown with one corner on the H.P. and the diagonal through that corner inclined at 30° to the H.P. and V.P.
Orthographic projections are a method of technical drawing where different views of an object are projected onto horizontal, vertical, and side reference planes. The front view is projected onto the vertical plane, the top view onto the horizontal plane, and the side view onto the side plane. Important aspects include the reference planes, pattern of views, and methods for drawing the projections. Drawings provide front, top, and side views to allow constructing the 3D isometric view of an object.
1. The problem involves projecting the views of a circular plate that appears as an ellipse in its front view.
2. The front view ellipse has a major axis of 50 mm and minor axis of 30 mm, with the major axis horizontal.
3. To draw the top view, the circular plate must be inclined such that the ellipse major axis in the front view is horizontal.
4. The top view will then show a true circle of 50 mm diameter, while the front view ellipse dimensions remain the same.
This document provides instructions and examples for drawing orthographic projections of points and lines. It begins by establishing conventions for labeling different views, such as using primes (') to denote top views. It then demonstrates how to draw the front, top, and side views of a point A placed in different quadrants. Additional concepts covered include drawing projections of various types of lines, such as vertical, horizontal, and angled lines. The document presents numerous problems showing how to determine projections, true lengths, and angles based on information provided about the point or line. It emphasizes important parameters to remember when drawing projections, such as true length, angles with planes, and view lengths. Finally, it defines the term "trace" as the point where
This document provides lecture notes on orthographic projections of points and lines. It begins by outlining the key information needed to draw projections, including the object, observer, and object location. It then discusses the four quadrants formed by the horizontal and vertical planes and how an object's placement affects its front and top views. Various examples of point and line projections are shown, including the effects of an object's placement in different quadrants. Key concepts like true length, front, top, and side views are defined. The document concludes with example problems demonstrating how to draw orthographic projections of lines given information like lengths, angles and end point positions.
1. Drawings provide a better understanding of an object's shape, size, and appearance compared to verbal or written descriptions, and can communicate information quickly.
2. There are many types of drawings, including engineering drawings, botanical drawings, portraits, and orthographic projections.
3. Orthographic projections show different views of an object projected onto planes perpendicular to the view. The main views are the front, top, and side views projected onto vertical, horizontal, and profile planes.
Orthographic projections are a technical drawing method that projects views of an object onto planes. There are three principal planes - the horizontal plane, vertical frontal plane, and profile plane. Views are the front view projected on the vertical plane, top view on the horizontal plane, and side view on the profile plane. There are two common methods for orthographic projections - first angle and third angle projection.
Drawings provide a better understanding of objects than verbal or written descriptions by depicting shape, size, and appearance in less time. Drawings have become an important communication medium in engineering and other fields. There are different types of drawings like portraits, nature drawings, maps, botanical drawings, zoological drawings, and engineering drawings which use techniques like orthographic projections, isometric views, and perspectives. Orthographic projections project different views of an object onto reference planes using front, top, and side views. There are first angle and third angle methods for orthographic projections.
The document discusses the basics of engineering graphics and orthographic projections of points. It provides:
1) The key information needed to draw projections of any object, including a description of the object, observer, and location of the object relative to reference planes.
2) How objects can be placed in one of four quadrants defined by the horizontal and vertical planes, and how the front and top views are affected.
3) Notations used to name different views in orthographic projections, using the example of point A.
4) Illustrations of the orthographic projections of point A placed in different quadrants, showing how its front and top views are drawn relative to the reference planes.
The document provides instructions for drawing orthographic projections of points, lines, planes and solids. It defines key terms and concepts needed such as quadrants, front view (FV), top view (TV), horizontal plane (HP) and vertical plane (VP). Examples are given of drawing the projections of a point and straight lines in different positions, including when they are inclined to the HP and/or VP. Methods are outlined for determining true length, angles and orientations based on the given views. Notations and a diagram of relationships between important parameters are also explained.
For those students who start there career in technical line like ITI, Diploma, Engineering of any field this ppt is helpful for them to understand the Engineering Drawing and Its Basic concepts of Orthographics Projection with very good images.
This document provides instructions for drawing orthographic projections of points, lines, planes and solids. It explains key concepts like quadrants, front view (FV), top view (TV), true length, inclination angles and more. Examples are given of drawing projections of a point and various types of lines (vertical, parallel, inclined) placed in different quadrants. The document establishes important parameters and notation for solving projection problems, including true length, angles of inclination, view lengths and positions of endpoints. Sample problems are worked through applying these concepts and parameters to draw projections when given information like dimensions, inclinations and endpoint positions.
The document provides instructions for drawing orthographic projections of points and lines. It defines key terms and concepts used in orthographic projections including quadrants, front view (FV), top view (TV), horizontal plane (HP), and vertical plane (VP). Examples are given of drawing the projections of a point located in different quadrants, as well as different types of lines, such as vertical, parallel, and inclined lines. Guidelines are provided for determining the FV and TV based on whether the object is above or below the HP and in front of or behind the VP. Methods for finding true lengths, angles, and orientations are also described when only FV and TV are given.
A regular hexagon with 25mm sides has one side lying in the horizontal plane and inclined at 60 degrees to the vertical plane. The surface of the hexagon is inclined at 45 degrees to the horizontal plane. To show the true shape, the vertical plane view will show the hexagon with one side vertical and the other sides projected accordingly. The initial position should assume the plane is parallel to the horizontal plane.
1. The document discusses the projection of points and their views in different quadrants formed by the horizontal and vertical planes.
2. Key details include how the top view and front view of a point change depending on whether it is above or below the planes, and in front of or behind the vertical plane.
3. Examples are given of points located in each quadrant and their corresponding projections.
This document provides an introduction to projections in technical drawing. It explains that 3D objects can be represented in 2D through various projection methods. It defines principal planes (horizontal and vertical planes), auxiliary planes, and different views (front, top, side). It discusses first angle projection method and provides examples of projecting points located in different positions relative to the planes. Key terms are defined for drawing point projections, such as notation for different views and how the front and top views of a point are drawn based on its position above, below, or in the principal planes. Sample exercises are given to practice projecting points in different locations.
The document provides information and instructions for drawing orthographic projections of points, lines, planes, and solids. It discusses the key elements needed, including a description of the object, observer location, and object placement relative to the horizontal and vertical planes. Guidelines are given for naming different views in projections using notations like a, a', and a" for the top, front, and side views of a point A. Examples are presented of drawing the projections of a point placed in different quadrants and of lines with different orientations. Methods are described for determining the true length and true inclinations to the planes when given the projections or when given other properties like the true length, inclinations, and object placement.
projection of straight line and point in engineering drawind Deena nath singh
The document provides instructions for drawing orthographic projections of points, lines, and basic solids. It explains that to draw projections, you need information about the object, observer, and object location. Points are used as simple examples, with their front, top, and side views explained. Guidelines are provided for naming different views and standard notations. Projections are demonstrated for a point placed in each of the four quadrants formed by the horizontal and vertical planes. Methods for drawing projections of lines are described, including vertical lines, lines parallel to both planes, and lines at various angles to the planes. Trapezoidal and rotational methods are explained for determining true lengths and angles from given projections.
The problem provides the top view, front view and position of one end of a line AB. The top view measures 65mm, the front view measures 50mm, and end A is in the horizontal plane and 12mm in front of the vertical plane. To solve the problem:
1) Draw the top view parallel to the XY line since in that case the front view will show the true length.
2) Extend the top view to determine the true length of 75mm.
3) Use trapezoidal method to determine the inclinations of the line with the principal planes as 30 degrees with the horizontal plane and 48 degrees with the vertical plane.
1. Drawings provide a better understanding of objects than verbal or written descriptions by conveying shape, size, and appearance in less time. As a result, drawings have become an important communication method in fields like engineering.
2. Orthographic projections are a technical drawing method that projects different views of an object onto horizontal, vertical, and profile reference planes while observing each plane perpendicularly. The front view is projected onto the vertical plane, the top view onto the horizontal plane, and the side view onto the profile plane.
3. There are two common methods for orthographic projections - first angle and third angle. In first angle, views are drawn with the object in the first quadrant above and in front of
The document provides instructions for projecting plane figures by describing their position relative to the horizontal and vertical planes. It explains that problems will give the plane figure and its inclination to the planes. The document outlines the 3 step process: 1) assume initial position, 2) consider surface inclination, 3) consider side/edge inclination. Examples are given of different inclinations and the steps are applied to sample problems.
This is Mechnicial Engineering's subjrct technicial drawing slides
topic name is Projection of lines.
this would help you in how you draw front side and top view of a line.
This document provides instructions for drawing orthographic projections of points, lines, planes and solids. It explains key concepts like quadrants, front view (FV), top view (TV), true length, inclination angles and more. Examples are given of drawing projections of a point and various types of lines (vertical, parallel, inclined) placed in different quadrants. The document establishes important parameters and notation for solving projection problems, including true length, angles of inclination, view lengths and positions of endpoints. Sample problems are worked through applying these concepts and parameters to draw projections when given information like dimensions, inclinations and endpoint positions.
The document provides instructions for drawing orthographic projections of points and lines. It defines key terms and concepts used in orthographic projections including quadrants, front view (FV), top view (TV), horizontal plane (HP), and vertical plane (VP). Examples are given of drawing the projections of a point located in different quadrants, as well as different types of lines, such as vertical, parallel, and inclined lines. Guidelines are provided for determining the FV and TV based on whether the object is above or below the HP and in front of or behind the VP. Methods for finding true lengths, angles, and orientations are also described when only FV and TV are given.
The document provides instructions for drawing orthographic projections of points, lines, and solids. It defines key terms like object, observer, horizontal and vertical planes. Points and lines can be placed in four quadrants defined by the horizontal and vertical planes. Front, top, and side views are drawn by projecting the object onto the respective planes. Examples are given of drawing the projections of points and lines in different orientations, as well as procedures for determining true lengths and angles from the projected views.
Drawings provide a better understanding of objects than verbal or written descriptions by depicting shape, size, and appearance in less time. Drawings have become an important communication tool across many fields including engineering. There are different types of technical drawings like orthographic projections which show multiple views of an object projected onto reference planes perpendicular to the view. Orthographic projections include front, top, and side views projected onto vertical, horizontal, and profile planes respectively using first or third angle projection methods.
Gaspar Monge was a French mathematician and revolutionary who lived from 1746 to 1818. He invented descriptive geometry, which is the theoretical basis for technical drawing. During the French Revolution, Monge served as the Minister of the Marine and helped reform the French educational system by founding the École Polytechnique. Descriptive geometry uses projections and planes to represent three-dimensional objects in two dimensions.
TRACES OF LINES IN SPACE USING ORTHOGRAPHIC PROJECTIONSamuelSunbai
The document provides instructions for drawing orthographic projections of points, lines, planes and solids. It defines key terms and concepts used in orthographic projections including object, observer, horizontal and vertical planes, quadrants, front, top and side views. Notations for different views are also defined. Several examples are provided to illustrate how to draw orthographic projections of a point and straight lines placed in different quadrants, and how to determine true lengths, angles and views based on given information about the object. Steps to solve related problems are demonstrated.
The document provides information on orthographic projections including:
- Key terms used in orthographic projections like object, observer, location of object, and quadrants.
- Notations used to label different views of an object.
- Examples of orthographic projections of a point located in different quadrants.
- Basic concepts for drawing projections of a point and straight lines in different orientations.
- Steps to draw projections when given information about the true length, inclinations, and positions of a line.
This document provides information and examples regarding orthographic projections and geometric conventions used in technical drawings.
It begins by defining the notation used to label different views, such as "front view" and "top view". It then demonstrates how to determine which quadrant a point lies in based on its x and y coordinates. Several examples are given of how points are projected onto different planes and quadrants.
The document also covers orthographic projections of lines, planes, and basic solids. It explains how to project points that make up these objects and then join them. Examples are shown of projecting lines with different orientations. Projections of planes at different angles are demonstrated as well.
This document provides information and examples regarding orthographic projections and views of geometric objects:
1) It explains the notation used to label different views, such as "front view" and "top view".
2) It demonstrates how to project a point placed in each of the four quadrants onto the front and top views, including how the views change based on the point's location.
3) Examples are given for projecting lines, planes, and basic geometric solids by first projecting their constituent points and joining them in the views.
projection of points-engineering graphicsSangani Ankur
This document discusses the projection of points and lines in space. It begins by introducing the topic and presenters. It then covers the following:
1. The orientation and projection of points in different quadrants and planes. Various examples are shown with diagrams.
2. The definition and notation used for projecting straight lines, including their true length, front and top views, and inclinations.
3. The different positions of lines in relation to the horizontal and vertical planes, including perpendicular, parallel, and oblique lines. Several examples are shown diagrammatically.
The document discusses the procedure for drawing projections of plane figures. It explains that problems will provide the description and position of the plane figure relative to the horizontal and vertical planes. The position is described by the inclination of the surface to one plane and the inclination of an edge to the other plane. It demonstrates solving problems in three steps: 1) Draw initial projections assuming positions, 2) Draw projections after changing surface inclination, 3) Draw final projections after changing edge inclination. Several example problems are provided and discussed step-by-step.
Similar to Projection of lines(thedirectdata.com) (20)
Projection of lines(new)(thedirectdata.com)Agnivesh Ogale
The line AB is inclined at 40 degrees to the VP. End A is 20mm above the HP and 50mm from the VP. The front view measures 65mm and the vertical trace is 10mm above the HP. To determine:
1) The true length of AB is 65/cos40° = 75mm
2) The inclination to the HP (θ) is 30 degrees
3) The horizontal trace is 10mm above the VP
Section and development(thedirectdata.com)Agnivesh Ogale
1. The solid is composed of half a cone and half a hexagonal pyramid sandwiched together.
2. It is cut by a section plane inclined at 45 degrees to the HP and passing through the midpoint of the axis.
3. The front view, sectional top view, and true shape of the section are drawn showing the cut points.
4. The development of the remaining parts of the half cone and half pyramid are drawn separately, with cut points marked.
Section and development(thedirectdata.com) 1Agnivesh Ogale
1. The solid is composed of half a cone and half a hexagonal pyramid sandwiched together with their bases joined.
2. It is cut by a section plane inclined 45 degrees to the HP and passing through the midpoint of the axis.
3. The front view, sectional top view, and true shape of the section are drawn showing the cut edges.
4. The development of the remaining parts of the half cone and half pyramid are also drawn, with the cut edges marked.
1) Draw an ellipse with a focus at point F and directrix CD where the distance between F and CD is 65mm.
2) Divide the line segment CF into 7 equal parts. Mark the third division from F as point V.
3) The ellipse is drawn through points C, V, and B.
The document describes different types of engineering curves including involutes, cycloids, spirals, and helices. It provides definitions and examples of how to draw each type of curve. Specifically, it explains how to draw an involute by winding a string around a circular pole and marking the path of the free end. It also describes how to draw different types of cycloids by having a small circle roll along a straight or curved path, and marking the location of a point on the circle's perimeter. Methods for drawing spirals and helices are also mentioned.
The document describes different methods for drawing ellipses, parabolas, and hyperbolas which are known as conic sections. These curves are formed by cutting a cone with planes. Ellipses can be drawn using the concentric circle method, rectangle method, oblong method, arcs of circle method, and rhombus method. Examples are given demonstrating how to draw ellipses using each of these techniques. Parabolas and hyperbolas are also defined and their eccentricities described. Methods for drawing tangents and normals to these curves are also mentioned.
A pentagonal prism with a 25mm base and 50mm axis is resting on one of its rectangular faces on the HP. The axis is inclined at 45° to the VP.
1. Assume the prism is standing on the HP. Draw its TV showing the true pentagonal base shape.
2. Draw its FV with the axis vertical and perpendicular to the VP.
3. Incline the axis 45° to the VP. Draw the new inclined FV and project the TV.
The document discusses the steps to solve problems involving the projections of plane geometric figures. It provides 3 key steps: 1) Draw front and top views of the initial position assuming certain surfaces are parallel to reference planes. 2) Draw new front and top views considering surface inclinations. 3) Draw final front and top views accounting for edge inclinations. Examples are given showing the application of these steps to problems involving rectangles, pentagons, hexagons, circles, and other shapes. Guidance is provided on initial assumptions and tracing outlines between views.
Projection of lines(new)(thedirectdata.com)Agnivesh Ogale
A 100mm line PQ is inclined at 30 degrees to the HP and 45 degrees to the VP. Its midpoint M is 20mm above the HP and in the VP. P is in the third quadrant and Q is in the first quadrant. The projections show PQ inclined at 30 degrees to the HP in front view and 45 degrees to the VP in top view, with midpoint M at 20mm above the HP in both views and the ends P and Q in their respective quadrants as given.
In the realm of cybersecurity, offensive security practices act as a critical shield. By simulating real-world attacks in a controlled environment, these techniques expose vulnerabilities before malicious actors can exploit them. This proactive approach allows manufacturers to identify and fix weaknesses, significantly enhancing system security.
This presentation delves into the development of a system designed to mimic Galileo's Open Service signal using software-defined radio (SDR) technology. We'll begin with a foundational overview of both Global Navigation Satellite Systems (GNSS) and the intricacies of digital signal processing.
The presentation culminates in a live demonstration. We'll showcase the manipulation of Galileo's Open Service pilot signal, simulating an attack on various software and hardware systems. This practical demonstration serves to highlight the potential consequences of unaddressed vulnerabilities, emphasizing the importance of offensive security practices in safeguarding critical infrastructure.
Main news related to the CCS TSI 2023 (2023/1695)Jakub Marek
An English 🇬🇧 translation of a presentation to the speech I gave about the main changes brought by CCS TSI 2023 at the biggest Czech conference on Communications and signalling systems on Railways, which was held in Clarion Hotel Olomouc from 7th to 9th November 2023 (konferenceszt.cz). Attended by around 500 participants and 200 on-line followers.
The original Czech 🇨🇿 version of the presentation can be found here: https://www.slideshare.net/slideshow/hlavni-novinky-souvisejici-s-ccs-tsi-2023-2023-1695/269688092 .
The videorecording (in Czech) from the presentation is available here: https://youtu.be/WzjJWm4IyPk?si=SImb06tuXGb30BEH .
Skybuffer SAM4U tool for SAP license adoptionTatiana Kojar
Manage and optimize your license adoption and consumption with SAM4U, an SAP free customer software asset management tool.
SAM4U, an SAP complimentary software asset management tool for customers, delivers a detailed and well-structured overview of license inventory and usage with a user-friendly interface. We offer a hosted, cost-effective, and performance-optimized SAM4U setup in the Skybuffer Cloud environment. You retain ownership of the system and data, while we manage the ABAP 7.58 infrastructure, ensuring fixed Total Cost of Ownership (TCO) and exceptional services through the SAP Fiori interface.
How information systems are built or acquired puts information, which is what they should be about, in a secondary place. Our language adapted accordingly, and we no longer talk about information systems but applications. Applications evolved in a way to break data into diverse fragments, tightly coupled with applications and expensive to integrate. The result is technical debt, which is re-paid by taking even bigger "loans", resulting in an ever-increasing technical debt. Software engineering and procurement practices work in sync with market forces to maintain this trend. This talk demonstrates how natural this situation is. The question is: can something be done to reverse the trend?
Monitoring and Managing Anomaly Detection on OpenShift.pdfTosin Akinosho
Monitoring and Managing Anomaly Detection on OpenShift
Overview
Dive into the world of anomaly detection on edge devices with our comprehensive hands-on tutorial. This SlideShare presentation will guide you through the entire process, from data collection and model training to edge deployment and real-time monitoring. Perfect for those looking to implement robust anomaly detection systems on resource-constrained IoT/edge devices.
Key Topics Covered
1. Introduction to Anomaly Detection
- Understand the fundamentals of anomaly detection and its importance in identifying unusual behavior or failures in systems.
2. Understanding Edge (IoT)
- Learn about edge computing and IoT, and how they enable real-time data processing and decision-making at the source.
3. What is ArgoCD?
- Discover ArgoCD, a declarative, GitOps continuous delivery tool for Kubernetes, and its role in deploying applications on edge devices.
4. Deployment Using ArgoCD for Edge Devices
- Step-by-step guide on deploying anomaly detection models on edge devices using ArgoCD.
5. Introduction to Apache Kafka and S3
- Explore Apache Kafka for real-time data streaming and Amazon S3 for scalable storage solutions.
6. Viewing Kafka Messages in the Data Lake
- Learn how to view and analyze Kafka messages stored in a data lake for better insights.
7. What is Prometheus?
- Get to know Prometheus, an open-source monitoring and alerting toolkit, and its application in monitoring edge devices.
8. Monitoring Application Metrics with Prometheus
- Detailed instructions on setting up Prometheus to monitor the performance and health of your anomaly detection system.
9. What is Camel K?
- Introduction to Camel K, a lightweight integration framework built on Apache Camel, designed for Kubernetes.
10. Configuring Camel K Integrations for Data Pipelines
- Learn how to configure Camel K for seamless data pipeline integrations in your anomaly detection workflow.
11. What is a Jupyter Notebook?
- Overview of Jupyter Notebooks, an open-source web application for creating and sharing documents with live code, equations, visualizations, and narrative text.
12. Jupyter Notebooks with Code Examples
- Hands-on examples and code snippets in Jupyter Notebooks to help you implement and test anomaly detection models.
How to Interpret Trends in the Kalyan Rajdhani Mix Chart.pdfChart Kalyan
A Mix Chart displays historical data of numbers in a graphical or tabular form. The Kalyan Rajdhani Mix Chart specifically shows the results of a sequence of numbers over different periods.
Dandelion Hashtable: beyond billion requests per second on a commodity serverAntonios Katsarakis
This slide deck presents DLHT, a concurrent in-memory hashtable. Despite efforts to optimize hashtables, that go as far as sacrificing core functionality, state-of-the-art designs still incur multiple memory accesses per request and block request processing in three cases. First, most hashtables block while waiting for data to be retrieved from memory. Second, open-addressing designs, which represent the current state-of-the-art, either cannot free index slots on deletes or must block all requests to do so. Third, index resizes block every request until all objects are copied to the new index. Defying folklore wisdom, DLHT forgoes open-addressing and adopts a fully-featured and memory-aware closed-addressing design based on bounded cache-line-chaining. This design offers lock-free index operations and deletes that free slots instantly, (2) completes most requests with a single memory access, (3) utilizes software prefetching to hide memory latencies, and (4) employs a novel non-blocking and parallel resizing. In a commodity server and a memory-resident workload, DLHT surpasses 1.6B requests per second and provides 3.5x (12x) the throughput of the state-of-the-art closed-addressing (open-addressing) resizable hashtable on Gets (Deletes).
High performance Serverless Java on AWS- GoTo Amsterdam 2024Vadym Kazulkin
Java is for many years one of the most popular programming languages, but it used to have hard times in the Serverless community. Java is known for its high cold start times and high memory footprint, comparing to other programming languages like Node.js and Python. In this talk I'll look at the general best practices and techniques we can use to decrease memory consumption, cold start times for Java Serverless development on AWS including GraalVM (Native Image) and AWS own offering SnapStart based on Firecracker microVM snapshot and restore and CRaC (Coordinated Restore at Checkpoint) runtime hooks. I'll also provide a lot of benchmarking on Lambda functions trying out various deployment package sizes, Lambda memory settings, Java compilation options and HTTP (a)synchronous clients and measure their impact on cold and warm start times.
AppSec PNW: Android and iOS Application Security with MobSFAjin Abraham
Mobile Security Framework - MobSF is a free and open source automated mobile application security testing environment designed to help security engineers, researchers, developers, and penetration testers to identify security vulnerabilities, malicious behaviours and privacy concerns in mobile applications using static and dynamic analysis. It supports all the popular mobile application binaries and source code formats built for Android and iOS devices. In addition to automated security assessment, it also offers an interactive testing environment to build and execute scenario based test/fuzz cases against the application.
This talk covers:
Using MobSF for static analysis of mobile applications.
Interactive dynamic security assessment of Android and iOS applications.
Solving Mobile app CTF challenges.
Reverse engineering and runtime analysis of Mobile malware.
How to shift left and integrate MobSF/mobsfscan SAST and DAST in your build pipeline.
Discover top-tier mobile app development services, offering innovative solutions for iOS and Android. Enhance your business with custom, user-friendly mobile applications.
The Microsoft 365 Migration Tutorial For Beginner.pptxoperationspcvita
This presentation will help you understand the power of Microsoft 365. However, we have mentioned every productivity app included in Office 365. Additionally, we have suggested the migration situation related to Office 365 and how we can help you.
You can also read: https://www.systoolsgroup.com/updates/office-365-tenant-to-tenant-migration-step-by-step-complete-guide/
Northern Engraving | Nameplate Manufacturing Process - 2024Northern Engraving
Manufacturing custom quality metal nameplates and badges involves several standard operations. Processes include sheet prep, lithography, screening, coating, punch press and inspection. All decoration is completed in the flat sheet with adhesive and tooling operations following. The possibilities for creating unique durable nameplates are endless. How will you create your brand identity? We can help!
Must Know Postgres Extension for DBA and Developer during MigrationMydbops
Mydbops Opensource Database Meetup 16
Topic: Must-Know PostgreSQL Extensions for Developers and DBAs During Migration
Speaker: Deepak Mahto, Founder of DataCloudGaze Consulting
Date & Time: 8th June | 10 AM - 1 PM IST
Venue: Bangalore International Centre, Bangalore
Abstract: Discover how PostgreSQL extensions can be your secret weapon! This talk explores how key extensions enhance database capabilities and streamline the migration process for users moving from other relational databases like Oracle.
Key Takeaways:
* Learn about crucial extensions like oracle_fdw, pgtt, and pg_audit that ease migration complexities.
* Gain valuable strategies for implementing these extensions in PostgreSQL to achieve license freedom.
* Discover how these key extensions can empower both developers and DBAs during the migration process.
* Don't miss this chance to gain practical knowledge from an industry expert and stay updated on the latest open-source database trends.
Mydbops Managed Services specializes in taking the pain out of database management while optimizing performance. Since 2015, we have been providing top-notch support and assistance for the top three open-source databases: MySQL, MongoDB, and PostgreSQL.
Our team offers a wide range of services, including assistance, support, consulting, 24/7 operations, and expertise in all relevant technologies. We help organizations improve their database's performance, scalability, efficiency, and availability.
Contact us: info@mydbops.com
Visit: https://www.mydbops.com/
Follow us on LinkedIn: https://in.linkedin.com/company/mydbops
For more details and updates, please follow up the below links.
Meetup Page : https://www.meetup.com/mydbops-databa...
Twitter: https://twitter.com/mydbopsofficial
Blogs: https://www.mydbops.com/blog/
Facebook(Meta): https://www.facebook.com/mydbops/
Have you ever been confused by the myriad of choices offered by AWS for hosting a website or an API?
Lambda, Elastic Beanstalk, Lightsail, Amplify, S3 (and more!) can each host websites + APIs. But which one should we choose?
Which one is cheapest? Which one is fastest? Which one will scale to meet our needs?
Join me in this session as we dive into each AWS hosting service to determine which one is best for your scenario and explain why!
Astute Business Solutions | Oracle Cloud Partner |
Projection of lines(thedirectdata.com)
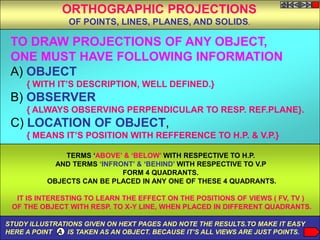
1. ORTHOGRAPHIC PROJECTIONS
OF POINTS, LINES, PLANES, AND SOLIDS.
TO DRAW PROJECTIONS OF ANY OBJECT,
ONE MUST HAVE FOLLOWING INFORMATION
A) OBJECT
{ WITH IT’S DESCRIPTION, WELL DEFINED.}
B) OBSERVER
{ ALWAYS OBSERVING PERPENDICULAR TO RESP. REF.PLANE}.
C) LOCATION OF OBJECT,
{ MEANS IT’S POSITION WITH REFFERENCE TO H.P. & V.P.}
TERMS ‘ABOVE’ & ‘BELOW’ WITH RESPECTIVE TO H.P.
AND TERMS ‘INFRONT’ & ‘BEHIND’ WITH RESPECTIVE TO V.P
FORM 4 QUADRANTS.
OBJECTS CAN BE PLACED IN ANY ONE OF THESE 4 QUADRANTS.
IT IS INTERESTING TO LEARN THE EFFECT ON THE POSITIONS OF VIEWS ( FV, TV )
OF THE OBJECT WITH RESP. TO X-Y LINE, WHEN PLACED IN DIFFERENT QUADRANTS.
STUDY ILLUSTRATIONS GIVEN ON HEXT PAGES AND NOTE THE RESULTS.TO MAKE IT EASY
HERE A POINT A IS TAKEN AS AN OBJECT. BECAUSE IT’S ALL VIEWS ARE JUST POINTS.
2. NOTATIONS
FOLLOWING NOTATIONS SHOULD BE FOLLOWED WHILE NAMEING
DIFFERENT VIEWS IN ORTHOGRAPHIC PROJECTIONS.
OBJECT POINT A LINE AB
IT’S TOP VIEW a ab
IT’S FRONT VIEW a’ a’ b’
IT’S SIDE VIEW a” a” b”
SAME SYSTEM OF NOTATIONS SHOULD BE FOLLOWED
INCASE NUMBERS, LIKE 1, 2, 3 – ARE USED.
3. VP
2nd Quad. 1ST Quad.
Y
Observer
X Y HP
X
3rd Quad. 4th Quad.
THIS QUADRANT PATTERN,
IF OBSERVED ALONG X-Y LINE ( IN RED ARROW DIRECTION)
WILL EXACTLY APPEAR AS SHOWN ON RIGHT SIDE AND HENCE,
IT IS FURTHER USED TO UNDERSTAND ILLUSTRATION PROPERLLY.
4. Point A is POINT A IN VP POINT A IN
Placed In 2ND QUADRANT 1ST QUADRANT
VP a’
different A A
quadrants a’
and it’s Fv & Tv a
are brought in
same plane for HP OBSERVER
Observer to see
clearly. HP OBSERVER
Fv is visible as
it is a view on
VP. But as Tv is a
is a view on Hp,
it is rotated
downward 900,
In clockwise
direction.The
In front part of a
Hp comes below
xy line and the
part behind Vp HP
comes above. HP OBSERVER
OBSERVER
Observe and
note the a
process. a’
A a’
POINT A IN A POINT A IN
3RD QUADRANT
VP 4TH QUADRANT
VP
5. Basic concepts for drawing projection of point
FV & TV of a point always lie in the same vertical line
FV of a point ‘P’ is represented by p’. It shows position of the point
with respect to HP.
If the point lies above HP, p’ lies above the XY line.
If the point lies in the HP, p’ lies on the XY line.
If the point lies below the HP, p’ lies below the XY line.
TV of a point ‘P’ is represented by p. It shows position of the point with
respect to VP.
If the point lies in front of VP, p lies below the XY line.
If the point lies in the VP, p lies on the XY line.
If the point lies behind the VP, p lies below the XY line.
6. PROJECTIONS OF A POINT IN FIRST QUADRANT.
POINT A ABOVE HP POINT A ABOVE HP POINT A IN HP
& INFRONT OF VP & IN VP & INFRONT OF VP
For Tv
For Tv
PICTORIAL PICTORIAL For Tv
PRESENTATION A PRESENTATION
a’ a’
A Y
Y
Y a’
a
a
X a X X A
ORTHOGRAPHIC PRESENTATIONS
OF ALL ABOVE CASES.
Fv above xy, Fv above xy, Fv on xy,
Tv below xy. Tv on xy. Tv below xy.
VP VP VP
a’ a’
X Y X Y X
a’ Y
a
a a
HP HP HP
7. PROJECTIONS OF STRAIGHT LINES.
INFORMATION REGARDING A LINE means
IT’S LENGTH,
POSITION OF IT’S ENDS WITH HP & VP
IT’S INCLINATIONS WITH HP & VP WILL BE GIVEN.
AIM:- TO DRAW IT’S PROJECTIONS - MEANS FV & TV.
SIMPLE CASES OF THE LINE
1. A VERTICAL LINE ( LINE PERPENDICULAR TO HP & // TO VP)
2. LINE PARALLEL TO BOTH HP & VP.
3. LINE INCLINED TO HP & PARALLEL TO VP.
4. LINE INCLINED TO VP & PARALLEL TO HP.
5. LINE INCLINED TO BOTH HP & VP.
STUDY ILLUSTRATIONS GIVEN ON NEXT PAGE
SHOWING CLEARLY THE NATURE OF FV & TV
OF LINES LISTED ABOVE AND NOTE RESULTS.
8. For Tv Orthographic Pattern
(Pictorial Presentation) V.P.
a’
Note: a’
Fv is a vertical line
A Showing True Length Fv
1.
FV &
Tv is a point. b’
A Line b’
perpendicular Y
X Y
to Hp B
& TV a b
Tv a b
// to Vp X
H.P.
Orthographic Pattern
(Pictorial Presentation) For Tv Note: V.P.
Fv & Tv both are
2. // to xy a’ Fv b’
b’ &
A Line B both show T. L.
// to Hp a’
& A Y X Y
// to Vp
b a b
Tv
X
a
H.P.
9. Fv inclined to xy V.P.
Tv parallel to xy. b’
3. b’
A Line inclined to Hp B
a’
and Y
parallel to Vp a’ X Y
(Pictorial presentation) A b
a
T.V. b
X
a
H.P.
Orthographic Projections
Tv inclined to xy V.P.
4. Fv parallel to xy.
a’ Fv b’
A Line inclined to Vp b’
and a’
parallel to Hp A
Ø
B X Y
(Pictorial presentation) a Ø
Ø Tv
a b
b
H.P.
10. For Tv
For Tv
5. A Line inclined to both
Hp and Vp b’
b’
(Pictorial presentation)
B
B
Y
Y
On removal of object a’
a’ i.e. Line AB
Fv as a image on Vp.
A
A Tv as a image on Hp,
X
X a T.V. b
a T.V. b
V.P.
b’
FV
a’
X Y
Orthographic Projections Note These Facts:-
Fv is seen on Vp clearly. Both Fv & Tv are inclined to xy.
To see Tv clearly, HP is a (No view is parallel to xy)
rotated 900 downwards, Both Fv & Tv are reduced lengths.
Hence it comes below xy. TV (No view shows True Length)
H.P. b
11. Orthographic Projections Note the procedure Note the procedure
Means Fv & Tv of Line AB When Fv & Tv known, When True Length is known,
are shown below, How to find True Length. How to locate FV & TV.
with their apparent Inclinations (Views are rotated to determine (Component a’b2’ of TL is drawn
True Length & it’s inclinations which is further rotated
&
with Hp & Vp). to determine FV)
V.P. V.P. V.P.
b’ b’ b 1’ b’ b1’
FV FV
TL
a’ a’ a’ b2’
X Y X Y X Y
b1
a b1 a Ø
a TV
TV TV
H.P. b H.P. b H.P. b b2
Here TV (ab) is not // to XY line In this sketch, TV is rotated Here a’b1’ is component
Hence it’s corresponding FV and made // to XY line. of TL ab1 gives length of FV.
a’ b’ is not showing Hence it’s corresponding Hence it is brought Up to
True Length & FV a’ b1’ Is showing Locus of a’ and further rotated
True Length to get point b’. a’ b’ will be Fv.
True Inclination with Hp.
& Similarly drawing component
True Inclination with Hp. of other TL(a’b1‘) TV can be drawn.
12. The most important diagram showing graphical relations 1) True Length ( TL) – a’ b1’ & a b
among all important parameters of this topic. 2) Angle of TL with Hp - Important
Study and memorize it as a CIRCUIT DIAGRAM TEN parameters
3) Angle of TL with Vp – Ø to be remembered
And use in solving various problems.
4) Angle of FV with xy – with Notations
used here onward
V.P. 5) Angle of TV with xy –
Distance between
End Projectors. 6) LTV (length of FV) – Component (a-1)
b’ b1’
7) LFV (length of TV) – Component (a’-1’)
8) Position of A- Distances of a & a’ from xy
9) Position of B- Distances of b & b’ from xy
10) Distance between End Projectors
a’ 1’
LTV
NOTE this
X Y & Construct with a’
a LFV Ø&
1 Construct with a
Ø
b’ & b1’ on same locus.
b & b1 on same locus.
Also Remember
b b1
H.P. True Length is never rotated. It’s horizontal component
is drawn & it is further rotated to locate view.
Views are always rotated, made horizontal & further
extended to locate TL, & Ø
13. GROUP (A)
GENERAL CASES OF THE LINE INCLINED TO BOTH HP & VP
PROBLEM 1) ( based on 10 parameters).
Line AB is 75 mm long and it is 300 &
400 Inclined to Hp & Vp respectively.
End A is 12mm above Hp and 10 mm b’ b’1
in front of Vp.
Draw projections. Line is in 1st quadrant.
FV
SOLUTION STEPS: TL
1) Draw xy line and one projector.
2) Locate a’ 12mm above xy line
& a 10mm below xy line.
3) Take 300 angle from a’ & 400 from
a and mark TL I.e. 75mm on both
a’
lines. Name those points b1’ and b1 X Y
respectively.
4) Join both points with a’ and a resp. a LFV
5) Draw horizontal lines (Locus) from Ø 1
both points.
6) Draw horizontal component of TL
a b1 from point b1 and name it 1.
( the length a-1 gives length of Fv
as we have seen already.) TV TL
7) Extend it up to locus of a’ and
rotating a’ as center locate b’ as
shown. Join a’ b’ as Fv.
8) From b’ drop a projector down
ward & get point b. Join a & b
b b1
I.e. Tv.
14. PROBLEM 2:
Line AB 75mm long makes 450 inclination with Vp while it’s Fv makes 550.
End A is 10 mm above Hp and 15 mm in front of Vp.If line is in 1st quadrant
draw it’s projections and find it’s inclination with Hp.
b’ b’1 LOCUS OF b
Solution Steps:-
1.Draw x-y line.
2.Draw one projector for a’ & a
3.Locate a’ 10mm above x-y &
Tv a 15 mm below xy.
4.Draw a line 450 inclined to xy 550
from point a and cut TL 75 mm
on it and name that point b1
Draw locus from point b1
a’
5.Take 550 angle from a’ for Fv
above xy line. X y
6.Draw a vertical line from b1
up to locus of a and name it 1.
It is horizontal component of a LFV
TL & is LFV.
1
7.Continue it to locus of a’ and
rotate upward up to the line
of Fv and name it b’.This a’ b’
line is Fv.
8. Drop a projector from b’ on
locus from point b1 and
name intersecting point b.
Line a b is Tv of line AB.
9.Draw locus from b’ and from
a’ with TL distance cut point b1‘
10.Join a’ b1’ as TL and measure
it’s angle at a’. LOCUS OF b
It will be true angle of line with HP. b b1
15. PROBLEM 3:
Fv of line AB is 500 inclined to xy and measures 55
mm long while it’s Tv is 600 inclined to xy line. If
end A is 10 mm above Hp and 15 mm in front of
Vp, draw it’s projections,find TL, inclinations of line
with Hp & Vp. b’ b’1
SOLUTION STEPS:
1.Draw xy line and one projector.
2.Locate a’ 10 mm above xy and
a 15 mm below xy line.
3.Draw locus from these points. 500
4.Draw Fv 500 to xy from a’ and
mark b’ Cutting 55mm on it. a’
X
5.Similarly draw Tv 600 to xy
from a & drawing projector from b’
y
Locate point b and join a b.
6.Then rotating views as shown, a
locate True Lengths ab1 & a’b1’ 600
and their angles with Hp and Vp.
b1
b
16. PROBLEM 4 :-
Line AB is 75 mm long .It’s Fv and Tv measure 50 mm & 60 mm long respectively.
End A is 10 mm above Hp and 15 mm in front of Vp. Draw projections of line AB
if end B is in first quadrant.Find angle with Hp and Vp.
b’ b’1
SOLUTION STEPS:
1.Draw xy line and one projector.
2.Locate a’ 10 mm above xy and
a 15 mm below xy line.
3.Draw locus from these points.
4.Cut 60mm distance on locus of a’ LTV 1’
& mark 1’ on it as it is LTV. a’
5.Similarly Similarly cut 50mm on X Y
locus of a and mark point 1 as it is LFV.
6.From 1’ draw a vertical line upward
a LFV
and from a’ taking TL ( 75mm ) in 1
compass, mark b’1 point on it.
Join a’ b’1 points.
7. Draw locus from b’1
8. With same steps below get b1 point
and draw also locus from it.
9. Now rotating one of the components
I.e. a-1 locate b’ and join a’ with it
to get Fv.
10. Locate tv similarly and measure
Angles &
b1
b
17. GROUP (B)
PROBLEMS INVOLVING TRACES OF THE LINE.
TRACES OF THE LINE:-
THESE ARE THE POINTS OF INTERSECTIONS OF A LINE ( OR IT’S EXTENSION )
WITH RESPECTIVE REFFERENCE PLANES.
A LINE ITSELF OR IT’S EXTENSION, WHERE EVER TOUCHES H.P.,
THAT POINT IS CALLED TRACE OF THE LINE ON H.P.( IT IS CALLED H.T.)
SIMILARLY, A LINE ITSELF OR IT’S EXTENSION, WHERE EVER TOUCHES V.P.,
THAT POINT IS CALLED TRACE OF THE LINE ON V.P.( IT IS CALLED V.T.)
V.T.:- It is a point on Vp.
Hence it is called Fv of a point in Vp.
Hence it’s Tv comes on XY line.( Here onward named as v )
H.T.:- It is a point on Hp.
Hence it is called Tv of a point in Hp.
Hence it’s Fv comes on XY line.( Here onward named as ’h’ )
18. b’
STEPS TO LOCATE HT.
(WHEN PROJECTIONS ARE GIVEN.)
1. Begin with FV. Extend FV up to XY line. a’
2. Name this point h’ v h’
( as it is a Fv of a point in Hp) x y
3. Draw one projector from h’.
4. Now extend Tv to meet this projector. VT’ HT
This point is HT a
STEPS TO LOCATE VT.
Observe & note :-
(WHEN PROJECTIONS ARE GIVEN.) 1. Points h’ & v always on x-y line. b
1. Begin with TV. Extend TV up to XY line. 2. VT’ & v always on one projector.
2. Name this point v
3. HT & h’ always on one projector.
( as it is a Tv of a point in Vp)
3. Draw one projector from v. 4. FV - h’- VT’ always co-linear.
4. Now extend Fv to meet this projector.
This point is VT 5. TV - v - HT always co-linear.
These points are used to
solve next three problems.
19. PROBLEM 6 :- Fv of line AB makes 450 angle with XY line and measures 60 mm.
Line’s Tv makes 300 with XY line. End A is 15 mm above Hp and it’s VT is 10 mm
below Hp. Draw projections of line AB,determine inclinations with Hp & Vp and locate HT, VT.
b’ b’1
a’ 450
SOLUTION STEPS:- 15
Draw xy line, one projector and x v h’
y
locate fv a’ 15 mm above xy. 10 300
Take 45 0 angle from a’ and
marking 60 mm on it locate point b’. VT’
Draw locus of VT, 10 mm below xy
a
& extending Fv to this locus locate VT.
as fv-h’-vt’ lie on one st.line.
Draw projector from vt, locate v on xy.
From v take 300 angle downward as
Tv and it’s inclination can begin with v.
b b1
Draw projector from b’ and locate b I.e.Tv point.
Now rotating views as usual TL and
it’s inclinations can be found.
Name extension of Fv, touching xy as h’
and below it, on extension of Tv, locate HT.
20. PROBLEM 7 :
One end of line AB is 10mm above Hp and other end is 100 mm in-front of Vp.
It’s Fv is 450 inclined to xy while it’s HT & VT are 45mm and 30 mm below xy respectively.
Draw projections and find TL with it’s inclinations with Hp & VP.
b’ b’ 1 LOCUS OF b’ & b’1
a’ 450
10 v h’
X Y
30
45
VT’ HT
SOLUTION STEPS:-
Draw xy line, one projector and
locate a’ 10 mm above xy. 100
Draw locus 100 mm below xy for points b & b1 a
Draw loci for VT and HT, 30 mm & 45 mm
below xy respectively.
Take 450 angle from a’ and extend that line backward
to locate h’ and VT, & Locate v on xy above VT.
Locate HT below h’ as shown.
Then join v – HT – and extend to get top view end b.
Draw projector upward and locate b’ Make a b & a’b’ dark. b b1 LOCUS OF b & b1
Now as usual rotating views find TL and it’s inclinations.
21. PROBLEM 8 :- Projectors drawn from HT and VT of a line AB
are 80 mm apart and those drawn from it’s ends are 50 mm apart.
End A is 10 mm above Hp, VT is 35 mm below Hp
while it’s HT is 45 mm in front of Vp. Draw projections,
locate traces and find TL of line & inclinations with Hp and Vp.
VT
b’ b’1
SOLUTION STEPS:- 55
1.Draw xy line and two projectors,
80 mm apart and locate HT & VT ,
35 mm below xy and 55 mm above xy Locus of a’ a’
respectively on these projectors. 10 50 v
2.Locate h’ and v on xy as usual. X y
h’ b b1
3.Now just like previous two problems,
Extending certain lines complete Fv & Tv
35
And as usual find TL and it’s inclinations.
a
HT
80
22. Instead of considering a & a’ as projections of first point,
if v & VT’ are considered as first point , then true inclinations of line with
Hp & Vp i.e. angles & can be constructed with points VT’ & V respectively.
b’ b1’
Then from point v & HT
a’
angles & can be drawn.
v &
X Y From point VT’ & h’
angles & can be drawn.
VT’
THIS CONCEPT IS USED TO SOLVE
a
NEXT THREE PROBLEMS.
b b1
23. PROBLEM 9 :-
Line AB 100 mm long is 300 and 450 inclined to Hp & Vp respectively. b1’
End A is 10 mm above Hp and it’s VT is 20 mm below Hp b’
.Draw projections of the line and it’s HT.
FV
Locus of a & a1’ a’ a1’
SOLUTION STEPS:- 10
X v h’
Draw xy, one projector 0) Y
and locate on it VT and V. (45
20
Draw locus of a’ 10 mm above xy. (300)
Take 300 from VT and draw a line.
Where it intersects with locus of a’ VT’
name it a1’ as it is TL of that part. HT
From a1’ cut 100 mm (TL) on it and locate point b1’
Now from v take 450 and draw a line downwards a a1
& Mark on it distance VT-a1’ I.e.TL of extension & name it a1
Extend this line by 100 mm and mark point b1.
Draw it’s component on locus of VT’
& further rotate to get other end of Fv i.e.b’ TV
Join it with VT’ and mark intersection point
(with locus of a1’ ) and name it a’
Now as usual locate points a and b and h’ and HT.
b b1
24. PROBLEM 10 :-
A line AB is 75 mm long. It’s Fv & Tv make 450 and 600 inclinations with X-Y line resp
End A is 15 mm above Hp and VT is 20 mm below Xy line. Line is in first quadrant.
Draw projections, find inclinations with Hp & Vp. Also locate HT. b’ b1’
FV
Locus of a & a1’ a’ a1’
15
X v h’
Y
600
20
450
VT’
SOLUTION STEPS:-
Similar to the previous only change HT
is instead of line’s inclinations,
views inclinations are given. a a1
So first take those angles from VT & v
Properly, construct Fv & Tv of extension,
then determine it’s TL( V-a1)
TV
and on it’s extension mark TL of line
and proceed and complete it.
b b1
25. PROBLEM 11 :- The projectors drawn from VT & end A of line AB are 40mm apart.
End A is 15mm above Hp and 25 mm in front of Vp. VT of line is 20 mm below Hp.
If line is 75mm long, draw it’s projections, find inclinations with HP & Vp
b’ b1’
a’ a1’
15
X v Y
20
25 VT’
a
Draw two projectors for VT & end A 40mm
Locate these points and then b b1
YES !
YOU CAN COMPLETE IT.
26. GROUP (C)
CASES OF THE LINES IN A.V.P., A.I.P. & PROFILE PLANE.
b’ Line AB is in AIP as shown in above figure no 1.
It’s FV (a’b’) is shown projected on Vp.(Looking in arrow direction)
Here one can clearly see that the
Inclination of AIP with HP = Inclination of FV with XY line
a’
A A.V.P.
B
Line AB is in AVP as shown in above figure no 2..
a b
It’s TV (a b) is shown projected on Hp.(Looking in arrow direction)
Here one can clearly see that the
Inclination of AVP with VP = Inclination of TV with XY line
27. LINE IN A PROFILE PLANE ( MEANS IN A PLANE PERPENDICULAR TO BOTH HP & VP)
For T.V.
ORTHOGRAPHIC PATTERN OF LINE IN PROFILE PLANE
VP VT PP
a’ a”
A a’
FV LSV
b’ b’ b”
X Y
HT
a
B
TV
a
b
b HP
Results:-
1. TV & FV both are vertical, hence arrive on one single projector.
2. It’s Side View shows True Length ( TL)
3. Sum of it’s inclinations with HP & VP equals to 900 ( + = 900 )
4. It’s HT & VT arrive on same projector and can be easily located
From Side View.
OBSERVE CAREFULLY ABOVE GIVEN ILLUSTRATION AND 2nd SOLVED PROBLEM.
28. PROBLEM 12 :- Line AB 80 mm long, makes 300 angle with Hp
and lies in an Aux.Vertical Plane 450 inclined to Vp. b’ Locus of b’ b 1’
End A is 15 mm above Hp and VT is 10 mm below X-y line.
Draw projections, fine angle with Vp and Ht.
Locus of a’ & a1’ a’ a 1’
15 v h’
X 450 Y
10
VT HT
a
AVP 450 to VP
Simply consider inclination of AVP Locus of b’
as inclination of TV of our line,
b b1
well then?
You sure can complete it
as previous problems!
Go ahead!!
29. PROBLEM 13 :- A line AB, 75mm long, has one end A in Vp. Other end B is 15 mm above Hp
and 50 mm in front of Vp.Draw the projections of the line when sum of it’s
Inclinations with HP & Vp is 900, means it is lying in a profile plane.
Find true angles with ref.planes and it’s traces.
VT (VT) a”
a’
SOLUTION STEPS:-
Side View
After drawing xy line and one projector Front view ( True Length )
VP
Locate top view of A I.e point a on xy as
It is in Vp, b’ b”
Locate Fv of B i.e.b’15 mm above xy as X a (HT)
Y
HP
it is above Hp.and Tv of B i.e. b, 50 mm
below xy asit is 50 mm in front of Vp
Draw side view structure of Vp and Hp top view
and locate S.V. of point B i.e. b’’
From this point cut 75 mm distance on Vp and
Mark a’’ as A is in Vp. (This is also VT of line.) b
From this point draw locus to left & get a’ HT
Extend SV up to Hp. It will be HT. As it is a Tv
Rotate it and bring it on projector of b.
Now as discussed earlier SV gives TL of line
and at the same time on extension up to Hp & Vp
gives inclinations with those panes.
30. APPLICATIONS OF PRINCIPLES OF PROJECTIONS OF LINES
IN SOLVING CASES OF DIFFERENT PRACTICAL SITUATIONS.
In these types of problems some situation in the field
or
some object will be described .
It’s relation with Ground ( HP )
And
a Wall or some vertical object ( VP ) will be given.
Indirectly information regarding Fv & Tv of some line or lines,
inclined to both reference Planes will be given
and
you are supposed to draw it’s projections
and
further to determine it’s true Length and it’s inclinations with ground.
Here various problems along with
actual pictures of those situations are given
for you to understand those clearly. CHECK YOUR ANSWERS
Now looking for views in given ARROW directions, WITH THE SOLUTIONS
YOU are supposed to draw projections & find answers, GIVEN IN THE END.
Off course you must visualize the situation properly. ALL THE BEST !!
31. PROBLEM 14:-Two objects, a flower (A) and an orange (B) are within a rectangular compound wall,
whose P & Q are walls meeting at 900. Flower A is 1M & 5.5 M from walls P & Q respectively.
Orange B is 4M & 1.5M from walls P & Q respectively. Drawing projection, find distance between them
If flower is 1.5 M and orange is 3.5 M above the ground. Consider suitable scale..
TV
B Wall Q
A
FV
32. PROBLEM 15 :- Two mangos on a tree A & B are 1.5 m and 3.00 m above ground
and those are 1.2 m & 1.5 m from a 0.3 m thick wall but on opposite sides of it.
If the distance measured between them along the ground and parallel to wall is 2.6 m,
Then find real distance between them by drawing their projections.
TV
B
0.3M THICK
A
33. PROBLEM 16 :- oa, ob & oc are three lines, 25mm, 45mm and 65mm
long respectively.All equally inclined and the shortest
is vertical.This fig. is TV of three rods OA, OB and OC
whose ends A,B & C are on ground and end O is 100mm
above ground. Draw their projections and find length of
each along with their angles with ground.
TV
O
C
A
FV
45 mm
B
34. PROBLEM 17:- A pipe line from point A has a downward gradient 1:5 and it runs due East-South.
Another Point B is 12 M from A and due East of A and in same level of A. Pipe line from B runs
200 Due East of South and meets pipe line from A at point C.
Draw projections and find length of pipe line from B and it’s inclination with ground.
5
1
A
12 M
B E
C
35. PROBLEM 18: A person observes two objects, A & B, on the ground, from a tower, 15 M high,
At the angles of depression 300 & 450. Object A is is due North-West direction of observer and
object B is due West direction. Draw projections of situation and find distance of objects from
observer and from tower also.
O
300
450
A
S
B
W
36. PROBLEM 19:-Guy ropes of two poles fixed at 4.5m and 7.5 m above ground,
are attached to a corner of a building 15 M high, make 300 and 450 inclinations
with ground respectively.The poles are 10 M apart. Determine by drawing their
projections,Length of each rope and distance of poles from building.
TV
C
15 M
A 300
4.5 M
450
B
7.5M
37. PROBLEM 20:- A tank of 4 M height is to be strengthened by four stay rods from each corner
by fixing their other ends to the flooring, at a point 1.2 M and 0.7 M from two adjacent walls respectively,
as shown. Determine graphically length and angle of each rod with flooring.
TV
4M
38. PROBLEM 21:- A horizontal wooden platform 2 M long and 1.5 M wide is supported by four chains
from it’s corners and chains are attached to a hook 5 M above the center of the platform.
Draw projections of the objects and determine length of each chain along with it’s inclination with ground.
TV
Hook H
D
A C
B
39. PROBLEM 22.
A room is of size 6.5m L ,5m D,3.5m high.
An electric bulb hangs 1m below the center of ceiling.
A switch is placed in one of the corners of the room, 1.5m above the flooring.
Draw the projections an determine real distance between the bulb and switch.
Ceiling
TV
Bulb
Switch
D
40. PROBLEM 23:-
A PICTURE FRAME 2 M WIDE AND 1 M TALL IS RESTING ON HORIZONTAL WALL RAILING
MAKES 350 INCLINATION WITH WALL. IT IS ATTAACHED TO A HOOK IN THE WALL BY TWO STRINGS.
THE HOOK IS 1.5 M ABOVE WALL RAILING. DETERMINE LENGTH OF EACH CHAIN AND TRUE ANGLE BETWEEN THEM
350
Wall railing
41. PROBLEM NO.24
T.V. of a 75 mm long Line CD, measures 50 mm.
SOME CASES OF THE LINE End C is 15 mm below Hp and 50 mm in front of Vp.
IN DIFFERENT QUADRANTS. End D is 15 mm in front of Vp and it is above Hp.
Draw projections of CD and find angles with Hp and Vp.
REMEMBER:
BELOW HP- Means- Fv below xy
BEHIND V p- Means- Tv above xy. d’ d’1 LOCUS OF d’ & d’1
X Y
d d1 LOCUS OF d & d1
c’
c
42. PROBLEM NO.25
End A of line AB is in Hp and 25 mm behind Vp.
End B in Vp.and 50mm above Hp.
Distance between projectors is 70mm.
Draw projections and find it’s inclinations with Ht, Vt.
LOCUS OF b’ & b’1
b’ b’1
a
X a’ b b1 Y
LOCUS OF b & b1
70
43. PROBLEM NO.26
End A of a line AB is 25mm below Hp and 35mm behind Vp.
Line is 300 inclined to Hp.
There is a point P on AB contained by both HP & VP.
Draw projections, find inclination with Vp and traces.
a
b’ b’1 LOCUS OF b’ & b’1
35
p p’
X y
p’1
25
=300
a’
LOCUS OF b & b1
b b1
44. PROBLEM NO.27
End A of a line AB is 25mm above Hp and end B is 55mm behind Vp.
The distance between end projectors is 75mm.
If both it’s HT & VT coincide on xy in a point,
35mm from projector of A and within two projectors,
b b1
Draw projections, find TL and angles and HT, VT.
55
a’
25
X Vt Y
Ht
a
35 b’ b’1
75