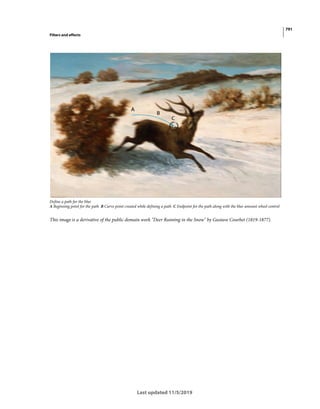
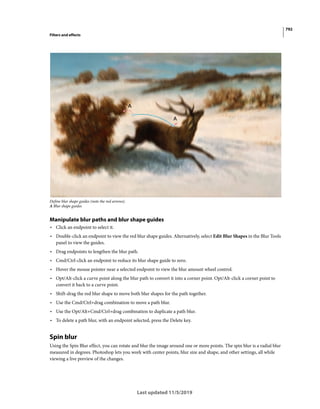
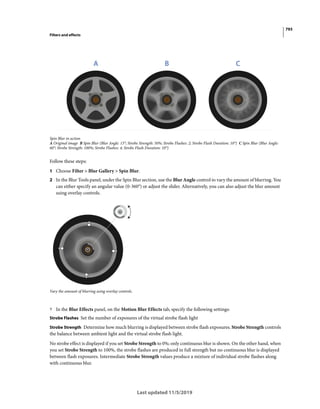
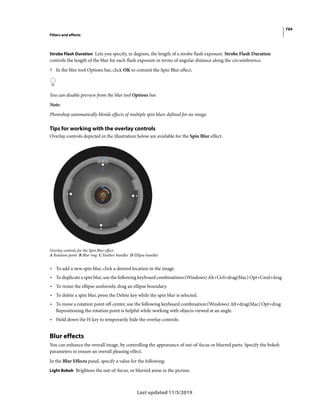
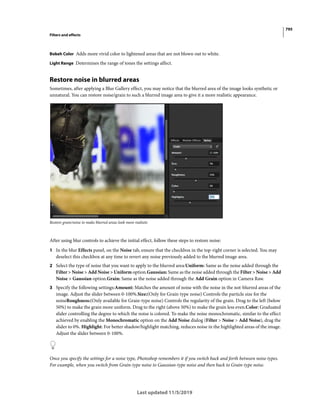
This document provides help topics for using Adobe Photoshop. It includes chapters on introducing Photoshop, using Photoshop on the iPad, working with cloud documents, and customizing the Photoshop workspace. The document provides information on features, tools, and workflows in Photoshop as well as guidance for common questions and troubleshooting issues.


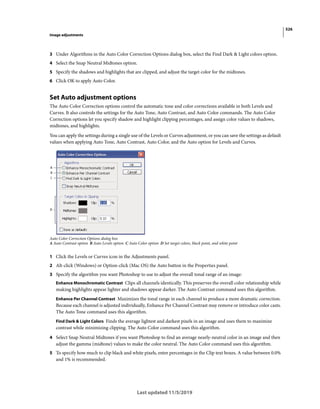
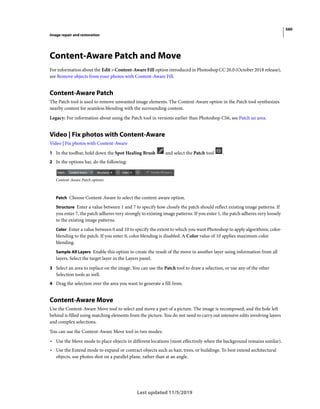
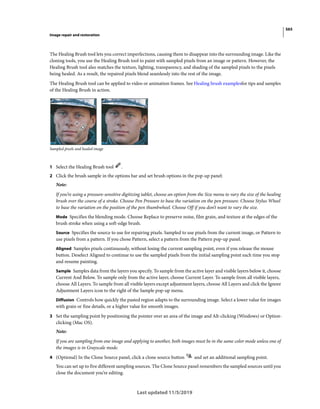
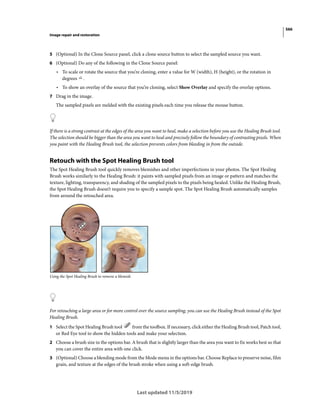
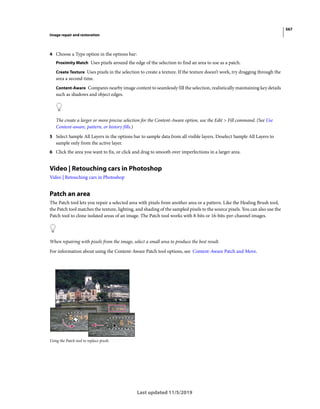
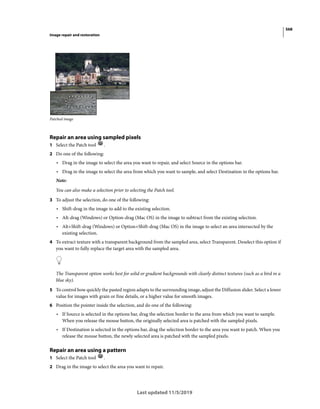
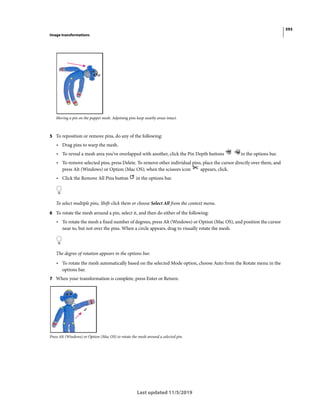
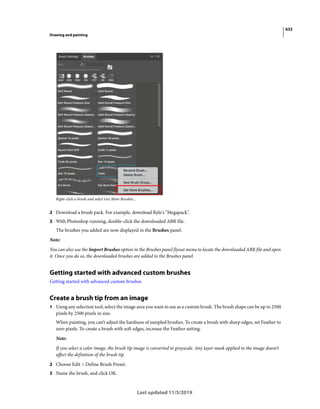
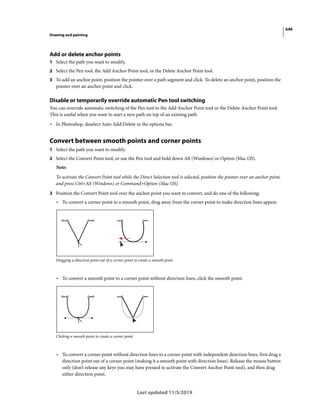
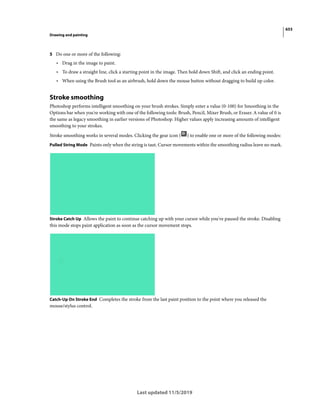
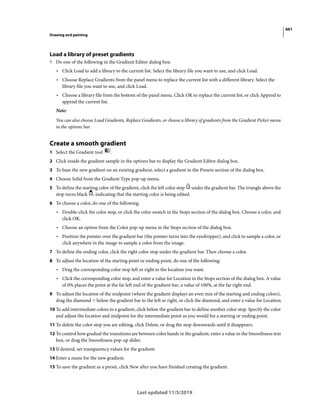
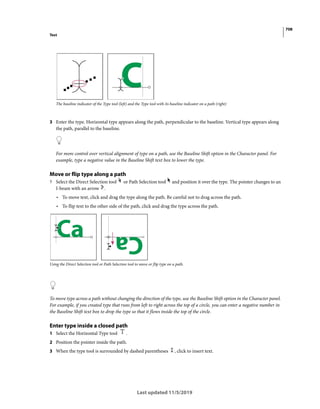
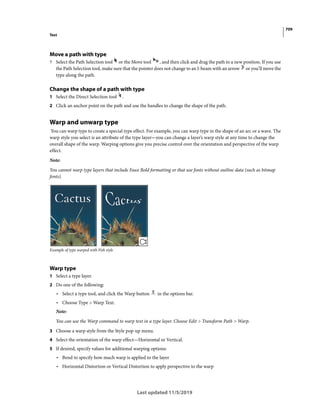
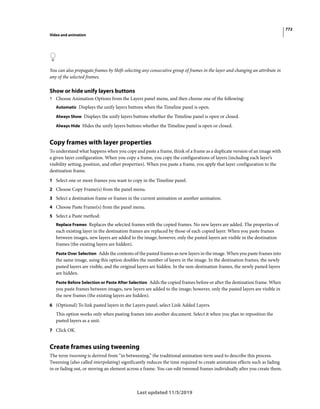
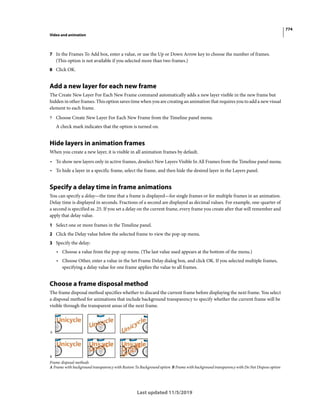
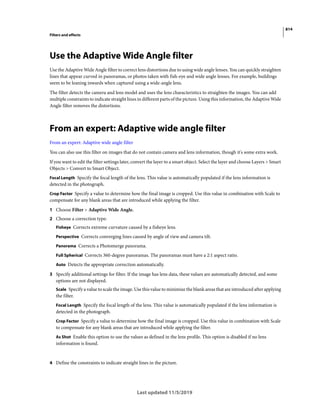
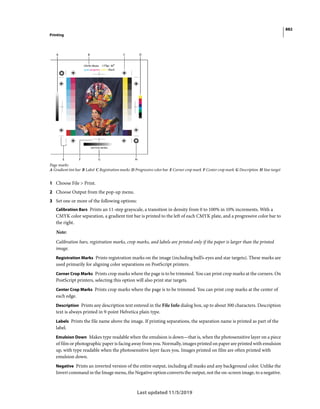
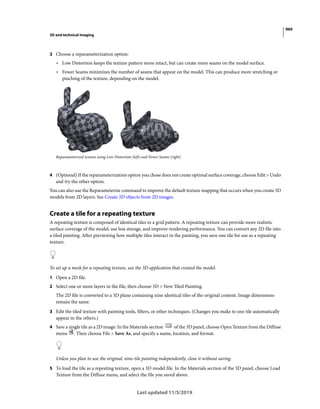
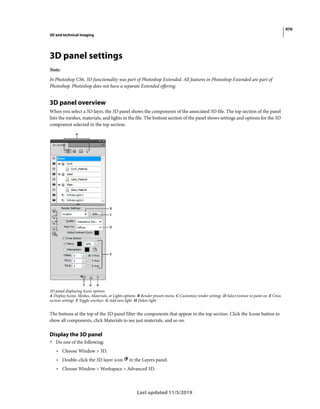
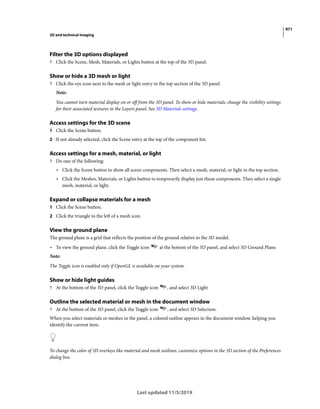
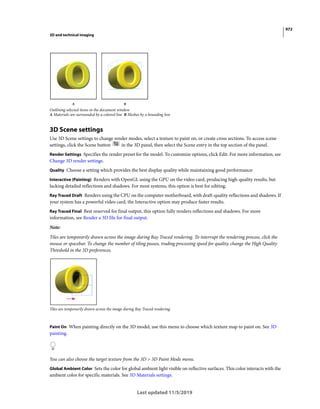
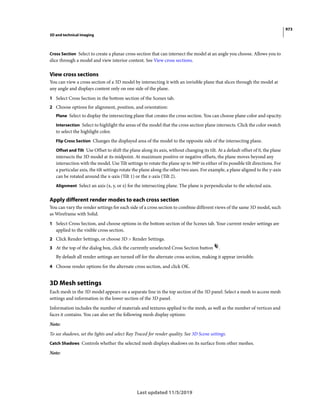
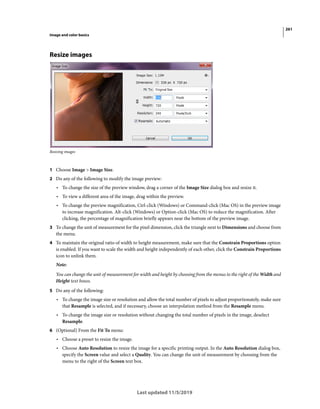
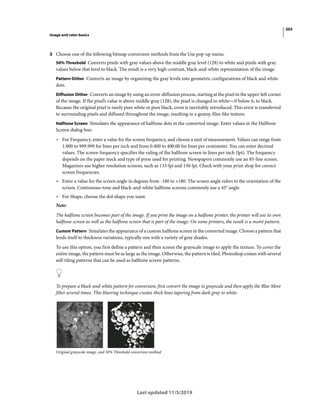
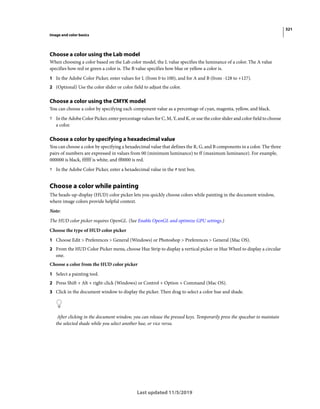
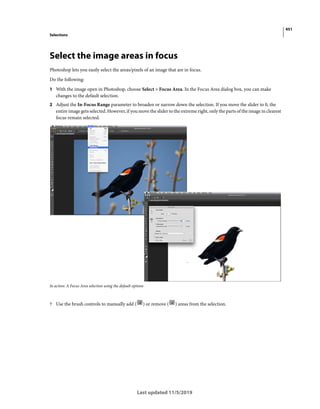
![106
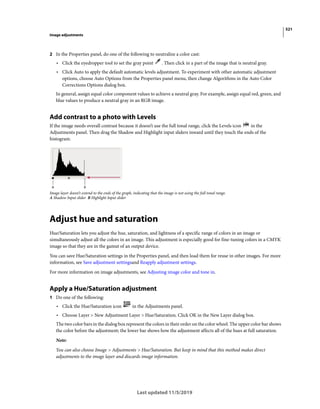
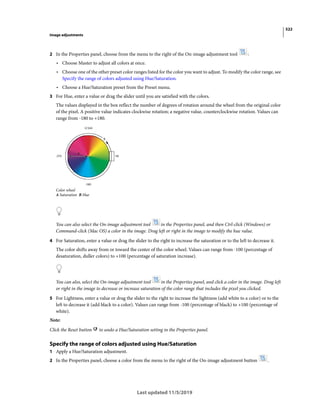
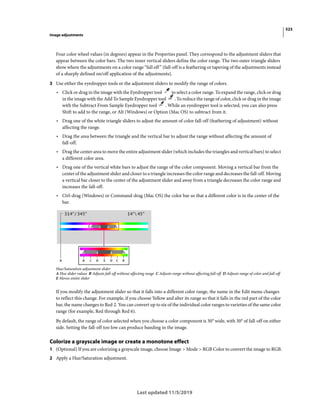
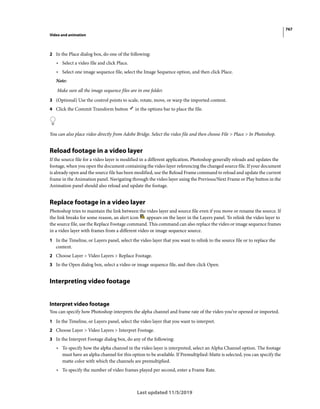
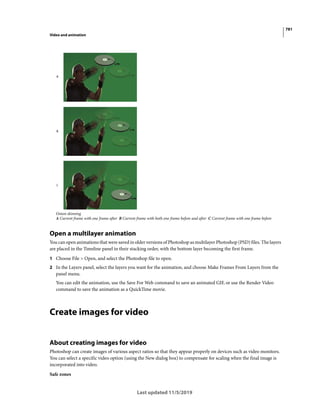
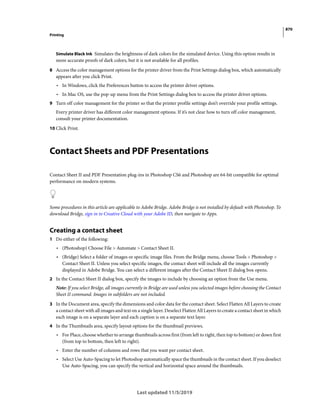
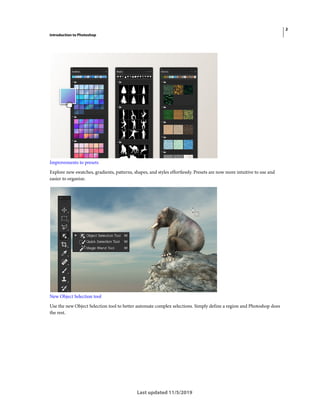
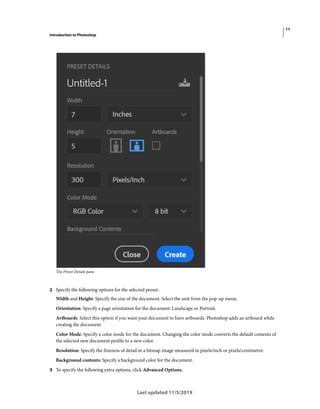
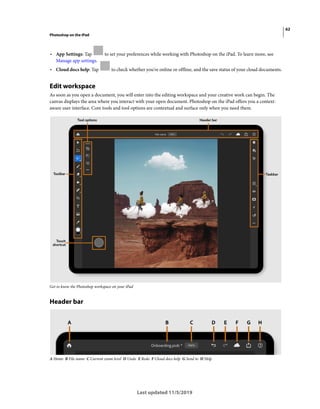
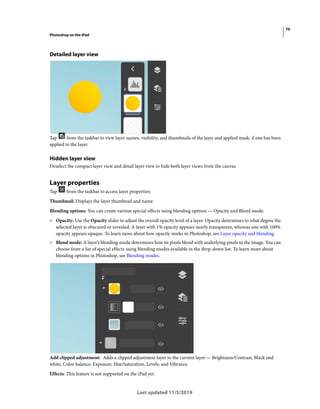
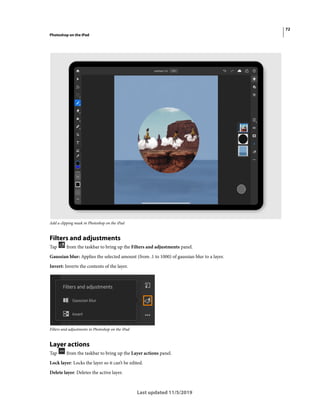
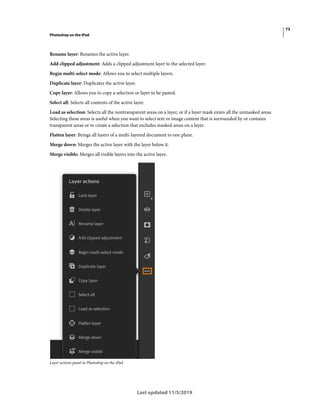
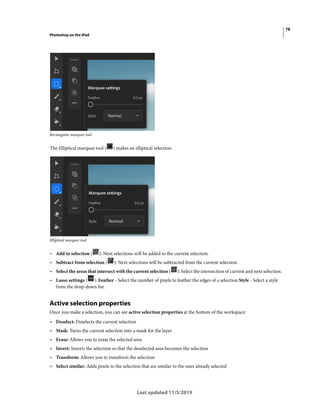
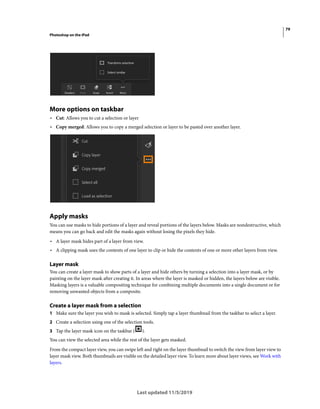
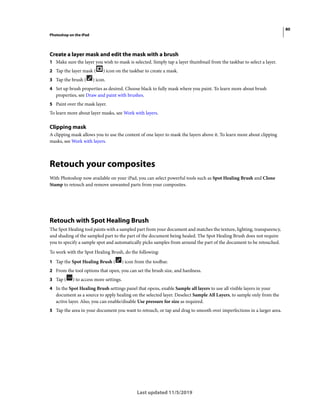
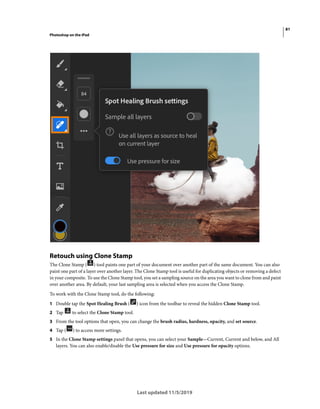
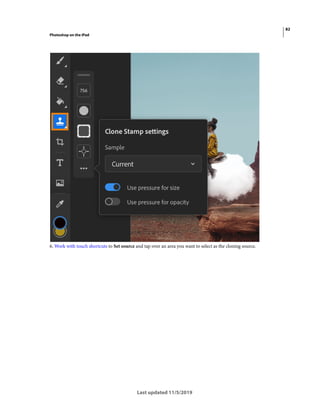
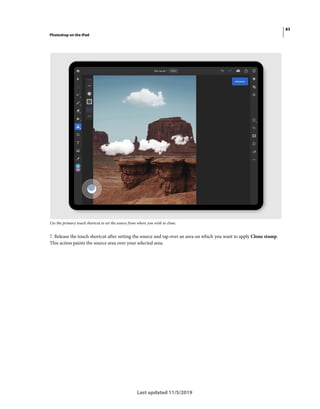
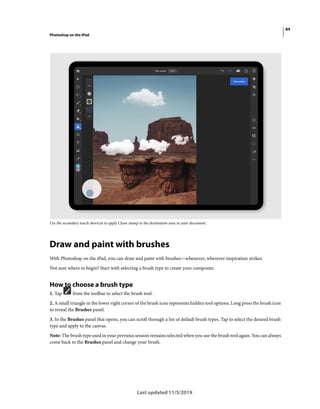
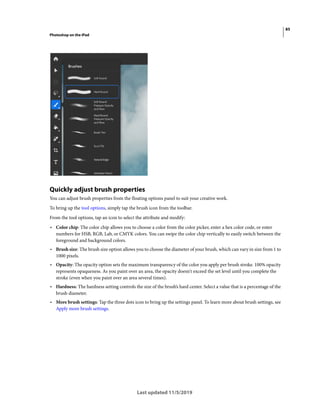
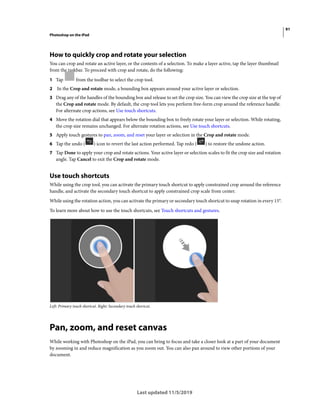
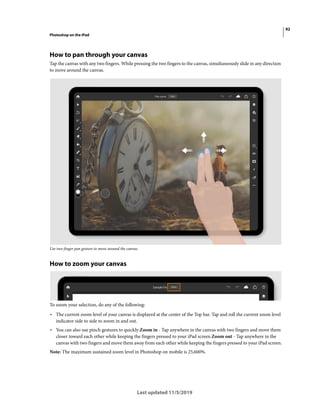
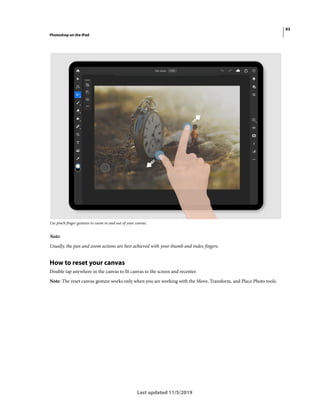
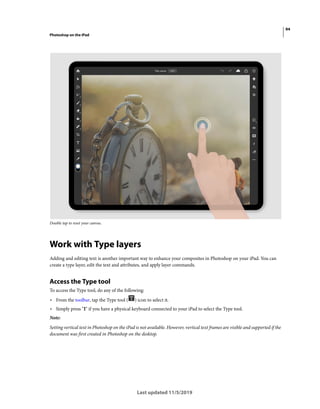
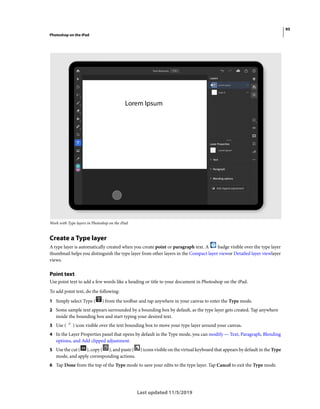
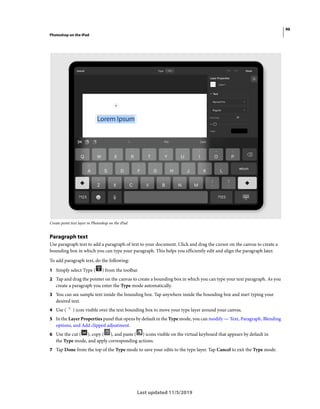
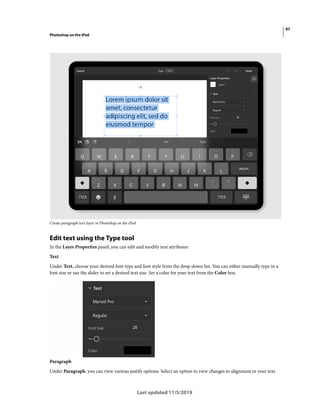
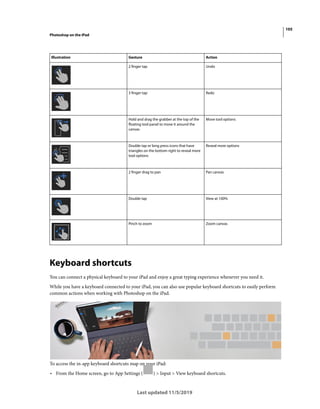
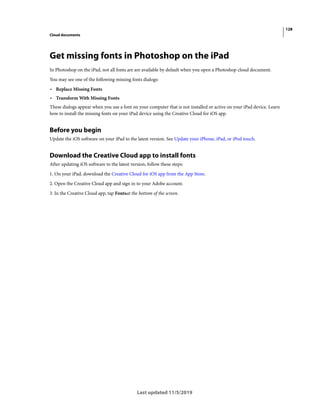
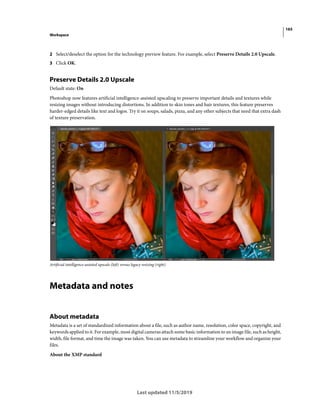
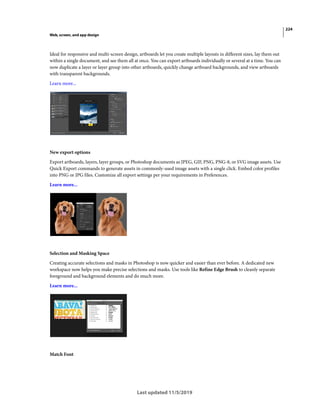
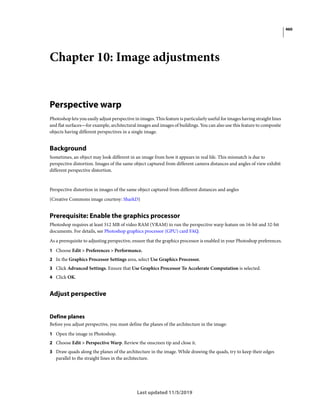
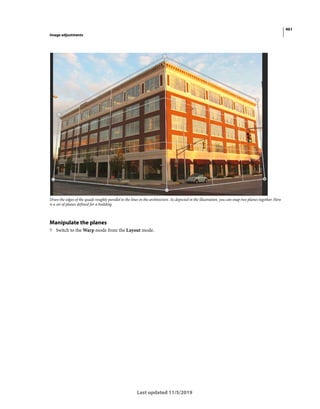
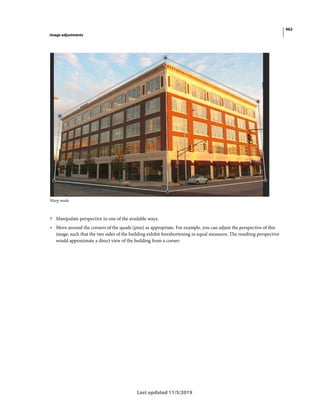
Photoshop on the iPad
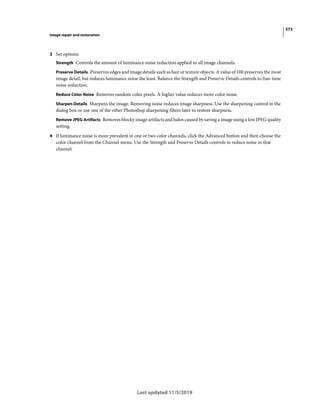
Last updated 11/5/2019
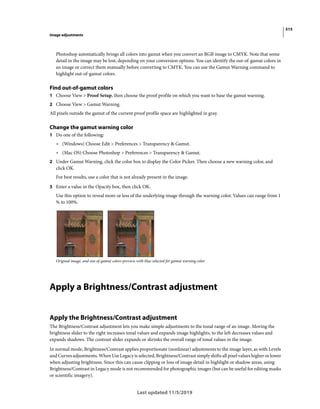
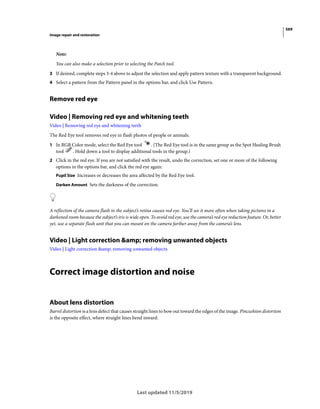
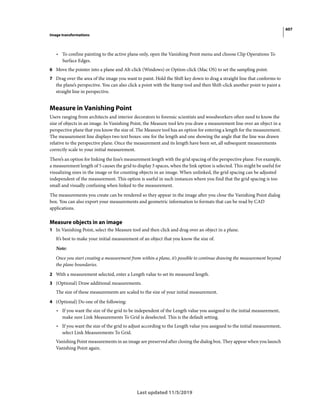
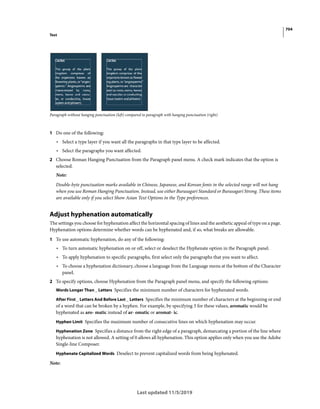
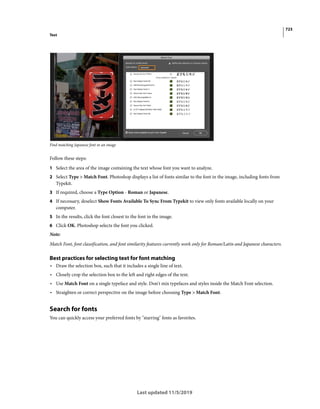
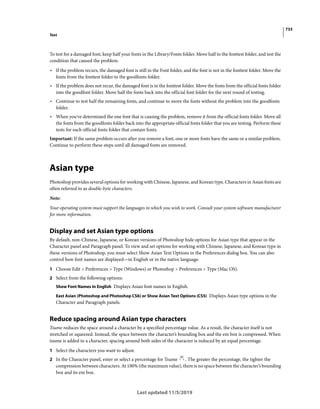
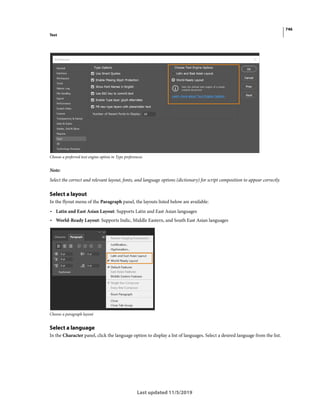
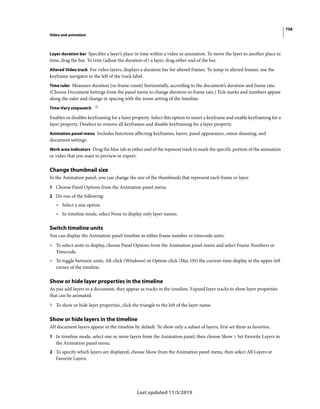
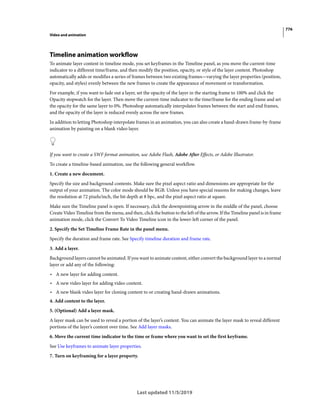
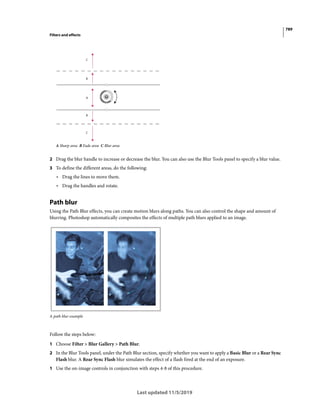
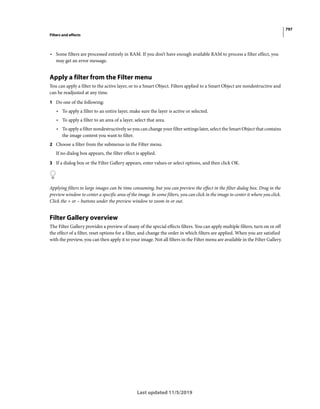
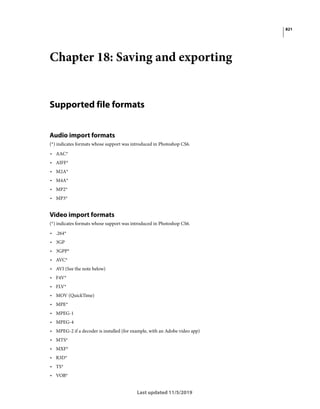
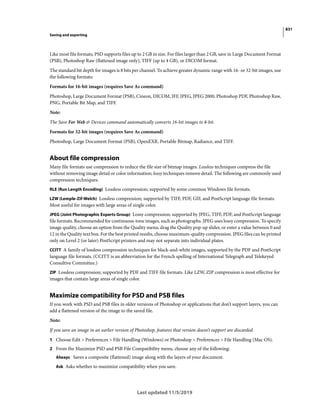
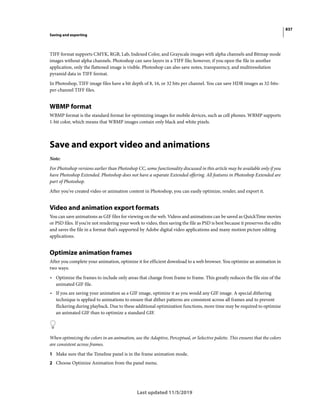
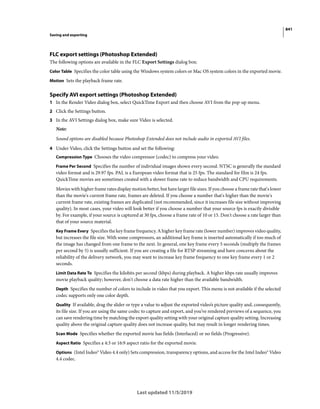
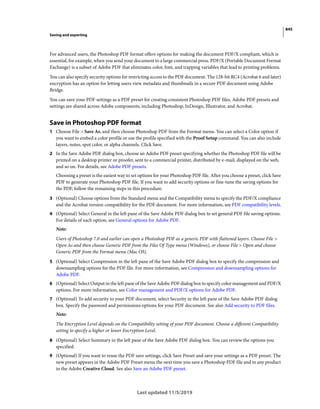
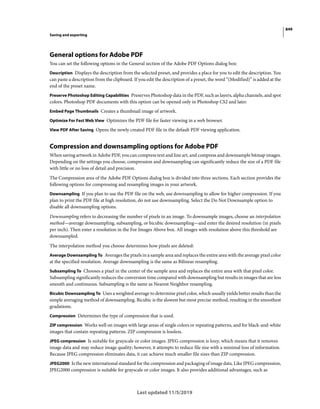
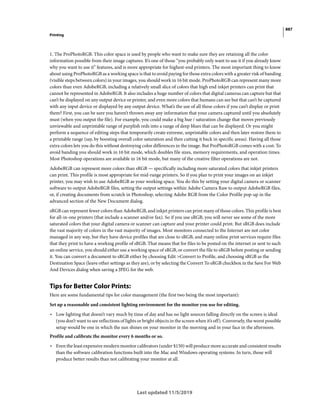
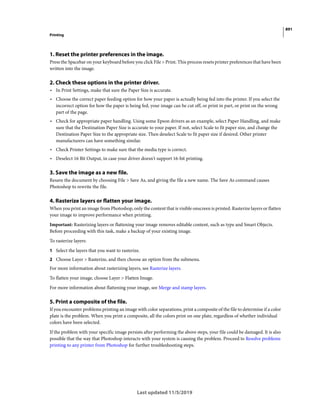
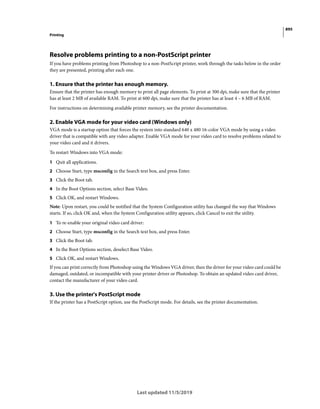
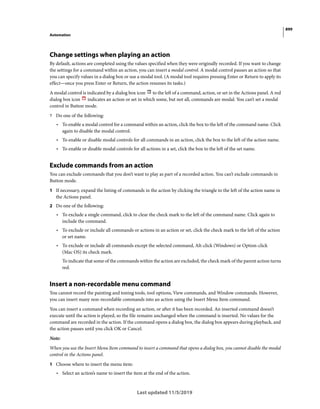
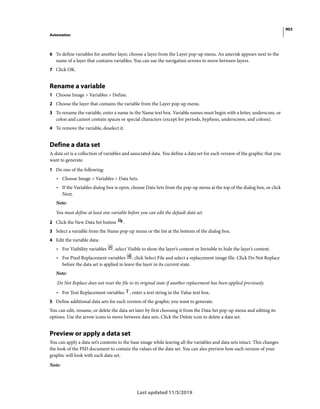
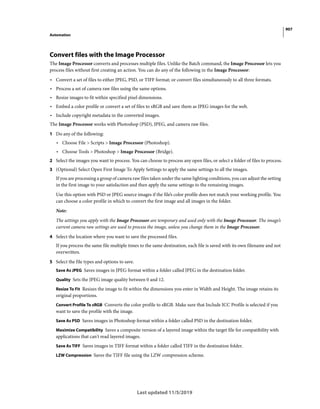
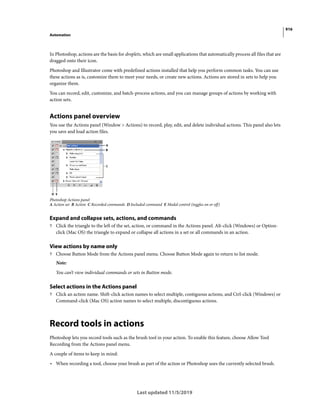
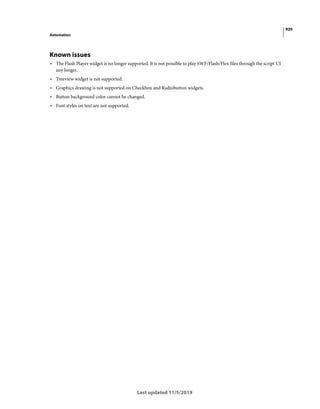
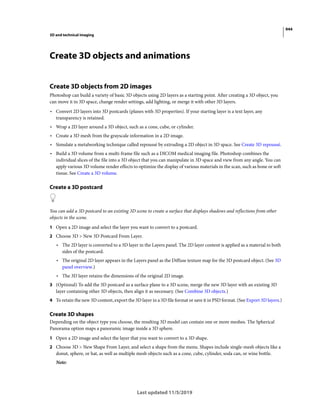
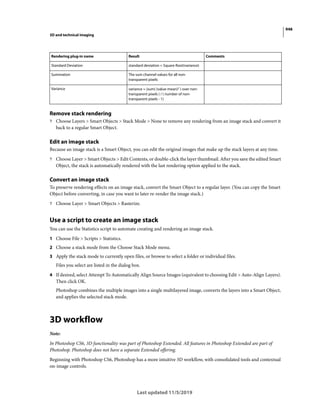
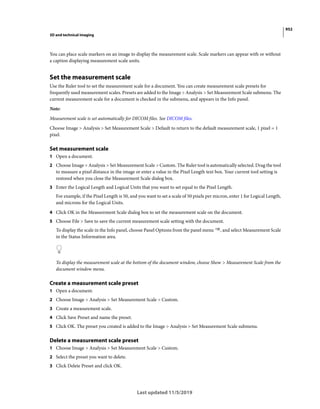
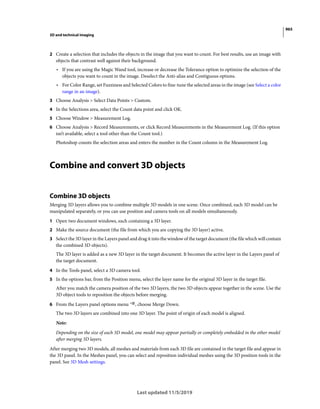
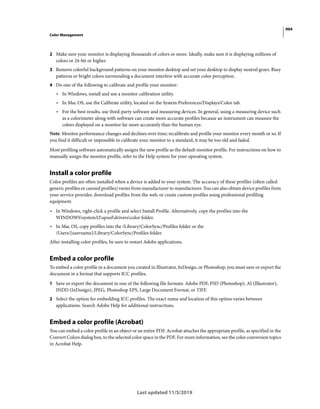
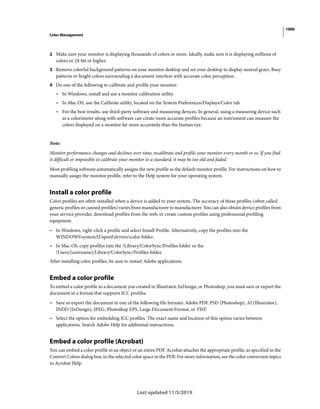
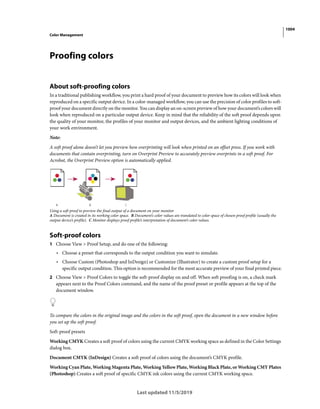
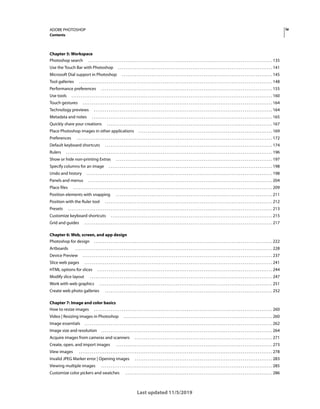
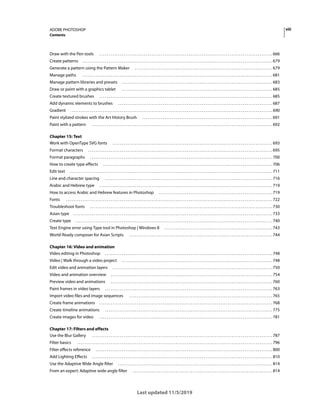
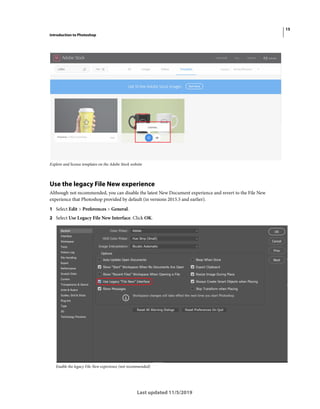
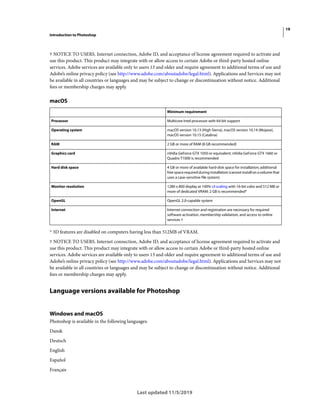
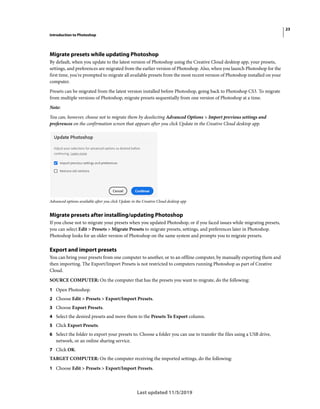
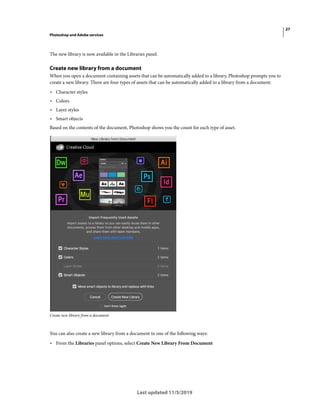
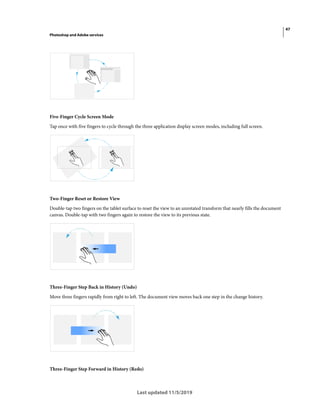
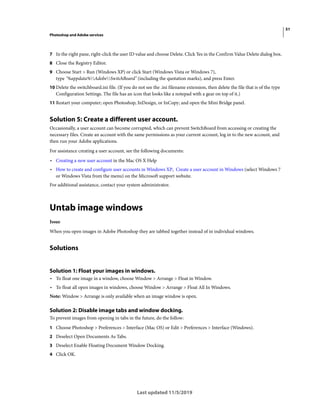
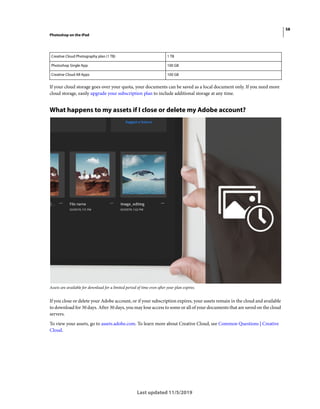
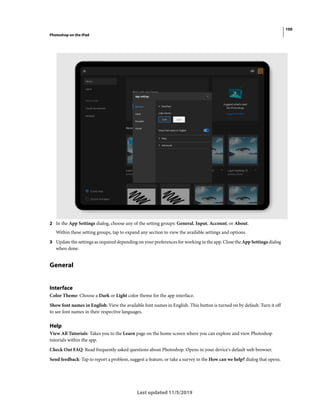
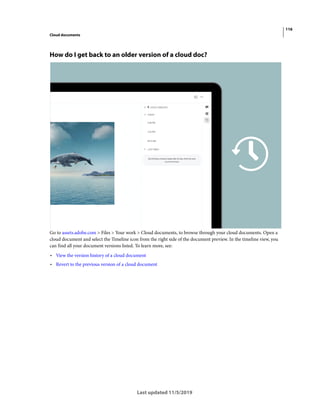
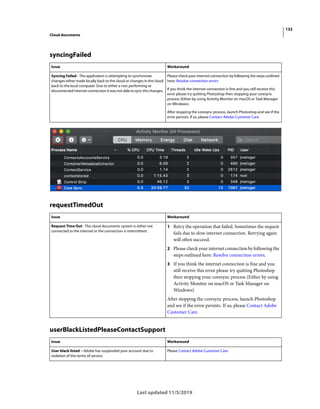
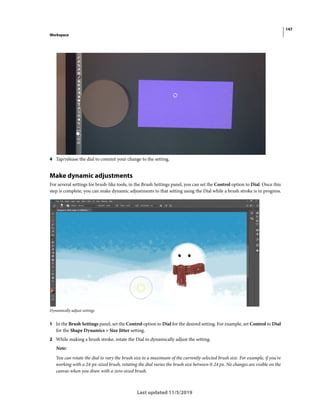
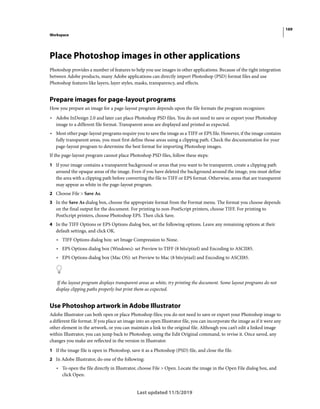
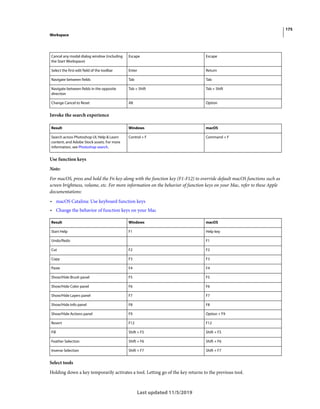
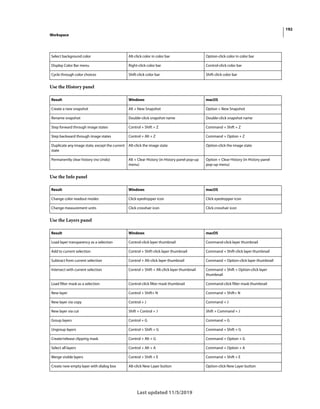
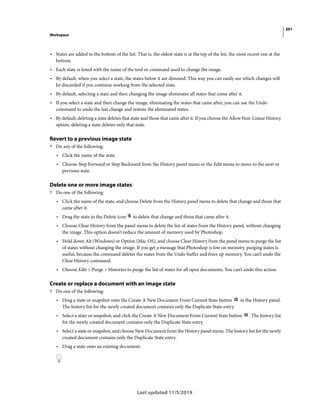
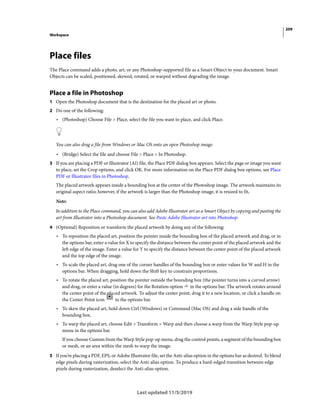
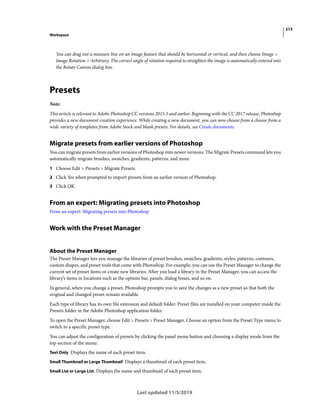
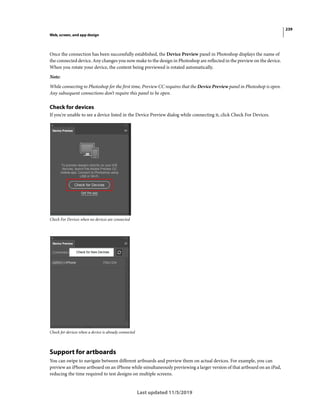
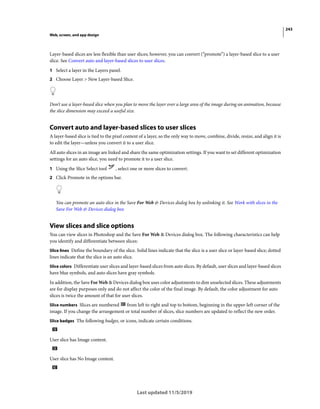
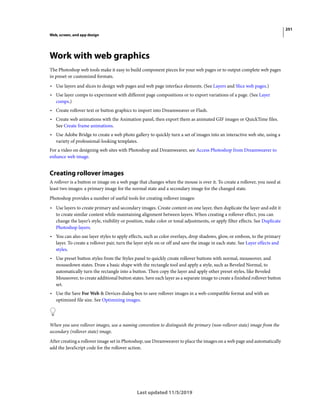
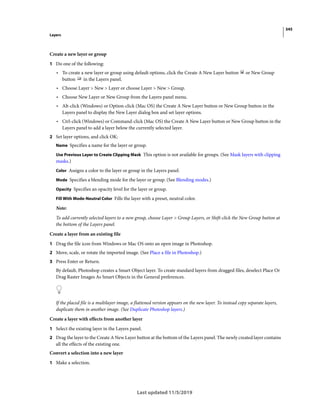
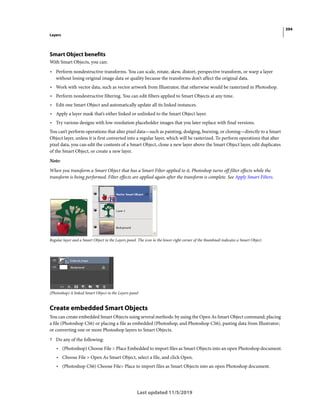
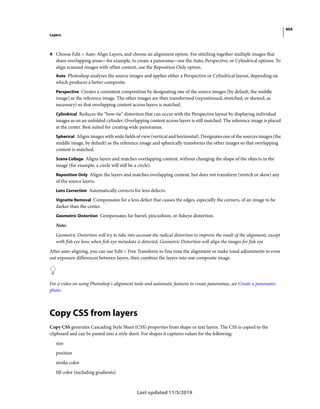
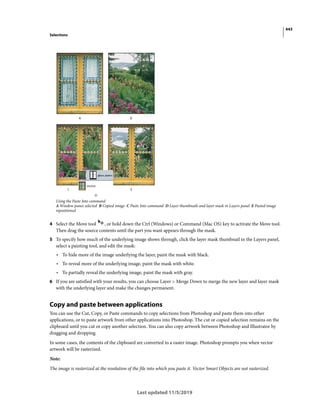
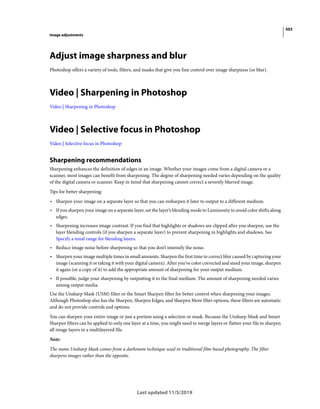
• From the editing workspace, go to Help ( ) > View keyboard shortcuts.
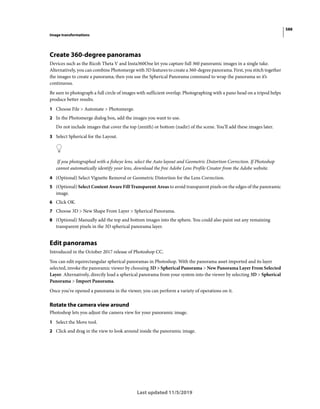
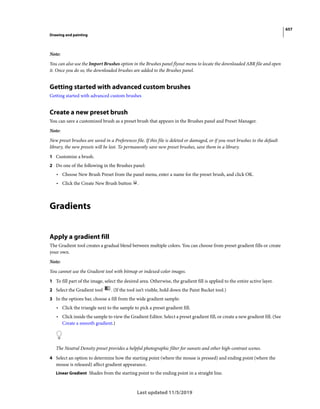
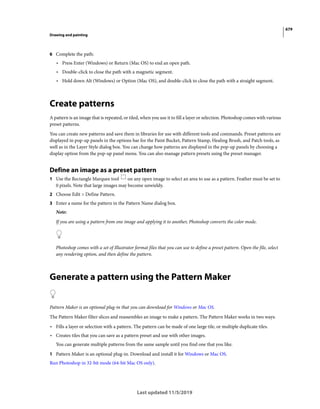
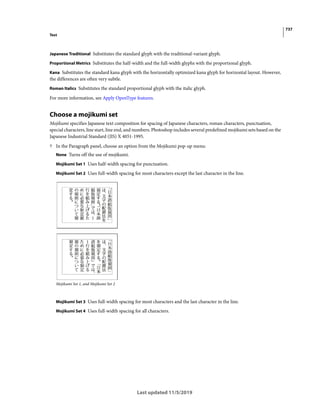
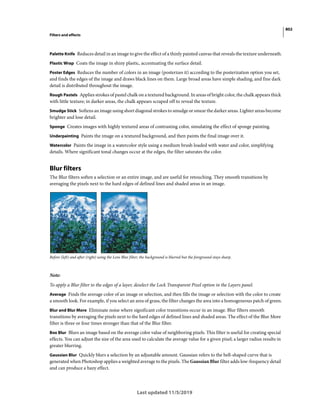
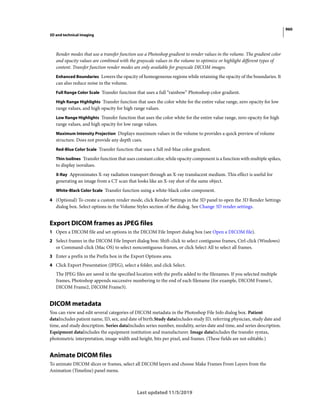
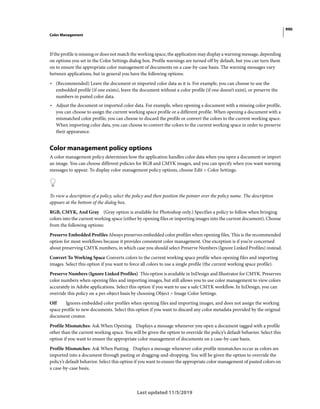
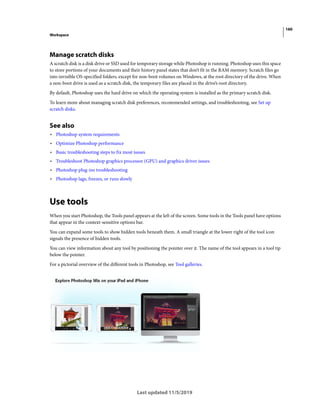
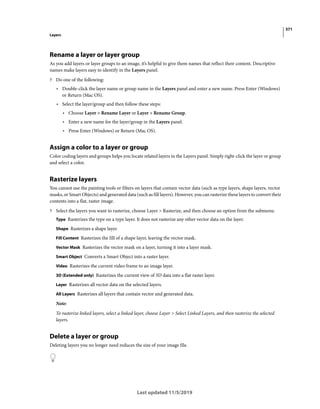
Let's take a look at the comprehensive list of keyboard shortcuts to work quickly on the iPad:
Action
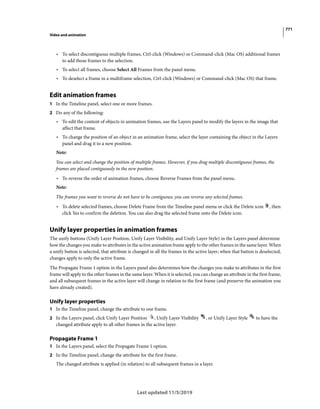
Keyboard shortcut (iPad)
Copy Command + C
Copy content from all visible layers Command + Shift + C
Paste Command + V
Undo Command + Z
Redo Command + Shift + Z
Move V
Transform N
Lasso L
Quick select W
Rectangular marquee M (Shift)
Elliptical marquee M (Shift)
Brush B
Eraser E
Paint bucket G (Shift)
Gradient G (Shift)
Spot healing brush J
Clone stamp S
Crop C
Type T
Eyedropper I
Use default foreground and background colors D
Switch foreground and background colors X
Brush size increase ]
Brush size decrease [
Select All Command + A
Deselect Command + D
Reselect Command + Shift + D
Invert Selection Command + Shift + I
Next selection view F
Previous selection view Shift + F
Fill with the foreground color Option + Delete](https://image.slidesharecdn.com/photoshopreference-221105105800-0601c9e0/85/photoshop_reference-pdf-116-320.jpg)


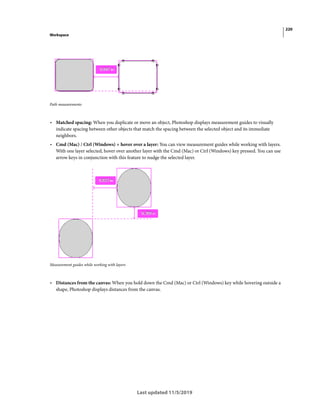
![172
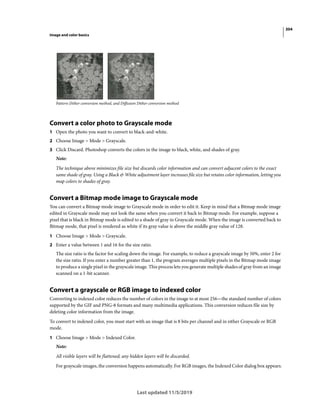
Workspace
Last updated 11/5/2019
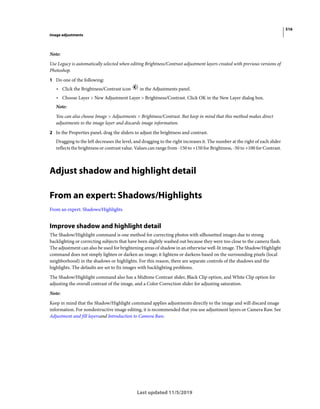
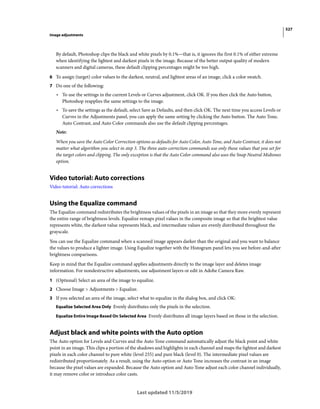
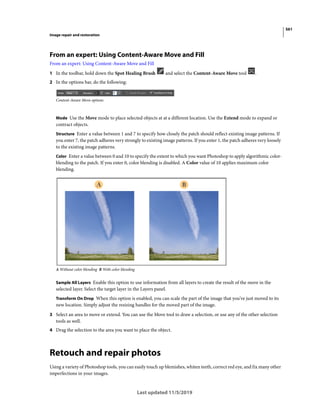
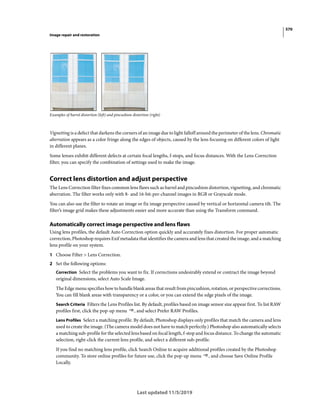
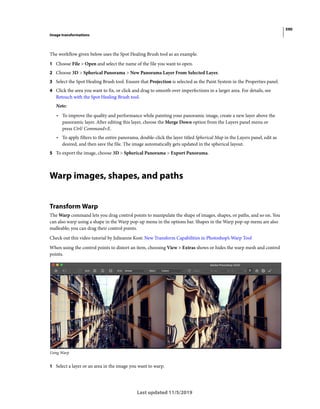
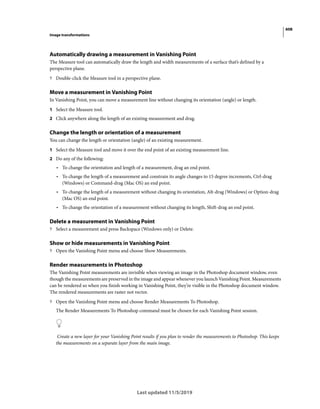
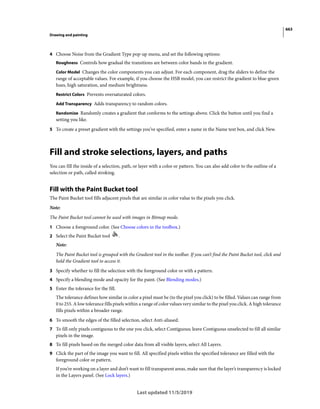
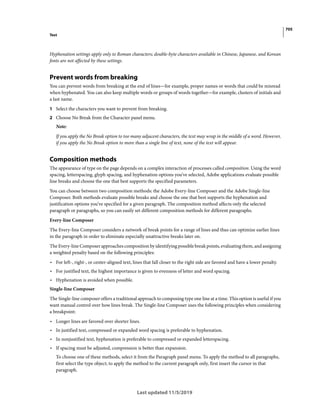
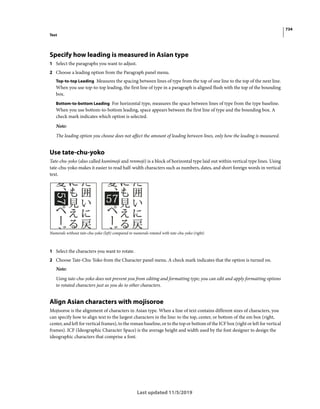
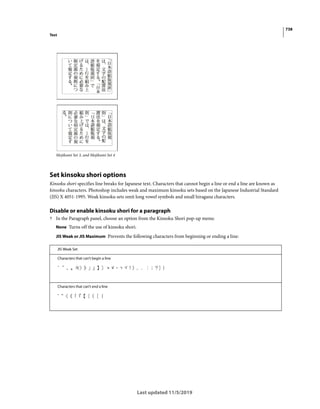
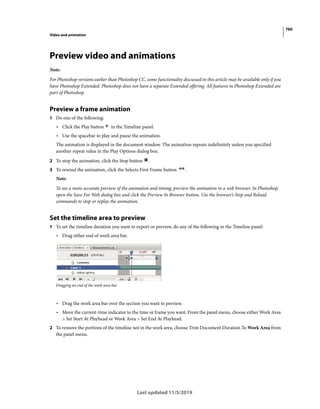
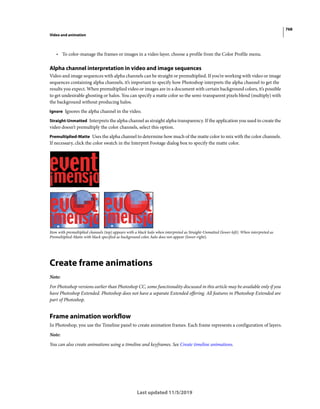
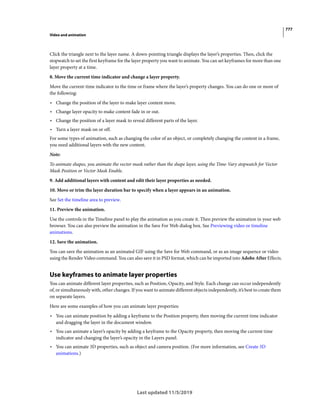
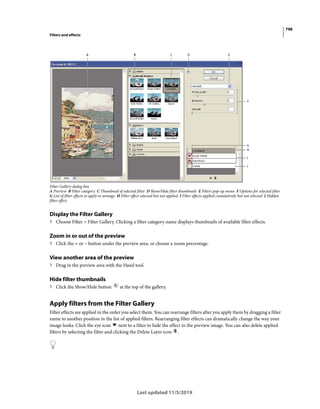
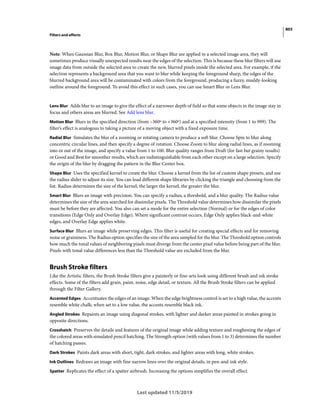
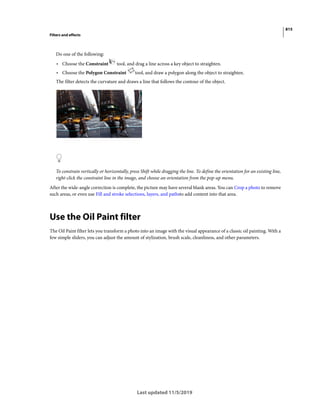
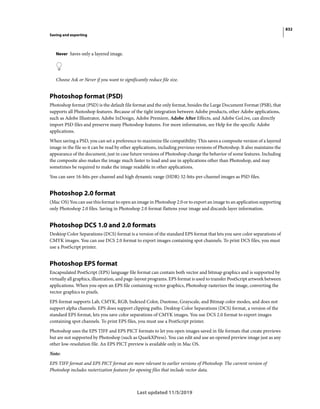
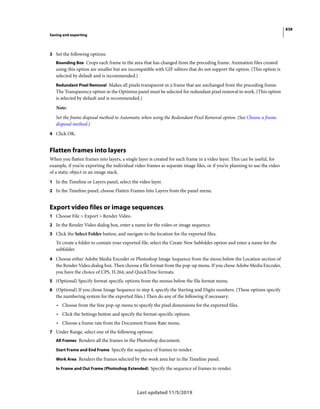
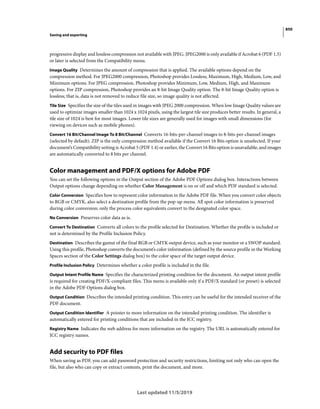
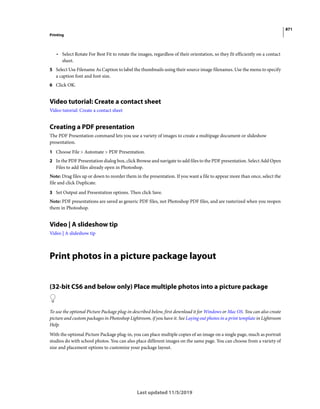
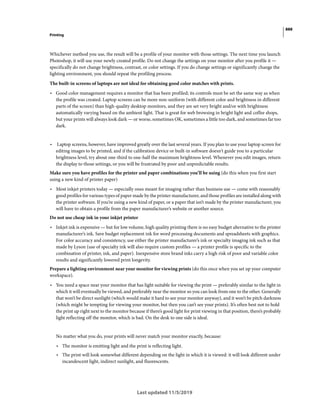
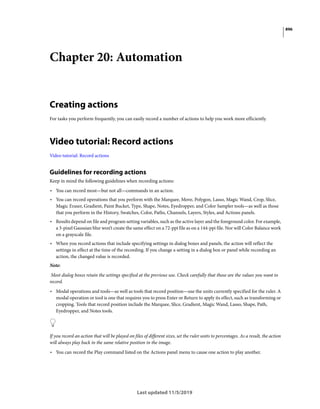
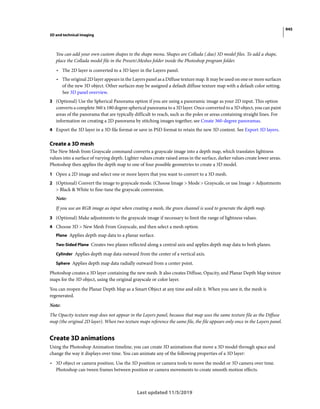
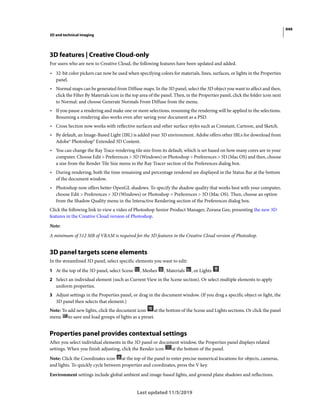
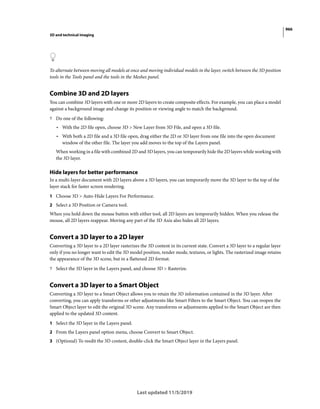
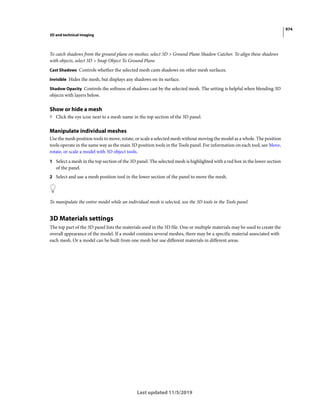
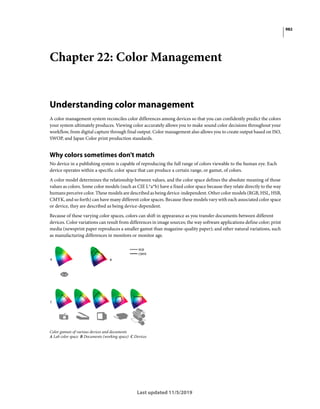
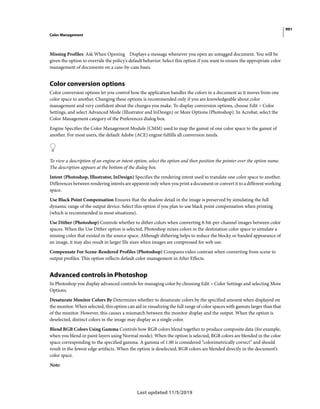
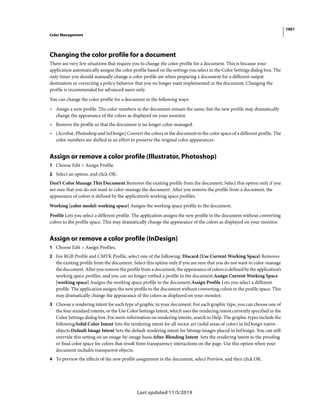
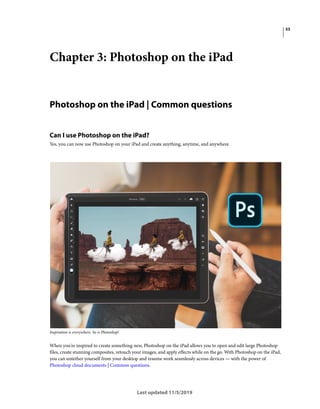
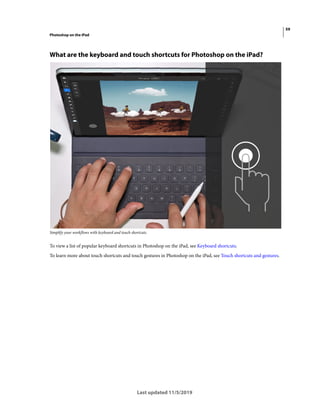
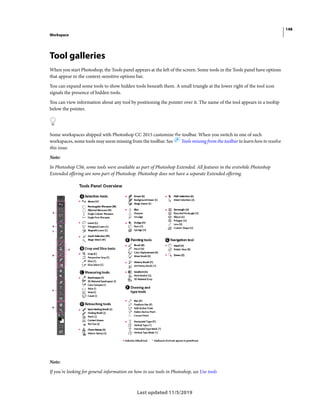
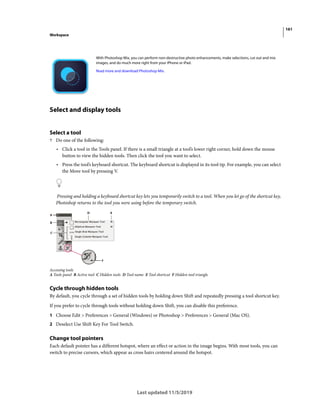
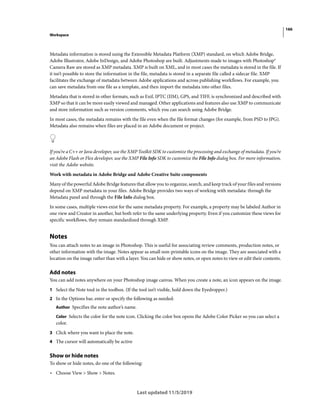
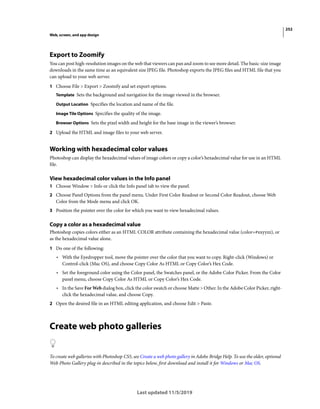
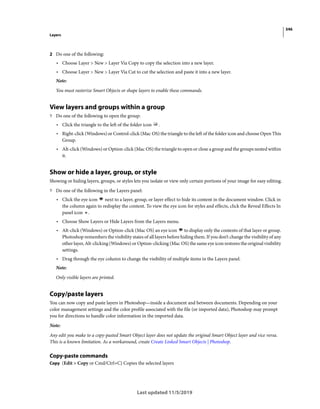
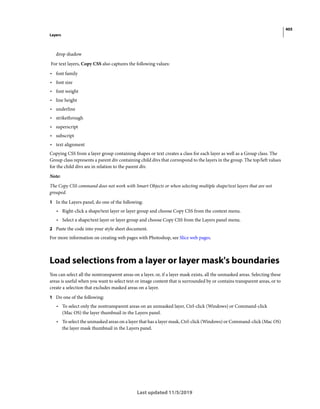
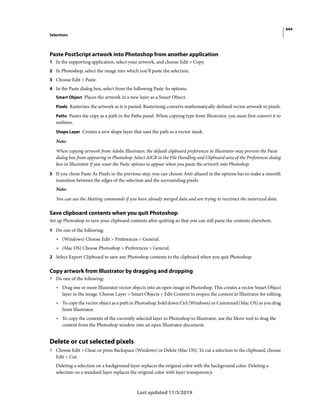
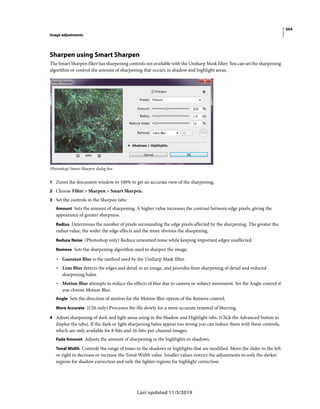
Link or embed an image using OLE (Windows only)
Photoshop is an OLE 2.0 server, which means it supports embedding or linking an image in an OLE container
application (usually a word-processing or page-layout program). For example, you can insert Photoshop files and
selections into other OLE applications, such as Adobe PageMaker, Adobe FrameMaker, and Microsoft Word, using
copy and paste or other methods.
• Linking lets you place a link in the OLE container file that refers to the Photoshop file on the hard drive.
• Embedding lets you insert the Photoshop file into the OLE container file.
After the image is in the container application, you can double-click it for editing in Photoshop. When you close the
image in Photoshop, it is updated in the container application.
Link or embed a selection or image in an OLE application
? Do one of the following:
• Copy a selection in Photoshop, and insert it in your OLE container application using the application’s Paste
Special command. Refer to your word-processing or page-layout application documentation for more
instructions. Pasted selections can only be embedded, not linked.
• Use your OLE container application’s Insert Object command to insert a new Photoshop image or existing
Photoshop file as an OLE-embedded or OLE-linked object. Refer to your word-processing or page-layout
application documentation for instructions.
Insert an unlinked screen-resolution bitmap into an OLE application
? With the Move tool , drag a selection to the OLE container application. When you drop the object, it appears as
a 72-ppi bitmap, which cannot be automatically updated in Photoshop.
Modify and update a linked or embedded image in an OLE application
1 Double-click the linked or embedded image in your word-processing or page-layout application to start Photoshop
(if it is not already running), and open the image for editing.
2 Modify the image as desired.
3 Do one of the following:
• For embedded images, close the file, or choose File > Update or File > Close & Return to [application name].
• For linked images, save and close the file.
Note:
You can also modify linked files without first opening the container document. The linked image is updated the next
time you open the document in its OLE container application.
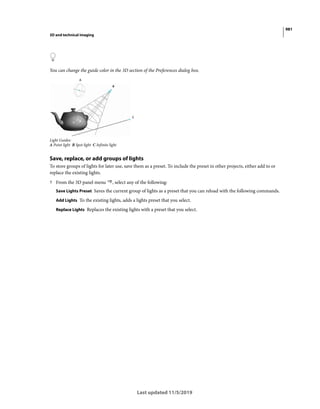
Preferences
About preferences
In order for Photoshop to run as smoothly as possible, in a way that's customized for your particular workflow, you
need to set up your Preferences to your liking.](https://image.slidesharecdn.com/photoshopreference-221105105800-0601c9e0/85/photoshop_reference-pdf-182-320.jpg)
![174
Workspace
Last updated 11/5/2019
2 Click Reset All Warning Dialogs, and click OK.
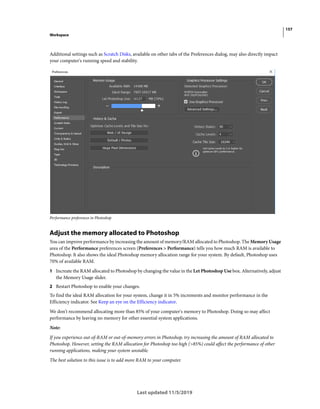
Performance-related preferences
See Performance preferences.
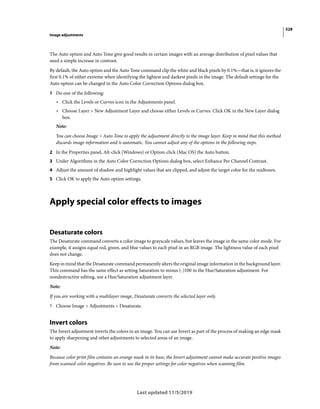
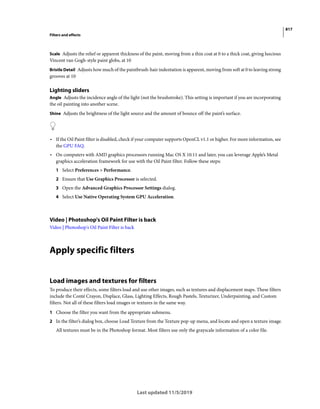
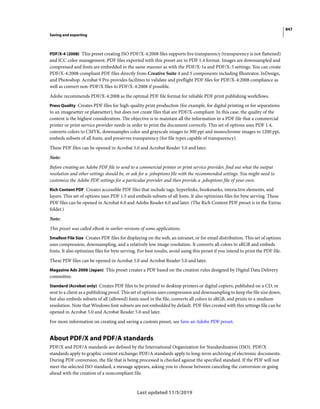
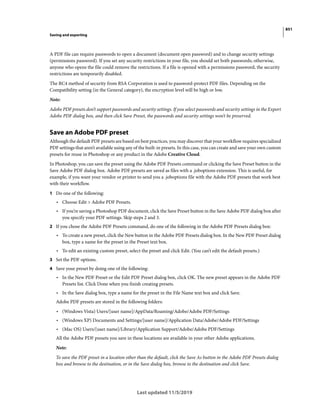
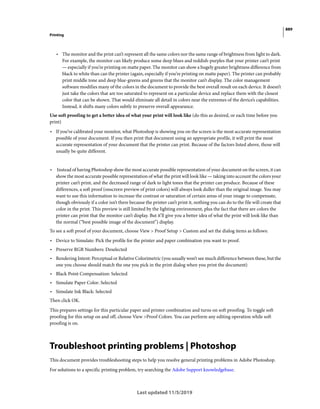
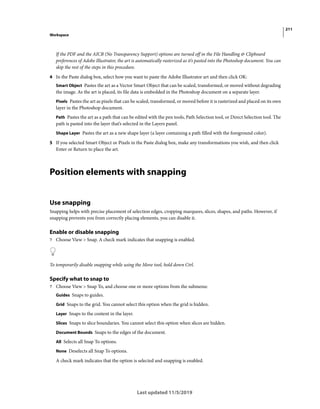
Default keyboard shortcuts
Notes:
• You can customize the keyboard shortcuts in Photoshop on the desktop. See Customize keyboard shortcuts.
• You can view, edit, and summarize keyboard shortcuts in the Keyboard Shortcuts dialog box. To view this in
Photoshop, select Edit > Keyboard Shortcuts or use the following keyboard shortcuts:
• Alt + Shift + Control + K (Windows)
• Alt + Shift + Command + K (macOS)
• On newer MacBook Pro models, the Touch Bar replaces the function keys on top of the keyboard. See this Apple
documentation article to understand how to use the function keys on these models.
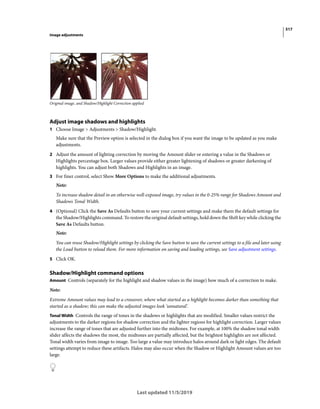
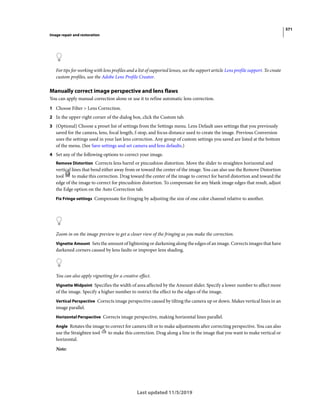
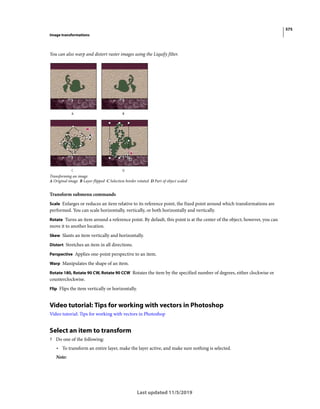
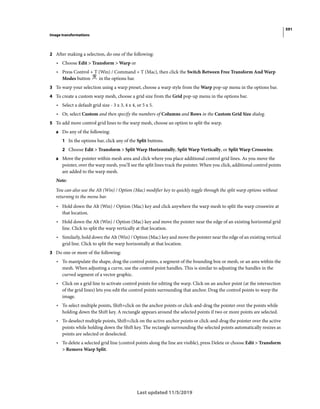
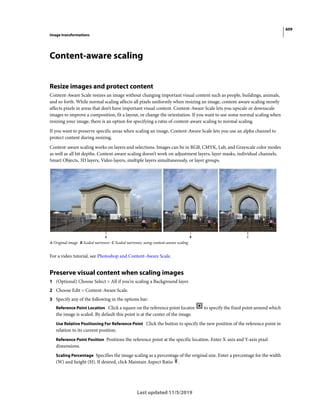
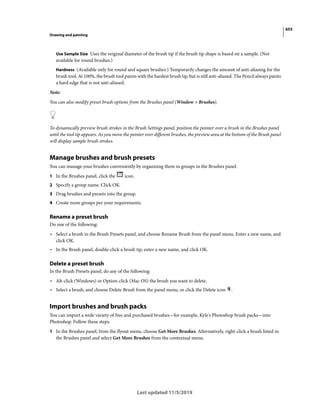
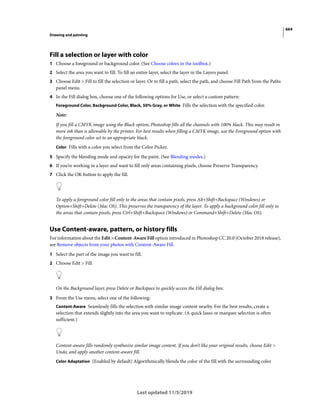
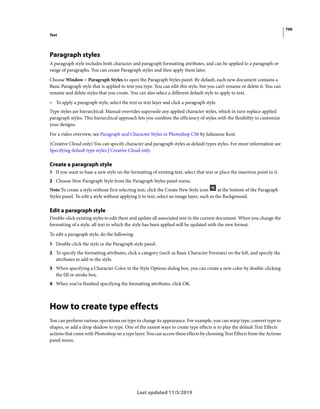
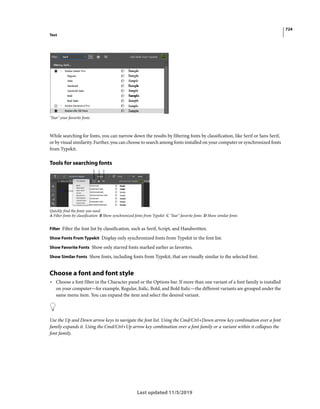
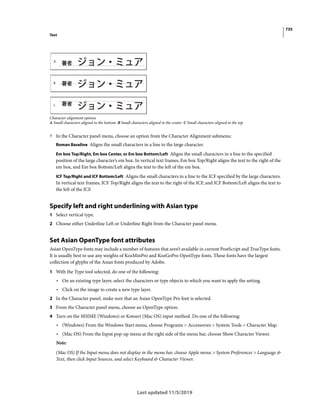
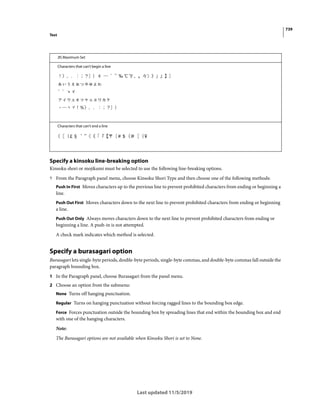
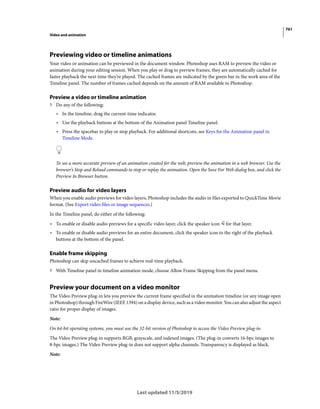
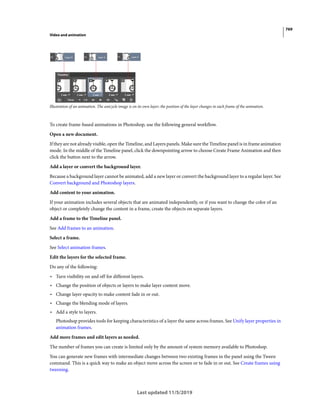
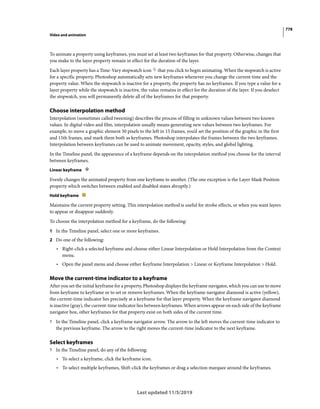
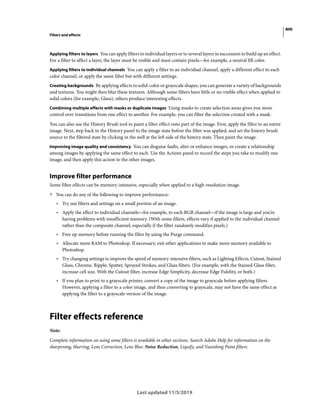
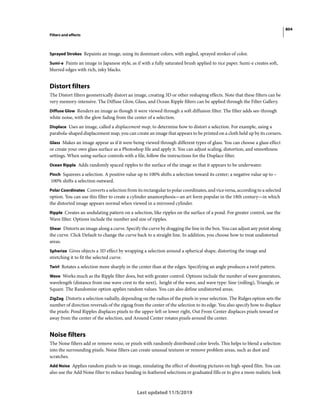
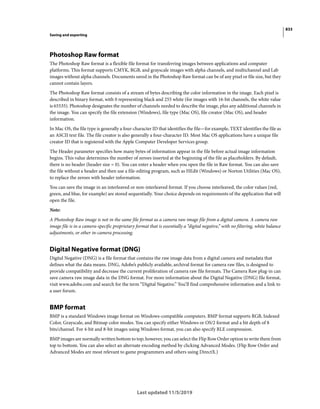
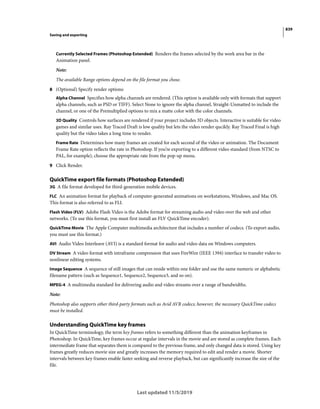
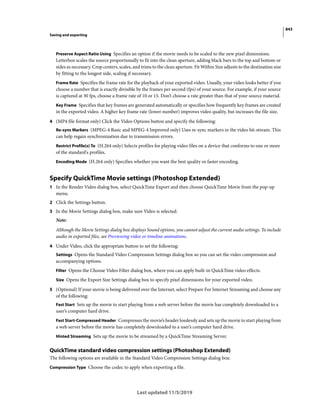
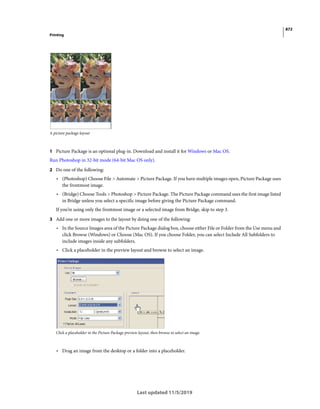
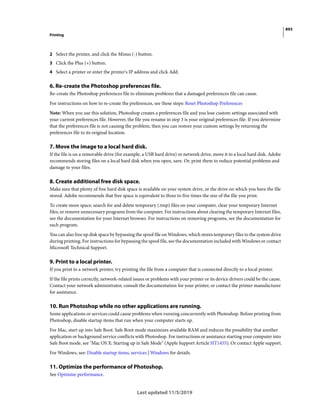
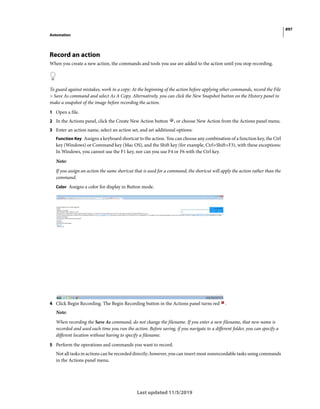
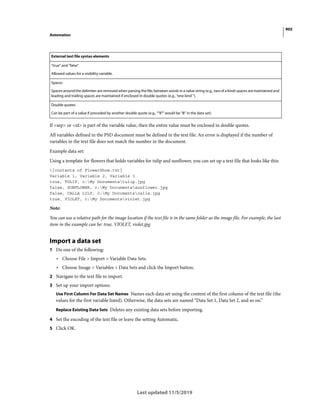
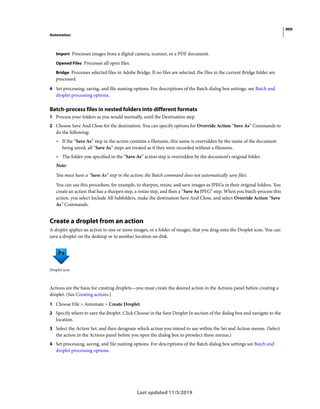
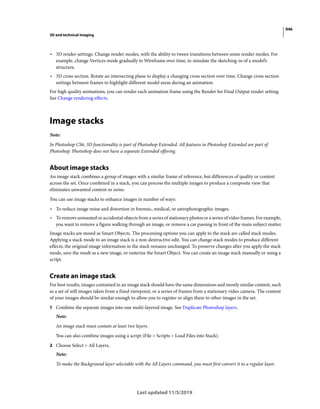
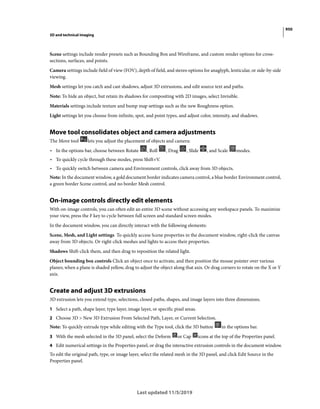
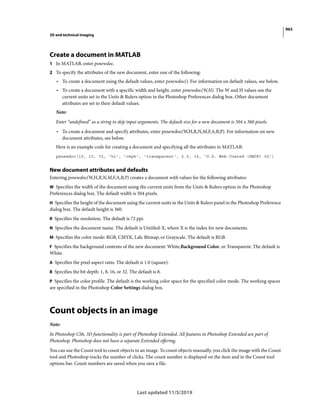
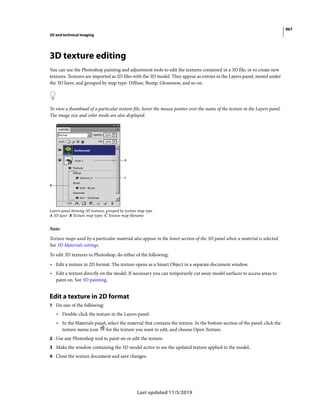
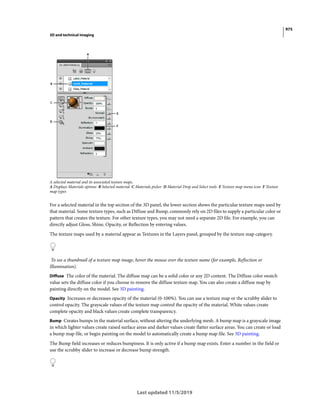
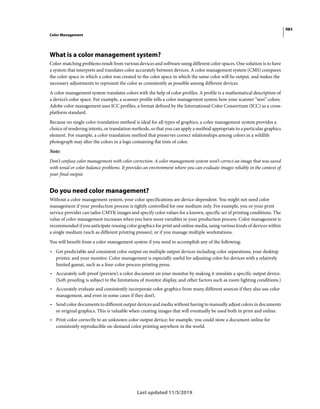
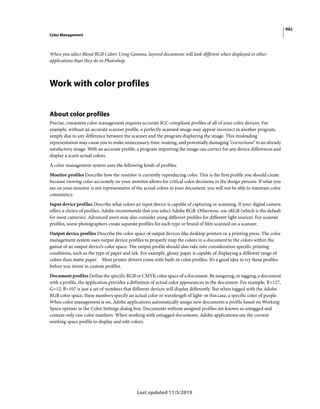
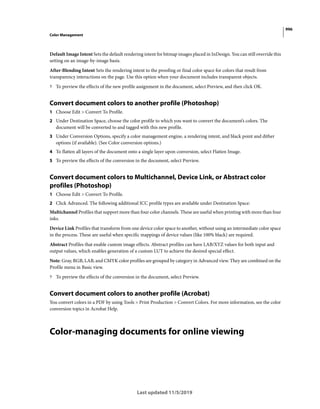
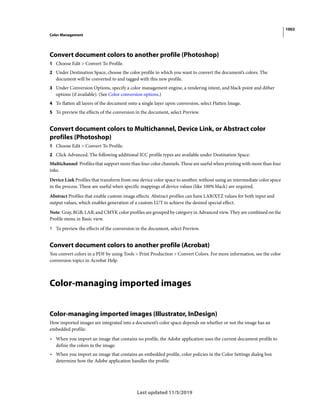
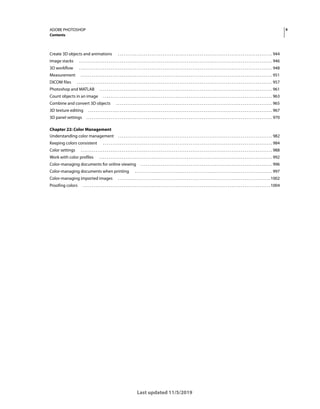
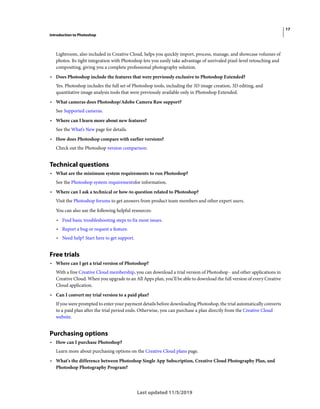
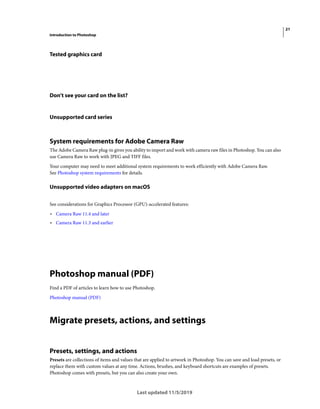
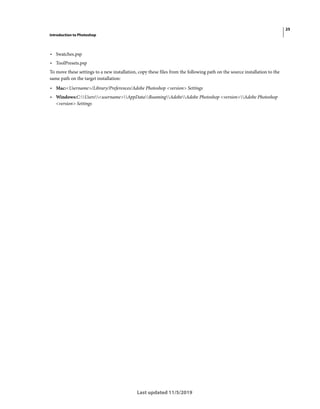
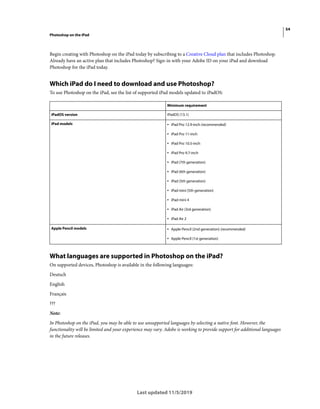
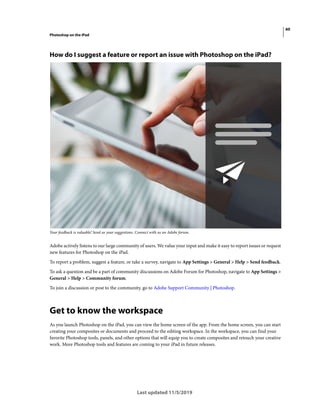
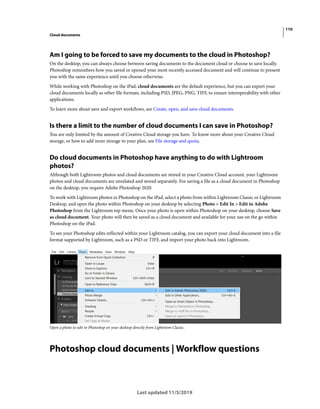
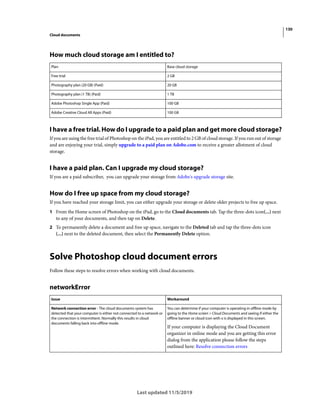
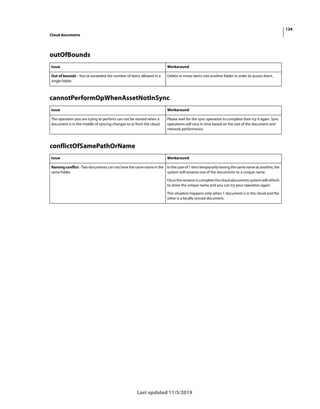
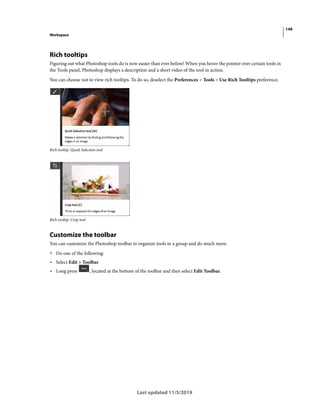
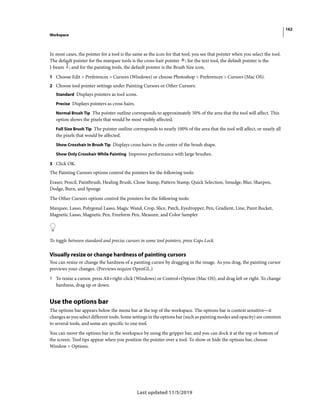
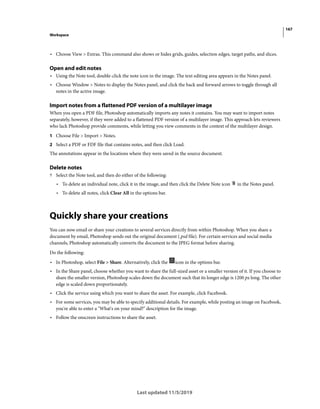
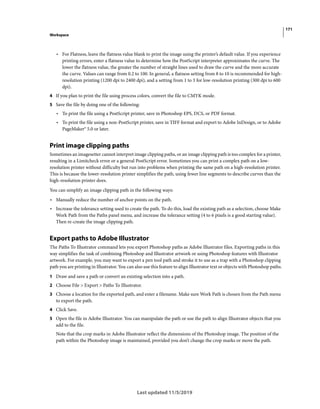
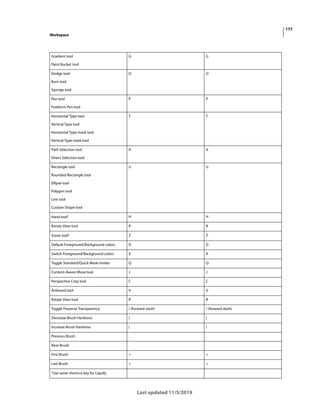
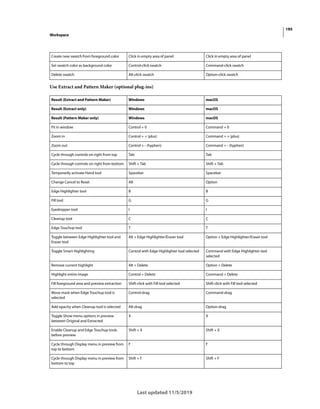
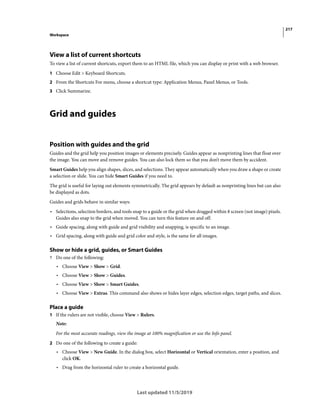
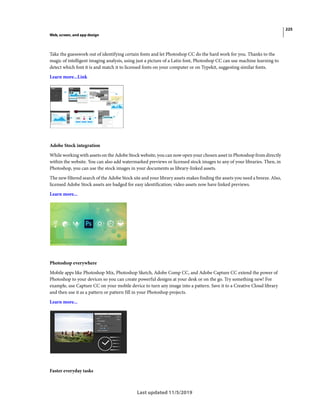
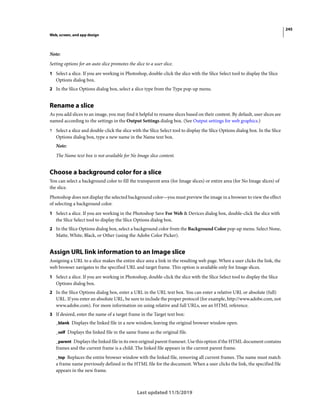
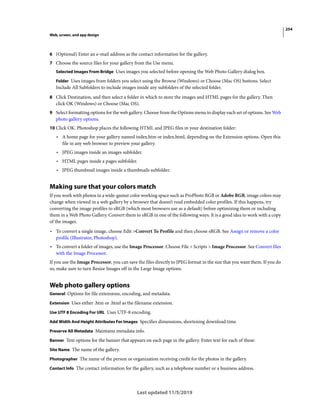
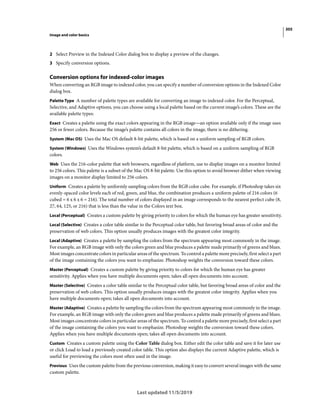
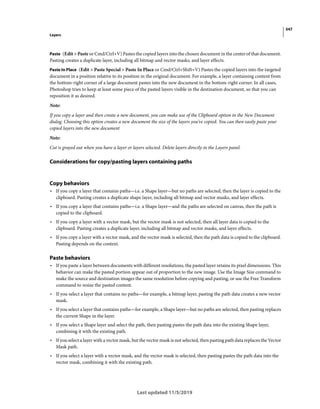
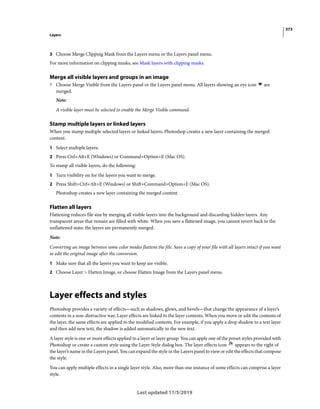
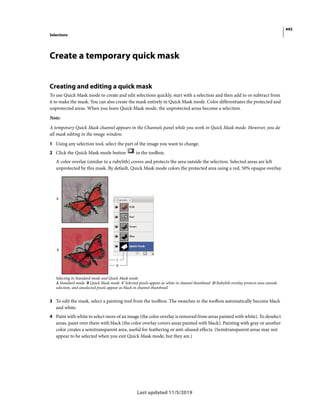
Popular shortcuts
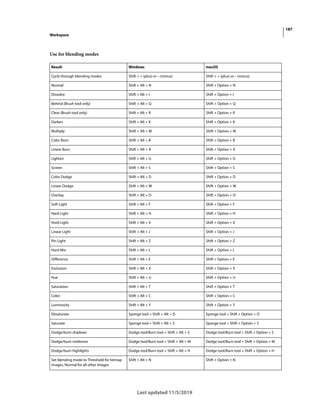
Result Windows macOS
Free Transform Control + T Command + T
Togglebetweenpaintinganderasingwiththe
same brush tip
Hold down ~ (tilde key) Hold down ~ (tilde key)
Decrease Brush Size [ [
Increase Brush Size ] ]
Decrease Brush Hardness { {
Increase Brush Hardness } }
Rotate the brush tip by 1 degree Left Arrow (anti-clockwise), Right Arrow
(clockwise)
Left Arrow (anti-clockwise), Right Arrow
(clockwise)
Rotate the brush tip by 15 degrees Shift + Left Arrow (anti-clockwise), Shift +
Right Arrow (clockwise)
Shift + Left Arrow (anti-clockwise), Shift
+ Right Arrow (clockwise)
Default Foreground/Background colors D D
Switch Foreground/Background colors X X
Fit layer(s) to screen Alt-click layer Option-click layer
New layer via copy Control + J Command + J
New layer via cut Shift + Control + J Shift + Command + J
Add to a selection Any selection tool + Shift-drag Any selection tool + Shift-drag
Delete brush or swatch Alt-click brush or swatch Option-click brush or swatch
Toggle auto-select with the move tool Control-click Command-click
Close all open documents other than the
current document
Ctrl + Alt + P Command + Option + P](https://image.slidesharecdn.com/photoshopreference-221105105800-0601c9e0/85/photoshop_reference-pdf-184-320.jpg)
![181
Workspace
Last updated 11/5/2019
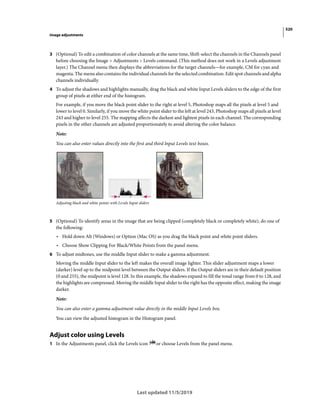
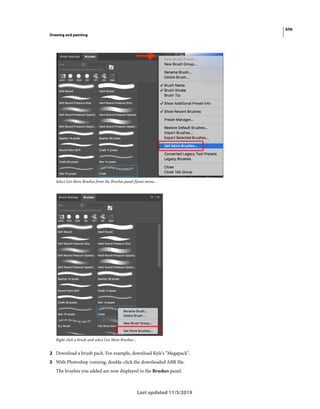
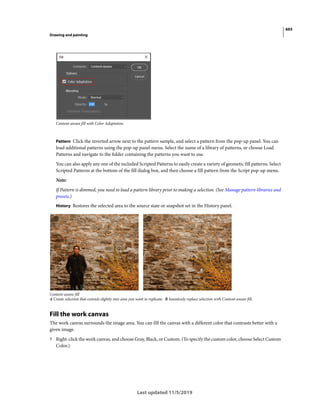
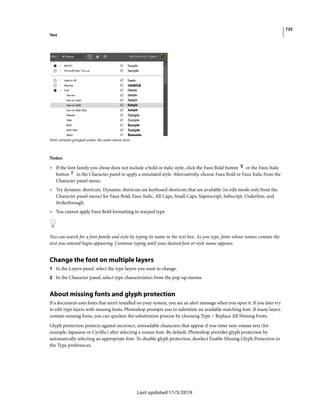
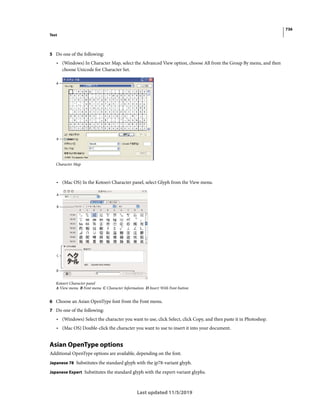
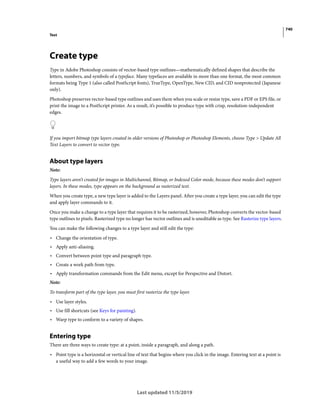
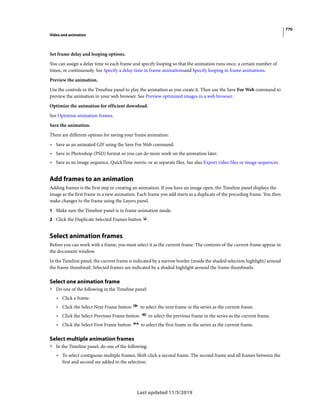
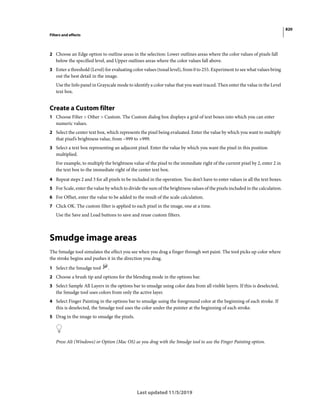
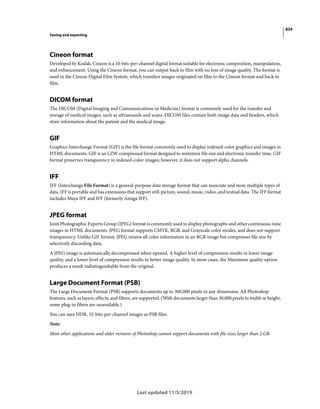
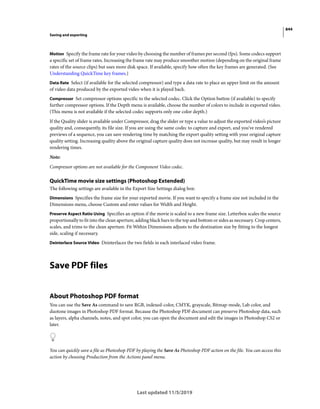
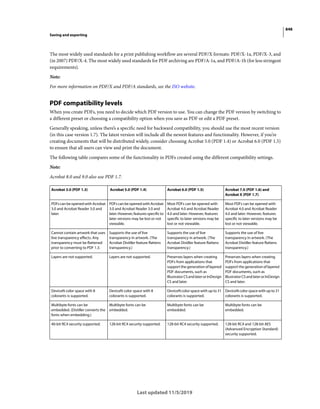
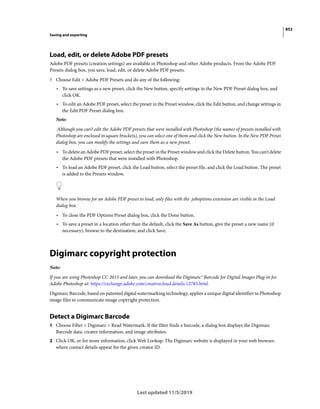
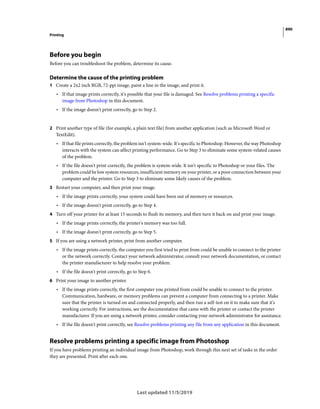
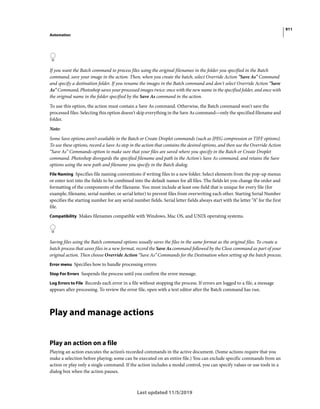
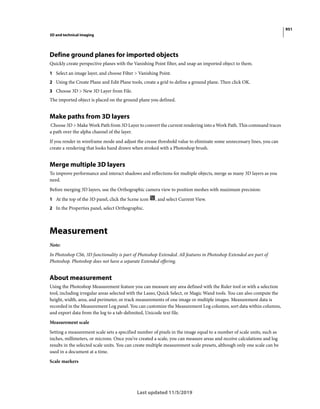
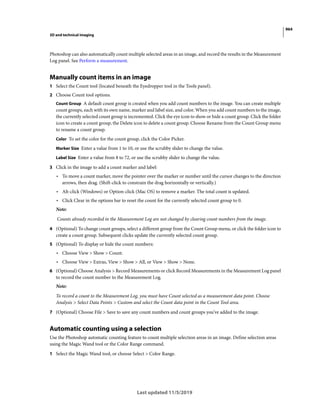
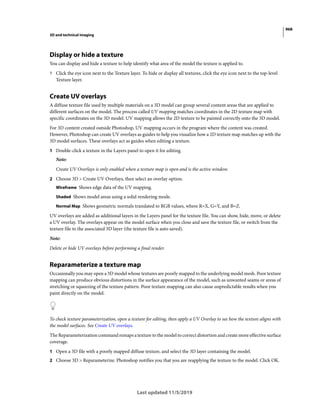
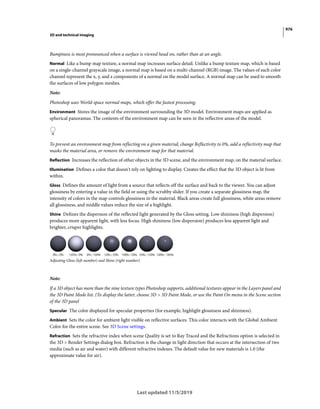
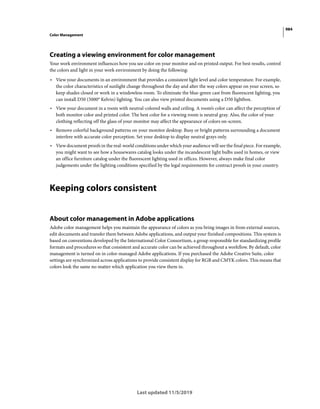
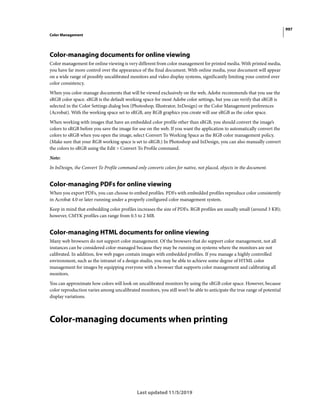
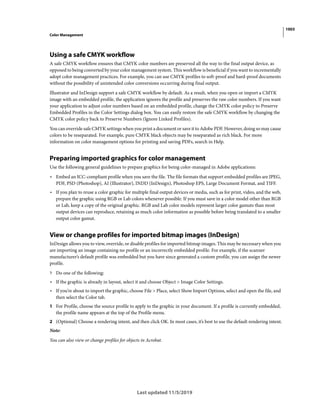
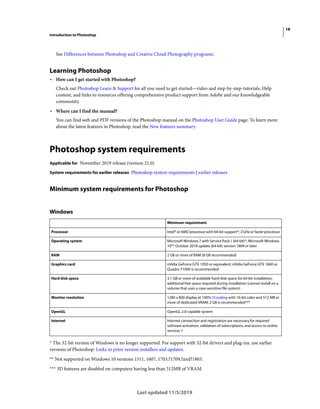
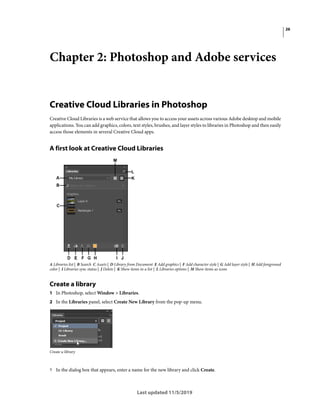
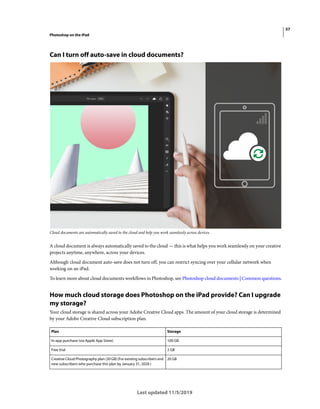
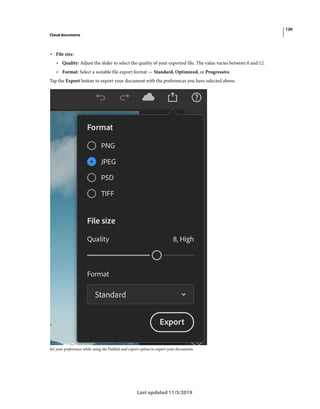
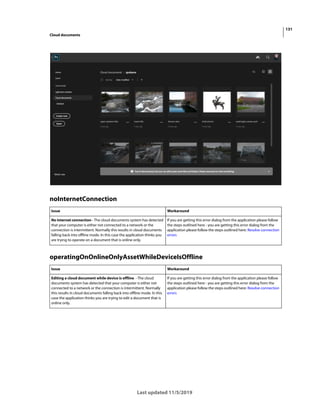
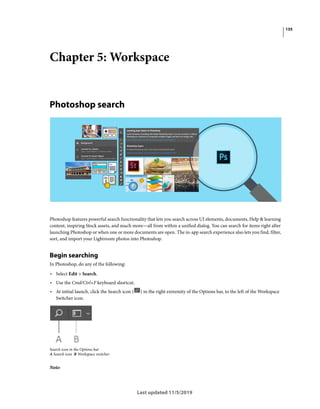
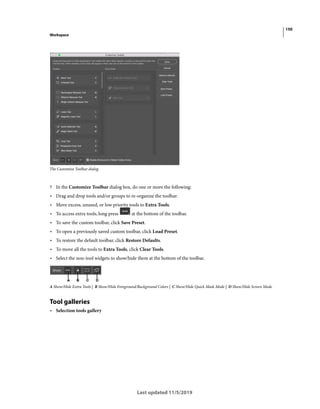
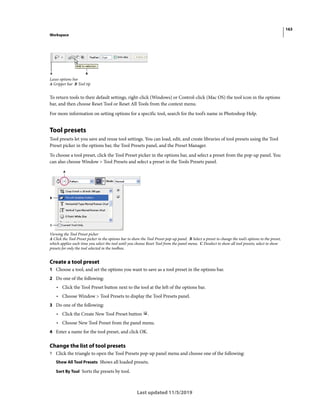
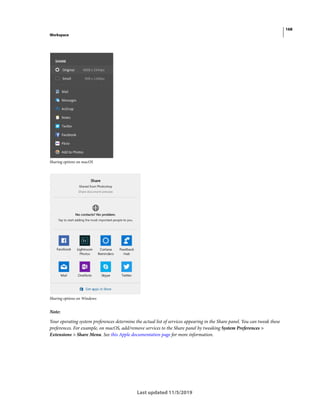
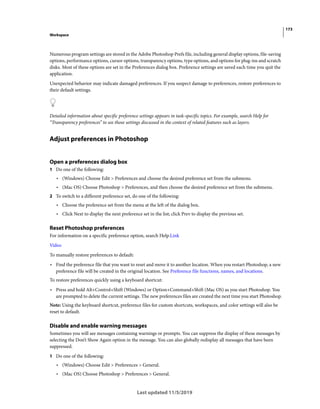
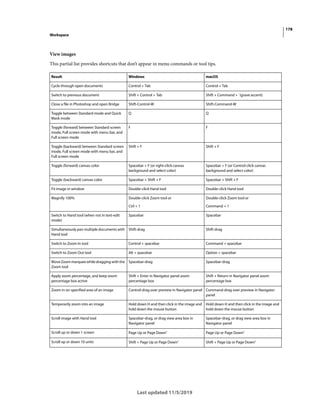
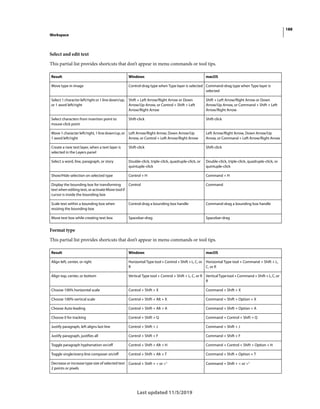
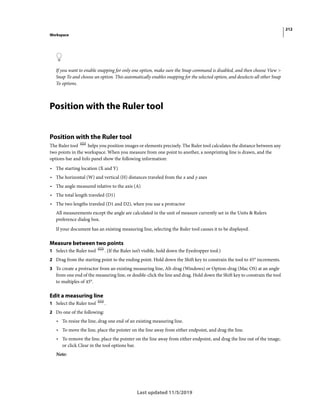
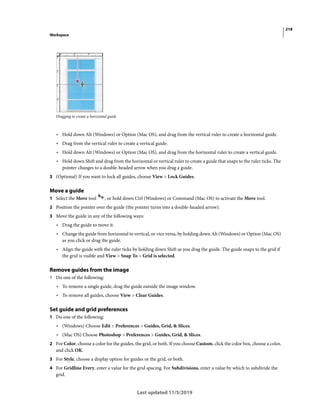
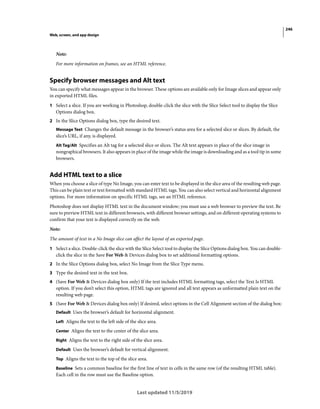
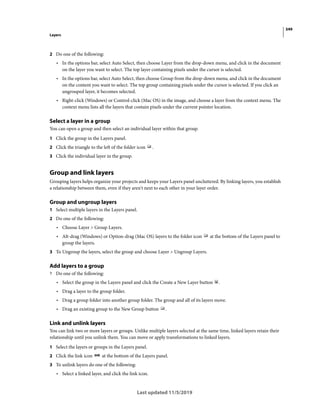
Use the Camera Raw dialog box
Note:
Holding down a key temporarily activates a tool. Letting go of the key returns to the previous tool.
Increase brush size (Brush, Stamp tools) ] ]
Decrease brush size (Brush, Stamp tools) [ [
Increase brush hardness (Brush, Stamp tools) Shift + ] Shift + ]
Decrease brush hardness (Brush, Stamp tools) Shift + [ Shift + [
Undo last action Control + Z Command + Z
Redo last action Control + Shift + Z Command + Shift + Z
Deselect all Control + D Command + D
Hide selection and planes Control + H Command + H
Move selection 1 pixel Arrow keys Arrow keys
Move selection 10 pixels Shift + arrow keys Shift + arrow keys
Copy Control + C Command + C
Paste Control + V Command + V
Repeat last duplicate and move Control + Shift + T Command + Shift + T
Create a floating selection from the current
selection
Control + Alt + T
Fill a selection with image under the pointer Control-drag Command-drag
Create a duplicate of the selection as a
floating selection
Control + Alt-drag Command + Option-drag
Constrain selection to a 15° rotation Alt + Shift to rotate Option + Shift to rotate
Select a plane under another selected plane Control-click the plane Command-click the plane
Create 90° plane off parent plane Control-drag Command-drag
Delete last node while creating plane Backspace Delete
Make a full canvas plane, square to the camera Double-click the Create Plane tool Double-click the Create Plane tool
Result Windows macOS
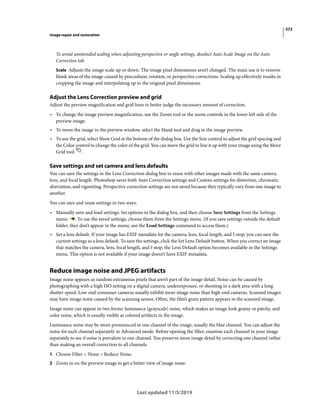
Zoom tool Z Z
Hand tool H H
White Balance tool I I
Color Sampler tool S S
Crop tool C C
Straighten tool A A
Spot Removal tool B B
Red Eye Removal tool E E](https://image.slidesharecdn.com/photoshopreference-221105105800-0601c9e0/85/photoshop_reference-pdf-191-320.jpg)
![182
Workspace
Last updated 11/5/2019
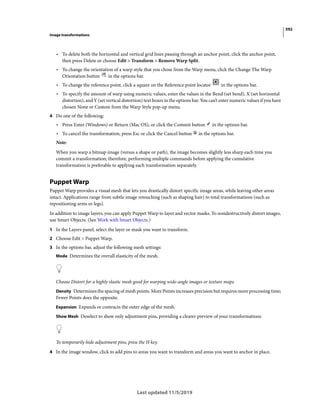
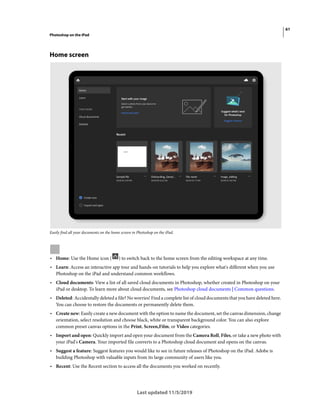
Basic panel Ctrl + Alt + 1 Command + Option + 1
Tone Curve panel Ctrl + Alt + 2 Command + Option + 2
Detail panel Ctrl + Alt + 3 Command + Option + 3
HSL/Grayscale panel Ctrl + Alt + 4 Command + Option + 4
Split Toning panel Ctrl + Alt + 5 Command + Option + 5
Lens Corrections panel Ctrl + Alt + 6 Command + Option + 6
Camera Calibration panel Ctrl + Alt + 7 Command + Option + 7
Presets panel Ctrl + Alt + 9 Command + Option + 9 (macOS Universal
Access zoom shortcut must be disabled in
System Preferences)
Open Snapshots panel Ctrl + Alt + 9 Command + Option + 9
Parametric Curve Targeted Adjustment tool Ctrl + Alt + Shift + T Command + Option + Shift + T
Hue Targeted Adjustment tool Ctrl + Alt + Shift + H Command + Option + Shift + H
Saturation Targeted Adjustment tool Ctrl + Alt + Shift + S Command + Option + Shift + S
Luminance Targeted Adjustment tool Ctrl + Alt + Shift + L Command + Option + Shift + L
Grayscale Mix Targeted Adjustment tool Ctrl + Alt + Shift + G Command + Option + Shift + G
Last-used Targeted Adjustment tool T T
Adjustment Brush tool K K
Graduated Filter tool G G
Increase/decrease brush size ] / [ ] / [
Increase/decrease brush feather Shift + ] / Shift + [ Shift + ] / Shift + [
Increase/decreaseAdjustmentBrush toolflow
in increments of 10
= (equal sign) / - (hyphen) = (equal sign) / - (hyphen)
Temporarily switch from Add to Erase mode
for theAdjustment Brush tool, or from Erase to
Add mode
Alt Option
Increase/decrease temporary Adjustment
Brush tool size
Alt + ] / Alt + [ Option + ] / Option + [
Increase/decrease temporary Adjustment
Brush tool feather
Alt + Shift + ] / Alt + Shift + [ Option + Shift + ] / Option + Shift + [
Increase/decrease temporary Adjustment
Brush tool flow in increments of 10
Alt + = (equal sign) / Alt + - (hyphen) Option = (equal sign) / Option + - (hyphen)
Switch to New mode from Add or Erase mode
oftheAdjustmentBrush toolorthe Graduated
Filter
N N
Toggle Auto Mask for Adjustment Brush tool M M
Toggle Show Mask for Adjustment Brush tool Y Y
Toggle pins for Adjustment Brush tool V V
Toggle overlay for Graduated Filter, Spot
Removal tool, or Red Eye Removal tool.
V V](https://image.slidesharecdn.com/photoshopreference-221105105800-0601c9e0/85/photoshop_reference-pdf-192-320.jpg)
![183
Workspace
Last updated 11/5/2019
Use the Black-and-White dialog box
Rotate image left L or Ctrl + ] L or Command + ]
Rotate image right R or Ctrl + [ R or Command + [
Zoom in Ctrl + + (plus) Command + + (plus)
Zoom out Ctrl + - (hyphen) Command + - (hyphen)
Temporarily switch to Zoom In tool
(Doesn’t work when Straighten tool is
selected. If Crop tool is active, temporarily
switches to Straighten tool.)
Ctrl Command
Temporarily switch to Zoom Out tool and
changethe Open Image buttontoOpenCopy
and the Cancel button to Reset.
Alt Option
Toggle preview P P
Full screen mode F F
Temporarily activate the White Balance tool
and change the Open Image button to Open
Object.
(Does not work if Crop tool is active)
Shift Shift
Select multiple points in Curves panel Click the first point; Shift-click additional
points
Click the first point; Shift-click additional
points
Add point to curve in Curves panel Control-click in preview Command-click in preview
Move selected point in Curves panel (1 unit) Arrow keys Arrow keys
Move selected point in Curves panel (10 units) Shift-arrow Shift-arrow
Open selected images in Camera Raw dialog
box from Bridge
Ctrl + R Command + R
Open selected images from Bridge bypassing
Camera Raw dialog box
Shift + double-click image Shift + double-click image
Display highlights that will be clipped in
Preview
Alt-drag Exposure, Recovery, or Black sliders Option-drag Exposure, Recovery, or Black
sliders
Highlight clipping warning O O
Shadows clipping warning U U
(Filmstrip mode) Add 1 - 5 star rating Ctrl +1 - 5 Command + 1 - 5
(Filmstrip mode) Increase/decrease rating Ctrl +. (period) / Ctrl+, (comma) Command + . (period) / Command+, (comma)
(Filmstrip mode) Add red label Ctrl + 6 Command + 6
(Filmstrip mode) Add yellow label Ctrl + 7 Command + 7
(Filmstrip mode) Add green label Ctrl + 8 Command + 8
(Filmstrip mode) Add blue label Ctrl + 9 Command + 9
(Filmstrip mode) Add purple label Ctrl + Shift + 0 Command + Shift + 0
Camera Raw preferences Ctrl + K Command + K
Deletes Adobe Camera Raw preferences Ctrl + Alt (on open) Option + Shift (on open)](https://image.slidesharecdn.com/photoshopreference-221105105800-0601c9e0/85/photoshop_reference-pdf-193-320.jpg)
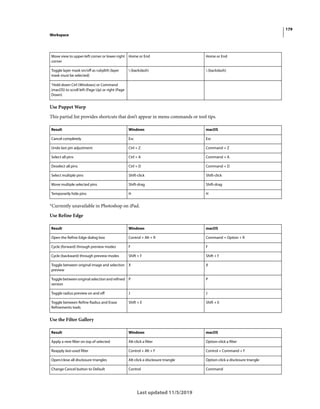
![185
Workspace
Last updated 11/5/2019
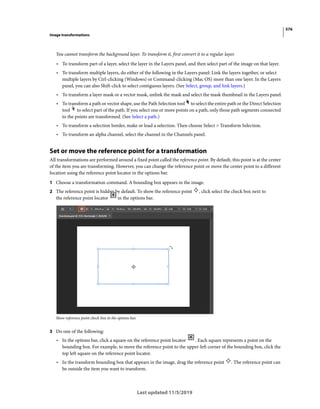
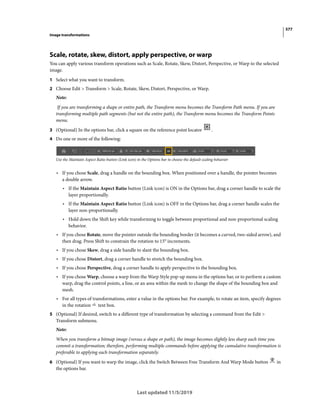
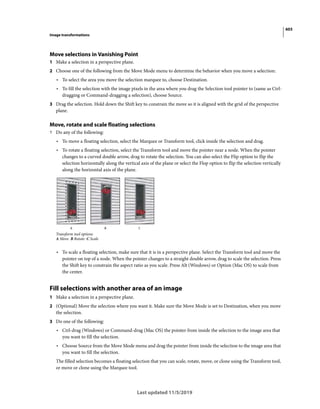
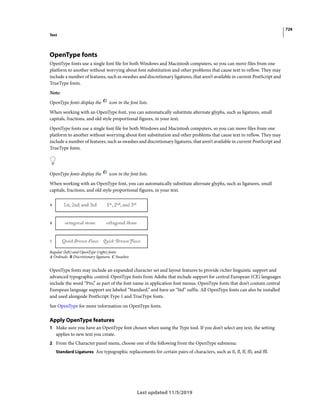
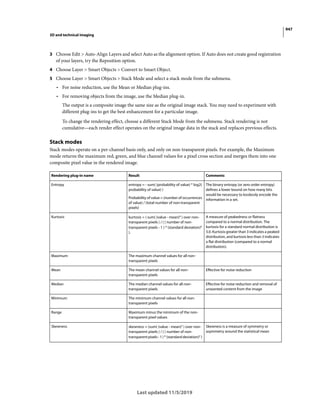
Transform selections, selection borders, and paths
This partial list provides shortcuts that don’t appear in menu commands or tool tips.
Edit paths
This partial list provides shortcuts that don’t appear in menu commands or tool tips.
Switch from Magnetic Lasso tool to Lasso tool Alt-drag Option-drag
Switch from Magnetic Lasso tool to polygonal
Lasso tool
Alt-click Option-click
Apply/cancel an operation of the Magnetic
Lasso
Enter/Esc or Control + . (period) Return/Esc or Command + . (period)
Move copy of selection Move tool + Alt-drag selection‡ Move tool + Option-drag selection‡
Move selection area 1 pixel Any selection + Right Arrow, Left Arrow, Up
Arrow, or Down Arrow†
Any selection + Right Arrow, Left Arrow, Up
Arrow, or Down Arrow†
Move selection 1 pixel Move tool + Right Arrow, Left Arrow, Up
Arrow, or Down Arrow†‡
Move tool + Right Arrow, Left Arrow, Up
Arrow, or Down Arrow†‡
Move layer 1 pixel when nothing selected on
layer
Control + Right Arrow, Left Arrow, Up Arrow,
or Down Arrow†
Command + Right Arrow, Left Arrow, Up
Arrow, or Down Arrow†
Increase/decrease detection width Magnetic Lasso tool + [ or ] Magnetic Lasso tool + [ or ]
Accept cropping or exit cropping Crop tool + Enter or Esc Crop tool + Return or Esc
Toggle crop shield off and on / (forward slash) / (forward slash)
Make protractor Ruler tool + Alt-drag end point Ruler tool + Option-drag end point
Snap guide to ruler ticks (except when View >
Snap is unchecked)
Shift-drag guide Shift-drag guide
Convert between horizontal and vertical
guide
Alt-drag guide Option-drag guide
†Hold down Shift to move 10 pixels
‡Applies to shape tools
Result Windows macOS
Transform from the center or reflect Alt Option
Constrain Shift Shift
Distort Control Command
Apply Enter Return
Cancel Control + . (period) or Esc Command + . (period) or Esc
Free transform with duplicate data Control + Alt + T Command + Option + T
Transform again with duplicate data Control + Shift + Alt + T Command + Shift + Option + T
Result Windows macOS
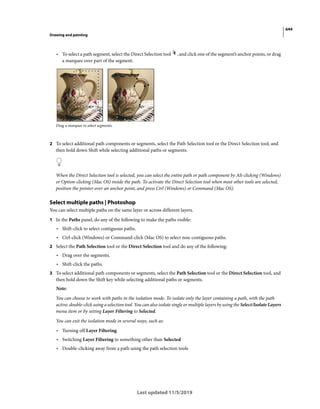
Select multiple anchor points Direct selection tool + Shift-click Direct selection tool + Shift-click
Select entire path Direct selection tool + Alt-click Direct selection tool + Option-click](https://image.slidesharecdn.com/photoshopreference-221105105800-0601c9e0/85/photoshop_reference-pdf-195-320.jpg)
![191
Workspace
Last updated 11/5/2019
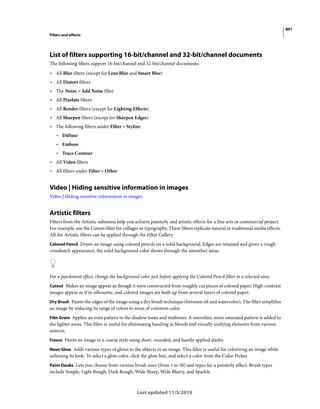
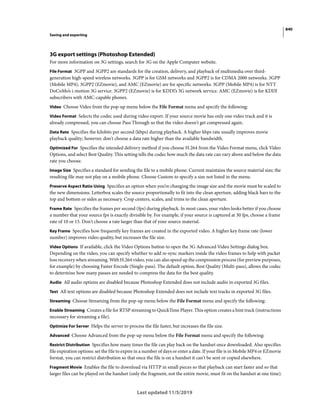
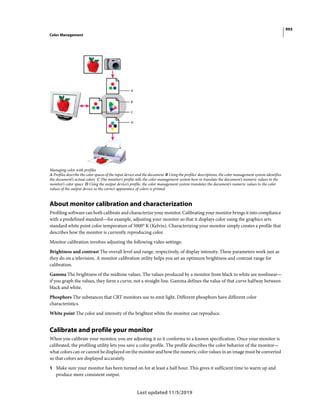
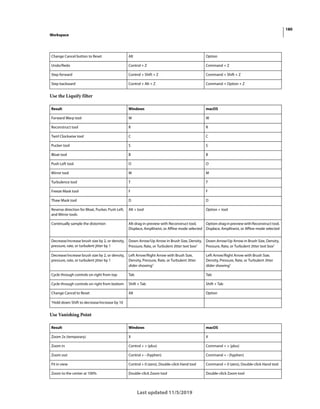
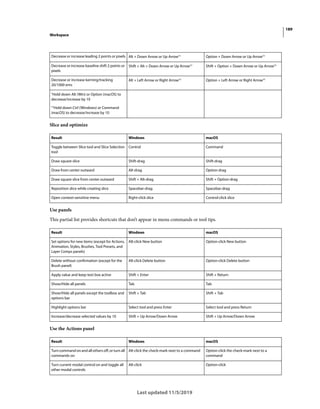
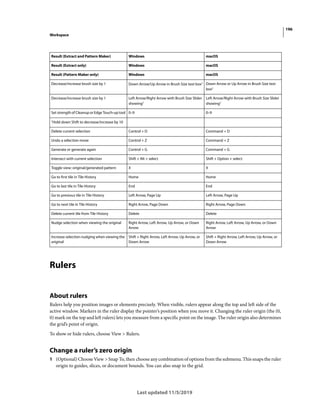
Use the Channels panel
Note:
If you prefer channel shortcuts starting with Ctrl/Command + 1 for red, choose Edit > Keyboard Shortcuts, and select Use
Legacy Channel Shortcuts.
Use the Clone Source panel
Use the Color panel
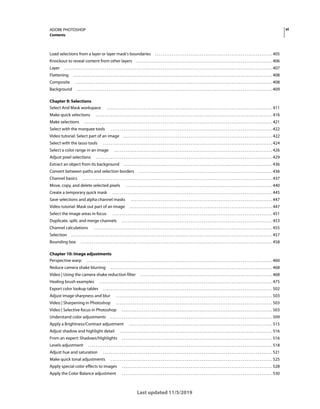
Select first/last brush Shift + , (comma) or . (period) Shift + , (comma) or . (period)
Display precise cross hair for brushes Caps Lock or Shift + Caps Lock Caps Lock
Toggle airbrush option Shift + Alt + P Shift + Option + P
Result Windows macOS
Select individual channels Ctrl + 3 (red), 4 (green), 5 (blue) Command + 3 (red), 4 (green), 5 (blue)
Select composite channel Ctrl + 2 Command + 2
Load channel as selection Control-click channel thumbnail, or Alt + Ctrl
+ 3 (red), 4 (green), 5 (blue)
Command-clickchannelthumbnail,orOption
+ Command + 3 (red), 4 (green), 5 (blue)
Add to current selection Control + Shift-click channel thumbnail Command + Shift-click channel thumbnail
Subtract from current selection Control + Alt-click channel thumbnail Command + Option-click channel thumbnail
Intersect with current selection Control + Shift + Alt-click channel thumbnail Command + Shift + Option-click channel
thumbnail
Set options for Save Selection As Channel
button
Alt-click Save Selection As Channel button Option-click Save Selection As Channel
button
Create a new spot channel Control-click Create New Channel button Command-click Create New Channel button
Select/deselect multiple color-channel
selection
Shift-click color channel Shift-click color channel
Select/deselect alpha channel and show/hide
as a rubylith overlay
Shift-click alpha channel Shift-click alpha channel
Display channel options Double-click alpha or spot channel thumbnail Double-click alpha or spot channel thumbnail
Toggle composite and grayscale mask in
Quick Mask mode
~ (tilde) ~ (tilde)
Result Windows macOS
Show Clone Source (overlays image) Alt + Shift Option + Shift
Nudge Clone Source Alt + Shift + arrow keys Option + Shift + arrow keys
Rotate Clone Source Alt + Shift + < or > Option + Shift + < or >
Scale (increase or reduce size) Clone Source Alt + Shift + [ or ] Option + Shift + [ or ]
Result Windows macOS](https://image.slidesharecdn.com/photoshopreference-221105105800-0601c9e0/85/photoshop_reference-pdf-201-320.jpg)
![193
Workspace
Last updated 11/5/2019
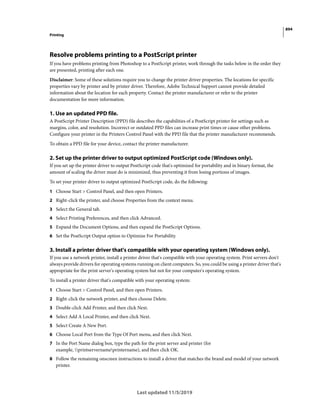
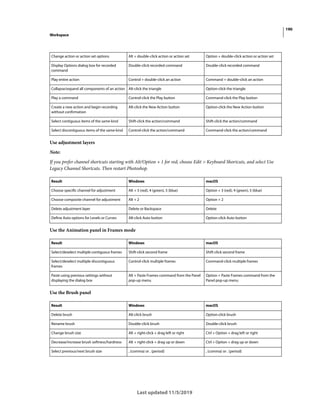
Create new layer below target layer Control-click New Layer button Command-click New Layer button
Select top layer Alt + . (period) Option + . (period)
Select bottom layer Alt + , (comma) Option + , (comma)
Add to layer selection in Layers panel Shift + Alt + [ or ] Shift + Option + [ or ]
Select next layer down/up Alt + [ or ] Option + [ or ]
Move target layer down/up Control + [ or ] Command + [ or ]
Merge a copy of all visible layers into target
layer
Control + Shift + Alt + E Command + Shift + Option + E
Merge layers Highlight layers you want to merge, then
Control + E
Highlight the layers you want to merge, then
Command + E
Move layer to bottom or top Control + Shift + [ or ] Command + Shift + [ or ]
Copy current layer to layer below Alt + Merge Down command from the Panel
pop-up menu
Option + Merge Down command from the
Panel pop-up menu
Merge all visible layers to a new layer above
the currently selected layer
Alt + Merge Visible command from the Panel
pop-up menu
Option + Merge Visible command from the
Panel pop-up menu
Show/hide this layer/layer group only or all
layers/layer groups
Right-click the eye icon Control-click the eye icon
Show/hide all other currently visible layers Alt-click the eye icon Option-click the eye icon
Toggle lock transparency for target layer, or
last applied lock
/ (forward slash) / (forward slash)
Edit layer effect/style, options Double-click layer effect/style Double-click layer effect/style
Hide layer effect/style Alt-double-click layer effect/style Option-double-click layer effect/style
Edit layer style Double-click layer Double-click layer
Disable/enable vector mask Shift-click vector mask thumbnail Shift-click vector mask thumbnail
Open Layer Mask Display Options dialog box Double-click layer mask thumbnail Double-click layer mask thumbnail
Toggle layer mask on/off Shift-click layer mask thumbnail Shift-click layer mask thumbnail
Toggle filter mask on/off Shift-click filter mask thumbnail Shift-click filter mask thumbnail
Toggle between layer mask/composite image Alt-click layer mask thumbnail Option-click layer mask thumbnail
Toggle between filter mask/composite image Alt-click filter mask thumbnail Option-click filter mask thumbnail
Toggle rubylith mode for layer mask on/off (backslash), or Shift + Alt-click (backslash), or Shift + Option-click
Select all type; temporarily select Type tool Double-click type layer thumbnail Double-click type layer thumbnail
Create a clipping mask Alt-click the line dividing two layers Option-click the line dividing two layers
Rename layer Double-click the layer name Double-click the layer name
Edit filter settings Double-click the filter effect Double-click the filter effect
Edit the Filter Blending options Double-click the Filter Blending icon Double-click the Filter Blending icon
Create new layer group below current
layer/layer set
Control-click New Group button Command-click New Group button
Create new layer group with dialog box Alt-click New Group button Option-click New Group button](https://image.slidesharecdn.com/photoshopreference-221105105800-0601c9e0/85/photoshop_reference-pdf-203-320.jpg)
![214
Workspace
Last updated 11/5/2019
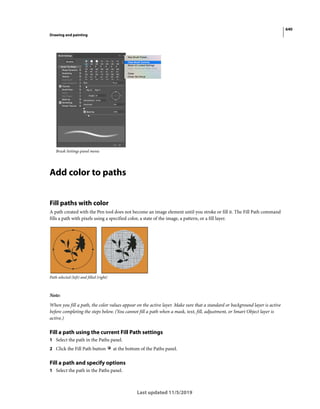
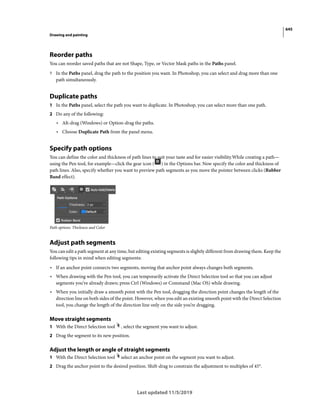
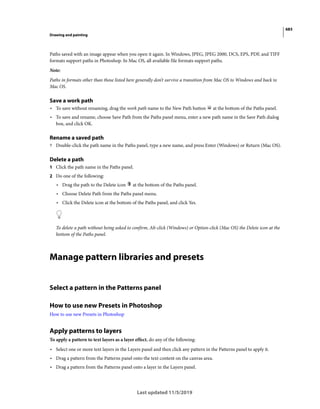
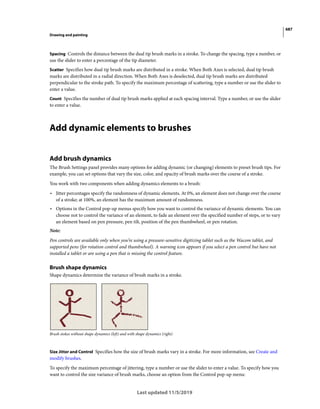
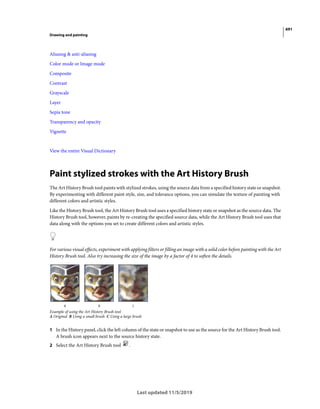
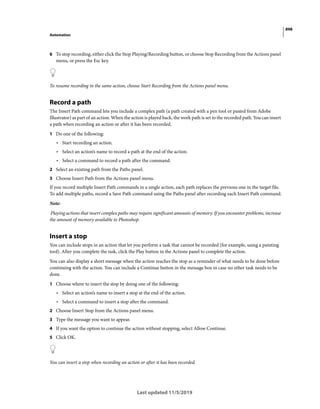
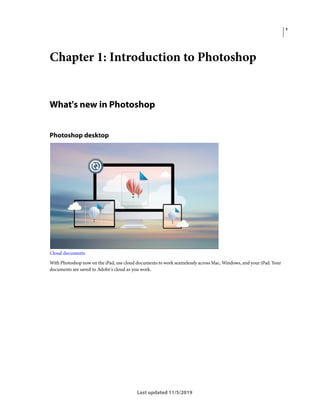
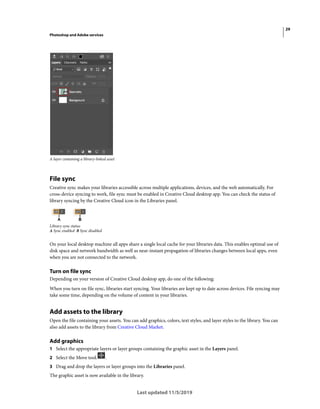
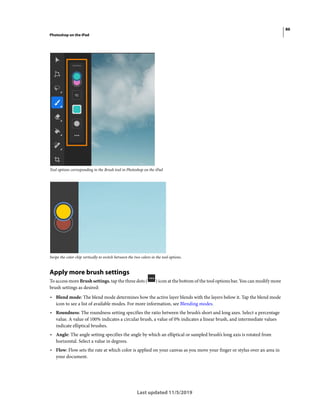
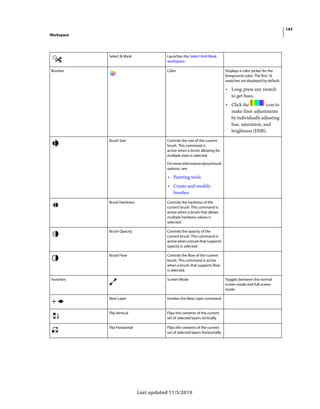
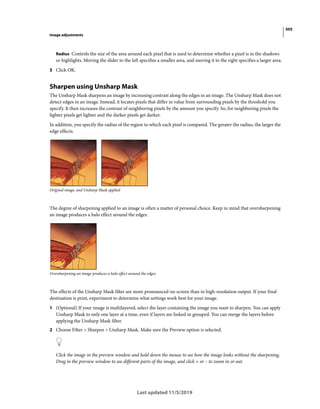
Stroke Thumbnail Displays a sample brush stroke and brush thumbnail of each brush preset. (This option is available
for brush presets only.)
To rearrange the list of items, drag an item up or down in the list.
Rearranging tool presets in the Preset Manager
Note:
To delete a preset in the Preset Manager, select the preset and click Delete. You can always use the Reset command to restore
the default items in a library.
Load a library of preset items
? Do one of the following:
• Click the triangle to the right of the Preset Type pop-up menu and then choose a library file from the bottom of
the panel menu. Click OK to replace the current list, or click Append to add the current list.
• To add a library to the current list, click Load, select the library file you want to add, and click Load.
• To replace the current list with a different library, choose Replace [Preset Type] from the panel menu. Select the
library file you want to use, and click Load.
Note:
Each type of library has its own file extension and default folder.
Manage preset items
You can rename or delete preset items, as well as create or restore libraries of presets.
Rename preset items
1 Select a preset item. Shift-click to select multiple items.
2 Do one of the following:
• Click Rename, and then enter a new name for the brush, swatch, and so on.
• If the Preset Manager currently displays presets as thumbnails, double-click a preset, enter a new name, and
click OK.
• If the Preset Manager currently displays presets as a list or text only, double-click a preset, enter a new name
inline, and press Enter (Windows) or Return (Mac OS).](https://image.slidesharecdn.com/photoshopreference-221105105800-0601c9e0/85/photoshop_reference-pdf-224-320.jpg)
![215
Workspace
Last updated 11/5/2019
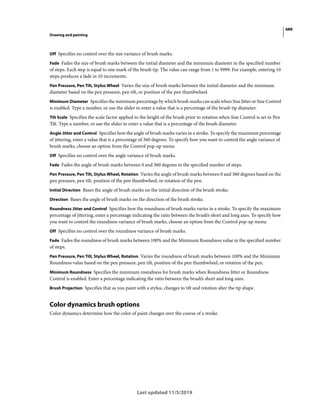
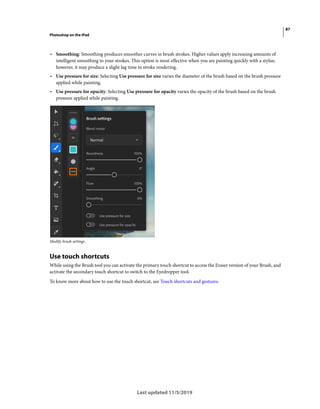
Delete preset items
? Do one of the following:
• Select a preset item, and click Delete.
• Alt-click (Windows) or Option-click (Mac OS) the items you want to delete.
Create a new library of presets
1 Do one of the following:
• To save all the presets in the list as a library, make sure that all items are selected.
• To save a subset of the current list as a library, hold down Shift, and select the items you want to save.
2 Click Save Set, choose a location for the library, enter a file name, and click Save.
You can save the library anywhere. However, if you place the library file in the appropriate Presets folder in the
default preset location, the library name will appear at the bottom of the panel menu after you restart Photoshop.
Restore the default library of preset items
? Choose Reset from the panel menu. You can either replace the current list or append the default library to the
current list.
Default preset locations
1 The default location for saving/loading/replacing presets depends on your operating system.
• Windows 7 and Windows Vista: [Drive]:Users<user>AppDataRoamingAdobeAdobe
Photoshop[version_number]Presets.
• Mac: <User>/Library/Application Support/Adobe/AdobePhotoshop[version_number]/Presets.
• Windows XP: [Drive]:Document and Settings<user>Application DataAdobeAdobePhotoshop
[version_number]Presets.
2 Presets that ship with Adobe Photoshop are stored in the Photoshop program folder.
Displaying hidden files in Windows
The default locations for saving/loading/replacing presets are hidden by default in Windows.
See Show hidden files and folders to learn how to view hidden items.
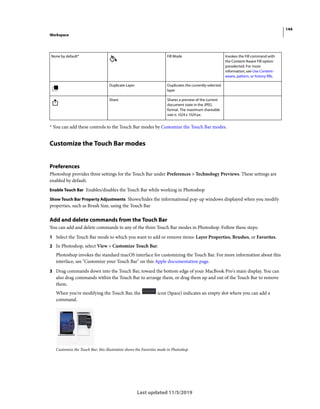
Customize keyboard shortcuts
Photoshop lets you view a list of all shortcuts, and edit or create shortcuts. The Keyboard Shortcuts dialog box serves
as a shortcut editor, and includes all commands that support shortcuts, some of which aren’t addressed in the default
shortcut set.
In addition to using keyboard shortcuts, you can access many commands using context-sensitive menus that are relevant
to the active tool, selection, or panel. To display a context-sensitive menu, right-click in the document window or panel.](https://image.slidesharecdn.com/photoshopreference-221105105800-0601c9e0/85/photoshop_reference-pdf-225-320.jpg)


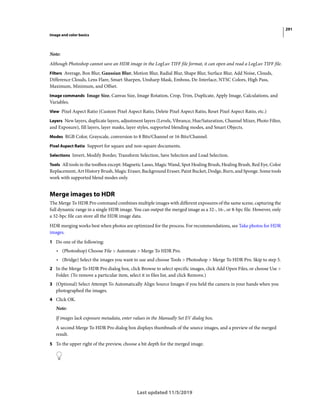
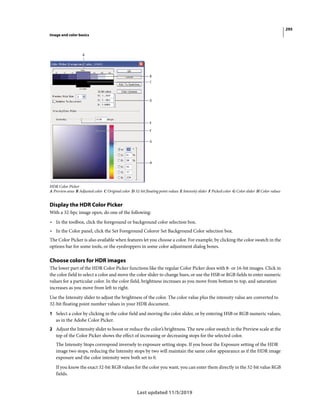
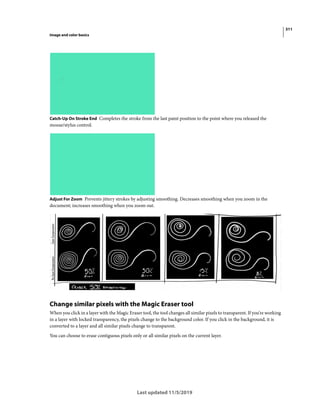
![285
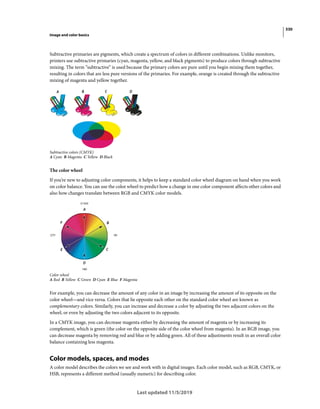
Image and color basics
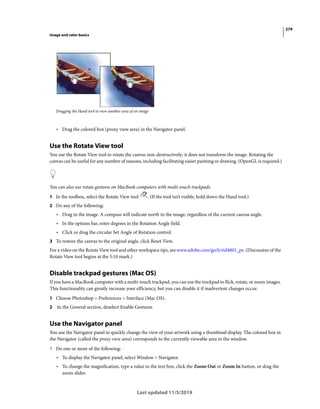
Last updated 11/5/2019
Solution 3: Open the file in another photo app and save as JPEG
Open the problematic image in a photo app such as Preview (on macOS) or Photos (on Windows). Now save the file
again as a JPEG image from within such an app. Try opening the file again in Photoshop.
Solution 4: Make sure that your hardware isn't damaged.
Validate your hardware to make sure that there are no hardware failures, such as with an external hard disk or network.
Viewing multiple images
View images in multiple windows
The document window is where your images appear. You can open multiple windows to display different images or
different views of the same one. A list of open windows appears in the Window menu. To bring an open image to the
front, choose the file name from the bottom of the Window menu. Available memory may limit the number of windows
per image.
1 Choose Window > Arrange > New Window For [Image File Name].
2 If you want to arrange the windows, choose Window > Arrange and then choose one of the following:
Cascade Displays undocked windows stacked and cascading from the upper-left to the lower right of the screen.
Tile Displays windows edge to edge. As you close images, the open windows are resized to fill the available space.
Float in Window Allows image to float freely.
Float All in Windows Floats all images.
Consolidate All to Tabs Shows one image in full screen and minimizes the other images to tabs.
You can use the Hand tool’s Scroll All Windows option to scroll through all open images. Select it in the options bar and
drag in one image to scroll through all visible images.
Match zoom and location in multiple images
Match only zoom
1 Open one or more images, or open one image in multiple windows.
2 Choose Window > Arrange > Tile to display the images edge to edge.
3 Select the Zoom tool, and then do one of the following:
• Select Zoom All Windows in the options bar, and then click one of the images. The other images zoom in or out
the same relative amount.
• Choose Window > Arrange > Match Zoom. Hold down the Shift key and click one of the images. The other
images zoom in or out at the same magnification.](https://image.slidesharecdn.com/photoshopreference-221105105800-0601c9e0/85/photoshop_reference-pdf-295-320.jpg)


![326
Image and color basics
Last updated 11/5/2019
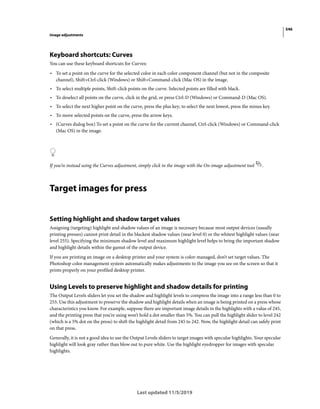
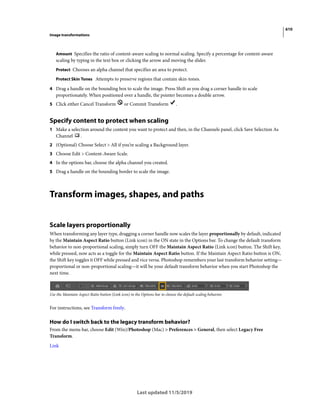
• When the Line tool, the Pen tool, or Gradient tool is being used, or when a selection is being moved, the Info panel
displays the x and y coordinates of your starting position, the change in X (DX), the change in Y (DY), the angle (A),
and the length (D) as you drag.
• When a two-dimensional transformation command is being used, the Info panel displays the percentage change in
width (W) and height (H), the angle of rotation (A), and the angle of horizontal skew (H) or vertical skew (V).
• When any color adjustment dialog box (for example, Curves) is being used, the Info panel displays before-and-after
color values for the pixels beneath the pointer and beneath color samplers.
• If the Show Tool Hints option is enabled, you see hints for using the tool selected in the toolbox.
• Depending on the options selected, the Info panel displays status information, such as document size, document
profile, document dimensions, scratch sizes, efficiency, timing, and current tool.
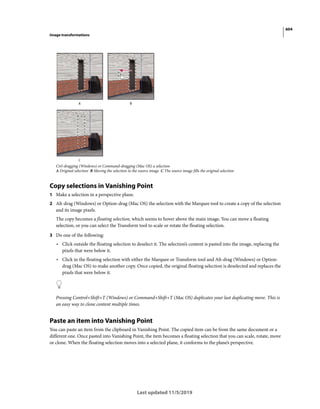
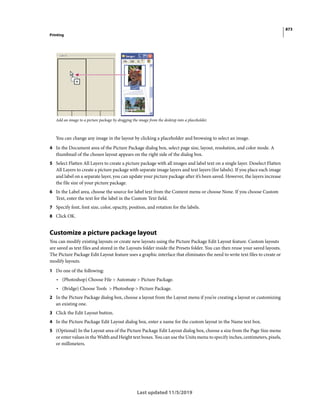
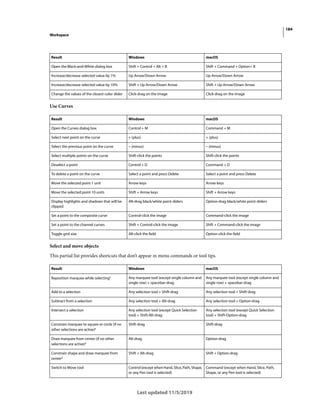
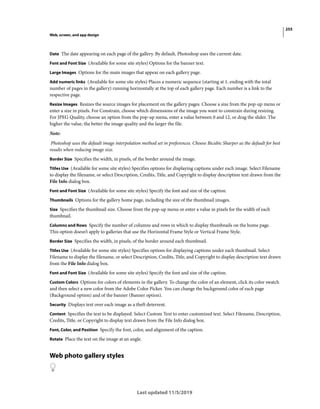
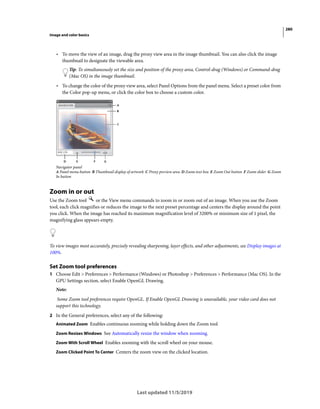
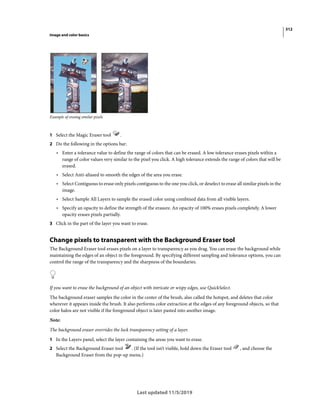
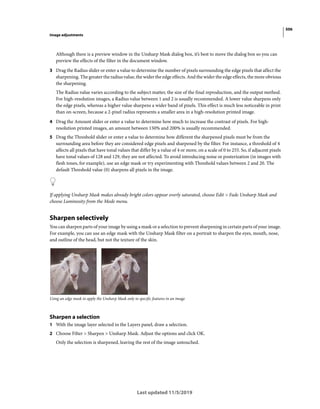
Use the Info panel
The Info panel displays file information about an image and also provides feedback about the color values as you move
a tool pointer over an image. Make sure the Info panel is visible in your workspace if you want to view information
while dragging in the image.
1 (Optional) Do one of the following if you need to display the Info panel:
• Click the Info panel tab if it’s docked with other panels.
• Choose Window > Info. File information about the image is displayed at the bottom of the Info panel. You can
change the information displayed by clicking the triangle in the upper right corner of the panel and choosing
Panel Options from the panel menu.
2 Set the options for the information you want displayed in the Info Panel by doing any of the following:
• Choose Panel Options from the Info panel menu and specify options in the Info Panel Options dialog box.
• Click an eyedropper icon and choose display options from the pop-up menu. You can also use the pop-up menu
to specify whether the Info panel displays 8-bit, 16-bit, or 32-bit values.
• Click the cursor coordinates icon and choose a unit of measurement.
3 Select a tool.
4 Move the pointer in the image, or drag in the image to use the tool. The following information may appear,
depending on which tool you’re using:
Displays the numeric values for the color beneath the pointer.
Displays the x and y coordinates of the pointer.
Displays the width (W) and height (H) of a marquee or shape as you drag, or the width and height of an active
selection.
Change the Info panel options
1 Click the triangle in the upper right corner to open the Info panel menu and choose Panel Options.
2 In the Info Panel Options dialog box, for First Color Readout, choose one of the following display options:
Actual Color Displays values in the current color mode of the image.
Proof Color Displays values for the output color space of the image.
[Color mode] Displays the color values in that color mode.
Total Ink Displays the total percentage of all CMYK ink at the pointer’s current location, based on the values set in
the CMYK Setup dialog box.](https://image.slidesharecdn.com/photoshopreference-221105105800-0601c9e0/85/photoshop_reference-pdf-336-320.jpg)

![338
Image and color basics
Last updated 11/5/2019
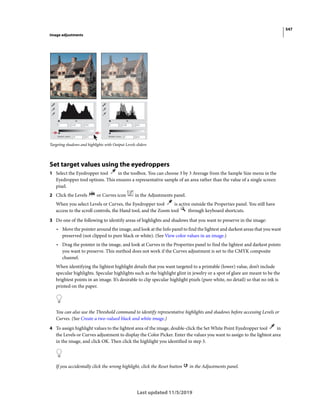
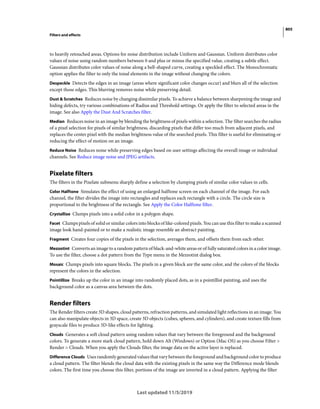
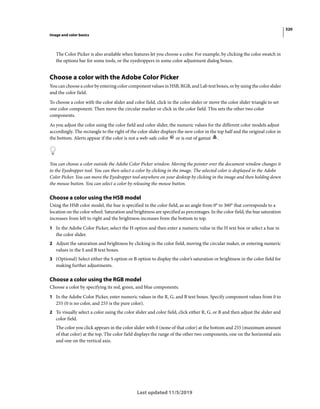
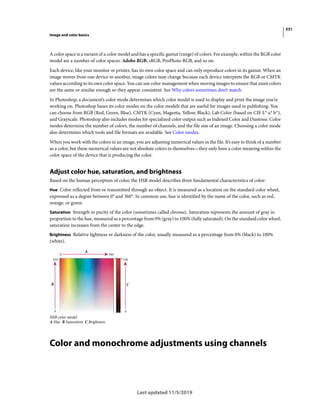
Color mode or Image mode
Color mode or Image mode
The color mode, or image mode, determines how the components of a color are combined, based on the number of
color channels in the color model. Color modes include grayscale, RGB, and CMYK, among others. Photoshop
Elements supports bitmap, grayscale, indexed, and RGB color modes.
HOW TO CHANGE THE COLOR MODE
Image > Mode > [Image mode]
RELATED CONCEPTS
Compression
Flattening
Grayscale
Raster & vector
Resample
Resolution
Sepia tone
View the entire Visual Dictionary
Color cast
Color cast
An unwanted color shift in the whole image, which can be caused by reflected light from a nearby object. For example,
many photos taken using flourescent lighting tend to have a greenish color cast.
HOW TO CORRECT COLOR CASTING
Auto Color
Eyedroppers, Levels or Curves adjustment
Image > Adjustments > Match Color, Neutralize option
Levels
Curves
RELATED CONCEPTS
Adjustment layer](https://image.slidesharecdn.com/photoshopreference-221105105800-0601c9e0/85/photoshop_reference-pdf-348-320.jpg)


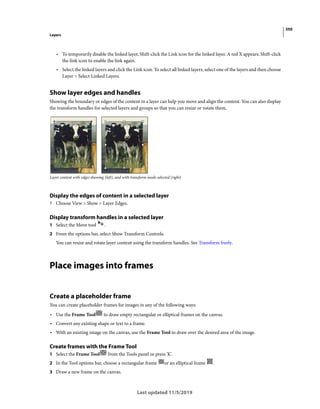

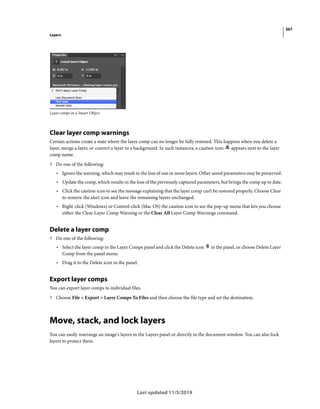
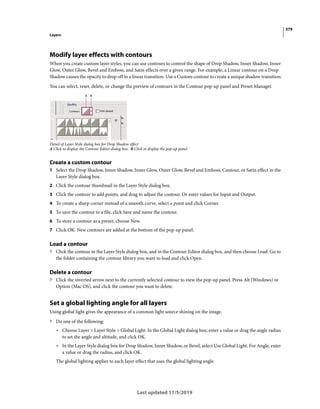

![389
Layers
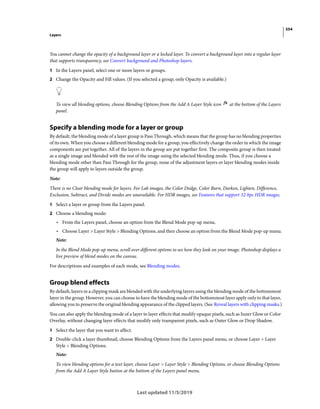
Last updated 11/5/2019
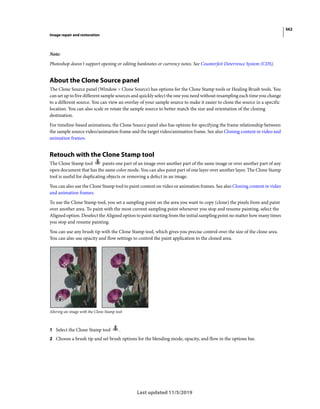
Image asset generation is enabled for the current document. Once enabled, the feature remains available whenever the
document is opened next. In order to disable image asset generation for the current document, deselect File > Generate >
Image Assets.
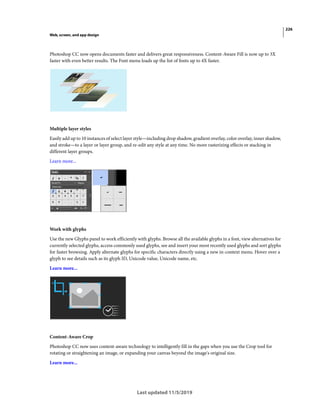
Generate multiple assets from a layer or layer group
To generate multiple assets from a layer/layer group, separate the asset names with commas. For example, the following
layer name generates three assets:
Ellipse_4.jpg, Ellipse_4b.png, Ellipse_4c.png
Save assets to a subfolder
You can choose to save image assets generated from particular layers/layer groups in a subfolder directly under the
document's asset folder. Include the subfolder name in the layer/layer group name; for example:
[subfolder]/Ellipse_4.jpg
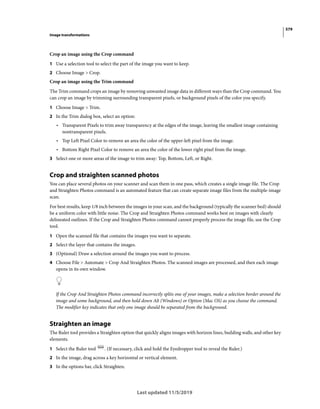
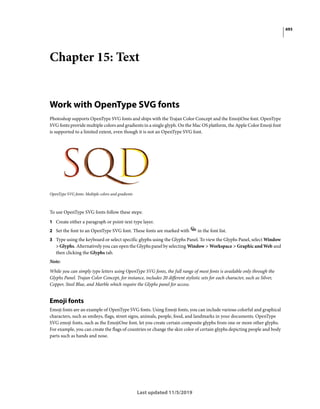
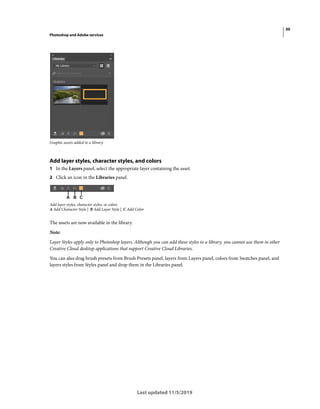
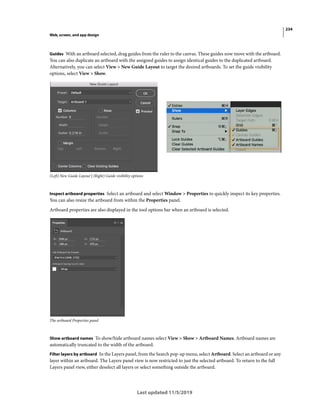
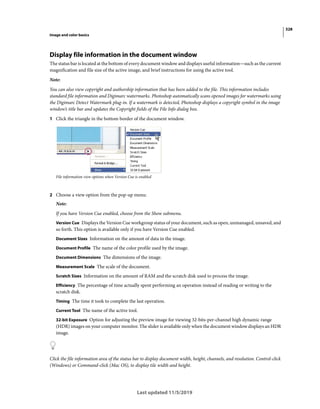
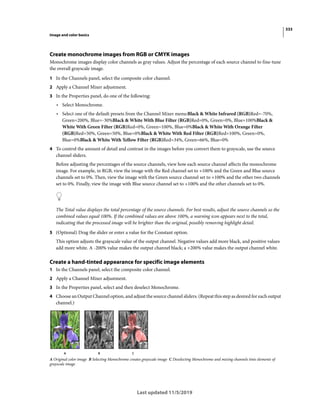
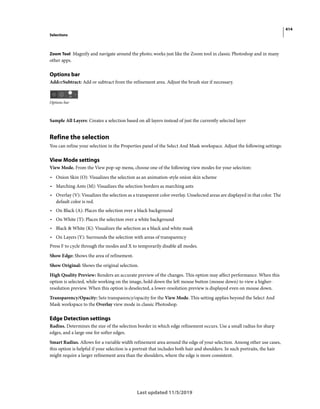
A web design use case
Generating image assets from a PSD file is particularly useful for multidevice web design. Consider the following web
design and its layer structure:
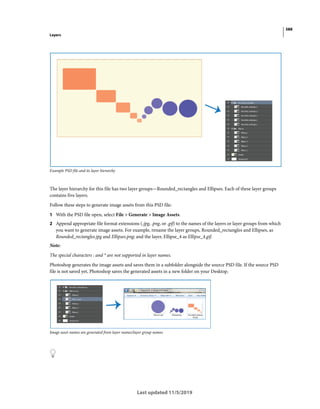
A web design and its layer hierarchy
Let's extract the icon on top and the top row of the Global Hotspots image grid as image assets:
• Append image format extensions to the appropriate layer names.](https://image.slidesharecdn.com/photoshopreference-221105105800-0601c9e0/85/photoshop_reference-pdf-399-320.jpg)
![392
Layers
Last updated 11/5/2019
As illustrated, you can mix different units and pixels while specifying the desired output image size. For example, 4in x 100
Rounded_rectangle_3.gif is a valid layer name for asset generation.
Quality parameters are not available for GIF assets.
Construct complex layer names
You can specify multiple asset names with parameters while naming a layer for asset generation. For example:
120% Delicious.jpg, 42% Delicious.png24, 100x100 Delicious_2.jpg90%, 250% Delicious.gif
Photoshop generates the following assets from this layer:
• Delicious.jpg (an 8-quality JPG image scaled 120%)
• Delicious.png (a 24-bit PNG image scaled 42%)
• Delicious_2.jpg (a 90%-quality JPG image that has an absolute size of 100x100 px)
• Delicious.gif (a GIF image scaled 250%)
Specify default settings for assets
You can specify document-wide default settings for the generated assets. Follow these steps:
1 Create an empty layer in the document.
2 Begin the name of the layer with the keyword default. Now, enter the settings that you want to apply to all image
assets generated from the document. For example:
default hi-res/ Generates all image assets in a subfolder named hi-res. For example, [asset_folder]/hi-res/Delicious.jpg.
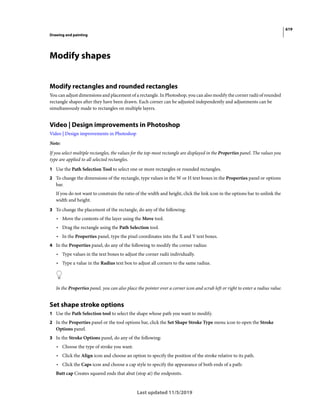
default hi-res/@2x Generates all image assets in a subfolder named hi-res. Additionally, suffixes the asset names with
@2x. For example, [asset_folder]/hi-res/Delicious@2x.jpg.
default 50% lo-res/ Saves image assets scaled down by 50% in the subfolder lo-res under the document's asset folder
default hi-res/@2x + 50% lo-res/ Generates two image assets from a layer:
• In the hi-res subfolder, an image asset whose name is suffixed with @2x
• In the lo-res subfolder, an image asset scaled down by 50%
Note:
Default scaling factors are overriden by scaling factors specified for individual layers.
Disable image asset generation for all documents
You can disable image asset generation globally for all Photoshop documents by modifying your Preferences.
1 Choose Edit > Preferences > Plug-Ins.
2 Deselect Enable Generator.
3 Click OK.
Note:
The File > Generate menu command is unavailable when you disable image asset generation from Preferences. The
feature can be enabled again only in the Preferences dialog box.](https://image.slidesharecdn.com/photoshopreference-221105105800-0601c9e0/85/photoshop_reference-pdf-402-320.jpg)


![419
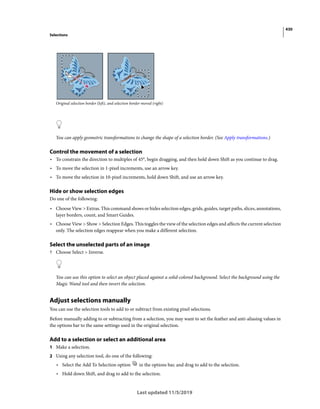
Selections
Last updated 11/5/2019
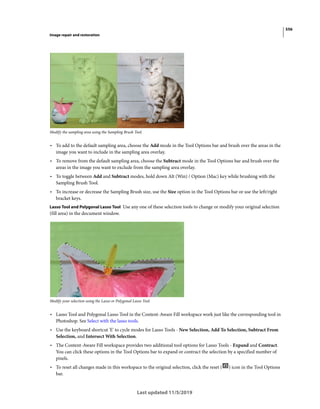
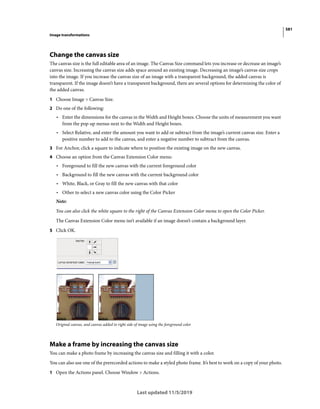
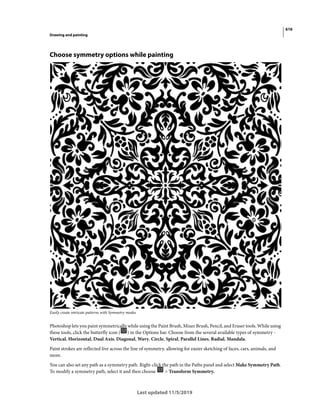
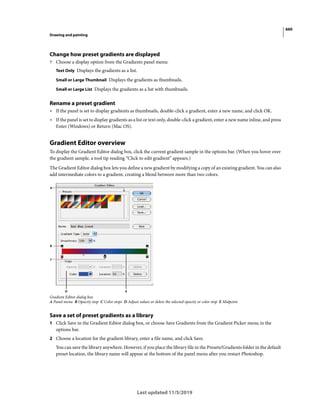
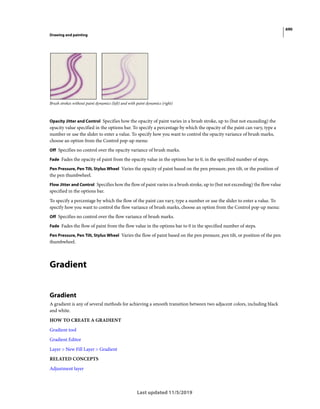
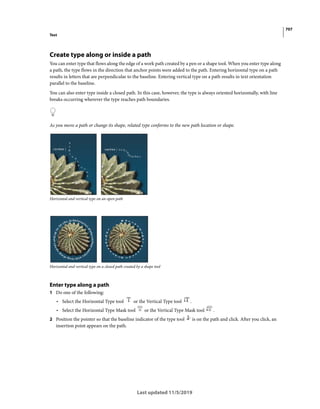
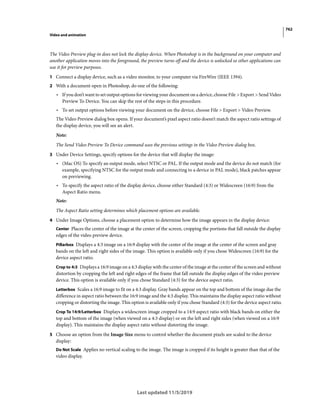
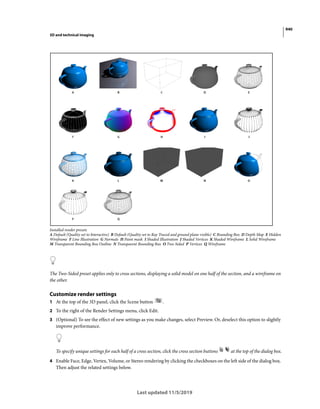
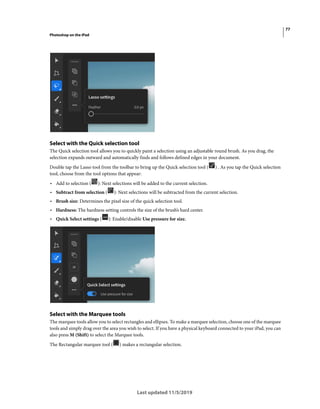
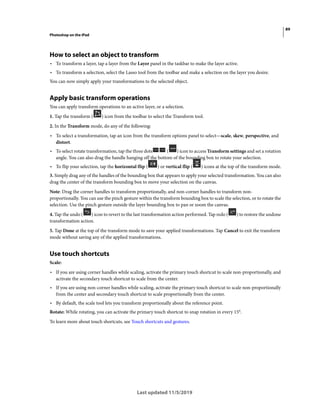
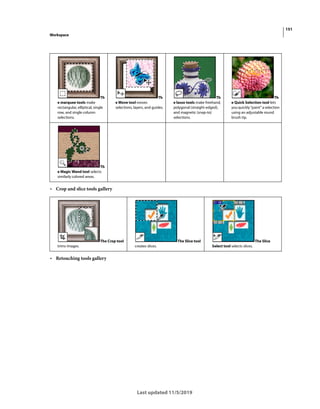
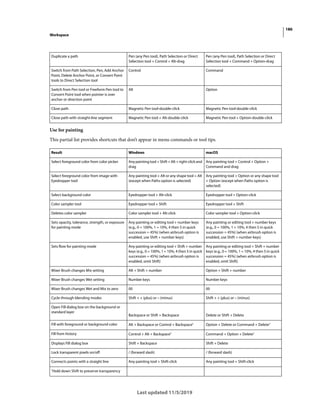
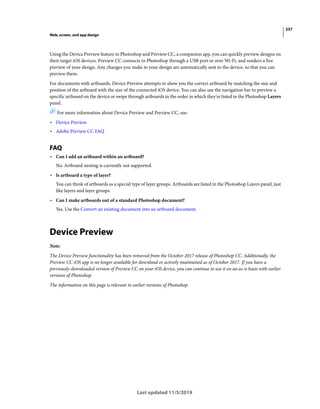
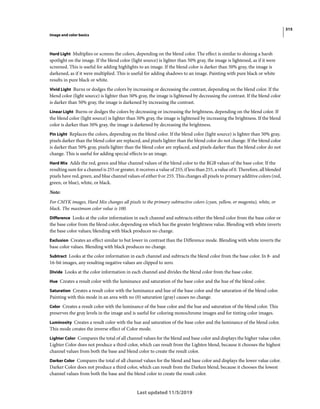
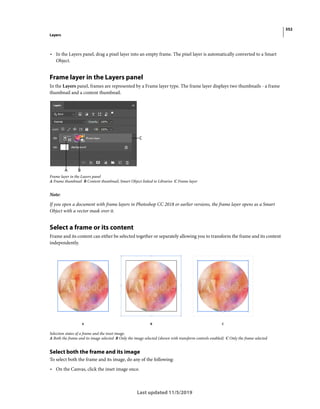
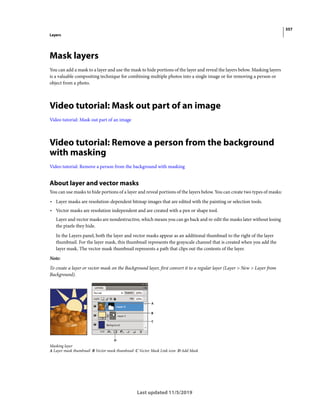
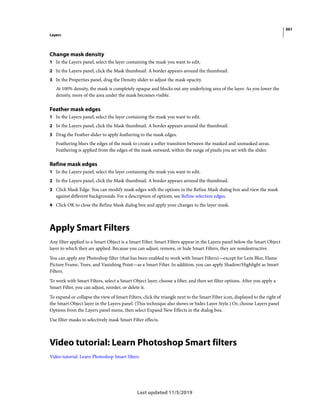
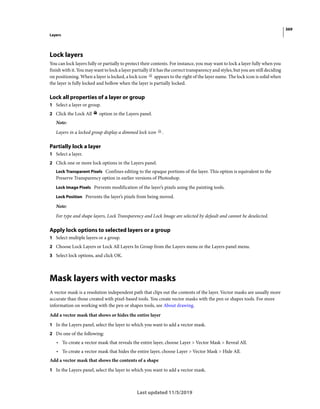
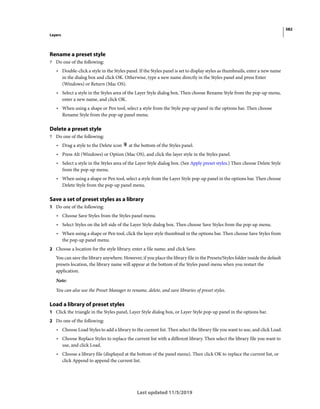
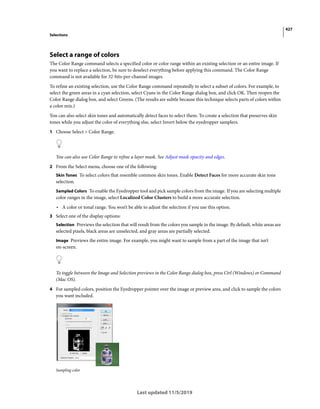
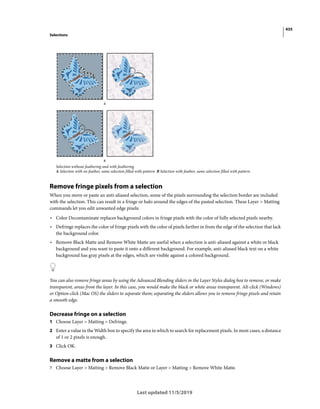
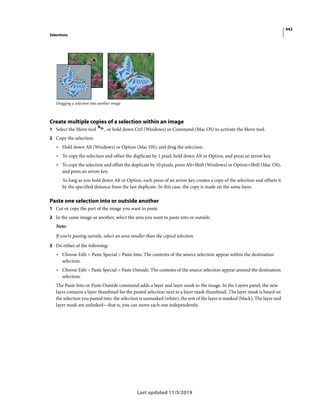
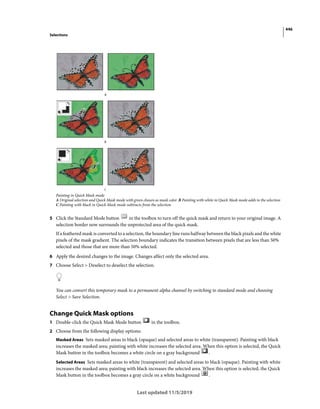
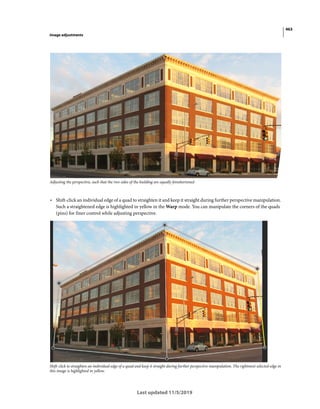
Refine the automatic selection using other selection tools. In this example, we've subtracted (right) from the automatic selection (left).
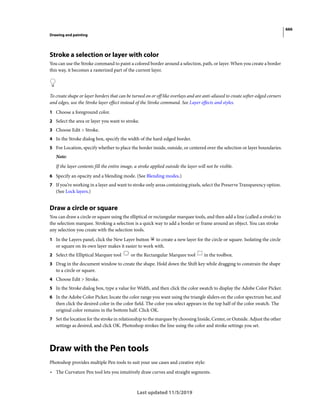
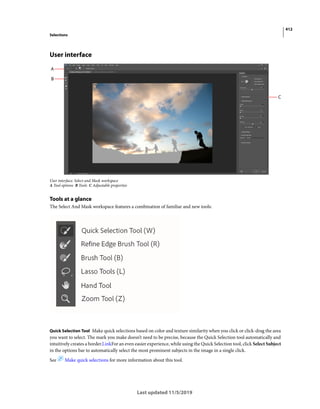
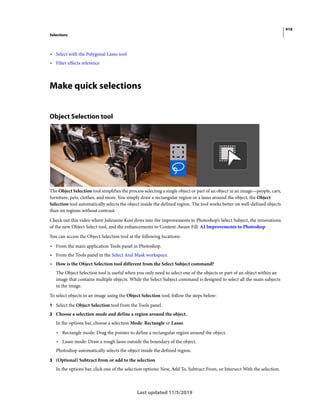
Quick Selection tool
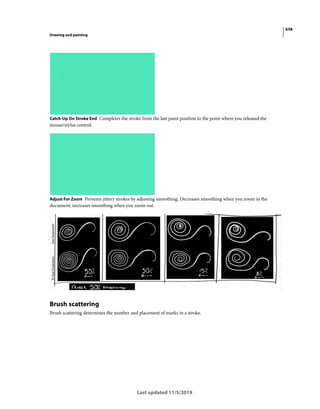
You can use the Quick Selection tool to quickly “paint” a selection using an adjustable round brush tip. As you drag,
the selection expands outward and automatically finds and follows defined edges in the image.
1 Select the Quick Selection tool . (If the tool isn’t visible, hold down the Magic Wand tool .)
2 In the options bar, click one of the selection options: New, Add To, or Subtract From.
New is the default option if nothing is selected. After making the initial selection, the option changes automatically
to Add To.
3 To change the brush tip size, click the Brush pop-up menu in the options bar, and type in a pixel size or drag the
slider. Use the Size pop-up menu options to make the brush tip size sensitive to pen pressure or a stylus wheel.
When creating a selection, press the right bracket (]) to increase the Quick Selection tool brush tip size; press the left
bracket ([) to decrease the brush tip size.
4 Choose Quick Selection options.
Sample All Layers Creates a selection based on all layers instead of just the currently selected layer.
Auto-Enhance Reduces roughness and blockiness in the selection boundary. Auto-Enhance automatically flows the
selection further toward image edges and applies some of the edge refinement you can apply manually in the Refine
Edge dialog with the Contrast and Radius options.
5 Paint inside the part of the image you want to select.](https://image.slidesharecdn.com/photoshopreference-221105105800-0601c9e0/85/photoshop_reference-pdf-429-320.jpg)
![425
Selections
Last updated 11/5/2019
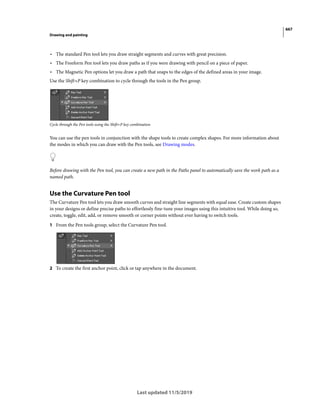
5 Do one or more of the following:
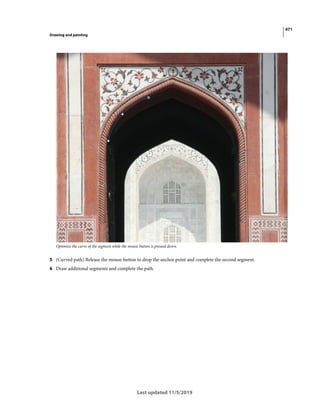
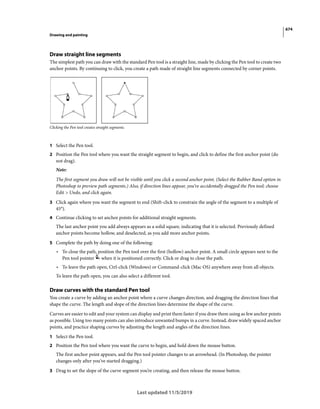
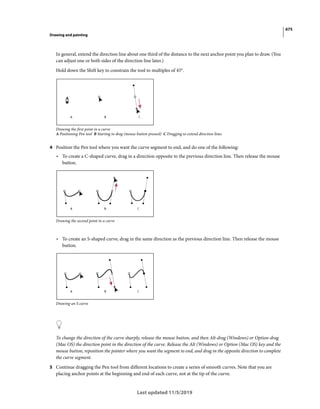
• To draw a straight segment, position the pointer where you want the first straight segment to end, and click.
Continue clicking to set endpoints for subsequent segments.
• To draw a straight line at a multiple of 45°, hold down Shift as you move to click the next segment.
• To draw a freehand segment, hold down Alt (Windows) or Option (Mac OS), and drag. When you finish, release
Alt or Option and the mouse button.
• To erase recently drawn straight segments, press the Delete key.
6 Close the selection border:
• Position the Polygonal Lasso tool pointer over the starting point (a closed circle appears next to the pointer), and
click.
• If the pointer is not over the starting point, double-click the Polygonal Lasso tool pointer, or Ctrl-click
(Windows) or Command-click (Mac OS).
7 (Optional) Click Refine Edge to further adjust the selection boundary. See Refine selection edges.
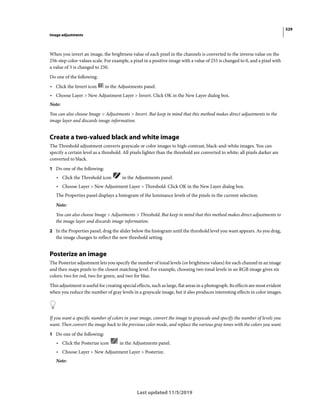
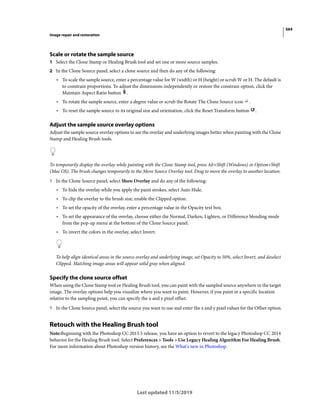
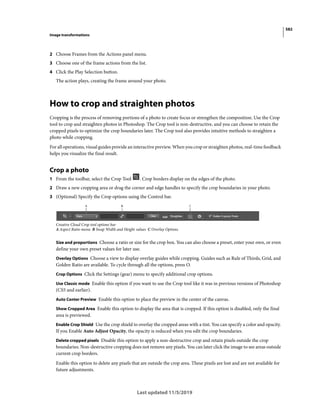
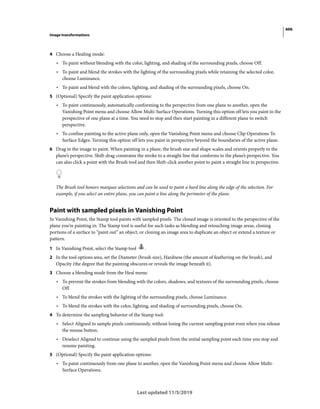
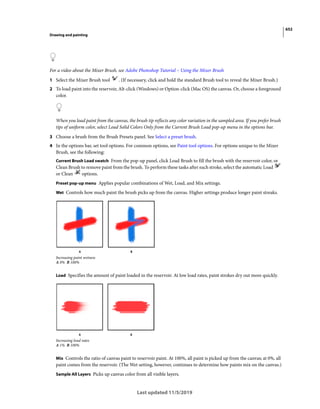
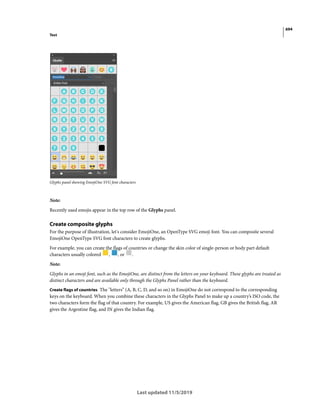
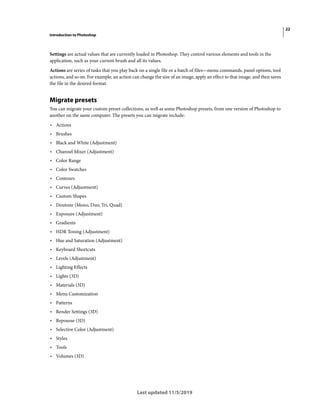
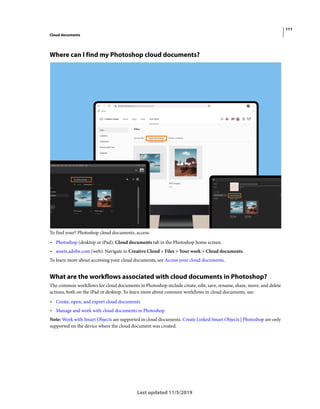
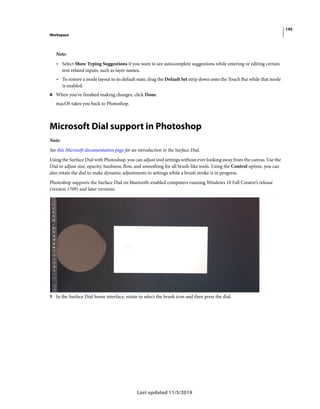
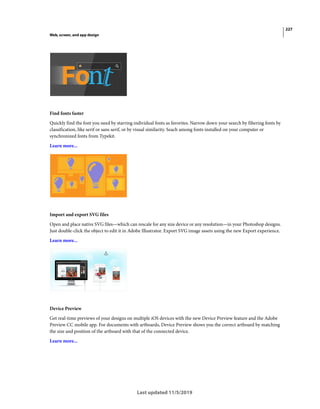
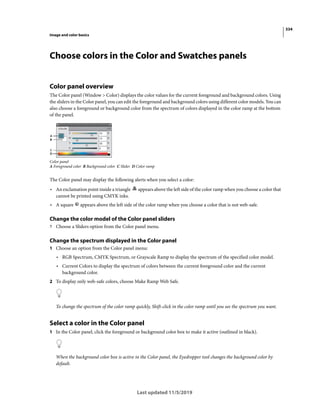
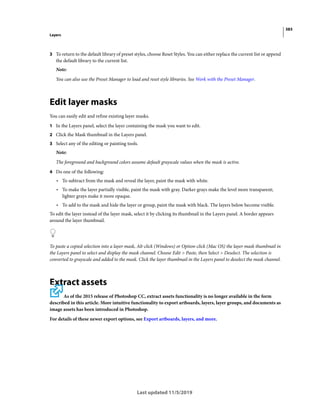
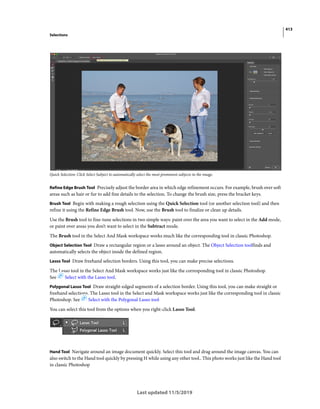
Select with the Magnetic Lasso tool
When you use the Magnetic Lasso tool , the border snaps to the edges of defined areas in the image. The Magnetic
Lasso tool is not available for 32-bits-per-channel images.
The Magnetic Lasso tool is especially useful for quickly selecting objects with complex edges set against high-contrast
backgrounds.
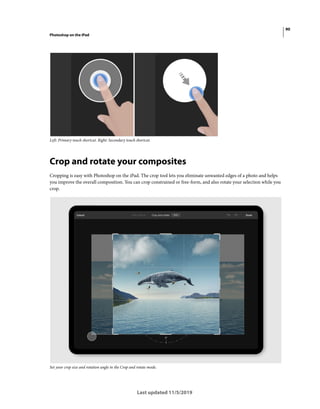
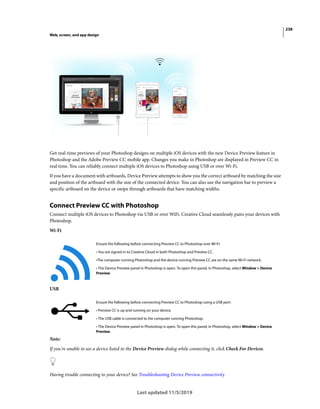
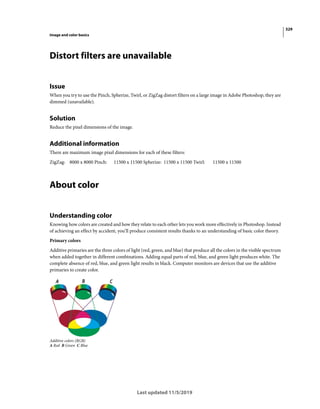
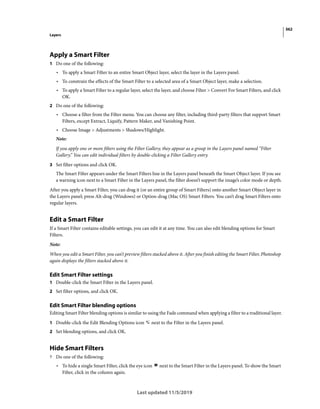
1 Select the Magnetic Lasso tool.
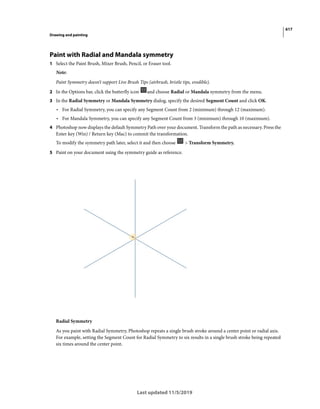
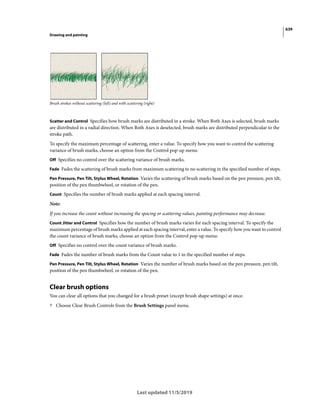
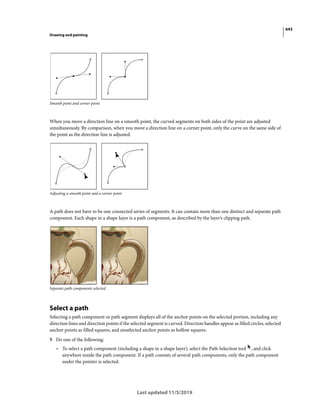
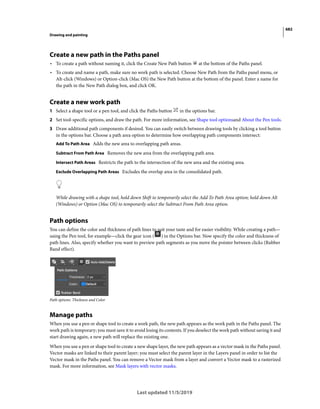
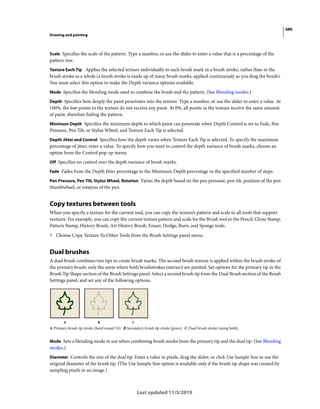
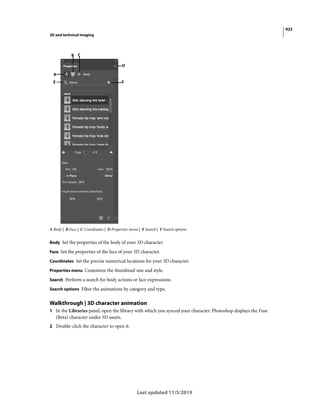
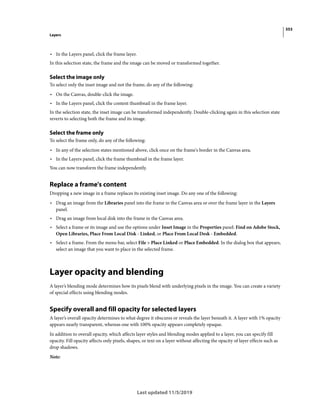
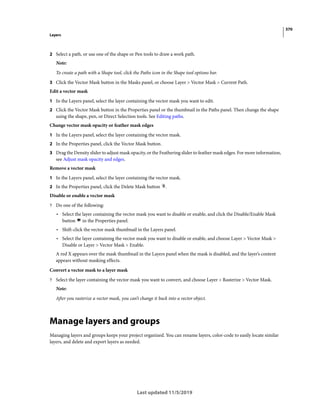
2 Specify one of the selection options in the options bar.
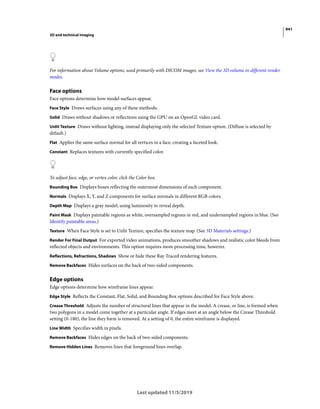
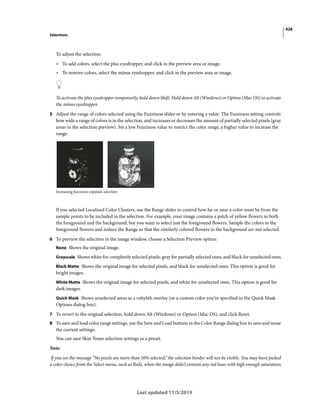
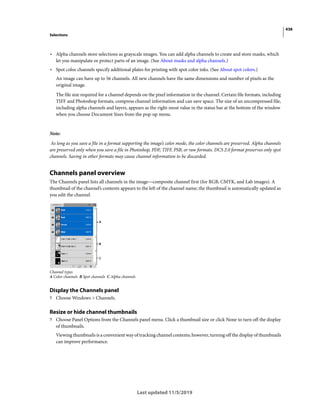
Selection options
A New B Add To C Subtract From D Intersect With
3 (Optional) Set feathering and anti-aliasing in the options bar. See Soften the edges of selections.
4 Set any of these options:
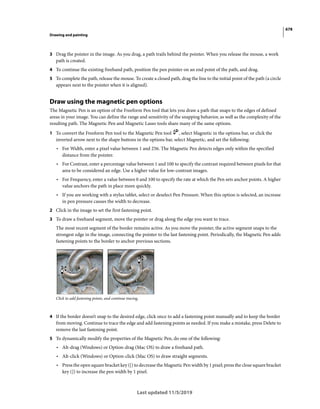
Width To specify a detection width, enter a pixel value for Width. The Magnetic Lasso tool detects edges only within
the specified distance from the pointer.
To change the lasso pointer so that it indicates the lasso width, press the Caps Lock key. You can change the pointer while
the tool is selected but not in use. Press the right bracket (]) to increase the Magnetic Lasso edge width by 1 pixel; press
the left bracket ([) to decrease the width by 1 pixel.
Contrast To specify the lasso’s sensitivity to edges in the image, enter a value between 1% and 100% for Contrast. A
higher value detects only edges that contrast sharply with their surroundings; a lower value detects lower-contrast
edges.](https://image.slidesharecdn.com/photoshopreference-221105105800-0601c9e0/85/photoshop_reference-pdf-435-320.jpg)


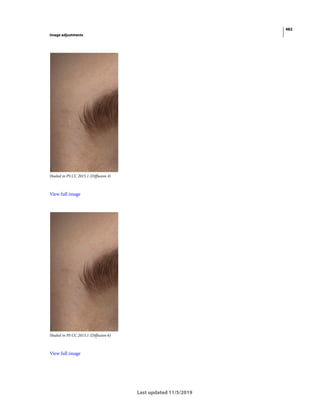


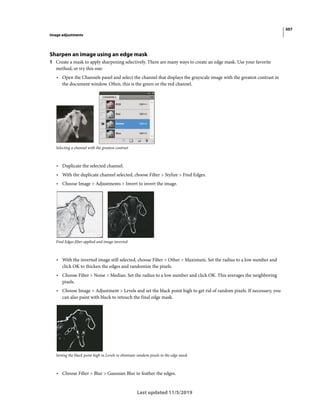
![514
Image adjustments
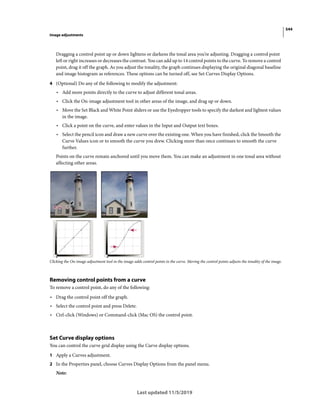
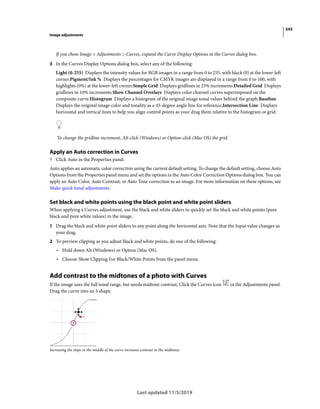
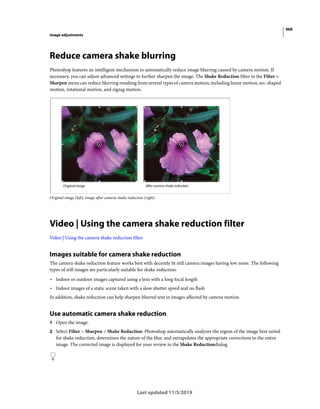
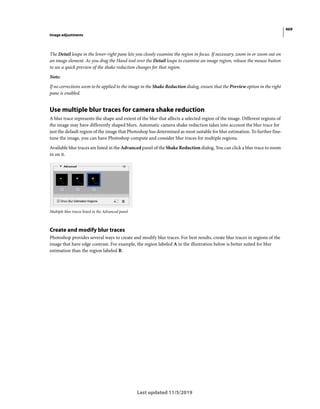
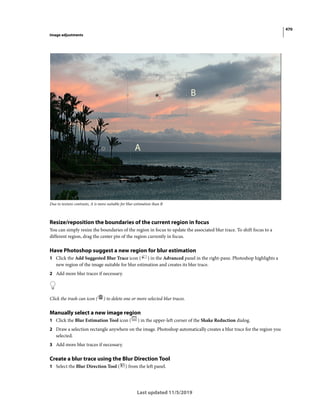
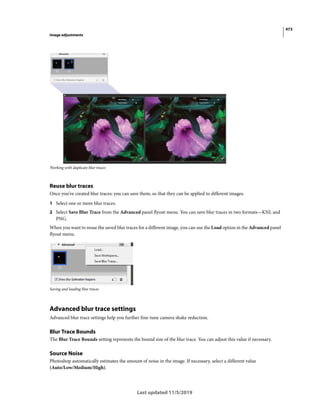
Last updated 11/5/2019
Reapply adjustment settings
Once an adjustment setting is saved, it’s stored as a preset and can be reapplied.
• Choose an adjustment preset from the Preset menu in the Properties panel.
• In an adjustment dialog box, click Load. Locate and load the saved adjustment file. In the Curves, Black & White,
Exposure, Hue/Saturation, Selective Color, Levels, or Channel Mixer dialog boxes, saved presets appear in the
Presets menu. Choose Load Preset from the Preset option to load a preset not shown on the Preset pop-up menu
from a different location.
To remove default presets, navigate to the following folders, move the presets out of the folders, and restart Photoshop.
• Windows: [startup drive]/Program Files/Adobe/Adobe Photoshop [version_number]/Presets/[adjustment
type]/[preset name]
• Mac OS: [startup drive]/Applications/Adobe Photoshop [version_number]/Presets/[adjustment type]/[preset
name]
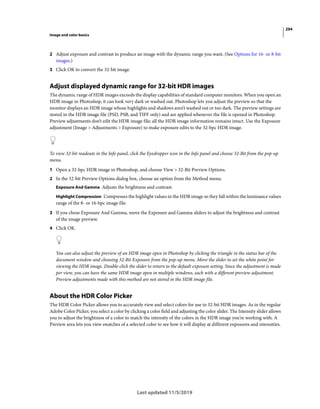
Correcting colors in CMYK and RGB
Although you can perform all color and tonal corrections in RGB mode and most adjustments in CMYK mode, choose
a mode carefully. Avoid multiple conversions between modes, because color values are rounded and lost with each
conversion. Don’t convert RGB images to CMYK mode if they are meant for on-screen display. For CMYK images that
are separated and printed, do not make color corrections in RGB mode.
If you must convert your image from one mode to another, perform most of your tonal and color corrections in RGB
mode. You can then use CMYK mode for fine-tuning. The advantages of working in RGB mode are:
• RGB has fewer channels. As a result, your computer uses less memory.
• RGB has a wider range of colors than CMYK, and more colors are likely to be preserved after adjustments.
You can soft proof colors to see an on-screen preview of how your document’s colors will look when reproduced on
a particular output device. See About soft-proofing colors.
You can edit an image in RGB mode in one window and view the same image in CMYK colors in another window. Choose
Window > Arrange > New Window For (Filename) to open a second window. Select the Working CMYK option for Proof
Setup, then choose the Proof Color command to turn on the CMYK preview in one of the windows.
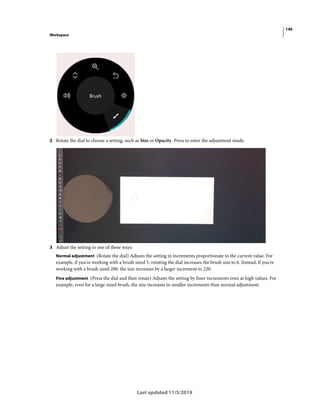
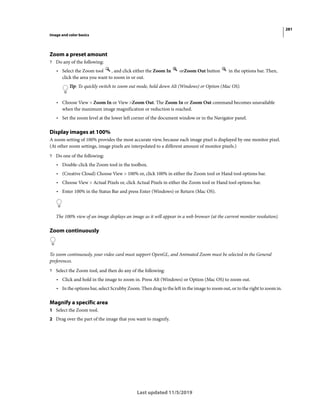
Identify out-of-gamut colors
A gamut is the range of colors that a color system can display or print. A color that can be displayed in RGB could be
out of gamut, and therefore unprintable, for your CMYK setting.
In RGB mode, you can tell whether a color is out of gamut in the following ways:
• In the Info panel, an exclamation point appears next to the CMYK values whenever you move the pointer over an
out-of-gamut color.
• In both the Color Picker and the Color panel, an alert triangle appears. When you select an out-of-gamut color,
the closest CMYK equivalent is displayed. To select the CMYK equivalent, click the triangle or the color patch.](https://image.slidesharecdn.com/photoshopreference-221105105800-0601c9e0/85/photoshop_reference-pdf-524-320.jpg)