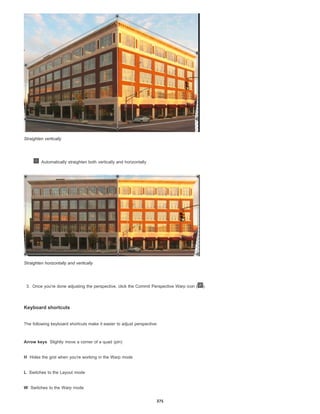
Downloaded 44 times


![Sync settings using Adobe Creative Cloud | Photoshop CC
To the top
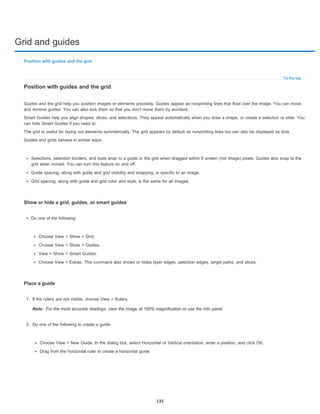
To the top
Video | Syncing presets in Photoshop CC
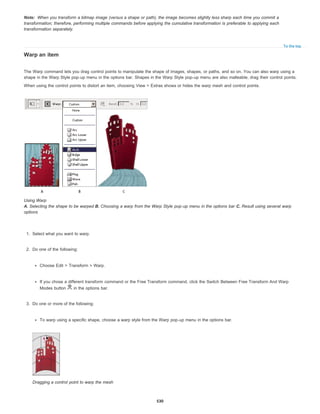
Sync settings
Manage Sync settings
See also
When you work on multiple computers, managing and syncing preferences among the computers can be time-consuming, complex, and prone to
error.
The new Sync Settings feature enables you to sync preferences and settings via Creative Cloud. If you use two computers, the Sync Settings
feature makes it easy for you to keep those settings synchronized across the computers.
The syncing happens via your Adobe Creative Cloud account. Settings are uploaded to your Creative Cloud account and then are downloaded
and applied on the other computer.
You can initiate the sync manually; it does not happen automatically and it cannot be scheduled.
Sync settings
To initiate the sync, choose one of the following:
(Windows) Edit > [your Adobe ID] > Sync Settings Now.
(Mac) Photoshop > [your Adobe ID] > Sync Settings Now.
Manage Sync settings
To change what data gets synchronized, choose one of the following:
(Windows) Edit > [your Adobe ID] > Manage Sync Settings.
(Mac) Photoshop > [your Adobe ID] > Manage Sync Settings.
Alternatively, click Sync Settings in the Preferences dialog box (Edit > Preferences).
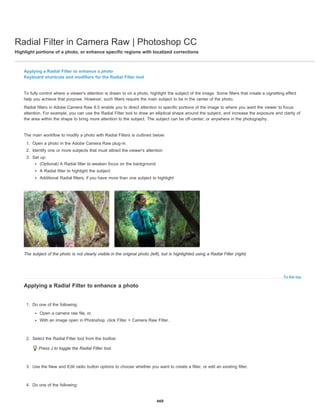
Manage Sync Settings
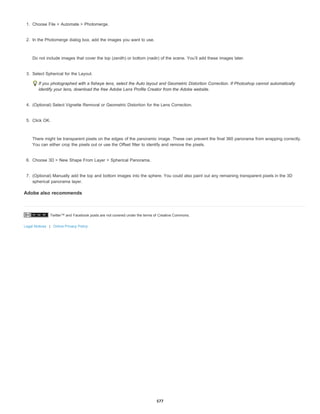
You can change the sync options and also choose what to do in case of conflict. Select the options to sync preferences and settings.
Synchronizable preferences refer to preferences that are not dependent on computer or hardware settings.
Select the preferences to sync.
55](https://image.slidesharecdn.com/photoshopreference-140325100646-phpapp02/85/Photoshop-reference-62-320.jpg)


![Panel Locations
Keyboard shortcuts
Menus or Menu Customization
Note:
(Fireworks) Choose Save Current from the workspace switcher in the Application bar.
2. Type a name for the workspace.
3. (Photoshop, InDesign) Under Capture, select one or more options:
Saves the current panel locations (InDesign only).
Saves the current set of keyboard shortcuts (Photoshop only).
Saves the current set of menus.
Display or switch workspaces
Select a workspace from the workspace switcher in the Application bar.
In Photoshop, you can assign keyboard shortcuts to each workspace to navigate among them quickly.
Delete a custom workspace
Select Manage Workspaces from the workspace switcher in the Application bar, select the workspace, and then click Delete. (The option is
not available in Fireworks.)
(Photoshop, InDesign, InCopy) Select Delete Workspace from the workspace switcher.
(Illustrator) Choose Window > Workspace > Manage Workspaces, select the workspace, and then click the Delete icon.
(Photoshop, InDesign) Choose Window > Workspace >Delete Workspace, select the workspace, and then click Delete.
Restore the default workspace
1. Select the Default or Essentials workspace from the workspace switcher in the application bar. For Fireworks, see the article
http://www.adobe.com/devnet/fireworks/articles/workspace_manager_panel.html.
In Dreamweaver, Designer is the default workspace.
2. For Fireworks (Windows), delete these folders:
Windows Vista
Users<username>AppDataRoamingAdobeFireworks CS4
Windows XP
Documents and Settings<username>Application DataAdobeFireworks CS4
3. (Photoshop, InDesign, InCopy) Select Window > Workspace > Reset [Workspace Name].
(Photoshop) Restore a saved workspace arrangement
In Photoshop, workspaces automatically appear as you last arranged them, but you can restore the original, saved arrangement of panels.
65](https://image.slidesharecdn.com/photoshopreference-140325100646-phpapp02/85/Photoshop-reference-72-320.jpg)


![To the top
Keys for Vanishing Point
Decrease/increase brush size by 2, or
density, pressure, rate, or turbulent
jitter by 1
Left Arrow/Right Arrow with Brush
Size, Density, Pressure, Rate, or
Turbulent Jitter slider showing
Left Arrow/Right Arrow with Brush
Size, Density, Pressure, Rate, or
Turbulent Jitter slider showing
Cycle through controls on right from
top
Tab Tab
Cycle through controls on right from
bottom
Shift + Tab Shift + Tab
Change Cancel to Reset Alt Option
Hold down Shift to decrease/increase by 10
Result Windows Mac OS
Zoom 2x (temporary) X X
Zoom in Control + + (plus) Command + + (plus)
Zoom out Control + - (hyphen) Command + - (hyphen)
Fit in view Control + 0 (zero), Double-click Hand
tool
Command + 0 (zero), Double-click
Hand tool
Zoom to center at 100% Double-click Zoom tool Double-click Zoom tool
Increase brush size (Brush, Stamp
tools)
] ]
Decrease brush size (Brush, Stamp
tools)
[ [
Increase brush hardness (Brush,
Stamp tools)
Shift + ] Shift + ]
Decrease brush hardness (Brush,
Stamp tools)
Shift + [ Shift + [
Undo last action Control + Z Command + Z
Redo last action Control + Shift + Z Command + Shift + Z
Deselect all Control + D Command + D
Hide selection and planes Control + H Command + H
Move selection 1 pixel Arrow keys Arrow keys
Move selection 10 pixels Shift + arrow keys Shift + arrow keys
Copy Control + C Command + C
Paste Control + V Command + V
Repeat last duplicate and move Control + Shift + T Command + Shift + T
† †
†
80](https://image.slidesharecdn.com/photoshopreference-140325100646-phpapp02/85/Photoshop-reference-87-320.jpg)

![Split Toning panel Ctrl+Alt+5 Command+Option+5
Lens Corrections panel Ctrl+Alt+6 Command+Option+6
Camera Calibration panel Ctrl+Alt+7 Command+Option+7
Presets panel Ctrl+Alt+8 Command+Option+8 (Mac OS
Universal Access zoom shortcut must
be disabled in System Preferences)
Open Snapshots panel Ctrl+Alt+9 Command+Option+9
Parametric Curve Targeted
Adjustment tool
Ctrl+Alt+Shift+T Command+Option+Shift+T
Hue Targeted Adjustment tool Ctrl+Alt+Shift+H Command+Option+Shift+H
Saturation Targeted Adjustment tool Ctrl+Alt+Shift+S Command+Option+Shift+S
Luminance Targeted Adjustment tool Ctrl+Alt+Shift+L Command+Option+Shift+L
Grayscale Mix Targeted Adjustment
tool
Ctrl+Alt+Shift+G Command+Option+Shift+G
Last-used Targeted Adjustment tool T T
Adjustment Brush tool K K
Graduated Filter tool G G
Increase/decrease brush size ] / [ ] / [
Increase/decrease brush feather Shift + ] / Shift + [ Shift + ] / Shift + [
Increase/decrease Adjustment Brush
tool flow in increments of 10
= (equal sign) / - (hyphen) = (equal sign) / - (hyphen)
Temporarily switch from Add to Erase
mode for the Adjustment Brush tool,
or from Erase to Add mode
Alt Option
Increase/decrease temporary
Adjustment Brushtool size
Alt + ] / Alt + [ Option + ] / Option + [
Increase/decrease temporary
Adjustment Brushtool feather
Alt + Shift + ] / Alt + Shift + [ Option + Shift + ] / Option + Shift + [
Increase/decrease temporary
Adjustment Brushtool flow in
increments of 10
Alt + = / Alt + - Option = / Option + -
Switch to New mode from Add or
Erase mode of the Adjustment Brush
tool or the Graduated Filter
N N
Toggle Auto Mask for Adjustment
Brush tool
M M
Toggle Show Mask for Adjustment
Brush tool
Y Y
Toggle pins for Adjustment Brush tool V V
Toggle overlay for Graduated Filter,
Spot Removaltool, or Red Eye
V V
82](https://image.slidesharecdn.com/photoshopreference-140325100646-phpapp02/85/Photoshop-reference-89-320.jpg)
![Removal tool.
Rotate image left L or Ctrl + ] L or Command + ]
Rotate image right R or Ctrl + [ R or Command + [
Zoom in Ctrl + + (plus) Command + + (plus)
Zoom out Ctrl + - (hyphen) Command + - (hyphen)
Temporarily switch to Zoom In tool
(Doesn’t work when Straighten tool is
selected. If Crop tool is active,
temporarily switches to Straighten
tool.)
Ctrl Command
Temporarily switch to Zoom Out tool
and change the Open Image button to
Open Copy and the Cancel button to
Reset.
Alt Option
Toggle preview P P
Full screen mode F F
Temporarily activate the White
Balance tool and change the Open
Image button to Open Object.
(Does not work if Crop tool is active.)
Shift Shift
Select multiple points in Curves panel Click the first point; Shift-click
additional points
Click the first point; Shift-click
additional points
Add point to curve in Curves panel Control-click in preview Command-click in preview
Move selected point in Curves panel
(1 unit)
Arrow keys Arrow keys
Move selected point in Curves panel
(10 units)
Shift-arrow Shift-arrow
Open selected images in Camera Raw
dialog box from Bridge
Ctrl + R Command + R
Open selected images from Bridge
bypassing Camera Raw dialog box
Shift + double-click image Shift + double-click image
Display highlights that will be clipped
in Preview
Alt-drag Exposure, Recovery, or Black
sliders
Option-drag Exposure, Recovery, or
Black sliders
Highlight clipping warning O O
Shadows clipping warning U U
(Filmstrip mode) Add 1 - 5 star rating Ctrl+1 - 5 Command+1 - 5
(Filmstrip mode) Increase/decrease
rating
Ctrl+. (period) / Ctrl+, (comma) Command+. (period) / Command+,
(comma)
(Filmstrip mode) Add red label Ctrl+6 Command+6
(Filmstrip mode) Add yellow label Ctrl+7 Command+7
(Filmstrip mode) Add green label Ctrl+8 Command+8
83](https://image.slidesharecdn.com/photoshopreference-140325100646-phpapp02/85/Photoshop-reference-90-320.jpg)

![To the top
Keys for selecting and moving objects
This partial list provides shortcuts that don’t appear in menu commands or tool tips.
Result Windows Mac OS
Reposition marquee while selecting Any marquee tool (except single
column and single row) + spacebar-
drag
Any marquee tool (except single
column and single row) + spacebar-
drag
Add to a selection Any selection tool + Shift-drag Any selection tool + Shift-drag
Subtract from a selection Any selection tool + Alt-drag Any selection tool + Option-drag
Intersect a selection Any selection tool (except Quick
Selection tool) + Shift-Alt-drag
Any selection tool (except Quick
Selection tool) + Shift-Option-drag
Constrain marquee to square or circle
(if no other selections are active)
Shift-drag Shift-drag
Draw marquee from center (if no other
selections are active)
Alt-drag Option-drag
Constrain shape and draw marquee
from center
Shift + Alt-drag Shift + Option-drag
Switch to Move tool Control (except when Hand, Slice,
Path, Shape, or any Pen tool is
selected)
Command (except when Hand, Slice,
Path, Shape, or any Pen tool is
selected)
Switch from Magnetic Lasso tool to
Lasso tool
Alt-drag Option-drag
Switch from Magnetic Lasso tool to
polygonal Lasso tool
Alt-click Option-click
Apply/cancel an operation of the
Magnetic Lasso
Enter/Esc or Control + . (period) Return/Esc or Command + . (period)
Move copy of selection Move tool + Alt-drag selection Move tool + Option-drag selection‡
Move selection area 1 pixel Any selection + Right Arrow, Left
Arrow, Up Arrow, or Down Arrow
Any selection + Right Arrow, Left
Arrow, Up Arrow, or Down Arrow
Move selection 1 pixel Move tool + Right Arrow, Left Arrow,
Up Arrow, or Down Arrow
Move tool + Right Arrow, Left Arrow,
Up Arrow, or Down Arrow
Move layer 1 pixel when nothing
selected on layer
Control + Right Arrow, Left Arrow, Up
Arrow, or Down Arrow
Command + Right Arrow, Left Arrow,
Up Arrow, or Down Arrow
Increase/decrease detection width Magnetic Lasso tool + [ or ] Magnetic Lasso tool + [ or ]
Accept cropping or exit cropping Crop tool + Enter or Esc Crop tool + Return or Esc
Toggle crop shield off and on / (forward slash) / (forward slash)
Make protractor Ruler tool + Alt-drag end point Ruler tool + Option-drag end point
Snap guide to ruler ticks (except when Shift-drag guide Shift-drag guide
‡
‡
‡
‡
‡
† †
†‡ †‡
† †
85](https://image.slidesharecdn.com/photoshopreference-140325100646-phpapp02/85/Photoshop-reference-92-320.jpg)


![To the top
To the top
To the top
To the top
Keys for the Clone Source panel
Keys for the Color panel
Keys for the History panel
Keys for the Info panel
Result Windows Mac OS
Show Clone Source (overlays image) Alt + Shift Opt + Shift
Nudge Clone Source Alt + Shift + arrow keys Opt + Shift + arrow keys
Rotate Clone Source Alt + Shift + < or > Opt + Shift + < or >
Scale (increase or reduce size) Clone
Source
Alt + Shift + [ or ] Opt + Shift + [ or ]
Result Windows Mac OS
Select background color Alt-click color in color bar Option-click color in color bar
Display Color Bar menu Right-click color bar Control-click color bar
Cycle through color choices Shift-click color bar Shift-click color bar
Result Windows Mac OS
Create a new snapshot Alt + New Snapshot Option + New Snapshot
Rename snapshot Double-click snapshot name Double-click snapshot name
Step forward through image states Control + Shift + Z Command + Shift + Z
Step backward through image states Control + Alt + Z Command + Option + Z
Duplicate any image state, except the
current state
Alt-click the image state Option-click the image state
Permanently clear history (no Undo) Alt + Clear History (in History panel
pop-up menu)
Option + Clear History (in History
panel pop-up menu)
95](https://image.slidesharecdn.com/photoshopreference-140325100646-phpapp02/85/Photoshop-reference-102-320.jpg)
![To the top
Keys for the Layers panel
Result Windows Mac OS
Change color readout modes Click eyedropper icon Click eyedropper icon
Change measurement units Click crosshair icon Click crosshair icon
Result Windows Mac OS
Load layer transparency as a selection Control-click layer thumbnail Command-click layer thumbnail
Add to current selection Control + Shift-click layer thumbnail. Command + Shift-click layer
thumbnail.
Subtract from current selection Control + Alt-click layer thumbnail. Command + Option-click layer
thumbnail.
Intersect with current selection Control + Shift + Alt-click layer
thumbnail.
Command + Shift + Option-click layer
thumbnail.
Load filter mask as a selection Control-click filter mask thumbnail Command-click filter mask thumbnail
Group layers Control + G Command + G
Ungroup layers Control + Shift + G Command-Shift + G
Create/release clipping mask Control + Alt + G Command-Option + G
Select all layers Control + Alt + A Command + Option + A
Merge visible layers Control + Shift + E Command + Shift + E
Create new empty layer with dialog
box
Alt-click New Layer button Option-click New Layer button
Create new layer below target layer Control-click New Layer button Command-click New Layer button
Select top layer Alt + . (period) Option + . (period)
Select bottom layer Alt + , (comma) Option + , (comma)
Add to layer selection in Layers panel Shift + Alt + [ or ] Shift + Option + [ or ]
Select next layer down/up Alt + [ or ] Option + [ or ]
Move target layer down/up Control + [ or ] Command + [ or ]
Merge a copy of all visible layers into
target layer
Control + Shift + Alt + E Command + Shift + Option + E
Merge layers Highlight layers you want to merge,
then Control + E
Highlight the layers you want to
merge, then Command + E
Move layer to bottom or top Control + Shift + [ or ] Command + Shift + [ or ]
Copy current layer to layer below Alt + Merge Down command from the
Panel pop-up menu
Option + Merge Down command from
the Panel pop-up menu
96](https://image.slidesharecdn.com/photoshopreference-140325100646-phpapp02/85/Photoshop-reference-103-320.jpg)


![Twitter™ and Facebook posts are not covered under the terms of Creative Commons.
Note:
Link or embed an image using OLE (Windows only)
Photoshop is an OLE 2.0 server, which means it supports embedding or linking an image in an OLE container application (usually a word-
processing or page-layout program). For example, you can insert Photoshop files and selections into other OLE applications, such as Adobe
PageMaker, Adobe FrameMaker, and Microsoft Word, using copy and paste or other methods.
Linking lets you place a link in the OLE container file that refers to the Photoshop file on the hard drive.
Embedding lets you insert the Photoshop file into the OLE container file.
After the image is in the container application, you can double-click it for editing in Photoshop. When you close the image in Photoshop, it is
updated in the container application.
Link or embed a selection or image in an OLE application
Do one of the following:
Copy a selection in Photoshop, and insert it in your OLE container application using the application’s Paste Special command. Refer to
your word-processing or page-layout application documentation for more instructions. Pasted selections can only be embedded, not
linked.
Use your OLE container application’s Insert Object command to insert a new Photoshop image or existing Photoshop file as an OLE-
embedded or OLE-linked object. Refer to your word-processing or page-layout application documentation for instructions.
Insert an unlinked screen-resolution bitmap into an OLE application
With the Move tool , drag a selection to the OLE container application. When you drop the object, it appears as a 72-ppi bitmap, which
cannot be automatically updated in Photoshop.
Modify and update a linked or embedded image in an OLE application
1. Double-click the linked or embedded image in your word-processing or page-layout application to start Photoshop (if it is not already
running), and open the image for editing.
2. Modify the image as desired.
3. Do one of the following:
For embedded images, close the file, or choose File > Update or File > Close & Return to [application name].
For linked images, save and close the file.
You can also modify linked files without first opening the container document. The linked image is updated the next time you open the
document in its OLE container application.
Adobe also recommends
Working with Photoshop and After Effects
Working with Photoshop and Flash
Working with Photoshop and Dreamweaver
Add or delete anchor points
125](https://image.slidesharecdn.com/photoshopreference-140325100646-phpapp02/85/Photoshop-reference-132-320.jpg)


![To the top
To the top
To the top
To the top
To the top
To the top
Added Basic and Advanced user interface modes
Improved Mac cursor visibility
Added option to load last mesh
Increased maximum Liquify brush size to 15,000
(English only) Resize Liquify brush with bracket-key [ ] shortcuts, which now match increments elsewhere in Photoshop
Ctrl (Windows) / Command (Mac OS) switches to magnifying glass
Alt + right click + drag changes brush size (Windows)
Ctrl + Alt + click + drag changes brush size (Mac OS)
Masks
Enable Invert and Threshold adjustments for masks in 32-bit/channel images
Plug-ins
Hold down Shift during startup to disable Optional and 3rd party plug-ins
Presets
Added New Document presets for common devices (for example, iPhone, iPad, and so forth)
Added new Gradient Map presets for traditional print toning and split-toning
Reorganized tool presets remain after restart
New HDR Pro presets from RC Concepcion and Scott Kelby
Printing
Added Edit button for description field in Print dialog
Allow Print dialog and print preview window to be resized
Allow customizable preview background color in the Print dialog
Allow manual repositioning of the printed area on page
Hide color profiles that are inappropriate for currently selected printer when using Photoshop Manages Color
Reintroduced Print Selected Area; you can modify selection in Print dialog
Saving
Warning message indicates that 16-bit images cannot display their file size in the Save as JPEG dialog
SDK
Added ability to access tool name associated with the tool preset name via scripting
Added the ability to return an array of guides in a document from the scripting SDK
150](https://image.slidesharecdn.com/photoshopreference-140325100646-phpapp02/85/Photoshop-reference-157-320.jpg)


![Note:
Note:
Rearranging tool presets in the Preset Manager
To delete a preset in the Preset Manager, select the preset and click Delete. You can always use the Reset command to restore the
default items in a library.
Load a library of preset items
Do one of the following:
Click the triangle to the right of the Preset Type pop-up menu and then choose a library file from the bottom of the panel menu.
Click OK to replace the current list, or click Append to add the current list.
To add a library to the current list, click Load, select the library file you want to add, and click Load.
To replace the current list with a different library, choose Replace [Preset Type] from the panel menu. Select the library file you want to
use, and click Load.
Each type of library has its own file extension and default folder.
Manage preset items
You can rename or delete preset items, as well as create or restore libraries of presets.
Rename preset items
1. Select a preset item. Shift-click to select multiple items.
2. Do one of the following:
Click Rename, and then enter a new name for the brush, swatch, and so on.
If the Preset Manager currently displays presets as thumbnails, double-click a preset, enter a new name, and click OK.
If the Preset Manager currently displays presets as a list or text only, double-click a preset, enter a new name inline, and press Enter
(Windows) or Return (Mac OS).
Delete preset items
155](https://image.slidesharecdn.com/photoshopreference-140325100646-phpapp02/85/Photoshop-reference-162-320.jpg)
![Do one of the following:
Select a preset item, and click Delete.
Alt-click (Windows) or Option-click (Mac OS) the items you want to delete.
Create a new library of presets
1. Do one of the following:
To save all the presets in the list as a library, make sure that all items are selected.
To save a subset of the current list as a library, hold down Shift, and select the items you want to save.
2. Click Save Set, choose a location for the library, enter a file name, and click Save.
You can save the library anywhere. However, if you place the library file in the appropriate Presets folder in the default preset location, the
library name will appear at the bottom of the panel menu after you restart Photoshop.
Restore the default library of preset items
Choose Reset from the panel menu. You can either replace the current list or append the default library to the current list.
Default preset locations
1. The default location for saving/loading/replacing presets depends on your operating system.
Windows 7 and Windows Vista: [Drive]:Users<user>AppDataRoamingAdobeAdobe Photoshop [version_number]Presets.
Mac: <User>/Library/Application Support/Adobe/AdobePhotoshop [version_number]/Presets.
Windows XP: [Drive]:Document and Settings<user>Application DataAdobeAdobePhotoshop [version_number]Presets.
2. Presets that ship with Adobe Photoshop are stored in the Photoshop program folder.
Displaying Hidden Files in Windows
The default locations for saving/loading/replacing presets are hidden by default in Windows.
1. To display hidden files in Windows XP:
a. Go to Start > Control Panel > Folder Options.
b. In the View tab, under Hidden files and folders, select Show hidden files and folders.
156](https://image.slidesharecdn.com/photoshopreference-140325100646-phpapp02/85/Photoshop-reference-163-320.jpg)


![Viewing multiple images
To the top
Cascade
Tile
Float in Window
Float All in Windows
Consolidate All to Tabs
To the top
View images in multiple windows
Match zoom and location in multiple images
View images in multiple windows
The document window is where your images appear. You can open multiple windows to display different images or different views of the same
one. A list of open windows appears in the Window menu. To bring an open image to the front, choose the file name from the bottom of the
Window menu. Available memory may limit the number of windows per image.
1. Choose Window > Arrange > New Window For [Image File Name].
2. If you want to arrange the windows, choose Window > Arrange and then choose one of the following:
Displays undocked windows stacked and cascading from the upper-left to the lower right of the screen.
Displays windows edge to edge. As you close images, the open windows are resized to fill the available space.
Allows image to float freely.
Floats all images.
Shows one image in full screen and minimizes the other images to tabs.
You can use the Hand tool’s Scroll All Windows option to scroll through all open images. Select it in the options bar and drag in one
image to scroll through all visible images.
Match zoom and location in multiple images
Match only zoom
1. Open one or more images, or open one image in multiple windows.
2. Choose Window > Arrange > Tile to display the images edge to edge.
3. Select the Zoom tool, and then do one of the following:
Select Zoom All Windows in the options bar, and then click one of the images. The other images zoom in or out the same relative
amount.
Choose Window > Arrange > Match Zoom. Hold down the Shift key and click one of the images. The other images zoom in or out at the
same magnification.
184](https://image.slidesharecdn.com/photoshopreference-140325100646-phpapp02/85/Photoshop-reference-191-320.jpg)


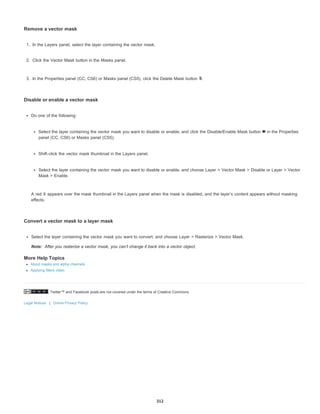


![Width
Contrast
Frequency
Stylus Pressure
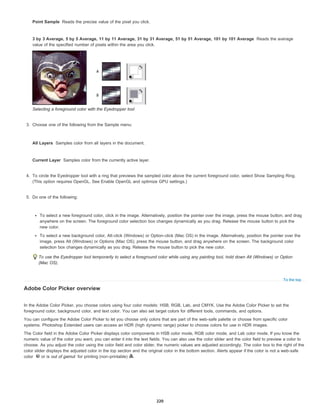
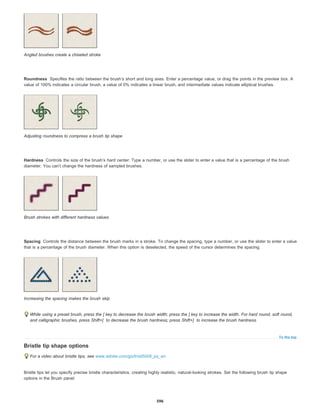
A. New B. Add To C. Subtract From D. Intersect With
3. (Optional) Set feathering and anti-aliasing in the options bar. See Soften the edges of selections.
4. Set any of these options:
To specify a detection width, enter a pixel value for Width. The Magnetic Lasso tool detects edges only within the specified distance
from the pointer.
To change the lasso pointer so that it indicates the lasso width, press the Caps Lock key. You can change the pointer while the tool is
selected but not in use. Press the right bracket (]) to increase the Magnetic Lasso edge width by 1 pixel; press the left bracket ([) to
decrease the width by 1 pixel.
To specify the lasso’s sensitivity to edges in the image, enter a value between 1% and 100% for Contrast. A higher value detects
only edges that contrast sharply with their surroundings; a lower value detects lower-contrast edges.
To specify the rate at which the lasso sets fastening points, enter a value between 0 and 100 for Frequency. A higher value
anchors the selection border in place more quickly.
On an image with well-defined edges, try a higher width and higher edge contrast, and trace the border roughly. On an image with softer
edges, try a lower width and lower edge contrast, and trace the border more precisely.
If you are working with a stylus tablet, select or deselect the Stylus Pressure option. When the option is selected, an
increase in stylus pressure decreases the edge width.
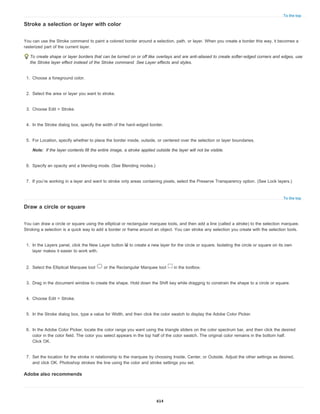
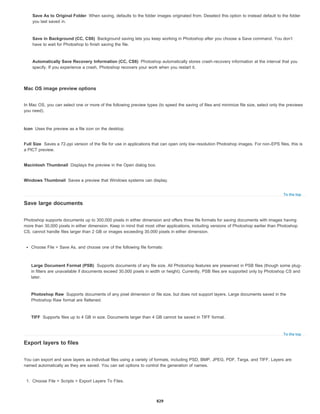
5. Click in the image to set the first fastening point. Fastening points anchor the selection border in place.
6. Release the mouse button or keep it depressed, and then move the pointer along the edge you want to trace.
The most recent segment of the selection border remains active. As you move the pointer, the active segment snaps to the strongest edge
in the image, based on the detection width set in the options bar. Periodically, the Magnetic Lasso tool adds fastening points to the selection
border to anchor previous segments.
7. If the border doesn’t snap to the desired edge, click once to add a fastening point manually. Continue to trace the edge, and add fastening
points as needed.
Fastening points anchor selection border to edges
8. To switch temporarily to the other lasso tools, do one of the following:
To activate the Lasso tool, hold down Alt (Windows) or Option (Mac OS), and drag with the mouse button depressed.
To activate the Polygonal Lasso tool, hold down Alt (Windows) or Option (Mac OS), and click.
345](https://image.slidesharecdn.com/photoshopreference-140325100646-phpapp02/85/Photoshop-reference-352-320.jpg)


![Making quick selections
To the top
Sample All Layers
Auto-Enhance
Select with the Quick Selection tool
Select with the Magic Wand tool
Select with the Quick Selection tool
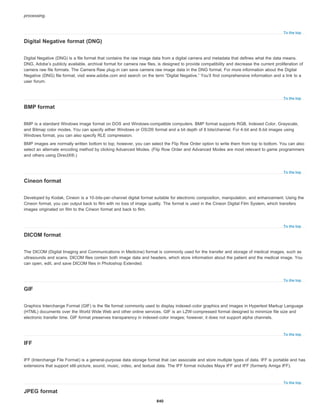
You can use the Quick Selection tool to quickly “paint” a selection using an adjustable round brush tip. As you drag, the selection expands
outward and automatically finds and follows defined edges in the image.
1. Select the Quick Selection tool . (If the tool isn’t visible, hold down the Magic Wand tool .)
2. In the options bar, click one of the selection options: New, Add To, or Subtract From.
New is the default option if nothing is selected. After making the initial selection, the option changes automatically to Add to.
3. To change the brush tip size, click the Brush pop-up menu in the options bar, and type in a pixel size or drag the slider. Use the Size
pop-up menu options to make the brush tip size sensitive to pen pressure or a stylus wheel.
When creating a selection, press the right bracket (]) to increase the Quick Selection tool brush tip size; press the left bracket ([) to
decrease the brush tip size.
4. Choose Quick Selection options.
Creates a selection based on all layers instead of just the currently selected layer.
Reduces roughness and blockiness in the selection boundary. Auto-Enhance automatically flows the selection further
toward image edges and applies some of the edge refinement you can apply manually in the Refine Edge dialog with the Contrast and
Radius options.
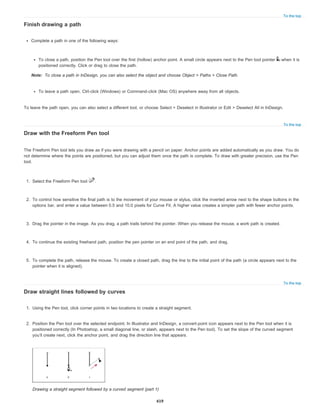
5. Paint inside the part of the image you want to select.
The selection grows as you paint. If updating is slow, continue to drag to allow time to complete work on the selection. As you paint near the
edges of a shape, the selection area extends to follow the contours of the shape edge.
Painting with the Quick Selection tool to extend the selection
If you stop dragging and then click or drag in a nearby area, the selection will grow to include the new area.
367](https://image.slidesharecdn.com/photoshopreference-140325100646-phpapp02/85/Photoshop-reference-374-320.jpg)


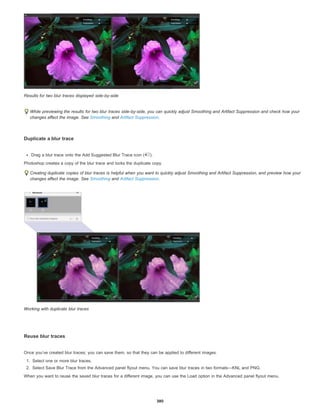


![Note:
To the top
To the top
To the top
Click an adjustment icon in the Adjustments panel. In CS5, you can also select an adjustment preset in the Adjustments panel.
Create an adjustment layer. See Create and confine adjustment and fill layers.
Double-click the thumbnail of an existing adjustment layer in the Layers panel.
You can also choose Image > Adjustments, and choose a command from the submenu to apply adjustments directly to the image
layer. Keep in mind that this method discards image information.
A new adjustment layer includes a layer mask, which by default is empty (or white), meaning that your adjustment is applied to the entire
image. (If you have an active selection on the image when you add an adjustment layer, the initial layer mask masks out the unselected
area in black.) Using the Brush tool, you can paint black areas on the mask where you don’t want the adjustment to affect the image. See
Edit a layer mask.
3. To toggle the view of your image with and without adjustments, click the Toggle Layer Visibility icon in the Properties panel (CC, CS6) or
the Adjustments panel (CS5).
To cancel changes, click the Reset button .
Save adjustment settings
You can save your color adjustment settings and apply them to other images. Once a setting is saved, it can be accessed in either the Preset
menu in the Properties panel (CC, CS6) or the presets list of the Adjustments panel (CS5). You can also choose the Load Preset option from an
adjustment dialog box menu. If you are saving color adjustment settings using the Match Color command, see Match the color in different images.
To save a setting in the Preset menu (CC, CS6) or the Adjustments panel (CS5), choose the Save Preset option from the panel menu. This
option is only available for Levels, Curves, Exposure, Hue/Saturation, Black & White, Channel Mixer, and Selective Color.
To save a setting in the Shadows/Highlights or Replace Color image adjustment dialog box, click Save. In the Levels, Curves, Exposure,
Hue/Saturation, Black & White, Channel Mixer, or Selective Color image adjustment dialog box, choose Save Preset from the panel menu.
Enter a name for the setting, then click Save.
Reapply adjustment settings
Once an adjustment setting is saved, it’s stored as a preset and can be reapplied.
(CC, CS6) Choose an adjustment preset from the Preset menu in the Properties panel.
(CS5) In the Adjustments panel, expand a set of adjustment presets and select from the menu list.
In an adjustment dialog box, click Load. Locate and load the saved adjustment file. In the Curves, Black & White, Exposure, Hue/Saturation,
Selective Color, Levels, or Channel Mixer dialog boxes, saved presets appear in the Presets menu. Choose Load Preset from the Preset
option to load a preset not shown on the Preset pop-up menu from a different location.
To remove default presets, navigate to the following folders, move the presets out of the folders, and restart Photoshop.
Windows: [startup drive]/Program Files/Adobe/Adobe Photoshop [version_number]/Presets/[adjustment type]/[preset name]
Mac OS: [startup drive]/Applications/Adobe Photoshop [version_number]/Presets/[adjustment type]/[preset name]
Correcting colors in CMYK and RGB
394](https://image.slidesharecdn.com/photoshopreference-140325100646-phpapp02/85/Photoshop-reference-401-320.jpg)


![Enhanced Spot Removal Tool in Camera Raw | Photoshop CC
Remove any unwanted aspects of a photo in simple steps, with the Spot Removal Tool that now behaves like the Healing Brush
To the top
Using the Spot Removal tool
Cleaning up a photo with the Visualize Spots feature
The Spot Removal tool in Camera Raw lets you repair a selected area of an image by sampling from a different area of the same image. The
tool is similar to the Healing Brush available in Photoshop. The default behavior for the Spot Removal tool is to be able to mark areas to touch
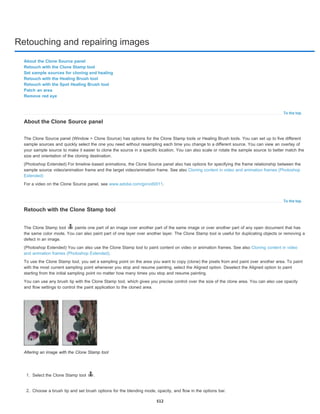
up, by dragging the brush across the photo. For example, remove a portion of the wire (connecting the helmet and the overhead wire) that is
distracting the view of the blue sky.
Using the Spot Removal tool on a raw image means that you are processing the raw image data directly. Working with raw image data directly
can provide cleaner matches for retouching (healing or cloning) actions. Also, since any edits and modifications to camera raw images are
stored in sidecar files, this process is non-destructive.
The zipline that appears to be connecting the wire and the helmet (image left) has been removed (image right)
Using the Spot Removal tool
1. Do one of the following:
Open a camera raw file, or,
With an image open in Photoshop, click Filter > Camera Raw Filter.
2. Select the Spot Removal tool from the toolbar.
3. Select one of the following from the Type menu:
Heal Matches the texture, lighting, and shading of the sampled area to the selected area.
Clone Applies the sampled area of the image to the selected area.
4. (Optional) In the Spot Removal tool options area under the Histogram, drag the Size slider to specify the size of the area that the Spot
Removal tool affects.
Use the bracket keys on your keyboard to change brush size
Left bracket ([), reduces the tool radius size
Right bracket (]), increases the tool radius size.
472](https://image.slidesharecdn.com/photoshopreference-140325100646-phpapp02/85/Photoshop-reference-479-320.jpg)


![Save Settings
Save New Camera Raw Defaults
Reset Camera Raw Defaults
Load Settings
To the top
Note:
Camera Raw Database
Sidecar “.XMP” Files
Note:
these locations if you don’t save them to the Camera Raw settings folder. However, you can use the Load Settings command to browse for and
apply settings saved elsewhere.
You can save and delete presets using the buttons at the bottom of the Presets tab.
Click the Camera Raw Settings menu button and choose a command from the menu:
Saves the current settings as a preset. Choose which settings to save in the preset, and then name and save the preset.
Saves the current settings as the new default settings for other images taken with the same camera, with
the same camera model, or with the same ISO setting. Select the appropriate options in the Default Image Settings section of the Camera
Raw preferences to specify whether to associate the defaults with a specific camera’s serial number or with an ISO setting.
Restores the original default settings for the current camera, camera model, or ISO setting.
Opens the Load Raw Conversion Settings dialog box, in which you browse to the settings file, select it, and then click Load.
Specify where Camera Raw settings are stored
Choose a preference to specify where the settings are stored. The XMP files are useful if you plan to move or store the image files and want to
retain the camera raw settings. You can use the Export Settings command to copy the settings in the Camera Raw database to sidecar XMP files
or embed the settings in Digital Negative (DNG) files.
When a camera raw image file is processed with Camera Raw, the image settings are stored in one of two places: the Camera Raw database file
or a sidecar XMP file. When a DNG file is processed in Camera Raw, the settings are stored in the DNG file itself, but they can be stored in a
sidecar XMP file instead. Settings for TIFF and JPEG files are always stored in the file itself.
When you import a sequence of camera raw files in After Effects, the settings for the first file are applied to all files in the sequence that do
not have their own XMP sidecar files. After Effects does not check the Camera Raw database.
You can set a preference to determine where settings are stored. When you reopen a camera raw image, all settings default to the values used
when the file was last opened. Image attributes (target color space profile, bit depth, pixel size, and resolution) are not stored with the settings.
1. In Adobe Bridge, choose Edit > Camera Raw Preferences (Windows) or Bridge > Camera Raw Preferences(Mac OS). Or, in the Camera
Raw dialog box, click the Open Preferences Dialog button . Or, in Photoshop, choose Edit >Preferences > Camera Raw (Windows) or
Photoshop > Preferences > Camera Raw (Mac OS).
2. In the Camera Raw Preferences dialog box, choose one of the following from the Save Image Settings In menu:
Stores the settings in a Camera Raw database file in the folder Document and Settings/[user name]/Application
Data/Adobe/CameraRaw (Windows) or Users/[user name]/Library/Preferences (Mac OS). This database is indexed by file content, so the
image retains camera raw settings even if the camera raw image file is moved or renamed.
Stores the settings in a separate file, in the same folder as the camera raw file, with the same base name and an
.xmp extension. This option is useful for long-term archiving of raw files with their associated settings, and for the exchange of camera raw
files with associated settings in multiuser workflows. These same sidecar XMP files can store IPTC (International Press Telecommunications
Council) data or other metadata associated with a camera raw image file. If you open files from a read-only volume such as a CD or DVD,
be sure to copy the files to your hard disk before opening them. The Camera Raw plug-in cannot write an XMP file to a read-only volume
and writes the settings to the Camera Raw database file instead. You can view XMP files in Adobe Bridge by choosing View >Show Hidden
Files.
If you are using a revision control system to manage your files and are storing settings in sidecar XMP files, keep in mind that you
483](https://image.slidesharecdn.com/photoshopreference-140325100646-phpapp02/85/Photoshop-reference-490-320.jpg)


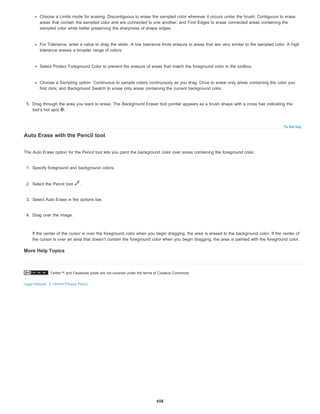


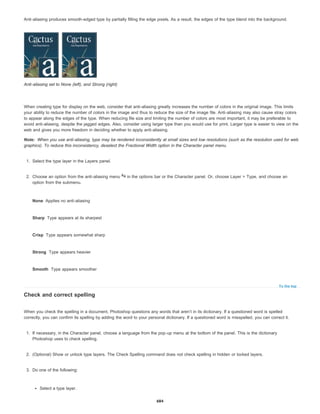


This document provides tutorials and help for using Adobe Photoshop CC. It covers topics such as what's new in Photoshop CC, warping perspective, printing 3D objects, creating smart objects, reducing camera shake, and sharing work on Behance. Additional sections provide tutorials on the Photoshop workspace and workflow, using tools, undo and history, image size and resolution, color modes, blending modes, and more. The document serves as a general help guide for getting started with and learning key features of Photoshop CC.


![Adobe photoshop extended cs5 [old version]](https://cdn.slidesharecdn.com/ss_thumbnails/adobephotoshopextendedcs5oldversion-130513070544-phpapp02-thumbnail.jpg?width=640&height=640&fit=bounds)


