
Recommended
More Related Content
What's hot
What's hot (18)
Similar to Phonics Instructional Strategies (Part 2)
Similar to Phonics Instructional Strategies (Part 2) (20)
Recently uploaded
Recently uploaded (20)
Phonics Instructional Strategies (Part 2)
- 1.
- 2.
- 3. T t
- 4. T t
- 5. Picture Sort by Initial Consonant B b Mm Rr Tt
- 6. Circle all of the words that start with a /t/.
- 8. A turtle. A tent.
- 9. My 5 year old grandson is learning to read. Yesterday he pointed at a picture in an animal book and said, Look Grandpa! It's a frickin' elephant! I took a deep breath, then asked, What did you call it? It's a frickin' Elephant, Grandpa! It says so on the picture! I looked, . . . and so it does... A f r i c a n Elephant So much for “Hooked on Phonics!” from an unknown author on email
- 10. Using magnetic letters and cookie tray
Editor's Notes
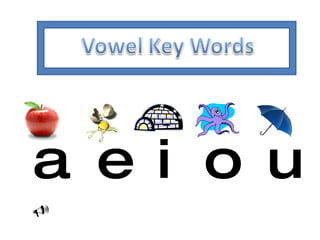
- The following slides demonstrate ways to explicitly teach the sounds of our language. . . I always put a “Vowel Key Word” strip on each child’s desk to help students learn the key words for each of the vowel sounds. I explicitly teach them to use the strip by pointing to the picture and saying the word, and then pointing to the letter and saying the letter name (long vowel) and short sound. “Apple, ā – ă ”. The students recite this, over time, until it becomes automatic. Many of the slides have audio represented by a megaphone icon at the bottom of the slide. After the audio has ended for each slide, please pause the Power Point, if necessary, to give yourself time to read each slide.
- This is an example of a letter /t/ page, using clip art, that can be used for a variety of activities with students. When I am teaching the sound for the letter /t/, I simply make a few copies of this page, cut the pictures apart, and I can use them for a variety of sorting activities like the ones that will follow.
- In the beginning I might use only one letter and have pictures that represent only two different sounds for my students to choose between. I cut the pictures for these two sounds apart and mix them up. The students then choose the pictures with that sound and paste them on the page. I always include a key word at the top of each page to help students remember the sound. I do this activity with a small group, with teacher modeling and lots of guided practice.
- The teacher can make a chart with only the letters at the top of the chart. Students can sort the pictures by first sound and paste them on the chart. This is a more advanced activity after the students know these sounds quite well.
- Again, using the same clip art file, I can cut and paste the pictures to make worksheets. I help students complete the activity in a small group with teacher modeling and guidance. The student worksheet would only have the pictures on it, not the directions. This works well for the Eenie, Meenie, Miney Moe game that we talked about earlier.
- I like to follow all of the activities that teach the letters in isolation with a book activity. This book would have explicit picture clues so that the students can be successful. This activity is good for initial sounds as well as concepts of print.
- These would be the next pages of the /t/ book. These books are easily made with the same clip art and simple language.
- Cookie trays are wonderful tools to use in conjunction with your magnetic letters. This is an activity to develop blending and segmenting of letters and words. I put about 6 carefully chosen letters randomly on each child’s tray. Then I ask my students to find the letters that make up the work that I ask them to make. They can make it and break it up again several times. That helps them become more automatic with the word. Once they are pretty confident with this, I will ask them if there is another word they can make. (Ex. Car/ran)
- This is one activity I have used to teach the less common word patterns, such as /ould/. Another way to teach word patterns and word families is through word walls and other group activities. Continue to part 3 of the Phonics Instructional Strategies Power Points.