SlideShare a Scribd company logo
1 2 3 4 5 6 7 9 10 11 12
14151617181921 202223
138
YOUR 106 AT A GLANCE2
19
06-05-2002
YOUR 106 AT A GLANCE 3
1 - Electric mirrors switch
2 - Storage compartment
3 - Lights, fog lamps and horn stalk
4 - Steering wheel with AIR BAG
5 - Ignition,ignition lock and engine
immobilser
6 - Windscreen wash/wipe stalk
7 - Instrument panel lighting rheostat
8 - Headlamp height adjustment
9 - Radio cassette player or spare
10- Adjustable centre vents
11- Controls for:
• Air conditioning or left-hand heated seat
• Lighter
• Hazard warning lights
• Rear screen and mirrors demisting
• Air recirculation or right-hand heated
seat
12 - Windscreen demisting vents
13- Side windows demisting vents
14- Adjustable side vent
15- Glove box
16- Passenger airbag
17- Ash tray
18- Passenger airbag disarming switch
19 - Electric window switches
20 - Gear lever
21 - Handbrake
22- Bonnet opening control
23- Fuse box
06-05-2002
The remote control
A single press on button A locks the
doors and boot or tailgate.
A single press on button B unlocks
the vehicle.
Key
The key switches on the ignition,
locks and unlocks the doors, tailga-
te, fuel filler flap and disarms the
passenger airbag.
LOCKING AND
UNLOCKING
YOUR 106 AT A GLANCE4
Keep your key number
in a safe place.
This will enable you to
obtain a new key if it is lost or
stolen.
60
A B
06-05-2002
ENGINE
IMMOBILISER
This locks the engine control sys-
tem and therefore prevents starting
of the vehicle by anyone who does
not have the key.
Operation
Each key has a special code.
When the ignition is switched on
the key code is recognised by the
engine immobiliser system and
starting is possible.
The engine immobiliser automati-
cally locks the engine control sys-
tem a few moments after the igni-
tion has been switched off.
Confidential card
This shows the identification code
which is required if any work is car-
ried out on the system by your
PEUGEOT dealer. This code is hid-
den by a film which must not be
removed unless required.
Keep your card in a safe place,
never in your vehicle.
YOUR 106 AT A GLANCE 5
When buying a second-
hand car:
- Make sure that you are given
the confidential card.
- It is advisable to have the key
codes memorised by your
PEUGEOT dealer in order to
ensure that the keys in your
possession are the only ones
which can start the vehicle.
57
06-05-2002
SEATS WITH MANUAL
CONTROLS
1. Forwards-backwards adjustment.
2. Seat back angle adjustment.
3. Access to rear seats (3 door).
For models fitted with air conditio-
ning, the storage compartment for
the handbook and maintenance
guide is under the passenger seat.
FRONT AND SIDE
AIRBAGS
Disarming the passenger airbag.
Insert the ignition key in switch 1
and turn it:
– to the «ON» position, the pas-
senger airbag is armed,
– to the «OFF» position, the pas-
senger airbag is not armed.
Operational Check
This is by means of the warning light
on the instrument panel.
If the passenger airbag is armed or
if your vehicle is not fitted with a
passenger airbag, the warning light
comes on for 6 seconds when the
ignition is switched on.
If the passenger airbag is not
armed, the warning light remains
on.
Always contact your PEUGEOT
dealer if the warning light flashes.
Passenger airbag precautions
For a vehicle fitted with a disarming
switch:
- disarm the air-
bag if you ins-
tall a rear-
wards-facing
child seat,
- arm the airbag
when an adult
is in the seat.
For a vehicle not fitted with a disar-
ming switch:
- do not install
r e a r - w a r d s -
facing child
seats on the
front passen-
ger seat.
Never place your feet or any object
on the fascia.
YOUR 106 AT A GLANCE6
50
2 3
1
3
1
71
06-05-2002
Off
Intermittent or continuous wipe
Windscreen wash
Fog lamps off
Front fog lamps on
Front/rear fog lamps on
LIGHTING - HORN
Ring A
Lighting controls
Lights off
Side lights
Rear fog lamp off
Rear fog lamp on
Dipped/
main beam lights
Ring B
Rear fog lamp control
Front/rear fog lamps control
FRONT AND REAR
WINDSCREEN WIPER
Front
3 - High speed wipe
2 - Normal speed wipe
1 - Intermittent wipe
0 - Stop
4 - Single wipe
Pulling the stalk towards you
washes the windscreen with timed
sweep, and headlamp wash if
headlamps are on.
Rear
YOUR 106 AT A GLANCE 7
A
B
62 63
3
2
1
0
4
06-05-2002
1 - Air flow adjustment
2 - Air distribution
To the central and side
vents
Footwells
Windscreens, side screens
and footwells
Windscreen and side
windows
3 -Temperature control
4 - Air conditioning
on/off
5 - Interior air
recirculation
EXTERIOR MIRRORS
Manual adjustment
- Adjust the position using the lever 1.
Electric adjustment:
- Using the two-way switch 2,
select the left-hand or right-hand
mirror, then adjust its position
using button 3.
- Return the two-way switch 2 to
the central position.
Demisting of the mirrors is
linked to the rear screen
demisting control.
HEATING/AIR CONDITIONING
YOUR 106 AT A GLANCE8
65 47
3
2
4
11
2
3
5
06-05-2002
YOUR 106 AT A GLANCE 9
PEUGEOT SERVICING
Your vehicle benefits from extended service intervals.
• For petrol engines: every 20 000 miles (30 000 km) or every two years.
• For diesel engines: every 10 000 miles (15 000 km) or every two years.
The extension of the service intervals means that the engine oil level must be checked regularly: topping up of
the oil between oil changes is normal.
It is for this reason that the Peugeot network offers you an intermediate service between each regular service.
The date of this visit is not shown by the service indicator. It is to be carried out at least every 10 000 miles
(15 000 km) for petrol engines and every 5 000 miles (7 500 km) for indirect injection diesel engines.
Your Peugeot dealer will carry out a quick check and will top up the levels if necessary; oil, coolant and screen
wash up to 2 litres.
If the oil level is too low, there is a risk of serious damage to the engine; check the engine oil level at least every
2 000 miles (3 000 km) or 3 000 miles (5 000 km), depending on the conditions of use.
The extended service intervals have been made possible by technical modifications to the vehicles and lubricants:
THUS IT IS ESSENTIAL TO USE ONLY ENGINE LUBRICANTS WHICH ARE APPROVED AND RECOMMENDED BY
THE MANUFACTURER.
06-05-2002
PEUGEOT MAINTENANCE10
SPECIAL FEATURES
Some of your vehicle’s vital components have specific servicing schedules.
The airbags and the pretensioning seat belts must be replaced every 10 years.
The brake fluid must be replaced every 40 000 miles (60 000 km) or every 2 years.
The pollen filter must be checked at each visit to the PEUGEOT dealer (intermediate visits and regular services).
Timing belt replacement : Consult a PEUGEOT dealer.
Note: the coolant does not need to be changed.
Arduous conditions of use
If the vehicle is used in certain particularly arduous conditions:
• Continuous door-to-door use.
• Town use (e.g. taxi).
• Repeated short journeys, with the engine cold in low temperatures.
Or in long stays in the following conditions:
• Hot countries with temperatures often above 30° C.
• Cold countries with temperatures often below minus 15° C.
• Countries with a dusty atmosphere.
• Countries whose lubricants or fuels do not conform to our recommendations.
It is necessary to follow an ‘Arduous conditions’ service schedule, which includes special operations and shorter
service intervals:
• Every 12 000 miles (20 000 km) or every year for petrol vehicles.
• Every 6 000 miles (10 000 km) or every year for indirect injection diesel vehicles.
06-05-2002
PEUGEOT MAINTENANCE 11
A AC C
20 000 (30 000)/ 40 000 (60 000)/ 60 000 (90 000)/ 80 000 (120 000)/
100 000 (150 000) 120 000 (180 000) 140 000 (210 000) 160 000 (240 000)
SERVICE LEVELS
Each vehicle has its own servicing cycle, based upon the engine type.
This cycle consists in alternating 3 types of service A, B and C, intermediate visits, and a few additional operations
depending on your vehicle; these correspond to key stages in the life of your 106.
Your dealer will advise you of the type and content of the next service due, when the first service is carried out
and at each subsequent service.
1st service at
6 000 miles* (10 000 km)
or 6 months*
This is necessary
in order to benefit
from the warranty.
THE MAINTENANCE CYCLE FOR YOUR PETROL 106
Service every 20 000 miles (30 000 km) or 2 years
Intermediate top-up visit incorporated in the fixed services.
* Whichever comes first
Brake fluid replacement every 2 years or every 40 000 miles (60 000 km).
These services are carried out with synthetic based oil; Fuel Economy oil or synthetic oil may also be used.
MILES (KM)
06-05-2002
PEUGEOT MAINTENANCE12
B BB C
B BB C
10 000 (15 000) / 20 000 (30 000) / 30 000 (45 000) / 40 000 (60 000) /
90 000 (135 000) 100 000 (150 000) 110 000 (165 000) 120 000 (180 000)
THE MAINTENANCE CYCLE FOR YOUR 106 DIESEL
Service every 10 000 miles (15 000 km) or 2 years
Intermediate top-up visit incorporated in the fixed services.
* Whichever comes first
Brake fluid replacement every 2 years or 40 000 miles (60 000 km)
These services are carried out with synthetic based oil; Fuel Economy oil or synthetic oil may also be used.
50 000 (75 000) / 60 000 (90 000) / 70 000 (105 000) / 80 000 (120 000) /
130 000 (195 000) 140 000 (210 000) 150 000 (225 000) 160 000 (240 000)
1st service at
6 000 miles* (10 000 km)
or 6 months*
This is necessary
in order to benefit
from the warranty.
MILES (KM)
06-05-2002
PEUGEOT MAINTENANCE 13
Services Level
Operations Description of operations for 1st service
A B C Intermediate visit
DRAIN AND REFILL
- Engine drain and refill.
- Fuel filter bleeding (Diesel).
- Oil filter.
- Fuel filter (Petrol).
REPLACEMENT - Fuel filter element (Diesel).
- Air filter element.
- Spark plugs (Petrol).
- Engine oil (check + top up).
- Manual gearbox oil (check + top up).
- Battery (check + top up) if plug is removable.
LEVEL - Front/rear windscreen wash (check + top up).
- Coolant (check + top up).
- Brake fluid (check + top up).
- Power steering fluid (check + top up according to specification).
- Operation of lights and indicators.
- Condition of glass, headlamp and light lenses and mirrors.
- Horn.
- Windscreen washer jets.
- Condition of wiper blades.
- Condition and tension of ancillary drive belts.
- Handbrake.
- Condition of hydraulic circuits (hoses and covers), check for leaks.
CHECK - Condition of rubber boots and gaiters.
- Brake pad wear.
- Clearances, hubs, rods, ball joints, flexible mountings.
- Sealing of dampers.
- Wear of rear linings.
- Condition and pressure of tyres (including spare wheel).
- Emission control check according to current legislation (Petrol).
- Smoke opacity (Diesel).
- Pollen filter check (according to specification).
- Visual check of the whole vehicle by a PEUGEOT dealer.
SERVICE - Courtesy vehicle
ROAD TEST
: All driving conditions : Arduous conditions
PEUGEOT SERVICING LEVELS A, B AND C
06-05-2002
TOTAL14
F
NL
SF
GR
A
D
CH
I
N
P
E
B
DK
GB
L
S
IRL
ACTIVADIESEL700010W
40
ACTIVADIESEL90005W
40
ACTIVA90005W
30*
ULTRADIESEL10W
40
ULTRA5W
30*
ULTRONDIESEL5W
40
QUARTZDIESEL700010W
40
QUARTZ90005W
40
QUARTZ90005W
30*ACTIVA700010W
40
ACTIVA90005W
40
ACTIVA90005W
30*
QUARTZ700015W
50
ULTRA10W
40
ULTRA5W
30*
ULTRON5W
40
ULTRON0W
30
QUARTZ700010W
40
QUARTZ90000W
40
QUARTZ90005W
40
QUARTZ90005W
30*
TRADE NAMES OF APPROVED AND RECOMMENDED LUBRICANTS IN EUROPE(1)
(1) Minimum quality level: petrol:ACEAA3 andAPI SH/SJ ; DieselACEAB3 andAPI CF/CD - ACEA =Association des Constructeurs EuropéensAutomobiles (Association of EuropeanAutomobile Manufacturers) - API =American Petroleum Institute.
If oil is used which does not conform to theACEAA3-B3 standards, this requires the "Arduous conditions" servicing schedule to be followed, which involves shorter intervals between services
* This Energy Saving oil may only be used in engines specifically designed for it (from 2000 Model Year).
D I E S E LD I E S E LP E T R O L P E T R O L
06-05-2002
PEUGEOT MAINTENANCE 15
0W 20
30
40
5020W
15W
10W
5W
Recommendations for
approved lubricants
The oils which appear in the table
opposite are suitable for most pur-
poses.
The diagram opposite states the
optimum range of viscosity depen-
ding on the temperatures at which
the oils are to be used.
It is also possible to use synthetic
oils of ‘superior quality’.
In the absence of semi-synthetic or
synthetic oils, oils of API SH/SJ
quality (for petrol engines), or
CD/CF quality (for diesel engines)
may be used by following the
‘Arduous Conditions’ maintenance
schedule which specifies shorter
intervals.
Do not hesitate to ask for advice
from a Peugeot dealer to maintain
driving pleasure and to minimise
the maintenance cost of your
vehicle.
For countries outside Europe, plea-
se contact a local PEUGEOT
dealer.
ESSENTIAL ESSENTIAL
Manual gearbox ESSO GEAR OIL BV TOTAL TRANSMISSION BV
75W 80 PR 9736.41 75W-80
Power steering ESSO ATF D TOTAL FLUIDE AT42
PR 9730.94
Brake fluid PEUGEOT DOT4
Coolant PROCOR TM108 / GLYSANTIN G33 or REVKOGEL 2000
ESSENTIAL Protection to minus 35 °C
Other approved products
06-05-2002
INSTRUMENTS AND CONTROLS18
1 2 3 4 5 6 7 9 10 118
12131415161718192021
Instrument panel (Petrol)
1 - Maximum coolant temperature
2 - Display control:
- total distance display
- trip recorder - trip recorder reset
- service indicator
3 - Speedometer
4 - Display:
- digital clock
- service indicator
- total distance
- trip recorder
5 - Left-hand indicator
6 - Low fuel level
7 - Fuel gauge
8 - Right-hand indicator
9 - Rev. counter
10 - Clock adjustment, lighting rheostat
11 - Oil pressure
12 - Engine autodiagnostics* (petrol)
13 - Front* and side** airbag warning
light and passenger airbag
disarm*
14 - ABS* (Anti-lock Braking System)
15 - Handbrake, low brake fluid level
and engine not running
16 - Battery charge
17 - Rear fog lamp
18 - Front fog lamps*
19 - Main beam
20 - Dipped beam
21 - Passenger airbag disarm
* According to specification or country.
** According to model.
06-05-2002
INSTRUMENTS AND CONTROLS 19
1 2 3 4 5 6 7 8 10 11 129
141617181920212223 1315
Instrument panel (Petrol)
1 - Coolant temperature gauge
2 - Maximum coolant temperature
3 - Display control:
- total distance display
- trip recorder - trip recorder reset
- service indicator
4 - Speedometer
5 - Display:
- digital clock
- service indicator
- oil level gauge
- total distance
- trip recorder
6 - Left-hand indicator
7 - Low fuel level
8 - Fuel gauge
9 - Right-hand indicator
10 - Rev. counter
11 - Clock adjustment, lighting rheostat
12 - Oil temperature gauge
13 - Engine autodiagnostics* (petrol)
14 - Front* and side** airbag warning
light and passenger airbag
disarm*
15 - Oil pressure
16 - ABS* (Anti-lock Braking System)
17 - Handbrake, low brake fluid level
and engine not running
18 - Battery charge
19 - Rear fog lamp
20 - Front fog lamps*
21 - Main beam
22 - Dipped beam
23 - Passenger airbag disarm
* According to specification or country.
** According to model.06-05-2002
INSTRUMENTS AND CONTROLS20
1 2 3 4 5 9 10 118
13 121415161718192021
6 7
Instrument panel (Diesel)
1 - Maximum coolant temperature
2 - Display control:
- total distance display
- trip recorder - trip recorder reset
- service indicator
3 - Speedometer
4 - Display:
- digital clock
- service indicator
- total distance
- trip recorder
5 - Left-hand indicator
6 - Low fuel level
7 - Fuel gauge
8 - Right-hand indicator
9 - Rev. counter
10 - Clock adjustment, lighting rheostat
11 - Oil pressure
12 - Pre-heat (diesel)
13 - Front* and side** airbag warning
light and passenger airbag
disarm*
14 - ABS* (Anti-lock Braking System)
15 - Handbrake, low brake fluid level
and engine not running
16 - Battery charge
17 - Rear fog lamp
18 - Front fog lamps*
19 - Main beam
20 - Dipped beam
21 - Passenger airbag disarm
* According to specification or country.
** According to model.
06-05-2002
Diesel engine pre-heat
Wait until the warning lamp goes
out then operate the starter. On
some models the warning lamp will
not light when the engine is hot.
Battery charge
warning lamp
Indicates either:
- faulty operation of the charging
circuit, or
- loose battery or starter terminals,
or
- broken or slack alternator belt, or
- a faulty alternator.
Consult a PEUGEOT dealer.
Anti-lock brake system
warning lamp (ABS)*
Indicates faulty ABS operation.
The vehicle does, however, retain
conventional braking.
Consult a PEUGEOT dealer.
Coolant temperature gauge
- Needle in zone (A): temperature
correct
- Needle in zone (B): the coolant
temperature is too high
Handbrake and brake
fluid level warning
lamp
Indicates either:
- that the engine is not running,
- that the handbrake is on or has
not been released correctly
(engine running),
- an excessive drop in the brake
fluid level (engine running and
handbrake released).
Note : with the engine running and
the handbrake off, if the warning
light remains lit then you must stop.
Consult a PEUGEOT dealer.
Low engine oil
pressure
It is essential to stop.
Indicates either:
- insufficient engine oil pressure,
or
- lack of oil in the lubrication system.
Top up the oil level if necessary.
Consult a PEUGEOT dealer.
High coolant
temperature
warning lamp
It is essential to stop.
Indicates too high a temperature,
caused by:
- a fan malfunction. Check the fuses
and replace them if necessary,
- a coolant leak; the cooling system is
pressurised, turn the cap to the 1st
notch, or* unscrew the cap two turns,
to let the pressure drop before
topping up the level,
- a coolant pump malfunction.
Warning lamps
INSTRUMENTS AND CONTROLS 21
B
A
06-05-2002
Engine auto-diagnostics
warning light*
It comes on each time the ignition is
switched on.
If it comes on with the engine run-
ning it indicates a malfunction in the
injection, ignition or emission
control system. If your vehicle is fit-
ted with a catalytic converter, there
is a risk of damage to it.
Contact a PEUGEOT dealer rapidly.
Front and side*
airbags
If the passenger airbag is armed or
if your vehicle is not fitted with a
passenger airbag, the warning light
comes on for 6 seconds when the
ignition is switched on.
Front airbag disarmed
If the passager airbag is disarmed,
the indicator light remains on.
In all cases, if the warning light
flashes, contact a PEUGEOT dealer.
Low fuel level
warning
Indicates that the quantity of fuel
remaining is less than 1 gallon
[5 litres] (Tank capacity approxima-
tely 10 gallons [45 litres]).
AIR
BAG
INSTRUMENTS AND CONTROLS22
F
E
- If the needle is in zone E, the
temperature is correct.
- If the needle is in zone F, the
temperature is too high. To lower
the temperature of the oil, reduce
your speed.
Oil temperature gauge*
Fuel supply cut-off*
If there is a major collision, a device
switches off the supply of fuel to the
engine.
To re-establish the supply to the
engine, press the button.
* According to specification
06-05-2002
Instrument panel display
When the ignition is switched on, this display shows in turn, the following infor-
mation:
- digital clock,
- service indicator,
- oil level indicator,*
- total distance.
Engine oil level
When the ignition is switched on, engine not running, the service indicator is dis-
played for a few seconds, then the engine oil level is indicated for approximate-
ly 10 seconds.
Maximum
Minimum
Check the level with the dipstick and top it up. The figure shown
is only correct if the vehicle has been on stable, level ground, with
the engine stopped, for 10 minutes.
No oil
When the LEDs flash, it is essential to top up the oil to the correct
level, otherwise the engine will be damaged.
* According to specification
Total distance and trip recorder
One brief press on button A changes the
display between total distance and the
trip recorder.
Resetting the trip recorder to zero
A long press on the button resets the trip
recorder to zero.
INSTRUMENTS AND CONTROLS 23
A
06-05-2002
SERVICE INDICATOR
This is a reminder of when the next
service is due in accordance with the
manufacturer’s maintenance sche-
dule.
Operation
When the ignition is switched on the
display shows the distance remai-
ning (rounded figures) before the
next service is due.
Example: 4800 km remain before
the next service is due. For five
seconds after the ignition is switched
on, the display shows:
5 seconds after switching on the igni-
tion the display resumes normal ope-
ration and shows the total and trip
distances.
When the distance remaining
before the next service is less
than 1000 km.
Example: 900 km remain before the
next service is due.
For five seconds after the ignition is
switched on, the display shows:
5 seconds after switching on the igni-
tion the display resumes normal ope-
ration. This indicates that a service
should be carried out shortly:
When a service is overdue.
For five seconds after the ignition is
switched on, the service symbol and
the excess distance flash.
Example: the service is overdue by
300 km The vehicle should be servi-
ced very soon.
For 5 seconds after the ignition is
switched on the display shows:
5 seconds after switching on the igni-
tion the display resumes normal ope-
ration.
INSTRUMENTS AND CONTROLS24
06-05-2002
Service intervals
If your vehicle is used in certain par-
ticularly difficult conditions it is
necessary to follow the "Arduous
conditions" servicing schedule,
which involves shorter intervals bet-
ween services (see the Warranty
and Maintenance Record booklet).
Comment: If the time limit between
two services is reached before the
relevant mileage limit, the service
spanner symbol will light up and the
display will show 0.
To change the service interval
- Switch off the ignition.
- Press and hold button 1.
- Switch on the ignition.
- Release the button straight away.
- The service interval is displayed.
- Each time button 1 is pressed
briefly, the service intervals are
alternated.
Example
- When the required service interval
is displayed, press button 1 for
10 seconds to confirm (the
selected service interval flashes
for 10 seconds).
Release the button to confirm when
the display stops flashing.
Reset to zero
Your PEUGEOT dealer will carry out
this operation after each service.
However, if you carry out your
service yourself, the zero reset
procedure is as follows:
- switch off the ignition,
- press and hold button 1,
- switch on the ignition,
- keep button 1 pressed for
10 seconds,
the display indicates [= 0] and the
service spanner symbol disappears.
INSTRUMENTS AND CONTROLS 25
1
06-05-2002
YOUR 106 IN DETAIL26
A B C
G
H
IJLKM
D E F
AUDIO RB1
06-05-2002
YOUR 106 IN DETAIL 27
j
jj
k
kk
j
jj
k
kk
v
w
k
j
Button Function
A TA Traffic information priority on/off.
B RDS RDS on/off.
Press for more than 2 seconds: regional following mode on/off.
C BND/AST Selection of wavebands FM1, FM2, FM3, AM.
Press for more than 2 seconds: autostore, automatic storing of stations.
D SRC Source selection; radio, cassette or CD*.
Press for more than 2 seconds: CD* shuffle.
E Press fully: cassette fast rewind.
F Press fully:cassette fast fowards.
E + F Press half-way: reverses the direction of play of the cassette.
Press fully: ejects the cassette.
G Increase the audio setting.
H Decrease the audio setting.
I AUDIO Selects the bass, treble, loudness and sound distribution.
J Higher frequency automatic search.
Selection of next CD* track.
K Lower frequency automatic search.
Selection of previous CD* track.
L MAN Manual/automatic operation of button J and K.
M Audio system on/off. Volume adjustment.
1 to 6 Selects a stored station.
Press for more than 2 seconds.
Selects a CD*.
* Available as an accessory.
06-05-2002
YOUR 106 IN DETAIL28
GENERAL FUNCTIONS
On / off
With the ignition key in the ACCESSORIES or IGNITION position, press the "M" button to switch the set on or off.
ANTI-THEFT SYSTEM
The first time you use the set following disconnection of the set or the battery, you must enter the confidential
code which was given to you on handover of your vehicle.
Entering the code
Switch the set on.
The display shows "CODE" then the set changes over to code request mode and "- - - -" is displayed.
Enter your four-digit code number using buttons "1" to "6".
For example : if your code is 5345 press buttons "5", "3", "4" and "5" in turn.
When the fourth number has been entered correctly, the radio starts automatically.
Error in entering the code
If an error is made when entering one of the first three digits, do not continue the operation and switch off the
radio to prevent blocking it.
Each incorrect code entry will result in the set being blocked for a period of from 5 seconds to 30 minutes, after
the 7th incorrect entry.
To unblock the set, leave it switched on during the waiting period. When "- - - -" is displayed, you can enter the
code again.
If the set is switched off during the waiting period, this waiting period will restart when the set is switched on
again.
After 14 incorrect code entries, the radio will be permanently blocked and the message "END" will be displayed.
ADJUSTING THE SOUND
Adjusting the volume
Turn the "M" button to increase or decrease the volume of the set.
If the radio overheats, the volume will reduce.
Note: If you have a car-phone fitted with a “mute” signal output connected to the set, the set will automatically
change to “mute” when the car-phone is used.
06-05-2002
YOUR 106 IN DETAIL 29
AUDIO SETTINGS
Press the “AUDIO” button several times in succession to access the bass (BASS), treble (TREB), loudness
(LOUD), fader (FAD) and balance (BAL).
Exit from audio mode is automatic after a few seconds, without pressing any button or by pressing the “AUDIO”
button after adjusting the balance.
Note: bass and treble settings are specific to each source. It is possible to set them differently for radio, cassette
and CD.
Bass setting
When “BASS” is displayed, press the “G” or “H” buttons to vary the setting.
– “BASS –9” for a minimum bass setting,
– “BASS 0” for a normal position,
– “BASS +9” for a maximum bass setting.
Treble setting
When “TREB” is displayed, press the “G” or “H” buttons to vary the setting.
– “TREB –9” for a minimum treble setting,
– “TREB 0” for a normal position,
– “TREB +9” for a maximum treble setting.
Adjusting the loudness
This function automatically emphasises bass and treble tones when the volume is low.
Press the “G” or “H” buttons to switch this function on or off.
Setting the front/rear sound distribution (Fader)
When “FAD” is displayed, press the “G” or “H” buttons to vary the setting.
The “G” button increases the volume at the front.
The “H” button increases the volume at the rear.
This function can be deactived by pressing buttons “M” and “I” simultaneously.
Setting the right/left sound distribution (Balance)
When “BAL” is displayed, press the “G” or “H” buttons to vary the setting.
The “G” button increases the volume on the right-hand side.
The “H” button increases the volume on the left-hand side.
06-05-2002
YOUR 106 IN DETAIL30
RADIO
Notes on radio reception
Your radio is subject to phenomena which do not affect domestic sets. Both MW/LW and FM reception are subject
to various forms of interference which are no reflection on the quality of your set, but are due to the nature of the
signals and the way in which they are transmitted.
On MW/LW, interference may be noticed when passing underneath high voltage power lines or bridges or through
tunnels.
On FM, interference may be the result of increasing distance from the transmitter, reflection of the signal by
obstacles (mountains, hills, buildings etc), or of being in an area which is not covered by a transmitter.
Selecting the radio
Press the "SRC" button, until the radio is selected.
Selecting a waveband
By short presses on the "BND/AST" button, you can select the FM1, FM2, FM3 and AM wavebands.
Automatic station search
Briefly press button “J” or “K” to search for the station immediately above or below. By continuing to press the
button in the direction selected, you will obtain continous scrolling of the frequency.
The scrolling stops at the first station found as soon as you release the button.
If the TA traffic programme is selected, only stations broadcasting this type of programme are selected.
Searching for a station occurs first in “LO” sensitivity (selection of the most powerful transmitters) during
scanning of the waveband, then in “DX” sensitivity (selection of the weakest and most distant transmitters).
Manual station search
Press the “MAN” button.
Briefly press button “J” or “K” respectively to increase or reduce the frequency displayed.
By continuing to press the button in the direction selected, you will obtain continuous scrolling of the frequency.
Scrolling stops as soon as you release the button.
Pressing the “MAN” button again returns you to automatic station search.
06-05-2002
YOUR 106 IN DETAIL 31
Manual storing of stations in the memory
Select the station required.
Press for more than two seconds one of the buttons “1” to “6”.
The sound stops then becomes audible again, confirming that the station has been stored in memory.
Automatic storing of FM stations in the memory (autostore)
Press the “BND/AST” button for more than two seconds, to automatically store the 6 stations with the strongest
signal in FM. These stations are stored in the FM3 waveband.
– If it is not possible to find 6 stations, the remaining memories are empty.
Recalling stations stored in the memory
For each waveband, briefly pressing the buttons “1” to “6” recalls the corresponding stored station.
RDS FUNCTION
Using the RDS (Radio Data System) function on FM
RDS allows you to continue to listen to the same station, whatever frequency it is using for the region you are
going through.
Switch the function on or off by briefly pressing the “RDS” button.
RDS station following
The display indicates the name of the station selected. The radio is continually searching for the station which has
the best reception and which is transmitting the same programme.
06-05-2002
YOUR 106 IN DETAIL32
Traffic information programmes
Press the "TA" button to switch the function on or off.
Any traffic information flash will be given priority, whatever source you are listening to (radio, cassette or CD).
If you wish to interrupt a message, press the "TA" button; this switches off the function.
Note: the volume of the traffic information announcements is independent of the volume of normal radio
listening. You can adjust it using the volume button. The setting will be stored and will be used when the
next messages are broadcast.
While traffic information is being broadcast, the display will alternately show “TRAFFIC” and the name of the
station.
When the station selected cannot broadcast traffic information, the display shows “NO TA”.
Regional following mode (REG)
When they are part of a network, certain stations broadcast regional programmes in the various areas they
serve.
With regional following mode you can keep listening to the same programme.
To do this press the “RDS” button for more than two seconds to switch this function on or off.
06-05-2002
YOUR 106 IN DETAIL 33
CASSETTE
Selecting cassette mode
When a cassette is inserted, the cassette player will start automatically.
If a cassette is already inserted, press the "SRC" button until the cassette is selected.
Ejecting the cassette
Fully press both buttons "E" and "F" to eject the cassette from the player.
Direction of play
The player will play sides 1 and 2 of the cassette alternately, by automatically reversing the direction of play at the
end of a side.
To manually reverse the direction of play, press both buttons "E" and "F" part way.
Fast forward/rewind
Fully press one of the buttons "E" or "F" to fast forward or fast rewind the cassette. At the end of the fast forward
rewind, the set plays the current side.
Note: During fast forwards or rewind of a cassette, the audio system will automatically play the last radio
station.
Recommendations for using casssettes
- Use good quality cassettes.
- Avoid use of cassettes which play for longer than 90 minutes.
- Never expose the cassettes to heat or the direct rays of the sun.
- Re-tighten the tape if necessary before introducing the cassette in the player.
- Clean the playing head regularly with a damp type cleaning cassette.
06-05-2002
YOUR 106 IN DETAIL34
CD MULTI-CHANGER (Available as an accessory)
Selecting the CD changer
Press the “SRC” button until the CD changer is selected.
Selecting a disc
Press a button from “1” to “6” to select the corresponding disc.
Selecting a track
Press button “J” to select the next track.
Press button “K” to return to the start of the current track or to select the previous track.
Accelerated play
Press the “MAN” button.
Keep button “J” or “K” pressed for forwards or backwards accelerated play.
Accelerated play stops as soon as you release the button.
Buttons “J” and “K” resume the “track selection” function when the “MAN” button is pressed again.
Shuffle (RAND)
When the CD multi-changer is selected, keep the “SRC” button pressed for two seconds. The tracks will be played
in random sequence. Pressing the “SRC” button again for two seconds returns you to normal play.
Note : Do not use blank CDs as these could damage your player.
06-05-2002
YOUR 106 IN DETAIL36
A B C
D
E
M JK FGIHL
AUDIO RD1
06-05-2002
YOUR 106 IN DETAIL 37
v
w
k
j
Button Function
A i Ejection of the CD.
B RDS RDS function on/off.
Press for more than 2 seconds: regional station following on/off.
C TA Traffic information priority on/off.
Press for more than 2 seconds: PTY function on/off.
D Increase the audio setting.
E Decrease the audio setting.
F AUDIO Selects the bass, treble, loudness and sound distribution.
G Automatic search of higher frequency.
Selection of next CD track.
H Automatic search of lower frequency.
Selection of previous CD track.
I MAN Manual/automatic operation of buttons G and H.
J Source selection, radio. Selection of wavebands FM1, FM2, FM3, AM.
Press for more than 2 seconds: automatic storing of stations (autostore).
K Source selection, CD.
Press for more than 2 seconds: shuffle.
L Source selection: CD player.
Press for more than 2 seconds: shuffle.
M ON/VOL Audio system on/off.
1 to 6 Selects a stored station.
Press for more than 2 seconds: stores a station.
Selects a CD*.
06-05-2002
YOUR 106 IN DETAIL38
GENERAL FUNCTIONS
On / off
With the ignition key in the ACCESSORIES or IGNITION position, press the "M" button to switch the set on or off.
The set can operate for 30 minutes without switching the ignition on.
ANTI-THEFT SYSTEM
The first time you use the set following disconnection of the set or the battery, you must enter the confidential
code which was given to you on handover of your vehicle.
Entering the code
Switch the set on.
The display shows "CODE" then the set changes over to code request mode and "- - - -" is displayed.
Enter your four-digit code number using buttons "1" to "6".
For example: : if your code is 5345 press buttons "5", "3", "4" and "5" in turn.
When the fourth number has been entered correctly, the radio starts automatically.
Error in entering the code
If an error is made when entering one of the first three digits, do not continue the operation and switch off the
radio to prevent blocking it.
Each incorrect code entry will result in the set being blocked for a period of from 5 seconds to 30 minutes, after
the 7th incorrect entry.
To unblock the set, leave it switched on during the waiting period. When "- - - -" is displayed, you can enter the
code again.
If the set is switched off during the waiting period, this waiting period will restart when the set is switched on
again.
After 14 incorrect code entries, the radio will be permanently blocked and the message “END” will be displayed.
ADJUSTING THE SOUND
Adjusting the volume
Turn the "M" button to increase or decrease the volume of the set.
If the radio overheats, the volume will reduce.
Note: If you have a car-phone fitted with a “mute” signal output connected to the set, the set will automatically
change to “mute” when the car-phone is used.
06-05-2002
YOUR 106 IN DETAIL 39
AUDIO SETTINGS
Press the “AUDIO” button several times in succession to access the bass (BASS), treble (TREB), loudness
(LOUD), fader (FAD) and balance (BAL).
Exit from audio mode is automatic after a few seconds, without pressing any button or by pressing the “AUDIO”
button after adjusting the balance.
Note: the bass and treble settings are specific to each source. It is possible to set the radio, CD, or CD multi-
changer differently.
Bass setting
When “BASS” is displayed, press the “D” or “E” buttons to vary the setting.
– “BASS –9” for a minimum bass setting,
– “BASS 0” for a normal position,
– “BASS +9” for a maximum bass setting.
Treble setting
When “TREB” is displayed, press the “D” or “E” buttons to vary the setting.
– “TREB –9” for a minimum treble setting,
– “TREB 0” for a normal position,
– “TREB +9” for a maximum treble setting.
Adjusting the loudness
This function automatically emphasises bass and treble tones when the volume is low.
Press the “D” or “E” buttons to switch this function on or off.
Setting the front/rear sound distribution (Fader)
When “FAD” is displayed, press the “D” or “E” buttons to vary the setting.
The “D” button increases the volume at the front.
The “E” button increases the volume at the rear.
This function can be deactived by pressing buttons “M” and “F” simultaneously.
Setting the right/left sound distribution (Balance)
When “BAL” is displayed, press the “D” or “E” buttons to vary the setting.
The “D” button increases the volume on the right-hand side.
The “E” button increases the volume on the left-hand side.
06-05-2002
YOUR 106 IN DETAIL40
RADIO
Notes on radio reception
Your radio is subject to phenomena which do not affect domestic sets. Both MW/LW and FM reception are
subject to various forms of interference which are no reflection on the quality of your set, but are due to the
nature of the signals and the way in which they are transmitted.
On MW/LW, interference may be noticed when passing underneath high voltage power lines or bridges or
through tunnels.
On FM, interference may be the result of increasing distance from the transmitter, reflection of the signal by obs-
tacles (mountains, hills, buildings etc), or of being in an area which is not covered by a transmitter.
Selecting the radio
Press the "J" button.
Selecting a waveband
By short presses on the “J” button, you can select the FM1, FM2, FM3 and AM wavebands.
Automatic station search
Briefly press button “G” or “H” to search for the station immediately above or below. By continuing to press the button
in the direction selected, you will obtain continuous scrolling of the frequency.
The scrolling stops on the first station found as soon as you release the button.
If TA, traffic information programme, is selected, only stations broadcasting this type of programme are selected.
Searching for a station occurs first in “LO” sensitivity (selection of the most powerful transmitters) during scanning of
the waveband, then in “DX” sensitivity (selection of the weakest and most distant transmitters).
To scan the waveband in “DX” sensitivity, press twice on button “G” or “H”.
Manual station search
Press the “MAN” button.
Briefly press button “G” or “H” respectively to increase or reduce the frequency displayed.
By continuing to press the button in the direction selected, you will obtain continuous scrolling of the frequency.
Scrolling stops as soon as you release the button.
Pressing the “MAN” button again returns you to automatic station search.
06-05-2002
YOUR 106 IN DETAIL 41
Manual storing of stations in the memory
Select the station required.
Press for more than two seconds one of the buttons “1” to “6”.
The sound stops then becomes audible again, confirming that the station has been stored in memory.
Automatic storing of FM stations in the memory (autostore)
Press the “J” button for more than two seconds, to automatically store the 6 stations with the strongest signal
in FM. These stations are stored in the FM3 waveband.
– If it is not possible to find 6 stations, the remaining memories are empty.
Recalling stations stored in the memory
For each waveband, briefly pressing the buttons “1” to “6” recalls the corresponding stored station.
RDS FUNCTION
Using the RDS (Radio Data System) function on FM
RDS allows you to continue to listen to the same station, whatever frequency it is using for the region you are
going through.
Switch the function on or off by briefly pressing the “RDS” button.
RDS station following
The display indicates the name of the station selected. The radio is continually searching for the station which
has the best reception and which is transmitting the same programme.
06-05-2002
YOUR 106 IN DETAIL42
Traffic information programme
Press the “TA” button to switch the function on or off.
Any traffic information flash will be given priority, whatever source you are listening to (radio, CD or CD changer).
If you wish to interrupt a message, press the “TA” button; this switches off the function.
Note: the volume of the traffic information announcements is independent of the volume of normal radio
listening. You can adjust it using the volume button. The setting will be stored and will be used when the
next messages are broadcast.
While traffic information is being broadcast, the display will alternately show “TRAFFIC” and the name of the station.
When the station selected cannot broadcast traffic information, the display shows “NO TA”.
Regional following mode (REG)
When they are part of a network, certain stations broadcast regional programmes in the various areas they serve.
With regional following mode you can keep listening to the same programme.
To do this press the “RDS” button for more than two seconds to switch this function on or off.
PTY function
This allows you to listen to stations broadcasting a specific type of programme (news, culture, sport, rock etc.).
With FM selected, press the “TA” button for two seconds to switch this function on or off.
To find a PTY programme:
– switch on the PTY function,
– briefly press button “G” or “H” to scroll down the list of the various types of programmes offered,
– when the programme of your choice is displayed, keep button “G” or “H” pressed for more than two seconds
to carry out an automatic search (after an automatic search the PTY function is switched off).
In PTY mode the different types of programmes can be stored in memory. To do this, press down the preselec-
tion buttons “1” to “6” for more than two seconds. Recalling the type of programme stored in the memory is by
a brief press on the corresponding button.
06-05-2002
YOUR 106 IN DETAIL 43
EON system
This connects stations which are part of the same network. It enables broadcasting of traffic information or a PTY
programme from a station which is part of the same network as the station to which you are listening.
This service is available when you have selected the TA traffic information programme or the PTY function.
COMPACT DISC
Selecting the CD as source
After inserting a disc, with the printed surface upwards, the player starts automatically.
If a disc is already inserted, press the "K" button.
Ejecting a disc
Press button “A” to eject the disc from the player.
Selecting a track
Press button “G” to select the next track.
Press button “H” to return to the start of the current track or to select the previous track.
Accelerated play
Press the “MAN” button.
Keep button “G” or “H” pressed for forwards or backwards accelerated play.
Accelerated play stops as soon as you release the button.
Buttons “G” and “H” resume the “track selection” function when the “MAN” button is pressed again.
Shuffle (RDM)
When the CD is selected, keep the “K” button pressed for two seconds. The tracks will be played in random
sequence. Pressing the “K” button again for two seconds returns you to normal play.
Note : Do not use blank CDs as these could damage your player.
06-05-2002
YOUR 106 IN DETAIL44
CD MULTI-CHANGER
Selecting the CD changer
Press the “L” button.
Selecting a disc
Press a button from “1” to “6” to select the corresponding disc.
Selecting a track
Press button “G” to select the next track.
Press button “H” to return to the start of the current track or to select the previous track.
Accelerated play
Press the “MAN” button.
Keep button “G” or “H” pressed for forwards or backwards accelerated play.
Accelerated play stops as soon as you release the button.
Buttons “G” and “H” resume the “track selection” function when the “MAN” button is pressed again.
Shuffle (RDM)
When the CD multi-changer is selected, keep the “L” button pressed for two seconds. The tracks will be played
in random sequence. Pressing the “L” button again for two seconds returns you to normal play.
Note : Do not use blank CDs as these could damage your player.
06-05-2002
YOUR 106 IN DETAIL 45
C D
C B A
CD changer (Available as an accessory)
To insert a disc into the changer:
– open sliding panel A,
– press button B to eject the cartridge C,
– open one of the six compartments of the cartridge by pulling tab D,
– insert the disc with the printed face upwards and close the compartment,
– insert the cartridge into the changer,
– close the sliding panel A.
06-05-2002
YOUR 106 IN DETAIL46
2 1
3
4
5 5
4
3
1 1 1 2
06-05-2002
YOUR 106 IN DETAIL 47
VENTILATION
1 - Windscreen de-icing/demisting vents.
2 - Air outlet to front passengers’ footwell.
3 - Side vents.
4 - Centre vents.
5 - Air outlet at the feet of the front occupants.
Recommendations for use
- Adjust the airflow to ensure sufficient renewal of air in the passenger compartment.
- Select the air distribution setting that is best suited to your requirements and the climatic conditions.
- Select a temperature setting and adjust it gradually to obtain maximum comfort.
06-05-2002
HEATING AND VENTILATION:
Location of the controls
1 - Air flow
Turn the knob to the desi-
red position.
To temporarily stop the entry of out-
side air :
- Turn the knob to position 0.
- Close the centre and side grilles.
- Place the air distribution control
in the centre and side vents posi-
tion.
This setting prevents the entry of
unpleasant odours or dust - it must
only be used in exceptional circum-
stances.
2 - Air distribution
Centre and side vents.
Occupants’ feet.
Windscreen, front windows
and occupants’ feet.
Windscreen and side
windows.
To rapidly demist or de-ice the wind-
screen and side windows:
- set temperature and air flow
controls to maximum position,
- set air distribution control to “wind-
screen and side windows”,
- close the centre and side vents.
To obtain correct and thorough air
distribution, ensure that:
- the exterior air grille is not obs-
tructed,
- the air inlet vents and the air pas-
sages under the front seats are
not blocked.
In summer, use the “centre and side
vents“ position.
In winter, in order to improve the
level of comfort, use the “occupants’
feet“ position and for good visibility
the “windscreen, front windows and
occupants’ feet“ position.
3 - Temperature adjustment
Move the control to the left (blue
zone: ambient temperature) or to the
right (red zone: hot).
YOUR 106 IN DETAIL48
54
1
3
2
06-05-2002
Air conditioning*
This function allows the temperatu-
re to be lowered in summer, and in
winter, above 0°C, the demisting
function to be improved.
4 - Air conditioning on/off
operation:
Press the switch; the indicator
lamp will light.
– adjust air flow, control 1.
– adjust air distribution, control 2.
– adjust temperature, control 3.
5 - Recirculation of the interior air
Press the switch. The indicator
lamp will light.
– Used simultaneously with the air
conditioning, it improves perfor-
mance.
– Used on its own, it prevents the
entry of outside air (dust, unplea-
sant odours) but there is a risk of
misting up of the windows.
Do not operate the interior air recir-
culation control continuously.
* According to specification
YOUR 106 IN DETAIL 49
- Operate the air condi-
tioning system for 5 to
10 minutes once or
twice a month to keep
it in perfect working order.
- If the system does not produ-
ce cold air, do not use it and
contact a Peugeot dealer.
06-05-2002
Front head restraints
Height adjustment: slide the head
restraint.
The adjustment is correct when the
upper edge of the head restraint is
at the same height as the top of the
head. This adjustment avoids
excessive movement of the head
rearwards, in cases of rear impact.
Adjustment of angle*: tilt the head
restraint.
To remove the head restraint: posi-
tion it at maximum height, press the
two lugs then remove the head
restraint.
Warning: never drive with the head
restraints removed; they must be in
place and correctly adjusted.
Adjustment of front seats
Forwards/backwards adjustment:
lift control 1, slide the seat, then let go to lock.
Adjustment of seat back:
push control 2 rearwards to obtain the required angle.
Access to rear seats: (3 doors)
raise control 3 or push control 2 towards the front.
Tilt the back of the seat, then pull the seat forward.
The position of the seats is memorised*. To put them back as they were
before, you need only return them to the original position.
The storage compartment for the handbook and Warranty book is located under the
front right-hand seat*.
* According to specification
YOUR 106 IN DETAIL50
1 3
2
06-05-2002
Rear seats
To tilt the seat:
– Pull the rear of the seat 1 and tilt it against the front seats.
– Place the seat-belt in the hook 2 (3-door) or on the top of the seat-back 4
(5-door).
– Unlock the seat-back by using the controls 3 on the sides.
– Tilt the seat-back 4.
To remove the rear seat cushions , tilt the seat cushion to 45° and remove it.
To replace the seat cushion: position it on the front fixing brackets and lower it to
the normal position.
When folding the rear seats, always start with the seat cushion, never the
seat back (risk of damage).
Rear head restraints*
These have one position (high) for
when they are in use and another
position (low) for storing. They are
removable.
To lower, press the lug.
To remove, pull upwards as far as
the stop and press the lug.
Warning: never drive with the head
restraints removed; they must be in
place and correctly adjusted.
* According to specification.
YOUR 106 IN DETAIL 51
21 34
06-05-2002
Isofix mounting*
The Isofix mountings available on
the two rear seats* allow for the ins-
tallation of special child seats**,
approved by UTAC for PEUGEOT
vehicles and marketed within the
network.
The fixings are available as an
accessory and must be fitted by an
approved PEUGEOT dealer.
The locks incorporated in the child
seat fit onto the mounting and
ensure quick, reliable and safe
installation of the seats. The
combined use of the seat belt is
compulsory for a forward-facing
child seat.
The forward-facing position is per-
mitted in the rear.
For maximum safety, it is essential
to adjust the corresponding front
seat to the intermediate longitudinal
position, seat back upright.
Follow the instructions for fitting
the child seat in the leaflet
provided when the child seat is
purchased.
* According to specification.
** Available during the model year
YOUR 106 IN DETAIL52
06-05-2002
YOUR 106 IN DETAIL 53
Never leave a child in a
vehicle which is
exposed to the sun and
has the windows
closed.
To protect young children from
the sun, fit sunblinds to the rear
windows.
Never leave the keys in the
reach of children inside the car.
Strap children into their child
seats even on short journeys.
Observe the precautions concer-
ning the passenger airbag.
1 2 3
1
2
3
Child seats
This was one of PEUGEOT’s main criteria when designing your vehicle, however the
safety of your children also depends on you.
For maximum peace of mind, please follow these simple precautions:
All children under the age of 10 are required to travel in approved child safety seats*,
fitted with seat belts.
After carrying out numerous tests, PEUGEOT recommend the following systems:
Up to 9 months (up to 22 lbs. or 10 kg)
«Baby Safe», a seat secured with its back to the engine and secured with a three-
point seat belt, on either the front or rear seat.
From 9 months to 3 or 4 years (20 to 40 lbs. or 9 to 18 kg)
«Römer Peggy» is fitted to the rear seat with a two-point (lap-belt) or three-point
belt.
From 3 to10 years of age (33 to 80 lbs or 15 to 36 kg)
«Klippan Optima» : is fitted in the rear with a three point belt (removable seatback).
from 33 to 55 lbs. [15 to 25 kg] : booster + seatback.
from 55 to 80 lbs. [25 to 36 kg] : use the booster on its own.
For maximum safety, fasten the three-point seat belts or the child seat straps keeping
the slack in relation to the child’s body to a minimum, even for short journeys.
To prevent the doors from opening accidentally: use the child-proof lock.
Also, do not open the rear windows more than a third.
* According to current legislation.
06-05-2002
Seat belts (5-door):
To adjust the height of the front
seat belts*:
Pull control 1 towards you and slide it.
To fasten the seat belts:
Pull the strap, then insert the end
into the buckle.
Rear seat belts
The rear seats are fitted with two
three-point inertia reel belts and a
lap belt.
Pre-tensioning and force-
limiting front seat belts*
Safety in the event of a front impact
has been improved by the
introduction of pre-tensioning and
force-limiting front seat belts.
Depending on the seriousness of
the impact, the pre-tensioning
system instantly tightens the seat
belts firmly against the body of the
occupant.
The pre-tensioning seat belts are
armed when the ignition is on.
* According to specification
YOUR 106 IN DETAIL54
1
To be effective, a seat
belt must be tensioned
as close to the body as
possible.
Depending on the nature and
seriousness of the impact the
pre-tensioning system may be
triggered before and indepen-
dently of the airbags.
In all cases, the airbag warning
light comes on.
Following an impact, have the
system checked by a PEUGEOT
dealer.
The system has been designed
to be fully operational for ten
years. Have it replaced at the end
of this period.
06-05-2002
Key position
There are four positions of the
ignition key in the lock:
"S" Stop: ignition is off.
"A" Accessories: ignition is off but
accessories can operate. The
battery charge warning lamp lights.
"M" Run: ignition on. The following
warning lamps light:
- low engine oil pressure,
- coolant temperature,
- battery charge,
- pre-heater (DIESEL),
- handbrake, low brake fluid,
- engine diagnostics*,
- ABS* (lights for 3 seconds, the
warning lamp should always go
out when the vehicle speed is
over 8 m.p.h. [12 km/h]),
- Airbag*, the warning lamp lights
for six seconds, then goes out.
"D" Starter: starts the engine.
The following warning lamps go out:
- low engine oil pressure,
- battery charge,
- engine diagnostics*.
Starting
Unlock the steering
Turn the steering wheel gently
while turning the key.
Before starting it is advisable to:
Press the clutch pedal while opera-
ting the starter to aid starting of the
engine.
* According to specification
YOUR 106 IN DETAIL 55
06-05-2002
YOUR 106 IN DETAIL56
Never race a cold engine.
Never run the engine in
an enclosed space.
If the engine cannot be
stopped using the igni-
tion key, press the brake pedal,
engage a gear and release the
clutch in order to stall the engi-
ne.
Do not modify the steering
lock in any way.
Starting a petrol engine*
Do not press the accelerator pedal.
Operate the starter without relea-
sing the key until the engine starts.
* According to specification
Starting a diesel engine
Engine cold:
Do not press the accelerator pedal.
Turn the key to position “M”, the
pre-heat warning lamp lights.
Wait until the warning lamp goes
out, then operate the starter in posi-
tion “D” until the engine runs
smoothly.
Engine hot:
Do not press the accelerator pedal.
Operate the starter.
If the engine stops or does not start
immediately, always wait a few
seconds before trying again using
the pre-heater.
NOTE: according to specifica-
tion, the pre-heat warning
lamp does not light if the engi-
ne is sufficiently hot.
06-05-2002
YOUR 106 IN DETAIL58
When buying a second-
hand car:
- Make sure that you are given
the confidential card.
- It is advisable to have the key
codes memorised by your
PEUGEOT dealer to ensure
that the keys in your posses-
sion are the only ones which
will permit starting of the
vehicle.
- Do not make any modifica-
tions to the engine immobi-
liser.
Confidential card
This shows the identification code which is required if any work is carried out on
the system by a PEUGEOT dealer. This code is hidden by a strip which must not
be removed unless required.
Keep your card in a safe place, never in your vehicle.
06-05-2002
KEYS
The keys will lock or unlock the
doors and the boot or tailgate inde-
pendently or simultaneously by
central locking, as well as the fuel
tank filler cap and the steering lock.
They also enable the passenger
airbag* to be disarmed.
THE REMOTE CONTROL
A single press on button A locks the
doors and boot or tailgate.
A single press on button B unlocks
the vehicle.
Note:
Do not repeatedly press the button
of your remote control out of range
of your vehicle. You risk causing it
not to work and the remote control
would have to be reprogrammed.
Changing the remote control
batteries
To gain access to the battery, unclip
the key casing with a coin where
you can see the ring (CR2016/3 V).
If the remote control does not work
after the battery has been changed,
re-programme the remote control.
Synchronising the remote
control*
- Use the key to unlock the driver’s
door of your vehicle.
- Within 30 seconds of unlocking
your vehicle, press button A
twice.
- The vehicle is locked by the
second press of the button.
The remote control is now working
again.
* According to specification
YOUR 106 IN DETAIL 59
A
B
06-05-2002
Engine immobiliser
This locks the engine control sys-
tem and therefore prevents starting
of the vehicle by anyone who has
not got the key.
Operation
The keys which were given to you
on delivery of your vehicle have an
electronic chip in the plastic part of
the key.
Each key therefore has a special
code.
When the ignition is switched on,
the key code is recognised by the
engine immobiliser system and
starting is possible.
If the key does not have a code or
has a different code from those sto-
red in the system memory, the
vehicle will not start.
The engine immobiliser automati-
cally locks the engine control sys-
tem a few moments after the igni-
tion has been switched off.
Additional key
You can store up to 5 keys.
If you require an additional key or
wish to replace a faulty key, you
must visit a PEUGEOT dealer.
YOUR 106 IN DETAIL 57
06-05-2002
DOORS
Opening the doors from the
inside
To open, pull handle 1.
Child safety
The rear doors are fitted with child-
proof locks:
Lower the catch to prevent the doors
being opened from the inside.
It is still possible to open the doors
from outside.
THE BOOT
Locking/unlocking the tailgate.
Using the key
To open the tailgate, turn the key
then push button 1.
The light is operated by opening the
tailgate*.
* According to specification
YOUR 106 IN DETAIL60
1
1
06-05-2002
Closing the tailgate
To close the tailgate, pull either of
the interior grab handles.
THE BONNET
Unlocking from the inside
Pull the handle.
Opening from the outside
To open:
Press the hook 1 and slowly raise
the bonnet. The struts will open and
keep the bonnet open.
To close:
Lower the bonnet most of the way
and let it drop when it is almost
closed. Check that it is locked
securely.
Filling with fuel
Fuel tank cap
- Insert the key, then turn it to the
left.
- Remove the cap.
Tank capacity: approximately 10
gallons (45 litres).
Only fill up with fuel with
the engine switched
off.
YOUR 106 IN DETAIL 61
1
06-05-2002
Athermic windscreen*
The windscreen has a non-
reflective zone above the interior
rear-view mirror.
This zone is intended for affixing toll
cards or parking passes.
Note: the athermic glass of the
windscreen limits the heating of the
passenger compartment by reflec-
ting more of the sun’s rays.
Sliding sun roof*
To open or partly open the roof:
- Open the concealing panel.
- Pull handle 1 to open out.
- Turn handle 1 the desired
amount.
Tilting sun roof*
- Tilt and push the handle.
Tilting window*
(3 door version)
To open the rear windows:
- Tilt lever 2 then push the window.
* According to specification
YOUR 106 IN DETAIL68
1
2
06-05-2002
Closing the tailgate
To close the tailgate, pull either of
the interior grab handles.
THE BONNET
Unlocking from the inside
Pull the handle.
Opening from the outside
To open:
Press the hook 1 and slowly raise
the bonnet. The struts will open and
keep the bonnet open.
To close:
Lower the bonnet most of the way
and let it drop when it is almost
closed. Check that it is locked
securely.
Filling with fuel
Fuel tank cap
- Insert the key, then turn it to the
left.
- Remove the cap.
Tank capacity: approximately 10
gallons (45 litres).
Only fill up with fuel with
the engine switched
off.
YOUR 106 IN DETAIL 61
1
06-05-2002
Switching off the side lights
switches off the rear fog lamp or
returns to the front fog lamps only
position if the vehicle is fitted with
them.
Horn
Press the end of the stalk.
Dipped/main beam.
Light off.
Rear fog lamp lit.
Lights off.
Front fog lamps.
Front and rear fog lamps.
Lights off.
Side light on.
In both clear and rainy
weather, in daylight and
at night, the rear fog
lamp dazzles and is the-
refore prohibited.
Do not forget to switch it off as
soon as it is no longer needed.
LIGHTS STALK
Front lights
Selection is by turning ring A.
Changing between dipped/main
beam:
Pull the stalk fully towards you.
When your vehicle is equipped with
long range light* these operate
simultaneously with the main beam.
To flash the headlamps:
Flick the stalk towards you and
release it.
N.B.: If the lights are left on when
you switch off the engine and open
a front door, a buzzer will sound.
Direction indicators (flashers)
Left, downwards.
Right, upwards.
Fog lamps
Operation is by turning ring B. The
position is shown by the warning
lamps on the fascia.
It operates with the dipped/main
beam headlamps.
These operate with the side lights,
dipped and main beam headlamps.
These operate with the side lights,
dipped and main beam headlamps.
Rear
Front and rear
YOUR 106 IN DETAIL62
A
B
A
B
06-05-2002
FRONT WINDSCREEN
WIPER
Windscreen wiper stalk positions:
3 High speed wipe
2 Normal speed wipe
1 Intermittent wipe
0 Stop
4 A single wipe
To operate the windscreen wash:
Pull the wiper stalk towards you.
REAR WINDSCREEN WIPER
To operate the rear screen
wiper*:
- Turn the wiper stalk A 1/8 turn
forwards for intermittent or conti-
nuous wipe*.
To operate the rear screen
wash:
- Turn the wiper stalk a further 1/8
turn forwards.
Headlamp wash*
To operate the headlamp wash*:
- Switch the headlamps to dipped
or main beam.
- Pull the wiper stalk towards you.
This operates simultaneously with
the windscreen wash/wipe.
* According to specification
Digital clock
The time is set with the ignition on,
engine off, by pressing button B for
more than 3 seconds. The hours
will then flash.
To set the hours
- A short press, the hours change
slowly.
- Press and hold, the hours
change swiftly. To memorise the
hour displayed, release the
button for 5 seconds, the minutes
will then flash.
To set the minutes
- A short press, the minutes change
slowly.
- Press and hold, the minutes
change swiftly. To memorise the
minutes displayed, release the
button for 5 seconds.
YOUR 106 IN DETAIL 63
0
4
1
2
3
A
B
06-05-2002
YOUR 106 IN DETAIL64
A
B
Front electric windows*
To open or shut the windows:
Ignition key in position “A” or “M”. Press the appro-
priate button:
– A: for the driver’s window
– B: for the passenger’s window
Operation is cancelled when the ignition is switched off.
* According to specification
06-05-2002
Interior mirror
The interior mirror has two posi-
tions:
- Day (normal)
- Night (anti-dazzle)
To change from one to the other:
push or pull the lever on the bottom
edge.
Manually controlled mirrors
To adjust:
move the adjustment lever in all
four directions.
Electrically controlled
mirrors*
To adjust:
- Select the mirror using the two way
switch 1.
- Adjust the mirror using control 2.
- Return the two-way switch 1 to
its central position.
* According to specification
When the vehicle is parked, the mirrors can be folded back manually.
Warning: The mirror on the driver’s side is aspherical to eliminate the «blind spot». Therefore, objects viewed in the mirror
are, in reality, closer than they appear. This must be taken into account in order to correctly judge the distance of vehicles
approaching from behind.
YOUR 106 IN DETAIL 65
1
2
06-05-2002
YOUR 106 IN DETAIL66
4
1
2
5
3
6
AUDIO
RDS TA
2
12
11
10
9
8
7
5
6
31
4
CENTRAL PANEL
1 - Passenger airbag disarming switch.
2 - Radio cassette player.
3 - Central adjustable vents for heating, ventilation
and air flow.
4 - Heating and ventilation controls.
5 - Interior air recirculation or right-hand heated seat
control*.
6 - Ashtray.
7 - Demisting control for rear screen and mirrors*.
8 - Hazard warning switch.
9 - Lighter.
10 - Air conditioning* or left-hand heated seat*
control.
11 - Headlamps height adjustment.
12 - Lighting rheostat.
* According to specification
06-05-2002
Heated seats*
Press the switch to operate the seat
heating.
Pressing it again stops the opera-
tion.
* According to specification
Lighting rheostat
Adjustment can only be done with
the engine running and the side-
lights on, by pressing button 12 on
the instrument panel, to increase or
decrease the instrument panel ligh-
ting level.
Adjusting the
headlamps
Depending on the load in your
vehicle, it is recommended that the
headlamp beam is adjusted.
0 - 1 or 2 people in the front seats.
– - 3 people.
1 - 5 people.
2 - 5 people + maximum authori-
sed load.
3 - Driver + maximum authorised
load.
This adjustment can only be carried
out when the lighting control is in
the dipped/main beam position.
Initial setting is position 0.
Hazard warning lights
The switch and the direction indica-
tors flash.
Controls the direction indicators
simultaneously and continuously.
Use only in cases of danger, for an
emergency stop or for driving in
unusual conditions.
Can operate with the ignition swit-
ched off.
Rear screen demister
Control for demisting the rear
screen (and exterior mirrors)*.
Goes out automatically after
approximately twelve minutes in
order to avoid excessive current
consumption.
Pushing it again restarts the opera-
tion for twelve minutes.
YOUR 106 IN DETAIL 67
06-05-2002
Front ashtray:
To empty:
- press tab 1, pulling on the housing
- detach the assembly upwards.
To refit:
- engage the lower part,
- press tab 1,
- push downwards and close the
assembly.
Rear ashtray*:
On 5-door:
- To empty: pull the ashtray pres-
sing downwards.
- To refit: push the ashtray while
pressing downwards.
On 3-door:
- to empty, pull the assembly
upwards.
Rear parcel shelf
To remove:
– Unhook the two cords 1.
– Lift the shelf and remove it.
Fixing a warning triangle
The two restraining straps* located
inside the boot enable a warning tri-
angle to be fixed.
* According to specification.
YOUR 106 IN DETAIL 69
1
1 1
06-05-2002
Handbrake
Application:
When you have completed your
parking manoeuvre, pull up the
handbrake to apply it.
To make application and release of
the handbrake easier, press the
brake pedal and pull the handbrake
with the engine running.
Release:
Press the button before releasing
the handbrake.
Anti-lock brake system
(ABS)*
In conjunction with approved tyres
in good condition, the anti-lock
brake system improves the stability
and handling of your 106, particu-
larly on poor or slippery surfaces.
The anti-lock brake system ope-
rates automatically if there is a risk
of wheel locking.
Lighting of the ABS warning lamp
may be due to the turning of a
wheel during an operation on the
vehicle (changing a wheel, for
example) with the ignition on (posi-
tion M).
Note: In certain conditions, normal
operation of the system can be
recognised by a light vibration of
the brake pedal.
Should an emergency stop be
necessary, press the brake pedal
firmly and continuously.
Power steering*
This is a driving aid which offers the
best compromise when parking and
when driving at high speeds.
Manual gearbox
The gear positions are indicated on
the gear lever knob.
1 - Reverse gear can only be
engaged with the vehicle
stationary and the engine
idling.
* According to specification.
YOUR 106 IN DETAIL70
1
06-05-2002
AIR BAGS*
The airbag system has been desi-
gned to maximise the safety of the
occupants in the event of serious
collisions. It works in conjunction
with the seat belts.
The electronic detectors register and
analyse any abrupt deceleration of
the vehicle; if the triggering threshold
is reached the airbags inflate instant-
ly and come between the occupants
and the vehicle.
Immediately after the impact, the air-
bags deflate rapidly, so that they do
not hinder the visibility of the occu-
pants and their exit if necessary from
the vehicle.
The airbags are not deployed in the
case of collisions which are not
serious, for which the seat belt is suf-
ficient to ensure maximum protec-
tion. The seriousness of a collision
depends on the nature of the obs-
tacle and the speed of the vehicle at
the moment of the collision.
Airbags only operate when the
ignition is switched on.
Note: the gas escaping from the
cushion can be a minor irritant.
FRONT AIR BAGS*
These are folded in the centre of the
steering wheel for the driver and in
the fascia for the front passenger.
They are deployed simultaneously
(except in cases where the airbag is
disarmed), for frontal impacts where
there is a risk of injury to the head or
chest.
- Remove the ignition key, insert it
into the passenger airbag switch 1
and turn it to the “OFF” position.
- One of these two warning
lights* on the instrument
panel is lit throughout the
disarming process.
In the “OFF” position, the passenger
airbag will not be triggered in the
event of an impact.
As soon as you remove the
rearwards-facing child seat from the
front passenger seat, turn the airbag
switch to the “ON” position, to arm
the airbag and thus ensure the
safety of your passenger in an
impact.
* According to specification.
Disarming the passenger
airbag*
To ensure the safety of your child,
it is essential to disarm the pas-
senger airbag when you install a
rearwards-facing child seat on the
front passenger seat.
YOUR 106 IN DETAIL 71
1
AIR
BAG
06-05-2002
Passenger airbag precautions
Vehicle fitted with a passenger
airbag disarming switch:
- disarm the airbag
if you install a
rearwards-facing
child seat on the
front passenger
seat,
- arm the airbag
when you trans-
port an adult on
the front pas-
senger seat.
Vehicle not fitted with a passenger
airbag disarming switch:
- do not install a rear-
wards-facing child seat
on the front passenger
seat.
Never place your feet or any object
on the fascia.
Front* and side* airbag operational check
Operation of the airbags is indicated by the warning light on the instrument
panel.
If the passenger airbag is armed (passenger airbag switch in the "ON" posi-
tion), the warning light will come on for six seconds when the ignition is switched on.
If the warning light:
- does not come on when the ignition is switched on or,
- does not switch off after six seconds or,
- flashes for five minutes then remains on.
Consult your PEUGEOT dealer.
SIDE AIR BAGS*
The side airbags are incorporated in the backrest frames of the front seat, on the
side nearest the door.
They are triggered independently of each other depending on the side on which the
collision occurs, in the case of side impacts which could cause injury to the thorax,
the abdomen and the head.
* According to specification
YOUR 106 IN DETAIL72
06-05-2002
YOUR 106 IN DETAIL 73
WARNING
For the front and side airbags to be fully effective, observe the following safety rules:
• Wear a correctly adjusted seat belt.
• Sit in a normal upright position.
• Do not leave an accessory, or any other object between the occupants of the front seats and the airbags. It could hamper
the operation of the airbags or injure the occupants.
• All work on the airbag system is strictly forbidden unless it is carried out by qualified personnel of the PEUGEOT network.
• After an accident or if the vehicle has been stolen or broken into, have the airbag systems checked.
• The airbag systems have been designed to be fully operational for 10 years after the vehicle has been registered. Have
them replaced by a PEUGEOT dealer after this period.
• Front airbags*
• Do not drive holding the steering wheel by its spokes or resting your hands on the centre part of the wheel.
• Smoke as little as possible; deployment of the airbags can cause burns or the risk of injury from a cigarette or pipe.
• Never remove or pierce the steering wheel or hit it violently.
• Side airbags*
• Never put covers on the front seats.
• Do not fix or glue anything to the front seat backrests. This could cause injury to the chest or arms when the side airbag
inflates.
• Do not sit with the upper part of the body any nearer to the door than necessary.
* According to specification
06-05-2002
PRACTICAL INFORMATION7474
4
1 3
568 7
2
1124 cm3
injection engine
1 . Air filter
2 . Brake fluid
3 . Battery
4 . Power steering
5 . Dipstick
6 . Engine oil filler
7 . Coolant
8 . Reservoir for front/rear screen and
headlamp wash-wipe*
06-05-2002
PRACTICAL INFORMATION 75
4
1 3
568 7
2
9
75
1360 cm3
injection engine
1 . Air filter
2 . Brake fluid
3 . Battery
4 . Power steering
5 . Dipstick
6 . Engine oil filler
7 . Coolant
8 . Reservoir for front/rear screen and
headlamp wash-wipe*
9 . Automatic gearbox
06-05-2002
PRACTICAL INFORMATION7676
4
1 3
68 7
2
5
16-valves 1587 cm3
engine
1 . Air filter
2 . Brake fluid
3 . Battery
4 . Power steering
5 . Dipstick
6 . Engine oil filler
7 . Coolant
8 . Reservoir for front/rear screen and
headlamp wash-wipe*
06-05-2002
PRACTICAL INFORMATION 7777
4
1 3
568 7
2
1527 cm3
diesel engine
1 . Air filter
2 . Brake fluid
3 . Battery
4 . Power steering
5 . Dipstick
6 . Engine oil filler
7 . Coolant
8 . Reservoir for front/rear screen and
headlamp wash-wipe*
06-05-2002
PRACTICAL INFORMATION7878
CHECKING THE LEVELS
1. Air filter
The air filter element must be
changed at the recommended
intervals. If you drive in a dusty
atmosphere, change it twice as
often.
Follow the recommendations given
in the maintenance schedule.
2. Brake fluid
The level must always be above the
DANGER mark on the reservoir. In
the event of a significant drop in the
fluid level, consult a PEUGEOT
dealer immediately. Use fluids
approved by the manufacturer,
which conform to DOT 3 or DOT 4
standards.
3. Battery
At the beginning of winter, have the
battery checked by a PEUGEOT
dealer.
In summer (30°C and above) or if
the battery is in heavy use, check
the level of electrolyte; it must cover
the separator plates at all times. If
necessary, top up with distilled
water.
4. Power steering*
When the engine is cold, the level
must always be above the MIN
mark, close to the MAX mark.
5. Dipstick
Check the oil level on flat ground,
with the engine cold and preferably
before the first journey of the day.
Never exceed the maximum level.
Check the level regularly.
6. Topping up with oil
Your oil must be changed in accor-
dance with the maintenance sche-
dule.
The oil must be topped up between
oil changes.
Regularly check and top-up the
oil level.
Maximum oil consumption is 0.5
litres per 600 miles (1000 km).
7. Coolant
Engine cold: the coolant level must
be between the min and max marks
in the expansion chamber with the
cap removed. To close, turn the cap
to the second notch*.
Cooling circuit
Always use the coolant which is
approved by the manufacturer
(PROCOR TM108 / GLYSANTIN
G33 or REVKOGEL 2000). If this is
not possible, top up with distilled
water and have the protection level
checked by a PEUGEOT dealer.
When the engine is hot, the coolant
temperature is regulated by the fan.
As the fan can operate with the
ignition key removed, and as the
cooling circuit is pressurised, do
not carry out any work for at
least an hour after switching off
the engine.
Note: the coolant does not need to
be renewed.
8. Front/rear screen and
headlamp wash reservoir*
For optimum cleaning quality and
for your safety, it is best to use clea-
ning products approved by PEU-
GEOT (capacity 4.5 litres without
headlamp wash, 5.5 litres with
headlamp wash).
* According to specification
06-05-2002
PRACTICAL INFORMATION 7979
Visual brake pad wear indicator*
The front brakes are fitted with visual wear indicators.
Regularly check the thickness of the brake pads.
To check: turn the wheels to full lock on the side to be checked. The thickness of pad remaining is represented by the measu-
rement X.
When the measurement is zero, the brake pads must be changed.
Advice
As brake pad wear depends on the way in which the vehicle is driven, particularly if the vehicle is used for urban driving or for
short journeys, or is driven in a very sporty manner, it may be necessary to check the thickness of the pads even between ser-
vice intervals.
* According to specification
06-05-2002
PRACTICAL INFORMATION8080
3
2
1
CHANGING A WHEEL
Access to the spare wheel
The spare wheel is outside, under
the luggage compartment, in a
metal carrier.
– Take out the wheel-brace 1.
– Using the wheel-brace 1, slacken
the spare wheel carrier bolt
inside the luggage compartment,
under the carpet.
– Lift the carrier to disengage the
hook towards the rear, then lower it.
– Take out the jack storage box 2
located in the spare wheel.
Remove the wheel
– Use the wheel-brace to remove
the wheel trim by pulling at the
valve location.
– Loosen the wheel bolts.
– Use the jack storage box to chock
the wheel at the opposite corner to
the wheel being changed.
– Position the jack head in the jac-
king point nearest to the wheel
being changed, taking care that
the entire base of the jack is in
contact with the ground.
– Raise the jack, remove the wheel
bolts and remove the wheel.
Fit the spare wheel
– Position the wheel, then lightly
pre-tighten the bolts using the
wheel-brace.
– Lower the jack and release it.
– Tighten the bolts using the
wheel-brace.
– Fit the wheel trim, starting with
the valve location, and press with
the palm of the hand.
Replacing the wheel in the
carrier
– Lift the wheel to aid re-positio-
ning of the carrier.
– Do not forget to retighten the
spare wheel carrier bolt.
06-05-2002
PRACTICAL INFORMATION 8181
For your safety, always
change a wheel:
– on level, solid, non-slippery
ground,
– with the handbrake applied,
– with first or reverse gear engaged,
– Chock the vehicle.
– Never position yourself under
a vehicle which is supported
only by a jack. Use a ramp.
After changing the wheel
– Have the wheel bolts and the
tyre pressure checked as
soon as possible.
– Have the damaged tyre
repaired so that it can be
returned to the vehicle as
soon as possible.
– The “space-saving”* type of
spare wheel is fitted with a
115/70R 15 tyre and is for
temporary use only.
- Pressure: 61 lbf. in2
(4.2 bars).
- Maximum speed: 50 m.p.h.
(80 km/h).
* According to specification
3
Special procedure for Sport model
Positioning the jack
– Close the jack completely.
– Position the jack under the vehicle at the jacking points tilting it by 90°, so that
the jack handle hinge is at the same height as the sill trim, then straighten it.
– Check that the jack is in correct contact with the sill.
Replacing the wheel in the carrier
– Position the jack storage box with the arrow pointing forwards.
Never place the jack in contact with the sill trim.
06-05-2002
Special features of the alloy
wheels*
Bolt covers
Alloy wheel bolts are covered by
chrome trims.
Use tool 3 to remove the trims before
slackening the bolts.
Anti-theft bolt**
If your wheels are fitted with an anti-
theft bolt (one per wheel), the
chrome trim and then the plastic
cover must be removed, using tool 3,
before it is unscrewed using one of
the two anti-theft sockets (which
were given to you on delivery of your
vehicle along with the duplicate keys
and the confidential card) and the
wheel brace 1.
Note: make a careful note of the code
number engraved on the top of the
anti-theft socket. This will enable you
to obtain a duplicate of the anti-theft
socket from a PEUGEOT dealer.
* According to specification.
** According to model and destination.
Fitting the spare wheel
If your vehicle is fitted with a steel
spare wheel, it is normal when secu-
ring it to notice that the bolt washers
do not come into contact with the
rim. The spare wheel is secured by
the cone-shaped support of each
bolt.
Fitting snow tyres
If you fit snow tyres mounted on steel
wheels, it is essential to use special
bolts available from your PEUGEOT
dealer.
PRACTICAL INFORMATION82
3 3
06-05-2002
CHANGING A BULB
Side lights W5W
Turn the plastic protector 1/8 turn
and remove it.
Change the bulb.
Dipped/main headlamps
H4 55/60 W
Turn the plastic protector 1/8 turn
and remove it.
Disconnect the connector.
Press the spring to unhook it then
change the bulb.
When refitting the plastic protector,
ensure that the locating notches
are correctly positioned and that
the protector is properly secured.
Only touch the bulb with a dry
cloth.
PRACTICAL INFORMATION 83
There is a risk of damage
to the dipped/main
headlamps. Only use
bulbs supplied by the
following manufacturers:
– TUNGSRAM
– PHILIPS
– OSRAM
– NORMA
These comply with the anti-UV
(Ultra-Violet) requirements
necessary for correct operation
and reliability of the headlamps.
The headlamps are fitted with
polycarbon glass with a
protective coating. We strongly
advise against cleaning them
with a dry or abrasive cloth or
with products containing
detergents or solvents.
06-05-2002
Direction indicator bulbs
PY21W
Access to the bulbs is from inside
the wheel arch.
Turn the wheels to full lock (to the
left to change the right hand bulb
and vice versa).
Open the access flap.
Turn the socket 1/4 turn.
Change the bulb.
Ensure that the flap is closed
correctly.
Side repeater W5W*
Pull the rear part of the transparent
cover and detach the assembly.
Support the connector and turn the
transparent cover 1/4 turn.
Change the bulb.
Rear lights
Direction indicators PY21W
Reversing lights P21W
Fog lamp P21W
Tail lights P5W
Brake/tail lights P21/5W
From inside the luggage com-
partment:
Remove the plastic protector 1.
Remove the air outlet grille 2 using
a cross-head screwdriver.
Slacken the two wing nuts 3 and
release the light block 4.
Pinch the lugs 5 to remove the
bulb-holder. Change the bulbs.
* According to specification
PRACTICAL INFORMATION84
4
3
1
2
5
06-05-2002
Additional brake light
5 W5W bulbs
Access to the light is easier if the
luggage compartment is open.
Remove the plastic protector by
pressing the side tabs.
Pinch the lugs to release the bulb-
holder.
Change the bulbs.
Front fog lamps/long range
lights H1/55W*
Access to the bulbs is from under-
neath the vehicle.
Turn the socket a 1/4 turn.
Change the bulb.
* According to specification
PRACTICAL INFORMATION 85
06-05-2002
PRACTICAL INFORMATION86
Beware of incompatible
additional electrical acces-
sories!
Your vehicle’s electrical
circuit is designed to operate
with standard or optional equip-
ment. Before installing additional
electrical equipment or accesso-
ries, consult a PEUGEOT dea-
ler.
Some electrical accessories, or
the way in which they are fitted,
may adversely affect the opera-
tion of your vehicle, namely, the
electronic control circuits, the
radio circuit and the electrical
charging circuit.
PEUGEOT does not accept any
responsibility for expenses
incurred by repairs or for any
faults resulting from the installa-
tion of additional accessories
which are not supplied or
recommended by PEUGEOT
and which were not installed in
accordance with the manufactu-
rer’s instructions, in particular
equipment with a consumption
greater than 10 milliamps. The
maxi fuses provide additional
protection for the electrical sys-
tems. Any work must be carried
out by a specialist.
Before removing a fuse the cause of the fault must be found and corrected.
The fuse numbers are on the fuse box.
Always change a faulty fuse for one of the same rating.
Removing-fitting a fuse
Correct Incorrect Pliers
06-05-2002
The 16 fuse boxes and maxi fuse
boxes are located under the
bonnet.
To gain access to the fuses, unhook
the covers.
16 fuse box
Maxi fuse box
PRACTICAL INFORMATION 89
F2
F1
F4
F6
F8
F10
F12
F14
MF1
MF3
MF2
MF4
F3
F5
F7
F9
F11
F13
F15
F16
06-05-2002
PRACTICAL INFORMATION90
Fuse Rating* Functions*
1 — Not used
2 30A Anti-lock braking system
3 25A Engine cooling
4 20A Anti-lock braking system
5 25A Fan unit
6 20A Additional driving lamps
7 — Not used
8 — Not used
9 10A Fuel pump
10 — Not used
11 10A Oxygen sensor
12 10A Left-hand main beam
13 10A Right-hand main beam
14 10A Left-hand dipped beam
15 10A Right-hand dipped beam
16 30A Pulsair pump
16 fuse box (engine compartment)
Maxi fuse (engine compartment)
MF1 20A Lighting switch
MF2 80A Ignition supply (starter +ve)
MF3 40A Ignition supply (ignition controlled +ve)
MF4 40A Battery +ve feed to 13-fuse box
* According to specification.06-05-2002
13 fuse box
13 fuse box in the passenger
compartment
To gain access to the passenger
compartment fuse box, press the
lug on the upper section and pull
the flap towards you.
PRACTICAL INFORMATION 87
F7
F2
F3
F10
F11
F4
F9
F5
F8
F6
F1
F12
F13
06-05-2002
PRACTICAL INFORMATION88
Fuse Rating* Functions*
1 — Not used.
2 25A Heater blower.
3 25A Heated rear screen – air conditioning – pressure switch – heated seats.
4 25A Radio – map reading light.
5 30A Heated rear screen - horn - lighter + heated mirrors.
6 10A Direction indicators / hazard warning lights.
7 10A Engine cooling – electronic immobiliser – coolant temperature control unit – instrument
panel – power steering – reversing lights.
8 20A Central locking - electronic immobiliser – interior lighting – boot lighting -
coolant temperature control unit - instrument panel - radio - clock.
9 30A Electric windows - hazard warning lights - electric mirrors – brake lights – front and rear
wipers - instrument panel.
10 20A Front electric windows.
11 5A Rear fog light + instrument panel lights.
12 5A Left tail-light – front sidelights - instrument panel lighting (rheostat) + headlamp height
adjustment.
13 5A Switch lighting – radio panel lighting –
number plate lighting – right tail light
13 fuse box (passenger compartment)
* According to specification.06-05-2002
Battery
To charge the battery with a battery
charger:
– Disconnect the battery starting
with the negative (–) terminal.
– Follow the instructions for use given
by the charger manufacturer.
– Re-connect starting with the
positive (+) terminal.
– Check that the terminals and
posts are clean. If they are
covered with sulphation (a white
or green deposit), undo them and
clean them.
To start and charge the battery
from another battery:
Make sure that the connections are
correct:
- Connect the red cable to the
positive (+) terminals of both bat-
teries.
- Connect one end of the green or
black cable to the negative (–)
terminal of the auxiliary battery.
- Connect the other end of the
green or black cable to an earth
point on the broken down vehicle
as far as possible from the
battery.
Operate the starter and allow the
engine to run.
Wait for the engine to return to idle,
then disconnect the cables.
It is advisable to disconnect the
battery if the vehicle is to be out
of use for more than one month.
PRACTICAL INFORMATION 91
– Do not disconnect the
terminals while the
engine is running.
– Do not recharge batteries
without first disconnecting the
terminals.
– A permanent electrical supply
is necessary for operation of
the electronic systems. If the
battery is disconnected, switch
on the ignition and wait
10 seconds before starting.
However, if minor disturbances
occur following disconnection
contact a PEUGEOT dealer.
06-05-2002
Peugeot 106 dag owners manual

More Related Content

What's hot

Sensing and Monitoring Systems: Automobiles
Sensing and Monitoring Systems: AutomobilesSensing and Monitoring Systems: Automobiles
Sensing and Monitoring Systems: Automobiles
Muhammad Junaid Asif
 
Manual actros mpii
Manual actros mpiiManual actros mpii
Manual actros mpii
Jose Delgado
 
Manual de servicio toyota / KIJYANG INNOVA / ONNOVA 1KD/2KD
Manual de servicio toyota / KIJYANG INNOVA / ONNOVA 1KD/2KDManual de servicio toyota / KIJYANG INNOVA / ONNOVA 1KD/2KD
Manual de servicio toyota / KIJYANG INNOVA / ONNOVA 1KD/2KD
Jordan Felipe Cabrera Nuñez
 
Sensors
SensorsSensors
Sensors
Vamsi Kovalam
 
03 m-ct-inyeccion-bosch-me744
03 m-ct-inyeccion-bosch-me74403 m-ct-inyeccion-bosch-me744
03 m-ct-inyeccion-bosch-me744lebegui2
 
Climatronic.pptx
Climatronic.pptxClimatronic.pptx
Climatronic.pptx
SEGUNDONELSONPERUGAC
 
MOTOR ISX MANTENIMIENTO PREVENTIVO
MOTOR ISX MANTENIMIENTO PREVENTIVOMOTOR ISX MANTENIMIENTO PREVENTIVO
MOTOR ISX MANTENIMIENTO PREVENTIVO
Jorge Castillo
 
Manual de Serviço
Manual de ServiçoManual de Serviço
Manual de Serviço
cerjs
 
SISTEMA ADAS EXPOSICION.pptx
SISTEMA ADAS EXPOSICION.pptxSISTEMA ADAS EXPOSICION.pptx
SISTEMA ADAS EXPOSICION.pptx
josebecerra91
 
Funcionamiento y diagnóstico de redes multiplexadas
Funcionamiento y diagnóstico de redes multiplexadas Funcionamiento y diagnóstico de redes multiplexadas
Funcionamiento y diagnóstico de redes multiplexadas
Jorge Antonio Guillen
 
Compressed air car_full_seminar_report
Compressed air car_full_seminar_reportCompressed air car_full_seminar_report
Compressed air car_full_seminar_reportNitin Kharche
 
Red bord(cd)
Red bord(cd)Red bord(cd)
Red bord(cd)
bishop2009
 
How to use Mercedes Benz CR2 IMMO Emulator
How to use Mercedes Benz CR2 IMMO EmulatorHow to use Mercedes Benz CR2 IMMO Emulator
How to use Mercedes Benz CR2 IMMO Emulator
BuyobdtoolShop
 
manual electrico ranger courier (ford)
manual electrico ranger courier (ford)manual electrico ranger courier (ford)
manual electrico ranger courier (ford)Alex Morales
 
Vagcom tool 12.12
Vagcom tool 12.12Vagcom tool 12.12
Vagcom tool 12.12
Jack Chen
 
Curso ecu chiptronic
Curso ecu   chiptronicCurso ecu   chiptronic
Curso ecu chiptronic
henrique diesel
 
66 Airbag frontal y lateral.pdf
66 Airbag frontal y lateral.pdf66 Airbag frontal y lateral.pdf
66 Airbag frontal y lateral.pdfjcarrey
 
Electronic Controller Of A Car
Electronic Controller Of A CarElectronic Controller Of A Car
Electronic Controller Of A Car
Brian Cole
 
Cursos d mecanica y electri. del automovil
Cursos d mecanica y electri. del automovilCursos d mecanica y electri. del automovil
Cursos d mecanica y electri. del automovilpppccclll
 

What's hot (20)

Sensing and Monitoring Systems: Automobiles
Sensing and Monitoring Systems: AutomobilesSensing and Monitoring Systems: Automobiles
Sensing and Monitoring Systems: Automobiles
 
Manual actros mpii
Manual actros mpiiManual actros mpii
Manual actros mpii
 
Manual de servicio toyota / KIJYANG INNOVA / ONNOVA 1KD/2KD
Manual de servicio toyota / KIJYANG INNOVA / ONNOVA 1KD/2KDManual de servicio toyota / KIJYANG INNOVA / ONNOVA 1KD/2KD
Manual de servicio toyota / KIJYANG INNOVA / ONNOVA 1KD/2KD
 
Sensors
SensorsSensors
Sensors
 
03 m-ct-inyeccion-bosch-me744
03 m-ct-inyeccion-bosch-me74403 m-ct-inyeccion-bosch-me744
03 m-ct-inyeccion-bosch-me744
 
Climatronic.pptx
Climatronic.pptxClimatronic.pptx
Climatronic.pptx
 
MOTOR ISX MANTENIMIENTO PREVENTIVO
MOTOR ISX MANTENIMIENTO PREVENTIVOMOTOR ISX MANTENIMIENTO PREVENTIVO
MOTOR ISX MANTENIMIENTO PREVENTIVO
 
Manual de Serviço
Manual de ServiçoManual de Serviço
Manual de Serviço
 
SISTEMA ADAS EXPOSICION.pptx
SISTEMA ADAS EXPOSICION.pptxSISTEMA ADAS EXPOSICION.pptx
SISTEMA ADAS EXPOSICION.pptx
 
Funcionamiento y diagnóstico de redes multiplexadas
Funcionamiento y diagnóstico de redes multiplexadas Funcionamiento y diagnóstico de redes multiplexadas
Funcionamiento y diagnóstico de redes multiplexadas
 
Compressed air car_full_seminar_report
Compressed air car_full_seminar_reportCompressed air car_full_seminar_report
Compressed air car_full_seminar_report
 
Red bord(cd)
Red bord(cd)Red bord(cd)
Red bord(cd)
 
How to use Mercedes Benz CR2 IMMO Emulator
How to use Mercedes Benz CR2 IMMO EmulatorHow to use Mercedes Benz CR2 IMMO Emulator
How to use Mercedes Benz CR2 IMMO Emulator
 
manual electrico ranger courier (ford)
manual electrico ranger courier (ford)manual electrico ranger courier (ford)
manual electrico ranger courier (ford)
 
Vagcom tool 12.12
Vagcom tool 12.12Vagcom tool 12.12
Vagcom tool 12.12
 
Curso ecu chiptronic
Curso ecu   chiptronicCurso ecu   chiptronic
Curso ecu chiptronic
 
66 Airbag frontal y lateral.pdf
66 Airbag frontal y lateral.pdf66 Airbag frontal y lateral.pdf
66 Airbag frontal y lateral.pdf
 
Automotive electronics
Automotive electronicsAutomotive electronics
Automotive electronics
 
Electronic Controller Of A Car
Electronic Controller Of A CarElectronic Controller Of A Car
Electronic Controller Of A Car
 
Cursos d mecanica y electri. del automovil
Cursos d mecanica y electri. del automovilCursos d mecanica y electri. del automovil
Cursos d mecanica y electri. del automovil
 

Similar to Peugeot 106 dag owners manual

Owner manual Nativa 2014.pdf
Owner manual Nativa 2014.pdfOwner manual Nativa 2014.pdf
Owner manual Nativa 2014.pdf
MiguelEstrada76
 
Mercedes w202 manual
Mercedes w202 manualMercedes w202 manual
Mercedes w202 manual
engdmsb
 
Piaggio x9 500 cc service repair manual
Piaggio x9 500 cc service repair manualPiaggio x9 500 cc service repair manual
Piaggio x9 500 cc service repair manual
ofpsdjksemmds
 
Vnx.su master propulsion_2003
Vnx.su master propulsion_2003Vnx.su master propulsion_2003
Vnx.su master propulsion_2003
vnx21
 
98 e150 250-350-450
98 e150 250-350-45098 e150 250-350-450
98 e150 250-350-450rukford1
 
00 mystique
00 mystique00 mystique
00 mystiquerukford1
 
98 grand marquis
98 grand marquis98 grand marquis
98 grand marquisrukford1
 
00 countur
00 countur00 countur
00 counturrukford1
 
00 mustang
00 mustang00 mustang
00 mustangrukford1
 
00 f series 150
00 f series 15000 f series 150
00 f series 150rukford1
 
00 grand marquis
00 grand marquis00 grand marquis
00 grand marquisrukford1
 
00 crown victoria
00 crown victoria00 crown victoria
00 crown victoriarukford1
 
98 mountaineer
98 mountaineer98 mountaineer
98 mountaineerrukford1
 
Accent 2015 workshop manual
Accent 2015 workshop manualAccent 2015 workshop manual
Accent 2015 workshop manual
TankBush
 
02 town car
02 town car02 town car
02 town carrukford
 
00 f series 250 350 450 550 lihgt super duty
00 f series 250 350 450 550 lihgt super duty00 f series 250 350 450 550 lihgt super duty
00 f series 250 350 450 550 lihgt super dutyrukford1
 
50777360 basic-manual-workshop-repair-manuals-325-and-337
50777360 basic-manual-workshop-repair-manuals-325-and-33750777360 basic-manual-workshop-repair-manuals-325-and-337
50777360 basic-manual-workshop-repair-manuals-325-and-337
Walter Mazibuko
 
02 villager
02 villager02 villager
02 villagerrukford
 

Similar to Peugeot 106 dag owners manual (20)

Owner manual Nativa 2014.pdf
Owner manual Nativa 2014.pdfOwner manual Nativa 2014.pdf
Owner manual Nativa 2014.pdf
 
Mercedes w202 manual
Mercedes w202 manualMercedes w202 manual
Mercedes w202 manual
 
Piaggio x9 500 cc service repair manual
Piaggio x9 500 cc service repair manualPiaggio x9 500 cc service repair manual
Piaggio x9 500 cc service repair manual
 
Vnx.su master propulsion_2003
Vnx.su master propulsion_2003Vnx.su master propulsion_2003
Vnx.su master propulsion_2003
 
98 e150 250-350-450
98 e150 250-350-45098 e150 250-350-450
98 e150 250-350-450
 
00 mystique
00 mystique00 mystique
00 mystique
 
98 grand marquis
98 grand marquis98 grand marquis
98 grand marquis
 
00 countur
00 countur00 countur
00 countur
 
00 mustang
00 mustang00 mustang
00 mustang
 
00 f series 150
00 f series 15000 f series 150
00 f series 150
 
00 grand marquis
00 grand marquis00 grand marquis
00 grand marquis
 
00 crown victoria
00 crown victoria00 crown victoria
00 crown victoria
 
98 mountaineer
98 mountaineer98 mountaineer
98 mountaineer
 
Accent 2015 workshop manual
Accent 2015 workshop manualAccent 2015 workshop manual
Accent 2015 workshop manual
 
02 town car
02 town car02 town car
02 town car
 
00 f series 250 350 450 550 lihgt super duty
00 f series 250 350 450 550 lihgt super duty00 f series 250 350 450 550 lihgt super duty
00 f series 250 350 450 550 lihgt super duty
 
50777360 basic-manual-workshop-repair-manuals-325-and-337
50777360 basic-manual-workshop-repair-manuals-325-and-33750777360 basic-manual-workshop-repair-manuals-325-and-337
50777360 basic-manual-workshop-repair-manuals-325-and-337
 
00 ranger
00 ranger00 ranger
00 ranger
 
02 villager
02 villager02 villager
02 villager
 
98 tracer
98 tracer98 tracer
98 tracer
 

Recently uploaded

Tyre Industrymarket overview with examples of CEAT
Tyre Industrymarket overview with examples of CEATTyre Industrymarket overview with examples of CEAT
Tyre Industrymarket overview with examples of CEAT
kshamashah95
 
What do the symbols on vehicle dashboard mean?
What do the symbols on vehicle dashboard mean?What do the symbols on vehicle dashboard mean?
What do the symbols on vehicle dashboard mean?
Hyundai Motor Group
 
Digital Fleet Management - Why Your Business Need It?
Digital Fleet Management - Why Your Business Need It?Digital Fleet Management - Why Your Business Need It?
Digital Fleet Management - Why Your Business Need It?
jennifermiller8137
 
Wondering if Your Mercedes EIS is at Fault Here’s How to Tell
Wondering if Your Mercedes EIS is at Fault Here’s How to TellWondering if Your Mercedes EIS is at Fault Here’s How to Tell
Wondering if Your Mercedes EIS is at Fault Here’s How to Tell
Vic Auto Collision & Repair
 
5 Warning Signs Your BMW's Intelligent Battery Sensor Needs Attention
5 Warning Signs Your BMW's Intelligent Battery Sensor Needs Attention5 Warning Signs Your BMW's Intelligent Battery Sensor Needs Attention
5 Warning Signs Your BMW's Intelligent Battery Sensor Needs Attention
Bertini's German Motors
 
欧洲杯比赛投注官网-欧洲杯比赛投注官网网站-欧洲杯比赛投注官网|【​网址​🎉ac123.net🎉​】
欧洲杯比赛投注官网-欧洲杯比赛投注官网网站-欧洲杯比赛投注官网|【​网址​🎉ac123.net🎉​】欧洲杯比赛投注官网-欧洲杯比赛投注官网网站-欧洲杯比赛投注官网|【​网址​🎉ac123.net🎉​】
欧洲杯比赛投注官网-欧洲杯比赛投注官网网站-欧洲杯比赛投注官网|【​网址​🎉ac123.net🎉​】
ahmedendrise81
 
Why Is Your BMW X3 Hood Not Responding To Release Commands
Why Is Your BMW X3 Hood Not Responding To Release CommandsWhy Is Your BMW X3 Hood Not Responding To Release Commands
Why Is Your BMW X3 Hood Not Responding To Release Commands
Dart Auto
 
Empowering Limpopo Entrepreneurs Consulting SMEs.pptx
Empowering Limpopo Entrepreneurs  Consulting SMEs.pptxEmpowering Limpopo Entrepreneurs  Consulting SMEs.pptx
Empowering Limpopo Entrepreneurs Consulting SMEs.pptx
Precious Mvulane CA (SA),RA
 
Things to remember while upgrading the brakes of your car
Things to remember while upgrading the brakes of your carThings to remember while upgrading the brakes of your car
Things to remember while upgrading the brakes of your car
jennifermiller8137
 
Ec330B Lc Excavator Volvo Service Repair.pdf
Ec330B Lc Excavator Volvo Service Repair.pdfEc330B Lc Excavator Volvo Service Repair.pdf
Ec330B Lc Excavator Volvo Service Repair.pdf
Excavator
 
Statistics5,c.xz,c.;c.;d.c;d;ssssss.pptx
Statistics5,c.xz,c.;c.;d.c;d;ssssss.pptxStatistics5,c.xz,c.;c.;d.c;d;ssssss.pptx
Statistics5,c.xz,c.;c.;d.c;d;ssssss.pptx
coc7987515756
 
gtyccccccccccccccccccccccccccccccccccccccccccccccccccccccc
gtycccccccccccccccccccccccccccccccccccccccccccccccccccccccgtyccccccccccccccccccccccccccccccccccccccccccccccccccccccc
gtyccccccccccccccccccccccccccccccccccccccccccccccccccccccc
4thzenzstar
 
Ec460b lc Excavator Volvo Service Repair.pdf
Ec460b lc Excavator Volvo Service Repair.pdfEc460b lc Excavator Volvo Service Repair.pdf
Ec460b lc Excavator Volvo Service Repair.pdf
Excavator
 
一比一原版(AIS毕业证)奥克兰商学院毕业证成绩单如何办理
一比一原版(AIS毕业证)奥克兰商学院毕业证成绩单如何办理一比一原版(AIS毕业证)奥克兰商学院毕业证成绩单如何办理
一比一原版(AIS毕业证)奥克兰商学院毕业证成绩单如何办理
eygkup
 
What Causes 'Trans Failsafe Prog' to Trigger in BMW X5
What Causes 'Trans Failsafe Prog' to Trigger in BMW X5What Causes 'Trans Failsafe Prog' to Trigger in BMW X5
What Causes 'Trans Failsafe Prog' to Trigger in BMW X5
European Service Center
 
What Exactly Is The Common Rail Direct Injection System & How Does It Work
What Exactly Is The Common Rail Direct Injection System & How Does It WorkWhat Exactly Is The Common Rail Direct Injection System & How Does It Work
What Exactly Is The Common Rail Direct Injection System & How Does It Work
Motor Cars International
 
Core technology of Hyundai Motor Group's EV platform 'E-GMP'
Core technology of Hyundai Motor Group's EV platform 'E-GMP'Core technology of Hyundai Motor Group's EV platform 'E-GMP'
Core technology of Hyundai Motor Group's EV platform 'E-GMP'
Hyundai Motor Group
 
Antique Plastic Traders Company Profile
Antique Plastic Traders Company ProfileAntique Plastic Traders Company Profile
Antique Plastic Traders Company Profile
Antique Plastic Traders
 
What Does the PARKTRONIC Inoperative, See Owner's Manual Message Mean for You...
What Does the PARKTRONIC Inoperative, See Owner's Manual Message Mean for You...What Does the PARKTRONIC Inoperative, See Owner's Manual Message Mean for You...
What Does the PARKTRONIC Inoperative, See Owner's Manual Message Mean for You...
Autohaus Service and Sales
 
一比一原版(AUT毕业证)奥克兰理工大学毕业证成绩单如何办理
一比一原版(AUT毕业证)奥克兰理工大学毕业证成绩单如何办理一比一原版(AUT毕业证)奥克兰理工大学毕业证成绩单如何办理
一比一原版(AUT毕业证)奥克兰理工大学毕业证成绩单如何办理
mymwpc
 

Recently uploaded (20)

Tyre Industrymarket overview with examples of CEAT
Tyre Industrymarket overview with examples of CEATTyre Industrymarket overview with examples of CEAT
Tyre Industrymarket overview with examples of CEAT
 
What do the symbols on vehicle dashboard mean?
What do the symbols on vehicle dashboard mean?What do the symbols on vehicle dashboard mean?
What do the symbols on vehicle dashboard mean?
 
Digital Fleet Management - Why Your Business Need It?
Digital Fleet Management - Why Your Business Need It?Digital Fleet Management - Why Your Business Need It?
Digital Fleet Management - Why Your Business Need It?
 
Wondering if Your Mercedes EIS is at Fault Here’s How to Tell
Wondering if Your Mercedes EIS is at Fault Here’s How to TellWondering if Your Mercedes EIS is at Fault Here’s How to Tell
Wondering if Your Mercedes EIS is at Fault Here’s How to Tell
 
5 Warning Signs Your BMW's Intelligent Battery Sensor Needs Attention
5 Warning Signs Your BMW's Intelligent Battery Sensor Needs Attention5 Warning Signs Your BMW's Intelligent Battery Sensor Needs Attention
5 Warning Signs Your BMW's Intelligent Battery Sensor Needs Attention
 
欧洲杯比赛投注官网-欧洲杯比赛投注官网网站-欧洲杯比赛投注官网|【​网址​🎉ac123.net🎉​】
欧洲杯比赛投注官网-欧洲杯比赛投注官网网站-欧洲杯比赛投注官网|【​网址​🎉ac123.net🎉​】欧洲杯比赛投注官网-欧洲杯比赛投注官网网站-欧洲杯比赛投注官网|【​网址​🎉ac123.net🎉​】
欧洲杯比赛投注官网-欧洲杯比赛投注官网网站-欧洲杯比赛投注官网|【​网址​🎉ac123.net🎉​】
 
Why Is Your BMW X3 Hood Not Responding To Release Commands
Why Is Your BMW X3 Hood Not Responding To Release CommandsWhy Is Your BMW X3 Hood Not Responding To Release Commands
Why Is Your BMW X3 Hood Not Responding To Release Commands
 
Empowering Limpopo Entrepreneurs Consulting SMEs.pptx
Empowering Limpopo Entrepreneurs  Consulting SMEs.pptxEmpowering Limpopo Entrepreneurs  Consulting SMEs.pptx
Empowering Limpopo Entrepreneurs Consulting SMEs.pptx
 
Things to remember while upgrading the brakes of your car
Things to remember while upgrading the brakes of your carThings to remember while upgrading the brakes of your car
Things to remember while upgrading the brakes of your car
 
Ec330B Lc Excavator Volvo Service Repair.pdf
Ec330B Lc Excavator Volvo Service Repair.pdfEc330B Lc Excavator Volvo Service Repair.pdf
Ec330B Lc Excavator Volvo Service Repair.pdf
 
Statistics5,c.xz,c.;c.;d.c;d;ssssss.pptx
Statistics5,c.xz,c.;c.;d.c;d;ssssss.pptxStatistics5,c.xz,c.;c.;d.c;d;ssssss.pptx
Statistics5,c.xz,c.;c.;d.c;d;ssssss.pptx
 
gtyccccccccccccccccccccccccccccccccccccccccccccccccccccccc
gtycccccccccccccccccccccccccccccccccccccccccccccccccccccccgtyccccccccccccccccccccccccccccccccccccccccccccccccccccccc
gtyccccccccccccccccccccccccccccccccccccccccccccccccccccccc
 
Ec460b lc Excavator Volvo Service Repair.pdf
Ec460b lc Excavator Volvo Service Repair.pdfEc460b lc Excavator Volvo Service Repair.pdf
Ec460b lc Excavator Volvo Service Repair.pdf
 
一比一原版(AIS毕业证)奥克兰商学院毕业证成绩单如何办理
一比一原版(AIS毕业证)奥克兰商学院毕业证成绩单如何办理一比一原版(AIS毕业证)奥克兰商学院毕业证成绩单如何办理
一比一原版(AIS毕业证)奥克兰商学院毕业证成绩单如何办理
 
What Causes 'Trans Failsafe Prog' to Trigger in BMW X5
What Causes 'Trans Failsafe Prog' to Trigger in BMW X5What Causes 'Trans Failsafe Prog' to Trigger in BMW X5
What Causes 'Trans Failsafe Prog' to Trigger in BMW X5
 
What Exactly Is The Common Rail Direct Injection System & How Does It Work
What Exactly Is The Common Rail Direct Injection System & How Does It WorkWhat Exactly Is The Common Rail Direct Injection System & How Does It Work
What Exactly Is The Common Rail Direct Injection System & How Does It Work
 
Core technology of Hyundai Motor Group's EV platform 'E-GMP'
Core technology of Hyundai Motor Group's EV platform 'E-GMP'Core technology of Hyundai Motor Group's EV platform 'E-GMP'
Core technology of Hyundai Motor Group's EV platform 'E-GMP'
 
Antique Plastic Traders Company Profile
Antique Plastic Traders Company ProfileAntique Plastic Traders Company Profile
Antique Plastic Traders Company Profile
 
What Does the PARKTRONIC Inoperative, See Owner's Manual Message Mean for You...
What Does the PARKTRONIC Inoperative, See Owner's Manual Message Mean for You...What Does the PARKTRONIC Inoperative, See Owner's Manual Message Mean for You...
What Does the PARKTRONIC Inoperative, See Owner's Manual Message Mean for You...
 
一比一原版(AUT毕业证)奥克兰理工大学毕业证成绩单如何办理
一比一原版(AUT毕业证)奥克兰理工大学毕业证成绩单如何办理一比一原版(AUT毕业证)奥克兰理工大学毕业证成绩单如何办理
一比一原版(AUT毕业证)奥克兰理工大学毕业证成绩单如何办理
 

Peugeot 106 dag owners manual

  • 1. 1 2 3 4 5 6 7 9 10 11 12 14151617181921 202223 138 YOUR 106 AT A GLANCE2 19 06-05-2002
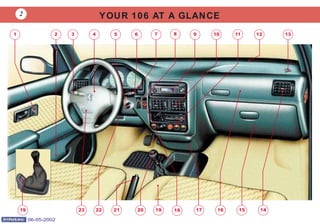
  • 2. YOUR 106 AT A GLANCE 3 1 - Electric mirrors switch 2 - Storage compartment 3 - Lights, fog lamps and horn stalk 4 - Steering wheel with AIR BAG 5 - Ignition,ignition lock and engine immobilser 6 - Windscreen wash/wipe stalk 7 - Instrument panel lighting rheostat 8 - Headlamp height adjustment 9 - Radio cassette player or spare 10- Adjustable centre vents 11- Controls for: • Air conditioning or left-hand heated seat • Lighter • Hazard warning lights • Rear screen and mirrors demisting • Air recirculation or right-hand heated seat 12 - Windscreen demisting vents 13- Side windows demisting vents 14- Adjustable side vent 15- Glove box 16- Passenger airbag 17- Ash tray 18- Passenger airbag disarming switch 19 - Electric window switches 20 - Gear lever 21 - Handbrake 22- Bonnet opening control 23- Fuse box 06-05-2002
  • 3. The remote control A single press on button A locks the doors and boot or tailgate. A single press on button B unlocks the vehicle. Key The key switches on the ignition, locks and unlocks the doors, tailga- te, fuel filler flap and disarms the passenger airbag. LOCKING AND UNLOCKING YOUR 106 AT A GLANCE4 Keep your key number in a safe place. This will enable you to obtain a new key if it is lost or stolen. 60 A B 06-05-2002
  • 4. ENGINE IMMOBILISER This locks the engine control sys- tem and therefore prevents starting of the vehicle by anyone who does not have the key. Operation Each key has a special code. When the ignition is switched on the key code is recognised by the engine immobiliser system and starting is possible. The engine immobiliser automati- cally locks the engine control sys- tem a few moments after the igni- tion has been switched off. Confidential card This shows the identification code which is required if any work is car- ried out on the system by your PEUGEOT dealer. This code is hid- den by a film which must not be removed unless required. Keep your card in a safe place, never in your vehicle. YOUR 106 AT A GLANCE 5 When buying a second- hand car: - Make sure that you are given the confidential card. - It is advisable to have the key codes memorised by your PEUGEOT dealer in order to ensure that the keys in your possession are the only ones which can start the vehicle. 57 06-05-2002
  • 5. SEATS WITH MANUAL CONTROLS 1. Forwards-backwards adjustment. 2. Seat back angle adjustment. 3. Access to rear seats (3 door). For models fitted with air conditio- ning, the storage compartment for the handbook and maintenance guide is under the passenger seat. FRONT AND SIDE AIRBAGS Disarming the passenger airbag. Insert the ignition key in switch 1 and turn it: – to the «ON» position, the pas- senger airbag is armed, – to the «OFF» position, the pas- senger airbag is not armed. Operational Check This is by means of the warning light on the instrument panel. If the passenger airbag is armed or if your vehicle is not fitted with a passenger airbag, the warning light comes on for 6 seconds when the ignition is switched on. If the passenger airbag is not armed, the warning light remains on. Always contact your PEUGEOT dealer if the warning light flashes. Passenger airbag precautions For a vehicle fitted with a disarming switch: - disarm the air- bag if you ins- tall a rear- wards-facing child seat, - arm the airbag when an adult is in the seat. For a vehicle not fitted with a disar- ming switch: - do not install r e a r - w a r d s - facing child seats on the front passen- ger seat. Never place your feet or any object on the fascia. YOUR 106 AT A GLANCE6 50 2 3 1 3 1 71 06-05-2002
  • 6. Off Intermittent or continuous wipe Windscreen wash Fog lamps off Front fog lamps on Front/rear fog lamps on LIGHTING - HORN Ring A Lighting controls Lights off Side lights Rear fog lamp off Rear fog lamp on Dipped/ main beam lights Ring B Rear fog lamp control Front/rear fog lamps control FRONT AND REAR WINDSCREEN WIPER Front 3 - High speed wipe 2 - Normal speed wipe 1 - Intermittent wipe 0 - Stop 4 - Single wipe Pulling the stalk towards you washes the windscreen with timed sweep, and headlamp wash if headlamps are on. Rear YOUR 106 AT A GLANCE 7 A B 62 63 3 2 1 0 4 06-05-2002
  • 7. 1 - Air flow adjustment 2 - Air distribution To the central and side vents Footwells Windscreens, side screens and footwells Windscreen and side windows 3 -Temperature control 4 - Air conditioning on/off 5 - Interior air recirculation EXTERIOR MIRRORS Manual adjustment - Adjust the position using the lever 1. Electric adjustment: - Using the two-way switch 2, select the left-hand or right-hand mirror, then adjust its position using button 3. - Return the two-way switch 2 to the central position. Demisting of the mirrors is linked to the rear screen demisting control. HEATING/AIR CONDITIONING YOUR 106 AT A GLANCE8 65 47 3 2 4 11 2 3 5 06-05-2002
  • 8. YOUR 106 AT A GLANCE 9 PEUGEOT SERVICING Your vehicle benefits from extended service intervals. • For petrol engines: every 20 000 miles (30 000 km) or every two years. • For diesel engines: every 10 000 miles (15 000 km) or every two years. The extension of the service intervals means that the engine oil level must be checked regularly: topping up of the oil between oil changes is normal. It is for this reason that the Peugeot network offers you an intermediate service between each regular service. The date of this visit is not shown by the service indicator. It is to be carried out at least every 10 000 miles (15 000 km) for petrol engines and every 5 000 miles (7 500 km) for indirect injection diesel engines. Your Peugeot dealer will carry out a quick check and will top up the levels if necessary; oil, coolant and screen wash up to 2 litres. If the oil level is too low, there is a risk of serious damage to the engine; check the engine oil level at least every 2 000 miles (3 000 km) or 3 000 miles (5 000 km), depending on the conditions of use. The extended service intervals have been made possible by technical modifications to the vehicles and lubricants: THUS IT IS ESSENTIAL TO USE ONLY ENGINE LUBRICANTS WHICH ARE APPROVED AND RECOMMENDED BY THE MANUFACTURER. 06-05-2002
  • 9. PEUGEOT MAINTENANCE10 SPECIAL FEATURES Some of your vehicle’s vital components have specific servicing schedules. The airbags and the pretensioning seat belts must be replaced every 10 years. The brake fluid must be replaced every 40 000 miles (60 000 km) or every 2 years. The pollen filter must be checked at each visit to the PEUGEOT dealer (intermediate visits and regular services). Timing belt replacement : Consult a PEUGEOT dealer. Note: the coolant does not need to be changed. Arduous conditions of use If the vehicle is used in certain particularly arduous conditions: • Continuous door-to-door use. • Town use (e.g. taxi). • Repeated short journeys, with the engine cold in low temperatures. Or in long stays in the following conditions: • Hot countries with temperatures often above 30° C. • Cold countries with temperatures often below minus 15° C. • Countries with a dusty atmosphere. • Countries whose lubricants or fuels do not conform to our recommendations. It is necessary to follow an ‘Arduous conditions’ service schedule, which includes special operations and shorter service intervals: • Every 12 000 miles (20 000 km) or every year for petrol vehicles. • Every 6 000 miles (10 000 km) or every year for indirect injection diesel vehicles. 06-05-2002
  • 10. PEUGEOT MAINTENANCE 11 A AC C 20 000 (30 000)/ 40 000 (60 000)/ 60 000 (90 000)/ 80 000 (120 000)/ 100 000 (150 000) 120 000 (180 000) 140 000 (210 000) 160 000 (240 000) SERVICE LEVELS Each vehicle has its own servicing cycle, based upon the engine type. This cycle consists in alternating 3 types of service A, B and C, intermediate visits, and a few additional operations depending on your vehicle; these correspond to key stages in the life of your 106. Your dealer will advise you of the type and content of the next service due, when the first service is carried out and at each subsequent service. 1st service at 6 000 miles* (10 000 km) or 6 months* This is necessary in order to benefit from the warranty. THE MAINTENANCE CYCLE FOR YOUR PETROL 106 Service every 20 000 miles (30 000 km) or 2 years Intermediate top-up visit incorporated in the fixed services. * Whichever comes first Brake fluid replacement every 2 years or every 40 000 miles (60 000 km). These services are carried out with synthetic based oil; Fuel Economy oil or synthetic oil may also be used. MILES (KM) 06-05-2002
  • 11. PEUGEOT MAINTENANCE12 B BB C B BB C 10 000 (15 000) / 20 000 (30 000) / 30 000 (45 000) / 40 000 (60 000) / 90 000 (135 000) 100 000 (150 000) 110 000 (165 000) 120 000 (180 000) THE MAINTENANCE CYCLE FOR YOUR 106 DIESEL Service every 10 000 miles (15 000 km) or 2 years Intermediate top-up visit incorporated in the fixed services. * Whichever comes first Brake fluid replacement every 2 years or 40 000 miles (60 000 km) These services are carried out with synthetic based oil; Fuel Economy oil or synthetic oil may also be used. 50 000 (75 000) / 60 000 (90 000) / 70 000 (105 000) / 80 000 (120 000) / 130 000 (195 000) 140 000 (210 000) 150 000 (225 000) 160 000 (240 000) 1st service at 6 000 miles* (10 000 km) or 6 months* This is necessary in order to benefit from the warranty. MILES (KM) 06-05-2002
  • 12. PEUGEOT MAINTENANCE 13 Services Level Operations Description of operations for 1st service A B C Intermediate visit DRAIN AND REFILL - Engine drain and refill. - Fuel filter bleeding (Diesel). - Oil filter. - Fuel filter (Petrol). REPLACEMENT - Fuel filter element (Diesel). - Air filter element. - Spark plugs (Petrol). - Engine oil (check + top up). - Manual gearbox oil (check + top up). - Battery (check + top up) if plug is removable. LEVEL - Front/rear windscreen wash (check + top up). - Coolant (check + top up). - Brake fluid (check + top up). - Power steering fluid (check + top up according to specification). - Operation of lights and indicators. - Condition of glass, headlamp and light lenses and mirrors. - Horn. - Windscreen washer jets. - Condition of wiper blades. - Condition and tension of ancillary drive belts. - Handbrake. - Condition of hydraulic circuits (hoses and covers), check for leaks. CHECK - Condition of rubber boots and gaiters. - Brake pad wear. - Clearances, hubs, rods, ball joints, flexible mountings. - Sealing of dampers. - Wear of rear linings. - Condition and pressure of tyres (including spare wheel). - Emission control check according to current legislation (Petrol). - Smoke opacity (Diesel). - Pollen filter check (according to specification). - Visual check of the whole vehicle by a PEUGEOT dealer. SERVICE - Courtesy vehicle ROAD TEST : All driving conditions : Arduous conditions PEUGEOT SERVICING LEVELS A, B AND C 06-05-2002
  • 13. TOTAL14 F NL SF GR A D CH I N P E B DK GB L S IRL ACTIVADIESEL700010W 40 ACTIVADIESEL90005W 40 ACTIVA90005W 30* ULTRADIESEL10W 40 ULTRA5W 30* ULTRONDIESEL5W 40 QUARTZDIESEL700010W 40 QUARTZ90005W 40 QUARTZ90005W 30*ACTIVA700010W 40 ACTIVA90005W 40 ACTIVA90005W 30* QUARTZ700015W 50 ULTRA10W 40 ULTRA5W 30* ULTRON5W 40 ULTRON0W 30 QUARTZ700010W 40 QUARTZ90000W 40 QUARTZ90005W 40 QUARTZ90005W 30* TRADE NAMES OF APPROVED AND RECOMMENDED LUBRICANTS IN EUROPE(1) (1) Minimum quality level: petrol:ACEAA3 andAPI SH/SJ ; DieselACEAB3 andAPI CF/CD - ACEA =Association des Constructeurs EuropéensAutomobiles (Association of EuropeanAutomobile Manufacturers) - API =American Petroleum Institute. If oil is used which does not conform to theACEAA3-B3 standards, this requires the "Arduous conditions" servicing schedule to be followed, which involves shorter intervals between services * This Energy Saving oil may only be used in engines specifically designed for it (from 2000 Model Year). D I E S E LD I E S E LP E T R O L P E T R O L 06-05-2002
  • 14. PEUGEOT MAINTENANCE 15 0W 20 30 40 5020W 15W 10W 5W Recommendations for approved lubricants The oils which appear in the table opposite are suitable for most pur- poses. The diagram opposite states the optimum range of viscosity depen- ding on the temperatures at which the oils are to be used. It is also possible to use synthetic oils of ‘superior quality’. In the absence of semi-synthetic or synthetic oils, oils of API SH/SJ quality (for petrol engines), or CD/CF quality (for diesel engines) may be used by following the ‘Arduous Conditions’ maintenance schedule which specifies shorter intervals. Do not hesitate to ask for advice from a Peugeot dealer to maintain driving pleasure and to minimise the maintenance cost of your vehicle. For countries outside Europe, plea- se contact a local PEUGEOT dealer. ESSENTIAL ESSENTIAL Manual gearbox ESSO GEAR OIL BV TOTAL TRANSMISSION BV 75W 80 PR 9736.41 75W-80 Power steering ESSO ATF D TOTAL FLUIDE AT42 PR 9730.94 Brake fluid PEUGEOT DOT4 Coolant PROCOR TM108 / GLYSANTIN G33 or REVKOGEL 2000 ESSENTIAL Protection to minus 35 °C Other approved products 06-05-2002
  • 15. INSTRUMENTS AND CONTROLS18 1 2 3 4 5 6 7 9 10 118 12131415161718192021 Instrument panel (Petrol) 1 - Maximum coolant temperature 2 - Display control: - total distance display - trip recorder - trip recorder reset - service indicator 3 - Speedometer 4 - Display: - digital clock - service indicator - total distance - trip recorder 5 - Left-hand indicator 6 - Low fuel level 7 - Fuel gauge 8 - Right-hand indicator 9 - Rev. counter 10 - Clock adjustment, lighting rheostat 11 - Oil pressure 12 - Engine autodiagnostics* (petrol) 13 - Front* and side** airbag warning light and passenger airbag disarm* 14 - ABS* (Anti-lock Braking System) 15 - Handbrake, low brake fluid level and engine not running 16 - Battery charge 17 - Rear fog lamp 18 - Front fog lamps* 19 - Main beam 20 - Dipped beam 21 - Passenger airbag disarm * According to specification or country. ** According to model. 06-05-2002
  • 16. INSTRUMENTS AND CONTROLS 19 1 2 3 4 5 6 7 8 10 11 129 141617181920212223 1315 Instrument panel (Petrol) 1 - Coolant temperature gauge 2 - Maximum coolant temperature 3 - Display control: - total distance display - trip recorder - trip recorder reset - service indicator 4 - Speedometer 5 - Display: - digital clock - service indicator - oil level gauge - total distance - trip recorder 6 - Left-hand indicator 7 - Low fuel level 8 - Fuel gauge 9 - Right-hand indicator 10 - Rev. counter 11 - Clock adjustment, lighting rheostat 12 - Oil temperature gauge 13 - Engine autodiagnostics* (petrol) 14 - Front* and side** airbag warning light and passenger airbag disarm* 15 - Oil pressure 16 - ABS* (Anti-lock Braking System) 17 - Handbrake, low brake fluid level and engine not running 18 - Battery charge 19 - Rear fog lamp 20 - Front fog lamps* 21 - Main beam 22 - Dipped beam 23 - Passenger airbag disarm * According to specification or country. ** According to model.06-05-2002
  • 17. INSTRUMENTS AND CONTROLS20 1 2 3 4 5 9 10 118 13 121415161718192021 6 7 Instrument panel (Diesel) 1 - Maximum coolant temperature 2 - Display control: - total distance display - trip recorder - trip recorder reset - service indicator 3 - Speedometer 4 - Display: - digital clock - service indicator - total distance - trip recorder 5 - Left-hand indicator 6 - Low fuel level 7 - Fuel gauge 8 - Right-hand indicator 9 - Rev. counter 10 - Clock adjustment, lighting rheostat 11 - Oil pressure 12 - Pre-heat (diesel) 13 - Front* and side** airbag warning light and passenger airbag disarm* 14 - ABS* (Anti-lock Braking System) 15 - Handbrake, low brake fluid level and engine not running 16 - Battery charge 17 - Rear fog lamp 18 - Front fog lamps* 19 - Main beam 20 - Dipped beam 21 - Passenger airbag disarm * According to specification or country. ** According to model. 06-05-2002
  • 18. Diesel engine pre-heat Wait until the warning lamp goes out then operate the starter. On some models the warning lamp will not light when the engine is hot. Battery charge warning lamp Indicates either: - faulty operation of the charging circuit, or - loose battery or starter terminals, or - broken or slack alternator belt, or - a faulty alternator. Consult a PEUGEOT dealer. Anti-lock brake system warning lamp (ABS)* Indicates faulty ABS operation. The vehicle does, however, retain conventional braking. Consult a PEUGEOT dealer. Coolant temperature gauge - Needle in zone (A): temperature correct - Needle in zone (B): the coolant temperature is too high Handbrake and brake fluid level warning lamp Indicates either: - that the engine is not running, - that the handbrake is on or has not been released correctly (engine running), - an excessive drop in the brake fluid level (engine running and handbrake released). Note : with the engine running and the handbrake off, if the warning light remains lit then you must stop. Consult a PEUGEOT dealer. Low engine oil pressure It is essential to stop. Indicates either: - insufficient engine oil pressure, or - lack of oil in the lubrication system. Top up the oil level if necessary. Consult a PEUGEOT dealer. High coolant temperature warning lamp It is essential to stop. Indicates too high a temperature, caused by: - a fan malfunction. Check the fuses and replace them if necessary, - a coolant leak; the cooling system is pressurised, turn the cap to the 1st notch, or* unscrew the cap two turns, to let the pressure drop before topping up the level, - a coolant pump malfunction. Warning lamps INSTRUMENTS AND CONTROLS 21 B A 06-05-2002
  • 19. Engine auto-diagnostics warning light* It comes on each time the ignition is switched on. If it comes on with the engine run- ning it indicates a malfunction in the injection, ignition or emission control system. If your vehicle is fit- ted with a catalytic converter, there is a risk of damage to it. Contact a PEUGEOT dealer rapidly. Front and side* airbags If the passenger airbag is armed or if your vehicle is not fitted with a passenger airbag, the warning light comes on for 6 seconds when the ignition is switched on. Front airbag disarmed If the passager airbag is disarmed, the indicator light remains on. In all cases, if the warning light flashes, contact a PEUGEOT dealer. Low fuel level warning Indicates that the quantity of fuel remaining is less than 1 gallon [5 litres] (Tank capacity approxima- tely 10 gallons [45 litres]). AIR BAG INSTRUMENTS AND CONTROLS22 F E - If the needle is in zone E, the temperature is correct. - If the needle is in zone F, the temperature is too high. To lower the temperature of the oil, reduce your speed. Oil temperature gauge* Fuel supply cut-off* If there is a major collision, a device switches off the supply of fuel to the engine. To re-establish the supply to the engine, press the button. * According to specification 06-05-2002
  • 20. Engine auto-diagnostics warning light* It comes on each time the ignition is switched on. If it comes on with the engine run- ning it indicates a malfunction in the injection, ignition or emission control system. If your vehicle is fit- ted with a catalytic converter, there is a risk of damage to it. Contact a PEUGEOT dealer rapidly. Front and side* airbags If the passenger airbag is armed or if your vehicle is not fitted with a passenger airbag, the warning light comes on for 6 seconds when the ignition is switched on. Front airbag disarmed If the passager airbag is disarmed, the indicator light remains on. In all cases, if the warning light flashes, contact a PEUGEOT dealer. Low fuel level warning Indicates that the quantity of fuel remaining is less than 1 gallon [5 litres] (Tank capacity approxima- tely 10 gallons [45 litres]). AIR BAG INSTRUMENTS AND CONTROLS22 F E - If the needle is in zone E, the temperature is correct. - If the needle is in zone F, the temperature is too high. To lower the temperature of the oil, reduce your speed. Oil temperature gauge* Fuel supply cut-off* If there is a major collision, a device switches off the supply of fuel to the engine. To re-establish the supply to the engine, press the button. * According to specification 06-05-2002
  • 21. Instrument panel display When the ignition is switched on, this display shows in turn, the following infor- mation: - digital clock, - service indicator, - oil level indicator,* - total distance. Engine oil level When the ignition is switched on, engine not running, the service indicator is dis- played for a few seconds, then the engine oil level is indicated for approximate- ly 10 seconds. Maximum Minimum Check the level with the dipstick and top it up. The figure shown is only correct if the vehicle has been on stable, level ground, with the engine stopped, for 10 minutes. No oil When the LEDs flash, it is essential to top up the oil to the correct level, otherwise the engine will be damaged. * According to specification Total distance and trip recorder One brief press on button A changes the display between total distance and the trip recorder. Resetting the trip recorder to zero A long press on the button resets the trip recorder to zero. INSTRUMENTS AND CONTROLS 23 A 06-05-2002
  • 22. SERVICE INDICATOR This is a reminder of when the next service is due in accordance with the manufacturer’s maintenance sche- dule. Operation When the ignition is switched on the display shows the distance remai- ning (rounded figures) before the next service is due. Example: 4800 km remain before the next service is due. For five seconds after the ignition is switched on, the display shows: 5 seconds after switching on the igni- tion the display resumes normal ope- ration and shows the total and trip distances. When the distance remaining before the next service is less than 1000 km. Example: 900 km remain before the next service is due. For five seconds after the ignition is switched on, the display shows: 5 seconds after switching on the igni- tion the display resumes normal ope- ration. This indicates that a service should be carried out shortly: When a service is overdue. For five seconds after the ignition is switched on, the service symbol and the excess distance flash. Example: the service is overdue by 300 km The vehicle should be servi- ced very soon. For 5 seconds after the ignition is switched on the display shows: 5 seconds after switching on the igni- tion the display resumes normal ope- ration. INSTRUMENTS AND CONTROLS24 06-05-2002
  • 23. Service intervals If your vehicle is used in certain par- ticularly difficult conditions it is necessary to follow the "Arduous conditions" servicing schedule, which involves shorter intervals bet- ween services (see the Warranty and Maintenance Record booklet). Comment: If the time limit between two services is reached before the relevant mileage limit, the service spanner symbol will light up and the display will show 0. To change the service interval - Switch off the ignition. - Press and hold button 1. - Switch on the ignition. - Release the button straight away. - The service interval is displayed. - Each time button 1 is pressed briefly, the service intervals are alternated. Example - When the required service interval is displayed, press button 1 for 10 seconds to confirm (the selected service interval flashes for 10 seconds). Release the button to confirm when the display stops flashing. Reset to zero Your PEUGEOT dealer will carry out this operation after each service. However, if you carry out your service yourself, the zero reset procedure is as follows: - switch off the ignition, - press and hold button 1, - switch on the ignition, - keep button 1 pressed for 10 seconds, the display indicates [= 0] and the service spanner symbol disappears. INSTRUMENTS AND CONTROLS 25 1 06-05-2002
  • 24. Service intervals If your vehicle is used in certain par- ticularly difficult conditions it is necessary to follow the "Arduous conditions" servicing schedule, which involves shorter intervals bet- ween services (see the Warranty and Maintenance Record booklet). Comment: If the time limit between two services is reached before the relevant mileage limit, the service spanner symbol will light up and the display will show 0. To change the service interval - Switch off the ignition. - Press and hold button 1. - Switch on the ignition. - Release the button straight away. - The service interval is displayed. - Each time button 1 is pressed briefly, the service intervals are alternated. Example - When the required service interval is displayed, press button 1 for 10 seconds to confirm (the selected service interval flashes for 10 seconds). Release the button to confirm when the display stops flashing. Reset to zero Your PEUGEOT dealer will carry out this operation after each service. However, if you carry out your service yourself, the zero reset procedure is as follows: - switch off the ignition, - press and hold button 1, - switch on the ignition, - keep button 1 pressed for 10 seconds, the display indicates [= 0] and the service spanner symbol disappears. INSTRUMENTS AND CONTROLS 25 1 06-05-2002
  • 25. YOUR 106 IN DETAIL26 A B C G H IJLKM D E F AUDIO RB1 06-05-2002
  • 26. YOUR 106 IN DETAIL 27 j jj k kk j jj k kk v w k j Button Function A TA Traffic information priority on/off. B RDS RDS on/off. Press for more than 2 seconds: regional following mode on/off. C BND/AST Selection of wavebands FM1, FM2, FM3, AM. Press for more than 2 seconds: autostore, automatic storing of stations. D SRC Source selection; radio, cassette or CD*. Press for more than 2 seconds: CD* shuffle. E Press fully: cassette fast rewind. F Press fully:cassette fast fowards. E + F Press half-way: reverses the direction of play of the cassette. Press fully: ejects the cassette. G Increase the audio setting. H Decrease the audio setting. I AUDIO Selects the bass, treble, loudness and sound distribution. J Higher frequency automatic search. Selection of next CD* track. K Lower frequency automatic search. Selection of previous CD* track. L MAN Manual/automatic operation of button J and K. M Audio system on/off. Volume adjustment. 1 to 6 Selects a stored station. Press for more than 2 seconds. Selects a CD*. * Available as an accessory. 06-05-2002
  • 27. YOUR 106 IN DETAIL28 GENERAL FUNCTIONS On / off With the ignition key in the ACCESSORIES or IGNITION position, press the "M" button to switch the set on or off. ANTI-THEFT SYSTEM The first time you use the set following disconnection of the set or the battery, you must enter the confidential code which was given to you on handover of your vehicle. Entering the code Switch the set on. The display shows "CODE" then the set changes over to code request mode and "- - - -" is displayed. Enter your four-digit code number using buttons "1" to "6". For example : if your code is 5345 press buttons "5", "3", "4" and "5" in turn. When the fourth number has been entered correctly, the radio starts automatically. Error in entering the code If an error is made when entering one of the first three digits, do not continue the operation and switch off the radio to prevent blocking it. Each incorrect code entry will result in the set being blocked for a period of from 5 seconds to 30 minutes, after the 7th incorrect entry. To unblock the set, leave it switched on during the waiting period. When "- - - -" is displayed, you can enter the code again. If the set is switched off during the waiting period, this waiting period will restart when the set is switched on again. After 14 incorrect code entries, the radio will be permanently blocked and the message "END" will be displayed. ADJUSTING THE SOUND Adjusting the volume Turn the "M" button to increase or decrease the volume of the set. If the radio overheats, the volume will reduce. Note: If you have a car-phone fitted with a “mute” signal output connected to the set, the set will automatically change to “mute” when the car-phone is used. 06-05-2002
  • 28. YOUR 106 IN DETAIL 29 AUDIO SETTINGS Press the “AUDIO” button several times in succession to access the bass (BASS), treble (TREB), loudness (LOUD), fader (FAD) and balance (BAL). Exit from audio mode is automatic after a few seconds, without pressing any button or by pressing the “AUDIO” button after adjusting the balance. Note: bass and treble settings are specific to each source. It is possible to set them differently for radio, cassette and CD. Bass setting When “BASS” is displayed, press the “G” or “H” buttons to vary the setting. – “BASS –9” for a minimum bass setting, – “BASS 0” for a normal position, – “BASS +9” for a maximum bass setting. Treble setting When “TREB” is displayed, press the “G” or “H” buttons to vary the setting. – “TREB –9” for a minimum treble setting, – “TREB 0” for a normal position, – “TREB +9” for a maximum treble setting. Adjusting the loudness This function automatically emphasises bass and treble tones when the volume is low. Press the “G” or “H” buttons to switch this function on or off. Setting the front/rear sound distribution (Fader) When “FAD” is displayed, press the “G” or “H” buttons to vary the setting. The “G” button increases the volume at the front. The “H” button increases the volume at the rear. This function can be deactived by pressing buttons “M” and “I” simultaneously. Setting the right/left sound distribution (Balance) When “BAL” is displayed, press the “G” or “H” buttons to vary the setting. The “G” button increases the volume on the right-hand side. The “H” button increases the volume on the left-hand side. 06-05-2002
  • 29. YOUR 106 IN DETAIL30 RADIO Notes on radio reception Your radio is subject to phenomena which do not affect domestic sets. Both MW/LW and FM reception are subject to various forms of interference which are no reflection on the quality of your set, but are due to the nature of the signals and the way in which they are transmitted. On MW/LW, interference may be noticed when passing underneath high voltage power lines or bridges or through tunnels. On FM, interference may be the result of increasing distance from the transmitter, reflection of the signal by obstacles (mountains, hills, buildings etc), or of being in an area which is not covered by a transmitter. Selecting the radio Press the "SRC" button, until the radio is selected. Selecting a waveband By short presses on the "BND/AST" button, you can select the FM1, FM2, FM3 and AM wavebands. Automatic station search Briefly press button “J” or “K” to search for the station immediately above or below. By continuing to press the button in the direction selected, you will obtain continous scrolling of the frequency. The scrolling stops at the first station found as soon as you release the button. If the TA traffic programme is selected, only stations broadcasting this type of programme are selected. Searching for a station occurs first in “LO” sensitivity (selection of the most powerful transmitters) during scanning of the waveband, then in “DX” sensitivity (selection of the weakest and most distant transmitters). Manual station search Press the “MAN” button. Briefly press button “J” or “K” respectively to increase or reduce the frequency displayed. By continuing to press the button in the direction selected, you will obtain continuous scrolling of the frequency. Scrolling stops as soon as you release the button. Pressing the “MAN” button again returns you to automatic station search. 06-05-2002
  • 30. YOUR 106 IN DETAIL 31 Manual storing of stations in the memory Select the station required. Press for more than two seconds one of the buttons “1” to “6”. The sound stops then becomes audible again, confirming that the station has been stored in memory. Automatic storing of FM stations in the memory (autostore) Press the “BND/AST” button for more than two seconds, to automatically store the 6 stations with the strongest signal in FM. These stations are stored in the FM3 waveband. – If it is not possible to find 6 stations, the remaining memories are empty. Recalling stations stored in the memory For each waveband, briefly pressing the buttons “1” to “6” recalls the corresponding stored station. RDS FUNCTION Using the RDS (Radio Data System) function on FM RDS allows you to continue to listen to the same station, whatever frequency it is using for the region you are going through. Switch the function on or off by briefly pressing the “RDS” button. RDS station following The display indicates the name of the station selected. The radio is continually searching for the station which has the best reception and which is transmitting the same programme. 06-05-2002
  • 31. YOUR 106 IN DETAIL32 Traffic information programmes Press the "TA" button to switch the function on or off. Any traffic information flash will be given priority, whatever source you are listening to (radio, cassette or CD). If you wish to interrupt a message, press the "TA" button; this switches off the function. Note: the volume of the traffic information announcements is independent of the volume of normal radio listening. You can adjust it using the volume button. The setting will be stored and will be used when the next messages are broadcast. While traffic information is being broadcast, the display will alternately show “TRAFFIC” and the name of the station. When the station selected cannot broadcast traffic information, the display shows “NO TA”. Regional following mode (REG) When they are part of a network, certain stations broadcast regional programmes in the various areas they serve. With regional following mode you can keep listening to the same programme. To do this press the “RDS” button for more than two seconds to switch this function on or off. 06-05-2002
  • 32. YOUR 106 IN DETAIL 33 CASSETTE Selecting cassette mode When a cassette is inserted, the cassette player will start automatically. If a cassette is already inserted, press the "SRC" button until the cassette is selected. Ejecting the cassette Fully press both buttons "E" and "F" to eject the cassette from the player. Direction of play The player will play sides 1 and 2 of the cassette alternately, by automatically reversing the direction of play at the end of a side. To manually reverse the direction of play, press both buttons "E" and "F" part way. Fast forward/rewind Fully press one of the buttons "E" or "F" to fast forward or fast rewind the cassette. At the end of the fast forward rewind, the set plays the current side. Note: During fast forwards or rewind of a cassette, the audio system will automatically play the last radio station. Recommendations for using casssettes - Use good quality cassettes. - Avoid use of cassettes which play for longer than 90 minutes. - Never expose the cassettes to heat or the direct rays of the sun. - Re-tighten the tape if necessary before introducing the cassette in the player. - Clean the playing head regularly with a damp type cleaning cassette. 06-05-2002
  • 33. YOUR 106 IN DETAIL34 CD MULTI-CHANGER (Available as an accessory) Selecting the CD changer Press the “SRC” button until the CD changer is selected. Selecting a disc Press a button from “1” to “6” to select the corresponding disc. Selecting a track Press button “J” to select the next track. Press button “K” to return to the start of the current track or to select the previous track. Accelerated play Press the “MAN” button. Keep button “J” or “K” pressed for forwards or backwards accelerated play. Accelerated play stops as soon as you release the button. Buttons “J” and “K” resume the “track selection” function when the “MAN” button is pressed again. Shuffle (RAND) When the CD multi-changer is selected, keep the “SRC” button pressed for two seconds. The tracks will be played in random sequence. Pressing the “SRC” button again for two seconds returns you to normal play. Note : Do not use blank CDs as these could damage your player. 06-05-2002
  • 34. YOUR 106 IN DETAIL36 A B C D E M JK FGIHL AUDIO RD1 06-05-2002
  • 35. YOUR 106 IN DETAIL 37 v w k j Button Function A i Ejection of the CD. B RDS RDS function on/off. Press for more than 2 seconds: regional station following on/off. C TA Traffic information priority on/off. Press for more than 2 seconds: PTY function on/off. D Increase the audio setting. E Decrease the audio setting. F AUDIO Selects the bass, treble, loudness and sound distribution. G Automatic search of higher frequency. Selection of next CD track. H Automatic search of lower frequency. Selection of previous CD track. I MAN Manual/automatic operation of buttons G and H. J Source selection, radio. Selection of wavebands FM1, FM2, FM3, AM. Press for more than 2 seconds: automatic storing of stations (autostore). K Source selection, CD. Press for more than 2 seconds: shuffle. L Source selection: CD player. Press for more than 2 seconds: shuffle. M ON/VOL Audio system on/off. 1 to 6 Selects a stored station. Press for more than 2 seconds: stores a station. Selects a CD*. 06-05-2002
  • 36. YOUR 106 IN DETAIL38 GENERAL FUNCTIONS On / off With the ignition key in the ACCESSORIES or IGNITION position, press the "M" button to switch the set on or off. The set can operate for 30 minutes without switching the ignition on. ANTI-THEFT SYSTEM The first time you use the set following disconnection of the set or the battery, you must enter the confidential code which was given to you on handover of your vehicle. Entering the code Switch the set on. The display shows "CODE" then the set changes over to code request mode and "- - - -" is displayed. Enter your four-digit code number using buttons "1" to "6". For example: : if your code is 5345 press buttons "5", "3", "4" and "5" in turn. When the fourth number has been entered correctly, the radio starts automatically. Error in entering the code If an error is made when entering one of the first three digits, do not continue the operation and switch off the radio to prevent blocking it. Each incorrect code entry will result in the set being blocked for a period of from 5 seconds to 30 minutes, after the 7th incorrect entry. To unblock the set, leave it switched on during the waiting period. When "- - - -" is displayed, you can enter the code again. If the set is switched off during the waiting period, this waiting period will restart when the set is switched on again. After 14 incorrect code entries, the radio will be permanently blocked and the message “END” will be displayed. ADJUSTING THE SOUND Adjusting the volume Turn the "M" button to increase or decrease the volume of the set. If the radio overheats, the volume will reduce. Note: If you have a car-phone fitted with a “mute” signal output connected to the set, the set will automatically change to “mute” when the car-phone is used. 06-05-2002
  • 37. YOUR 106 IN DETAIL 39 AUDIO SETTINGS Press the “AUDIO” button several times in succession to access the bass (BASS), treble (TREB), loudness (LOUD), fader (FAD) and balance (BAL). Exit from audio mode is automatic after a few seconds, without pressing any button or by pressing the “AUDIO” button after adjusting the balance. Note: the bass and treble settings are specific to each source. It is possible to set the radio, CD, or CD multi- changer differently. Bass setting When “BASS” is displayed, press the “D” or “E” buttons to vary the setting. – “BASS –9” for a minimum bass setting, – “BASS 0” for a normal position, – “BASS +9” for a maximum bass setting. Treble setting When “TREB” is displayed, press the “D” or “E” buttons to vary the setting. – “TREB –9” for a minimum treble setting, – “TREB 0” for a normal position, – “TREB +9” for a maximum treble setting. Adjusting the loudness This function automatically emphasises bass and treble tones when the volume is low. Press the “D” or “E” buttons to switch this function on or off. Setting the front/rear sound distribution (Fader) When “FAD” is displayed, press the “D” or “E” buttons to vary the setting. The “D” button increases the volume at the front. The “E” button increases the volume at the rear. This function can be deactived by pressing buttons “M” and “F” simultaneously. Setting the right/left sound distribution (Balance) When “BAL” is displayed, press the “D” or “E” buttons to vary the setting. The “D” button increases the volume on the right-hand side. The “E” button increases the volume on the left-hand side. 06-05-2002
  • 38. YOUR 106 IN DETAIL40 RADIO Notes on radio reception Your radio is subject to phenomena which do not affect domestic sets. Both MW/LW and FM reception are subject to various forms of interference which are no reflection on the quality of your set, but are due to the nature of the signals and the way in which they are transmitted. On MW/LW, interference may be noticed when passing underneath high voltage power lines or bridges or through tunnels. On FM, interference may be the result of increasing distance from the transmitter, reflection of the signal by obs- tacles (mountains, hills, buildings etc), or of being in an area which is not covered by a transmitter. Selecting the radio Press the "J" button. Selecting a waveband By short presses on the “J” button, you can select the FM1, FM2, FM3 and AM wavebands. Automatic station search Briefly press button “G” or “H” to search for the station immediately above or below. By continuing to press the button in the direction selected, you will obtain continuous scrolling of the frequency. The scrolling stops on the first station found as soon as you release the button. If TA, traffic information programme, is selected, only stations broadcasting this type of programme are selected. Searching for a station occurs first in “LO” sensitivity (selection of the most powerful transmitters) during scanning of the waveband, then in “DX” sensitivity (selection of the weakest and most distant transmitters). To scan the waveband in “DX” sensitivity, press twice on button “G” or “H”. Manual station search Press the “MAN” button. Briefly press button “G” or “H” respectively to increase or reduce the frequency displayed. By continuing to press the button in the direction selected, you will obtain continuous scrolling of the frequency. Scrolling stops as soon as you release the button. Pressing the “MAN” button again returns you to automatic station search. 06-05-2002
  • 39. YOUR 106 IN DETAIL 41 Manual storing of stations in the memory Select the station required. Press for more than two seconds one of the buttons “1” to “6”. The sound stops then becomes audible again, confirming that the station has been stored in memory. Automatic storing of FM stations in the memory (autostore) Press the “J” button for more than two seconds, to automatically store the 6 stations with the strongest signal in FM. These stations are stored in the FM3 waveband. – If it is not possible to find 6 stations, the remaining memories are empty. Recalling stations stored in the memory For each waveband, briefly pressing the buttons “1” to “6” recalls the corresponding stored station. RDS FUNCTION Using the RDS (Radio Data System) function on FM RDS allows you to continue to listen to the same station, whatever frequency it is using for the region you are going through. Switch the function on or off by briefly pressing the “RDS” button. RDS station following The display indicates the name of the station selected. The radio is continually searching for the station which has the best reception and which is transmitting the same programme. 06-05-2002
  • 40. YOUR 106 IN DETAIL42 Traffic information programme Press the “TA” button to switch the function on or off. Any traffic information flash will be given priority, whatever source you are listening to (radio, CD or CD changer). If you wish to interrupt a message, press the “TA” button; this switches off the function. Note: the volume of the traffic information announcements is independent of the volume of normal radio listening. You can adjust it using the volume button. The setting will be stored and will be used when the next messages are broadcast. While traffic information is being broadcast, the display will alternately show “TRAFFIC” and the name of the station. When the station selected cannot broadcast traffic information, the display shows “NO TA”. Regional following mode (REG) When they are part of a network, certain stations broadcast regional programmes in the various areas they serve. With regional following mode you can keep listening to the same programme. To do this press the “RDS” button for more than two seconds to switch this function on or off. PTY function This allows you to listen to stations broadcasting a specific type of programme (news, culture, sport, rock etc.). With FM selected, press the “TA” button for two seconds to switch this function on or off. To find a PTY programme: – switch on the PTY function, – briefly press button “G” or “H” to scroll down the list of the various types of programmes offered, – when the programme of your choice is displayed, keep button “G” or “H” pressed for more than two seconds to carry out an automatic search (after an automatic search the PTY function is switched off). In PTY mode the different types of programmes can be stored in memory. To do this, press down the preselec- tion buttons “1” to “6” for more than two seconds. Recalling the type of programme stored in the memory is by a brief press on the corresponding button. 06-05-2002
  • 41. YOUR 106 IN DETAIL 43 EON system This connects stations which are part of the same network. It enables broadcasting of traffic information or a PTY programme from a station which is part of the same network as the station to which you are listening. This service is available when you have selected the TA traffic information programme or the PTY function. COMPACT DISC Selecting the CD as source After inserting a disc, with the printed surface upwards, the player starts automatically. If a disc is already inserted, press the "K" button. Ejecting a disc Press button “A” to eject the disc from the player. Selecting a track Press button “G” to select the next track. Press button “H” to return to the start of the current track or to select the previous track. Accelerated play Press the “MAN” button. Keep button “G” or “H” pressed for forwards or backwards accelerated play. Accelerated play stops as soon as you release the button. Buttons “G” and “H” resume the “track selection” function when the “MAN” button is pressed again. Shuffle (RDM) When the CD is selected, keep the “K” button pressed for two seconds. The tracks will be played in random sequence. Pressing the “K” button again for two seconds returns you to normal play. Note : Do not use blank CDs as these could damage your player. 06-05-2002
  • 42. YOUR 106 IN DETAIL 43 EON system This connects stations which are part of the same network. It enables broadcasting of traffic information or a PTY programme from a station which is part of the same network as the station to which you are listening. This service is available when you have selected the TA traffic information programme or the PTY function. COMPACT DISC Selecting the CD as source After inserting a disc, with the printed surface upwards, the player starts automatically. If a disc is already inserted, press the "K" button. Ejecting a disc Press button “A” to eject the disc from the player. Selecting a track Press button “G” to select the next track. Press button “H” to return to the start of the current track or to select the previous track. Accelerated play Press the “MAN” button. Keep button “G” or “H” pressed for forwards or backwards accelerated play. Accelerated play stops as soon as you release the button. Buttons “G” and “H” resume the “track selection” function when the “MAN” button is pressed again. Shuffle (RDM) When the CD is selected, keep the “K” button pressed for two seconds. The tracks will be played in random sequence. Pressing the “K” button again for two seconds returns you to normal play. Note : Do not use blank CDs as these could damage your player. 06-05-2002
  • 43. YOUR 106 IN DETAIL44 CD MULTI-CHANGER Selecting the CD changer Press the “L” button. Selecting a disc Press a button from “1” to “6” to select the corresponding disc. Selecting a track Press button “G” to select the next track. Press button “H” to return to the start of the current track or to select the previous track. Accelerated play Press the “MAN” button. Keep button “G” or “H” pressed for forwards or backwards accelerated play. Accelerated play stops as soon as you release the button. Buttons “G” and “H” resume the “track selection” function when the “MAN” button is pressed again. Shuffle (RDM) When the CD multi-changer is selected, keep the “L” button pressed for two seconds. The tracks will be played in random sequence. Pressing the “L” button again for two seconds returns you to normal play. Note : Do not use blank CDs as these could damage your player. 06-05-2002
  • 44. YOUR 106 IN DETAIL 45 C D C B A CD changer (Available as an accessory) To insert a disc into the changer: – open sliding panel A, – press button B to eject the cartridge C, – open one of the six compartments of the cartridge by pulling tab D, – insert the disc with the printed face upwards and close the compartment, – insert the cartridge into the changer, – close the sliding panel A. 06-05-2002
  • 45. YOUR 106 IN DETAIL46 2 1 3 4 5 5 4 3 1 1 1 2 06-05-2002
  • 46. YOUR 106 IN DETAIL 47 VENTILATION 1 - Windscreen de-icing/demisting vents. 2 - Air outlet to front passengers’ footwell. 3 - Side vents. 4 - Centre vents. 5 - Air outlet at the feet of the front occupants. Recommendations for use - Adjust the airflow to ensure sufficient renewal of air in the passenger compartment. - Select the air distribution setting that is best suited to your requirements and the climatic conditions. - Select a temperature setting and adjust it gradually to obtain maximum comfort. 06-05-2002
  • 47. HEATING AND VENTILATION: Location of the controls 1 - Air flow Turn the knob to the desi- red position. To temporarily stop the entry of out- side air : - Turn the knob to position 0. - Close the centre and side grilles. - Place the air distribution control in the centre and side vents posi- tion. This setting prevents the entry of unpleasant odours or dust - it must only be used in exceptional circum- stances. 2 - Air distribution Centre and side vents. Occupants’ feet. Windscreen, front windows and occupants’ feet. Windscreen and side windows. To rapidly demist or de-ice the wind- screen and side windows: - set temperature and air flow controls to maximum position, - set air distribution control to “wind- screen and side windows”, - close the centre and side vents. To obtain correct and thorough air distribution, ensure that: - the exterior air grille is not obs- tructed, - the air inlet vents and the air pas- sages under the front seats are not blocked. In summer, use the “centre and side vents“ position. In winter, in order to improve the level of comfort, use the “occupants’ feet“ position and for good visibility the “windscreen, front windows and occupants’ feet“ position. 3 - Temperature adjustment Move the control to the left (blue zone: ambient temperature) or to the right (red zone: hot). YOUR 106 IN DETAIL48 54 1 3 2 06-05-2002
  • 48. Air conditioning* This function allows the temperatu- re to be lowered in summer, and in winter, above 0°C, the demisting function to be improved. 4 - Air conditioning on/off operation: Press the switch; the indicator lamp will light. – adjust air flow, control 1. – adjust air distribution, control 2. – adjust temperature, control 3. 5 - Recirculation of the interior air Press the switch. The indicator lamp will light. – Used simultaneously with the air conditioning, it improves perfor- mance. – Used on its own, it prevents the entry of outside air (dust, unplea- sant odours) but there is a risk of misting up of the windows. Do not operate the interior air recir- culation control continuously. * According to specification YOUR 106 IN DETAIL 49 - Operate the air condi- tioning system for 5 to 10 minutes once or twice a month to keep it in perfect working order. - If the system does not produ- ce cold air, do not use it and contact a Peugeot dealer. 06-05-2002
  • 49. Front head restraints Height adjustment: slide the head restraint. The adjustment is correct when the upper edge of the head restraint is at the same height as the top of the head. This adjustment avoids excessive movement of the head rearwards, in cases of rear impact. Adjustment of angle*: tilt the head restraint. To remove the head restraint: posi- tion it at maximum height, press the two lugs then remove the head restraint. Warning: never drive with the head restraints removed; they must be in place and correctly adjusted. Adjustment of front seats Forwards/backwards adjustment: lift control 1, slide the seat, then let go to lock. Adjustment of seat back: push control 2 rearwards to obtain the required angle. Access to rear seats: (3 doors) raise control 3 or push control 2 towards the front. Tilt the back of the seat, then pull the seat forward. The position of the seats is memorised*. To put them back as they were before, you need only return them to the original position. The storage compartment for the handbook and Warranty book is located under the front right-hand seat*. * According to specification YOUR 106 IN DETAIL50 1 3 2 06-05-2002
  • 50. Rear seats To tilt the seat: – Pull the rear of the seat 1 and tilt it against the front seats. – Place the seat-belt in the hook 2 (3-door) or on the top of the seat-back 4 (5-door). – Unlock the seat-back by using the controls 3 on the sides. – Tilt the seat-back 4. To remove the rear seat cushions , tilt the seat cushion to 45° and remove it. To replace the seat cushion: position it on the front fixing brackets and lower it to the normal position. When folding the rear seats, always start with the seat cushion, never the seat back (risk of damage). Rear head restraints* These have one position (high) for when they are in use and another position (low) for storing. They are removable. To lower, press the lug. To remove, pull upwards as far as the stop and press the lug. Warning: never drive with the head restraints removed; they must be in place and correctly adjusted. * According to specification. YOUR 106 IN DETAIL 51 21 34 06-05-2002
  • 51. Isofix mounting* The Isofix mountings available on the two rear seats* allow for the ins- tallation of special child seats**, approved by UTAC for PEUGEOT vehicles and marketed within the network. The fixings are available as an accessory and must be fitted by an approved PEUGEOT dealer. The locks incorporated in the child seat fit onto the mounting and ensure quick, reliable and safe installation of the seats. The combined use of the seat belt is compulsory for a forward-facing child seat. The forward-facing position is per- mitted in the rear. For maximum safety, it is essential to adjust the corresponding front seat to the intermediate longitudinal position, seat back upright. Follow the instructions for fitting the child seat in the leaflet provided when the child seat is purchased. * According to specification. ** Available during the model year YOUR 106 IN DETAIL52 06-05-2002
  • 52. YOUR 106 IN DETAIL 53 Never leave a child in a vehicle which is exposed to the sun and has the windows closed. To protect young children from the sun, fit sunblinds to the rear windows. Never leave the keys in the reach of children inside the car. Strap children into their child seats even on short journeys. Observe the precautions concer- ning the passenger airbag. 1 2 3 1 2 3 Child seats This was one of PEUGEOT’s main criteria when designing your vehicle, however the safety of your children also depends on you. For maximum peace of mind, please follow these simple precautions: All children under the age of 10 are required to travel in approved child safety seats*, fitted with seat belts. After carrying out numerous tests, PEUGEOT recommend the following systems: Up to 9 months (up to 22 lbs. or 10 kg) «Baby Safe», a seat secured with its back to the engine and secured with a three- point seat belt, on either the front or rear seat. From 9 months to 3 or 4 years (20 to 40 lbs. or 9 to 18 kg) «Römer Peggy» is fitted to the rear seat with a two-point (lap-belt) or three-point belt. From 3 to10 years of age (33 to 80 lbs or 15 to 36 kg) «Klippan Optima» : is fitted in the rear with a three point belt (removable seatback). from 33 to 55 lbs. [15 to 25 kg] : booster + seatback. from 55 to 80 lbs. [25 to 36 kg] : use the booster on its own. For maximum safety, fasten the three-point seat belts or the child seat straps keeping the slack in relation to the child’s body to a minimum, even for short journeys. To prevent the doors from opening accidentally: use the child-proof lock. Also, do not open the rear windows more than a third. * According to current legislation. 06-05-2002
  • 53. Seat belts (5-door): To adjust the height of the front seat belts*: Pull control 1 towards you and slide it. To fasten the seat belts: Pull the strap, then insert the end into the buckle. Rear seat belts The rear seats are fitted with two three-point inertia reel belts and a lap belt. Pre-tensioning and force- limiting front seat belts* Safety in the event of a front impact has been improved by the introduction of pre-tensioning and force-limiting front seat belts. Depending on the seriousness of the impact, the pre-tensioning system instantly tightens the seat belts firmly against the body of the occupant. The pre-tensioning seat belts are armed when the ignition is on. * According to specification YOUR 106 IN DETAIL54 1 To be effective, a seat belt must be tensioned as close to the body as possible. Depending on the nature and seriousness of the impact the pre-tensioning system may be triggered before and indepen- dently of the airbags. In all cases, the airbag warning light comes on. Following an impact, have the system checked by a PEUGEOT dealer. The system has been designed to be fully operational for ten years. Have it replaced at the end of this period. 06-05-2002
  • 54. Key position There are four positions of the ignition key in the lock: "S" Stop: ignition is off. "A" Accessories: ignition is off but accessories can operate. The battery charge warning lamp lights. "M" Run: ignition on. The following warning lamps light: - low engine oil pressure, - coolant temperature, - battery charge, - pre-heater (DIESEL), - handbrake, low brake fluid, - engine diagnostics*, - ABS* (lights for 3 seconds, the warning lamp should always go out when the vehicle speed is over 8 m.p.h. [12 km/h]), - Airbag*, the warning lamp lights for six seconds, then goes out. "D" Starter: starts the engine. The following warning lamps go out: - low engine oil pressure, - battery charge, - engine diagnostics*. Starting Unlock the steering Turn the steering wheel gently while turning the key. Before starting it is advisable to: Press the clutch pedal while opera- ting the starter to aid starting of the engine. * According to specification YOUR 106 IN DETAIL 55 06-05-2002
  • 55. Key position There are four positions of the ignition key in the lock: "S" Stop: ignition is off. "A" Accessories: ignition is off but accessories can operate. The battery charge warning lamp lights. "M" Run: ignition on. The following warning lamps light: - low engine oil pressure, - coolant temperature, - battery charge, - pre-heater (DIESEL), - handbrake, low brake fluid, - engine diagnostics*, - ABS* (lights for 3 seconds, the warning lamp should always go out when the vehicle speed is over 8 m.p.h. [12 km/h]), - Airbag*, the warning lamp lights for six seconds, then goes out. "D" Starter: starts the engine. The following warning lamps go out: - low engine oil pressure, - battery charge, - engine diagnostics*. Starting Unlock the steering Turn the steering wheel gently while turning the key. Before starting it is advisable to: Press the clutch pedal while opera- ting the starter to aid starting of the engine. * According to specification YOUR 106 IN DETAIL 55 06-05-2002
  • 56. YOUR 106 IN DETAIL56 Never race a cold engine. Never run the engine in an enclosed space. If the engine cannot be stopped using the igni- tion key, press the brake pedal, engage a gear and release the clutch in order to stall the engi- ne. Do not modify the steering lock in any way. Starting a petrol engine* Do not press the accelerator pedal. Operate the starter without relea- sing the key until the engine starts. * According to specification Starting a diesel engine Engine cold: Do not press the accelerator pedal. Turn the key to position “M”, the pre-heat warning lamp lights. Wait until the warning lamp goes out, then operate the starter in posi- tion “D” until the engine runs smoothly. Engine hot: Do not press the accelerator pedal. Operate the starter. If the engine stops or does not start immediately, always wait a few seconds before trying again using the pre-heater. NOTE: according to specifica- tion, the pre-heat warning lamp does not light if the engi- ne is sufficiently hot. 06-05-2002
  • 57. YOUR 106 IN DETAIL58 When buying a second- hand car: - Make sure that you are given the confidential card. - It is advisable to have the key codes memorised by your PEUGEOT dealer to ensure that the keys in your posses- sion are the only ones which will permit starting of the vehicle. - Do not make any modifica- tions to the engine immobi- liser. Confidential card This shows the identification code which is required if any work is carried out on the system by a PEUGEOT dealer. This code is hidden by a strip which must not be removed unless required. Keep your card in a safe place, never in your vehicle. 06-05-2002
  • 58. KEYS The keys will lock or unlock the doors and the boot or tailgate inde- pendently or simultaneously by central locking, as well as the fuel tank filler cap and the steering lock. They also enable the passenger airbag* to be disarmed. THE REMOTE CONTROL A single press on button A locks the doors and boot or tailgate. A single press on button B unlocks the vehicle. Note: Do not repeatedly press the button of your remote control out of range of your vehicle. You risk causing it not to work and the remote control would have to be reprogrammed. Changing the remote control batteries To gain access to the battery, unclip the key casing with a coin where you can see the ring (CR2016/3 V). If the remote control does not work after the battery has been changed, re-programme the remote control. Synchronising the remote control* - Use the key to unlock the driver’s door of your vehicle. - Within 30 seconds of unlocking your vehicle, press button A twice. - The vehicle is locked by the second press of the button. The remote control is now working again. * According to specification YOUR 106 IN DETAIL 59 A B 06-05-2002
  • 59. Engine immobiliser This locks the engine control sys- tem and therefore prevents starting of the vehicle by anyone who has not got the key. Operation The keys which were given to you on delivery of your vehicle have an electronic chip in the plastic part of the key. Each key therefore has a special code. When the ignition is switched on, the key code is recognised by the engine immobiliser system and starting is possible. If the key does not have a code or has a different code from those sto- red in the system memory, the vehicle will not start. The engine immobiliser automati- cally locks the engine control sys- tem a few moments after the igni- tion has been switched off. Additional key You can store up to 5 keys. If you require an additional key or wish to replace a faulty key, you must visit a PEUGEOT dealer. YOUR 106 IN DETAIL 57 06-05-2002
  • 60. DOORS Opening the doors from the inside To open, pull handle 1. Child safety The rear doors are fitted with child- proof locks: Lower the catch to prevent the doors being opened from the inside. It is still possible to open the doors from outside. THE BOOT Locking/unlocking the tailgate. Using the key To open the tailgate, turn the key then push button 1. The light is operated by opening the tailgate*. * According to specification YOUR 106 IN DETAIL60 1 1 06-05-2002
  • 61. DOORS Opening the doors from the inside To open, pull handle 1. Child safety The rear doors are fitted with child- proof locks: Lower the catch to prevent the doors being opened from the inside. It is still possible to open the doors from outside. THE BOOT Locking/unlocking the tailgate. Using the key To open the tailgate, turn the key then push button 1. The light is operated by opening the tailgate*. * According to specification YOUR 106 IN DETAIL60 1 1 06-05-2002
  • 62. Closing the tailgate To close the tailgate, pull either of the interior grab handles. THE BONNET Unlocking from the inside Pull the handle. Opening from the outside To open: Press the hook 1 and slowly raise the bonnet. The struts will open and keep the bonnet open. To close: Lower the bonnet most of the way and let it drop when it is almost closed. Check that it is locked securely. Filling with fuel Fuel tank cap - Insert the key, then turn it to the left. - Remove the cap. Tank capacity: approximately 10 gallons (45 litres). Only fill up with fuel with the engine switched off. YOUR 106 IN DETAIL 61 1 06-05-2002
  • 63. Athermic windscreen* The windscreen has a non- reflective zone above the interior rear-view mirror. This zone is intended for affixing toll cards or parking passes. Note: the athermic glass of the windscreen limits the heating of the passenger compartment by reflec- ting more of the sun’s rays. Sliding sun roof* To open or partly open the roof: - Open the concealing panel. - Pull handle 1 to open out. - Turn handle 1 the desired amount. Tilting sun roof* - Tilt and push the handle. Tilting window* (3 door version) To open the rear windows: - Tilt lever 2 then push the window. * According to specification YOUR 106 IN DETAIL68 1 2 06-05-2002
  • 64. Closing the tailgate To close the tailgate, pull either of the interior grab handles. THE BONNET Unlocking from the inside Pull the handle. Opening from the outside To open: Press the hook 1 and slowly raise the bonnet. The struts will open and keep the bonnet open. To close: Lower the bonnet most of the way and let it drop when it is almost closed. Check that it is locked securely. Filling with fuel Fuel tank cap - Insert the key, then turn it to the left. - Remove the cap. Tank capacity: approximately 10 gallons (45 litres). Only fill up with fuel with the engine switched off. YOUR 106 IN DETAIL 61 1 06-05-2002
  • 65. Switching off the side lights switches off the rear fog lamp or returns to the front fog lamps only position if the vehicle is fitted with them. Horn Press the end of the stalk. Dipped/main beam. Light off. Rear fog lamp lit. Lights off. Front fog lamps. Front and rear fog lamps. Lights off. Side light on. In both clear and rainy weather, in daylight and at night, the rear fog lamp dazzles and is the- refore prohibited. Do not forget to switch it off as soon as it is no longer needed. LIGHTS STALK Front lights Selection is by turning ring A. Changing between dipped/main beam: Pull the stalk fully towards you. When your vehicle is equipped with long range light* these operate simultaneously with the main beam. To flash the headlamps: Flick the stalk towards you and release it. N.B.: If the lights are left on when you switch off the engine and open a front door, a buzzer will sound. Direction indicators (flashers) Left, downwards. Right, upwards. Fog lamps Operation is by turning ring B. The position is shown by the warning lamps on the fascia. It operates with the dipped/main beam headlamps. These operate with the side lights, dipped and main beam headlamps. These operate with the side lights, dipped and main beam headlamps. Rear Front and rear YOUR 106 IN DETAIL62 A B A B 06-05-2002
  • 66. FRONT WINDSCREEN WIPER Windscreen wiper stalk positions: 3 High speed wipe 2 Normal speed wipe 1 Intermittent wipe 0 Stop 4 A single wipe To operate the windscreen wash: Pull the wiper stalk towards you. REAR WINDSCREEN WIPER To operate the rear screen wiper*: - Turn the wiper stalk A 1/8 turn forwards for intermittent or conti- nuous wipe*. To operate the rear screen wash: - Turn the wiper stalk a further 1/8 turn forwards. Headlamp wash* To operate the headlamp wash*: - Switch the headlamps to dipped or main beam. - Pull the wiper stalk towards you. This operates simultaneously with the windscreen wash/wipe. * According to specification Digital clock The time is set with the ignition on, engine off, by pressing button B for more than 3 seconds. The hours will then flash. To set the hours - A short press, the hours change slowly. - Press and hold, the hours change swiftly. To memorise the hour displayed, release the button for 5 seconds, the minutes will then flash. To set the minutes - A short press, the minutes change slowly. - Press and hold, the minutes change swiftly. To memorise the minutes displayed, release the button for 5 seconds. YOUR 106 IN DETAIL 63 0 4 1 2 3 A B 06-05-2002
  • 67. YOUR 106 IN DETAIL64 A B Front electric windows* To open or shut the windows: Ignition key in position “A” or “M”. Press the appro- priate button: – A: for the driver’s window – B: for the passenger’s window Operation is cancelled when the ignition is switched off. * According to specification 06-05-2002
  • 68. Interior mirror The interior mirror has two posi- tions: - Day (normal) - Night (anti-dazzle) To change from one to the other: push or pull the lever on the bottom edge. Manually controlled mirrors To adjust: move the adjustment lever in all four directions. Electrically controlled mirrors* To adjust: - Select the mirror using the two way switch 1. - Adjust the mirror using control 2. - Return the two-way switch 1 to its central position. * According to specification When the vehicle is parked, the mirrors can be folded back manually. Warning: The mirror on the driver’s side is aspherical to eliminate the «blind spot». Therefore, objects viewed in the mirror are, in reality, closer than they appear. This must be taken into account in order to correctly judge the distance of vehicles approaching from behind. YOUR 106 IN DETAIL 65 1 2 06-05-2002
  • 69. YOUR 106 IN DETAIL66 4 1 2 5 3 6 AUDIO RDS TA 2 12 11 10 9 8 7 5 6 31 4 CENTRAL PANEL 1 - Passenger airbag disarming switch. 2 - Radio cassette player. 3 - Central adjustable vents for heating, ventilation and air flow. 4 - Heating and ventilation controls. 5 - Interior air recirculation or right-hand heated seat control*. 6 - Ashtray. 7 - Demisting control for rear screen and mirrors*. 8 - Hazard warning switch. 9 - Lighter. 10 - Air conditioning* or left-hand heated seat* control. 11 - Headlamps height adjustment. 12 - Lighting rheostat. * According to specification 06-05-2002
  • 70. Heated seats* Press the switch to operate the seat heating. Pressing it again stops the opera- tion. * According to specification Lighting rheostat Adjustment can only be done with the engine running and the side- lights on, by pressing button 12 on the instrument panel, to increase or decrease the instrument panel ligh- ting level. Adjusting the headlamps Depending on the load in your vehicle, it is recommended that the headlamp beam is adjusted. 0 - 1 or 2 people in the front seats. – - 3 people. 1 - 5 people. 2 - 5 people + maximum authori- sed load. 3 - Driver + maximum authorised load. This adjustment can only be carried out when the lighting control is in the dipped/main beam position. Initial setting is position 0. Hazard warning lights The switch and the direction indica- tors flash. Controls the direction indicators simultaneously and continuously. Use only in cases of danger, for an emergency stop or for driving in unusual conditions. Can operate with the ignition swit- ched off. Rear screen demister Control for demisting the rear screen (and exterior mirrors)*. Goes out automatically after approximately twelve minutes in order to avoid excessive current consumption. Pushing it again restarts the opera- tion for twelve minutes. YOUR 106 IN DETAIL 67 06-05-2002
  • 71. Front ashtray: To empty: - press tab 1, pulling on the housing - detach the assembly upwards. To refit: - engage the lower part, - press tab 1, - push downwards and close the assembly. Rear ashtray*: On 5-door: - To empty: pull the ashtray pres- sing downwards. - To refit: push the ashtray while pressing downwards. On 3-door: - to empty, pull the assembly upwards. Rear parcel shelf To remove: – Unhook the two cords 1. – Lift the shelf and remove it. Fixing a warning triangle The two restraining straps* located inside the boot enable a warning tri- angle to be fixed. * According to specification. YOUR 106 IN DETAIL 69 1 1 1 06-05-2002
  • 72. Handbrake Application: When you have completed your parking manoeuvre, pull up the handbrake to apply it. To make application and release of the handbrake easier, press the brake pedal and pull the handbrake with the engine running. Release: Press the button before releasing the handbrake. Anti-lock brake system (ABS)* In conjunction with approved tyres in good condition, the anti-lock brake system improves the stability and handling of your 106, particu- larly on poor or slippery surfaces. The anti-lock brake system ope- rates automatically if there is a risk of wheel locking. Lighting of the ABS warning lamp may be due to the turning of a wheel during an operation on the vehicle (changing a wheel, for example) with the ignition on (posi- tion M). Note: In certain conditions, normal operation of the system can be recognised by a light vibration of the brake pedal. Should an emergency stop be necessary, press the brake pedal firmly and continuously. Power steering* This is a driving aid which offers the best compromise when parking and when driving at high speeds. Manual gearbox The gear positions are indicated on the gear lever knob. 1 - Reverse gear can only be engaged with the vehicle stationary and the engine idling. * According to specification. YOUR 106 IN DETAIL70 1 06-05-2002
  • 73. AIR BAGS* The airbag system has been desi- gned to maximise the safety of the occupants in the event of serious collisions. It works in conjunction with the seat belts. The electronic detectors register and analyse any abrupt deceleration of the vehicle; if the triggering threshold is reached the airbags inflate instant- ly and come between the occupants and the vehicle. Immediately after the impact, the air- bags deflate rapidly, so that they do not hinder the visibility of the occu- pants and their exit if necessary from the vehicle. The airbags are not deployed in the case of collisions which are not serious, for which the seat belt is suf- ficient to ensure maximum protec- tion. The seriousness of a collision depends on the nature of the obs- tacle and the speed of the vehicle at the moment of the collision. Airbags only operate when the ignition is switched on. Note: the gas escaping from the cushion can be a minor irritant. FRONT AIR BAGS* These are folded in the centre of the steering wheel for the driver and in the fascia for the front passenger. They are deployed simultaneously (except in cases where the airbag is disarmed), for frontal impacts where there is a risk of injury to the head or chest. - Remove the ignition key, insert it into the passenger airbag switch 1 and turn it to the “OFF” position. - One of these two warning lights* on the instrument panel is lit throughout the disarming process. In the “OFF” position, the passenger airbag will not be triggered in the event of an impact. As soon as you remove the rearwards-facing child seat from the front passenger seat, turn the airbag switch to the “ON” position, to arm the airbag and thus ensure the safety of your passenger in an impact. * According to specification. Disarming the passenger airbag* To ensure the safety of your child, it is essential to disarm the pas- senger airbag when you install a rearwards-facing child seat on the front passenger seat. YOUR 106 IN DETAIL 71 1 AIR BAG 06-05-2002
  • 74. Passenger airbag precautions Vehicle fitted with a passenger airbag disarming switch: - disarm the airbag if you install a rearwards-facing child seat on the front passenger seat, - arm the airbag when you trans- port an adult on the front pas- senger seat. Vehicle not fitted with a passenger airbag disarming switch: - do not install a rear- wards-facing child seat on the front passenger seat. Never place your feet or any object on the fascia. Front* and side* airbag operational check Operation of the airbags is indicated by the warning light on the instrument panel. If the passenger airbag is armed (passenger airbag switch in the "ON" posi- tion), the warning light will come on for six seconds when the ignition is switched on. If the warning light: - does not come on when the ignition is switched on or, - does not switch off after six seconds or, - flashes for five minutes then remains on. Consult your PEUGEOT dealer. SIDE AIR BAGS* The side airbags are incorporated in the backrest frames of the front seat, on the side nearest the door. They are triggered independently of each other depending on the side on which the collision occurs, in the case of side impacts which could cause injury to the thorax, the abdomen and the head. * According to specification YOUR 106 IN DETAIL72 06-05-2002
  • 75. YOUR 106 IN DETAIL 73 WARNING For the front and side airbags to be fully effective, observe the following safety rules: • Wear a correctly adjusted seat belt. • Sit in a normal upright position. • Do not leave an accessory, or any other object between the occupants of the front seats and the airbags. It could hamper the operation of the airbags or injure the occupants. • All work on the airbag system is strictly forbidden unless it is carried out by qualified personnel of the PEUGEOT network. • After an accident or if the vehicle has been stolen or broken into, have the airbag systems checked. • The airbag systems have been designed to be fully operational for 10 years after the vehicle has been registered. Have them replaced by a PEUGEOT dealer after this period. • Front airbags* • Do not drive holding the steering wheel by its spokes or resting your hands on the centre part of the wheel. • Smoke as little as possible; deployment of the airbags can cause burns or the risk of injury from a cigarette or pipe. • Never remove or pierce the steering wheel or hit it violently. • Side airbags* • Never put covers on the front seats. • Do not fix or glue anything to the front seat backrests. This could cause injury to the chest or arms when the side airbag inflates. • Do not sit with the upper part of the body any nearer to the door than necessary. * According to specification 06-05-2002
  • 76. Passenger airbag precautions Vehicle fitted with a passenger airbag disarming switch: - disarm the airbag if you install a rearwards-facing child seat on the front passenger seat, - arm the airbag when you trans- port an adult on the front pas- senger seat. Vehicle not fitted with a passenger airbag disarming switch: - do not install a rear- wards-facing child seat on the front passenger seat. Never place your feet or any object on the fascia. Front* and side* airbag operational check Operation of the airbags is indicated by the warning light on the instrument panel. If the passenger airbag is armed (passenger airbag switch in the "ON" posi- tion), the warning light will come on for six seconds when the ignition is switched on. If the warning light: - does not come on when the ignition is switched on or, - does not switch off after six seconds or, - flashes for five minutes then remains on. Consult your PEUGEOT dealer. SIDE AIR BAGS* The side airbags are incorporated in the backrest frames of the front seat, on the side nearest the door. They are triggered independently of each other depending on the side on which the collision occurs, in the case of side impacts which could cause injury to the thorax, the abdomen and the head. * According to specification YOUR 106 IN DETAIL72 06-05-2002
  • 77. YOUR 106 IN DETAIL 73 WARNING For the front and side airbags to be fully effective, observe the following safety rules: • Wear a correctly adjusted seat belt. • Sit in a normal upright position. • Do not leave an accessory, or any other object between the occupants of the front seats and the airbags. It could hamper the operation of the airbags or injure the occupants. • All work on the airbag system is strictly forbidden unless it is carried out by qualified personnel of the PEUGEOT network. • After an accident or if the vehicle has been stolen or broken into, have the airbag systems checked. • The airbag systems have been designed to be fully operational for 10 years after the vehicle has been registered. Have them replaced by a PEUGEOT dealer after this period. • Front airbags* • Do not drive holding the steering wheel by its spokes or resting your hands on the centre part of the wheel. • Smoke as little as possible; deployment of the airbags can cause burns or the risk of injury from a cigarette or pipe. • Never remove or pierce the steering wheel or hit it violently. • Side airbags* • Never put covers on the front seats. • Do not fix or glue anything to the front seat backrests. This could cause injury to the chest or arms when the side airbag inflates. • Do not sit with the upper part of the body any nearer to the door than necessary. * According to specification 06-05-2002
  • 78. PRACTICAL INFORMATION7474 4 1 3 568 7 2 1124 cm3 injection engine 1 . Air filter 2 . Brake fluid 3 . Battery 4 . Power steering 5 . Dipstick 6 . Engine oil filler 7 . Coolant 8 . Reservoir for front/rear screen and headlamp wash-wipe* 06-05-2002
  • 79. PRACTICAL INFORMATION 75 4 1 3 568 7 2 9 75 1360 cm3 injection engine 1 . Air filter 2 . Brake fluid 3 . Battery 4 . Power steering 5 . Dipstick 6 . Engine oil filler 7 . Coolant 8 . Reservoir for front/rear screen and headlamp wash-wipe* 9 . Automatic gearbox 06-05-2002
  • 80. PRACTICAL INFORMATION7676 4 1 3 68 7 2 5 16-valves 1587 cm3 engine 1 . Air filter 2 . Brake fluid 3 . Battery 4 . Power steering 5 . Dipstick 6 . Engine oil filler 7 . Coolant 8 . Reservoir for front/rear screen and headlamp wash-wipe* 06-05-2002
  • 81. PRACTICAL INFORMATION 7777 4 1 3 568 7 2 1527 cm3 diesel engine 1 . Air filter 2 . Brake fluid 3 . Battery 4 . Power steering 5 . Dipstick 6 . Engine oil filler 7 . Coolant 8 . Reservoir for front/rear screen and headlamp wash-wipe* 06-05-2002
  • 82. PRACTICAL INFORMATION7878 CHECKING THE LEVELS 1. Air filter The air filter element must be changed at the recommended intervals. If you drive in a dusty atmosphere, change it twice as often. Follow the recommendations given in the maintenance schedule. 2. Brake fluid The level must always be above the DANGER mark on the reservoir. In the event of a significant drop in the fluid level, consult a PEUGEOT dealer immediately. Use fluids approved by the manufacturer, which conform to DOT 3 or DOT 4 standards. 3. Battery At the beginning of winter, have the battery checked by a PEUGEOT dealer. In summer (30°C and above) or if the battery is in heavy use, check the level of electrolyte; it must cover the separator plates at all times. If necessary, top up with distilled water. 4. Power steering* When the engine is cold, the level must always be above the MIN mark, close to the MAX mark. 5. Dipstick Check the oil level on flat ground, with the engine cold and preferably before the first journey of the day. Never exceed the maximum level. Check the level regularly. 6. Topping up with oil Your oil must be changed in accor- dance with the maintenance sche- dule. The oil must be topped up between oil changes. Regularly check and top-up the oil level. Maximum oil consumption is 0.5 litres per 600 miles (1000 km). 7. Coolant Engine cold: the coolant level must be between the min and max marks in the expansion chamber with the cap removed. To close, turn the cap to the second notch*. Cooling circuit Always use the coolant which is approved by the manufacturer (PROCOR TM108 / GLYSANTIN G33 or REVKOGEL 2000). If this is not possible, top up with distilled water and have the protection level checked by a PEUGEOT dealer. When the engine is hot, the coolant temperature is regulated by the fan. As the fan can operate with the ignition key removed, and as the cooling circuit is pressurised, do not carry out any work for at least an hour after switching off the engine. Note: the coolant does not need to be renewed. 8. Front/rear screen and headlamp wash reservoir* For optimum cleaning quality and for your safety, it is best to use clea- ning products approved by PEU- GEOT (capacity 4.5 litres without headlamp wash, 5.5 litres with headlamp wash). * According to specification 06-05-2002
  • 83. PRACTICAL INFORMATION 7979 Visual brake pad wear indicator* The front brakes are fitted with visual wear indicators. Regularly check the thickness of the brake pads. To check: turn the wheels to full lock on the side to be checked. The thickness of pad remaining is represented by the measu- rement X. When the measurement is zero, the brake pads must be changed. Advice As brake pad wear depends on the way in which the vehicle is driven, particularly if the vehicle is used for urban driving or for short journeys, or is driven in a very sporty manner, it may be necessary to check the thickness of the pads even between ser- vice intervals. * According to specification 06-05-2002
  • 84. PRACTICAL INFORMATION8080 3 2 1 CHANGING A WHEEL Access to the spare wheel The spare wheel is outside, under the luggage compartment, in a metal carrier. – Take out the wheel-brace 1. – Using the wheel-brace 1, slacken the spare wheel carrier bolt inside the luggage compartment, under the carpet. – Lift the carrier to disengage the hook towards the rear, then lower it. – Take out the jack storage box 2 located in the spare wheel. Remove the wheel – Use the wheel-brace to remove the wheel trim by pulling at the valve location. – Loosen the wheel bolts. – Use the jack storage box to chock the wheel at the opposite corner to the wheel being changed. – Position the jack head in the jac- king point nearest to the wheel being changed, taking care that the entire base of the jack is in contact with the ground. – Raise the jack, remove the wheel bolts and remove the wheel. Fit the spare wheel – Position the wheel, then lightly pre-tighten the bolts using the wheel-brace. – Lower the jack and release it. – Tighten the bolts using the wheel-brace. – Fit the wheel trim, starting with the valve location, and press with the palm of the hand. Replacing the wheel in the carrier – Lift the wheel to aid re-positio- ning of the carrier. – Do not forget to retighten the spare wheel carrier bolt. 06-05-2002
  • 85. PRACTICAL INFORMATION 8181 For your safety, always change a wheel: – on level, solid, non-slippery ground, – with the handbrake applied, – with first or reverse gear engaged, – Chock the vehicle. – Never position yourself under a vehicle which is supported only by a jack. Use a ramp. After changing the wheel – Have the wheel bolts and the tyre pressure checked as soon as possible. – Have the damaged tyre repaired so that it can be returned to the vehicle as soon as possible. – The “space-saving”* type of spare wheel is fitted with a 115/70R 15 tyre and is for temporary use only. - Pressure: 61 lbf. in2 (4.2 bars). - Maximum speed: 50 m.p.h. (80 km/h). * According to specification 3 Special procedure for Sport model Positioning the jack – Close the jack completely. – Position the jack under the vehicle at the jacking points tilting it by 90°, so that the jack handle hinge is at the same height as the sill trim, then straighten it. – Check that the jack is in correct contact with the sill. Replacing the wheel in the carrier – Position the jack storage box with the arrow pointing forwards. Never place the jack in contact with the sill trim. 06-05-2002
  • 86. Special features of the alloy wheels* Bolt covers Alloy wheel bolts are covered by chrome trims. Use tool 3 to remove the trims before slackening the bolts. Anti-theft bolt** If your wheels are fitted with an anti- theft bolt (one per wheel), the chrome trim and then the plastic cover must be removed, using tool 3, before it is unscrewed using one of the two anti-theft sockets (which were given to you on delivery of your vehicle along with the duplicate keys and the confidential card) and the wheel brace 1. Note: make a careful note of the code number engraved on the top of the anti-theft socket. This will enable you to obtain a duplicate of the anti-theft socket from a PEUGEOT dealer. * According to specification. ** According to model and destination. Fitting the spare wheel If your vehicle is fitted with a steel spare wheel, it is normal when secu- ring it to notice that the bolt washers do not come into contact with the rim. The spare wheel is secured by the cone-shaped support of each bolt. Fitting snow tyres If you fit snow tyres mounted on steel wheels, it is essential to use special bolts available from your PEUGEOT dealer. PRACTICAL INFORMATION82 3 3 06-05-2002
  • 87. CHANGING A BULB Side lights W5W Turn the plastic protector 1/8 turn and remove it. Change the bulb. Dipped/main headlamps H4 55/60 W Turn the plastic protector 1/8 turn and remove it. Disconnect the connector. Press the spring to unhook it then change the bulb. When refitting the plastic protector, ensure that the locating notches are correctly positioned and that the protector is properly secured. Only touch the bulb with a dry cloth. PRACTICAL INFORMATION 83 There is a risk of damage to the dipped/main headlamps. Only use bulbs supplied by the following manufacturers: – TUNGSRAM – PHILIPS – OSRAM – NORMA These comply with the anti-UV (Ultra-Violet) requirements necessary for correct operation and reliability of the headlamps. The headlamps are fitted with polycarbon glass with a protective coating. We strongly advise against cleaning them with a dry or abrasive cloth or with products containing detergents or solvents. 06-05-2002
  • 88. Direction indicator bulbs PY21W Access to the bulbs is from inside the wheel arch. Turn the wheels to full lock (to the left to change the right hand bulb and vice versa). Open the access flap. Turn the socket 1/4 turn. Change the bulb. Ensure that the flap is closed correctly. Side repeater W5W* Pull the rear part of the transparent cover and detach the assembly. Support the connector and turn the transparent cover 1/4 turn. Change the bulb. Rear lights Direction indicators PY21W Reversing lights P21W Fog lamp P21W Tail lights P5W Brake/tail lights P21/5W From inside the luggage com- partment: Remove the plastic protector 1. Remove the air outlet grille 2 using a cross-head screwdriver. Slacken the two wing nuts 3 and release the light block 4. Pinch the lugs 5 to remove the bulb-holder. Change the bulbs. * According to specification PRACTICAL INFORMATION84 4 3 1 2 5 06-05-2002
  • 89. Additional brake light 5 W5W bulbs Access to the light is easier if the luggage compartment is open. Remove the plastic protector by pressing the side tabs. Pinch the lugs to release the bulb- holder. Change the bulbs. Front fog lamps/long range lights H1/55W* Access to the bulbs is from under- neath the vehicle. Turn the socket a 1/4 turn. Change the bulb. * According to specification PRACTICAL INFORMATION 85 06-05-2002
  • 90. Direction indicator bulbs PY21W Access to the bulbs is from inside the wheel arch. Turn the wheels to full lock (to the left to change the right hand bulb and vice versa). Open the access flap. Turn the socket 1/4 turn. Change the bulb. Ensure that the flap is closed correctly. Side repeater W5W* Pull the rear part of the transparent cover and detach the assembly. Support the connector and turn the transparent cover 1/4 turn. Change the bulb. Rear lights Direction indicators PY21W Reversing lights P21W Fog lamp P21W Tail lights P5W Brake/tail lights P21/5W From inside the luggage com- partment: Remove the plastic protector 1. Remove the air outlet grille 2 using a cross-head screwdriver. Slacken the two wing nuts 3 and release the light block 4. Pinch the lugs 5 to remove the bulb-holder. Change the bulbs. * According to specification PRACTICAL INFORMATION84 4 3 1 2 5 06-05-2002
  • 91. Additional brake light 5 W5W bulbs Access to the light is easier if the luggage compartment is open. Remove the plastic protector by pressing the side tabs. Pinch the lugs to release the bulb- holder. Change the bulbs. Front fog lamps/long range lights H1/55W* Access to the bulbs is from under- neath the vehicle. Turn the socket a 1/4 turn. Change the bulb. * According to specification PRACTICAL INFORMATION 85 06-05-2002
  • 92. PRACTICAL INFORMATION86 Beware of incompatible additional electrical acces- sories! Your vehicle’s electrical circuit is designed to operate with standard or optional equip- ment. Before installing additional electrical equipment or accesso- ries, consult a PEUGEOT dea- ler. Some electrical accessories, or the way in which they are fitted, may adversely affect the opera- tion of your vehicle, namely, the electronic control circuits, the radio circuit and the electrical charging circuit. PEUGEOT does not accept any responsibility for expenses incurred by repairs or for any faults resulting from the installa- tion of additional accessories which are not supplied or recommended by PEUGEOT and which were not installed in accordance with the manufactu- rer’s instructions, in particular equipment with a consumption greater than 10 milliamps. The maxi fuses provide additional protection for the electrical sys- tems. Any work must be carried out by a specialist. Before removing a fuse the cause of the fault must be found and corrected. The fuse numbers are on the fuse box. Always change a faulty fuse for one of the same rating. Removing-fitting a fuse Correct Incorrect Pliers 06-05-2002
  • 93. The 16 fuse boxes and maxi fuse boxes are located under the bonnet. To gain access to the fuses, unhook the covers. 16 fuse box Maxi fuse box PRACTICAL INFORMATION 89 F2 F1 F4 F6 F8 F10 F12 F14 MF1 MF3 MF2 MF4 F3 F5 F7 F9 F11 F13 F15 F16 06-05-2002
  • 94. PRACTICAL INFORMATION90 Fuse Rating* Functions* 1 — Not used 2 30A Anti-lock braking system 3 25A Engine cooling 4 20A Anti-lock braking system 5 25A Fan unit 6 20A Additional driving lamps 7 — Not used 8 — Not used 9 10A Fuel pump 10 — Not used 11 10A Oxygen sensor 12 10A Left-hand main beam 13 10A Right-hand main beam 14 10A Left-hand dipped beam 15 10A Right-hand dipped beam 16 30A Pulsair pump 16 fuse box (engine compartment) Maxi fuse (engine compartment) MF1 20A Lighting switch MF2 80A Ignition supply (starter +ve) MF3 40A Ignition supply (ignition controlled +ve) MF4 40A Battery +ve feed to 13-fuse box * According to specification.06-05-2002
  • 95. 13 fuse box 13 fuse box in the passenger compartment To gain access to the passenger compartment fuse box, press the lug on the upper section and pull the flap towards you. PRACTICAL INFORMATION 87 F7 F2 F3 F10 F11 F4 F9 F5 F8 F6 F1 F12 F13 06-05-2002
  • 96. PRACTICAL INFORMATION88 Fuse Rating* Functions* 1 — Not used. 2 25A Heater blower. 3 25A Heated rear screen – air conditioning – pressure switch – heated seats. 4 25A Radio – map reading light. 5 30A Heated rear screen - horn - lighter + heated mirrors. 6 10A Direction indicators / hazard warning lights. 7 10A Engine cooling – electronic immobiliser – coolant temperature control unit – instrument panel – power steering – reversing lights. 8 20A Central locking - electronic immobiliser – interior lighting – boot lighting - coolant temperature control unit - instrument panel - radio - clock. 9 30A Electric windows - hazard warning lights - electric mirrors – brake lights – front and rear wipers - instrument panel. 10 20A Front electric windows. 11 5A Rear fog light + instrument panel lights. 12 5A Left tail-light – front sidelights - instrument panel lighting (rheostat) + headlamp height adjustment. 13 5A Switch lighting – radio panel lighting – number plate lighting – right tail light 13 fuse box (passenger compartment) * According to specification.06-05-2002
  • 97. Battery To charge the battery with a battery charger: – Disconnect the battery starting with the negative (–) terminal. – Follow the instructions for use given by the charger manufacturer. – Re-connect starting with the positive (+) terminal. – Check that the terminals and posts are clean. If they are covered with sulphation (a white or green deposit), undo them and clean them. To start and charge the battery from another battery: Make sure that the connections are correct: - Connect the red cable to the positive (+) terminals of both bat- teries. - Connect one end of the green or black cable to the negative (–) terminal of the auxiliary battery. - Connect the other end of the green or black cable to an earth point on the broken down vehicle as far as possible from the battery. Operate the starter and allow the engine to run. Wait for the engine to return to idle, then disconnect the cables. It is advisable to disconnect the battery if the vehicle is to be out of use for more than one month. PRACTICAL INFORMATION 91 – Do not disconnect the terminals while the engine is running. – Do not recharge batteries without first disconnecting the terminals. – A permanent electrical supply is necessary for operation of the electronic systems. If the battery is disconnected, switch on the ignition and wait 10 seconds before starting. However, if minor disturbances occur following disconnection contact a PEUGEOT dealer. 06-05-2002