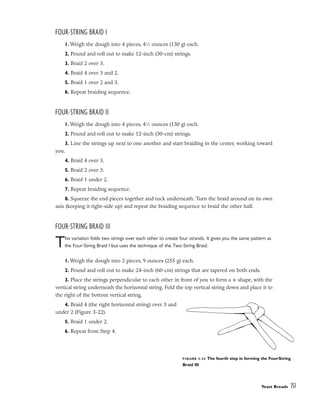
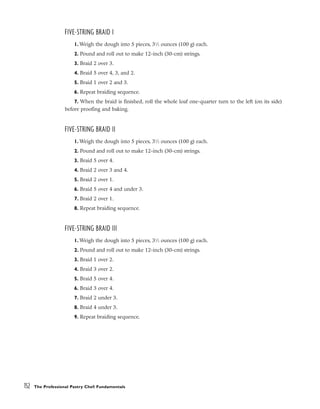
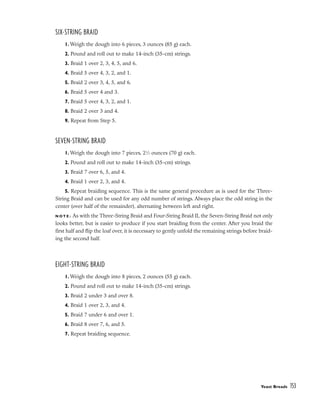
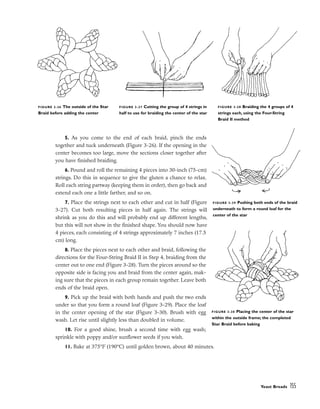
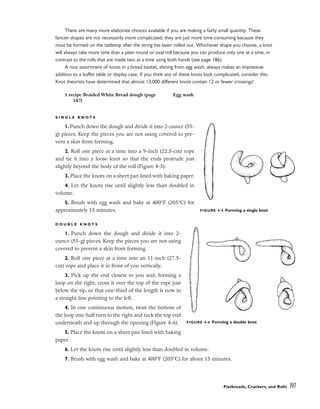
This document provides an overview of the 4th edition of the book "The Professional Pastry Chef" by Bo Friberg. Some key details include:
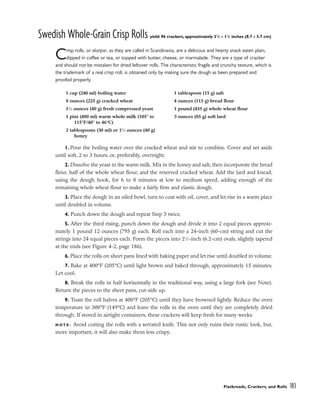
- The 4th edition has been expanded and revised with new recipes, illustrations, templates, and color photos to reflect the latest industry trends.
- Appendices on ingredients, equipment, and weights/measures have been greatly expanded.
- The book is designed to provide practical, workable recipes for both students and professional pastry chefs.
- Teaching methods and the importance of engaging students visually and through multiple senses is discussed.


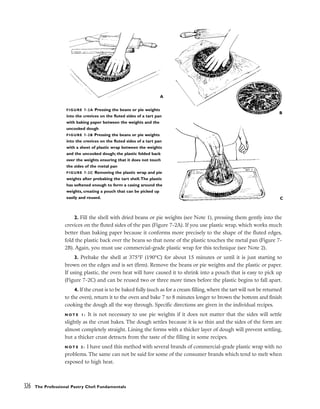
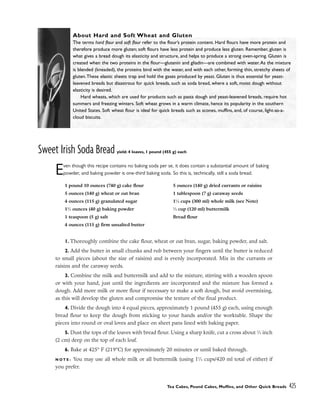
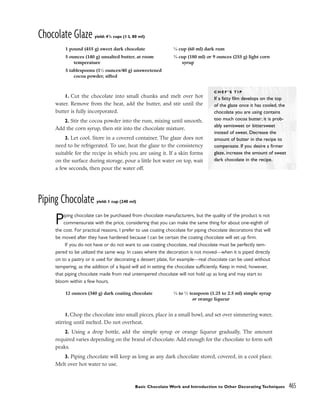
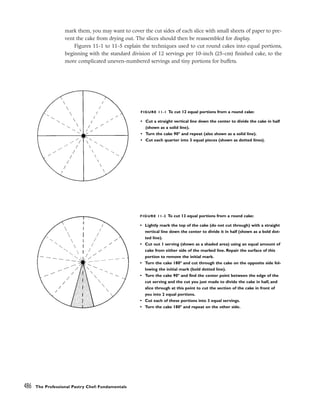
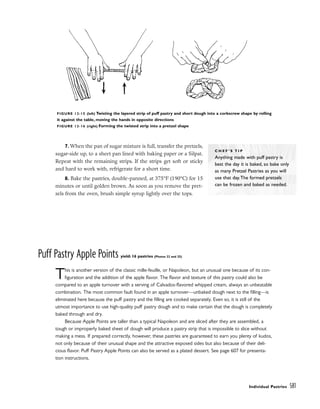
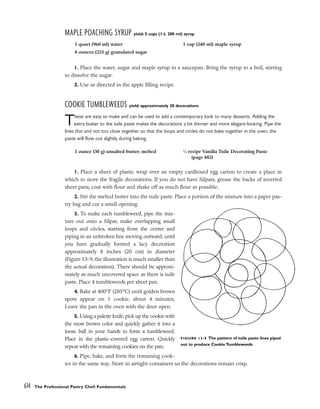
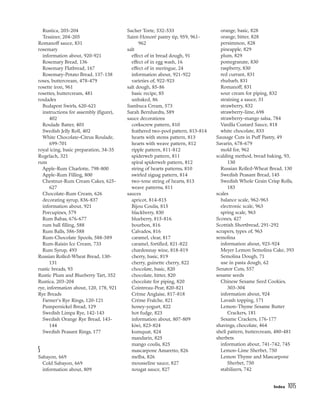
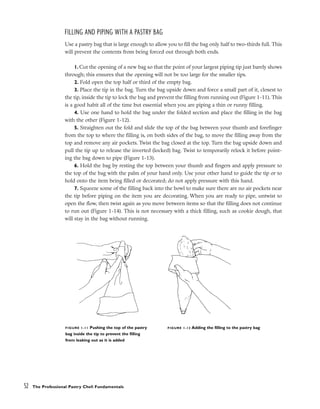
![This is done to facilitate spreading the batter evenly without the sides of the sheet pan get-
ting in the way, as the standard industry sheet pans in the United States have 1-inch (2.5-
cm) sides. Readers throughout Europe and in other countries where regular sheet pans con-
tain raised sides only on the short ends may eliminate this step.
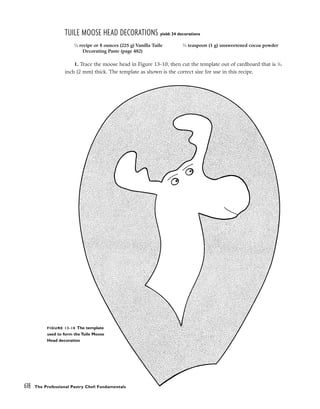
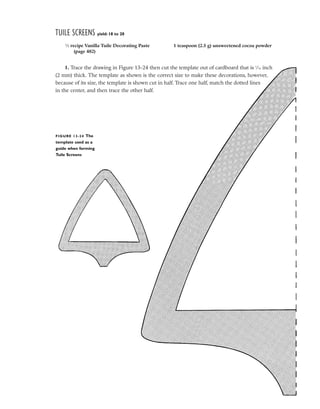
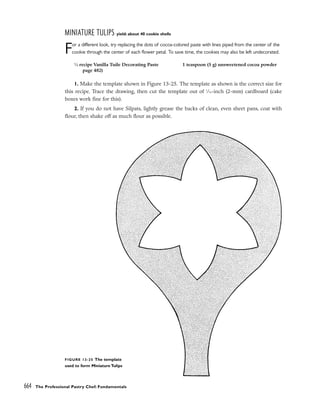
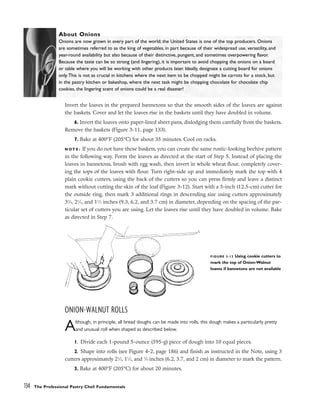
■ Some recipes in this text include instructions for making templates. Thin cardboard is one
possibility because it is readily available and easy to work with; however, plain cardboard
templates are intended for one-time use only. (A simple method to extend the life of a tem-
plate is to spray or brush 2 or 3 layers of food-grade lacquer on both sides, so the template
can be cleaned and reused.) A sturdier and more practical template can be made from 1
⁄16-
inch (2-mm) plastic. These take a bit more effort to construct, but they can be used over and
over. I prefer the laminated type of plastic (the type often used to cover office files or docu-
ments) since it will lie perfectly flat and will not tear, but polyurethane sheets also work well.
■ Any recipe in this book can be scaled up or down in direct proportions as long as it is not
multiplied or divided by any number greater than four. In calculating ingredients that do not
divide straight across, e.g. to divide in half a recipe calling for 3 eggs or 11
⁄3 cups of a liquid,
round the number up (using 2 eggs or 51
⁄2 ounces of liquid for the examples given).
■ When a weight yield is given for baked goods (for example, four 1-pound, 4-ounce [570 g]
loaves), it relates to the product before being baked. As a general rule, ten percent of the
weight is lost in steam during the baking process of any item. When a large amount of liquid
is part of the ingredients (such as for bread), up to 2 ounces (55 g) for every pound (455 g) of
dough will expire.
■ A properly calibrated thermometer is of great importance for both safe food handling and
to obtain desired results whenever the exact temperature of the ingredients determines the
outcome. Refer to page 967 for instructions on how to calibrate a thermometer.
■ The ingredients and equipment used to produce these recipes are discussed in detail in the
appendixes and the recipe introductions, sidebars, and chef’s tips. These sections contain a
tremendous amount of information, and I strongly urge readers to thoroughly familiarize
themselves with the products used to make a particular item, not simply for the sake of
curiosity, but to ensure the best possible result in the safest manner.
■ When white flour is used in recipes in this book, cake flour, bread flour, or high-gluten flour
is specified. All-purpose flour, pastry flour, and the dozens of other specialty white flours are
not used. Many recipes combine cake flour and bread flour to create the desired protein
content. If you do not have cake flour or bread flour, all-purpose flour may be substituted
with a good result in most cases. When high-gluten flour is unavailable, bread flour may be
used instead. The protein content of cake flour is generally around 7 percent. Bread flour
has a protein content of approximately 12 percent, and high-gluten flour about 14 percent.
When cake flour and bread flour are combined in equal amounts, they essentially create all-
purpose flour, which has a protein content of approximately 9 to 10 percent. All of these
protein percentages vary depending on the manufacturer.
Introduction xvii](https://image.slidesharecdn.com/pasrtychefbofriberg-230126181648-7030731a/85/pasrty-chef-Bo-Friberg-pdf-19-320.jpg)
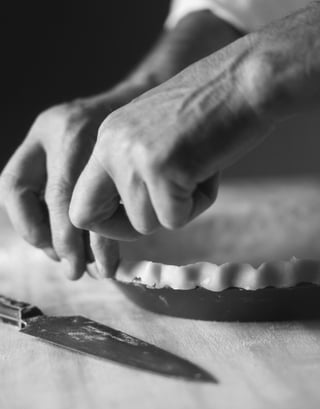


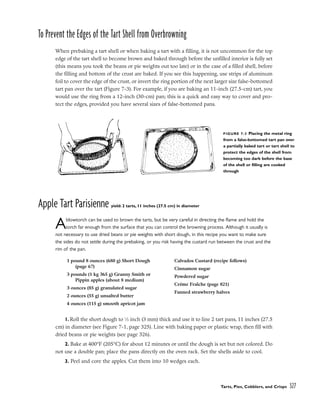
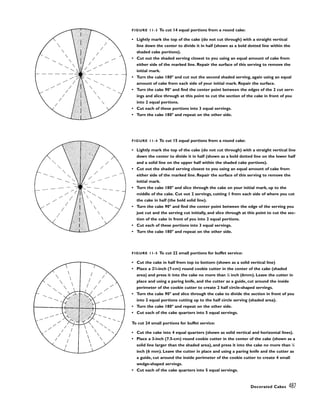
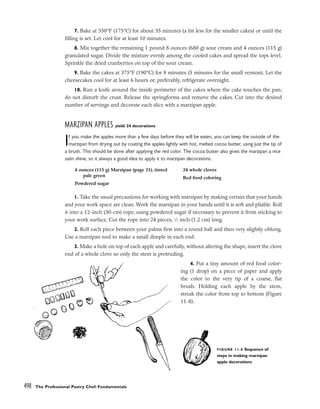
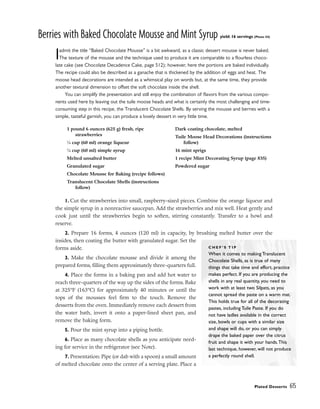
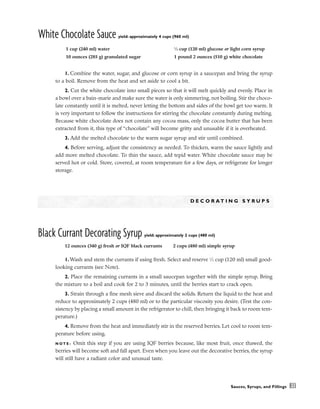
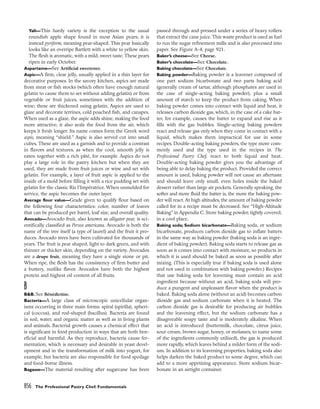
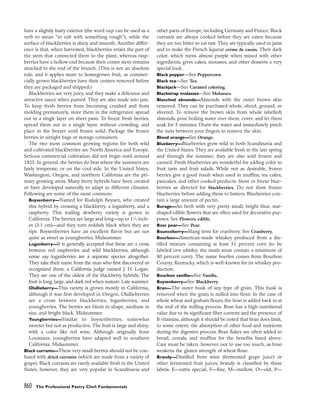
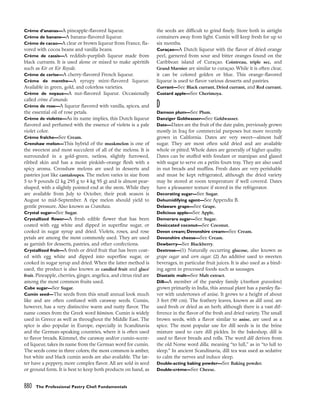
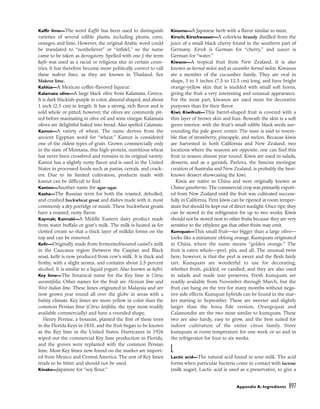
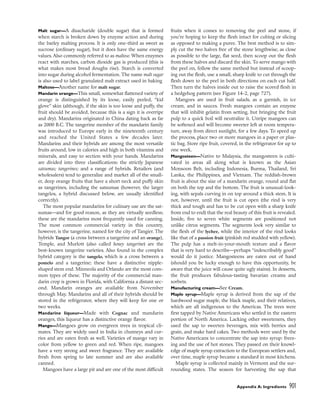
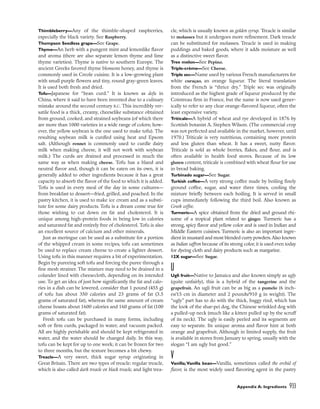
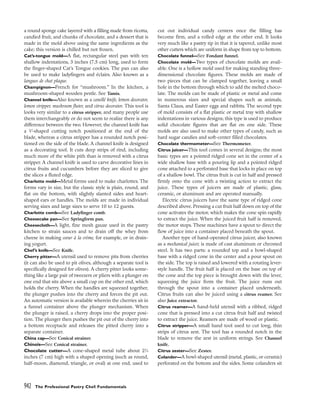
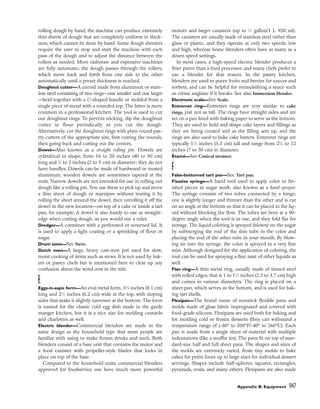
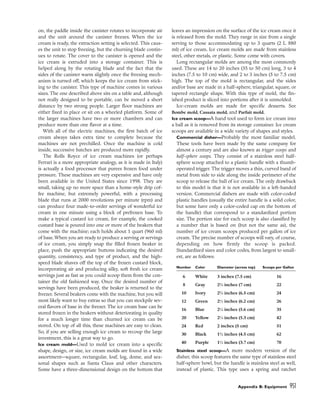
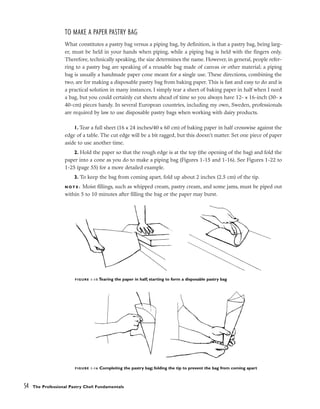
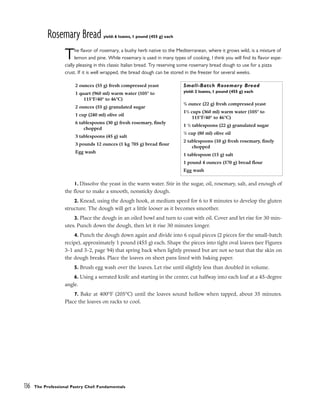
![Marzipan yield: approximately 4 pounds 6 ounces (1 kg 990 g)
Marzipan is used extensively in European pastry shops. It will keep almost indefinitely if you take
proper care in mixing and handling it. It should be stored in airtight containers in a very cool place
or in the refrigerator. It can also be stored in the freezer, should you need to keep it for a long time. If the
oil separates from the marzipan after it thaws, add a small amount of water and some powdered sugar.
Continue to knead until smooth and elastic.
1. In a stainless steel mixing bowl, use the hook attachment to mix the almond paste with
the glucose or corn syrup at low speed until combined.
2. Start adding the sugar, scraping the sides of the bowl down as necessary. Add enough of
the powdered sugar to make a fairly firm yet malleable dough.
3. Store the marzipan, wrapped in plastic, inside an airtight container in a cold place.
N O T E : The amount of powdered sugar needed depends on the consistency of the almond paste.
Always mix at low speed and take care not to overmix. The friction will make the marzipan
warm, thereby softening it, and you will end up adding too much powdered sugar.
Mise en Place 21
2 pounds (910 g) almond paste
1
⁄2 cup (120 ml) glucose or light corn syrup
2 pounds (910 g) sifted powdered sugar
All About Marzipan
Due to its high sugar content (60 to 70 percent), marzipan dries quickly when exposed to air and should be
kept covered at all times. If it dries reconstitute by kneading in a little water. Use a stainless steel bowl to pre-
vent discoloration. Keep your tools and workplace scrupulously clean, and always wash your hands.The
almond oil brought to the surface will absorb even a small trace of dirt, which not only ruins the off-white
color of the marzipan, but can lead to spoilage.
Marzipan is rolled out in the same manner as pastry dough, except powdered sugar is used instead of
flour to prevent the paste from sticking. It can be left smooth or may be textured before being used to cover
cakes, petits fours, and pastries. It is an ideal surface to decorate and pipe on. It is also used on petits fours
and pastries that are to be coated with fondant or chocolate; the marzipan keeps the coating from soaking
into the sponge and helps achieve an even surface.A thin layer of marzipan on a bûche de Noël or chocolate
cake prevents the thin layer of chocolate coating from mixing with the buttercream. Not only does the marzi-
pan make a smooth finish possible, but the combination of chocolate and marzipan also gives the pastry a dis-
tinctive flavor.With few exceptions, marzipan should not be rolled out thicker than 1
⁄8 inch (3 mm), or it can
look clumsy and unattractive and may be overwhelming in flavor.
Water-soluble food coloring can be used to tint marzipan, but add it with discretion to keep the colors
soft. Green (such as for Princess Cake [page 530]) should usually be toned down with the addition of yellow.
When adding color to a small amount of marzipan, or when you need only a hint of color, put a drop on a
piece of baking paper and add some of it to the marzipan with the tip of a knife. Knead the marzipan until the
color is completely worked in. Unsweetened cocoa powder can be used to produce brown in various shades,
unless for some reason you do not want the chocolate flavor.Work the desired amount of cocoa powder into
the marzipan, kneading it until you have a smooth, evenly colored marzipan. If you are adding a large amount of
cocoa powder, you may have to compensate by working in some simple syrup or water to prevent the marzi-
pan from getting too dry.To color marzipan bright white for decoration only, use 4 to 6 drops titanium diox-
ide for every 1 ounce (30 g) untinted marzipan.This should be done only for pieces that will not be eaten.](https://image.slidesharecdn.com/pasrtychefbofriberg-230126181648-7030731a/85/pasrty-chef-Bo-Friberg-pdf-41-320.jpg)
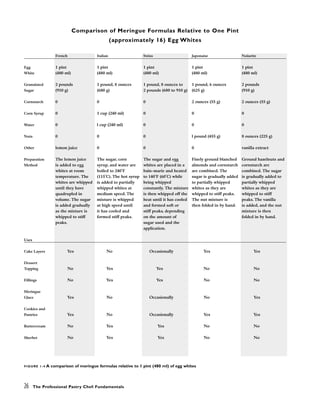
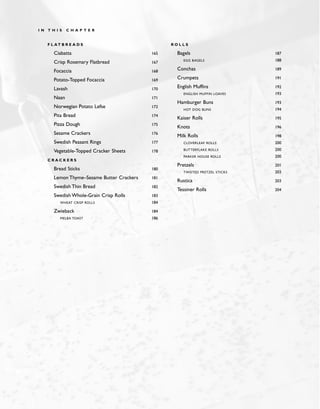
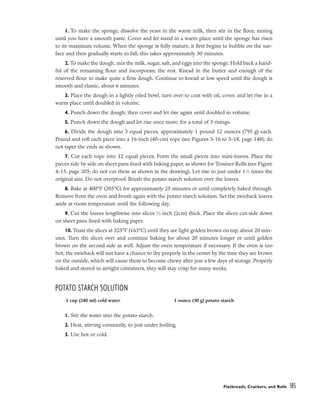
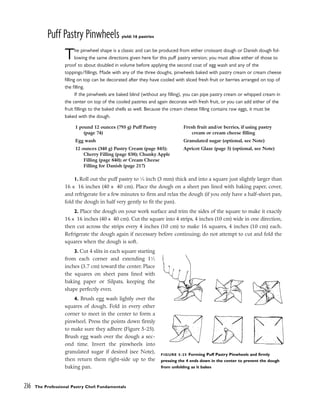
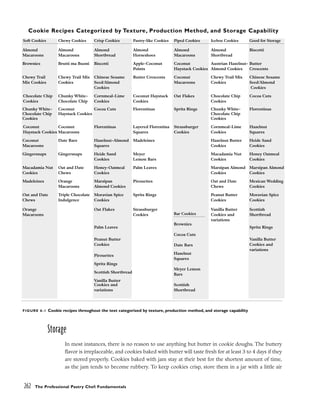
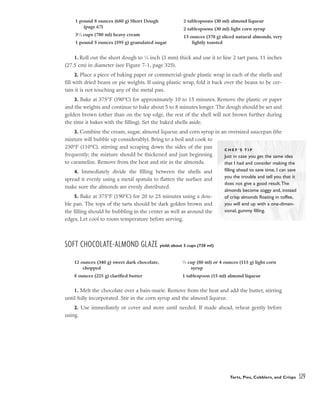
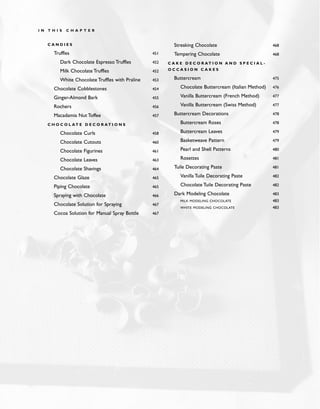
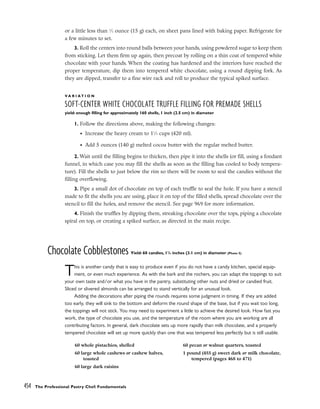
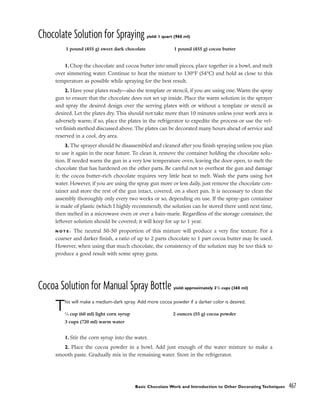
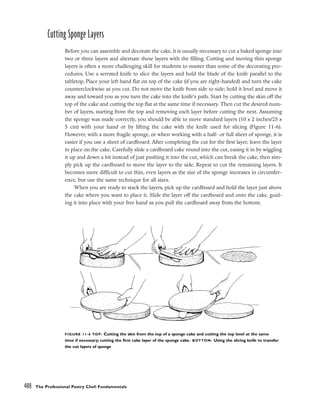
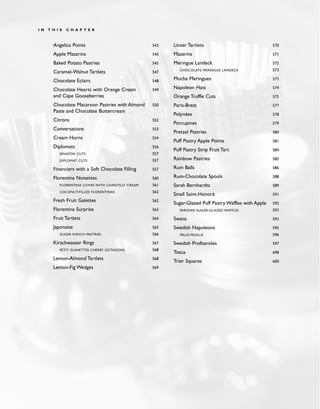
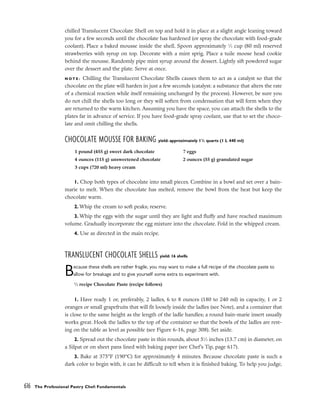
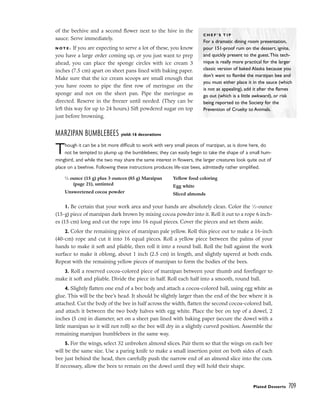
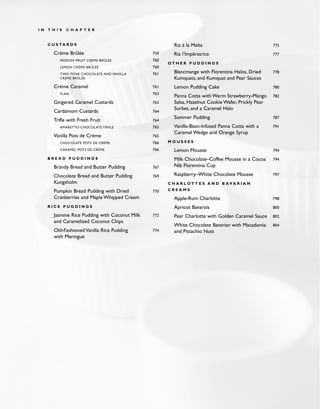
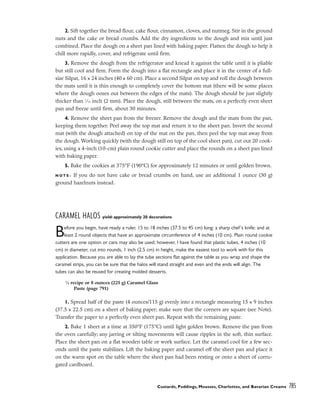
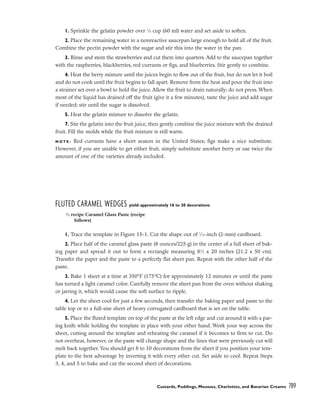
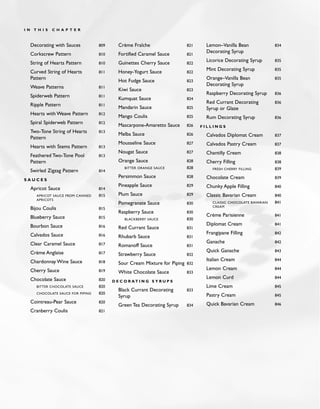
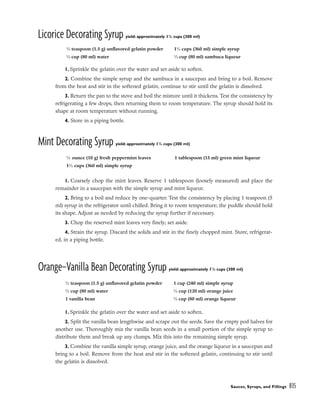
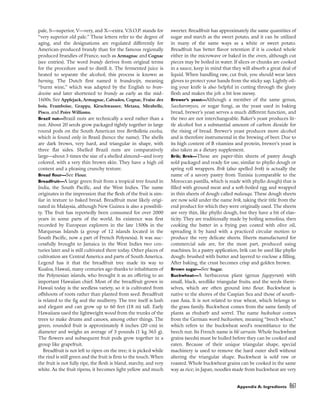
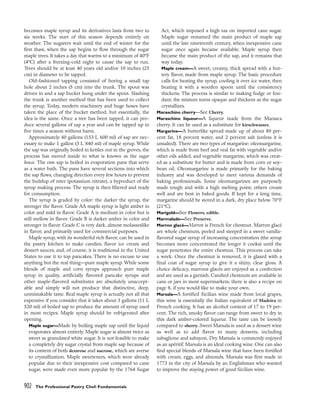
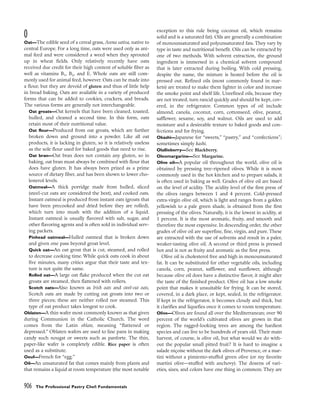
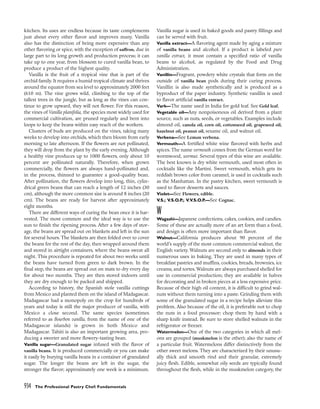
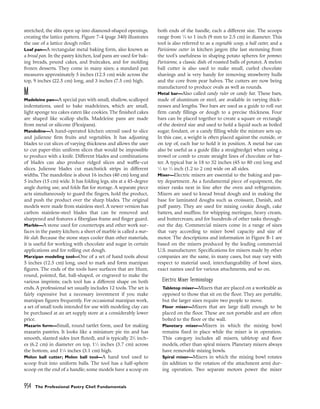
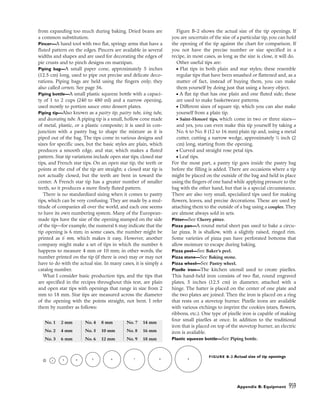
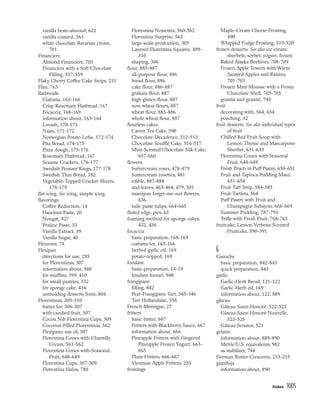
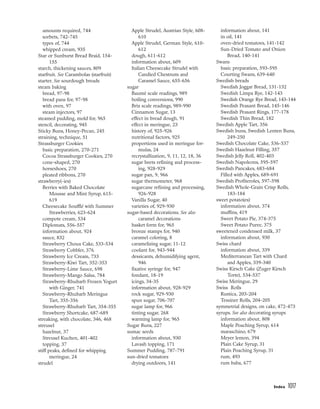
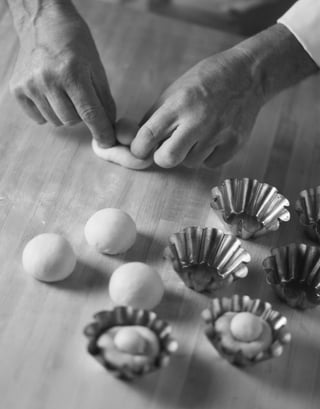
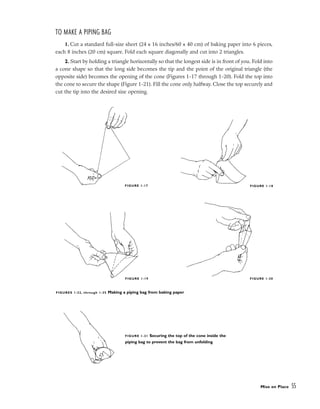
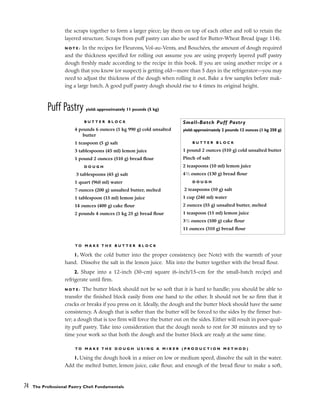
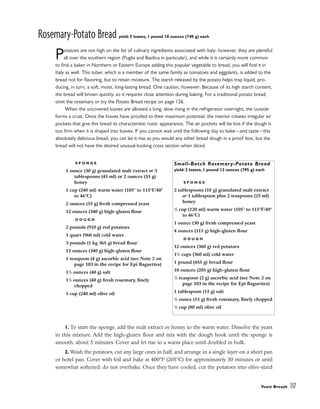
![Meringue Noisette
yield: 4 shells, 10 inches (25 cm) in diameter, or about 60 shells, 3 inches (7.5 cm) in diameter
1. Draw 4 circles, 10 inches (25 cm) in diameter, on 2 sheets of baking paper. Place the
papers upside down on sheet pans and set aside.
2. Remove as much skin from the toasted hazelnuts as comes off
easily, then grind the nuts to a fine consistency. Combine with the corn-
starch.
3. Whip the egg whites to a thick foam; they should quadruple in
volume. Still whipping, gradually add the sugar, taking 3 to 4 minutes to
add all of it. Continue to whip the meringue until it forms stiff peaks.
Add the vanilla. Gently fold the nut and cornstarch mixture into the
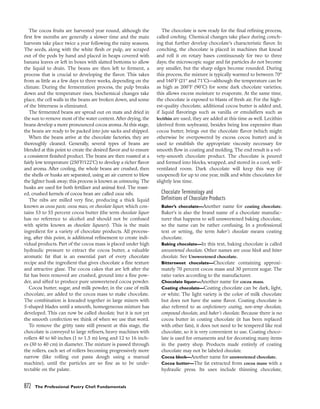
meringue by hand.
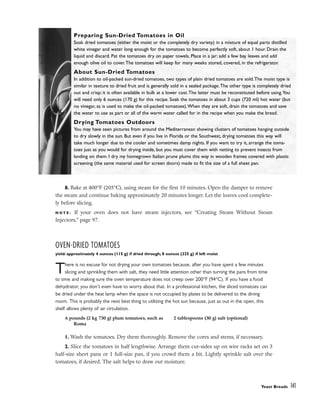
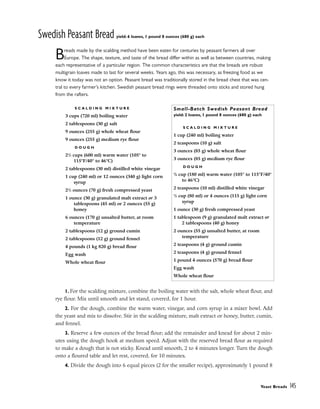
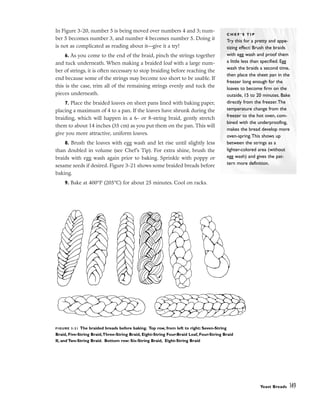
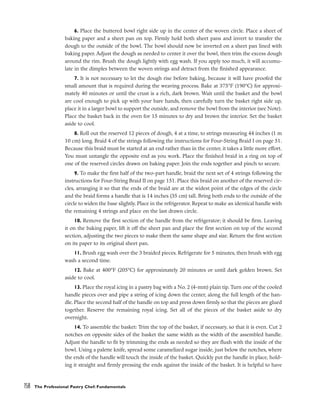
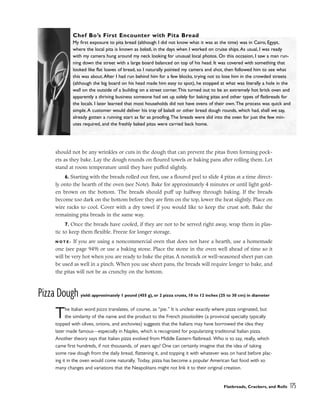
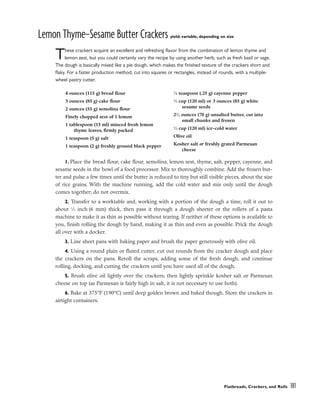
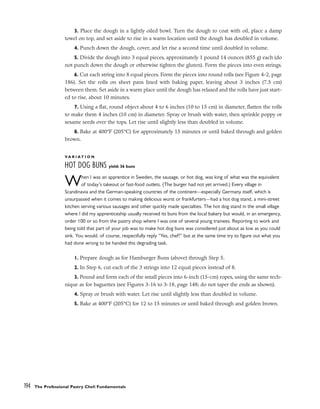
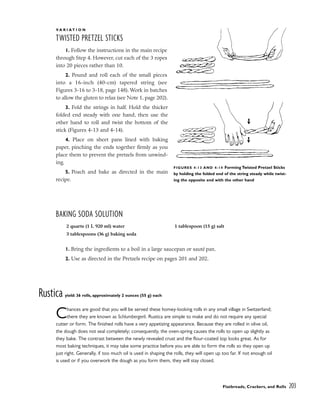
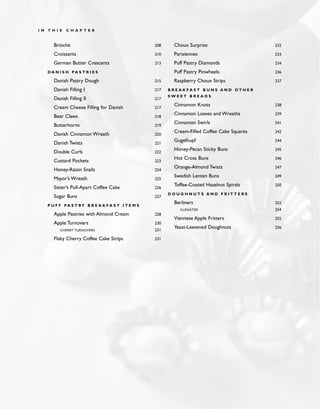
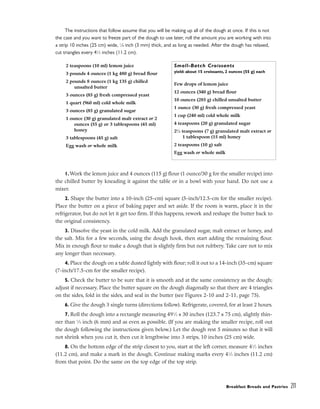
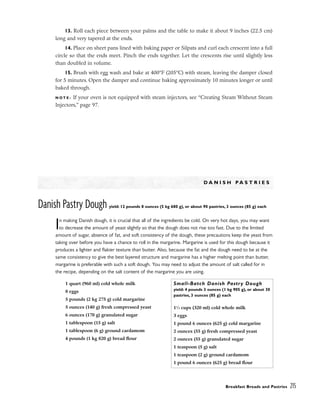
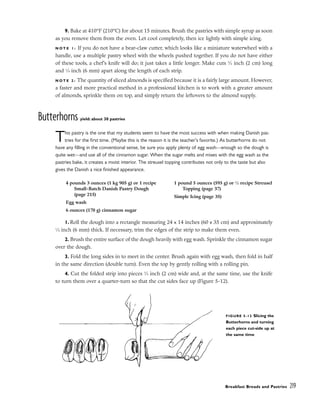
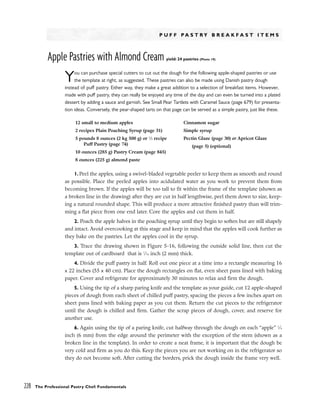
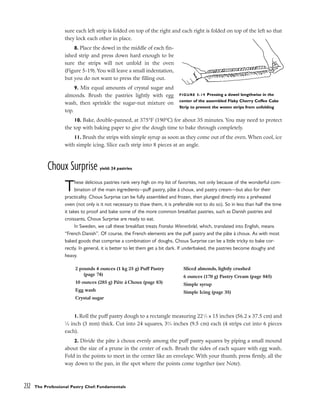
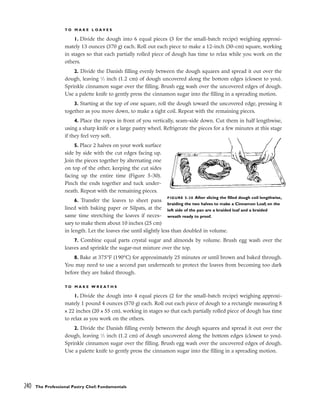
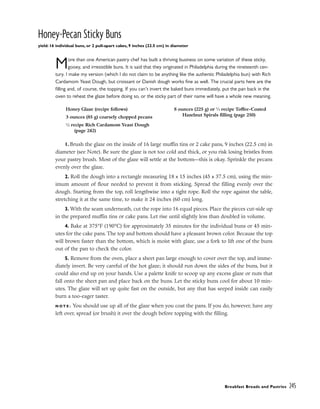
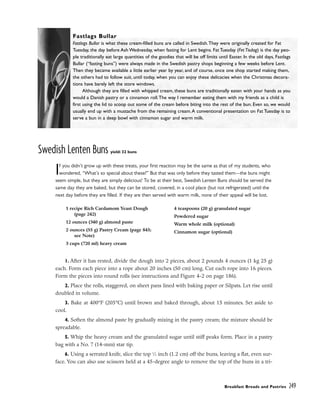
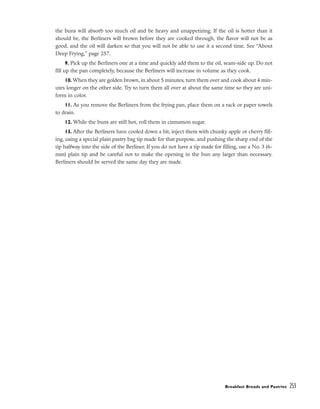
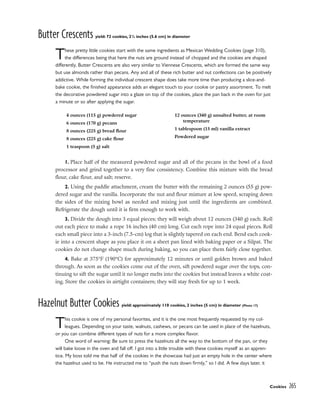
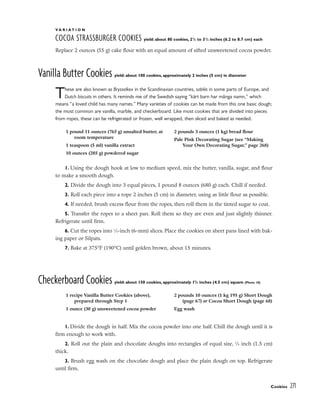
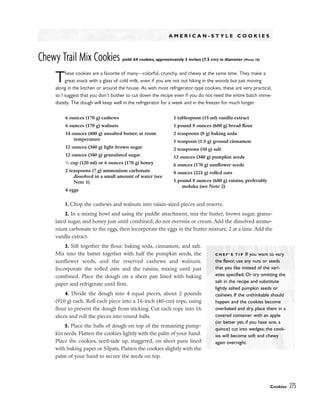
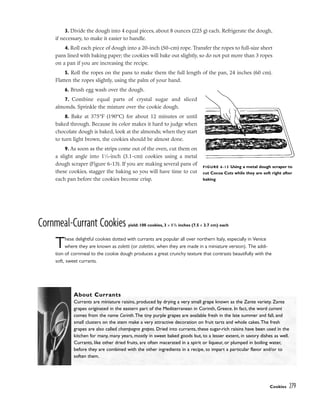
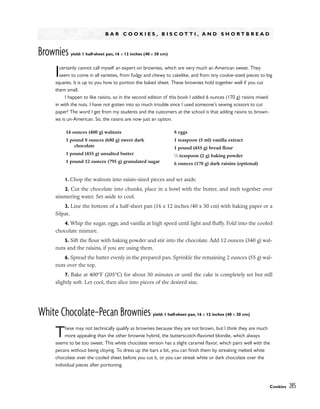
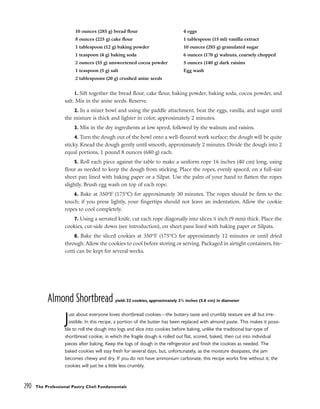
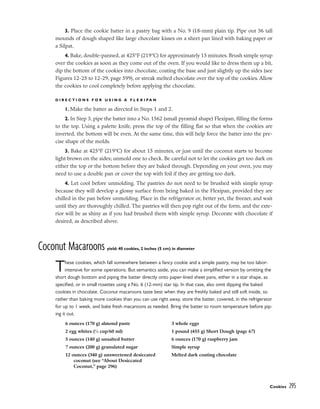
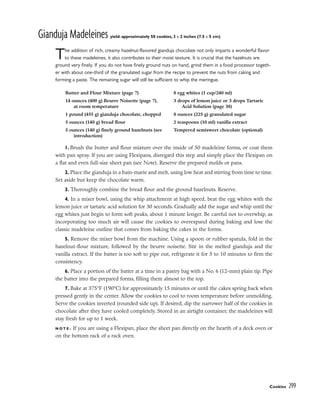
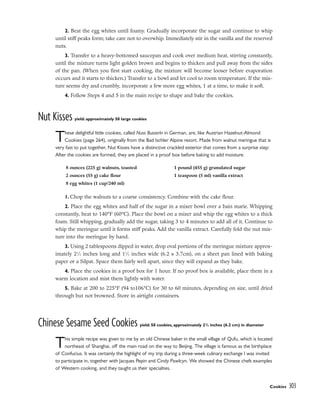
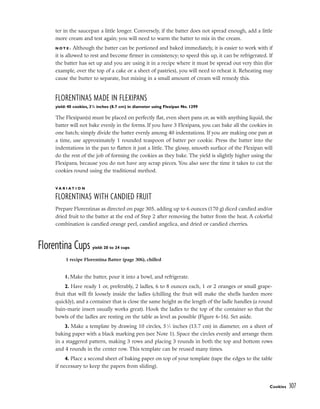
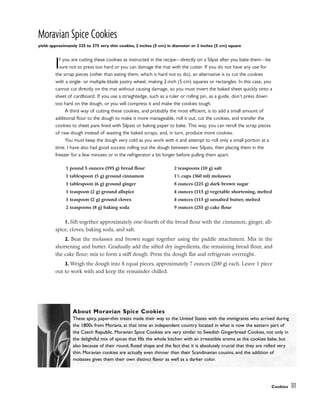
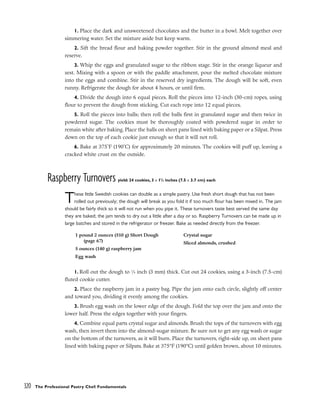
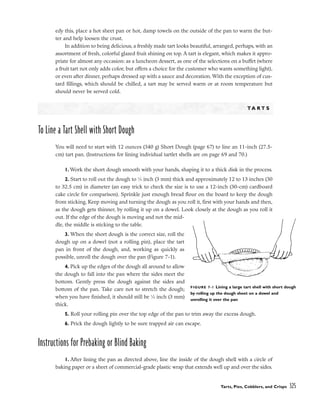
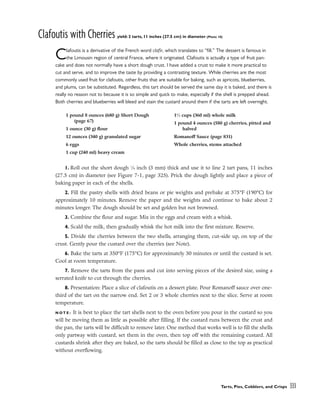
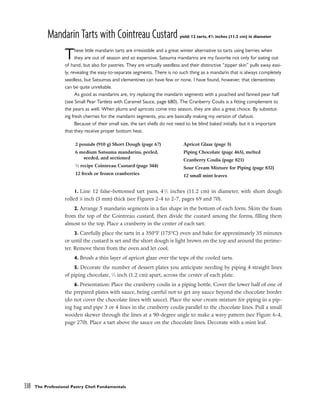
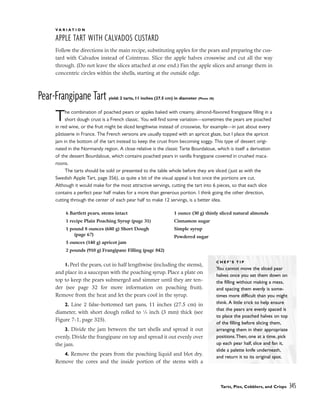
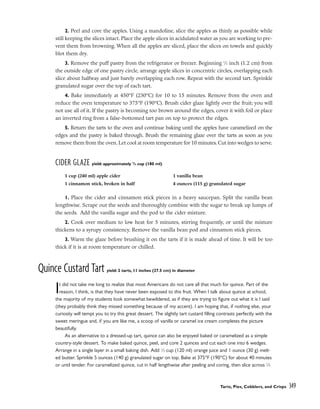
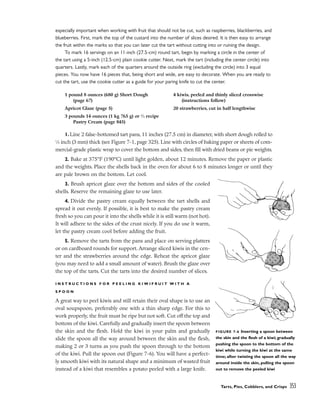
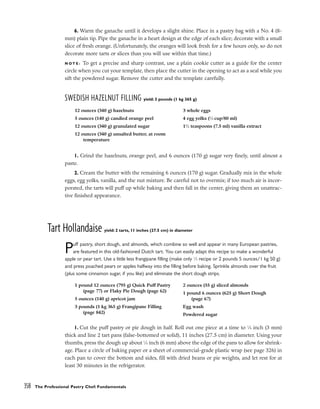
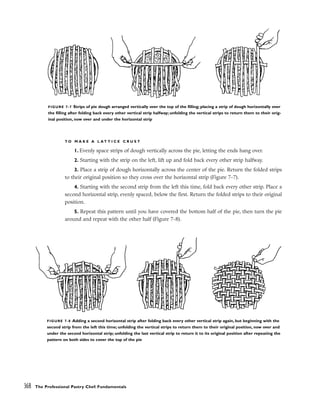
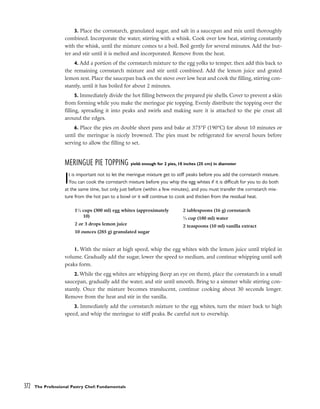
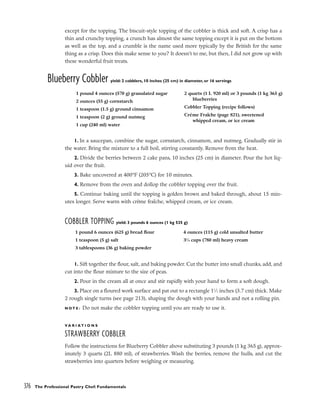
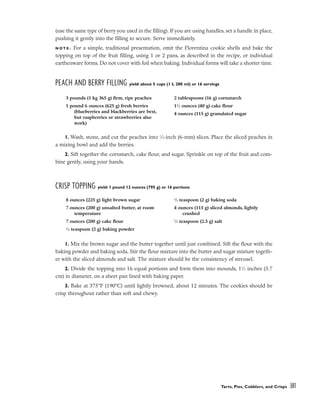
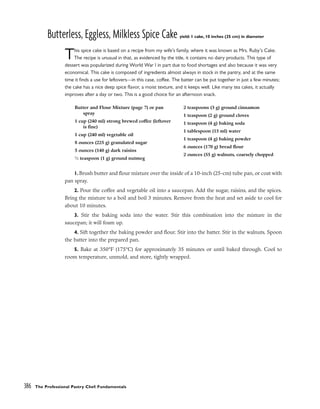
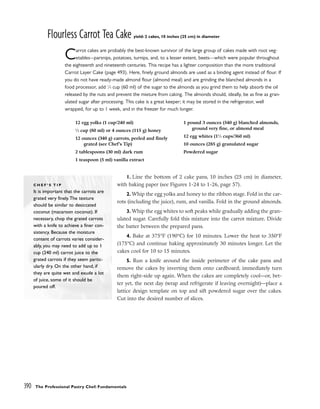
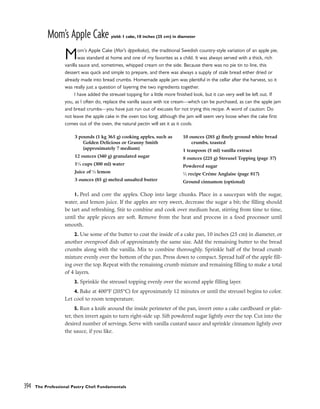
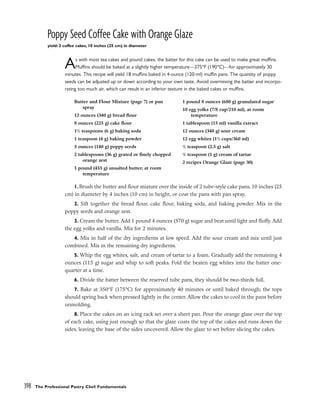
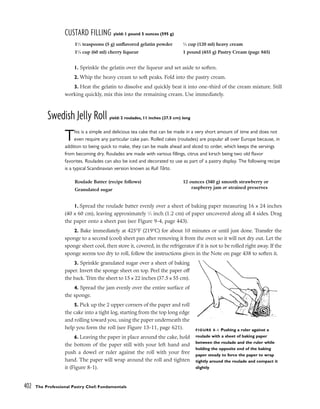
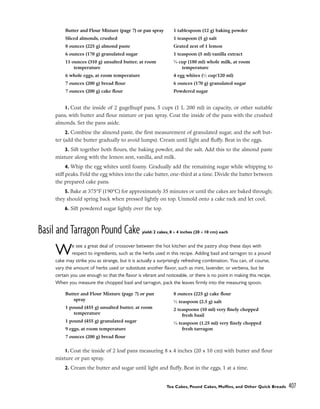
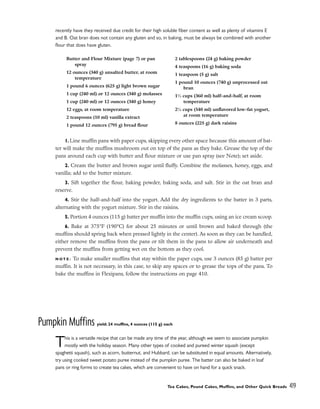
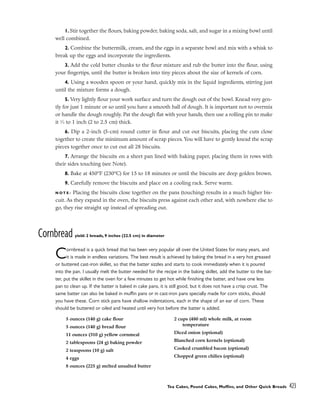
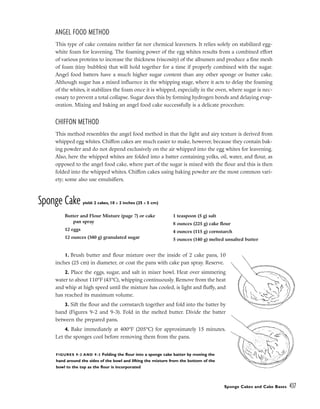
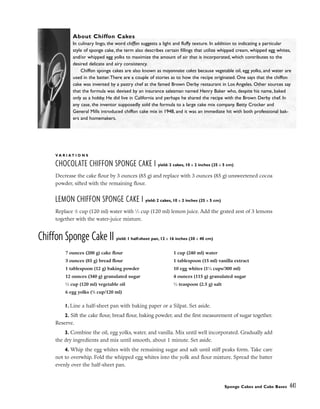
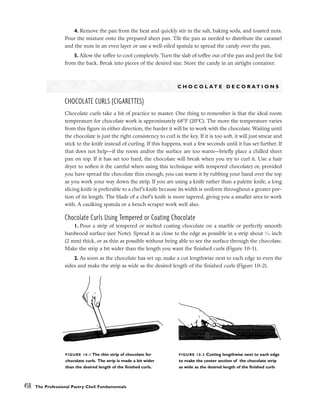
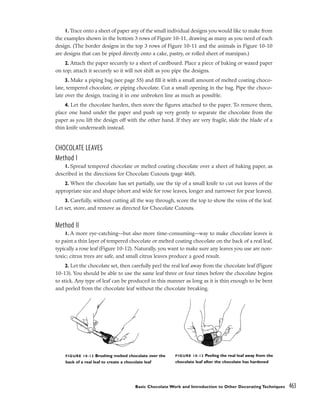
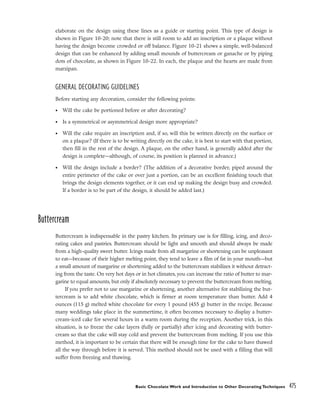
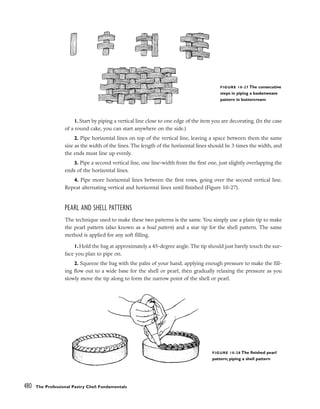
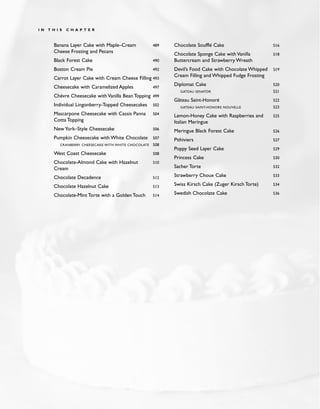
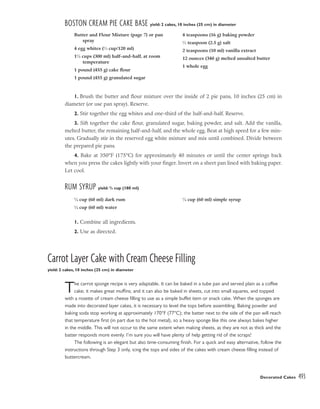
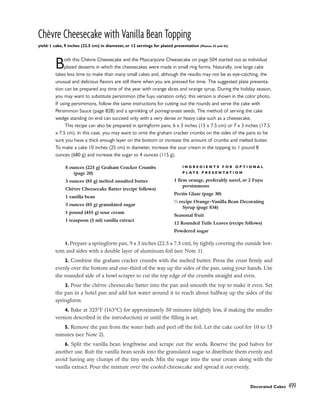
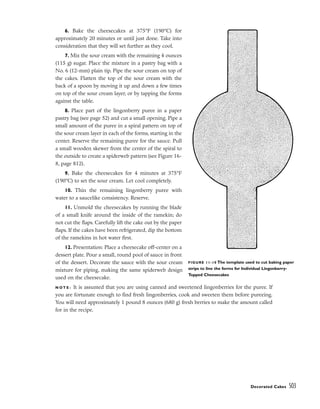
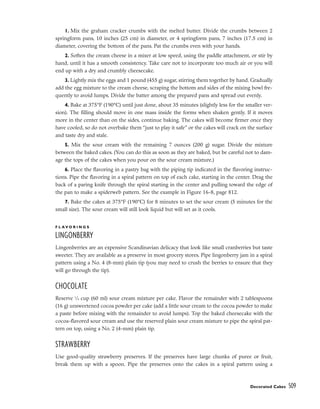
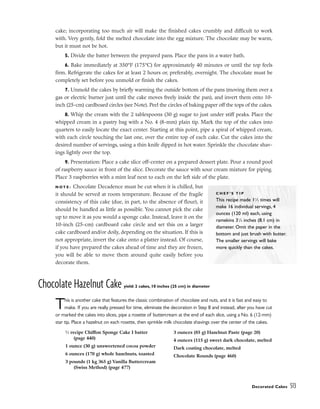
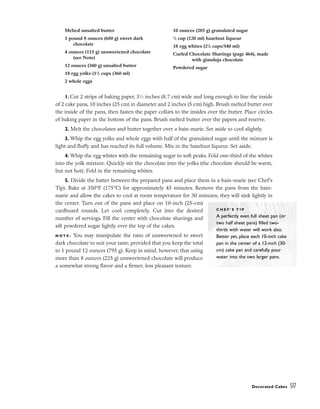
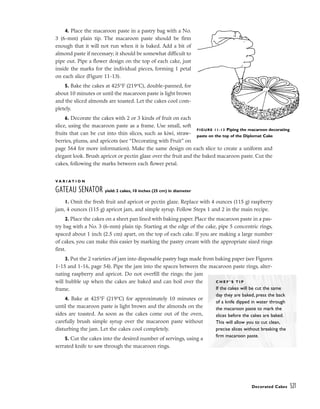
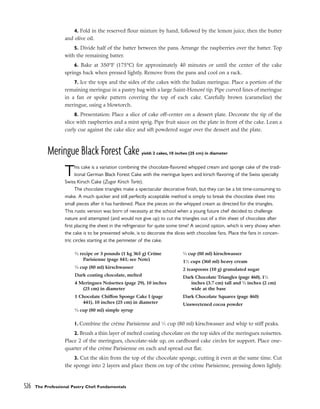
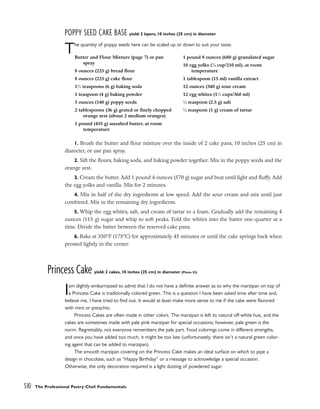
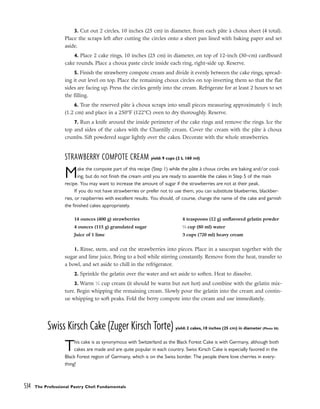
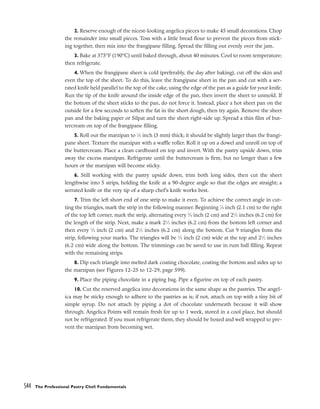
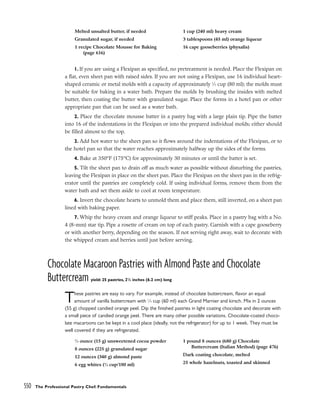
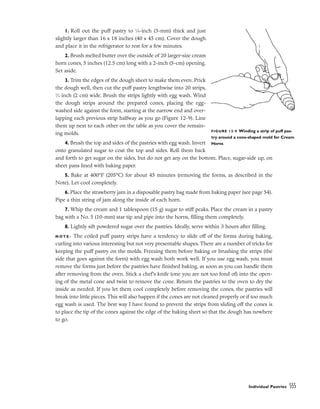
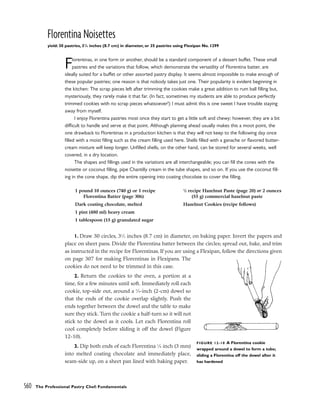
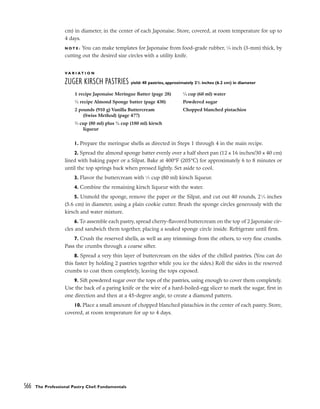
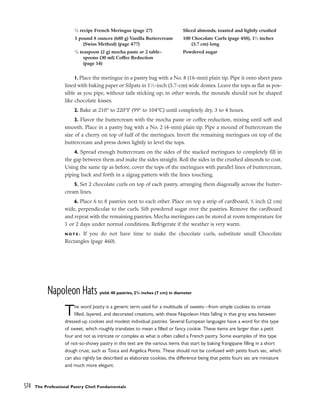
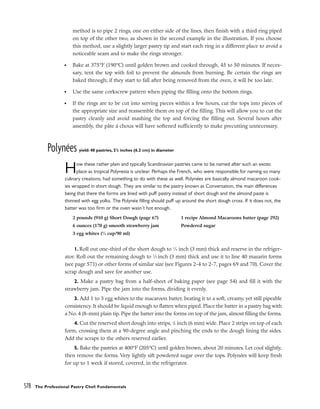
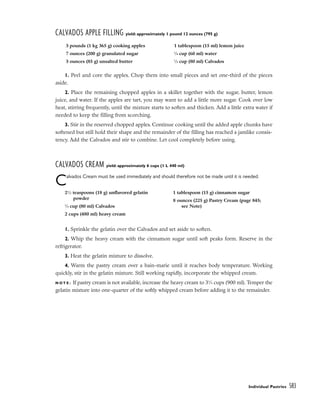
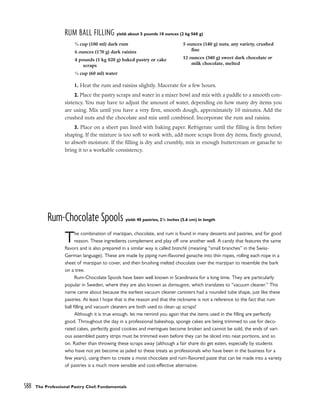
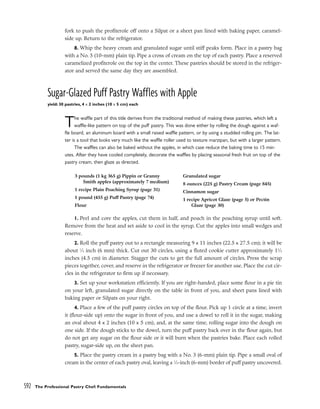
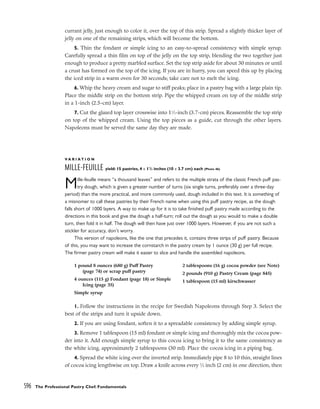
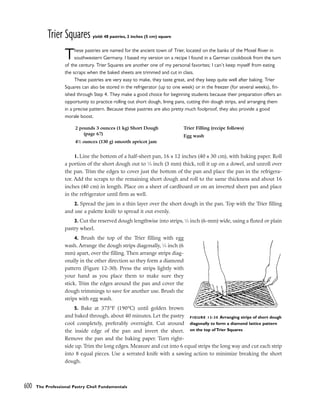
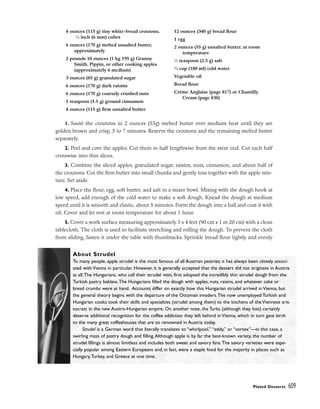
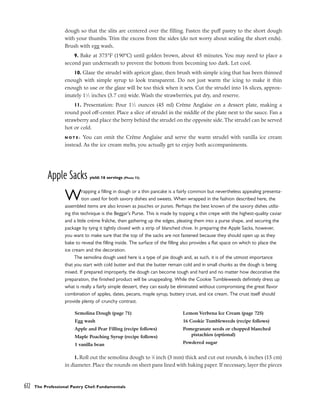
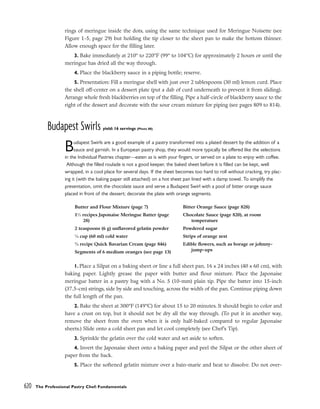
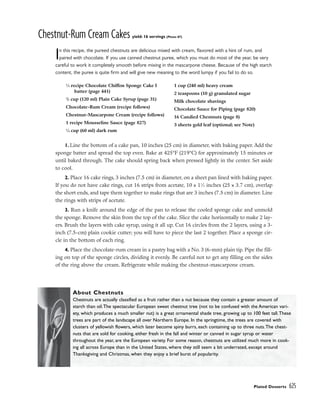
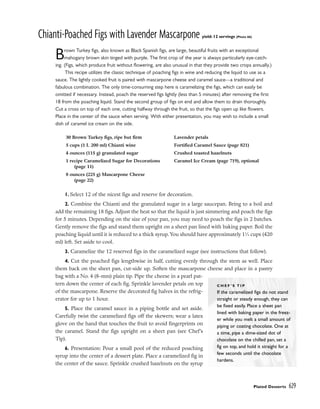
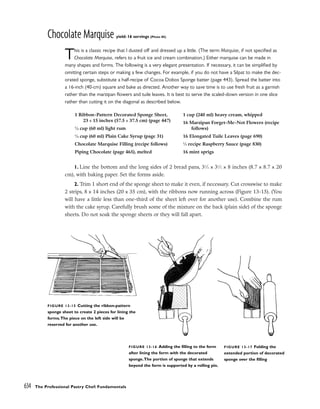
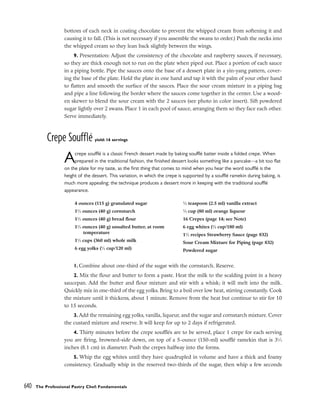
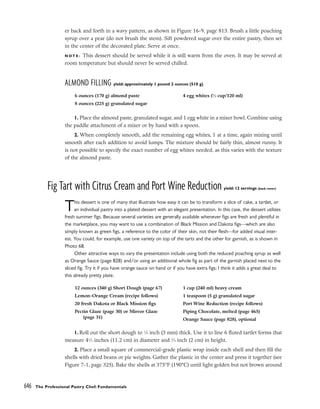
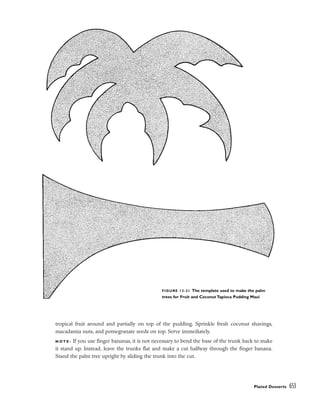
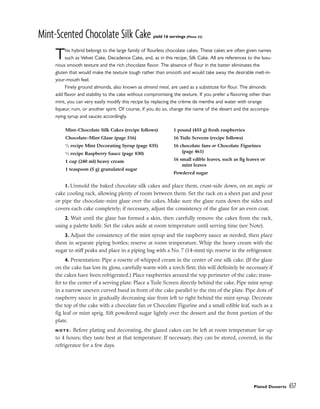
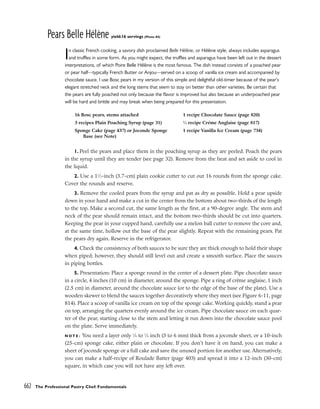
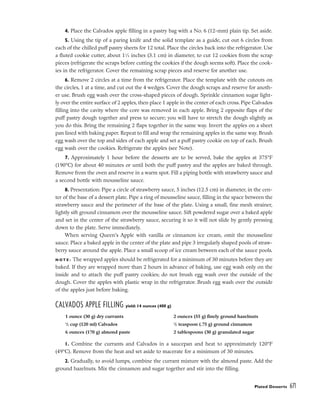
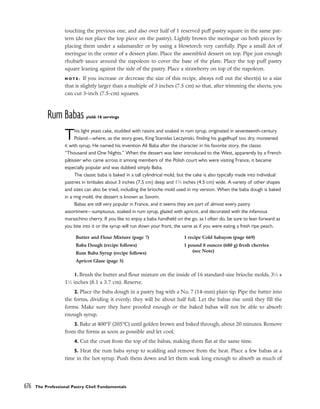
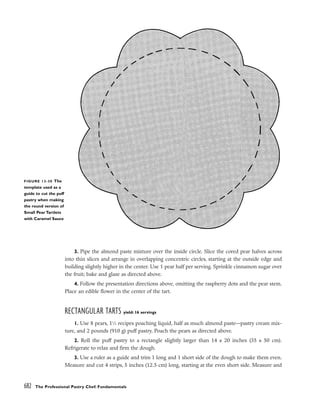
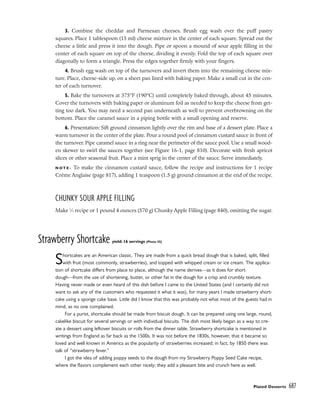
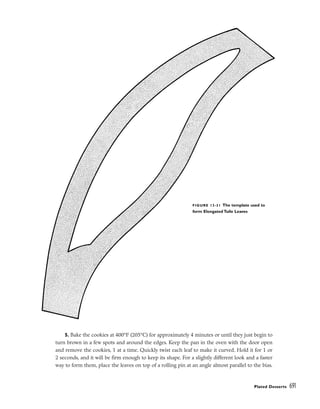
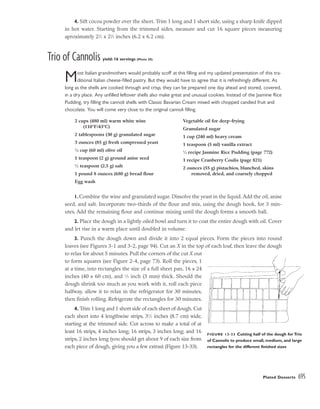
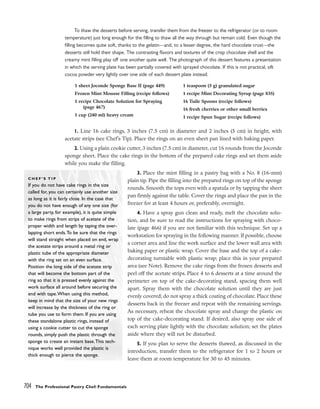
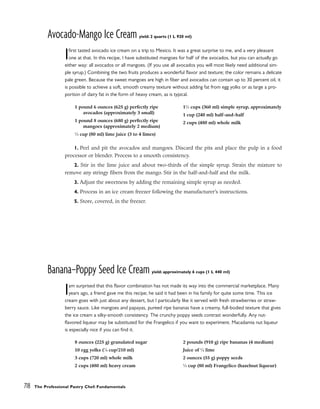
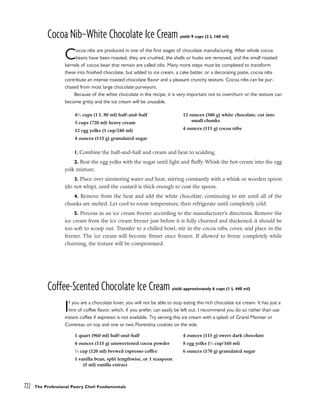
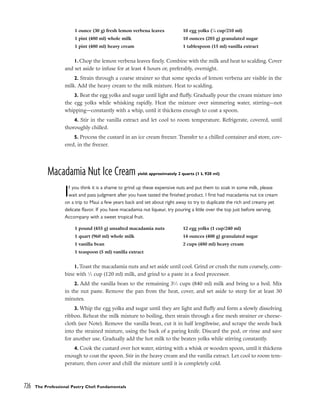
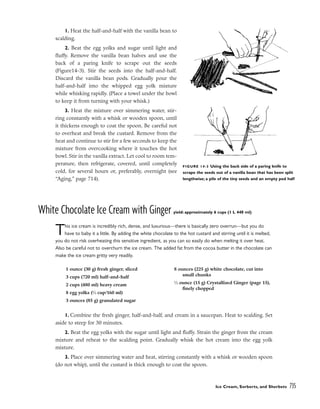
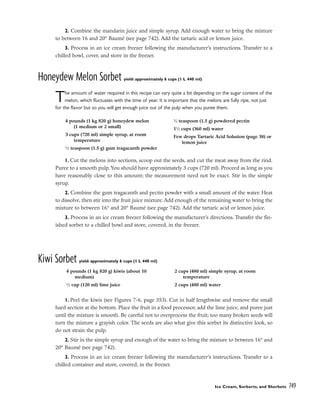
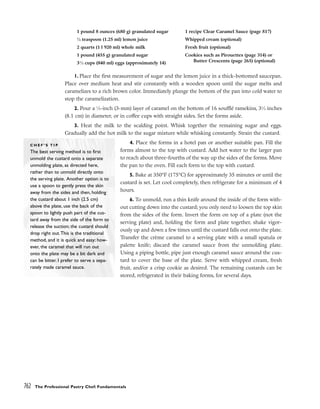
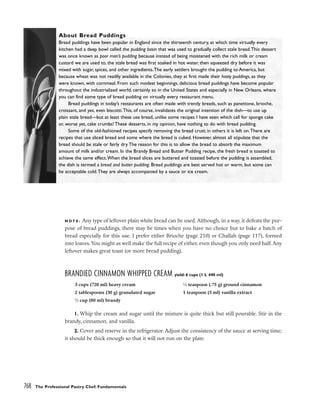
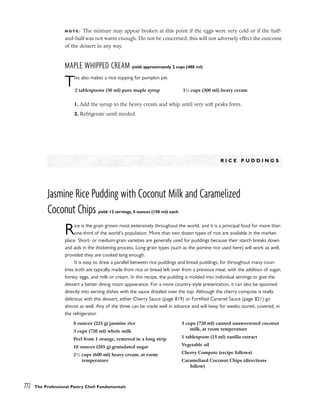
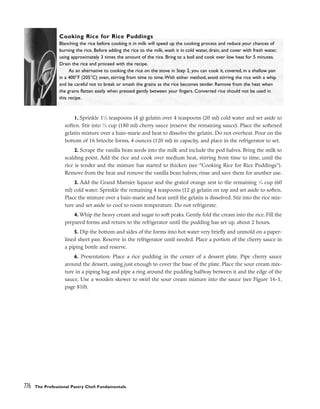
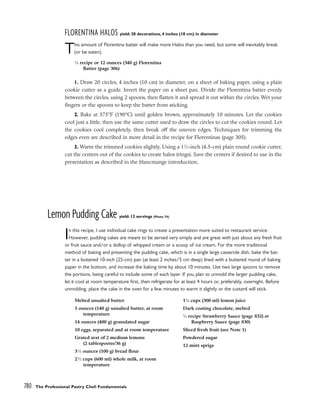
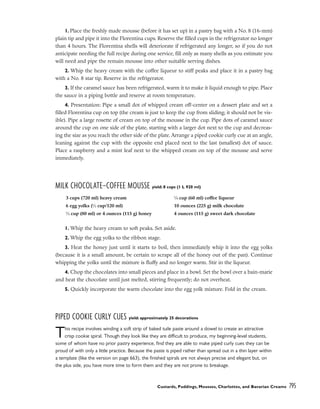
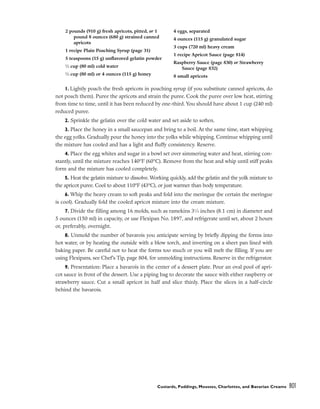
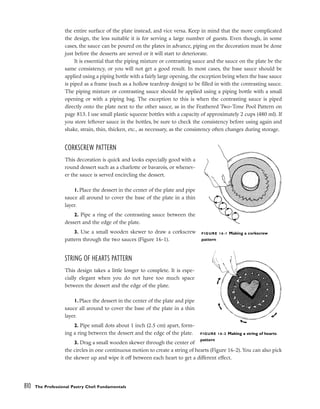
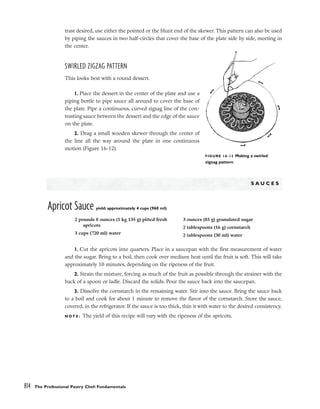
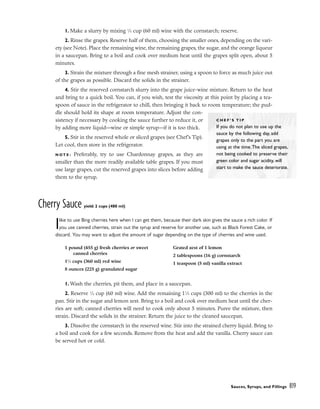
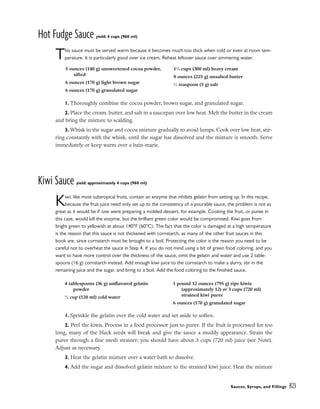
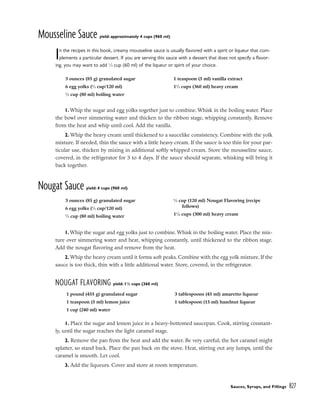
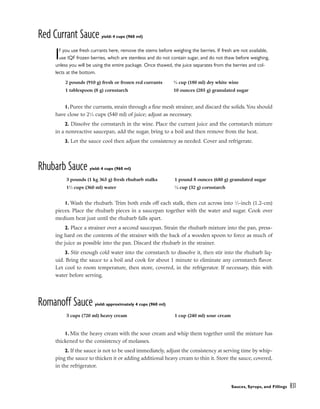
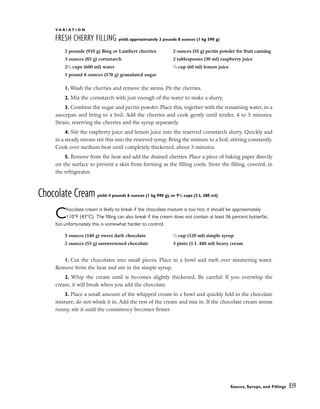
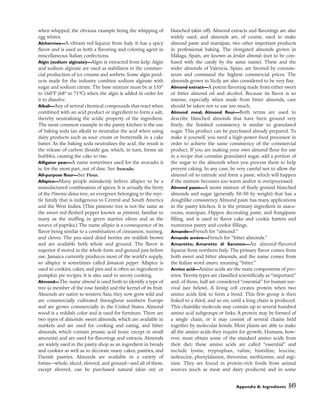
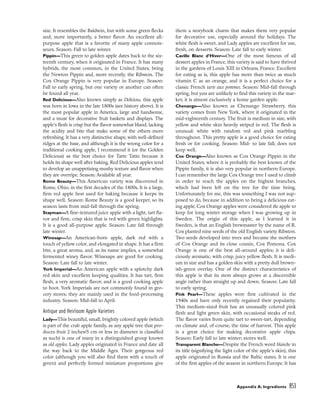
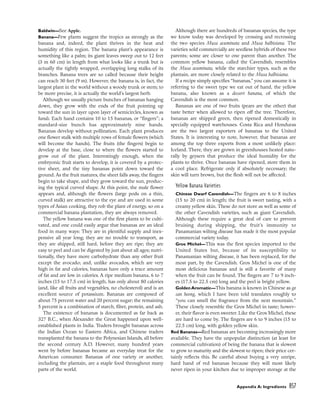
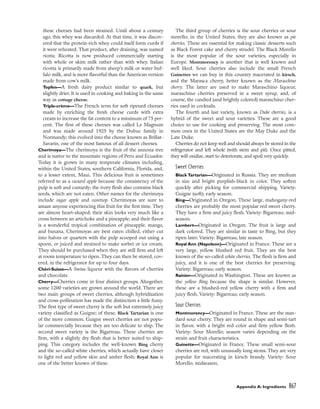
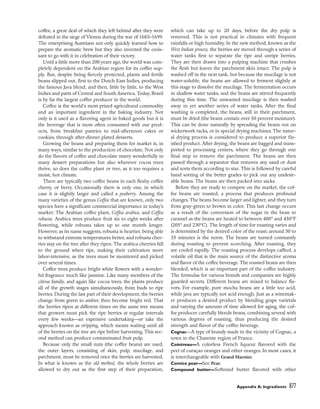
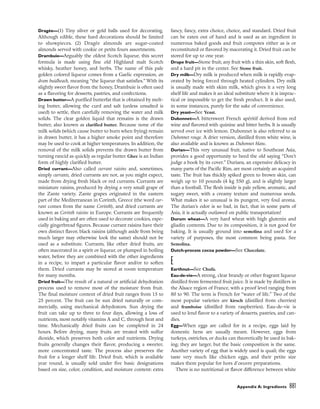
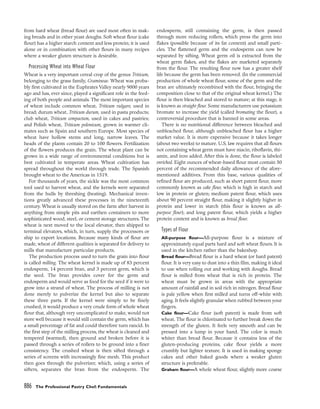
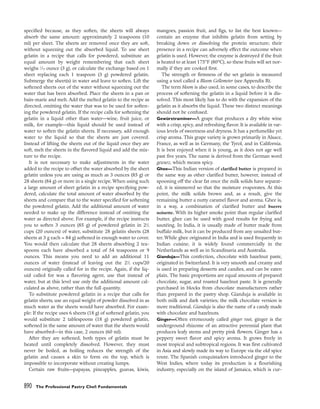
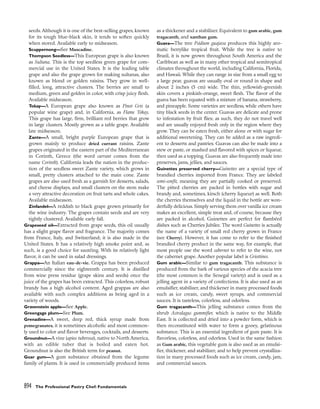
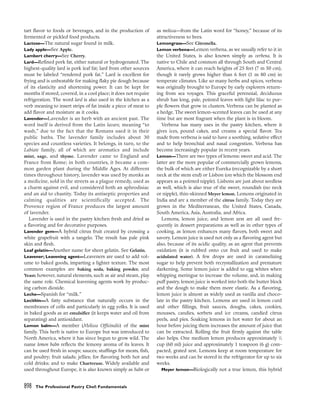
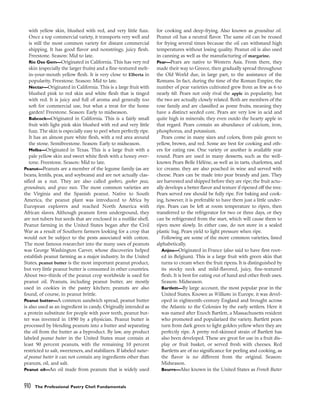
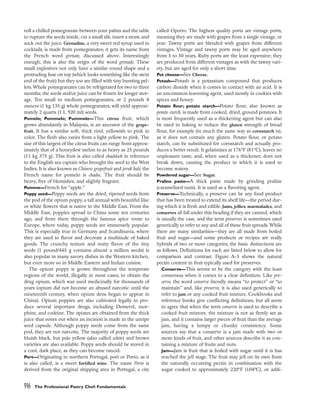
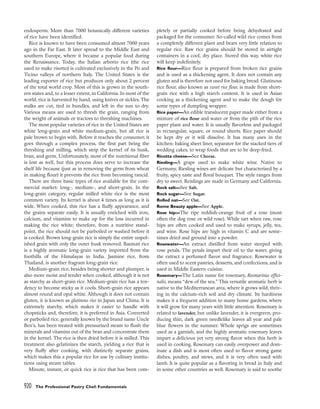
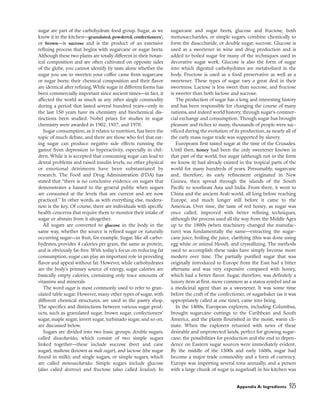
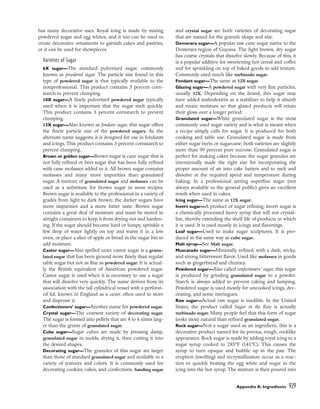
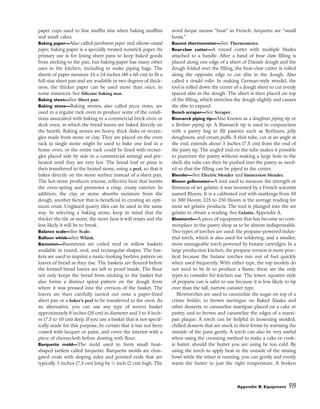
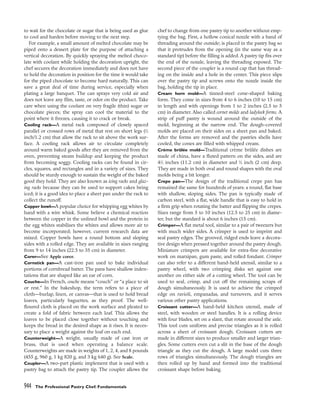
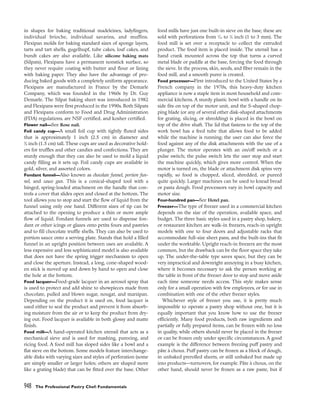
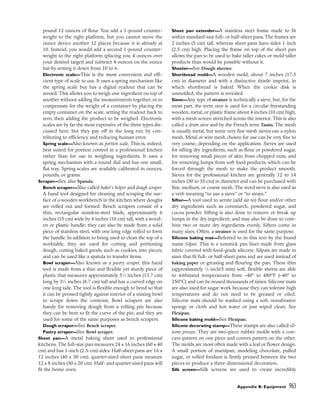
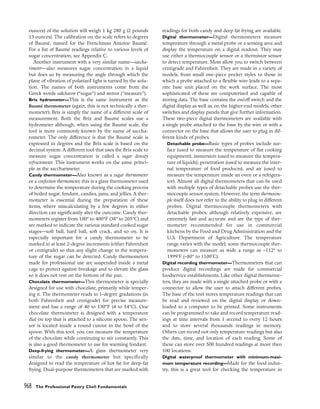
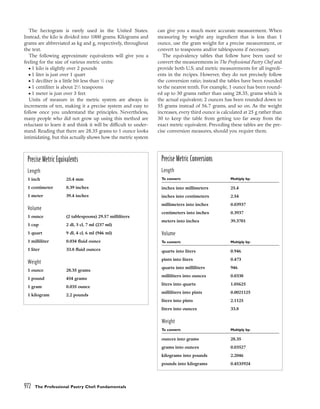
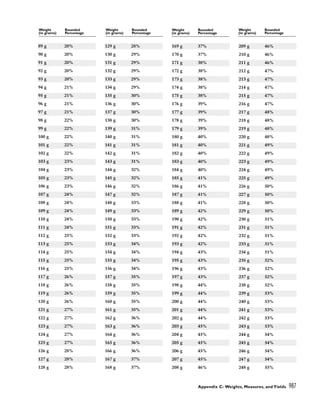
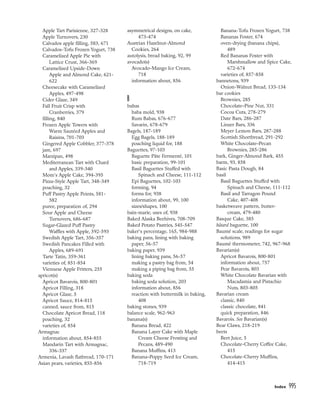
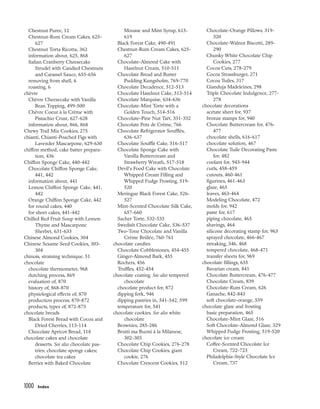
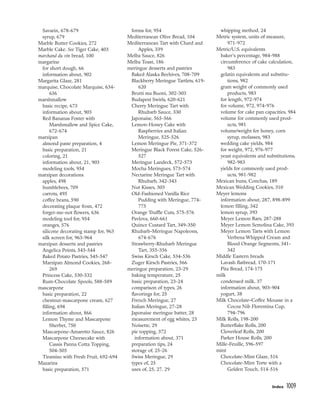
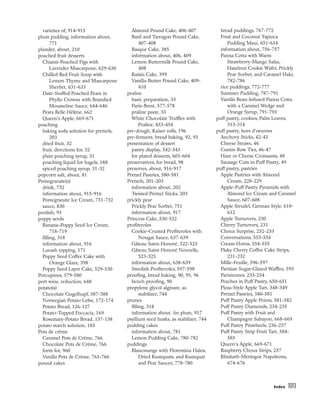
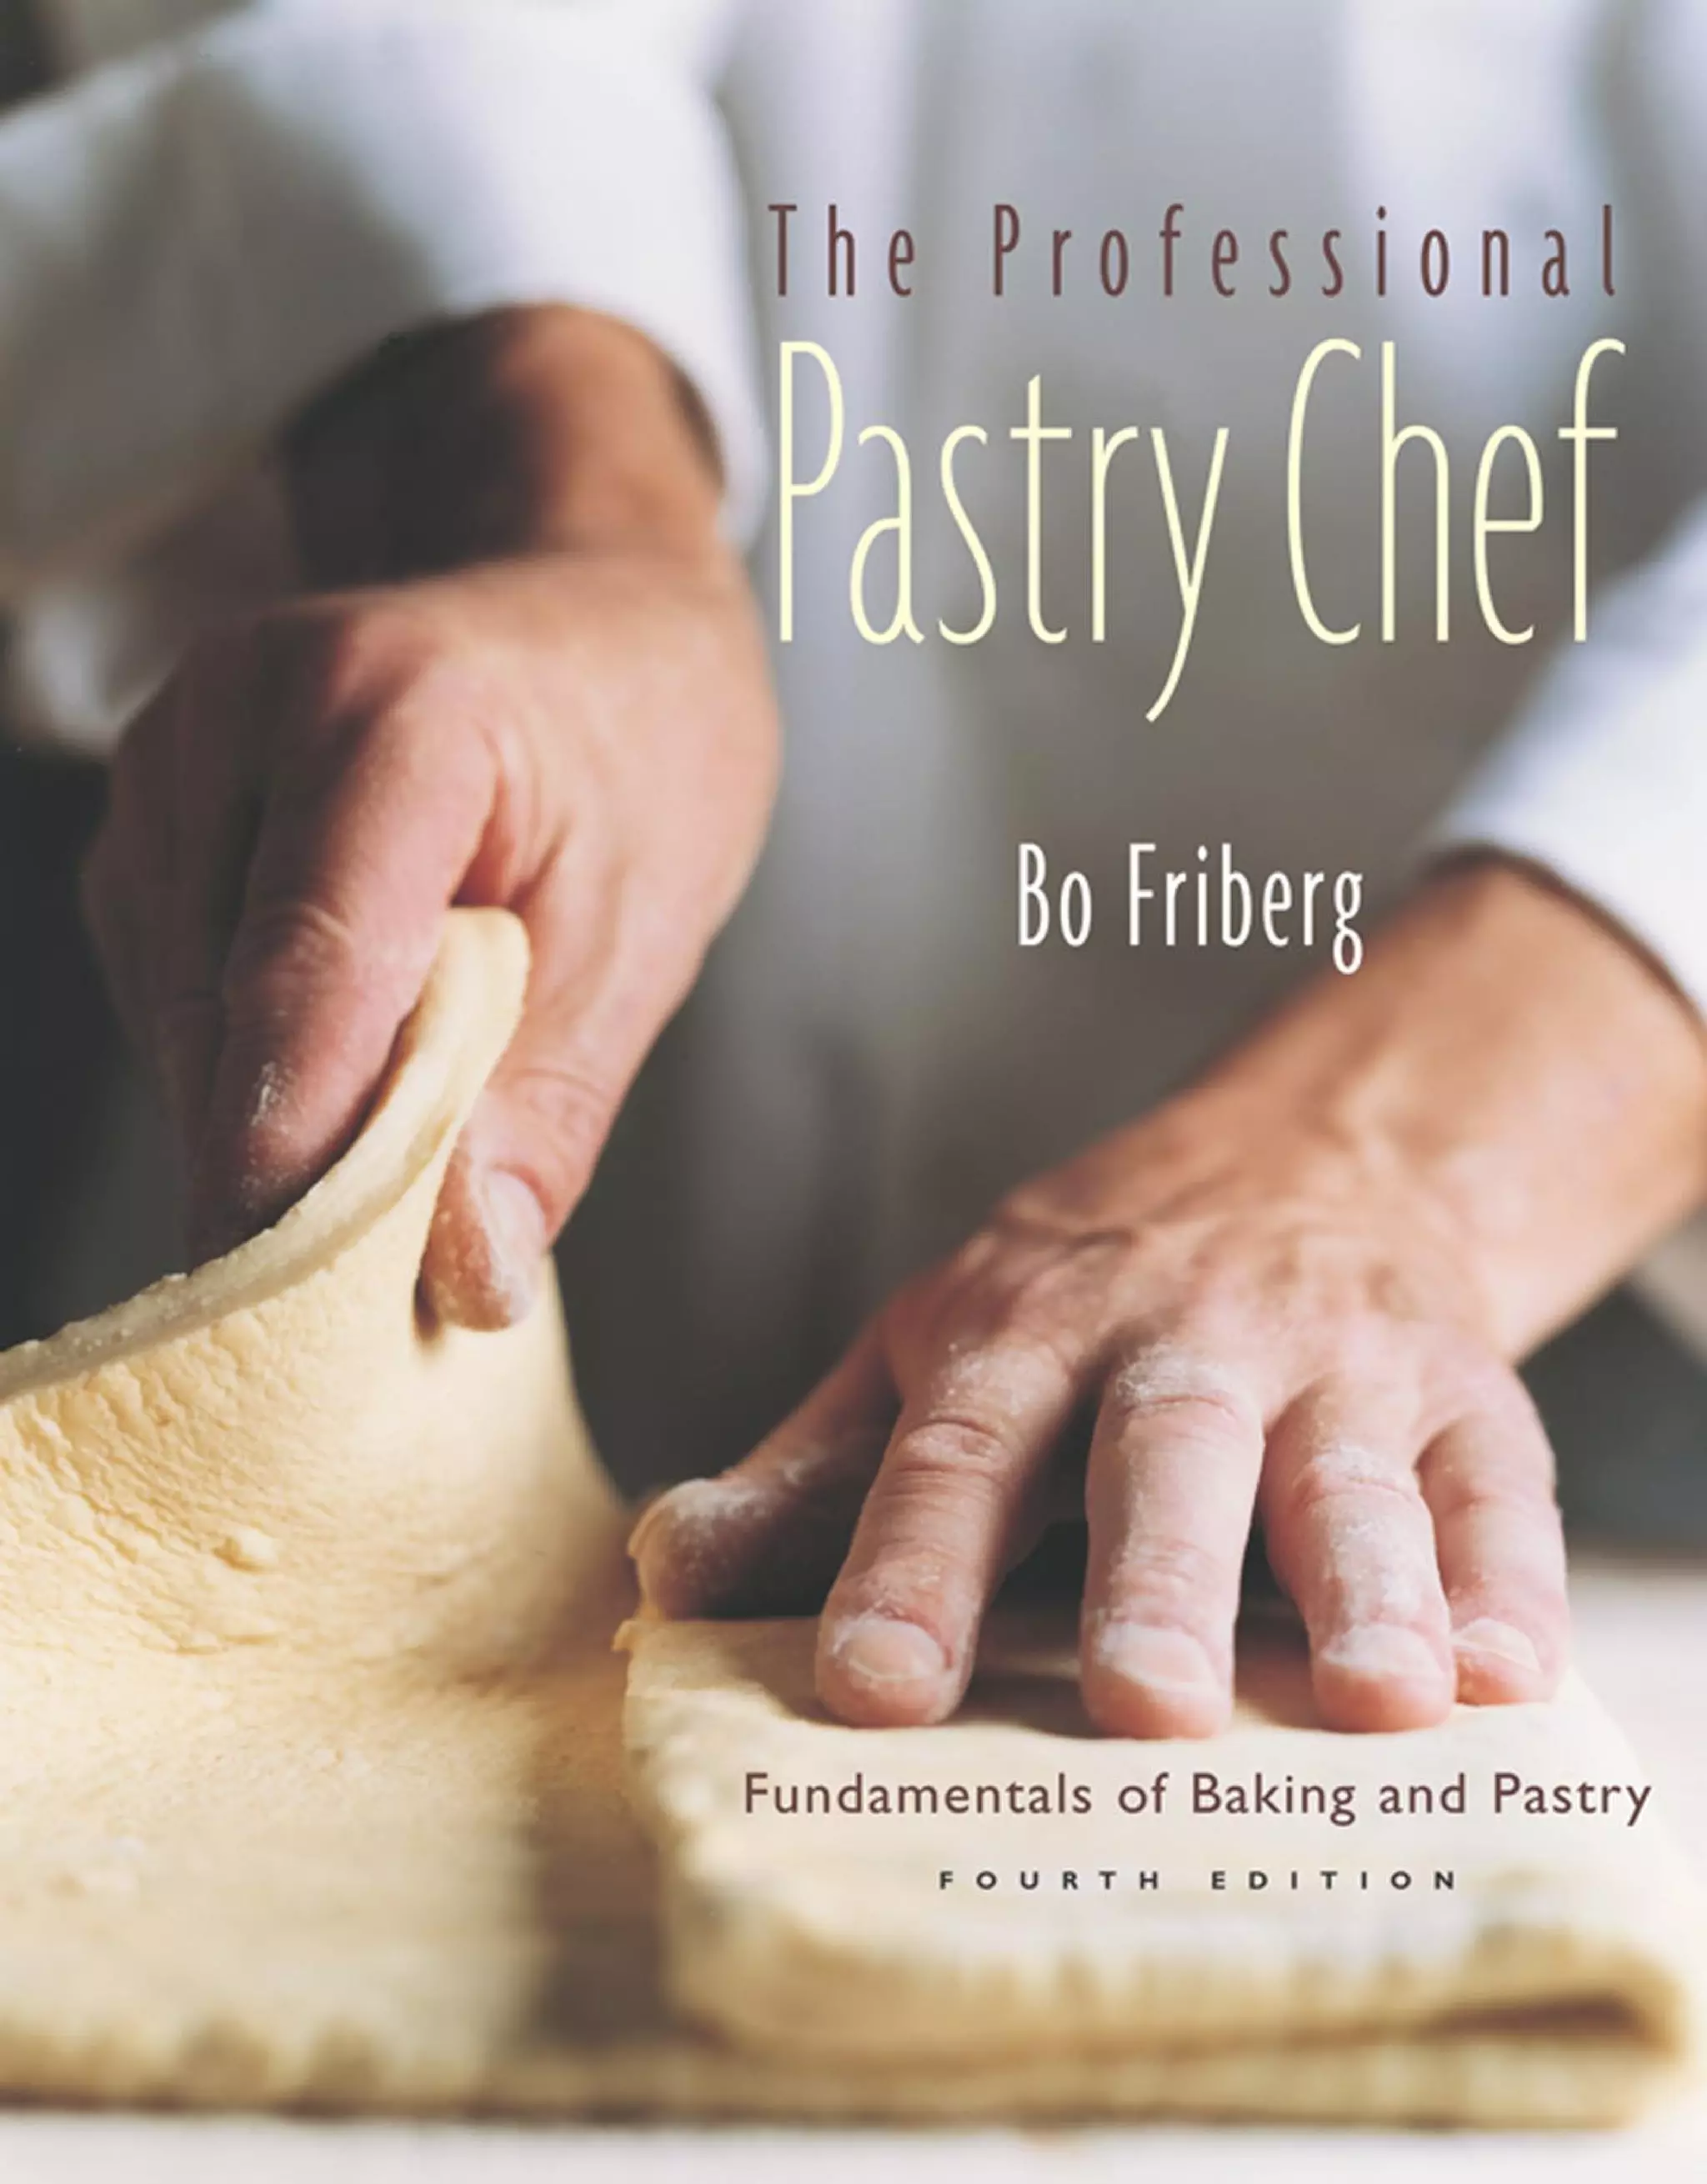
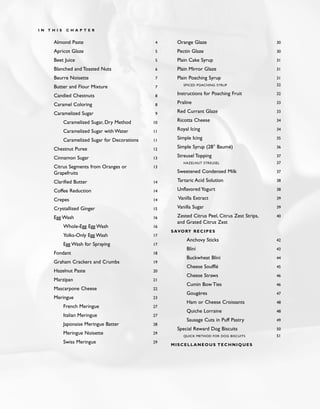
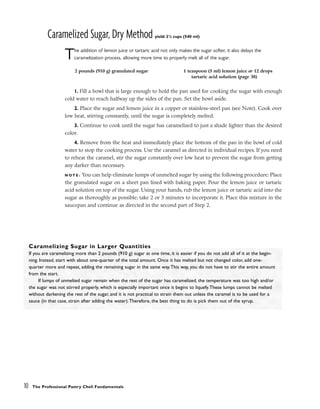
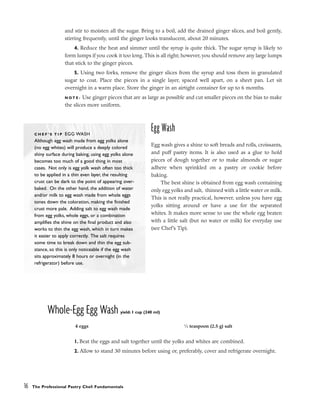
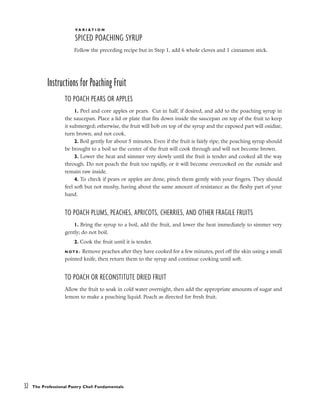
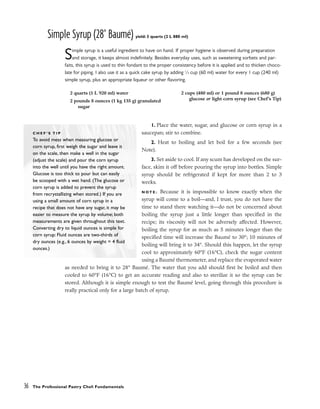
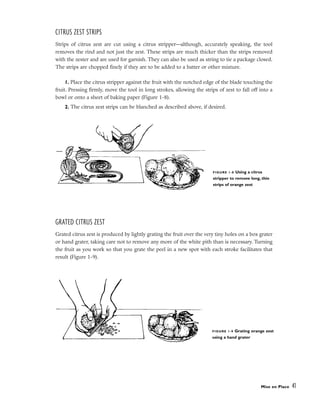
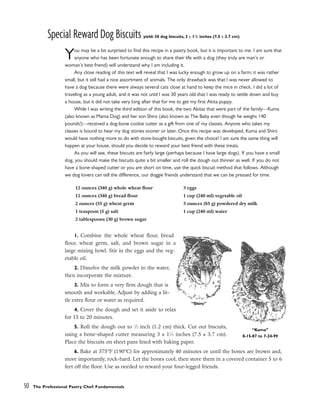
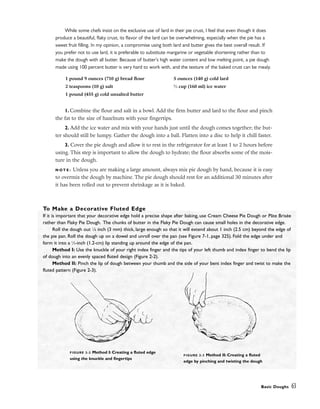
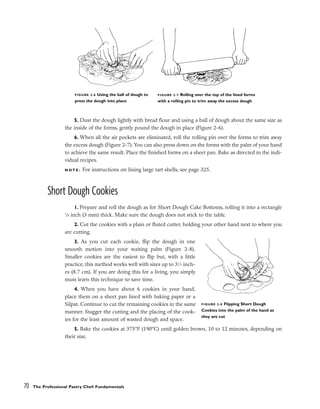
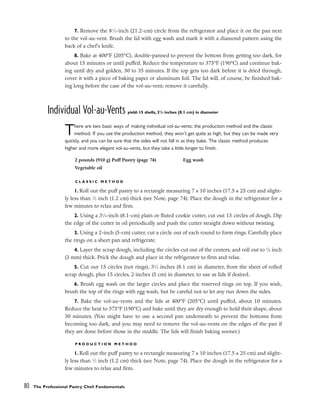
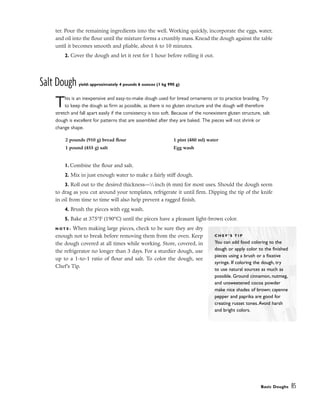
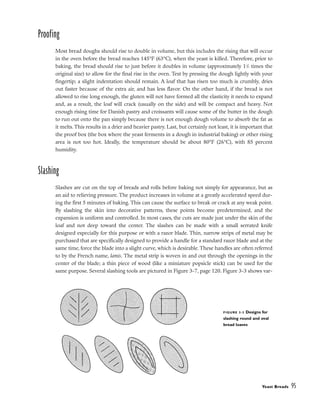
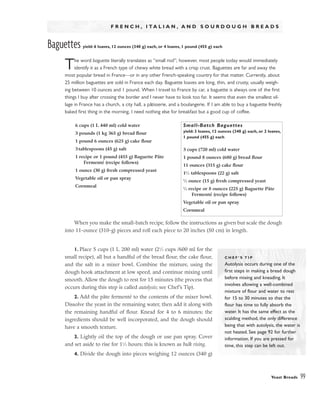
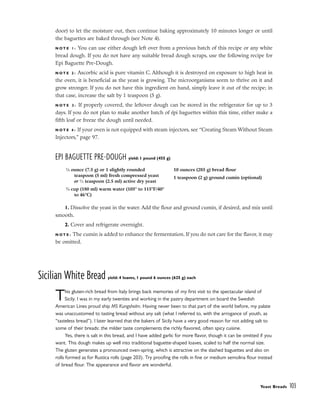
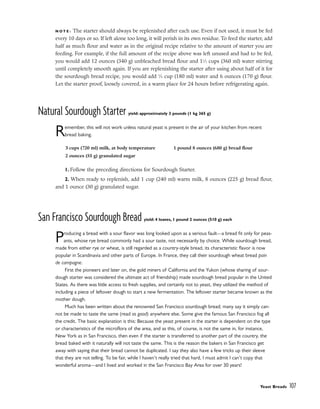
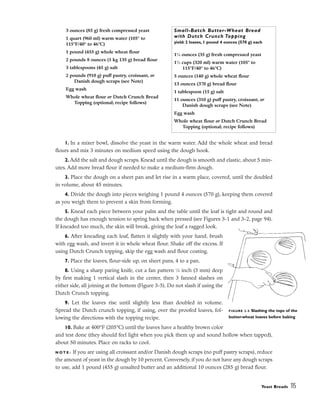
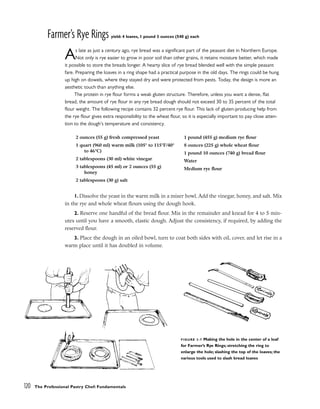
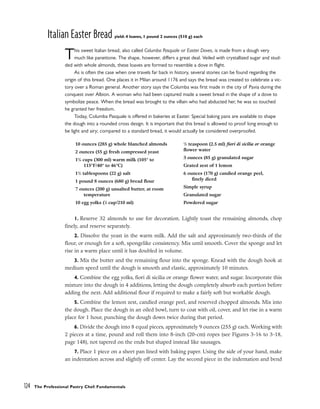
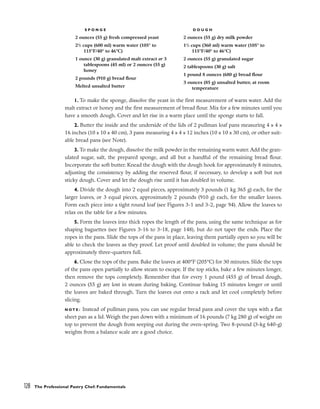
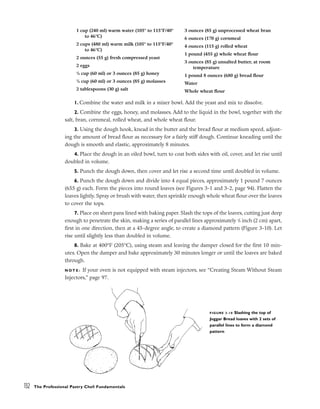
4. Place the batter in a pastry bag with a No. 4 (8-mm) plain tip (use
a No. 3 [6-mm] tip if making the smaller size). Pipe the batter in a spi-
ral within the 4 circles drawn on the papers, starting in the center and
working to the outside (Figure 1-5).
5. Bake immediately at 250°F (122°C) for approximately 1 hour or
until dry.
Swiss Meringue yield: 2 to 3 quarts (1 L 920 ml to 2 L 880 ml)
Swiss meringue could be described as a mixture of French and Italian meringues. It can be eaten raw, as
the egg whites are pasteurized by being heated to 140°F (60°C) with the sugar. Swiss meringue is quicker
and easier to produce than its Italian counterpart, but it is not as stable and should be used fairly soon once
it has been prepared. It is typically used in buttercream and fillings, but it can also be piped into cookies or
made into other shapes, then baked or dried in the same way as French meringue. However, for this use,
Swiss meringue should be made with less sugar to ensure better volume and stiff peaks.
1. Combine the egg whites and sugar in a mixing bowl. Place the bowl over simmering water
and heat to 140°F (60°C), whipping constantly to avoid cooking the egg whites.
2. Remove from the heat and whip the mixture at high speed until it has cooled completely.
N O T E : If the meringue is to be piped or spread on top of a dessert, or if it will be dried in the
oven, less sugar should be used to ensure a stiffer and lighter meringue. If the meringue is to be
added to a filling or used to make buttercream, use the full amount of sugar.
Mise en Place 29
4 ounces (115 g) hazelnuts, toasted
1 ounce (30 g) cornstarch
1 cup (240 ml) egg whites
1 pound (455 g) granulated sugar
1 teaspoon (5 ml) vanilla extract
FIGURE 1-5 Piping meringue noisette
batter into a spiral within the circle
drawn on a sheet of baking paper
2 cups (480 ml) egg whites 1 pound 4 ounces to 1 pound 12 ounces (570
to 795 g) granulated sugar (see Note)](https://image.slidesharecdn.com/pasrtychefbofriberg-230126181648-7030731a/85/pasrty-chef-Bo-Friberg-pdf-49-320.jpg)


![chunks. Do not cut the pieces too small, as they will become smaller as they are worked into the
dough; reserve.
3. Add the cold water, bread flour, high-gluten flour, and ascorbic acid to the sponge. Knead
for 6 minutes using the dough hook at low speed. Add the salt, rosemary, and olive oil. Knead
6 minutes longer, then incorporate the potatoes. Knead just long enough to mix in the potato
chunks. Do not mash them into the dough; whole pieces of potato should be visible in the fin-
ished bread. This Italian country-style bread dough will be soft and may seem too sticky at first.
After the resting and punching-down periods, it will firm up considerably as the gluten matures.
4. Cover the dough and let it rest in a warm place for 30 minutes.
5. Punch the dough down, then let it rise again for 30 minutes.
6. Punch the dough down and weigh it into 5 equal pieces, approximately 1 pound 10
ounces (740 g) each (2 pieces, approximately 1 pound 12 ounces [795 g] each, for the smaller
recipe). Form the pieces into tight round loaves (see Figures 3-1 and 3-2, page 94). Place on
sheet pans and leave in the refrigerator overnight to rise and form a natural crust.
7. Remove the loaves from the refrigerator. They should be 11
⁄2 times their original size. Let
rise further at room temperature if necessary.
8. Bake at 475°F (246°C) directly on the floor of a deck oven or on the bottom rack of a rack
oven, using steam for the first 10 minutes. Open the damper to remove the steam and lower the
temperature to 375°F (190°C). Continue baking 20 to 25 minutes longer or until the bread is
baked through and has a dark golden crust.
N O T E : If your oven is not equipped with steam injectors, see “Creating Steam Without Steam
Injectors,” page 97.
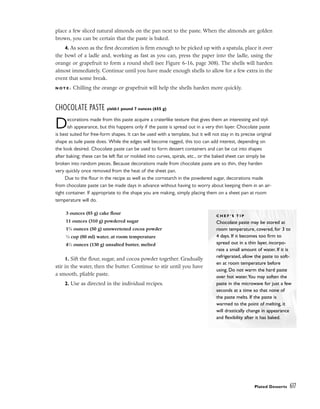
Southwestern Corn and Cheese Bread yield: 6 loaves, 11
/2 pounds (680 g) each
To prepare the fresh corn kernels for this recipe, remove the corn husks, then cut the kernels away
from the cob using a serrated knife. Blanch the kernels in boiling water (to cook the starch) for
approximately 1 minute, refresh under cold water, and dry on paper towels. When corn is not in season,
substitute thawed frozen corn kernels. You may want to consider sprinkling the peppers over half of the
dough only so that you will have some cheese bread for those who would prefer it less spicy, or you can
use roasted mild green chilies instead.
As with cinnamon rolls, the finished appearance of these loaves depends on how tightly you roll the
logs. If they are rolled tightly, as instructed, the oven-spring will force the center of the coil up and into an
attractive peak. If rolled too loosely, they will flatten as they bake, with the energy directed outward
instead.
138 The Professional Pastry Chef: Fundamentals](https://image.slidesharecdn.com/pasrtychefbofriberg-230126181648-7030731a/85/pasrty-chef-Bo-Friberg-pdf-158-320.jpg)