Downloaded 38 times


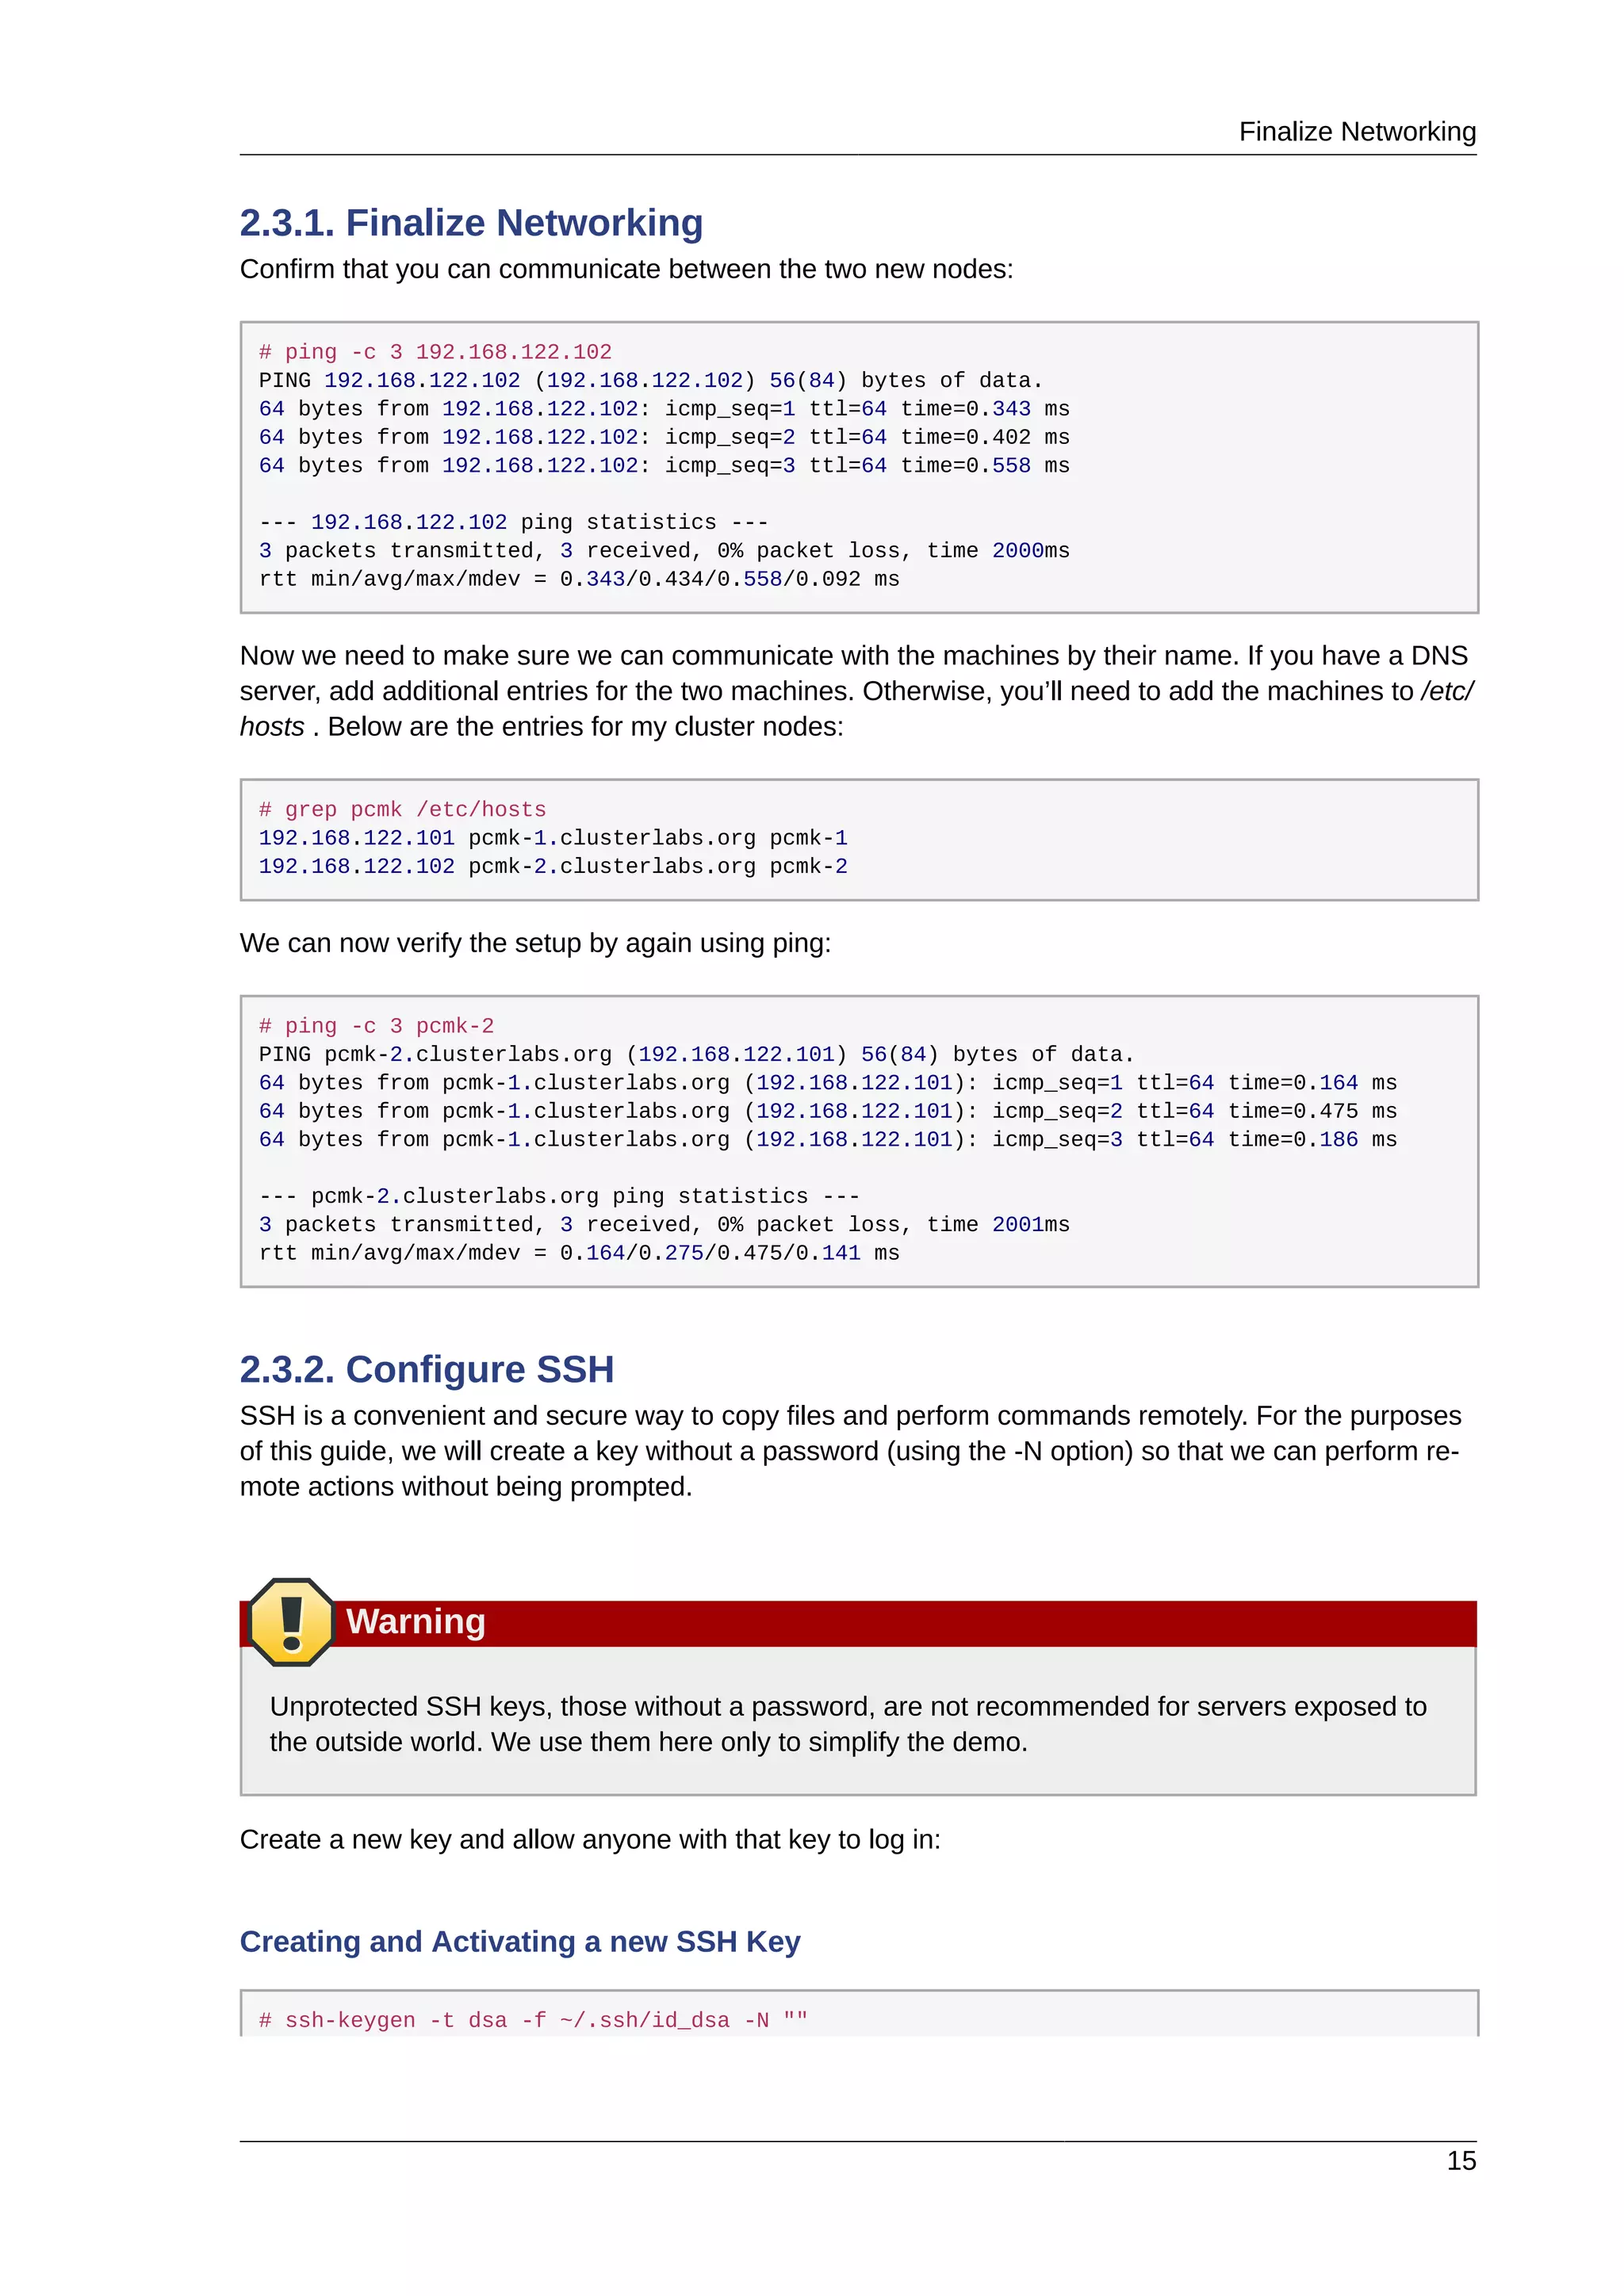
![Chapter 2. Installation
12
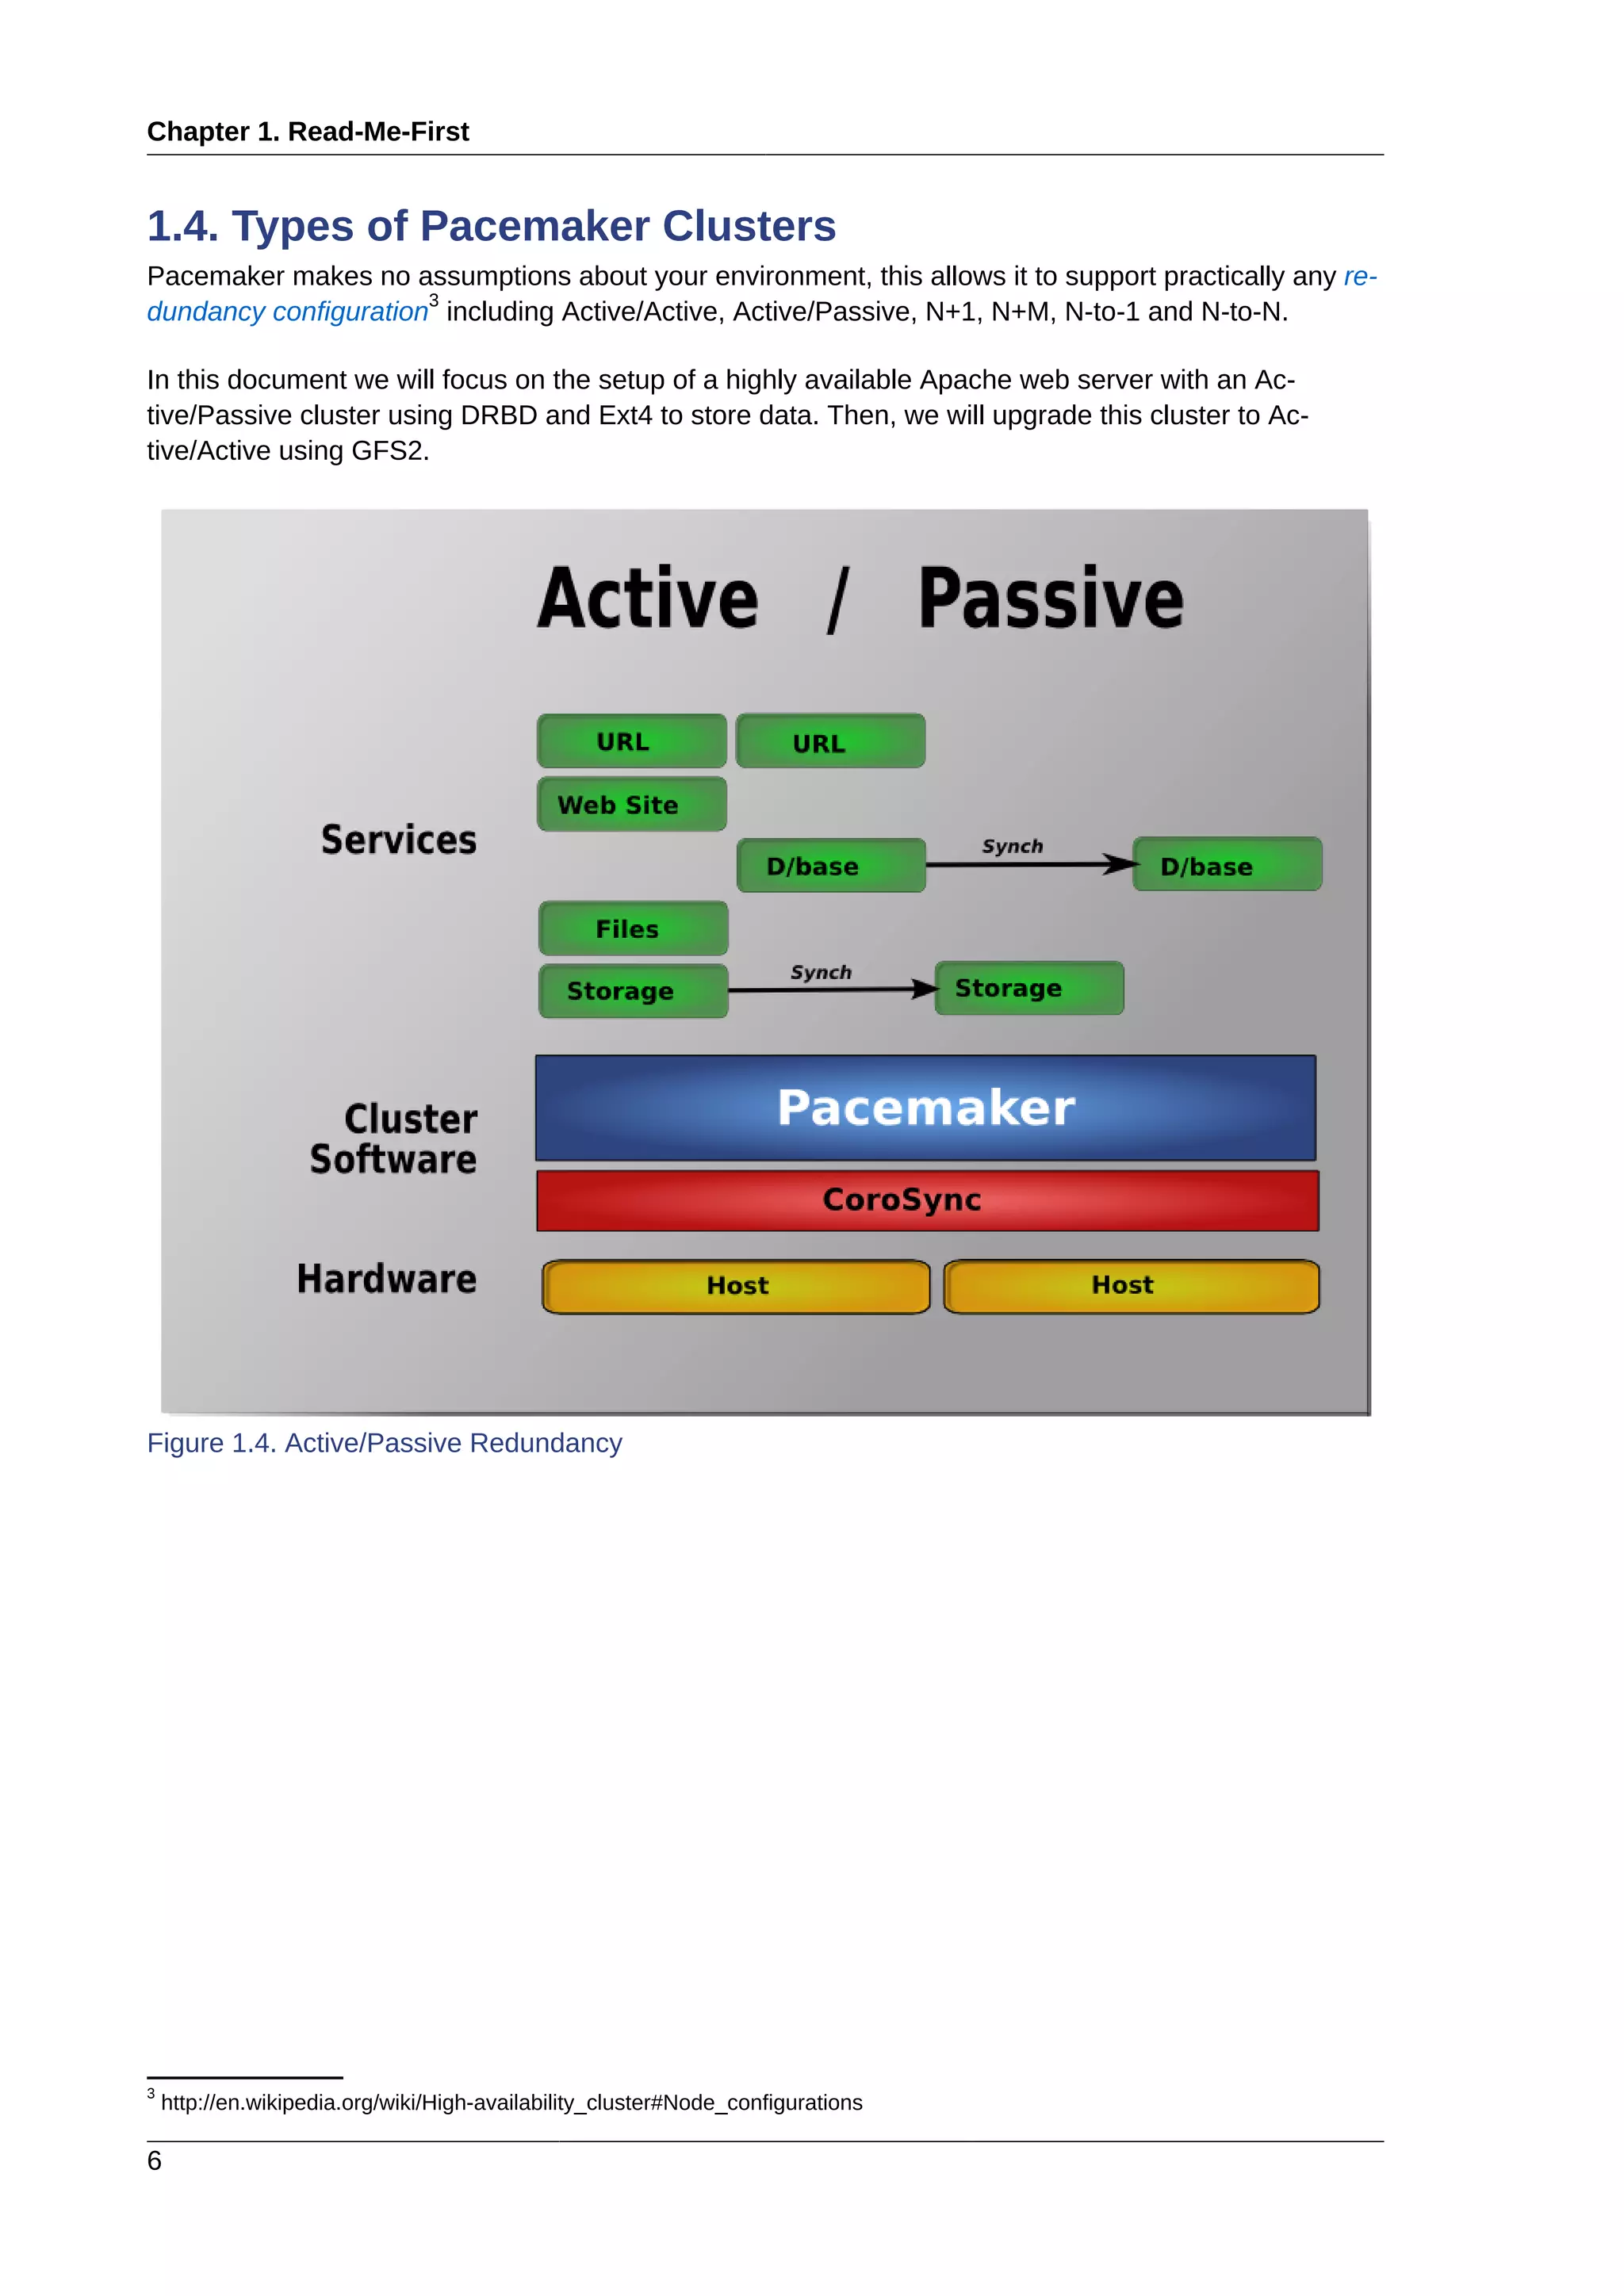
2.2. Post Installation Tasks
2.2.1. Networking
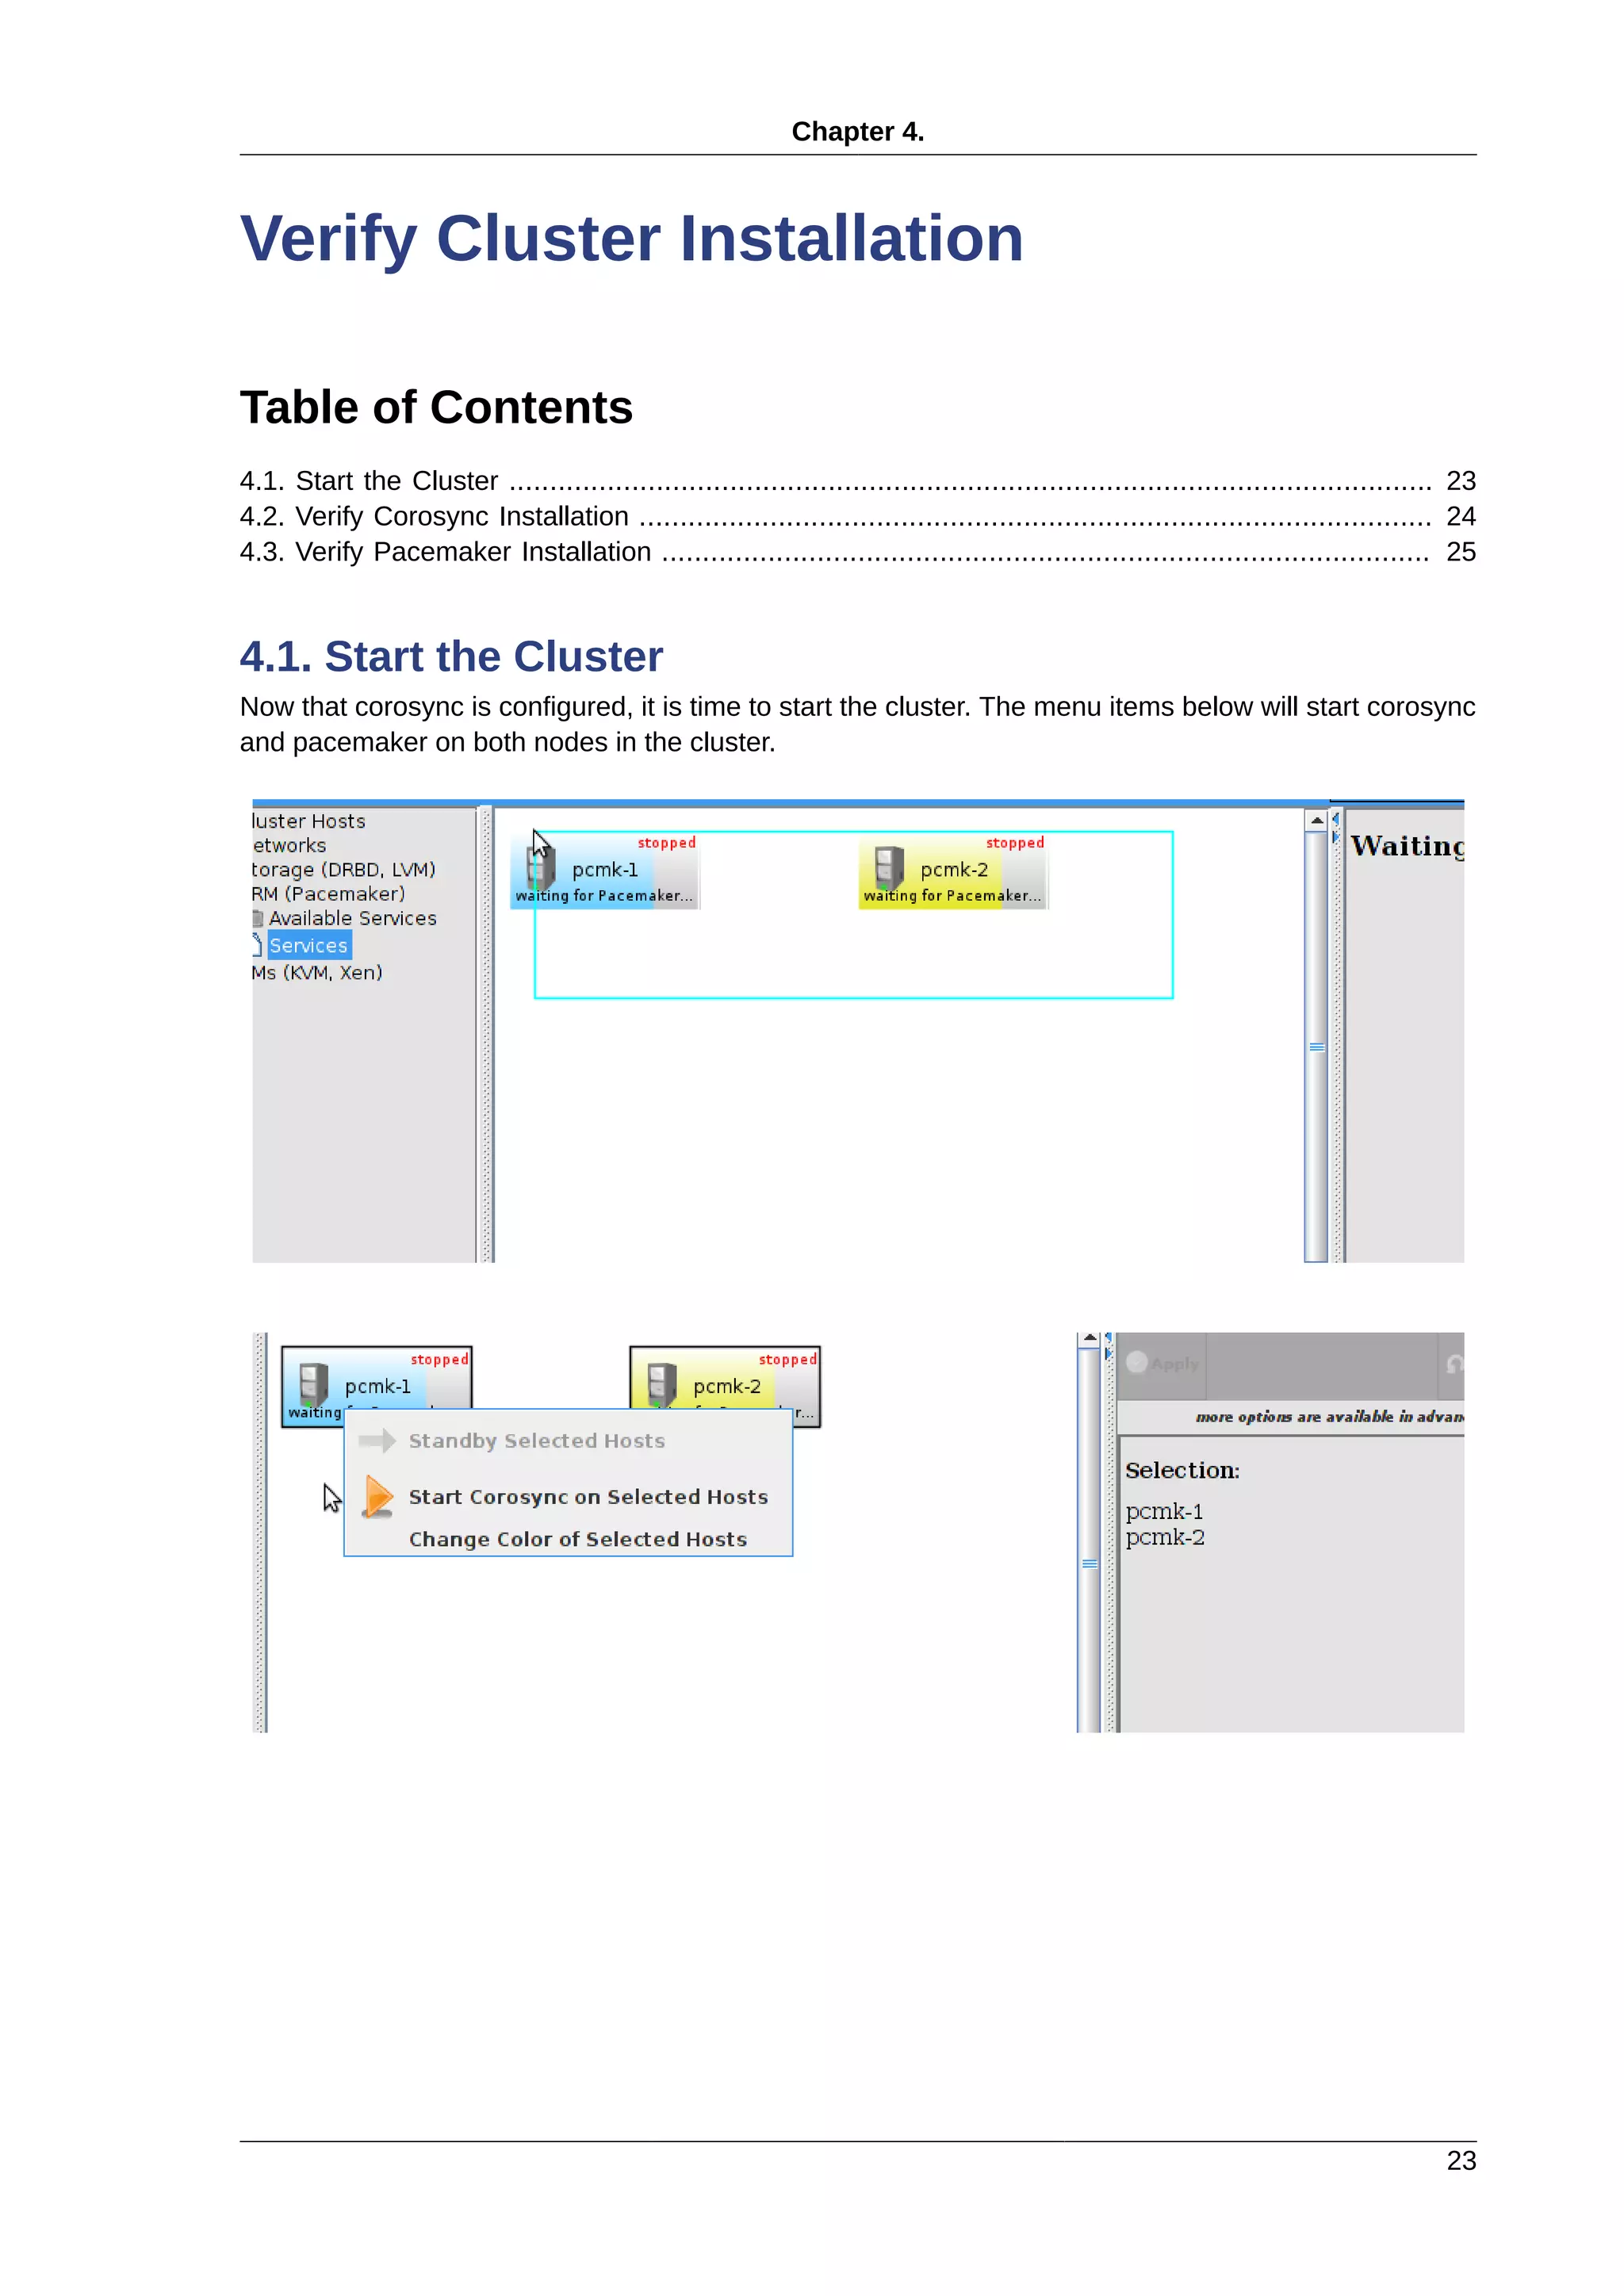
Bring up the network and ensure it starts at boot
# service network start
# chkconfig network on
Check the machine has the static IP address you configured earlier
# ip addr
1: lo: <LOOPBACK,UP,LOWER_UP> mtu 16436 qdisc noqueue state UNKNOWN
link/loopback 00:00:00:00:00:00 brd 00:00:00:00:00:00
inet 127.0.0.1/8 scope host lo
inet6 ::1/128 scope host
valid_lft forever preferred_lft forever
2: eth0: <BROADCAST,MULTICAST,UP,LOWER_UP> mtu 1500 qdisc pfifo_fast state UP qlen 1000
link/ether 52:54:00:d7:d6:08 brd ff:ff:ff:ff:ff:ff
inet 192.168.122.101/24 brd 192.168.122.255 scope global eth0
inet6 fe80::5054:ff:fed7:d608/64 scope link
valid_lft forever preferred_lft forever
Now check the default route setting:
[root@pcmk-1 ~]# ip route
default via 192.168.122.1 dev eth0
192.168.122.0/24 dev eth0 proto kernel scope link src 192.168.122.101
If there is no line beginning with default via, then you may need to add a line such as
GATEWAY=192.168.122.1
to /etc/sysconfig/network and restart the network.
Now check for connectivity to the outside world. Start small by testing if we can read the gateway we
configured.
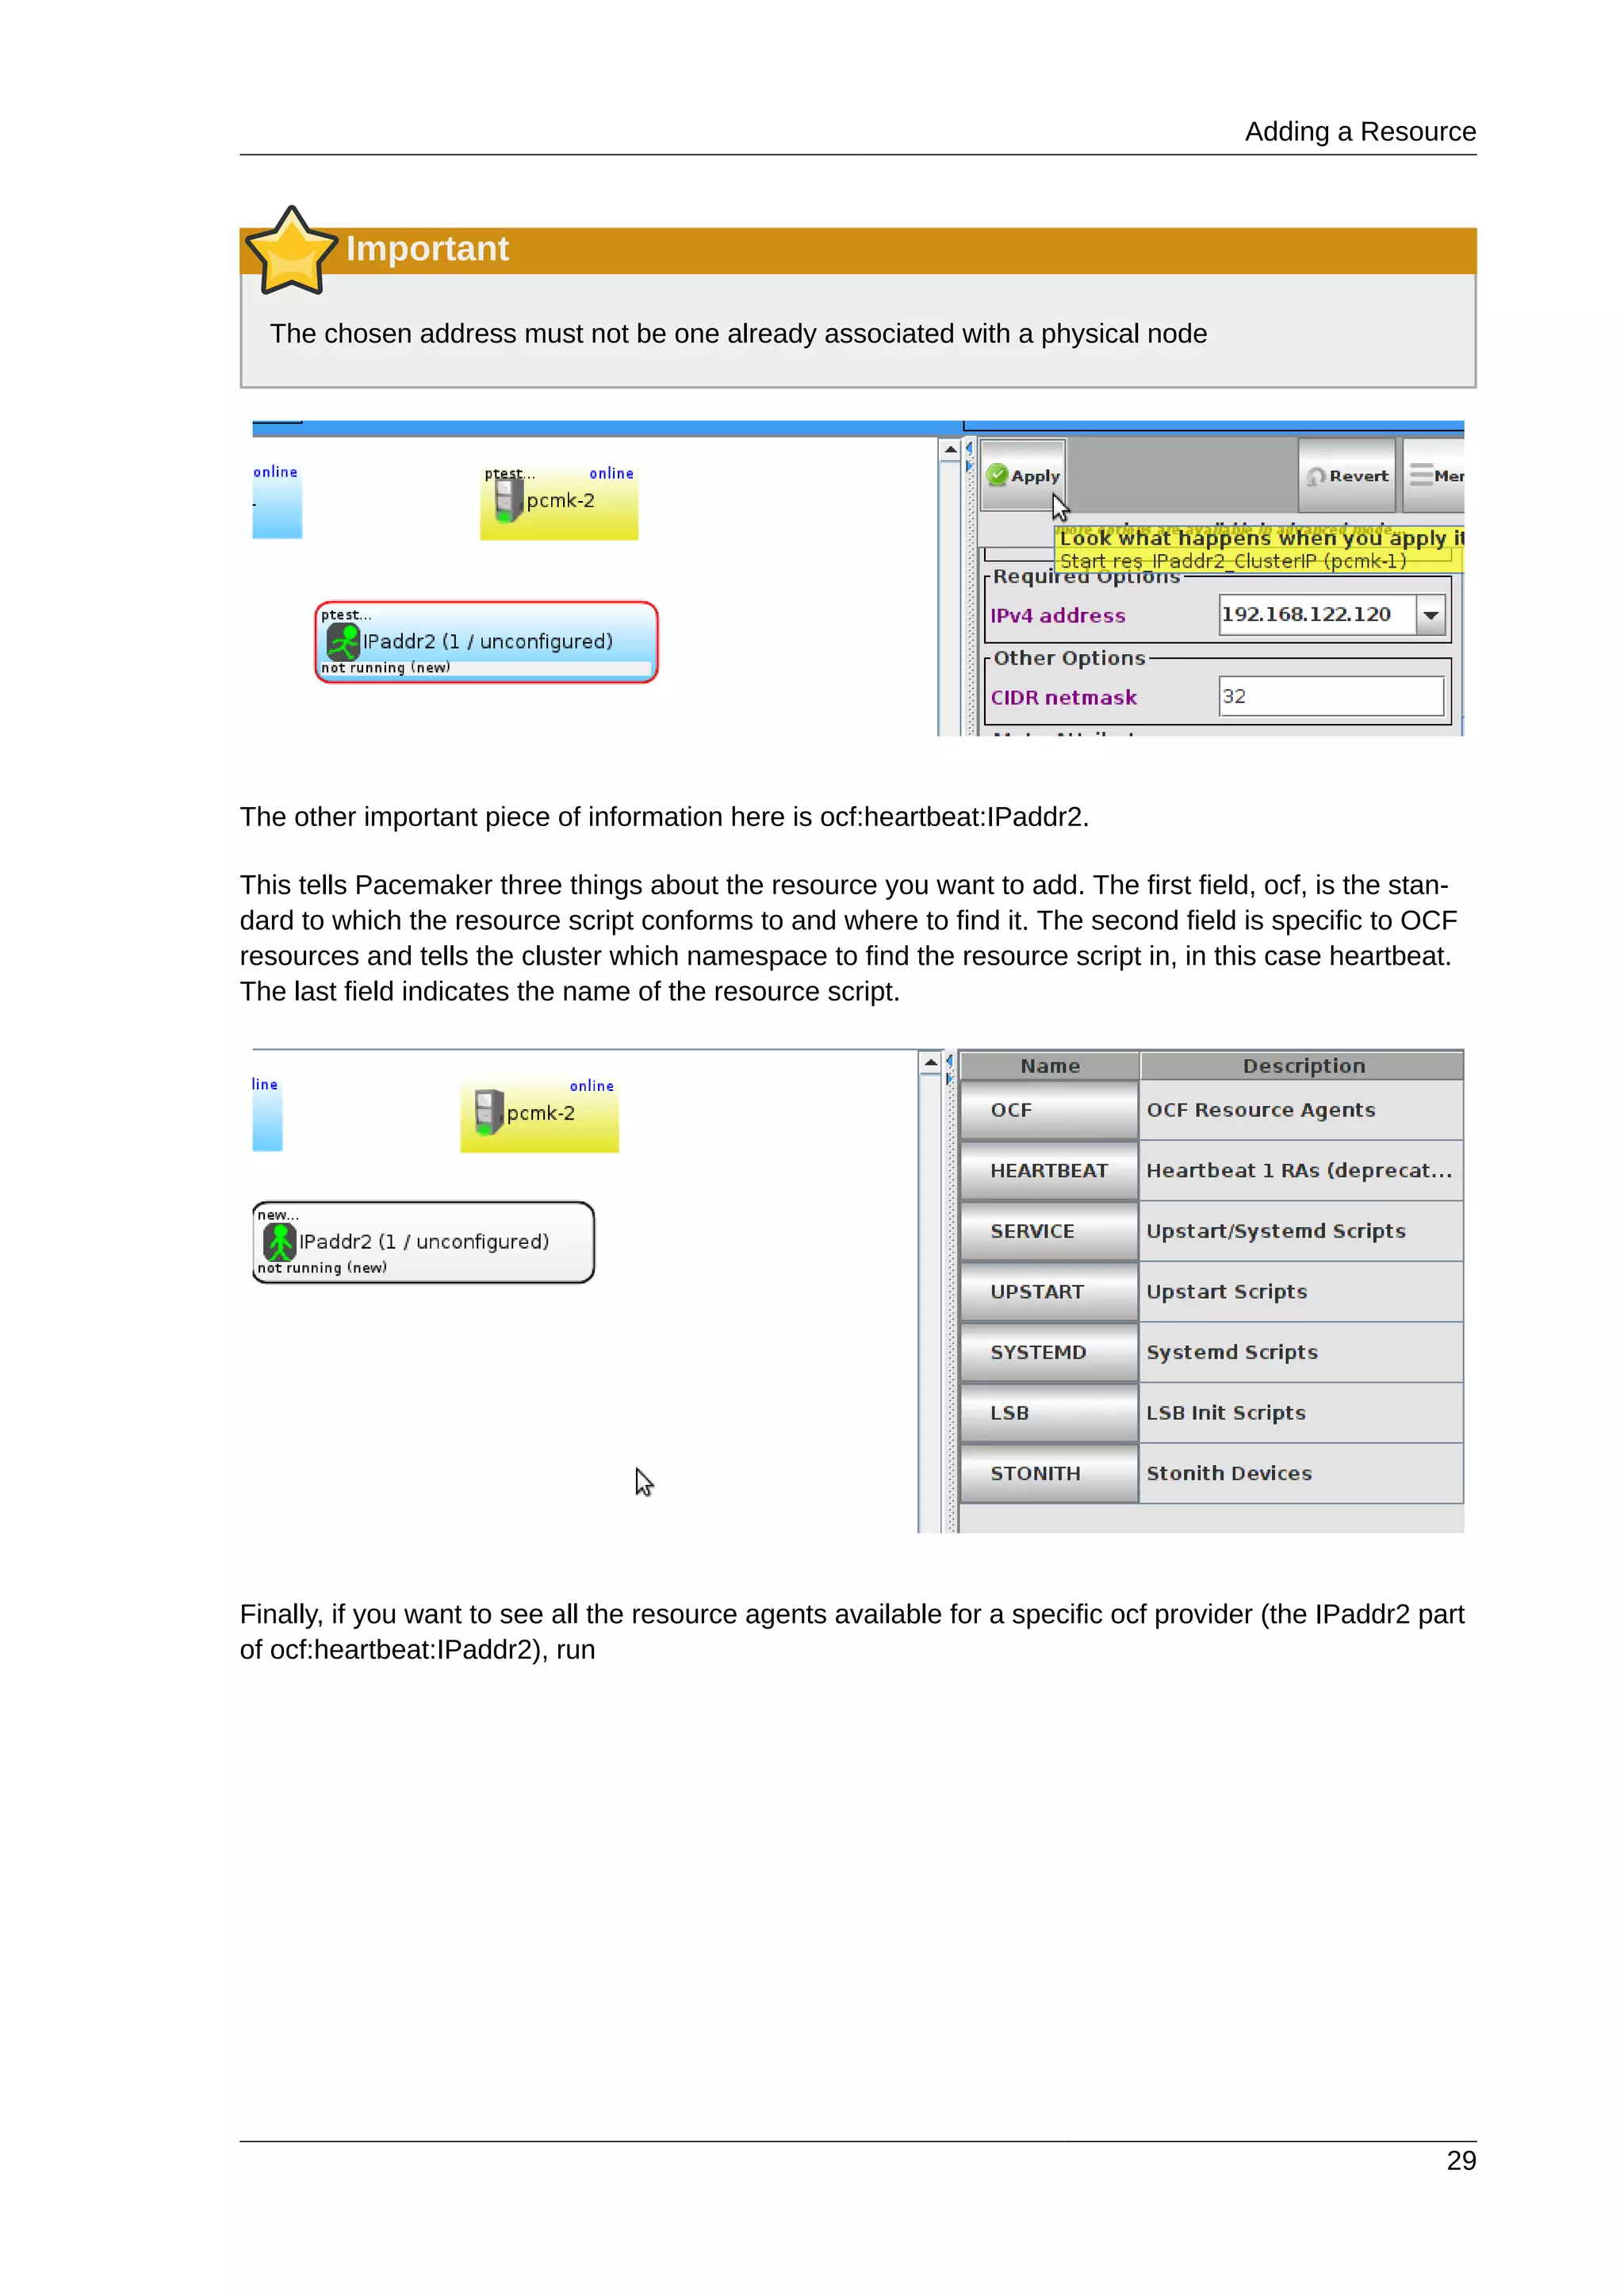
# ping -c 1 192.168.122.1
PING 192.168.122.1 (192.168.122.1) 56(84) bytes of data.
64 bytes from 192.168.122.1: icmp_req=1 ttl=64 time=0.249 ms
--- 192.168.122.1 ping statistics ---
1 packets transmitted, 1 received, 0% packet loss, time 0ms
rtt min/avg/max/mdev = 0.249/0.249/0.249/0.000 ms
Now try something external, choose a location you know will be available.
# ping -c 1 www.google.com
PING www.l.google.com (173.194.72.106) 56(84) bytes of data.
64 bytes from tf-in-f106.1e100.net (173.194.72.106): icmp_req=1 ttl=41 time=167 ms
--- www.l.google.com ping statistics ---
1 packets transmitted, 1 received, 0% packet loss, time 0ms
rtt min/avg/max/mdev = 167.618/167.618/167.618/0.000 ms](https://image.slidesharecdn.com/pacemaker-1-140326044348-phpapp02/75/Pacemaker-1-1-clusters-from-scratch-18-2048.jpg)
![Leaving the Console
13
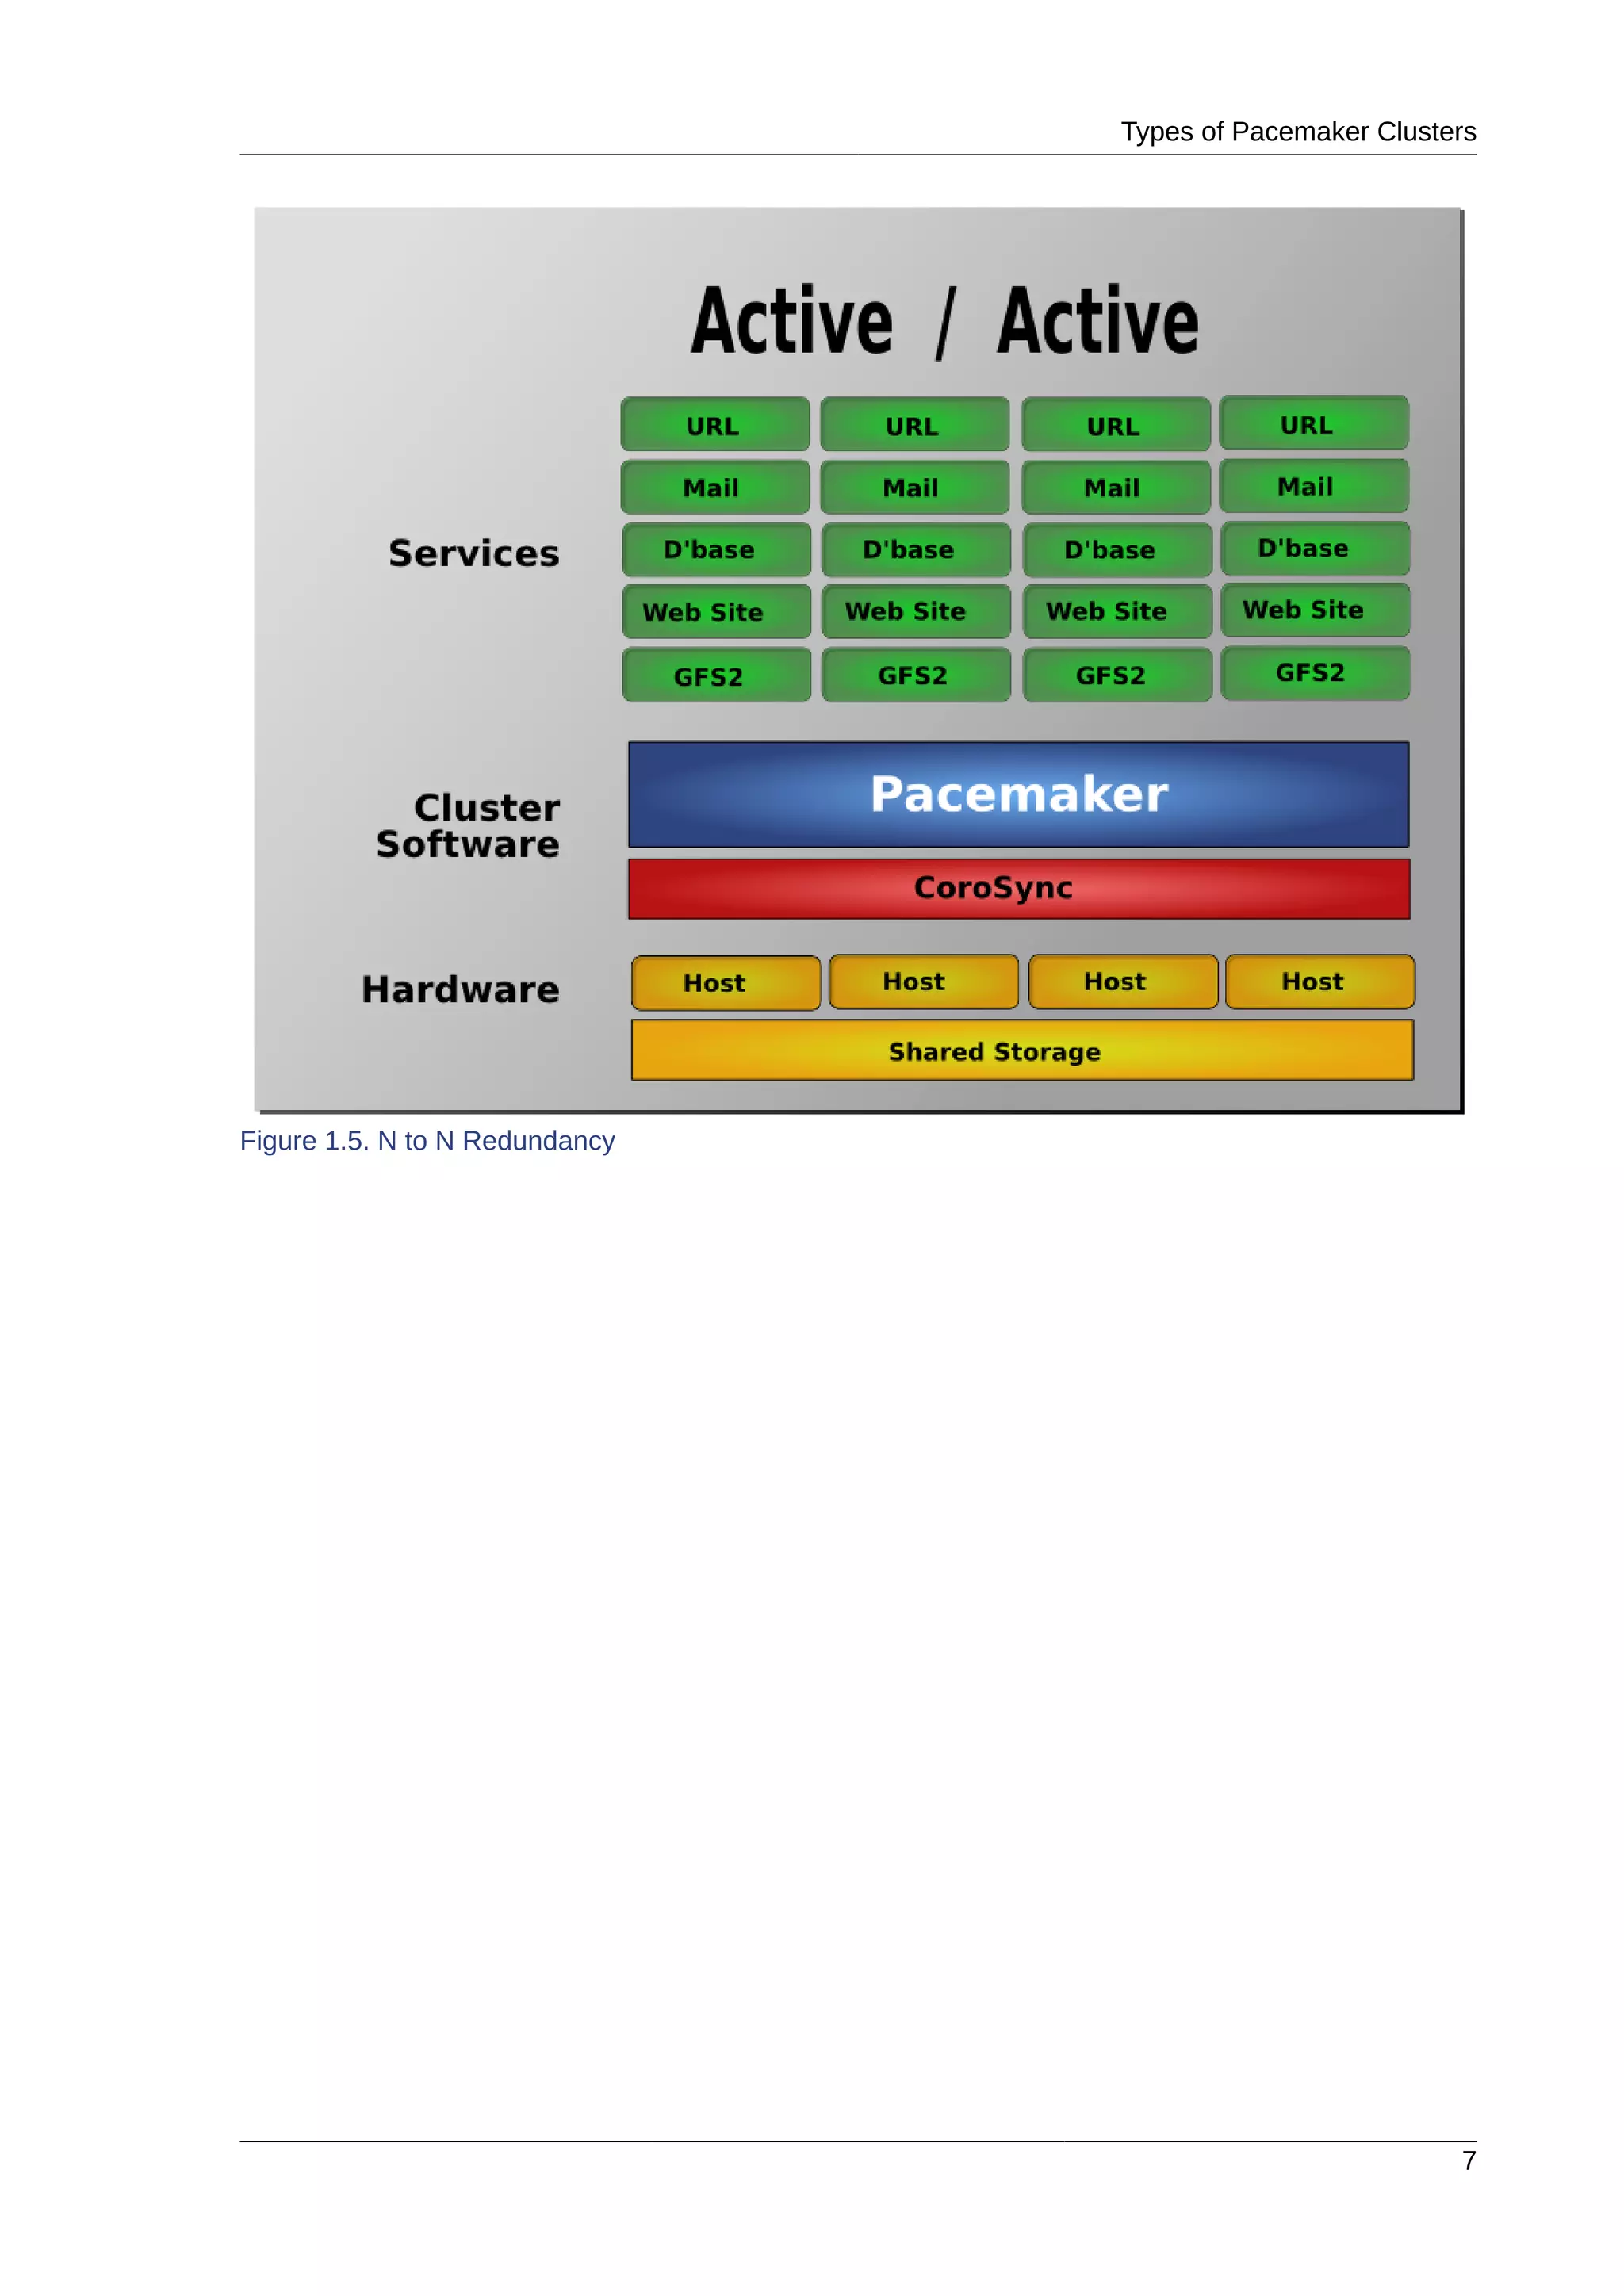
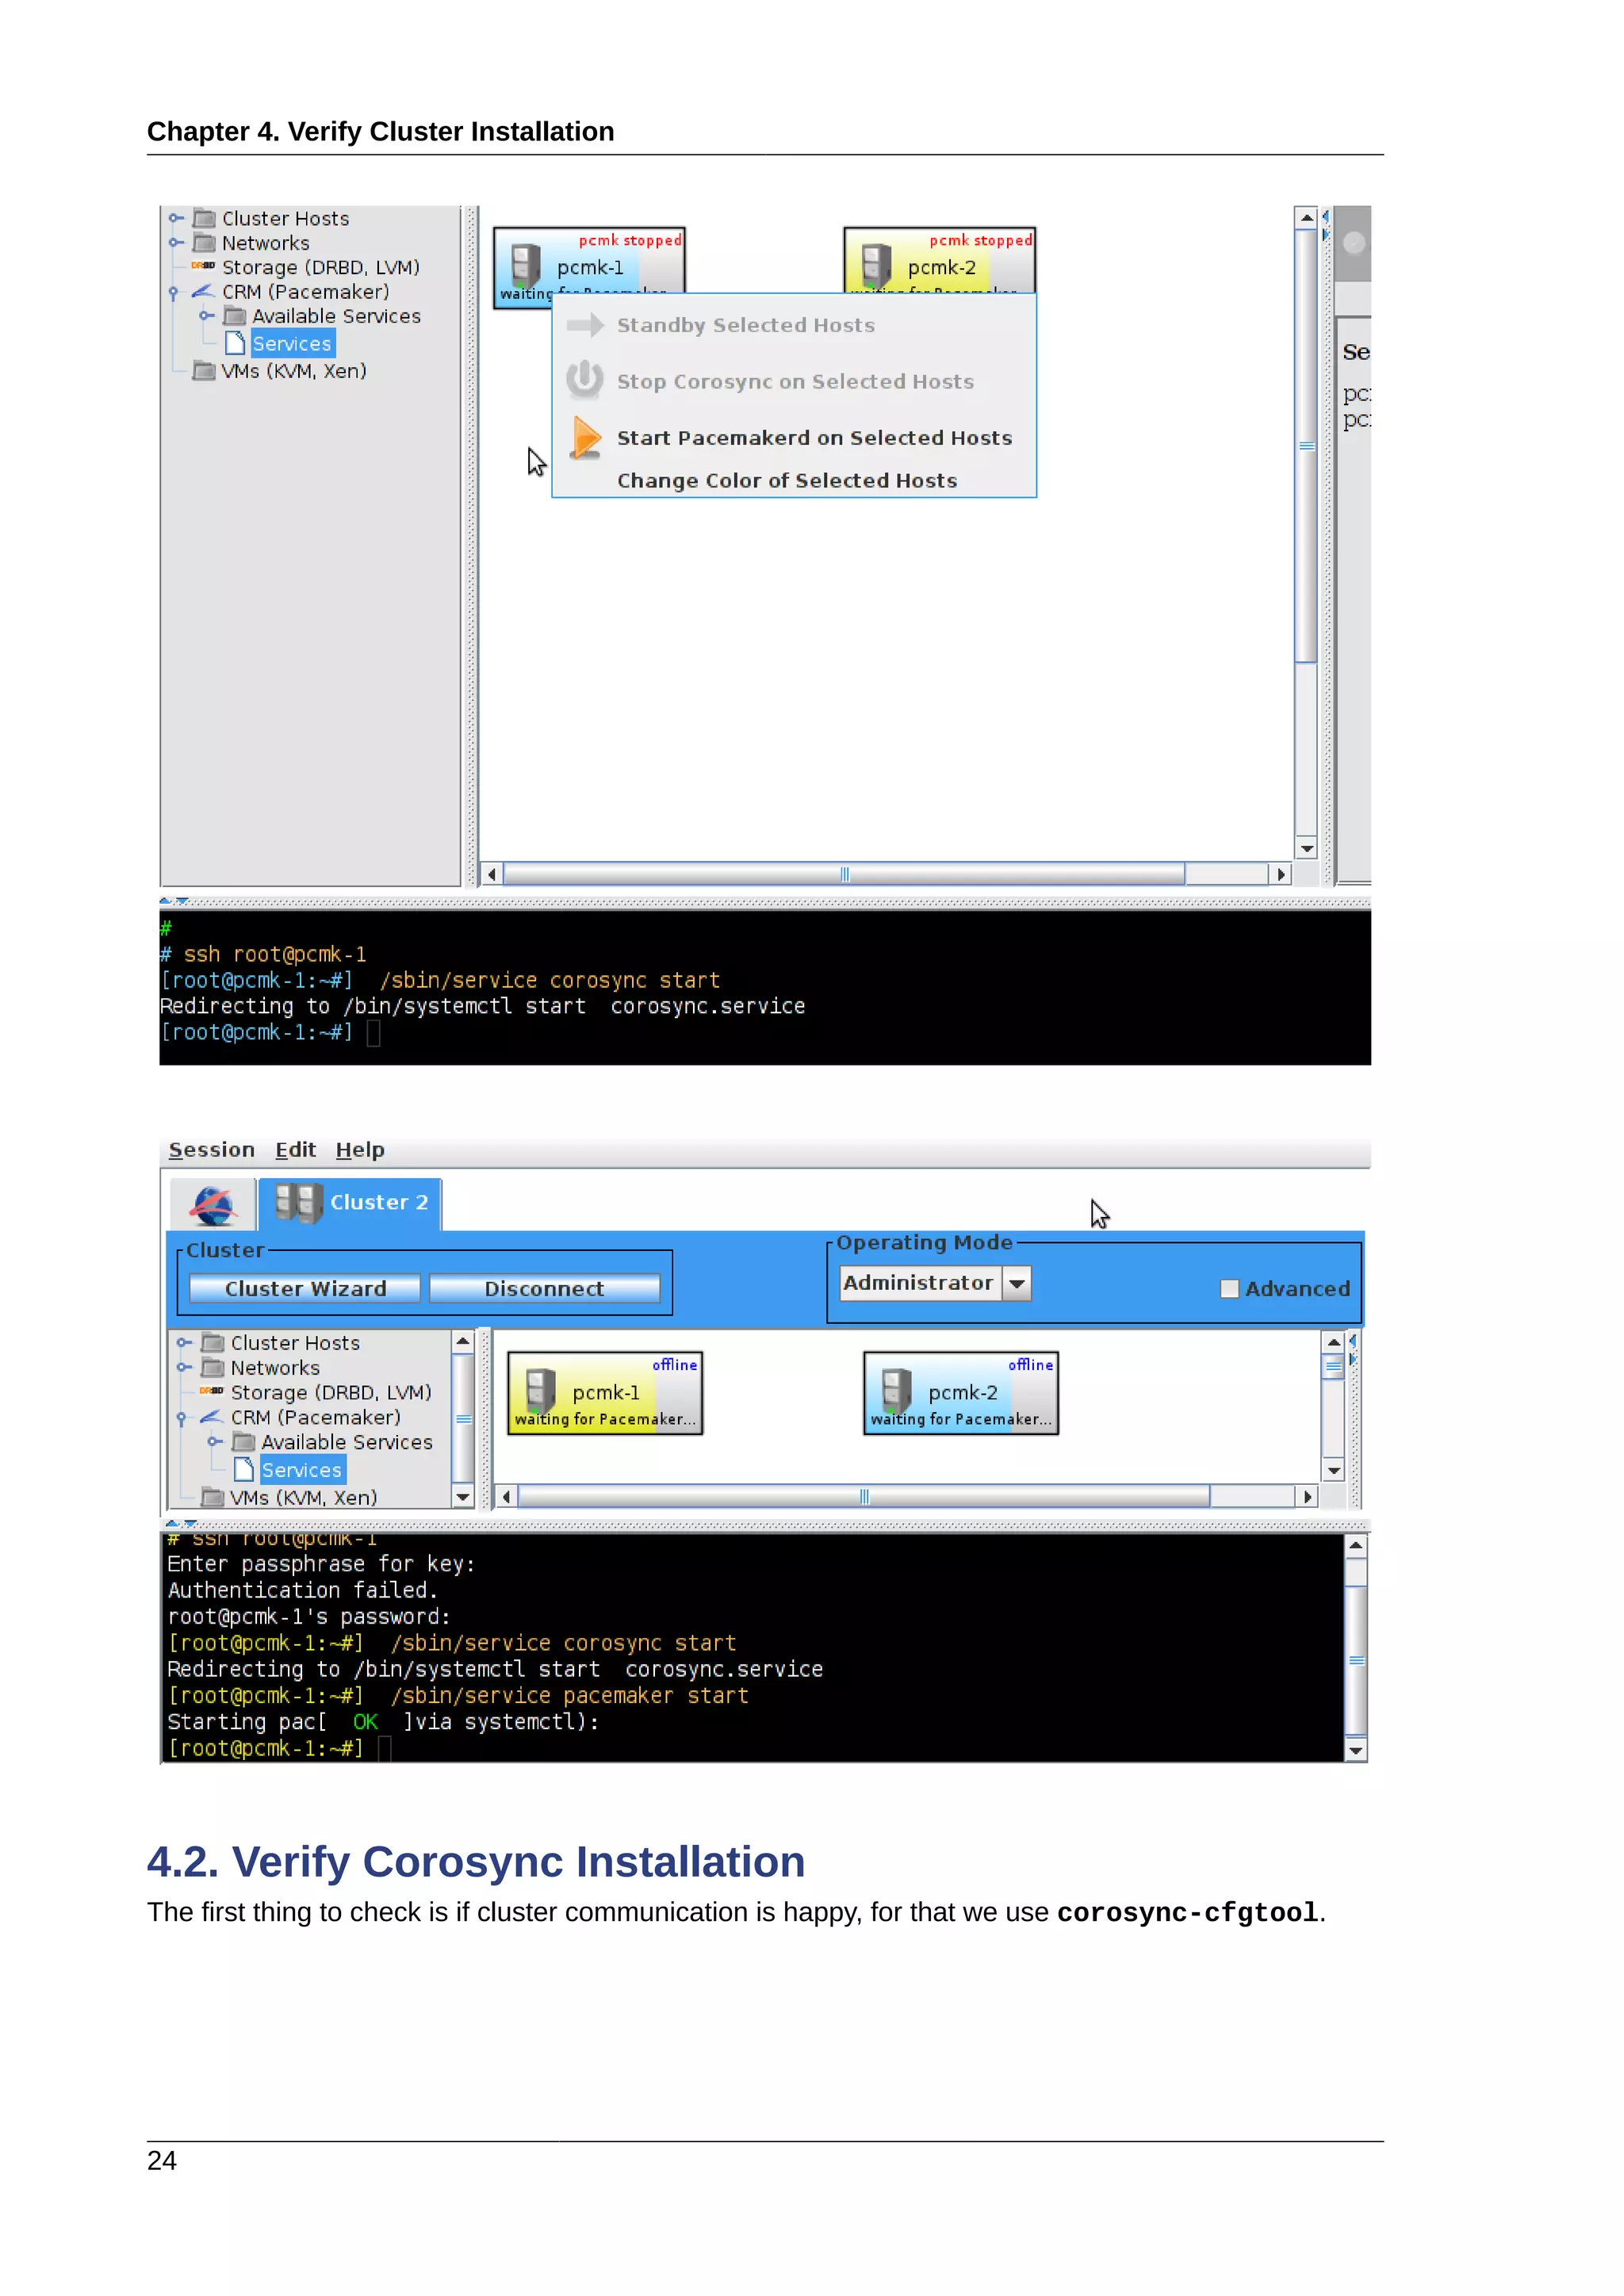
2.2.2. Leaving the Console
The console isn’t a very friendly place to work from, we will now switch to accessing the machine re-
motely via SSH where we can use copy&paste etc.
First we check we can see the newly installed at all:
beekhof@f16 ~ # ping -c 1 192.168.122.101
PING 192.168.122.101 (192.168.122.101) 56(84) bytes of data.
64 bytes from 192.168.122.101: icmp_req=1 ttl=64 time=1.01 ms
--- 192.168.122.101 ping statistics ---
1 packets transmitted, 1 received, 0% packet loss, time 0ms
rtt min/avg/max/mdev = 1.012/1.012/1.012/0.000 ms
Next we login via SSH
beekhof@f16 ~ # ssh -l root 192.168.122.11
root@192.168.122.11's password:
Last login: Fri Mar 30 19:41:19 2012 from 192.168.122.1
[root@pcmk-1 ~]#
2.2.3. Security Shortcuts
To simplify this guide and focus on the aspects directly connected to clustering, we will now disable the
machine’s firewall and SELinux installation.
Warning
Both of these actions create significant security issues and should not be performed on machines
that will be exposed to the outside world.
Important
TODO: Create an Appendix that deals with (at least) re-enabling the firewall.
# setenforce 0
# sed -i.bak "s/SELINUX=enforcing/SELINUX=permissive/g" /etc/selinux/config
# systemctl disable iptables.service
# rm '/etc/systemd/system/basic.target.wants/iptables.service'
# systemctl stop iptables.service
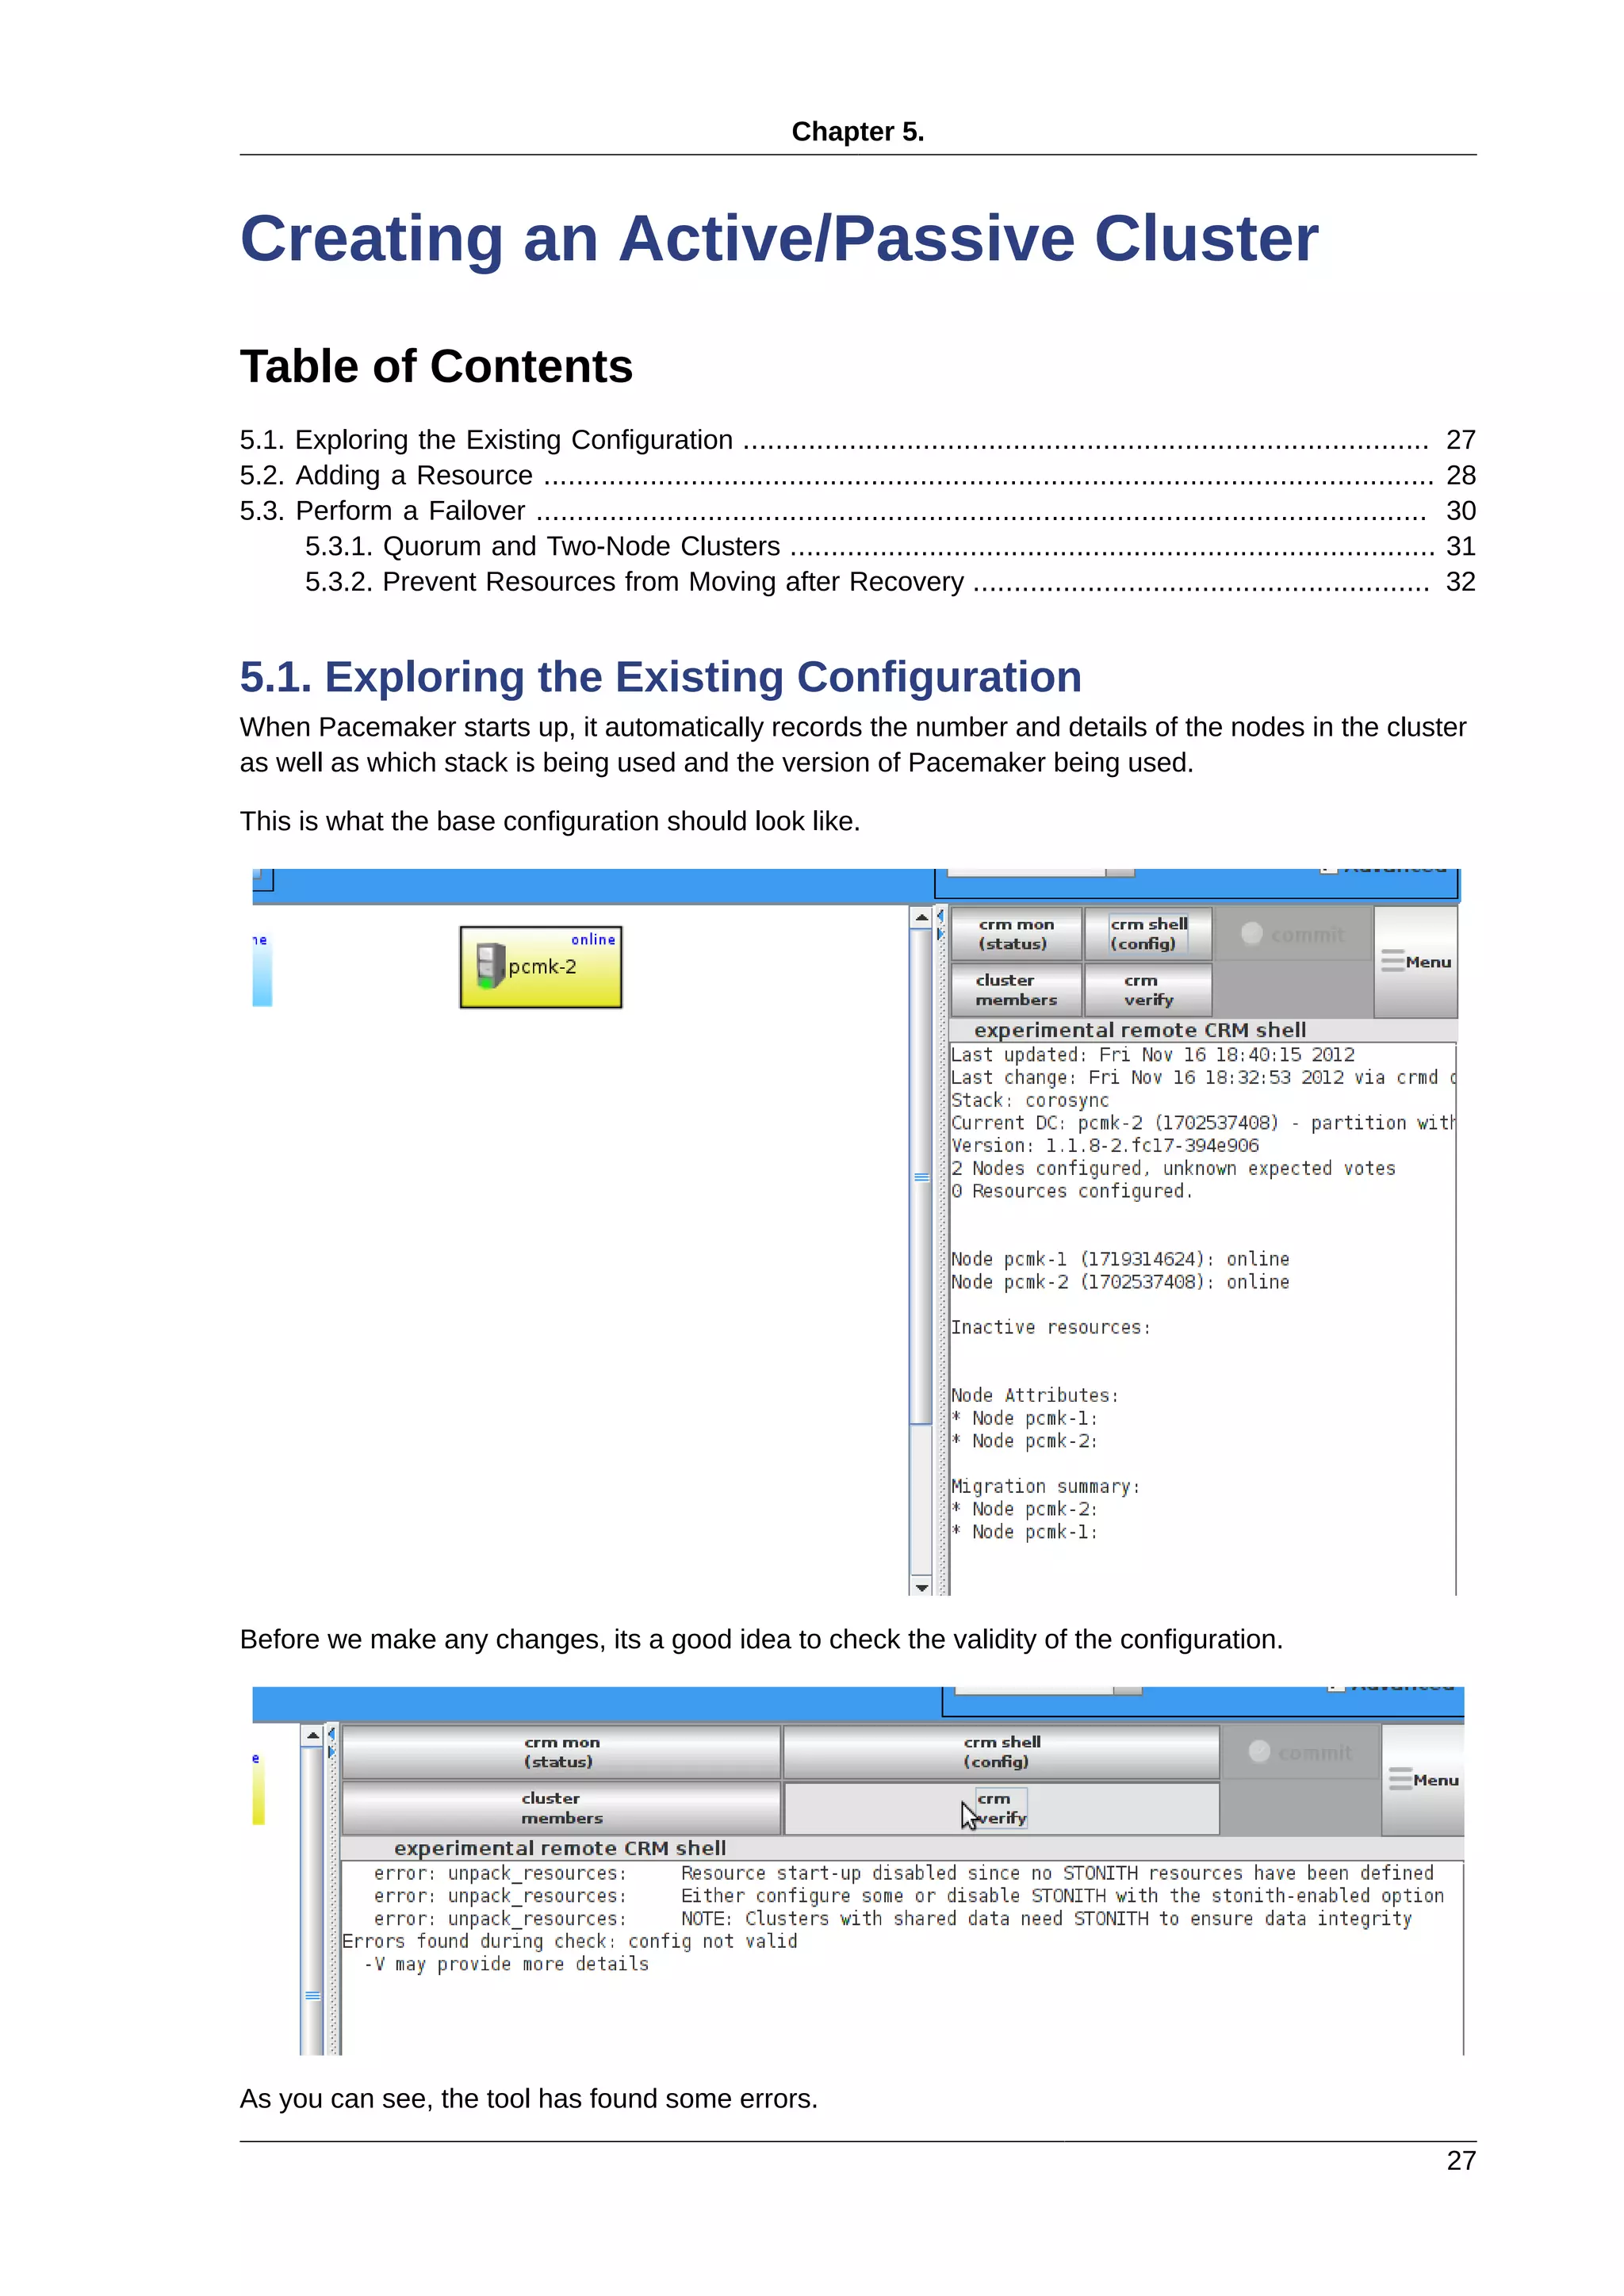
2.2.4. Short Node Names
During installation, we filled in the machine’s fully qualifier domain name (FQDN) which can be rather
long when it appears in cluster logs and status output. See for yourself how the machine identifies it-
self:
# uname -n](https://image.slidesharecdn.com/pacemaker-1-140326044348-phpapp02/75/Pacemaker-1-1-clusters-from-scratch-19-2048.jpg)
![Chapter 2. Installation
14
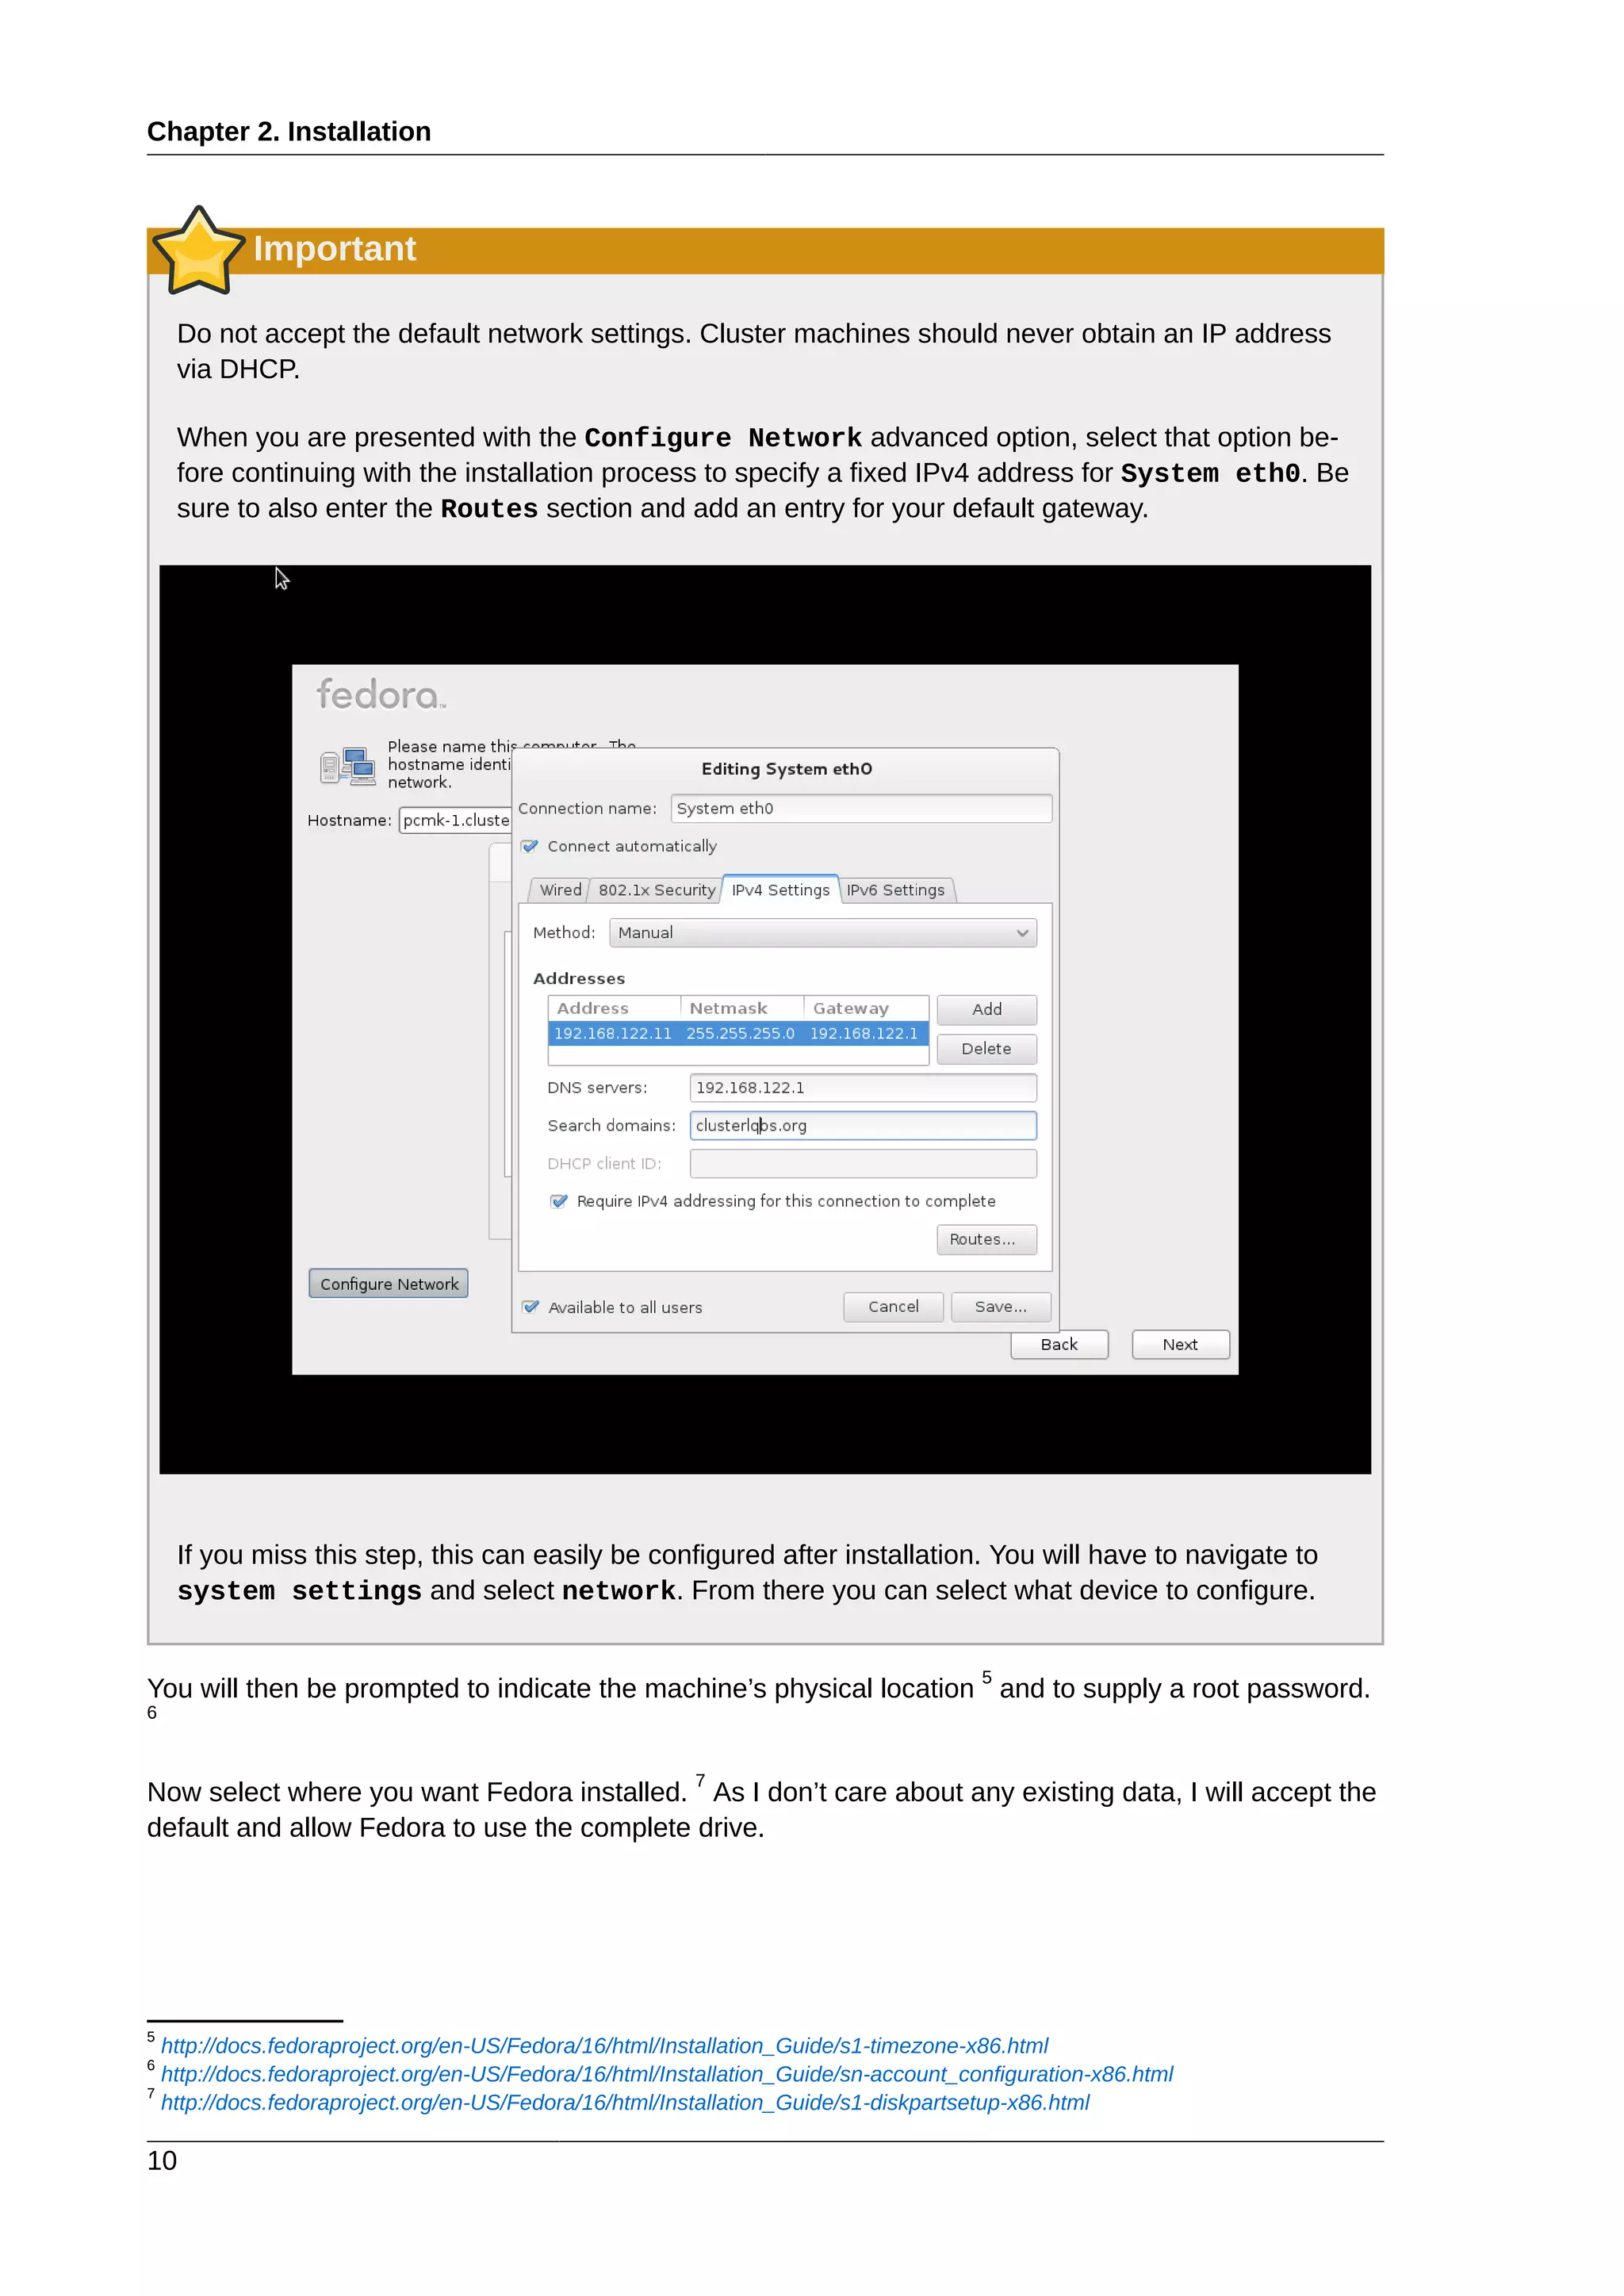
pcmk-1.clusterlabs.org
# dnsdomainname
clusterlabs.org
The output from the second command is fine, but we really don’t need the domain name included in
the basic host details. To address this, we need to update /etc/sysconfig/network. This is what it should
look like before we start.
# cat /etc/sysconfig/network
NETWORKING=yes
HOSTNAME=pcmk-1.clusterlabs.org
GATEWAY=192.168.122.1
All we need to do now is strip off the domain name portion, which is stored elsewhere anyway.
# sed -i.sed 's/.[a-z].*//g' /etc/sysconfig/network
Now confirm the change was successful. The revised file contents should look something like this.
# cat /etc/sysconfig/network
NETWORKING=yes
HOSTNAME=pcmk-1
GATEWAY=192.168.122.1
However we’re not finished. The machine wont normally see the shortened host name until about it re-
boots, but we can force it to update.
# source /etc/sysconfig/network
# hostname $HOSTNAME
Now check the machine is using the correct names
# uname -n
pcmk-1
# dnsdomainname
clusterlabs.org
2.2.5. NTP
It is highly recommended to enable NTP on your cluster nodes. Doing so ensures all nodes agree on
the current time and makes reading log files significantly easier.
9
2.3. Before You Continue
Repeat the Installation steps so far, so that you have two Fedora nodes ready to have the cluster soft-
ware installed.
For the purposes of this document, the additional node is called pcmk-2 with address
192.168.122.102.
9
http://docs.fedoraproject.org/en-US/Fedora/17/html-single/System_Administrators_Guide/index.html#ch-
Configuring_the_Date_and_Time](https://image.slidesharecdn.com/pacemaker-1-140326044348-phpapp02/75/Pacemaker-1-1-clusters-from-scratch-20-2048.jpg)
![Chapter 2. Installation
16
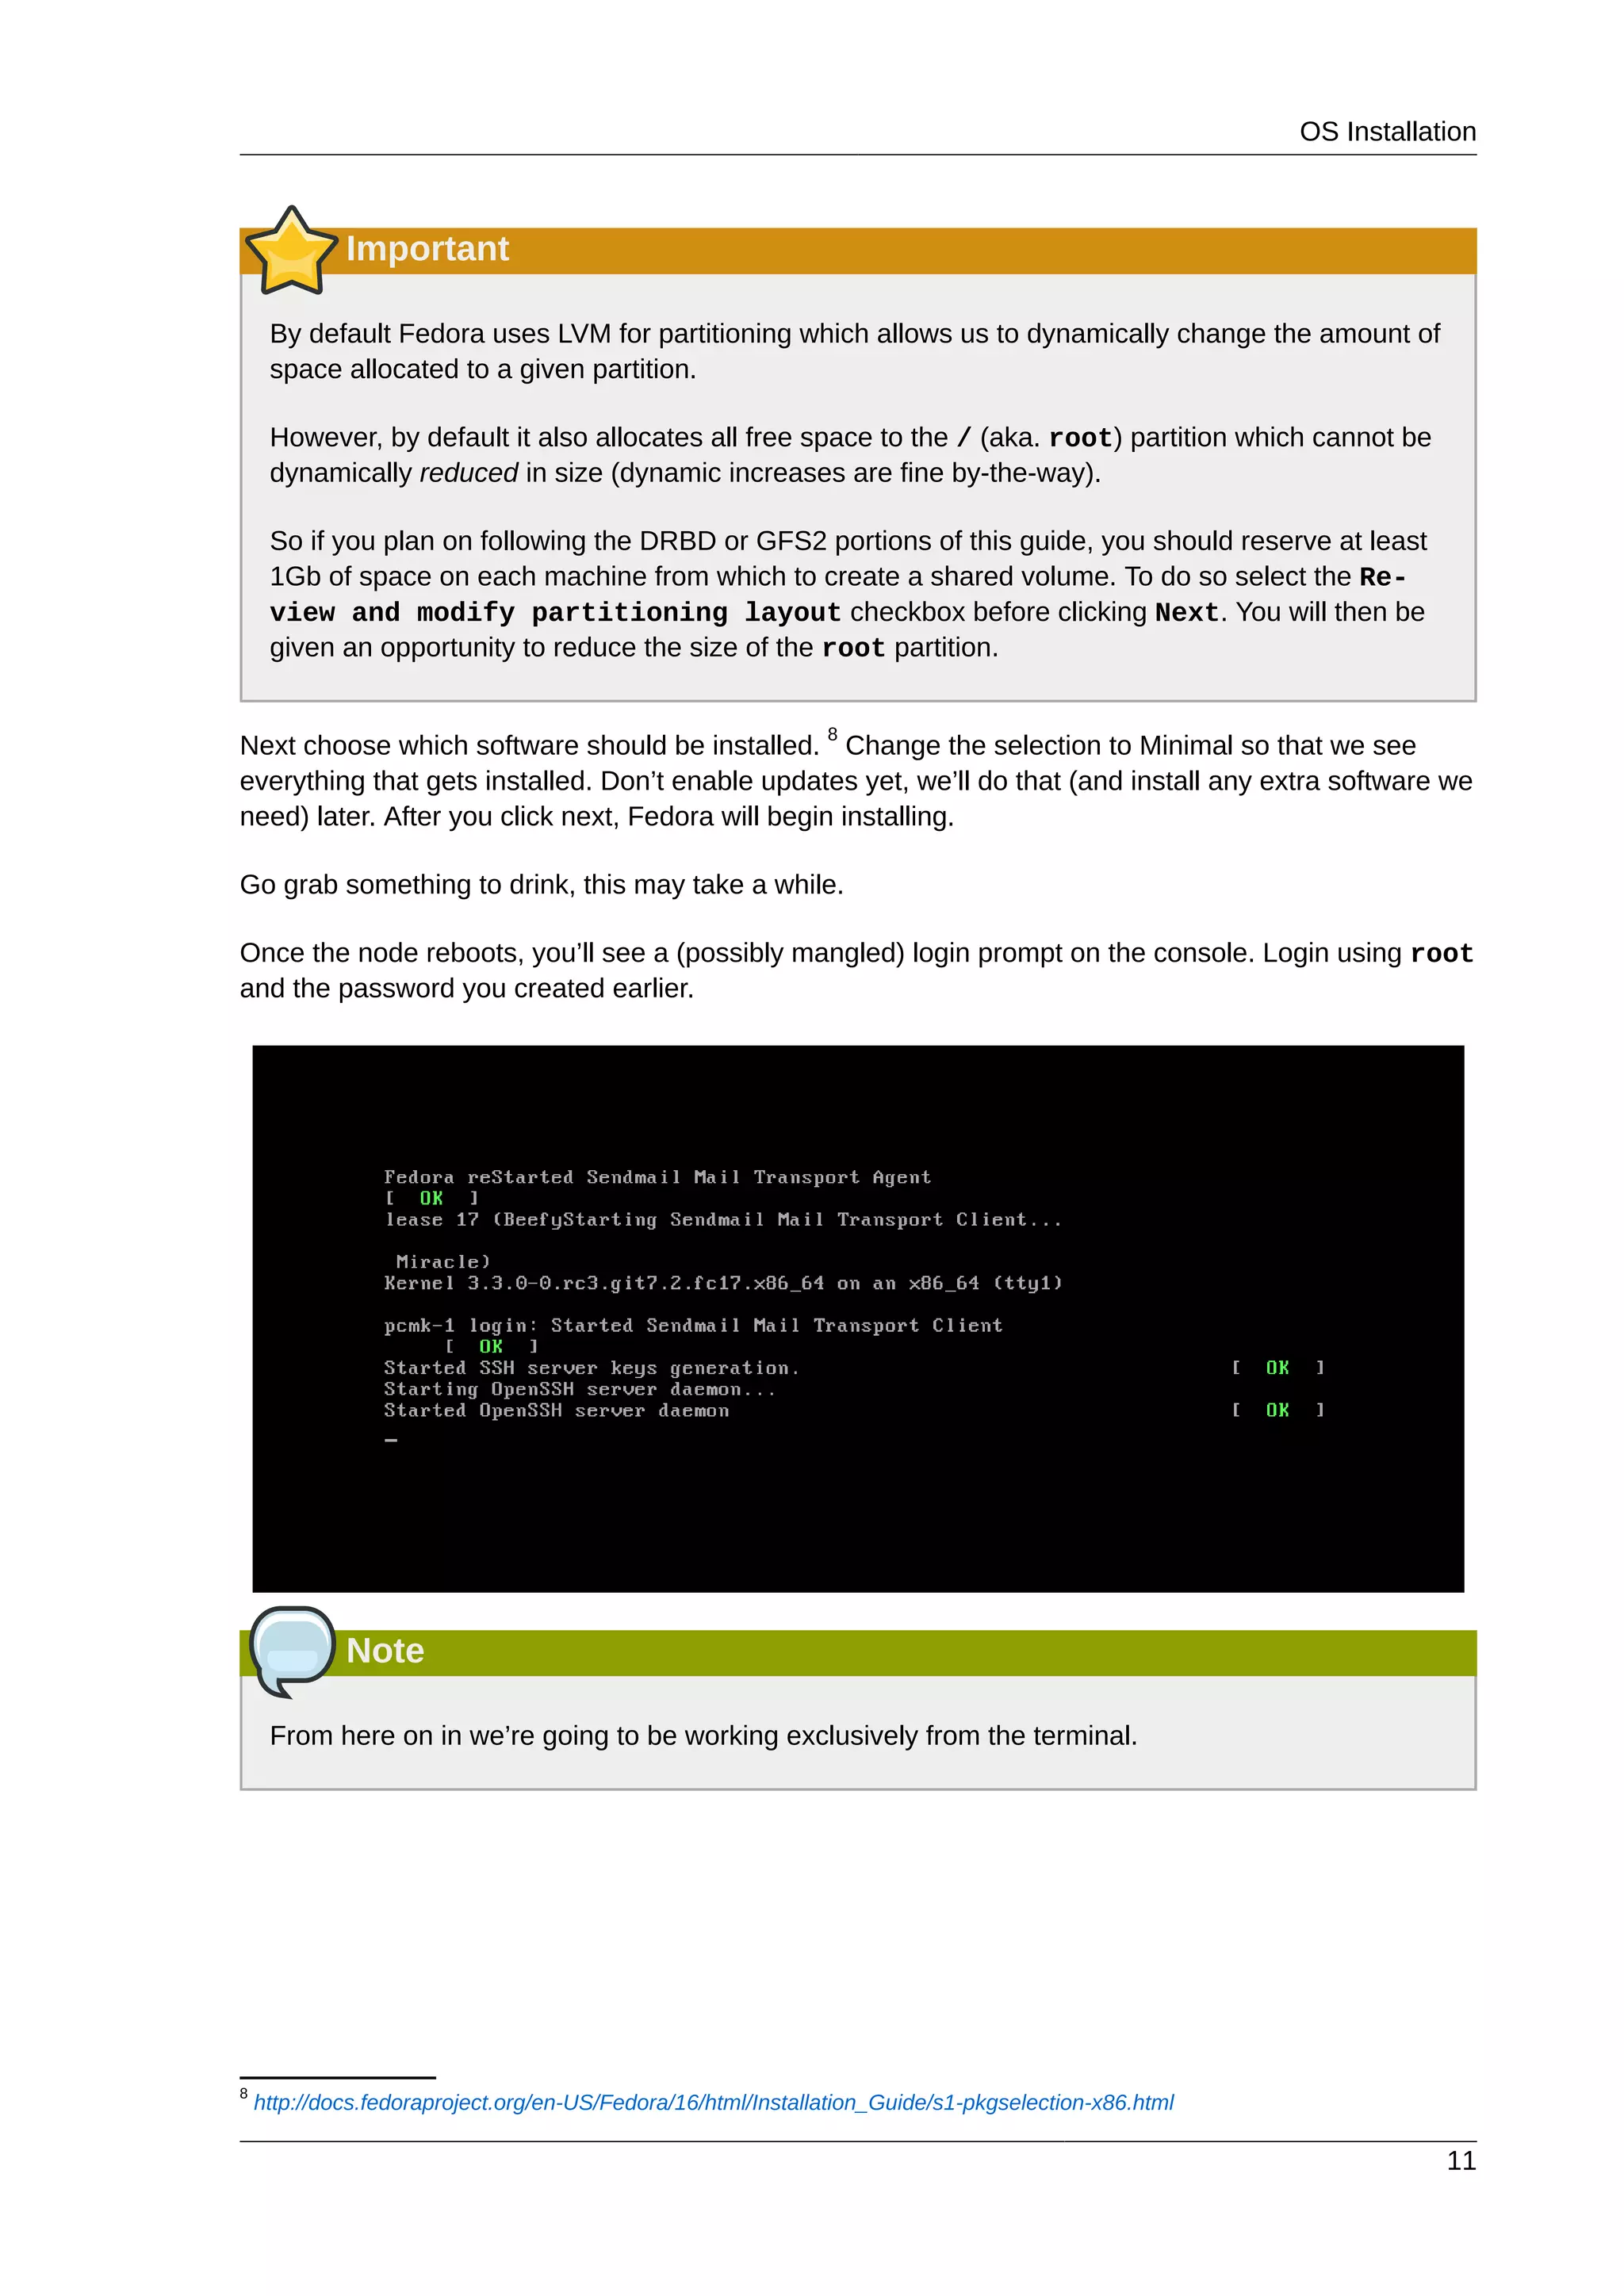
Generating public/private dsa key pair.
Your identification has been saved in /root/.ssh/id_dsa.
Your public key has been saved in /root/.ssh/id_dsa.pub.
The key fingerprint is:
91:09:5c:82:5a:6a:50:08:4e:b2:0c:62:de:cc:74:44 root@pcmk-1.clusterlabs.org
The key's randomart image is:
+--[ DSA 1024]----+
|==.ooEo.. |
|X O + .o o |
| * A + |
| + . |
| . S |
| |
| |
| |
| |
+-----------------+
# cp .ssh/id_dsa.pub .ssh/authorized_keys
Install the key on the other nodes and test that you can now run commands remotely, without being
prompted
Installing the SSH Key on Another Host
# scp -r .ssh pcmk-2:
The authenticity of host 'pcmk-2 (192.168.122.102)' can't be established.
RSA key fingerprint is b1:2b:55:93:f1:d9:52:2b:0f:f2:8a:4e:ae:c6:7c:9a.
Are you sure you want to continue connecting (yes/no)? yes
Warning: Permanently added 'pcmk-2,192.168.122.102' (RSA) to the list of known
hosts.root@pcmk-2's password:
id_dsa.pub 100% 616 0.6KB/s 00:00
id_dsa 100% 672 0.7KB/s 00:00
known_hosts 100% 400 0.4KB/s 00:00
authorized_keys 100% 616 0.6KB/s 00:00
# ssh pcmk-2 -- uname -n
pcmk-2
#
2.4. Cluster Software Installation
2.4.1. Install the Cluster Software
Since version 12, Fedora comes with recent versions of everything you need, so simply fire up the GUI
and run:](https://image.slidesharecdn.com/pacemaker-1-140326044348-phpapp02/75/Pacemaker-1-1-clusters-from-scratch-22-2048.jpg)


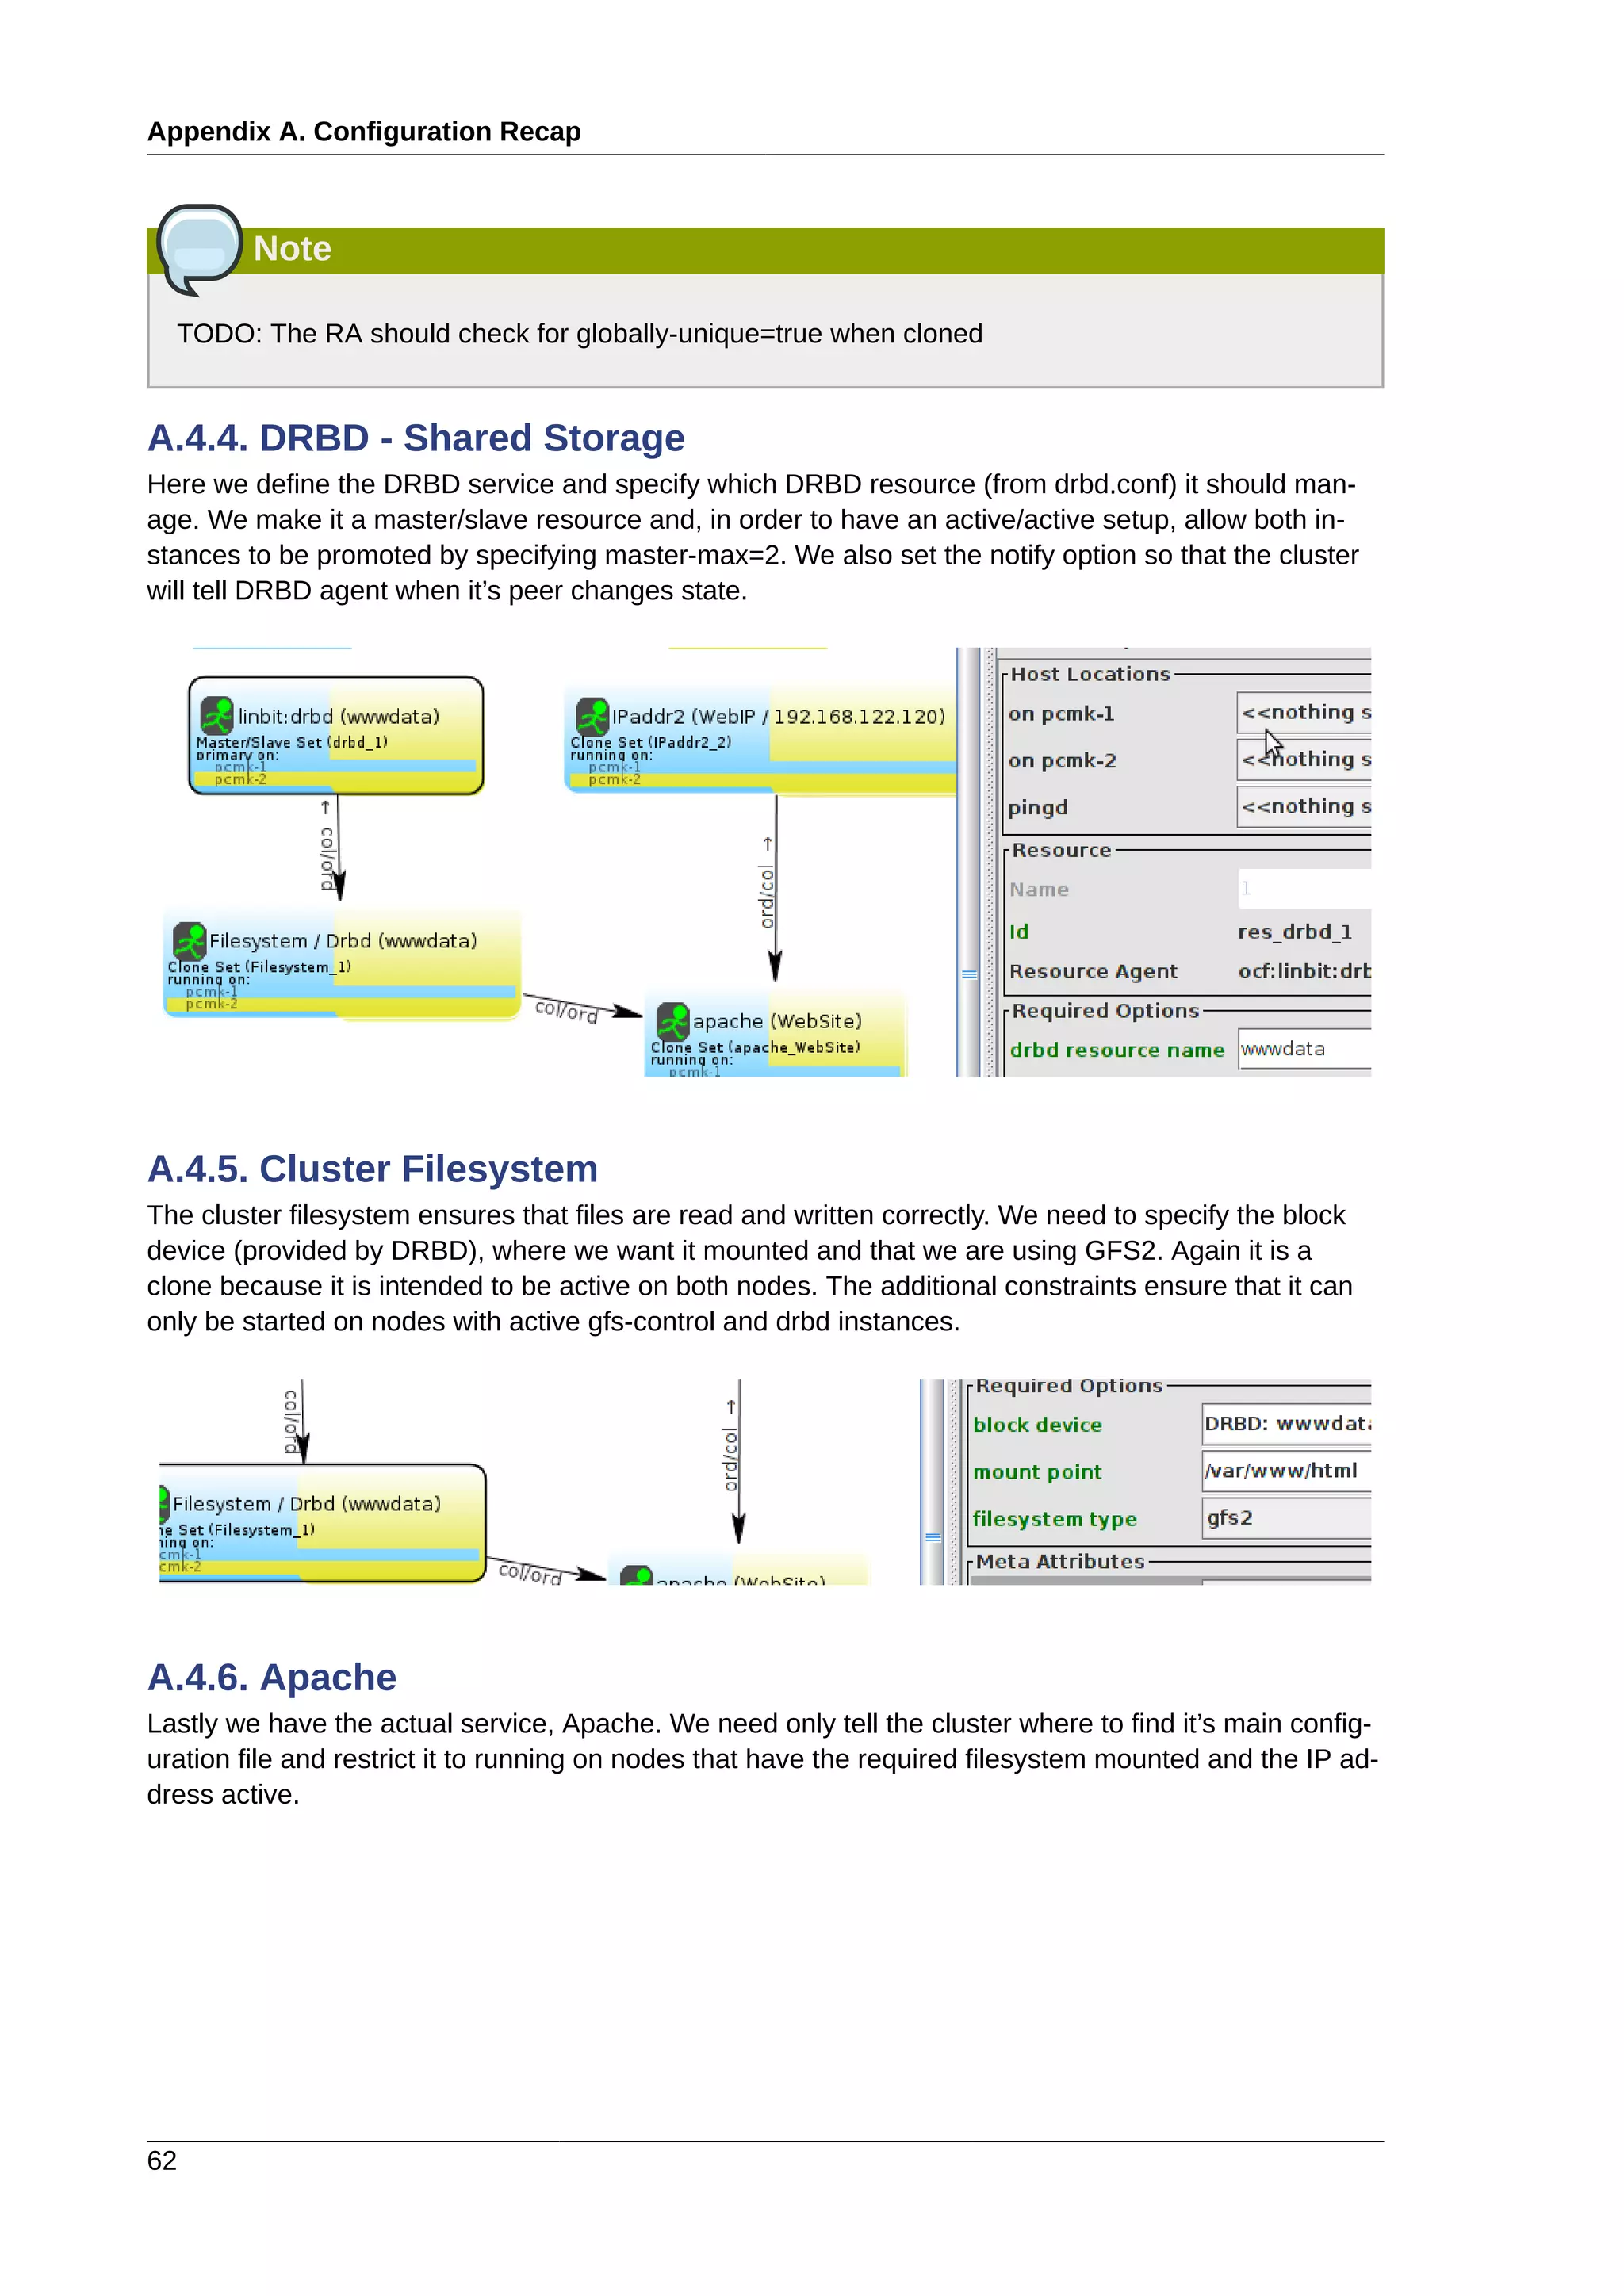
![Chapter 6.
35
Apache - Adding More Services
Table of Contents
6.1. Forward ............................................................................................................................. 35
6.2. Installation .......................................................................................................................... 35
6.3. Preparation ........................................................................................................................ 35
6.4. Enable the Apache status URL ........................................................................................... 36
6.5. Update the Configuration .................................................................................................... 36
6.6. Ensuring Resources Run on the Same Host ........................................................................ 38
6.7. Controlling Resource Start/Stop Ordering ............................................................................ 39
6.8. Specifying a Preferred Location .......................................................................................... 40
6.9. Manually Moving Resources Around the Cluster .................................................................. 41
6.9.1. Giving Control Back to the Cluster ............................................................................ 42
6.1. Forward
Now that we have a basic but functional active/passive two-node cluster, we’re ready to add some real
services. We’re going to start with Apache because its a feature of many clusters and relatively simple
to configure.
6.2. Installation
Before continuing, we need to make sure Apache is installed on both hosts. We also need the wget
tool in order for the cluster to be able to check the status of the Apache server.
6.3. Preparation
First we need to create a page for Apache to serve up. On Fedora the default Apache docroot is /var/
www/html, so we’ll create an index file there.
# cat <<-END >/var/www/html/index.html
<html>
<body>My Test Site - pcmk-1</body>
</html>
END
For the moment, we will simplify things by serving up only a static site and manually sync the data be-
tween the two nodes. So run the command again on pcmk-2.
[root@pcmk-2 ~]# cat <<-END >/var/www/html/index.html <html>](https://image.slidesharecdn.com/pacemaker-1-140326044348-phpapp02/75/Pacemaker-1-1-clusters-from-scratch-41-2048.jpg)


This document provides instructions for installing and configuring an active/passive cluster using Pacemaker and Corosync on Fedora 17. It begins with installing Fedora on two nodes and configuring basic networking. Next, it covers installing the cluster software packages and configuring Corosync. It then demonstrates verifying the cluster installation and creating a basic active/passive configuration with a single Apache resource. The document proceeds to add more services, configure replicated storage using DRBD, and convert the cluster to an active/active configuration using GFS2. It concludes with configuring fencing via STONITH and recapping the final cluster configuration.