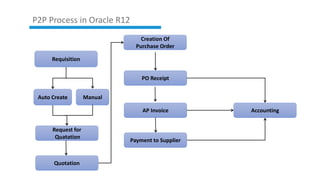
Procure To Pay
Vignesh kumar G
6th OCT 2021
RFQ and Quotation(Optional)
Purchase Requisition
1
2
3 Purchase Order
4
Make Payment
Create Receipt
5 Enter AP Invoice
6
Agenda
7 Q&A
P2P Process in Oracle R12
Requisition
Request for
Quatation
Creation Of
Purchase Order
PO Receipt
AP Invoice
Payment to Supplier
Accounting
Quotation
Auto Create Manual
Purchase Requisition Creation
Requirement
 Oracle Purchasing Responsibility
 Requisition Preference setup(Sequence number
 Item in IMO
Key Activities
 Purchase Requisition create based on internel requirement
 Purchase Requisition Approve by specified user
 Purchase Requisition converted into RFQ or PO.
Possible Options Implementation Consideration
Approved based PR needs to generate neeeds to config approval
group,approval assignment,document type should be define in
purchasing responsibility
 Approval based flow
 Without approval flow
Chainsys had experience on developed
integration for (DBS, OCBC, ANZ, BDO etc)
Create Purchase Requisition:
 Requisition is nothing but a formal request to buy something (like Inventory material, office supplies etc)
needed for the enterprise. Only an employee can create one.
There are two types of requisitions:
 Internal Requisition: Internal requisitions provide the mechanism for requesting and transferring
material from one inventory to other inventory.
 Purchase requisition: Unlike Internal requisitions, Purchase requisitions are used for requesting material
from suppliers.
 Navigation: Purchasing Responsibility > Requisitions > Requisitions
 Choose the requisition type and enter the Item, quantity, Price details in the Lines tab
In Source Details tab, specify the Buyer name.
Click the Distributions button. Enter the Charge Account.
Save the work. The status of the requisition will now be “Incomplete”. And now the Approve button
is highlighted. The requisition needs to be approved first before proceeding further by the concerned
authority. Submit this requisition for Approval by clicking on the Approve button. The status will
now be updated to “In Process” .The workflow then will send an Approval notification to the
concerned person (derived based on hierarchy used—Position or Supervisor hierarchy) using which
he can Approve or Reject the requisition.
At any time the status of requisition can be checked using the Requisition summary window.
Navigation: Requisitions > Requisition Summary
Enter requisition number and click on the find button.
We can also check the Action History of requisition (it will show details about who has submitted, approved and
cancelled the requisitions) as below:
Navigation: Tools menu > Action History.
Purchase Order Creation
Requirement
 Raise RFQ to Multiple suppliers
 Select Quote based on negotiation
 Approve the Quote
Key Activities
 RFI to RFQ
 RFQ to PO
 PR PO
Possible Options Implementation Consideration
Approved based PO needs to generate neeeds to config approval
group,approval assignment,document type should be define in
purchasing responsibility
 Approval based flow
 Without approval flow
Chainsys had experience on developed
integration for (DBS, OCBC, ANZ, BDO etc)
Create Purchase Order:
There are 4 types of Purchase Orders:
 Standard PO: A Standard PO is created for one–time purchase of various items
 Planned PO: A Planned PO is a long–term agreement committing to buy items or services from a single
source. You must specify tentative delivery schedules and all details for goods or services that you want to
buy, including charge account, quantities, and estimated cost.
 Blanket agreement: A Blanket PO is created when you know the detail of the goods or services you plan
to buy from a specific supplier in a period, but you do not know the detail of your delivery schedules.
 Contract agreement: Contract purchase agreements are created with your suppliers to agree
on specific terms and conditions without indicating the goods and services that you will be purchasing
 Navigation for creating a standard PO: Purchase Orders > Purchase Orders
Choose type as Standard Purchase Order. Enter the Supplier, Buyer. In the Lines tab, specify the line
number, line type, Item, quantity, price etc.
Click Terms to enter terms, conditions, and control information for purchase orders.
Click Currency button to enter and change currency information for purchase orders, RFQs, and
quotations.
Click Shipments button to enter multiple shipments for standard and planned purchase order lines
Purchase order shipment specifies the quantity, ship–to organization and location, date you want your
supplier to deliver the items on a purchase order line, and country of origin for the items. When you save,
Purchasing creates distributions depending on the default information available.
To enter more shipment information, select the More tab.
Enter the Receipt Close Tolerance percent, Invoice Close Tolerance percent to set the receiving
and invoice close point.
Select one of the following options for Match Approval Level:
Two–Way: Purchase order and invoice quantities must match within tolerance before the
corresponding invoice can be paid.
Three–Way: Purchase order, receipt, and invoice quantities must match within tolerance
before the corresponding invoice can be paid.
Four–Way: Purchase order, receipt, accepted, and invoice quantities must match within
tolerance before the corresponding invoice can be paid.
Select an Invoice Match Option:
Purchase Order: Payables must match the invoice to the purchase order.
Receipt: Payables must match the invoice to the receipt.
Save the work.
Click Distributions button to enter distributions for the shipments.
Select more tab to enter more details and the requisition number (optional).
Save the work.
Click the Receiving Controls button to enter receiving control information for purchase orders.
– Enter the maximum acceptable number of Days Early and Days Late for receipts.
– Enter the Action for receipt date control.
– Enter the maximum acceptable over–receipt Tolerance percent (receipts that exceed the quantity
received tolerance).
– Enter the Action for Overreceipt Quantity.
– Select Allow Substitute Receipts to indicate that receivers can receive substitute items in place of
ordered items.
– Enter the default Receipt Routing that you assign goods: Direct Delivery, Inspection Required, or
Standard Receipt.
– Enter the Enforce Ship To location option to determine whether the receiving location must be the same
as the ship–to location.
Save the work.
Click on the Approve button to initiate the Approval process.
Receipt Creation
Requirement
 Approved Purchase order
 Purchasing Responsibility
Key Activities
 GRN
 Receiving Transaction based on Matching option
 Create ERS Invoice
Possible Options Implementation Consideration
Receiving transaction method should be define in PO or supplier
site.
Manual way of approve disable ERS option in supplier site.
 Automatic ERS invoice against
receipt
 Manual invoice against receipt
Chainsys had experience on developed
integration for (DBS, OCBC, ANZ, BDO etc)
Create a receipt to receive the items in the Purchase Order.
Navigation: Receiving : Receipts
Enter the PO Number and select find button.
Go to Lines, check the lines you want to receive in the PO.
Click on Header button and Save which creates the receipt.
Create Invoice in Payables
Requirement
 Payable Responsibility
 Receipt Number
Key Activities
 Manually enter date in invoice form.
 Match the Receipt.
 Validate the invoice.
Possible Options Implementation Consideration
Create payment terms and Payment Method.
Define both in supplier site.
 Manual invoice against match
receipt
Chainsys had experience on developed
integration for (DBS, OCBC, ANZ, BDO etc)
Once the goods are received, it’s time to pay the vendor for the goods purchased and hence the invoices
are created.
Navigation: Payables> Invoices>Entry>Invoices
Enter type — Standard, supplier information and amount.
Click the Match button to match to either Purchase Order or Receipt (depending on the Invoice Match
option specified on the PO) and avoid manually entering the invoice.
Enter the PO Number you want match to and click Find.
Select the lines required and click on Match button.
This creates the invoice and you can see the status of the invoice as “Never Validated”. it has to be
Validated and Accounted before you can pay it.
Validating the Invoice:
Click on Actions Button and Select “Validate”. Click on OK button.
Now you can see the status of the invoice as “Validated”,
if there are no issues during validation.
Create Accounting Entries:
Click on Actions Button and Select “Create Accouting”. Click on OK button.
Now we can see the Accounted status as “Yes”.
You can see the Accounting Entries here:
Tools > View Accounting
Making a Payment:
Requirement
 Payable Responsibility
 payble invoice should be created
Key Activities
 Select pay in full option in invoice workbench action button.
 Execute quick payment in payment form
 Create Accounting
Possible Options Implementation Consideration
Create bank ,bank branch and accout
Define Payment document and payment profile
 Manual payment against match
invoice
 Quick payment directly go from
invoice workbench
Chainsys had experience on developed
integration for (DBS, OCBC, ANZ, BDO etc)
Invoice window and query the invoice you want to pay. You would see Amount paid as 0.00 before you
make a payment.
Click Actions button. Select “Pay in full” and click “OK”.
Select the Bank Account and Document. Save the Work.Now that the payment is made, when you query
for the invoice in Invoice window, you will the Amount Paid as $50,000.00.
Create Accounting entries for payment.
Click Actions and select “Create Accounting”
View Accounting Entries:
In the Payments window, query for the payment.
Tools menu>View Accounting
Q&A
Chain-Sys Corporation
283, State Street ,Suite 201,
Westerville, OH 43081,
USA.
Chain-Sys Europa B.V.
Van Heuven Goedhartlaan 13D
1181 LE Amstelveen
The Netherlands
Chain-Sys Middle East
#6WA-232, PO Box 371425
DAFZA, Dubai,
UAE
Chain-Sys Asia Pacific Pte. Ltd.
Harbourfront Ave,
#13-03 Keppel Bay Tower,
Singapore - 098632
Development Headquarters
Chain-Sys (India) Pvt. Ltd.
#85, Ponniamman Nagar,
Ayanambakam, Chennai - 600095
India.
Global Headquarters
Chain-Sys Corporation
325, S. Clinton Street, Grand Ledge,
West Lansing, Michigan – 48837
USA.
www.chainsys.com
Global Presence – Serving Locally
Thank You.

p2p (2).pptx

  • 1.
    Procure To Pay Vigneshkumar G 6th OCT 2021
  • 2.
    RFQ and Quotation(Optional) PurchaseRequisition 1 2 3 Purchase Order 4 Make Payment Create Receipt 5 Enter AP Invoice 6 Agenda 7 Q&A
  • 3.
    P2P Process inOracle R12 Requisition Request for Quatation Creation Of Purchase Order PO Receipt AP Invoice Payment to Supplier Accounting Quotation Auto Create Manual
  • 4.
    Purchase Requisition Creation Requirement Oracle Purchasing Responsibility  Requisition Preference setup(Sequence number  Item in IMO Key Activities  Purchase Requisition create based on internel requirement  Purchase Requisition Approve by specified user  Purchase Requisition converted into RFQ or PO. Possible Options Implementation Consideration Approved based PR needs to generate neeeds to config approval group,approval assignment,document type should be define in purchasing responsibility  Approval based flow  Without approval flow Chainsys had experience on developed integration for (DBS, OCBC, ANZ, BDO etc)
  • 5.
    Create Purchase Requisition: Requisition is nothing but a formal request to buy something (like Inventory material, office supplies etc) needed for the enterprise. Only an employee can create one. There are two types of requisitions:  Internal Requisition: Internal requisitions provide the mechanism for requesting and transferring material from one inventory to other inventory.  Purchase requisition: Unlike Internal requisitions, Purchase requisitions are used for requesting material from suppliers.  Navigation: Purchasing Responsibility > Requisitions > Requisitions
  • 6.
     Choose therequisition type and enter the Item, quantity, Price details in the Lines tab
  • 7.
    In Source Detailstab, specify the Buyer name.
  • 8.
    Click the Distributionsbutton. Enter the Charge Account.
  • 9.
    Save the work.The status of the requisition will now be “Incomplete”. And now the Approve button is highlighted. The requisition needs to be approved first before proceeding further by the concerned authority. Submit this requisition for Approval by clicking on the Approve button. The status will now be updated to “In Process” .The workflow then will send an Approval notification to the concerned person (derived based on hierarchy used—Position or Supervisor hierarchy) using which he can Approve or Reject the requisition.
  • 10.
    At any timethe status of requisition can be checked using the Requisition summary window. Navigation: Requisitions > Requisition Summary Enter requisition number and click on the find button. We can also check the Action History of requisition (it will show details about who has submitted, approved and cancelled the requisitions) as below: Navigation: Tools menu > Action History.
  • 11.
    Purchase Order Creation Requirement Raise RFQ to Multiple suppliers  Select Quote based on negotiation  Approve the Quote Key Activities  RFI to RFQ  RFQ to PO  PR PO Possible Options Implementation Consideration Approved based PO needs to generate neeeds to config approval group,approval assignment,document type should be define in purchasing responsibility  Approval based flow  Without approval flow Chainsys had experience on developed integration for (DBS, OCBC, ANZ, BDO etc)
  • 12.
    Create Purchase Order: Thereare 4 types of Purchase Orders:  Standard PO: A Standard PO is created for one–time purchase of various items  Planned PO: A Planned PO is a long–term agreement committing to buy items or services from a single source. You must specify tentative delivery schedules and all details for goods or services that you want to buy, including charge account, quantities, and estimated cost.  Blanket agreement: A Blanket PO is created when you know the detail of the goods or services you plan to buy from a specific supplier in a period, but you do not know the detail of your delivery schedules.  Contract agreement: Contract purchase agreements are created with your suppliers to agree on specific terms and conditions without indicating the goods and services that you will be purchasing  Navigation for creating a standard PO: Purchase Orders > Purchase Orders
  • 13.
    Choose type asStandard Purchase Order. Enter the Supplier, Buyer. In the Lines tab, specify the line number, line type, Item, quantity, price etc. Click Terms to enter terms, conditions, and control information for purchase orders. Click Currency button to enter and change currency information for purchase orders, RFQs, and quotations.
  • 14.
    Click Shipments buttonto enter multiple shipments for standard and planned purchase order lines Purchase order shipment specifies the quantity, ship–to organization and location, date you want your supplier to deliver the items on a purchase order line, and country of origin for the items. When you save, Purchasing creates distributions depending on the default information available. To enter more shipment information, select the More tab.
  • 15.
    Enter the ReceiptClose Tolerance percent, Invoice Close Tolerance percent to set the receiving and invoice close point. Select one of the following options for Match Approval Level: Two–Way: Purchase order and invoice quantities must match within tolerance before the corresponding invoice can be paid. Three–Way: Purchase order, receipt, and invoice quantities must match within tolerance before the corresponding invoice can be paid. Four–Way: Purchase order, receipt, accepted, and invoice quantities must match within tolerance before the corresponding invoice can be paid. Select an Invoice Match Option: Purchase Order: Payables must match the invoice to the purchase order.
  • 16.
    Receipt: Payables mustmatch the invoice to the receipt. Save the work. Click Distributions button to enter distributions for the shipments. Select more tab to enter more details and the requisition number (optional). Save the work.
  • 17.
    Click the ReceivingControls button to enter receiving control information for purchase orders. – Enter the maximum acceptable number of Days Early and Days Late for receipts. – Enter the Action for receipt date control. – Enter the maximum acceptable over–receipt Tolerance percent (receipts that exceed the quantity received tolerance). – Enter the Action for Overreceipt Quantity. – Select Allow Substitute Receipts to indicate that receivers can receive substitute items in place of ordered items. – Enter the default Receipt Routing that you assign goods: Direct Delivery, Inspection Required, or Standard Receipt. – Enter the Enforce Ship To location option to determine whether the receiving location must be the same as the ship–to location. Save the work.
  • 19.
    Click on theApprove button to initiate the Approval process.
  • 20.
    Receipt Creation Requirement  ApprovedPurchase order  Purchasing Responsibility Key Activities  GRN  Receiving Transaction based on Matching option  Create ERS Invoice Possible Options Implementation Consideration Receiving transaction method should be define in PO or supplier site. Manual way of approve disable ERS option in supplier site.  Automatic ERS invoice against receipt  Manual invoice against receipt Chainsys had experience on developed integration for (DBS, OCBC, ANZ, BDO etc)
  • 21.
    Create a receiptto receive the items in the Purchase Order. Navigation: Receiving : Receipts Enter the PO Number and select find button.
  • 22.
    Go to Lines,check the lines you want to receive in the PO.
  • 23.
    Click on Headerbutton and Save which creates the receipt.
  • 24.
    Create Invoice inPayables Requirement  Payable Responsibility  Receipt Number Key Activities  Manually enter date in invoice form.  Match the Receipt.  Validate the invoice. Possible Options Implementation Consideration Create payment terms and Payment Method. Define both in supplier site.  Manual invoice against match receipt Chainsys had experience on developed integration for (DBS, OCBC, ANZ, BDO etc)
  • 25.
    Once the goodsare received, it’s time to pay the vendor for the goods purchased and hence the invoices are created. Navigation: Payables> Invoices>Entry>Invoices Enter type — Standard, supplier information and amount.
  • 26.
    Click the Matchbutton to match to either Purchase Order or Receipt (depending on the Invoice Match option specified on the PO) and avoid manually entering the invoice. Enter the PO Number you want match to and click Find.
  • 27.
    Select the linesrequired and click on Match button.
  • 28.
    This creates theinvoice and you can see the status of the invoice as “Never Validated”. it has to be Validated and Accounted before you can pay it. Validating the Invoice: Click on Actions Button and Select “Validate”. Click on OK button.
  • 29.
    Now you cansee the status of the invoice as “Validated”, if there are no issues during validation.
  • 30.
    Create Accounting Entries: Clickon Actions Button and Select “Create Accouting”. Click on OK button. Now we can see the Accounted status as “Yes”.
  • 31.
    You can seethe Accounting Entries here: Tools > View Accounting
  • 32.
    Making a Payment: Requirement Payable Responsibility  payble invoice should be created Key Activities  Select pay in full option in invoice workbench action button.  Execute quick payment in payment form  Create Accounting Possible Options Implementation Consideration Create bank ,bank branch and accout Define Payment document and payment profile  Manual payment against match invoice  Quick payment directly go from invoice workbench Chainsys had experience on developed integration for (DBS, OCBC, ANZ, BDO etc)
  • 33.
    Invoice window andquery the invoice you want to pay. You would see Amount paid as 0.00 before you make a payment. Click Actions button. Select “Pay in full” and click “OK”.
  • 34.
    Select the BankAccount and Document. Save the Work.Now that the payment is made, when you query for the invoice in Invoice window, you will the Amount Paid as $50,000.00.
  • 35.
    Create Accounting entriesfor payment. Click Actions and select “Create Accounting” View Accounting Entries: In the Payments window, query for the payment. Tools menu>View Accounting
  • 36.
  • 37.
    Chain-Sys Corporation 283, StateStreet ,Suite 201, Westerville, OH 43081, USA. Chain-Sys Europa B.V. Van Heuven Goedhartlaan 13D 1181 LE Amstelveen The Netherlands Chain-Sys Middle East #6WA-232, PO Box 371425 DAFZA, Dubai, UAE Chain-Sys Asia Pacific Pte. Ltd. Harbourfront Ave, #13-03 Keppel Bay Tower, Singapore - 098632 Development Headquarters Chain-Sys (India) Pvt. Ltd. #85, Ponniamman Nagar, Ayanambakam, Chennai - 600095 India. Global Headquarters Chain-Sys Corporation 325, S. Clinton Street, Grand Ledge, West Lansing, Michigan – 48837 USA. www.chainsys.com Global Presence – Serving Locally Thank You.