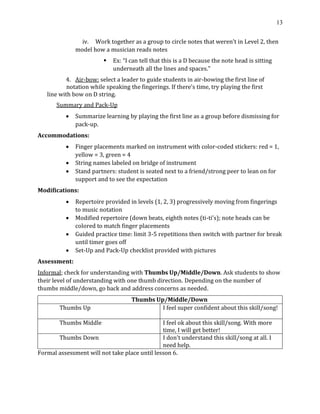
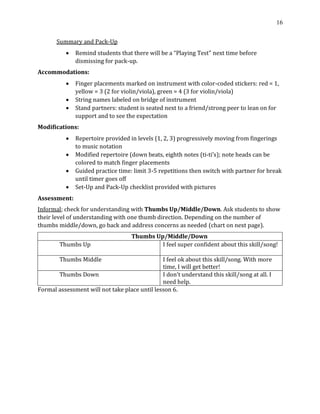
SlideShare a Scribd company logo
1 of 22
Download to read offline
1
Lesson Plan: O Pastorzinho/Dó Ré Mi Fá for Beginning Orchestra
Lesson Length: 6 class periods; 30 minutes each, 1x per week
Grade Level: 4th
and 5th
grade cello group lesson (second half of first year or beginning of
second year)
M.A. and National Music Standards (4th Grade):
Cr3: Refine and complete artistic work. (3-4.M.Cr.03)
P5: Develop and refine artistic techniques and work for presentation. (3-4.M.P.05)
P6: Convey meaning through presentation of artistic work. (3-4.M.P.06)
R7: Perceive and analyze artistic work. (3-4.M.R.07)
R8: Interpret intent and meaning in artistic work. (3-4.M.R.08)
Co11: Relate artistic ideas and works to societal, cultural, and historical contexts to
deepen understanding. (3-4.M.Co.11)
Click this link and then click Arts Framwork
Day 1: Introduction to Solfège and Scales
Objectives (teacher voice): Students will be able to...
• Explain, in their own words, what solfège is and why musicians use it
• Explain, in their own words, how to play the D scale
• Compare and contrast Do, Re, Mi and O Pastorzinho
Objectives (student voice): I will be able to...
• Tell you what solfège is and why we use it
• Tell you how to move your fingers for the D scale
• Show what’s the same and what’s different between Do, Re, Mi and O
Pastorzinho
Procedure:
Set-Up: Prepare the following in advance
• whiteboard/projector with fingering for the D scale (D 1 3 4 / A 1 3 4)
• Do Now sheet for each student
Warm-Up: Do Now and D scale
• Do Now: Write the fingering from the board onto your piece of paper, then
try playing it. Bonus Challenge: try playing it backwards!
▪ Expectation: students complete Do Now while waiting to get
instrument tuned, tightening and rosining bow, preparing materials
▪ As students arrive, assign the Do Now. When you see everyone
playing, set a timer for 30 seconds of additional of practice time
2
▪ When the timer goes off, ask students “Does this pattern sound
familiar?” They may answer with songs they’ve either played/heard
▪ “This is called a scale. Not like a fish scale or a snake scale. In music, a
scale is a pattern of notes that start and end on the same note. As a
musician, when I see patterns like D134 or 431D I can tell that it will
sound like a scale because the notes are one after another. They do
not skip.” *remind students to fill in their answers on their
worksheet*
• Play the scale on the board with students counting you in and
keeping a steady beat, then you count in and keep a steady beat
while students play the D scale, half notes starting on D0
• Informal assessment: Thumbs Up/Middle/Down to check for
understanding; “How do you think that went? Great, Ok, or not
so good?” If there are several thumbs middle/down, ask “What
can we do differently?” to gage the group’s understanding on
how to improve. Guide students to the answer as needed.
Repertoire: Introduction to Solfège and O Pastorzinho/Dó Ré Mi Fá
1. Introduction to Solfège
i. Connection to The Sound of Music; “Have you ever seen or heard of
The Sound of Music? It’s a musical with a song called Do-Re-Mi
(https://youtu.be/drnBMAEA3AM). Many people recognize this song
because the lyrics have alliteration (matching the first letter of certain
words) that helps singers remember their solfège. Like Doe, a deer, a
female deer.”
ii. Write the word solfège on the board and add Do, Re, Mi, Fa, Sol, La, Ti,
do (lowercase on purpose) underneath the fingerings. Have students
write the solfège on their scale sheet, then have students sing the
solfège with you. “It’s not solfège anymore if we don’t sing it!”
• Add hand signs: have students make the signs along with you
while singing/humming.
• “As string players we use fingerings, but many musicians use
solfège to learn about their notes and scales. Solfège is very
helpful when you’re making music with musicians that play
different instruments.”
2. Introduction to O Pastorzinho/Dó Ré Mi Fá
i. Teacher will explain the title and information about the lyrics before
playing a recording of the original song
(https://www.youtube.com/watch?v=gjz9PM4iWWg)
ii. “This song is similar to Do Re Mi except it’s in Portuguese. I want to see
what similarities and differences you can find!”
3
• Guided listening: ask students to listen closely for one similarity or
one difference in the recording of Pastorzinho/Dó Ré Mi Fá vs Do
Re Mi
• Share-out to compare students’ findings; Q: “What was similar?
What was different?” A: Different sounds, different styles of
music, O Pastorzinho uses more upbeats
• “The melody of O Pastorzinho starts on an upbeat. An upbeat is
when the music starts on a ‘weaker’ note. If you tap your foot,
when your foot is flat on the floor that is the downbeat, and
when you lift your foot up that is the upbeat. Tap with me 1+
2+ 3+ 4+”
• “The singer sang differently than how we just sang. It’s because
different languages pronounce solfège differently. In
Portuguese, Re sounds more like ‘heh.’ Did anyone notice
that?”
• The lyrics describe a shepherd singing while working, and a
princess compliments their voice
3. Teacher will activate prior knowledge by questioning:
i. Q: “What does the 4/4 mean?” A: Count to 4, 4 beats per measure,
quarter note gets the beat
ii. Q: “What does the symbol with two lines and two dots mean?” A:
repeat sign
iii. Q: “What do the dots underneath notes stand for?” A: Staccato, short
sounds
iv. Q: “What is the symbol at the end of the first line?” A: eighth rest
4. Teacher will perform the piece (Level 1). Students will point to their sheet
music with finger, pencil, or bow while listening.
i. Teacher will model how to follow the music to the beat and audiate
as a reminder of expected behavior for this activity.
ii. Start/stop at least once to make sure students are following along
iii. Briefly check for understanding with a thumbs up/middle/down; “As
musicians, we read music similar to how people read books: left to
right. Does everyone understand?” Model by pointing to the notes on
the worksheet to show how musicians eyes track the notes
5. First line only: pluck, air-bow, bow
i. students will pluck (speaking fingerings), then air-bow (speaking
fingerings, letter names, moving fingers, and moving bow on arm)
before playing with bow on the D string.
Summary and Pack-Up
4
• Summarize learning by playing Level 2 one more time before dismissing for
pack-up.
Accommodations:
• Finger placements marked on instrument with color-coded stickers: red = 1,
yellow = 3, green = 4
• String names labeled on bridge of instrument
• Stand partners: student is seated next to a friend/strong peer to lean on for
support and to see the expectation
Modifications:
• Repertoire provided in levels (1, 2, 3) progressively moving from fingerings
to music notation
• Modified repertoire (down beats, eighth notes (ti-ti's); note heads can be
colored to match finger placements
• Guided practice time: limit 3-5 repetitions then switch with partner for break
until timer goes off
• Set-Up and Pack-Up checklist provided with pictures
Assessment:
Informal; check for understanding with Thumbs Up/Middle/Down. Ask students to show
their level of understanding with one thumb direction. Depending on the number of
thumbs middle/down, go back and address concerns as needed. (chart on next page)
Thumbs Up/Middle/Down
Thumbs Up I feel super confident about this skill/song!
Thumbs Middle I feel ok about this skill/song. With more
time, I will get better!
Thumbs Down I don’t understand this skill/song at all. I
need help.
Formal assessment will not take place until lesson 6.
5
Day 2: Continuing to learn about Scales, Solfège, and continuing Level 1
Objectives (teacher voice): Students will be able to...
• With visual and/or physical cues, speak or sing solfège in ascending order
• Explain, in their own words, how to play the D scale
• Compare and contrast Do, Re, Mi and O Pastorzinho
• Demonstrate their progress on the first line of O Pastorzinho
Objectives (student voice): I will be able to...
• Speak or sing solfège in ascending order
• Tell you how to move your fingers for the D scale
• Show what’s the same and what’s different between Do, Re, Mi and O
Pastorzinho
• Show you my progress so far on O Pastorzinho
Procedure:
Set-Up: Prepare the following in advance
• Whiteboard/projector with D scale fingerings, stairs, and solfège (see
Appendix F for visual)
Warm-up: Do Now, D scale, and Solfège Review
• Do Now: Finger Map
▪ Directions: Use your cello to help you write the notes on the D and A
strings. Fill in all 8 bubbles with the fingering, then try playing the D
scale alone or with a partner (see Appendix F)
▪ When you see everyone practicing, set a timer for 30 seconds. When
the timer goes off, Thumbs Up/Middle/Down “How did that go? Great,
Ok, or not so good?” (Informal Assessment; checking for
understanding of the finger patterns in the D scale)
• D scale together using half notes for full bows, then eighth notes:
1) 2)
D- 1- D D D D 1 1 1 1
• Solfège Review
▪ Q: “Who remembers what solfège is used for?” A: Singers use solfège
when there’s no lyrics/Musicians use solfège to communicate about
music
▪ Point to each note and have everyone speak the solfège, then sing it
6
▪ “As string players we use fingerings, but many musicians use solfège
to learn about their notes and scales. Solfège is very helpful when
you’re making music with musicians that play different instruments.”
▪ Write solfège on the back of the finger map, one for each stair
Repertoire: O Pastorzinho/Dó Ré Mi Fá
1. Review Level 1 information from last class period, activate prior knowledge
with questioning:
i. Q: “Who remembers what we talked about with this song?” A: The
Sound Of Music musical, solfège, a shepherd singing
ii. Q: “What string are we using?” A: the D string
iii. Q: “What is the first note? How many fingers do we need?” A: open D
iv. Q: “Does this melody start on an upbeat or a downbeat?” A: Upbeat
2. Play O Pastorzinho/Dó Ré Mi Fá Level 1 first line as a group once. Depending
on any issues that arise, go back to those spots with everyone as needed.
Implement Practice Time depending on your group’s needs.
i. Practice Time: give students X minutes/seconds to practice with a
guided task (like focusing on fingering or staccato). This should be no
longer than one minute. Students can work alone or with a partner.
When the timer goes off, everyone will get ready to play together one
more time.
• Informal Assessment: Thumbs Up/Middle/Down before
moving on to the next three lines; “How did that go? Great, Ok,
or not so good?” If there are several thumbs middle/down, ask
“What can we do differently?” to gage the group’s
understanding on how to improve. Guide students to the
answer as needed.
3. Continue working on Level 1 lines 2-4
i. Q: “What looks the same as before?” A: staccato; lines 1 and 4 are the
same
ii. Q: “What looks different?” A: different finger patterns except 1st and
4th line
iii. Q: “Does this rhythm pattern sound familiar?” A: same as D scale
warm-up.
4. Point-and-say: select a leader to guide students in pointing to the second line
speaking the fingerings.
5. Air-bow: select a leader to guide students in air-bowing the first line of
notation while speaking the fingerings.
7
i. Practice Time: give students X minutes/seconds to practice with a
guided task (like focusing on fingering or staccato). This should be no
longer than one minute. Students can work alone or with a partner.
When the timer goes off, everyone will get ready to play together one
more time.
Summary and Pack-Up
• Summarize learning by playing the first line as a group before dismissing for
pack-up.
Accommodations:
• Finger placements marked on instrument with color-coded stickers: red = 1,
yellow = 3 (2 for violin/viola), green = 4 (3 for violin/viola)
• String names labeled on bridge of instrument
• Stand partners: student is seated next to a friend/strong peer to lean on for
support and to see the expectation
Modifications:
• Repertoire provided in levels (1, 2, 3) progressively moving from fingerings
to music notation
• Modified repertoire (down beats, eighth notes (ti-ti's); note heads can be
colored to match finger placements
• Guided practice time: limit 3-5 repetitions then switch with partner for break
until timer goes off
• Set-Up and Pack-Up checklist provided with pictures
Assessment:
Informal; check for understanding with Thumbs Up/Middle/Down. Ask students to show
their level of understanding with one thumb direction. Depending on the number of
thumbs middle/down, go back and address concerns as needed.
Thumbs Up/Middle/Down
Thumbs Up I feel super confident about this skill/song!
Thumbs Middle I feel ok about this skill/song. With more
time, I will get better!
Thumbs Down I don’t understand this skill/song at all. I
need help.
Formal assessment will not take place until lesson 6.
8
Day 3: Solfège/D Scale/Level 1 review and Starting Level 2
Objectives (teacher voice): Students will be able to...
• With visual and/or physical cues, speak or sing solfège in ascending order
• Model and explain in their own words, how to play the D scale
• Identify similarities and/or differences between O Pastorzinho Level 1 and
Level 2
• Identify and describe symbols using content-specific vocabulary
• Apply prior knowledge of Level 1 finger patterns to Level 2 modified notation
Objectives (student voice): I will be able to...
• Speak or sing solfège ascending
• Show you how to move your fingers for the D scale
• Show what’s the same and what’s different between Level 1 and Level 2
• Point out and describe music symbols to you
• Show you my progress so far on O Pastorzinho
Procedure:
Set-Up: Prepare the following in advance
• Whiteboard/projector
• Solfège hand sign flash cards taped to whiteboard
Warm-up: Scale Showdown and Solfège Review
• Do Now: Solfège Match
▪ Use pictures of the hand signs taped to the board and have each
student trace a line from one hand sign to one solfège
▪ Match the hand sign to the solfège by drawing a line from the hand
sign to the solfège (set timer if needed)
▪ Share-out answers as a group before moving on to the D scale
• Scale Showdown (Informal Assessment: knowledge of the D scale)
▪ First, review the D scale by going over the fingering. Play the D scale
together as a group, then have students guide you in writing the finger
pattern on the board.
▪ Directions: stand in a circle. Teacher will play an open D. The person
to the right will play the next note (1); keep going until the group
reaches high d (4 on A).
▪ If someone plays a wrong note, they’re out. Restart the scale on open
D. The game continues until two musicians remain.
▪ Tip: for the first day playing this game, focus on either an ascending or
descending scale. Also, it may be helpful to have a practice round
speaking the notes/solfège
9
Repertoire:
1. Review Level 1 information from last class period, activate prior knowledge
with questioning:
i. Q: “Who remembers what this song is about?” A: The Sound Of Music
musical, solfège, shepherd singing
ii. Q: “What string are we using?” A: the D string
iii. Q: “What is the first note? How many fingers do we need?” A: open D
iv. Q: “Does this melody start on an upbeat or a downbeat?” A: Upbeat
2. Play O Pastorzinho/Dó Ré Mi Fá Level 1 as a group once. Depending on any
issues that arise, go back to those spots with everyone as needed. Implement
Practice Time depending on your group’s needs.
i. Practice Time: give students X minutes/seconds to practice with a
guided task (like focusing on finger patterns or staccato). This should
be no longer than one minute. Students can work alone or with a
partner. When the timer goes off, everyone will get ready to play
together one more time.
• Informal Assessment: Thumbs Up/Middle/Down before
moving on to the next three lines; “How did that go? Great, Ok,
or not so good?” If there are several thumbs middle/down, ask
“What can we do differently?” to gage the group’s
understanding on how to improve. Guide students to the
answer as needed.
3. Level 2: modified notation, notes are colored by finger placement
i. Q: “What looks the same as before?” A: time signature, rests, staccato
ii. Q: “What looks different?” A: Two lines instead of four, music staff,
lines and spaces, no fingerings, notes are colored based on finger
placement (0 = black, 1 = red, 3 = yellow, 4 = green)
iii. I Spy: How many _______ can you find?
▪ Have students look for each color, share-out how many of each
color were found, connect color to symbol/fingering
4. Point-and-say: select a leader to guide students in pointing to the first line of
notation and speaking the fingerings, then do it again a second time speaking
letter names.
5. Air-bow: select a leader to guide students in air-bowing while speaking the
fingerings. *If there’s not enough time, save this step for Day 4*
Summary and Pack-Up
• Summarize learning by playing Level 2 as a group before dismissing for pack-
up.
10
Accommodations:
• Finger placements marked on instrument with color-coded stickers: red = 1,
yellow = 3 (2 for violin/viola), green = 4 (3 for violin/viola)
• String names labeled on bridge of instrument
• Stand partners: student is seated next to a friend/strong peer to lean on for
support and to see the expectation
Modifications:
• Repertoire provided in levels (1, 2, 3) progressively moving from fingerings
to music notation
• Modified repertoire (down beats, eighth notes (ti-ti's); note heads can be
colored to match finger placements
• Guided practice time: limit 3-5 repetitions then switch with partner for break
until timer goes off
• Set-Up and Pack-Up checklist provided with pictures
Assessment:
Informal; check for understanding with Thumbs Up/Middle/Down. Ask students to show
their level of understanding with one thumb direction. Depending on the number of
thumbs middle/down, go back and address concerns as needed.
Thumbs Up/Middle/Down
Thumbs Up I feel super confident about this skill/song!
Thumbs Middle I feel ok about this skill/song. With more
time, I will get better!
Thumbs Down I don’t understand this skill/song at all. I
need help.
Formal assessment will not take place until lesson 6.
11
Day 4: Reviewing Level 2 and starting Level 3
Objectives (teacher voice): Students will be able to...
• With visual and/or physical cues, speak or sing solfège in ascending and
descending order
• Model how to play the D scale
• Identify similarities and/or differences between O Pastorzinho Level 2 and
Level 3
• Identify and describe symbols using content-specific vocabulary
• Apply prior knowledge of Level 2 modified notation to Level 3 music staff
notation
• Identify the chorus as the refrain of a song
Objectives (student voice): I will be able to...
• Speak or sing solfège ascending and descending
• Show you how to play the D scale
• Point out what’s the same and what’s different between Level 2 and Level 3
• Point out and describe music symbols to you
• Show you my progress so far on O Pastorzinho
• Tell you what a chorus of a song is
Procedure:
Set-Up: Prepare the following in advance;
• Whiteboard/projector with Level 3 and lyrics on display (can just be the
sheet music held onto the board with a magnet)
• Do Now sheets prepared for Name That Tune
• Mi Re Do written on board
Warm-up: Name That Tune and D scale review
• Do Now: Name That Tune
▪ Directions: Use the D scale and solfège from last week to figure out
this tune on your own or with a partner
▪ Mi, Re, Do = Hot Cross Buns; students should recognize this quickly as
they’ve played it before
▪ Set timer for one minute. When timer goes off, ask the group if anyone
recognizes the pattern before playing it together
• D scale review: Demonstrate the D scale using the primary rhythm in
O Pastorzinho (pattern should be all the same note, ex: DDD D DD)
12
• If the group is able to play the rhythm accurately and play in-tune, try it as a
round!
Repertoire:
1. Review Level 2 information from last class period, activate prior knowledge
with questioning *This strongly depends on the pacing of your group, if they
needed more time then you will need to cover Level 2 information before
moving on* Remind everyone to write down their answers on their
worksheet.
i. Q: “Who remembers what is different between Level 1 and Level 2?”
A: Notation (not just fingerings)
ii. Q: “What string are we using?” A: the D string
iii. Q: “What is the first note? How many fingers do we need?” A: open D
iv. Q: “What should we do every time there’s a dot underneath or above a
note?” A: staccato, play short sounds by moving the bow a short
length
2. Play Level 2 both lines as a group once. Depending on any issues that arise,
go back to those spots with everyone as needed.
• Informal Assessment: Thumbs Up/Middle/Down before
moving on to Level 3, “How did that go?” If there are several
thumbs middle/down, ask “What can we do differently?” to
gage the group’s understanding on how to improve. Guide
students to the answer as needed.
• Implement Practice Time as needed.
3. New: Level 3 with Lyrics
i. Q: “What looks the same as Level 2?” A: Symbols (time signature,
staccato markings, up and down bow markings, bar lines, double bar line
ii. Q: “What looks different?” A: There are more notes, no colors, and
lyrics
iii. Point out the lyrics on the bottom of the page. One side is English, and
the other is Portuguese. Speak or sing the lyrics out loud while
pointing at the notes for students to connect the rhythm of notes to
the lyrics. Acknowledge the connection out loud
▪ Ex: “The notes follow a pattern because of the lyrics.”
▪ “This is why the song has two names: O Pastorzinho or Dó Ré
Mi Fá.”
▪ “The notes we’re learning line up with the lyrics for the chorus.
Has anyone heard that word before? What do you think it
means?” (fill in questions on worksheet)
13
iv. Work together as a group to circle notes that weren’t in Level 2, then
model how a musician reads notes
▪ Ex: “I can tell that this is a D because the note head is sitting
underneath all the lines and spaces.”
4. Air-bow: select a leader to guide students in air-bowing the first line of
notation while speaking the fingerings. If there’s time, try playing the first
line with bow on D string.
Summary and Pack-Up
• Summarize learning by playing the first line as a group before dismissing for
pack-up.
Accommodations:
• Finger placements marked on instrument with color-coded stickers: red = 1,
yellow = 3, green = 4
• String names labeled on bridge of instrument
• Stand partners: student is seated next to a friend/strong peer to lean on for
support and to see the expectation
Modifications:
• Repertoire provided in levels (1, 2, 3) progressively moving from fingerings
to music notation
• Modified repertoire (down beats, eighth notes (ti-ti's); note heads can be
colored to match finger placements
• Guided practice time: limit 3-5 repetitions then switch with partner for break
until timer goes off
• Set-Up and Pack-Up checklist provided with pictures
Assessment:
Informal; check for understanding with Thumbs Up/Middle/Down. Ask students to show
their level of understanding with one thumb direction. Depending on the number of
thumbs middle/down, go back and address concerns as needed.
Thumbs Up/Middle/Down
Thumbs Up I feel super confident about this skill/song!
Thumbs Middle I feel ok about this skill/song. With more
time, I will get better!
Thumbs Down I don’t understand this skill/song at all. I
need help.
Formal assessment will not take place until lesson 6.
14
Day 5: Continuing Level 3 and Preparing for Playing Assessment
Objectives (teacher voice): Students will be able to...
• With visual and/or physical cues, speak or sing solfège in ascending and
descending order
• Model how to play the D scale
• Identify and describe in their own words the easy versus difficult parts of the
song
• Identify and describe symbols using content-specific vocabulary
• Apply prior knowledge of solfège and the D scale to identify a short melody
• Identify the chorus as the refrain of a song
Objectives (student voice): I will be able to...
• Speak or sing solfège ascending and descending
• Show you how to play the D scale
• Point out what’s easy and what’s tricky for me in this song
• Point out and describe music symbols to you
• Show you my progress so far on O Pastorzinho
• Tell you what a chorus of a song is
Procedure:
Set-Up: Prepare the following in advance;
• Whiteboard or projector with Level 3 and lyrics on display (can just be the
sheet music held onto the board with a magnet) and D scale letter names
with fingerings
• Do Now sheets prepared for Name That Tune
Warm-up: Name That Tune and Scale Conductor
• Do Now: Name That Tune
▪ Directions: Use the D scale and solfège to figure out this tune on your
own or with a partner
▪ Re Re Mi Re Do = ending of Mary Had a Little Lamb; students should
recognize it as they’ve already played it
▪ Set timer for one minute. When timer goes off, ask the group if anyone
recognizes the pattern before playing it together
▪ Reveal the title of the tune after playing one more time
• Scale Conductor: D scale
▪ One conductor will point to notes in the D scale, in Ascending or
Descending order, one at a time. The conductor can vary tempo, and
they must give a cut off so musicians know when to end.
▪ Musicians must watch the conductor so they know when to change to
the next note.
15
▪ The conductor will select the next conductor based on who is
demonstrating positive posture (posture chant: edge of seat, feet flat
on floor, tall straight back, strong, strong core).
Repertoire:
1. Review Level 3 information from last class period, activate prior knowledge
with questioning *This strongly depends on the pacing of your group, if they
needed more time then you will need to cover Level 3 information before
moving on*
i. Q: “Who remembers what is different between Level 2 and Level 3?”
A: There are more notes
ii. Q: “What string are we using?” A: D string
iii. Q: “What is the first note? How many fingers do we need? A: open D
iv. Q: “What should we do every time there’s a dot underneath or above a
note?” A: staccato, play short sounds by moving the bow a short
length
2. Practice then Play
i. Practice Time: give students X minutes to practice with a guided task
(like maintaining speed or focusing on staccato). This should be no
longer than two minutes. Students can work alone or with a partner.
When the timer goes off, everyone will get ready to play together one
more time. *Skip this if your group is confident in their understanding
of Level 3*
ii. Play Level 3 as a group once. Depending on any issues that arise, go
back to those spots with everyone as needed.
• Informal Assessment: Thumbs Up/Middle/Down before
moving on to the game, “How did that go?” If there are several
thumbs middle/down, ask “What can we do differently?” to
gage the group’s understanding on how to improve. Guide
students to the answer as needed.
3. If there’s time, preview Solfège Game Mi-Do-Do
i. Like Poison Rhythm, but with solfège; either have whiteboard
prepared with solfège and D scale or have students gather their
worksheets
ii. One person will be the Do-Do (as in, the do-do bird). The Do-Do's job
is to sing or play patterns with three solfège symbols . The teacher
(you) will be the first Do-Do, then watch over the next Do-Do to verify
accuracy of solfège/notes.
iii. If anyone repeats “Mi-Do-Do" they are out. The last musician will be
the next Do-Do.
16
Summary and Pack-Up
• Remind students that there will be a “Playing Test” next time before
dismissing for pack-up.
Accommodations:
• Finger placements marked on instrument with color-coded stickers: red = 1,
yellow = 3 (2 for violin/viola), green = 4 (3 for violin/viola)
• String names labeled on bridge of instrument
• Stand partners: student is seated next to a friend/strong peer to lean on for
support and to see the expectation
Modifications:
• Repertoire provided in levels (1, 2, 3) progressively moving from fingerings
to music notation
• Modified repertoire (down beats, eighth notes (ti-ti's); note heads can be
colored to match finger placements
• Guided practice time: limit 3-5 repetitions then switch with partner for break
until timer goes off
• Set-Up and Pack-Up checklist provided with pictures
Assessment:
Informal; check for understanding with Thumbs Up/Middle/Down. Ask students to show
their level of understanding with one thumb direction. Depending on the number of
thumbs middle/down, go back and address concerns as needed (chart on next page).
Thumbs Up/Middle/Down
Thumbs Up I feel super confident about this skill/song!
Thumbs Middle I feel ok about this skill/song. With more
time, I will get better!
Thumbs Down I don’t understand this skill/song at all. I
need help.
Formal assessment will not take place until lesson 6.
17
Day 6: Review Level 3 and Begin Assessment
Objectives (teacher voice): Students will be able to...
• With visual and/or physical cues, speak or sing solfège in ascending and
descending order
• Model how to play the D scale
• Identify and describe in their own words the easy versus difficult parts of the
song
• Identify and describe symbols using content-specific vocabulary
• Apply prior knowledge of solfège and the D scale to strengthen ear training
• Identify the chorus as the refrain of a song
Objectives (student voice): I will be able to...
• Speak or sing solfège ascending and descending
• Show you how to play the D scale
• Point out what’s easy and what’s tricky for me in this song
• Point out and describe music symbols to you
• Show you my progress so far on O Pastorzinho
• Tell you what a chorus of a song is
Procedure:
Warm-up: D scale
• D scale review: each musician will have a turn to lead the group for the D
scale warm-up using the primary rhythm in O Pastorzinho
R D D D D D D
(pattern should be all the same note, ex: DDD D DD)
Repertoire:
1. Review Level 3 information from last class period, activate prior knowledge
with questioning *This strongly depends on the pacing of your group and
what their needs are. Select questions at your discretion. *
i. Play Level 3 as a group once. Depending on any issues that arise, go
back to those spots with everyone as needed.
• Informal Assessment: Thumbs Up, Thumbs Middle, Thumbs
Down before moving on to the Hopscotch Game, “How did that
go?” If there are several thumbs middle/down, ask “What can
18
we do differently?” to gage the group’s understanding on how
to improve. Guide students to the answer as needed.
2. Formal Assessment; review the following expectations before assessing each
student individually
i. Students are expected to practice while waiting for their turn.
ii. Students have a choice of Level 1, 2, or 3; but any students that choose
Level 1 or 2 will be asked to show their sheet music for Level 3
iii. This Check-in will be noted on the progress report, so do your best!
3. Mi-Do-Do, Scale Conductor, or Scale Showdown
• Vote between the three games to reinforce solfège and scale work. There may
or may not be enough time for all three. Rules for each game below:
• Scale Conductor: D scale
▪ One conductor will point to notes in the D scale, in Ascending or
Descending order, one at a time. The conductor can vary tempo, and
they must give a cut off so musicians know when to end.
▪ Musicians must watch the conductor so they know when to change to
the next note.
▪ The conductor will select the next conductor based on who is
demonstrating positive posture (posture chant: edge of seat, feet flat
on floor, tall straight back, strong core).
• Mi-Do-Do
▪ Like Poison Rhythm, but with solfège; either have whiteboard
prepared with solfège and D scale or have students gather their
worksheets
▪ One person will be the Do-Do (as in, the do-do bird). The Do-Do's job
is to sing or play patterns with three solfège symbols . The teacher
(you) will be the first Do-Do, then watch over the next Do-Do to verify
accuracy of solfège/notes.
▪ If anyone repeats “Mi-Do-Do" they are out. The last musician will be
the next Do-Do.
• Scale Showdown (Informal Assessment: knowledge of the D scale)
▪ First, review the D scale by going over the fingering. Play the D scale
together as a group, then have students guide you in writing the finger
pattern on the board.
▪ Directions: stand in a circle. Teacher will play an open D. The person
to the right will play the next note (1); keep going until the group
reaches high d (4 on A).
▪ If someone plays a wrong note, they’re out. Restart the scale on open
D. The game continues until two musicians remain.
19
▪ Tip: for the first day playing this game, focus on either an ascending or
descending scale. Also, it may be helpful to have a practice round
speaking the notes/solfège
Summary and Pack-Up
• Congratulate students on their hard work before releasing them to pack-up.
Accommodations:
• Finger placements marked on instrument with color-coded stickers: red = 1,
yellow = 3 (2 for violin/viola), green = 4 (3 for violin/viola)
• String names labeled on bridge of instrument
• Stand partners: student is seated next to a friend/strong peer to lean on for
support and to see the expectation
Modifications:
• Repertoire provided in levels (1, 2, 3) progressively moving from fingerings
to music notation
• Modified repertoire (down beats, eighth notes (ti-ti's); note heads can be
colored to match finger placements
• Guided practice time: limit 3-5 repetitions then switch with partner for break
until timer goes off
• Set-Up and Pack-Up checklist provided with pictures
Assessment:
Informal; check for understanding with Thumbs Up/Middle/Down. Ask students to show
their level of understanding with one thumb direction. Depending on the number of
thumbs middle/down, go back and address concerns as needed.
Thumbs Up/Middle/Down
Thumbs Up I feel super confident about this skill/song!
Thumbs Middle I feel ok about this skill/song. With more
time, I will get better!
Thumbs Down I don’t understand this skill/song at all. I
need help.
Formal Assessment on O Pastorzinho/Dó Ré Mi Fá based on the following rubric (next page)
Assessment Accommodations/Modifications:
• Allow students to perform with a partner if desired
• Modified selection: student choice of line (depending on level selected)
• Student choice of Level 1, 2, or 3; students that select Level 1 or 2 must show their
written work on Level 3 (note names, fingerings, circled spots)
Other specific IEP/504 accommodations/modifications are case-by-case.
20
Achievement Exceeding
Expectation
4
Meeting
Expectation
3
Progressing to
Expectation
2
Not Yet
Meeting the
Expectation
1
Symbol
Identification
Note Reading
Student can identify
all music symbols
without assistance
and could teach this
skill to someone
else.
Student can identify
75% of music
symbols with a few
reminders.
Student can identify
50% of music
symbols with
several reminders.
Student cannot
identify music
symbols without
hand-over-hand
assistance.
Rhythm
Performing with a
steady beat
Student can perform
with a steady beat
without assistance
and could teach this
skill to someone
else.
Student can perform
with a steady beat
75% of the time,
with a few
reminders.
Student can perform
with a steady beat
for 50% of the time,
with several
reminders.
Student cannot
perform with a
steady beat without
hand-over-hand
assistance.
Posture
Maintaining active
musician posture
Student can
maintain active
musician posture
without assistance
and could teach this
skill to someone
else.
Student can
maintain active
musician posture for
75% of the time,
with a few
reminders.
Student can
maintain active
musician posture for
50% of the time,
with several
reminders.
Student cannot
maintain active
musician posture
without hand-over-
hand assistance.
Left Hand
Position
and Finger
Placement
Student can move
their left hand
fingers to the proper
placements without
assistance and could
teach this skill to
someone else.
Student can move
their left hand
fingers to the proper
placements 75% of
the time with a few
reminders.
Student can move
their left hand
fingers to the proper
placements for 50%
of the time, with
several reminders.
Student cannot
move their left hand
fingers to the proper
placements without
hand-over-hand
assistance.
Right Hand
Position
Student can
maintain bow hold
and position without
assistance and could
teach this skill to
someone else.
Student can
maintain bow hold
and position 75% of
the time with a few
reminders.
Student can
maintain bow hold
and position for
50% of the time,
with several
reminders.
Student cannot
maintain bow hold
and position without
hand-over-hand
assistance.
21
Content-Specific Vocabulary
* = definition provided by NAFME’s Core Music Standards Glossary
+ = definition provided by the OnMusic dictionary
All other definitions self-created
Air-bow A method to encourage audiation.
Violinists and violists place their bow stick
side down on their left elbow and move it
as if playing on the string. Cellists hover
their bow stick side down above the
strings. Everyone says the note names or
fingerings.
*Audiate Hear and comprehend sounds in one’s head
(inner hearing), even when no sound is
present.
*Beat; Downbeat vs Upbeat *Underlying steady pulse present in most
music. A downbeat is the first beat of the
measure. When played under the direction
of a conductor, it is signified by the
downward movement of the conductor’s
hand. An upbeat is the last beat of any
measure, usually a weak beat. It is called
the “upbeat” because the conductor always
directs it with an upward swing of the
baton or hand. This anticipates the first
beat of the next measure, the “downbeat,”
always directed by a downward swing of
the baton or hand.
Bow Essential equipment that comes with each
string family instrument, required to play
Arco (with hair on the string). A stick,
wooden or carbon fiber, with horsehair
attached at both ends. Students must know
how to prepare their bow before playing
Arco.
Bowings; Up Bow vs Down Bow Bowings are symbols that indicate which
direction to move the bow. Up Bow (left) is
notated as V and Down Bow (right) is
notated as . Each notation occurs
above the note as needed. The plural form
is bowings.
Fingerings/Finger Patterns Finger placements, written in number form
above the printed note (0 = open/no
fingers, 1 = pointer finger on red, 2= middle
22
finger on yellow (3 for cello), 3 = ring finger
on green, 4 = pinky on blue violin/viola).
Pluck/Pizzicato Pulling on any string to make a ringing,
resonant sound. Typically executed with
the pointer finger. Pizzicato (Pizz.) is the
musical term, interchangeable with Pluck.
*Repertoire Body or set of musical works that can be
performed.
Rests; Eighth Rests In music, a Rest indicates silence. There are
different names for different lengths of
silence. O Pastorzinho uses Eighth Rests,
which are equal to an eighth note. Eighth
Rests are shorter than Quarter Rests.
*Scale; Ascending and Descending *Pattern of pitches arranged in ascending
or descending order and identified by their
specific arrangement of whole and half
steps. Ascending is moving from low to
high sounds, and Descending is moving
from high to low sounds.
Sheet Music The piece of paper that tells musicians
what to play and how. This can be western
standardized music notation on the staff,
fingerings, letter names, a lead sheet with
chord symbols, or tablature (a picture that
shows finger placement).
+Solfège/Solfeggio The practice of singing exercises to the
syllables of solmization. Solamization is
the syllables Do, Re, Mi, Fa, Sol, La, Ti, Do
and their association with specific pitches,
especially in regard to the indication of
intervals.
Staccato vs Legato Staccato is the musical term for “short
sound.” This is executed by moving the
bow at a shorter length, briefly stopping
between notes. By contrast, Legato is the
musical term for “long sound.” This is
executed by moving the bow longer
lengths for a smooth sound.

More Related Content

Similar to O Pastorzinho Lesson Plans Final

Teaching perception of pitch article
Teaching perception of pitch articleTeaching perception of pitch article
Teaching perception of pitch articleKris Bowtell
 
Pulse, accent and rhythm
Pulse, accent and rhythmPulse, accent and rhythm
Pulse, accent and rhythmBelén Álvarez
 
Lesson plan 3 - Kindergarten
Lesson plan 3 - KindergartenLesson plan 3 - Kindergarten
Lesson plan 3 - KindergartenPaula Pilotti
 
TPD Roman - Lesson 1 - nivel inicial
TPD   Roman - Lesson 1 - nivel inicialTPD   Roman - Lesson 1 - nivel inicial
TPD Roman - Lesson 1 - nivel inicialLaura Roman
 
Writing Development Of ELL Students In A Music Classroom
Writing Development Of ELL Students In A Music ClassroomWriting Development Of ELL Students In A Music Classroom
Writing Development Of ELL Students In A Music ClassroomValerie Erickson-Mesias
 
au-dr-6-music-and-drama-games-powerpoint_ver_4.pptx
au-dr-6-music-and-drama-games-powerpoint_ver_4.pptxau-dr-6-music-and-drama-games-powerpoint_ver_4.pptx
au-dr-6-music-and-drama-games-powerpoint_ver_4.pptxYasmineAli33
 
Using Songs in the English Classroom
Using Songs in the English ClassroomUsing Songs in the English Classroom
Using Songs in the English Classroomkathiuska456
 
LP_Wk7(Sept.19-21)_MAPEH 1_Teacher Lenette_SY. 2023-2024.pdf
LP_Wk7(Sept.19-21)_MAPEH 1_Teacher Lenette_SY. 2023-2024.pdfLP_Wk7(Sept.19-21)_MAPEH 1_Teacher Lenette_SY. 2023-2024.pdf
LP_Wk7(Sept.19-21)_MAPEH 1_Teacher Lenette_SY. 2023-2024.pdfangelopablo4
 
Moller Poulsen - Kindergarten Lesson Plan 1
Moller Poulsen - Kindergarten Lesson Plan 1 Moller Poulsen - Kindergarten Lesson Plan 1
Moller Poulsen - Kindergarten Lesson Plan 1 ailenmp
 
LP_Wk7(Sept.19-21)_MAPEH 1_Teacher Lenette_SY. 2023-2024.pdf.pdf
LP_Wk7(Sept.19-21)_MAPEH 1_Teacher Lenette_SY. 2023-2024.pdf.pdfLP_Wk7(Sept.19-21)_MAPEH 1_Teacher Lenette_SY. 2023-2024.pdf.pdf
LP_Wk7(Sept.19-21)_MAPEH 1_Teacher Lenette_SY. 2023-2024.pdf.pdfangelopablo4
 
LP_Wk7(Sept.19-21)_MAPEH 1_Teacher Lenette_SY. 2023-2024.pdf.pdf
LP_Wk7(Sept.19-21)_MAPEH 1_Teacher Lenette_SY. 2023-2024.pdf.pdfLP_Wk7(Sept.19-21)_MAPEH 1_Teacher Lenette_SY. 2023-2024.pdf.pdf
LP_Wk7(Sept.19-21)_MAPEH 1_Teacher Lenette_SY. 2023-2024.pdf.pdfangelopablo4
 
au-t-1664323778-songs-and-games-for-early-years-and-lower-primary_ver_2.pptx
au-t-1664323778-songs-and-games-for-early-years-and-lower-primary_ver_2.pptxau-t-1664323778-songs-and-games-for-early-years-and-lower-primary_ver_2.pptx
au-t-1664323778-songs-and-games-for-early-years-and-lower-primary_ver_2.pptxMaryKalejaiye
 
teaching pronunciation activity
teaching pronunciation activityteaching pronunciation activity
teaching pronunciation activityjinjoomoon718
 
District inset areasof music and arts
District inset areasof music and artsDistrict inset areasof music and arts
District inset areasof music and artslerise
 
Estebo – tpd – lesson plan nº 2 kindergarten
Estebo – tpd – lesson plan nº 2 kindergartenEstebo – tpd – lesson plan nº 2 kindergarten
Estebo – tpd – lesson plan nº 2 kindergartenCynthiaestebo
 
Slideshare 120508021919-phpapp02
Slideshare 120508021919-phpapp02Slideshare 120508021919-phpapp02
Slideshare 120508021919-phpapp02cipotron
 

Similar to O Pastorzinho Lesson Plans Final (20)

Teaching perception of pitch article
Teaching perception of pitch articleTeaching perception of pitch article
Teaching perception of pitch article
 
Lesson week 13
Lesson week 13Lesson week 13
Lesson week 13
 
Pulse, accent and rhythm
Pulse, accent and rhythmPulse, accent and rhythm
Pulse, accent and rhythm
 
Lesson plan 3 - Kindergarten
Lesson plan 3 - KindergartenLesson plan 3 - Kindergarten
Lesson plan 3 - Kindergarten
 
TPD Roman - Lesson 1 - nivel inicial
TPD   Roman - Lesson 1 - nivel inicialTPD   Roman - Lesson 1 - nivel inicial
TPD Roman - Lesson 1 - nivel inicial
 
Writing Development Of ELL Students In A Music Classroom
Writing Development Of ELL Students In A Music ClassroomWriting Development Of ELL Students In A Music Classroom
Writing Development Of ELL Students In A Music Classroom
 
au-dr-6-music-and-drama-games-powerpoint_ver_4.pptx
au-dr-6-music-and-drama-games-powerpoint_ver_4.pptxau-dr-6-music-and-drama-games-powerpoint_ver_4.pptx
au-dr-6-music-and-drama-games-powerpoint_ver_4.pptx
 
Using Songs in the English Classroom
Using Songs in the English ClassroomUsing Songs in the English Classroom
Using Songs in the English Classroom
 
LP_Wk7(Sept.19-21)_MAPEH 1_Teacher Lenette_SY. 2023-2024.pdf
LP_Wk7(Sept.19-21)_MAPEH 1_Teacher Lenette_SY. 2023-2024.pdfLP_Wk7(Sept.19-21)_MAPEH 1_Teacher Lenette_SY. 2023-2024.pdf
LP_Wk7(Sept.19-21)_MAPEH 1_Teacher Lenette_SY. 2023-2024.pdf
 
Moller Poulsen - Kindergarten Lesson Plan 1
Moller Poulsen - Kindergarten Lesson Plan 1 Moller Poulsen - Kindergarten Lesson Plan 1
Moller Poulsen - Kindergarten Lesson Plan 1
 
pt.pptx
pt.pptxpt.pptx
pt.pptx
 
3 music lm q2
3 music lm q23 music lm q2
3 music lm q2
 
LP_Wk7(Sept.19-21)_MAPEH 1_Teacher Lenette_SY. 2023-2024.pdf.pdf
LP_Wk7(Sept.19-21)_MAPEH 1_Teacher Lenette_SY. 2023-2024.pdf.pdfLP_Wk7(Sept.19-21)_MAPEH 1_Teacher Lenette_SY. 2023-2024.pdf.pdf
LP_Wk7(Sept.19-21)_MAPEH 1_Teacher Lenette_SY. 2023-2024.pdf.pdf
 
LP_Wk7(Sept.19-21)_MAPEH 1_Teacher Lenette_SY. 2023-2024.pdf.pdf
LP_Wk7(Sept.19-21)_MAPEH 1_Teacher Lenette_SY. 2023-2024.pdf.pdfLP_Wk7(Sept.19-21)_MAPEH 1_Teacher Lenette_SY. 2023-2024.pdf.pdf
LP_Wk7(Sept.19-21)_MAPEH 1_Teacher Lenette_SY. 2023-2024.pdf.pdf
 
au-t-1664323778-songs-and-games-for-early-years-and-lower-primary_ver_2.pptx
au-t-1664323778-songs-and-games-for-early-years-and-lower-primary_ver_2.pptxau-t-1664323778-songs-and-games-for-early-years-and-lower-primary_ver_2.pptx
au-t-1664323778-songs-and-games-for-early-years-and-lower-primary_ver_2.pptx
 
teaching pronunciation activity
teaching pronunciation activityteaching pronunciation activity
teaching pronunciation activity
 
District inset areasof music and arts
District inset areasof music and artsDistrict inset areasof music and arts
District inset areasof music and arts
 
Estebo – tpd – lesson plan nº 2 kindergarten
Estebo – tpd – lesson plan nº 2 kindergartenEstebo – tpd – lesson plan nº 2 kindergarten
Estebo – tpd – lesson plan nº 2 kindergarten
 
Music 3 tg full english
Music 3 tg full englishMusic 3 tg full english
Music 3 tg full english
 
Slideshare 120508021919-phpapp02
Slideshare 120508021919-phpapp02Slideshare 120508021919-phpapp02
Slideshare 120508021919-phpapp02
 

More from EmilyPlunkett3

Final Project Interviews
Final Project Interviews Final Project Interviews
Final Project Interviews EmilyPlunkett3
 
Practice Time Choice Board
Practice Time Choice BoardPractice Time Choice Board
Practice Time Choice BoardEmilyPlunkett3
 
Cantiga de Roda Harmony
Cantiga de Roda HarmonyCantiga de Roda Harmony
Cantiga de Roda HarmonyEmilyPlunkett3
 
Cantiga de Roda Harmony
Cantiga de Roda HarmonyCantiga de Roda Harmony
Cantiga de Roda HarmonyEmilyPlunkett3
 
Cantiga de Roda Melody
Cantiga de Roda MelodyCantiga de Roda Melody
Cantiga de Roda MelodyEmilyPlunkett3
 
Final Project Interviews.pdf
Final Project Interviews.pdfFinal Project Interviews.pdf
Final Project Interviews.pdfEmilyPlunkett3
 
draft Final Project Scope Sequence.pdf
draft Final Project Scope Sequence.pdfdraft Final Project Scope Sequence.pdf
draft Final Project Scope Sequence.pdfEmilyPlunkett3
 
O Pastorzinho Score and Parts
O Pastorzinho  Score and Parts O Pastorzinho  Score and Parts
O Pastorzinho Score and Parts EmilyPlunkett3
 
Borboletinha Worksheets
Borboletinha WorksheetsBorboletinha Worksheets
Borboletinha WorksheetsEmilyPlunkett3
 
Borboletinha Score and Parts
Borboletinha Score and PartsBorboletinha Score and Parts
Borboletinha Score and PartsEmilyPlunkett3
 

More from EmilyPlunkett3 (15)

O Pastorzinho Verse
O Pastorzinho VerseO Pastorzinho Verse
O Pastorzinho Verse
 
Final Project Interviews
Final Project Interviews Final Project Interviews
Final Project Interviews
 
Practice Time Choice Board
Practice Time Choice BoardPractice Time Choice Board
Practice Time Choice Board
 
Scale Guide
Scale GuideScale Guide
Scale Guide
 
Cantiga de Roda Harmony
Cantiga de Roda HarmonyCantiga de Roda Harmony
Cantiga de Roda Harmony
 
Cantiga de Roda Harmony
Cantiga de Roda HarmonyCantiga de Roda Harmony
Cantiga de Roda Harmony
 
Finger Map
Finger MapFinger Map
Finger Map
 
Cantiga de Roda.pdf
Cantiga de Roda.pdfCantiga de Roda.pdf
Cantiga de Roda.pdf
 
Cantiga de Roda Melody
Cantiga de Roda MelodyCantiga de Roda Melody
Cantiga de Roda Melody
 
Final Project Interviews.pdf
Final Project Interviews.pdfFinal Project Interviews.pdf
Final Project Interviews.pdf
 
draft Final Project Scope Sequence.pdf
draft Final Project Scope Sequence.pdfdraft Final Project Scope Sequence.pdf
draft Final Project Scope Sequence.pdf
 
O Pastorzinho Score and Parts
O Pastorzinho  Score and Parts O Pastorzinho  Score and Parts
O Pastorzinho Score and Parts
 
O Pastorzinho Chorus
O Pastorzinho ChorusO Pastorzinho Chorus
O Pastorzinho Chorus
 
Borboletinha Worksheets
Borboletinha WorksheetsBorboletinha Worksheets
Borboletinha Worksheets
 
Borboletinha Score and Parts
Borboletinha Score and PartsBorboletinha Score and Parts
Borboletinha Score and Parts
 

Recently uploaded

Like-prefer-love -hate+verb+ing & silent letters & citizenship text.pdf
Like-prefer-love -hate+verb+ing & silent letters & citizenship text.pdfLike-prefer-love -hate+verb+ing & silent letters & citizenship text.pdf
Like-prefer-love -hate+verb+ing & silent letters & citizenship text.pdfMr Bounab Samir
 
Earth Day Presentation wow hello nice great
Earth Day Presentation wow hello nice greatEarth Day Presentation wow hello nice great
Earth Day Presentation wow hello nice greatYousafMalik24
 
DATA STRUCTURE AND ALGORITHM for beginners
DATA STRUCTURE AND ALGORITHM for beginnersDATA STRUCTURE AND ALGORITHM for beginners
DATA STRUCTURE AND ALGORITHM for beginnersSabitha Banu
 
Employee wellbeing at the workplace.pptx
Employee wellbeing at the workplace.pptxEmployee wellbeing at the workplace.pptx
Employee wellbeing at the workplace.pptxNirmalaLoungPoorunde1
 
MARGINALIZATION (Different learners in Marginalized Group
MARGINALIZATION (Different learners in Marginalized GroupMARGINALIZATION (Different learners in Marginalized Group
MARGINALIZATION (Different learners in Marginalized GroupJonathanParaisoCruz
 
MICROBIOLOGY biochemical test detailed.pptx
MICROBIOLOGY biochemical test detailed.pptxMICROBIOLOGY biochemical test detailed.pptx
MICROBIOLOGY biochemical test detailed.pptxabhijeetpadhi001
 
Pharmacognosy Flower 3. Compositae 2023.pdf
Pharmacognosy Flower 3. Compositae 2023.pdfPharmacognosy Flower 3. Compositae 2023.pdf
Pharmacognosy Flower 3. Compositae 2023.pdfMahmoud M. Sallam
 
Historical philosophical, theoretical, and legal foundations of special and i...
Historical philosophical, theoretical, and legal foundations of special and i...Historical philosophical, theoretical, and legal foundations of special and i...
Historical philosophical, theoretical, and legal foundations of special and i...jaredbarbolino94
 
Proudly South Africa powerpoint Thorisha.pptx
Proudly South Africa powerpoint Thorisha.pptxProudly South Africa powerpoint Thorisha.pptx
Proudly South Africa powerpoint Thorisha.pptxthorishapillay1
 
Hierarchy of management that covers different levels of management
Hierarchy of management that covers different levels of managementHierarchy of management that covers different levels of management
Hierarchy of management that covers different levels of managementmkooblal
 
Types of Journalistic Writing Grade 8.pptx
Types of Journalistic Writing Grade 8.pptxTypes of Journalistic Writing Grade 8.pptx
Types of Journalistic Writing Grade 8.pptxEyham Joco
 
Full Stack Web Development Course for Beginners
Full Stack Web Development Course  for BeginnersFull Stack Web Development Course  for Beginners
Full Stack Web Development Course for BeginnersSabitha Banu
 
Computed Fields and api Depends in the Odoo 17
Computed Fields and api Depends in the Odoo 17Computed Fields and api Depends in the Odoo 17
Computed Fields and api Depends in the Odoo 17Celine George
 
Enzyme, Pharmaceutical Aids, Miscellaneous Last Part of Chapter no 5th.pdf
Enzyme, Pharmaceutical Aids, Miscellaneous Last Part of Chapter no 5th.pdfEnzyme, Pharmaceutical Aids, Miscellaneous Last Part of Chapter no 5th.pdf
Enzyme, Pharmaceutical Aids, Miscellaneous Last Part of Chapter no 5th.pdfSumit Tiwari
 
Blooming Together_ Growing a Community Garden Worksheet.docx
Blooming Together_ Growing a Community Garden Worksheet.docxBlooming Together_ Growing a Community Garden Worksheet.docx
Blooming Together_ Growing a Community Garden Worksheet.docxUnboundStockton
 
18-04-UA_REPORT_MEDIALITERAСY_INDEX-DM_23-1-final-eng.pdf
18-04-UA_REPORT_MEDIALITERAСY_INDEX-DM_23-1-final-eng.pdf18-04-UA_REPORT_MEDIALITERAСY_INDEX-DM_23-1-final-eng.pdf
18-04-UA_REPORT_MEDIALITERAСY_INDEX-DM_23-1-final-eng.pdfssuser54595a
 
ECONOMIC CONTEXT - LONG FORM TV DRAMA - PPT
ECONOMIC CONTEXT - LONG FORM TV DRAMA - PPTECONOMIC CONTEXT - LONG FORM TV DRAMA - PPT
ECONOMIC CONTEXT - LONG FORM TV DRAMA - PPTiammrhaywood
 
Crayon Activity Handout For the Crayon A
Crayon Activity Handout For the Crayon ACrayon Activity Handout For the Crayon A
Crayon Activity Handout For the Crayon AUnboundStockton
 
Roles & Responsibilities in Pharmacovigilance
Roles & Responsibilities in PharmacovigilanceRoles & Responsibilities in Pharmacovigilance
Roles & Responsibilities in PharmacovigilanceSamikshaHamane
 

Recently uploaded (20)

Like-prefer-love -hate+verb+ing & silent letters & citizenship text.pdf
Like-prefer-love -hate+verb+ing & silent letters & citizenship text.pdfLike-prefer-love -hate+verb+ing & silent letters & citizenship text.pdf
Like-prefer-love -hate+verb+ing & silent letters & citizenship text.pdf
 
Earth Day Presentation wow hello nice great
Earth Day Presentation wow hello nice greatEarth Day Presentation wow hello nice great
Earth Day Presentation wow hello nice great
 
DATA STRUCTURE AND ALGORITHM for beginners
DATA STRUCTURE AND ALGORITHM for beginnersDATA STRUCTURE AND ALGORITHM for beginners
DATA STRUCTURE AND ALGORITHM for beginners
 
Employee wellbeing at the workplace.pptx
Employee wellbeing at the workplace.pptxEmployee wellbeing at the workplace.pptx
Employee wellbeing at the workplace.pptx
 
MARGINALIZATION (Different learners in Marginalized Group
MARGINALIZATION (Different learners in Marginalized GroupMARGINALIZATION (Different learners in Marginalized Group
MARGINALIZATION (Different learners in Marginalized Group
 
MICROBIOLOGY biochemical test detailed.pptx
MICROBIOLOGY biochemical test detailed.pptxMICROBIOLOGY biochemical test detailed.pptx
MICROBIOLOGY biochemical test detailed.pptx
 
Pharmacognosy Flower 3. Compositae 2023.pdf
Pharmacognosy Flower 3. Compositae 2023.pdfPharmacognosy Flower 3. Compositae 2023.pdf
Pharmacognosy Flower 3. Compositae 2023.pdf
 
Historical philosophical, theoretical, and legal foundations of special and i...
Historical philosophical, theoretical, and legal foundations of special and i...Historical philosophical, theoretical, and legal foundations of special and i...
Historical philosophical, theoretical, and legal foundations of special and i...
 
Proudly South Africa powerpoint Thorisha.pptx
Proudly South Africa powerpoint Thorisha.pptxProudly South Africa powerpoint Thorisha.pptx
Proudly South Africa powerpoint Thorisha.pptx
 
Hierarchy of management that covers different levels of management
Hierarchy of management that covers different levels of managementHierarchy of management that covers different levels of management
Hierarchy of management that covers different levels of management
 
Types of Journalistic Writing Grade 8.pptx
Types of Journalistic Writing Grade 8.pptxTypes of Journalistic Writing Grade 8.pptx
Types of Journalistic Writing Grade 8.pptx
 
Full Stack Web Development Course for Beginners
Full Stack Web Development Course  for BeginnersFull Stack Web Development Course  for Beginners
Full Stack Web Development Course for Beginners
 
Computed Fields and api Depends in the Odoo 17
Computed Fields and api Depends in the Odoo 17Computed Fields and api Depends in the Odoo 17
Computed Fields and api Depends in the Odoo 17
 
ESSENTIAL of (CS/IT/IS) class 06 (database)
ESSENTIAL of (CS/IT/IS) class 06 (database)ESSENTIAL of (CS/IT/IS) class 06 (database)
ESSENTIAL of (CS/IT/IS) class 06 (database)
 
Enzyme, Pharmaceutical Aids, Miscellaneous Last Part of Chapter no 5th.pdf
Enzyme, Pharmaceutical Aids, Miscellaneous Last Part of Chapter no 5th.pdfEnzyme, Pharmaceutical Aids, Miscellaneous Last Part of Chapter no 5th.pdf
Enzyme, Pharmaceutical Aids, Miscellaneous Last Part of Chapter no 5th.pdf
 
Blooming Together_ Growing a Community Garden Worksheet.docx
Blooming Together_ Growing a Community Garden Worksheet.docxBlooming Together_ Growing a Community Garden Worksheet.docx
Blooming Together_ Growing a Community Garden Worksheet.docx
 
18-04-UA_REPORT_MEDIALITERAСY_INDEX-DM_23-1-final-eng.pdf
18-04-UA_REPORT_MEDIALITERAСY_INDEX-DM_23-1-final-eng.pdf18-04-UA_REPORT_MEDIALITERAСY_INDEX-DM_23-1-final-eng.pdf
18-04-UA_REPORT_MEDIALITERAСY_INDEX-DM_23-1-final-eng.pdf
 
ECONOMIC CONTEXT - LONG FORM TV DRAMA - PPT
ECONOMIC CONTEXT - LONG FORM TV DRAMA - PPTECONOMIC CONTEXT - LONG FORM TV DRAMA - PPT
ECONOMIC CONTEXT - LONG FORM TV DRAMA - PPT
 
Crayon Activity Handout For the Crayon A
Crayon Activity Handout For the Crayon ACrayon Activity Handout For the Crayon A
Crayon Activity Handout For the Crayon A
 
Roles & Responsibilities in Pharmacovigilance
Roles & Responsibilities in PharmacovigilanceRoles & Responsibilities in Pharmacovigilance
Roles & Responsibilities in Pharmacovigilance
 

O Pastorzinho Lesson Plans Final

  • 1. 1 Lesson Plan: O Pastorzinho/Dó Ré Mi Fá for Beginning Orchestra Lesson Length: 6 class periods; 30 minutes each, 1x per week Grade Level: 4th and 5th grade cello group lesson (second half of first year or beginning of second year) M.A. and National Music Standards (4th Grade): Cr3: Refine and complete artistic work. (3-4.M.Cr.03) P5: Develop and refine artistic techniques and work for presentation. (3-4.M.P.05) P6: Convey meaning through presentation of artistic work. (3-4.M.P.06) R7: Perceive and analyze artistic work. (3-4.M.R.07) R8: Interpret intent and meaning in artistic work. (3-4.M.R.08) Co11: Relate artistic ideas and works to societal, cultural, and historical contexts to deepen understanding. (3-4.M.Co.11) Click this link and then click Arts Framwork Day 1: Introduction to Solfège and Scales Objectives (teacher voice): Students will be able to... • Explain, in their own words, what solfège is and why musicians use it • Explain, in their own words, how to play the D scale • Compare and contrast Do, Re, Mi and O Pastorzinho Objectives (student voice): I will be able to... • Tell you what solfège is and why we use it • Tell you how to move your fingers for the D scale • Show what’s the same and what’s different between Do, Re, Mi and O Pastorzinho Procedure: Set-Up: Prepare the following in advance • whiteboard/projector with fingering for the D scale (D 1 3 4 / A 1 3 4) • Do Now sheet for each student Warm-Up: Do Now and D scale • Do Now: Write the fingering from the board onto your piece of paper, then try playing it. Bonus Challenge: try playing it backwards! ▪ Expectation: students complete Do Now while waiting to get instrument tuned, tightening and rosining bow, preparing materials ▪ As students arrive, assign the Do Now. When you see everyone playing, set a timer for 30 seconds of additional of practice time
  • 2. 2 ▪ When the timer goes off, ask students “Does this pattern sound familiar?” They may answer with songs they’ve either played/heard ▪ “This is called a scale. Not like a fish scale or a snake scale. In music, a scale is a pattern of notes that start and end on the same note. As a musician, when I see patterns like D134 or 431D I can tell that it will sound like a scale because the notes are one after another. They do not skip.” *remind students to fill in their answers on their worksheet* • Play the scale on the board with students counting you in and keeping a steady beat, then you count in and keep a steady beat while students play the D scale, half notes starting on D0 • Informal assessment: Thumbs Up/Middle/Down to check for understanding; “How do you think that went? Great, Ok, or not so good?” If there are several thumbs middle/down, ask “What can we do differently?” to gage the group’s understanding on how to improve. Guide students to the answer as needed. Repertoire: Introduction to Solfège and O Pastorzinho/Dó Ré Mi Fá 1. Introduction to Solfège i. Connection to The Sound of Music; “Have you ever seen or heard of The Sound of Music? It’s a musical with a song called Do-Re-Mi (https://youtu.be/drnBMAEA3AM). Many people recognize this song because the lyrics have alliteration (matching the first letter of certain words) that helps singers remember their solfège. Like Doe, a deer, a female deer.” ii. Write the word solfège on the board and add Do, Re, Mi, Fa, Sol, La, Ti, do (lowercase on purpose) underneath the fingerings. Have students write the solfège on their scale sheet, then have students sing the solfège with you. “It’s not solfège anymore if we don’t sing it!” • Add hand signs: have students make the signs along with you while singing/humming. • “As string players we use fingerings, but many musicians use solfège to learn about their notes and scales. Solfège is very helpful when you’re making music with musicians that play different instruments.” 2. Introduction to O Pastorzinho/Dó Ré Mi Fá i. Teacher will explain the title and information about the lyrics before playing a recording of the original song (https://www.youtube.com/watch?v=gjz9PM4iWWg) ii. “This song is similar to Do Re Mi except it’s in Portuguese. I want to see what similarities and differences you can find!”
  • 3. 3 • Guided listening: ask students to listen closely for one similarity or one difference in the recording of Pastorzinho/Dó Ré Mi Fá vs Do Re Mi • Share-out to compare students’ findings; Q: “What was similar? What was different?” A: Different sounds, different styles of music, O Pastorzinho uses more upbeats • “The melody of O Pastorzinho starts on an upbeat. An upbeat is when the music starts on a ‘weaker’ note. If you tap your foot, when your foot is flat on the floor that is the downbeat, and when you lift your foot up that is the upbeat. Tap with me 1+ 2+ 3+ 4+” • “The singer sang differently than how we just sang. It’s because different languages pronounce solfège differently. In Portuguese, Re sounds more like ‘heh.’ Did anyone notice that?” • The lyrics describe a shepherd singing while working, and a princess compliments their voice 3. Teacher will activate prior knowledge by questioning: i. Q: “What does the 4/4 mean?” A: Count to 4, 4 beats per measure, quarter note gets the beat ii. Q: “What does the symbol with two lines and two dots mean?” A: repeat sign iii. Q: “What do the dots underneath notes stand for?” A: Staccato, short sounds iv. Q: “What is the symbol at the end of the first line?” A: eighth rest 4. Teacher will perform the piece (Level 1). Students will point to their sheet music with finger, pencil, or bow while listening. i. Teacher will model how to follow the music to the beat and audiate as a reminder of expected behavior for this activity. ii. Start/stop at least once to make sure students are following along iii. Briefly check for understanding with a thumbs up/middle/down; “As musicians, we read music similar to how people read books: left to right. Does everyone understand?” Model by pointing to the notes on the worksheet to show how musicians eyes track the notes 5. First line only: pluck, air-bow, bow i. students will pluck (speaking fingerings), then air-bow (speaking fingerings, letter names, moving fingers, and moving bow on arm) before playing with bow on the D string. Summary and Pack-Up
  • 4. 4 • Summarize learning by playing Level 2 one more time before dismissing for pack-up. Accommodations: • Finger placements marked on instrument with color-coded stickers: red = 1, yellow = 3, green = 4 • String names labeled on bridge of instrument • Stand partners: student is seated next to a friend/strong peer to lean on for support and to see the expectation Modifications: • Repertoire provided in levels (1, 2, 3) progressively moving from fingerings to music notation • Modified repertoire (down beats, eighth notes (ti-ti's); note heads can be colored to match finger placements • Guided practice time: limit 3-5 repetitions then switch with partner for break until timer goes off • Set-Up and Pack-Up checklist provided with pictures Assessment: Informal; check for understanding with Thumbs Up/Middle/Down. Ask students to show their level of understanding with one thumb direction. Depending on the number of thumbs middle/down, go back and address concerns as needed. (chart on next page) Thumbs Up/Middle/Down Thumbs Up I feel super confident about this skill/song! Thumbs Middle I feel ok about this skill/song. With more time, I will get better! Thumbs Down I don’t understand this skill/song at all. I need help. Formal assessment will not take place until lesson 6.
  • 5. 5 Day 2: Continuing to learn about Scales, Solfège, and continuing Level 1 Objectives (teacher voice): Students will be able to... • With visual and/or physical cues, speak or sing solfège in ascending order • Explain, in their own words, how to play the D scale • Compare and contrast Do, Re, Mi and O Pastorzinho • Demonstrate their progress on the first line of O Pastorzinho Objectives (student voice): I will be able to... • Speak or sing solfège in ascending order • Tell you how to move your fingers for the D scale • Show what’s the same and what’s different between Do, Re, Mi and O Pastorzinho • Show you my progress so far on O Pastorzinho Procedure: Set-Up: Prepare the following in advance • Whiteboard/projector with D scale fingerings, stairs, and solfège (see Appendix F for visual) Warm-up: Do Now, D scale, and Solfège Review • Do Now: Finger Map ▪ Directions: Use your cello to help you write the notes on the D and A strings. Fill in all 8 bubbles with the fingering, then try playing the D scale alone or with a partner (see Appendix F) ▪ When you see everyone practicing, set a timer for 30 seconds. When the timer goes off, Thumbs Up/Middle/Down “How did that go? Great, Ok, or not so good?” (Informal Assessment; checking for understanding of the finger patterns in the D scale) • D scale together using half notes for full bows, then eighth notes: 1) 2) D- 1- D D D D 1 1 1 1 • Solfège Review ▪ Q: “Who remembers what solfège is used for?” A: Singers use solfège when there’s no lyrics/Musicians use solfège to communicate about music ▪ Point to each note and have everyone speak the solfège, then sing it
  • 6. 6 ▪ “As string players we use fingerings, but many musicians use solfège to learn about their notes and scales. Solfège is very helpful when you’re making music with musicians that play different instruments.” ▪ Write solfège on the back of the finger map, one for each stair Repertoire: O Pastorzinho/Dó Ré Mi Fá 1. Review Level 1 information from last class period, activate prior knowledge with questioning: i. Q: “Who remembers what we talked about with this song?” A: The Sound Of Music musical, solfège, a shepherd singing ii. Q: “What string are we using?” A: the D string iii. Q: “What is the first note? How many fingers do we need?” A: open D iv. Q: “Does this melody start on an upbeat or a downbeat?” A: Upbeat 2. Play O Pastorzinho/Dó Ré Mi Fá Level 1 first line as a group once. Depending on any issues that arise, go back to those spots with everyone as needed. Implement Practice Time depending on your group’s needs. i. Practice Time: give students X minutes/seconds to practice with a guided task (like focusing on fingering or staccato). This should be no longer than one minute. Students can work alone or with a partner. When the timer goes off, everyone will get ready to play together one more time. • Informal Assessment: Thumbs Up/Middle/Down before moving on to the next three lines; “How did that go? Great, Ok, or not so good?” If there are several thumbs middle/down, ask “What can we do differently?” to gage the group’s understanding on how to improve. Guide students to the answer as needed. 3. Continue working on Level 1 lines 2-4 i. Q: “What looks the same as before?” A: staccato; lines 1 and 4 are the same ii. Q: “What looks different?” A: different finger patterns except 1st and 4th line iii. Q: “Does this rhythm pattern sound familiar?” A: same as D scale warm-up. 4. Point-and-say: select a leader to guide students in pointing to the second line speaking the fingerings. 5. Air-bow: select a leader to guide students in air-bowing the first line of notation while speaking the fingerings.
  • 7. 7 i. Practice Time: give students X minutes/seconds to practice with a guided task (like focusing on fingering or staccato). This should be no longer than one minute. Students can work alone or with a partner. When the timer goes off, everyone will get ready to play together one more time. Summary and Pack-Up • Summarize learning by playing the first line as a group before dismissing for pack-up. Accommodations: • Finger placements marked on instrument with color-coded stickers: red = 1, yellow = 3 (2 for violin/viola), green = 4 (3 for violin/viola) • String names labeled on bridge of instrument • Stand partners: student is seated next to a friend/strong peer to lean on for support and to see the expectation Modifications: • Repertoire provided in levels (1, 2, 3) progressively moving from fingerings to music notation • Modified repertoire (down beats, eighth notes (ti-ti's); note heads can be colored to match finger placements • Guided practice time: limit 3-5 repetitions then switch with partner for break until timer goes off • Set-Up and Pack-Up checklist provided with pictures Assessment: Informal; check for understanding with Thumbs Up/Middle/Down. Ask students to show their level of understanding with one thumb direction. Depending on the number of thumbs middle/down, go back and address concerns as needed. Thumbs Up/Middle/Down Thumbs Up I feel super confident about this skill/song! Thumbs Middle I feel ok about this skill/song. With more time, I will get better! Thumbs Down I don’t understand this skill/song at all. I need help. Formal assessment will not take place until lesson 6.
  • 8. 8 Day 3: Solfège/D Scale/Level 1 review and Starting Level 2 Objectives (teacher voice): Students will be able to... • With visual and/or physical cues, speak or sing solfège in ascending order • Model and explain in their own words, how to play the D scale • Identify similarities and/or differences between O Pastorzinho Level 1 and Level 2 • Identify and describe symbols using content-specific vocabulary • Apply prior knowledge of Level 1 finger patterns to Level 2 modified notation Objectives (student voice): I will be able to... • Speak or sing solfège ascending • Show you how to move your fingers for the D scale • Show what’s the same and what’s different between Level 1 and Level 2 • Point out and describe music symbols to you • Show you my progress so far on O Pastorzinho Procedure: Set-Up: Prepare the following in advance • Whiteboard/projector • Solfège hand sign flash cards taped to whiteboard Warm-up: Scale Showdown and Solfège Review • Do Now: Solfège Match ▪ Use pictures of the hand signs taped to the board and have each student trace a line from one hand sign to one solfège ▪ Match the hand sign to the solfège by drawing a line from the hand sign to the solfège (set timer if needed) ▪ Share-out answers as a group before moving on to the D scale • Scale Showdown (Informal Assessment: knowledge of the D scale) ▪ First, review the D scale by going over the fingering. Play the D scale together as a group, then have students guide you in writing the finger pattern on the board. ▪ Directions: stand in a circle. Teacher will play an open D. The person to the right will play the next note (1); keep going until the group reaches high d (4 on A). ▪ If someone plays a wrong note, they’re out. Restart the scale on open D. The game continues until two musicians remain. ▪ Tip: for the first day playing this game, focus on either an ascending or descending scale. Also, it may be helpful to have a practice round speaking the notes/solfège
  • 9. 9 Repertoire: 1. Review Level 1 information from last class period, activate prior knowledge with questioning: i. Q: “Who remembers what this song is about?” A: The Sound Of Music musical, solfège, shepherd singing ii. Q: “What string are we using?” A: the D string iii. Q: “What is the first note? How many fingers do we need?” A: open D iv. Q: “Does this melody start on an upbeat or a downbeat?” A: Upbeat 2. Play O Pastorzinho/Dó Ré Mi Fá Level 1 as a group once. Depending on any issues that arise, go back to those spots with everyone as needed. Implement Practice Time depending on your group’s needs. i. Practice Time: give students X minutes/seconds to practice with a guided task (like focusing on finger patterns or staccato). This should be no longer than one minute. Students can work alone or with a partner. When the timer goes off, everyone will get ready to play together one more time. • Informal Assessment: Thumbs Up/Middle/Down before moving on to the next three lines; “How did that go? Great, Ok, or not so good?” If there are several thumbs middle/down, ask “What can we do differently?” to gage the group’s understanding on how to improve. Guide students to the answer as needed. 3. Level 2: modified notation, notes are colored by finger placement i. Q: “What looks the same as before?” A: time signature, rests, staccato ii. Q: “What looks different?” A: Two lines instead of four, music staff, lines and spaces, no fingerings, notes are colored based on finger placement (0 = black, 1 = red, 3 = yellow, 4 = green) iii. I Spy: How many _______ can you find? ▪ Have students look for each color, share-out how many of each color were found, connect color to symbol/fingering 4. Point-and-say: select a leader to guide students in pointing to the first line of notation and speaking the fingerings, then do it again a second time speaking letter names. 5. Air-bow: select a leader to guide students in air-bowing while speaking the fingerings. *If there’s not enough time, save this step for Day 4* Summary and Pack-Up • Summarize learning by playing Level 2 as a group before dismissing for pack- up.
  • 10. 10 Accommodations: • Finger placements marked on instrument with color-coded stickers: red = 1, yellow = 3 (2 for violin/viola), green = 4 (3 for violin/viola) • String names labeled on bridge of instrument • Stand partners: student is seated next to a friend/strong peer to lean on for support and to see the expectation Modifications: • Repertoire provided in levels (1, 2, 3) progressively moving from fingerings to music notation • Modified repertoire (down beats, eighth notes (ti-ti's); note heads can be colored to match finger placements • Guided practice time: limit 3-5 repetitions then switch with partner for break until timer goes off • Set-Up and Pack-Up checklist provided with pictures Assessment: Informal; check for understanding with Thumbs Up/Middle/Down. Ask students to show their level of understanding with one thumb direction. Depending on the number of thumbs middle/down, go back and address concerns as needed. Thumbs Up/Middle/Down Thumbs Up I feel super confident about this skill/song! Thumbs Middle I feel ok about this skill/song. With more time, I will get better! Thumbs Down I don’t understand this skill/song at all. I need help. Formal assessment will not take place until lesson 6.
  • 11. 11 Day 4: Reviewing Level 2 and starting Level 3 Objectives (teacher voice): Students will be able to... • With visual and/or physical cues, speak or sing solfège in ascending and descending order • Model how to play the D scale • Identify similarities and/or differences between O Pastorzinho Level 2 and Level 3 • Identify and describe symbols using content-specific vocabulary • Apply prior knowledge of Level 2 modified notation to Level 3 music staff notation • Identify the chorus as the refrain of a song Objectives (student voice): I will be able to... • Speak or sing solfège ascending and descending • Show you how to play the D scale • Point out what’s the same and what’s different between Level 2 and Level 3 • Point out and describe music symbols to you • Show you my progress so far on O Pastorzinho • Tell you what a chorus of a song is Procedure: Set-Up: Prepare the following in advance; • Whiteboard/projector with Level 3 and lyrics on display (can just be the sheet music held onto the board with a magnet) • Do Now sheets prepared for Name That Tune • Mi Re Do written on board Warm-up: Name That Tune and D scale review • Do Now: Name That Tune ▪ Directions: Use the D scale and solfège from last week to figure out this tune on your own or with a partner ▪ Mi, Re, Do = Hot Cross Buns; students should recognize this quickly as they’ve played it before ▪ Set timer for one minute. When timer goes off, ask the group if anyone recognizes the pattern before playing it together • D scale review: Demonstrate the D scale using the primary rhythm in O Pastorzinho (pattern should be all the same note, ex: DDD D DD)
  • 12. 12 • If the group is able to play the rhythm accurately and play in-tune, try it as a round! Repertoire: 1. Review Level 2 information from last class period, activate prior knowledge with questioning *This strongly depends on the pacing of your group, if they needed more time then you will need to cover Level 2 information before moving on* Remind everyone to write down their answers on their worksheet. i. Q: “Who remembers what is different between Level 1 and Level 2?” A: Notation (not just fingerings) ii. Q: “What string are we using?” A: the D string iii. Q: “What is the first note? How many fingers do we need?” A: open D iv. Q: “What should we do every time there’s a dot underneath or above a note?” A: staccato, play short sounds by moving the bow a short length 2. Play Level 2 both lines as a group once. Depending on any issues that arise, go back to those spots with everyone as needed. • Informal Assessment: Thumbs Up/Middle/Down before moving on to Level 3, “How did that go?” If there are several thumbs middle/down, ask “What can we do differently?” to gage the group’s understanding on how to improve. Guide students to the answer as needed. • Implement Practice Time as needed. 3. New: Level 3 with Lyrics i. Q: “What looks the same as Level 2?” A: Symbols (time signature, staccato markings, up and down bow markings, bar lines, double bar line ii. Q: “What looks different?” A: There are more notes, no colors, and lyrics iii. Point out the lyrics on the bottom of the page. One side is English, and the other is Portuguese. Speak or sing the lyrics out loud while pointing at the notes for students to connect the rhythm of notes to the lyrics. Acknowledge the connection out loud ▪ Ex: “The notes follow a pattern because of the lyrics.” ▪ “This is why the song has two names: O Pastorzinho or Dó Ré Mi Fá.” ▪ “The notes we’re learning line up with the lyrics for the chorus. Has anyone heard that word before? What do you think it means?” (fill in questions on worksheet)
  • 13. 13 iv. Work together as a group to circle notes that weren’t in Level 2, then model how a musician reads notes ▪ Ex: “I can tell that this is a D because the note head is sitting underneath all the lines and spaces.” 4. Air-bow: select a leader to guide students in air-bowing the first line of notation while speaking the fingerings. If there’s time, try playing the first line with bow on D string. Summary and Pack-Up • Summarize learning by playing the first line as a group before dismissing for pack-up. Accommodations: • Finger placements marked on instrument with color-coded stickers: red = 1, yellow = 3, green = 4 • String names labeled on bridge of instrument • Stand partners: student is seated next to a friend/strong peer to lean on for support and to see the expectation Modifications: • Repertoire provided in levels (1, 2, 3) progressively moving from fingerings to music notation • Modified repertoire (down beats, eighth notes (ti-ti's); note heads can be colored to match finger placements • Guided practice time: limit 3-5 repetitions then switch with partner for break until timer goes off • Set-Up and Pack-Up checklist provided with pictures Assessment: Informal; check for understanding with Thumbs Up/Middle/Down. Ask students to show their level of understanding with one thumb direction. Depending on the number of thumbs middle/down, go back and address concerns as needed. Thumbs Up/Middle/Down Thumbs Up I feel super confident about this skill/song! Thumbs Middle I feel ok about this skill/song. With more time, I will get better! Thumbs Down I don’t understand this skill/song at all. I need help. Formal assessment will not take place until lesson 6.
  • 14. 14 Day 5: Continuing Level 3 and Preparing for Playing Assessment Objectives (teacher voice): Students will be able to... • With visual and/or physical cues, speak or sing solfège in ascending and descending order • Model how to play the D scale • Identify and describe in their own words the easy versus difficult parts of the song • Identify and describe symbols using content-specific vocabulary • Apply prior knowledge of solfège and the D scale to identify a short melody • Identify the chorus as the refrain of a song Objectives (student voice): I will be able to... • Speak or sing solfège ascending and descending • Show you how to play the D scale • Point out what’s easy and what’s tricky for me in this song • Point out and describe music symbols to you • Show you my progress so far on O Pastorzinho • Tell you what a chorus of a song is Procedure: Set-Up: Prepare the following in advance; • Whiteboard or projector with Level 3 and lyrics on display (can just be the sheet music held onto the board with a magnet) and D scale letter names with fingerings • Do Now sheets prepared for Name That Tune Warm-up: Name That Tune and Scale Conductor • Do Now: Name That Tune ▪ Directions: Use the D scale and solfège to figure out this tune on your own or with a partner ▪ Re Re Mi Re Do = ending of Mary Had a Little Lamb; students should recognize it as they’ve already played it ▪ Set timer for one minute. When timer goes off, ask the group if anyone recognizes the pattern before playing it together ▪ Reveal the title of the tune after playing one more time • Scale Conductor: D scale ▪ One conductor will point to notes in the D scale, in Ascending or Descending order, one at a time. The conductor can vary tempo, and they must give a cut off so musicians know when to end. ▪ Musicians must watch the conductor so they know when to change to the next note.
  • 15. 15 ▪ The conductor will select the next conductor based on who is demonstrating positive posture (posture chant: edge of seat, feet flat on floor, tall straight back, strong, strong core). Repertoire: 1. Review Level 3 information from last class period, activate prior knowledge with questioning *This strongly depends on the pacing of your group, if they needed more time then you will need to cover Level 3 information before moving on* i. Q: “Who remembers what is different between Level 2 and Level 3?” A: There are more notes ii. Q: “What string are we using?” A: D string iii. Q: “What is the first note? How many fingers do we need? A: open D iv. Q: “What should we do every time there’s a dot underneath or above a note?” A: staccato, play short sounds by moving the bow a short length 2. Practice then Play i. Practice Time: give students X minutes to practice with a guided task (like maintaining speed or focusing on staccato). This should be no longer than two minutes. Students can work alone or with a partner. When the timer goes off, everyone will get ready to play together one more time. *Skip this if your group is confident in their understanding of Level 3* ii. Play Level 3 as a group once. Depending on any issues that arise, go back to those spots with everyone as needed. • Informal Assessment: Thumbs Up/Middle/Down before moving on to the game, “How did that go?” If there are several thumbs middle/down, ask “What can we do differently?” to gage the group’s understanding on how to improve. Guide students to the answer as needed. 3. If there’s time, preview Solfège Game Mi-Do-Do i. Like Poison Rhythm, but with solfège; either have whiteboard prepared with solfège and D scale or have students gather their worksheets ii. One person will be the Do-Do (as in, the do-do bird). The Do-Do's job is to sing or play patterns with three solfège symbols . The teacher (you) will be the first Do-Do, then watch over the next Do-Do to verify accuracy of solfège/notes. iii. If anyone repeats “Mi-Do-Do" they are out. The last musician will be the next Do-Do.
  • 16. 16 Summary and Pack-Up • Remind students that there will be a “Playing Test” next time before dismissing for pack-up. Accommodations: • Finger placements marked on instrument with color-coded stickers: red = 1, yellow = 3 (2 for violin/viola), green = 4 (3 for violin/viola) • String names labeled on bridge of instrument • Stand partners: student is seated next to a friend/strong peer to lean on for support and to see the expectation Modifications: • Repertoire provided in levels (1, 2, 3) progressively moving from fingerings to music notation • Modified repertoire (down beats, eighth notes (ti-ti's); note heads can be colored to match finger placements • Guided practice time: limit 3-5 repetitions then switch with partner for break until timer goes off • Set-Up and Pack-Up checklist provided with pictures Assessment: Informal; check for understanding with Thumbs Up/Middle/Down. Ask students to show their level of understanding with one thumb direction. Depending on the number of thumbs middle/down, go back and address concerns as needed (chart on next page). Thumbs Up/Middle/Down Thumbs Up I feel super confident about this skill/song! Thumbs Middle I feel ok about this skill/song. With more time, I will get better! Thumbs Down I don’t understand this skill/song at all. I need help. Formal assessment will not take place until lesson 6.
  • 17. 17 Day 6: Review Level 3 and Begin Assessment Objectives (teacher voice): Students will be able to... • With visual and/or physical cues, speak or sing solfège in ascending and descending order • Model how to play the D scale • Identify and describe in their own words the easy versus difficult parts of the song • Identify and describe symbols using content-specific vocabulary • Apply prior knowledge of solfège and the D scale to strengthen ear training • Identify the chorus as the refrain of a song Objectives (student voice): I will be able to... • Speak or sing solfège ascending and descending • Show you how to play the D scale • Point out what’s easy and what’s tricky for me in this song • Point out and describe music symbols to you • Show you my progress so far on O Pastorzinho • Tell you what a chorus of a song is Procedure: Warm-up: D scale • D scale review: each musician will have a turn to lead the group for the D scale warm-up using the primary rhythm in O Pastorzinho R D D D D D D (pattern should be all the same note, ex: DDD D DD) Repertoire: 1. Review Level 3 information from last class period, activate prior knowledge with questioning *This strongly depends on the pacing of your group and what their needs are. Select questions at your discretion. * i. Play Level 3 as a group once. Depending on any issues that arise, go back to those spots with everyone as needed. • Informal Assessment: Thumbs Up, Thumbs Middle, Thumbs Down before moving on to the Hopscotch Game, “How did that go?” If there are several thumbs middle/down, ask “What can
  • 18. 18 we do differently?” to gage the group’s understanding on how to improve. Guide students to the answer as needed. 2. Formal Assessment; review the following expectations before assessing each student individually i. Students are expected to practice while waiting for their turn. ii. Students have a choice of Level 1, 2, or 3; but any students that choose Level 1 or 2 will be asked to show their sheet music for Level 3 iii. This Check-in will be noted on the progress report, so do your best! 3. Mi-Do-Do, Scale Conductor, or Scale Showdown • Vote between the three games to reinforce solfège and scale work. There may or may not be enough time for all three. Rules for each game below: • Scale Conductor: D scale ▪ One conductor will point to notes in the D scale, in Ascending or Descending order, one at a time. The conductor can vary tempo, and they must give a cut off so musicians know when to end. ▪ Musicians must watch the conductor so they know when to change to the next note. ▪ The conductor will select the next conductor based on who is demonstrating positive posture (posture chant: edge of seat, feet flat on floor, tall straight back, strong core). • Mi-Do-Do ▪ Like Poison Rhythm, but with solfège; either have whiteboard prepared with solfège and D scale or have students gather their worksheets ▪ One person will be the Do-Do (as in, the do-do bird). The Do-Do's job is to sing or play patterns with three solfège symbols . The teacher (you) will be the first Do-Do, then watch over the next Do-Do to verify accuracy of solfège/notes. ▪ If anyone repeats “Mi-Do-Do" they are out. The last musician will be the next Do-Do. • Scale Showdown (Informal Assessment: knowledge of the D scale) ▪ First, review the D scale by going over the fingering. Play the D scale together as a group, then have students guide you in writing the finger pattern on the board. ▪ Directions: stand in a circle. Teacher will play an open D. The person to the right will play the next note (1); keep going until the group reaches high d (4 on A). ▪ If someone plays a wrong note, they’re out. Restart the scale on open D. The game continues until two musicians remain.
  • 19. 19 ▪ Tip: for the first day playing this game, focus on either an ascending or descending scale. Also, it may be helpful to have a practice round speaking the notes/solfège Summary and Pack-Up • Congratulate students on their hard work before releasing them to pack-up. Accommodations: • Finger placements marked on instrument with color-coded stickers: red = 1, yellow = 3 (2 for violin/viola), green = 4 (3 for violin/viola) • String names labeled on bridge of instrument • Stand partners: student is seated next to a friend/strong peer to lean on for support and to see the expectation Modifications: • Repertoire provided in levels (1, 2, 3) progressively moving from fingerings to music notation • Modified repertoire (down beats, eighth notes (ti-ti's); note heads can be colored to match finger placements • Guided practice time: limit 3-5 repetitions then switch with partner for break until timer goes off • Set-Up and Pack-Up checklist provided with pictures Assessment: Informal; check for understanding with Thumbs Up/Middle/Down. Ask students to show their level of understanding with one thumb direction. Depending on the number of thumbs middle/down, go back and address concerns as needed. Thumbs Up/Middle/Down Thumbs Up I feel super confident about this skill/song! Thumbs Middle I feel ok about this skill/song. With more time, I will get better! Thumbs Down I don’t understand this skill/song at all. I need help. Formal Assessment on O Pastorzinho/Dó Ré Mi Fá based on the following rubric (next page) Assessment Accommodations/Modifications: • Allow students to perform with a partner if desired • Modified selection: student choice of line (depending on level selected) • Student choice of Level 1, 2, or 3; students that select Level 1 or 2 must show their written work on Level 3 (note names, fingerings, circled spots) Other specific IEP/504 accommodations/modifications are case-by-case.
  • 20. 20 Achievement Exceeding Expectation 4 Meeting Expectation 3 Progressing to Expectation 2 Not Yet Meeting the Expectation 1 Symbol Identification Note Reading Student can identify all music symbols without assistance and could teach this skill to someone else. Student can identify 75% of music symbols with a few reminders. Student can identify 50% of music symbols with several reminders. Student cannot identify music symbols without hand-over-hand assistance. Rhythm Performing with a steady beat Student can perform with a steady beat without assistance and could teach this skill to someone else. Student can perform with a steady beat 75% of the time, with a few reminders. Student can perform with a steady beat for 50% of the time, with several reminders. Student cannot perform with a steady beat without hand-over-hand assistance. Posture Maintaining active musician posture Student can maintain active musician posture without assistance and could teach this skill to someone else. Student can maintain active musician posture for 75% of the time, with a few reminders. Student can maintain active musician posture for 50% of the time, with several reminders. Student cannot maintain active musician posture without hand-over- hand assistance. Left Hand Position and Finger Placement Student can move their left hand fingers to the proper placements without assistance and could teach this skill to someone else. Student can move their left hand fingers to the proper placements 75% of the time with a few reminders. Student can move their left hand fingers to the proper placements for 50% of the time, with several reminders. Student cannot move their left hand fingers to the proper placements without hand-over-hand assistance. Right Hand Position Student can maintain bow hold and position without assistance and could teach this skill to someone else. Student can maintain bow hold and position 75% of the time with a few reminders. Student can maintain bow hold and position for 50% of the time, with several reminders. Student cannot maintain bow hold and position without hand-over-hand assistance.
  • 21. 21 Content-Specific Vocabulary * = definition provided by NAFME’s Core Music Standards Glossary + = definition provided by the OnMusic dictionary All other definitions self-created Air-bow A method to encourage audiation. Violinists and violists place their bow stick side down on their left elbow and move it as if playing on the string. Cellists hover their bow stick side down above the strings. Everyone says the note names or fingerings. *Audiate Hear and comprehend sounds in one’s head (inner hearing), even when no sound is present. *Beat; Downbeat vs Upbeat *Underlying steady pulse present in most music. A downbeat is the first beat of the measure. When played under the direction of a conductor, it is signified by the downward movement of the conductor’s hand. An upbeat is the last beat of any measure, usually a weak beat. It is called the “upbeat” because the conductor always directs it with an upward swing of the baton or hand. This anticipates the first beat of the next measure, the “downbeat,” always directed by a downward swing of the baton or hand. Bow Essential equipment that comes with each string family instrument, required to play Arco (with hair on the string). A stick, wooden or carbon fiber, with horsehair attached at both ends. Students must know how to prepare their bow before playing Arco. Bowings; Up Bow vs Down Bow Bowings are symbols that indicate which direction to move the bow. Up Bow (left) is notated as V and Down Bow (right) is notated as . Each notation occurs above the note as needed. The plural form is bowings. Fingerings/Finger Patterns Finger placements, written in number form above the printed note (0 = open/no fingers, 1 = pointer finger on red, 2= middle
  • 22. 22 finger on yellow (3 for cello), 3 = ring finger on green, 4 = pinky on blue violin/viola). Pluck/Pizzicato Pulling on any string to make a ringing, resonant sound. Typically executed with the pointer finger. Pizzicato (Pizz.) is the musical term, interchangeable with Pluck. *Repertoire Body or set of musical works that can be performed. Rests; Eighth Rests In music, a Rest indicates silence. There are different names for different lengths of silence. O Pastorzinho uses Eighth Rests, which are equal to an eighth note. Eighth Rests are shorter than Quarter Rests. *Scale; Ascending and Descending *Pattern of pitches arranged in ascending or descending order and identified by their specific arrangement of whole and half steps. Ascending is moving from low to high sounds, and Descending is moving from high to low sounds. Sheet Music The piece of paper that tells musicians what to play and how. This can be western standardized music notation on the staff, fingerings, letter names, a lead sheet with chord symbols, or tablature (a picture that shows finger placement). +Solfège/Solfeggio The practice of singing exercises to the syllables of solmization. Solamization is the syllables Do, Re, Mi, Fa, Sol, La, Ti, Do and their association with specific pitches, especially in regard to the indication of intervals. Staccato vs Legato Staccato is the musical term for “short sound.” This is executed by moving the bow at a shorter length, briefly stopping between notes. By contrast, Legato is the musical term for “long sound.” This is executed by moving the bow longer lengths for a smooth sound.