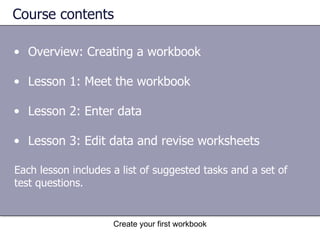
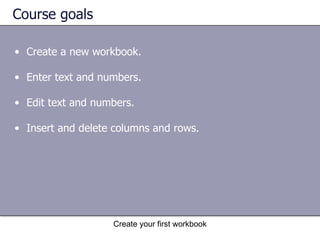
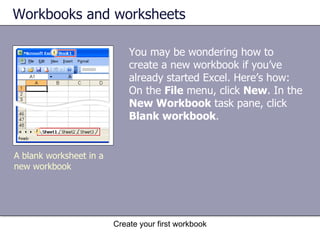
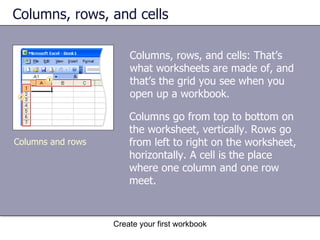
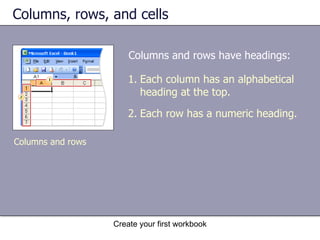
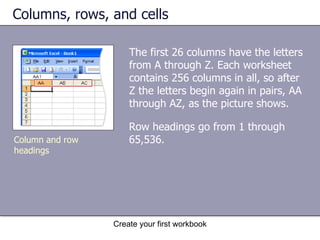
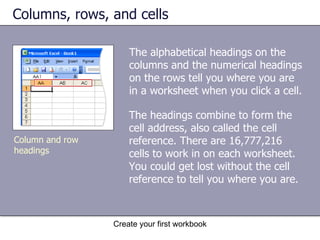
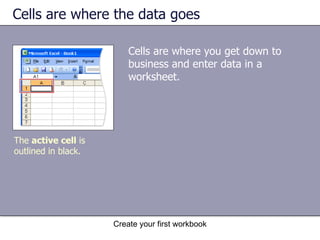
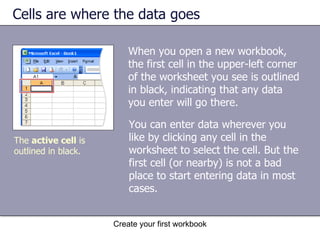
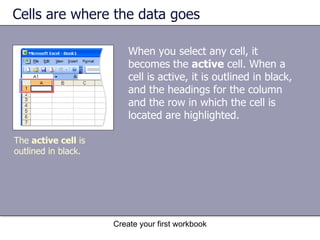
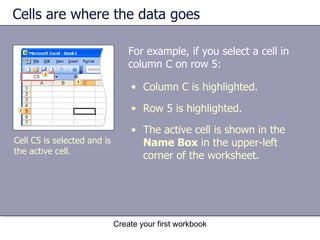
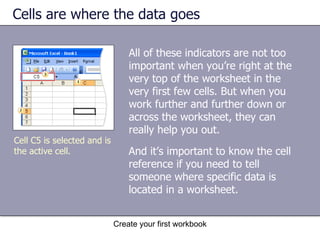
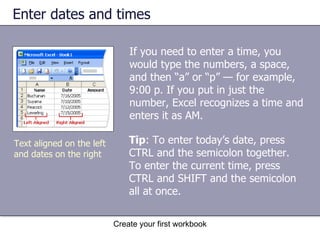
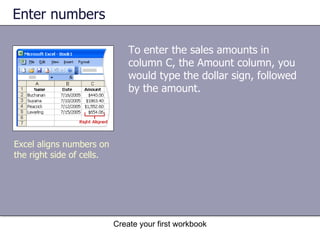
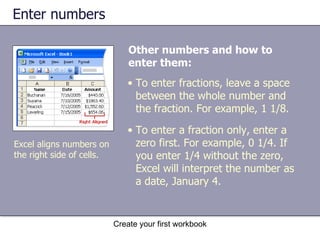
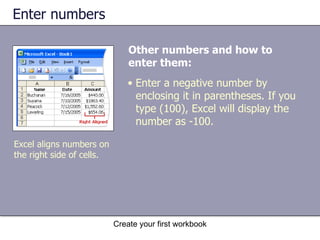
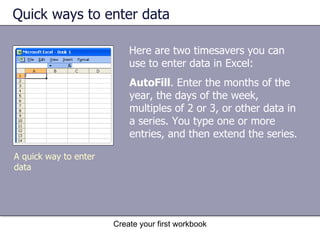
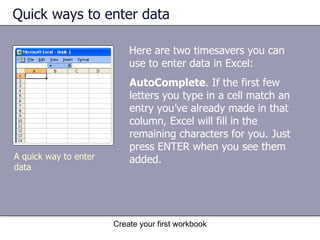
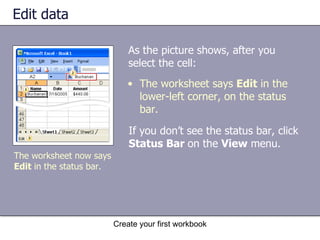
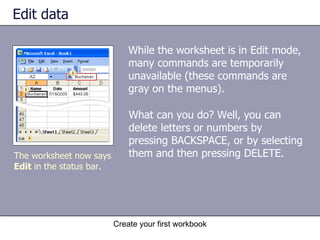
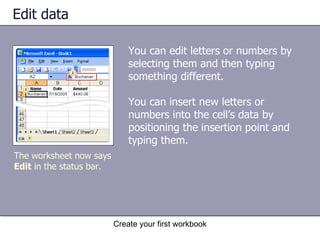
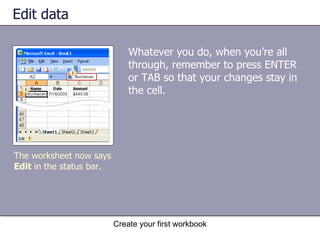
Microsoft ®  Office  Excel ®   2003 Training Create your first workbook South Arkansas Community College
Course contents Overview: Creating a workbook Lesson 1: Meet the workbook Lesson 2: Enter data Lesson 3: Edit data and revise worksheets Create your first workbook Each lesson includes a list of suggested tasks and a set of test questions.
You've been asked to enter data in Excel, but you're not familiar with the program and wonder how to do some of the basics. Overview: Creating a workbook Create your first workbook This is the place to learn the skills you need to work in Excel—how to create a workbook, enter and edit different kinds of data, and add and delete columns and rows—quickly and with little fuss.
Course goals Create a new workbook. Enter text and numbers.  Edit text and numbers. Insert and delete columns and rows.  Create your first workbook
Lesson 1 Meet the workbook
Meet the workbook When you start Excel you're faced with a big empty grid. There are letters across the top, numbers down the left side, tabs at the bottom named Sheet1 and so forth. If you're new to Excel, you may wonder what to do next.  We'll begin by helping you get comfortable with some Excel basics that will guide you when you enter data in Excel. Create your first workbook How do you get started in Excel?
Workbooks and worksheets When you start Excel, you open a file called a  workbook . Each new workbook comes with three worksheets, like pages in a document. You enter data into the worksheets.  Create your first workbook A blank worksheet in a new workbook Each worksheet has a name on its  sheet tab  at the bottom left of the workbook window: Sheet1, Sheet2, and Sheet3. You view a worksheet by clicking its sheet tab.
Workbooks and worksheets Create your first workbook A blank worksheet in a new workbook It’s a good idea to rename the sheet tabs to make the information on each sheet easier to identify.  The first workbook you open is called Book1 in the title bar at the top of the window until you save it with your own title.  Sheet tabs are at the bottom of the workbook window.
Workbooks and worksheets You can add additional worksheets if you need more than three. Or if you don’t need as many as three, you can delete one or two (but you don’t have to).  Create your first workbook A blank worksheet in a new workbook You can also use keyboard shortcuts to move between sheets.
Workbooks and worksheets You may be wondering how to create a new workbook if you’ve already started Excel. Here’s how: On the  File  menu, click  New . In the  New Workbook  task pane, click  Blank workbook .  Create your first workbook A blank worksheet in a new workbook
Columns, rows, and cells Columns go from top to bottom on the worksheet, vertically. Rows go from left to right on the worksheet, horizontally. A cell is the place where one column and one row meet.  Create your first workbook Columns and rows Columns, rows, and cells: That’s what worksheets are made of, and that’s the grid you see when you open up a workbook.
Columns, rows, and cells Create your first workbook Columns and rows Columns and rows have headings:  Each column has an alphabetical heading at the top.  Each row has a numeric heading.
Columns, rows, and cells The first 26 columns have the letters from A through Z. Each worksheet contains 256 columns in all, so after Z the letters begin again in pairs, AA through AZ, as the picture shows.  Create your first workbook Column and row headings Row headings go from 1 through 65,536.
Columns, rows, and cells The alphabetical headings on the columns and the numerical headings on the rows tell you where you are in a worksheet when you click a cell.  Create your first workbook Column and row headings The headings combine to form the cell address, also called the cell reference. There are 16,777,216 cells to work in on each worksheet. You could get lost without the cell reference to tell you where you are.
Cells are where the data goes Cells are where you get down to business and enter data in a worksheet. Create your first workbook The  active cell  is outlined in black.
Cells are where the data goes Create your first workbook The  active cell  is outlined in black.  When you open a new workbook, the first cell in the upper-left corner of the worksheet you see is outlined in black, indicating that any data you enter will go there.  You can enter data wherever you like by clicking any cell in the worksheet to select the cell. But the first cell (or nearby) is not a bad place to start entering data in most cases.
Cells are where the data goes Create your first workbook The  active cell  is outlined in black.  When you select any cell, it becomes the  active  cell. When a cell is active, it is outlined in black, and the headings for the column and the row in which the cell is located are highlighted.
Cells are where the data goes Create your first workbook Cell C5 is selected and is the active cell. For example, if you select a cell in column C on row 5: Column C is highlighted.  Row 5 is highlighted.  The active cell is shown in the  Name Box  in the upper-left corner of the worksheet.
Cells are where the data goes Create your first workbook Cell C5 is selected and is the active cell. The selected cell has a black outline and is known as C5, which is the  cell reference .  You can see the cell reference of the active cell by looking in the   Name Box in the upper-left corner.
Cells are where the data goes Create your first workbook Cell C5 is selected and is the active cell. All of these indicators are not too important when you’re right at the very top of the worksheet in the very first few cells. But when you work further and further down or across the worksheet, they can really help you out.  And it’s important to know the cell reference if you need to tell someone where specific data is located in a worksheet.
Assignment Rename a worksheet tab. Move from one worksheet to another. Add color to sheet tabs. Add, move, and delete worksheets. Review column headings and use the Name Box. Save the workbook. Create your first workbook
Lesson 2 Enter data
Enter data You can enter two basic kinds of data into worksheet cells: numbers and text.  You can use Excel to create budgets, work with taxes, record student grades, or even track daily exercise or the cost of a remodel. Professional or personal, the possibilities are nearly endless.  Now let’s dive in to data entry.  Create your first workbook You can use Excel to enter all sorts of data.
Start with column titles (be kind to readers) When you enter data, it’s a good idea to start by entering titles at the top of each column, so that anyone who shares your worksheet can understand what the data means (and so that you can understand it yourself, later on). You’ll often want to enter row titles too.  Create your first workbook Worksheet with column and row titles
Start with column titles (be kind to readers) In the picture: Create your first workbook Worksheet with column and row titles The column titles are the months of the year, across the top of the worksheet.  The row titles down the left side are company names.
Start with column titles (be kind to readers) Create your first workbook Worksheet with column and row titles This worksheet shows whether or not a representative from each company attended a monthly business lunch.
Start typing Say that you’re creating a list of salespeople names. The list will also have the dates of sales, with their amounts.  So you will need these column titles: Name, Date, and Amount.  Create your first workbook Press TAB and ENTER to move from cell to cell.
Start typing You don’t need row titles down the left side of the worksheet in this case; the salespeople names will be in the leftmost column. You would type “Date” in cell B1 and press TAB. Then you’d type “Amount” in cell C1.  Create your first workbook Press TAB and ENTER to move from cell to cell.
Start typing After you typed the column titles, you’d click in cell A2 to begin typing the names of the salespeople.  You would type the first name, and then press ENTER to move the selection  down  one cell to cell A3 (down the column), and then type the next name, and so on.  Create your first workbook Press TAB and ENTER to move from cell to cell.
Enter dates and times To enter a date in column B, the Date column, you should use a slash or a hyphen to separate the parts: 7/16/2005 or 16-July-2005. Excel will recognize this as a date.  Create your first workbook Text aligned on the left and dates on the right
Enter dates and times Create your first workbook Text aligned on the left and dates on the right If you need to enter a time, you would type the numbers, a space, and then “a” or “p” — for example, 9:00 p. If you put in just the number, Excel recognizes a time and enters it as AM. Tip : To enter today’s date, press CTRL and the semicolon together. To enter the current time, press CTRL and SHIFT and the semicolon all at once.
Enter numbers To enter the sales amounts in column C, the Amount column, you would type the dollar sign, followed by the amount.  Create your first workbook Excel aligns numbers on the right side of cells.
Enter numbers Other numbers and how to enter them:   Create your first workbook Excel aligns numbers on the right side of cells. To enter fractions, leave a space between the whole number and the fraction. For example, 1 1/8.  To enter a fraction only, enter a zero first. For example, 0 1/4. If you enter 1/4 without the zero, Excel will interpret the number as a date, January 4.
Enter numbers Other numbers and how to enter them:   Create your first workbook Excel aligns numbers on the right side of cells. Enter a negative number by enclosing it in parentheses. If you type (100), Excel will display the number as -100.
Quick ways to enter data Here are two timesavers you can use to enter data in Excel: Create your first workbook AutoFill . Enter the months of the year, the days of the week, multiples of 2 or 3, or other data in a series. You type one or more entries, and then extend the series.  A quick way to enter data
Quick ways to enter data Here are two timesavers you can use to enter data in Excel: Create your first workbook AutoComplete . If the first few letters you type in a cell match an entry you’ve already made in that column, Excel will fill in the remaining characters for you. Just press ENTER when you see them added.  A quick way to enter data
Assignment Enter data using TAB and ENTER. Fix mistakes as you type. Enter dates and times. Enter numbers. Use AutoFill. Use AutoComplete. Fix text that’s too long for a cell.  Create your first workbook
Lesson 3 Edit data and revise worksheets
Edit data and revise worksheets Everyone makes mistakes sometimes, and sometimes data that you entered correctly needs to be changed later on. Sometimes the whole worksheet needs a change.  In this lesson we'll learn how to edit data and how to add and delete worksheet columns and rows. Create your first workbook Edit data, insert columns, and insert rows.
Edit data Say that you meant to enter Peacock’s name in cell A2, but you entered Buchanan’s name by mistake. Now you spot the error and want to correct it.  Create your first workbook Two ways to select a cell
Edit data You need to select the cell, and there are two ways: Create your first workbook Two ways to select a cell Double-click a cell to edit the data in it.  Click the cell, and then edit the data in the formula bar.
Edit data What’s the difference? Your convenience. You may find the formula bar, or the cell itself, easier to work with. Create your first workbook Two ways to select a cell If you’re editing data in many cells, you can keep your pointer at the formula bar while you move from cell to cell by using the keyboard.
Edit data As the picture shows, after you select the cell: Create your first workbook The worksheet now says  Edit  in the status bar.  If you don’t see the status bar, click  Status Bar  on the  View  menu.  The worksheet says  Edit  in the lower-left corner, on the status bar.
Edit data While the worksheet is in Edit mode, many commands are temporarily unavailable (these commands are gray on the menus).  Create your first workbook The worksheet now says  Edit  in the status bar.  What can you do? Well, you can delete letters or numbers by pressing BACKSPACE, or by selecting them and then pressing DELETE.
Edit data You can edit letters or numbers by selecting them and then typing something different.  You can insert new letters or numbers into the cell’s data by positioning the insertion point and typing them. Create your first workbook The worksheet now says  Edit  in the status bar.
Edit data Whatever you do, when you’re all through, remember to press ENTER or TAB so that your changes stay in the cell.  Create your first workbook The worksheet now says  Edit  in the status bar.
Remove data formatting Surprise! Someone else has used your worksheet, filled in some data, and made the number in cell C6 bold and red to highlight the fact that Peacock made the highest sale.  But that customer changed her mind, so the final sale was much smaller. Create your first workbook Formatting stays with the cell.
Remove data formatting You go to make the fix.  Create your first workbook Formatting stays with the cell.  The original number is formatted bold and red.  You delete the original figure. You enter a new number. Bold and red again! What gives here?
Remove data formatting What’s going on is that it’s the cell that is formatted, not the data in the cell. So when you delete data that has special formatting, you also need to delete the formatting from the cell.  Until you do, any data you enter in that cell will have the special formatting.  Create your first workbook Formatting stays with the cell.
Remove data formatting  To remove formatting, select the cell and point to  Clear  on the  Edit  menu. The  Formats  command removes the format from the cell.  Or you can click  All  to remove both the data and the formatting at the same time.  Create your first workbook You can remove cell formatting.
Insert a column or a row After you’ve entered data, you may find that you need another column to hold additional information.  Or maybe you need another row, or rows.  Do you have to start over? Of course not.  Create your first workbook You can easily insert new columns and rows.
Insert a column or a row To insert a single column, click any cell in the column immediately to the  right  of where you want the new column to go.  So if you want an order-ID column between columns B and C, you’d click a cell in column C, to the right of the new location. Then on the  Insert  menu, click  Columns .  Create your first workbook You can easily insert new columns and rows.
Insert a column or a row To insert a single row, click any cell in the row immediately  below  where you want the new row to go. For example, to insert a new row between row 4 and row 5, click a cell in row 5. Then on the  Insert  menu, click  Rows .  Create your first workbook You can easily insert new columns and rows.
Insert a column or a row As the animation shows, Excel gives a new column or row the heading its place requires, and changes the headings of later columns and rows.  Create your first workbook Animation: Right-click, and click  Play . You can easily insert new columns and rows.
Insert a column or a row Excel gives a new column or row the heading its place requires, and changes the headings of later columns and rows.  Create your first workbook You can easily insert new columns and rows.
Assignment Edit data. (Use a different color to show that data was changed) Delete formatting from a cell. Work in Edit mode. Insert and delete columns and rows. Create your first workbook

Microsoft® office excel a

  • 1.
    Microsoft ® Office Excel ® 2003 Training Create your first workbook South Arkansas Community College
  • 2.
    Course contents Overview:Creating a workbook Lesson 1: Meet the workbook Lesson 2: Enter data Lesson 3: Edit data and revise worksheets Create your first workbook Each lesson includes a list of suggested tasks and a set of test questions.
  • 3.
    You've been askedto enter data in Excel, but you're not familiar with the program and wonder how to do some of the basics. Overview: Creating a workbook Create your first workbook This is the place to learn the skills you need to work in Excel—how to create a workbook, enter and edit different kinds of data, and add and delete columns and rows—quickly and with little fuss.
  • 4.
    Course goals Createa new workbook. Enter text and numbers. Edit text and numbers. Insert and delete columns and rows. Create your first workbook
  • 5.
    Lesson 1 Meetthe workbook
  • 6.
    Meet the workbookWhen you start Excel you're faced with a big empty grid. There are letters across the top, numbers down the left side, tabs at the bottom named Sheet1 and so forth. If you're new to Excel, you may wonder what to do next. We'll begin by helping you get comfortable with some Excel basics that will guide you when you enter data in Excel. Create your first workbook How do you get started in Excel?
  • 7.
    Workbooks and worksheetsWhen you start Excel, you open a file called a workbook . Each new workbook comes with three worksheets, like pages in a document. You enter data into the worksheets. Create your first workbook A blank worksheet in a new workbook Each worksheet has a name on its sheet tab at the bottom left of the workbook window: Sheet1, Sheet2, and Sheet3. You view a worksheet by clicking its sheet tab.
  • 8.
    Workbooks and worksheetsCreate your first workbook A blank worksheet in a new workbook It’s a good idea to rename the sheet tabs to make the information on each sheet easier to identify. The first workbook you open is called Book1 in the title bar at the top of the window until you save it with your own title. Sheet tabs are at the bottom of the workbook window.
  • 9.
    Workbooks and worksheetsYou can add additional worksheets if you need more than three. Or if you don’t need as many as three, you can delete one or two (but you don’t have to). Create your first workbook A blank worksheet in a new workbook You can also use keyboard shortcuts to move between sheets.
  • 10.
    Workbooks and worksheetsYou may be wondering how to create a new workbook if you’ve already started Excel. Here’s how: On the File menu, click New . In the New Workbook task pane, click Blank workbook . Create your first workbook A blank worksheet in a new workbook
  • 11.
    Columns, rows, andcells Columns go from top to bottom on the worksheet, vertically. Rows go from left to right on the worksheet, horizontally. A cell is the place where one column and one row meet. Create your first workbook Columns and rows Columns, rows, and cells: That’s what worksheets are made of, and that’s the grid you see when you open up a workbook.
  • 12.
    Columns, rows, andcells Create your first workbook Columns and rows Columns and rows have headings: Each column has an alphabetical heading at the top. Each row has a numeric heading.
  • 13.
    Columns, rows, andcells The first 26 columns have the letters from A through Z. Each worksheet contains 256 columns in all, so after Z the letters begin again in pairs, AA through AZ, as the picture shows. Create your first workbook Column and row headings Row headings go from 1 through 65,536.
  • 14.
    Columns, rows, andcells The alphabetical headings on the columns and the numerical headings on the rows tell you where you are in a worksheet when you click a cell. Create your first workbook Column and row headings The headings combine to form the cell address, also called the cell reference. There are 16,777,216 cells to work in on each worksheet. You could get lost without the cell reference to tell you where you are.
  • 15.
    Cells are wherethe data goes Cells are where you get down to business and enter data in a worksheet. Create your first workbook The active cell is outlined in black.
  • 16.
    Cells are wherethe data goes Create your first workbook The active cell is outlined in black. When you open a new workbook, the first cell in the upper-left corner of the worksheet you see is outlined in black, indicating that any data you enter will go there. You can enter data wherever you like by clicking any cell in the worksheet to select the cell. But the first cell (or nearby) is not a bad place to start entering data in most cases.
  • 17.
    Cells are wherethe data goes Create your first workbook The active cell is outlined in black. When you select any cell, it becomes the active cell. When a cell is active, it is outlined in black, and the headings for the column and the row in which the cell is located are highlighted.
  • 18.
    Cells are wherethe data goes Create your first workbook Cell C5 is selected and is the active cell. For example, if you select a cell in column C on row 5: Column C is highlighted. Row 5 is highlighted. The active cell is shown in the Name Box in the upper-left corner of the worksheet.
  • 19.
    Cells are wherethe data goes Create your first workbook Cell C5 is selected and is the active cell. The selected cell has a black outline and is known as C5, which is the cell reference . You can see the cell reference of the active cell by looking in the Name Box in the upper-left corner.
  • 20.
    Cells are wherethe data goes Create your first workbook Cell C5 is selected and is the active cell. All of these indicators are not too important when you’re right at the very top of the worksheet in the very first few cells. But when you work further and further down or across the worksheet, they can really help you out. And it’s important to know the cell reference if you need to tell someone where specific data is located in a worksheet.
  • 21.
    Assignment Rename aworksheet tab. Move from one worksheet to another. Add color to sheet tabs. Add, move, and delete worksheets. Review column headings and use the Name Box. Save the workbook. Create your first workbook
  • 22.
  • 23.
    Enter data Youcan enter two basic kinds of data into worksheet cells: numbers and text. You can use Excel to create budgets, work with taxes, record student grades, or even track daily exercise or the cost of a remodel. Professional or personal, the possibilities are nearly endless. Now let’s dive in to data entry. Create your first workbook You can use Excel to enter all sorts of data.
  • 24.
    Start with columntitles (be kind to readers) When you enter data, it’s a good idea to start by entering titles at the top of each column, so that anyone who shares your worksheet can understand what the data means (and so that you can understand it yourself, later on). You’ll often want to enter row titles too. Create your first workbook Worksheet with column and row titles
  • 25.
    Start with columntitles (be kind to readers) In the picture: Create your first workbook Worksheet with column and row titles The column titles are the months of the year, across the top of the worksheet. The row titles down the left side are company names.
  • 26.
    Start with columntitles (be kind to readers) Create your first workbook Worksheet with column and row titles This worksheet shows whether or not a representative from each company attended a monthly business lunch.
  • 27.
    Start typing Saythat you’re creating a list of salespeople names. The list will also have the dates of sales, with their amounts. So you will need these column titles: Name, Date, and Amount. Create your first workbook Press TAB and ENTER to move from cell to cell.
  • 28.
    Start typing Youdon’t need row titles down the left side of the worksheet in this case; the salespeople names will be in the leftmost column. You would type “Date” in cell B1 and press TAB. Then you’d type “Amount” in cell C1. Create your first workbook Press TAB and ENTER to move from cell to cell.
  • 29.
    Start typing Afteryou typed the column titles, you’d click in cell A2 to begin typing the names of the salespeople. You would type the first name, and then press ENTER to move the selection down one cell to cell A3 (down the column), and then type the next name, and so on. Create your first workbook Press TAB and ENTER to move from cell to cell.
  • 30.
    Enter dates andtimes To enter a date in column B, the Date column, you should use a slash or a hyphen to separate the parts: 7/16/2005 or 16-July-2005. Excel will recognize this as a date. Create your first workbook Text aligned on the left and dates on the right
  • 31.
    Enter dates andtimes Create your first workbook Text aligned on the left and dates on the right If you need to enter a time, you would type the numbers, a space, and then “a” or “p” — for example, 9:00 p. If you put in just the number, Excel recognizes a time and enters it as AM. Tip : To enter today’s date, press CTRL and the semicolon together. To enter the current time, press CTRL and SHIFT and the semicolon all at once.
  • 32.
    Enter numbers Toenter the sales amounts in column C, the Amount column, you would type the dollar sign, followed by the amount. Create your first workbook Excel aligns numbers on the right side of cells.
  • 33.
    Enter numbers Othernumbers and how to enter them: Create your first workbook Excel aligns numbers on the right side of cells. To enter fractions, leave a space between the whole number and the fraction. For example, 1 1/8. To enter a fraction only, enter a zero first. For example, 0 1/4. If you enter 1/4 without the zero, Excel will interpret the number as a date, January 4.
  • 34.
    Enter numbers Othernumbers and how to enter them: Create your first workbook Excel aligns numbers on the right side of cells. Enter a negative number by enclosing it in parentheses. If you type (100), Excel will display the number as -100.
  • 35.
    Quick ways toenter data Here are two timesavers you can use to enter data in Excel: Create your first workbook AutoFill . Enter the months of the year, the days of the week, multiples of 2 or 3, or other data in a series. You type one or more entries, and then extend the series. A quick way to enter data
  • 36.
    Quick ways toenter data Here are two timesavers you can use to enter data in Excel: Create your first workbook AutoComplete . If the first few letters you type in a cell match an entry you’ve already made in that column, Excel will fill in the remaining characters for you. Just press ENTER when you see them added. A quick way to enter data
  • 37.
    Assignment Enter datausing TAB and ENTER. Fix mistakes as you type. Enter dates and times. Enter numbers. Use AutoFill. Use AutoComplete. Fix text that’s too long for a cell. Create your first workbook
  • 38.
    Lesson 3 Editdata and revise worksheets
  • 39.
    Edit data andrevise worksheets Everyone makes mistakes sometimes, and sometimes data that you entered correctly needs to be changed later on. Sometimes the whole worksheet needs a change. In this lesson we'll learn how to edit data and how to add and delete worksheet columns and rows. Create your first workbook Edit data, insert columns, and insert rows.
  • 40.
    Edit data Saythat you meant to enter Peacock’s name in cell A2, but you entered Buchanan’s name by mistake. Now you spot the error and want to correct it. Create your first workbook Two ways to select a cell
  • 41.
    Edit data Youneed to select the cell, and there are two ways: Create your first workbook Two ways to select a cell Double-click a cell to edit the data in it. Click the cell, and then edit the data in the formula bar.
  • 42.
    Edit data What’sthe difference? Your convenience. You may find the formula bar, or the cell itself, easier to work with. Create your first workbook Two ways to select a cell If you’re editing data in many cells, you can keep your pointer at the formula bar while you move from cell to cell by using the keyboard.
  • 43.
    Edit data Asthe picture shows, after you select the cell: Create your first workbook The worksheet now says Edit in the status bar. If you don’t see the status bar, click Status Bar on the View menu. The worksheet says Edit in the lower-left corner, on the status bar.
  • 44.
    Edit data Whilethe worksheet is in Edit mode, many commands are temporarily unavailable (these commands are gray on the menus). Create your first workbook The worksheet now says Edit in the status bar. What can you do? Well, you can delete letters or numbers by pressing BACKSPACE, or by selecting them and then pressing DELETE.
  • 45.
    Edit data Youcan edit letters or numbers by selecting them and then typing something different. You can insert new letters or numbers into the cell’s data by positioning the insertion point and typing them. Create your first workbook The worksheet now says Edit in the status bar.
  • 46.
    Edit data Whateveryou do, when you’re all through, remember to press ENTER or TAB so that your changes stay in the cell. Create your first workbook The worksheet now says Edit in the status bar.
  • 47.
    Remove data formattingSurprise! Someone else has used your worksheet, filled in some data, and made the number in cell C6 bold and red to highlight the fact that Peacock made the highest sale. But that customer changed her mind, so the final sale was much smaller. Create your first workbook Formatting stays with the cell.
  • 48.
    Remove data formattingYou go to make the fix. Create your first workbook Formatting stays with the cell. The original number is formatted bold and red. You delete the original figure. You enter a new number. Bold and red again! What gives here?
  • 49.
    Remove data formattingWhat’s going on is that it’s the cell that is formatted, not the data in the cell. So when you delete data that has special formatting, you also need to delete the formatting from the cell. Until you do, any data you enter in that cell will have the special formatting. Create your first workbook Formatting stays with the cell.
  • 50.
    Remove data formatting To remove formatting, select the cell and point to Clear on the Edit menu. The Formats command removes the format from the cell. Or you can click All to remove both the data and the formatting at the same time. Create your first workbook You can remove cell formatting.
  • 51.
    Insert a columnor a row After you’ve entered data, you may find that you need another column to hold additional information. Or maybe you need another row, or rows. Do you have to start over? Of course not. Create your first workbook You can easily insert new columns and rows.
  • 52.
    Insert a columnor a row To insert a single column, click any cell in the column immediately to the right of where you want the new column to go. So if you want an order-ID column between columns B and C, you’d click a cell in column C, to the right of the new location. Then on the Insert menu, click Columns . Create your first workbook You can easily insert new columns and rows.
  • 53.
    Insert a columnor a row To insert a single row, click any cell in the row immediately below where you want the new row to go. For example, to insert a new row between row 4 and row 5, click a cell in row 5. Then on the Insert menu, click Rows . Create your first workbook You can easily insert new columns and rows.
  • 54.
    Insert a columnor a row As the animation shows, Excel gives a new column or row the heading its place requires, and changes the headings of later columns and rows. Create your first workbook Animation: Right-click, and click Play . You can easily insert new columns and rows.
  • 55.
    Insert a columnor a row Excel gives a new column or row the heading its place requires, and changes the headings of later columns and rows. Create your first workbook You can easily insert new columns and rows.
  • 56.
    Assignment Edit data.(Use a different color to show that data was changed) Delete formatting from a cell. Work in Edit mode. Insert and delete columns and rows. Create your first workbook