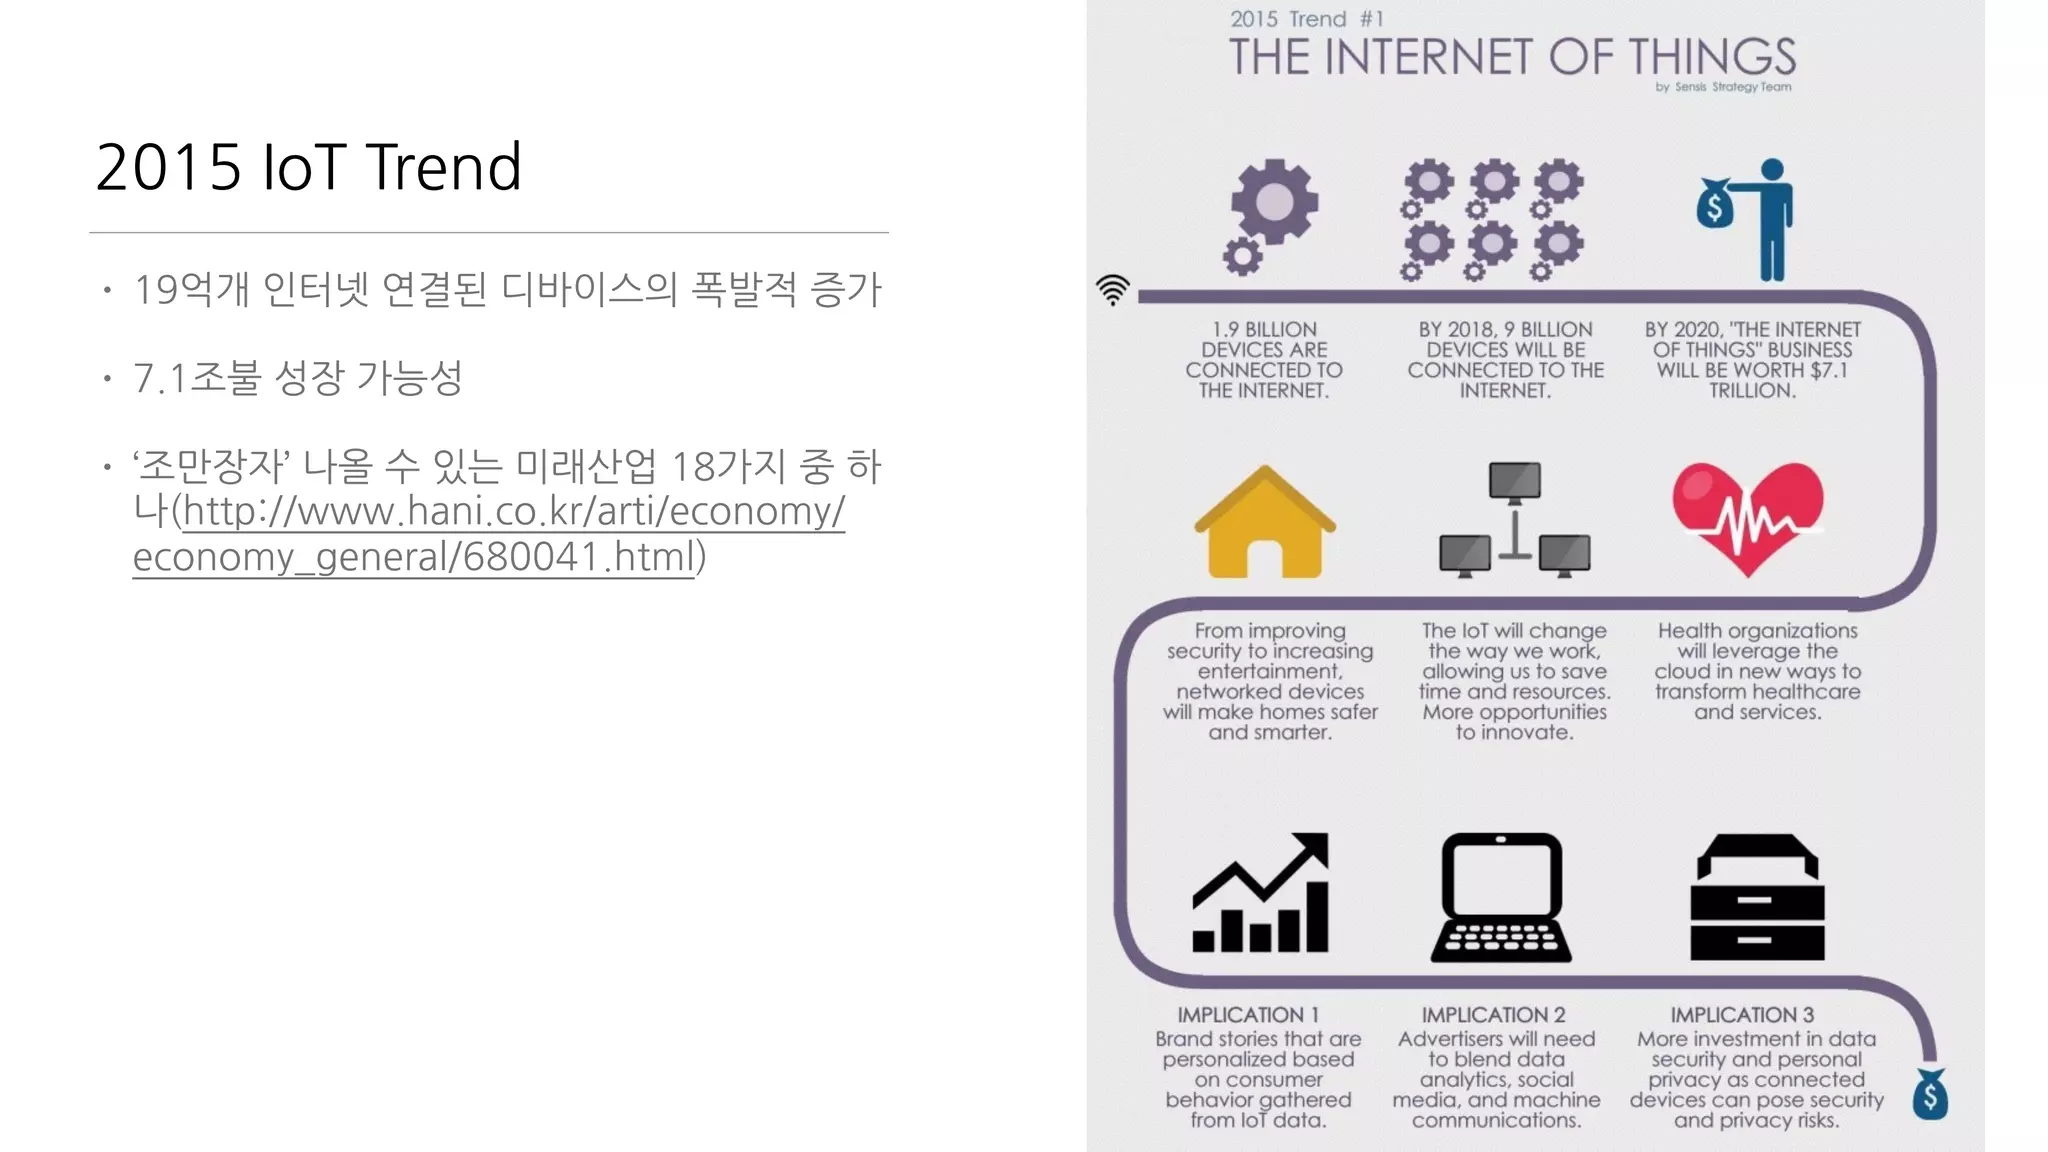
2015 IoT Trend
•19억개 인터넷 연결된 디바이스의 폭발적 증가
• 7.1조불 성장 가능성
• ‘조만장자’ 나올 수 있는 미래산업 18가지 중 하
나(http://www.hani.co.kr/arti/economy/
economy_general/680041.html)
4.
Kevin Ashton
“The Internetof Things has the potential to change the
world, just as the Internet did. Maybe even more so.”
Full Stack Engineer?
•Server Programming 열심히 배웠는데
• FrontEnd도 중요
• 거기에 Mobile App도 만들어야
• PHP/Java/ASP 배우고
• Javascript 배우고
• C/C++도?
• Database는? SQL? 그건 뭐야?
특징
• 초소형
• 초저가
•고사양
• MCU와 WiFi를 일체형
• 3.3V 전압
• 다양한 제품군
• 다양한 프로젝트들 (https://www.tindie.com/
search/#q=esp8266)
• Arduino 지원
• NodeMCU - Lua Script 지원
19.
19
• USB2TTL 장비를통한 PC와 통신
• Arduino 사용 업로드
• NodeMCU Custom ROM Flashing
• Lua 기본 Scripting
• Input/Output
• WiFI 설정
• 데이터 전송/수신
ESP8266 편에서 다룰 내용
(http://www.slideshare.net/geekscape/nodemcu-esp8266-workshop-1)
20.
ESP8266 - USB연결
• ESP8266 -> USB
• 3.3v, CH_PD - 3.3v
• GND - GND
• Tx - Rx
• Rx - Tx
• 500mA 지원 여부를 꼭 확인
21.
PL2303 USB Driver설치
• Windows
http://www.ifamilysoftware.com/news37.html
(support windows 8.1/10 공식드라이버에서는 지원안함)
• Mac
http://www.prolific.com.tw/US/ShowProduct.aspx?p_id=229&pcid=41
• Terminal (for Windows Only)
Putty
CoolTerm (http://freeware.the-meiers.org/)
22.
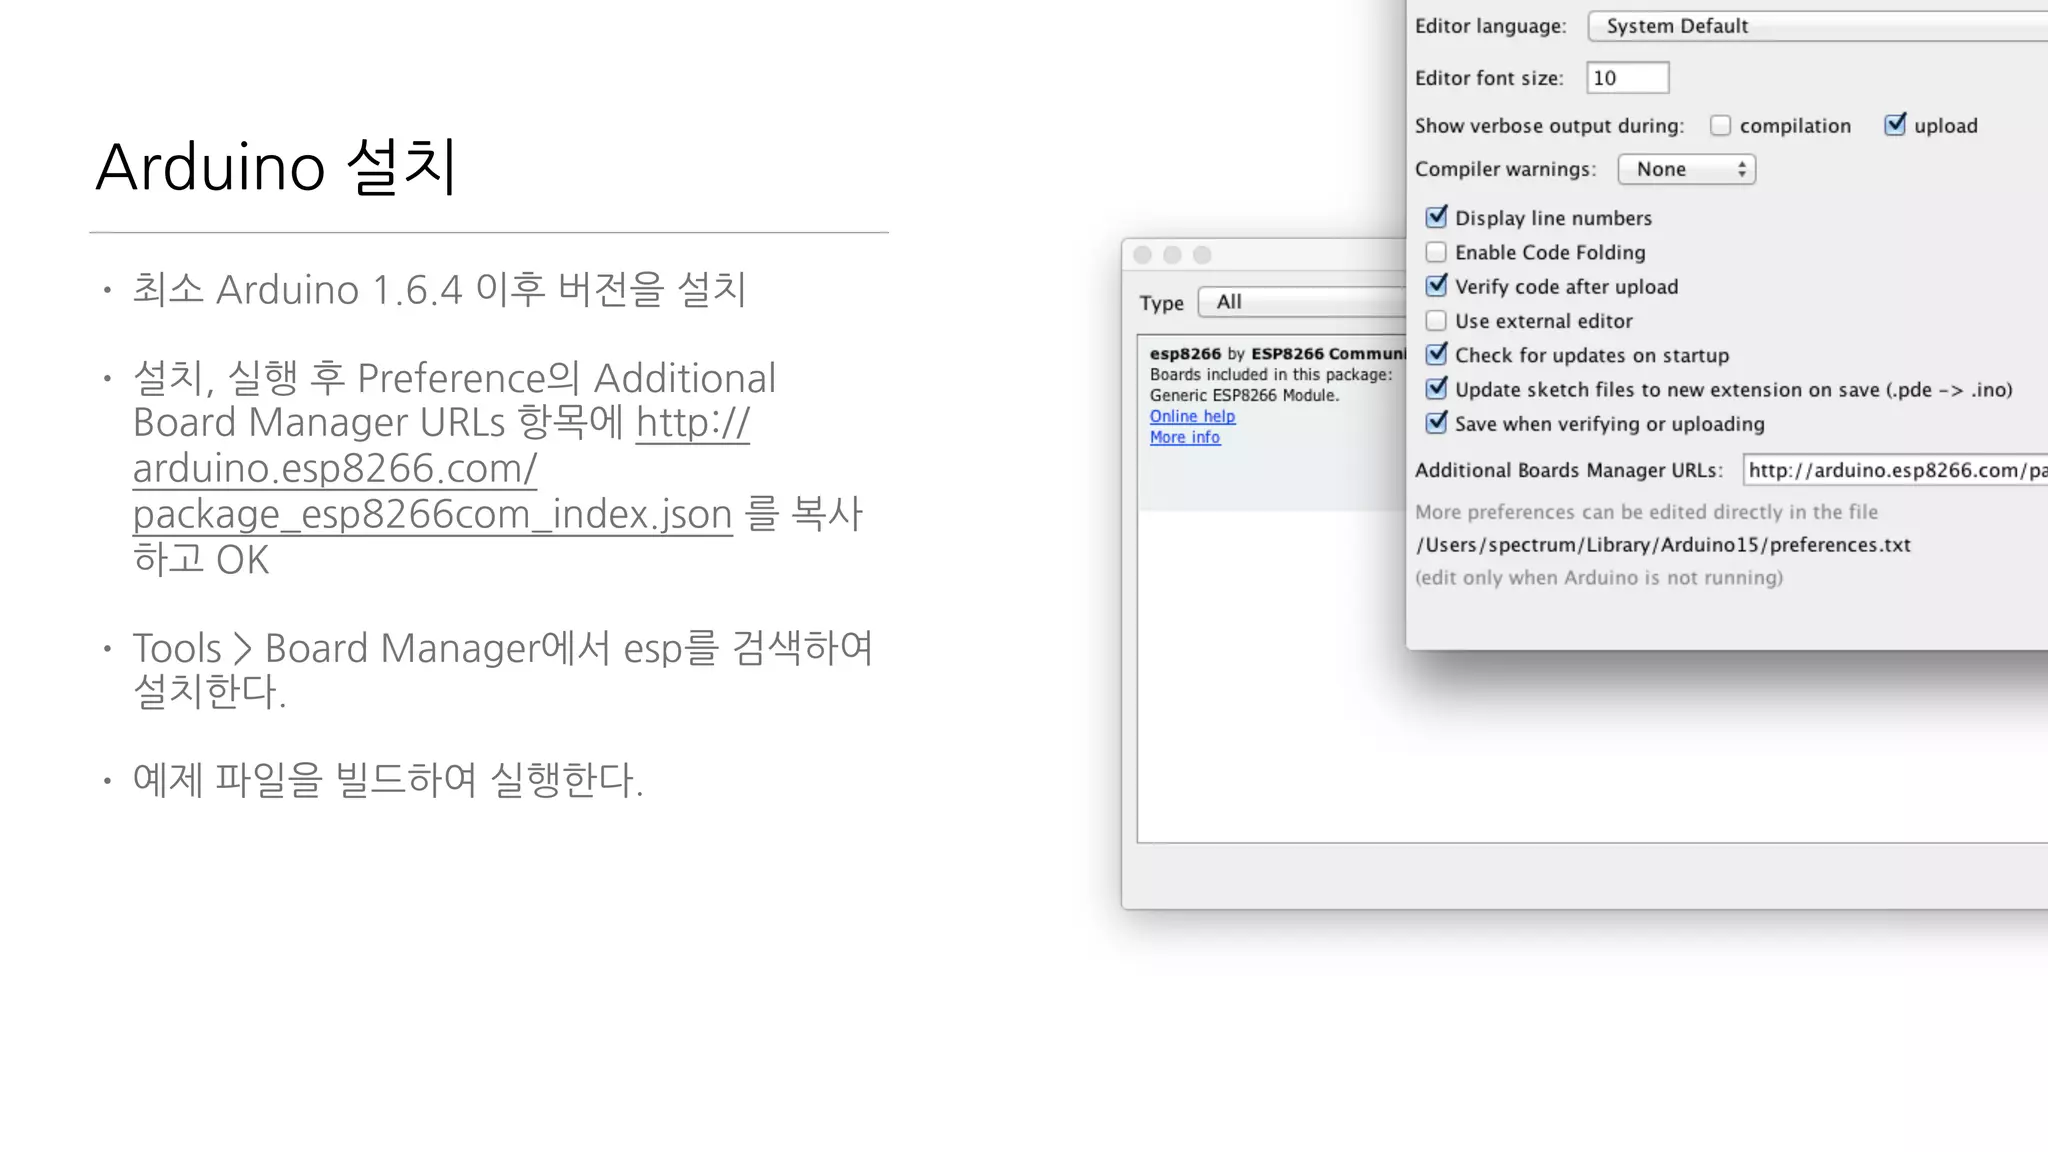
Arduino 설치
• 최소Arduino 1.6.4 이후 버전을 설치
• 설치, 실행 후 Preference의 Additional
Board Manager URLs 항목에 http://
arduino.esp8266.com/
package_esp8266com_index.json 를 복사
하고 OK
• Tools > Board Manager에서 esp를 검색하여
설치한다.
• 예제 파일을 빌드하여 실행한다.
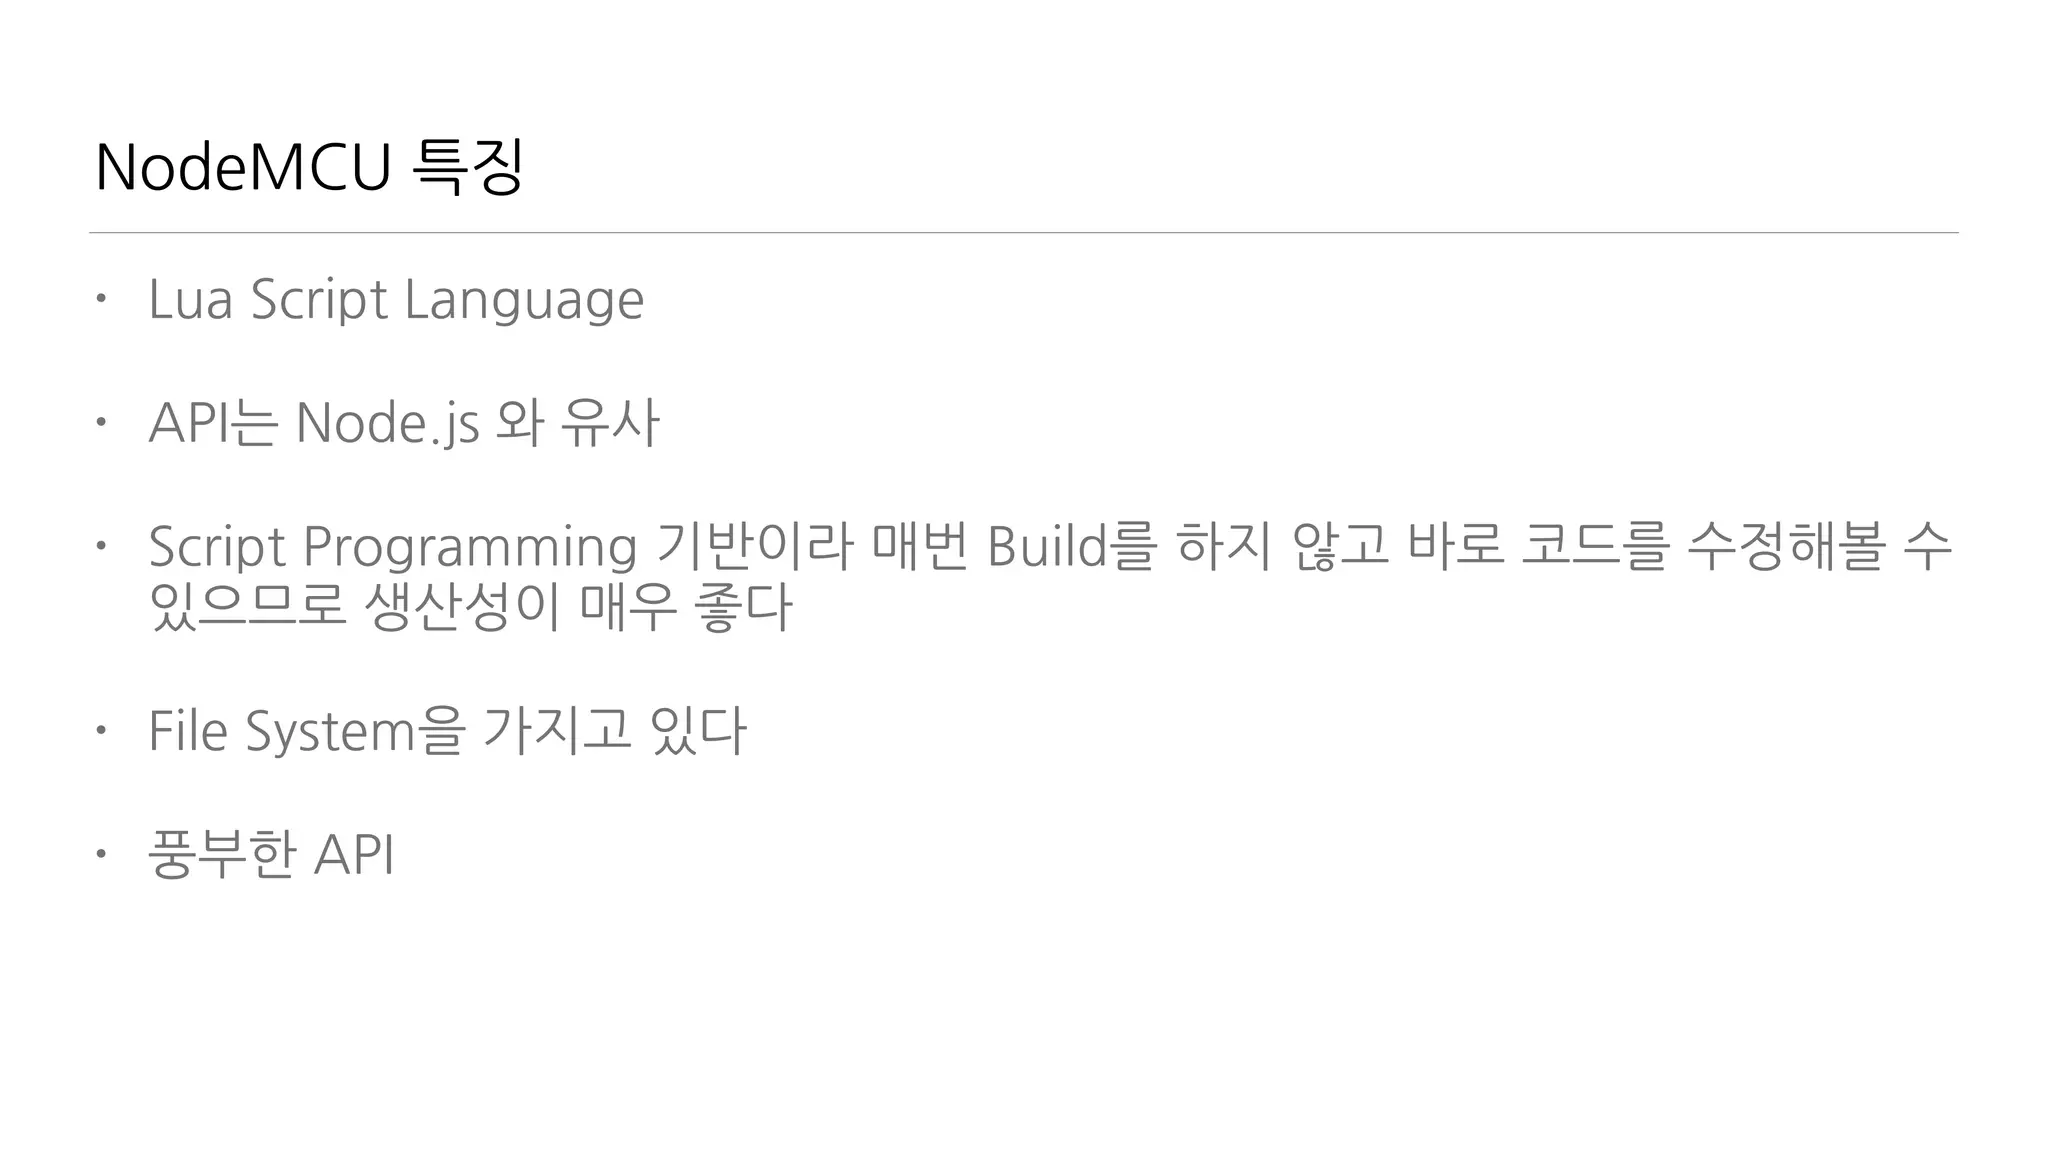
NodeMCU 특징
• LuaScript Language
• API는 Node.js 와 유사
• Script Programming 기반이라 매번 Build를 하지 않고 바로 코드를 수정해볼 수
있으므로 생산성이 매우 좋다
• File System을 가지고 있다
• 풍부한 API
25.
NodeMCU 설치 절차
•pip install pyserial
• https://github.com/themadinventor/
esptool 에서 esptool 받기
• https://github.com/nodemcu/nodemcu-
firmware/releases 에서 rom 받기
• GPIO0 를 GND 와 연결 (dev Board에선
jumper를 쇼트) 후 리셋
• ./esptool.py —port /dev/tty.usbserial
write_flash 0x00000 nodemcu_latest.bin
—baud 230400 으로 플래싱
26.
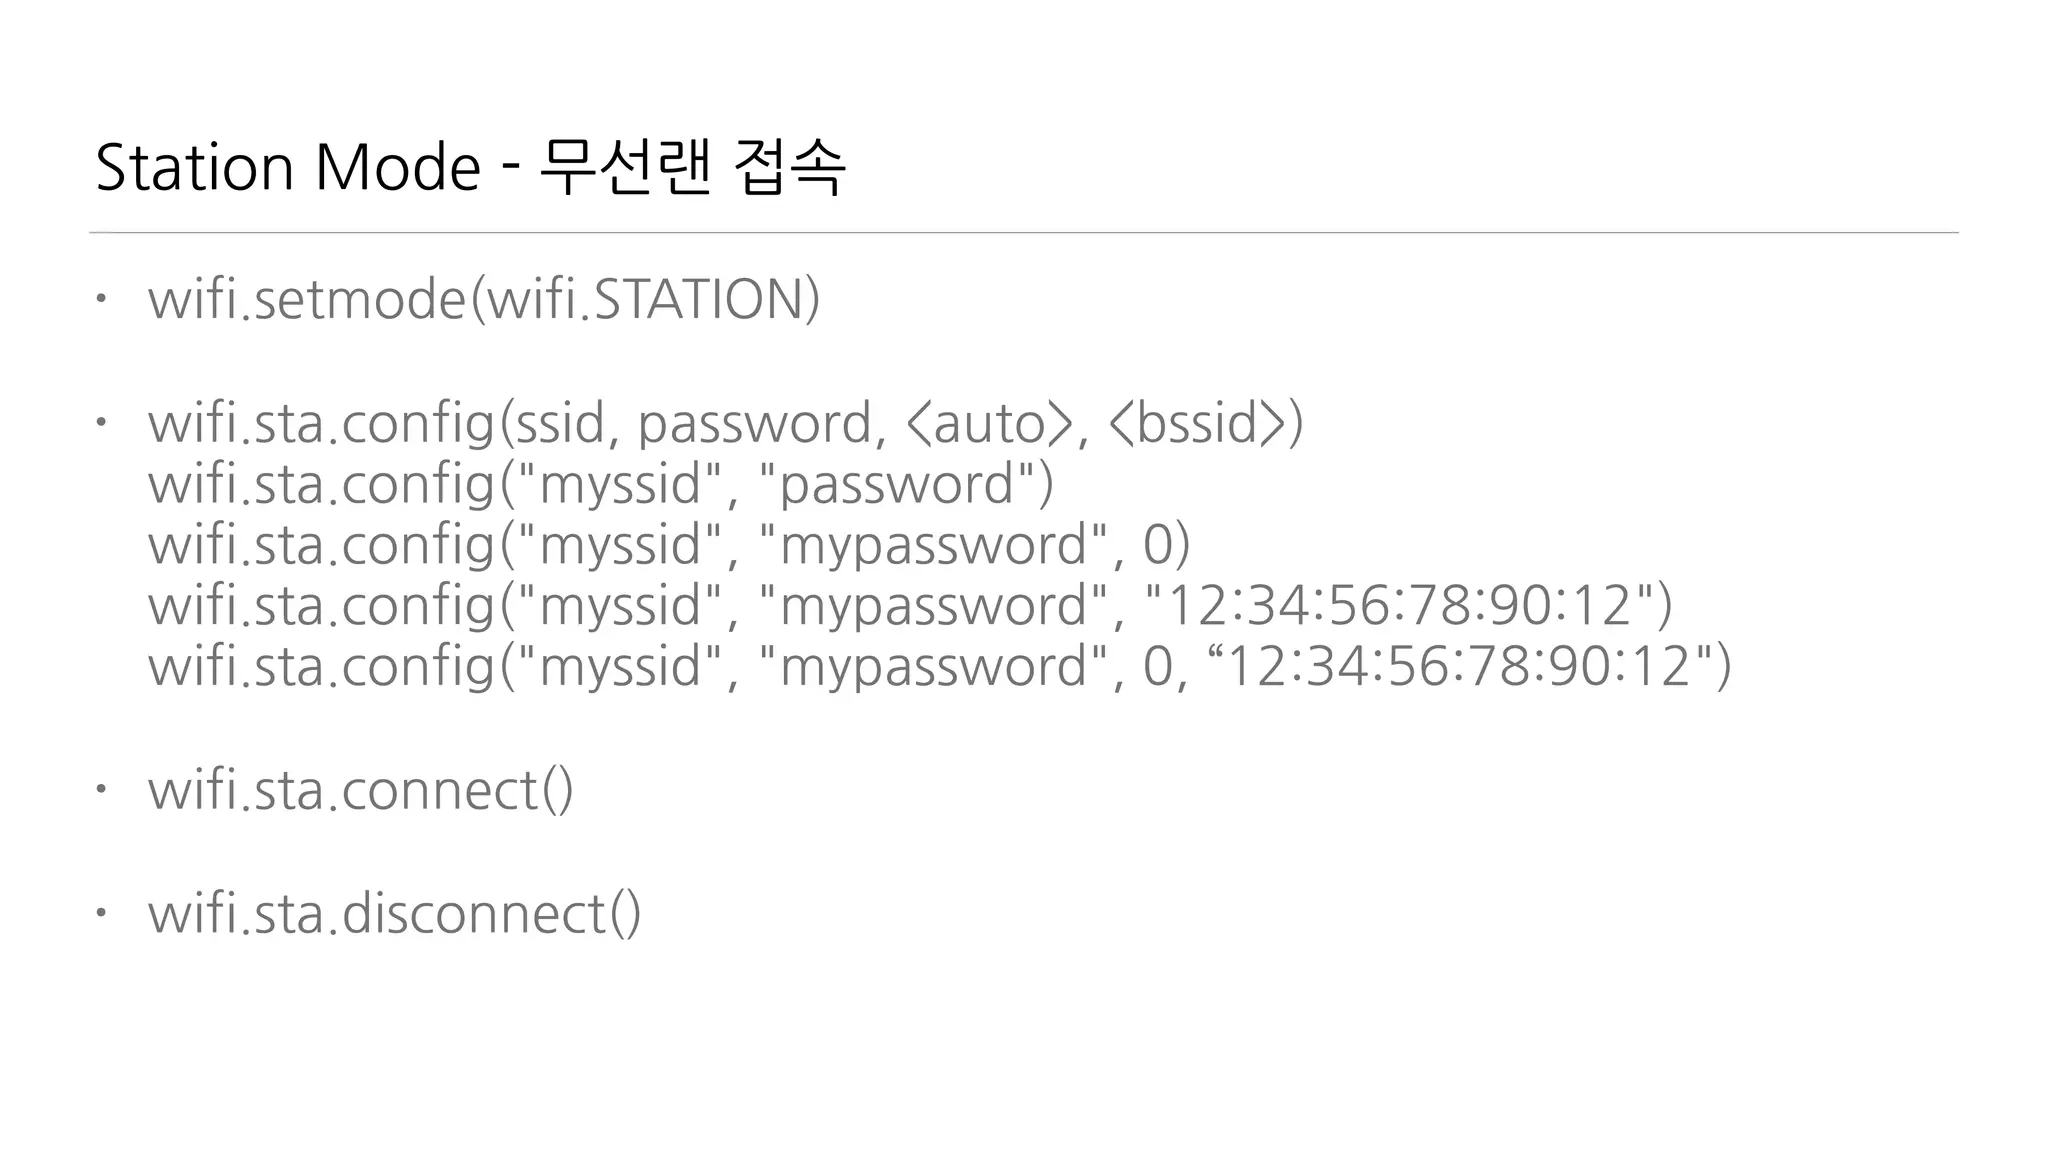
NodeMCU 연결
• 9600baud/ 8 / none / 1 설정하고 터미널로 연결
• > 프롬프트 확인
• WiFi 공유기 접속
print(wifi.sta.getip()) — nil 확인
wifi.setmode(wifi.STATION)
wifi.sta.config("SSID","password")
print(wifi.sta.getip()) — 접속 정보 확인
• http://nodemcu.com/index_en.html 예제 실행
27.
NodeMCU 기본 API- node object
• node.restart() 재실행
• node.heap() 남은 용량 체크
• node.info() 기기 정보
• node.compile(“file.lua”) 컴파일 실행
.lc 확장자의 바이트 코드를 만든다.
메모리 절약효과가 있다.
• dofile(“file.lua”) 해당 파일을 실행
28.
NodeMCU 기본 API- file object
• file.remove(“file.lua”) 삭제
• file.list() 파일 목록 보기
l = file.list();
for k,v in pairs(l) do
print("name:"..k..", size:"..v)
end
• file.format() 파일 삭제
• file.rename(“old.lua”, “new.lua”) 파일명 변경
29.
Lua 맛보기
• 브라질에서만들었음. 자유로움이 느껴짐.
• 매우 크기가 작아서 MCU에 적합
• 기본 라이브러리는 적으나 C/C++로 확장하기 용이
함.
• JSON과 비슷한 table을 가지고 있음
• js와 유사한 Function 구조
function name(param)
return value
end — {} 대신 end로 block 구성하는 점이 다름
• for variable = 시작값, 마지막 값, 증가값 do
end
• https://repl.it/languages/Lua 가지고 놀아봅시
다!
30.
Javascipt vs Lua
•//
/* ..
*/
• { }
• null
• {a:1, b:1}
• [1,2,3], a++, a+=1, a>b ? a: b
a>b && a || b
• a=1, b=1, c=1
• a+”…”+b
• —
—[[
]]—
• … end
• nil
• {a=1, b=1}
• no Array, no ++, +=,
no tenary use (and, or)
• a,b,c=1,2,3
• a..”…”..b
Station/SoftAP/StationAP
• Station -외부 AP에 접속하기 위한 상태, 보통
무선랜 연결을 하는 쪽
• SoftAP - Station의 접속을 받는 상태. 무선 공
유기.
• StationAP - 두개를 결합. 접속도 가능하고 접
속을 받는 것도 가능. 스마트폰의 테더링과 비
슷
• 필요한 상황에 따라 세 가지를 조합/전환해가
면서 사용한다.
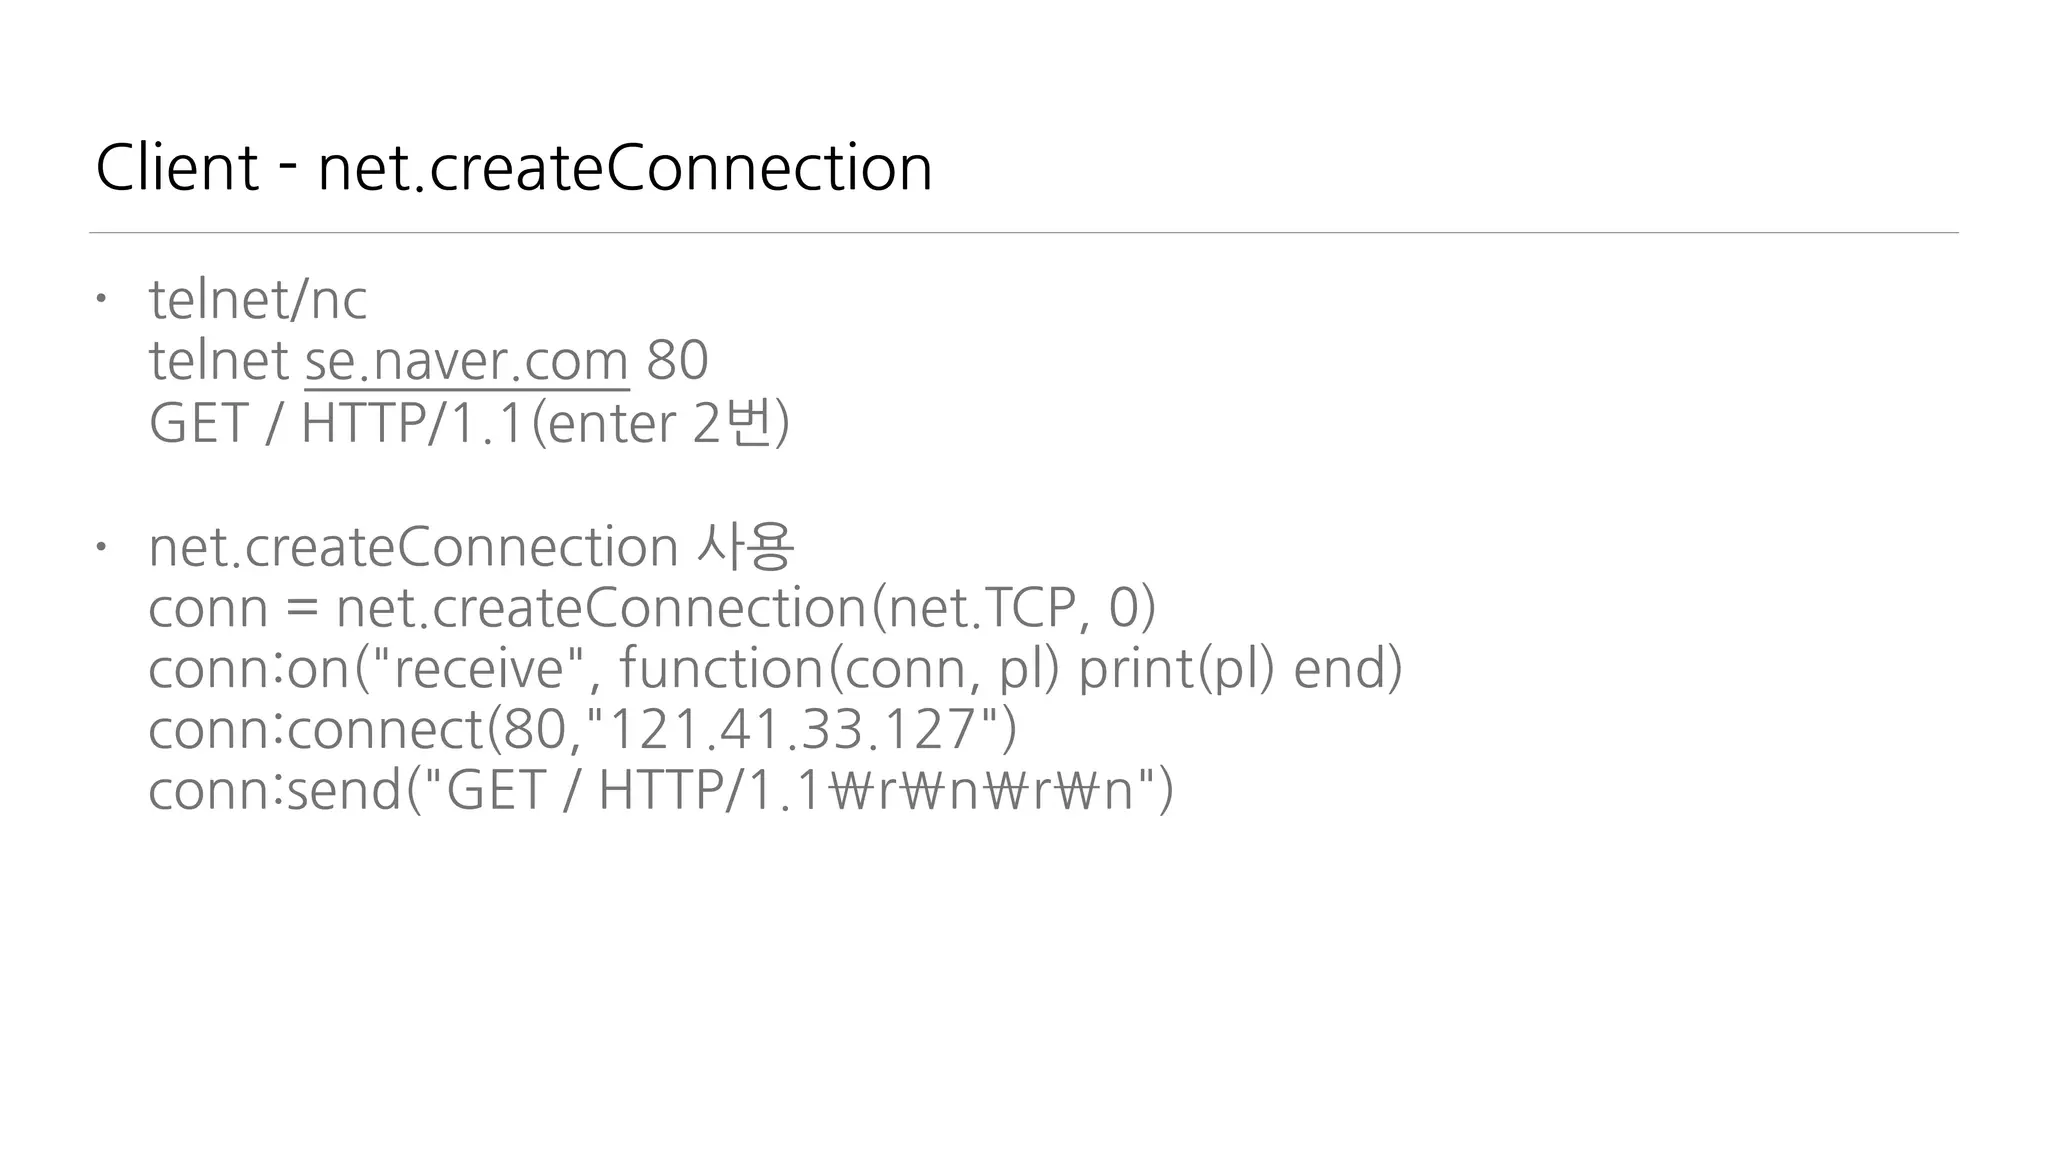
Server - net.createServer
•srv=net.createServer(net.TCP)
srv:listen(80,function(conn)
conn:on("receive",function(conn,payload)
print(payload)
conn:send("<h1> Hello, NodeMCU.</h1>")
conn:close()
end)
end)
• nodemcu쪽 console을 주의깊게 볼 것
43.
Meteor 편에서 다룰내용
• Meteor 설치
• Javascript 언어 개요
• 기본 Project 학습
• 외부 Hardware와 유선 연결 - SerialPort package 활용
• 외부 Hardware와 무선 연결 - WiFi
44.
근데 IoT랑 뭔상관인가요?
• IoT는 급격하게 성장하는 분야지만 여전히 UI는 이슈
• IoT는 이벤트 중심, Web은 문서 기반.
• 실시간 UI는 어떻게?
• Meteor는 Web도 되고 실시간
• 기존에는 솔루션은?
https://thingspeak.com/
https://plot.ly
http://www.nimbits.com/
• 하지만, 내 손으로 만들어야 한다면?
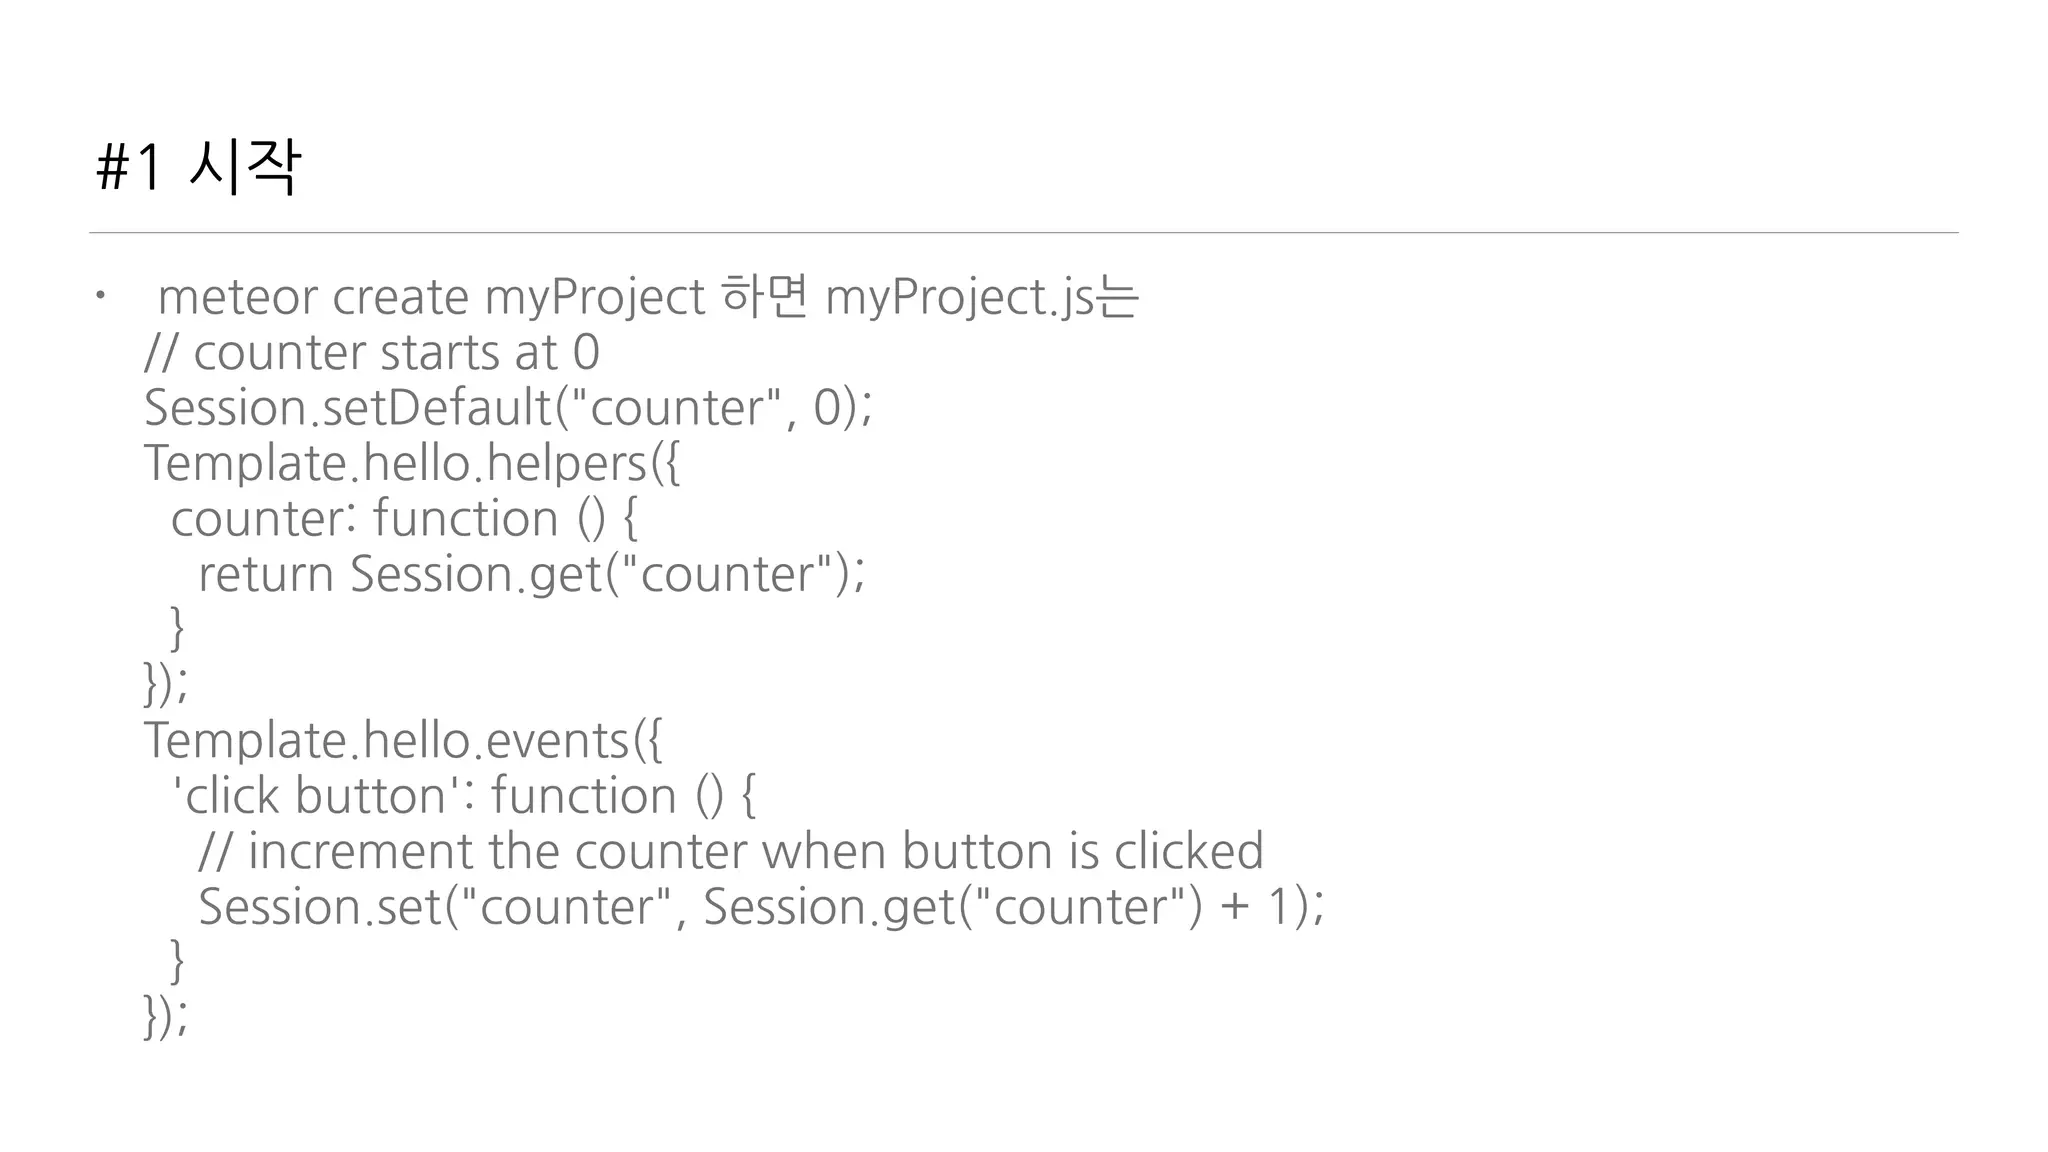
#1 시작
• meteorcreate myProject 하면 myProject.js는
// counter starts at 0
Session.setDefault("counter", 0);
Template.hello.helpers({
counter: function () {
return Session.get("counter");
}
});
Template.hello.events({
'click button': function () {
// increment the counter when button is clicked
Session.set("counter", Session.get("counter") + 1);
}
});
50.
#1 시작
• Session
//counter starts at 0
Session.setDefault("counter", 0);
Template.hello.helpers({
counter: function () {
return Session.get("counter");
}
});
Template.hello.events({
'click button': function () {
// increment the counter when button is clicked
Session.set("counter", Session.get("counter") + 1);
}
});
51.
#1 시작
• Helper
//counter starts at 0
Session.setDefault("counter", 0);
Template.hello.helpers({
counter: function () {
return Session.get("counter");
}
});
Template.hello.events({
'click button': function () {
// increment the counter when button is clicked
Session.set("counter", Session.get("counter") + 1);
}
});
52.
#1 시작
• Events
//counter starts at 0
Session.setDefault("counter", 0);
Template.hello.helpers({
counter: function () {
return Session.get("counter");
}
});
Template.hello.events({
'click button': function () {
// increment the counter when button is clicked
Session.set("counter", Session.get("counter") + 1);
}
});
53.
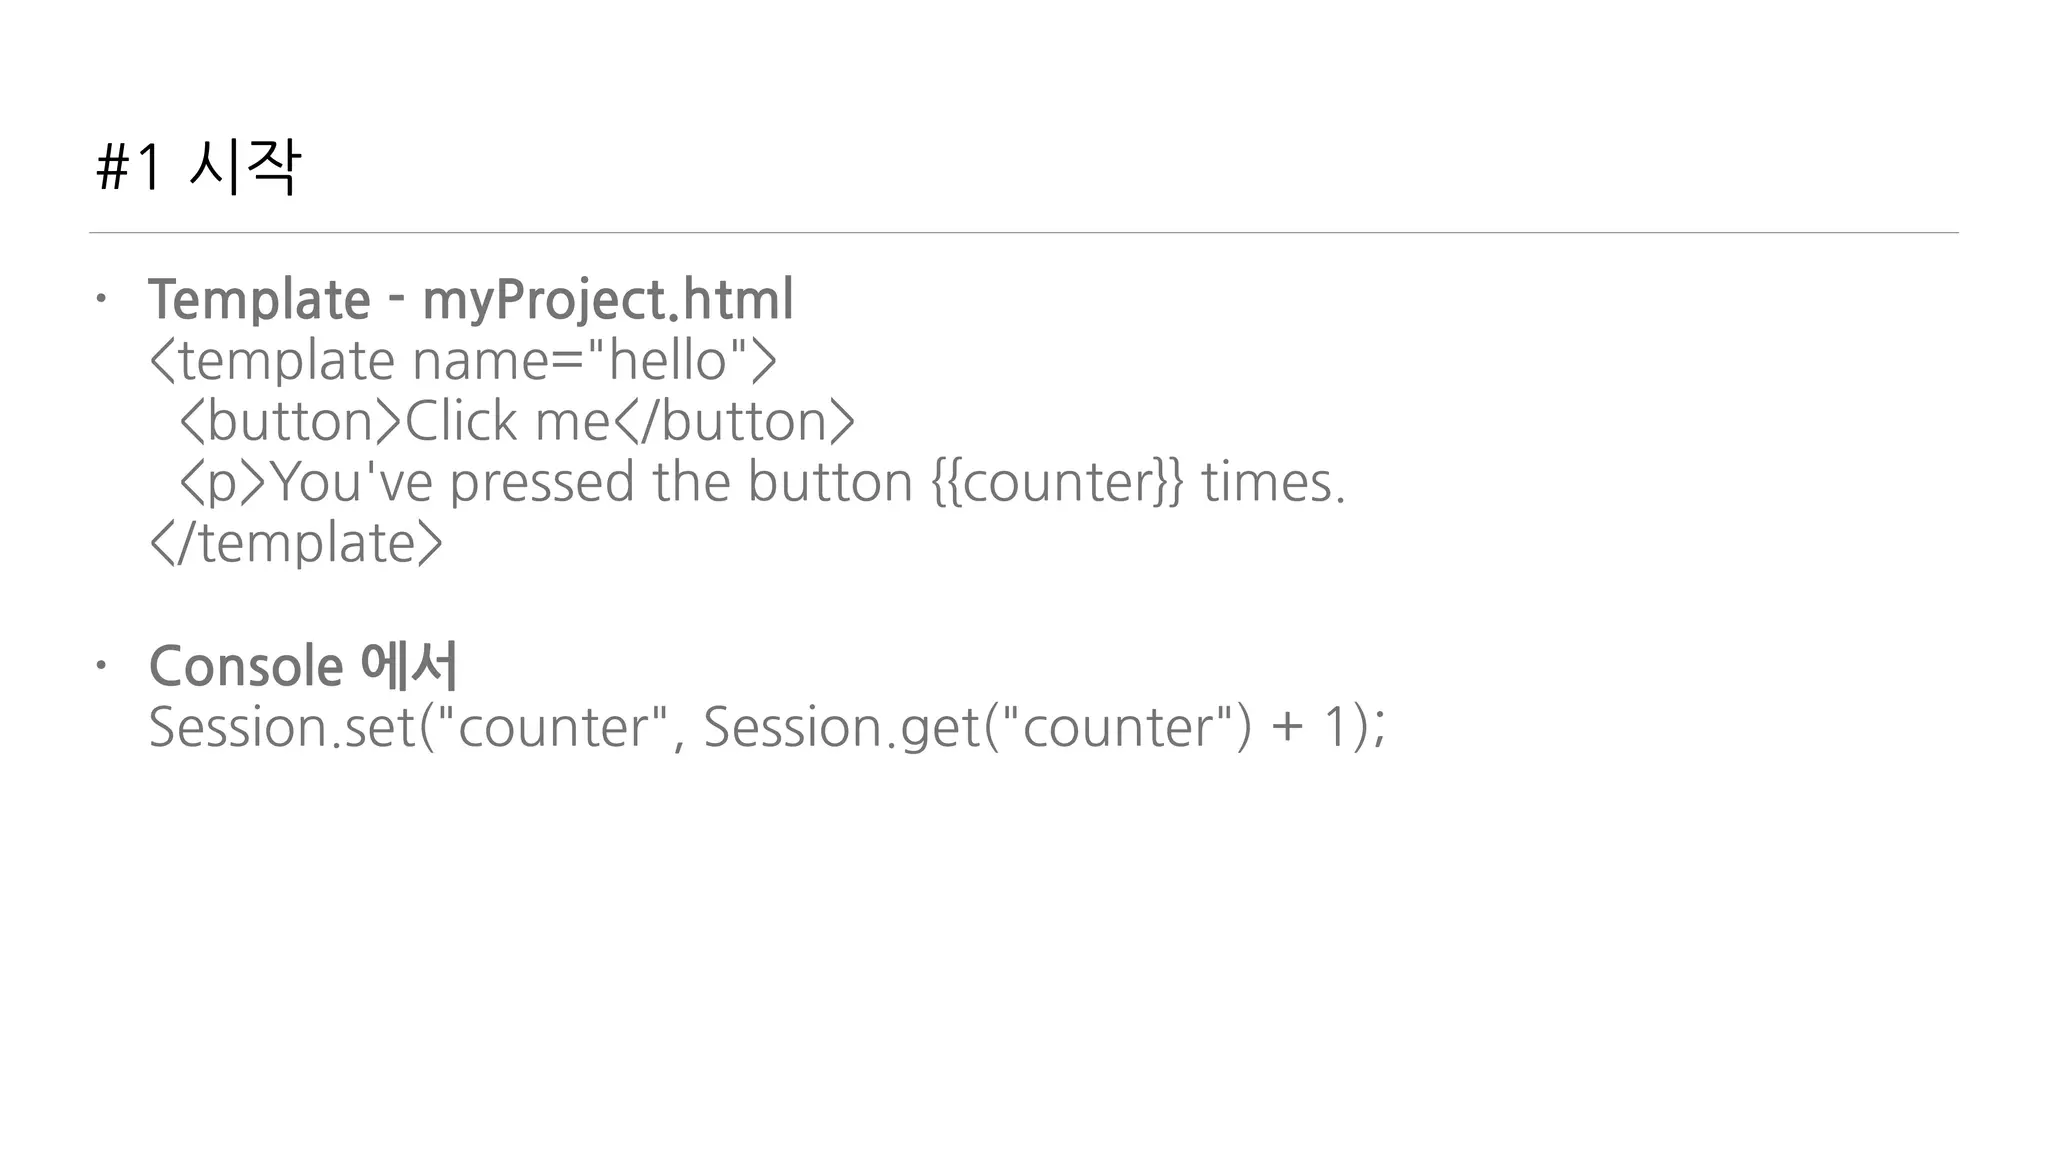
#1 시작
• Template- myProject.html
<template name="hello">
<button>Click me</button>
<p>You've pressed the button {{counter}} times.
</template>
• Console 에서
Session.set("counter", Session.get("counter") + 1);
54.
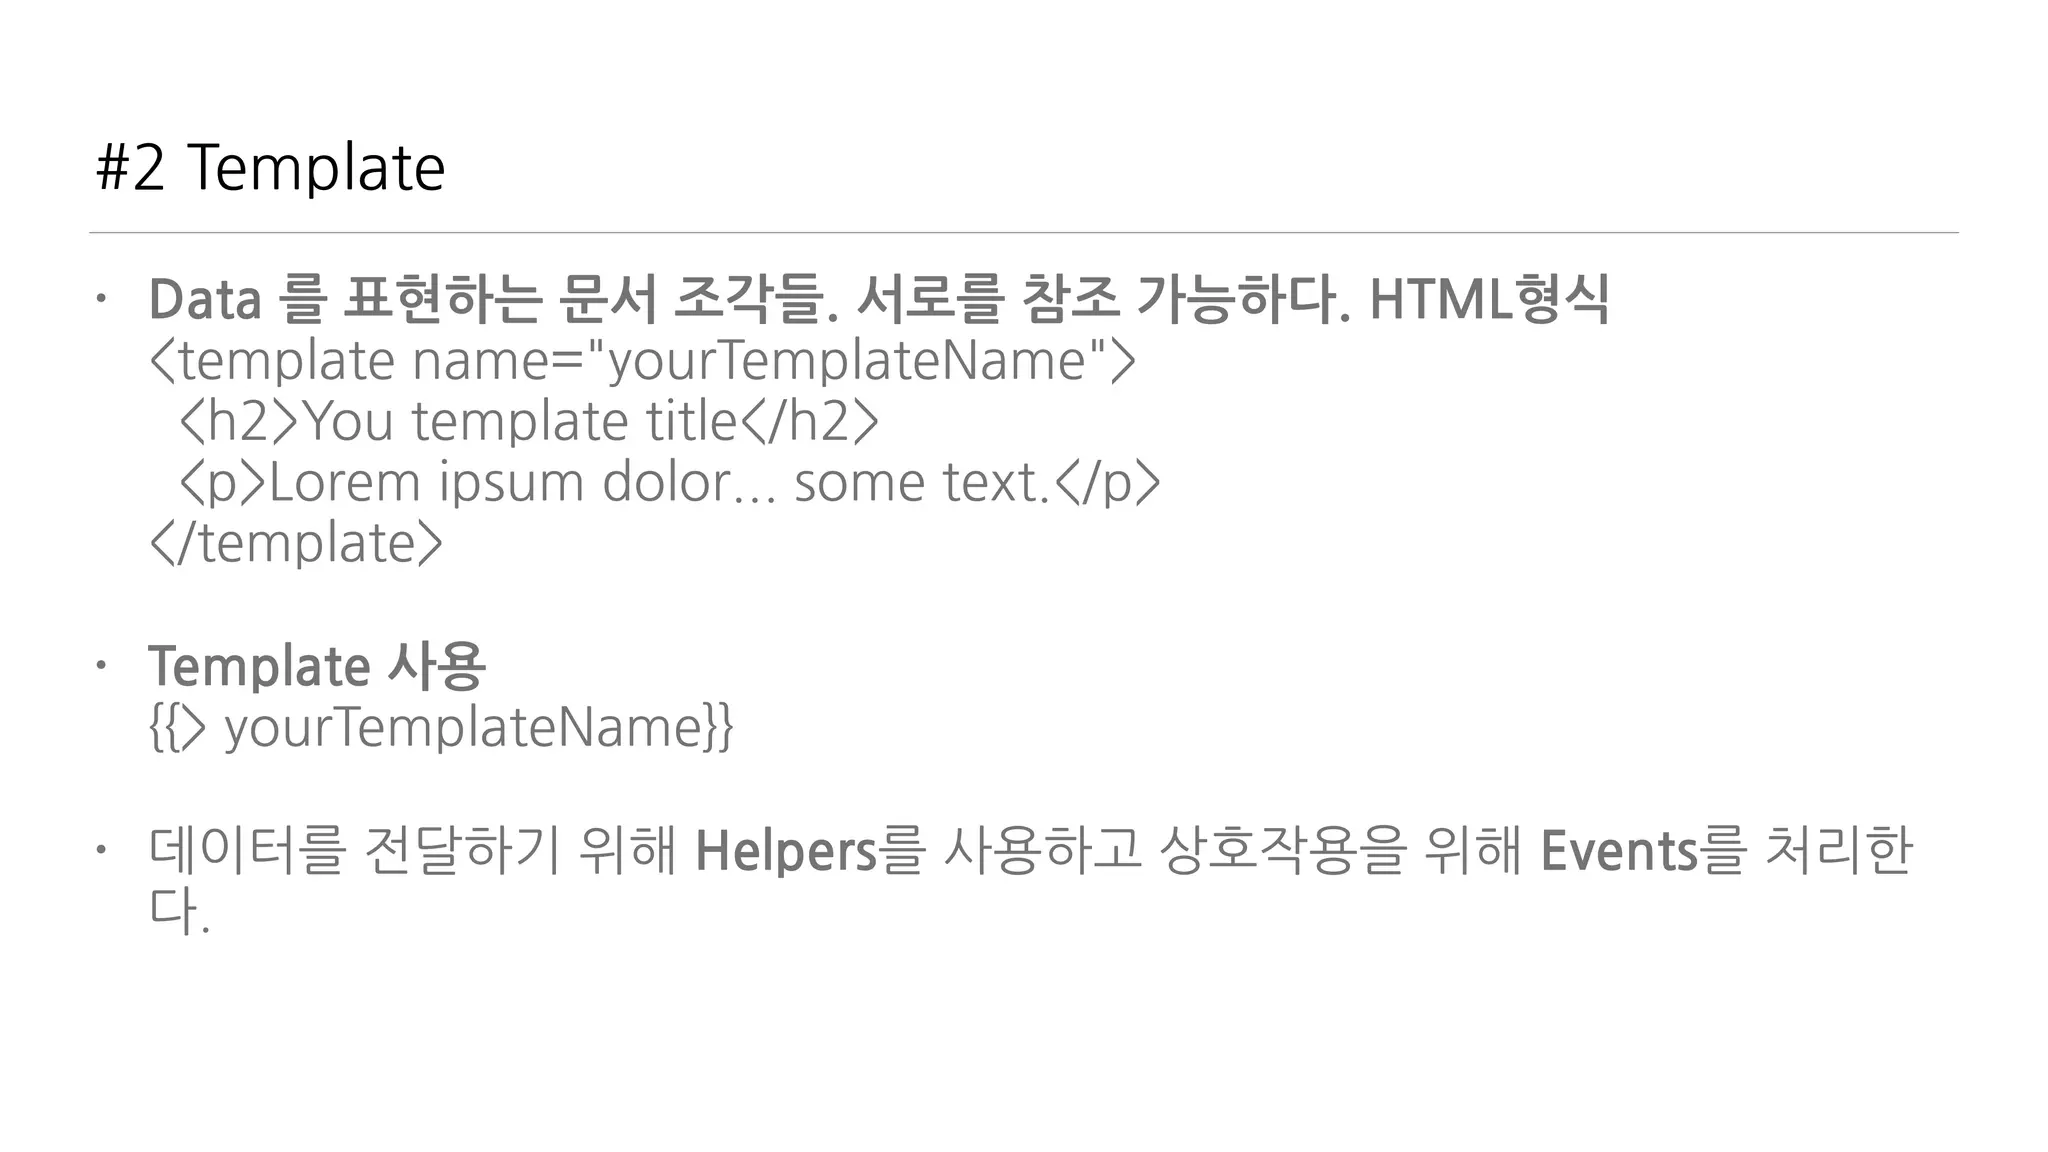
#2 Template
• Data를 표현하는 문서 조각들. 서로를 참조 가능하다. HTML형식
<template name="yourTemplateName">
<h2>You template title</h2>
<p>Lorem ipsum dolor... some text.</p>
</template>
• Template 사용
{{> yourTemplateName}}
• 데이터를 전달하기 위해 Helpers를 사용하고 상호작용을 위해 Events를 처리한
다.
55.
#3 Helpers
• Template에Data를 전달하는 function들
Template.yourTemplateName.helpers({
books: function() {
return ['Discover Meteor', 'Meteor in action', 'Practical Meteor'];
}
});
• Template에 적용
<template name="yourTemplateName">
{{#each books}}
<p>{{this}}</p>
{{/each}}
</template>
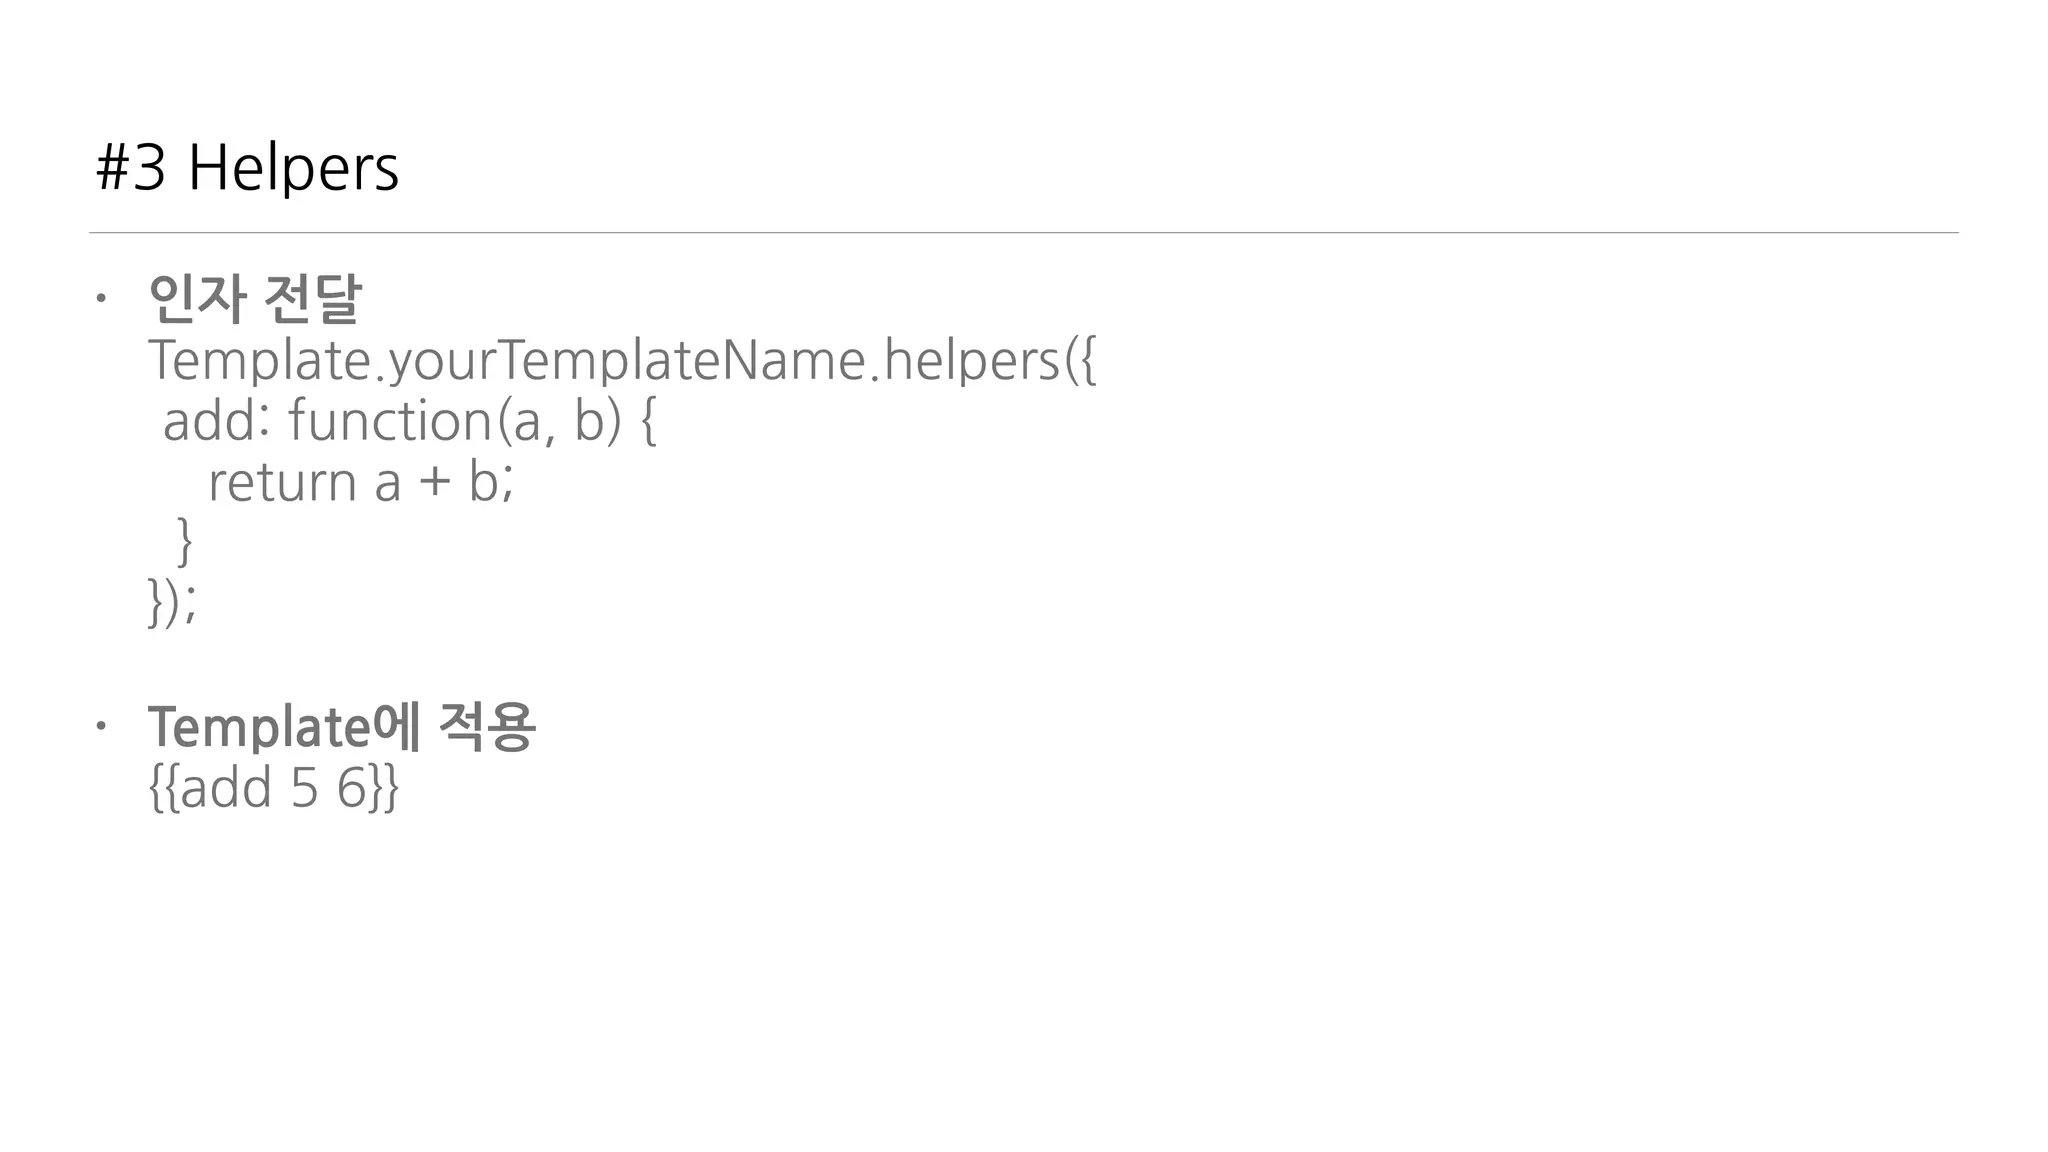
#3 Helpers
• 인자전달
Template.yourTemplateName.helpers({
add: function(a, b) {
return a + b;
}
});
• Template에 적용
{{add 5 6}}
58.
#4 Events
• Template과상호작용. click의 예
Template.yourTemplateName.events({
'click .clickable': function() {
return alert('You clicked!');
}
});
• .clickable을 눌렀을 때 처리
<button class="clickable">Click me</button>
<p class="clickable">You can also click on me.</p>
59.
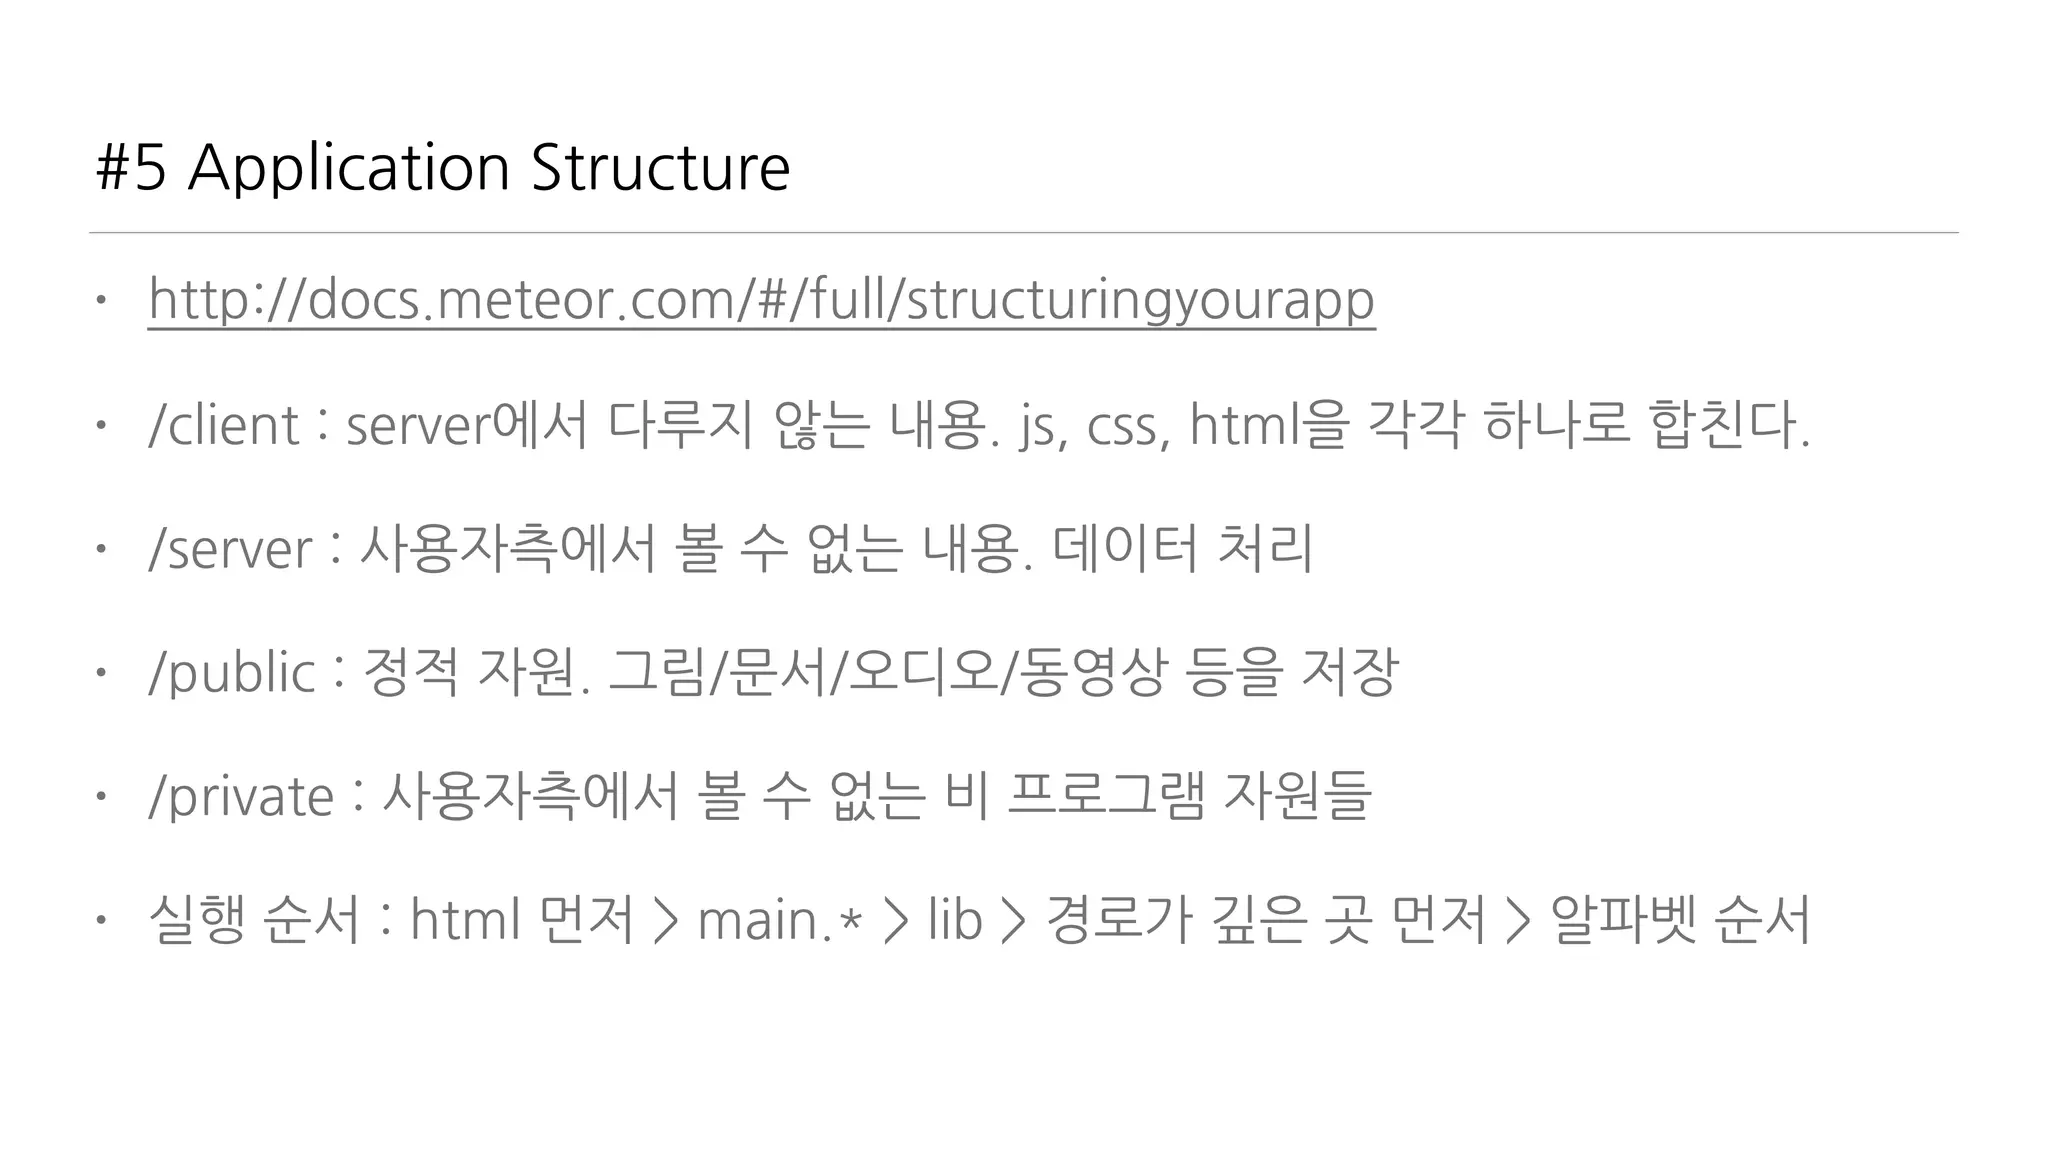
#5 Application Structure
•http://docs.meteor.com/#/full/structuringyourapp
• /client : server에서 다루지 않는 내용. js, css, html을 각각 하나로 합친다.
• /server : 사용자측에서 볼 수 없는 내용. 데이터 처리
• /public : 정적 자원. 그림/문서/오디오/동영상 등을 저장
• /private : 사용자측에서 볼 수 없는 비 프로그램 자원들
• 실행 순서 : html 먼저 > main.* > lib > 경로가 깊은 곳 먼저 > 알파벳 순서
60.
#6 Packages
날로 먹는것
“거인의 어깨에 올라타라” - “바퀴를 다시 만들지 말
라”
Meteor add packageName 으로 사용
검색은?
https://atmospherejs.com/
61.
#7 Account Package
•서비스의 시작은 로그인이 반
• 간편한 사용
$ meteor add accounts-ui
$ meteor add accounts-password
• Template html 파일에 적용
<template name=“main”>
{{> loginButtons}}
....
• 풍부한 SNS 지원. facebook, twitter, weibo, google, …..
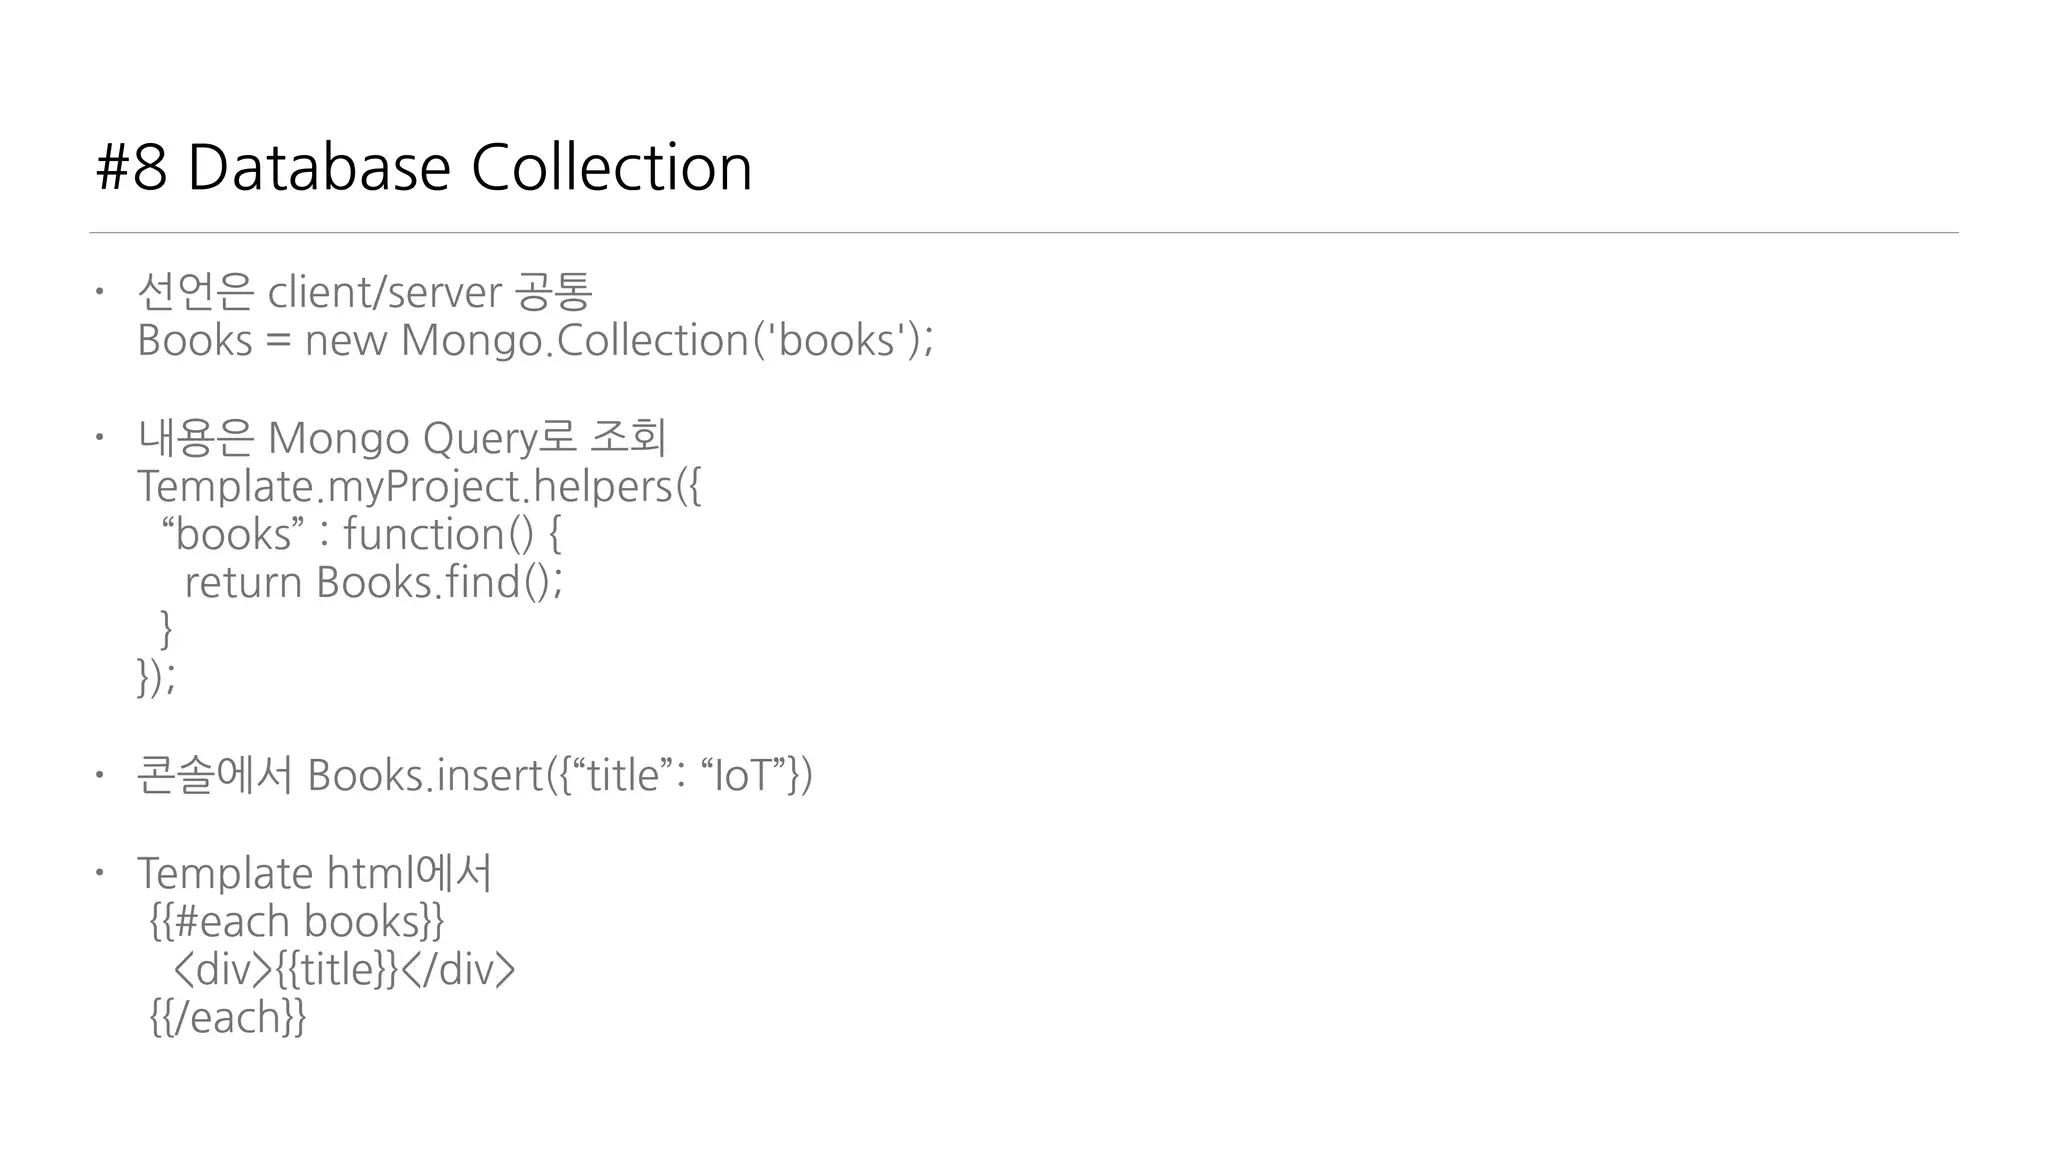
#8 Database Collection
•추가
Books.insert({“title”: “IoT”})
• 수정
Books.update({“title”: “IoT”}, {title: “IoT Meteor”})
• 삭제
Books.remove({“title”: “IoT”})
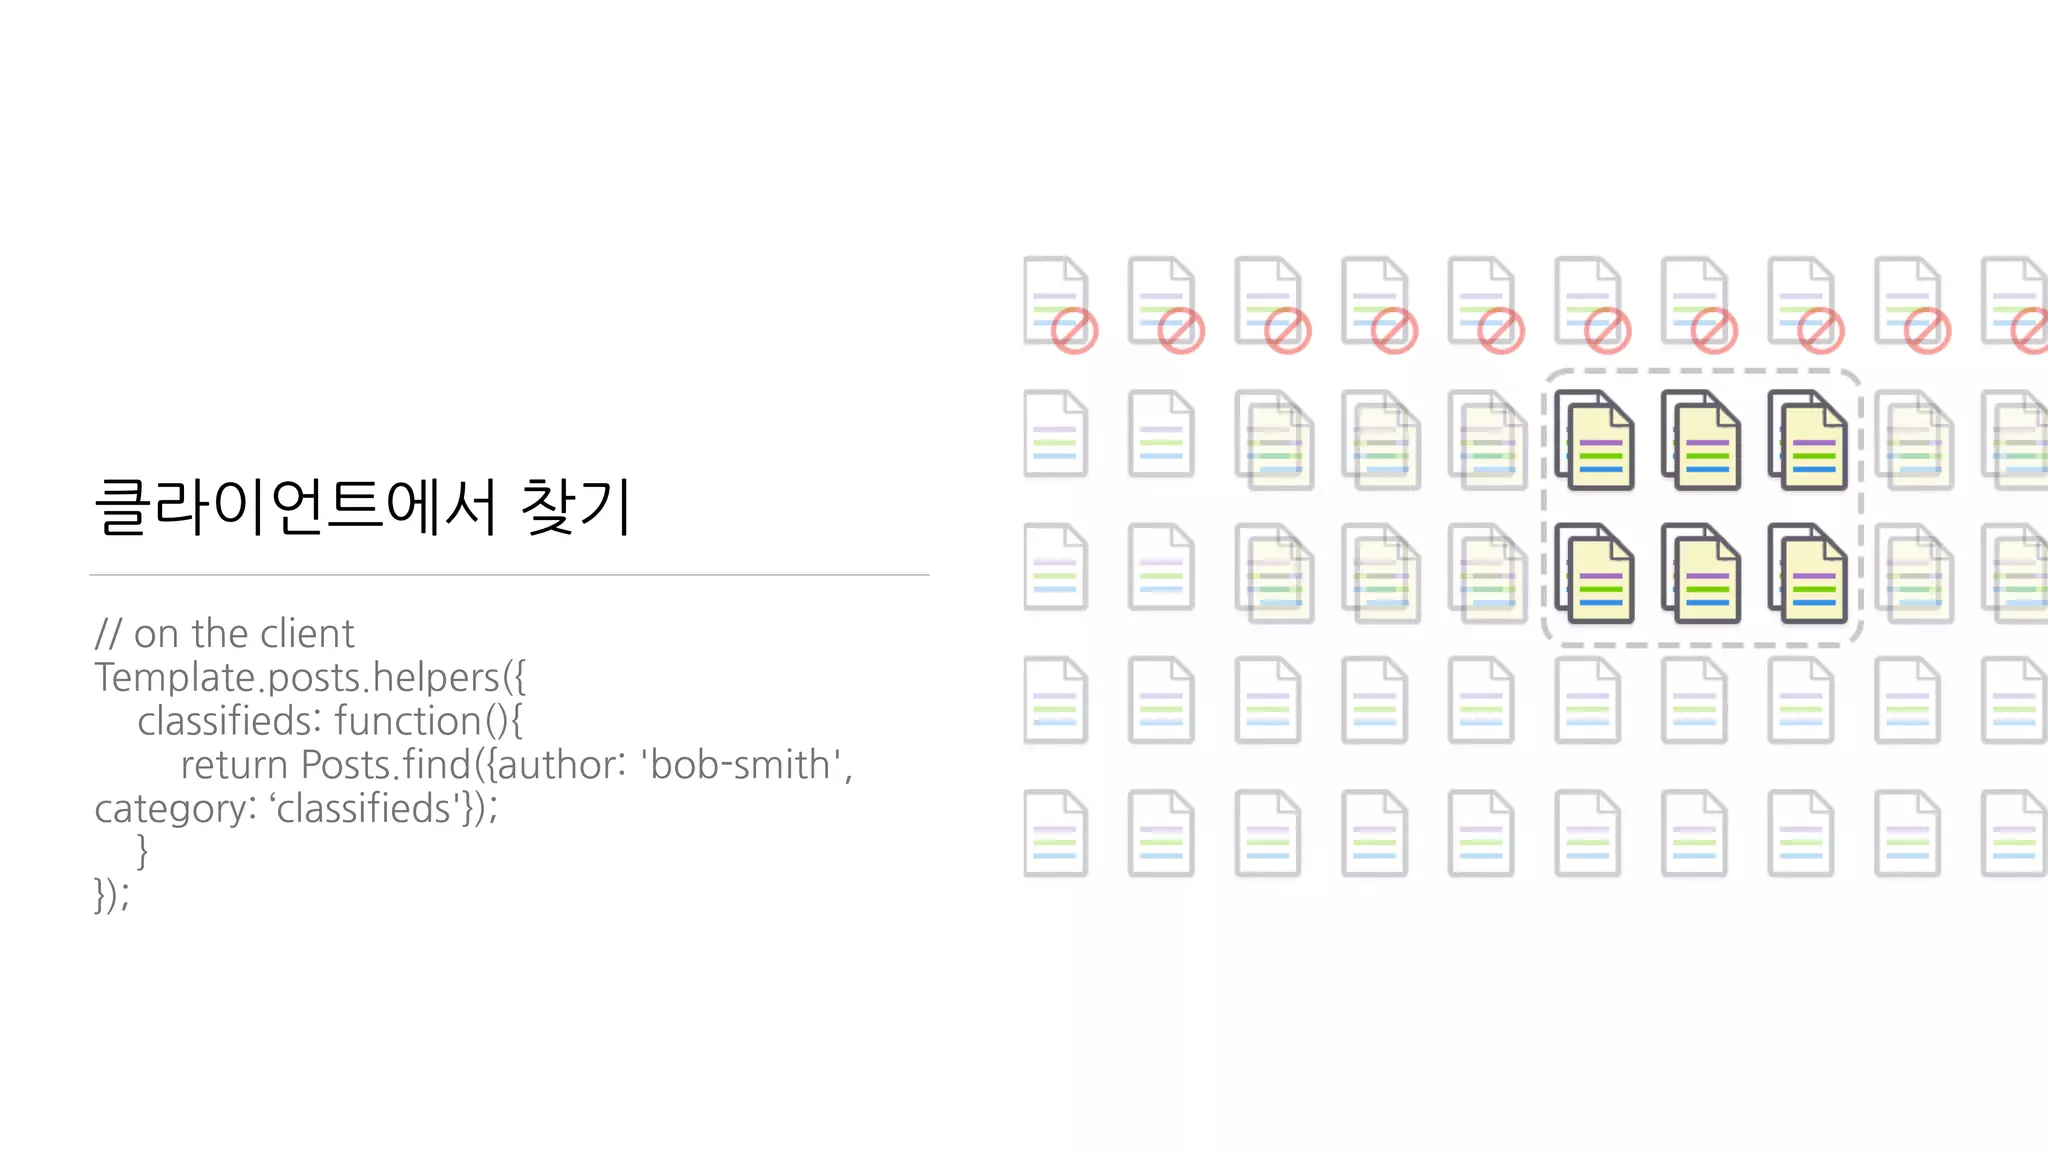
• 찾기
• 하나 찾기
Books.findOne({“title”: “IoT”})
• 모두 찾기
Books.find({})
64.
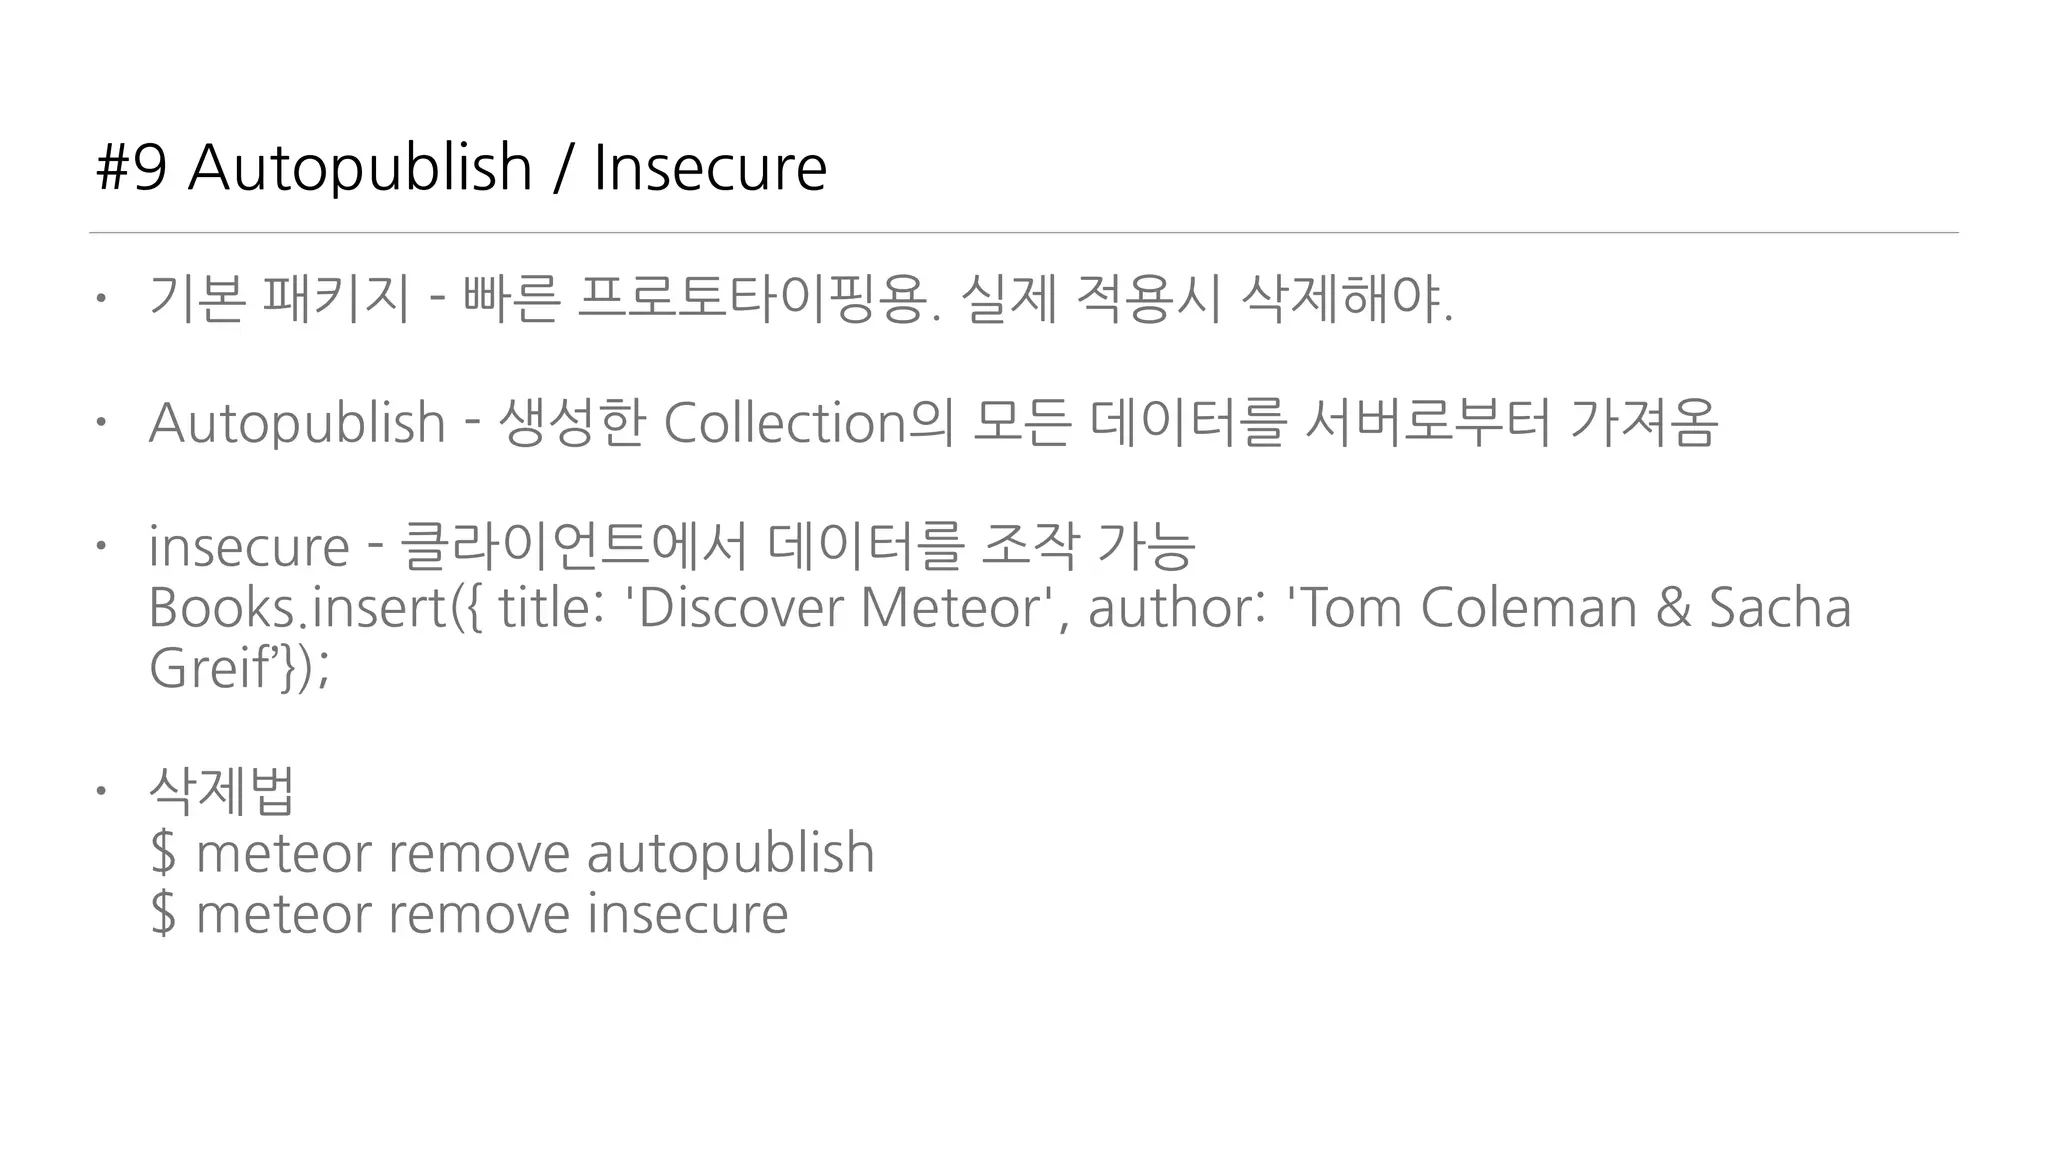
#9 Autopublish /Insecure
• 기본 패키지 - 빠른 프로토타이핑용. 실제 적용시 삭제해야.
• Autopublish - 생성한 Collection의 모든 데이터를 서버로부터 가져옴
• insecure - 클라이언트에서 데이터를 조작 가능
Books.insert({ title: 'Discover Meteor', author: 'Tom Coleman & Sacha
Greif’});
• 삭제법
$ meteor remove autopublish
$ meteor remove insecure
65.
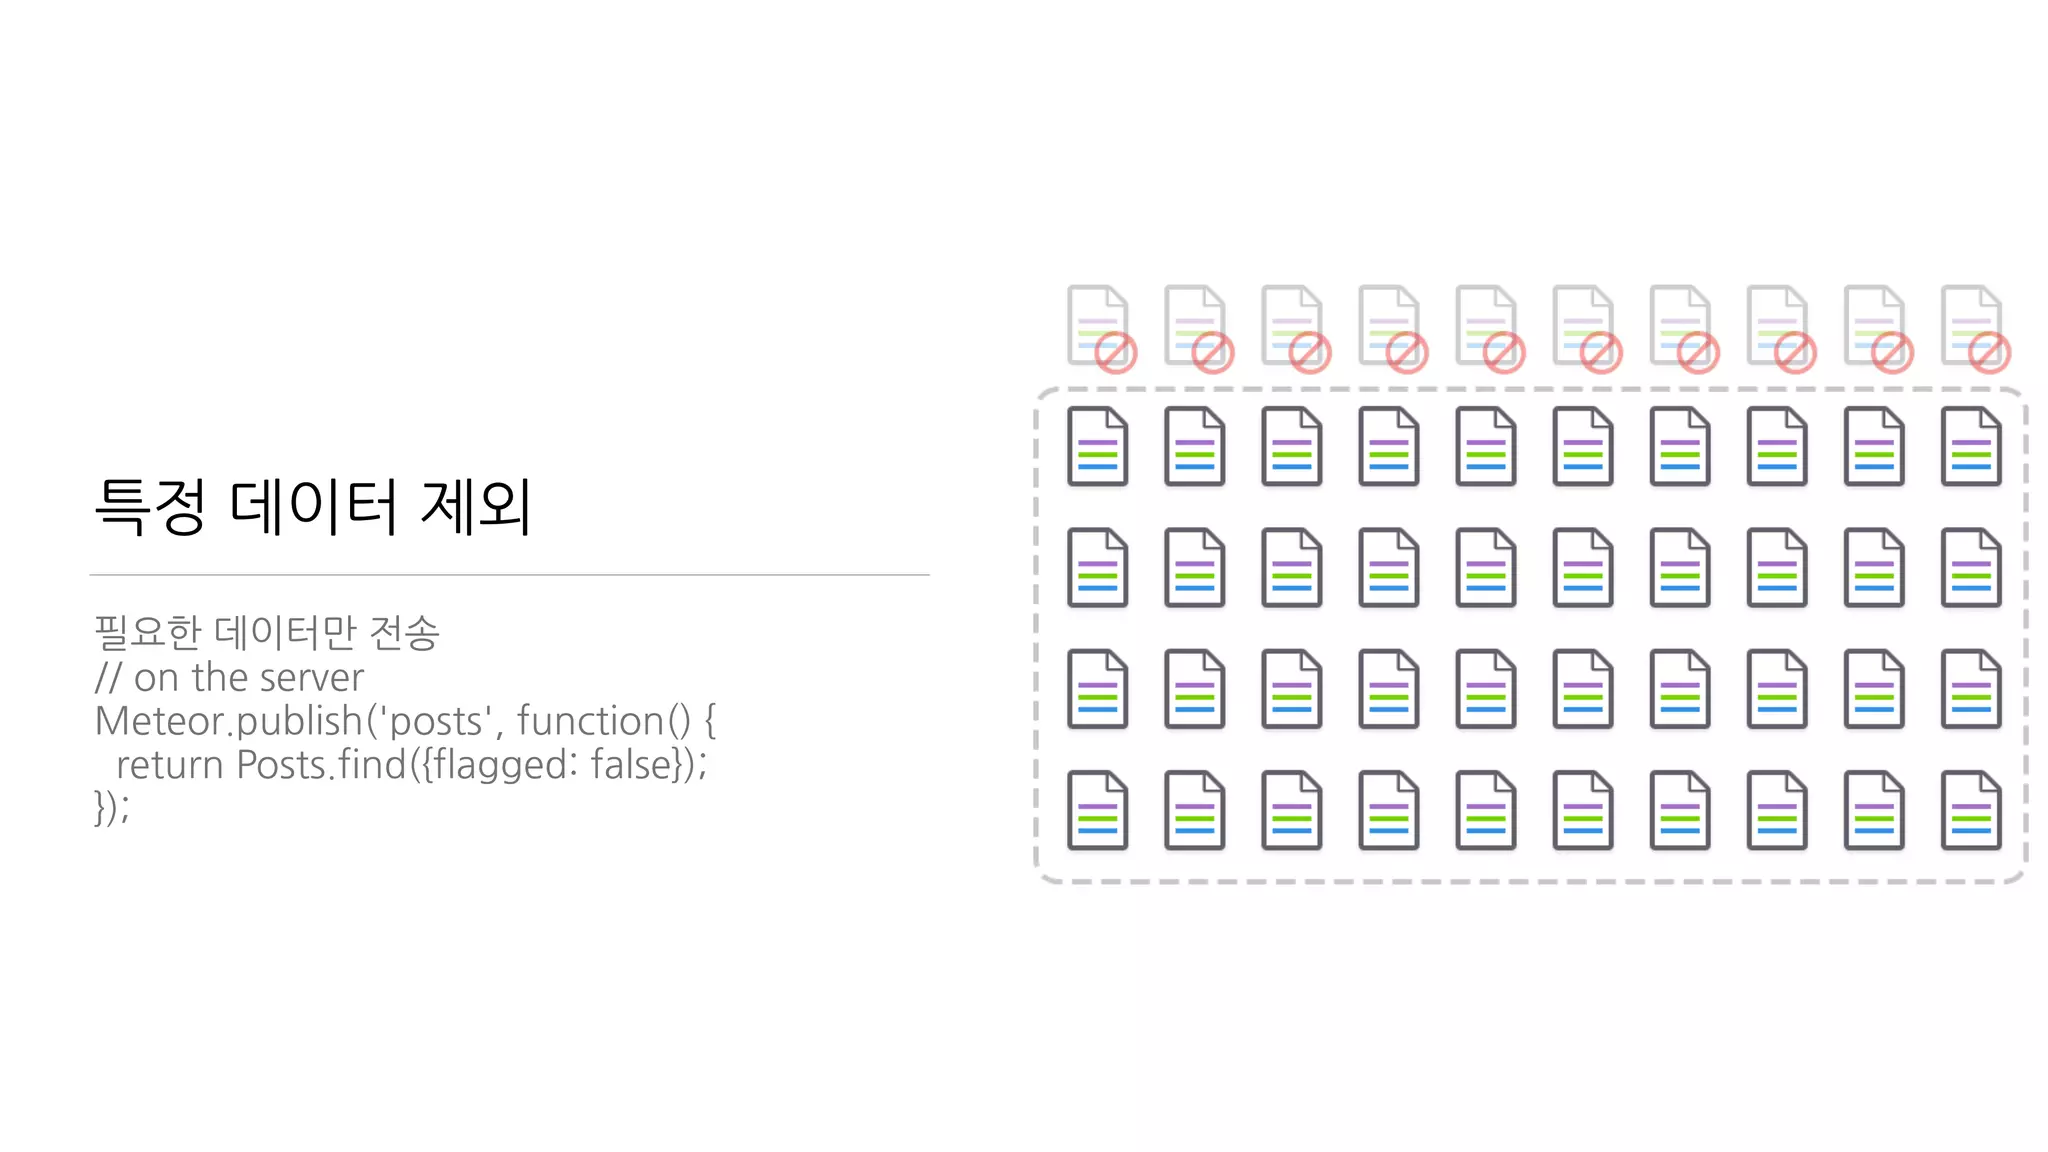
#10 Publish &Subscribe
• 데이터를 가져오는 방법. 구독과 발행. Meteor 핵심 개념
• 서버로부터 발행
Meteor.publish('books', function() {
return Books.find();
});
• 클라이언트에서 구독
var booksSub = Meteor.subscribe(‘books');
• https://www.discovermeteor.com/blog/understanding-meteor-
publications-and-subscriptions/
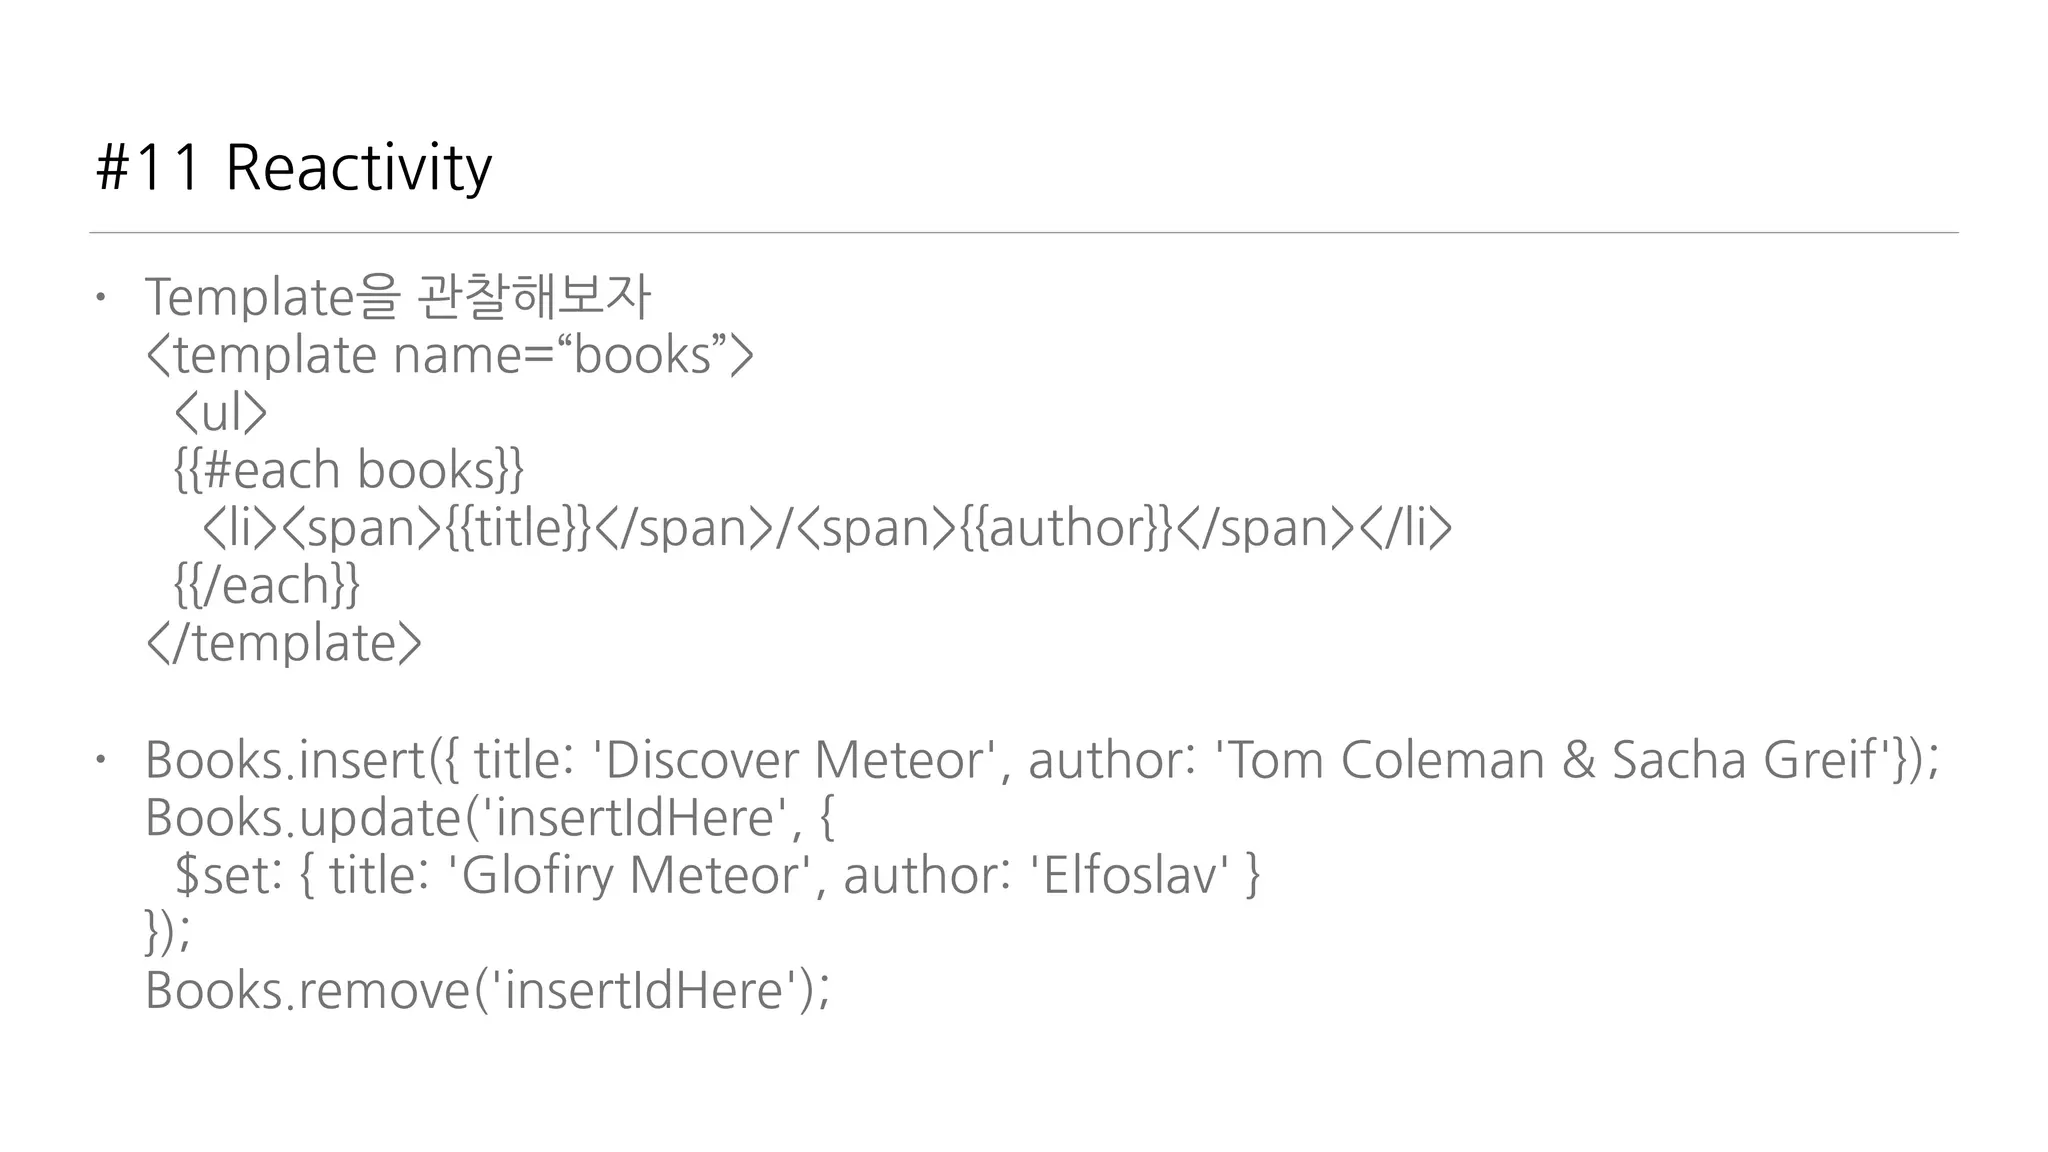
#11. Reactivity
Reactive Programming
구현은거들 뿐 선언만 놓고 온다.
선언을 하면 데이터가 변경될 때 스스로 변화한다.
Reactive data sources 안에서 Reactive
computation 이 이루어진다.
http://docs.meteor.com/#/full/reactivity
#12 Methods
• 서버에게일을 시키는 방법
• insecure 제거 후 데이터 조작은 서버에서
Meteor.methods({
addBook: function(title, author) {
check(title, String); //check if title is String
check(author, String); //check if author is String
if (title === '') { throw new Meteor.Error(500, "Parameter title can't be
empty”); }
if (author === '') { throw new Meteor.Error(500, "Parameter author can't be
empty”); }
Books.insert({title: title, author: author});
}
});
#13 Deploy
서버 호스팅?
build하거나 galaxy (추천!) 쓰세요.
galaxy 로 Deploy 는
meteor deploy yourdomain.xxx
이게 전부!
76.
참고자료
• http://meteor.com -공식 홈페이지(영문)
• http://kr.discovermeteor.com/ 한글 무료 번역 자료. 쉽고 체계적인 설명
• http://www.meetup.com/Meteor-Seoul/ Meteor Seoul Meetup (그리고?)
• https://opentutorials.org/module/1406 생활코딩 Meteor School 초급반
• https://www.facebook.com/groups/meteorschool/ 페이스북 Meteor
School
• https://forums.meteor.com/ Meteor 포럼(영문)
77.
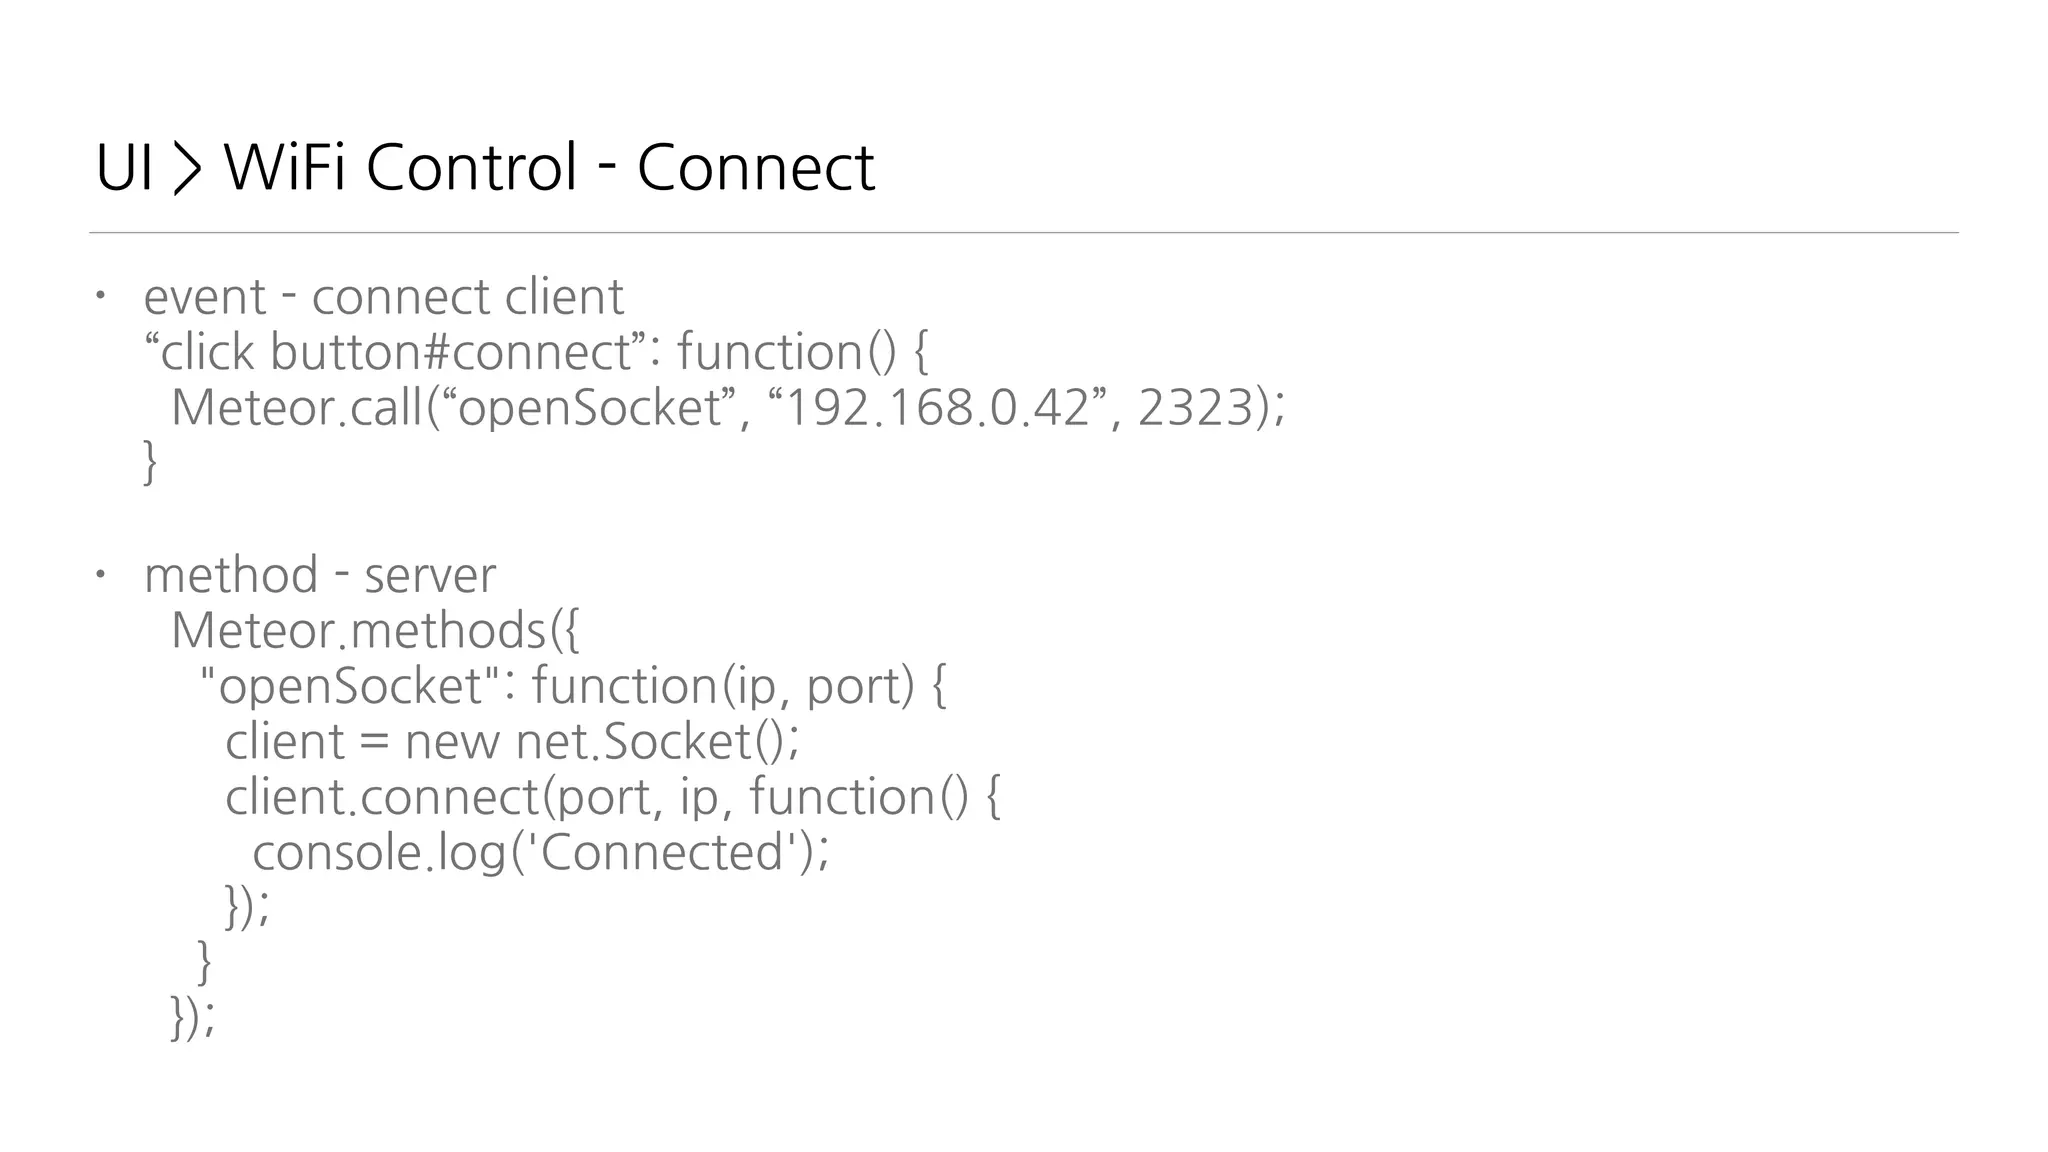
Meteor에서 직접 모듈과통신
serialport package
$ meteor add spectrum:serialport
혹은
$ meteor add donaldaverill:serialport
https://atmospherejs.com/donaldaverill/
serialport
78.
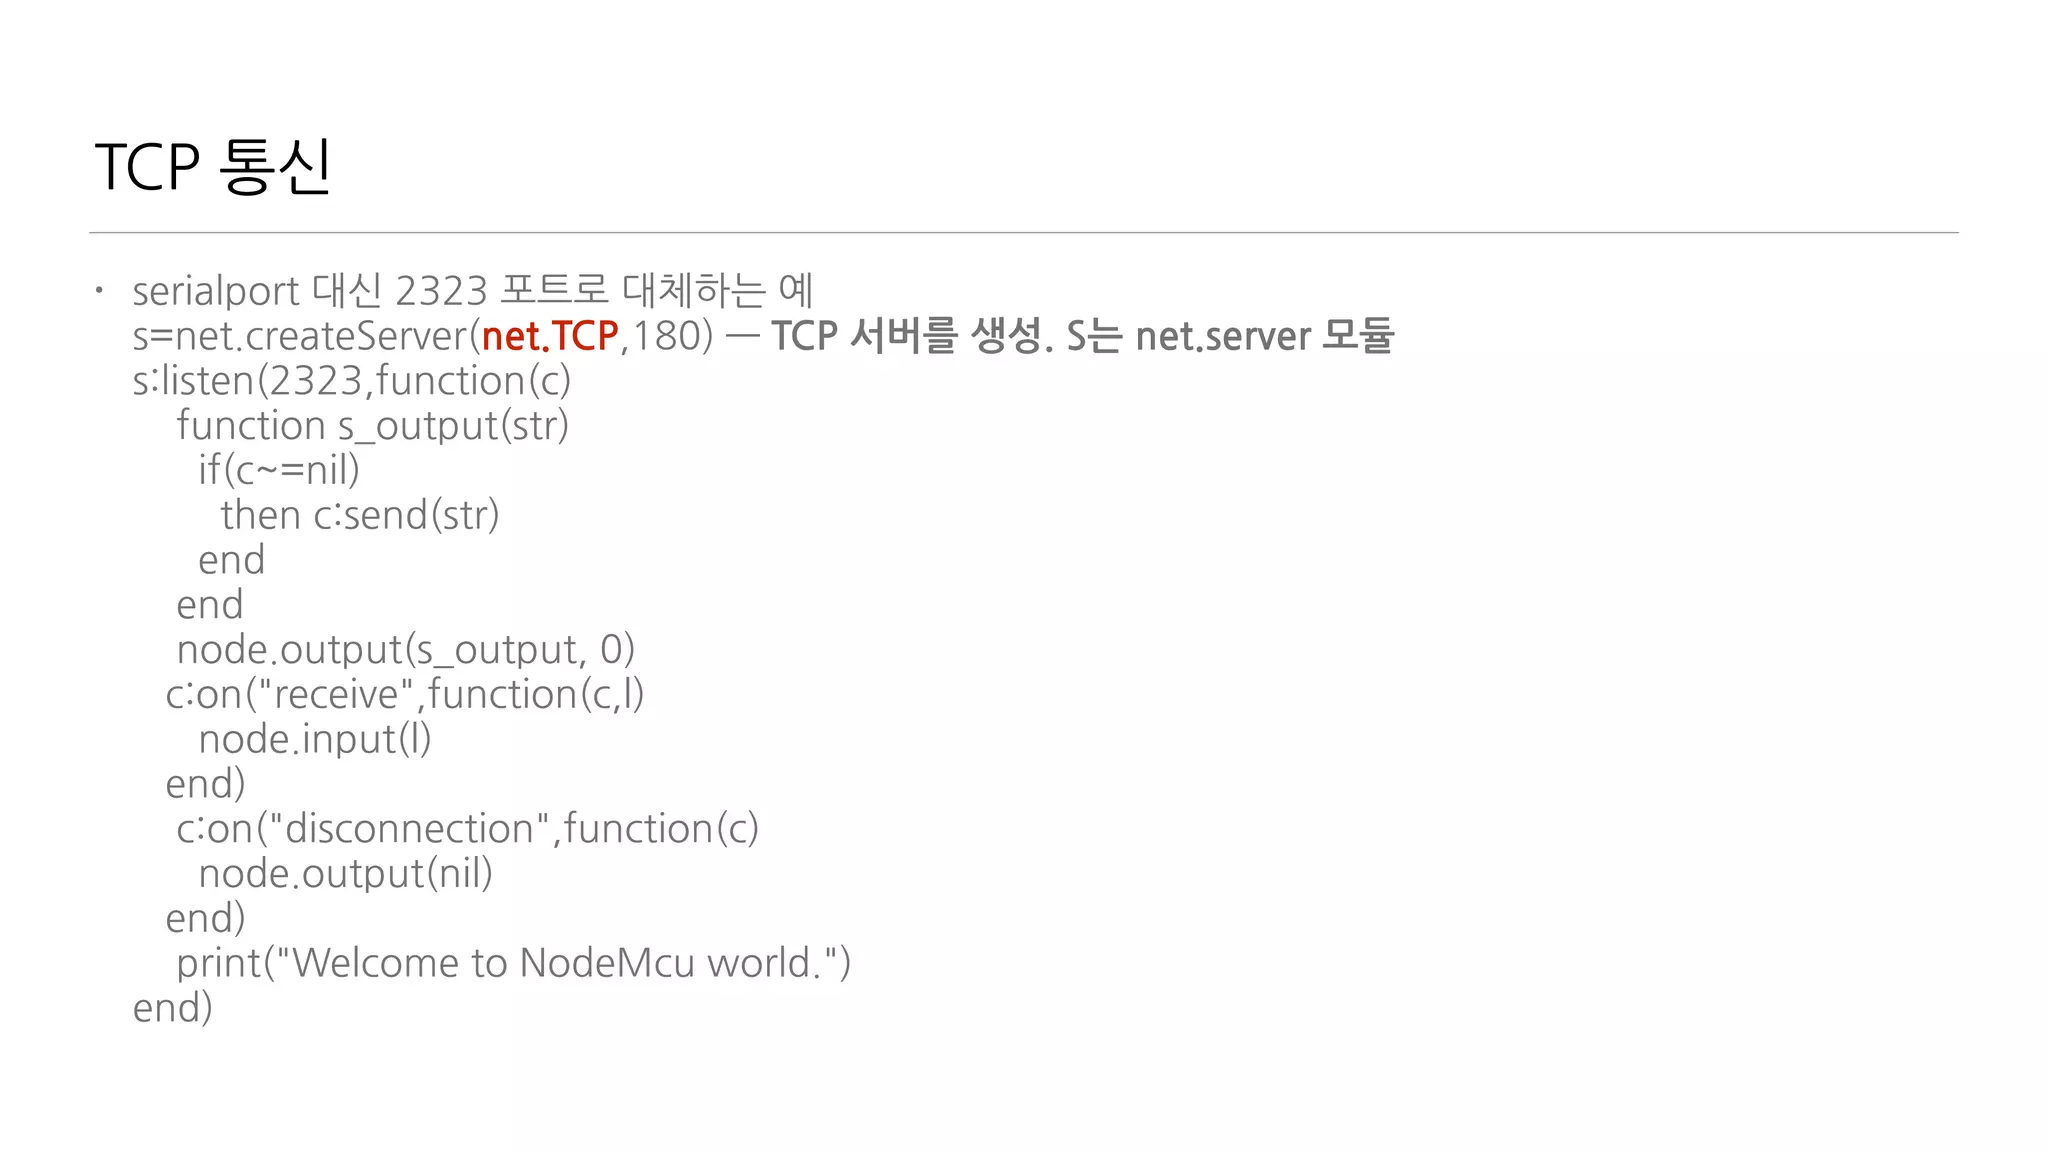
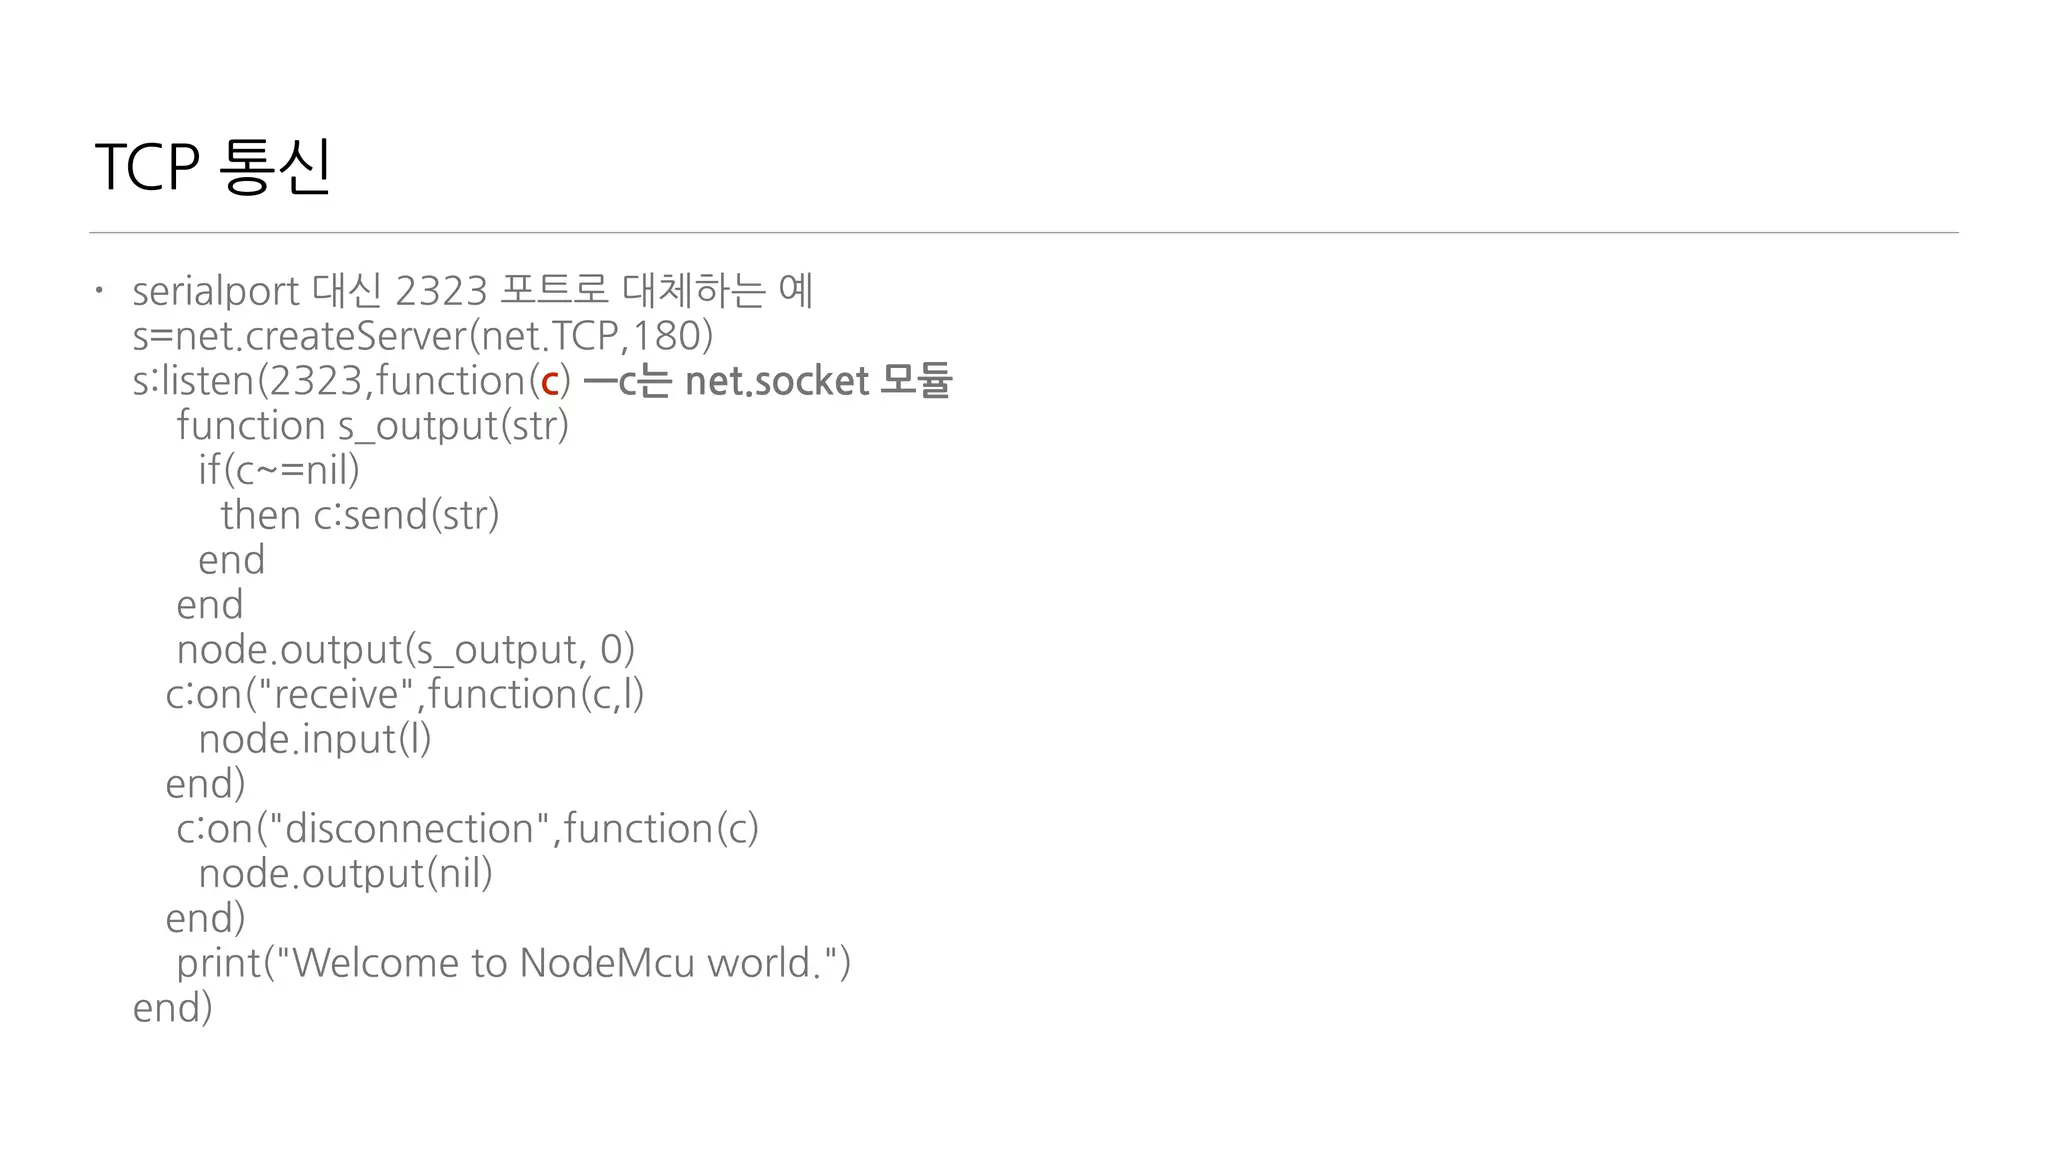
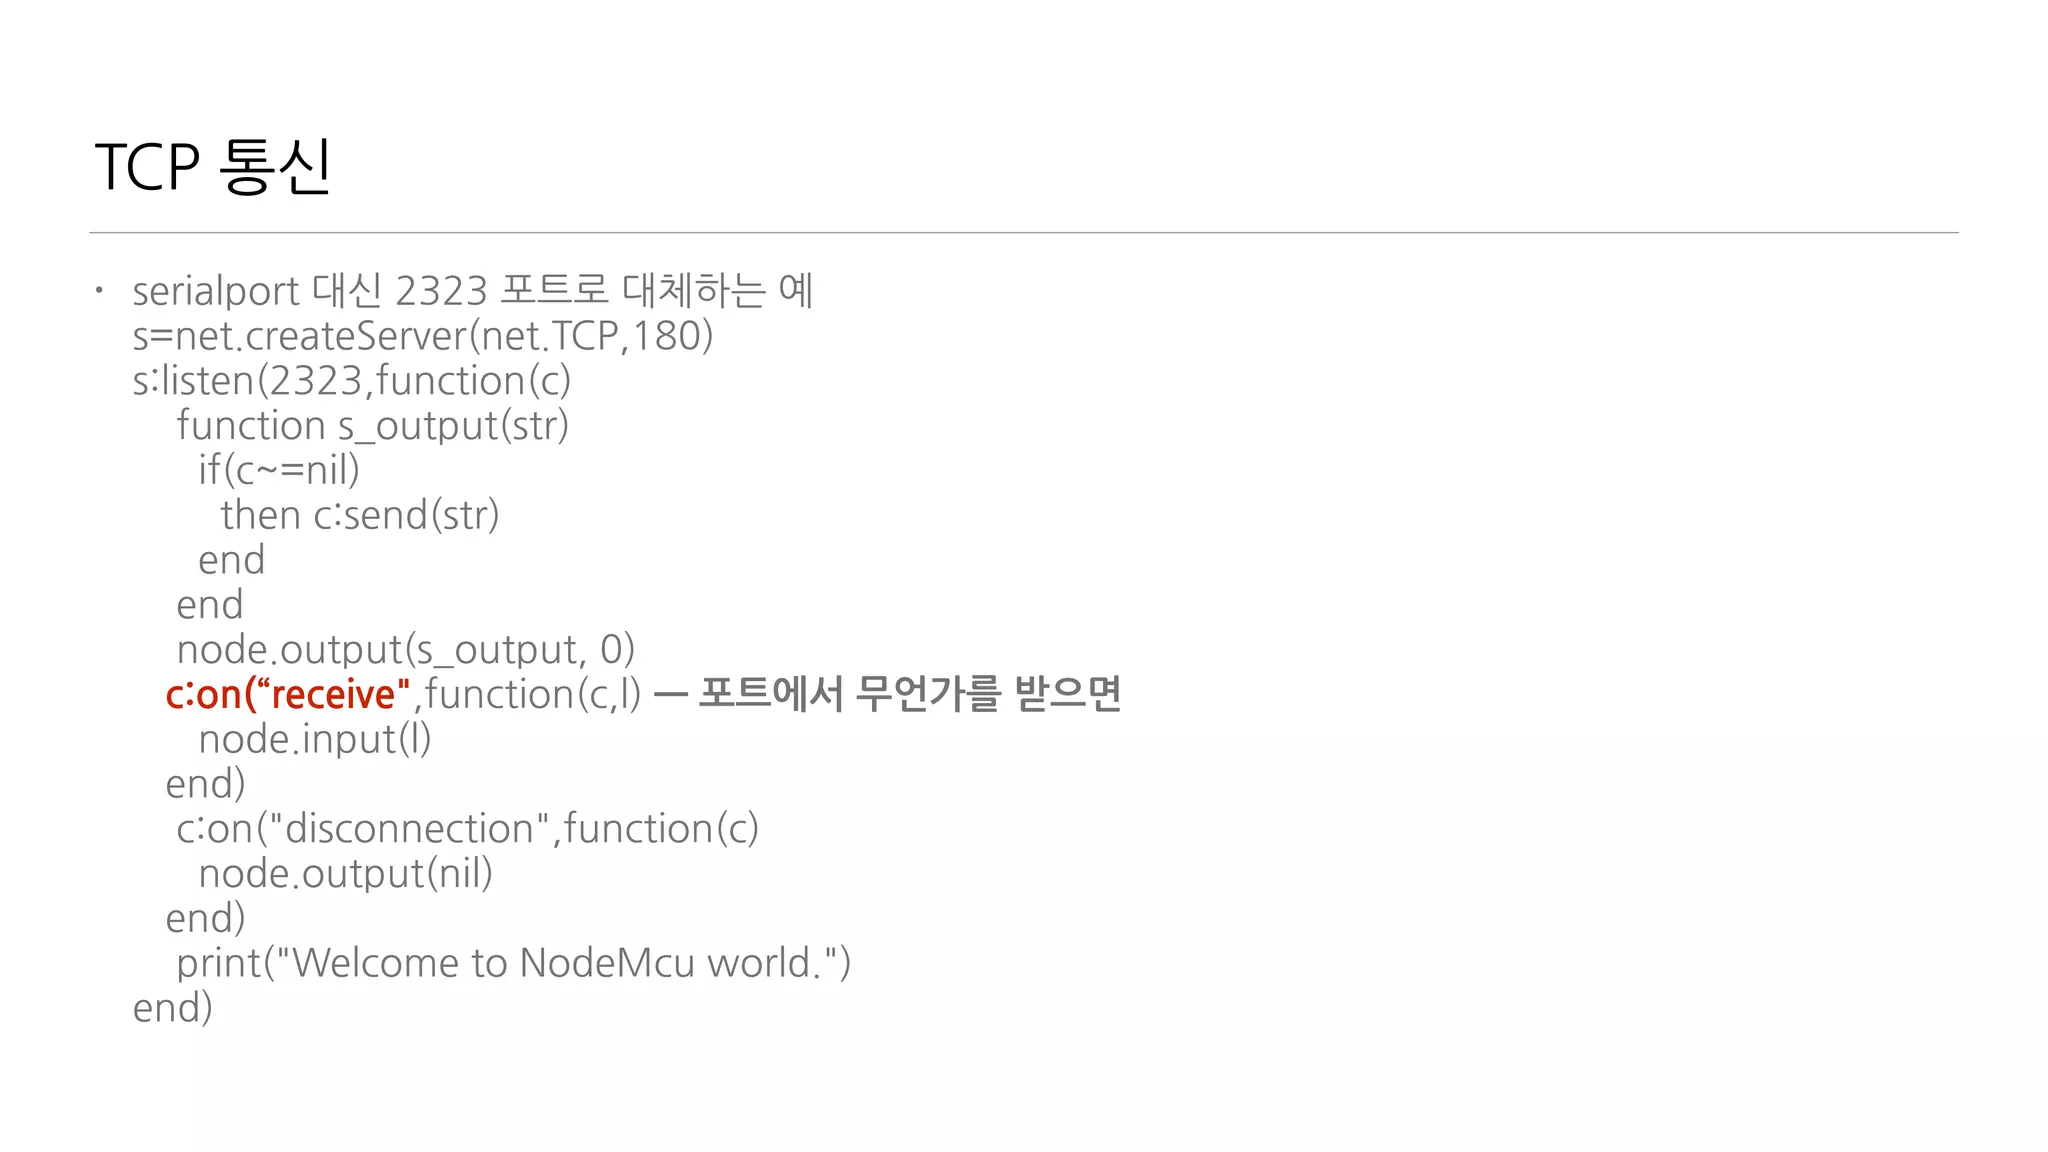
TCP 통신
• serialport대신 2323 포트로 대체하는 예
s=net.createServer(net.TCP,180)
s:listen(2323,function(c)
function s_output(str)
if(c~=nil)
then c:send(str)
end
end
node.output(s_output, 0)
c:on("receive",function(c,l)
node.input(l)
end)
c:on("disconnection",function(c)
node.output(nil)
end)
print("Welcome to NodeMcu world.")
end)
79.
TCP 통신
• serialport대신 2323 포트로 대체하는 예
s=net.createServer(net.TCP,180) — TCP 서버를 생성. S는 net.server 모듈
s:listen(2323,function(c)
function s_output(str)
if(c~=nil)
then c:send(str)
end
end
node.output(s_output, 0)
c:on("receive",function(c,l)
node.input(l)
end)
c:on("disconnection",function(c)
node.output(nil)
end)
print("Welcome to NodeMcu world.")
end)
80.
TCP 통신
• serialport대신 2323 포트로 대체하는 예
s=net.createServer(net.TCP,180)
s:listen(2323,function(c) — 2323포트를 수신한다.
function s_output(str)
if(c~=nil)
then c:send(str)
end
end
node.output(s_output, 0)
c:on("receive",function(c,l)
node.input(l)
end)
c:on("disconnection",function(c)
node.output(nil)
end)
print("Welcome to NodeMcu world.")
end)
81.
TCP 통신
• serialport대신 2323 포트로 대체하는 예
s=net.createServer(net.TCP,180)
s:listen(2323,function(c) —c는 net.socket 모듈
function s_output(str)
if(c~=nil)
then c:send(str)
end
end
node.output(s_output, 0)
c:on("receive",function(c,l)
node.input(l)
end)
c:on("disconnection",function(c)
node.output(nil)
end)
print("Welcome to NodeMcu world.")
end)
82.
TCP 통신
• serialport대신 2323 포트로 대체하는 예
s=net.createServer(net.TCP,180)
s:listen(2323,function(c)
function s_output(str)
if(c~=nil)
then c:send(str)
end
end
node.output(s_output, 0)—output 결과를 s_output으로 넘긴다. 단, 시리얼로는 보내지 않음(0)
c:on("receive",function(c,l)
node.input(l)
end)
c:on("disconnection",function(c)
node.output(nil)
end)
print("Welcome to NodeMcu world.")
end)
83.
TCP 통신
• serialport대신 2323 포트로 대체하는 예
s=net.createServer(net.TCP,180)
s:listen(2323,function(c)
function s_output(str)
if(c~=nil)-net.socket을 생성이 되었으면
then c:send(str)
end
end
node.output(s_output, 0)
c:on("receive",function(c,l)
node.input(l)
end)
c:on("disconnection",function(c)
node.output(nil)
end)
print("Welcome to NodeMcu world.")
end)
84.
TCP 통신
• serialport대신 2323 포트로 대체하는 예
s=net.createServer(net.TCP,180)
s:listen(2323,function(c)
function s_output(str)
if(c~=nil)
then c:send(str)—output으로 들어온 것을 2323포트로 보낸다.
end
end
node.output(s_output, 0)
c:on("receive",function(c,l)
node.input(l)
end)
c:on("disconnection",function(c)
node.output(nil)
end)
print("Welcome to NodeMcu world.")
end)
85.
TCP 통신
• serialport대신 2323 포트로 대체하는 예
s=net.createServer(net.TCP,180)
s:listen(2323,function(c)
function s_output(str)
if(c~=nil)
then c:send(str)
end
end
node.output(s_output, 0)
c:on(“receive",function(c,l) — 포트에서 무언가를 받으면
node.input(l)
end)
c:on("disconnection",function(c)
node.output(nil)
end)
print("Welcome to NodeMcu world.")
end)
86.
TCP 통신
• serialport대신 2323 포트로 대체하는 예
s=net.createServer(net.TCP,180)
s:listen(2323,function(c)
function s_output(str)
if(c~=nil)
then c:send(str)
end
end
node.output(s_output, 0)
c:on("receive",function(c,l)
node.input(l)—받은 내용을 nodeMCU의 입력으로 보낸다.
end)
c:on("disconnection",function(c)
node.output(nil)
end)
print("Welcome to NodeMcu world.")
end)
87.
TCP 통신
• serialport대신 2323 포트로 대체하는 예
s=net.createServer(net.TCP,180)
s:listen(2323,function(c)
function s_output(str)
if(c~=nil)
then c:send(str)
end
end
node.output(s_output, 0)
c:on("receive",function(c,l)
node.input(l)
end)
c:on(“disconnection”,function(c)—연결이 끊어지면
node.output(nil)
end)
print("Welcome to NodeMcu world.")
end)
88.
TCP 통신
• serialport대신 2323 포트로 대체하는 예
s=net.createServer(net.TCP,180)
s:listen(2323,function(c)
function s_output(str)
if(c~=nil)
then c:send(str)
end
end
node.output(s_output, 0)
c:on("receive",function(c,l)
node.input(l)
end)
c:on("disconnection",function(c)
node.output(nil)—output 연결을 해제한다.
end)
print("Welcome to NodeMcu world.")
end)
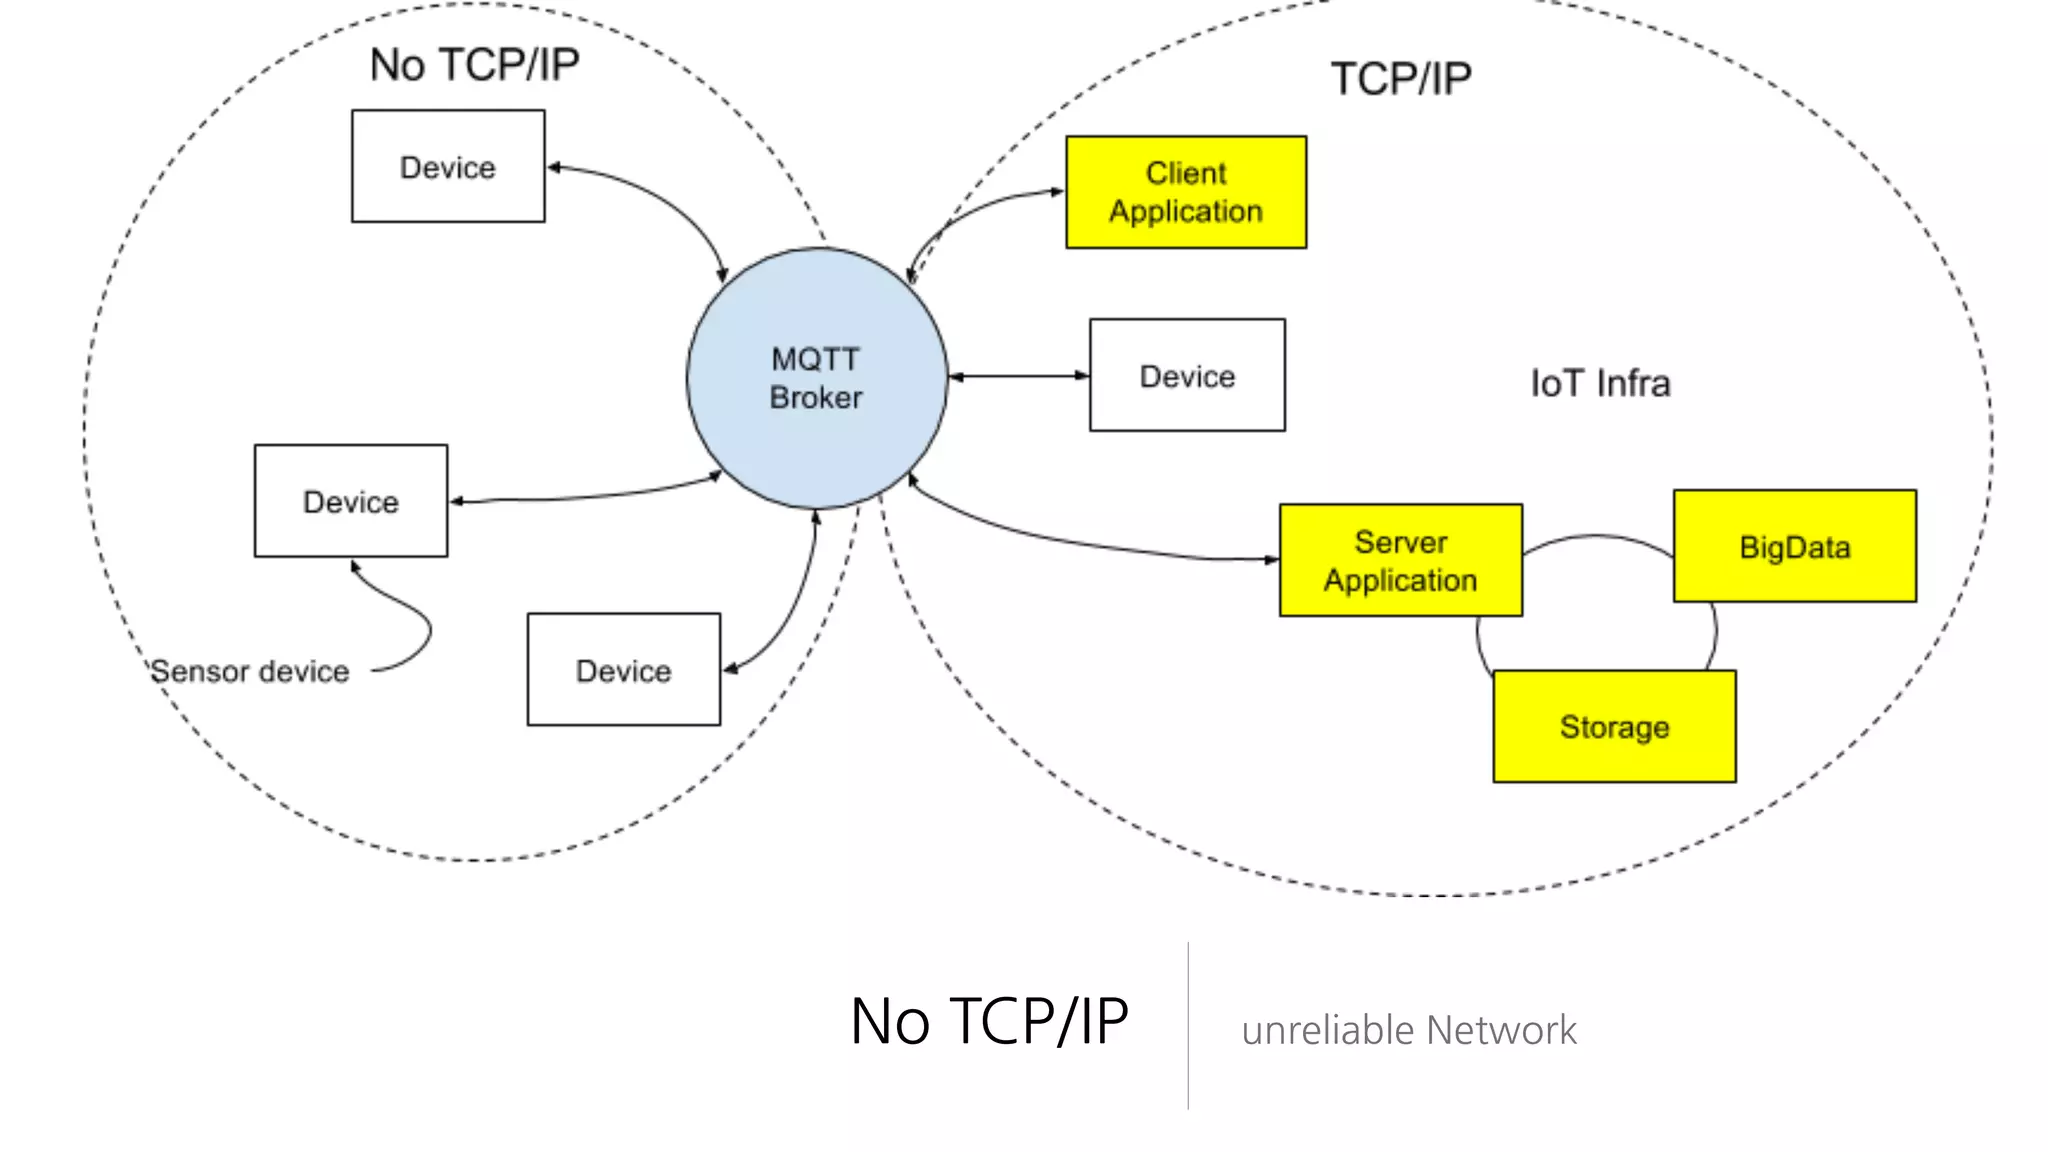
MQTT?
Message Queue TelemetryTransfer
M2M(machine-to-machine)와 IoT(Internet of
things)에서의 사용을 목적
저전력
작은 데이터량
pub/sub 기반 (Meteor와 같다!)
서버가 없다
대신 pub/sub을 중계하는 Broker
누구냐 넌?
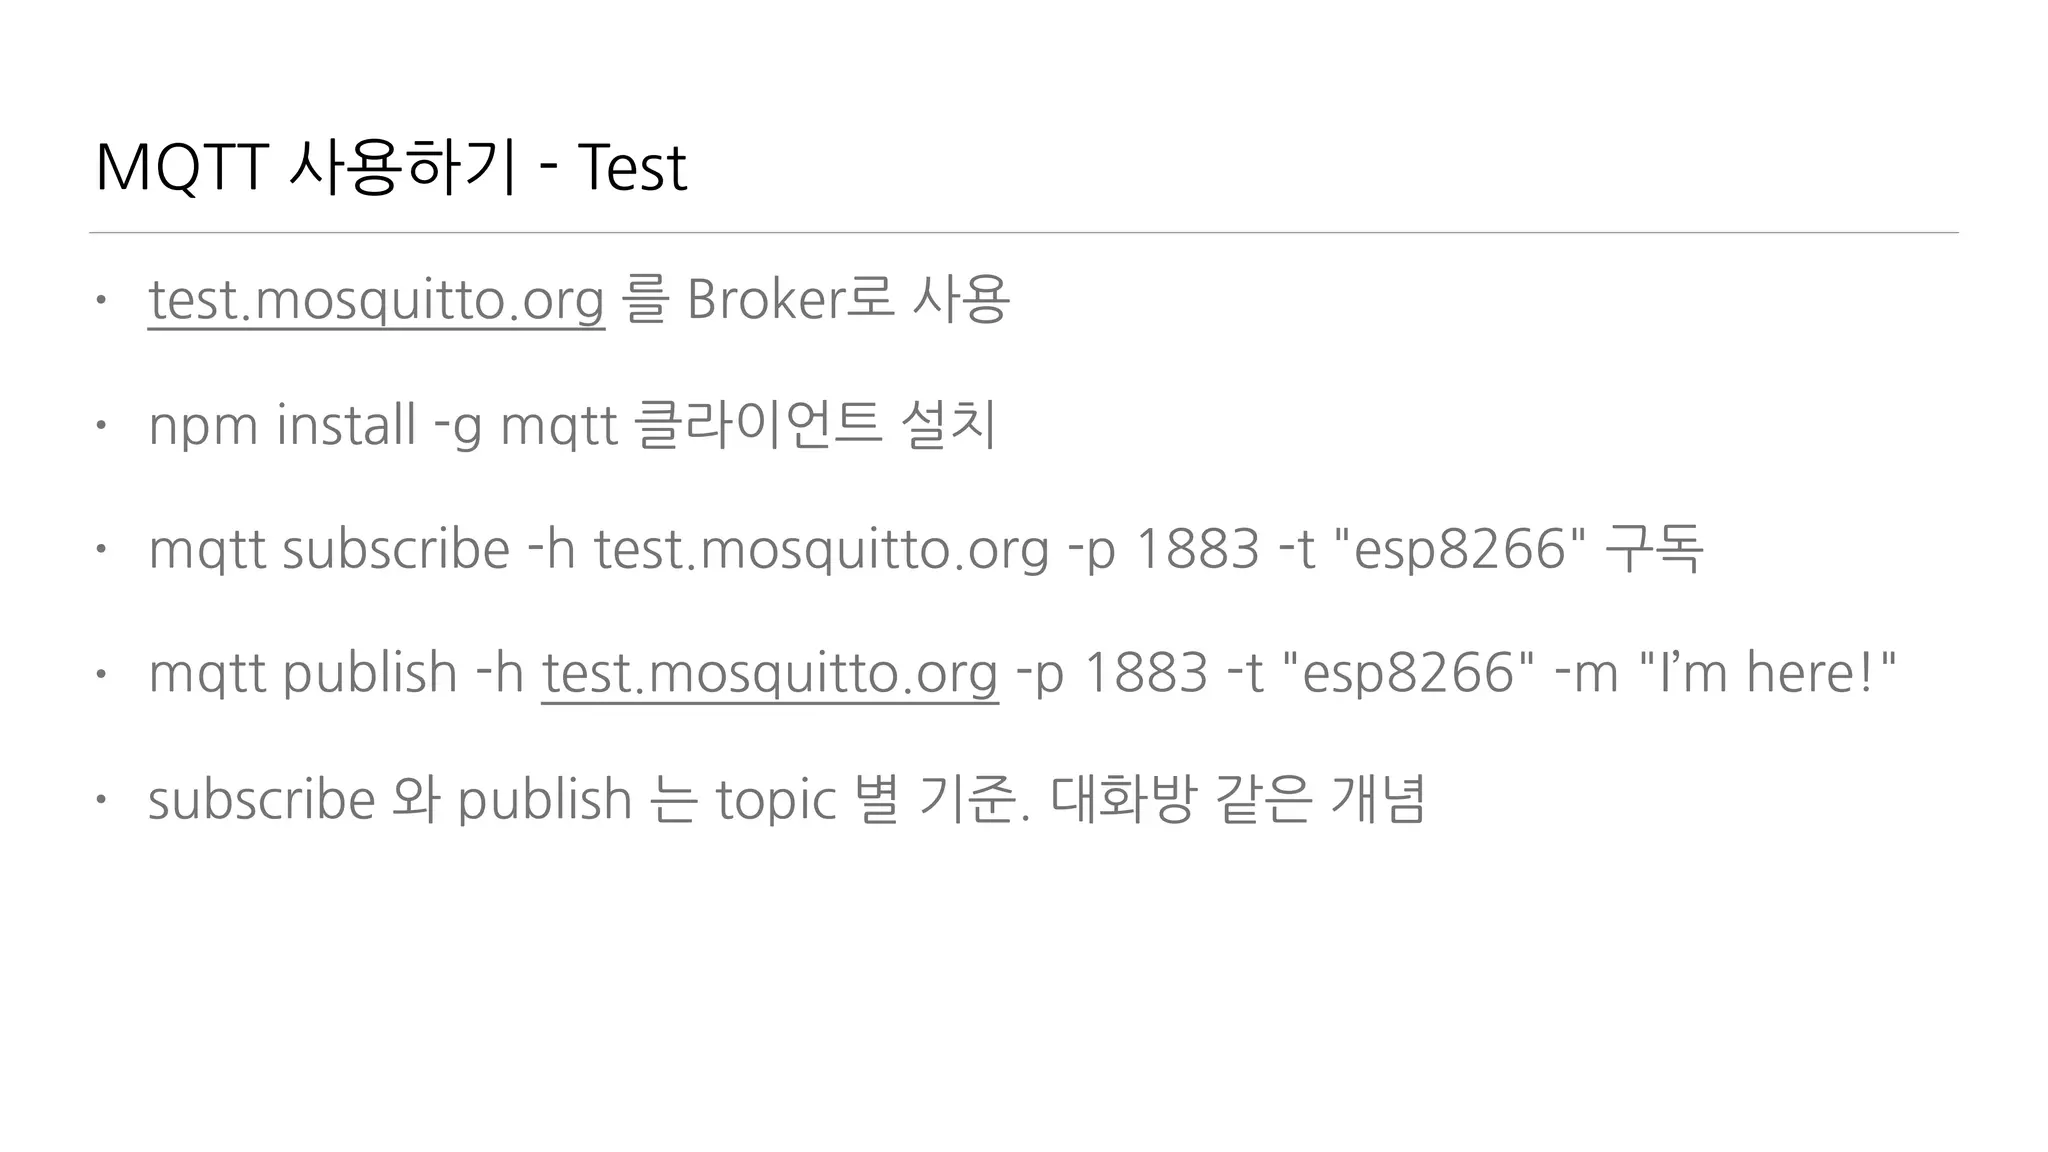
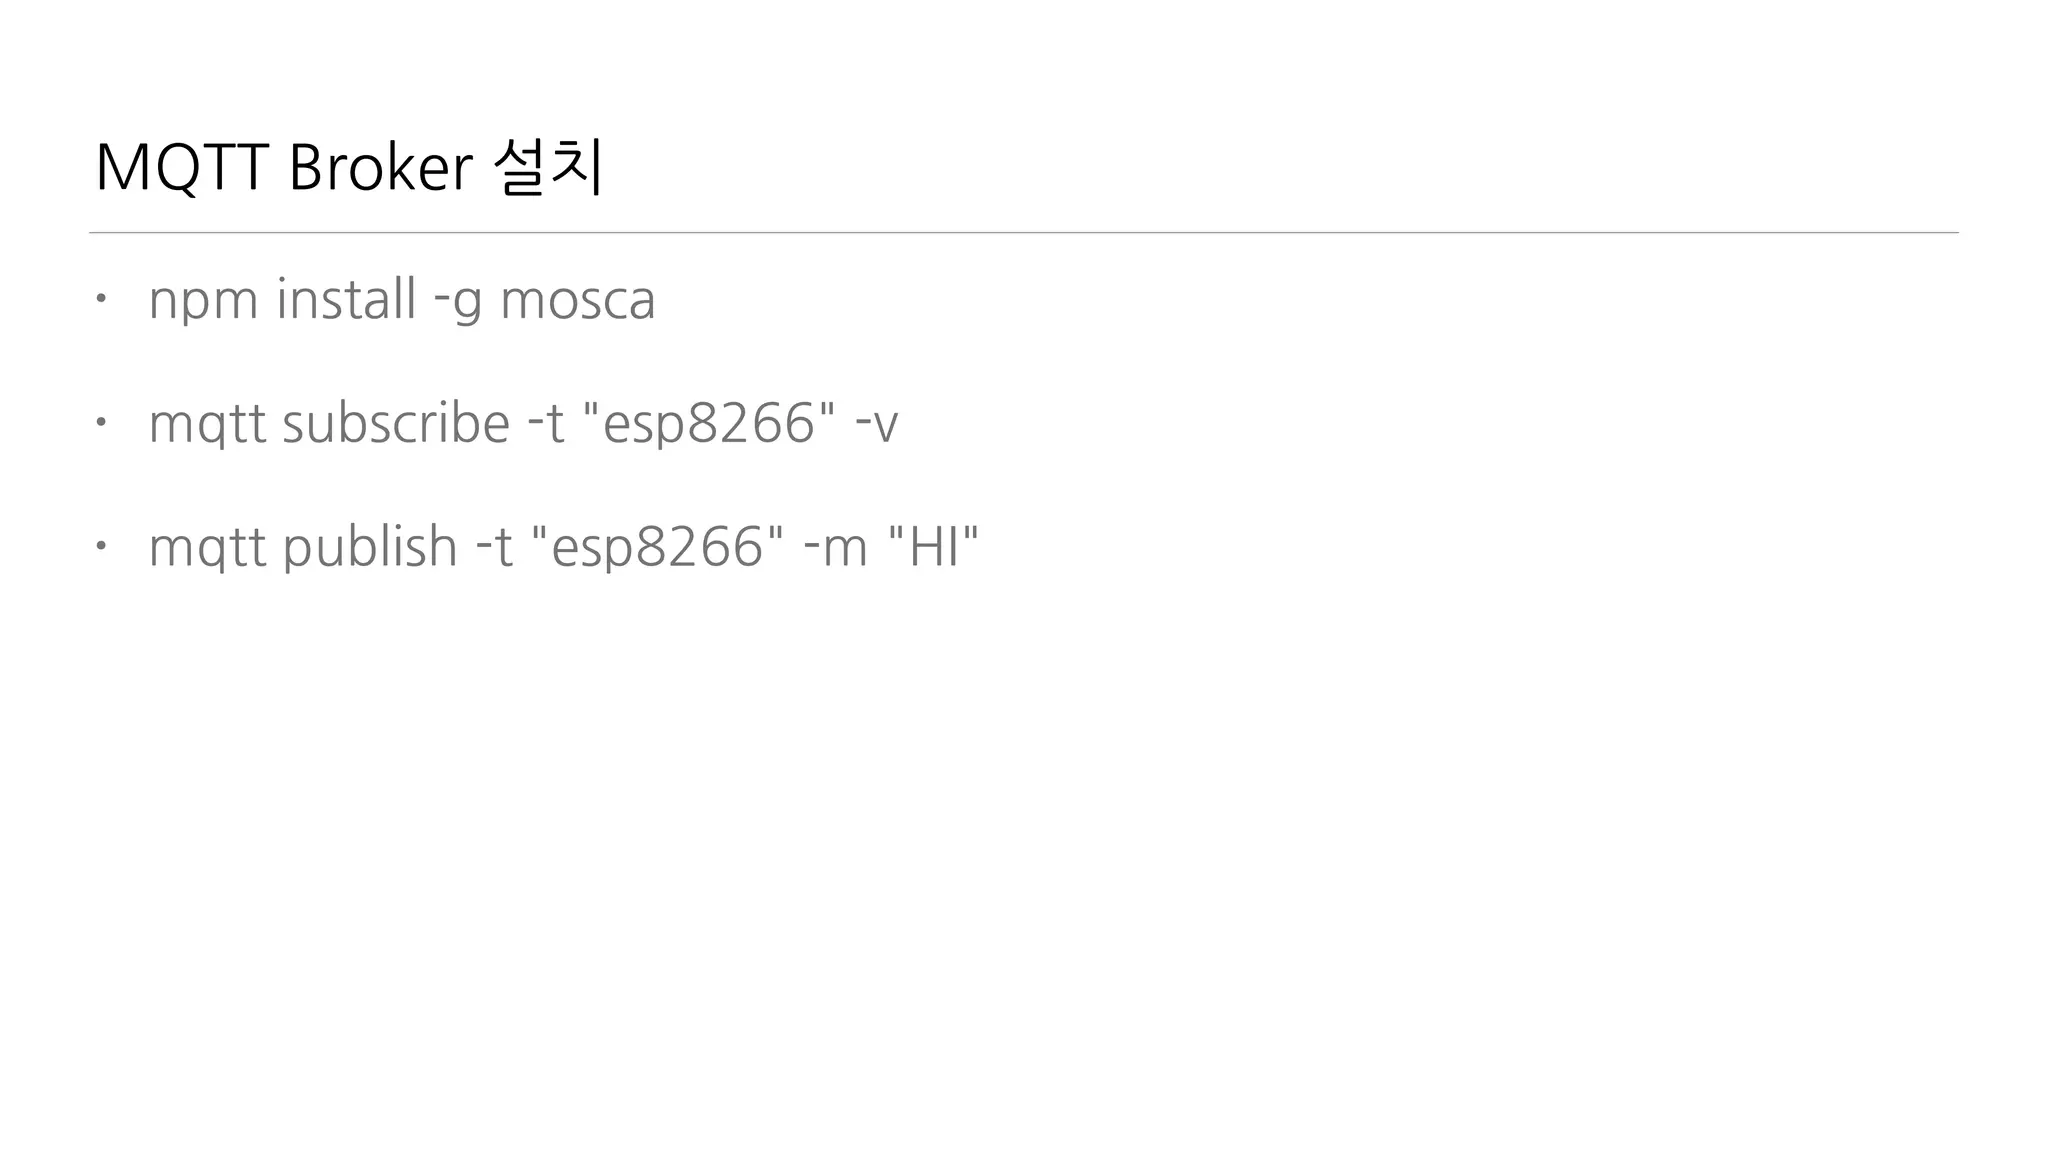
MQTT 사용하기 -Test
• test.mosquitto.org 를 Broker로 사용
• npm install -g mqtt 클라이언트 설치
• mqtt subscribe -h test.mosquitto.org -p 1883 -t "esp8266" 구독
• mqtt publish -h test.mosquitto.org -p 1883 -t "esp8266" -m "I’m here!"
• subscribe 와 publish 는 topic 별 기준. 대화방 같은 개념
95.
MQTT 사용하기 -Cloud
• cloudmqtt.com 를 Broker로 사용
• mqtt subscribe -h m11.cloudmqtt.com -p 11863 -t "light" -u test -P test
구독
• mqtt publish -h m11.cloudmqtt.com -p 11863 -t "light" u test -P test —m
"I’m here!”
• https://api.cloudmqtt.com/sso/cloudmqtt/console
• 권한 관리


![Javascipt vs Lua
• //
/* ..
*/
• { }
• null
• {a:1, b:1}
• [1,2,3], a++, a+=1, a>b ? a: b
a>b && a || b
• a=1, b=1, c=1
• a+”…”+b
• —
—[[
]]—
• … end
• nil
• {a=1, b=1}
• no Array, no ++, +=,
no tenary use (and, or)
• a,b,c=1,2,3
• a..”…”..b](https://image.slidesharecdn.com/metoriot-160921134004/75/Meteor-IoT-30-2048.jpg)


![#3 Helpers
• Template에 Data를 전달하는 function들
Template.yourTemplateName.helpers({
books: function() {
return ['Discover Meteor', 'Meteor in action', 'Practical Meteor'];
}
});
• Template에 적용
<template name="yourTemplateName">
{{#each books}}
<p>{{this}}</p>
{{/each}}
</template>](https://image.slidesharecdn.com/metoriot-160921134004/75/Meteor-IoT-55-2048.jpg)
![#3 Helpers
• Object 사용
Template.yourTemplateName.helpers({
books: function() {
return [
{ title: 'Discover Meteor', pages: 300 },
{ title: 'Meteor in action', pages: 250 },
{ title: 'Practical Meteor', pages: 199 }
];
}
});
• Template에 적용
<template name="yourTemplateName">
{{#each books}}
<p>{{title}}, {{pages}} pages.</p>
{{/each}}
</template>](https://image.slidesharecdn.com/metoriot-160921134004/75/Meteor-IoT-56-2048.jpg)


![#12 Methods
• 클라이언트에서 사용
//client code
Template.yourTemplateName.events({
'submit .add-book-form': function(e) {
e.preventDefault();
Meteor.call('addBook', {
title: $(‘[name="title"]').val(),
author: $('[name="author"]').val();
}, function(error, result) {
if (!error) {
$(‘[name=“title”]').val(''),
$(‘[name=“author”]').val(''),
}
});
}
});](https://image.slidesharecdn.com/metoriot-160921134004/75/Meteor-IoT-74-2048.jpg)


![[2D4]Python에서의 동시성_병렬성](https://cdn.slidesharecdn.com/ss_thumbnails/2d4pythondeview2014-140929211011-phpapp01-thumbnail.jpg?width=640&height=640&fit=bounds)


![[120316] node.js 프로그래밍 5장](https://cdn.slidesharecdn.com/ss_thumbnails/120316nodejsch5-120319081659-phpapp01-thumbnail.jpg?width=640&height=640&fit=bounds)


