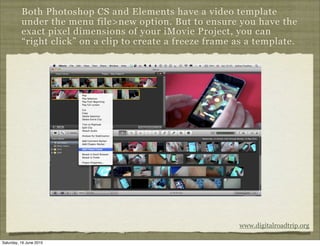
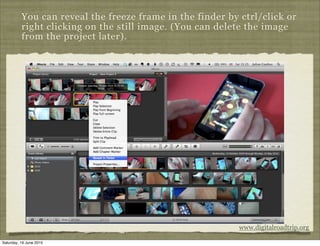
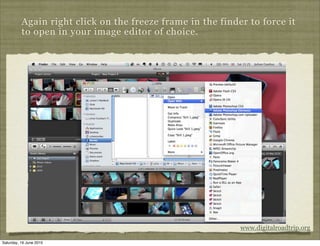
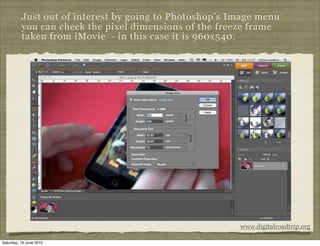
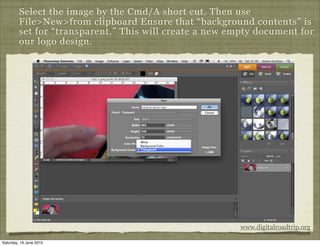
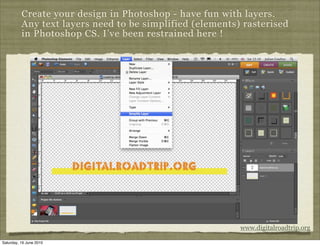
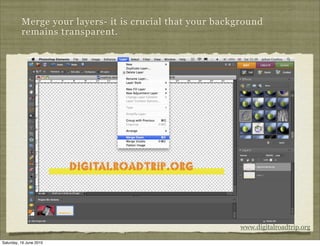
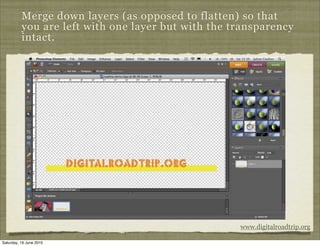
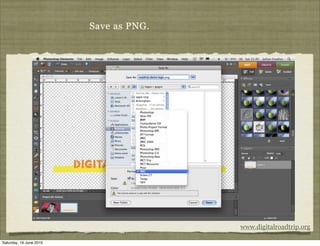
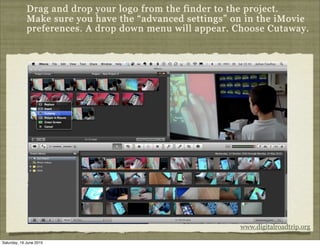
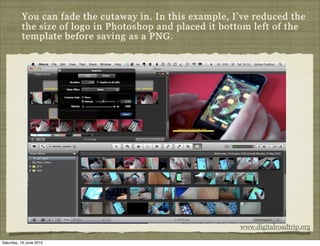
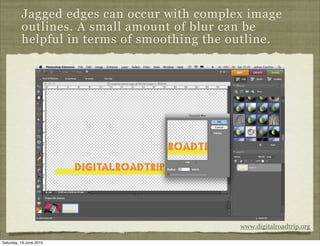
Creating logos
                            for iMovie 09
                             This isn’t an official iMovie function, but it does help
                         leverage existing Photoshop skills in learners for use in video.


                                                                                     www.digitalroadtrip.org
Saturday, 19 June 2010
Both Photoshop CS and Elements have a video template
          under the menu file>new option. But to ensure you have the
          exact pixel dimensions of your iMovie Project, you can
          “right click” on a clip to create a freeze frame as a template.


                                                           www.digitalroadtrip.org

Saturday, 19 June 2010
You can reveal the freeze frame in the finder by ctrl/click or
          right clicking on the still image. (You can delete the image
          from the project later).


                                                           www.digitalroadtrip.org

Saturday, 19 June 2010
Again right click on the freeze frame in the finder to force it
          to open in your image editor of choice.


                                                            www.digitalroadtrip.org

Saturday, 19 June 2010
Just out of interest by going to Photoshop’s Image menu
          you can check the pixel dimensions of the freeze frame
          taken from iMovie - in this case it is 960x540.


                                                        www.digitalroadtrip.org

Saturday, 19 June 2010
Select the image by the Cmd/A short cut. Then use
         File>New>from clipboard Ensure that “background contents” is
         set for “transparent.” This will create a new empty document for
         our logo design.


                                                         www.digitalroadtrip.org

Saturday, 19 June 2010
Create your design in Photoshop - have fun with layers.
          Any text layers need to be simplified (elements) rasterised
          in Photoshop CS. I’ve been restrained here !


                                                          www.digitalroadtrip.org

Saturday, 19 June 2010
Merge your layers- it is crucial that your background
          remains transparent.


                                                          www.digitalroadtrip.org

Saturday, 19 June 2010
Merge down layers (as opposed to flatten) so that
          you are left with one layer but with the transparency
          intact.


                                                    www.digitalroadtrip.org

Saturday, 19 June 2010
Save as PNG.


                                        www.digitalroadtrip.org

Saturday, 19 June 2010
Drag and drop your logo from the finder to the project.
             Make sure you have the “advanced settings” on in the iMovie
             preferences. A drop down menu will appear. Choose Cutaway.


                                                         www.digitalroadtrip.org

Saturday, 19 June 2010
You can fade the cutaway in. In this example, I’ve reduced the
          the size of logo in Photoshop and placed it bottom left of the
          template before saving as a PNG.


                                                         www.digitalroadtrip.org

Saturday, 19 June 2010
Jagged edges can occur with complex image
          outlines. A small amount of blur can be
          helpful in terms of smoothing the outline.


                                             www.digitalroadtrip.org

Saturday, 19 June 2010
A note about Final Cut Pro/Express


               this kind of work can be extended in FCE/Pro

               whole .PSD files with layers can be imported

               the file appears as a nested track with each layer intact

               each video track can then be animated and effects applied
               offering a whole new way of working with time based
               Photoshop layers.


Saturday, 19 June 2010
julian coultas

                         digitalroadtrip.org

                         +44 7970323255


Saturday, 19 June 2010

Making logos for i movie 09

  • 1.
    Creating logos for iMovie 09 This isn’t an official iMovie function, but it does help leverage existing Photoshop skills in learners for use in video. www.digitalroadtrip.org Saturday, 19 June 2010
  • 2.
    Both Photoshop CSand Elements have a video template under the menu file>new option. But to ensure you have the exact pixel dimensions of your iMovie Project, you can “right click” on a clip to create a freeze frame as a template. www.digitalroadtrip.org Saturday, 19 June 2010
  • 3.
    You can revealthe freeze frame in the finder by ctrl/click or right clicking on the still image. (You can delete the image from the project later). www.digitalroadtrip.org Saturday, 19 June 2010
  • 4.
    Again right clickon the freeze frame in the finder to force it to open in your image editor of choice. www.digitalroadtrip.org Saturday, 19 June 2010
  • 5.
    Just out ofinterest by going to Photoshop’s Image menu you can check the pixel dimensions of the freeze frame taken from iMovie - in this case it is 960x540. www.digitalroadtrip.org Saturday, 19 June 2010
  • 6.
    Select the imageby the Cmd/A short cut. Then use File>New>from clipboard Ensure that “background contents” is set for “transparent.” This will create a new empty document for our logo design. www.digitalroadtrip.org Saturday, 19 June 2010
  • 7.
    Create your designin Photoshop - have fun with layers. Any text layers need to be simplified (elements) rasterised in Photoshop CS. I’ve been restrained here ! www.digitalroadtrip.org Saturday, 19 June 2010
  • 8.
    Merge your layers-it is crucial that your background remains transparent. www.digitalroadtrip.org Saturday, 19 June 2010
  • 9.
    Merge down layers(as opposed to flatten) so that you are left with one layer but with the transparency intact. www.digitalroadtrip.org Saturday, 19 June 2010
  • 10.
    Save as PNG. www.digitalroadtrip.org Saturday, 19 June 2010
  • 11.
    Drag and dropyour logo from the finder to the project. Make sure you have the “advanced settings” on in the iMovie preferences. A drop down menu will appear. Choose Cutaway. www.digitalroadtrip.org Saturday, 19 June 2010
  • 12.
    You can fadethe cutaway in. In this example, I’ve reduced the the size of logo in Photoshop and placed it bottom left of the template before saving as a PNG. www.digitalroadtrip.org Saturday, 19 June 2010
  • 13.
    Jagged edges canoccur with complex image outlines. A small amount of blur can be helpful in terms of smoothing the outline. www.digitalroadtrip.org Saturday, 19 June 2010
  • 14.
    A note aboutFinal Cut Pro/Express this kind of work can be extended in FCE/Pro whole .PSD files with layers can be imported the file appears as a nested track with each layer intact each video track can then be animated and effects applied offering a whole new way of working with time based Photoshop layers. Saturday, 19 June 2010
  • 15.
    julian coultas digitalroadtrip.org +44 7970323255 Saturday, 19 June 2010