SlideShare a Scribd company logo
Instructions	for	Installation	
SL-5410-A Motion Sensor Light Control
Owner’s Manual
Written by
Nathan Mack
Edited by
Terry Anderson
4/1/16	 Heath	Zenith	 	 i
Heath	Zenith	 4/1/16	 	
Table	of	Contents	
	
Product	Description	.................................................................................................................................	1	
Specifications	..............................................................................................................................................	1	
Safety	Hazards	&	Notes	..........................................................................................................................	1	
Included	Parts	............................................................................................................................................	1		
					Required	Tools	...........................................................................................................................................	2	
Preparing	To	Begin	...............................................................................................................................	2-3	
Mounting	.......................................................................................................................................................	3	
Wiring	............................................................................................................................................................	4	
					New	Installations	........................................................................................................................................	4	
				New	&	Existing	Installations	.....................................................................................................................	5	
Adjusting	.......................................................................................................................................................	6	
					Time	Adjusting	............................................................................................................................................	6	
					Light	Adjusting	............................................................................................................................................	6	
Auto	Mode	....................................................................................................................................................	6	
					Manual	Override		........................................................................................................................................	6	
Operation	......................................................................................................................................................	7	
Test	Mode	.....................................................................................................................................................	7	
Troubleshooting	&	Manual	Repair	.................................................................................................	7-8	
	 	
	ii
4/1/16	 Heath	Zenith	 	
Product	Description	
	
The	Heath	Zenith	SL-5410-A	Motion	Sensor	Light	Control	controls	outdoor	lighting	
to	provide	security	and	safety	conveniently	to	your	home	and	garage.	It	does	this	by	
sensing	heat	from	moving	objects.	It	has	the	
capability	of	controlling	500	watts	or	less	of	
lighting.	By	using	built-in	time	adjusting	
photocell,	it	can	be	automatically	switched	on	
or	off	after	so	many	minutes/hours.	For	
clarification,	see	the	image	to	the	right	for	an	
example	and	part	names	of	a	Photocell.	
Specifications	
	
Maximum	Lighting	Load:	500	watts,	incandescent	
Range:	Up	to	50	ft.	
Required	Electrical	Power:	120	V,	60	Hz,	1	Watt	(only	for	Lighting	Control)	
Total	Size:	6	1/4”	X	2	1/2”	X	4.5	
Net	Weight	14	oz.	
Safety	Hazards		
	
Throughout	this	manual,	there	are	many	hazards	to	follow	very	closely	for	your	
personal	safety	and	that	of	the	product’s.	Failure	to	do	so	could	result	in	product	
damage,	personal	harm	like	electrical	shock,	or	even	death.	Included	below	are	the	
types	of	warnings	used	throughout	this	manual.		
	
DANGER:	 Indication	of	possible	serious	injury	or	death.	
CAUTION:	 Possible	minor	injury	or	product	damage	may	occur.	
Note:	 Helpful	user	information,	not	resulting	in	injury/product	damage.	
	
The	main	types	of	hazards	you	may	encounter	during	instillation	are	the	following:		
	
DANGER:	Electric	Shock.	Electric	Shock	can	cause	severe	personal	injury	or	
even	death.	To	avoid	this,	turn	your	power	off	at	the	circuit	breaker	or	
fuse	before	installing.	
DANGER:	Fire	Hazard.	Fire	Hazard	can	cause	severe	personal	injury	and	
property	damage.	Fire	hazards	can	be	caused	by	electrical	shock.	To	
avoid	this,	make	sure	nothing	is	flammable	by	place	of	installation.	
	
	
Example	of	Photocell	
1
Heath	Zenith	 4/1/16	 	
Included	Parts	 	 	 	 	 	
Inside	your	SL-5410-A	package,	you	will	find	several	sets	of	parts	that	are	needed	to	
construct	the	motion	sensor	Light	Control:	
	
1. Lighting	Control		
2. (3)	Three	solder-less	wire	connectors		
3. (2)	Two	lamp	holders		
4. Junction	box	cover		
5. Gasket		
6. Cover	screws		
	
Required	Tools	
	
To	fully	install	your	SL-5410-A,	the	
following	tools	will	also	be	required	
(Not	included	in	the	box).	
	
A. Drill	
B. Phillips©	head	screwdriver	
C. Wire	Stripper	
	
Depending	on	location	of	installation,	
additional	wiring,	wire	connectors,	
junction	boxes,	or	conduit	may	be	
required.		
Preparing	To	Begin	
	
Before	beginning	to	construct	your	SL-5410-A	Motion	Sensor	Light	Control,	make	
sure	to	follow	these	rules/guidelines	to	ensure	your	safety	and	the	product’s	safety:	
	
1) Select	a	location	for	the	Lighting	Control	based	on	the	coverage	angles	shown	in	
Figure	1	(See	Figure	1	to	your	right).	
2) Avoid	aiming	the	Light	Control	at	a	water	
source	water	or	objects	which	may	change	
temperatures	rapidly.	DO	NOT	locate	the	
Light	Control	over	heating	vents	or	air	
conditioners.	DO	NOT	allow	sunlight	to	
							fall	directly	on	the	front	of	the	device.		
Note:	 Local	building	codes	may	require	installation	of	the	Light	Control	be	
preformed	by	a	qualified	electrician.	To	avoid	a	fine,	check	your	local	codes	
as	they	apply	to	your	state.	If	your	house’s	wiring	is	aluminum,	consult	an	
electrician	about	proper	wiring	methods.	
These	are	NOT	the	exact	parts.	Just	examples.	
(Parts	1-3/A-B	are	not	shown	below)	
4.	
	5.	
6.	
Figure	1:	Coverage	Angles	
2	
C.	
	2)
4/1/16	 Heath	Zenith	 	
	
3) To	avoid	nuisance	triggering,	DO	NOT	point	the	Light	Control	at	trees	or	shrubs			
or	where	the	motion	of	pets	may	be	detected.	
4) Avoid	having	either	the	lamps	or	the	Light	Control	pointed	at	nearby	light-		
colored	objects	since	the	reflection	may	trigger	the	daylight	shut	off	feature.		
DO	NOT	point	the	control	lights	or	other	lights	at	the	Light	Control.	
5) The	detector	is	most	sensitive	to	motion	across	its	detection	field	and	least					
sensitive	to	motion	directly	towards	the	
detector,	as	shown	in	Figure	2	(right).	
6) DO	NOT	allow	halogen	lamps	to	shine			
directly	at	the	Lighting	Control	case.	
7) The	sensor	must	be	mounted	as	shown	in		
Figure	3	with	the	controls	facing	downward	
to	avoid	the	risk	of	electrical	shock.	
8) Figure	3	(below)	also	shows	two	typical		
installations.	The	lamps	are	to	be	on	either		
of	the	Light	Control.	DO	NOT	let	the	Control	
touch	the	lamp	holder	or	lamp,	as	damaging	
or	unstable	operation	may	occur.		


DANGER:	 Fire	Hazard.	Fire	hazard	can	cause	property	damage,	personal	injury	or	
even	death.	To	avoid	this,	make	sure	the	light	is	not	directly	pointed	at	
any	heat	vents	or	air	conditioners.	
Note:	
The	Lighting	Control	
requires	120	Volts	AC		
controlled	by	a	switch.	The	
total	power	Switched	MUST	
NOT	exceed	500	watts.	
Figure	3:	Sensor	Mounting	
Figure	2:	Light	Detection	Field	
Installation	Version	#1	
Installation	Version	#2	
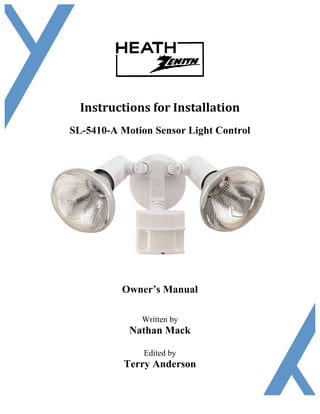
Mounting	
	
The	SL-5410-A	Motion	Sensor	Light	control	is	made	for	mounting	above	a	
front	door	or	a	garage	door.	As	described	in	Preparation	part	7	and	shown	in	
Figure	3	(See	Figure	3	above),	the	mounting	of	your	Light	control	MUST	be	
mounted	one	of	the	two	ways	following:	
	
1. Install	the	preferred	lamp	in	its	designated	holder,	and	put	the	control	
system	(back	end	facing	outward)	in	place	of	the	other	lamp.	
2. Install	both	lamps	in	their	designated	holders,	and	put	the	control	system	
in	the	middle	of	the	two	lamp	holders.	
	
3
Heath	Zenith	 4/1/16	 	
Caution:	 Product	Damage.	Product	damage	can	cause	your	system	to	break.	To	
avoid	this,	make	sure	to	not	let	the	mounting	control	touch	or	rest	on	
the	lamp	holder	or	lamp(s)	after	installation.	
New	Installations		
	
	
Follow	each	step	EXACTLY	for	the	safest	and	most	effective	for	wiring:	
	
1. Route	the	power	wiring	from	a	fused	or	circuit	breaker	power	source	through	to	
a	switch	and,	lastly,	to	your	Lighting	Control	(See	Figure	4	below).	
2. Install	a	fitting	junction	box	at	the	location	of	where	you	decided	to	put	your	
Lighting	Control	(center	or	in	place	of	a	lamp	holder).	
3. If	necessary,	route	a	three	(3)-wired	approved	cable	from	the	light	to	the	
junction	box.		
	
Caution:	 Product	Inactive.	Product	being	inactive,	in	this	particular	case,	
could	result	in	the	SL-5410-A	to	not	turn	on.	To	avoid	this,	all	
three	(3)	wires	MUST	be	suitable	for	carrying	a	current.	If	you	
use	a	metal	box	for	installing,	the	cable	needs	a	grounding	wire.	
	
4. Run	the	power	wires	through	the	gasket	hole.		
	
	
Note:									 If	your	SL-5410-A	Light	Control	has	already	been	installed,	skip	this	
section	and	resume	to	“New	&	Existing	Installations.”	
DANGER:	 Electrical	Shock.	Electrical	Shock	can	lead	to	severe	personal	injury	or	
even	death.	To	avoid	this,	make	sure	the	power	to	your	circuit	breaker	
or	fuse	is	TURNED	OFF	before	proceeding	to	wire.	
Figure	4:	Wiring	Map	
4
4/1/16	 Heath	Zenith	 	
New	&	Existing	Installations	
	
The	following	section	has	many	terms	that	mean	more	than	what	they	appear.	For	
example,	“black”	and	“white	wires”	here	don’t	only	mean	colors.	All	uses	of	these	
terms	in	this	section	are	italicized	and	bolded	for	easy	noticeability.		
Please	read	the	table	of	definitions	below	carefully	before	beginning	wiring:	
	
Type	of	Wire	 Meaning	
	
Grounding	Wire	
This	wire	protects	the	exposed	metal	by	
providing	a	path	of	current	to	the	ground	
below.	This	wire	may	appear	as	bare	
metal	or	may	have	a	green	lining.	
White	Wire	(a.k.a.	Neutral	Wire)	 This	wire	has	zero	(0)	voltage	to	ground.	
Its	protective	covering	is	white.	
Black	Wire	(a.k.a.	Hot	Wire)	 This	wire	has	a	120V	(Volts)	potentially	
going	down	to	ground.	
	
Follow	the	instructions	below	to	successfully	set	up	the	wiring	to	the	SL-5410-A.	
Use	Figure	5	(down,	left	side)	and	Figure	6	(down,	right	side)	for	extra	guidance.	


1. If	used,	connect	the	grounding	wire	from	the	power	source	to	the	bare	ground	
wire	in	the	controlled	circuit.		
2. Now	connect	the	ground	wire	to	the	junction	(outlet)	box	grounding	screw.	
Connect	the	wires	by	tightly	twisting	them	together	and	securing	them	with	
solder-less	wire	connectors	(See	Figure	4	on	last	page).	
3. Connect	the	white	wire	from	the	power	source,	the	white	wire	from	the			
Lighting	Control,	and	the	white	wire	from	each	lamp	holder	(See	Figure	5).	
4. Connect	the	black	wire	from	the	power	source	and	the	black	wire	from	the	
Lighting	Control	together.	
5. Connect	the	red	wire	from	the	Lighting	Control	and	the	black	wire	from	each		
lamp	holder	together.		
Note:	 The	cover	gasket	(Part	5	in	the	package)	is	not	included	in	the	following	
Figure	(Figure	5).	It	is	visible	in	Figure	6.	Also,	make	sure	the	cover	gasket	is	
evenly	adjusted	and	placed	to	all	four	(4)	sides	of	the	cover	before	resuming.	
Figure	5:	Control	Wiring	
Figure	6:	Insides	Diagram	
4	
5
Heath	Zenith	 4/1/16	 	
ADJUSTING	
	
The	following	two	(2)	sections	will	show	you	how	to	make	automatic	adjustments	to	
your	Light	Control.	This	will	allow	you	to	adjust	how	long	your	light	stays	on	after	
motion	is	detected,	and	you	will	learn	how	to	get	the	light(s)	to	turn	on/off	
throughout	the	day.		
Time	Adjustment	
	
The	Time	adjustment	controls	how	long	the	light	stays	on	after	motion	has	been	
detected.		
	
1. Turn	the	Time	Control	to	mid-position.	Pay	attention	to	how	long	it	takes	for	
the	lighting	to	turn	off	after	motion	has	frozen	or	left	the	light’s	detection	
radius.	
2. Adjust	the	control	clockwise	to	increase	the	turn-off	time,	and	counter-
clockwise	to	decrease	the	turn-off	time.		
	
Light	Adjustment	
	
The	Light	adjustment	determines	when	the	light	level	on	the	Light	Control	will	shut	
off	when	in	Auto	Mode	(See	next	step).	The	Light	Level	Control	was	set	counter-
clockwise	(TEST	position)	in	production	so	it	can	operate	in	daylight.		
To	fix	this,	do	the	following:		
	
1. At	dawn,	turn	the	Light	Level	Control	clockwise.	
2. At	dusk,	SLOWLY	turn	the	Light	Level	Control	counter-clockwise	again.		
	
That’s	it!	Now	the	Light	Control	will	only	be	active	from	dusk	to	dawn.	
Auto	Mode	
	
In	Auto	Mode,	the	Light	Control	detects	motion	and	turns	on	the	lighting	
automatically	for	a	set	time	limit.	Auto	Mode	is	activated	when	power	to	the	light	
has	been	turned	off	for	more	than	five	(5)	seconds	and	then	turned	back	on.	


Note:	 When	increasing	the	turn-off	time,	it	can	only	be	increased	by	seven	(7)	
minutes	maximum;	decreasing	turn-off	time	can	only	be	adjusted	by	ten	(10)	
minutes	maximum.	
6
4/1/16	 Heath	Zenith	 	
Manual	Override	
	
Manual	Override	keeps	the	light	on	regardless	of	motion	or	light	level.	To	do	this,	
simply	flip	the	switch	on	an	off	within	one	(1)	second	while	you’re	in	Auto	Mode.	
Operation	
	
By	using	the	wall	switch	to	your	Lighting	Control,	you	can	pick	one	of	two	operating	
modes	for	the	motion	sensor	lamps.	Those	two	modes	are	Auto	and	Manual.	
Test	Mode	
	
Test	mode	will	allow	you	to	test	the	coverage	radius	of	the	your	motion	sensor	light.	
To	begin,	follow	these	steps:	
	
1. Turn	the	Light	and	Time	Controls	completely	counter-clockwise	to	the	Test	
Position	(See	Figure	7	to	the	right).	
2. Turn	the	wall	switch	on.	The	
lighting	will	turn	on	for	about	one	
(1)	minute	then	off	again.	This	
shows	the	wiring	was	done	
properly	and	that	the	lamps	work.	
3. Walk	through	the	coverage	area.	
The	light	will	turn	on	when	motion	
is	sensed	and	will	turn	off	shortly	
after	motion	stops.	Wait	ten	(10)	
seconds	between	test	motions.	
• You	can	change	the	light’s	coverage	area	by	adjusting	the	ball	joint.		
Troubleshooting	&	Manual	Repair		
	
Problem	 Probable	Cause	
Lights	wont	come	on	 • Light	switch	is	turned	off	
• Flood	light	is	loose	or	burned	out	
• Fuse	is	blown	
• Circuit	is	turned	off	
• Daylight	turn-off	is	on	(Refer	to	“Time	Adjustment”)	
• If	it’s	a	new	installation,	wiring	could	be	incorrect	
• Re-aim	the	motion	sensor	ball	joint	where	desired	
Lights	come	on	during	
the	day	
• Light	Control	may	be	installed	in	a	dark	location.	
• Light	Control	is	in	Test	Mode.	
Figure	7:	Light,	Time	Controls	
6	
7	
LIGHT	
(Daylight	
shut-off)
Heath	Zenith	 4/1/16	 	
	
For	technical	assistance	on	the	SL-5410-A,	call	616-982-3496	during	the	week	
between	8:00	a.m.	to	4:30	p.m.,	Eastern	Standard	Time.	


Lights	come	on	for	no	
reason	
• Light	Control	may	be	sensing	small	animals	or	
automobile	traffic.	Try	re-aiming	sensor.	
• Sensitivity	is	set	too	high.	Try	reducing	sensitivity.	
• Your	device	is	haunted.	Call	a	priest.	
Lights	stay	on	
continuously	
• A	flood	lamp	is	positioned	too	close	to	sensor	or	
pointed	at	nearby	objects	that	cause	heat	to	trigger	
sensor.	Try	repositioning	the	lamp	away	from	the	
sensor	or	nearby	objects.	
• Light	Control	is	pointed	toward	a	heat	source	like	an	
air	vent,	dryer	vent,	or	brightly	painted	heat-	
reflective	service.	Try	repositioning	the	sensor.	
• Light	Control	is	in	Manual	Mode.	Switch	it	to	Auto.	
Lights	flash	on	and	off	 • Heat	or	light	from	lamps	may	be	turning	light	
control	on	and	off.	Try	repositioning	the	lamps	away	
from	the	sensor.	
• Light	Control	is	in	Test	mode	and	is	warming	up.		
(Note:	Flashing	is	normal	under	these	conditions).	
• Light	may	be	leaking	through	flood-lamp	reflectors.	
8
4/1/16	 Heath	Zenith	 	
	
The	Heath	Company	reserves	the	right	to	discontinue	products	and	to	change	
specifications	any	time	without	incurring	any	obligation	to	incorporate	new	features	
in	products	previously	sold.	


HEATH	COMPANY	LLC	
BENTON	HARBOR,	MI	49022	
595-4026-1	
	
Copyright	©	1995	
Heath	Company	
All	rights	reserved	
Printed	in	Taiwan

More Related Content

Viewers also liked

Legal but not necessarily available - abortion services at state hospitals in...
Legal but not necessarily available - abortion services at state hospitals in...Legal but not necessarily available - abortion services at state hospitals in...
Legal but not necessarily available - abortion services at state hospitals in...Bahar Aldanmaz
 
Teletrabajo
TeletrabajoTeletrabajo
Teletrabajo
lobito65
 
Førstehjelp A-B-C tiltak
Førstehjelp A-B-C tiltakFørstehjelp A-B-C tiltak
Førstehjelp A-B-C tiltak
Trine Nyhus Kleiv
 

Viewers also liked (6)

Legal but not necessarily available - abortion services at state hospitals in...
Legal but not necessarily available - abortion services at state hospitals in...Legal but not necessarily available - abortion services at state hospitals in...
Legal but not necessarily available - abortion services at state hospitals in...
 
Teletrabajo
TeletrabajoTeletrabajo
Teletrabajo
 
Førstehjelp A-B-C tiltak
Førstehjelp A-B-C tiltakFørstehjelp A-B-C tiltak
Førstehjelp A-B-C tiltak
 
Bachelor English
Bachelor EnglishBachelor English
Bachelor English
 
LLB Degree Certificates
LLB Degree CertificatesLLB Degree Certificates
LLB Degree Certificates
 
chhabi c.v
chhabi c.vchhabi c.v
chhabi c.v
 

Similar to MackPTWAsgn6

Gas turbine flow meter
Gas turbine flow meterGas turbine flow meter
Amcrest HDCVI DVR User Manual
Amcrest HDCVI DVR User Manual Amcrest HDCVI DVR User Manual
Amcrest HDCVI DVR User Manual
Amcrest Security
 
(Sm) aq07 tsbnser eng
(Sm) aq07 tsbnser eng(Sm) aq07 tsbnser eng
(Sm) aq07 tsbnser eng
islamrabie5
 
Ap650 installation guide_72_e-131207-01_revd
Ap650 installation guide_72_e-131207-01_revdAp650 installation guide_72_e-131207-01_revd
Ap650 installation guide_72_e-131207-01_revdAdvantec Distribution
 
Ap650 installation guide_72_e-131207-01_revd
Ap650 installation guide_72_e-131207-01_revdAp650 installation guide_72_e-131207-01_revd
Ap650 installation guide_72_e-131207-01_revdAdvantec Distribution
 
Motorola ap650 access point installation guide (part no. 72 e 131207-01 rev. d )
Motorola ap650 access point installation guide (part no. 72 e 131207-01 rev. d )Motorola ap650 access point installation guide (part no. 72 e 131207-01 rev. d )
Motorola ap650 access point installation guide (part no. 72 e 131207-01 rev. d )Advantec Distribution
 
Pandora FMS: ePolicy Orchestrator
Pandora FMS: ePolicy Orchestrator Pandora FMS: ePolicy Orchestrator
Pandora FMS: ePolicy Orchestrator
Pandora FMS
 
Pandora FMS: IIS Enterprise Plugin
Pandora FMS: IIS Enterprise PluginPandora FMS: IIS Enterprise Plugin
Pandora FMS: IIS Enterprise Plugin
Pandora FMS
 
Pandora FMS: Apache Tomcat Enterprise Plugin
Pandora FMS: Apache Tomcat Enterprise PluginPandora FMS: Apache Tomcat Enterprise Plugin
Pandora FMS: Apache Tomcat Enterprise Plugin
Pandora FMS
 
Liquid turbine flow meter
Liquid turbine flow meterLiquid turbine flow meter
Manual ZTE ZXMW NR8250.pdf
Manual ZTE ZXMW NR8250.pdfManual ZTE ZXMW NR8250.pdf
Manual ZTE ZXMW NR8250.pdf
PedroRMejias
 
AH01152010_IOM BX Series_Short.pdf
AH01152010_IOM BX Series_Short.pdfAH01152010_IOM BX Series_Short.pdf
AH01152010_IOM BX Series_Short.pdf
Setyohadi Nugroho
 
Current sensor 05A
Current sensor 05ACurrent sensor 05A
Current sensor 05A
Raghav Shetty
 
White lcd serials user manual v3.1
White lcd serials user manual v3.1White lcd serials user manual v3.1
White lcd serials user manual v3.1
Manuel Llerenas
 

Similar to MackPTWAsgn6 (20)

Gas turbine flow meter
Gas turbine flow meterGas turbine flow meter
Gas turbine flow meter
 
Amcrest HDCVI DVR User Manual
Amcrest HDCVI DVR User Manual Amcrest HDCVI DVR User Manual
Amcrest HDCVI DVR User Manual
 
(Sm) aq07 tsbnser eng
(Sm) aq07 tsbnser eng(Sm) aq07 tsbnser eng
(Sm) aq07 tsbnser eng
 
Ap650 installation guide_72_e-131207-01_revd
Ap650 installation guide_72_e-131207-01_revdAp650 installation guide_72_e-131207-01_revd
Ap650 installation guide_72_e-131207-01_revd
 
Ap650 installation guide_72_e-131207-01_revd
Ap650 installation guide_72_e-131207-01_revdAp650 installation guide_72_e-131207-01_revd
Ap650 installation guide_72_e-131207-01_revd
 
Motorola ap650 access point installation guide (part no. 72 e 131207-01 rev. d )
Motorola ap650 access point installation guide (part no. 72 e 131207-01 rev. d )Motorola ap650 access point installation guide (part no. 72 e 131207-01 rev. d )
Motorola ap650 access point installation guide (part no. 72 e 131207-01 rev. d )
 
Pandora FMS: ePolicy Orchestrator
Pandora FMS: ePolicy Orchestrator Pandora FMS: ePolicy Orchestrator
Pandora FMS: ePolicy Orchestrator
 
Pandora FMS: IIS Enterprise Plugin
Pandora FMS: IIS Enterprise PluginPandora FMS: IIS Enterprise Plugin
Pandora FMS: IIS Enterprise Plugin
 
Gas turbine flow meter
Gas turbine flow meterGas turbine flow meter
Gas turbine flow meter
 
Gas turbine flow meter
Gas turbine flow meterGas turbine flow meter
Gas turbine flow meter
 
Pandora FMS: Apache Tomcat Enterprise Plugin
Pandora FMS: Apache Tomcat Enterprise PluginPandora FMS: Apache Tomcat Enterprise Plugin
Pandora FMS: Apache Tomcat Enterprise Plugin
 
Liquid turbine flow meter
Liquid turbine flow meterLiquid turbine flow meter
Liquid turbine flow meter
 
Liquid turbine flow meter
Liquid turbine flow meterLiquid turbine flow meter
Liquid turbine flow meter
 
Opd scan
Opd scanOpd scan
Opd scan
 
Opd scan
Opd scanOpd scan
Opd scan
 
Opd scan
Opd scanOpd scan
Opd scan
 
Manual ZTE ZXMW NR8250.pdf
Manual ZTE ZXMW NR8250.pdfManual ZTE ZXMW NR8250.pdf
Manual ZTE ZXMW NR8250.pdf
 
AH01152010_IOM BX Series_Short.pdf
AH01152010_IOM BX Series_Short.pdfAH01152010_IOM BX Series_Short.pdf
AH01152010_IOM BX Series_Short.pdf
 
Current sensor 05A
Current sensor 05ACurrent sensor 05A
Current sensor 05A
 
White lcd serials user manual v3.1
White lcd serials user manual v3.1White lcd serials user manual v3.1
White lcd serials user manual v3.1
 

MackPTWAsgn6