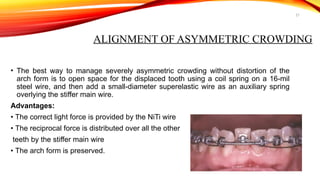
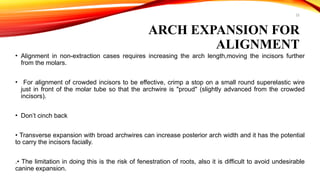
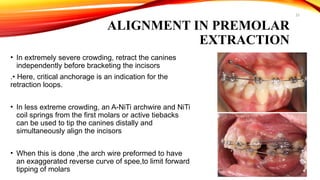
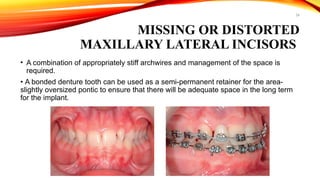
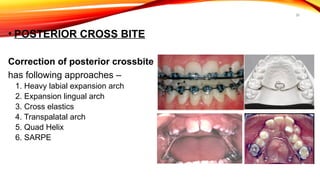
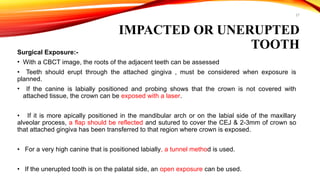
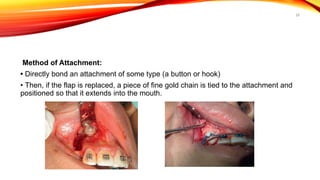
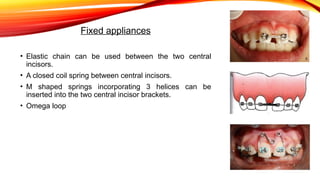
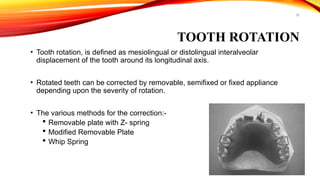
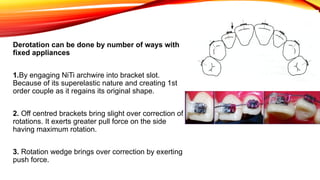
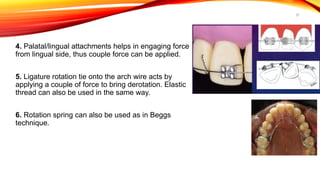
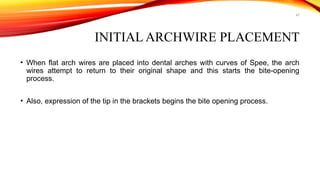
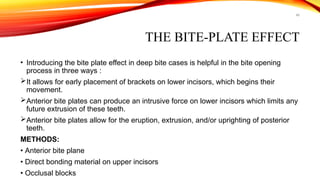
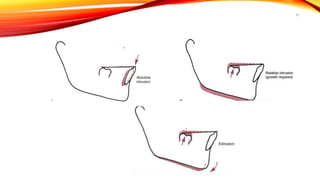
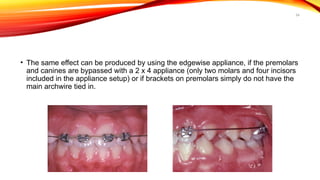
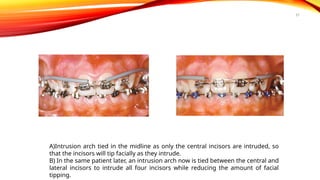
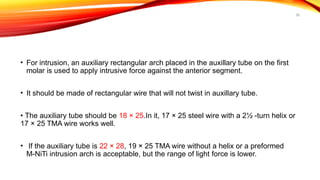
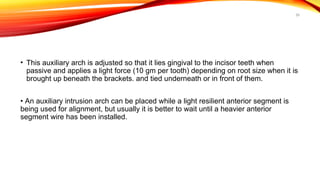
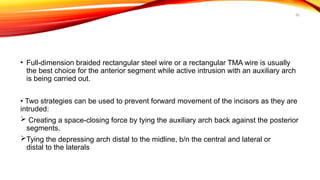
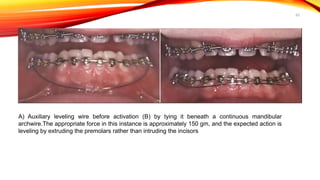
LEVELING AND
ALIGNMENT IN PEA
DR. ANZA SALIM
FIRST YEAR POST GRADUATE
1
2
CONTENTS
1. INTRODUCTION
2. ALIGNMENT
3. LEVELING
4. ANCHORAGE CONTROL DURING LEVELLING AND ALIGNING
5. CONCLUSION
6. REFRENCES
3
All the mechanics to be accomplished in our orthodontic treatments with the
SWA can be divided into three stages:
 Leveling And Alignment
 Working Stage
 Finishing Stage
The purpose of this initial phase of treatment in the PEA is to
• Bring the teeth into alignment.
• Correct vertical discrepancies (like deep overbite and open bite by levelling
out the arches)
INTRODUCTION
4
DEFINITION
McLaughlin, Bennet, Trevisi (MBT) in their book Systemized
Orthodontic Treatment defined tooth Leveling and Aligning as –
“The tooth movements needed to achieve passive engagement of a steel
rectangular wire of 0.019/0.025 dimension and of suitable arch form, into a
correctly placed preadjusted 0.022 bracket system.”
5
OBJECTIVES
Short term objectives (Proffit)
In the initial months of treatment, the objective is to achieve proper
aligning and leveling by passive engagement of a rectangular wire.
Long term objectives
Towards the end of treatment, the objective is to achieve an ideal
dentition, displaying six keys of normal occlusion, and the dentition
properly positioned within the facial profile.
6
GOALS
1. Bring the teeth into alignment.
2. Control the anteroposterior position of incisors.
3. Control width and form of the dental arches.
4. Correct vertical discrepancies by leveling out the arches.
7
ALIGNMENT
• In nearly every patient with malaligned teeth, the root apices are closer to the
normal position than the crowns because malalignment almost always develops as
the eruption paths of teeth are deflected.
• Bringing teeth into alignment requires a combination of labiolingual and mesiodistal
tipping guided by an archwire, but usually not root movement.
8
PRINCIPLES IN THE CHOICE OF
ALIGNMENT ARCHES
Force:
• Initial archwires for alignment should provide light, continuous force of approximately
50 gm to produce the most efficient tipping tooth movement. Heavy force, should be
avoided.
Arch form:
• The light resilient archwires used in the first stage of treatment need not be shaped
to the patient's arch form as carefully as the heavier archwires used later in treatment,
but from the beginning, the archwires should reflect each individual's arch form.
• If preformed archwires are used for alignment, the appropriate large, medium, or
small arch form should be selected.
9
PROPERTIES
• The wires for initial alignment require a combination of excellent strength, excellent
springiness, and a long range of action.
• Ideally, there would be an almost flat load-deflection
curve, with the wire delivering about 50 gm at almost
any degree of deflection.
• At this point, superelastic A-NiTi wires are so much
More effective and efficient for alignment than any
other alternatives.
10
1. ARCHWIRE MATERIALS
• The flat load-deflection curve of superelastic NiTi makes it ideal for initial alignment and it
can be accomplished simply by tying 14 or 16-mil A-NiTi.
• The wire provides remarkable range over which a tooth can be moved without generating
excessive force.
• If a large range is not necessary, a triple-strand 17.5-mil multistrand steel wire (3 x 8 mil)
can be used.
• If recontoured monthly and retied, the time to alignment is equivalent to that with A-NiTi.
11
• Other possibilities:
(1) Elastic M-NiTi,
(2) A variety multistrand wires (eg: coaxial wires)
(3) Loops in small-diameter steel wires
• These wires, although they were the standard of treatment for initial alignment not
lond ago,have little or no place in current therapy.
12
The tendency of the wires to "travel" around the arch can be prevented by:
• crimping a stop onto the archwire b/n any two
brackets that are close together
• using a wire with a midline dimple
13
2. SIZE OF ARCHWIRE
• For mesiodistal sliding, at least 2 mil of clearance b/n the archwire and the bracket is
needed, 4 mil desirable, and more than that provides no advantage.
• The largest initial archwire that should be used with an 18-slot bracket is 16 mil, and 14
mil would be more satisfactory.
• With 22-slot bracket, a 16 or 18 mil archwire would be satisfactory.
• For the superelastic A-NiTi wires, the manufactures preparation of the material
determines the clinical performance.
• For all other wires, wire size is an important criteria.
14
Effects of doubling the diameter
:• Strength ∝ → Increases by 8 times
• Springiness ∝1/ → Decreases by 16 times
• Range ∝ 1/d → Decreases by ½
• For initial alignment, the smallest diameter wire that has adequate strength would be
preferred.
• When multiple strands of the same diameter wires are used, strength is added while
springiness is relatively unaffected.
15
3.SHAPE OF THE ARCH WIRE
• A tightly fitting resilient rectangular archwire is undesirable because:
 Resistance to sliding.
 produces back-and-forth movement of the root apices as the teeth move.
 making the aligning slower and more root resorption.
• For that reason, round wires for alignment are preferred.
16
4. INTERBRACKET DISTANCE
• Effects of doubling the length:
• Strength ∝ 1/L Decreases by ½
• Springiness ∝ Increases by 8 times
• Range ∝ Increases by 4 times.
• The wider the individual brackets the smaller the inter bracket span.The smaller inter
bracket span the lesser is the springiness and range of action.
• A powerful means of gaining increased springiness and range of action without
sacrificing too much strength is to bend a loop into archwire b/n two teeth
17
NARROW BRACKETS
INTER BRACKET SPAN INCREASES
INCREASE IN THE LENGTH OF THE
WIRE
INCREASED FLEXIBILITY
DECREASED FORCES
18
CLINICAL CONSIDERATIONS IN ALIGNING
19
ALIGNMENT IN CROWDING
• Crowding is a common kind of malocclusion.
• It can be
• Symmetric crowding
• Asymmetric crowding
• Superelastic NiTi wire is an ideal choice for initial alignment as it has flat load
deflection rate.
• It has good range of action so does not generate excessive force.
20
SYMMETRIC CROWDING
• Crowded arch alignment requires opening
space.
• Two ways to open the space –
1. When additional arch length is required, stops
are useful in front of molar tube so that archwire
is proud (slightly advanced from crowded
incisors). Stops on the archwire should hold it to
slightly in advance position.
2. Use of compressed coil spring to open space
for crowded incisors
• Open coil springs should not be used until 0.018
or0.020 round wires are in place..
21
ALIGNMENT OF ASYMMETRIC CROWDING
• The best way to manage severely asymmetric crowding without distortion of the
arch form is to open space for the displaced tooth using a coil spring on a 16-mil
steel wire, and then add a small-diameter superelastic wire as an auxiliary spring
overlying the stiffer main wire.
Advantages:
• The correct light force is provided by the NiTi wire
• The reciprocal force is distributed over all the other
teeth by the stiffer main wire
• The arch form is preserved.
22
ARCH EXPANSION FOR
ALIGNMENT
• Alignment in non-extraction cases requires increasing the arch length,moving the incisors further
from the molars.
• For alignment of crowded incisors to be effective, crimp a stop on a small round superelastic wire
just in front of the molar tube so that the archwire is "proud" (slightly advanced from the crowded
incisors).
• Don’t cinch back
• Transverse expansion with broad archwires can increase posterior arch width and it has the potential
to carry the incisors facially.
.• The limitation in doing this is the risk of fenestration of roots, also it is difficult to avoid undesirable
canine expansion.
23
ALIGNMENT IN PREMOLAR
EXTRACTION
• In extremely severe crowding, retract the canines
independently before bracketing the incisors
.• Here, critical anchorage is an indication for the
retraction loops.
• In less extreme crowding, an A-NiTi archwire and NiTi
coil springs from the first molars or active tiebacks
can be used to tip the canines distally and
simultaneously align the incisors
• When this is done ,the arch wire preformed to have
an exaggerated reverse curve of spee,to limit forward
tipping of molars
24
MISSING OR DISTORTED
MAXILLARY LATERAL INCISORS
• A combination of appropriately stiff archwires and management of the space is
required.
• A bonded denture tooth can be used as a semi-permanent retainer for the area-
slightly oversized pontic to ensure that there will be adequate space in the long term
for the implant.
25
CROSSBITE CORRECTION
Individual Teeth Displaced into Anterior Crossbite:
• Anterior crossbite of one or two teeth almost always is an expression of severe crowding.
• Its correction requires first opening enough space, then bringing the displaced tooth or
teeth across the occlusion into proper position.
• To avoid occlusal interferences, bite blocks may be used temporarily. (usually on lower
1st molars)
• During rapid growth in early adolescence, opening the bite may not be required.
26
• POSTERIOR CROSS BITE
Correction of posterior crossbite
has following approaches –
1. Heavy labial expansion arch
2. Expansion lingual arch
3. Cross elastics
4. Transpalatal arch
5. Quad Helix
6. SARPE
27
IMPACTED OR UNERUPTED
TOOTH
Surgical Exposure:-
• With a CBCT image, the roots of the adjacent teeth can be assessed
• Teeth should erupt through the attached gingiva , must be considered when exposure is
planned.
• If the canine is labially positioned and probing shows that the crown is not covered with
attached tissue, the crown can be exposed with a laser.
• If it is more apically positioned in the mandibular arch or on the labial side of the maxillary
alveolar process, a flap should be reflected and sutured to cover the CEJ & 2-3mm of crown so
that attached gingiva has been transferred to that region where crown is exposed.
• For a very high canine that is positioned labially, a tunnel method is used.
• If the unerupted tooth is on the palatal side, an open exposure can be used.
28
Method of Attachment:
• Directly bond an attachment of some type (a button or hook)
• Then, if the flap is replaced, a piece of fine gold chain is tied to the attachment and
positioned so that it extends into the mouth.
29
• Mechanical Approaches for Aligning:-
• Ideally, a fixed appliance should already be in place before exposing, with a heavy
stabilizing archwire in position (at least18-mil round steel, preferably a rectangular
steel), so that the force can be applied immediately.
• The numerous alternatives include
Special alignment spring either soldered to a heavy base archwire or bent into a
light archwire.
Cantilever spring from the auxiliary tube.
30
Ankylosis of an unerupted tooth:-
• Displacement of the anchor teeth will occur.
• Occasionally an unerupted tooth will start to move and then will become
ankylosed,apparently held by a small area of fusion.
• It can can sometimes be freed if the area is anesthetized and the tooth lightly
luxated, breaking the area of ankylosis.
• To prevent re-ankyloses, apply orthodontic force immediately after the luxation.
31
UNERUPTED OR IMPACTED LOWER
SECOND MOLARS
• When second molar is not severely tipped, place a separator b/n the two teeth.
• For more severe problems, an attachment must be bonded to the second molar. An
auxiliary spring can be useful to bring both upper and lower second molars into
alignment.
• The easiest way is to use a segment of 16 × 22 M-NiTi wire from the auxiliary tube
on the 1st molar to the tube on the second molar; while a heavier and rigid wire
remains in place anteriorly.
• Another possibility in adolescents is surgical
uprighting of 2nd molar, when 3rd molar is extracted.
32
MIDLINE DIASTEMA
• Etiologic factors like supernumerary tooth (mesiodens), cyst, tumour if any is
removed.
• Habits like tongue thrusting and digit sucking are intercepted using habit
breaking appliance like cribs, spurs, etc.
• The major cause of midline diastema is due to the presence of thick, fibrous,
papillary or papillary penetrating labial frenum.
It usually requires surgical removal.
33
• It is better to align the teeth before frenectomy.
.• If the frenum is removed first, scar tissue forms as
healing progresses and the space closure becomes more
difficult
.• If the space is large and the frenal attachment is thick,
the space should be closed at least partially, and
immediately after frenectomy, orthodontic movement
should be resumed.
Removable appliances
• Hawley’s appliance incorporating 2 finger springs distal
to central incisor.
• Labial bows (split labial bows)
34
Fixed appliances
• Elastic chain can be used between the two central
incisors.
• A closed coil spring between central incisors.
• M shaped springs incorporating 3 helices can be
inserted into the two central incisor brackets.
• Omega loop
35
TOOTH ROTATION
• Tooth rotation, is defined as mesiolingual or distolingual interalveolar
displacement of the tooth around its longitudinal axis.
• Rotated teeth can be corrected by removable, semifixed or fixed appliance
depending upon the severity of rotation.
• The various methods for the correction:-
 Removable plate with Z- spring
 Modified Removable Plate
 Whip Spring
36
Derotation can be done by number of ways with
fixed appliances
1.By engaging NiTi archwire into bracket slot.
Because of its superelastic nature and creating 1st
order couple as it regains its original shape.
2. Off centred brackets bring slight over correction of
rotations. It exerts greater pull force on the side
having maximum rotation.
3. Rotation wedge brings over correction by exerting
push force.
37
4. Palatal/lingual attachments helps in engaging force
from lingual side, thus couple force can be applied.
5. Ligature rotation tie onto the arch wire acts by
applying a couple of force to bring derotation. Elastic
thread can also be used in the same way.
6. Rotation spring can also be used as in Beggs
technique.
38
TIPPED TEETH
• A tipped mandibular molar is a frequent situation among orthodontic patients, which
usually occurs after premature loss of adjacent teeth leading to the inclination of the
molars.
• In excessive inclination, overeruption of the antagonist molar, premature contacts, and
occlusal interferences impede prosthetic restoration.
• Several orthodontic approaches are suggested for mandibular molar uprighting, such
as Australian uprighting spring, cantilever spring, prefabricated Sander spring, helical
uprighting spring, NiTi coil spring, push spring appliance are few of the currently
available options
39
METHODS
1. The auxiliary uprighting helix wire
2. Loops
3. Compressed coil spring
4. Reversed loop
5. Lingual auxillaries
40
LEVELING
Leveling is the process in which the incisal edges of the anterior teeth and
the buccal cusps of the posterior teeth are placed on the same horizontal
level.
41
DEEP OVERBITE
Deep overbite can be divided into two types.
1. True deep bite:-
which is mostly due to the infra eruption of posterior teeth.
2. Pseudo deep bite:-
Is due to the supra eruption of anterior teeth.
42
The correction of deep overbite involves :
• Eruption / extrusion of posterior teeth.
• Distal tipping of posterior teeth
• Proclination of incisors
• Intrusion of incisors
• A combination of two or more of the above tooth movements
43
EXTRUSION OF POSTERIOR TEETH
• Extrusion of posterior teeth is commonly indicated in patients with decreased lower
anterior face height.
• It is also indicated in true deep bite cases.
• If the incisal edges of the maxillary anterior teeth are positioned above the inferior
margin of upper lip
• Growing individuals
• Horizontal growth pattern
44
PROCLINATION OF INCISORS
• Numerous deep bite cases present with retroclinated incisors.
• Proclination of incisors is indicated when there is an increased nasolabial angle and
retruded lip.
• So soft tissue should be evaluated before proclinating the incisors.
45
TRUE INTRUSION OF UPPER AND LOWER ANTERIORS
• Bite opening by true intrusion although can be used in both grown and growing individuals, it is effective in
growing individuals.
• True intrusion of incisors is indicated
In pseudo deep bite where the incisors are supra erupted.
Increased lower anterior facial height
Excessive gingival display during smiling or speech
• Methods:--
Utility arches.
Burstone Intrusion arches.
Three piece intrusive arch
46
NON EXTRACTION TREATMENT
• Non-extraction treatment generally favors bite opening.
• This is because distal tipping of posterior teeth and proclination of incisors normally
occurs in these cases.
• There are a number of mechanical factors that lead to arch leveling and control of
the deep overbite.
47
INITIAL ARCHWIRE PLACEMENT
• When flat arch wires are placed into dental arches with curves of Spee, the arch
wires attempt to return to their original shape and this starts the bite-opening
process.
• Also, expression of the tip in the brackets begins the bite opening process.
48
THE BITE-PLATE EFFECT
• Introducing the bite plate effect in deep bite cases is helpful in the bite opening
process in three ways :
It allows for early placement of brackets on lower incisors, which begins their
movement.
Anterior bite plates can produce an intrusive force on lower incisors which limits any
future extrusion of these teeth.
Anterior bite plates allow for the eruption, extrusion, and/or uprighting of posterior
teeth.
METHODS:
• Anterior bite plane
• Direct bonding material on upper incisors
• Occlusal blocks
49
BITE OPENING EFFECT
• In the great majority of cases after rectangular stainless steel wires have been in
place for 6 weeks, the arches are normally level and adequate bite opening has
been achieved. If this is not so, then bite opening curves can be placed into the
rectangular steel wires
50
There are three possible ways to level a lower arch with an excessive curve of Spee
:(A) Absolute intrusion
(B) Relative intrusion
achieved by preventing eruption of the incisors while growth provides vertical
space into which the posterior teeth erupt
(C) Extrusion of posterior teeth
which causes the mandible to rotate down and back in the absence of growth.
As a general rule, relative intrusion is quite acceptable for adolescents; absolute
intrusion is used for the most part in patients who are too old for relative
intrusion to succeed.
EXCESSIVE CURVE OF SPEE
51
52
LEVELING BY INTRUSION
• The key to successful intrusion is 'light continuous force directed toward the tooth
apex.
• Can be accomplished in three ways:
(1) With continuous archwires that bypass the premolar (and frequently the canine)
teeth
(2) With segmented archwires and an auxiliary depressing arch
(3) With aligners that have attachments on the posterior teeth.
53
BYPASS ARCH WIRES
• Most useful for patients who will have a lot of vertical growth either the mixed or
early permanent dentition period.
• Three different mechanical arrangements are commonly used, each based on the
same mechanical principle: uprighting and distal tipping of the molars, pitted against
intrusion of the incisors.
• A classic version of this approach to leveling was seen in the first stage of the
BeggS technique in which the premolar teeth were bypassed and only a loose tie was
made to the canine.
54
• The same effect can be produced by using the edgewise appliance, if the premolars
and canines are bypassed with a 2 x 4 appliance (only two molars and four incisors
included in the appliance setup) or if brackets on premolars simply do not have the
main archwire tied in.
55
• A more flexible variation of the same idea was developed as Ricketts utility arch:
• Formed from rectangular wire; can be placed into the brackets with slight labial root
torque to control the inclination of the incisors as they move labially while intruding.
• Utility arches for intrusion largely replaced by the segmented arch approach
• Successful use of any type of bypass arch for leveling requires keeping the forces
light, accomplished by selecting a small-diameter archwire, and by using a long span
ie. b/n the 1st molars and the incisors.
56
SEGMENTED ARCHWIRES FOR
INTRUSION
• This approach is recommended for maximum control of the anterior and posterior
segments.
• This technique requires auxillary rectangular tubes on first molars in addition to the
regular bracket or tube.
• After preliminary alignment, a full-dimension rectangular archwire is placed in the bracket
slots of teeth in the buccal segment connecting them into a solid unit.
• In addition, a heavy lingual arch (36-mil round or 32 × 32 rectangular steel wire) is used
to connect right and left posterior segments,further stabilizing them.
57
A)Intrusion arch tied in the midline as only the central incisors are intruded, so
that the incisors will tip facially as they intrude.
B) In the same patient later, an intrusion arch now is tied between the central and
lateral incisors to intrude all four incisors while reducing the amount of facial
tipping.
58
• For intrusion, an auxiliary rectangular arch placed in the auxillary tube on the first
molar is used to apply intrusive force against the anterior segment.
• It should be made of rectangular wire that will not twist in auxillary tube.
• The auxiliary tube should be 18 × 25.In it, 17 × 25 steel wire with a 2½ -turn helix or
17 × 25 TMA wire works well.
• If the auxiliary tube is 22 × 28, 19 × 25 TMA wire without a helix or a preformed
M-NiTi intrusion arch is acceptable, but the range of light force is lower.
59
• This auxiliary arch is adjusted so that it lies gingival to the incisor teeth when
passive and applies a light force (10 gm per tooth) depending on root size when it is
brought up beneath the brackets. and tied underneath or in front of them.
• An auxiliary intrusion arch can be placed while a light resilient anterior segment is
being used for alignment, but usually it is better to wait until a heavier anterior
segment wire has been installed.
60
• Full-dimension braided rectangular steel wire or a rectangular TMA wire is usually
the best choice for the anterior segment while active intrusion with an auxiliary arch
is being carried out.
• Two strategies can be used to prevent forward movement of the incisors as they are
intruded:
 Creating a space-closing force by tying the auxiliary arch back against the posterior
segments.
Tying the depressing arch distal to the midline, b/n the central and lateral or
distal to the laterals
61
LEVELING BY EXTRUSION
• Can be accomplished with continuous archwires by placing an exaggerated curve of
Spee in the upper archwire and a reverse curve in the lower archwire.
• With both the 18- and 22-slot appliances, when preliminary alignment is completed, a
second wire 16-mil steel, will be sufficient to complete the leveling.
• A possible alternative is a 16-mil "potato chip" A-NiTi wire, preformed by the
manufacturer with an extremely exaggerated curve.
• The extreme curve needed to generate enough force can lead to problems if patients
miss appointments (i.e., the wire does not failsafe)
62
• In patients those who have little if any growth remaining, an archwire heavier than
16-mil steel is needed to complete the leveling.
• With 22-slot appliance, 18-mil archwire is used.
• With 18-slot, leave the 16-mil wire in place and add an auxiliary leveling arch of 17 ×
25 mil TMA or steel, tied anteriorly beneath the base arch.
63
A) Auxiliary leveling wire before activation (B) by tying it beneath a continuous mandibular
archwire.The appropriate force in this instance is approximately 150 gm, and the expected action is
leveling by extruding the premolars rather than intruding the incisors
64
• Although the auxiliary leveling arch looks like an intrusion arch, it differs in two
important ways:
The presence of a continuous base arch
The higher amount of force.
• Leveling will occur almost totally by extrusion as long as a continuous rather than
segmented wire is in the bracket slots, and segmenting the arch makes
intrusion possible.
65
CONCLUSION
• Successful tooth alignment depends on recognizing that unwanted tooth
movements can occur early in treatment, mainly owing to the tip built into the
preadjusted brackets.
• These unwanted tooth movements need to be controlled, or the underlying
malocclusion will worsen during tooth alignment which will increase the time and effort
needed to complete the case.
66
REFRENCES
• Contemporary orthodontics- william.R.Protfit, Henry W.Fields. Brent E.Larson.David.M.Sarver.61h
edifion. 2019
• Systemized onhodontic treatment mechanics, McLaughlin, Bennet, Trevisi. 2001
• Orthodontics current principles and techniques- Lee W. Graber, Robert L. Vanarsdall, Katherine W.L.
Vig, Greg J. Huang.6th edition
• McLaughlin R P. Bennett JC 1989 The transition from standard edgewise to preadjusted appliance
systems. Jaumal afClinical Orthodontics 23: 142-153
• Robinson S N 1989 An evaluation of the changes in lower incisor position during the initial stages of
clinical treatment using a preadjusted edgewise appliance. University of London Msc thesis.
• McLaughlin R P. Bennett J C 1999 An analysis of orthodontic tooth movement -the VTO. Revista
Espana Ortodontica29(2): 10-29
• Leveling and Aligning: Challenges and Solutions; Bhavna Shroff and Steven J. Lindauer, Semin
Orthod 2001:7:16-25

Leveling and Aligning,Leveling & Aligning

  • 1.
    LEVELING AND ALIGNMENT INPEA DR. ANZA SALIM FIRST YEAR POST GRADUATE 1
  • 2.
    2 CONTENTS 1. INTRODUCTION 2. ALIGNMENT 3.LEVELING 4. ANCHORAGE CONTROL DURING LEVELLING AND ALIGNING 5. CONCLUSION 6. REFRENCES
  • 3.
    3 All the mechanicsto be accomplished in our orthodontic treatments with the SWA can be divided into three stages:  Leveling And Alignment  Working Stage  Finishing Stage The purpose of this initial phase of treatment in the PEA is to • Bring the teeth into alignment. • Correct vertical discrepancies (like deep overbite and open bite by levelling out the arches) INTRODUCTION
  • 4.
    4 DEFINITION McLaughlin, Bennet, Trevisi(MBT) in their book Systemized Orthodontic Treatment defined tooth Leveling and Aligning as – “The tooth movements needed to achieve passive engagement of a steel rectangular wire of 0.019/0.025 dimension and of suitable arch form, into a correctly placed preadjusted 0.022 bracket system.”
  • 5.
    5 OBJECTIVES Short term objectives(Proffit) In the initial months of treatment, the objective is to achieve proper aligning and leveling by passive engagement of a rectangular wire. Long term objectives Towards the end of treatment, the objective is to achieve an ideal dentition, displaying six keys of normal occlusion, and the dentition properly positioned within the facial profile.
  • 6.
    6 GOALS 1. Bring theteeth into alignment. 2. Control the anteroposterior position of incisors. 3. Control width and form of the dental arches. 4. Correct vertical discrepancies by leveling out the arches.
  • 7.
    7 ALIGNMENT • In nearlyevery patient with malaligned teeth, the root apices are closer to the normal position than the crowns because malalignment almost always develops as the eruption paths of teeth are deflected. • Bringing teeth into alignment requires a combination of labiolingual and mesiodistal tipping guided by an archwire, but usually not root movement.
  • 8.
    8 PRINCIPLES IN THECHOICE OF ALIGNMENT ARCHES Force: • Initial archwires for alignment should provide light, continuous force of approximately 50 gm to produce the most efficient tipping tooth movement. Heavy force, should be avoided. Arch form: • The light resilient archwires used in the first stage of treatment need not be shaped to the patient's arch form as carefully as the heavier archwires used later in treatment, but from the beginning, the archwires should reflect each individual's arch form. • If preformed archwires are used for alignment, the appropriate large, medium, or small arch form should be selected.
  • 9.
    9 PROPERTIES • The wiresfor initial alignment require a combination of excellent strength, excellent springiness, and a long range of action. • Ideally, there would be an almost flat load-deflection curve, with the wire delivering about 50 gm at almost any degree of deflection. • At this point, superelastic A-NiTi wires are so much More effective and efficient for alignment than any other alternatives.
  • 10.
    10 1. ARCHWIRE MATERIALS •The flat load-deflection curve of superelastic NiTi makes it ideal for initial alignment and it can be accomplished simply by tying 14 or 16-mil A-NiTi. • The wire provides remarkable range over which a tooth can be moved without generating excessive force. • If a large range is not necessary, a triple-strand 17.5-mil multistrand steel wire (3 x 8 mil) can be used. • If recontoured monthly and retied, the time to alignment is equivalent to that with A-NiTi.
  • 11.
    11 • Other possibilities: (1)Elastic M-NiTi, (2) A variety multistrand wires (eg: coaxial wires) (3) Loops in small-diameter steel wires • These wires, although they were the standard of treatment for initial alignment not lond ago,have little or no place in current therapy.
  • 12.
    12 The tendency ofthe wires to "travel" around the arch can be prevented by: • crimping a stop onto the archwire b/n any two brackets that are close together • using a wire with a midline dimple
  • 13.
    13 2. SIZE OFARCHWIRE • For mesiodistal sliding, at least 2 mil of clearance b/n the archwire and the bracket is needed, 4 mil desirable, and more than that provides no advantage. • The largest initial archwire that should be used with an 18-slot bracket is 16 mil, and 14 mil would be more satisfactory. • With 22-slot bracket, a 16 or 18 mil archwire would be satisfactory. • For the superelastic A-NiTi wires, the manufactures preparation of the material determines the clinical performance. • For all other wires, wire size is an important criteria.
  • 14.
    14 Effects of doublingthe diameter :• Strength ∝ → Increases by 8 times • Springiness ∝1/ → Decreases by 16 times • Range ∝ 1/d → Decreases by ½ • For initial alignment, the smallest diameter wire that has adequate strength would be preferred. • When multiple strands of the same diameter wires are used, strength is added while springiness is relatively unaffected.
  • 15.
    15 3.SHAPE OF THEARCH WIRE • A tightly fitting resilient rectangular archwire is undesirable because:  Resistance to sliding.  produces back-and-forth movement of the root apices as the teeth move.  making the aligning slower and more root resorption. • For that reason, round wires for alignment are preferred.
  • 16.
    16 4. INTERBRACKET DISTANCE •Effects of doubling the length: • Strength ∝ 1/L Decreases by ½ • Springiness ∝ Increases by 8 times • Range ∝ Increases by 4 times. • The wider the individual brackets the smaller the inter bracket span.The smaller inter bracket span the lesser is the springiness and range of action. • A powerful means of gaining increased springiness and range of action without sacrificing too much strength is to bend a loop into archwire b/n two teeth
  • 17.
    17 NARROW BRACKETS INTER BRACKETSPAN INCREASES INCREASE IN THE LENGTH OF THE WIRE INCREASED FLEXIBILITY DECREASED FORCES
  • 18.
  • 19.
    19 ALIGNMENT IN CROWDING •Crowding is a common kind of malocclusion. • It can be • Symmetric crowding • Asymmetric crowding • Superelastic NiTi wire is an ideal choice for initial alignment as it has flat load deflection rate. • It has good range of action so does not generate excessive force.
  • 20.
    20 SYMMETRIC CROWDING • Crowdedarch alignment requires opening space. • Two ways to open the space – 1. When additional arch length is required, stops are useful in front of molar tube so that archwire is proud (slightly advanced from crowded incisors). Stops on the archwire should hold it to slightly in advance position. 2. Use of compressed coil spring to open space for crowded incisors • Open coil springs should not be used until 0.018 or0.020 round wires are in place..
  • 21.
    21 ALIGNMENT OF ASYMMETRICCROWDING • The best way to manage severely asymmetric crowding without distortion of the arch form is to open space for the displaced tooth using a coil spring on a 16-mil steel wire, and then add a small-diameter superelastic wire as an auxiliary spring overlying the stiffer main wire. Advantages: • The correct light force is provided by the NiTi wire • The reciprocal force is distributed over all the other teeth by the stiffer main wire • The arch form is preserved.
  • 22.
    22 ARCH EXPANSION FOR ALIGNMENT •Alignment in non-extraction cases requires increasing the arch length,moving the incisors further from the molars. • For alignment of crowded incisors to be effective, crimp a stop on a small round superelastic wire just in front of the molar tube so that the archwire is "proud" (slightly advanced from the crowded incisors). • Don’t cinch back • Transverse expansion with broad archwires can increase posterior arch width and it has the potential to carry the incisors facially. .• The limitation in doing this is the risk of fenestration of roots, also it is difficult to avoid undesirable canine expansion.
  • 23.
    23 ALIGNMENT IN PREMOLAR EXTRACTION •In extremely severe crowding, retract the canines independently before bracketing the incisors .• Here, critical anchorage is an indication for the retraction loops. • In less extreme crowding, an A-NiTi archwire and NiTi coil springs from the first molars or active tiebacks can be used to tip the canines distally and simultaneously align the incisors • When this is done ,the arch wire preformed to have an exaggerated reverse curve of spee,to limit forward tipping of molars
  • 24.
    24 MISSING OR DISTORTED MAXILLARYLATERAL INCISORS • A combination of appropriately stiff archwires and management of the space is required. • A bonded denture tooth can be used as a semi-permanent retainer for the area- slightly oversized pontic to ensure that there will be adequate space in the long term for the implant.
  • 25.
    25 CROSSBITE CORRECTION Individual TeethDisplaced into Anterior Crossbite: • Anterior crossbite of one or two teeth almost always is an expression of severe crowding. • Its correction requires first opening enough space, then bringing the displaced tooth or teeth across the occlusion into proper position. • To avoid occlusal interferences, bite blocks may be used temporarily. (usually on lower 1st molars) • During rapid growth in early adolescence, opening the bite may not be required.
  • 26.
    26 • POSTERIOR CROSSBITE Correction of posterior crossbite has following approaches – 1. Heavy labial expansion arch 2. Expansion lingual arch 3. Cross elastics 4. Transpalatal arch 5. Quad Helix 6. SARPE
  • 27.
    27 IMPACTED OR UNERUPTED TOOTH SurgicalExposure:- • With a CBCT image, the roots of the adjacent teeth can be assessed • Teeth should erupt through the attached gingiva , must be considered when exposure is planned. • If the canine is labially positioned and probing shows that the crown is not covered with attached tissue, the crown can be exposed with a laser. • If it is more apically positioned in the mandibular arch or on the labial side of the maxillary alveolar process, a flap should be reflected and sutured to cover the CEJ & 2-3mm of crown so that attached gingiva has been transferred to that region where crown is exposed. • For a very high canine that is positioned labially, a tunnel method is used. • If the unerupted tooth is on the palatal side, an open exposure can be used.
  • 28.
    28 Method of Attachment: •Directly bond an attachment of some type (a button or hook) • Then, if the flap is replaced, a piece of fine gold chain is tied to the attachment and positioned so that it extends into the mouth.
  • 29.
    29 • Mechanical Approachesfor Aligning:- • Ideally, a fixed appliance should already be in place before exposing, with a heavy stabilizing archwire in position (at least18-mil round steel, preferably a rectangular steel), so that the force can be applied immediately. • The numerous alternatives include Special alignment spring either soldered to a heavy base archwire or bent into a light archwire. Cantilever spring from the auxiliary tube.
  • 30.
    30 Ankylosis of anunerupted tooth:- • Displacement of the anchor teeth will occur. • Occasionally an unerupted tooth will start to move and then will become ankylosed,apparently held by a small area of fusion. • It can can sometimes be freed if the area is anesthetized and the tooth lightly luxated, breaking the area of ankylosis. • To prevent re-ankyloses, apply orthodontic force immediately after the luxation.
  • 31.
    31 UNERUPTED OR IMPACTEDLOWER SECOND MOLARS • When second molar is not severely tipped, place a separator b/n the two teeth. • For more severe problems, an attachment must be bonded to the second molar. An auxiliary spring can be useful to bring both upper and lower second molars into alignment. • The easiest way is to use a segment of 16 × 22 M-NiTi wire from the auxiliary tube on the 1st molar to the tube on the second molar; while a heavier and rigid wire remains in place anteriorly. • Another possibility in adolescents is surgical uprighting of 2nd molar, when 3rd molar is extracted.
  • 32.
    32 MIDLINE DIASTEMA • Etiologicfactors like supernumerary tooth (mesiodens), cyst, tumour if any is removed. • Habits like tongue thrusting and digit sucking are intercepted using habit breaking appliance like cribs, spurs, etc. • The major cause of midline diastema is due to the presence of thick, fibrous, papillary or papillary penetrating labial frenum. It usually requires surgical removal.
  • 33.
    33 • It isbetter to align the teeth before frenectomy. .• If the frenum is removed first, scar tissue forms as healing progresses and the space closure becomes more difficult .• If the space is large and the frenal attachment is thick, the space should be closed at least partially, and immediately after frenectomy, orthodontic movement should be resumed. Removable appliances • Hawley’s appliance incorporating 2 finger springs distal to central incisor. • Labial bows (split labial bows)
  • 34.
    34 Fixed appliances • Elasticchain can be used between the two central incisors. • A closed coil spring between central incisors. • M shaped springs incorporating 3 helices can be inserted into the two central incisor brackets. • Omega loop
  • 35.
    35 TOOTH ROTATION • Toothrotation, is defined as mesiolingual or distolingual interalveolar displacement of the tooth around its longitudinal axis. • Rotated teeth can be corrected by removable, semifixed or fixed appliance depending upon the severity of rotation. • The various methods for the correction:-  Removable plate with Z- spring  Modified Removable Plate  Whip Spring
  • 36.
    36 Derotation can bedone by number of ways with fixed appliances 1.By engaging NiTi archwire into bracket slot. Because of its superelastic nature and creating 1st order couple as it regains its original shape. 2. Off centred brackets bring slight over correction of rotations. It exerts greater pull force on the side having maximum rotation. 3. Rotation wedge brings over correction by exerting push force.
  • 37.
    37 4. Palatal/lingual attachmentshelps in engaging force from lingual side, thus couple force can be applied. 5. Ligature rotation tie onto the arch wire acts by applying a couple of force to bring derotation. Elastic thread can also be used in the same way. 6. Rotation spring can also be used as in Beggs technique.
  • 38.
    38 TIPPED TEETH • Atipped mandibular molar is a frequent situation among orthodontic patients, which usually occurs after premature loss of adjacent teeth leading to the inclination of the molars. • In excessive inclination, overeruption of the antagonist molar, premature contacts, and occlusal interferences impede prosthetic restoration. • Several orthodontic approaches are suggested for mandibular molar uprighting, such as Australian uprighting spring, cantilever spring, prefabricated Sander spring, helical uprighting spring, NiTi coil spring, push spring appliance are few of the currently available options
  • 39.
    39 METHODS 1. The auxiliaryuprighting helix wire 2. Loops 3. Compressed coil spring 4. Reversed loop 5. Lingual auxillaries
  • 40.
    40 LEVELING Leveling is theprocess in which the incisal edges of the anterior teeth and the buccal cusps of the posterior teeth are placed on the same horizontal level.
  • 41.
    41 DEEP OVERBITE Deep overbitecan be divided into two types. 1. True deep bite:- which is mostly due to the infra eruption of posterior teeth. 2. Pseudo deep bite:- Is due to the supra eruption of anterior teeth.
  • 42.
    42 The correction ofdeep overbite involves : • Eruption / extrusion of posterior teeth. • Distal tipping of posterior teeth • Proclination of incisors • Intrusion of incisors • A combination of two or more of the above tooth movements
  • 43.
    43 EXTRUSION OF POSTERIORTEETH • Extrusion of posterior teeth is commonly indicated in patients with decreased lower anterior face height. • It is also indicated in true deep bite cases. • If the incisal edges of the maxillary anterior teeth are positioned above the inferior margin of upper lip • Growing individuals • Horizontal growth pattern
  • 44.
    44 PROCLINATION OF INCISORS •Numerous deep bite cases present with retroclinated incisors. • Proclination of incisors is indicated when there is an increased nasolabial angle and retruded lip. • So soft tissue should be evaluated before proclinating the incisors.
  • 45.
    45 TRUE INTRUSION OFUPPER AND LOWER ANTERIORS • Bite opening by true intrusion although can be used in both grown and growing individuals, it is effective in growing individuals. • True intrusion of incisors is indicated In pseudo deep bite where the incisors are supra erupted. Increased lower anterior facial height Excessive gingival display during smiling or speech • Methods:-- Utility arches. Burstone Intrusion arches. Three piece intrusive arch
  • 46.
    46 NON EXTRACTION TREATMENT •Non-extraction treatment generally favors bite opening. • This is because distal tipping of posterior teeth and proclination of incisors normally occurs in these cases. • There are a number of mechanical factors that lead to arch leveling and control of the deep overbite.
  • 47.
    47 INITIAL ARCHWIRE PLACEMENT •When flat arch wires are placed into dental arches with curves of Spee, the arch wires attempt to return to their original shape and this starts the bite-opening process. • Also, expression of the tip in the brackets begins the bite opening process.
  • 48.
    48 THE BITE-PLATE EFFECT •Introducing the bite plate effect in deep bite cases is helpful in the bite opening process in three ways : It allows for early placement of brackets on lower incisors, which begins their movement. Anterior bite plates can produce an intrusive force on lower incisors which limits any future extrusion of these teeth. Anterior bite plates allow for the eruption, extrusion, and/or uprighting of posterior teeth. METHODS: • Anterior bite plane • Direct bonding material on upper incisors • Occlusal blocks
  • 49.
    49 BITE OPENING EFFECT •In the great majority of cases after rectangular stainless steel wires have been in place for 6 weeks, the arches are normally level and adequate bite opening has been achieved. If this is not so, then bite opening curves can be placed into the rectangular steel wires
  • 50.
    50 There are threepossible ways to level a lower arch with an excessive curve of Spee :(A) Absolute intrusion (B) Relative intrusion achieved by preventing eruption of the incisors while growth provides vertical space into which the posterior teeth erupt (C) Extrusion of posterior teeth which causes the mandible to rotate down and back in the absence of growth. As a general rule, relative intrusion is quite acceptable for adolescents; absolute intrusion is used for the most part in patients who are too old for relative intrusion to succeed. EXCESSIVE CURVE OF SPEE
  • 51.
  • 52.
    52 LEVELING BY INTRUSION •The key to successful intrusion is 'light continuous force directed toward the tooth apex. • Can be accomplished in three ways: (1) With continuous archwires that bypass the premolar (and frequently the canine) teeth (2) With segmented archwires and an auxiliary depressing arch (3) With aligners that have attachments on the posterior teeth.
  • 53.
    53 BYPASS ARCH WIRES •Most useful for patients who will have a lot of vertical growth either the mixed or early permanent dentition period. • Three different mechanical arrangements are commonly used, each based on the same mechanical principle: uprighting and distal tipping of the molars, pitted against intrusion of the incisors. • A classic version of this approach to leveling was seen in the first stage of the BeggS technique in which the premolar teeth were bypassed and only a loose tie was made to the canine.
  • 54.
    54 • The sameeffect can be produced by using the edgewise appliance, if the premolars and canines are bypassed with a 2 x 4 appliance (only two molars and four incisors included in the appliance setup) or if brackets on premolars simply do not have the main archwire tied in.
  • 55.
    55 • A moreflexible variation of the same idea was developed as Ricketts utility arch: • Formed from rectangular wire; can be placed into the brackets with slight labial root torque to control the inclination of the incisors as they move labially while intruding. • Utility arches for intrusion largely replaced by the segmented arch approach • Successful use of any type of bypass arch for leveling requires keeping the forces light, accomplished by selecting a small-diameter archwire, and by using a long span ie. b/n the 1st molars and the incisors.
  • 56.
    56 SEGMENTED ARCHWIRES FOR INTRUSION •This approach is recommended for maximum control of the anterior and posterior segments. • This technique requires auxillary rectangular tubes on first molars in addition to the regular bracket or tube. • After preliminary alignment, a full-dimension rectangular archwire is placed in the bracket slots of teeth in the buccal segment connecting them into a solid unit. • In addition, a heavy lingual arch (36-mil round or 32 × 32 rectangular steel wire) is used to connect right and left posterior segments,further stabilizing them.
  • 57.
    57 A)Intrusion arch tiedin the midline as only the central incisors are intruded, so that the incisors will tip facially as they intrude. B) In the same patient later, an intrusion arch now is tied between the central and lateral incisors to intrude all four incisors while reducing the amount of facial tipping.
  • 58.
    58 • For intrusion,an auxiliary rectangular arch placed in the auxillary tube on the first molar is used to apply intrusive force against the anterior segment. • It should be made of rectangular wire that will not twist in auxillary tube. • The auxiliary tube should be 18 × 25.In it, 17 × 25 steel wire with a 2½ -turn helix or 17 × 25 TMA wire works well. • If the auxiliary tube is 22 × 28, 19 × 25 TMA wire without a helix or a preformed M-NiTi intrusion arch is acceptable, but the range of light force is lower.
  • 59.
    59 • This auxiliaryarch is adjusted so that it lies gingival to the incisor teeth when passive and applies a light force (10 gm per tooth) depending on root size when it is brought up beneath the brackets. and tied underneath or in front of them. • An auxiliary intrusion arch can be placed while a light resilient anterior segment is being used for alignment, but usually it is better to wait until a heavier anterior segment wire has been installed.
  • 60.
    60 • Full-dimension braidedrectangular steel wire or a rectangular TMA wire is usually the best choice for the anterior segment while active intrusion with an auxiliary arch is being carried out. • Two strategies can be used to prevent forward movement of the incisors as they are intruded:  Creating a space-closing force by tying the auxiliary arch back against the posterior segments. Tying the depressing arch distal to the midline, b/n the central and lateral or distal to the laterals
  • 61.
    61 LEVELING BY EXTRUSION •Can be accomplished with continuous archwires by placing an exaggerated curve of Spee in the upper archwire and a reverse curve in the lower archwire. • With both the 18- and 22-slot appliances, when preliminary alignment is completed, a second wire 16-mil steel, will be sufficient to complete the leveling. • A possible alternative is a 16-mil "potato chip" A-NiTi wire, preformed by the manufacturer with an extremely exaggerated curve. • The extreme curve needed to generate enough force can lead to problems if patients miss appointments (i.e., the wire does not failsafe)
  • 62.
    62 • In patientsthose who have little if any growth remaining, an archwire heavier than 16-mil steel is needed to complete the leveling. • With 22-slot appliance, 18-mil archwire is used. • With 18-slot, leave the 16-mil wire in place and add an auxiliary leveling arch of 17 × 25 mil TMA or steel, tied anteriorly beneath the base arch.
  • 63.
    63 A) Auxiliary levelingwire before activation (B) by tying it beneath a continuous mandibular archwire.The appropriate force in this instance is approximately 150 gm, and the expected action is leveling by extruding the premolars rather than intruding the incisors
  • 64.
    64 • Although theauxiliary leveling arch looks like an intrusion arch, it differs in two important ways: The presence of a continuous base arch The higher amount of force. • Leveling will occur almost totally by extrusion as long as a continuous rather than segmented wire is in the bracket slots, and segmenting the arch makes intrusion possible.
  • 65.
    65 CONCLUSION • Successful toothalignment depends on recognizing that unwanted tooth movements can occur early in treatment, mainly owing to the tip built into the preadjusted brackets. • These unwanted tooth movements need to be controlled, or the underlying malocclusion will worsen during tooth alignment which will increase the time and effort needed to complete the case.
  • 66.
    66 REFRENCES • Contemporary orthodontics-william.R.Protfit, Henry W.Fields. Brent E.Larson.David.M.Sarver.61h edifion. 2019 • Systemized onhodontic treatment mechanics, McLaughlin, Bennet, Trevisi. 2001 • Orthodontics current principles and techniques- Lee W. Graber, Robert L. Vanarsdall, Katherine W.L. Vig, Greg J. Huang.6th edition • McLaughlin R P. Bennett JC 1989 The transition from standard edgewise to preadjusted appliance systems. Jaumal afClinical Orthodontics 23: 142-153 • Robinson S N 1989 An evaluation of the changes in lower incisor position during the initial stages of clinical treatment using a preadjusted edgewise appliance. University of London Msc thesis. • McLaughlin R P. Bennett J C 1999 An analysis of orthodontic tooth movement -the VTO. Revista Espana Ortodontica29(2): 10-29 • Leveling and Aligning: Challenges and Solutions; Bhavna Shroff and Steven J. Lindauer, Semin Orthod 2001:7:16-25

Editor's Notes

  • #10 When supereelastic niti introduced the major objection was its expense Tiple stand patient discomfort greater Additional clical time to retie it In busy practide you cant afford to use the less expensive wire
  • #11 1 and 2 expnsive 3 Time taken to bend loops