SlideShare a Scribd company logo
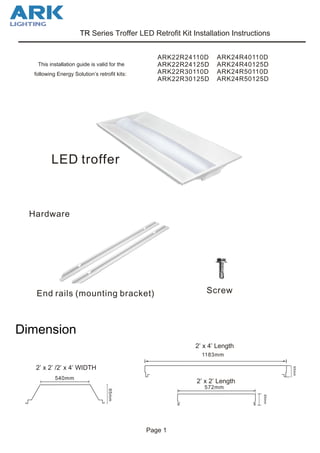
65mm
540mm
65mm
Page 1
TR Series Troffer LED Retrofit Kit Installation Instructions
This installation guide is valid for the
following Energy Solution’s retrofit kits:
ARK22R24110D
ARK22R24125D
ARK22R30110D
ARK22R30125D
ARK24R40110D
ARK24R40125D
ARK24R50110D
ARK24R50125D
2’ x 2’ 2’ x 4’ WIDTH/
65mm
2’ x 4’ Length
2’ x 2’ Length
1183mm
572mm
Dimension
End rails (mounting bracket) Screw
Hardware
LED troffer
Page 2
TR Series Troffer LED Retrofit Kit Installation Instructions
WARNING FAILURE TO FOLLOW THESE
INSTRUCTIONS AND WARNINGS MAY
RESULT IN DEATH, SERIOUS INJURY OR SIGNIFI-
CANT PROPERTY DAMAGE.For your protection,
carefully read these warnings and instructions in their
entirety before installing or maintaining this equip-
ment. These instructions do not attempt to cover all
installation and maintenance situations.
WARNING: This retrofit must be installed by a quali-
fied electrician in accordance with any NEC, CEC,
state, and/or local code requirements. This retrofit kit
is not for use with all fixture bodies.
WARNING: Risk of fire or electric shock. Installation
requires knowledge of luminaire electrical systems. If
not qualified, do not attempt installation. Contact a
qualified electrician.
WARNING: Risk of fire or electric shock. Never
connect to, disconnect from or service while circuit
equipment is energized.
WARNING: Risk of fire or electric shock. Luminaires
wiring, power supply, or other electrical parts may
be damaged when drilling for installation of retrofit
assembly hardware. Inspect wiring and components
for damage.
WARNING: Risk of personal injury. This equipment
may have sharp edges. Wear gloves to prevent cuts
or abrasions when removing from carton, handling
and maintaining this equipment.
Do not install in a damaged fixture
• This equipment must be installed in accordance
with all federal, state and local laws, regulations and
codes
• Proper grounding is required to ensure personal
safety
•All service shall be performed by qualified service
personnel
•This equipment must be installed and modified in
accordance with all federal, state and local laws,
regulations and codes by a professional who is famil-
iar with the construction and operation of this prod-
uct and any hazards involved
NOTICE: Do not install with total power input greater
than power rating of original fixture
WARNING: To prevent wiring damage or abrasion,
do not expose wiring to edges of sheet metal or
other sharp objects.
WARNING: Only those open holes indicated in the
photographs and/or drawings may be made or al-
tered as a result of kit installation. Do not leave any
other open holes in an enclosure of wiring or electri-
cal components
Warnings
Page 3
TR Series Troffer LED Retrofit Kit Installation Instructions
1.Turn off power to fixture
2. Remove the lens, ballasts, socket bars and so on
Remove the lamps. Remove the ballast cover.
Remove the socket-bars, sockets, ballast
and the wiring between the ballast and the sockets.
3. Install the side Rails
Installation procedure
Remove door/louver, ballast
cover, socket bars, lampholders,
ballast and wiring.
Host Fixture
Shell
Figure2 - Mounting Rail fully installed
Figure 1 Start with Mounting Rail at a slight angle, nested between the ceiling grid T-bar and the fixture housing
Page4
TR Series Troffer LED Retrofit Kit Installation Instructions
4. Suspend the LED Retrofit Insert from the Mounting Rails
5. Finalize installation of the LED Retrofit Insert.
Figure 3 - Suspend LED Insert from Mounting Rails
Figure4 - Securing the Latches
Branch Wiring
Entry
Hinge Pin
Pivot
Hole
Image of Completed Installation
Position the LED Retrofit Insert in the host fixture opening so
the driver is on the same end as the branch wiring entry point.
With the Insert positioned vertically, insert the Hinge Pin on
one end of the LED Retrofit Insert into the pivot hole in the
Mounting Rail (Fig. 3).
Align the Hinge Pin on the opposite corner with the slot in
the Mounting Rail and slide the LED Retrofit Insert toward the
corner of the host fixture until both Hinge Pins are located in
the pivot holes.
Complete the installation by rotating the LED Retrofit Insert
so it is flush with the ceiling and secure it by rotating the
latches (Fig. 4).

More Related Content

What's hot

DC Holiday Detectors for Holiday Test
DC Holiday Detectors for Holiday TestDC Holiday Detectors for Holiday Test
DC Holiday Detectors for Holiday Test
Aimil Ltd
 
I g5a manual_v2.4_ 110131
I g5a manual_v2.4_ 110131I g5a manual_v2.4_ 110131
I g5a manual_v2.4_ 110131
Chan Suk
 
756 i e5_eng_081014
756 i e5_eng_081014756 i e5_eng_081014
756 i e5_eng_081014
Toàn Huỳnh
 
I g5a
I g5aI g5a
Electrical Safety for the Non-Electrical Skilled Worker by EFCOG
Electrical Safety for the Non-Electrical Skilled Worker by EFCOGElectrical Safety for the Non-Electrical Skilled Worker by EFCOG
Electrical Safety for the Non-Electrical Skilled Worker by EFCOGAtlantic Training, LLC.
 
Electrical hazard
Electrical hazardElectrical hazard
Electrical hazard
Safeness Lesson
 
Bien tan ls gioi thieu bien tan i e5 series (new)-2-dienhathe.vn
Bien tan ls   gioi thieu bien tan i e5 series (new)-2-dienhathe.vnBien tan ls   gioi thieu bien tan i e5 series (new)-2-dienhathe.vn
Bien tan ls gioi thieu bien tan i e5 series (new)-2-dienhathe.vn
Dien Ha The
 
Sv ig5a manual dienhathe.vn
Sv ig5a manual dienhathe.vnSv ig5a manual dienhathe.vn
Sv ig5a manual dienhathe.vn
Dien Ha The
 
Edwards Signaling 125STRNR1248D Installation Manual
Edwards Signaling 125STRNR1248D Installation ManualEdwards Signaling 125STRNR1248D Installation Manual
Edwards Signaling 125STRNR1248D Installation Manual
JMAC Supply
 
Sv i h
Sv i hSv i h
I s7 eng_101201
I s7 eng_101201I s7 eng_101201
I s7 eng_101201
Toàn Huỳnh
 
Fuji frenic-5000 g11s-p11s-user-manual
Fuji frenic-5000 g11s-p11s-user-manualFuji frenic-5000 g11s-p11s-user-manual
Fuji frenic-5000 g11s-p11s-user-manual
Toàn Huỳnh
 
Ahd cctv manual-design
Ahd cctv manual-designAhd cctv manual-design
Ahd cctv manual-design
patnaglobal
 
Eaton-Instruction-Manual-01
Eaton-Instruction-Manual-01Eaton-Instruction-Manual-01
Eaton-Instruction-Manual-01Joe Galuska
 

What's hot (15)

DC Holiday Detectors for Holiday Test
DC Holiday Detectors for Holiday TestDC Holiday Detectors for Holiday Test
DC Holiday Detectors for Holiday Test
 
I g5a manual_v2.4_ 110131
I g5a manual_v2.4_ 110131I g5a manual_v2.4_ 110131
I g5a manual_v2.4_ 110131
 
756 i e5_eng_081014
756 i e5_eng_081014756 i e5_eng_081014
756 i e5_eng_081014
 
I g5a
I g5aI g5a
I g5a
 
Electrical Safety for the Non-Electrical Skilled Worker by EFCOG
Electrical Safety for the Non-Electrical Skilled Worker by EFCOGElectrical Safety for the Non-Electrical Skilled Worker by EFCOG
Electrical Safety for the Non-Electrical Skilled Worker by EFCOG
 
Electrical hazard
Electrical hazardElectrical hazard
Electrical hazard
 
Bien tan ls gioi thieu bien tan i e5 series (new)-2-dienhathe.vn
Bien tan ls   gioi thieu bien tan i e5 series (new)-2-dienhathe.vnBien tan ls   gioi thieu bien tan i e5 series (new)-2-dienhathe.vn
Bien tan ls gioi thieu bien tan i e5 series (new)-2-dienhathe.vn
 
Sv ig5a manual dienhathe.vn
Sv ig5a manual dienhathe.vnSv ig5a manual dienhathe.vn
Sv ig5a manual dienhathe.vn
 
Changhong chasis eta-5
Changhong    chasis eta-5Changhong    chasis eta-5
Changhong chasis eta-5
 
Edwards Signaling 125STRNR1248D Installation Manual
Edwards Signaling 125STRNR1248D Installation ManualEdwards Signaling 125STRNR1248D Installation Manual
Edwards Signaling 125STRNR1248D Installation Manual
 
Sv i h
Sv i hSv i h
Sv i h
 
I s7 eng_101201
I s7 eng_101201I s7 eng_101201
I s7 eng_101201
 
Fuji frenic-5000 g11s-p11s-user-manual
Fuji frenic-5000 g11s-p11s-user-manualFuji frenic-5000 g11s-p11s-user-manual
Fuji frenic-5000 g11s-p11s-user-manual
 
Ahd cctv manual-design
Ahd cctv manual-designAhd cctv manual-design
Ahd cctv manual-design
 
Eaton-Instruction-Manual-01
Eaton-Instruction-Manual-01Eaton-Instruction-Manual-01
Eaton-Instruction-Manual-01
 

Similar to LED troffer retrofit kit install instructions-ARK Lighting

M lite mr-series-led-upgrade-kit-installation-instructions 3 led light bars m...
M lite mr-series-led-upgrade-kit-installation-instructions 3 led light bars m...M lite mr-series-led-upgrade-kit-installation-instructions 3 led light bars m...
M lite mr-series-led-upgrade-kit-installation-instructions 3 led light bars m...
David Rozek
 
M-Lite Installation instructions for our 2x2 led light bar retrofit kit
M-Lite Installation instructions for our 2x2 led light bar retrofit kitM-Lite Installation instructions for our 2x2 led light bar retrofit kit
M-Lite Installation instructions for our 2x2 led light bar retrofit kit
David Rozek
 
ES 22-EUT-S223 Manual
ES 22-EUT-S223 ManualES 22-EUT-S223 Manual
ES 22-EUT-S223 Manual
Domotica daVinci
 
(Service Manual Di470) Manual de Mantenimiento para Maquinas Fotocopiadoras M...
(Service Manual Di470) Manual de Mantenimiento para Maquinas Fotocopiadoras M...(Service Manual Di470) Manual de Mantenimiento para Maquinas Fotocopiadoras M...
(Service Manual Di470) Manual de Mantenimiento para Maquinas Fotocopiadoras M...
Kevin Lazkanu
 
ES-22-EUT-S213 Manual
ES-22-EUT-S213 ManualES-22-EUT-S213 Manual
ES-22-EUT-S213 Manual
Domotica daVinci
 
ES-21-EUT-S222 Manual
ES-21-EUT-S222 ManualES-21-EUT-S222 Manual
ES-21-EUT-S222 Manual
Domotica daVinci
 
ES-61-EUT-R222 Manual
ES-61-EUT-R222 ManualES-61-EUT-R222 Manual
ES-61-EUT-R222 Manual
Domotica daVinci
 
Rec installation-manual
Rec installation-manualRec installation-manual
Rec installation-manual
Optimus Energy Philippines
 
Fr e700 instruction manual(basic)
Fr e700 instruction manual(basic)Fr e700 instruction manual(basic)
Fr e700 instruction manual(basic)
anhducgay
 
Jy997d16501m
Jy997d16501mJy997d16501m
Jy997d16501m
minhchau309
 
ES-21-EUT-S212 Manual
ES-21-EUT-S212 ManualES-21-EUT-S212 Manual
ES-21-EUT-S212 Manual
Domotica daVinci
 
Manual de la Mezcladora SoundCraft Notepad -12Fx
Manual de la Mezcladora SoundCraft Notepad -12FxManual de la Mezcladora SoundCraft Notepad -12Fx
Manual de la Mezcladora SoundCraft Notepad -12Fx
javierdavidvelasco17
 
Mitsubishi inverter fr-a700-instruction-manualbasic-160425031653
Mitsubishi inverter fr-a700-instruction-manualbasic-160425031653Mitsubishi inverter fr-a700-instruction-manualbasic-160425031653
Mitsubishi inverter fr-a700-instruction-manualbasic-160425031653
Dien Ha The
 
Mitsubishi inverter fr-a700-instruction-manualbasic dienhathe.vn
Mitsubishi inverter fr-a700-instruction-manualbasic dienhathe.vnMitsubishi inverter fr-a700-instruction-manualbasic dienhathe.vn
Mitsubishi inverter fr-a700-instruction-manualbasic dienhathe.vn
Dien Ha The
 
Mitsubishi inverter fr-a700-instruction-manualbasic-160425031653
Mitsubishi inverter fr-a700-instruction-manualbasic-160425031653Mitsubishi inverter fr-a700-instruction-manualbasic-160425031653
Mitsubishi inverter fr-a700-instruction-manualbasic-160425031653
Dien Ha The
 
Avtron Pinhole Lens Camera Aa 4522 p-fs-manual
Avtron Pinhole Lens Camera Aa 4522 p-fs-manualAvtron Pinhole Lens Camera Aa 4522 p-fs-manual
Avtron Pinhole Lens Camera Aa 4522 p-fs-manual
Avtron
 
Catalog FR-A700 Instruction manual (basic)-Beeteco.com
Catalog FR-A700 Instruction manual (basic)-Beeteco.comCatalog FR-A700 Instruction manual (basic)-Beeteco.com
Catalog FR-A700 Instruction manual (basic)-Beeteco.com
Beeteco
 
8928 a 8930a_usermanual_concise
8928 a 8930a_usermanual_concise8928 a 8930a_usermanual_concise
8928 a 8930a_usermanual_concise
SchoolVision Inc.
 
8928 a 8930a_usermanual_concise
8928 a 8930a_usermanual_concise8928 a 8930a_usermanual_concise
8928 a 8930a_usermanual_conciseSchoolVision Inc.
 

Similar to LED troffer retrofit kit install instructions-ARK Lighting (20)

M lite mr-series-led-upgrade-kit-installation-instructions 3 led light bars m...
M lite mr-series-led-upgrade-kit-installation-instructions 3 led light bars m...M lite mr-series-led-upgrade-kit-installation-instructions 3 led light bars m...
M lite mr-series-led-upgrade-kit-installation-instructions 3 led light bars m...
 
M-Lite Installation instructions for our 2x2 led light bar retrofit kit
M-Lite Installation instructions for our 2x2 led light bar retrofit kitM-Lite Installation instructions for our 2x2 led light bar retrofit kit
M-Lite Installation instructions for our 2x2 led light bar retrofit kit
 
ES 22-EUT-S223 Manual
ES 22-EUT-S223 ManualES 22-EUT-S223 Manual
ES 22-EUT-S223 Manual
 
(Service Manual Di470) Manual de Mantenimiento para Maquinas Fotocopiadoras M...
(Service Manual Di470) Manual de Mantenimiento para Maquinas Fotocopiadoras M...(Service Manual Di470) Manual de Mantenimiento para Maquinas Fotocopiadoras M...
(Service Manual Di470) Manual de Mantenimiento para Maquinas Fotocopiadoras M...
 
ES-22-EUT-S213 Manual
ES-22-EUT-S213 ManualES-22-EUT-S213 Manual
ES-22-EUT-S213 Manual
 
ES-21-EUT-S222 Manual
ES-21-EUT-S222 ManualES-21-EUT-S222 Manual
ES-21-EUT-S222 Manual
 
ES-61-EUT-R222 Manual
ES-61-EUT-R222 ManualES-61-EUT-R222 Manual
ES-61-EUT-R222 Manual
 
Rec installation-manual
Rec installation-manualRec installation-manual
Rec installation-manual
 
Fr e700 instruction manual(basic)
Fr e700 instruction manual(basic)Fr e700 instruction manual(basic)
Fr e700 instruction manual(basic)
 
Jy997d16501m
Jy997d16501mJy997d16501m
Jy997d16501m
 
ES-21-EUT-S212 Manual
ES-21-EUT-S212 ManualES-21-EUT-S212 Manual
ES-21-EUT-S212 Manual
 
Manual de la Mezcladora SoundCraft Notepad -12Fx
Manual de la Mezcladora SoundCraft Notepad -12FxManual de la Mezcladora SoundCraft Notepad -12Fx
Manual de la Mezcladora SoundCraft Notepad -12Fx
 
Mitsubishi inverter fr-a700-instruction-manualbasic-160425031653
Mitsubishi inverter fr-a700-instruction-manualbasic-160425031653Mitsubishi inverter fr-a700-instruction-manualbasic-160425031653
Mitsubishi inverter fr-a700-instruction-manualbasic-160425031653
 
Mitsubishi inverter fr-a700-instruction-manualbasic dienhathe.vn
Mitsubishi inverter fr-a700-instruction-manualbasic dienhathe.vnMitsubishi inverter fr-a700-instruction-manualbasic dienhathe.vn
Mitsubishi inverter fr-a700-instruction-manualbasic dienhathe.vn
 
Mitsubishi inverter fr-a700-instruction-manualbasic-160425031653
Mitsubishi inverter fr-a700-instruction-manualbasic-160425031653Mitsubishi inverter fr-a700-instruction-manualbasic-160425031653
Mitsubishi inverter fr-a700-instruction-manualbasic-160425031653
 
Avtron Pinhole Lens Camera Aa 4522 p-fs-manual
Avtron Pinhole Lens Camera Aa 4522 p-fs-manualAvtron Pinhole Lens Camera Aa 4522 p-fs-manual
Avtron Pinhole Lens Camera Aa 4522 p-fs-manual
 
Catalog FR-A700 Instruction manual (basic)-Beeteco.com
Catalog FR-A700 Instruction manual (basic)-Beeteco.comCatalog FR-A700 Instruction manual (basic)-Beeteco.com
Catalog FR-A700 Instruction manual (basic)-Beeteco.com
 
8928 a 8930a_usermanual_concise
8928 a 8930a_usermanual_concise8928 a 8930a_usermanual_concise
8928 a 8930a_usermanual_concise
 
8928 a 8930a_usermanual_concise
8928 a 8930a_usermanual_concise8928 a 8930a_usermanual_concise
8928 a 8930a_usermanual_concise
 
Dukane 8107 wib usermanual
Dukane 8107 wib usermanualDukane 8107 wib usermanual
Dukane 8107 wib usermanual
 

LED troffer retrofit kit install instructions-ARK Lighting

  • 1. 65mm 540mm 65mm Page 1 TR Series Troffer LED Retrofit Kit Installation Instructions This installation guide is valid for the following Energy Solution’s retrofit kits: ARK22R24110D ARK22R24125D ARK22R30110D ARK22R30125D ARK24R40110D ARK24R40125D ARK24R50110D ARK24R50125D 2’ x 2’ 2’ x 4’ WIDTH/ 65mm 2’ x 4’ Length 2’ x 2’ Length 1183mm 572mm Dimension End rails (mounting bracket) Screw Hardware LED troffer
  • 2. Page 2 TR Series Troffer LED Retrofit Kit Installation Instructions WARNING FAILURE TO FOLLOW THESE INSTRUCTIONS AND WARNINGS MAY RESULT IN DEATH, SERIOUS INJURY OR SIGNIFI- CANT PROPERTY DAMAGE.For your protection, carefully read these warnings and instructions in their entirety before installing or maintaining this equip- ment. These instructions do not attempt to cover all installation and maintenance situations. WARNING: This retrofit must be installed by a quali- fied electrician in accordance with any NEC, CEC, state, and/or local code requirements. This retrofit kit is not for use with all fixture bodies. WARNING: Risk of fire or electric shock. Installation requires knowledge of luminaire electrical systems. If not qualified, do not attempt installation. Contact a qualified electrician. WARNING: Risk of fire or electric shock. Never connect to, disconnect from or service while circuit equipment is energized. WARNING: Risk of fire or electric shock. Luminaires wiring, power supply, or other electrical parts may be damaged when drilling for installation of retrofit assembly hardware. Inspect wiring and components for damage. WARNING: Risk of personal injury. This equipment may have sharp edges. Wear gloves to prevent cuts or abrasions when removing from carton, handling and maintaining this equipment. Do not install in a damaged fixture • This equipment must be installed in accordance with all federal, state and local laws, regulations and codes • Proper grounding is required to ensure personal safety •All service shall be performed by qualified service personnel •This equipment must be installed and modified in accordance with all federal, state and local laws, regulations and codes by a professional who is famil- iar with the construction and operation of this prod- uct and any hazards involved NOTICE: Do not install with total power input greater than power rating of original fixture WARNING: To prevent wiring damage or abrasion, do not expose wiring to edges of sheet metal or other sharp objects. WARNING: Only those open holes indicated in the photographs and/or drawings may be made or al- tered as a result of kit installation. Do not leave any other open holes in an enclosure of wiring or electri- cal components Warnings
  • 3. Page 3 TR Series Troffer LED Retrofit Kit Installation Instructions 1.Turn off power to fixture 2. Remove the lens, ballasts, socket bars and so on Remove the lamps. Remove the ballast cover. Remove the socket-bars, sockets, ballast and the wiring between the ballast and the sockets. 3. Install the side Rails Installation procedure Remove door/louver, ballast cover, socket bars, lampholders, ballast and wiring. Host Fixture Shell Figure2 - Mounting Rail fully installed Figure 1 Start with Mounting Rail at a slight angle, nested between the ceiling grid T-bar and the fixture housing
  • 4. Page4 TR Series Troffer LED Retrofit Kit Installation Instructions 4. Suspend the LED Retrofit Insert from the Mounting Rails 5. Finalize installation of the LED Retrofit Insert. Figure 3 - Suspend LED Insert from Mounting Rails Figure4 - Securing the Latches Branch Wiring Entry Hinge Pin Pivot Hole Image of Completed Installation Position the LED Retrofit Insert in the host fixture opening so the driver is on the same end as the branch wiring entry point. With the Insert positioned vertically, insert the Hinge Pin on one end of the LED Retrofit Insert into the pivot hole in the Mounting Rail (Fig. 3). Align the Hinge Pin on the opposite corner with the slot in the Mounting Rail and slide the LED Retrofit Insert toward the corner of the host fixture until both Hinge Pins are located in the pivot holes. Complete the installation by rotating the LED Retrofit Insert so it is flush with the ceiling and secure it by rotating the latches (Fig. 4).